Transcripts
1. Muted Abstract Landscape - Introduction: Let's paint some easy, beginner friendly, muted, abstract style landscapes. We will be painting NOP grade the end of with some interesting botanical illustrations of wild plant. This class is very beginner friendly. Before starting, let me quickly introduce myself. My name is Ash. I have a small Instagram account in our diagram, a dot. You can check out my artwork. I love painting minimalist works. We will be painting three beautiful project. It is easy to follow. We have two chapters in each project. The first chapter will help you to get the preparation, and the second chapter will help you to do the process. You can pin this under 15 minutes, so anybody who loves to be inking joy, I hope this class will help you in your journey. So let's get started.
2. Art Materials Overview: So let's see what our art materials are required in an overview. So for the colors, I'm going to use Winsor and Newton Cotman watercolors regarding the color will be discussing in the coming session. For the guage, I am going to use this insulin, your dense designer, gosh, but this is little bit expensive. You can substitute it with this premium poster colors, which is very cheap. Or you can use any brands wash. And regarding the brushes, I'll be using brushes from stationary. And for the people we are going to use cardi BBA. You don't have caddy paper. You can substitute with any cold pressed or rough textured paper if you have handmade, be burst that look more beautiful. And color mixing palette, Jarrod Florida and to tape down my BBA angling to use this white hardball. This is like a cardboard piece which is like GSM paper. And why she does this is a beeper or CT. And if you wanted to sketch out the illustration first, you can use our pro circle like this to create a soccer. Or you can use any link in order to create them moon and a pencil for, you know, just randomly sketching it out. So these are the basic art videos that we will be requiring. But in the each project I'll be explaining or darned specific material you have to prepare so that it is easy for you once you start painting. For a while NOT exists is, is it does not at all necessary, then you should do it in COBie or 300 odd expensive people. You can substitute a bit cheaper washing. It is just to know the brushstrokes and everything. So you can use any people regarding the colors. You can use any brand, any colors of your child. I feel for you to experiment with different kinds of schemes as well. So without much delay, let's move on to the next session.
3. Botanical Illustration of Wild Plant Exercise 1: Let's do obama exercise before actually digging in with our project. So we require any people. This is just to see the brushstrokes and your hand woman. For this, I'm going to use my 0 sized round brush from stationary. So I'm just applying a little bit of water. You can use any color for this particular exercise. You don't need those specific alloys. And here I am going to draw thin lines. So this is very, very important venue are doing our botanical illustration. So try to create TIN lines, are using the tip of the brush. And if you noticed my hand woman or rest moment, I am holding the brush treat and then just dragging the beans are the tip of the brush to the beeper. So this way you can create simple Streep on that. Team strokes. Do try to create teams through using whichever brush you have. If your brushes like pointed ones, it will definitely help you. Now, let's do some more exercise. That is to paint a leaf. So I am holding my brush street and then just dragging the paint like this using the tip of my brush to apply little bit pressure and then drag it. So you have to load each time while you are painting. So these type of exercises will help you to create that pure ISIL botanical illustrations of plants. So practice it till you get it correct. Are the y's might ruin your entire painting. So this is a very, very simple stroke. Let me show you again. So I'm, as you see, I have put a little bit pressure at the tip of our brush and then just drag it. So just have fun with it. Try different strokes. Try to hold your brush in the street, lying and then just drag it or the upward direction and drag it. So you can know for yourself how these kinds of strokes works. So basically you don't have to give much pressure to your brush. It's like simply drag. So just see how these kinds of strokes works. Gave little bit fresher and then just release it. And also try to paint different leaves in different directions, not just in one direction. This week, you can actually create different types of leaves and strokes. So you create a lot of different leaves. So basically we need a long leaves for our job, botanical illustration. So that's why I am only painting big leaves. So these small exercises will help you to avoid are blocks. So whenever you are stuck, you can just have fun with this kind of strokes and learn something new. Let me show you in a different angle. So that's how I draw. Leave. So just give a little bit pressure at the tip of the brush and then just drag it like this. Don't give much pressure at the tip. Just simply give little bit pressure and then just release it. Repeat these kind of strokes until you get it correct. I hope this exercise will help you. Let's move on to the next session.
4. Botanical Illustration of Wild Plant Exercise 2: So let's do one more small exercise before starting the project. So here we are doing an under botanical illustration. For that, I'm going to load my brush. And here I am again practicing my thin stroke. So I will be painting one more thin stroke. So this will be a stem. So I have started from the bottom and draw a small curve at the top and fill it with thin strokes. So add long strokes at the bottom. And then when you are going at the edge of the stem, reduce the size of the stroke. Let me show you once again. So let's practice this small strokes and how to fill it. So it's very simple. Use the tip of the brush and then just draw a small, small lines together. That's it. Make sure that the tip of the stem has this kind of edge or dip. And then fill it with thin strokes like this. So reduce the size of the stroke going at the edge of the stem. So let me show you. I'm going to draw small stroke like this little bit. And then start family dog. Apply or fill in these kind of small strokes. Here, I have used the force that is the tip of the stem, one-foot portion. I have covered it with the small leaves. So practice these kind of small, small things so that your entire painting will look more beautiful. Even though it is a very small exercise, I can guarantee you, it will definitely help you in your journey. So let's start painting the final projects.
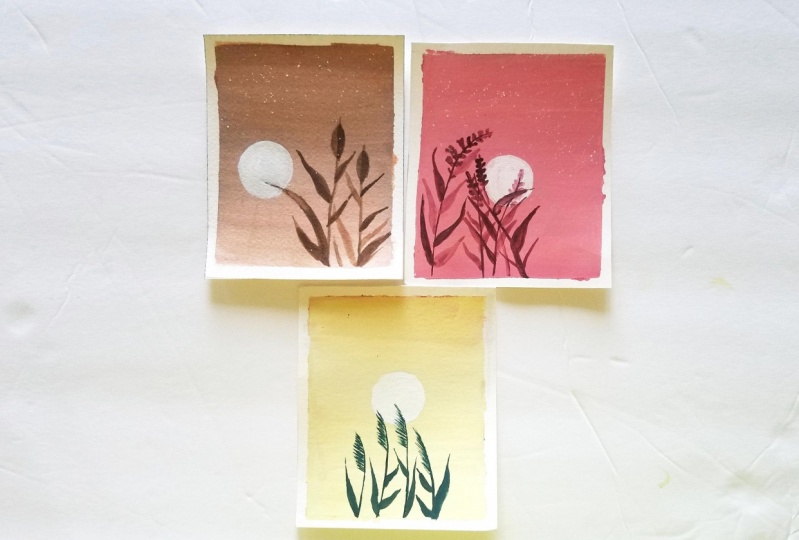
6. Beige Field - Composition & Color Palette : Let's start with our project. So this chapter will include all the preparation that we will be required in order to do the project. So we will cover modern art materials are required. What the color balance that's going to be there, and the composition part. So let's start. For us. We'll discuss modern art materials that require. So in order to sketch, I'll need a pencil and in order to draw them moon, I'm going to use this pro so you can use any late for the brushes. I'm going to use a flat brush of size, eat and CEO size brush, round brush or a liner brush for the wild plant. And people. I am using my car, the BBA, I have taped down, using the washi tape to my board. I have taken E6 signs, paper or glass of water, color mixing palette, some gosh, and what others. Regarding the color palette of we will be needing the round watercolor and white quash. You can use bonds here now or bond, well, in start off this, but all, you can use white watercolors instead of gosh, I have applied by brown to my color palette and also white wash. So for the gradient I need to shade in order to create that. I have mixed a white and then I'll own. So this color looks a little bit, but I eat and I have to tone it down. For that. I'm going to add some more white to this mix show. So I'm going to add some more white quash and going to mix it. Let's apply a bit more brown and then just mix it. So this looks very VDB. So I am going to apply a bit more brown. And I'm going to create another sheet at the Bardo. If you can see, I have created a shared which is little bit darker compared to the tone which we have already created. So these two colors will be our gradient, that is for our buck that art. Let's see how this color looks. This color looks very beautiful. So it's a MUX to cheat. This is not too bright naught to dial. Let's see the next shade. So if you can see there is a light variation due to the ratio of light. And in my palette I'm going to apply some byte for the moon and some brown for our wild plants. Electric prepare my color palette before starting the painting so that it is very easy for me to apply when I am painting. That's why I have put all the colors in my color palette before starting the painting. So this is a color balance. We will be painting the background with the beach here. And Dan cool illustration of wild flowers with brown. Ones are color palette is really led to the composition. For that, I'm going to use BI Pro circle and pencil. You can sketch it before starting the project. So I'm going to draw us towards my left. And this will be our moon. And regarding the wild plants, I will be painting in it in the right side of the people. So that will be our cone flower, and we will do some leaves in between these two. So that would be a big leaf. Here. We'll draw some more leaves here and there. So I have uploaded our reference image for the sketches. You can check it out and that evidence session in the description. So this way you can actually figure that out like the, exactly where the wild plants are so that it's easier for you once you start being. Here, I have used an E6 sheet. So according to the size of the paper, the composition will change. Make sure that you are painting does not stretch. While you are painting in a bigger picture. The element should be kept in such a way that it is coincide with each other. For example, here are the leaves will have an impact on the moon. So do the sketches accordingly. Let's start painting now.
7. Beige Field - Process: Let's start being t for that, I am going to do a gradient that is the background for that. I'm going to load my flat brush with the darker tone of beach. And I'm going to start it from the top. Load your brush with the color and then just apply it. We are doing an OH, peak gradient here. That means it does not translucent. If you are using a white watercolors to create this BCCI, you might have to do two layers to get this kind of weakness. Here. Since I'm using white Gosh from the insulin noodle, I only require one layer to get that beautiful A-B-C background to the gradient. So I have started with the darker tone. So till the middle of the beam, I am applying the sheet. Well at the bottom, I'm going to load my brush with the lighter tone of the beach. And then they start applying from the bottom of TB. But look at the opaqueness of the beat. If you're using watercolors or white watercolors to create the beach. Make sure that you do two layers, at least. Once the first layer is completely dry, apply the second layer. The colors might VDI, if you are doing two layer, you can see I have blender that very smoothly, because these two colors will complement each other very well. Do not load your brush with water to bond these two colors. Now, let's dry this background. Make sure your background is completely dry. Before starting with the elements. For that, I'm using my size brush and loading it with my brown color. Don't use too much water. Load your brush with the consistency of beamed. Now, let's being the wildflower botanical illustration of the white fly. So as we have practiced and now Obama exercise have created a thin stroke. So this will be our stem. Now, I'm just going to draw call, unlike structure. Since we have already sketched it. It's easy. Nor small line at the top. Now for the leaves, draws more leaves. Using upward direction. Use thin strokes to create thin leaves. So if you want, you can make it a little bit dark by applying the consistency of paint. Paint leaves in darker tone of brown and use little bit water and tone it out, and then paint some leaves so that it will look more beautiful. Now let's paint the big leaf. For that. I have used little bit of water. So it's kind of a medium consistency, not too thick or not to die. So if you can see I've just painted leaf, which covers the moon. No, add some more leaves here and the edge. Now I'm going to apply a darker tone of brown from the 3 fourth portion of that particular leaves. You can add a number of leaves. Make sure that you have some species left between these two flies and the BS. I'm going to use some undamped rash and then mix this night throne and dot prod. So basically it's like a shadow thing. The moon light hits will be lighter. And when it comes down, it will be DACA. And we're going to add a little bit darker brown so that we can get that kind of moonlight effect using a damp brush. I'm just blending these. Leave. Once it's completely dry, I am going to paint the moon. So this is one way of painting the moon. I'll be showing another way of creating the moon and white flaws in the next project. So I'm just going to apply the white beamed inside that. So we have Aldi sketch to make sure that you don't cover that. I'm not giving any shadows to the moon. We're just filling the beam inside that so good. Using a white goulash. Lord, the painting, the consistency. And then just below, I'm using my size, one size. But as you can use any brush for this. Now I'm going to add the foot out a little bit and giving the details to the leaf. So project is almost complete. Now, let's add some stars. This is completely optional. And just loading my brush with white gouache and doing some splatter. That does tapping my brush. So load your brush with white paint. And then just tapping. This is completely optional. You don't have to include stars because it's a muted while. You might not get that valuable in field, but yeah, you can definitely at some status. So a project is completed. Once it's completely dry, I am removing my masking tape. So gently remove your masking tape because this is a handmade paper. So it might be bus will be extremely careful. So it's very, very simple landscape to being it, but it looks really beautiful. So our project is completed.
9. Pale Field - Compostion & Color Palette: Let's start with the second project. We'll discuss what are large videos are required for this particular project. For the blush, I'm going to use my size eight flood brush and appointed flush. This is of size one or 0. You can use any pointer liner brushes. I'm using synthetic rush. And for the composition part, I'll be using a pencil and pro soccer. For the BBA, I'm going to use KD is six size paper to the board using masking tape. And for the colors I'll be using some yellow, pink, and white wash, color mixing palette, some water. Now, let's see the composition. So this is any ES6 size people. I'm going to draw a moon towards my right side of the people. It's a little bit right side of the paper. I'm just going to draw a circle. So this will be a moon. And regarding the wild plants, I'll be sketching it in the left side. I will be uploading the reference. So this is a rough sketch like where the wild plants will be. I'm going to do four main branches, like a stem kind of thing. So it will be in a symmetric order. Some will be overlapping, some will be in the different direction and everything. So make sure that you don't go beyond half of your pH. That is a wildflower doesn't go beyond the. Let's prepare some colors before painting. For that, I'm going to use my lemon yellow and permanent rose watercolors and a little bit of white quash for the gradient. Here. I am planning to do skin tone. For that. I'm going to mix these colors. So first I'm going to apply lemon yellow to my mixing color mixing palette. And with that, I'm going to add a little bit of permanent rose. So basically these two colors blend well to create a peach toward, but we need a muted version of a skin tone. Now for this, I am going to add some white gouache as well to get that new to cheat. So I'm looking for a color which is not too bright or too dark. So let's just mix it and see how these colors blend. So frequency, it has built all. I needed to get a little bit dark tone. So I'll be mixing some more permanent rose. You can choose your own color palette. You don't need to have the same shape as what I am using. Here. I'm just looking for skin tone. So here if you can see it looks like a baby pink color. So I'm going to add some more colors to make it more skin tone of that roast in dish. So I have added some more permanent rose. So these color is actually a bright pink. But I wanted a MUX to cheat. So I am going to add some more colors and make it a little bit dark. Let me show you what this color looks like. So this looks like a baby being so it's kind of a bright pink or about eye color, but I don't need that color. So I'm going to tone it down. For that. I'm mixing lemon yellow and mix it really velvet. Let's watch and see how the stone looks. This looks a little bit too bright. So I'm going to turn it down again. With that, I'm going to add more rows to it. And then we're going to mix it. Now let's see how this color looks. It had gone down a bit. And that looks good enough. So let's fix this color for our gradient. Now I'm going to apply some modules to my mixing palette. This is for the botanical illustration of why you would apply. I'm going to add a little bit of white for my mole. So this is white goulash. Now, let's swatch these colors and see. This pink looks really vibrant. So I'm going to mix some colors to get a darker tone so that our wild plants looks more beautiful. For that, I am going to use brown sheet. You can use bonds here and elsewhere. Instead of adding black, I am adding a bit of brown with my rewards. And I'm going to mix these two colors. So basically this is for our plant. I'm going to add a little bit more. But I'm going to mix these two colors. You can see it looks beautiful, maroon cheat. I'm going to fix this color for my wild plants. The Scala complement with the gradient color. So I'm going to fix this color. So this will be for our vile plants. Now, let's start painting.
10. Pale Field - Process: So let's start painting our gradient first for that, I'm going to use my size it flat brush. I'm going to load my brush with the skin tone color. So I am going to do a gradient. So I'm just applying the beam directly and not using wet on wet technique rather than I'm using a wet on dry technique. This is because I needed an A-B-C gradient. I don't need a translucent gradient. Since we are using gouache wash without watercolors, it creates a beautiful opaqueness to the beam. Here. I am going to do only one layer. So that's why I'm loading my brush with maximum peak and then just applying it. So while working with gosh, all watercolors make sure that you don't overdo the layers. It will ruin your gradient completely. So gradient is nothing but applying. Bayes court keyboard, I'm using only one sheet. So gradient can be to shield three sheets as well. So it's basically a transition of colors. So I have applied the gradient, basically apply the beamed evenly. Now let's dry this background. So once this is completely dry, I'm going to pin the moon first. So last project we have created the vile plants and then we have created the moon here. And I'm going to directly pin the moon first. Just going to apply the white paint, that is a whitewash inside the circle. Just apply it. And just applying our filling the circle with white. I'm not giving any texture to the moon. Since this is an abstract style. I'm not going to do the shadows and the more suggestive lie and even coat of paint and let it dry. So once it's complete dry, Let's pin the white plants. Make sure that you are a gradient and the moon is completely dry before starting with the wild plants. So I'm just loading my 0 size brush and then just giving an outline. So we have already sketched this part. If you really struggle with knowing the composition of wild flowers, you can actually draw an outline of all the things like include the plants and the leaves. Here, I have only done the basic thing, like the mean stems. So whenever you're sketching, make sure that you don't leave a dark urine. Use a dark pencil and lever dark marks in your people. Otherwise, what happens is that when you paint and it goes outside the outline, it will not look good. So uses small HB pencil which doesn't give you much shadows. So here I am directly being tin my leaves. So I'm just using a random strokes. So if you see I have done alternatively used in the stem. So you can actually experiment with adding the leaves and everything. So make sure that the branch which overlaps the moon has a lighter tone at the DIP. Now I'm just going to add some more leaves here and there. So I'm just standardly applying the strokes. Make sure that you do on applied to many so that it looks like overcrowded. So being denied minimalists work is kind of simple, but you need to know where you have to please the elements. So you can turn down your color tone using little bit of quarter and then draw some more leaves. So when you add little bit of water to the color and then just draw some leaves. It looks like dark and light or no calories. So it gives you that aesthetic field at a, then applying the same sheet. You can tone down the color and then apply it. So here I have applied the doc leaves first and then draw some light leaves. You can do accordingly. You can start with the lighter tone and then just move on to the darker tone. Now let's pin the mean. Why implant. So if you can see and just applying a small stroke. So I'm applying the strokes, the left side and the right side. Just use it alternatively. So that's it. It's very simple. It may look simple, but it is a bit tricky since you have to do a thin stroke. I'm going to fill the other four stems with the same stroke. So if you can see I have left out some space in between these two arcs. So the tip of the stem, it will be small ones here going down, it gets little bit bigger. Practice these kind of small strokes. If you find it difficult. Now I'm going to turn down my beamed and then going to apply it at this sporadic less stem, which is overlapping the moon. So you can see I have not picked up dark tone of the color. Instead I have drawn down my bin and then applied it. So if you can see the moon light hits that particular stem and that area, it looks like you can lift something does fail. Since that moon light hits that particular stem as well. I'm going to just do lifting technique that is simply using a damp brush and then just take the bead x is being diverted into your tissue paper. So that's how we can do a lifting technique. Q1, you can do the same technique with the leaves as well, since it hits that moonlight. It didn't dry. So I'm going to add some splatters to the painting. This is completely your choice. If you don't want to add the stars, you can just skip this step and be done with the project. So I'm done. Now, let's remove the masking tape gently. Adb was really tough. So make sure that you peel off your watch carefully. The good time, and then this simply be love. So we are done with this project and it looks very symbol Mu did and vibrant enough. So let's move on to the next project.
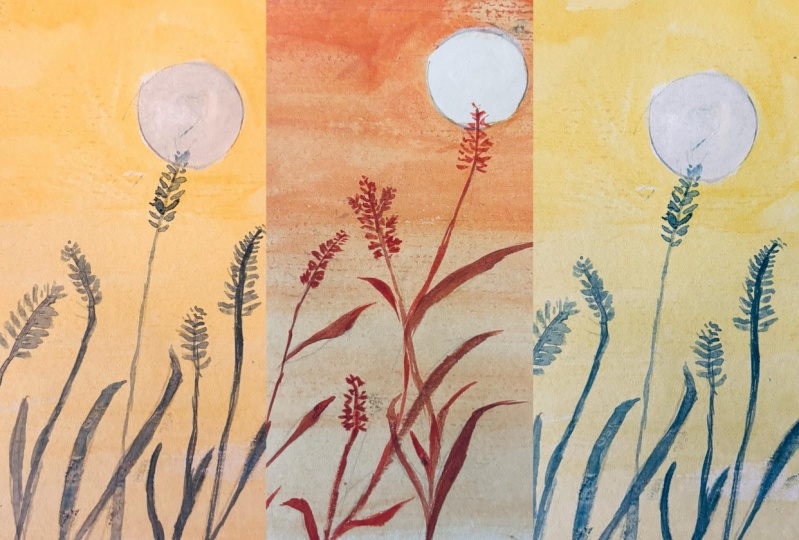
12. Sublime - Composition & Color Palette: So for the binding project, let's see what all art materials are required for the brushes. I'm going to use a flat brush and a noun blasts of size 0. You can use a liner brush. And for the colors I'm going to use Winsor and Newton, watercolor and white quash. And people, I'm going to use KD is excites people attach to avoid using a masking tape, a water color mixing palette, and that's it. Now, for the composition, I'm going to draw a moon in the center of the BBA. Just draw a circle at the center of the BBA. Here I'm using a process called to create the shape. You can use any lid as well. So this will be a moon. And for the wide plan, we will be painting directly in the center. So I'm just doing a rough sketch. I have a data storage reference for you, so you can just check it out. So this will be our main branches and we'll fill in the leaves and everything later on. So this is a basic composition. Now let's see what are the color palette I have already applied by cosh to my color palette. Now for the gradient, I am going to use lemon yellow. This is lemon yellow, hue and Brown from insulin new done, these are watercolors and I am going to apply a bit of lemon yellow first. So basically I needed a muted shade of yellow. And I'm going to add a bit of brown. You can use bonds sienna or burnt umber. And I'm going to mix these two colors. This has brown hue. I don't want that kind of color. So I'm going to add more jello. So basically in either a yellow ocher mu to cheat, if you don't have brown, you can use yellow ocher as well. Now let's add the white and mix it really bad at this. It looks really beautiful. It's muted, and it looks really nice. Let's watch this. The sheet looks a little bit not muted, so I am going to add a bit of white to the mixture and create a light going off Ford we have already created. So that looks good. So I'm going to fix this color for my gradient. And for the wild plant. I'm going to add my brown. And I'm going to add a little bit of blue, blue. You can use Bush in blue. If you don't have this kind of blues, you can add black as well. I don't need that black color. Instead, I needed a dark green or greenish color. I'm going to mix these colors. Now, let's fetch this color. So that looks beautiful. I am going to fix this color for my wild plant. So this is basically a greenish gray shade. We also need some white gouache as well, so you can put some white quash, the moon. So these are the color palette. Let's mourn with process.
13. Sublime - Process: So let's start painting was we'll do the gradient for that. I'm going to use my site, you see it flat brush. I'm going to load my beat and going to use a wet on dry technique to do the gradient ends. We are not using two colors. You don't need to worry about the blending, but you just need to make sure that the gradient have even gone to feed. So load your brush and then just apply the beat. So just apply the paint evenly. So we can see and just applying the beam from left to right, right to left. And it gives me a little bit faster. Don't give much pressure. Gently apply the beat and greediness. Ready, let it dry. So once it's completely dry, we are going to be in the mood. I'm using white gouache to being the moon. I'm using my size brush to fill the moon. So it's simply applying white coat of paint inside that. So good. Use thick consistency of paint since this is a MUX to cheat. If you don't use the consistency of white bead, it will not look highly. Suggest fill in. So if you don't have a gaur, shorter poster follows if you are using a white watercolors or do you can do is you can do first layer. And then once it's completely dry, you can do another layer. This is dyed and I'm going to do another layer to show you how it is done. So make sure the flawlessly I just completely die and then apply another layer. This is because this yellow is a very muted. So you need to highlight the white. Now lead to GI. Once it's completely dry, Let's do the wild plant for that. I'm going to use my size four brush and loading dock copied. Now I'm just going to apply in the outline or the stems of the plant. Now I'm going to fill in. So this one also we have practiced in the warm-up session. So I'm just filling in that area. So it's like a feather kind of a thing. You can do like this. Or what do you do is you can start from the top and then go to the bottom. I'm going to create a thicker stroke. And then I'm just going to fill in the top of the blind using thin lines. So this is why we did have all of exercise. Now, let's fill in the other stems as you have appointed to brush, it will be very easy. You can use a liner brush or a brush to do the same. So this fine, I'm going to turn down my color using water because it overlaps the moon. So in order to get the light, that moonlight effect, I'm going to turn down the upper area of the branch. So just use water and load your brush with the beam and then fill in so that it does not do doc. So basically it feels like that moon light is hitting the stem, creating a shadow in the plant. Now, let's add some leaves. I'm going to randomly apply it. So that's why we have practiced these kind of rules before. And applying and random. Basically, I'm not all crowding the ideas. I'm leaving some spaces and then just applying the VFS. And it's going to add few more and then just done with it. I really loved the way it has to or not. So I am going to stop with this. Now. Let's remove the masking tape. Make sure your painting is completely dry and then this be loved in masking deep. Do it very gently because the paper is very delegate. So if you use a while she did, which has lot of gum, it might be add up your people. And we are done. The doc project looks simple and beautiful.
14. Conclusion: Thank you so much for joining me and learning the simple landscapes I hope you guys enjoyed while painting. And I hope this class has to do in your art journey.
 Aiswarya Sathyan, In love with the world of colors