Transcripts
1. Welcome : Cosmos - Moon,Sun & Eclipse: Do you enjoy painting moons? Just like me, if you are somebody who loves to be in moon, I have something interesting for you guys. Before starting, let me quickly introduce myself. My name is Ashley. I'm an artist from India. I have an Instagram handle called a cartogram, a dark ash. All my artworks are uploaded there. You can check it out. In this class, we will be learning how to create them. Beautiful moon skills along with few other project. Initially, I thought that I would create a cause which just covers moonscape. Then later on I found this amazing differences. And that's how I thought I would create a course for which contains some more elements rather than just the Moon. That's how I mean this session. Cosmos, which simply means the universe where we explore some moonscape, sun and Eclipse. We will be painting den projects in this class where we will learn how to be informed. Moon skips to sun and for Eclipse, this course is ideal for beginners as well as intermediate three others who are into gosh or acrylics are even posted. Carlos, we will explore these projects with the most effortless way of creating these paintings. Since we are not been thing realistic washing, we can always have our own elements added to the project. This class is structured in such a way that each project will have five chapters, which will include art material, color, ballot composition, crosses, and final elements. Firstly, chapters that is the color palette and composition will help you to prepare before starting the painting. And the process and final elements will give you an idea on how to create these kinds of paintings without much effort. Addition to that, we will be exploring the medium wash and we will learn some interesting technique that is not the usual ones are the projects are done in abstract style so you don't have to worry about being perfect. You just have to relax and have fun. I'm really excited to bring you this course. I hope you enjoy this session while painting artist, not just a board painting, it's always abort that API. You can just have fun with the projects and you can create your own versions. So without much ado, let's get started.
2. Art Materials Overview: Let's have a look at water. Art materials are required in general. Anyway, we will be discussing on the medians for each project. So first is the colors. I will be using squash beans from the brand. Or you can use the semi liquids from brand new palette. You can either use into odd in semi liquid form. And I'll be discussing some alternative aswell. And for the brushes, I'll be using synthetic round brush Mindy. And these are from stationary, white water-soluble pencils to create outlines, some lists of different size to create so-called coloring palette. Here I'm using ceramic palette, some water. And for the people, I'm going to use 300 GSM black people. The system brand k, ds, this is an Indian brand and this is of size. If i. So if you can see it has a very thick paper and I'll be using this sketch book. This is a seven into seven sketch for black sketch book. Gsm is 180 GSM and it is from Irish paper. So these are the overall view of art materials on Wednesday if you don't have varchar black paper, I am going to give you sum all the needle that you can use instead of these. For the bean, you can substitute gosh, with this poster colors. This is from gamma. These are premium brand poster colors. You can use the same. So basically any of the mediums will be good for this kind of projects since we are going to apply it on top of black paper, it is always good to have some opaque medium. You can also use acrylic as it's an opaque medium. But the only problem is that the final results will be different according to the medium you have chosen. So you can always choose acrylic wash posters for this kind of project. I wouldn't recommend watercolors do. For the papers. If you don't have black papers, what you can do is you can take your white sheet and apply a coat of black paint. These three I have applied the first one, I have a light bolster black. Second is gosh and toddlers accurate? So for the bees, you can use a bolsters, acrylic or gouache black colors to create that black surface. You can also use black chart papers or less GSM paper if you're working with opaque medium. Said let's move on to the next session.
3. Gouache Overview: In this session we will be talking about the medium. Gosh, if you're an absolute beginner, you can definitely go and refer some beginner friendly classes. Here, I am going to briefly explain about the media. So goulash is a very versatile and most renting medium these days. It is an opaque and water-soluble medium consisting of natural pigment binding agent, etc. It is made up of larger pigments compared to watercolors. But it is very similar to watercolors as it can be revetted and dries to a Mac finish. It is similar to act relates our oil paint as it dries easily and can be used in A-B-C painting styles. It can form a superficial layers. The best way to start with gouache is to start from the middle tone and then slowly progress to a lighter or darker dots. It is easier to estimate the tonal value as we progress. Let me quickly point out some advantages of using wash feeds. We can easily correct helping with the MI, some mistakes, unless like watercolors, it is much easier. Lighter tones can be easily applied over the dark washes. Just like watercolors, we can leave that and use the beam, which gives an advantage over the acrylic. She's one of the opaque medium which we can reactivate using water. It has a matte finish, which makes the painting look amazing. Gorgeous, used to create a realistic abstract and illustrator works by many artist. Washes available may lean tubes and in semi liquid forms. Application of gouache paint is very simple compared to acrylic or oil pins and washes similar to poster colors, but as more purer and have high pigment compared to posters, goulash colors last long. Gouache works well with toned papers as well. We can use less GSM people's compared to water colors to create quash paintings. So these are some of the advantage. And the disadvantage of course, is that it can not have a glossy look. Washed paintings are not water resistant, so you have to be extra careful. Not like acrylic. The acrylics, it gives you a water system after completing the painting. But like watercolors, gosh. These are the basic pros and cons of using wash bins. I would prefer to use synthetic brushes by working with quash because it gives the best results compared to the natural hairs. And these are some of the advantages and disadvantages of gosh. I hope you enjoyed this session and exploding this medium. Let's move on to the next session.
4. Techniques: Let me quickly show you some interesting techniques and brushstrokes that helped me in my journey get an absolute beginner. You can definitely check out some beginner friendly wash causes in skill share by amazing artist. I am going to show you some fun techniques that I use on a daily basis. So for that, I have applied some wash paint, especially lemon yellow and loaded in my brush. The first thing that I'm going to show you is called scribbling. So when we were kids, we used to scribble a lot. This technique is similar to that. Load your brush with paint and then just get a blood around. Scribbling is nothing but carelessly applying different strokes. We will be using this technique to create texture. Now let's do some dry on dry technique. This is a common technique. The name suggests we will be applying or dry coat of paint onto a dry surface. For that, I am going to dry my brush and load the paint and then just simply apply it on the dry surface. So this dry on dry technique is eat common. It gives you amazing texture. Moving on, let's see. Another technique I call this dabbing technique. It is applying the paint. Very minimal effort. You don't have to give much pressure. Threshold to the SSH. It simply means dabbing the paint onto this. So first, using the corner of the brush without any pressure. So I'm not giving much pressure to my brush. So simply that your brush moving on. This wet on wet technique. Again, it's a common technique. So it's simply applying wet coat of paint on a wet surface. Usually in gosh, we don't use this kind of wet on wet technique much, but we can definitely try out. Now moving on, let's do another technique. So it's similar to a dabbing technique, but we will hold the brush horizontally and then dab it. So here I'm giving a little bit pressure to the corner of the brush, tip of the brush. So just apply and then drag, apply and dry. You can do this in a vertical and a horizontal and good. Apply the paint and then just take a brush off the surface. Moving on. I'm going to do another technique. I am just applying my brush and twisting it with the edge of the brush and twisting it. So this way you can create amazing clouds. So apply it just to a steel brush. So you can see, you can get amazing, amazing texture with this kind of strokes. So this is how I twist it. Make sure that you use a synthetic brush if you're using these kind of techniques. So these are some interesting techniques. I hope you had fun. And let's get started with the next session.
6. Moonscape 1 - Art Materials: Let's see what our art materials direct graph for this particular project. We need some goulash colors. We will be looking into the kind of valid data for the brushes. I'm going to use my round brush size 10 and one. For the People. I'm going to use my seven into seven black sketch from, this is from brand Irish mixing palette and water. And to create that outline for our moon, I'm going to use my pro circuit and water, so liberal white pencil. Let's move on to our color palette session.
7. Moonscape 1 - Color Palette: Let's start with our color palette, the data, I'm going to apply some weight. And using my titanium white, I'm going to apply that white into different areas of my palette. And with that, I'm going to add some black. V will be mixing some green. And I'm going to apply black. I might be needing some more black, so I'm going to apply a little bit more black in my palette. Let's swatch the scholars first. So vibrant with the black color. Now let's mix these colors. So more white and a bit that looks really dark. So I'm going to apply some more white to that. I need up below. So I have make some more white to the block and I'm going to mix it. Now. I'm going to play some more white to make it little bit lighter. So Creator, we have created to Greece a bit darker gray and lighter gray. Now, we are going to swatch it. That green has that effect. Now let's watch the little bit darker tone of three. Even though these two gray looks similar in the camera, it has a slight variation. In the course grades little bit light compared to the darker gray. Black doesn't have that kind of effect. But when you add applying over the top of the lighter tone, it will look by Brendan, let's start painting.
8. Moonscape 1 - Composition: The composition is very simple. V have to draw a circle in the middle or the center of the beat. I'm not using any masking tape. So I am drawing a circle using the leg. So if you can see the circle is pretty evident. The size of the circles can be the according to the size of the pizza. Make sure that the cell good girl was the center of that page.
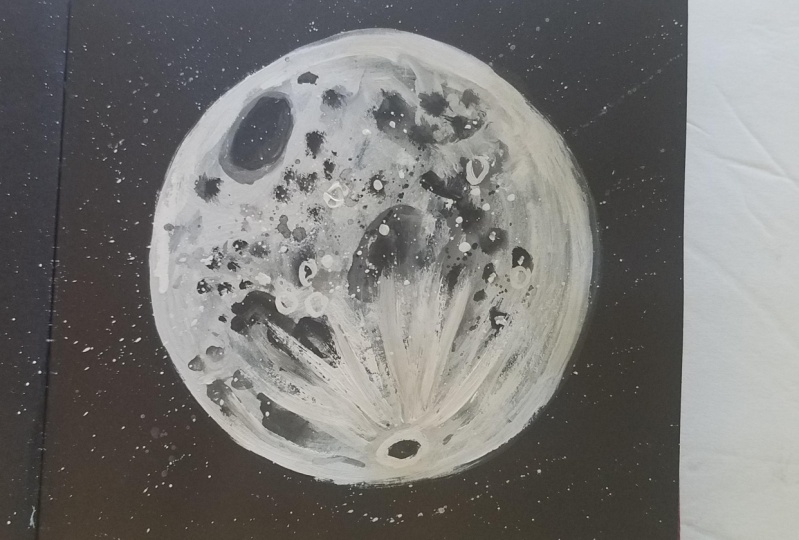
9. Moonscape 1 - The Process: Let's start painting. I'm going to do some splatters to create some stars. So for that I'm going to use my size one brush and loading it with bite. And then doing some splatter. I'm using small splatters to cover the background. Now, I'm going to paint the moon for that. I'm going to use my size 10 brush. This is a size 10 brush. I'm loading it with the gray and I'm going to start painting inside the cell good. So maintain the shape. And I'm going to draw so good. And then slowly progress to the next area. Wounds have a lot of shadows. And with this kind of abstract effects, you can create beautiful textures inside the moon. You can do it on a very random basis. But I always make sure that it is so good at the left side of the moon. Now I'm just going to drag the beam inside the cell. Now I'm going to use to drag the beans. So basically we are doing a wet on wet technique. I'm applying CTO for inside the cell and then just apply some good. When you're doing wet on wet technique, we get beautiful textures. Really extremely careful while painting the edge of the set. So try to maintain the shape. So we're going to be painting. I'll crack at the edge. That could I. So now let's add some shadows. I'm going to use my size one brush and I'm going to load it with some dogs. So I have mixed some block with the gray to create little bit more dock. To dock, not too light. I'm going to directly apply the blockchain and create some random shadows. You can use small and medium shade. So I'm just randomly lying. Now. I'm going to add some dirty and draw a circle. And then add some strokes. That is simply doing upward stroke with the brush. And then apply some block inside that so good so that it looks like a crack. Now load some gray and create some more texture inside the moon. Now going to add some black. So basically I'm playing it on with the gray and black and creating some random texture. Now, let's add some more. So basically I'm using so like even you can draw some. So close yet ended. This randomly applying it. Now apply some day. So if you want to cover some shadows, you can always use this to apply some gray inside that circle, which we have already left out. And do some splatters inside the cell girl using black and then use gray to fill in some gaps. I'll moon is our most complete. Let's add some elements.
10. Moonscape 1 - Final Elements: Let's add some final elements. In order to do that, I'm going to load my brush with white and I am going to do some outlining. Now create upward strokes. Use only your tip of your brush to create those kinds of strokes. So that looks like I could add some more white brush with the consistency of white and then apply. Now I'm going to add some splatters. So this is another random basis. You can draw some sort of goes with the y. You can add as much as possible. Don't forget to have fun with it. So I am playing and on with black and white and creating more texture inside the cell as much as possible. So all these are on a very, very random basis. But you can always use reference images to know the shadows. Odd, odd. If you are somebody who's struggling with the composition, you can definitely check out some reference images, and that's it. Our project is completed.
12. Moonscape 2- Art Materials: Let's see what good art materials are required for this particular project. For the brushes, I'm going to use my round brush size eat and one from the brand stationary. Some gouache paint than water soluble pencil lead in order to create the outline for our moon. And a seven into seven black sketches. This is from the brand Irish, and this is 180 GSM black paper. You can use any black paper which has a square shape. Some tissue paper, water.
13. Moonscape 2 - Color Palette: Let us see what are required for this particular project. I'm going to start with yellow. And we're going to apply a bit of maybe a load to my balance. The next color, I'm going to use a scarlet, red. And the next event is the next test, my all time favorite color. That is why we will be needing a little bit of weight. And now let's watch this and see how it looks in the black people. So for us it's yellow. It has a beautiful weakness. So this will work. Now moving on, I'm going to take 1 million, right? And that looks really beautiful. Now let's see how Scarlett walks. That looks really vibrant. Wide we have already seen, but I'm just applying it. Again. This looks nice. I'm going to add one more color to my palette that does block. Now, let's mix a lighter tone of a date. Good. This book was, I am going to take my 1 million and I'm going to add a bit of Scotland to the woman in creating a beautiful dress. Now, I lied a little bit of white. Let's see how it looks. It looks is I didn't put, so I'm going to add a little bit scholars to create that value. And that looks better. So these, the color palette, the base color palette, we might have to mix a dark tone of red as well, but we will do that. For now. This will be our main color palette. Let's move on to composition.
14. Moonscape 2- Composition: The composition is very simple. V have to draw a circle in the middle or the center of the beat. I'm not using any masking tape. So I am drawing a circle using the leg. So if you can see the circle is pretty evident. The size of the circles can be the according to the size of the pizza. Make sure that the cell good girl was the center of that page.
15. Moonscape 2 - The Process: Let's start painting. I'm placing my lid on top of the silicon. And I am going to do some splattering in order to create some stars in the sky. So I'm loading my mate gear. And hyoid, I'm using size 0 brush to do this. The smaller the brush, you will get small splatters. So when you do gallows plateau on black sheet of paper, it looks really nice. Now I'm going to do a plateau with vermilion. Apply water and creator or G consistency. And then just dab your brush. So this is SASA, this is the most fun technique. Now I'm going to apply some whites plateaus as well. Some mix water and paint. And then this dab your brush, you'll get a beautiful splatters of colors with this kind of techniques. So I have used red and white to create the beautiful effect on the black people. Now, let's remove the net and start painting. I'm going to start over with white. So I have a little bit of water to my bead and then mix it really well. I'm using my size six brush. Slowly, paint inside the circle, using the create that consistency and then make sure that you paint inside the cell. So a portion of the so-called wet much water. My painting dentists be extremely cautious. Now I'm going to load my brush with the light. Don't know that we have already created. We have mixed law million and scholar plus white. I'm applying that color as the next layer. That is after white. I'm applying that chain. Now. I'm going to apply for lead with the rest of the portion. So basically this 341 foot portion white. You can use this, get a blink to fill the moon so that it creates beautiful texture. Make sure that you don't use much water. Because these beans, my data, if you're using a water supply as the next layer, make sure that you maintain that cell. I'm using this method which we have already seen in the last few lessons. Make sure that you have a clean edge. I'm going to add 1 million again. And some scholars semi dry. I'm going to do one more. On top of that. I'm starting with, and I'm doing scribbling technique. Since this dice quick compared to the watercolors, you can start the next layer when it is semi dry. If you can leave some blocks space since the sketchbook is black, you can leave some negative spaces in between. So this would be extremely careful. So I'm just resting my production, creating some textures. Since this is not that realistic bull, you can just play around with the brush. Would be only thing you have to be extremely careful is that do not use much water. Try as much as possible. Now I'm going to mix scarlet, red and a little bit of black. To create a dot. I have added a lot of black. Now, I'm going to add some scholars. So basically two is 2.75, meaning a portion of black and scarlet. And then apply from the bottom. So this is actually creating shadows. Adding some texture to the moon. At the bottom. Not exactly at the bottom, but dry side, bottom corner. Using damp brush, do a vet wash. This mixed. This is to create the blend between two colors. Apply some white beans. You can use the dabbing technique in order to blend these two colors. And it does give you some texture. So you can definitely use the dabbing technique and make sure that you blend it at the edge of the cell glassware. Use damn brush in order to vet those areas and blended. And then apply some weight. You can add white and white and then just apply it in the width area. Now let's apply some yellow and then blend it with the dead and white. So basically the yellow colors gives you more texture. I need a fresh yellow pins. This is a bit watery. So I am going to load my ballad with little more, some consistency of paint. And then I'm just applying it. So basically I'm doing the dabbing technique. Make sure that your brush has enough water so that the load is loaded and then applied to stop these APIs with yellow. This is all random strokes. Now I'm going to add little and then give the highlight. So let's add some final elements.
16. Moonscape 2 - Final Elements: Let's add some final touches to our moon. In order to do that, I'm going to add my red, dark red, black and create some small so good at on my mood. So I have started from the bottom and I'm randomly applying some circular strokes here and there. I'm going to draw some circles. So basically I am adding different shapes with my dark red color and creating some shadow effects. And the moon, if you see the moon, it has some shadows that makes it more beautiful. So in order to create those kind of shadow effects, I have use my dark maroon, red shade and I have blinded random way. Now, I'm going to apply some more. Yellow. The same way. We have created some circular shapes and some dots here at ended with yellow. Now, I'm doing the same. So basically creating some more texture to take my black. And this going to apply some goods here. So it's totally up to you where you wanted to do this. Shadow stops. Now learn to change my water acids very muddy. I have to use white. So I have fresh water and loaded white. And I'm doing the same. Concentrate more on the areas where we have actually blended. Rate. Add some more strokes here and there with white. And the bottom and left lane little more white. Now, just add some strokes with white so that it looks like a crack. And the moon, if you have seen the moon reference, there is a small crack. I have used million. Now some black and blend it really well at the edges. You can actually play around with these scholars. I'm really happy with the moon has turned out, especially the textures. So our project is completed.
18. Moonscape 3 -Art Materials: Now this IV or don't art materials are required for this particular project. The first one is the lead. You can use any plastic containers led in order to create an outline for the moon. You can use a brothel glassware. For the brushes I'm using synthetic round brush size one psi 0. You can choose any of them. Really know water-soluble pencils in order to create the outline of ballet. And 300 GSM black people. And I have attached the beeper to my board using a washi tape. Data for the tissue paper. Goulash colors, we will be seeing the kind of violet in the next session. If you don't have Gosh, you can use postdoc either asphalt. So these are the basic things that we need for this particular project.
19. Moonscape 3 - Color Palette: Let us see in details what is the color palette that we are going to use for this particular project? I'm using GWAS set from the Brown Bruce draw the first color. I'm going to use. Yellow. Add a tiny bit of yellow. The next color is the titanium white. Again, from the brand restaurant. You can also use white poster colors if you don't have any Gore set with you. I'm going to apply a tiny bit of white. The next color is some combination of few colors. But this particular color, I'm going to mix yellow ocher and bonds sienna. So I have a light yellow ocher. Now I'm going to apply a little bit of burnt sienna and some white. This will create the base color for our moon. You can see that the shows in the video. Now, let us watch these colors and see how it looks on the black people. So the first color, I'm just applying it to see how it works and the black. And this really vibrant. Next is the white. It looks really beautiful. Now let us mix these colors. Make sure that you know, you mix it. Mix it. You can add some water to get that smooth consistency. I'm adding a little bit of water. Now let's see. The sheet looks a little bit dark. So I'm going to add some white and create a little lighter Don't, of this particular color. But we will definitely need the scholar as well. So I'm going to save this Scholar. And I'm going to add some white to that. I didn't mixture to make it a little bit light. So I'm applying more white in order to clear that. I want that beast and creamy color. So that's why I applied a lot of ways that the mixture, this will be the base coat on moon. Add Wanda in between to get that smooth consistency. Let us see how this guy and this guy looks perfect. So these are scalars which we will be painting inside the moon and outside the sky. And to this, I am going to add some black. This is to create some shadows inside the moon. Even though it doesn't have much effect on black people. Applying a ball. Don't. Look by Brendan ash. So these are the Kalevala and let's get started.
20. Moonscape 3 - Composition: For this particular project, I am going to do a crescent moon in order to get the outline correct or the circular shift, correct. I'm using alert. This is a cap from a container. And I am going to play said midway through the piece, this is any finite sheet. So if you have a smaller or bigger sheet, the composition will change according to the people. And just drawing an outline. I'm not going to draw the entire circle. Only Halford one foot pushing. So I'm going to leave some spaces above and below the moon. So this is our composition. So once a composition is ready, the first step is to do some splattering technique. In order to do that, I am applying some water to my mid Gilo and creating a beautiful consistency so that I can create some amazing splatter. I'm sure that most of you are familiar with this technique. This is the most fun technique of all the techniques. Hi, I am loading my brush with paint. And this tapping the brush with another greetings, little splatters of wet paint. I'm using a smaller brush in order to create small splatters. Once you are happy with your splatter, make sure that it is completely dry before starting the process.
21. Moonscape 3 - The Process: Let us start by applying wet on wet technique. I'm applying even coat of water. Make sure that you apply the water inside the outline. In case if you have some rules of what the outside, use a tissue paper and just wipe it off and apply the water inside the crescent shape. Now, I'm going to apply the condo and using my lighter tone. That is a Middleton that we have already created. And I have draw zone chiefly in the middle. And then just applying the field through the outline first. The beef absorbs water easily. That is why we have to be a little bit faster in order to take advantage of that wet on wet technique and to create texture. Make sure that you leave little bit black's piece here and there. That is a negative species. You don't have to be really specific about the spaces that you are actually living. Now in order to blend the edges, I'm using a dry brush technique and blending the beam with the beat. Like this. I'm going to take the DACA, don't know. And I'm going to apply it from the top portion off and then slowly come to what's the mydata portion? The dark portion of the moon. Now, I'm using my dabbing technique. I have taken a little bit more like a damp brush and then just blend the colors with the people. Since it's a black people, you don't have the white board, you know, blooms or anything. You can just blend it, make sure that your brush doesn't have much water. You can also use the lifting technique to lift some beans. If you want to create. This is also called technique is completely dry and you had a blind the next column. As a next layer. I'm using my damp brush. Blend the edges once again. You can drop in some, what does he want and audit to create some more texture. Now that is create some shadows. In order to do that, I'm going to load my brush with black color and then just going to apply like this. I'm going to drop in some black beans here and there. It is not structured. You can create some sound. We're creating some shadows and the moon. So this is totally random. There is no specific thing that you should do like this, that we didn't just have fun. And if you feel that you have created a lot of shadows, again, back using the lighter, don't. So that's the advantage of goulash. And if you feel that you haven't created much shadows, you can do that as well using black sheet as I'm doing. So in-between, you can draw some small circles. You can give some outline to the blooms that is already created. I'm just having fun with the block and then applying in TRND, you can do the same. So if you don't know how to create this kind of shadows, you can always have definite means this with you. So this is what I was talking previously. You can use a lighter tone about the DACA don't being T, if necessity has that kind of advantage or watercolor. And this blending it. Make sure that whatever you're doing, these inside the outline we have already created so that we can get the shape. And then we're going to do the blending once again at the edges in order to get the direct effect. And now I'm going to add a little bit of white here at ended. By applying, you can create more texture to the moon. I feel that the light doesn't look good with the texture that we have already created. So I'm going to blend it using the lighter tone of the light yellow that is illegal. And I'm going to apply the white again. You can draw small circles here, then they're using lighter tones and darker tones, even black to create textures are flying a bit of white here and there. So basically it is to have fun with all the calculus. I'm really happy with the texture that I have created inside the moon. Now, let us add some final elements to the painting.
22. Moonscape 3 - Final Elements: Let us add some final elements to the beam. I'm going to add some blue stars get ended in the sky. In order to do so, I'm going to apply my yellow. I'm using a consistency with this move water and less speed and applying it in the people and then just merging it with my finger. You can create as many as you want. This just applying and just munching it makes sure that you have a sheet. You can apply apply a cotter pin and then just match it with your finger. You can also use an image, the colors, if you don't want your hands to get dy. Now, I'm going to apply a dark coat of pink that is less water or more paint to the center of the smudged area like this so that it looks like a gluing stuff. So if you can see I am adding more paint and less water. And then just lying that the consistency of the center of the smudged area. So that is one way of getting out gluings dots. We can see you can create an amazing deck, showed an effect with this kind of technique. Let's highlight the white stars now. Using the same technique, I'm going to load my brush with the consistency of p it and then just apply it to the center of area. And the final project is ready. I'm going to remove this masking tape. And you have this beautiful moonscape.
24. Moonscape 4 -Art Materials: Let's see what our art materials are required for this particular project. For creating the outline for the moon, I will be using a lead. So this is a mid-size leg and water. So legal principles to create the outline. And for the brushes I'm going to use my size one brush. This is ground, ground, stationary, round brush. Some golf colors, 300 GSM black paper at that. So the word using washi tape, color palette, water to mix the beans. So let's see the color palette.
25. Moonscape 4 - Color Palette: Let's see what our colors are required for this particular project. So we need some yellow, blues and greens. So first, I'm going to apply some yellow to my palette. So we will be painting some stars using this yellow. Now for the blue, we will be needing this certainly in blue. I'm applying civilian blue into area of my palette because we will be mixing some blues. And I'm going to use some viridian green. And I'm going to apply the titanium white with my cell in blue. So v will be mixing some blue hues. So for us, we are going to mix this blue and mix it really well. Use water accordingly. So the consistency of cautious, very important. When you are painting with this mixture, I'm going to add some more white to create a little lighter tone of what we have already created. So this, the first, I have created a mid blue. Now I'm going to mix a lighter blue. So as I have already suggested, we need some blue hues. Now let's watch these blues and see that looks more like Be still blue. This is our mid blue. Now let's see what it looks like. Now. Let's see what the inquiry, they look beautiful with black people. Now I'm going to add this one in green, blue to create that beautiful greenish blue. So that's how it looks. We might tap to create some darker use of these colors. Now let's see how yellow looks like. So D is, we have created the first hues. Now, let's make some darker hues. For that, I have applied some black. Now, let's mix this block with the blue block to the saline blue and create a darker blue hue. Now I'm going to apply a bit of luck with my green plus blue mix. So this bit darker. So I'm going to apply some sap green to tone it down a little bit. A fee. It doesn't torn down. So that's why I'm adding sap green. Now, mix it really well. V might be using both these colors, the word in black mix, as well as the sap green were dn black mix. Let's see how these green looks like. So that green looks really good. Now let's see how this blue looks. A bit bright. I need, need some darker hue. So I'm going to apply a bit more black to it to create that dark blue, not dor dot naught to blight. That's the color I was looking for. And these are our color palette. Let's start painting.
26. Moonscape 4 - Composition: Let's see what does a composition good this, I'm going to use my medium size leg. Here. We are going to create a semicircle in an inverted way. So at the right side, I am drawing a semicircle like a moon, crescent moon. So it's more towards your right side, leaving the left side portion 3. Now let's start painting. So first step is to create some stars. In order to do that, I am going to load my brush with mid yellow, use enough water and create some beautiful splatters here and they're slowly dab your brush. To create the splatters. By using smaller brush, you can get small splatters. Now let's add some big stars. For that. I'm going to use my brush upside down. That is using the edge of the brush to create big stars here around there. So I'm just randomly applying it. So that's it. Now make sure that it's completely dry before starting with the process.
27. Moonscape 4 - The Process: One sees plateaus are completely dry. Let's start painting. So first I'm going to load my brush with the dark blue that we have already created. I'm going to mix it with my mid blue to create a medium blue. I'm going to apply it from the top of the crescent shape, which we have already created and applied this blue. So basically I'm outlining it. With that thick and thick strokes. Make sure that you don't use much water so that we can create a lot of beautiful texture. So this is basically a dry on dry method. Now, let's add some texture inside the semicircle on the crescent. So using that tip of the brush, create some textures. Load your brush with the dark blue and apply it. Put on the top. I'm using dry on dry wet, blended really well. I'm using my brush to create the texture. Now I'm going to load the sap green mix and then apply it at the edge of the circle. So I'm applying it on the top of the dark blue, which we have already layered. Now, let's load some more blue and apply it on top of the blues. So basically we add, creating some layers using different cues of green and blue. Now I'm going to apply my light blue and mix these two blues. And using my water to reactivate the paint and loaded and apply from the top. So basically that light blue will be used to create an outline. Using die brush technique. Distract some pains so that it looks like a blended blush. You can use this technique to create the V is in C because it doesn't have a specific stroke. It's mostly dragging the BMD. I need a little bit blue. So I'm going to apply some cell in blue to my valid and blue. And in-between the light blue and the green. Since we are doing dry on dry technique, it doesn't take much time to dry. Like watercolors, gouache dries pretty fast. Compare the watercolors. Now I'm going to load my word in green mix and then apply another layer on top of the sap green. Create textures and blend these colors. So this twist your brushes. Now let's add some shadows here and there that I have loaded my brush with black and create some circles and draw some circles. So these add-on, non-random basis create shadows. Small dots. So close. Just have fun. Now I'm going to apply some more blue and do some outlining on the colors leg the block which we have already applied. And if you feel that you know, some, some spaces, we need to cover it up with the blue. You can do the same even though we use block. These blue will look live birth rate. That is, the advantage of, gosh. You can use lighter Don't over the darker tones. You can again apply the Docker Dylan's over the light tones. So create different types of textual isn't. Have fun with the different hues. So make sure that stays at the edge of the silica and blue at the other side. I'm giving some highlights using the light blue at the corners of the mouth. And that's it. I'll moon is completed. And that's it. A project is completed.
29. Sun 1 - Art Materials: I'd materials required for this projects are medium-size lead and a water-soluble pencils, some gouache paint to a 100 years and black people, some water color palette to mix. And for the brushes we need some flat brush, small size and round brush, and a liner brush. So that's all we need. Let's look at the color palette.
30. Sun 1 - Color Palette: Let's see what this particular project, so the first thing I'm going to apply, I have some water in my palette, but that is completely okay. Now with this, I'm going to add some scarlet. So basically we need a red, orange, yellow hues. With this, I'm going to add some Clemson. Now, let's add this 1 million in a very different idea of the ballot. And lemon yellow and made a load to the red mix. We have RDD. Get ready to that. I'm going to add some white and some lemon yellow as well. So the mixture as well million Scarlett grim sin, maybe yellow, white and lemon yellow. Now, let's mix all this. Don't worry, we will be needing lot of orange. Now. I'm going to mix it. So it looks very vibrant. Let's swatch. And that orange looks really beautiful. It's not too bright. Now let's mix some yellow hues that I'm going to add some yellow, lemon yellow, and some white. We have beautiful orange and yellow hues that see how that color. And that looks really beautiful. Let's apply well million and see how it looks. That looks really beautiful to these three colors. Looks really nice. Now. Lemon yellow. We will need some white to create another layer on top. So I'm going to apply some white also in my palette. I'm just stretching it out. So that's a color palette for this particular project. Let's get started with the process.
31. Sun 1 - Composition: The composition is very simple. This is any, if I see it, we need to create a large silica in the center of the beach. For this, I'm using my but also good. You can use any lid as well. I'm just going to outline the silicon using my water soluble white pencil. If you don't have this, you can use a white gel pen asset. So our aim is to create a large circle in this end of the beach. That's it. Let's start painting.
32. Sun 1 - The Process: Let's start painting. But this bullet list, I'm going to load my flat brush and I'm going to fill inside the cell, good. I'm going to apply a layer of art and inside Lisa, Good. Make sure that you maintain that CI. I need an opaque layer of paint so evenly. So our goal is still high. Black. People using a tick themed don't use much water because once it's dry, it will not look asked. But I does this. Say I need an opaque, so good. And it's okay if some goals out of the cell. I have a small solution for that. So you can use vertical strokes using your flat brush to create that. It might look very simple task. But let black paper, it's going to create that opaqueness and we have to use laddering technique to create that. Now I am willing to apply some block though my Ballard, going to remove that excess paint and maintain good. So once the cell is completely dry, I use black color before starting to create textures. And so that looks correct. So this will be obese, but our sun x's. Make sure that you also know completely dry before using black color. Otherwise, it might mix together and it might create a different shade of audit. So make sure that it's completely dry. Let's keep it to dry. So once it's dry, I'm going to start. And for this, I am going to use my yellow hue. And I'm going to just lie over the top of the hill. It, I am using my scribbling technique. So I'm creating some textures inside the sun. I'm speeding the process a little bit. And yeah, using a larger brush, you might not get the same effect. So you will have medium brush so that we can create more texture. So the negative space between that you can see the odd shape. Now I'm going to apply some lemon yellow, lemon yellow portion of the sun. Let's fill in the cell. So basically we have to do a scribbling technique of the lemon. Now, let's add some elements.
33. Sun 1 - Final Elements: But the final elements, we are going to add some more texture. I'm going to load my whoami and apply it at the right side of the sun. So apply it. I'm concentrating mode on the right side. Now apply some are going to do scribbling technique, all Waldo, put on the left and blended with the audio. So we are doing the scribbling technique again. On top off the yellow. You can see the sun looks really beautiful. Slowly progress to the left side and slowly. So basically dark side on the diode and light shades on the left side. I'm going to apply some more because I need that will be consistency of white. And then slowly apply it. You again makes white paint and water in same ratio and then just apply it on top of the yellow layer. So I'm progress and nose as well. Now I'm going to load my brush with audio and then just apply on top of the white and then just blend it. Now, some lemon yellow. So basically I'm playing around with the shape to create some shadows and some abstract effects. So this is totally on a random basis. And to add some yellow to the left side as well. Not too much, but just a bit. So Sandra has some white and in both the sides it has some reds and yellows. So if you think that this effect is different from yours, it's okay. Because that's the beauty of abstract walks. You don't have to have the same replica of the watts. You can create your own Washington's. Now let's do some splatters. Which I'm going to do is read. And I'm just stopping with the beam to create beautiful splatters. I'm going to use the splattering technique and concentrating mode on the inside and then outside. And apply some lemon, yellow and some yellow hues plateaus. Now for the final touches, I'm going to add another layer of paint to create some shadows. And our project is completed.
34. Project 6 Flaring Sun: Hi.
35. Sun 2 - Art Materials: Let's see what an art materials are required for this particular project. For the people, I am using my 300 GSM black people. I have attached it to my board using or she did. And we need some goulash and color ballot, some water for the brushes. I'm going to use my size 8 and 1 round brush from stationary. I need a bigger size led to create the outline and white pencil. So let's move on to color ballot.
36. Sun 2 - Color Palette: Let's see what our colors for this particular project. For the first column, we need a bright orange. In order to create a bright orange, I am going to apply some lemon yellow to my palette. A bit of yellow, a bit of vermilion red. One is to, one needs to 0.05. And then I'm going to apply some white to the mixture. And I'm going to apply it in a different area of my palette. Now, let's mix this color and see how it looks. This color has more yellow dent in order to create that orange here, I am going to apply a little bit more and mix it really well. I am going to speed up a little bit. So it has a beautiful shade, but this looks little dull. So in order to create that bright orange, I am going to apply some odd min yellow and mix it really well. This is the most important. You have to mix it really well. Now, I am going to apply that same orange to a different area. And I am going to mix the extra white which I have already loaded on my palette to create a lighter tone of that particular audit. Let's watch them. On inch looks really vibrant. If you have excess of this particular colors, we will be needing these colors for another project. So these are the two sheets of orange that we will be using for our project. With this additional to these scholars, we will be needing some more colours. That is red. So basically all the rates. Now addition to that, I'm going to apply a bit of black to create maroon sheet. So these are the basic colors that we require. So let's simply swatch them. So I'm going to apply some scarlet that looks really beautiful. Now. The Scala we have applied and just applying it again to get that area. Now some will million drag. And and I'm going to need some white. I am going to mix. We have already seen how, why it looks. V will be needing some more colors with these palette. While processing, we will be mixing some colors here and there. So let's start with the painting.
37. Sun 2 - Composition: For decomposition, we need to create a semicircle which will cover the left side of TB bug. That is phi. I have taken a bigger lead here. So if you see we have covered the left corner with a semicircle. Now let's move on to that process.
38. Sun 2 - The Process: Let's start painting. For us. I'm going to load my brush with the bright orange. I'm using my size 8 brush. And I'm starting from the top of the semicircle. Fill in the yellow, bright orange inside that semicircle. Here, I am using us get a blink method are scribbling strokes to fill in the yellow. This gives amazing texture to our sun. Instead of just simply filling the circle. You can use this scribbling mattered. But make sure that the edges have that word transition. You can twist your brush as well. All these techniques and tools we have discussed in the earlier class. Since this is an affected son, you don't have to worry about the texture of the beam. You can just have fun with it. I'm going to load my brush with water and apply it just below the ADI. I'm using my scribbling method to fill in. So you can see it creates a beautiful texture. You're scribbling Medco to fill in that area. Make sure that you fill inside the same. You sell good. If there is kalos outside your cell, you can use block to get rid of that. X is Carlos. I'm not using much water. Now I'm going to load my brush with crimson and apply it as the mixed layer at the bottom potion of the, so good. That does the same thing. So I'm using my scribbling method to fill in the beans. As you can see, it does create a beautiful texture and gives him a static field. Make sure that at the edge of the semicircle, you have a vertical brushstrokes rather than scribbling technique. This makes sure that you have that semicircle. Now I'm just using my dry brush and this could have blink. Now let's add another coat of paint layer for that, I am going to mix my bride audit with creating a darker orange. And I'm applying it on top of the bright orange or dark area of the Sun. I'm again using my scribbling technique. Make sure that you are bright orange is semi dry or dry. And then apply the dock on top of it. You're scribbling technique so that it creates a beautiful texture. You can just have fun with it. Now I'm applying my 1 million, which we have already created. On top of D. I'm applying the Doc sheet. Now I'm going to add some Scarlett to my vermilion and apply it as the next layer. I'm using this shield on top of the 1 million, which we have already filled in so that it gives a beautiful texture. So this is how we create some random texture to our paintings. I have applied, then I have applying a darker tone about that so that it gives us put into effect. Now I'm adding my scar lead with and then applying on top of the Clemson, which we have already applied. Add more Scarlett and less crimson. And then apply it. I'm using a straw at the edge of the circle. So you can see because when you use a scribbling technique at the edges, it doesn't look good. Use belly of the brush to create textures. Now I'm going to load my bright and then apply it at the bottom of the sun. So basically we are creating an outline from the bottom till the mid portion of the sun. So when you are applying the bright orange to get a motor tract, now I'm lying at the bottom and creating more texture. I don't use much water. As black VBA absorbs a lot of keep creating layers after layers instead of applying wet on wet technique so that it looks vibrant and aesthetic enough. I'm going to load my brush with. And then applying the court. I'm using my link and twisting method to fill in those areas. I'm loading my brush, I'm adding a bit of law and apply another chord. So basically it's like now I'm going to add black to create a model. And at the bottom of the semicircle, good. I'm creating some textures with the modal. So it's very random basis. Blended really well. So when you are doing this kind of technique, make sure that you are little bit faster. Create some textures with the dark maroon color. You can create some black holes. You can slow down this video by using the speed buttons to your Skillshare class settings. Now, I'm going to use a wet on wet technique to create the players of the sun. But that I am applying a vet and the outer area of the Sun. So if you have seen I'm applying not a not uniform be more like creating some spikes. Now I'm going to apply my wet paint. I have used my bride and then just apply it. So the water is absorbed pretty fast. So you have to be little bit faster. Create some texture to your painting. You can use a random strokes to create the players. But make sure that you have a vet god of war. Now, I'm applying doc. Concentrate more on the middle area. Use only tip of the brush to create these kind of store. Now, add some crimson to the players. Brushes. To create these kind of strokes. Don't use too much water. Some bright orange. You can see it really looks beautiful and the flavors are coming pretty well. And bright and light. And create some more flares at the top and the bottom of the cell. And in the middle, create larger flares. Now, load your brush with the right audience and create an outline to your son, especially from the bottom till the media. And then add some more bright orange to the players. The players extremely beautiful. Now, let's add some final touches.
39. Sun 2 - Final Elements: Let's create some more final elements to this project. I am going to do some splattering technique. In order to do that, I am going to cover my son, are the semicircle with my lead and then do a splattering technique. I'm using my size one brush to create smallest factors. So whenever you are using a smaller brush to create that small splatters, apply that are doing. Now, load some data and do this black tree. Make sure that your players are completely dry. Then do this splattering technique. Now I'm going to use my white to create some splatters. Now, I'm going to open the leg and I'm going to add some splatters inside the sun as well. So I'm loading lie to them soon. But I audience and doing some splatters inside the circle as well. I'm keeping my brush horizontally and doing this blocking technique. So this way, you can create a lot of splatters with Scott and White. Now, I'm going to my masking tape, or masking tape. This axis we, I have my masking tape. I noticed that I am going to add some bright. So basically I am reducing the space between the Sun and the flavors using my bright audio. Create Outlines and blended three semicircular using I have used and nobody to blend in better. And that's it. Our project is completed.
40. Project 7 Lunar Eclipse: Hi.
41. Eclipse 1 - Art Materials: Let us see what our art materials are required for this particular project. For the brushes, I'm using synthetic round brush of size 01 for the beeper 300 GSM be fed batch to avoid using washi tape, water-soluble pencil, some water, one lid in order to create the outline. Goulash colors. A ballot to show people.
42. Eclipse 1 - Color Palette: For this particular project, I'm going to use titanium, white and ultramarine blue. Let us see how it works with black paper. I'm going to load ultra marine blue into areas. And to this ultra marine blue, I'm going to add a little bit of white to create light blue color. And I'm going to apply white and a different area because we will be needing white. Now let us see how this works. And the black people, the y, we have already seen that it looks really beautiful and the black paper. Now let's see how the ultramarine looks with the black paper. So if you can see it doesn't give you any sort of colors. It looks really transparent with the black paper. So I will be adding another blue. This is called a saddle in blue to my ultramarine blue to create that beautiful blue which we will be needing for our project. Now I'm going to mix these two views. So this is ultramarine blue and settling blue. Let's see how this blue, Alex, yes, this looks really beautiful. We will definitely use this blue. So basically our light blue and dark blue combined. Now, let us mix this blue and see. Basically it has more of a violet tint to it. So I'm going to apply some of blue which we have already mixed in order to get the lighter tone of the blue, which we have already mixed. Basically in order to create a blue tint. When we mixed it into marine blue and white, it was basically a violet tint. So in order to create that beautiful blue tint, I have added the ultra marine and certainly in Bluemix ballot. And that blue looks really beautiful and it does go with the midtone. Now, we will be adding one more lighter tone of blue. For that, I am going to add a little bit of white to the old already created mixture. Mix it really well. So basically we have three blues. Let's see how this works. And that looks really nice. So basically we are playing around with the proportion of white and blues and creating different tones of blues. So this will be our color palette. Or these keep plaque nearby. So if something goes wrong, we can easily corrected using a black color. Now let us see what is the composition of the painting. This is very simple. I'm going to draw a circle in the middle of the paper. I'm using a medium shaped lead in order to create that medium. So occur. It's not too big, not too small. A medium size. Now, let's walk through the process.
43. Eclipse 1 - Composition: The composition of this painting is very simple. We are going to draw a circle in the middle of the people. I have taken our medium. So that is a lid. And then outlining. Using my water soluble white pencil. If you don't have that pencil, you can use a white gel pen as well. So this is our composition. Let's get started.
44. Eclipse 1 - The Process: Let us stop being. In order to start, I am going to load my mid blue to my synthetic brush. I am using my size one brush and I'm stopping it from the middle left corner and then slowly building it. So basically you have to draw a semicircle. And when you reach at the top, the thickness of the beam slowly progress to the next site that does the right side as well. So basically forming a semicircle. Now, let us adopt on the dark blue, which we have already mixed. And I'm going to use a dry brush technique. And slowly start from the top and then slowly progress it to the edges of deep into. Q. Notice I'm not using much water, and I'm just applying the paint on the tip of my brush is used for this technique. Semicircle, which we have already created with the middle tone of blue. And then just shift your brush like this. Basically, I am shaking my hand. Only my tip of the brush is touched with the people. To see. It creates a beautiful texture. Now, I'm going to extend that semicircular and using the doctrine of the blue. This is why the outline. Now I'm going to take my blue. And then the sell goods at the end just to sell goods. Now, I am going to use the light blue Dawn which we have already created. And give up outline. Outline. Basically draw some ESA and then just applying it in and blend it like this. And just blend it. Now I'm going to load the dock blue again and then slowly blend with the light blue. So basically it gives you texture and have that beautiful aesthetic field. If Q1 you can lift some beans. An auditor that lifting, I use my wet brush, that is my damp brush and I'm loading the excess paint and then just dabbing it to my tissue paper. This is called the lifting technique. Gives you beautiful blend. Now I'm going to use my white and then I am going to do an outer layer with the white. So this is basically a decimal, a soft light. See, I'm only drawing it. Blend with the second day. Apply some bite above the dock. Like that. It's not exactly in the center so that it looks like the light is coming from the other source. Now, I'm going to load my dark blue. And then just again, you can use gonna blink technique to create texture, which we have discussed in the first few lessons. I'm using my wet brush and just simply applying it at the bottom of the sulcus so that it looks blended to blend. And now I'm going to load by white again and giving little bit highlight here. And so that would be a source of light. Outline with white. Basically draw with white as an alternate. In order to add some final. Let's see the next session.
45. Eclipse 1 - Final Element: Let us add some final elements. In order to do that, I am going to do a splattering technique. For this. I am going to use my smaller brush that aside. I have no did it with a light blue color and then just tap the brush with another brush, creating this beautiful splatters. So when you use a small brush, you get small as plateaus. Once it's dry. Let's add some alleles from the light source code. This I have loaded my brush with white. I have used bet white beans in order to create this kind of feeling. It's three's. Coming from the light source. Use more water and less white paint to create this kind of effect. Slowly draw lines like this. Now I'm going to load a thick consistency of white bead. And I am going to draw on top of the layers that we have already created. So it basically shows the deflection of the v's extended strokes like this. In order to create a Beta strokes I have just taken inside and then just drag that strokes. So few of them are small and few of them are inconsistent. Apply. And we are done.
47. Eclipse 2- Art Materials: But the ideas really require a late VI using a medium size Lead for the sodium will Benson. For the brushes you can use round brush either sides. One ought to do some coloring palette, tissue paper, black paper attached to the gourd, and some water. So let's see the color palette.
48. Eclipse 2 - Color Palette: Let's see what our graph for this particular project, the first color I'm going to load in my palette as this hot pink. This is from grand brushstroke and applying a bit of hot pink into areas. And then one, I'm going to add some rules color. So a bit of a rules and a bit more. So this is similar to shade. And I need some white, so I'm going to apply it in a different area. So if you need to correct something inside Eclipse, I am going to add a bit of black as a condition. Now, let's mix these colors and see how it looks. So the shadow for this mixture is 2.5, is 2.25. And mix it really well. So you will get a mid pink. I need to fit this to my pink. So I have added the rest of the heart being that I have already loaded on my valid to get that vibrant pink. Let's see how it looks. And that color looks really beautiful. If you don't want to mix these colors, you can just use heartbeat Nashville. I'm going to load a little bit of hot pink to create some texture to my painting. So you don't want to mix this. You can just use the hard thing as such. So that will look more vibrant. So hard thing looks like a neon color. So this is how these colors look. So you can see it looks really beautiful. Color palette is ready. So let's get started with painting.
49. Eclipse 2 - Composition: For the composition, we will be drawing medium size circle in the center of the beach. Use my lid and water-soluble pencil to create the circle. That said, let's start painting.
50. Eclipse 2 - The Process: Let's start painting. So I am going to load my brush with the pink which we have mixed. That's the beauty of the gosh, you can reactivate the vet, your beans and you say, if it is dry acrylics, you don't have that luxury. So once you have load your brush with paint, I am just going to draw an outline over the so-called which we have already created. I'm using my size one brush. If you have any liner or rigor brushes, you can use the same. So I'm just painting over the outline. But I am not going to be so good. I'm going to leave some spaces here and there. I am not going to be in-between these gaps. Now, I'm going to use my wet on wet technique to create the players. So I'm just applying some water and dragging it out or spreading them. Don't load your brush with too much water. Just take enough to create that create structure with the vet CTO photo. So spread the word accordingly and then apply the paint inside div with surface. So if you see we have the advantage of wet on wet technique. The pigments get absorbed with the vet and create a beautiful texture that just looks like a flower. Now use the same technique at the edges, the edges. So the trick is not to have so much water, but a bit of war. And at the bottom of the cell, we've showed that you don't do much. It doesn't look good when you do up. Since our media has to be smaller. I'm going to add some water to the edge of our declares, which we have on to deeply and add some more layers. So if you haven't noticed, I'm using only my tip of the brush to create this kind of strokes. Now I'm going to add some pink clouds. You can use the dabbing technique, which we have onto the lot. Size. My brush. Make sure that you are not too big.
51. Eclipse 2 -Final Elements: In order to add some final elements, make sure that your painting is completely dry. So for the final elements, we will be adding some stars here at end there. For this purpose, we will be using splattering technique. I have reactivated my paint. Now, let's do some scattering. So I have loaded my brush and I'm just dabbing the brush and creating beautiful splatters or lead on the beam thing inside and outside the silica. Now I'm going to add some hot pink splatters to the load your brush with heart being and creates plateaus. Now, let's do some white clapping till consistency of water and paint is very important. You need equal amount of water and paint to create the beautiful and vibrant plateaus. In order to create big stars are big dots. I am going to use my brush upside down. Use the edge of the brush to create big dots. Like this. This is the ECS way to create big dots are big splatters. So here I am concentrating more on the create splatters using the edge of the brush like this. Now loaded with Hard pink and create a random dots here. And now we will need some white. And then just press it like this. Don't press it too much. Now let's do some stars outside the cell can add some pink dots randomly. And that's it. I'll project is completed. Now I'm going to remove my masking tape. That's the eclipse. It looks aesthetically beautiful.
52. Project 9 Abstract Eclipse: Hi.
53. Eclipse 3 - Art Materials: Let's see what our lab materials are required for this particular project. We need some quash paint and for the brushes I'm going to use my round brush size 01. If you have liner brush, you can use that as well. A medium-size leg and a pencil to draw the outline. For the people. I'm going to use 300 GSM p where dash, avoid using washy, color mixing palette some water. That's it. Now let's move on to color mixing.
54. Eclipse 3 - Color Palette: For the color palette, v will be having some blues and pink. I'm going to apply in my palette is cobalt blue. And the next color I'm going to apply as ultra marine blue. And for the pink, I'm going to use scarlet, red and hot pink. You can always keep white and black nearby. If we need some corrections are to create additional effect. Now, let's watch these colors and see how it looks on black paper. We will test how cobalt blue looks in black vapor. It is quiet, transparent. Now, ultra marine blue. And now Scarlett. And hot pink. So pink and Scala, it looks nice. Let's mix some violet and create a little lighter blue so that it works beautifully on black paper. So I am going to mix some white and cobalt blue hue to see how the blue looks. And that looks vibrant, but I need a little bit more blue. So I am going to mix these blue and a bit of white. That blue is medium blue. I need a little bit brighter blue. So I am going to add the ultra muddy this mixture. And that blue looks good. So these odd Alcala valid, Let's move on to the composition.
55. Eclipse 3 - Composition: We are going to paint a glimpse and descent of debate. Here. I am going to draw on medium silicon using my lid and what does audible white pencil. So it's kind of a center area. It gobbles the center area. So I'm simply drawing are so good at the center of the page. And let's start painting.
56. Eclipse 3 - The Process: Let's start painting. Well, as I'm going to load my brush with blue color, which we have already created. I'm using 900 size brush. You can use any pointed brushes. And I'm just going to draw a semicircle on top of the outline which we have already created. So I am using blue at the bottom and being on the top. The silica. Here, I'm using a medium thickness degree at the outline. And now I'm going to apply some random scroll like this on dry technique to create this kind of tech shadows. So I'm just giving some pressure at the tip of my brush and just dragging the bead. So it looks like I'm concentrating more on the edge of the cell, good. And once it's coming down, I am reducing the thickness of this rule. Now we are going to be opposite side of the cell. Good. I'm going to add a bit of white to my SCADA and then apply. Sufi can see the different. When we applied spotted directly, it was not looking too much vibrant. But when I added a bit of, a tiny bit of white, that looks really beautiful. So draw a semicircle. Good. Now let's do, or we have created at the bottom. You will stri on right technique and drag the beans. Use the tip of your brush to create these kind of texture or shape the brush to create these kind of texture. Basically it looks like a plate, auto fire kind of a thing. Don't give much pressure to the tip of the brush. This smoothly of Gly, brush at the edge and then applied to create these kind of texture. Make sure that Gilgamesh pain doesn't have much water, but enough Bordeaux to load the beam. So I'm just randomly applying these pins. Now, let's add some highlight. For that. I'm going to use my ultramarine blue and create another layer on top of the cobalt blue mix which we have already painted. Use the same technique to create textures. So basically we are applying another layer on top of the blue which we have already created. But make sure that you leave some negative space so that you can see the other blue. We meet. I'm going to apply a little bit of ultramarine to my palette. Now I'm going to load, I'll draw my zeros. I create a small outline on top of D semicircle which we have already painted. So basically draw a line between that blue. You can use a liner brush to do the same. Now I'm going to repeat the same with hot pink. I'm going to do another layer on top of the Scarlet, which we have already painted. So I'm going to load my brush with heart Bing. And I'm just going to draw a semicircle on top of that Scala. And if you can use block inside the cell, a little bit hard pink, you can use dabbing technique as well. Now, Let's add some splatters for that. I'm going to load my brush with hot pink and create some splatters. I need smalls, plateaus. That's why i'm, I'm using my size 0 brush. Now little bit of drama. And tap your brush to create splatters. Now cobalt blue, ultramarine and white mix and do some splatters. My blues, and then brush. And now playing it on our project as most complete. Now let's add some final elements.
57. Eclipse 3 - Final Elements: Let's add some final touches. Put that I'm going to use my hero size brush. This is a damp brush and blend these two colors together. Mainly at the edge of the, so good. And blended really well with the background that is about black background. So use less water. This way. We can create a foggy kinda. I'm just applying no damn brush towards the edge of the circle. And that's set out, project is complete. Let's remove these masking tape. And that's it. A project is completed.
58. Project 10 Golden Eclipse: In this lesson.
59. Eclipse 4 - Art Materials: Let's see what our activities in Zurich weapon this particular project. In order to create the outline, we need medium-sized lead and water-soluble pencil. And for the brushes I'm going to use my lawn breast size one, this is from non stationary and a black IPA. This is 300 GSM paper. That's to avoid using washi tape and some gosh, color and ballot. What do they show people? So let's get started with the color palette.
60. Eclipse 4 - Color Palette: Let us see for this particular project. But that I'm going to make some bright color I'm applying in my palette as lemon yellow. With yellow, I'm going to add a bit of yellow. And a portion of 1 million. I'm going to add to the mixture. And applying a bit of white. We will be needing some white to create light tone of the audit. Now let's mix these colors. Mix it really well, especially with the goulash acids, very opaque medium. You have to mix really well. Now I'm going to add a little bit more as I need that. She'd, rather than good load pins. Now mix a dreamy read this. So I'm going to add some yellow to create that audience that we require. So I'm adding a bit of yellow to this range and creating, now I am applying the same color in a different area of my body. And I'm going to add the white to create lighter tone upward. We have already created now does the audit. So these are the two sheets that we will be using for this particular project. Now let's rats there. You see it looks really bright. Now let's watch the lighter tone. That looks good. So this will be our love for the upcoming project. So let's get started with.
61. Eclipse 4 - Composition: The composition of this particular project is very simple. We have to draw medium sized circle in the middle of the paper. Here, I am using my lead and water-soluble pencil to create the same. And we will be painting outdoor area as well as in the area of the circle. Let's move on to the grasses.
62. Eclipse 4 - The Process: Let's create this beautiful eclipse. In order to stop being thing, I'm loading my psi is brush ash, red, yellow. And I'm starting from the left side. I'm drawing above the outline which we have already created. Using my medium straw. Not too big, not too thin, and slowly progress it to the other side. I am going to my people, I'm going to put it horizontally. This way. I can have a steady hand. I'm not going to paint a complete circle. I'm going to live some ADL between those two lines. I'm going to tilt my people and draw a small structure. So that will be our source of light. And apply the god of p. So this is us lactose. Now, I'm going to apply darker tone of yellow, orange we have already created. And then just apply the band in the middle of the night tools. And then just draw outline above the door. You can shift. Your aim is to get a steady hand. I'm increasing the thickness of the strokes here to show more light coming from behind. Now I'm going to apply a wet wash In order to the whole area. But nearby delight tools. This is wash simply means applying water to the people. And then to the vet Bosch. I have a light orange stone and blended with the BBA. I have discovered a small portion nearby the light source. Looks like an eclipse. Now, I'm just increasing the thickness of the site so that it looks like they apply it from behind. Us are dry brush technique to this ocher. Now I'm going to add a small light source from the outside. So I have taken vet guard of B that is more water and then apply and Diodotus area and then applied that Docker dawn of odd inch, just like what we have created inside that we are doing it outside. So this basically shows the light tools and make sure that you don't use much beamed to create blended. And for those who want. So you can actually be inside the cell line which we have already created. You can use black paint and create up bow fix. So good. I like a little bit of asymmetry in my paintings. So that's it. It's very simple to create. Now, let's add some status. I'm going to use my lid to cover the Eclipse and then load my brush with midtone yellow. And then use the splattering technique to create some small splatters. Here I have used 0 size brush and creating some wonderful splatters. This way, I can make sure that, you know, that is no start inside the eclipse. But if you don't have to cover, you can always use black if you have created some splatter inside the glyphs. Now add some audience that is dark, don't afford. We have created and create some splatters out. Eclipse painting is complete.
63. Thank You: That's the end of this journey. I hope it was informative. And most importantly, I hope you guys had fun painting. So always try to explore new mediums and never, ever stop creating.
 Aiswarya Sathyan, In love with the world of colors