Transcripts
1. Introduction to the Class: Hello and welcome to my Skillshare class. I'm Shannon and not as from Bangla. I have been practicing art with different media over the years. Pr on Skillshare, I teach painting, watercolors, gosh, and academics. In this class, we will learn to paint tropical forests using gosh. This class is structured into different stages, covering different concepts in the process. Like thumbnail, I love ballad, perspective, elements supplies, techniques and other IP centric. Although painting looks complex at first, the comprising elements are Dort in simplified terms. Even a big innovator realize how using various techniques in the right manner will help paint or challenging artwork. So without any further ado, let's get started with the class.
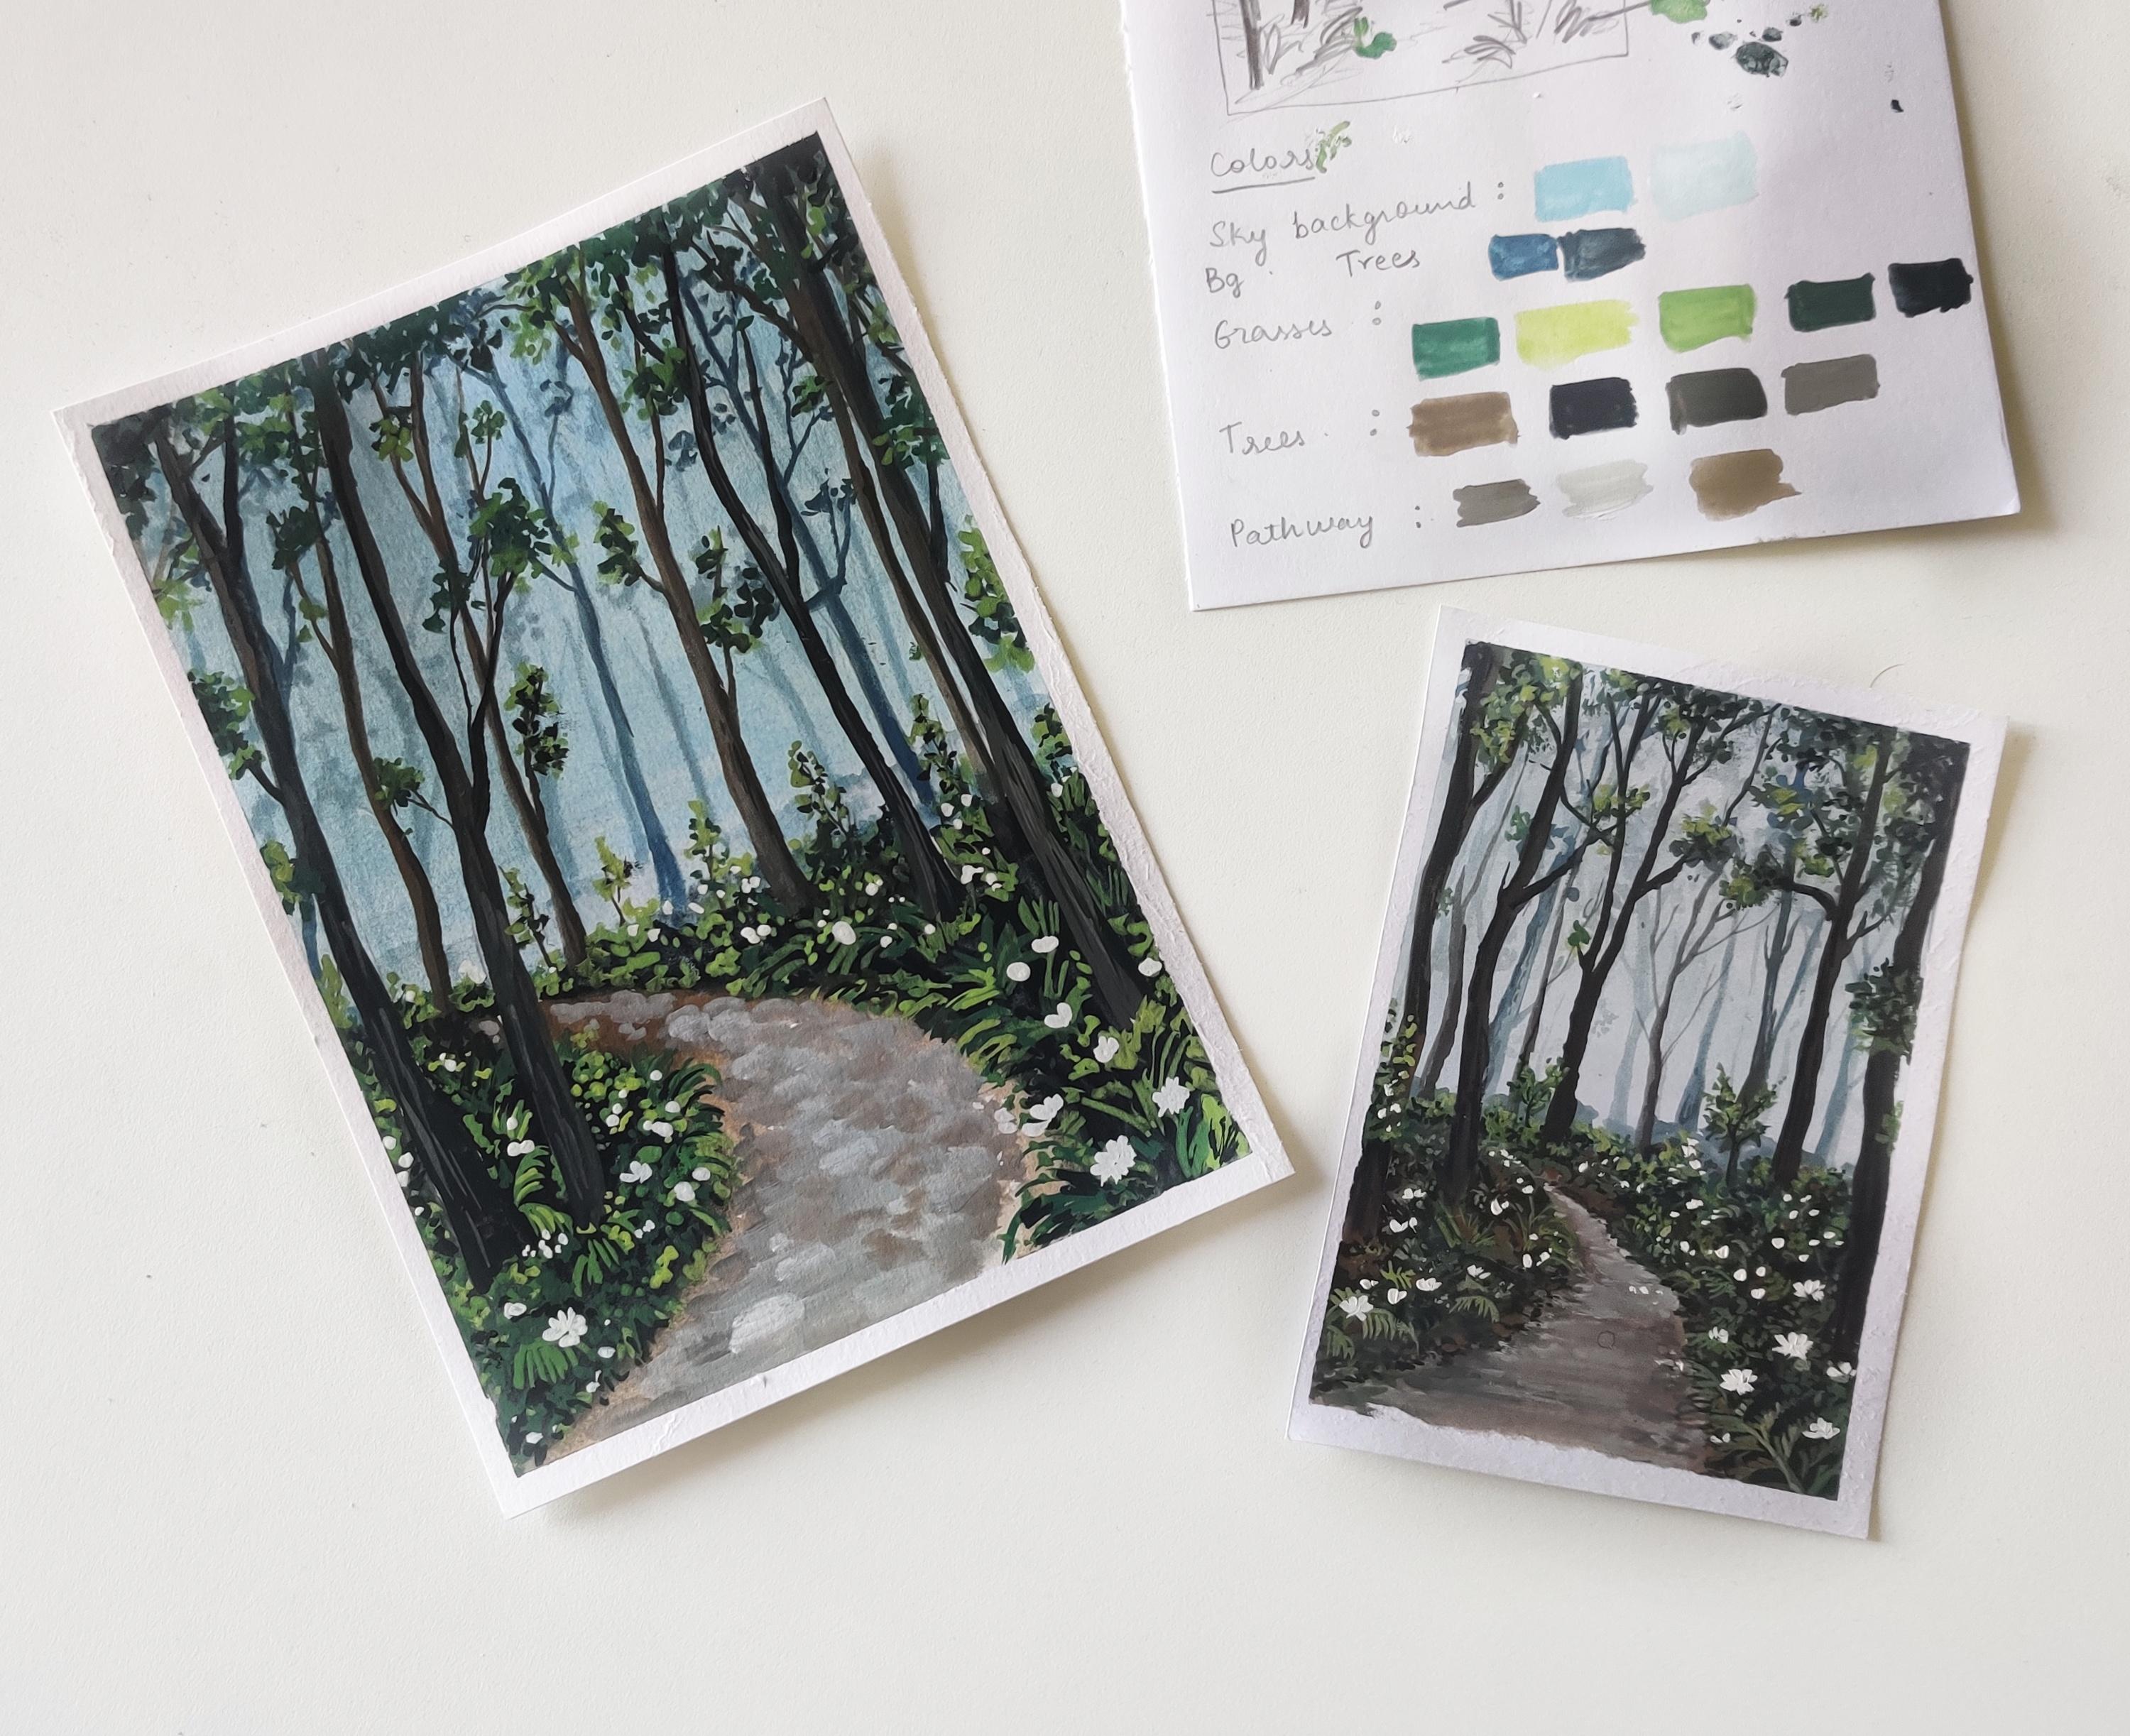
2. Art supplies: Welcome back. I'm glad you joined my class. So let us have a look at the materials. The paper that I'm using is Bruce draw mixed media paper. So this is 250 GSM and a soft textured paper. I would recommend you to use a fine texture and a minimum of 200 GSM people for gosh works and do not use a rough textured paper. Next is colors for the green foliage and the grasses. I'll be using the green, lemon, yellow, and black. I prefer a separate black and white cubes for my gosh works. And makes transposon blue, black and white for the distant land and the trees. And I'll also use bone Dumbo for the pathway and the tree trunks. Next we will talk about the brushes. I'll be using four brushes. One is flat brush for the washes. Then I have size eight round brush and a size two round brush and a fine liner brush for painting the needles. Next, we would need a ceramic palette or any kind of palette for mixing colors. Pencil for sketching. You can use any pencil that you have. Then we would need a masking tape to tape down your paper on a cardboard. Two jars of water for cleaning brushes and taking clean water for the washes. Lastly, we would need old clot or a tissue paper for wiping dopings or the water of the brushes. That is all about the supplies. You can go with any similar supplies that you have.
3. Thumbnail & Colors: In this chapter, we will draw a small thumbnail of the painting to understand the elements and the composition innovate away. So I will start with the horizon line in the form of the grasses. Then I will draw a C shape that is inverted C shape, another parallel C-shape, forming a reward or the pathway. Then we have the grasses on either side of the pathway. Then we will draw a lot of trees. So these are the foreground trees. In the background. There will be some distinct hazy trees. Although it, so we have this thumbnail. There are huge trees in the foreground, and then there are boundaries that is bought and the grasses on either sides of the pathway. Next we will talk about the colors that we will use for the painting. So we will need ocean blue, black, and lots of weight for the background. We will be adjusting the tonal values of the bluish color by adding more white to it. If you add less white, you will get darker color. Now to paint the district trees, we need a darker blue color. So we will add more of blue and black and less of white. Next to pin the grasses and folly ages, we will go with the limb green and lemon yellow. With these colors, we will create various tonal values, mixing lemon, yellow and green, and uses a mid-range of green. And if you add black to the green color, it uses her darker when we will also be using black allow for the shadows and darker areas in the glasses. So basically you would need three colors for the grasses and though for the ages that is lemon yellow, deep green, and black. For the trees, we will use one Dumbo, black. And then when mixing black and bone down burn, it gives us a darker brown color. And when we add white to this mix, then we will get a grayish brown mix. So this is like a doc alert, which will be used to add the highlights on the tree trunks. For the pathway. We will use the same color mix and we will also add some more white to add the highlight. Then we will use a lighter brown colored by adding white OO bond number. That is it. Let us move on to that techniques chapter.
4. Techniques: Let us learn the basic techniques required to get started with the beam being the first technique is wet on wet. Here we apply clean water on the paper, and then we apply wet paint. This helps us have a soft background wash in the painting. I'll use this technique to obtain the distant trees as well on wet surface. Since the trees are further away from the viewpoint, so they appear hazy and not so clear. So this technique is perfect to achieve a softer look in the background. Moving on, we have a wet on dry technique. This technique is majorly used in the class. Here we apply wet paint directly on the dry paper. This gives us sharp and crisp edges, which is ideal to create the foreground trees, grasses, and the foliage is. Next we will practice the elements of the painting one by one. So first, let us learn to paint the grasses. Here we will paint the base code using black color. Once this layer dries, we will go on and add the green colors. Black color helps to suggest the shadows and darker areas under the grasses. So first I'll start with the darker green. Now Boehm some random shape of grasses. So you can paint some simple grass shapes found in shape on the phone like shape. If you want, you can try adding leafy shapes as well. I'll be using these dots as fillers in the beam. So you can add some highlights with lighter color on the other side of the leaf. So this way you will create a nice balance of the lighter and darker colors. So he RNA being on the black surface at first you won't be able to see anything clearly. But then as the paint dries, it will be visibility early. So the AMDR is to achieve dense grassy area. Once we have identified darker grasses, next we will add some lighter color highlight. So this ADI should have a right balance of all the green colors. Suppose we are leaping with one green color, then it might look pale and unattractive. To avoid that, we will make use of oil. Friend only values of greens that we have. Light and shadows play a very important role in the painting. You can also add some dots to fill in the space. This will act as fillers in the painting. I had some ideas, we might feel it does not dark enough. Then we can add some concentrated black, which will act as the shadows. So you have to do a bit of trial and vectors on a piece of paper if you want to get it right. Moving on, we will see how to paint the trees in the painting. Here we will paint the trees in three different types based on the perspective. First one is the district trees. We view these trees from a distance so they appear bluish, hazy in Italo. Second is mid ground trees. These are darker than the previous layer, but they're not so crisp and blade in APRNs. And the last one is the foreground trees. These trees appear very dark and we can see the details as well. Also, when you paint the trees, try to paint them in an irregular way to achieve a natural effect. Next is the pathway. This is a COVID ward. The shape new Norway, same as mine. You can go with the straight or an inward though go road. Okay, so here we will use diluted, burnt umber as the base layer for the bad way. Once the layer dries, we will add some lighter grayish color to create an illusion of an uneven surface, which adds a sense of depth to the painting. That is it with the techniques. Now, let us move on to the painting session.
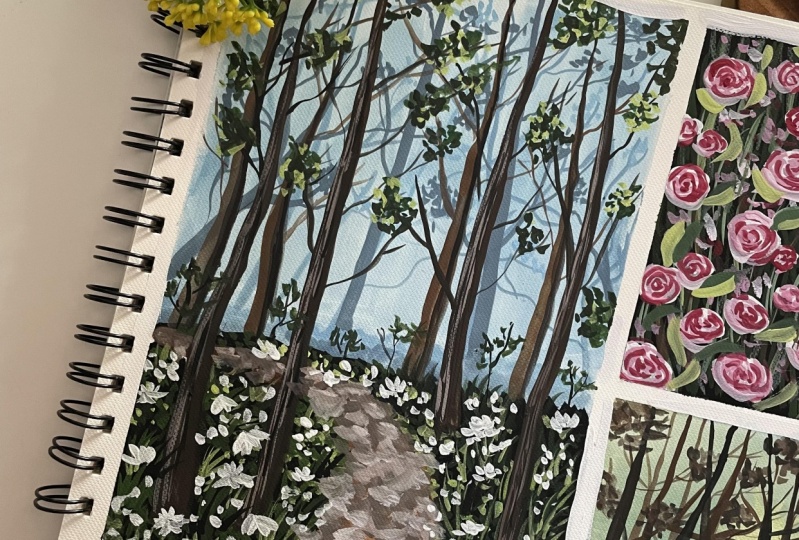
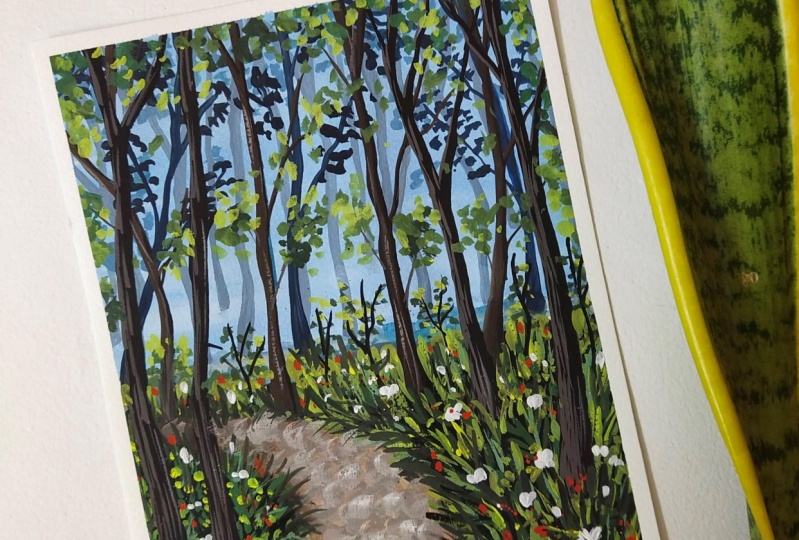
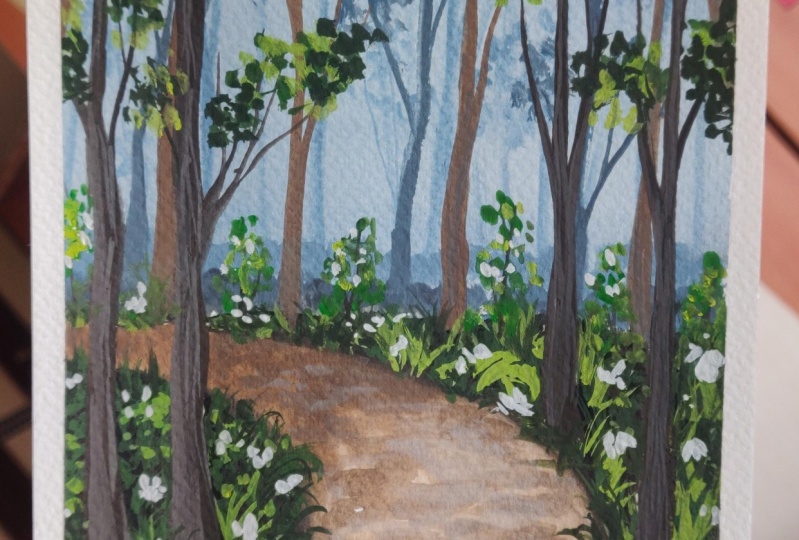
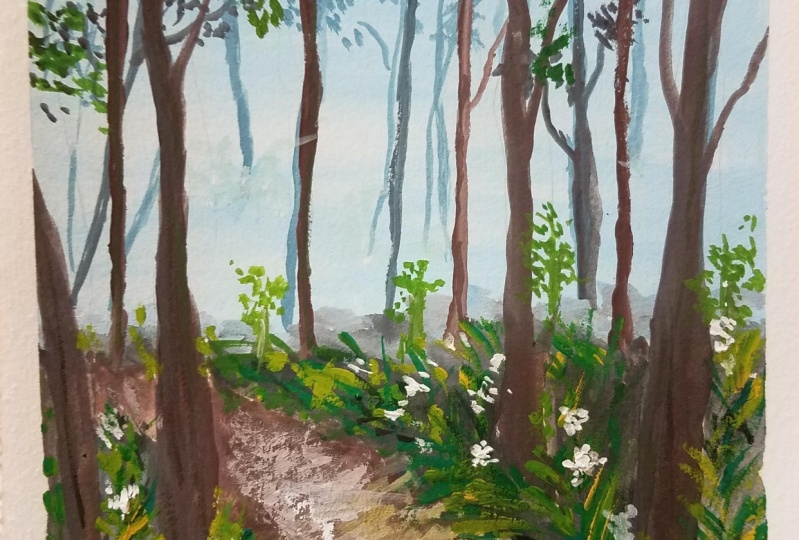
5. Part1 - Painting the Background: In this class we will learn doping this gorgeous for the spin. This main income prices of various elements like background misty layers with trees and sky. The middle ground layer and the foreground layer of Clay's, which adds a sense of depth in the bending. And in the foreground we have a curvy, but we're in the middle of the forest. Alright, so let us get started. I will apply masking tape on all the sides of the paper to keep it tightly secured and sealed while painting. Next step is to sketch the basic composition of the building, just to get an idea of where the elements will be placed. I'm drawing the horizon line in the same dirt in the form of grasses. And then I'll mark the background. Trees. Don't worry about creating perfect shapes, just aligned to do. And in the foreground we have this Comey by the way. So I'm going to draw a C in order to see like shape, another battle and see like shape. So this should look like. And then I'll mark the foreground trees. So these three drugs are a little wider than the background trees. I'm just roughly marking the outline. Later I might change the shapes. And the other edges of the pathway will be covered with grasses. So it will be uneven in chip. And let us get to the painting. Next, I have taken three colors on my palette. That dispersion blue, black, and white. So I'll be taking small amount of ocean blue and black. And then I had lots of white to it. To create a light bluish color. I'll be going with wet on wet technique. So I'm applying clean water on the paper first. And then I'll apply this red beans. Okay, so the paper is made. I'm applying water using a flat brush. Now, I'll dig this bluish color and apply on the upper part of the paper. I think it needs to be more weight. So I'll add more white in this. I'll paint the area above the horizon with lighter blue color. Slider brushing, horizontal motion to get even brush strokes. Next we will beam there distant trees with DACA alert. Again, darker color. I'll add a bit of black, but this same mixture. Now this is a darker blue color. With the help of my size two round brush. I'd been there distant trees. Here the reshapes need not people fit. Here. I'm painting some street and some warmly lines. And we will naturally look in the background forest. The background is bluish because of the atmospheric conditions like mist, fog, etc. Next we will add the three voltages using the same color. You just have goddamn Dobbins in order to create an impression of reuse. And in the main group to suggest 34 lineages. In this particular area is far from us. We're trying to achieve a perspective line distance in the painting. When the objects are far away from the viewpoint and they don't appear perfect. So don't bother about achieving perfect shape and sizes. Yeah. Next we will paint another layer of trees. So this is a middle ground trees. These trees will appear slightly darker in color and they are closer than the previous layer. So these trees appear darker in color because they are closer to us or w point. Okay, so for this layer, I'll add more blue and black and very little of white beams. Painting the trees in the same manner. Your add some branches in different direction. Trees look natural when you pin them in irregular shapes. If you're not confident with paintings as trees, then you can simply draw straight lines and paint the foliage. But I would recommend you to practice on a piece of paper to strengthen your muscle memory. And it will be easy for your adopting things as well. Now by adding multiple layers, we can already see how it creates a sense of distance and dimension in the painting. So that is how you create a natural-looking painting. Once we have been doing that tree trunks, we will add the foliage is using same color, white because it is away from W wind and it is hazy. So we wouldn't be able to see the exact color of the element. I hope that makes sense. Next value we will be in the tree and the foliage is everything in same color. Okay, So your lab, the beans to create an impression of values like we did in the previous layer. Same with this one as well. You just have go dab your brush to create an impression of reuse. Next, we will paint the ground are the base for the macron Greece. So I'll go with a bluish color to paint the background. Next, I'll add a darker version of the same color. So the lighter blue color is for the lighter background. So here I will connect this darker tree with the darker background. So now you can clearly see a sense of distance between the two layers, right?
6. Part 2 - Painting the Grasses: The background layer is completed. Now, let us move on to pain the grasses. To paint the base layer for glasses. I will go with the black color. Apply black on either sides of the pathway and avoid painting on the pathway. Also leave some space for the tree trunk. So this technique is called negative painting, where we've been outside though focus area. We leave the empty space for the tree trunks and the pathway. And we have been being outside that area. Here. I'm applying wet paint on dry surface. So this is called wet on dry technique in wash. So this is the base layer for the grasses. We will paint the further details like grasses and flyers once the back layer dries. Next, I'm going to Bond Dunbar and mix it with equal amount of water. So I'll take this beam and apply it on the pathway. So it is okay if you mix this brown with the black on the edges. The pathway gets wider towards the wind. So I'll use my size eight brush to cover this larger area. Blend the two colors with a damp brush to avoid having sharper edges. We will paint the middle ground trees using brown color. Okay, So I'll be using burned down bowl for this. These trees are neither too close nor too far from the viewpoint. They're located somewhere in the middle. Though. Perspective. The blank spaces are for ago foreground trees. And those trees will be comparatively bigger than the trees in the middle area. Okay, So as the object tends to move away from the viewpoint, it APR smaller and the alert also fades away. You can paint as many do you want. There is no fixed number as such. I'll be four to five of these round alert trees. Now, I add some darker colors on any of the site, depict the shadows and make them look cylindrical. I had some irregular brand just to make them look natural. So the folio just will be identically 0, 1s and the beans dry. Now we're going let this dry and makes the green colors. Were the grasses. Ache, I need darker green and lemon yellow. So mixing green and lemon a lot o, achieve a medium green color. Now if you add more a load with this colored, you will get a yellowish green color. So you have to experiment with the colors to see the tonal range that you can achieve. Adding more yellow to the green gives us a bluish green color. Which can be used for highlighting purpose. So we will keep the different tonal values of beams lady on the ballot so we can easily been the grasses are late, so let us paint the glasses now. Now I'll start painting the shape of the leaves when darker green. You can paint simple shape of leaves or phone lake shapes. Remember the ones we learned in the techniques chap go. You have to use the similar ones. Are if you know any easier way to pin the grasses, you can go with that. Paint some grass blades on the pathway as valid. And the idea of filling the space is to make it look for low and very bushy in APRNs. So I'd know as many gases and shapes you want. Use tiny dots as filler objects that will be very helpful in filling the spaces. Next, I will add some highlights using lighter green color. I'm just dabbing my brush to create the impression of the early use are the highlights. So be very gentle when you apply the paint on wet surface. In the foreground area doesn't have darker colored gases. So I'll add some black to this green to achieve a darker green color. Now, with this darker green mix, I will add some darker grasses to add some shadows and contrast in doping in. We need to have a right balance of light and shadows. Non-black alert acts as the shadow in the grasses. And the lighter color acts as the light falling on the grasses. So there is a mix of both the dark and light dark colors. You can allow the paint to dry and then add the lighter colors to depict the highlights. So we will later Dre until the beams dry. I will be in the grasses on the right side being some simple glass shapes. So you can go with found in Lake shape. Although the phone cheap, anything that you lake, the end result should be a group of grasses. So don't bother about creating perfect shapes. So in the empty spaces here or you can add some guards, which will act as the fillers and inclined grass blades. On the bottom. I learned some lighter color to create some highlights on the grasses. The highlight suggest that there is some light falling on the grasses. And then I like some darker colors to the shadows in the grasses. Remember, we need to use different tonal values of green light from a yellowish green. The dark green possible to achieve perfect balance.
7. Part 3 - Painting the Trees and Final details: Moving on, we will be in the foreground trees. So let us make some darker brown color to paint this, I'll mix black and brown to create a darker brown color, which I use to paint the trunk of the trees. Initially, I had drawn the shapes roughly, but now I'll pin them in a neat shape. So I lied in this brown color inside the gray shapes. Now I lied in this brown color to give a nice tree shape. The trees in the foreground, IPOs be burden size due to the perspective. If any element is closer to the viewpoint, it appears to be good and we can see the exact dollar. So your, I'm building this darker color. And then I'll add the texture and details. So I paint the trees darker initially. Later we will add the details like highlights and texture. You can observe and follow along with me as I beam. There is nothing in New York. I'm painting some more trees with the same technique. Once we have that tree trunk branches. So the branches in upward direction and beam the branches him and irregular, making them look mastered. The branches are the main trunk. I'll also add some darker color in the middle boundaries that I have already painted. Makes them look more dimensional. Creates a natural look in the painting. For the foreground trees, we will add some lighter highlights. So I mix this wide with the brown and black mix that I have already. So even mixing white and gives us this somewhat like grayish mix. So I will apply this on the left side of the trees depicting the light or B highlight. Once we have been did that tree, trunk and branches, it's time for us to add the leaves and create some loose foliage. I'll start with the midtone of green. By dabbing the paint on the branches. I'm using my size two round brush to create these group of leaves to depict the foliage. Dab your brush on random branches. There is no fixed position as such. You can dab your brush on any branches. I extend a tiny branch. The good thing about Gosh, is you can go back to your painting. I add or subtract any elements that you add or remove. Next, I will add some lighter green color. Just dilate. Use different tonal values of green. I'm applying lighter green. Those are just the brighter. Note that I'm not making perfect shape of leaves your IT IS audit dabbing. That is doing its job. You need not be very good at drawing or replicating the shapes. It's all about creating the impressions in. Now with the help of my fine liner brush, I will add tiny lines on the tree trunk. So you've got drunk and then you will apply darker lines. So drunk. Next I'll mix green and black who were already darker green color. Now with this darker green mix, I will divert on the upper part to create or darker foliage effect. Like I said earlier, it is going to be a mixture of different tonal values of green. I will let you absorb and follow along with me as I beam this forest. You can come up with your own washing of the forest. It doesn't have to be exact same replica. Next in the grasses, I'll add some black to add the shadows. In a graph is in the foreground, looks more after drying. So I'm trying to add this black to add some shadows. I had some darker and lighter colors here and there on the glasses. I'm doing my own dialect to get these glasses right. There is no fixed set of rules where I can say this has to be like this or like that. No, it has to be natural and uncontrolled. If I tried to control the brush strokes, it will end up looking something different and you might not like that. Okay, So if you are new to this, then visit on a piece of paper before you paint on the main beam. It doesn't really easy. Just that do need a little practice. Moving on in the middle ground area, I will add some tiny plants. First I beam the stem of the plant with round gallery. Then once it is done, I'll add the leaves on these games using various green colors that I have on the ballot. So these glands are in the middle of downtown area. Moving on, we will add some depth on the by three. So we need white color for this, while igneous leftover brown color and mix it with white. Now with this makes sure I will gently dab on debug. This will create an illusion of uneven surface. And then I will add more paint to the existing beams and elaborate on the bug. So now you can see it has created a nice texture, giving an uneven look. I think more white on the bottom. Okay, so this pathway is done. The background trees are done. Grasses are done. Now the only thing left is the flies. Now, I'll add some flowers on the grasses using white color. It thicker paint and paint tiny flowers on the grasses. So I'm being lingered on random areas. So these white flowers, a nice contrast to the right. You can add as many blocks as you want. So if you are interested in using different colors for the flowers, you can go with that as well. In low paying, anything that interests you. Okay, So before we call it done, let me just see if there is anything to add. You can check your painting. If you feel there is something missing, then you can add it. Okay, So let us remove the masking tape and reveal the final outcome. There you go. This is the final look of the painting. I hope you had fun learning session with me. And I'm really looking forward for your class project and feedback. Let me know your views on my glass. So if you have any requests or suggestion about the class topics or if you want me to make more of these watch bindings, then please let me know in the discussion section below. Alright, so I will see you in my next class. Happy painting, buh-bye.
 Shanan Subhan, Watercolor/Gouache | Art Educator