Transcripts
1. Intro - Lakes with Gouache : Hello and welcome to my class
on painting legs with gosh. I am challenge
upon an artist and art educator based
in Bangalore, India. In this class, we
will learn to paint for beautiful lake paintings. Eaten every step
in the painting is simplified into easy
and actionable steps. I will be using reference image, so it will help you break down the composition and approach
it in a simpler way. It will be painting one
painting at a time. So you can make time for all the paintings in
your busy schedule. Without any further delay. Let's get started.
2. Materials: Before we start the class, let us go through
all the art supplies that we are going to
need for the class. Let us start with the papers. I'm using this Mohonk 300 GSM, a 100% cotton paper. This is a watercolor paper. I'll be using some
watercolor techniques in the wash painting. Mainly wet on wet paper
has cold press texture. Texture to the paper. You can even go with hot
press or rough paper. But with rough paper, it will be slightly difficult
to slide your brush. Next, we will talk about colors. I'll be using colors
from various brands like Art Philosophy, Bruce drew. I also have familiar for black. I'll mention all the color
names as and when we paint. And also in the beginning
of each chapter, we'll talk about brushes. I have this whole
set for gouache. It will mostly be using
this. This isn't bad. I guess I'm
pronouncing it right. Size nine, round brush. After more. Size seven. Princeton heritage
size two, round brush. And Bruce draw fine liner brush. You can use any fine liner. We will be using it to
paint the minute details. Next, I'll be using this plate
as my palette for mixing the colors o'clock napkin or tissue paper to wipe off the extra water of the
brushes after cleaning. You can also have a water spray bottle just in case you need to
rewrite the colors. Gouache paints tend to dry
up very fast while painting. It is very useful to have
a spray bottle ready. Next, we would need
masking tape to tape down the paper
on any hard selfies. We will take two
jars of clean water. One is to go the clean water for the washes are the one
to clean the brushes. So you clean the brush. It clean water from
the other judge. That way you will have clean and neat washes
in the painting. Next, we will need an old guard. Those scraped the paints for
row achieving the textures. It is okay if you
do not have this, it is an optional thing. Then we would need to upload riot to dry the wet
layers in the painting. A pencil for sketching. Yeah, that is pretty much it. We will now move on
to the next chapters.
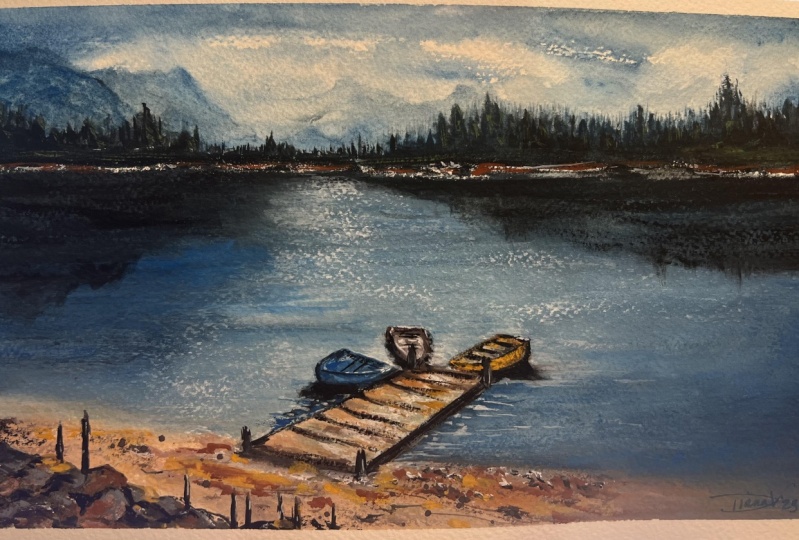
3. Project 1 - Composition: This is that a French
image of the painting. In the reference image, you need to first find
the horizon line. That will make it
easier to divide the composition and understand the subject in a simpler way. Above the horizon
line, we have Skype, distant misty layer, and
the mid ground trees. Below the horizon line is the lake shore and the
rocks, boards, etc. There are some boards
anchored to this wouldn't be a need not paint the exact same thing as
that of the reference. You can add or
subtract the elements. As for your convenience, I have changed the
color of the shore, painted only three boats, and added some
clouds in the sky. We will loop in
dengue it layer by layer using some
basic techniques. Up until sketch composition
of the painting. It also helps to understand the lighter and darker
values in the paintings. I hope you are clear
with the sketch. Now let us practice
the board. Sure.
4. Project 1 - Boats and Lake : Welcome to the first painting
project of this class. Let's start down the
paper on a hard surface. Here, I'm using a
half-inch masking tape, and I'm only taping
it down on two sides. Now we will begin
with the sketching. Let's mark the
composition center in the reference image
so that it is easier to simplify when
divided into two parts. The upper half, we have the horizon line,
leaving some space. I'm going to draw
this horizon line about this is the
sky and the trees. Below this line, we will have
the water and the ground. Next in the foreground, we have these rocks. So let us roughly
draw the outlines. Then little ahead of these
rocks we have this water line. Water touches the line. We will roughly mark
this one, our reference. Then we will draw
this urban VR or dog. I'm going to note down the
angle and replicate the same. It is somewhere
around 4045 degrees. This dark area, we
will draw some boats. These are some basic
or more chips. You can even draw some
simple board shapes. Then some vertical lines
depicting the offense. Lastly, we have some tiny
rocks on the signed. The sketch doesn't have to be exactly same as though
reference image. That is it for now. Rest of the details we
shall add as we proceed. I already have the colors
that are said Julian, blue, black, portion
blue, white. Once Yana, taco, Dumbo. So we will proceed
with the painting. I'm going with wet
on wet technique. I'm applying clean water on the upper part that is
above the horizon line. Use any larger brush
for applying water. Now I'm switching to my
size seven round brush. It also has a pointed tip, so it is easier for me
to add details as well. Persian blue, black. Mix these two colors. Now apply this wet paint
on the wet surface. This will suggest the
blue and white sky. Next we will add a tiny bit
of white to the same mixture, make an opaque paste. For the misty distant layer. I'm going to make
it a little darker. You can add black and Persian blue to increase the darkness. So I'm adding this four
distinct misty layer. Right now at this stage, the color looks
saturated and bright. But when we add darker layers
in the further stages, it IPOs Like or
dull misty layer. Just trust the process
and follow along with me. At the end, it is going
to turn out really well. Next we would need
a tissue to wipe off the excess water
off the brush. With this **** brush, we will soften the MR. Leo. We don't need to have any defined shape here
for this distant Leo. Next we'll mix Persian
blue, burnt umber, black. We're mixing these three
colors to form a darker mix. With this darker paint. We will begin the
mid ground elements. That is though trees
near the horizon. I think some vertical
brushstrokes to depict the pine trees. This size two brush, I'm adding some final
vertical brushstrokes. Resembles the
clustered pine trees. In the reference image. If you notice, there are
some white highlights. So we will replicate
the same by applying darker paint and leaving
some blank white areas. Alright, so we have painted the area above the horizon line. Now let's paint the
water below the horizon. So this is the lake water and we will follow wet
on wet technique. I'm using my large
brush to apply water, apply even coat of water
and make sure there are no extra pull up articles of
water anywhere in this area. Let's mix the color. I'm taking white, Humbert of
burnt sienna, ocean blue. I didn't brown to this mix it a little muddy in appearance. I have this lighter blue color. I'll apply this in the center area to create
the highlight in the water. We are going from light to dark. So first I'll paint
a lighter color. And then these darker colors. Like I said earlier, we are going from light to dark. Now, I'm adding
this mid-range blue around these lighter areas. Wet on wet technique. So the colors will
blend in Raleigh well, spread, applying darker
blue panes below the horizon line will not apply paints on this tiny white spaces
that we have left. This is basically the reflection
of the trees on water. Leave some gaps in between when you apply
these brushstrokes. This new topics or sense
of movement in the water. Now applying some darker paint towards the foreground area. I'm maintaining this lighter
color in the center part. This is the reflection
of the sky in the water. So currently what we are
painting is the base layer. We will add the further
details later on. Once this layer dries mixed, let us mix white months, Yana do a bit of
a yellow or blue. This should basically look
like a pale blue color. I'm going to apply
this in the form of ripples in the lighter area because I do not
want this area to be very bright and prominent. So in order to give
this moody appearance, I'm adding this color here. Next, I'm going to take a bit of burnt sienna and apply it
along the horizon line. Just some ground color. Moving on, we will paint the foreground assigned
or the shore area. So we're going to paint it in very lighter color by mixing
yellow, ocher and white. Know, in order to add
some radiation here, I'm mixing it with the
burnt sienna and black. Apply this mix
randomly so that we don't have flat appearance. Using a darker color. I'm adding some pebbles in
the same foreground area. I'm using my fingertip
to smudge the paint. All right. We will
allow the paint to dry so that we can paint
the further layers. Now that we have the base ready, let us go ahead and paint
the ripples in the water. So I'm mixing blue and black, perform darker blue color. I'm applying this
darker blue mix starting from the horizon area. I'm switching to my
size seven round brush. You can use any similar
brush for this. Apply paint, leaving
tiny gap in-between. Those are just a repulse as well as the movement in the water. We are using darker colors suggest reflection of
the trees in the water. As we approach the
foreground area, we will paint these tiny lines to show the details
in the ripples. In the district
area of the lake, we can hardly see
any movement or ripples because it is
far from the viewpoint. I'm using my size two round brush for
the tiny details here. Now for the ripples
closer to the shore, we will use a bit lighter color by mixing white to the same. I weren't painting these darker
ripples in the mid area. We will avoid that for time being your time and
slowly enjoy the process. We will paint this ripples 109. How fun painting each
and every brush stroke. So if you observe, I'm painting the
brush strokes with different sizes and trying
to connect each other. Now as we approach the mid area, which is a reflection
of the water. We will apply these tiny lines. We will paint very few
ripples in the mid area. I have mixed off in blue
with a bit of white to make lighter bluish color because it goes well with
the background. Also tried to create a transition between the
darker and the lighter color. We cannot simply jump from
darker to lighter, right? We will add some mid-range
of blue in-between. I'm going back to the
distant treeline to add some final details using
my fine liner brush. The foreground short area, we will add some tiny
pebbles using brown color. I'm also painting
some tiny rocks here. Moving on, we will be
painting this wooden. I'll paint the base layer. Also painting the board. The color of the board
depends on what you want. You can doping blue black
on any color you want. Right now I'm painting
the base layer. I'll cover the upper area, Florida the pinch to create some noise in the
foreground short area. Now for the foreground
rocky area, we will paint layer. So I'm going to either
make soft color as the base for this, we will be using the technique. So if you have watched
my previous classes, you might know how I affirm
that garden technique. I've painted these
various colors and now I'm allowing
this to dry. Meanwhile, I'll paint some other tiny details
you're in there. You need not compulsorily
follow all the steps. Right now, I'm trying to add
some texture in short area. If you wish to keep
it clean and simple. Then you can do that as well. It's totally up to you adding some texture in the foreground using
a yellow ocher. Alright, moving on, we will do the detailing work for the
Wooden and also for the board. Using one Tiana. Adding these lines here. I'll be adding these parallel
lines inside this field. Next we will take darker
blue color, paint, reflection of the
board and the water, will do it for all
the board shirt. Also apply darker Payne's
right under the wooden. We will add some ripples
around this area. Now, I'll be adding the
outlines for the board. It'll be adding some darker and lighter colors on the board will make it look more
dimensional. Sense of depth. Adding some darker colored
pebbles on the sign. Some shadows for the rocks here. We will paint the
foreground rocky area. First or wet the area
using clean water. Applied a darker color, leaving some tiny
spaces in between. Next I take this piece
of card that I have. I'm scraping the beams so that they can create
this rocket extra. It is okay if you do
not have an old card, you can leave it as it is by creating some
circular shifts. Next I'm adding some
vertical lines. Just a fence like shape. Moving on. I didn't this darker outlines
for the wooden feel, for the x and white. And we will add some
highlights on the shore area. Also adding some white
highlights on the link. I just started putting some
movement in the water. Lastly, we will add
some final details like shadows and
highlights on the board. Sure. Alright, so we are done with the painting. Let us remove the masking
tape. There you go. And this is how our
painting looks like. Let us take a moment
to appreciate the beauty that we
have created together. Blue shadow projects under
the project gallery. I would love to
see your creation.
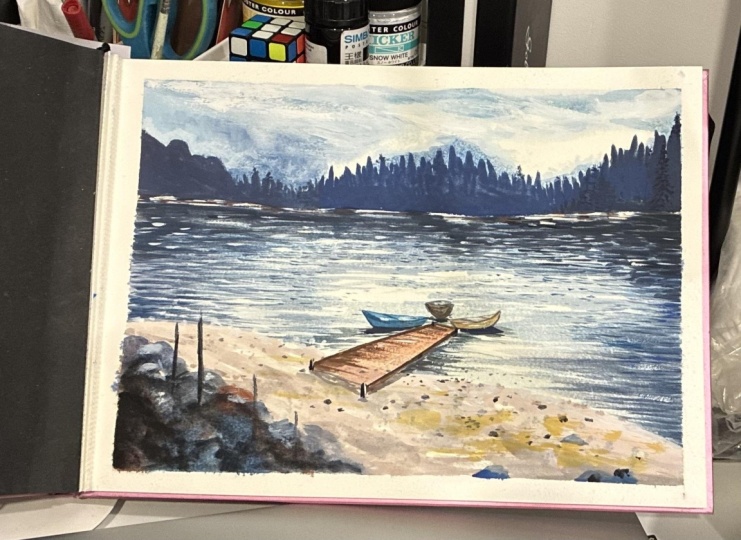
5. Project 2 - Composition: Before we begin the
second project, let us go through the
composition first, we will be learning to
create this painting today. In the composition, we have a cloudy sky. In the district. We have mountain ranges from distant area below
foreground video, and a sloping land which is covered with grasses
and it rocks. This is the lake here and
it has partly right up. So we can see the sign
Lake area in the center. The reference image, the
elements are a bit darker. Gumbert, I thought of painting it a little
lighter in color. So he odd, I have changed
the color slightly. The sites of this lake
that has some rocks and the gravels that are bluish colored or hazy
mountains in the mid ground, that is this darker
green color mountain. Now let us draw the sketch. The domain area. We have this horizon line. I bought. This is the mountains
and the sky. Below. That will be the lake, the ground, and the tree line. We will start with
the mountains. Then we will draw
the tree line from the horizon till the forebrain. So it is a continuous
regression of trees from midground
to foreground. Also marking the boundaries
of the dried part. You can add darker shade. Understand the shadows
in the painting. Alright, let us move on
to the painting project.
6. Project 2 - Mountains and Dried Lake : Welcome to the second
project of the class. Let us start by masking
tape onto the paper. We will begin with the sketching
because it is easier to understand where
the elements will be placed in the painting. Let us mark the composition. Somebody in the mid part, I'm going to draw
the horizon line. We will divide the
painting into two parts, one above and one below
the horizon line. First, I'm going to mark
the closest mountain. This is the mid ground area. We can see this darker mountain. Next we will mark the
more distant mountains. Here. How we can
distinguish these mountains is their color and their size. The upper part is for the Skype. Now moving on to the elements
below the horizon line, we have partially dry lake here. We shall mark though
dried-up area. It looks like Go
Pathway as well. It's up to your interpretation. Draw a wobbly line, slightly curved
boundaries for this lake. On the sides we have
slopey area for the trees. Now, we will just roughly
mark the composition. Then we will later add
the dimensions and the details as weeping light. So we are done with
the sketching part. Now let's move on
to the painting. Right now, grab the
colors component, gumbo, ultramarine blue. You can go with any
alternative shared. There was no competition in
using the exact same sheets. Now let us begin
with the painting. Firstly, we will apply
clean water to go with wet on wet
technique. For this guy. One advantage with gouache is that you can use it either as accurately as
watercolor for the sky. I'll be using
watercolor technique, which is wet on wet. Now let us mix this guy colors. Ultramarine, blue,
black, and white. Mix these three colors, perform unmuted or blue color. For this guy. It need not
be exact same shared. I'm not matching the colors
here because we're not creating a copy right here. I'm taking this extra
black and white. You can add a tiny bit of
brown that is burnt umber to make it a little warmer
and muted shade of blue. We have this blue color. Applying some angular strokes to depict the bluish
spot in the sky. Leave some white
areas as well for the bright white
affecting the sky. Around with colors and create
a lovely looking Skype. Use water to blend the
colors if required. Okay, so we are done
with the Skype. Moving on, we will paint
the distant mountains. We are going to use a slightly darker tone
off the sky color. Mix ultramarine, and apply the veins inside
those sketched area. Next we will paint
another mountain. Darker color. What do
I believe by mixing? Blue brown? Here we have a
slightly darker color, which he distinguishes
between two mountains. I'm adding a bit
greener as well. These are two
different mountains of white over this mountain. Kind of exchange. Some
character to the mountain. Moving on, I'll be painting the main ground on
the front mountain. So I'll add over four to make it a
little warmer in color. Applying this warmer green, I had some water to
make an diluted. We will use this
as our base color. We have Olive Green. Mountain Boys. Your. Next we will add
some darker colors. I'm mixing black,
green, and blue. Applying some angular
brushstrokes. This creates a sense of depth and makes it more dimensional. Now apply some
triangular brushstrokes, some tiny brush strokes to suggest no pine trees
on the mountain. This depicts the
cluster of pine trees applying some darker colors
on the foot of the mountain. Now I'm switching to my
size two round brush. Apply some vertical
brushstrokes. Fill in that area. This creates an impression of the tree line at the
foot of the mountain. You can use different tonal
values of green colors. Apply some tiny brush strokes on the foot of the mountain. Blended well-read
background layer. Also applied on the slope
area of the mountain. Let's Spend the ground area. Leave some tiny
spaces in-between. Those are just
reflecting what a body. Next I'll mix a
bluish green shade by taking green and
ultramarine blue. With this shared, we will
paint some pine trees. Closer to the viewpoint, IPOs and bigger in size. The size of the tree increases as we move
towards the foreground. Next I'm switching to my
size seven round brush. Next we will paint some
trees in the ground area. Let us choose foliage over here. I would go brush and create
the impression of leaves. For the lower part, I'll be mixing some
green with a low. If you absorb the
reference image. And the lower part of
these trees are darker. So we will try to create the similar impression
in the painting as well. Some black color and create the shape of the foliage
in the lower part. This could be suggested as the shadows of the
trees on itself. I'm adding some darker shades and bottom of these three line. This creates a sense of depth and dimension
in the painting. Moving on towards
the foreground, we have a slopey area. We will mix olive green shade by mixing yellow ocher
and burnt umber. We'll apply this sheet
here for the slope area. As we move closer
to the foreground, we will use much brighter shade. So I'm using for
this slope area, the area closer to
the foreground, we have brighter color, and as we move further away, the colors get darker. Next we will apply
some darker greens on this slopey area. Those are just some grasses and some texture. Those slopes. Moving on, we will paint the
area underneath this slope, eland, which is
the rocky surface. Mixed brown, less black. Apply this darker mix
for the distant land. As we approach the foreground, we will add a bit of white
color to the same mix. This makes it a
lighter grayish color. Also saved a darker color. So here we are having a combination of a
lighter and darker mix. Now going back to
the distant land, applying a darker mix, those are just the
dried-up area in the lake since it
is away from us. So we are only able to see the line as obese of
horizontals strip. Next, I'll be mixing
the color for the side. So here I have black. I'm going to add white, brown, red, some L0. This creates a new shade. Which is ideal for the
layer of the sign. Some more white to
make it lighter shade. Here I'm switching to my size seven round brush and
applying a mid-tone color. Apply the paints inside
those sketched area. Words the foreground. Let's
apply some darker color to create Apache
and Nonaka surface. When you add wet paint on wet surface will be called
as wet on wet technique. Like I said, it is not exact same copy of
the reference image. The reference image,
it is much darker, but I'm trying to keep
it lighter in color. Now we'll mix some
green and yellow ocher. Green colored. By entry. We have a bushy area
with overlapping trees. Now let's take Brown, Black. So we have a darker brown mix. Dab this makes on the left side. This suggest though
partially visible trees in the painting frame. Adding some darker
colors in-between to add a contrast
in-between the tree line. I think some darker
shade on the slope area. We had painted obese, so Leo for the rocky surface. Now we are going to
add extra to it. I'm just having some black creating an
impression of the rocks. Now this looks like
a rocky surface. Some rocks in the middle
of the lake as well. Next, I'm going to mix this
darker color with white, creating an off-white I love. I'll add this alone mix on the rocky surface to
create some highlights. Mixed, we will take a
filbert brush, size six. This is nothing but a flat
brush with rounded edges. Okay, so load some white paint that both the extra
paint from the brush. Gently apply the brushstrokes
on the mountain. This creates texture and
misty APRNs on the mountain. And for the ground mountain, we will apply some
black strokes. I add some guides and makes
it look more organic. We will do the same for
the distant mountains as well on the base level. Next, let us make a bond
on board and black, thicker can't just empty. We will perform dry
brush technique. Lord, some paints
lighted on the mid area. So you need to create
this dry texture. Cheaper tissue paper handy so that you can wipe
off the extra veins. I'm applying the paint
on the boundaries. Next I'll take a
yellow ocher, paint, some foliage in the mid
area of the tree line. Just dabbing some thick paint to create an impression
of yellow foliage. Next, I'm taking
this scarlet red, thicker paint again to create
the impression of foliage. So we're having a mix
of all these colors. We are having three foliage of various colors like yellow, red, and green, brown, etc. Along with this, I'm also adding some black
for the shadows. The paint on the
foreground as well. Also underneath
those slopey area. For the mid area of the side. I'm defining the boundaries. Also, underground. New York, no mountains. Adding some definition to
the underneath rocky area. Applying a mix of lighter
and darker colors. Using my size two round brush. Add some tiny dots. The big thing, the smaller
stones or pebbles. Further distant
area, I'm applying some vertical lines as though
trunk of the pine trees. Now in the next step, we are going to paint
the lake water. Before that, we need to
dry the existing paint. I'm using a blow dryer to
speed up the drying process. The colors have
completely dried up. Now let us move on
to paint the water. Here. I'm applying water
only on the blank areas. Paint the lake water. Be careful when you apply
water near the rocky surface. With size seven, I'm
mixing ultramarine blue and a bit of burnt sienna. Mute down the vibrancy. This diluted tone, apply
on the wet surface. Not completely fill up the area, leave some white spaces as well. We have water on what the site's dried-up
area in the center, which means that the
water has dried up and this slide is showing
up in the center. If you absorb, I'm using different tonal values
of blue and brown. At some places it is
lighter and vibrant, and some other areas it is
darker, brownish in color. This creates URL and
organic look and what? We will allow the paint to dry, that we can apply another
layer of dry paint. Moving on, we will
take filbert brush, same ultramarine blue, and add
some texture in the water. Boundaries. And some dry brush technique
in the area of the lake. This creates a texture and
rippled effect in the water. Next we will take some black
create dry brush effect. This lobby area. Here I'm mixing
some green as well. The bottom part is
usually darker. Area has a lighter highlighted. We are almost at the
end of the painting. Now we will focus on
the detailing part. Makes black, brown and white. Adding some boots
on the signed area. This creates a
noise and make sure you can use various
tonal values of gray and black rocks on the boundaries. I didn't get in
some random texture by sliding the
brush horizontally. There is no fixed button or
rule that I'm following. I'm trying to create the impression of
the reference image. Painting some rocks partially
submerged in the water. Lastly, we will paint
some birds in the sky, some distant boards
using gray color. Right? So we are done
with the painting. Now let us remove the
masking tape and reveal the final look of the
painting. There you go. This is how the painting looks. I hope you had fun
learning session with me. Who share your class project. Under the projects gallery.
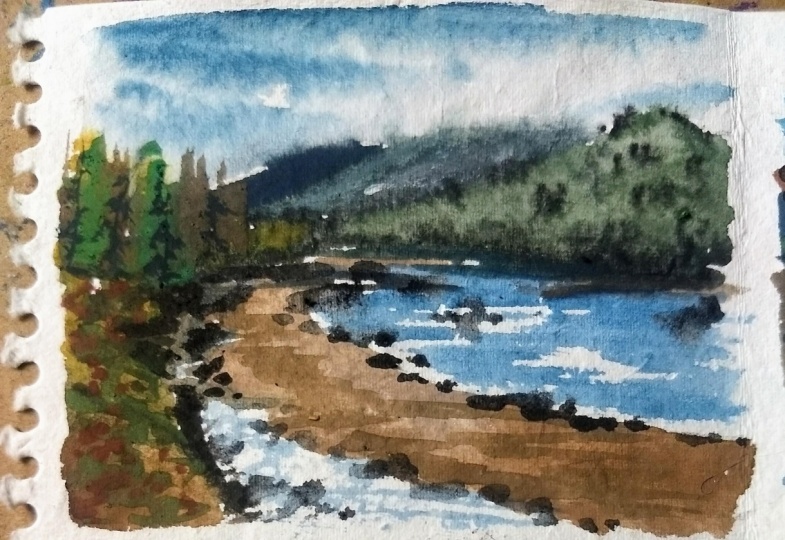
7. Project 3 - Composition: Welcome to week
three of the class. Today we will learn to
create this painting. This is the reference
image for the same. We have a cloudy sky and
the student mountain. We will learn to paint the
dimensions in the mountain. Then there is reflection of these mountains
in the Lake water. Towards the foreground we have these partially submerged
grasses and a lovely tree. Let us sketch the composition. We will draw the horizon line, then the mountains and
the reflection part. You need to understand
the darker shadows and lighter highlights
in the painting to create a nice contrast.
8. Project 3 - Lakes and Reflections: Welcome to the third
project of the class. Let us sketch the
composition of the painting. Somewhere in the center. I'm going to mark the horizon
line about the heart. We have the mountains, the mountains in the front. And then we have the
mountains in the back side. We draw this line to give
a 3D look to the mountain. Doesn't have to be exactly
same as the reference image. Next, we will draw
the reflection of the mountains in the Lake. This needs to be a mirror image of the
mountains above the horizon. Okay, So we are done
with the sketch. Now let us proceed
with the painting. For the Skype, we will go
with wet on wet technique. So I'll be applying clean water. He was in my large brush. I'm going to take ultramarine
blue, white, blue. Now let us apply this
thick mix for this guy. I'll be painting with blue. And we'll also leave some
white spaces for clouds. It is like a negative
approach where we paint outside the focal element. Next, they go round brush. So this needs to be wet. I'm applying this
clean water around the blue areas to soften
those sharp edges. Now lift some color from the other brush and add
some delicate brushstrokes. The cloud shape has
been formed here. Now let us apply blue for
the rest of the area. You'll need not create the
exact same replica of the sky. You can choose to change the colors or the
shape of the cloud. It's up to you. Now take some
concentrated shade. Overlap the paint
on the blue area. This step is to
define the clouds. The sky is done. Now let us paint the
reflection of the sky in the lake as well. I'll be going with
wet on wet technique. I'm applying clean water. Note that I'm not applying
water for the mountain area. It is just outside that area. The reflection of
the sky need not have all the details
as that of the sky. We can have a blurry
APRNs in the water. Now, I'm going back to the sky and adding
some minute details. I didn't. This will enhance
the cloudy part in the sky. Moving on, let us
paint the mountains. I'm going to take plus black. This is one color. Next we will take burnt sienna, white, a bit of yellow ocher to make
a very lighter shade. I have two sheets, your light and dark. Now, I'm going to paint the lighter highlights
in the mountain. We have lighter areas
on the right side, which means that the source of light is from the right side. Next I'm taking darker color, applying it on the other
side of this lighter area. Next we will take
these two colors. I didn't between
the lighter areas. Since this mountain
range is farther away from the ground mountain, we will painted blue in color so that it appears a little hazy. Alloca, a tiny bit of green. We'll apply this color mix
on the ground mountain. We are trying to achieve or
variation in the color mixes. Try to add various tonal values. You can add white or black to
make it lighter or darker. Next, we will mix
burnt sienna and ultramarine blue and
some white in it. So we'll mix these colors. We will apply this on the
mountain in the right. For this particular mountain, I'm adding the
lighter colors first, and then I'll add
the darker colors. The mountain to
paint need not be exactly same as mine or
the reference image. I'll be adding and
removing a lot of colors to achieve the
diamond in the mountains. You can even choose to paint a simple mountain
in the background. That's also fine. The previous layer has dried. So I'm adding the texture on the darker side
of the mountain. Next we will be
painting the bushes near the foot of the mountain. I'm mixing yellow
ocher plus green. Apply the colors along
the horizon line. Give it a shape of bushes. You can add darker shadows by adding black to the mixture. A bunch of bushes along
the horizon line. Makes with the help of a darker color and
size two round brush. I'm going to add my new
texture on the mountains. I'll just glide the brush
to achieve their texture. Similarly, we will repeat
the same on the mountain. Moving on, we've really
been better reflection of these mountains
in the Lake water. I'm applying clean water to
perform wet on wet technique. I'm wetting the entire
area below the horizon. Now we will paint
the mirror image of the mountains
in the Lake water. You need not create all
the tiny details here. We will try to create a blurry
reflection in the water. I'm adding darker colors for darker reflection
of the mountains and retaining the lighter areas for the highlights
of the mountain. Now using a fine liner brush, I will add these tiny
horizontal lines to create a sense of
movement in the water. Use lighter blue color to add
ripples in the white areas. All right, So we will allow the paint to dry using upload. The paper has dried. Next we will take a
darker green color. Increase along the horizon line. The trees that we added
earlier appears slightly. I'm going to darken. Those are trees that
we have painted. Also, we will add
these tiny dots. Those are just the
clustered pine trees. Adding another layer
of texture and among these mountains are ready. Finally, from the viewpoint, the DRI is epi, already smaller. Also adding some details
in the reflection part. This is wet on dry technique. That technique we followed for the base layer was wet on lead. Next, I'm adding
some definition to the highlight areas by adding
some yellow ocher onto it. Okay, so we will
leave it for now. Moving on, let us paint the whole ground
grasses that are partly submerged in the water. I'll be performing wet
on wet technique again. So I'll read this area
using my clean brush. Let us mix the colors
I'm going to make. So Joe Montana and white will have this
lighter, muted color. I'm going to apply this on the wet surface as
the base layer. This is going to create
a blurry effect, which is ideal for the
base layer of the grasses. The bottom area, you can
apply black or darker blown. We will apply some
simple brush strokes to create the shape
of the grasses. Adding in some darker
brown to add a sense of variation and shadows
in the grass part. I'm going to allow this
layer to dry completely. Alright, the paper has dried. Now let us add some details of the grasses using wet
on dry technique. I'm adding these
vertical lines to suggest the grasses that are partly submerged in the water. Now you can either do it with the fine liner brush
or you can choose often rush to complete this particular step with
the help of a fan brush. You can add details
like this very easily. If you do not have this brush, then it is fine. Maybe you can pause
the video and, or take your own time
to paint the glasses. Now with the help of
a fine liner brush, I'm adding these individual
vertical brushstrokes. Okay, so we will leave it, you're moving on like a spain TO or in the middle of the lake
using darker brown color. And I'm using my size
two round brush. We will start with the
trunk of the tree, then split it into two part. These two parts we will further divided into
multiple parts. Creating the branches
in the tree. You can paint. You can paint as many
branches as you want. Depending on the
branches you add, it decides the
density of the tree. Now I'm switching to my
fine liner brush and adding these very tiny tweaks at
the ends of the branches. I find it very relaxing and therapeutic to these branches. Next we are going to add very transparent leaves
on the branches here. I'm going to take a
very diluted tone. On the branches. You can see how beautiful
these leaves on the trees. Next we really dab some darker
colors as the chartreuse. Alright, so we are done
with this painting. Let us remove the masking tape and reveal the final APRNs. There you go. This is how
our painting looks like. I hope you have achieved
a similar effect. Your class projects. Under the project gallery. I would love to see your
creations from this class.
9. Project 4 - Mountains & Lakes: Let us start the fourth
project of the class. I have already gone the paper
using the masking tape. Now let us sketch the
composition of the painting. Somewhere in the mid area. I have drawn this horizon line. On the right side, there is one darker mountain
that you can see here. Towards the left that are
these mountain ranges. In the mid area. We will draw these, the student mountains
based on the colors. We can say that it is
away from the viewpoint. Towards the foreground. We have these tiny
rocks buying area. Then there's reflection of
the mountains in the Lake. That is about the sketching rest of the elements as we paint. Okay, so let's get started
with the painting. We'll start with the sky. So I'm applying clean water on the sky area to perform
wet on wet technique. Let us mix the colors. Cobalt blue, orbit
of Persian blue, and mix some white to it to make pasted or a
lighter blue color. With this color mix, we will apply some
zigzaggy brushstrokes, leave some spaces, and apply
these angular brush strokes. It doesn't have to be exactly same as the reference image. You can come up with your
own shapes and sizes. Next, I'm mixing a
bit darker shade. Applying over these blue areas. This art, a sense of
depth in the clouds. Mixed with anything
black and white. Mix it together to
achieve a gray shade. I feel the paper
has already dried. I'm applying water on the
lower part of the sky. Okay, so the sky is done. Now let us paint the
distant mountains. He order these distant
mountains will be hazy, bluish in color. We will be using lighter
bluish gray color. I'm applying a bit of
brown, but the same shared. The next conjugate of mountain mixture will mix burnt sienna and white. Apply on the next
month and year. You some white
spaces in-between. I'm trying to separate
each layer of mountain, different color that it
is easier to distinguish. The next mountain, mixing
yellow ocher and one Tiana. For the next one, we will
use a very muted color. Blue, white. My new mix, these colors, you will
get you a Walmart. For the next one, we will add a yellow ocher to the same mix. I'm filling in the blank areas
using the same color mix. Next we will paint the
mountain on the right. So I'm going to take
black plus potion blue, mix it together and apply
it on the mountain, right? I'm following wet on dry. Consistency of the
paint is ready. I just have this mountain I'm applying some tiny
brush strokes, just the unevenness area. I'm dabbing the
brush and creating these watercolor brush
strokes to create the sense of clustered
by entry effect. Next, we will move on to the
left side of the mountains. And we will create a sense of dimension and some
details in the mountains. I'm taking this bond on board and dabbing the paint
to create this texture. Next, we will take a damp brush. Glide the brush to
achieve extrude effect. This will make the
mountains look dimensional and we will avoid having
a flat appearance. Next, we will mix
blue and brown. We'll make a darker
shade and repeat the same on the next
consecutive mountain. Dab the brush to create or
whatever texture you want. Next we will mix
olive green and blue. Dab it on the next mountain. This creates the impression of the pine trees on the mountain. Moving on, we will create
some extra in for most. Next we will think black. Paint some pine trees. For most mountain that we have painted my paper around to
easily paint the pine trees. Whatever feels
comfortable for you. These tiny vertical lines will suggest though
clustered pine trees. We've also added on the
distant mountain area. Moving on, Let's paint the lake. Again. I'll be using
wet on wet technique. I'm applying clean water
using my large brush. Make sure you're applying
even coat of water. Now apply blue right
under the mountain area. Further reflection
in the right side. I'm mixing it with
the black color. Alright, now I'm painting the mirror image
of the mountains. The end result might be a
blurry, bluish reflection. So you don't have to achieve the exact same shape
of the mountains. Leave some white
spaces in-between. I'm randomly painting the
overall shape of the mountains. Him. Towards the foreground
we will add cobalt blue, suggesting the color of
the sky in the water. Let us add some shadows
underneath the mountains. I'm taking burnt umber and applying it over
the Persian blue layer. Apply horizontal brushstrokes. Achieve a sense of
movement in the water. Applying black underneath
the mountain on the right. Leave a tiny space. Next I'm going to apply burnt sienna in the
space that we had left. This will suggest
the ground area right below the mountain. Black plus abortion law. We will add the
darker reflections. Next. Let us add some definition
to the I'm using brown. These lines here. This will make the mountain
look more dimensional. I'm adding some darker color
near the horizon because I felt that area was a little
more vibrant and flat. So I'm just covering
it up with some black. You can always go
back to the opening and darker or lighter colors. On the late water. I'm adding some white to
reflect the sky colors. Moving on, we will add some more depth in
the distant mountain. My adding the shadows, 20-odd, I'm using darker color. Distant mountain. Any element for that
matter should be lighter than the background or
the foreground element. Moving on, let us paint the
pine tree in the foreground. We will first paint the
base with darker colors. This will act as
the cast shadows of the branches and the leaves. Start with the crown part. Gradually increase the width of the branches and the leaves. Your time and enjoy the process of painting these tiny leaves. There will be another Tiny Tree. Decided this fueled by entry. Once we have painted the
leaves with black color, then we will omit tone
green colored leaves. We will add another layer of
leaves using green color. Once we are done with
these two layers, we will then add the
lighter colored leaves. This point of time. It may not make
much sense to add these darker colors over
the darker mountains. But once we add the
lighter colors, you will see the difference. Next, I'm applying a lighter mix of yellow ocher and olive green. This is like a bluish green. I'm adding this as the
highlights on the pine tree. We will come back to this
again once the paint dry. I think Tom darker highlights
and shadows on the rocks. Next I'm adding some free
flying birds in the sky. I'll add some final highlights and shadows here and there. I'm going back to the mountains. I'm adding this
darker color to add a sense of separation
between these mountains. Alright, so we are done
with this painting. Let us remove the masking
tape. There you go. This is how the
painting looks like. Gorgeous, right? I hope you enjoyed creating
this painting with me. Your class projects and
the project gallery.
 Shanan Subhan, Watercolor/Gouache | Art Educator