Transcripts
1. Intro: Hi. I'm Ma Favor. I'm a surface
pattern designer and online teacher with over
100,000 students worldwide. In this class, I'm going
to teach you how to create a Halloween themed mini pattern
collection Impro crate. We will explore how
to find its ram from a specific theme and
how to work with seasonal colors to make your mini collections
look cohesive. I will guide you step by step on how to create a
pattern from scratch in Procreate and how to use
pattern layout templates to make the entire process more
fun, easy, and seamless. In this class, I'm using
my free power pack Procrate brush set featuring 20 on my favorite
procrate brushes, including two pattern
layout templates that I will show you how
to use during the lessons. Using the Power
pack is optional, but I highly recommend it
to be able to follow along and get the most out of
the learning experience. This is a fun, creative class, perfect for anyone
looking to practice designing pattern collections
around a specific theme. You will need a basic
understanding of Procreate and have created at least a few patterns before. If you never made a
pattern in Procreate, I would recommend checking
out my class on creating an editable pattern with color variations before
diving into this one. I will link to that class
in the description. And if you're eager to dive
deeper into pattern design, be sure to check out Pan
Rebels, my membership program. In Patter Rebels, you will get
access to monthly classes, design resources,
like Procrit brushes, color palettes, MCPs, and
pattern layout templates. Plus, we have monthly design challenges,
feedback sessions, and KNA opportunities,
where you can ask me anything about design or
running a creative business. You can learn more at
patter rebels.com. So with all of that said, let's get started and bring your Halloween Mini pattern
collection to life.
2. Your Project: This class project,
you will create your own Halloween themed mini pattern
collection I Procrate. Your collection will include
at least three patterns, inspired by the Halloween theme and using a seasonal palette. Feel free to use my Power
Pack Procrate brush set to make the process easier or work with
your own brushes. Once you completed
your mini collection, share your patterns in
the project gallery. I can wait to see
what you create.
3. Downloads and Resources: This class, you
will have access to my free Power pack
Procreate brush set, which includes 20 of my favorite brushes designed to streamline your pattern
making process. The set also includes two
pattern layout templates that we will use during the
class to make designing your min collections more
efficient and enjoyable. While using the Power
PAC is optional, I highly recommend it for the
best learning experience. To download the brush set, you can download the PDF from the project and
Resources section and tap the link to the
Power Pack brush set, or you can go directly
to Maver com Power PAC. Here, you will need to
sign up with your name and your e mail address
and tap download your freebie and then your freebie will be
sent to your inbox. In the PDF, you will
also find the link to download my Halloween
color palette, if you want to use the
same colors as me. And throughout the class, I'm using my Halloween
Pinterest board as inspiration. I made this board
specifically for you, my students in this class, and you can feel free to stick to just using
this premate board, or if you want to take
it a step further, you can gather more inspiration on Pinterest for yourself. The link to the
Pinterest board is also in the PDF that you can
download here in class. If you're interested in
downloading and using the Procreate mockups that I'm showing you quickly
here in this class, you can subscribe to my
Patter Rebels membership. And the All Axis
membership plan. And that will bring you these
five stunning Halloween themed procreate mockups. It's not a must at all
to use these mockups, but I just wanted
to show you them and let you know how to
get your hands on them. So these are exclusive for my Palos members in the
All Axis membership plan.
4. Finding Inspiration: The very first
thing that we will do in this class is to find inspiration for our mini
pattern collections. We are going to create
three patterns. One, a little bit more bicy, which is the hero pattern, a second one that is called
the secondary pattern, which is like medium bisi and
then the blender pattern, which is the simplest one. To find inspiration,
I am using Pinterest, and I've created a board
that's called Halloween, and you will find the link to my pinterest board
here in the class. You can use my inspiration
images that I've gathered here or you
can find your own. I usually use Pinterest, I think is the most simple
way to access inspiration. Here, what I want to decide is, what do I want my
patterns to include? What type of motifs, and also get inspiration
for the colors. In this class, I've included
downloadable color palette, so you can use the
same colors as me. But I will show
you here as well. In the next lesson, how I gather my color palette, how I find the inspiration
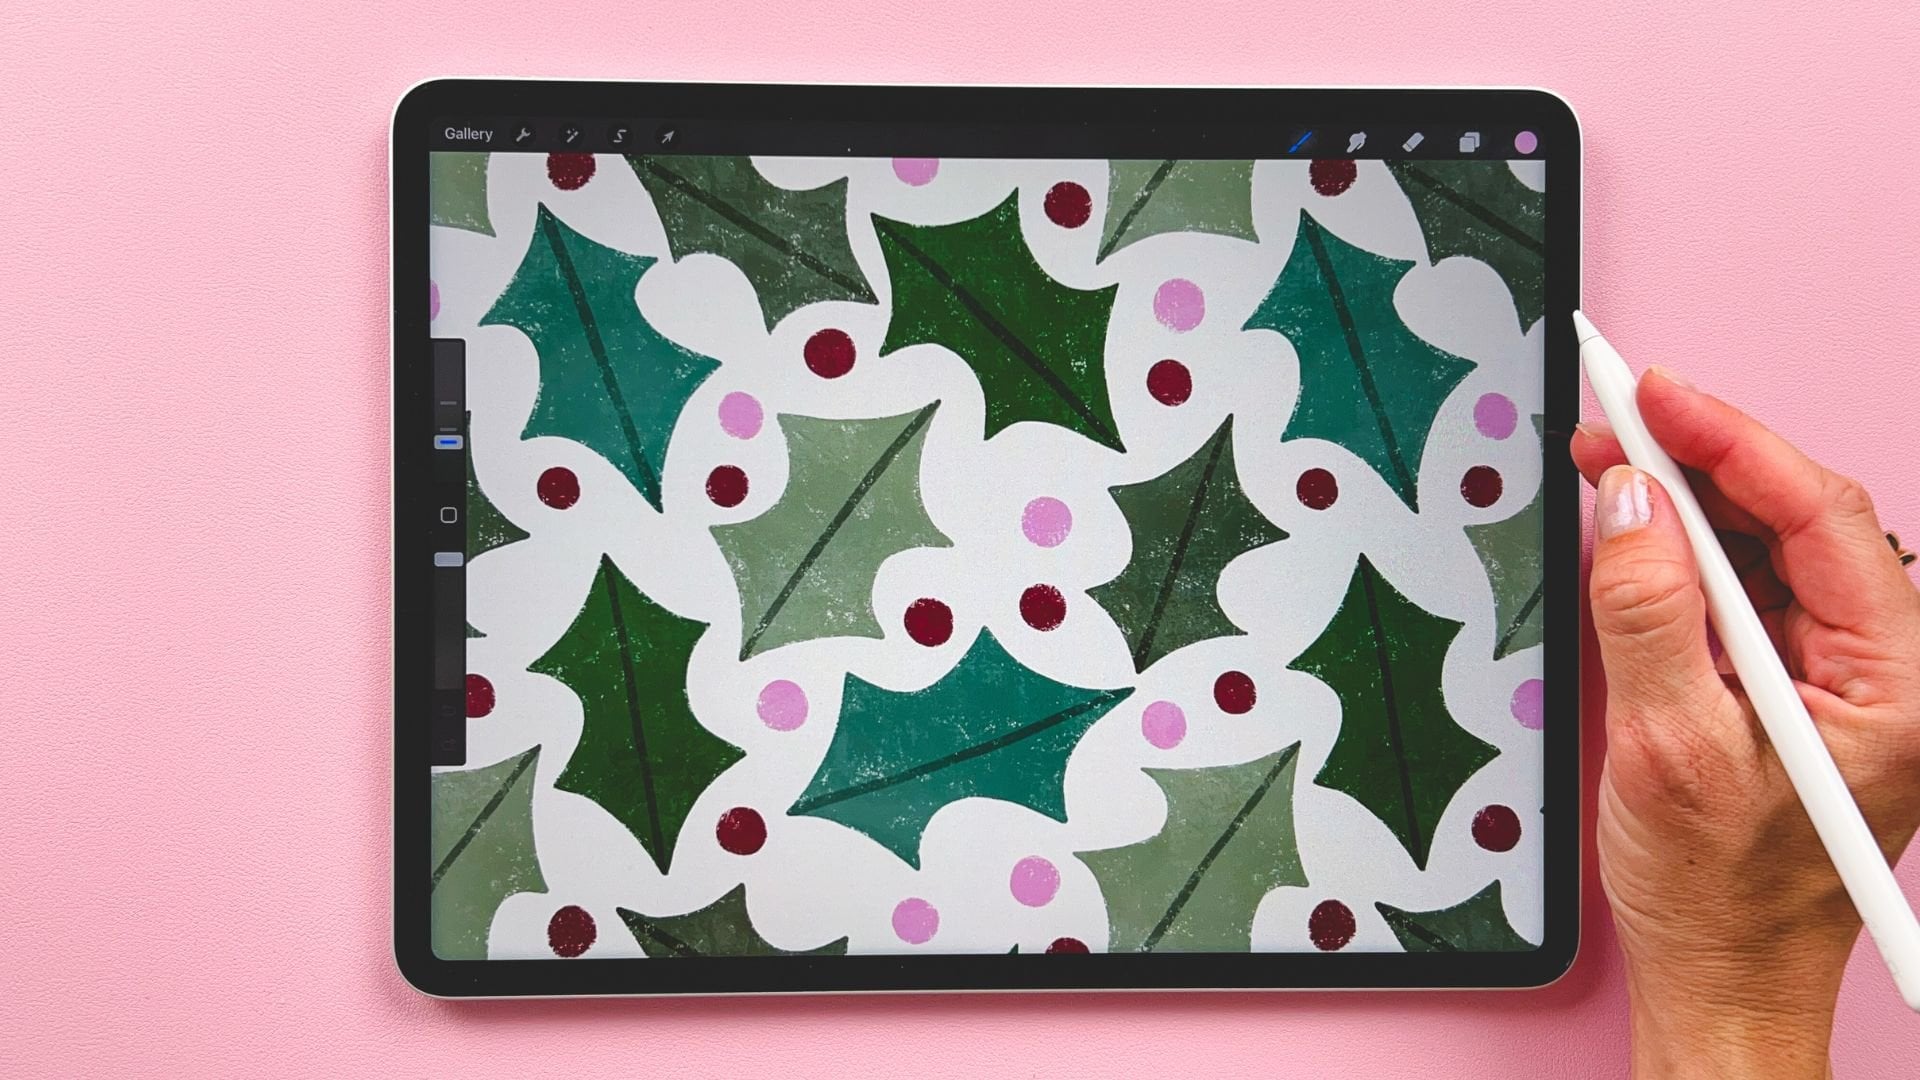
for the colors. So Halloween theme is, I would say, pretty simple, we have the pumpkins,
we have the ghost. You have the which
hats, the cats, the skeleton, the motives of
Halloween are pretty clear. You can, of course, move away from that, but
at the same time, if you want to try to excel your Halloween
pattern collections in any way or make
any money of them, people usually want
the motives that they are used to within
that holiday theme. For Halloween, You could go
for pumpkins or skeletons. You could go for
like a hero pattern with a mix of different motifs. We won't do that in this class, because I want to
show you how simple it can be to create a
minute pattern collection. So I will create one motif
in the hero pattern, but with several
different colors instead of several
different motives. And I'm going for the most simple motif that
I can think of to draw, and that is a pumpkin. There's a bunch of different
pumpkin inspirations. You have the one with
like faces, cut of faces, the one with patterns on them, and just a simple pumpkin. So I am drawing pumpkins and I want something else that is more simple for
the blender pattern. You could go for maybe
stripes with one pattern, and Then I could
go for maybe moons or stars for the blender print. So just scroll through
here and see where you can find and see what you want
to draw in your patterns, what type of motifs, but I'm going for pumpkins and
stripes and I think stars. So let's move on
to the next lesson where I will show you how I quickly sketch up the
full mini collection.
5. Sketching the Collection: So we are back in Procreate, and now we will sketch
our collection, the rough idea of
our collection. You can use any type
of canvas, any size. I am going to use, we
can create a new one. I usually just go
for a square canvas, as most of my patterns are
created in a square format, you can go for any
format that you want to, and I usually use the SRGB color profile that
is below display P three. Then I tap create and
here I have my cavas. The first thing that
I want to do is to bring up Pinterest. I will tap the three little
dots and tat split view and then tap pinterest, and I like to have that
window to the left. I will drag that to the left. And here I have the inspiration. You can choose in which
order you want to do this. I will sum out so that I can
see my full square here. And I've included a color
palette for you to use. I've taken those colors from inspirational
images like this. I will show you how to do that, but when we create this inspirational kind
of sketching board, I will use the colors in my Halloween color
palette because I've already chosen those ones. But I will show you
how I did that. So you can decide if you want to start with finding the colors. It depends on how
you like to work, or if you want to start with
sketching out your motifs. I am really color driven, so I will start with the colors. I think. You can
use any brush here. Right now, my favorites are the dry inker and
the dry acrylic, and let's just use
the dry acrylic and try out some
different colors here to get some inspiration. You can bring out the
color panel like this. What I would do then is that I would just
go for an image. I see a lot of purple and
orange, black, white. You can also go for a
pinkish color palette. There's some blues and
some greens as well, but there are a few colors that are more common
for Halloween, and I would say that orange
is definitely one of those. Then I would go to fetch a color that is similar
to what I see here. Bring up that, for example, and let's add the
colors on this side. So we'll have a larger brush, and then I can just draw some different
orange colors here. I might want to try things out and go for a
little bit darker. So like orange and brown and
a little bit lighter, oops. Then I just try things
out and see what I like. I would definitely
like some darker, almost black color, but I'm not sure that I want
completely black. I might want a softer. It might be like really
dark browns then, that might bring my
pattern a softer look. There's some pink
here. I like the pink, and I also like to go
towards the purple. Let's just try a
little bit of purple. Maybe like a dusty purple. That might look cool, and maybe a little bit like dustier, and it can go for a little bit darker, something like that. Then I would like
to go for the pink, like the pink way as well, and that seems like it's a
little bit of peachy pink. Maybe like that, and maybe ale bit more red
in that, brighter. Lighter. And I could
also go for ops. I could also go for more like pinkish pink
if I go over here. There maybe dustier. And I just try out some colors so that I get a
bunch of different colors. I might want to try out some different orange
colors as well. If I go for a little
bit more like yellow orange, Mary, brighter, maybe some kind of
cream, white dish, color, like that,
even more bright, and maybe something that
it's a little bit more red. Okay, so now I have
collected with just a few images and scrolling
through my board here. I've gathered some colors. And the next step is to
try to sketch my patterns, as I imagine that my
patterns should look. And then I can try out these
colors on the sketches. So I have my colors here. I can just rename that
layer, tap the layer, tap rename, and
rename it to color. And I can bring them down
a little bit in size, so I will tap to transform to and bring the colors
down a little bit like this so that I can draw the sketch on my
patterns over here. I have the colors in my
Halloween color palette. I will show you first how I will do when I select
colors like this, and then I will show
you which colors I will choose from my
premade palette. So now it's time to
sketch our patterns. I will sketch with. I think that I don't want to sketch with like a
pencil brush for this, but I will go ahead and use the dry acrylic to sketch
right away in color. What I could do with a
perfect pencil is just to create a square. I could draw square. That is like that, and then I can I can choose
if I want it to be perfectly square shaped by tapping and holding to
do the quick shape, or I could just go ahead and
draw a square like this. Really rough, and it really
doesn't matter because this is just me trying out my ideas. So I want three patterns. These are my three
pattern tiles. And oh, I put them
on the color layer. But that's fine. Doesn't
matter, it's just a sketch. Then I will tap the plus
to add a new layer, and now I can try to just use the dry acrylic and right
away, sketch by color. So what I would do here is to probably
choose a background. I'm thinking that this
would be my hero pattern and my secondary and
my blender print. So I would start with choosing a background
color. It could be white. But for me, personally,
Halloween is supposed to be a little
bit more color than that. So I want a different
background color. I would try to go
for the brown one. So if I would use these colors, that is how I would do it. And I would just draw
a square like this. Yes, on top of my sketch square. So maybe it's pointless to create the sketching
pencil square first, but I don't really care
because this is a sketch, and I'm just doing
it as I feel like, like how my creative
process works, and you should do what you feel like in your
creative process. So then I have a
background that is orange. Then I would go ahead and think, maybe I want my
second background to be white then or
like a cream white, and then we will go for that. You could start with
the backgrounds and see how the colors would fit in. Then I could go I could go
for a pink background maybe here. That would look good. But I'm also a
little bit curious about using a darker background like the darker brown one. And I can tap and feel
to make that color. Now I will tap into my
color palette because I have my pre made palette
that I really like to use. So I will use my
darker brown hair because I think it's even. Yeah, that's almost more black. You can see now that it
works kind of the same. Here I have my
color inspiration, and here I have my
premade color palette. You could easily
just save these to a premade color palette and then choose from these colors. Now as I have my
premade palette, I will move away from my colors that we've chosen
from the inspiration board, because I just
wanted to show you how you can choose
your own colors. And now I will use
my palette instead. I would drag this one over
here and start to use it. I could try maybe this
little brighter orange. For that background, it's a
little bit more like soft, and then I have my cream white over here, and I
will use that one. Let's try this out. I think it's easier to have the background
backgrounds on one layer. If you want to change the colors of the backgrounds later on, and then I can tap the
plast at a new layer and here I can just write
like motifs or something. So I don't care that much about separating the layers when
it comes to sketching, except having the background on one color because
that will make it easier to change the background when I sketch out my ideas. With the dry acrylic brush, I will start to sketch my ideas, and I have this idea about
pumpkins that I really want to try out and I want to just
draw a simple type of pumpkin. I don't want anything extra. I don't think that I want
any face on the pumpkin, cut out face or
something like that. But I will just try
to find a pumpkin. Here I have a pumpkin, and I can also just draw
from my imagination. I will som in on
the hero pattern, which is where I can imagine
having the pumpkins. Then I want to try
different colors. I would maybe like
a pink pumpkin. Let me just see how this. That's a pretty big brush, but I think It might work. So I'm using 7% in brush size
with a dry acrylic brush. And now I will actually just
kind of sketch my idea out. So I'm thinking that I want
pumpkins in different colors. I don't know if I
want them twisted around like a toast pattern
or in one direction, but that might just sort itself out when we are
creating the pattern later on. So Right now I'm just trying out the colors and also trying out
my idea with the pumpkins. So I might want to mix it up with like a brownish pumpkin. And I'm thinking that I want
to reuse the colors that I have a few pumpkins
of each color. Maybe let's try out this base. That didn't look That good, maybe, but it's a
little bit pale. Let's just tap and fill. Tap and drag the other beach, too that, No, that
didn't look good. Let's try out the darker
brown, and that looked good. And I will tap color drop. Okay, I really like the
combination of these and maybe these peach colors. So as I'm sketching my motives, I'm also trying out the
colors as you can see. You can change this
later on as well. Okay, so that looks good. I will actually add on top with ttes if I would like to change the color of
the pumpkins later on. With a smaller brush. I will just go down in brush
size to maybe two or 1%. I want to try to
use a darker like maybe this brown black
color and create these ops, that was really big. Details. I don't like this
brush for the details. I might just want to use the perfect pencil or
something like that from the power pack brush set and
a little bit larger in size. And yeah, that looks better. So I'm imagining
colorful pattern with some details in
black or almost black, the darkest color in
my color palette. And something like that. As you can see, it's a
really rough sketch, and the point of that is to move along to not get stuck
here in the process, but just get my ideas out so that I can start
to draw my pattern. This looks a little bit empty, and I might need let's go
for the dry acrylic again. I might need to fill the
pattern up with something. Let's try the Dry acrylic and a
larger brush size 3%. Not that pink color. Let's try the beige color. And I will just add a few like
filler elements like dots. Dots are what comes closest
to me at this moment. I will just add some
filler elements here, and that instantly made me feel like the pattern popped a little bit more, made
it more interesting. Now we have sketched
a pumpkin pattern. I'm pretty happy
with that. I think it can be really cute. And now what I want to do is I think I want to do some
stripes on this one, and stars on that one. I don't need my inspirational
mood board for that. So I would just go ahead and let's go for
the stars first. Sometimes it's easier to go for the most simple
pattern to figure out the medium complex pattern, the secondary
pattern over there. So let's go for stars. I could use the dry
acrylic again and try to have draw
stars like this. That might look good. I
could also try that color. So now I'm figuring
out the color before I decide the motif. I think I want a softer look, so maybe the soft
page or this one. I will just go ahead and
tap the selection tool and tap to drag to
select all of these, and then I will tap the
transform tool and pull them out so that I can draw my final Stormo tees and let
me just use this base color. I'm not sure if that is what
I want to use later on, but I'm thinking of, like, a more airy pattern with stars. The important thing here is
that I myself know my idea. So it's a little bit rough, maybe, but I know what
I'm thinking here, just a simple blackish pattern with simple stars
in a airy balance. Okay, so next, I want to draw this pattern and it's
supposed to be stripes. I want more colors than
in the blender print. This is the blender print,
hero print a secondary print, but I don't want as many
colors as in the hero print. I don't think at least. So let me just try things out. I think pink would look good. And here I'm just
thinking of drawing, you know, some lines. So strokes so that it's a
simple stripes pattern. Maybe some kind of
base there as well. I'm not completely sure of
which colors I want to use. I want to try out the colors. Maybe I want to tap and
fill and drag the colors. I think that looked
better, actually. I don't want too many colors, so maybe that is good for now. This is a very simple sketch over my mini pattern collection, and now we will move on
to create pattern by pattern and make them match each other while we
are creating them.
6. Make a Pattern Template: Now when we have
created our sketch, we tried out the colors. It's time to start with
creating the first pattern. You can start with any pattern
that you want to for me. In this collection,
I want to start with the hero pattern because that
feels the most fun for me. That is what I will start with. First, I will just
save this image to my camera role so that I can use it in the reference window. I will tap the actions
panel and I will tap share JPEG and save image. Then I can head back
to gallery and here I want to tap the plus
to add a new canvas. I have my pre made
canvases here, but I will create a new
one with you altogether. I usually use my
standard size is 3,000 in width and 3,000
in height and 300 DPI. Your maximum amount of
layers will be a little bit different depending
on your iPad storage. I can create as
many as 204 layers, but I don't need that many. You don't need that many either. Then I will tap color profile, and what I usually use is the first S RGB color profile underneath the display P three. Then I tap create.
The very first thing that we will do in this
class is to create a pattern template that we can
reuse over and over again, and I will show you
how to do that. So I will tap into
the layers panel. I can take my pre made color palette or any
color that you want to. And then I will
just tap the layer, and with a color selected, any type of color, you
will just tap fill layer, then you'll tap plus in the layers panel,
tad a new layer. I usually choose another color. It's not a must, but it's easier to keep track
of your layers. If you choose different colors, and then I will tap
plus again to add a new layer and a different
color fill layer. Tap the plast that new layer and a different
color and fill layer. Now we have four layers
with different colors. The colors are just to
keep track of the layers. Then I will shut
down my color panel, and I can tap the first layer, tap the transform tool, and then I will tap in
the top left corner node. Make sure that I have the
chain symbol tapped in, and I will type in one and 500. That will bring me half of
the size of the Canvas, and my first square will be placed at the very
top left corner. Then I will tap the next layer, I will tap the transform tool and tap the top
right corner node, the little blue point there. Make sure I have
the chain symbol tapped in and type in 1,500. Then I will tap the next layer. I might need to sum out a bit. Here, it's really important
that you don't move your screen like
notch your screen because then you will mess
up this pattern template. You can start sued out. Maybe that's better,
so you don't need to move your layers. Then I will tap in the
bottom left corner node. Make sure I have
the chain symbol tapped in and type in 1,500. Then I will tap the next layer, tap the transform tool, tap in the bottom
right quarter node, and type in 1,500. Now I have four smaller squares, and they are perfectly placed
to the edges of the Canvas. There's no gaps in between. What I do next is that I tap
any layer that you want to, but I will start
with the top here, and then I will tap
select that layer. I will tap Save and
load and the plus, and I have saved this
selection to selection one. I will tap the
layers panel again, the next layer beneath, select that layer,
save and load, tap to plus, and you have saved this square
as selection two. I'll tap the next layer, select, save and load, tap to plus, and you
have selection three. The next layer, select, save load, tap to plus, and now you have selection four. Now I have actually saved
all of these four layers. In different selections. I don't need these anymore, but if you want to, you can
just merge them together, and you can use this as your
pattern template guide file, which will make all
of your patterns perfect without any white
lines in the future. Just a little note here. If you would get white lines, I would highly
recommend to check out my class about leveling up your pattern
design in Procreate, because I have a lot of
tips and tricks there about not getting white lines in your patterns in Procreate. Now we have created
the pattern template, and I will just tap gallery. You can rename this
to pattern template. We can use this for all of
the patterns in this class.
7. Hero Pattern Sketching: It's time to create
our first pattern, and I will start with
the pumpkin pattern. First, I will just select
the pattern template that we created in the last lesson
in the previous lesson. If you skip that lesson, make sure to move back to that one because
otherwise you won't be able to follow along when we create the actually
repeated pattern. I'll tap and select the pattern template and
then I will tap duplicate, and I will tap in 21 of these. I will always say
one as the original. I can just rename this
to Pumpkin pattern, for example, and then
I will tap in to that. I can delete this first layer, swipe the right on that
one and tap clear. Now I can start to
sketch my hero pattern, which is the busiest pattern
in our mini collection, the one with the pumpkins. So the way that we will
create this pattern, I will just drag out my color panel here
here because I think it's convenient to have it on my Canvas or on
my artboard here. What I want to do to
create this pattern is to use a pattern layout,
which is super fun. If you never created a pattern with a
pattern layout before, I really recommend to do it, and you can just follow my lead. I have two pattern layouts here. It's stamp brushes in
Procreate that I've created, and it's the bold flowers
and the toast rectangles. These ones are for free
in the Power Pack. If you're interested in
getting more pattern layouts, I have my pattern toolkit, which includes 25 pan layouts, and also in my membership, Pan bles you will get one new panel layout
template every month. So you can check that
out. You'll find all of the links to
that hearing class. But now let's get
started with this, and what I want to
do is that I want to use the bold flowers
pattern layouts. That's at the bottom
here in the power pack. You can use any color. I usually go for black when
I create the layout layers, and I choose black and I
usually go for around 60%. So that way, you will be able to place
the pattern layout. On your Canvas, and it won't
be falling off that ed. Because if it's falling off the edge like this,
it won't work. So you will just want
to place it within your Canvas with one
stamp like that, and then you will tap
the transform tool and tap it to Canvas. Tap your layers panel, you can tap layer one and
rename that to layout. Now we know that we have
our layout on this layer. The next thing that I want
to do before I sketch my pattern is to tap
the n on that layer. I will drag down my opacity. I usually go for around 15%
to be able to draw on top, but still that you
can see it on screen. But you can go even
lower, of course. It's just hard for you
to see it on screen if I go lower than around 15 or 20%. That is the layout layer, and now it's time
to start to sketch our hero pattern,
our pumpkin pattern. What I do then is to tap the
plus to add a new layer, and now I will just rename
this to sketch right away. To be honest, when I'm creating my own patterns for myself, I don't usually name all of
the layers all of the time. It's mostly when I need to
know when I need to keep track of where the different
things are in my design. But when I create classes, I usually name the layers, so that you will be
able to follow along, so don't feel forced to name the layers if you
don't feel like it. But I am on the sketch layer. And here, I will use. Let's just use another color. I will use this darker
brown color to sketch with. And in the power pack, I have a sketch pencil that's called perfect
pencil that I really like. So I will use that one.
And let's see which size. I want a rather big size here because I'm creating
like a bowler sketch. So I think that I want
around 20 or 30%. I have 29% now. Let's
just try that out. The next thing that we can
do now is to bring out our sketch where we created
our mini collections. I will tap the actions
panel tap Canvas, tap reference,
image, import image, and I will tap my sketch. I have my color palette. If you downloaded
my color palette, you have the same as me, but you can also use your own, of course, and then I
have my reference here. I will zoom in on
my pumpkin pattern. It won't look exactly like this and that's completely fine. It's just a reference, just to get my ideas down
that I did this rough sketch, and now I want to create
actual pattern on this cavas. What I do then is to
sketch out the pumpkins. And for this pan layout, it's made from the beginning. It's called bold flowers. From the beginning, it's
made so that you will create a flower and leaves
on these lines. You can create all sorts of flowers and all sorts
of leaves, of course. But you can also use this
layout for any type of motif, and the point of it is that if you follow the layout
approximately, you don't need to
follow it completely, but if you follow it as a guide, you will get a well
balanced and really, really nice looking pattern. Okay. Let's get started. I will sketch my pumpkins. I think that I want them
can in one direction, but they can be a
little bit tilted, just like they are here. I will start with just drawing
a pumpkin in one of these. I'm not going to use the lines
to create leaves on those. I will probably go
I want to go rather big in the circles here. Something like that, maybe. This is also a rough sketch. I'm just trying things out and seeing what shape of
the pumpkins that I want. We might need to move around some of the
pumpkins later on because it's just to guide
the pattern layouts. It's not your finished design and the finished placement
of your elements, but it will go much quicker
when we have a guy like this. As you can see, I'm
just moving through and creating different sizes
of pumpkins like this. As you can see, there are different numbers on the layout, which means that it's supposed to be so that you could copy
this motive on this one, and then you will get a
nice flow in the pattern. You could choose to
copy the full motif. In that case, I would recommend to draw the
biggest one first, and then you can copy that one and make it smaller
because we don't want to enlarge our drawings that much in procreate because
then we lose resolution. But you could also
use this layout. As we will do now, we
will draw each motive. By itself separately. So each pumpkin will be separate and different from each other a little
bit different. It's still the same
kind of feeling. But I will reuse the colors. So at the one placement of the pumpkin, I
will use one color. Let's say the darker brown, and then I will use
the darker brown in the one placement
up here as well. Okay, let's just continue. I'm drawing the pumpkins. I don't know what happened
with the opacity there. I want 100% opacity. I'm drawing the pumpkins
that are within the canvas. Not the ones that are cut off. We need to flip the pattern
around to draw those ones. Like this, and then we have
one smaller over here. I have some dots there, but I won't draw in the
dots in the sketch. The dots are filler elements, and I would use those
to fill in empty space. I can already see
that this might be an issue here that I have
so much empty space, and I might want to
move that pumpkin. But I will create a full sketch and then check out
my patent sketch, the full patent sketch before I choose to
move any motifs. The next thing that we
will do is to add a layer. I will tap the plus
in the layers panel, tap the layer, tap, rename, and rename this to background, and then I will tap and drag
it beneath my layout layer. This background is orange, but in the sketch, I will just use a white color. You can use the cream white in the color palette or
just a white color. And I will tap the layer
and tap feel layer. The important thing is
that it's just a sketch, and I want the
light background to be able to see everything
in the sketch easily. The next step is to swipe to the right on all of these
layers and tap group. Then I want to select
the full group. I will tap the group,
tap the selections tool. If you get an error message that looks like this or
something similar, you will just tap cancel, and then you need to move
back into your layers panel, tap one of the layers, tap the selection
tool and make sure that you don't have
color fill checked in. It's also good to have
free hand checked in. So no color fill but free hand, and then you should be able
to select a full group. If you still can
select the full group, you will just swipe to
the right on all of the layers in the group and
tap the selections tool, and that works exactly the same. But we will tap the group, tap the selections tool. Then I will tap Save and load, and as you remember, we saved four
different selections, four different squares
in our last lesson. What I will do is just to tap, you can tap any of them. You don't need to
start with one. I will just do that now. But you can start with
the number four as well, but I will start
with number one. Then I will tap the
transform tool, I will tap flip vertical
and flip horizontal. Doesn't matter in
which order you flip horizontal or vertical, just one time on each. Then I can tap the
selections tool to deselect. I will tap it again to select, save and load selection two. Tap to transform to flip
vertical and flip persontal. Then I will tap the selection
tool again to deselect and tap the selections to save
and load selection three, tap to transform to flip
vertical and flip persontal. Then I will tap this selection
tool to deselect and tap it again to select Save
and load selection four, tap the transform to, flip
vertical and flip persontal. Then I want to get my pattern in the same direction
as I drew it in. You can flip the Canvas, but I usually tap
the transform to and tap rotate 45
degrees four times, which will get me back in
my original direction. The next thing that I want to do is to tap the sketch layer. Use the same color, which one did I sketch
with, this brown. And with a perfect pencil, I will draw this pumpkin. Like that. Then I have
one more over here. Let me just flip the cavas
again and this time, I will tap the group, tap this selections tool, and now I can tap let's just tap selection
four this time. I will tap the transform tool. Now, I just want to
flip in the edges. I will tap the transform
to just flip horizontal. Tap this selections tool. To deselect, tap it
again to select, selection three, tap the transform tool
and Flate parsontal. Tap the selection
tool again to de select and tap it to select. Selection two, tap the
transform tool, flap prizontal, tap the selection tool to deselect and tap the
transform tool again, or selection tool again
to select, Save and load, selection one, tap the
transform to the flp persontal. Then I can tap the
transform tool again and Flate pazontal, to get it back in the
original direction. Then I will tap
the sketch layer, my perfect pencil, and here I
will draw the last pumpkin. Okay, so now this is finished, the sketch, and I
want to try it out. So what I would do then is
to tap the layers panel, turn off the layout layer. And I can swipe down with
three fingers tap copy all, swipe down with three
fingers tap paste, and here I have a
flattened image. You can try out the
pattern in Procreate, which I can show
you in a minute. But I also wanted to show you the pattern tester
on my website, which is a free tool. It's my fffab.com
slash Pattern tester. And you can tap and drag your flattened image
into the patent tester, swipe away procreate, and here you can see how your
pattern is repeated. As far as I can see, we only have one issue and it's this little part here because everything else looks
pretty balanced. So what I would do is to just make sure that we
don't have that much space, or actually, we have
a little bit space there and a little
bit space there. So I would just hit
back into Procreate. And if you want to try it
out in Procreate instead, I would swipe the
right to duplicate this layer so that
I have four copies, and then I will
tap the transform, tap in the top left corner node, type in 1500 pixels. And tap the next layer, tap in the top
right corner node, and type in 1,500 pixels. Then I will tap the next layer, tap in the bottom
left corner node, swim out a bit, which is here, type in 1,500 pixels. And then I will tap
the next layer, tap in the bottom right corner
node, and 1,500 pixels. And here you have your pattern repeated in Procreate as well. So here we can also
see that we have, let's just create
a new layer that I can draw on or I can
just draw on this one to show you We have a little
bit of issue over here, is too much space, and
that's that one as well, and then we have a little
bit too much space here. So just move the pumpkins
around in the sketch. So delete that layer. This one was a pretty easy one to see here in the pattern. I will tap the sketch layer, tap the selection tool, and I will just
move the selection around one of the pumpkins
that have a lot of space, and then I will tap
the transform tool, make sure that I don't
have snapping and magnetics turned on
here in the settings. Then I can just move
it a little bit. As you can see, it already
looks more balanced. That was one of them, and where
do we have the other one? It feels like it might
be over here somewhere. I might need to flip
the pattern around. But first, I will tap
this selection tool and I can actually go in
and select some of these pumpkins and maybe I just want to twist them
a little bit because I see that many of them are in the exactly
the same direction. I could just select them, tap the transform tool, and rotate them a little to make the pattern a little bit more fun and a
little bit more dynamic. I think that Let's see. Here we have a lot of space. I'm not sure if I can just move that down if that will
solve the full problem, but let's just do it. We will see what happens. I'm moving that one down. I might twist it a little bit, and now we have a little
better space in between there. So Let's just try out the
pattern again quickly, so I will swipe down
with three fingers, tap copy all, swipe down with three
fingers and tap paste, tap three letter dots, split view, tap Safari, and then I would tap and
drag my new flatten image. This looks much better to me. I still have a little
bit of space over here. I might want to flip the pattern around a little bit
to be able to move this large pumpkin this way and maybe this
small pumpkin upwards. L et's do that. And what I do then is just to delete the flatten image,
tap the group again. So, this is a little bit
of work as you feel, probably feel when you do this. But if you get the sketch right, your pattern will be
right from the start. So it's easier to get a
good sketch from the start, and then the pattern will
just fall into place. I'll tap the group, tap the selections tool,
save and load, selection four, tap
the transform tool, flip vert coun fl persontal. Tap the selection tool to deselect and tap it
again to select, save and load selection three, tap the transform to flip
vertical fl horizontal. Then I'll tap the
selection tool to deselect and tap it again
to select selection two, tap to transform to flip
vertcn fl persontal. Tap the selections tool
again to select it. Tap save and load,
selection one, tap the transform tool
flip compli person tool. Then I will tap the
transform tool and tap rotate 45
degrees four times. Here we can see if I
can move my pumpkin. It's this space over here, so I can actually
probably move that one. I will select around this
one and move it up here. I can rotate it a little
bit if I want to, and that might just be enough. I could also move
this smaller one, a little bit upwards, like that, and then you can move
them around until you feel that it probably
looks balanced and good. Okay, I'm feeling that
I'm happy with this. It depends on how you want
your pattern to look, more symmetrical or
more like imperfect. I'm moving that one up there as well and twisting it around. Now I feel that I'm happy
with this sketch and it's time to move on to
make the actual pattern.
8. Hero Pattern: Make the Pattern: We are finished with our
sketch of the pumpkin pattern, and now it's time to draw the actual pattern to make
it a finished pattern. So we have our sketch here, and the first thing
that I will do is just to tap the
on the sketch layer, and I will drag down the
opacity so that I can draw on top of my sketch. So I have the opacity
to around 14%. The next thing that I
will do is to change the color of the background
because now I want the orange color
of the background so that I can choose the
colors of the pumpkins. So I would go for this orange. I'll try that out. Remember, you can always change
colors later on. So you can just try
it out and see if you like what I planned over here or what you planned
in your paa sketch, or if you want to change something later on
with the colors. I'll tap the layer
when I selected a color and tap f layer. And now I have my
orange background and I have my sketch
layer on top. The layout layer
is here as well. As you can see,
I've moved around some pumpkins to make
the pattern balanced. And that is exactly how we
are using pattern layouts. We use the mas gits and
depending on the motives that we're drawing and
how our pattern looks. We might need to change a
little bit with the balance, moving our motives around, but at the same time, it's much quicker to
start with a layout. Okay. But now we don't
need a layout anymore, so we'll just uncheck
the visibility of that. Then I have my group
here, within my group, and I can choose
if I want to draw beneath or on top
of my sketch layer. For this pattern, I will draw
on top of my sketch layers. I will tap the plus tatnu layer, and here I want to use
one layer per color. So let's start with one
color of the pumpkins. We could, for example, start with let's choose a color. We could start with the More
orange color or the brown. Let's call that layer. Should we call it
orange, dark orange. We can call it. Or whatever. But I'm just
separating the colors in layers now when
we start to draw, so we have the dark orange. Now what we want to use
the layout layer for is to understand which of the pumpkins will be
in the same color. But for now, we're just
using one of them, or we're just starting
with one of them. So I'm starting with this one. It's named number five, and then I can see quickly that the one at the edge is
also named number five. This one and this
one will be the same color, the dark orange. I'll turn off the
layout layer again, but we will tap on and off this while we choose the
colors of the pumpkins. I will draw with the
dry inchor for this. I really like the texture of
that brush at the moment. I have my favorite brushes
in different moments, different patterns,
different periods. Right now, I really
like the dry inchor. So I'm using the dark
orange and the dry inker. And now it's time to
draw the pumpkins. So I want 100% in opacity, and let's just try out our size. So let's try 5%. This was the number five oops. I'm on the wrong layer. I guess, no, I have
the wrong color. I want a dark orange, and that is too small
brush for my preference. So around 20%, and
that's much better. I like this like chunky
look of the pumpkins. So I want to draw them
in larger brush size. So then I know that this and this is supposed
to be dark orange. What I will do first is to
create the different colors. So here you can see I have
number two, number two. So these two are supposed
to be in the same color. Then I have one, one, and three, and maybe there is number three. But let's just start
with the one over there. So we could go for let's
try out this peachy color, and I will add a new layer in the layers panel and
rename that to Peach. And with the dry inchor, I said, I want to do it
number one to be peach. So just turn off the
visibility of a layered layer. And then I will draw
the number one here. Impeach. As you can see, it's
this really nice texture of this brush that I love. So you can choose like the
shape you want of the pumpkin. Maybe you want more
square or more round. You can do as you wish here. So turn on the
layout layer again, and that was number one. So you can om out a bit and
see that that was number one. So we will wait
with that. So let's move on to number two. And number two could be
let's do it the brown. The brown. We only
have one brown. Yeah. Brown. I'm thinking
this brown maybe or that one. Maybe this one. I had the
really dark one there, but I'm not sure
if that will make too much contrast towards
the other colors. Let's just use that and we
had the layout two and two. These two are
supposed to be brown. I will draw those on the
brown layers, in a bit. I'm a fast drawer
and a fast creator, but you can of course create a complicated patterns as you wish and be as
detailed as you wish here. It's all a matter of your style. I really like the
simple style and I really enjoy to
create a fast pace. Then I have two of
the brown ones and I have one over here that
isn't cut off from the edge. Let me just check the number
of that one is number three. We do have number five, Let me just tap and drag the layout above
everything else. This one will be number five, and let's zoom out. That one will be three.
And here's a four. We only have 14, I think.
We have two number three. Let's add a new layer
on top of the brown, turn off the visibility
of the layout layer, and here I will use pink. So I am going for this
like, medium colored pink. And with the dry anchor, ooming in, what was the name of the three
and three? Yeah, there. So I would do this
pumpkin now, like that. Maybe a little bit more
in this direction. I really really enjoy the
texture of this brush. And then that one was
number three, the pink one. So now I've drawn all of these. And what I would
do now is to add the little things there,
what's it called? No, these parts and these parts. I'm not sure if I want the lines on the pumpkins to be black, but or almost black
like the dark brownish. But I will try to
do these ones in black. Now you have a choice. You can choose to create one of these parts for each pumpkin on a separate layer or
all of them on one layer. To save layers here, I don't need to save
layers on my iPad, but if you need to save layers, I will try to as
much as possible, keep the same colors
on the same layers. If you don't need
to save layers, it might be simpler to move around umatves, if
you need to do that, if you draw all of
the parts that are supposed to be for one pumpkin on a separate layer and
then group them together. But I will do it like
this because I want to show you how I would do
if I want to save layers. So I'll tap the
plast at aw layer, and I will rename this to. It's not black, but
I will write black, and it's this dark brown. I will try that one. And now, I can choose if I want
to use the same brush. Let's try that out and maybe
below all of the pumpkins. Let's try that out, and we can draw like a boxy
shape like that. Maybe take down the brush size. I have 5% now so that I can get a little bit of
more boxy shapes. Yes, I think that that
might look really nice. So I'm just drawing all
of these black parts. And if you are annoyed by the black parts
shining through, especially on the
lighter colors. You could just choose
the eraser tool, the power pack, and for
example, the monoline brush, and then you could
go in and erase what's below here so that
it's not shining through. Oops. So that's a little
detailed choice to make, but as the what's it called the brush that
we're using the dry inker, as it's a little
bit see through. It might look better if we erase the black parts beneath
the colored layers. I'm doing this quickly. You can do it more
detail if you want to. I just wanted to show
you how to do that. So I think we've done that
on all of the pumpkins now. And now it's time to
add other details. Let's start with the pink layer. I will tap the plaster
add a new layer, and I will rename this to text. And then I can just swipe it right on those and tap group, and then I can rename
the group to pink. Pink. So I know it's the pink pumpkin. On the text layer or what
you want to call it, I would go for the darker
color of the pink, and I'm on top of the pink
pumpkin, so it's this one. And then I would draw some lines. On this one. This is the look that I'm after. Now I will do that
on all of these. I will tap the brown
layer, tap the plus. I will tap rename texture, swipe to the right on
both of those tap group, and rename the group to brown. On the texture layer, I will go for which brown
did I had that one? I will try this this one, a little bit darker
with a perfect pencil, and it's on these ones, and that looks great
with the color. Now we'll just add some lines. To add a little bit more
interest to the pattern. And something more happening. I want this kind of hand drawn and a little
bit more rough look, so I do these lines
rather quickly. Next, I will tap
the peach layer, tap the plus to the new
layer, rename to take, and then I will swipe the
right on both of those, tap group, tap the group, rename, and right pitch. Then I will tap
the texture layer and choose the
darker peach color. Then I would just
draw these lines. Then we have one left, tap the dark orange layer, tap the plasta that in your
layer, renamed to texture, swipe the right on both
layers, tap the group, rename the dark orange, and on the texture layer, I have that one, so I might
work good with that one. Then I would add those details. So what I meant previously
with if you want to add the black parts
with these groups, it might be easier to
move around the pumpkins, because if I would
tap this group now and tap the transform to, I would just move around
this and not the black part. If I would want to
add the black parts, let's just turn off the visibility of that layer
and tap the text layer, tap the plus, I could just add that I'm on the dark orange within the group on
a separate layer. Beneath orange and
within the group. And here you could move
your whole pumpkin. But as I wanted to show you how to save layers, I
will delete that one, turn on the black
layer and keep all of my black parts or very dark
brown parts on my layer. Okay, now we've finished
this part of the pattern, and it's time to flip it around. I'll tap the whole
group up here, and I will tap the
transformed tool. Order selection tool,
and then I will tap Save and load
selection four, tap the transform tool, flip vertical, flip persontal. I will tap the selection tool to deselect and tap it
again to select, tap selection three
and save load, tap the transform tool, flip vertical flip persontal. Then I will tap this selection
tool to deselect and tap it again to select
Save load selection two. Tap to transform to flip
vertical and flip pizontal. Tap the selection tool to
deselect and tap selection one, tap to transform to flip vert
to go and flo prisontal. Then I will tap the transform
tool and rotate 45 degrees four times so that I get the pattern in the same
direction as I drew it in. Then I will move ahead and
turn on the layout layer because now I want to know which pumpkins are supposed
to be in the same color. I instantly see here that the number three
is here, the pink. I will start on the
pink layer there, turn off the visibility
of the layout layer and I know that this pumpkin
is supposed to be pink. I want to draw it
with the dry inker, choose the same pink, and so in a little bit. I could save this.
Did I need that? Yeah, maybe. I could save that. I think I draw it with
20%, and then I will draw. That pink pumpkin and fill it in with this Awesome
textured brush. Okay. So then I can just
move along on the layout. Number five is supposed
to be the dark orange. I'll tap the dark orange layer. Number five, tap dark orange, can turn off the layout
layer if it's in the way. Then I will draw
the dark orange. Here. Next, turn on the layout. I have O number one,
which is the peach. Turn off the layout again, open up the peach group, tap the peach layer,
use the peach color, and it was that one was knits. Yeah, it's cut off, so I need to flip the
pattern a little bit. I won't do the peach, actually. I want to do the number four, and we don't have a number four, so I will tap beneath the layout layer on
top of the pink layer, tap the plus a new layer. And here I will go for another
color, maybe like Base. Maybe this medium one. So there's only one
of the number four, can turn off the layout layer, and draw the Big pumpkin. I didn't like the angle of that, so my draw it like this instead. Okay, so I'm happy with that. I can tap to add a new layer on top and rename that
layer to texture. And then I can use the
darker beige color, the perfect pencil, and add the texture here, the little lines. Like that. Swipe it right on both
of those, tap group, rename the group to page ops. Oops. Rename the group to page. Then I would move ahead and go to the next
texture layer, maybe. We could go to the
pink texture layer. Use the pink brush. It's over here. I
could add the lines. Like that, next texture layer, the brown already
have texture in both, the pitch so we wit with
and the dark orange. And the texture with that brown and just ops
it's the wrong color. With that brown, am I
on the right layer? Yeah. And then I would add. The texture like that. Then I
will go to the black layer, tap the dark brown. And for this, I used
the dry inker with a smaller brush and add
these little black parts, or did I use the
dry, I think I did. I don't remember,
but I think I did. Yeah. And add the black parts. Again, if you feel
the need to erase a little bit beneath
the texture here. Beneath the layer with
the color of the pumpkin. You can erase a
little bit so that the black part doesn't
shine through. So now we need to flip
the pattern around one more time to
get this pumpkin. I will tap the group,
tap the selection tool, sad, selection four,
and now I want to flip only the right
and left edges in. I will tap selection four, tap the transform to, flip pal. Tap the selection
tool to deselect, tap the selection tool again to select Save and
load selection three, tap the transform tool
and flip persontal. Tap the selection tool again and select Save and
load selection two, tap to transform tool
and flip persontal. Tap the selection
tool to deselect and tap it again to
select Save and load, selection one, tap to transform
tool and flip persontal. Now it's a little
bit flipped around. I will tap the transform
tool and tap flip prisontal so that I get it in the right
direction as I draw it in. I will turn on the layout layer and see which color
was number one. It was this peach color. So then I will go to
the peach layer with the peach color
and the dry inker, and then turn off the visibility
of the layout layer and draw my pumpkin with
a larger brush. Maybe like hoops. Doing it again until I'm happy. This looks pretty good to me, and then adding the
detail with the texture and the perfect pencil
on the texture layer. And then adding the black on the black layer with the d.
Oops, and a smaller brush. And erasing the extra parts. Then I can turn off
the sketch layer and have a look at my pattern.
9. Hero Pattern: Add Details: Now we are all good
with the pumpkins. What I want to do now is to
add the little Beige dots. I will tap the layers panel, and I will just
tap on top here in my layers and tap the plus, and I will write dots and use this base color
with the dry inker. And I can see what size I want. I think I want
around there, 20%. Then I will just add some
dots here and there. I'm calling these
filler elements, just to can I fill the
pattern with something else. Add something more.
That's interesting. So I can add them like
in groups of three, maybe two here and there. Maybe one. On some
places, in some places. Two. One, you can decide how are you want it to be or
how dense you wanted to be, where you want to
place these dots. That is good, I think, and then I want to flip
the pattern around one more time to
make sure that I don't have any empty spaces. I will tap the group, tap the selection to save and
load, selection four. Tap to transform two flip
word column flip persontal. Tap the selections tool again to deselect, and tap save and load, selection three,
tap to transform to flip word, column
flip persontal. Then tap the selections tool
to deselect, tap it again. Save and load selection two, tap to transform to
flip articul pzontal, tap the selection tool to
deselect, and tap it again. Save and load, selection one, tap to transform to flip
articulm fprizontal. Then I will tap the
transform tool to select my whole pattern and rotate
45 degrees four times. And now I am finished
with the pattern, and it's time to
test the pattern.
10. Hero Pattern: Test the Pattern: Time to try out our pattern. I will swipe down three
fingers, tap copy all, and we just tap on top
on my layers panel so that my pasted layer
will be on top here, and then I will swipe down
three fingers, tap paste. Here I have a flatten image. The way that I usually
test my panels is in the patent tester
on my websites. I will tap into Safari, and to the patent tester, which you can find
on my website, and there's also a
link in this class. It's a completely free tool, and then I will tap and drag my flatten image into the
pattern tester and I can zoom in and out and see that I'm super super
happy with this pattern. As you can see, as we did a really thorough sketch
with the pattern, it was easier to get the
final pattern right. We didn't need to redo everything over and
over again there. I will also try out
my pan in Procreate. I went back to procreate, I swipe to the right so
that I have you can do, you have five copies, and then I will tap
the transform tool, tap in the top left corner node, type in 1,500 pixels. When you have the little
chain symbol tapped in, and then you tap the next layer, tap in the top
right corner node, type in 1,500 pixels. Tap the next layer, tap the bottom left corner
node, 1,500 pixels. Tap the next layer and tap
the transform tool and in the bottom right corner
node and 1,500 pixels. Then you can merge these layers together by swiping
them together. And here we have
our first pattern. So we'll just shut down my color panel and
my reference window. Here we have our first
pattern in our collection. It's the repeated pattern. And then you have
your patentile. For this class, for the purpose of the class
and sharing your patterns, I suggest that you share your repeated patterns because then we can see a
Zoomed out version. So I'll turn on that one
and later on in class, I will show you how
to export the files. So let's move on to
the next pattern.
11. Secondary Pattern: Draw the Stripes: Let's continue to create
our secondary pattern, which I'm thinking
is the stripes one. It has a little bit more
colors than the stars one, which I'm considering
to be a blender print. The first thing that
we will do is just to select the pattern template
and duplicate that one. Then I will tap into
one of those and I can just swipe the right on the
first layer and tap clear, and then I can draw my pattern. So let's just bring
up our reference, tab Canvas reference image, import image, and I want
my reference image here. You can zoom in. So this is actually a simple
stripes pattern, and I will show you how to do
that with a texture brush. And I'm not sure if I want
to use exactly these colors. Let's try it out when we create. So now I know it's a
simple stripes pattern. I don't need this
one, but what I might want to Do is two, actually, go back to gallery, tap the select for
the Pumpkins patent, tap Share, and tap J peg and save that
to your camera roll. That way, tap into
pattern template again. Actions panel Canvas reference, and I might want to
use import here. I might want to use
the Pumpkins pattern for color reference here to decide which colors I want to have on
my stripes pattern. So for the stripes pattern, we are not sketching anything. We're just creating it. It's a quick pattern to create. You need to be a little
bit detailed in the edges. But other than that,
let's just move along. The first thing
that I will do is to add a background layer. I will tap the first layer, tap rename, rename
the background. And then I will bring
out my color panel, and I want the cream
white background. I will tap the cream white, tap the background layer
and tap fill layer. The next thing that
I want to do is to turn on some guidelines here. I will tap the actions
panel drawing guide, edit drawing guide, and
I want to to the grid. But I could bring it down to
maybe a tenth of the size. The size of my canvas
is 3,000 pixels. If I type in 300, then I know that I have an
even amount of squares here. This is just to make sure that
our lines are matching up. Then I will tap in
the layers panel, the plast to add a new layer. And just as we did in the previous pattern
with the Pumpkin, I will keep my color
separated in layers. That way, it will
be much easier to recolor later on if we
would want to do that. So let's just start here. We can always delete, move back and forth
and try things out. I want to use the same
brush, the dry inker. Let's just the new layer here. It's the same color. Let's just choose a color to start with. Let's would choose like the
brighter pink that one maybe. Then I will just draw. This looks a little bit large. How about around 10%, maybe? Maybe around 10%, I can just remove the smallest size stairs. I will tap the size
tap the minus so that I can bring a size that is
maybe 12% and save that, and then I can draw here,
and that looks good to me. With the guidelines,
what we want to do is, even though if we want
to make a curly line, we still want to met
it up here and here. If I would like to
do a wavy thing, I still want to do it
sharp in the edges. But for this pattern, I want to keep it
straight lines, a little bit wonky, maybe,
but mostly straight. I will just start with drawing. I won't do the quick shape, which is when you tap and hold, to make a straight
line because I don't want that straight lines. I want it a little
bit more organic, as you can see here,
but I still want it to be straighten the edges. There you have one, and I
will tap to add a new layer. I can just rename
this to pink or nice. Rename the layer to pink, and tap to add a new layer. I have the pink. I
might want the peach. Let's try the lighter peach. Over there. That
looks good, too. So I'll just rename it to peach. So I'm just trying
out the colors, and I wanted to match this. In my sketch, I had black lines, but I'm not sure that I
want that sharp pattern. So I'll try out the more
soft colors, I think. I'll tap the plast
that a new layer. And if I had peach there, I might do maybe like
the base that's on the The dot? Let's try that out. That's good. Let's just
rename that layer to Base. We can always rector
this later on. Ta the plast a a new layer, and let's go for the
other base maybe. I'm trying to go for
the softer colors here, not the really dark ones to keep it like a soft looking pattern. Should we do one more color? I think so because if
we have one line here, And we will have one
on the edge there. So as you can see, I'm
drawing on the lines. Then we have one, two,
three, four, five, six, seven, eight, 910. So I need one more
to make five lines of each or two lines
of each color. Okay, so take that
away, remove that. And then let's try. Should we do the background,
maybe the orange one. This one was what are we
supposed to call that? Dark base and One. Oops. Tap ta a new layer and
rename the layer to orange. Then I will draw an orange here. I really like these colors. I don't feel that I want to
actually change the colors, but if you would like to
experiment a little bit, you could just draw with the different colors and
see which one you like. But I really like
the softer ones. So I will do the
orange like that. Now all that we need
to do is just to move back to the pink layer
to the pink color, draw a pink one here. Tap peach layer. Draw a peach here. And the base layer. Draw the base there. The dark base, is this
one, the medium one. Oops. Draw that one. There. And then we need to flip the pan around to draw
the ones on the sides. So I will swipe the right on all of these
layers, tap group. Tap the group and tap
the selections tool. If you get an error message, you might have
Colorful selected. I talked more about that in the first video with
the Pumpkin pattern. Check that out if you don't
know what I'm talking about, if you get an error
message here. Otherwise, I selected a group,
tap the selection tool, saved selection four, and I
just want to flip the edges. I tap the transform
tool, flip horizontal, tap the selection
tool to deselect, tap it again to select,
Save load selection three. Tap the transform tool
and flip horizontal, tap the selection tool
again to deselect and tap it again to select Save
a load selection two. Flip prisontal with
the transform tool, tap the selections tool
to deselect and tap it again to select
save a load selection. One, tap the transform
tool and flip prisontal. Now we can see we
have one line left there and it's on
the orange layer. I will just draw with the orange color on the
orange layer like this. Now it's time to
flip this around and fix the edges
of the pattern.
12. Secondary Pattern: Make the Pattern: Let's make the repeat
of the pattern. What I will do first
is to just turn off the drawing guide
because I don't need that, and I will turn off the reference window
because I don't need that, I'm happy with my colors, but I will keep my
color palette because we need to draw in the edges. What I will do now is to
tap the layers panel, tap the group, tap the
selection tool, save load, tap selection four,
and I will tap the transform tool and
just flip vertical. Then I will tap the
selections tool to deselect. Tap save a load,
selection three, tap the transform
to flip vertical. Tap the selection tool
again to the select, and tap it again to select
Save load, selection two, tap the transform tool
and flip vertical, and tap the selection
tool again to deselect, and tap it again to
select selection one, tap the transform tool
and flip vertical. If we wom in here, you can see that the edges aren't matching. So what we need to do
now is to go in on each layer and make sure
that the edge are matching. I think we can manage to do
that even here in the edges, even though they are
cut off a little bit. So let's just start
with orange layer. And I think on that layer, I only need to fix a
little detail there. So I will go really
low in size, 5%. And with the right color. I could probably just like, move over the brush a little
bit over the edge and drag it down so
that you can't see the edge there because
it was so close. I think that this
would look good. And then I need to do
something about this, and as I can see it here, it will be a little bit too thick if I just
fill it in there. So what I would do
then is go with the eraser tool and the monoline brush
from the power pack, and I would erase with a larger brush a little bit of this so that
I can redraw it. And then I will tap the power pack brush
set, the dry inchor. And now I need the
20% brush size again and the same orange color. And now I can just
see if I can get the right line here and
might take a little while. Did I have no, I had 12%
in size when I draw this. I had 12% in size, and then I'll just
try to match it, and that matches it. And if I swum in,
I can go in with a smaller brush
size, fix this edge. This is a bit of work
when you have take brushes because you don't want it to have sharp
edges here and there. Then you will see where the
stroke or the line repeats. That looks good now, and if you want to you can fill in
a little bit more here, just to make it look a little bit more
even in the texture. Let's move on to the next layer, the dark base, like that. Here I can see that
I need to erase as it's too much space
on both sides. Then I can try to I don't
need to erase the same part. I can ask the orange one. I could erase maybe from
here to maybe up or down. So maybe I could just erase there so that is not exactly the same part
as the orange one. And then I tap the right color. I have 12% in brush size. On the right layer with
the dry anchor brush, I can move in and
just change this. But I can see that
this is a little bit far out on the right, and this is a little bit
too far out on the left. I would actually just erase a larger part of that so that I can get it in
the right direction. Then I will just draw until I
find the right line and use 5% brash size to move over these edges so that
you can't see them. Okay. That's good and
here on this one. I think we actually can
just add a little bit. And make sure that you
don't have a line there. You're filling a little
bit over here as well. So that is not
obvious. That's great. And now we're moving to the
Base tap the Base color. Where do we have that one?
This one is super simple. We just have a
little bit of here. I'm just adding a bit there. Already looks great. The next one We can see if we can add here or if it would only look too thick. Maybe we could actually erase
just a little bit here, and then we want to add
that dry incher edge again. This might actually work. Yeah, I think that works. We're moving to the
next layer peach. The peach is pretty good. I would just fill in a
bit over the edge there. Make sure you can see
that I've been here and fill in some
color because that will be a fail when it comes to the seam
less part of pato making. You don't want to see
where the seams are. That's good and then go to the pink layer, the pink color. Here, we could probably just
erase a little bit here. And maybe a little
bit there. Could we? Now, we're on the peach layer. Pink. Peach, ase. I'm using a smaller brush to just add in the texture
in the edge there. Make sure that this
line isn't showing, adding in some more
there and making sure that the edge is seamless, and I think I will do
the same on this one. Raise a bit there, raise ale bit there
and use a small brush. To just add a little bit to the edge and to
the center parts. Okay, now we're finished
with the pattern, and it's time to test
13. Secondary Pattern: Test the Pattern: Test the pattern, I will tap at the top of my layers panel. Swipe down with three fingers, tap copy all, swipe down with
three fingers tap paste. That will have given
you a flattened image, and I will go to
my patent tester on my website, which
is a free tool. I will tap split view
in procreate Safari. Then I will tap and drag my pattern into
my patent tester. This is the quickest way
to test patterns for me. And this looks perfect. I'm super happy with that, and then I will move
back to procreate. If you want to test
the pendent procreate, I'll just shut down
the color panel, and then I would swipe
the right on the layer to duplicate it so that
I have five copies, tap the transform two, tap in top left corner node. Type in 1,500 pixels, when you have the little
chain symbol taped in. Tap the next layer, tap in
the top right corner node, and type in 1,500 pixels. Tap the next layer, tap in
the bottom left corner node, type in 1,500 pixels, and tap in the bottom
right corner node on the next layer and
type in 1,500 pixels. Then we can swipe these layers
together to merge them. Here you have your
repeated pattern and here you have
your pattern tile. To share in class, I suggest that we share
the repeated patterns. I will keep that on the
visibility when we move on to our last and next pattern,
the blender prints.
14. Blender Pattern: Make the Pattern: Let's move on to create our last pattern,
our blender pattern. I will save my patent templates. I will tap select, tap the patent template,
and tap duplicate. And that way, I have a copy of my patent template
to be used later on. So tap in to the
patent template, and here I have that. What I need to do now is
to make the stars pattern. As you can see here, is just a pattern. This one I made with a dark
background and base stars. I'm not sure which
colors I want, but I don't need to bring out
the reference or anything. First, let's just rename this two stripes
and this two stars. Then tap into the pattern
template that I named stars, swipe the right on the layer and tap clear
to clear that layer. What I will do is to
add a background here, so I will tap the
layer tap rename, right background and then enter, and here I want to choose a color from my
Halloween color palette. Let's try the darker
brownish color first. I will tap that one tap f layer. And it's a little bit hard
to see this on screen. Let's just create in a different color because you
can't see the edges here. Let's create we can just
create the Base background, tap the background, tap f layer. Now we have a Base background, and now I will tap the layer
and rename that to stars. And for this pattern, I have a little trick. So you could definitely
draw the stars, and you could do it in any
brush with the dry incher, for example, you could
just draw the stars. Let's do white stars on
the base background, and you can draw the
stars and fill them in and you draw another
star and fill it in. But I have a little
shortcut here, and that is my star stamp brush. So with the star stamp brush that's included in
the power pack, I will just stamp my star. So if you haven't
downloaded the power pack, you can go ahead and draw
the stars with a dry inchor, just as I did here, and it will work
exactly the same. But if you have downloaded
my power pack brush set, you have a star stamp that you are free to use for both
personal and commercial use, and it's a little bit wonky. It's very charming, and it's
a nice motif to be used either as a filler element or as a separate element in a
blended pattern like this. So I am going to use
that star stamp. So if you haven't
downloaded the Power pack, you can just draw
the stars like that. But now I am going to
use the star stamps. I will tap the H fontol, and just move those out because I just
wanted to show you. And then I'm using
the star stamp. Here, I just want to
place some stars. It's really just a matter
of checking out the size. I think that this
size is pretty good, around 20%, maybe a little bit smaller,
around 18%, maybe. I just want to place some
stars here and there. We can move them around
later on. Maybe like that. Then I want to tap
the layers panel. Swipe to right on both of
the layers, tap group. Tap the group, tap
the selection tool, Save and load, selection four, tap the transform tool, flip vertical flat persontal. Tap the selection tool
again to deselect, and tap it again to save
a load selection three. Tap to transform tool, flip vertical flat persontal. Tap the selection tool
again to deselect, and tap the selection tool
to select, selection two. Tap to transform tool, flip vertical flo persontal. Tap this selection tool again to select selection one
and save and load. Tap to transform to flip
vertical flat persontal. Here I will just
add one more star, or should I add two,
three more stars. I don't know how
dense I want it. I don't think that I want it. That dense, actually. I will add two stars, and then I will move
them around, I think. So when I made all of the stars
that I think that I want, I will use the selection tool. Select around the star, tap the transform tool and
just move the stars around. Until I feel that they are a little bit more
balanced in the pattern. We can just twist them around
as well if you want to. And just moving them. I think that this looks good. So now I will show
you how to add the texture from the dry
inch to these stars.
15. Blender Pattern: Add Texture: Will add what's it called the dry ink
texture to the stars. This is optional, but
it's a fun little trick. What I will do is that I will tap the stars layer tap select, and then I can just turn
off the visibility of that layer and I will tap
the plus tad a new layer. With the same color, I'll
go for the dry incher. Here you can choose
a larger brush size and just move over your full canvas so that the full stars are
filled with the dry ink. Texture. I think that
it will work with filling the stars that
are cut off in the edges. But we will see that when
we test the pattern, if it doesn't work, we
can just redo those. Then I'll tap this
selection tool and now we can see that you have this really nice texture
in the stamped stars.
16. Blender Pattern: Test the Pattern: Let's try out the pattern
and see how it's repeated. I will tap at the top
of my layers panel, swipe down with three
fingers tap copyal, swipe down with three
fingertap, paste. First, I will tap the
three later dots, tap split view, Safari, and now I will tap and
drag my flatten image from my layers panel into
my patent tester. And I will swipe down to
zoom out and swipe up, and I think that this
is a perfect pattern. It's a little bit
imperfect in the balance, but I really like
the look of that. I will keep it like that.
And then I will go into procreate and swipe
to the right on the flatten image to
get five copies out, tap the first layer, tap in the top left corner node, type in 1,500 pixels. When you have the
chain sable taped in, tap the next layer, tap in the top
right corner node, type in 1,500 pixels. Tap the next layer, tap in
the bottom left corner node, type in 1,500 pixels, tap in the next layer and tap in the bottom right corner node, and type in 1,500 pixels
and tap the transform tool. Now, I will swipe
these layers together. I will also shut
down my color panel, and then I will have my
repeated image here, my repeated pattern,
and my patentile. I will keep my repeated
pattern visible. The I can export these patterns later on and so that you can
share them in the class.
17. Recoloring: Now we actually created all three patterns that we
planned from the beginning, and we made the hero pattern, the Pumpkins, the secondary
pattern with the lines, and the blender pattern
with the stars. Now, I just wanted to show
you how to do if you want to recolor the patterns in a non destructive
way in procreate. Let's just move into the
simplest pattern first, and then we can move into the
most complicated pattern, so we can just see how to
change the colors of those. Tap into the stars
pattern or actually, let's just make a copy of that. Tap the select button, tap the stars pattern, tap duplicate, so that we
can change the colors. Then I will tap
into the new one, and here I will turn off the visibility of the
two flatten images. Now I can just move
into the layer, that's called Layer four now, but it should be named stars. Then I will tap that layer
tap falc then I will choose another color from my
color palette over here. And I can tap filler, and then I have
recolor the stars. You can also recolor
the background. You will just choose a color. Let's choose pink color. Tap the background and filler. That is how you would
recolor the stars pattern. Let's recolor to darker
background and flayer. And maybe I want the
stars to be base, as we planned from the
start, tap filler. That is how you recolor a
simple pattern like this. If you want to recolor
the pumpkin pattern, it works exactly the
same on all patterns, but I just wanted to show you a pattern that is a little
bit more complicated. I would duplicate that one
and tap into one of those, turn off the visibility
of the flatten images, sum out a little bit. Let's say that I want to change the color of
the background first. Maybe you don't need
flock on that one. You will just need
the background, maybe I want the background
to be cream white, for example. Cream
white background. Tap the layers panel background, feel layer, super simple. Then I might need to change
the colors of some pumpkins. I will go into the brown layer, for example, tap
the layer, tap afg. Maybe I want a softer
orange color there now. Then I also need to change
the color of the texture. I will tap that
layer af and I would want the darker color of
the orange of that texture. Let's just change the color
of one more pumpkin color. Let's change the pink one. So I'll tap the pink layer, tap afg. Choose a color. Maybe this darker base
color and tap f layer, and then tap the texture layer, tap afg maybe I
would just go for a darker base there
and tap f layer. That is how you would recolor the pattern in
a non destructive way and you would do the same on stripes as you would
on the other ones. I would just tap and drag these two recolor
patterns over here, so I know that these three
are my original patterns.
18. Export the Files: So now it's time to
export the files. And I will show you how I would export the files to
be sharing in class. And you can also export the files to be used on
a print on a man shop or a product or to take it into another program if you
want to I don't know, put it on a moreAP, or
something like that. What I would do is to just
select my three patterns, and tap share JPEG and save it to my camera roll or save it to wherever
you want to save it. If you want to save
your patent tile, I would tap into the pattern and turn off the visibility
of the repeated pattern, tap the actions panel, share Peg, and then I
would save the image. In class, I would suggest that you share your repeated images, but you can also use your patent tiles
for other purposes.
19. BONUS: Have a Look at Using Procreate Mockups: We are finished with our
mini pattern collections. But before you go, I just
wanted to show you one of my favorite ways of trying
out my patterns on products, and that is mockups. So these mockups are exclusive for the members in
my Pattern ables membership, and you will get them if you subscribe to the
All Access plan. But if you're interested,
check it out, and I just wanted to show
you how to use them. So for example, if you want to try out your pattern collection, this is P mockps that's
included in this class, if you're looking at it in the Pattern reverse membership. And I have this napkin
mockup where you can see your full pattern collection in a napkin mockup that
has Halloween theme, kind of like a rustic
Halloween theme. All that you need to do with MGA in Procreate is that I've
created the file like this. You don't need to touch
any of the layers that have the chain symbols. You just need to add
your patterns here. Let me just remove my patterns so you can
see how to add them. Here I would just tap
that top nap in layer, tap actions panel
a insert a photo, and then I would insert my
pattern that I've created. And here you can sum it, move it on the Map to somewhere where you
think it's good fit. Then I would do the
same on the middle one, middle napkin, tap actions
panel, add inserted photo, and I would insert my
repeated pumpkin pattern, and then maybe bring
it down in size a bit. And add it over there. The next one, I will
tap the bottom napkin, tap the actions panel, add insert photo and
add my stars pattern. And there it looks really nice. Then you can just
export this image, share image as a JPEG, save it to your camera, and then you can use it on
your website or wherever on Instagram where you want to show your patterns
that you created. I will show you the
other mockups that are included as a member of the all access plan in my
Pattern Ribles membership. So that is, you have
the napkin mockup. You have the pumpkin mockup,
which is really fun. You can imagine that you can have drawn the
pattern on a pumpkin. Then you have this
little baby girl dress, and a throw pillow
and a gift bag, all with a Halloween theme. So if you would like
to explore that, check out my membership, Pan Raples, and the all access.
20. Final Thoughts: And that my friends is
all for this class. If you only get one
thing out of this class, I hope it is that
it doesn't need to be complicated to make
a pattern collection. In this class, we're
creating a mini collection, but if you want to
take it further, you can add more patterns to
make it a larger collection, that can be used for
all sorts of purposes. There's no limit to
what you can create, and you already done the groundwork by
finding inspiration, choosing a theme, and creating
this mini collection. And if you're eager
to dive deeper into pattern design and get
the Procreate mockups. Be sure to check out
my membership Paneras. In Patter ables,
you will get access to monthly classes,
design resources, like Procreate brushes,
color palettes, mockups, and pattern
layout templates. Plus, we have a monthly design challenge,
feedback sessions, and Q&A opportunities
where you can ask anything about design or
running a creative business. You can learn more at pattern
bles.com. With that said, Thank you so much for watching. If you like this class, hit the follow button
by my name to make sure that you don't miss
out on my future classes. You can also tap
my name to go to my profile page here
on skill share, which is where you find all of my classes
available to watch. If you have other
questions at all, please ask them on the
discussions page hearing class, and feel free to leave a review to let me know if you
enjoy this class. I would love to
hear your thoughts. Make sure to share your
project hearing class, and if you post it on Instagram, feel free to tag
me with MA favor. Thanks again for watching.
 Maja Faber, Surface Pattern Designer