Transcripts
1. Intro: Hey, I'm Maja Faber. And in this class, I'm going to teach
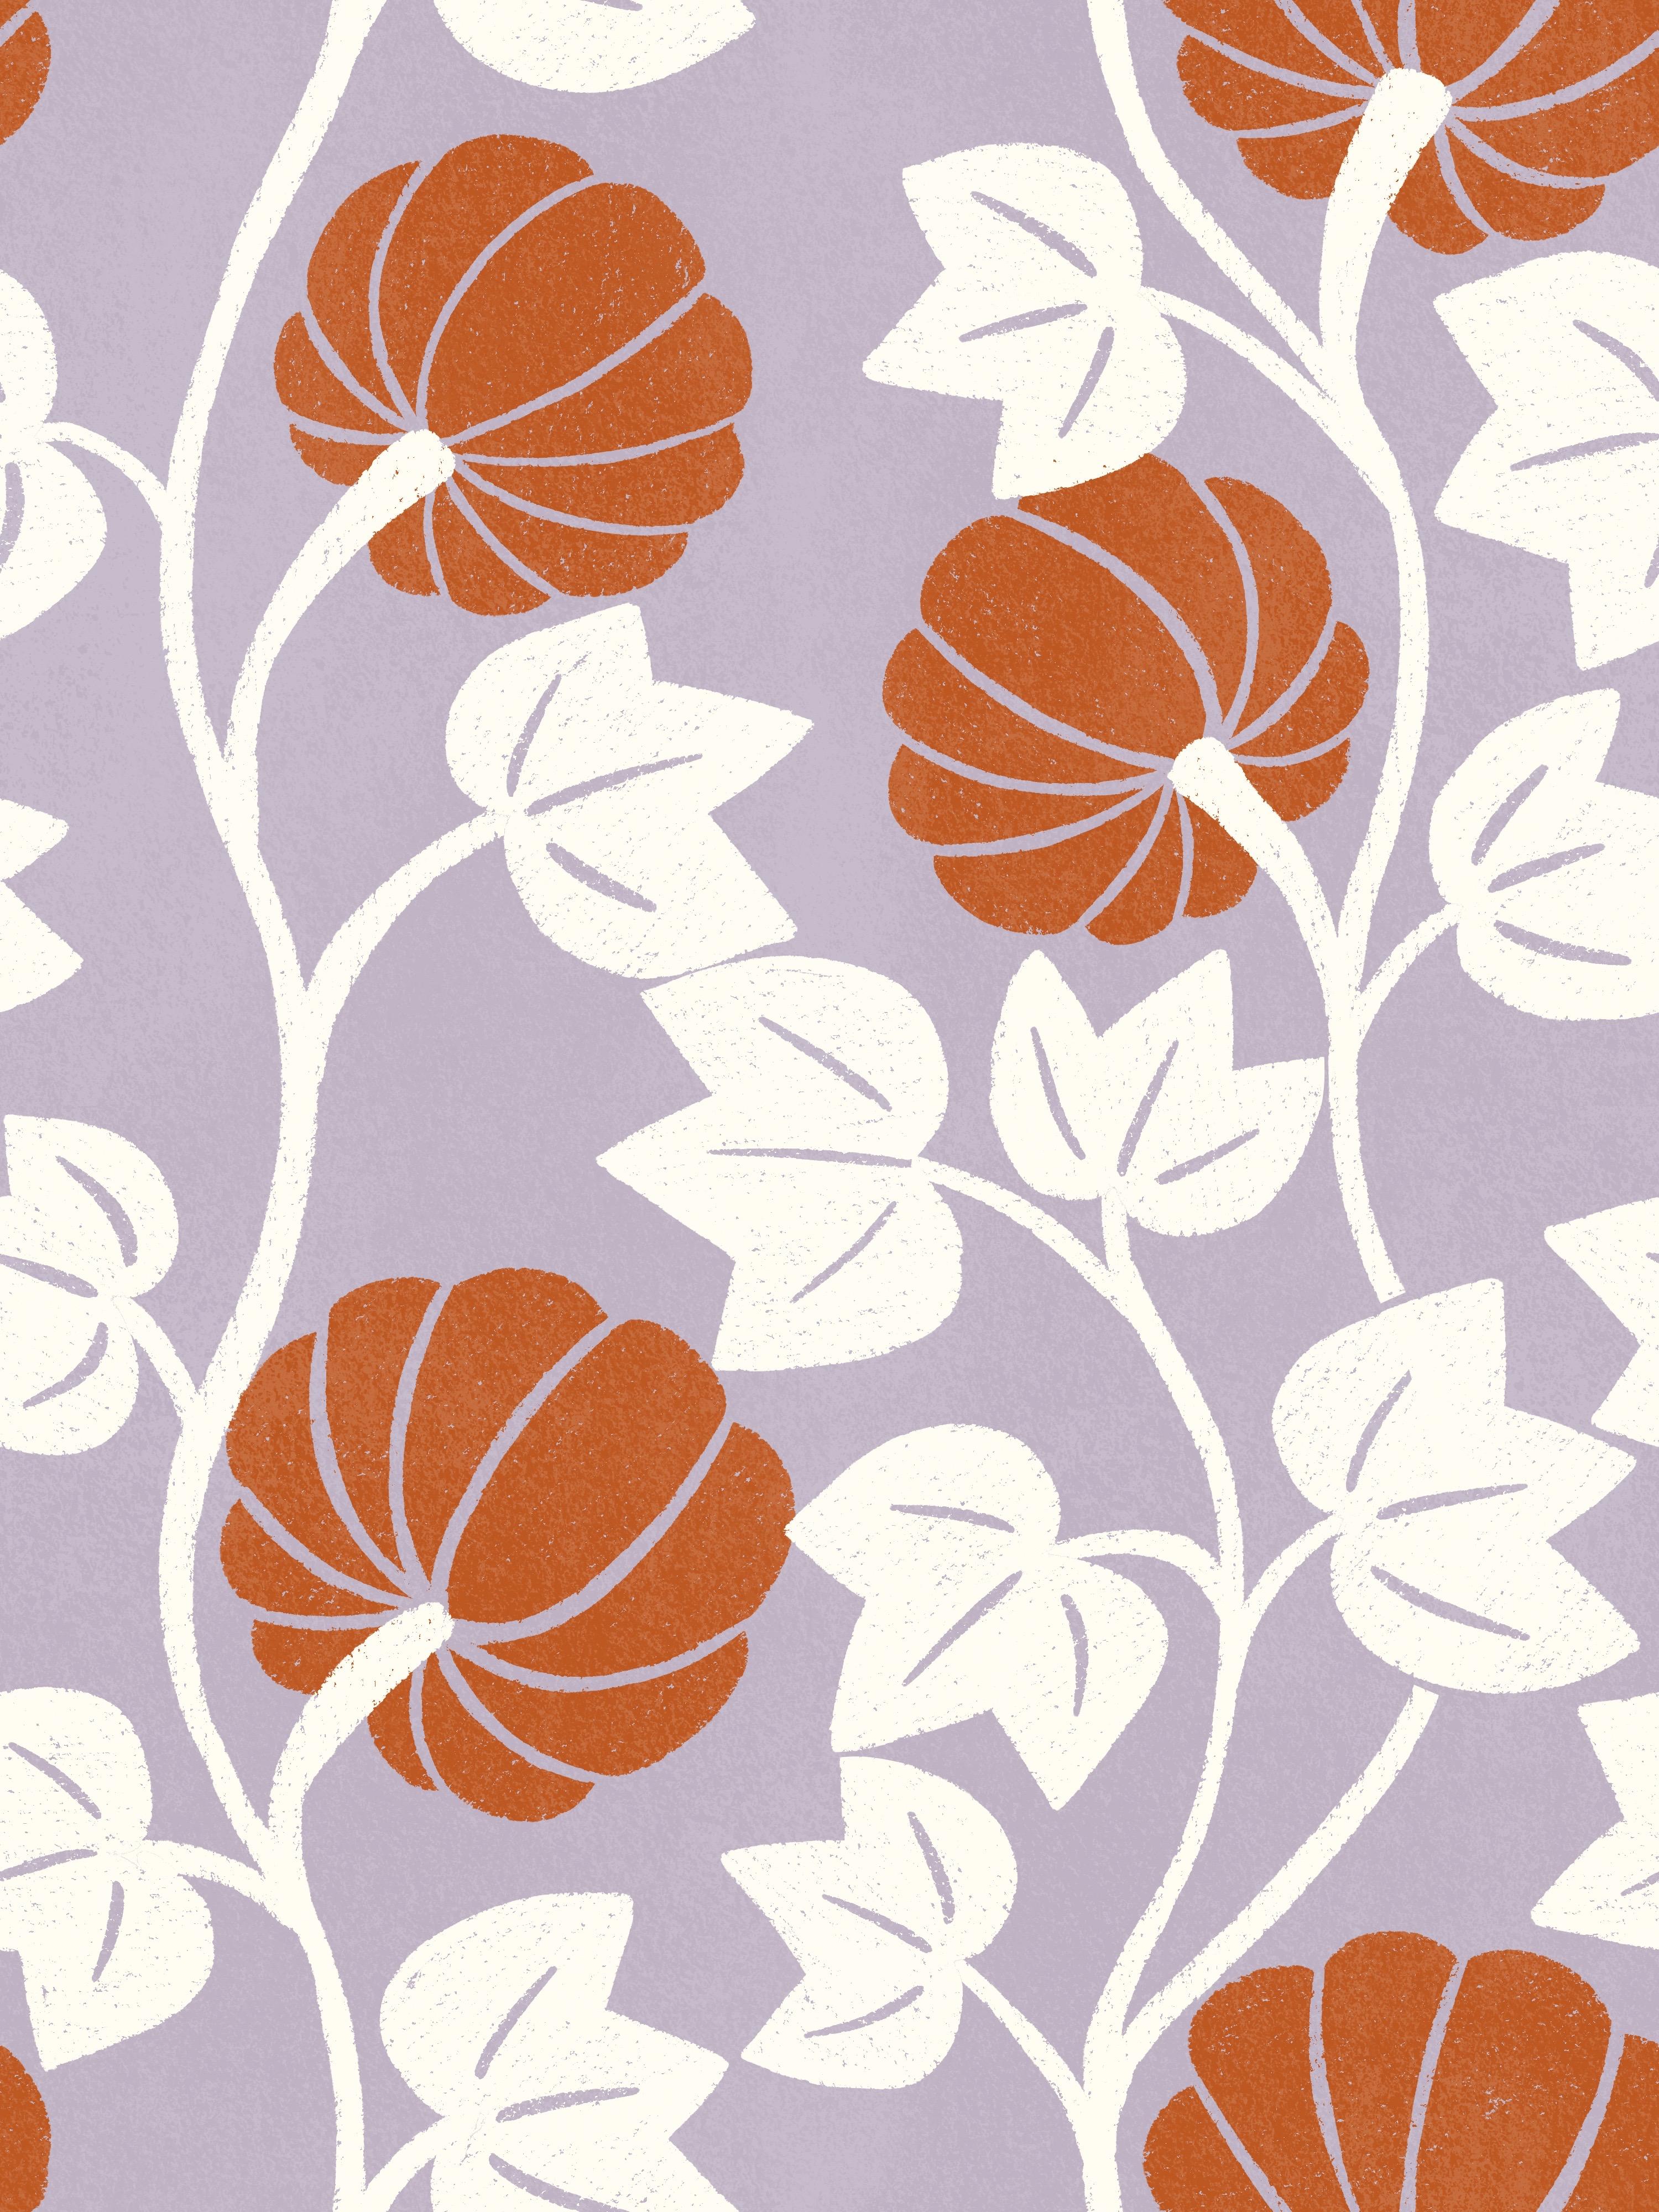
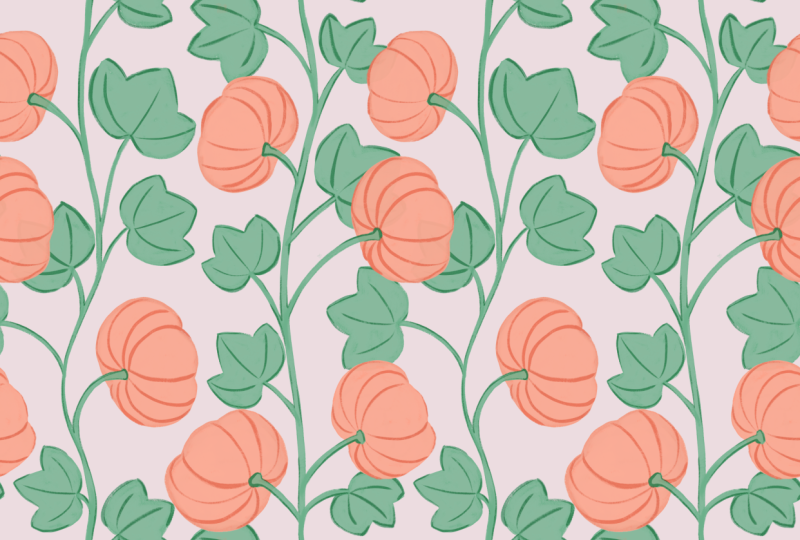
you how to create this beautiful Pumpkin
Vines Pattern in procreate. You will learn how to work
with in depth sketches and how to draw and refine your design with
only two brushes, making it easy to add subtle yummy texture
to your motifs. We will also explore how
to layer your motifs, add blend mode to textures, and recolor your patterns. Don't worry if this
seems complicated. I will show you how to create these rather intricate
patterns with a simple step by step method. As a bonus, you receive
free resources, including two procreate brushes and one procreate color palette. Let's have some fun and
create this stunning Pumpkin wines pattern
together in Procreate. Join me in this class,
and let's get started.
2. Your Project: Project in this
class is to create the Pumpkin Vines
pattern in Procreate, following the instructions
that I give you in class. Please do share your
project here in class. I would love to see
what you create.
3. Canvas and Pattern Template Setup: So, the very first thing
that we will do in this class is to
start a new canvas. Usually, in the classes
that I created recently, we are using the Pattern
perfect template. But in this class,
I wanted to teach you how to create a
rectangular pattern, and the pattern perfect
template is a square pattern. So then we will create a completely new
template ourselves, and I will actually also include this template
as a free download, but I just wanted to show you in class how
to create this for yourself because
maybe you want to use another size of Canvas
to me in the future, and then you need to
be able to create these templates for yourself. So let's start by
tapping the plus in the top right corner
in Procreate to create a new Cavas and here you tap the little folder
symbol with a plus, which is new cavas. In the dimensions, we will go
for a rectangular pattern. So I would use 3,000 pixels in width and 4,000
pixels in height. The DPI is set to 300
for high resolution, and for me, that would give
me 152 maximum layers. You might have less
amount of layers, and that's completely fine. It depends on the
storage of your iPad. So then we will tap color profile and just
make sure that we have the first SRGB color profile that is shown under display Pt. So SRDB this one over here. And then we tap crate. So now we have our canvas, and what we need to do is to
create our pattern action. To do this, I will grab my color palette and pull
it out on my Canvas here, and I have downloaded the
Pumpkin Vines color palette. For this purpose, when we're
creating this paten action, you can use any colors, but I will use the Pumpkin
Vines color palette. That is included as a
free download in class. I will just choose a color. I have the orange color
selected and I will just tap and drag to fill my whole
Canvas with that color. Next, I will tap the plus in Layers panel to add a new layer and I will
select a new color, tap and drag to fill the
layer with that color. Tap the plus to add a new layer. And choose a new color, tap and drag to fill that
layer with a new color. Tap the plaster to
add a new layer, and here I will choose a
fourth color and tap and drag. So now I have one, two, three, four layers that is
filled with colors. The next thing that I
will do, I can just shut down the color palette over there is that I will
tap my layers panel, tap on the first layer, tap the transform tool, which is the arrow that
you see over here, tap in the top left corner, and I will continue to have
the chain symbol tapped in. So you should notice
that that is blue, and then I will write
in half of the size in this first box
that says 3,000. So type in 1,500. And that will bring me fourth
of the size of the canvas. It's actually half of
the size of the canvas, but it will be divided
into four boxes, and it is perfectly aligned to the top left corner
of my canvas. Then I will just tap
the layers panel, tap the next layer, tap the transform tool, tap in the top
right corner node, and type in 1,500 pixels. Taped layers panel.
The next layer, which is the green one for me, I will just zoom out a
bit so that I can see my cornondes and then I will tap in the
bottom left cornonde, type in 1,500 and tap the layers panel
and tap the last layer, which is orange one for me, tap in the bottom right
cornond and type in 1,500. Now I have four boxes
that are perfectly aligned to the
edges of my canvas. And this is really
important to avoid getting those nasty white
lines in your patterns. The next thing that I
would do is to select, for example, the
layer number four, which is this one over here. I will tap the layer, tap Select, and then that will bring me up
the selections tool. When I have the
selections tool selected, I will tap Save a load and the plus to save the
selection as selection one. Next, I will tap the
layers panel again, tap the next layer, select, save and load the plus, and I will save that
to selection two. Tap the layers panel again, the next layer, select, save and load the plus. To save that box as
selection number three, tap the layers panel again, tap the fourth layer, which is the orange one for me, tap, select, save
and load the plus. And now I have saved all
of these four selections. Then I will just untap
the selections tool, and now I have these
four selections saved in the selection tool so
that we can use it as a pattern action when
we start to create our
4. Finding Inspiration: So the very first
thing that we will do is to find inspiration. I will simplify the
shape of the pumpkin and the leaves and the
vines in this pattern. So I will try to use photos
and then simplify the shapes. So I will go to Pinterest
and I have searched for Pumpkin photo on Pinterest. I don't feel that
Pinterest is amazing all the time when it comes
to searching photos, but it usually works to
find some inspiration. So let's just screenshot
some pumpkins. I like this one, the
fat one over there. So I can just
screenshot that one. I like this one as well. And this one is a
little bit simpler. So I'm just taking screenshots of the pumpkin
shapes that I like. I want pumpkins that are
shown from the side, so these ones are
really good and some that are a little bit,
like blobby, bubbly. I don't know what it's called, but you can see the shapes of the pumpkin a little bit
in the sides of them. And yeah, I think that maybe
we have enough pumpkins now. Yeah. So let's just try to see if we can find
some leaves as well. The vines, I think
will be kind of easy. We will just draw some lines. But let's just write
Pumpkin leaf photo, maybe, and see if we can find
something. Nothing on that one. Yeah, there. So as I mentioned, it's not always very good with photos as
inspiration on Pinter. Sometimes you don't
find everything, or you find it, but you need to
search for it a lot, and sometimes you only find
one photo like we do here. But that's fine because
we will just use this as an inspiration to kind of get
the main shape of the leaf, and then we will
simplify the shape. So in the next lesson, I will show you how to
sketch these motifs.
5. Sketching the Motifs: So now we have our
inspiration images. So let's head back
to Procreate again. When you screenshot an image, it ends up in the
photos library. So you know that if you're
not used to screenshotting, so I will tap Procreate to
start up Procreate again. And here we will
just delete all of these four layers
because we don't need those anymore
with the four squares. If you would want to
keep this as a template, before you create
something with it, you can just tap gallery, and I will just write
pattern, template, and oops. And for what was it? 3,000 times 4,000 pixels. And then I will tap
Select and duplicate. So that is how you can create your own pattern templates
that you can use. So I will include
one of these in class so that you can
just start from that one. So just tap into
one of those again, and now we want to
sketch our motifs. What I will do is that I will tap the three little
dots over here, split view, and I will
tap my Photos app. Here I have five photos. I will select my
four photos with the pumpkins and the
one with the leaves, and then I will just tap and drag until I see
that little green plus sign in procreate and import the
photos in procreate. So now I have all of these, and I will just turn those down so that I
have one at a time. Now I will just start to sketch these pumpkins and I will actually create a
new layer on top here, and then I will actually
just trace on the image. And that is to make it easy to get the shape of the
pumpkin that I want. This shape will change
over and over again as we create new sketches and the pattern,
the final pattern. So don't worry about
copying the photo because this is just
the starting phase, and it's just to show you
how you can keep it really simple to get the shapes
of an object quickly. So I will use the so let's use the perfect pencil from the pattern elements. You can use any sketching
brush that you want to. But I'm going to use that one. And on that layer, the new layer, and with
black as the color, I will just zoom in
here and kind of just sketch out the
shape a little bit. I'm trying to guess
where I would see some blows because
I want that to show So I can do those little floppy shapes even more than they
are on the photo. Maybe something
like that. I'm not sure that I like this one. So I would try to sketch some different pumpkins
to see how I like them. So that is that one and
I can turn that one off. It's okay, but I need to really refine that sketch before
I would be happy with it. Then I can turn on another one, and I can just rearrange
that to maybe over here. And on this one, I will tap the end
and just drag down opacity bit because
the image was so dark, so I don't know if I would have seen what
I'm drawing on top. And then I will tap
my sketch layer, and here I will draw the little stick like that
and the shapes like this. So as you can see, the
sketch is rather rough. But I want to quickly
make the shape so that it looks
like a pumpkin and then I can refine it later on. I will also need
to kind of change the sketch after the style that I'm creating in my pattern. Next, I will turn on
the next pumpkin, and you don't need
to draw this many. I'm just going to because I want to see which one of
them I like the most. I'm going to try this one now. And on the sketch layer
that I'm actually going to name sketch motifs. I am going to draw this one, so maybe even more simple something like that, maybe. Turn that image off and just complete that
sketch over there. That one was cute, and
then the next one. Yeah, I like that one
too. I'm going to sketch, I think, four pumpkins to see
which one of these I like. Then just tap the end to drag down the
opacity of that one, tap the sketch layer, and draw the pumpkin here. Oops, I'm on the wrong layer, tap the sketch layer. That one is actually
going in that direction. Yeah. Maybe can, maybe I want to have it
like that or maybe I don't. It depends on what
will happen when I'm drawing the vines and
the leaves later on. Okay, so now I have kind of the basic shape of that pumpkin. Maybe I want to erase a little bit of that
one over there. Okay, something like that,
and then turn that image off. And the next I want the leaf. So I will just move my sketches up here and
draw the leaf down there. So I will turn on
the leaf photo. It down a little bit. This
is just a sketch so we can scale up and
down how much we want to and then tap the end symbol on that layer to drag
down the opacity, and then I want
to draw the leaf. So I think that I want to have, let's just do the shape
of the leaf first. I think that I want to do a
simplified version of this. So as you can see,
instead of one, two, three, four, five,
I'm just doing three. But I don't think
drawing police will be angry with me because I'm
not drawing very realistic. I really enjoy
simplifying my shapes. So this is good and then
maybe some things like that, and then turn off that layer. Yeah, so I really
like that shape. I might need to refine it
a little bit later on. Maybe I want to do that now, so I can just duplicate it. I will select that
one, copy and paste, then I have the new
one on a new layer. I will just add it
here and try to draw it in a
different direction, maybe, like that to see
how that will look. And then I will tap the
end symbol drag down opacity to really low,
actually, around 15%. And oops, I don't
need a new layer. I can tap the sketch
motifs layer on top. And then just draw a little bit more refined
sketch of this leaf to see if I like the shape of it or if
I need to, like, redo it. And then I can delete the layer beneath
with that single one. Oops, and on the
sketch Motif layer. I can just refine the
sketch a little bit. We will do this
later on as well, but as we only had one
inspiration image for the leaf, I just wanted to see that I really like the shape that
I got here from the leaf. So I did, and now I'm
happy with how this looks. So let's move on to the next lesson where
we will sketch the
6. Sketching the Pattern Draft: So we have our sketch
layer with motifs. I will select all of the image layers and
just delete that one. And here we have a layer
with nothing in it. So I will tap and
drag that layer above or create a new layer
by tapping the plus. And here I will just
rename to sketch Pattern. And let's just name it to sketch pattern draft or whatever,
sketch Pattern one. So sketch pattern draft or sketch Pattern one or
something like that. I will turn off the motifs
layer with the sketch. And on this pattern,
sketch Pattern draft, I want to start sketching out the motifs because
we are creating a pattern that will
have vines going down and they need to
match up in the edges, and you also need to get a
good flow in the pattern. So how I will do that is to first turn on
the drawing guide. So tap the actions panel, tap Canvas, drawing guide, edit drawing guide, and you can have your drawing guide
set to anything here, any size, I mean, but I have two degree. And as I know that the width of my canvas is 3,000 pixels. I might go for 300
just to make it easy. That looks fine for me
because then I know that all squares are equally sized, so that I should have
ten squares, one, two, three, four, five, six, seven, eight, nine, ten. So that's good. You can go for 300 or half of 300
or 600 or whatever, but it's good that you have
an equal amount of squares and that it's divided by ten. I'm not very good at math, but you understand
what I mean, right? Then tap done. And here we have our grid. What I want to do now is that I will take my sketch brush again, the perfect pencil from the pattern elements or any type of brush that
you want to sketch with. And then I want to draw
some vines going down. And I will show you how to do this the simplest possible way. So you've seen these
really intricate patterns, the William Morris patterns, where you have like vines
and branches and leaves going around each other and meeting up and
anything like that. You can make those patterns as complicated as you want to, and they can be really, really interesting when you get this really complex look where they just kind of
flow into each other, the vines and the
branches and everything. But if you want to create
that type of pattern, but not spend months
and months or I don't know how long it would take to create that type of
complex pattern, at least a few weeks maybe, then I want to show
you the simplest way that I know to create
this type of pattern. So I'm all about simplifying and making it easy for you to create fun and interesting and
really beautiful patterns. So what I will do is
that I will start with the box number three over here and number
three over there. So then I know that I
have an equal amount. So you have four
in the middle and then three on each side. So what I want to do
then is just to get a flowing feel to a
line that I will draw. That will be the lines or the branches or whatever you're drawing that
I want to meet up. I want to get this really
nice flow in the pattern. I will show you how to do it. The first one, we want to go. I'm just going to do it
quickly now to show you. We wanted to go in and then out and then in
again and then out. The second one,
we want to go in, but a little bit less, not as much bend on that one. So in out in and then out
again. So something like that. So then I'm going to do this now a little bit more detail. So I'm going to start on this
one and end on this one. That's the most important thing. So I'm going in and
out and in again, and I want to end up here. So we will fix this later on, but you want it to be
as close as possible. You don't want to end up here because then the
pattern won't meet up. And with the other
one, I want to go in, but a little not as
deep curve on that one, out and in and out again. So then you get a
really nice flow. You have one that's
moving a lot like whoa. And then one that's a little
bit more soft in the flow. So this is the
simplest way to create those patterns where
you have like branches or vines or that
meat up at edges. Now I would just go in and just erase this to not get confused. So, something like that. And we will fix the edges. We will actually
create the pattern of the sketch first because with
these types of patterns, it's harder to kind of
redraw them afterwards. So then we want to
know that we are doing as much as possible
right from the start. Okay, so now we
have the two vines on the sketch pattern draft. And then we want to add some
pumpkins and some vines. You can do this
with any flowers, any plants or whatever. So what I will do is
just to kind of go up here with a little branch. I could actually do
this on a new layer, and then I can
merge those layers. But if I do it on a new layer, I have my two vines there, so I don't need to
mess with those, and then I can just
add a new layer. I don't need to name that one, but I will just draw the
pumpkins there and the leaves. So there I could have a
pumpkin, for example, and I want to spread
out the pumpkins and I want it to
be like flowing. So I'm doing a rough
sketch where I'm just creating pumpkins
from circles. And then I will
also add leaves as triangles all in sort
of flowing motion. I don't want it to
go out to the edge. So let's just do, no,
I don't like that. I'm going to continue that there, maybe
something like that. And then it would
probably look good with something with a pumpkin
over here, maybe. So I'm trying to get this
flow like to find the flow in the vines and just drag it up to a little branch or
whatever you call it, and add a pumpkin over there. So the next step is
to add some leaves, and I will just start by adding something
maybe over here, and I will add triangles
like that maybe. And one over there maybe needs to be repeated
on the other side. We will see about that, or
maybe this one is too wavy. Yeah, I can see now that this is going a little bit too far out. I want it to go a
little bit smoother. I will actually go
into the pattern draft again and just smoothen out that line a little bit so that I can
fit the leaf over here. So I'm just adjusting as we go, and then I go into the new layer again and maybe add
a leaf over there. And the next I want to
add maybe over here. Might be nice to have
like one leaf like that, something like that, and
one leaf maybe like that. I'm not sure what I'm going to do with the overlapping part, but let's just fix
that later on. And maybe we want hoops.
What happened there? Maybe we want this to go
down a little bit like that. I'm using 44% in brush
size because I want this rather thick lined sketch. Okay, so something like that. And then let's move
on to the next one. I think we have a little
area there that could do a leaf and then maybe
something there. And moving on, should
we do one over there and maybe one over there and maybe
last one up here. So I'm trying to fill the gaps and trying to get
a good flow in the pattern. We can always change
this later on, but it's good to have
a start, at least. Okay, so that is the first
part of the pattern sketch, and then I will tap the
layer three and just merge down so that I have everything on the
sketch pattern draft. Okay, so now we have the first sketch of the pattern draft. We need to repeat it
to see how it looks, and we also need to actually add the sketches of the
pumpkin and everything. But we will do that
in the next lesson.
7. Sketching the Final Pattern: So now it's time to
sketch our final pattern. So with this pattern, it's all about sketching and figuring out if
your pattern works before we start to draw
the actual motifs with our brushes and our
textures and our colors. So this is the way to go
to get these types of patterns to look
right and look good. So starting with the sketch, I will tap the end symbol and drag down the opacit
to maybe around 24%. And then I will tap to
add a new layer on top. We can just name this tops
sketch final pattern maybe, or sketch two or
whatever you want. I will keep the
little lines there, the guidelines to start
with so that I can see that the lines that I draw for the vines are in
the right position. So on my new sketch layer, I will use the
perfect pencil again, which is in the
Pattern elements brush set that you can download. I will include it in the downloads lesson
here in the class, a link to where
you can download, the Pattern elements brush set. Then we will go ahead
and start to sketch. I can actually bring
down opacity a little bit more on the sketch, I think, maybe to around 15%. I hope that you can
see that on screen. You should be able
to see it on screen. Okay. With the perfect pencil, I will start with the vines. I will just add those. Oops. I have around 44%, and I will just draw
the vines like that. And the next one, maybe I even want a larger
brush for this. Let's go for around 60%, maybe. Let's try that out. I will save the size.
Yeah, that's good. And then I will draw the vines. So now I'm refining the sketch, so I'm trying to get it as
right as possible there. Where the pattern meets
up here at the edges and also the shapes of the
vines that I want to have. I can see here that I didn't go completely right down there. So I will start there on the line on the drawing
guide and then go up. It's still a sketch, so it doesn't need to be
completely perfect, but now we're
refining our sketch. So I want to be I want
it to be a little bit less messy than the first
pattern draft sketch. Moving on, I now want to add
my pumpkins and my leaves. So what I do then is that I
turn on my sketch motifs, and I can just drag that on top, turn off the sketch final
pattern, and let's see. I think that the drawing guides are a little bit in the way now, so I will just turn off
the drawing guides, tap the actions panel, Canvas, turn off the drawing guides, and here I can choose which pumpkins that I want
to go forward with. I think that I want
to use this one. I think that it has
a good flow to it. I will actually use one of
the pumpkins and repeat it. You can use several different, but I want to keep it
as simple as possible. So I want to go for this one. On that layer, I will tap the selection tool
and drag around the selection with free hand selected and then
tap copy and paste. Oops, I had the wrong layer
selected. Sorry for that. I need to have the sketch
motifs layer selected, tap and drag around the motif, tap the little gray dot to close the selection and
tap copy and paste. Now I have the pumpkin. If I turn off the motifs, I have the pumpkin over here. So I can just rename this to Pumpkin so that I know
what my layers are. And then on the
sketch motifs again, I want to add a leaf and
I will just use this one. Then I can select it
with the selection tool, tap and drag free hand
around the object, tap the gray dot to
close the selection, tap copy paste, and
here I have my leaf. Then I can turn off
the sketch motifs. I'm going to use those two. I would just drag that one
down again, the layer, and turn on the visibility
of the sketch final pattern, and I also have the sketch
pattern draft over here. Then I have my
pumpkin and my leaf. So what I will do next
is that I will turn off the leaf to start with and
start with the pumpkin. So with the pumpkin
layer selected, I will tap the transform tool
and place the pumpkin on the first place that I
added a pumpkin over there. And then I will swipe
the right to duplicate the pumpkin layer and tap and drag it to
the other position. Maybe I need to flip it horizontal and drag
it over there. I will adjust this later on, but now I just want
to place them, and then I will
duplicate that one. At this point, you
don't need to worry at all about resolution if you resize and rotate and anything like that because
this is just a sketch. You can resize this
however you want, and it won't affect your final pattern when
it comes to resolution. I'm just trying to
get a good flow with the pumpkins here so that they move in a good flow
around the pattern. And I don't want them to
go outside of the edges. Then I will duplicate
that pumpkin again, the layer, tap the
transform too, and I don't want them in
the exact same direction, but I want to twist
it up a little bit. Maybe you can twist it like that or like that. I
will twist it like that. Then it feels like
that pumpkin is a little bit too
similar to that one. Maybe I can twist that
one up even more. I'm not sure. Let's
see how that works. Okay, so then I want to just
merge these layers together. So I have four pumpkin layers. I can just swipe down to
merge them like this, or I can tap the
layer and tap merge down three times to get all
of the pumpkins on one layer. The next thing that I
want to do is just to add some kind of branches that
go out to the pumpkins. And I will do that on
the pumpkin layer. So I will tap the brushes
and use the perfect pencil. And now I just want to kind
of add a little branch there that goes out
to that pumpkin. So maybe something like that. I'm thinking that
the pumpkin has maybe a little darker thing
there and it goes in, so I can even erase
a little bit there. And I want to get a good
flow in the little vine, part of the vine, the branch that goes out there like that. And then the next one,
if I make that square, in the end, it might be easier, and I want to get
a good direction of that kind of twirl there. So something like that. I'm just filling
them in with black so that I can see easier
if it looks good. I think that looks good to me. And then I see that
this one is actually pointing a little bit
in the wrong direction, I think. I want the vine. So now I'm starting
with the vine instead of with the pumpkin and erase a bit of that
pumpkin part over there, and I can just adjust the
direction of that over there. So that looks good. And
this one. Same here. Maybe I want to start
with the branch that goes out and just include
the pumpkin in there. It's a little bit large, so just raise a little bit. So this is some just detailed
work to get the pumpkins to have a good kind of flow
to how they move up the vine. Okay, so the next step
is to add the leaves. So then I will tap the leaf layer and I will
just tap it like that. And I want to add
the first leaf. Let's I don't know. Let's start with
this one over there maybe. Maybe this one. And I can adjust the size. If I tap free form, I can even adjust and use
this little yellow box there. You can adjust the selection
around your object, and then you can adjust the shape of it. Maybe
you want to do that. Again, this is just a sketch, so it's okay to
adjust the shape of this leaf like this
without losing resolution. Maybe a little bit smaller
and even smaller maybe. Maybe try something like that. Then I will just
duplicate the leaf layer, tap the transform tool, and I will drag it down there, flip horizontal and place it somewhere that I
think looks good, maybe closer to that vine
and I can adjust the size. I'm using freeform here because
then all the leaves won't look exactly the same when
I redraw them later on. And then I can go in and duplicate one of the
leaf layers again. So I'm using the first one. It doesn't really matter
which one you're using, and then I can just adjust
it so that it goes. That looks pretty
good, like that. And then again and I'm going to do this one at the bottom there,
so fly horizontal. And I want that one to be, like, a little bit fatter maybe
or a little bit longer. I'm not sure. Just trying it out to see what works in this
position of the pattern. And then I'm going to duplicate the first leaf again.
It's this one. Again, it doesn't matter
which one you're duplicating. I just wanted that original
shape for this one. And I'm adding it here, and I can adjust the size. Maybe I want it to
be a little bit bigger here because we have a little bit more space there. So something like that, and
then duplicating that one. Twisting it around and
placing it over here. I think that might look
really, really nice. And I can adjust
the bounding box. Is that what it's called the
selection around the leaf with yellow little box so that I can adjust
the shape of it. Okay, so then I can duplicate
the first leaf again. I hope that you don't run into a maximum amount of
layers reached here. If you do, you can
just merge the leaves. Or create your pattern
on a smaller canvas. So here I want the branch
to go out a little bit. I'm going to put one over there, and then I'm
duplicating that one, and I want them all to be
pointing a little bit down, so maybe something around there. And then again, duplicating that one and flipping horizontal, maybe adjusting
the size a little bit and placing it over there. Okay, so let's see. Now we can just
merge the leaves. I would just swipe down
with all of the leaves. We have all of
leaves on one layer, and then I will start to add
the branches to the leaves. Now I can actually turn off
the layer with the sketch. I can just drag up that one because I not really sure if I remember how I wanted it to look when I'm turning
off the sketch. And then I can turn off
the pattern draft sketch. And on the leaf layer, I can just add the branches. And what I'm doing here
is that I'm trying to continue with kind of the
flow of the branches. So they're going in the same what do you say direction or in the same
they have the same vibe. Like, this one is
going straight. I don't want that. I want it to go a little bit down
like the other ones. We can also fix it in
the final pattern, of course, but this
is the final sketch, so I want to make sure
that I'm doing it in a way that will at least be close to how I want
the final pattern to look. And here, I can just do a little bit more
curve in that one. Okay, so for me,
this looks good. There's something a little
bit strange over here. Maybe we can fix that later on. I'm not sure. Let's see. So this is our final
pattern sketch. And in the next lesson, we will actually try
it out as a pattern.
8. Test the Sketch: So now we have our
pattern sketch, but we need to try
out the pattern, and we also need to
create the pattern out of this sketch so that
the ends meet up. So what I would do is that I will add a new layer
at the bottom, first, actually, of all, I will merge these
layers together, so I will merge
the pumpkin down, and then I will merge
the leaf down to the sketch final pattern so that I have all the
sketch on one layer. And then I will add a new layer and I will
drag that beneath, and I will just
fill it with white. I will just select
white over there or in your color panel and just tap and fill that
layer with white. The next thing that I will do is to select both of
these layers and tap group so that I have the background and the
sketch in one group. Then I will tap the group, tap the selections tool, and here you need to have free hand selected
because if you have automatic or if you have
automatic selected, it won't work, so you need
to have free hand selected. As you can see, you get this little error message if
you have automatic selected. That is a question that
I get a lot of times. However, if you get
any error message, you can just select both of the layers
instead of the group. That works exactly the same. I just want to mention that,
but I will select the group, tap selections, I have
free hand selected. I don't have color
fill selected, so that one should be white, and then I will tap
Save a load selection four tap the transform tool, which is arrow, flip vertical
and flip horizontal. Doesn't matter in which order you choose these selections. Then I will tap the
selections tool again, save and load selection three, the transform tool, flip
vertical and flip horizontal. I will tap the
selections tool again to deselect and the selection
tool once again, select selection two, tap flip vertical
and flip horizontal. It also doesn't
matter in which order you tap horizontal and vertical. You can tap flip horizontal
and flip vertical or flip vertical,
and flip horizontal. Then tap Save a load
again, selection one, tap the Transform tool, flip vertical and
flip horizontal. What I want to do now is
just to twist this around. I will just turn my
Canvas around, rotate it. That's the simplest way. Now we can see how this
pattern is repeated. So as we can see, I think that it looks good. If you feel that it looks
a little bit strange, you can tap the transform
tool and flip horizontal. That way, it might look
more as how you draw it. So now we can see
how this looks. I will start with tapping the
sketch final pattern here, and now I can go in and
adjust some things. I would choose black
as the color and with the perfect pencil again
from the pattern elements, I will just go in here and make sure that
these ends meet up there. Like that, we will need to do this when we create the
final pattern as well. But I just want to see that
the sketch is working fine. So I think that we might need to add a leaf as I can see it because we have a lot of
empty space over here. So what I will do then is
that I can just go in here. Or where should I add a leaf? Yeah, I think that I should
add a leaf maybe over here. That would probably look good. Okay, so the sketch, I will just add a
leaf over there. And as I don't have any leaf, now on a separate layer, I will tap the selections tool and I can just drag around
one of these leaves, tap to close it on
the gray dot, tap, copy and paste, and now I have a leaf from that selection
that I can place over here. So then I can just
adjust the leaf. I can adjust the bounding
box around the object. If I want to change the size, I have free form selected, I can adjust the
size of the leaf. I wanted to kind of fill up the space, but
at the same time, I don't want this leaf to be super large and the other
ones to be smaller. So it can be a little bit
bigger but not too big. I don't want any place in my
pattern to really stand out. I want the ice to move smoothly
throughout the pattern. So that is why I want the
leaves kind of the same size. So how does that look? I think that looks good. If we turn it around,
how does it look? Yeah, I think that it
looks okay, actually. Maybe it's a little
bit too far out. I can select that leaf again. It's there, and I
can just pull it in a little bit. Like that, maybe. Maybe that looks better. Then I can actually pull out that leaf, so then I fill that
spot a little bit. I'm twisting the pattern
around to see where do I have empty spaces that needs
to be filled a little bit to make it look
more balanced. I'll just merge these
two, merge down. I have all in the
sketch and then I will tap the selection tool and I will just drag around this leaf. And then I don't need
to copy and paste. I can just tap the
transform tool and drag it out a little bit, just a little bit
and twist it around. And then add a new
line there for the branch or the vine or whatever you say to
go out to that leaf. Now, I think that this
pattern looks good. It might be so that it feels
like you have a space in the center here because nothing
is actually overlapping. So what I could do
is that I could just pull out this pumpkin.
Let's try to do that. I don't know if you can
see it on screen now, but the objects are kind of
flowing into each other, but you can see a
straight line here. And if you can see a line like this in a pattern that is
supposed to be flowing, then it will be easier
for the line to see where the repeat is. So I want to kind of
just overlap something on that line so that I
can see it as clearly. So I will just pull
out the pumpkin. I will select the sketch layer, tap and drag to select around the pumpkin,
tap the gray dot. Then I can just pull out
the pumpkin a little bit to kind of make
it overlap that line. Like that, I think that
probably will look better, and then I will just add
a little line there. That looks good. I do want this to be
a little bit thicker, but I will fix that with
the brush later on. And let's see how everything is. I think that something
might be missing over here. But what I would do now is that I will swipe down
with three fingers, tap copy all, swipe down with three
fingers and tap paste, tap split screen, Safari, and then I go to the Pattern
Tester on my website, which is linked to in the downloads and resources
section in this class. And then I will tap and drag to place my
pattern in there. And here I can just see if I have some empty space and I can instantly see that I have
empty space over there. Then I just need to figure out where that is
in the pattern. I could just easily add
another leaf there, I think. Let's see where it is.
It's probably over there by the double. Yeah, it's beneath
the double leaves. Double leaves are
going that way. So then I have empty space here. I might be able, I will just erase that image and
go into the sketch. I might be able to
just add a leaf here. That might work. And then I don't need to repeat it again. So I can just fetch a leaf, tap the selection tool, drag around the leaf,
tap the gray dot, tap copy and paste. And here I have a
new leaf that I can adjust the bounding box with a yellow little dot and
I can just drag it up, tap free form, so I
can change the size of it and rotate it a bit. Maybe like that will look good. And then I can adjust how
it's connected with the vine. I think that probably look good. So let's swipe down with three
fingers once again, tap, copy all and swipe down
with your fingers, tap paste, and then tap
spit screen and go into the paten tester again and drag in your image. And let's see. Yeah, I think that leaf
filled out the space. So we might need to make
some final adjustments. But for me, this looks
good as a sketch, and now we will continue
with drawing the motifs with
9. Draw the Vines: So now it's time to start to draw actual pattern
with our brushes, our textures, and our colors. We need to try out this
pattern later on as well and might need to adjust some things even after we made this
sketch so throughly. But we have come a long
way with our skit, so I think that we should come pretty close to final
pattern when we're finished. So if you ended up with a little single leaf over there above the
sketch final pattern, you can just merge
the sketch layers together so that you have
all of the sketches, the final pattern
sketch in one layer. I did that off camera, and then I couldn't redo, so I couldn't show you that, but you can just merge all the layers together that has the final pattern sketch. I also have the
sketch pattern draft and the sketch motifs. I want to note before
we start that if you end up with reaching
your layer limit, I would suggest to save
the sketches in one file, and then you can just create a new file
like I've done here, select the file and duplicate it and draw your
pattern in one file. That way, you can delete your sketches as you
don't need them anymore, but you might want to
sketches for future use, so you can always save
them in a separate file. Okay, so tapping in to
one of these files. That was just a little tip
before we get started. I never reach my lay
limit anymore as I had a huge storage of 2
terabytes on my iPad, so I never reach my lay limit. But if you do, that is one tip on how to move
forward from there. Okay, so the next
step that we will do is to just tap in on the
sketch final pattern, and I will just drag down
the opacity on that one. So for this pattern, we will
draw it in some colors. I will draw it in with
a white background, and I think that I will draw
the vines with some kind of, like, bluish color and
the pumpkins in orange. But then later on in glass, I will show you how to change
the colors of the pattern. So for now, we are
using these colors, and then we will
change it later on. You can use any colors
you want to, of course. So we already have a
background layer here. Let's just rename
that to background. And then tap and drag out your color palette to your canvas so that you have the pumpkin vines
color palette here. I will just adjust
this to go with the cream white there
in the color palette. So I will tap and drag to fill the background layer
with cream white instead of the really
bright white color. The next step is to add a new layer on top of the
sketch final pattern. This one I will rename to Vines. Now, I'm not a native
English speaker, so I'm not sure what part of
this is called the vines, actually, or if any, is, but I'm calling it Vines. I think you understand
what I mean. But when I'm talking
about the vines, I'm talking about the larger
branches that goes up there, and then we will add the
leaves and the pumpkins. So I'm going to choose
the vintage ink from the Pumpkin
Vines brush set, and I am going to use
this little purple, kind of dusty lavender
purple color. And I'm not sure which
brush size to use. Let's try with around 20% there. And I'm going to start to
draw the actual vines. I want them to be thicker
than the actual sketch. So maybe this is good. I'm not sure yet. I think
that it looks good, but I think that I need to
go down in the opacity here, so I will tap the sketch
final pattern again and bring down the opacity to
maybe just around 10%. I hope that you can
see that on screen. Okay, I'm going to go
up a little bit so you can see it on
screen, around 15%, but you can go to
as low as you want to so that you're not disturbed
by the background sketch. And then I will tap
and drag and draw. Let's try maybe around
12% in brush size. And I want to, like,
push and let go, press and let go with the brush so that I
get a little bit, like, uneven brush size. I'm not sure if that was good, or if that was too thin. Might be good. Let's try it out. And then I'm going to go in and draw the second vinee
which is this one. Some kind of pushing and
letting go and pushing and letting go to get
this organic stroke. That aren't equally thick
or thin around the stroke. Okay, so now I've
created the vines. And what I need to do now
is just to match them up. So I will tap the group, tap the selections tool, save a load, selection four, tap the transform tool, and I will just flip vertical, and then I will tap save
a load, selection three, tap the transform
tool, flip vertical. Save a load selection two, transform to flip vertical, save a load selection one, transform to and flip vertical. Now we can see that the
ines aren't meeting up, so we need to go in and
erase a little bit here. I will erase some parts
so that I can get them to meet up without getting
some strange edges there. And then I will use
the vintage ink again. Maybe I should save
that brush size. I'll tap the brush and tap the plus to save 12%
there in brush size. And then I'll just try
to make the meet up. I can fix the details
by zooming in. As long as you can't see
where the edge is, it's fine. So that looks good. And now I can see that I have some scruffy parts here
that I will just raise. Swimming in so that I don't
have any more of those. No, that looks
good. Okay, so now I think that this looks fine. It's something with
this little edge there. Yeah, that looks
good. Okay, great. So now we have our vinees. So let's move on to
the next lesson.
10. Draw the Pumpkins: Okay. So moving on to
drawing the pumpkins, as I drew this pattern
in the other direction, I will actually do
that now as well. And as the pumpkins
are, hopefully, if I turn this pattern around, will the pumpkins be in
the center? I'm not sure. Okay, let's start like this
and see what will happen. So I will add a new layer, and I will name this one Pumkins and use the orange color, the brown orange color, and the vintage ink. So now I will start
to draw the part of the pumpkins that
are the orange ones, and then we will connect
it with the vines. So I will actually
just draw like this. And then I will
erase some parts of the pumpkin that I want to be like the inner parts of this little I don't
know what you call it. The shape of the pumpkin.
Okay, something like that. It doesn't matter that much at this part of the pumpkin as that branch or
whatever goes there. So what I will do is that I will just fill in this with color
with the orange color. So I will draw it in because
that way we will get the awesome texture
that this brush gives. So when you're drawing
with this brush, you instantly get this
kind of vintage texture, which I really love. It also saves a lot of
time adding texture. You just get it instantly. So that's good. So
filling it in like that. Mm. Okay, so maybe
something like that. And then I want to add
the sketch on top, so I will just tap and drag
to drag the sketch on top. And on the pumpkin layer, I will tap and hold
with the eraser tool so that I will erase with the
vintage ink brush as well. And then I can go
after the sketch here, but I also want to
go after the blobs. You can see where the blobs, I don't know what
to call them that they go down like that. So first, I will just
do like a rougher sketch maybe
something like that, and then that one goes in. And then we can adjust
the edges later on. That one goes in like that. So what I'm doing
is just to meet up this inner part
here with the top. And on the top, you will get this little thing that
goes in the center. So it's not super important
how it looks over here. But I'm trying to get a good flow and a good
movement in this. Lines. So we're actually
erasing parts of the motif now, you can also add white parts, but I know that in this pattern, I always want the
background to be showing underneath
these pumpkins. So then I know that
I want to erase. With this brush,
when you're erasing, you can see that you
get some little, like, scruffy parts here. You can erase that as well, so that you get a clean line. But it's your choice. It depends on the look
that you're after. In this pattern. I might need to adjust some
edges there so that they're not too, like, pointy. So I'm just fixing the
details here with all of these erased lines. Okay, so that looks good. And then I want to add
that part of the vine. I will do that on a separate
layer because I want to keep this orange on one layer and
that part on another layer. So I want to add a new layer. Later on, I will actually add it to the leaves layer, I think, but now I will add a
new layer and I will choose that purple
or lavender color. And pull it up. As you can see, it's not
directly on the sketch there, so I need to see
where I've actually drawn the vinee and
not the sketch. So maybe something like that. Let's fill that in
and see how it looks. You can always change later on. That's what's so
nice with Procreate. It's so easy to make changes. Okay, so let's turn off the sketch now
and see how it looks. Yeah, so I like
the look of that. I think it might be nice to have a little bit more flow
to that piece there. And I also want to erase some, like, thicker lines
on the pumpkins. I will go back to the pumpkin
and I will erase some more. So then I don't need a sketch. Now I will just see how it looks and how I
want it to look. And this is all a matter
of personal preference, style, what you
think looks good. And yeah, trial and
error, actually. When I'm creating these types
of patterns where, like, this small pumpkin is only one part of a kind
of intricate pattern. So then I don't think
that you need to mind, like all the details
on all of the motifs. So much because it's the whole pattern that
matters and how it's balanced and how it flows and not specifically if you
have a little scratch there. It doesn't really matter
that much most of the time. It's how your pattern
looks as a full pattern. Okay, so I like this,
but I want to adjust that little part there, and I think that I want
it to go up like that, and that instantly
looks better for me. So I'm happy with
that at the moment. And now let's continue
to draw the rest of the pumpkins just like this. So we'll turn on
the sketch layer, and I will on the
pumpkins layer with the orangey brown color,
draw another pumpkin. So here, I want to mention that if you want to use the same
pumpkin over and over, you can definitely do that. It will make the pattern
look a little bit more static and not as dynamic. I'm going to draw each of
these pumpkins to make a little bit more flexibility
in the pattern or a more dynamic pattern
with more unique motifs. But if you want
to just duplicate this one and add
it to over there, you can definitely do that. That's a matter of choice. But I'm going to continue to
draw the pumpkin over here, so I'm going to draw like this. Like that. And then we
will do the erasing part. So as we did this
one time before, I'm just going to do
it rather quickly, and you can just
draw along with me. Mm. Maybe I don't need
that part to be two. I can just make
it one like that, maybe. I think so. Then I will erase
a little bit more. I think that I will
do the final parts of the erasing when we added little branch and things so that I
know how it looks. Okay. And then I'm going to go into that layer with a
little branch there, and I will draw it from the vineeG down like that and just kind of trying things out
and see how it looks. Then I need to turn off the sketch layer to
see how that looks. This looks really
strange over here. I'm not super happy with that, and I'm not happy with how
that looks over there either. So I will just adjust that
part by drawing that in again and probably just
creating a new line there. Maybe I want these to be
a little bit more blobby. I don't know. I'm not sure. No, that looks super strange. No. Okay, filling it in. And then let's see how we will make those lines look
better. Like that. That looks better. And
then maybe like that. Yeah, I think that looks fine. I could adjust that part. So you can be as detailed
as you want to here. But now I am happy with that, so I'm just going in and erasing the details here in
the white parts. Okay, I think that looks good, especially when we're zooming out and seeing the
whole pattern. So now let's move on
to the next pumpkin. Which is that one. Now I would say that you can
draw each of these pumpkins. I will do a little cheat here. I will select this pumpkin and tap two closed a section
and tap copy paste so that I get it on new layer. And then I will tap
and drag this one down over there
and just copy it. And I can adjust the size, maybe just making it a little
bit smaller and just a little bit fatter like this. So maybe something like
that. If you don't adjust too much and if you
only make things smaller, you won't lose that
much resolution. It won't show anyway, the amount of resolution
that you will lose won't show in your pattern. So now I will tap on the layer with a
little branch there. So I did a little
cheat and I copied my motifs because
this class will take a really long time if
I draw every single motif. Like that. And I think
that is also a good trick. You can copy and just adjust
the size a little bit. And it will still be a
very interesting pattern. Does that look good? Can we just turn off the
visibility of that one? Yeah, I think that looks good. Okay, so now turn on the
visibility of the sketch and tap the group because now
we need to flip it around to be able to
draw that pumpkin. So I will tap the
selections tool, tap Save and load, selection four when I have
the group selected. Tap flip vertical
and flip horizontal, tap the selection tool to deselect and tap
the selection tool again to select selection
number three and save and load, flip vertical and
flip horizontal, tap the selection tool again, selection two, the
transform tool, flip vertical and
flip horizontal, tap the selection tool again, Save and load, selection one, flip vertical, and
flip horizontal. Where is the pumpkin? Oh, no, the pumpkin is over there.
Sometimes that happens. So what we do then is to
tap the selections two, save a load, selection four, and just flip vertical. Tap save a load, selection three,
and flip vertical. Save a load, selection two, flip vertical, save a load and selection one,
flip vertical. And now we can
draw that pumpkin. So now if I want to, I can, for example, copy that pumpkin, and I will actually
do that because I am a little bit lazy today, and I just want to
finish this pattern. So I am selecting the pumpkin with the
selection tool, tap, copy paste so that I
have it on a new layer, and then I will tap and
drag to add it over here. You can flip it to make it
look a little bit different, and you can adjust
the bounding box with the yellow box there, and I will just adjust the size. I could even drag
it down like that. So then I have adjusted
the size a bit. So that's good, but
I think that it's flowing the same
position as that one. Maybe I want it to be a
little bit more like that. And then I need to
adjust that as well, because I saw now
when I placed this that it was in the same
direction as that one. So I think that it will look better if it's more like this. So those things can happen when we are creating
the final pattern. On the layer with the
little branches there, I will go like, free hand like this, or maybe I want to do
it like this direction. So I need to have like
a line that goes out, maybe like that will look good. Then I can turn off
the visibility of the sketch because
that's just in the way, and I can adjust where I want
that part of the pumpkin. Yeah, so I think that
this is looking good now. We can also adjust, maybe we want them a
little bit thicker. These are all details
that you can work with for how long you want to. In the next lesson,
we will draw the.
11. Draw the Leaves: So now it's time to start
to draw the leaves. So what I will do then is just first to merge the layers
with the pumpkins, so I will tap merge down on all of those layers so that I have
all of those on one layer. Then I will turn on my sketch, and I will on the layer
with the branches here. I will rename this leaves, and here I will start
to draw the leaves. So with the vintage ink again, I will just start to draw them. And here I won't copy them. I will just draw each
leaf by themselves. Just to make a little bit
more dynamic pattern. So I was a little bit lazy
there with the pumpkins. You can draw each pumpkin
completely unique, and that might make a
more interesting pattern. But for me, I just
wanted to copy it so that I quickly could
move on with the class. Okay, so moving on, let's
start with drawing the leaves. So first of all, I will just drag out some branches
because as you can see here, the sketch is a little bit off. I changed it from
the original sketch. So what I want to do is maybe I can just draw
one of the leaves here. So that I get a feeling for
how the leaf will look. I know that I want to pull
that one out a little bit, but I can destroy it like this because the vines are
on one layer now, so that's good with keeping them on separate layers,
at least for now. And I can see if I want to put it out in
this empty space here. I think that I do
want to do that. So then I can just tap
the transform to oops, tap the selection tool
and just select around the leaf and just drag
it out a little bit. So that was the first
leaf that we draw, I wanted to make sure that I
got the right shape of it. Otherwise, I could just
draw it like freehand, and then I can just add little branch that
goes up like that. I will adjust these later on. But I just want to get a good flow in the
pattern for now. So let's just draw
that one over there. I'm filling it in so that
we get this yummy texture. And moving on, I
would do this one. Maybe we should go
up something like that and feeling it in and adding one
over there, maybe. And now I'm just trying
to go with the flow of the pattern and not completely
drawing after the sketch, but at the same time
using the sketch as a guide for the placement of the motifs so that I don't get the balance and
flow completely wrong. Okay. And then we
have one over here. Maybe it goes out. Like that. Oh, I have around
12% in brush size. And going up like that and
maybe I'm going down there. And then this one.
And here I wanted to show you what to do if
you're doing overlapping. In this pattern, this will probably be the
only overlapping, so that's a little
bit strange, maybe. But I just wanted to show
you how you could do that in a simple way. I'm not getting that
right. Okay, like that. And we have something else? Yeah, we have the other
ones that are over there. But let's start with these ones. So now I just want to turn off the sketch so that I can
fix the details here and maybe just get
a good like vibe in the pattern and a good movement with
these branches. Those look good. This looks
a little bit strange. One. Here we are missing
some colors over there. Okay, so this is at least
good enough for this class. Now I will do the same technique as it did with the pumpkins. I will tap and hold
with the eraser so that I can erase just
some little lines. And I'm going to do these
lines rather quick. Something like that.
And then I noticed that this is much thinner than
all of the other ones. So I will just
adjust the size of that branch going out there to leaves and
that looks better. I think that I want, like, thicker branches
in this pattern. That would probably look good. Yeah, I really like to
look when they're getting a little bit thicker
these branches. Something like that. I
needed to pause there to connect the power cable. But now I will adjust
this little vine there because I can just
erase that part of the vine and I will
show you how to do when you have
overlapping objects now. Tap the vines layer, and then you can just
use the eraser and just erase a little bit
outside of that leaf. And that will give you
a really nice effect. So as we didn't plan this, I haven't I haven't made more leaves overlapping,
but that's fine. I will just raise that
part of the vine, and then I will go in on
the leaf and just fill in the parts that were missing there. So that
looks pretty cool. So you could do that all over
the pattern if you want to. I'm not going to do that now
as we didn't plan for it, but that is how I would do
very simple overlapping. Motif. So now we need to flip this whole pan around because we have leaves in the edges. So we can pull it in. So tap the new group over there. That's the pattern and tap the selections to save
and load selection four, tap the transform tool, flip vertical and
flip horizontal. Selection two, saving
load selection three, flip vertical and
flip horizontal. The selection tool, saving
load selection two, the transform tool, flip
vertical, flip horizontal. The selections two, save
and load selection one, the transform tool, flip
vertical, and flip horizontal. Here we have some leaves
that we need to fill in. I will just turn it
around maybe like that. Yeah, like that. I didn't
need to turn around. So tap the leaves layer, and with the same branch with the same color, I
will just continue. Maybe I want to
turn around to get a good bow good look of
that branch over there. So, something like
that looks good to me. And then the next one
could maybe go from there. I'm changing the sketch a little bit to adjust it to
my final pattern. That's fine. Like that, and then we have
one leaf over here going up there and the leaf. Maybe something like that. Okay, so that looks good, turning off the sketch and then erasing
part of the leaves. Oops, too big. I don't know what size. Seven. Yeah, seven is good. So three little
lines on each leaf. So this all looks fine to me. I'm not super happy with
that leaf over there. Let's just turn on the sketch to see if we have covered all
leaves. Yeah, we have. Okay, so now you can just see if you want to
make some changes. I can instantly see that I
want to change this one. So I will actually I think that I will just pull that one out. I will grab the leaf with the selection tool and
try to pull it out. Tap to close the selection, tap the transform tool, pull the leaf out a bit, and then I will add
that little line there. I will adjust it, make it a new one so that it fits better. Not like that more. Like that, maybe. Yeah, this looks better, and then I can just
add a little bit on that one so that it gets
a little bit bigger. So what this also
did was that it moved away from this center line that we talked about earlier. So now we have a little
overlapping leaf up here as well. I think that that looks good. I could make it even a
little bit larger if I wanted to Okay, so for me, let's
twist it around. This looks really good. So now it's time to try out this
12. Test the Pattern: So now it's time to
test the final pattern. And what I would do then
is just to tap the group so that I'm on top of the
group when I paste my image, and I will swipe down
with three fingers, copy all, swipe down with
three fingers and paste. And then we can test the
patterns in two ways. The first way is to use my
pattern tester on the website. I will tap the three
little dots at the top, split view, tap Safari and I
have my Pattern Tester here, which is linked to the resources and download lesson
in this class, and then tap and drag
to pull in the pattern. Then I will zoom in and zoom out and see how
the pattern looks. I think that it looks
really, really good. I really like that the pumpkins are in small little groups. And I like the flow
in the pattern. If I would have
remade this pattern, I might have made more of
the leaves overlapping. I'm not going to do that now, but that's just a little
tip from me to you to make the pattern even
more interesting to overlap the leaves
a little bit more. So I really like to
look at this pattern, but I'm not super happy
about the colors. I don't need to change anything in this
pattern at the moment. But before I'm
changing the colors, I want to show you how
you would do if you would make some final
detail changes to the
13. Make Changes: Okay, so if we want to do
some changes to the pattern, I didn't feel the
need to do that. I will show you how to do it. So you can do changes to
the pattern just straight away on the motifs that
are here in the center. If you, for example, would want to add
something here, you can just do that and
nothing will change. But if you want to change
something that are edges, you would need to repeat
the pattern again. So then I would tap the group, and I would actually
tap on to turn on the sketch as well so that
everything is flipped around, and then tap the selections to, Save and load selection four, tap the transform
to, flip vertical, flip horizontal, tap the
selections tool again, selection three, tap to
transform to, flip vertical, and flip horizontal, and tap the selections tool
again, selection two, the transform tool, flip
vertical and flip horizontal, selections tool, same
load selection one, the transform to flip
vertical and flip horizontal. I'll just turn off
the sketch layer, and here you can go
in and make changes to your motifs that were
on the edges as well. So that is how you
could make changes to the pattern once you have
created the final pattern. I would just turn it around
so that I have it like this. Okay, so the next step is
to recolor this pattern, and we will do that
in the next lesson.
14. Recoloring: So now we will
recolor this pattern, and I want to do
that because that I think that it looks
a little bit sharp. This pattern for me would
look great as, for example, wallpaper or maybe
maybe on fabric, but I think I'm thinking
of, like, wallpaper, stationary, maybe some kind
of textile home decor. But as wallpaper, I wouldn't want this to
be the bright colors. So I want to change it. I've added some colors in the Pumpkin Vines color palette that you can use and
experiment with, and you can also
use any other color you want to, of course. So let's start with
selecting the background. And I want to add a
color to the background, so we could use maybe we should use the green
color as a background. So let's tread it
out. I want to use the green over there and tap and drag the mint green
to fill the background. And then I want to change
the color of the vinees. So I will tap the vinees layer, tap Alpha ok so that you will only color the
objects on that layer, and then I want to use white, the cream white, tap the layer with vinees
and tap fill layer. So now I have recolored
those in white. I want to do the same
with the leaves. So I will tap that layer and tap Avalok and then tap
the white again, tap the layer and tap filler. So that looks pretty
cool, but I also want to change the
color of the pumpkins. So I will tap Avalok
on that layer, and I think that I
want the pumpkins to be a darker green there. So I will tap the
layer and tap filler. So for me, this looks
really, really cool, and I really like the look of this pattern now
it's three colors, but it feels like it's
almost two colors and then just a different
hue of the green. So that's much softer
if we're thinking of like wallpaper and
those sort of products. So that is how you recolor this pattern to
not lose texture. You can also, for example, recolor by tapping and filling and tap continue
fill and do like this. But for me, that
won't necessarily fill in all the textures.
Sometimes it does. Now it does, but sometimes it doesn't I'm using the Avalok and fill layer to make sure that these yummy textures are
all filled with the right
15. Add Overall Texture: Now we are going to add some more yummy texture
to this pattern. And that's simple to do. Just follow my lead. So I will tap on the leaves layer here and
tap to add new layer on top. And there I will just add overall texture as the
name on that layer. Then I will choose the
vintage texture brush, and I will go for a gray color. So just tap that
classic color panel and go for a light gray color. And I will go for a large breast size and then
just swipe over the pattern. So this looks pretty
strange, doesn't it? But that is because we
will use a blending mode. So tap the layer, tap the end symbol, and drag up to Caliburn. And here you can see that
you've added some texture. So I think that that texture
was a little bit too much. You can either bring
down the opacity. But first, I want to
tap of lock and just go up a little bit here in gray so that I have
an even lighter gray. Not over there over there
somewhere and tap the layer, tap the layer, so that it's a little bit
of lighter texture. But I still feel that
it's a bit too much, so I will tap the layer and drag down the opacity a little bit, maybe to around 50%, so that I have texture in
the background as well, but it's really, really subtle. So for me, this looks good. You can experiment
with how much texture you want to create. The grayer, the darker gray, you color this texture, the more texture it will become. So let me just
show you one time. If we go really dark
here and we will tap the layer when it has Alphalox selected
and tap the layer, you can see that you get
a lot of texture here, which I don't want to do, so I'm tapping with two fingers to do. But you can experiment, and now we added the texture. But what we need to
do now when we added the texture is that we need to create a pattern
of the texture, make sure that we
can't see any lines. So the first thing that
I will do is just to drag up the opacity
to maximum there. And then I will swipe
down with three fingers, copy all, swipe down with
three fingers and paste, and then I will split view, go back to the
pattern tester and just tap and drag my image. And then I will swipe
to the right to go all in full screen on the pattern tester and
just see if I can see any lines in the texture. I can't see any lines here, but if you can, I want to
show you how to fix it. So I'll just delete that image, and I will actually delete that first image
over there as well. And I will tap and
drag the sketch below, actually, because I
don't need that anymore. And then I want to create a
pattern out of this again, create the pattern action to see if you have any lines
in your texture. So let's just create a darker texture because I
want to show you what I mean. So I will tap a darker gray
color and tap three layers. So now we have a lot of texture. And then I will tap the group, tap the selection
tool, save and load, selection four, tap
the transform to, flip vertical, and
flip horizontal. Tap the selection tool again, selection three and save
and load the transform to, flip vertical, and
flip horizontal. Selection tool again, save
a load selection two, transform to, flip vertical
and flip horizontal. Selections tool
again, selection one to transform to flip vertical,
and flip horizontal. If we zoom in here, you might see that you
have a line over here, and if we zoom in, you can see that it's sharp, but you might not see
it in the pattern. But if you end up like this, I will show you how to fix it. So then we go into the
overall texture layer. We make sure that we have the
same gray color selected. And with the vintage
texture brush, you can, first of all, for example, erase a little bit of texture. So tap and hold with the eraser tool to
erase a little bit of texture on those places where
you could see those lines. And then I would go in with the texture and just
smoothen it out. You could do a little
bit smaller as well. So adding texture, but making
the line not so visible. Oops, I need to tap Alpha
lock to make sure that I can add texture on
the full layer. Okay, so now we don't
have any sharp lines. So that looks
really, really good. And then I can tap the layer, and I'll just bring down the gray color
of the texture there. So I will tap the layer again, tap of, tap layer, fill layer to bring down
the look of the texture, and then just drag down the opacity to what
I want it to be, maybe around 65% this time, and that looks good to me.
16. Test the Final Pattern: So we have finished
this pattern, and it's time to test
the pattern out. So swipe down with
three fingers tap copy, swipe down with three
fingers tap paste. I still haven't really
decided if I want to pattern in this direction
or in that direction. But I don't know. Let's
just make the pumpkins. Hanging or you can
make them upwards. I think that this
was the original that I did. I'm not sure. I don't remember
anymore, but I'm going to keep them hanging
downwards like this. Then I will tap the
three little dots, tap split view, tap Safari, and then I will tap
and drag my image, and I can drag down
for a smaller size. I really, really like the
look of this pattern. I think it will look amazing
as wallpaper, for example. And for me, this
looks super good. So then I will head back to Procreate and to test the
pattern in Procreate, I will just shut down
the color panel. I will swipe to right four
times or three times. Or actually four times so that I have four copies
of the original, and then I will
tap the transform to tap in the top
left corner node, type in half of the size
of the first box there. So 3000/2, 1,500. Make sure that you have the
blue chain symbol tapped in. I will tap the next layer, tap in the top right
corner node, 1,500, tap in the next layer, bottom left corner node, 1,500, tap on the fourth layer. Bottom right corner
node and 1,500. And here we have the pattern
repeated in Procreate. So this looks amazing, and it's time to
export our patterns.
17. Export the Pattern: So it's time to export
your pattern so that you can use it and also
share it here in class. So let's just merge
these four together, so you can swipe down with four fingers or swipe
down with two fingers, all of the four
layers to merge them. So this is your PT pattern, and this is your pattern tile. And you can, of course,
export them both. So to export your pattern tile, tap the actions
panel, tap share, I usually export as JPEG, and then you can just save image or wherever
you want to save it. To your dropbox, to your
iCloud files or wherever. And then I will turn
on the visibility of the repeated image, tap, the actions
panel, share and JPEG. And there you have
your two images, the pattern tile, and your repeated pattern ready
to be shared here in class.
18. Next Step: Grab Your Free Starter Pack: Before we end this class, I want to give you
something extra. If you enjoy this
class and want to keep building your
pattern design skills, I put together a free Pattern Rebels Starter
Pack just for you. Inside, you will find two mini classes,
procreate brushes, a playful color palette, time saving templates, and
even a procreate mockup. All designed to help you create beautiful patterns with more confidence and
less overwhelm. It's a real taste of the classes tools and
resources that you find inside the Pattern
Rebels membership without the commitment. No credit card, no
deadline, no catch. Everything is yours
to keep forever. You can grab it
right now through the link I've shared
here in class. Just click Sign up and you will get instant
access to everything. It's completely free. I can't wait to see what
you create with it. The link is in the
description about this class. And if you're excited
to dive even deeper, check out Pattern Rebels
my membership program. Inside, you will get
monthly classes, resources like brushes,
palettes, mockups, and pattern layout templates, plus design challenges, feedback sessions,
and Q&As with me. You can learn more at
patternrebels.com. Finally, thank you so
much for watching. If you like this class, you
can hit the follow button by my name so you don't
miss my future classes. You can also tap my name to see all of my classes
here on Skillshare. If you have any questions, drop them in the Discussions tab and feel free to leave a view
if you enjoy this class. I would love to
hear your thoughts. Don't forget to upload your
project here in the gallery, and if you share
it on Instagram, tag me with Maja Faber. I would love to see
what you create. Thanks again for joining me, and I hope that you
enjoy this class.
 Maja Faber, Surface Pattern Designer