Transcripts
1. Introduction: Hey, guys. Welcome
to this course. My name is Dijo Sengupta, and I am your instructor today. So a little background about me. I'm a huge nerd when it
comes to everything film, starting from storyboards
to editing to cinematography to color
correction, to color grading, to sound, to VFX, to CGI, to animation, to literally every single thing. I can talk about it days
after days and I can do it night after
night. That's how I am. I'm a little crazy, but like
film, and it's my passion. So I did my bachelor's and my master's in films
and animations, and I've been working on
literally all the softwares for almost 20 years now. Yeah. It's been a long time. And I directed a couple
of short films. I directed a couple
of music videos. I directed a huge web
series on prime video, and I'm super blessed
and honored to have all of these
movies, series, films get over two to
three dozen awards and nominations,
including Cans 2024. And I still can't
believe it's true. Pinch me. It's a fun
course, honestly. This course is this
class is for beginners who have no idea of the software
called DaVinci Resolve. I'm going to be hand holding each and every one of you guys, providing you the footages
and going through each and every single thing as to
how to create a masterpiece. Now, yes, I'm going to be
teaching the tools to you. I will be, but more
than the tools, I will also be focusing on
the mentality as to what does a person go
through when they sit down, when they
start editing. So the tools are important, 100%, but think
about it like this. Hollywood editors, when
they sit on a feature film, do they think about
that I'm going to start training those
muscles and teaching you, okay, how to creatively think, how to creatively edit. That is something I'm
going to be teaching you. So I'm not only just going
to be teaching you editing, I'm going to be teaching you
editing to tell a story. How to navigate through the narrative arc is something
I'm going to be covering. I'm going to be
covering on how to do cuts on a timeline with
the story in mind, depending on the genre of
the film that you're doing. Is it a commercial? Is it an advertisement?
Is it a short film? Is it a feture film? Is it a horror film? We'll
play it by the ear. Then obviously, the
different popular cuts, such as the JN L cuts, sifting, how to do jump cuts, all of
those things I'm going to be be covering how
to use transitions. And if you have
slow more footages, how will we time remap? Time remapping is
something when you see the footages going slow,
they're going fast. So I will be covering those as well and when to
actually use it. From a mentality perspective,
tools are obviously, you're going to see me
on the screen doing it tenuously Amab talking and telling you what
exactly I'm thinking, but also the tools is obvious. That's the editing part. The one thing I'm going
to be covering is sound music because I believe
sound is 50% of a film. That's what my amazing
professor used to tell me in my college days, and I believe it to
the dot, literally. I'm going to teaching
you the Fairlight page, which is the basics as without getting overwhelmed
as to how to use it, how to use transitions, how to use the equalizer, because at some
point, you're going to use the equalizer,
how to use it. And are some rules in Hollywood? What are some rules
to follow based on, what are the levels
for dialogue? What are the levels for music? I'm going to be covering
all of those and how to adjust them based on your film, based on your commercial,
whatever you're doing. And obviously, I'll be providing BN tire footage for you so that you can download
them and practice at your own will, at your own pace. Then I will be covering a
little bit on the VFX aspect. So I do specialize. I did have
specialization in VFX, but I'm going to be keeping
this intro very, very 11. So I'm going to be talking
about just the fusion page. Basically, I'm going
to be introducing you node to the node side because most people who are starting out are
used to after effects, but that is industry standard, but not for Hollywood level VFX. It is important to
understand how nodes work. The concept of nodes.
We're going to be covering the fusion
page in detail as well. But from the basic standpoint, I will be covering the
concept of masking, not just teaching you
how to mask stuff, but I will be
covering the concept. So you can then problem
solve yourself and use it on your own
footage because every footage is dynamic in nature. Then, obviously, we
will be covering tracking and king in case
you have some green screen, or if you want to
replace the sky, I'm going to covering
those basics. Little bit of tracking for motion graphics in case you
want to put some stuff in it. Then I'm going to be the
last but not the least, I'm going to be
covering rendering because that is
completely underrated. After you're done,
how do you deliver your footage? How do
you deliver your movie? How do you deliver
your commercial? Depends on where
you're putting it. Are you putting it on Instagram? Are you putting it on YouTube? A delivering it to a client? Are you giving it
to an OTT platform. So I will be covering
each and every one of them and how
to go about it. This class is not for people who have fair
knowledge in editing, but it could be something
that might give you perspective as to how the
mentality is for an editor. If you are a skilled editor,
you might know most of this, but it could be a
refresh for you. And this class is definitely for the beginners who have
no idea how to edit, but want to get into the
editing gig and actually make themselves available for
work in the industry, whether it's at a studio, if it's at production house, if it's at a corporate
marketing firm, or if you want to start
freelancing, whatever you want. This will help you
kick start and you can start your
own work into it. Alright? So let's go
without further ado, download the
footages, grab a cup of coffee, a bottle of water, and let's get started, and I'm excited, and you will have to submit your
final edit to me. So let's see how it works out, and I'm always there for
you. Use the discussions. You can head me up on
Instagram or email, and we can get started. I'm excited for this journey.
And let's get started. I'm going to go into my screen, and I hope you are, too. Cheers.
2. The Narrative Arc: Way we do it, we need to edit it in a way to
tell a story, right? So that's also where
you're directing your overall skills
come into play. So how can I explain this? For example, it depends on the genre of
what you're doing. If let's say you're
doing romantic, so romantic would
be somewhere along, um, slow paced, right? The editing, the cuts need
to be very, very slow paced. Obviously, you might
understand you might not mean if you're
a complete newbie, you might not know what
cuts mean, per se. So it's important to understand that cuts is basically
when there's different, you know, when you're
cutting between clips. So that needs to be fast based. Like, you see diferent differen scenes in different
different places. Very, very fast. If
it's, let's say, like, a romantic thing, you might want to make it more slow
paced, make it more lovey. That is something that
people will actually enjoy. People will want to, like,
relax and understand the emotion of the
person A and person B. So it depends on exactly how you plan to tell your
story. All right. So, uh, just looking
at my points here. So yes, so this is where you take a look at your
storyboards and your scripts and your
overall genre of the film. And based on that,
we do an edit. So what I've done is, um, I have shot something amazing, and I think it does what we're
going to be doing is we're actually going to go
through a complete edit and showcase how things work, how I edit stuff so
that when I edit it, I will actually show you and explain to you why I'm
doing what I'm doing, right? So this process is basically
to find your story. Sometimes you might
see you might derail a little bit
from your storyboards and scripts and your short list, which is absolutely fine because this is where improvisation, your skills as an editor
will come handy, right? So without further
ado, let's go. I am super excited for you guys. I'm gonna be doing
everything live. So I'm gonna be showing you the screen and
everything right over here. So I'm super excited. So let's go and let's go. Get ready to just
3. Software Walk Around: So basically number one thing that we're going to
be doing is I want to show you what I
have on my screen. So if you see this thing,
I'm going to keep, this thing that
you see over here, I'm going to be
moving it around. This is basically
for you guys to understand what I'm typing, if there's any
shortcuts, so you can actually see what this is. So basically, we shot this little short
film for this course, especially called Markets
basically about a person who is getting into,
um, the marketing. He's trying to trade stocks, and he's trying to take a risk, and we're actually
going to see whether he fails or he succeeds and whether he actually makes
money out of it or not. A so that's something that
we will be checking out. So if you see, firstly, as soon as you shoot, guys, as soon as you shoot, the number one thing you
need to do is you need to, like, just arrange your footage. That is super, super
important, right? So if you take a look over
here, we have videos. So we have different
scenes over here. We have, um, um, music where we're going
to be doing some BGM, which we've added
some background music and some sound
effects and audio, which is the audio that
is recorded, right? So now, what is room tone? So room tone is something we will talk about in
the sound area. We will look at mostly right
now the editing side, right? So, firstly, if you guys
don't know what to do, where to get the software, which is the DaVinci Resolve,
which is, like, right here, this is going to be in your
main software, right here. This one. And basically, what we're going to be doing
is you open your browser, it could be Google Chrome
or it could be Safari. So we go to this website called Black Magic
Design, right? So in Black Magic Design, you go to this place
called Products. You go to click on Products, you click on Deventi Resolve and Fusion software right here. So we have this DaventiRsolve. So this is $295, so we can go with the
free one, alright? So as soon as you
click on this one, you go to the free download now. You click on that, and you
basically do this public beta. This is the one that is free. This is the one that is paid. For now, free is good, right. So if you guys already
have this setup, so you can just ignore
this particular step, you download Mac Windows
or whatever you want. And once you download
your download will begin. It's a straightforward process, double click on the EXE or the DNG file and you
will have the um, software ready up and going. So what we're going
to be doing is going to be opening
the software. I am using a MAC, by the way, if you haven't realized it. What we're going to be doing is we're going to be overall going through the software and actually showing you
guys what it is. Now, if you're coming
from a place which is like Premiere Pro or if you're coming from
a place which is like, Final Cut Pro, this is
a little bit different. We don't have files
that we save. Everything is saved
on a database. So when you over
here, you can see, like, this is the screen
that is open up first. I'm just going to
get rid of this. So you can see over here,
uh, we have a database. So in the database, this is the place where you
will have all your projects, right in this area, right? This is where you'll
have all your projects. So, um, you can export, import, new project, open
project, and project. This goes a little bit advanced. I'm not going to
be covering that. Same thing with
Network and Cloud. That is advanced. I'm not
going to be covering that. So over here, you can
create a new folder, and this is just the slide where you can see
the views and stuff. This is a grid view,
this is a list view, whatever is your preference. And this is obviously
the search to search when you
have many projects, you'll be able to search it. Alright, then what we're
going to be doing, what I was saying
was that we don't really you know how in premiere, you have dot PR project file. So we don't really have files. Everything is stored in
a database, which is, if you click the Icon here, you can see, like
Reveal and Finder. I will show you over
here where Reveal and Finder or Reveal and File exxploorer based
on Windows or Mac. Over here, you see resolve
projects over here is where all of your
projects will be. So again, you don't
need to do that. You can just open
DeventureRsolve. You'll see your projects
over here, right? In case you want to
export the project, that is something
we'll cover towards the end of the
Edit suite, right? So first, we have a
simple untitled project. What we will do is we can double click this or
let's make a new project. So I'll make a new
project. We'll call this market because that is the name of the film
that we called it. So we do create. Alright. Look at that. So as soon as you see over here, I'm going to remove myself
from the screen, basically. So over here, if you see, I'm going to move this
thing over here, so you guys can see the stuff. We have different pages. So we have media,
cut, edit, fusion, color, falte, and deliver. So basically the
whole point of, um, this is to showcase that
you go from left to right. That's the whole point
of DivingiRsolve, right? So you start off with media, then you cut, then you
edit, then you do fusion. Fusion is basically the place where you do VFX and
motion graphics. Color is basically the place where you color
grade, color correct. Falte is basically the
DivingiRsolves version of their music place, and deliver is basically
to deliver your, um, final product to
whatever you want. Hopefully, it'll be
Netflix for you guys. So let's go page by page. Okay, so we'll do a quick
software walk around. So we go to, um, right, so media page over
here, if you see, um, this area, this area right here is
basically your storage. Basically, this is the Finder, slash um, uh Finder or
what do you call it. File Explorer, like in Windows, that's what
it's called, right? Then this area is
basically your bins. This is your audio. This
area is your audio, this area, and this
is your metadata. Alright? So you can
see over here we have um, these
different options. So basically, the way DaventureRsolve works is you can't really move
around stuff too much. It's like it's already laid out. The software workspace is
already laid out in premiere, you can take out windows and rearrange them
however you want. Over here, it's just laid out. So basically, this
is how it looks. If you want to close
it up like that, you can do inspector is
where there's different, um, options for,
um, your per clip. So this is a place
where we start, um, basically your edit. So keep in mind this top part is your
local computer folder, basically a folder
structure of your computer. So you can see,
like we have Users, GGO, so we have all these stuff. There are desktop
documents downloads is over here, right? So what you can do, there are two ways you can import stuff. You can either drag
and drop from top to from top to, like, bottom, like here, or you can just open your File Explorer
and then there's drag and drop them, right? So the way I like to work, I like to skip this
media and this cut. I like to directly go to Edit. So basically why I like to
do that is because it just gives I'm old school like that, you can say, it's just everything
is laid out over here. But I want you guys to know
what each page does, right?
4. Importing Footage: Now, I'm going to move
this here so we can create over here, um, new bin. So basically what a bin is
basically like a folder. So I want you guys to
make sure that you guys know that housekeeping
your bins, housekeeping, your
files and folders is super, super
important, right? So we have videos, then we have some go to start
using a shortcut now, which is Command Shift, you can see it on
the right side. We call it audio, right? So videos, audio, and
that's pretty much it. We have two things right now. In the future, maybe we might do SFX and BGM at a later point. So now we go to videos,
and we use Command I, or you can do right
click and you can import the media
age command I. So what I'm going to be doing,
I'm going to do Command I, that'll open up, my finder. What I'll be doing is I'll be taking this video right here. So what I'm going to be
doing is, as you can see, I have things laid out
in scene one scene two, scene three, scene four,
scene, five scene, right. So I have all these
scenes laid out. So instead of dragging and
dropping each, you know, things like this,
what I'll be doing is I'll just open it
from right here. So we have Dropbox. I'm going to be going through
let's see from Academy. Then I'll just open it. We do filmmaker journey courses. This is the Edit suite, the market, we have video. So we have all these renders. What I'm going to be doing is
I'm going to taking all of this and just dragging
it to the bottom. So it says change
project frame rate. I do not want to change
my project framewor. I want to keep my project
frame rate as it is, right? So now you can see
what happens is, everything is just
dumped over here, right? I don't like the way this works. So what I'm doing is I'm going to be deleting
all of this. I want my bins, also
to be arranged. So what I'm going to be
doing is I'm going to be doing we'll
call it scene one, scene four, seven
and scene nine. Alright, so since I opened it, I'm going to open
scene one here, open scene one here as well. Take this drag. All right? Don't cheat. Wget
frame rightate. Scene five, scene five, take it, drag scene nine. Scene nine, take it and drag. And then we have
maybe a time laps. Now, we make a new bin
called Time lapse. Alright? So open
that and drag it. All right. So now what
you can see is we have videos where everything
is arranged properly. With these sliders,
you can actually make it big or small,
however you want it. So let's make it
big for you guys. So basically, as you can see,
if I open scene one now, you see how there's
different things. So you can double
click to actually see. And over here, if you take
a look at the right side, I'm going to remove
myself from the screen. Uh, this is the inspector. Basically, the inspector
has different parameters, Zoom position, rotation angle. Basically, it will rotate
the entire thing, right? Then we have pitch is like that. Then we have VRs like
this, then cropping. Obviously, we can dropping is, you know, I'm assuming,
you know what dropping is. Then we have, uh, we get
into all of these in a bit and then endereta is
basically what is the codec, the frame rate, the resolution, the audio, and time code, and just more details
about it, right? So we have basically done the first aspect of importing
the footage, all right? So now basically what
we're going to be doing is we're going to be
starting to edit. So now the cut page is
something basically. It is to quickly sort
your footage, right? So basically, if you see
this is your media bin, so you have all of
these things ready. What you can do is you can just, like, see it all and
you can edit it. You can just, like, drag
and drop footage over here. But I personally don't
use the cut page as much. I directly like to
go to the edit page. Reason being, it is
much more cleaner and you'll actually understand what exactly is going on over here. Alright? So now, I am ready. Alright, so also
I'll be looking over here on my left side,
which is my other monitor. Basically I'll be looking at my storyboards in my short list, so I can actually understand
what I am doing it. So, right, so, obviously,
we start with scene one. Okay, before I get into that, let me talk about the
Edit page a little bit. So same thing. This
is the media pool. The media pool is basically
where all your footages are where all of your footage, audios, then we have
it could be music, it could be assets, animation. All of that will be residing, like, right on this area. This is your main timeline
area, the entire area. And then on the right side, let me just remove myself. This is your metadata, and this is the inspector, metadata mixer, basically right here is
basically the audio. And then Quick Export is something if you want to
export something quickly. Now, the way the venture resolve works is these arrows, you see, you can increase them
if you want to have a better look as to
what is going on. This will reduce the timeline.
Same thing over here. If you want to see more options, you can click this
down, click this up. Everything is pretty
much how I say. It's very limited in
terms of customization, but it really helps
because it makes you focus on just what you want to do, like, your creative side, right? Why my ears are
hurting a little bit. These headphones are
after a point, you know, it just hurts your ears because you're hearing
yourself continuously.
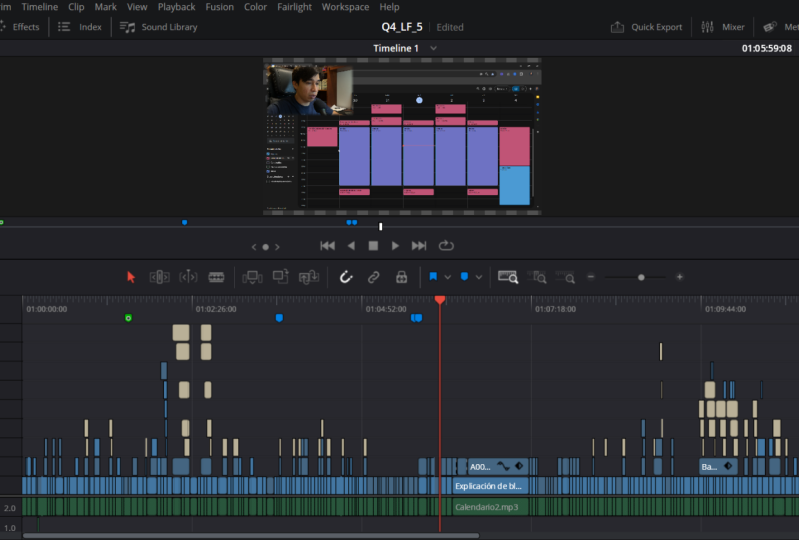
5. Sifting: All right. What I'm
going to doing? I'm going to start, firstly, the other bin that
I'm going to be making is I'm going
to be making this bin called Timeline Timelines. So I'll move this in the master. So timelines is basically
right here your timelines. So timeline is where
the edit will happen. So I right click
Create New timeline. So we'll call it timeline
version one, right? And I'm not going to
use project settings. I'm going to uncheck this so
you can see what I'm doing. The format, what I'll be doing, I will not be working on four K. I'll be working on 1920 by 1080, 24 frames per second. Monitor is basically what
you'll be seeing over here. This is where the monitor
is. This is fine. Output, I don't need to worry
about this and color, also, I don't need to be
worrying about this right now, and I do create. So basically timeline
version one gets built. So this is timeline version, you can see Video
one, audio one. So this option over here is basically it has
displaced tack timelines. So what this does is
like a tab, right? It's like a tab where you
can have multiple timelines. So timeline, version
one, version two, you can keep adding
and deciding. So as a trick, I like
to keep that on. I'll talk about these
track heights in a bit. Let's start dragging
footages and seeing what's up. So
we have seen one. Let me just scrub through this. So you can see a lot
of noises there. So I'm just scrub
into the footage. So we have a medium
shot, and we have, like, a medium wide
shot, I would say. So I'm just, like,
sorting through the just seeing
which one I can use. So what I'll do is I'll
take all of these three. I'm going to drag them
right over here, right? So now, the way we can, um, uh, do this is basically fun thing is once you
have the timeline, right? So the way we can work is
this button right here will basically zoom you out
to the entire tannel so you can see all
your clips over here. And this one basically zooms into a particular
clip. All right. So for example, if I click
this and I go like that, it zooms into that clip, right? Detailed Zoom. And if
you hover over this, it says full extent zoom. And this is what custom Zoom. So now way the way how you can do it is you hold
command or control. So you hold alter option, I need to keep
dragging like this. That is one way of doing it. And shift and the scroll wheel is making the video
track up and down. Same thing with the audio, depending on where
your mouse is. And Shift Z basically puts
everything into picture. So even like let's say I have this to open and
this to open now, see how that's getting hid out. Now if I do Shift
Z, Look at that. It's made over here. So going to remove
that up because I want my timeline to be big shifts. Alright? So that's how it go. So now what we'll do is I'll be scrubbing through this timeline. So we can see like over here. So we see over here we have this out of focus shot to him. So what I'll be doing is
I'll be cutting right here. Okay? So basically
now what this is, take a look at this.
Trim Edit mode. So we have this selection
mode, Trim Edit mode. Then we have dynamic trim mode, and then we have the Blade tool. So the blade tool is with B. The trim mode is
with T. So what is trim mode is basically now, let's say, first, I'll show you what
trim mode is in a bit. This process, by the way, when you're just putting things in place so that
the story is there, this process is called
sifting, right? So press B for blade.
See how the icon change? I'm going to cut right
here. What I'm doing, I'm going to drag
select this part. I'm going to be deleting it. Backspace. Now, you can do that, or what you can do is this thing called ripple delete, guys. Ripple delete is basically it deletes it and
deletes all the gaps. So as soon as you ripple
delete, look at that. It goes all the way to the end. Same thing, for example, if
I have a cut right here, so to cut at that particular
time, I use Command B. So if I cut here and I cut B, and then I select this, if I delete, see how there's a gap. Now, Command Z to undo. If I take this and
I do ripple delete, that means it deletes
the gap as well. All right? So Command
Z to also um, undo it. So let's
say I'm over here. Now, I personally, I don't
want the audio, to be honest. So you can see how when
I'm selecting the video, the audio is also
getting selected. The way why this works is
because this is linked. So linked selection is on. So I'm going to
uncheck that. And then I can see how I can
select these separately. So I really don't care
about the audio here. I just want to see this because
I want music over here. Same thing over here also, I don't want the audio, right?
6. Cutting with a Story in Mind: So now, let me just play
and see how it looks. So you see how it's
slowly coming into focus. So let's see, um. So I think over here,
there's a little bit, um, I think the acting might not be the
best part over here. So what we'll do is we'll
just scrub and see. So you can see,
where he's shaking. So you can use this
part as a cut. So I do Shift V right here. Shift V to select the clip
at the playhead, basically. So what I'll do is I'll just
do a cut which is Command B. And over here, what I'll do is, I'll take this close up,
I'll move it to the top. Alright? I'll just see. You see how he's
turning to the right. So we can use this
as, like, a gut. I'm just dragging it,
putting it over here. So let's see how this looks. All right, so you see how I just put it over there, right? So now, this is what the
trim tool actually does. So basically what we will
do is I'll take the B, I'll cut this, and I'll
ripple delete it, right? So we see the cut over here. I'm just trying to show
you where it turns. Okay, so you see how
he turns over here. So I want to make it in a way
that when he when he turns, at that point, we
do a close up shot, we cut to a close
up and he turns immediately. Alright,
so let's go back. So he turns and when he turns. But the thing is, he's supposed to turn
right here, right? Like, right at this
point of time. So I want to trim it over there. So I use T to trim. So you can see if I go up, This is to trim it like this. If I go up like this, I will
be trimming inside that box. Understood. So when
you're trimming inside, you have to make sure that if
you take a look on the top four is the four different the whole clip is divided into four
different parts, so you'll be able
to see which part I am actually looking at, right? So let's see It turns here. All right. So since I
trimmed it out too much, what I'll be doing is I'm
moving it right here. So you can actually see
when I'm trimming it, you can see, like, how the end of the clip is actually how much is there
and how much is not there. So you can see that. I'm going
to move all the way here, press A for selection again. Let's see. Alright. Alright, look straight. So
that's the point I want. So Command B, ripple do it. So now. Look at that. There you go. No, no, no. He looks up. Now, he looks up, what
I'm gonna be doing is I'm gonna Sorry, ripple
accidentally. He looks up right
here with closing his eyes. So what I'll be doing. Sometimes, what
happens is you might miss certain important
points, okay? So at those certain points, the best thing is just
press the word press the letter M. So that
does is creates a marker, like, right here,
creates a marker, and it'll tell you what um you can write whatever
you want over here. So basically what you can do is you can double
click it and you can name it like potential cut point, you know, something like that. And you can also if you
want, you can change like the colorle my favorite color is pink, so I'll just do pink. So we see over here
there's a cut point. So what we'll do is Look up. Okay, there he goes. He looks
up again over there, right? So what we'll do is we'll
take the blade tool, we'll cut over here. We'll go to this
marker, we'll cut here, take these two,
and ripple delete. So what did I do there is I am using his movements
to actually cut, right? Same thing over here. When he was looking up,
so when he was looking left and then when he
was looking up, right? So that's basically what I
tell continuity, remember? So let's, um, go to, um, Go to the Start. To go start, you press Home. Alright? That harrow like that is actually
the home button. Even I didn't know that's
the symbol for home. Okay. All right, so and
let's see and play. There are slow movements,
which is nice. When we come into focus. Looks left. We got at that
point. He's very, very sad. He looks up, closes his eyes, he looks down, looks down again. He looks left, All right. Not bad. Shakes
his head. Alright. Okay. So we see this bang. Let's use that as So now, this is where guys I'm, like, so excited
to show you guys. So you see this thing right here is where, like, you know, this bang where he
bangs the um thingy. So that's where you
can actually use those cut points to
actually tell a story. And, um, that is all that is the main magic, you know,
that's the main magic. That's basically
the secret sauce. If you take a look over here, um, sorry, let me
show you the screen. If you take a look here,
so if you do, by the way, shortcut Command
plus, to zoom in, Command minus to
zoom out, right? That's just a
shortcut that I have. So if you see over here and
um to move frame by frame, you pose right arochi
or left arochi, right? Left, right. Alright. So you see he looks left. Then I use that at
the same point to do a cut. Same thing over here. This cut point over here
where I made this marker. He closes eyes. So take a look. That's where your um continuity, your attention to detail actually actually
matter, alright? Let's look at that.
He closes his eyes, and that's where I cut
back to wide again. So now I'm going
to move forward. I want to move forward and pop right at that bang
frame by frame, boom. So and Shift V,
Command B. Alright? So I don't need this anymore. I'm just gonna
delete it. Alright. So now we have, um an
overall we have an overall, um, edit over here,
which is there. Alright, so now, what I'm going to be doing is we're
going to go to scene two. So we have, um, Oh, so one thing we forgot to import is audio.
So let's do that. So same thing. I would say, what we'll do is go
back to Media page. So we go to audio. So we do scene two. So only scene two, scene seven, scene nine have audios,
so that's fine. Makes it easy. So let's do that. Scene two. Then we have
seen what? Scene seven. I'm looking at the top
and just copying a scene seven and scene nine. Alright, so scene two,
we have scene two. Okay. We have this
one. All right. Scene seven. Audio. Scene seven. Boom, Scene nine. Seen nine. Audio, boom. Alright, so we
dragged our audio. Because now one thing
which will be fun to show you guys is that the audio
has been recorded separately, like, from a mic and
not really from, uh, the camera audio. Obviously, Shooting
audio separately is makes or breaks, honestly. Film. Sound is 50%, guys. Just know that.
Okay, let me just check whether everything is
being recorded or not, right? Perfect. So we do.
Okay, beautiful. Uh. Alright. Okay.
Moving back to the edit. So here use this. So what I will be teaching
you guys is firstly, so this is the basics of, um, a sifting, right? So overall to
understand sifting. So this is what I mean by
cutting with story in mind. So obviously, this guy's very, very pissed about something. He's in extreme extreme
distress, right? So remember what I told
you guys about, um, Dolly, one of the
things which is super, super important
is just movement. So this movement
doesn't look bad. You know, this cut
doesn't look bad. But how do you think
this can be enhanced? So obviously we have a dynamic Change over here,
which is focus. Um, we have a dynamic change
here, which is focus. Then we have a close up,
which gives a sense of his emotions. And also this one. Over here, you see
this is static. It's nice, but come
on, flavor, right? Flavor. We look for flavor. And over here, since
we're showcasing the emotion that he's
really reallyly pissed, what we'll do is we'll
select the clip. Over here, inspector, right? So inspector is basically all the options that
you can do to any clip, right? So I'm going
to open this up. And you can see over here, transform, we have Zoom, position, go left right. We have rotation,
however you want. Anchor point is just
to change the anchor. This button right
here is to undo. This is to add
keyframes and animate, which I'll be
talking about later. Cropping, if you want
to crop, you can crop. Now, what we will be
doing is Dini resolve. The reason why I chose DentiRsolve is
because it is smart. What we'll be doing is we
will be doing dynamic Zoom. Now, before I get
into that, what is important is to
understand stuff here. Play, stop, move forward, move backward to the
clip, make it loop just so that the clip loops,
right? Play backwards. Stop, play forwards, stop. The shortcut is L. K and J. J is backwards, K stop, L is forwards, K stop. If I press L twice,
it'll go faster. If I press J twice thrice, the more you press, the
more faster it goes. All right. So that's
the shortcut. This right here is to
show different tools. When you click on
it, it turns on. So you can use it for
transform Command Z. And over here, we have
crop Dynamic Zoom, you can add crop
over here as well. Now, but what we said we
are going to be doing, we're going to be
doing dynamic Zoom. I'm going to turn that on
and I will turn this one. Take this one, and
I'll be turning it on right here for
them from the switch. All right. So now
what Dynamic Zoom does is this red is start point, green is stop point, right? Sorry, the reverse green
is start, red is stop. So you see so it's going
from zoomed in to outwards. You can see there's a
slight movement outwards. So we wanted to go inwards because that's the
emotion I want to convey. So I swap that with the swap button. So you
see it's that easy. DeVitre resolve just makes
things super, super easy. I move it more inwards, and move it towards his hand. So you see you can see,
like, the keyframe that Dewits always doing. Now, I go here, I turn
this off and play. Let's see how it looks. Okay, so obviously I made
a mistake over here, which is I wanted it to
be a little bit more. So you go towards the end,
Automatly the trim tool comes up and you just make it a
little bit more bigger. So then like that, right there. And then I just take
it forward. Alright? So you see what difference
that dolly that overall what difference that
makes it breaks it, right? So that's the whole point
of, um, this dolly. Now, if this was actually
done on set, which is, like, actually take the camera
actually gone forward, now, that would have made
much of a difference because remember how
we talked about how dolly movement is
actually better. So since we didn't dolly, I'm using the dolly movement
to give that effect, right? So this is basically
what cutting with story in mind means. So if you see, like, a
simple thing such as this is what makes or breaks, like, a difference in editing.
So keep that in mind. So first, sifting
was the first part, how we just arrange
the clips, right? And then cutting it based on, like, where he's
looking at to show that time face is important. So this was not there
in the storyboards. This one, where he's like, looking left and
then looking right. This is where I made that creative decision
as an editor that this will convey more emotion of the director of this guy's, um, facial expressions, right? Now, sorry. You can see
7. J and L Cut: What we'll be doing is
I will be introducing something called a J cut N Cut. Alright? So what is a Jacut? So Jacut is when the audio
from the next scene, right, starts playing before. So what we'll do is
we'll use this as a moment for Jacu his
hand where he's like, you know, he's going like that. We'll use that as
a moment of um, jacut. So basically,
what does that mean? Jacut I want to use that bang, but instead of showing the bang, I will use that
as an impact with another sound from the
next scene, alright? Now, what I'm going to
be doing is I will be showing you guys
something amazing, which is this thing called
artless dot IO, alright? So basically, what
I'll be doing is, I'll be putting these links also downstairs, not downstairs. I said downstairs. I went down in the link
in the link below. I'll be giving you. This is a paid subscription, of course. There's plenty of free websites and links that give you
access to sound as well, which is copyright free. You
can use it however you want. So you can use that as well. I'll be putting
some links below. So I'm gonna be
using sound effects. So anyway, so what
I have done is I have taken I've gone
to Artlst dot IO. I've searched Dorbang and I've just downloaded
this first thing, right? Once I downloaded it, I put it in my folder. Basically in your Find or iffy exxploe where
your thing is. Then what I'm going
to be doing is I'm going to DivingiRsolve. I will make a new bin
called SFX, right? I open SX and basically, I'll do Command I again to
import, and same thing. I open my Dorbank and I pop. Now, what I'll do is I'll
use this as SFX, right? So now wait let's see where
he's right there, right? This is the point right here. All right? So I'll cut it here. I'll drag this, delete
it. So now watch how. All right. Beautiful.
Now I can do that, or I can just do, like, maybe just one. I like that. And I'll just take what I did is I held Alt and I
dragged it again, right? I held Alt and drag
so you can hold Alt and you can duplicate
it as much as you want. Now, since there was only this one hand like
that, so I just did one, and then what I'll do is
and move it like that. All right. So the reason why I don't
understand what I'm doing. Cool. Now, sometimes what
happens is audio, right? We'll talk about this
later. Actually, I'll talk about it during
audio, right? So now, boom. So that is what a Jcut is. Reason why is watch this. Ready? It creates a J. That's why it's called a Jcut. So that is why this whole
JcutECuT is what it is. ECAT is the opposite, right? ECAT is basically the visual
transition happens before, and the audio from the
previous scene ends. Understand. So it's
basically the opposite. So basically, if it's
like this is oh, sorry. This is the J. And if it's L, it
would be like this. So basically, the
video would stop, and, like, the visual
it happens before. So that's you will see an
example very, very soon. All right. So now what we'll
do is we'll go to scene two. We'll see. So there. So I don't think we can use this clip because
I'll tell you why. All right, see this one. Okay. What we'll do is actually,
we'll cheat a little bit. So obviously, you
can see. So let me take a look at this action. So you see this is one side, and this is the other This
is what an OTS shot is. So obviously, you can
see in this side, we have um, Ashish
basically being there, and on this side, we
have Santos here. But you see the door is from the right side of Ashish, right? So this is actually
actually breaking the 180. So the shot was
actually shot wrong. What we'll see if we
can fix this somehow. So we go to the inspector,
go to the video, and we'll see if we can
flip this a little bit. Let's see how it
looks. So minus, I'm gonna take this
out. All right. All right. I'll just press B press B, and I'll just cut that. Take this delete this. He bangs it and he removes
it, and we see that. So now, obviously, even
if you flip it sometimes, you know, things
don't actually work. So how do I show the door? Now, in these situations like this is you
need to be super, super mindful
because after this, let's say you add Santos right? So let's see if I add this guy, So over here, you see, like, the door ideally is on
this side, but actually, it does not because
it's because I had flipped it is why it worked. Understood. So this is how
you can cheat a little bit, but let's be real. Every time fixing it in
post doesn't always help. Alright, guys, so
keep that in mind. Alright, so I think
this worked out for us. So what I'll be
doing is I'll just be moving this a bit closer. And what I'll do is there's
too much door over here. So this is why I
use a trim tool. Remember that? And I'll just drag it towards a
little bit to the left. Opens it right there, and over here, I'll just cut. Because I don't want to
waste too much time. So see how I did it
just a regular delete. I'll command Z and
ripple delete. That way it takes care of it. Now, let's just watch
the cut. Alright?
8. Walkthrough an Actual Edit: Now what we are
going to be doing is Now is going to go
throughing the footage. Now, over here, basically what
we will be doing is we're going to be doing
an Cut over here. So I showed you what a JCut is. Now, through the OTS we will
be doing an Cut, as well. So what I'll do firstly is I'll drag both these OTSs
over here, right? So I'll just drag
one to the top, one to the bottom, and we'll
have this one over here. So shift Z to showcase. And now, let's get
into the edit. Now obviously, this
is camera audio, and this is what
we'll do is we'll sync this camera audio with the actual audio
which is recorded, right? So we'll go to audio scene two. So we have Santos over here. We'll drag it
somewhere down here. And Asit's audio, we'll
drag it somewhere down here. All right. So I'm just checking
for command, command. I select both these audios. Right click Auto line clips
with wave form, sync. All right. Same
thing. Take this, take this Autoline waveform. Sync. So now, I'm just
going to move this here. The other way to, so one
very, very important thing. The D key is to
disable it, enable it. So I'm going to
disable this one, which is the camera audio.
Alright, so this is good. Let me disable this one.
Right. So as you can see, over here, I can barely
hear them, right? So the levels that were
recorded is super, super low. That is still fixable, but
if it's too much high, then the audio becomes clipped. That is what being
clipped means, right? So you understood what
I did over here, right? So you select both the clips and then you auto line
and sync with waveform. So now what I can do is I can delete the camera
audio over here, delete the camera
audio over here. So now I can move this up here and take this,
move this up here. So I use Alt or
option and move up. That's how I do it. So I'll take this and I will
link them together. Sorry. Take these two and link. So now, if I ink. Link clips. So now
they are linked. Same thing with this one. I take this one and this one, I will go ink clips. So now they are linked together. Alright? So now obviously, you can see the audio
levels too much. So we click on the
audio on the audio tab, we'll take the volume and
we'll make it to like ten or maybe like 20. So we can start
seeing the waveforms. Same thing with this. We'll do like 20. All right, so now let's just
hear how things are flowing. Alright, so firstly, obviously, this is not working out properly because you can only
hear from my left side. So that's the second
thing housekeeping is super, super
important, right? So what we'll do is we'll call this SP because I
know the surnames. So we'll call it SP over here. We call it AK over here. So what we'll do is I
will be moving this down. So first, I don't
want to unlink stuff because I don't want to link
it at the current moment. Pop. Alright. So I move this down to Santos and Ash
just track to over here. So, keep in mind, guys,
each scene or, like, each um, how do I put it, each character should
have their own track because you'll understand why because of their levels
and stuff, alright? And always remember that, um, dialogue should always
be, like, Mono. So what is mono, I will get
into that in a bit, right? So basically, what I did is
I sync these clips for now. Uh, let me just change it. I will talk about what I'm
doing at the next lesson. But for now, it is important for you to
understand what an CAT is. A also, this is an LCAT, and also you'll
understand how I'm going through an actual edit. So this is how I would
edit a typical OTS. Understood. Cool. Oba makeup a. Uh, Nifte 4,000 nifty this Nifty, 43 ous, 500. 2000 profits. Jason. Mood email. Alright, so I think the
last clip looks the best. So All right. After action, right? So I'm just looking at literally
the waveform right now, and I will just go Command B, Command B or Control B. I'm just going to take this, delete it. All right, drag these over here. Same thing with Asit I think. A. Alright, so this is
good. So command B again, take that, cut. So take this, I will
drag it all the way here, all the way back here. So obviously I'm
going to keep Ahi on top because I'm gonna
be overlapping them. Alright? So let's see. Now, let's see. So how's the
previous scene look? He opens the door, Kachak.
Right there, right? So we have Santos right
here. Alright, let's see. Caps phone Lara. Okay,
caps phone lagoon a phone. Alright. So this is now what I'm gonna be doing is I'm
going to be doing LCAT. So obviously, now basically how it was was the
sound remains, the sound starts, right? And then the scene changes. Over here, the video remains, the video remains, but
the sound comes later on. Understand? I mean, the
video comes later on. Phone. So here we have what we'll do is we'll
take Ash over here. It Thea phone. So we'll use this part. And we'll delete this,
take this over here. And let's see. Alright. Cups of phone phone. Is a phone. A phone. Let me just take this B
and disable this for now. Is phony, Don, rather Iris phonyona. So now look at that. RS by phony done RS by phony done Run by phony dune ra, Burna pura. Done rather pura. Alright. So you see,
so I cut it over here. RS So now this actually, I ended up making a Jacut only. Sounded by phony done ra, pura. Rather I'll just cut this
over here and take this k. God on. Make Nip. Alright.
So what I'll do? God on a To. All right. Let's take this. Delete.
I mean, not delete it. Disable it, I meant. Abula and C. Bull on A. Tick. Mekavo. Take this Disable this. Ticker Mega v. NIPT. Ticker Mega v. NIPT 23,000. Bulk. Bula AO. A Mega v. NIPT, 23,500. I Mega v. NIPT. An Ihaka. Cups phone phone. Ian phone. Maka. So over here, if you
see, what we're gonna be doing is gonna be taking
this, like, right here. Santosh little, sorry. Santoso audio, pup. We'll take this one over here. We'll drag these together. Actually I don't
need you anymore. Take this one, take it, and we'll move it. Right here. Cow Mega, 50, 23,500. Next tri. Okay. All right. So that, my friend is EcutHO here, if
you see over here. Audio comes before the
scene changes nifty. Over here, audio the
visual stays the same. Three And then it switches. So basically the J and the LCAT are basically the opposite. Next tekNexttek. Another Next week. T Well change it
here and over here, we'll take this one enable? And what we'll do is we'll
take this one right here. Take this one right here.
Neighborhood disable. Quantity 2000. Same thing. Take cut over here, disable, take this enable it. Or actually now. Enable it. Take that, go to this edit point, cut
over here, disable it. All right? Okay.
Sorry, disable this. Ting quantity? 2000 Hazard na. Profits are con Jason. Tick, MenkaT. We'll use this for meeting ma. Okay. Alright. Tick?
MenkalTo meeting you. A chat. We'll take this cut
over here to say this. Menkalth meeting you, ma'am. Are. The dialogical. Okay. Really chi the B. Okay, so obviously this is he messed up the dialogue here. So what we'll do is
we'll take this pop, pop, take this, take
this, delete it. Take this entire thing,
move it back here, right? Menkaltho meeting you. Okay. Chilo Are Tick? When you cut down, meeting. Okay? Are Next time. Alright, take this
again, disable that. Cut over here, disable unable. At Next time. A next. Alright. So obviously, over here, we see Chito pillow Chito pillow, we just got it over
there. Take that. Arna next time. Alright, so here we have
this little you can see, like this little
gap which is there. So we will fix this, right? Arna RN Nine, we'll fix that. So basically this
one and this one. So obviously, we don't
require Santos here or here, so I'll just disable this. I'll take this and this
and we'll move it here. Alright. Watch how this
makes a difference. No, I get next time. Okay, s. Bye. Alright, and let's see
if there's anything good over there. All right. So you can use like obviously this doesn't work because
this guy actually, if you see he
actually walks away, so we have to keep this. We have to end the scene
like right here, right? So I'm going to just go up and delete. Look at that, guys. We have successfully
made an OTS edit, so I made you guys walk through
how an actual edit looks. Let's play it back and let's
see how it is. From here. Cups phone phone. Phone Mega volo 50,
23,500 next week. Tika. In quantity? 20000 AzatnaPfits
are byconn Japs. Tick When cath meeting. Okay. Really halo. Ti Next time. Okay, hog Bye. All right. So that was guys. So one thing which
I did not like this in my edit was 2000
ga quantity, right? So that's so 2000 quantity
is not actually his audio. So we'll take that and we'll actually enable
Santosa's audio. 2000 car. And we'll actually
disable this one. Quantity? 2000 car. Or Hs now. Profits are cone. This moment. So we're not
doing like the Next week. T? Ling Gandhi. Alright. So we see, Okay, so it goes
back to attention to detail, right, guys, I'm just
gonna be dragging it here. Next week. Tik? Ling Gondi? 2000. Or as now. So you see how the
way I am doing it, I'm not just focusing
on whoever's speaking. Keep that person in the frame. It's also about
listening, right? So when you show a person
listening to a conversation, that automatically creates
a J or an L card, right? So that is what the whole
concept of editing is. Now, what you can do is you can keep this or what you can
do is you can clean it up.
9. When to Use Transitions: Right. So now we'll
talk a little bit about, um, transitions. Now, a transition is usually used when I
want to change a scene. So over here, this
scene change would be, um, we used a JCut to
do a scene change, so we didn't really
need anything. The way transitions work is usually two times
change of scenes, change of time or change of day. That is where you
can keep transition. Now transitions, keep in mind, you don't have to go
crazy with transition. Sometimes it can just
be a simple fade to black or a simple,
um, cross dissolve. It doesn't have to be
some crazy transition. Those are good in music
videos and super VFX times, but, like, a simple
cross dsolve, does it? So let's
go to the screen. Let me just show you
where you can find, um, your transitions. So you have this
place called effects. So you go to effects, and
you have video transitions. You have audio transitions,
video transitions. Over here, we can do like
a simple crossisolve. So what you can do is
you can go over here. You can add to
favorites as well. Allright? You can add
favorites over here. It comes in your toolbox with video transitions.
It comes over here. So you can just drag and
you can just drop them. So if I zoom in, you can see the transition is
like right over here. I can close it, increase it, close it, increasing
however I want it to. All right? So that is basically
how you add a transition. And you can also go to when
you select a clip right, the transition,
which is there on the clip, you'll
find it over here. So we have a video. We
have the transition. So you can do cross dissolve. You can also change
the transition to, like, whatever you want. Let's say if I do box
now, it creates a box. Obviously, that
doesn't look good. So we do, like, a
simple cross dissolve. Since there's nothing
after, it'll go to black. But obviously, if
there's a let's say, I'm going to take this one, hold this all go like this, and then you can get the
option of doing it in between. You see if it's in between. That's how cross is always. Obvious This not the
clip I'll be using. Understood. So that
is the way to go. Let's use let's use an example. Let's do scene three. Go
back to the media pull. Scene three, we see
he's going here. So we'll use this over here. So we'll use this as
a cross dissolve. So do we have scene
three audio? We don't. So I can just P. Still this. So I'm just going to scrub through the thing a little bit. So it walks into
frame. All right. So up. So what we can do is we can
go, like, to collections. Sorry, effects, cross dissolve, I just do like fade to black, fade to black, and then we
add one more from fade. All right. So this is
because I'm using it for transition of scenes and maybe a little passage through time. To see how that works? That is when you should use
the transition. Let's just see the
scene, blah, blah, blah. I'm just pressing L to fast
forward through the singing. Alright. We see him doing
his stuff, blah, blah, blah. Done. Alright, so he's done. I just at a cut
point just to know. It just doesn't make sense,
so I'll just debate it. Yeah, and then we add one
more thing over here. Let's just play it. Alright, he's done.
Alright, beautiful. So that is pretty
much how you would do um a simple transition. So keep in mind,
change of scene, change of time and
change of day, or maybe there's an impactful
emotional shift, alright? So that's when you use
transition effects. Like, for example, how we use the since we didn't
use an effect, but you use this as an
impactful emotional shift. Boom. See? No. The scene, actually, however, is this
scene happens in future. This scene happens in past. So we will be so that's why I used it as
a transition because it's a change of time day and also a change of
emotional shift, right? So that's when you
use transitions. That's what you need to
think of when you're doing, like, the storyboards, as well. Sometimes it helps. Alright? So that is done.
10. How to Time Remap: Now what I'll show you guys. Fun fact, right? So you can see, we
have the regular bins, and then we have smart
bins, as well, alright? So what we can do is, I want to show you guys what
time remapping is. So remember how we
showed, um, overall, we showed the fact that you can different of shooting in
different frame rates. So basically, there's
a scene in this film where thing is shot at
a higher frame rate. So how can we shoot
that in slow motion? This is where I will be
showing you how that is done and how we can use that
to our advantage, right? Now, I don't personally remember which scene the slow motion is. So that's why I use
Smart Bins, all right? So what I can do I go to
my go to my media page, go here to SmartBins, right click add SmartBn. Okay. So now what I'll
be calling this is, I'll call it slow
motion shots, right? So now, what I'll do match
all of these properties. So now what I'll do
is I will let's see. I'm just seeing the short
frame rate is or is not 24 or the short frame is sorry, 120. No, sorry. The media properties,
I think we are going to be looking at metadata clip details where the shot frame
rate is 24, right? So that is 24, 23.976, we
have a couple of them. So you see this is
where I would say it is important to make sure you shoot at the
same frame rate, B over here you see the
mistake that happened in the shoot is some that's audio. The audio is shot at
24 frames per second, but the video shot at 23.97. Even if it's very
little, still there sometimes a little lag happens,
not much of a difference. 30 frames that will
shot in 30 frames. Um, 50, nothing is short. 60, nothing is short. We should have a 12119. Alright we have a 119.88, right? And we create it. So look, now we have created
a SmartBn where basically all our slo moo shots are
in one place. All right? So now what we'll do is I will show you guys
how to time remap. So I go here, I select this. Now here, if you select this, you can see in the metadata, it is shot at 119 120 FPS. So what we'll do now. I'll remove the audio, okay? So I'll just cut
this, remove this, actually. I want to
take the screen. I'm just using my
anarchies to go back. Alright, too late. Okay, so at this point, I
want it to be slow, right. So basically what you do is I'm going to remove
this meta data. So you see the speed change, this is what it is. But we don't really talk
about this inspector here because this is too
boring and it's like, too, like, you can't
really do much from there. So what we'll do is we will, um, do Command R.
Basically what command R is it gives a speed change, and Shift C is basically
it opens the curves. So what we'll do is over here, Alright, so at this
point, we wanted it. Alright, so now, before
I talk about it, how much slow can you go is a super important thing
to worry about, as well. So sometimes what
happens is, um, a clip is shot at 60 FPS. Sometimes it is shot at 120 FPS, but your timeline is set
at 24 frames per second. How do you know how
much you should go? The way to know this is super, super simple is simple
mathematics, right? Let me show you guys. So if your clip is
shot at 120 FPS, you take and 24 frames
as your timeline. You go that divided by 120. So it is 0.2, which
is you can go till a 20% decline, right? 20% decline is a lot. Same thing if it's 60 FPS, 24, divided by 60. You can go to 40%. So basically, if this is
the clip, if I go here, it's at 100%, I can go
till 20% if I want. So take a look at that.
See how slow it is. Alright? So if I go below this like 5%, then
see what happens. You'll get frame drops
because there's not enough frames to show
you guys, right? So if there's 120 FPL bute moving it even
more further away, there's no more frames
for you to shoot. See how the frame is dropping? Take a look. Yeah.
So we'll go 20%. But for this 120
FPS is too much, so we'll just go 40%. All right, 40%. So we can do that,
but this is the way to overall just
slow down or clip. Right. But what we're going to be doing is
we're going to be doing time remapping. So
what is time remapping? Time remapping is when
you want a person to be normal at normal speed, and then slow down
and then again, go to normal speed. So
it'll be normal speed. At the time where
he's screaming, we'll slow it down and then we'll move back up to
the same thing, right? So we do that through
the process of that is called time remapping. All right? Let's go
into it, pop up. So I'll put this back to
however it was hundred FPS. So now, you can right click and you can
do retime controls. This will show the speed
change, basically. So when you click
here, it'll slow down. You can see the speed over here, it can slow down. So
that's what it does. So let's see 100%. At that. I paused it. Over here, I want to add a speed point. So you cl here, add SpedPoint. Ah. Right when he's done, I want
to add another speed point. Add another speed point. Alright? So at this point,
now what happens is, I can take this and drag
it to let's say 40%. So now watch. And just take
this, remove this cut. So that is a basic
time remapping, right? Piss piss piss. Slow motion. B. Now we can adjust it and
now we can take it over here. Or what we can do
is we can hold this and we can adjust it
without changing the speed, but actually the points
in the clip, right? So the top part is
to change the speed, the bottom part is to change
the point of the clip. So I think that works better. But still, this is not
good enough in my opinion. What we'll do is we'll do Shift C is basically
what that does. It brings out the curve editor. Oh, sorry. I just going
to move this right here. So you can do that, or
you can go over here to right click and you can do retime curve. That
will bring this. So you can see over
here, we have already the retime speed is
given the curve, the graph editor is given. So sometimes what will happen is you won't
be able to see it. That time you just
click on this arrow, retime speed because we have done the retiming of the speed. You select this keyframe,
you smooth it out. Select this keyframe,
you smooth it out. Take these tangents,
bring it closer, take these tangents,
bring it closer. So what do you see now it
is much more smooth rather than just far
points, hard points. See how much more
smoother that is. That, my friend is
basic time remapping. And that is what is beautiful. When you shoot in slow motion, you can slow down footages, like nobody's business. Alright?
11. Some useful Shortcuts: Alright. Moving on
to the next lesson, we have simple symbol
shortcuts, right? So mostly I talked
about the shortcuts as in when we flew through, but just to summarize, let me just show
this Shifts used to bring the entire particular
thing into frame. Command plus is Zoom in, Command plus is Zoom out. Again, it depends where
your playhead is. This particular thing
is your playhead. So, um, if it's like over here, then zoom in over here. If it's like over here,
then zoom in here. Alright, so it depends on
where your play head is. That is what Shift
Z does. Shift V selects the clip,
the topmost clip. So if I'm over here, it's okay, that doesn't select that
because it's not selected. Sometimes, sometimes
it glitches out. Sometimes it only
selects the first thing, or a track selector. Alright. That's what
Shift V does. What else? Then we have B is blade. B is your blade tool, select that A is your selector tool, T is your trim tool. All right, M is your marker. If you want to add a marker,
you can delete the marker. Shift Command M or
Control M does a marker, and you can name it
immediately as you want. Then we have Command Shift L is basically to have
linked selection on. And if you want to link stuff
like this one and this one, you can do Command
and like that. Then those two clips
will be linked together. See you like that. All right. So these are some
useful shortcuts. Press home is to go
to the beginning and down arrow basically goes
to the next immediate cut, and up arrow goes to
the previous cut. And once you do this
control or command, you can select clips like
this with the arrow keys. Like up or down also to select. And if you want to hold
all to option go up, you'll make new
tracks like that. You can it go down
or up. Alright? So here's some
useful short cuts. Then we have, um, Command C, Command V is already there for
Command and paste. If I have Command
C, then Command V, I can past circle up here. Depends on where
your playhead is. Then uh Command Z is, um, undo. So that's there. So, yeah, that's
pretty much it, guys. That is overall
basics of editing. I showed you guys what it does. In the next, um, lessons. I'll be talking about
the falte page. Basically, in the falte page, we'll be discussing a little bit about audio and how
things work, right? So thank you guys for
sticking to the edit. Please let me know if you
have any questions now, so let me know if there's
any particular thing in editing that
you want to know. Alright? Thank you Masym
12. Why is Sound: Okay, guys, what's up? Alright, so the edit
is now let's say the assume the edit is done.
We have a simple we did. We focused on the
way to edit through, um, film, through a story. We went through,
certain ways of just, like, doing, like, a dynamic
zoom, creating the emotion, using transitions to how
JCUt L cut through OTS and also showcased over here and showcased time
remapping as well. So now what we're going to
be doing is always remember, guys, that sound is
50% of a film, right? So half of it is visuals, half of it is pure,
pure audio, right? So sound is super,
super important. So this is what we're
going to be doing. We're gonna be
exploring a little on the Fairlight page, alright?
13. Walkthrough of the Fairlight Page: So what we're going
to be doing is, I'm gonna be showing
my screen right here. Pup. Alright, cool. So we're going to be going
right here in this Faye page. For in the beginning,
this might seem very, very daunting for you guys. Extremely extremely daunting. So now, let me just
walk through what is. Alright so this entire place, this entire place is basically
called the mixer, right? This is called the Mixer. This
is where your videos are. This is a control room, overall just gives you overall levels. This gives you the
loudness meter. And this right here is
your mixers, basically. So, if I drag this out, for example, this
is all your mixer. So basically, this thing,
like audio one SPAK, this is for example,
I should rename it. I'll call it SFX. Let's say SFX over here
because we have the door, if you remember, we have
the banging of the door. Sorry. We have the door
banging over here. So the shortcuts are pretty much the same command plus and, um, command plus and minus. So now, this right here, wow, I need to take
off my screen, right? Obviously you guys are
not able to see this. All right, cool. Sounds good. All right. So if you see
over here on the right side, this is your mixer area.
So these are the levels. So you can see SFX,
whatever you name right here, whatever you name, like right here on
these tracks will get reflected right here on
these tracks as well, right? And this is your
main master output, which includes
every single track. So these tracks become these tracks over here,
the vertical ones, right? And over here in these ones is where you add effects
on top of it. Like over here, you add
effects on each track, for example, this SFX track
will have one effect. Santos will have one effect,
one effect like over here. Ashish will have one
effect over here. So it'll flow through,
one particular line that is what each
track is separate, which is why people keep each person to be completely,
completely separate. So the effects that we have for Santos may not necessarily be the same effects we
had to Ashish because the parameters will
change because the voice, the depth, the
overall frequencies of how a person talks
is different, right? So which is why we're
going to be showcasing that's why we keep them
on a separate track. And it's also a good idea
to also keep them, like, overall, just keep them
labeled in general, you know? Okay, so, number one, let's see. What we're going to be
doing is we will take these track colors I'm just going to put it chocolate
for the sound effects. Santos, I will put as yellow, and Ashish, I will
put as steel, right? So visually, I know, like, what exactly going on. Right. Now, this is just
to select the timelines. This is to just show
display grid, overall, just the grids whether
you want to or not, and you can just keep
it however it is. This one is to display
the video track. So over here the video tracks if you want to see,
you can see it. I keep it sometimes
if it helps me. Like, for example, I know,
like this portion was for OTS, so it's just nice to
have it. Then what else? We have display video scroller. So what this does is
over here at the bottom, it gives exactly at that time. So you can see, like at this particular
point of time, you can, drag it around, and it
will play accordingly. Same thing if you
want, you can do Audio Stroller as one and
AudioStroller two as well. So you can see, over here, we have Audio Stroller
one.This is SP, and let's say, we can choose AK. So you can see two different waveforms
over here that we have. Right? So basically plays,
and you just get a nicer view of the waveform. Yeah, 15, 23,500 next week. Te Living quantity? Alright, so that is
what we are doing. So this is what basically
the fate page is, right? So now, let's choose one
little person over here. Let's choose Santos,
for example. Alright, so let's solo
him. So these buttons over here basically are to solo, which means only this
track will be soloed. Only I'll not every other
track will be music. Mega, 15, 23,500 next week. Alright, so that is solo. And mute is only this
is muted, right? So everything else will
play except this SP. Sunday. Alright? So R is to record. We will not get into recording. Recording is a little bit more complicated. So that is that. Same thing you can
do S and M S and M. So solo is to just solo
that. Mute is to mute that. So basically what solo means is basically muting
everything else, right? So you can approach it
either way you want. So now what we will
do is we will work on a thing called an equalizer.
14. The Equaliser: So what is an equalizer? So if you take a
look at this, this is called an equalizer, right? So let's say caps. An equalizer is divided into
different bands, right? It's divided into different
different types of bands. So this band towards
the left over here, this is called the
low frequencies. So this is the low frequencies. You travel all the way
to mid frequencies, mid frequencies, you travel all the way to high frequencies. Now, the low frequencies are
basically the base element, like the boom, boom,
boom, like that. Mid frequencies are where most of the dialogues usually reside. High frequencies are
the shrill voices. K Like, those are the things
that are usually there. So when you listen to
a particular person, let's say, over here,
we're listening to Santos. 15, 23,500 next week. So overall, I would say his
voice is a little bit less. So I want to 15, 23,000. So basically what is
happening is I want to just remove some
bass elements in it. It'll just clear out the thing. Because what that
does is also it clears out a lot of
noise which is there. So basically, to do that, what I do is I have to just
reduce the low frequencies. So if I enable band one, so see now everything
is there present. My I'm doing it on the
wrong track, actually. So you can see I did it on the wrong track
because I was doing it on the SFX. I need
to do it on SP. So this mistake is a good mistake because it
shows you how it works, right? This only works on the SFX. So we have got to do
SP. So if you see EQ, which is equalizer,
I select this one. What I do is I select this, and let me just Plate. Band one. Mega volo. Nifty. 23,500. So you can see a visualization
of what it's playing. That was also something
I was wondering. Why is it not playing? No, that's just I wonder. Yeah. Mega volo 50. See the difference? O H right now. Profits of icon Jason. So you see how, like, um, what's gonna So if you
see like over here, 2000. So the base is very, very high. What I'll do is I'll just
decrease the base a little bit, take the second portion, and
just decrease it like that. So this is basically
the different ways of showcasing like a
little bit more smoother. You can do, like, a pointed one. So pointed one is basically
something like this, which doesn't make sense for this one. You can
do it like this. This doesn't make
sense. So we do something like this or
something like that. So I think a harsh little
bit more harsh is nice. So we'll go like that. Ota no pro we can reduce
this part also. So overall, the low frequencies which are not
necessary, we can do. 2000 cars. Or now. Profits are by. Let's take
this down a little bit. Let's put this also
like this there. So it smooths out. So basically, these are the different graphs
that you can use to smoke. Japs and. All right, so let's
increase the band six, which gives more
points, basically. Pop. Increase it up. Increase it up over there. Since his 2000 car. Or xy Azkna You can decrease
it, like, right there. Boom. 2000 car. OH AzknaPfits a icon. So if you turn it off, Oxy
AzknaPfits a cone Jas NE. See what AzknaPfits a cone. JabsNE So it's unnecessary
unnecessary basil voice goes away if you turn
on the equalizer. Or H Azkna. Obviously, you'll
be able to hear it much better on your own
headphones. This okay. OH YazaknaPfits a icon. So just solo this?
Right. Jab Sony. Tick? Menkalto meeting a man. Alright, Menkaltoy
just play this. ****. Menkalto See the
unnecessary bass thing. ****. Menkalto meeting ma. Maybe we can use just a little
bit more bass, I think. That is unnecessary. Same
thing with three. All right. Tap Sonny. ****? Men
caldo meeting him. Alright, so that's what
basically an equal Azo does, you can do this for
each and every person. So for example, if
we take Ashish, for example, so
let's remove him. Let's just take
Ashish over here, and we listen to him. Sandra So you can see over here, his base is actually low so we have to do
reverse for him. So let's choose AK
which AK right here, so we chose double click
on that. Stick this. Let's hear what he has. So we can increase the base
over here a little bit. Alright, so let's hear
it one more time. Aris Sandia Pony, Don rabura. See the difference? It one more time. Iris
Sandia Pony Dunrabura. His voice is more lighter side. Santosa's voice is
more, like, deep. So we can that way, we switched it up and overall, this affects the entire
track throughout. So now let's take this and let's hear this with how it
sounds with an equalizer. Cups phone phone. I Santa Mega vol 50,
23,500 next week. Tika. Living quantity? 2000 car. Or Azatna. Profits are cone. Jason. Tick,
MenkalTmting in. Okay. Inext time. Okay, Josh. Bye. Alright, so that is
what an equalizer does. Now, let's talk about what
these numbers are over here.
15. Types of Channels: Two, one, one, two. So now, basically what this means is that it is the type
of channels which is there. So there are usually three types of channels.
One is a mono. A monochannel means it
is a single channel, and one is a stereo, which is left and right, right? So what a monochannel does, the rule of thumb is every
single dialog needs to be equally spread out in all
different channels, right? So if you have, let's say,
headphones and if you have, let's say, speakers, mono means it is equally
distributed everywhere. So the same amount of volume, same amount of levels is
equally distributed throughout. So it is not changing howsoever. You can see that
over here, like, if you just see
there's only 1 bar, and the other ones have
like 2 bars, right? So that is how dialogue
should be there always mono. And then the two is
basically stereo. So stereo is basically, um, when there's a left channel and
a right channel, you know? Sometimes when you watch stuff, it goes to the it's
more on the left ear, sometimes it's more
on the right ear. So that is what stereo is. Then the third
type of channel is called surround sound channel. So surround sound usually
comes in two types. There's actually many types. There's 5.1, then there's 7.1, then there's 8.2.
So stuff like that. So what is 5.1 is basically usually seen in home theaters or in actual movie theaters. So 5.1 is basically there's
three speakers in the front, which is the center center, then front left, front right. Then there is back
left back right, and the 0.1 is the base module. So the base module is basically
the low frequency, right? So that is what 5.1
is 7.1 is the same. There's seven speakers in total. And then there's one subwoofer, which is the low frequency. Remember how we talked about the equalizer just a minute ago, how equalizers are basically
the low frequencies, the base things that 0.1
is basically the base. So usually sound effects
and sound effects and, um, ambience, those things
are interior because it just gives more texture in
the environment, right? So, for example, we
see over here in this, um, this particular door
bang, let's solo this. You see how there's a
two channel over here. You see, these are not on
the same level, right? Now, let's say, if you want, you know, for example, you can pan this
maybe to the left. So for example, you can
take this over here. You want it to only come
from the left side. So what you can do is you
can pan it to the left here. Or you can pan it to the right. Right. So this is something
that I you double click it, you can see how you can you can see how it can
be from the center. It can be from the front,
it can be from the back. So we keep it center, maybe since there's not much
movement on the scene, particularly, so I
think center is good. We're using this
as a transition. So again, that is something
we will that you can do. Eventually, you can
animate that as well. That's how people do, you know, like the helicopter traveling
and stuff like that. That's you can animate
those bands and stuff. That is what it means. We'll get to that
at advanced stage. Right now, we're very,
very basic right. So that is basically
the types of channels. Now,
16. Basic Transitions in Clips: Let's go back to our
dialogues, right? So sometimes what happens
is you might want to place effects on sound. So for example, if you
see, let me just unsolo this and just mute this because I want
these to be visible. So So you see how
these at the ends, they are just hard hard stops. So basically at these
points is basically where you should be adding
effects, alright? So a good thumb rule is at the end and then at the beginning
of every clip of sound, you should add what is called across it's not crawl across. It's called fade, I think. Fade. Audio, sorry. I'm
looking at transit. Yeah. Cross fade. I was
right in the beginning. Alright, so cross fade, right? So we can do three D B. DB
means decibels, by the way. That is a measurement of
the volume of the sound. So let's say we do three
like this, like that. So we can do it like
this. Or if you want, you can take this off. You can take this little
thing right here and you can just go like that and then
just go it out like this. So what this does same thing. You can just poop. And then poop, like that. Understands smooth.
Same thing like that. Just a little bit here, little
bit there. Oh, too much. Sorry. Like that. That's good. 50. Liking quantity? 2000. So again, sudden. So we just, like, do a little bit, do a little bit, right there. Quantity. 2000 car. O H Azna. Profits a cone Jason. ****, when you call them. This is a long one, so
we'll take it over there. It's a little one
little one and little. Next time. Okay, hos Bye. This is extra, so we can just put it all the way there and
just put it down like that. Liking tied the Anything
to get next time. Alright, Charles. Bye. Beautiful. All right. So that is how you add
some basic effects. Sometimes what happens is a good when they're
clips together, maybe you might have different clips together,
like over here. What you can do is you can
just right click on the cut, add six frame cross fade. So basically six
frame cross fade is basically it just fade between both
the clips together. So it just like it just
smooths out, so there's no, like, harsh beginning or end. So there you go.
See? Just smooth. Alright, so that is
what, um, effects is. Now, let's add some music to
this entire thing, right? Let's add some nice tracks to
this entire thing. Alright.
17. Adding Stock Music and Mixing: We have some stock footages, actually, that we bought. No that we bought, we just have. So it's just music. We have some background music. We have time laps, new life. Let's see. So what we can do is, let's open the media pool. Okay, let's open the media
pool, open this thing. We'll use audio and
we'll make a new bin over here called PGM, which
means background music. So again, guys,
it's important to always name whatever you do. So let's just put all of
these together, right here. So what we can do, let's hear Look at me. I'm just selecting
the right one. So we can use this as the
immediate initial starting. So what I'm going
to be doing is I'll make one more track, add track. So this is how you add
a track, by the way. So we're adding a music track. So we have since this is music, we're going to do
stereo guys, right? So we add background music. Let's say this is one, since this is the one that
we're doing, which one was it? Alright. Perfect. That's what we'll do. Now, sometimes what happens is you are scrolling through
it. Let's say I want. This is a very good scene
for, like, this part, right? It's beautiful. So now, obviously, you don't
want to take there are two ways of taking it. So you can either drag
this entire thing and use the shortcuts B and cut it up and
stuff like that. You can do that, or you can
listen to the entire thing. Let's say, you can
use the letter I for making an
endpoint like that. Listen to the music
a little bit. Nice. Not bad. So we stop here. We put Oh. That is in and out
point basically in out point, and then you drag. So that's just like
the only that portion gets selected, right? So I'm just going
to put it here. I don't need you. I do right click and
delete empty tracks. So if there's any empty tracks, it'll just delete
because I like to be clean in my overall, um, how I operate. So this line over here, by
the way, I showed it to you. This is just to drag in,
like, the overall timeline. So now what we do
let's hear this. Now, the other thing edit, one thing that I wanted
to just put out there is, let me just add a cross
dissolve here as well. Like a nice, slow
cross dissolve. And what I'll do is I will this shortcut is
super, super important. So from the playhead to
everything in the front, you do Alt or option Y. So it selects everything
in the front. Alright? So let's just
use this as an example. So this and everything
in the front will be, um, selecting everything
in the front. And in the back, I
always forget because you don't I usually
never need it. But, select, I think, timeline and select
clips backward, yeah. Select Command Y, yeah,
right, Alt comma y. So it's pop pop pop like that. You select everything
back and just that, you select everything
front, right? So Alt option Y is backwards. Alt Y is forwards, right? So we take this Y, move everything a
little bit forward. So now what happens is,
I'll just disable this. So it gives that cinematic
feel. Look at that. And what we can do is
we can actually, um, take this, start from a little
bit beforehand, like this. And let's see. Let's remove
the media pull on second. And now let's go
from here and play. We'll see how the colors
are also here, by the way, so it just easier. Look at that. Nice now. Is it all the way? All right, so you see
how the base drops, the base drops like those
beat starts coming, and at that point,
there's a cut. So let's match this cut. Let's match this cut
with this base, right? So this cut right
here and this base, let's put it, like align
it properly, right here. See this thing? Right here. When the cut comes, immediately the base also drops, alright? Let's hear it. Let's
hear it from here. Focus over here,
right? Focus here. Nice. Look at that. See? That is my friend that my
friend is called. That is called Creative
Editing, right? Through sound. Beautiful. Alright, so I muted that, so let's just unmute this in here this part with the
bang of the door. Nice. So we use that as a
transition to a different song. So just put it a
little bit more. I'm just curious to
see how it sounds. That's all. Caps. Alright, so I think that one was
better, I think. Just end it right there. Like, right here.
Pop. Right there. Just at this point, I want it. At this point, I wanted
to I want to use this to break this and transition
even, like, the song. Here. Beautiful. Look at that. So that is done. So
what I can do is now, same thing. I zoom in. I take this little thing, I add a fade, take here, and I add a small little
fade. Same thing, guys. Even if it's a small
sudden effect, it's just good to just
add just a little. Even if it's very minute,
just very little. I'm adding I'm pressing
Command plus and Command minus to zoom
in and Zoom out, by the way, just so
you guys have an idea. All right? So let's
just hear it. Alright, so now over here, we see like a door open
door open, knob, right? Alright, so this is
where we can add some nice, um, music, right? So before I get into music, let's add let me talk about
a rule of thumb first.
18. Levels and Rules: Alright, so rule of thumb
is basically for dialogues. Do not let it go beyond, um, negative ten to
negative 6 decibels, right? And for sound, let it be
two negative 3 decibels. Here is to show you
how what I mean is I'm going to just remove myself and I'm going to go over here, and I'll show you over here.
So let's say the music. Alright. So you see over here, this is right now at it is right now, this is what. Negative five is actually going way below, way, way above. So that's something
which is not good. We need to adjust that. So. See it is like hitting unity. Unity basically means zero. We don't want it we
don't want it to hit the red part because that
means it is peaking. It is clipping, right? So we
want it to be below that, right? ***** is fine. Mega. We want to keep things on
the yellow to the red part. Nifty, 23,000. So like this portion
So this portion, we can just take this,
go to the inspector. Instead of 20, we can
just do 15, right? Since this one wants louder. Caps phone lago. Alright. Maybe we'll
do this like 12. Capsiphone. I under phone
Mega v, 15, 23,000. So, see, that is at least good. So you have to just
make sure that the thumb rule is the
levels over here. Dialogue should be
between negative ten to negative six, right here. And with music, you can
go to negative three, which is up here. All right? So keep in mind that
zero is over there. Do not cross zero.
Keep it over here. That is how the
rule of thumb is, and that is what should be your always goal is
just something which is nice to keep in mind. 15 23,500 next week. And this over here, this bus one is your overall levels, right? Living quantity? 2000 car
Ozuna. Profits of icon. Japs. ****. When you call
thumb? Meeting in my home. Okay, so that is
your rule of thumb.
19. How to Look for Music & Important Tips: Now, moving on to things such
as stock music, all right? Finding music from afar. So we have this
door handle open. So let's use this door
handle open to find music. So now, there are websites which are available for purchase
as subscriptions, which gives you the
right to, like, post stuff on your
own YouTube channel or if you have clients, you want to sell it
to your clients. So those are some good
things which you can use. Ideally, making your own music
is always the best thing. But stock music, the
thing the way it works is some websites include a
lot of copyright things. So understanding copyright is a whole different
subject altogether. And when you're going
through stock music, understand the rights
of the music first. Like, can you use this music
to sell it to a client? Can you use this music
on YouTube channel? Because the last thing I
want for you guys is to face copyright
issues or copyright, like, you know, strikes
or something like that. I honestly don't want you
guys to go through that. So keep in mind that, ask the artist of the song to get the license and
then use it, right? There are websites which
allows you to post on YouTube. It allows you to post on, use it to sell it to clients
and stuff like that. So it depends on what
you're using it for. Based on that is what the
license is made, right? Now, there's this website
called artlst dot IO, so I'm just going to
show you guys my screen. So we have artlst dot IO. So I will put the link
for you guys over there. So basically, over here,
it gives you access to every single
thing like music, sound effects, some footage
and templates as well, but I usually use it for, like, sound effects, Mindian music. So we needed door open, right? So door open. And we can see like door
handles on. That's too much. Definitely not car. I think
this one was the best. Is glass. Fridge
heavy would end. This is nice. Okay, not bad. There you go. This is the
one. I wanted to open. So I take this down
the WayFle. All right. So basically now with
Artlist, you can, um, use Artlst for, uh, your own projects. You can use it for
your customers. You can use it for posting
on your YouTube channel. You can use it however
you want to, alright? So let me go back
to the media page. Let's go to SFX. We had this Door bang and then
we'll commandeoimport. And let me just actually
open my finder. Let's add SFX over here, and let's go to my
downloads and we go here. So we have a couple of more
sound effects as well. This one. It's a phone. Door open. Alarm. All right, so we use this one, drag and drop, and
it is right here. We go back to phyllite,
go to Media Pool, get this Sonic bath same
from SFX, and we'll drag it. So this is on the SFX, so
we keep it right here. All right. So now let's go here. Then we get rid of
the media pool. All right. Let's see where
it is. Let's solo this. All right. Right
here at this point is where I wanted to open. Right here, Basically, I take this and I just trim it down because
I don't need that. Alright, so now you
see what this happens. Over here, see, this
is a stereo track, but this is the left channel and the right
channel, but over here, it's only on the left
channel, which is why you can only hear from your left side. So this is where I will show you guys a trick because
a lot of you guys go wrong, and this is something
which is one of the most basic things
of understanding what and how to activate and navigate
through your channels. A lot of amateurs
go wrong with this, or even there are some experienced people I know they overlook through
this as well. It only happens to the left. So what you do is
you take this clip, you right click it, and you go to this thing called
clip attributes right? When you go to clip attributes, you can see these
things over here. So format. So look, think
about it like this. The track over here
is a stereo track, but the sound that is there
is a monosund, right. So basically, we
are trying to make sure that it is audible
on both left and right. So what we do is
you change this to a stereo and you press. Okay. So now, it will be
audible on both ends. Se? So now this level is
a little bit low. So what we'll do is
we'll do like five, which is through the volume. Alright. That's how you
do a couple of things. And that my friend, brings the end to the basics
of the FalltPage. That is pretty much it
just to overall navigate through a couple of
things and as to how to do what to do. There's many more
things that is there, which I will talk about
in advanced courses. By the way, you can do the
same thing from here as well. You can go here,
clip attributes. You can do it from here as
well. So un soolwing it, and this is what we have
so far. Let's take a look. Cups phone phone. Phone Mega v, 50, 23,500 next week. Tika. Living quantity? 2000 car OzardnaPfits
are icon nine, Jason. Tick, Mikal th meeting. Okay. Ali in hi next
time. Okay, Jose Bye. Alright, guys. So
that is basically, um, what it is. Oh, by the way, just a quick shortcut
Command F to go full screen, Command F to go, um, again, from full screen. And if you go over here, Zoom and zoom out, you
can, like, zoom out. Press hold the middle mouse
button and move it around and press Z to just fit
back to screen, right? So that is the basics of, um, the sound overall.
20. Understanding the Fusion Page: Alright, guys, welcome to
the intro to VFX module. I think in this one, we will cover very, very we will just scratch
the surface, but we will scratch
it in a way that it makes you useful in
the industry, okay? We will be covering basically
a couple of basic things. We will talk about, number one, what masking and rotoscope is. We'll be talking about
how green screen works. So basically, green
screen is basically the art of king. So we
will talk about that. And thirdly, we will talk a
little bit about tracking. So these are the three
things which basically scratch the surface into the
world of visual effects. So we'll talk about how we
can do some basic stuff. And obviously, VFX is
such a vast field. People take it truly as their sole responsibility,
their sole field. And if there's something
that interests you, let me know, comment below. I am that's one thing is my specialization is
CG and VFX, right? And let's scratch the surface. We'll do something
which makes your work elevated to the next level,
right?Vamos, let's go. So I'm going to share
my screen over here. So we have this similar timeline that we had made,
if you remember. I'm going to scrub through this timeline,
blah, blah, blah. Over here, we have this one. So this is the one
that we graded, if you remember, over here. So what I've done is
I have this scene, which is shot in green screen. So I've taken that, I've taken some in and out points
like we had done, and I made this little
clip over here. Alright? I made
this little clip, and what I did is I did a CST, which is a color
space transform. I made it from a S lock 32
Rex 709. I didn't add a lot. I just added a simple
white balance fix and like, it was
too warm for me. And then also I just balanced it out a little bit. Allright? So this is what I did so far. And what we're going
to be doing is we will generate a lot of this,
right, of how this looks. So we'll go over here,
right click on the clip. We will do generate Lut
and a 65 point cube. So remember how online, you get a lot of lots
that is available. People will tell you, Oh, you should buy this lot,
you should buy this lot. So this is what a lot
is. Basically, people grade an entire clip, and then they sell that lot. But see, that's the thing
about louts, right? Not every lot works
for every single lot. So it is very difficult to create something
which is unique for all images because all
images are not the same. Hence, do not be a lot pitch. The only ut which is useful
is the film print emulation, which is FPE is what
we had done for the Kodak 23 83 film look. Which was made for only
Sinon film log gamma, which we did properly. So unless until you don't know
what that lot is used for, just buying lots to
make the image look good without the
proper knowledge doesn't make sense, right? So before you buy lots, make sure you're cognizant
about that thing. Alright, going back
to the 65 point cube, we'll just call it
AK green, right? Let's save this to the market we'll save
this to the market. We have courses. We
have it right here. I'll just put it over here, right here. A green. Alright we'll save that lot. Now, what we will do is I will introduce you guys to
this place called Fusion. Now, fusion is something
which is very, very, very different, right? So, yes, you can use
after effects for this, but I want you guys to
know the new software. The new things of how the industry works,
which is node based. So that's why I'm scratching the surface because it's
a very, very vast topic. I'm just scratching
the surface on that. So let me walk through the
fusion page a little bit. So we have two different pages. One is the left side,
one is the right side. So media in is what the input is and media out is
what the output is, right? So, for example, right
now in this one, we have, if I just zoom in over here, uh, this is one clip over here. All right? So right click, I can do open infusion page. So what this does is it just creates one input
and one output. So that is that. These are a couple of things which are
there with some options. We first, we have a background. We have fast noise, text, paint, color corrector,
color curves. If you just, like,
hover over it, you'll be able to
see what these are. We'll use some of these right now so you understand
what I'm talking about. Right? Then we have spline, which is when you add keyframes and when you
animate, we will use this. Keyframes has the
keyframes in it. Metadata always, it shows, um, the metadata of
what each clip is. Inspector, we've already been
we've already done that, which is like the
tools and the things. Let's turn that off.
Turn off metadata. Turn off this and keyframes. We will just keep the
inspector and metadata on, and we will increase the
size over here, right?
21. Concept of Masking and Rotoscopy: This is what we will
be doing. We will be removing the uh, removing this green, right? So before this green, I want to talk about
what masking is, right? So now, before I get
into any of this, what I will do is I will
create a background node. So this is a background. So what I'll be doing
is I will put this. So if you hit one, it
will come to the left. If you hit two, it'll come
to the right, alright? Or you can drag over here to the left, drag over
here to the right. Now, this background node, I'm going to make this just
any just a pink color, for example, because why not? So let's say this media
out what we have, this is two and this
background is one. See how the little
dot over there is? Either do that or you can just drag over here, drag over there. So you can just
take this drag over there, and I'll drag over here. So now let's talk
about what is masking. What is the concept of masking? Remember how I talked
about how masking is basically a cookie cutter? That is what mask is. So let's say this is the
background that we have, right? So imagine it on a piece of
paper, you have a pink paper. Now, what a mask is, so the shortcut to get
any node is shift space, and then you type the node. So now we have polynd. So I just added this
node called a polygon. So the way node works, it works from top to bottom. You see this arrow, it
works top to bottom. So media in which we're feeding the median,
and this is out. So same thing how in the
color corrector node, we had over here, we have in point and
this is the outpoint. So basically, this two dot is
basically what this two is. Understood. So everything will
be in between here, right? The only thing in
color corrector, you go from sorry, you
go from left to right. Over here, you go from
bottom to bottom to down. Now, originally, infusion, you actually will flow horizontally,
which is like this. But I come from Nuke, which is foundries thing. So I just find it easier
to go to go vertically. And that's just the
industry standard way, in my opinion. I just use that. Now, background polygon node. So now, the way polygon node works is we have different
different things, right? So let's say I add
just a random shape. Look at that. It creates white. So what does this do? It creates
an Alpha channel, right? So white means it is there. Black means it is not there. So if I go over here,
I choose Alpha, this is what the alpha is, and this is the color, alright? So what I'll do is I'll take this output and I'll
attach it to the background. And I'll take this and
move it over there. Do you see what happened? The shape that I made
is now over here. So now if I move,
let's say, over here. All right. So that is
what a cookie cutter is. So think about it like this. Now, let's say I add
another polygon node, and I just do like that. So see there, that's two images. Now, let's say I
make it like big. I can change the shape, or let's say if I add like here, add more points, right here. I can add more points over
here. I can take this. I can take this
little thing over here and edit it like that. So I can keep adding more shape. Polygon one, polygon two. Now, what I can do is
take this polygon. You see in the
inspector on the right, we have different
different things. So what it does,
what are masters? I'm getting you to
concept of mask, right? So I can take the level,
I can decrease it. That is like the transparency. So same thing over here,
you can do Alpha channel. So the Alpha is always
white and black. So what is white and what is white is there,
what is black isn't. All right? So you can see it like this checkerboard means
there's nothing there. Alright, soft edge
remember how we talked about is basically just
to soften the edge. And I'll tell you
how that will be useful at that point of time. Invert is basically
I can invert it. Look at that. It just
makes the invert. I take this one. Obviously,
why did not that work? Because it's pink in color. So if I invert it, then it'll it'll be like the
opposite. You get me? So take this uninvert this. Look at that. This one, I uninverted. There you go. Now both of them
are not inverted. Now, let's just work with
one. So let's use this one. I invert it. So now
only this portion is not there, that
portion is there. So that is basically
the concept of a mask, right? So, same thing. Let's say we take this
one, for example. Let's take this one over here. So basically, if you
think about it like this, if I add, let's say, shift space, a polygon node,
so I add it over here. So let's say I take so now nothing has
obviously popped up. So let me just decrease it. Let me just make
something like that. Alright? Look, the media two out, what has
happened to it? I just made a simple
mask out of it. Now, obviously, if I take
the media in to one, this is the same
thing that is seeing. This is the output, right? This is the polygon, and this is the output. Is just uh I'm just smoking it. Like this. Alright. Perfect. As, this is how
a simple mask works. So now what we'll do is
let's remove this, right? So that is what masks work. And the way to actually
do this is, um, when you add just randomly stuff around,
basically, for example, this I don't really
need to worry about this I can
just do a regular, like, just a rough mask. That is what a garbage
mat is, right? That is what is the
definition of a garbage mat. So that is what masks are. Now let's move on to actually removing this
green screen, right?
22. Chroma and Luma Keying: Alright. So in Nuke, we use this thing
called a Delta here. Right? So I have a Delta que,
I just put that over here. So Delta here, basically what
that does before Oh, sorry, before you do a
Delta here, first, we need to have you noticed that this is still
the log image. So over here, we already have completely Gamma three send into ASL three. So we
already have that. So this is already ESL three, so we don't really
need to do anything. We can just add
this lot over here. I dit it by choosing the edit option and choose
the t file that is there, and now my lot file
is properly there. So now I have properly
converted it. So anyway, so now
we add over here Shift space, Delta
here, beautiful. Alright, so over here, what we'll do is simple. Scale to fit. Scale to fit. Command F is the. Now, Delta here,
simple. You take this. Take this boom. Look at that. Immediately, it is removed. Now, if you take a look
over here at the Alpha, you can see, like,
the alpha is not really that beautiful,
to be honest, right? So now, how do we fix that? So white is good.
Black is not there. So if you see over here, we have um just
overall, some noise, and the worst thing is
this man has curly hair, This man has curly
hair, which makes king literally ten
times more difficult. But since this is
a basic course, I will teach you the tips and
tricks of how to do this. Alright. So we have
an entire footage of him just going around, you can see, like, all of
this curly hair just there. But anyway, so we go to Matt. Now, what we do is over here, I add this thing
called again gamma. So what this does is, firstly, I want to decrease the gamma to see where these
things are over there exactly where um the um
the whites are there. So what I'll do is I'll
take the threshold, increase it just like that. So I can get rid
of these things. I'll just reset
the gamma points. I can see over here. Alright. That's good. Then same thing. We will now increase the gamma to see where
these points are outside, and we'll just remove that. We'll just reset it
to see how it looks. So we'll just do two
we'll just do, like, a simple play, and we
can see like over here, this is kind of
like how he looks. You can see the
Alpha at least is good. We'll take it out. Now we'll take the restore. Take this spin up
or just weave it, take the up again. I'm just gonna zoom in
through the hair and see, like the hairs like right here. So I want to clean
the foreground. Can the background. So just
do soft colour. Fine fringe. We do medium. Actually
none is good. I'm just trying to see like if there's any fringes or
anything which are there. Taking care of the mat. Erode is fine. But what are these artifacts
which are coming on him? But we will be fixing
that in a bit. And you can see these
black black backgrounds. What we can do is we can
erode it a little bit. Just a wee bit to see how he is the foreground,
the background. What we'll do is, um, now what we'll do is
we'll add a simple mask. Basically just
something like that. Basically, what this will do is anything Got it. I put it here. There you go. Basically we're removing the So now when I see
what I'm doing, how the marks over here
are getting edited. So what this is the
fact that over here, I'm moving here, I'm
taking this over here. Moving here, bringing this here. So basically what I'm doing is I am animating the key frame of the mask that my friend
is called otoscopy. You just learned it. So
when you move around masks, there are particular points that my friend is called otoscopy. Like, over here, this thing, I'm just going to take these
points, move it over here. So you see how it moves
eventually with time, so it doesn't destroy anything that my friend is called
otoscope, alright? Digging the fringe. So spill is basically if there's any green
which is spilling on him, which I can do, like,
rare just to, like, make sure it is
overall, it is good. So sometimes what happens
is there are just, like, these square squares which come because they are a little bit weird in
the sense that if, let's say I go over here, to see the Alpha, like on
the Delta here. And if I like, let's say, I do like a gain Gamma, I reduce the gain gamma
or reduce the gain gamma. So see, everything's
pretty much proper, right? Same thing over there, everything is
pretty much proper. What we can do is
we can see where the key might be
going wrong, okay? Let's say we have the ut,
we remove the lut and we just check the lt whether that is there's something from there. Take the gain, we can
just check to see what's happening.
Alright, that is fine. Preblur. We don't need
pblur that is okay. Green. So what we do is we try and see if there's
something that we can fix. But honestly, the mat
looks beautiful and that itself is trying to see
if I can restore the fringe. And if I can replace it with
hard colour, there you go. I replace one with hard colour and that
usually fixes stuff. But I'm just going
to see a couple of other areas where
he's actually going. So I'm just gonna T. I want to lose too much
information as well. So the best thing
what we can do is, um let's remove this alpha. Let's put on the
lot here as well. So we do edit, E browse. Actually, no, we'll keep
the lot on that side only. There's too many lots. I want this part to be
completely raw, actually. So this is what we do. We add a background node, and what we'll do is we'll make this pure pink.
Alright, pure pink. What we'll do is we'll
add a merge node. So merge is basically It
merges two clips together. So the yellow is background.
The green is foreground. So we take the Delta here,
we put this into foreground, and we see like two over here, and we take the
background to yellow. Now, reason why I did this is if your matt,
if your subject, if your foreground looks good on a random color like this
on a photo or a video, it'll be much more
forgiving, right? So this is what we just check to see whether
the Matt looks good, especially the hair because
his hair is so annoying. So we can check over here
with the Delta ear seeing we're going to add
some fine tuning to see if there's anything we can
do. Alright. This is fine. The mat overall, we just
clean the foreground a little bit in the background
just a little bit. We just clean stuff out. And that's pretty much it, guys. That's pretty much it. Do that. So he looks good on
the overall color. Okay, beautiful. So basically, he looks good on, uh, the pink color. So let's just remove this,
let's just remove this. And let's put it back here. Alright, so now what we have
to do is, in my opinion. So obviously, this one
is remove this one. You don't need the
polygon anymore. What we'll do is we can now, we'll add a simple merge. And what we will do, guys, is we have a nice
footage over here, what I will, I have to
import it, actually. I have to import it from Market. We have video. We have Tis. Let's take this one. Paris, you put this so
F two to rename it. Two, we'll call it Paris and we'll put
this merge right here. Hoop, I hurled shift to do that. This is the background, the yellow is the background, green is the foreground. I'm seeing why this
is not being seen. I like that. So you can do it either
way if you want. I just seeing the color
overall how it is flowing. So sometimes this is
what I'm talking about. Sometimes fusion
just lyches out. It's because, like, maybe the overall the area is
not really proper. This would be background. Here. So sometimes we don't go right. So if this, we'll just do sometimes just
a simple key out. Then what we do is we go
back to the edit page. Since this already
has a nice key, we just take this,
go to the inspector, maybe just position it, um, do like a 1.1 with a Zoom, and we just choose part of
the Images that we want. And there you go.
That, my friend is what that my friend is
what keying basically is. So that my friend
is what king is, and I hope this makes sense. Now, moving on to the
next type of key, it's called a luma key. All right, so we look at another simple little image
if we can find. Uh let me see. Alright, so we use this one. Alright, so this will be super, super difficult to
do because we'll just so basically
what is Lumaki? I gonna put this together. So Lumaki is basically,
I do theodia. Lumaki is basically,
um difference between a green Chromaki and
Lumaki Chroma key or a green screen key
removes a particular color. It could be a green
screen or a blue screen. Then we have a Luma key,
which is you remove the luminance of that
particular image. So it could be usually it's used for sky because
that is the most luminant. The most the sky is the
brightest in the entire image. So you use that for stuff like
sky replacement and stuff. So here, I'll just give
you a quick example. This is not the best example, but you can do it in two ways, either on the color page or
either on the fusion page. All right. So basically
what I did is I did a simple luma key before I do that Command
P to disable it. Um, I take my media
one, like, right here. I take polygon, shift
space polygon. Right here. What I'm going to be doing
is I'm going to, like, make a mask like that. And All right. What basically I do is you
have to do this properly. You have to take mass. I add this plus thing. Basically, what that does is it adds points as it
when like you change it. So see me adjusting. So the more time you spend,
the more detail it'll be. This is basically
what rotoscope is. Like this, like this, like this. This like this, papa pa
like that. And by that. So you can see this is
what that thing does, and you can see
the Alpha for it. And then now what I'll do is I'll just remove
this completely. Take this out. And
I just invert it. You just take this
over here. Take that. Take this one and
this one chose. Move side. Then blur it out. Blur this out, take this
one, blow this out as well. So you see, this is
basically what Luma k is. So again, I didn't
really do a good job. So God is in the
details, you got to go, like in per like little mountain curve
and you got to do that. You got to do it for every
single frame, right? Because now, I
move let's say I'm over here, I move one frame up. See the sky is moving. You
got to take your polygon. You got to move it down. Next frame, move it up. Next frame, move
it up. Next frame, move it up. Next
frame, move it down. That, my friend is what
rotoscopi is, right? So that's where you see,
these things moving around. That is what rotoscope is. Now, this is
something you can do in the fusion page. Let
me just reset the node. The other way you can do
it is in the color page. So over here, what you do is you just go
over here, click. Clicking this super, super easy. What you do is you turn on the highlights and you
like, poop like that. Done. That's how easy it
is in the color page. So I take D like that. Use the softness. Use
the low softness a bit. High softness also. I go
to keep playing with these until you somewhat get a mask, somewhat. And you can change I think. So that is how you key
the luminance out, okay? So that my friend is king.
23. Basics of Tracking: Moving on to the next
one, which is tracking. So tracking is a
whole other ballgame. So what we'll do is we'll take a nice little clip that we have. Let's see, we can use
this scene, for example. Alright. Why is it like this? Alright. So what we'll do is basically we will try to track a text based on his head
movement, right? So basically, this is what
we do. So we go to fusion. The way tracking
works is like this. Now, shift space. Simple. There
is planar tracker, right? Or let's just use
a regular tracker. Tracker. Alright? Now, the
way tracking works is we choose a point that we want
to track, which is like this. Right? Or maybe, like, choose something which has, like, good contrast
or something. Tracker itself. Ery
track. Like that. And what we will
do is, No, sorry. Before we do any of
that, I just want to make sure I need
there particular things. Let me just reset. I just remember something I'll
tell you what I remember. I reset the fusion
composition again. So, uh, over here, you see he's actually walking. So I want the text
to start coming from here and play like till there. Alright, so what I'll
do is I'll do a cut here and I'll do
like a cut here. So I only want this
clip to be infusion. So I do plop, right click Open infusion page
where is open. So now we just know, like, from the start,
it's only this mix. All right? So what
we will do is, this particular clip
which is there, I will take the color of it. There's a CST. What
I'll do is S look, so there's a color space
transform, right? B. So what we'll do is we'll take this we'll add a color space
tran because by default, it will not have anything. So we'll just do input color
space, we'll do Sorry. As we have a three Sena, this
will be log two log three. 79, point forward.
Alright, there you go. We have a color space
transform over here now we add a simple tracker. Now we have this thing
called an Iteltrack. What do we choose is this one? Alright. Inteltrak
four point is one. What we'll do is now we
will just track forward. Track forward. Wow. There you go. It's tracking, by the way. That uses some CPU
power, at least, CP GPU power. Almost done. You can see the red
line moving by itself. Alright, render
completed. Look at that. So now we have the entire track following that part
of his head, right? So now we can add a symbol. Either you do that
or you can just add like a text, right? So over here, let's
say we say hello, or we can say something
stock market, buying process. All right. Let me take this. It's gonna put this on the one. I'll put this over here
on the second part. There you go. I'm
pressed one to do that. Now what I'll do is I'll
just do, like, simple track. I obviously can't see
anything because over here, we don't have operations set. Operation at. So now, watch this. The text is moving
with his head. Obviously, this
doesn't make sense, so what we'll do is
we'll move it over here, move it over here to the side. What we'll do is we'll
change the color to, let's say, black.
Then we'll play. So that is, my friend, how you do a simple,
simple tracking, right? And now you can see over
here I used it for text. You can use it for when there's a camera movement,
you can use that for, um, making sure text is
stable at a particular place. You can use it for
overall just anything. That's how you use tracking. If you want to choose
something that you want to track,
you click on that, you track it, and then
you place text on it, and then that text will remain. I'll follow that position of what you want to track, right? So that kind of is the
intro to VFX guys. Um, there is much more stuff
which is there in VFX, especially in the film industry. This is just
literally scratching the surface because these are the basic things
you will need, simple green screen removal, simple understanding
of what masks are, and the fact that you will
already into the fusion page, which is note based composting, which means it is excellent. And that you know
what is foreground, background, what is
an Alpha channel, and also we talked
about tracking, which is basic text tracking. That is an overall
understanding of the VFX side. Again, scratching the
surface, guys, right? I know it's still we have over we've spent 50 minutes of just
what we've been doing. But still, it is a lot. A lot of people don't know these basic things as
to what things does. People are just
understanding the tools. Do this, do that,
do this, do that. But the concept of
how it works is very, very different what is what
you learned over here. Now you're at least confident
in tracking in text and understanding how to
re a green screen as simple as that, right? And play around with the
software a little bit, and if you have any questions, if there's any
particular side that you want me to take
care, let me know. Alright? See you the next lesson of rendering and deliverables. That's going to be super
short, so don't worry. It's very, very easy.
24. Final Checks: Alright, guys, welcome
to the last module, to the last side
of the Edit suite. I think we've come a long way. Now we have made
our master edit. We have done some
color correction. We have done some VFX. Now it is time to render
and deliver. All right? Let's go. So this
is the entire edit. Number one thing
that you need to always know is you need to
do your final checks, right? You need to watch this thing 1,000 times or a 1,000 times, you need to just watch
your entire timeline. You need to make
sure everything. There's no channels
which are like, muted, unmuted, nothing as sort. You need to make sure
you hear everything, scrap through the timeline, just see if there's
any mistakes. If there are some gaps,
you join those gaps. If there's anything stuff
like that, you can do. One small quick tip that I found is you go to
over here in Edit, there's this thing
called Delete gaps. So if you delete
gaps, all those gaps will get deleted, right? So delete gaps. See, every
single gap gets deleted. Even your intentional
gaps get deleted. So keep that in mind. Only do that when it is
actually important. Like over here, this gap
over here is important, so that's why we will
not delete gaps. Anyway, your edit is fine. Everything works beautiful.
We ended up in Paris. Amazing. Good stuff. Now, one thing that you have to have to check or you
click on your timeline. Number one, you check
timeline settings, right? So first, you just
check the format. Okay, it is 90 2010 80, blah blah blah, 24
frames per second. Monitor doesn't matter anymore. Output. Okay, everything
is perfectly fine. All right? And then
one more thing you do, you go to your felt page. You just make sure overall
you play through it. You just check out your control room and your loudness meter, make sure nothing is
just overly peaking. So everything that way
is fine. All right? Then you go to your
color page once, make sure to check every
single thing is there's no node which is turned
off or torn down. So just make sure each thing
is just checked properly. All of that is good to go. Then your effects, check the things which you
have effects on. Now one thing from an
organization standpoint, I like to keep the
clips that I have Vf. I like to keep them
a different color. So I usually go
here right click. I go to clip Color. I make it, let's say, orange
or something like that. Like, these two are important. Clip color, I make it orange. So I know overall, these
two have VFX in it. That is something which
is nice for me, right? That is something which
can be easily done. Alright? Beautiful.
Alright. Nice. That's good. Now, what you want to do is you
want to set an point, you press I Inpoint, and you go all the way towards
the end, and you press O. So this is what will
be rendered, okay? Then you go to
your deliver page.
25. Best Render Settings for different Scenarios: Now, in the delever page, you'll have your
custom settings, your overall timeline
that you'll be exporting shifts that
to see everything. Over here, what I'll do is I'll take the video height down. I'll take the audio
height down so I can see an overall just a view
of what I'm doing. Now, over here, firstly, you write now from
a basic standpoint, if you want something
like these things, these are basically codex, and these are very compatible
codec which will be available can be done on YouTube, vimeo or
whatever you want. So Xtra 65 is fairly new and it's a little bit more
compressed. So let's do that. Xtra 65, we'll call
this market, right? And location is your brows. Let's say I choose the
desktop and I do save. So make sure your format
is always quick time. Your codec is h265 or h264. Your resolution is
very, very important. Make sure that is the same.
Frame rate is the same. Quality. You keep it automatic. DVD result does some
great stuff doing that. Your audio make sure the AC is not that
compatible everywhere. So click that,
choose linear PCM, and bit depth 32 is
not required because 32 is float that goes
into Advanced audio, which we don't want to
get into right now. We just do a simple
16 bit or a 24 bit. That should be good
enough, right? And if you haven't
changed stuff around, bus one steeo is
your main output. Bus is basically a combination
of all the tracks, which is the main bus,
which is the output. So once that is done, and basically what I do is add
to render queue. All right? Once you add to render Q, it'll come over here on
the right side, you select it and you render it. Once you render it, this
is how it's going to look. It's going to render the
entire thing with the sound. I'll show you the
percentage right here and, like, the overall
the timeline of what's happening and how
much time is remaining. It's a fairly small little edit. So see how it's taking
time out there. It's because we did some
green screen removal, so that'll be slow. So the more processing you do, the more slow it will be always. Keep that in mind. So this is honestly the best
Rendo settings. For you for YouTube.
So keep that in mind. This is good enough. If you want to go higher,
you can always do ProRes. Pros is only available on Mac. So if you do PRs that
maintains the quality, there's less compression,
so that is good. Otherwise, if you want, um, you can restrict
this and you can increase it to 100,000,
something like that. But automatic does a
good job to start off, this is the best render
settings, keeping it simple. Again, there are
videos, a lot of videos that do
many, many changes. Honestly, as a
professional filmmaker, all of this doesn't make
that much of a difference. Unless you're delivering
for cinema, then it does. Unless there are requirements by OTTs or something like
that, then it is important. Otherwise, to get the
highest bit depth, resolution is more than enough, automatic is more than enough. Trust me, it will not make
much of a difference. You can restrict, but
whether it will be visible or not visible is
honestly up to the viewer. So I'm just being
realistic over here, especially if you're doing
Instagram or, like, YouTube. That's basically
what it is, right? That's pretty much it.
That ends the rendering.
26. Project Archivals: Let's say you want to you're just like OCD about keeping a backup and
stuff like that. So how do you access
this at a later point, you want to move to
another PC or something? So you go to the home Home is where your projects
will be like, right here. You right click over here,
Export Project Archive, right? So when you export
Project Archive, you choose Desktop or
wherever you want to save it. You do Save. You
add media files, you add your Render
case, you add your proxy media, if you want. So it comes as a
file as dot DRA, which is DaVinci Resolve
Archive, all right? And you do o, and
everything gets copied, everything gets built and your archival folder
is there available, right here on your desktop, which is right here.
Market dot TRA. You cache your media files. Literally, the same path is
everything is maintained, pathwise. Proximedia right here. See, the same path
is made properly. So all of that is
like right here. Alright? 960 by
540 do is Bxymdia. So you can see every
single thing is here. Media files and proximedia and your cache and your project. So now let's say you want to
if you want to import it, you just right click
on your project. Import project. When you
import or import project. Once you import project, basically go to your desktop, you choose this DRP, which is a DiwgiRsolt
project, right? So that is basically
how you export, and you can put that
whole folder into your SSD into your hard drive, into your thumb drive
and go along with it. So wherever you have DwigRsolt, you have access to
the project, right? So that pretty much ends, um, the lesson of
the Edit Suite. Alright? Thank you guys
so much for watching. We'll see you in
motion graphics, where we will play with
some lower thirds, play with some, um enhancers and some Golar
animations. In fusion. Alright? Take care.
Have a good one.
27. Thank You!: Alright, so that ends the amazing long class
of Event Resolve. Hope you guys had an
amazing experience learning the
software. It is free. Use it to your will,
and I hope to see fun projects from everything that you've learned and
everything that you've created. And whether it's
being a freelancer, whether it's being an editor at a firm, I wish you all the EME on Instagram, email me, find me, send me your portfolio. I'd love to see all of your work and where
you guys are going. It means a lot for me to have you guys learn this and
go through with this, and I hope you got
a lot from it. Thank you, and I'll
see you around.
 Jijo Sengupta, Be the Master of Space & Time