Transcripts
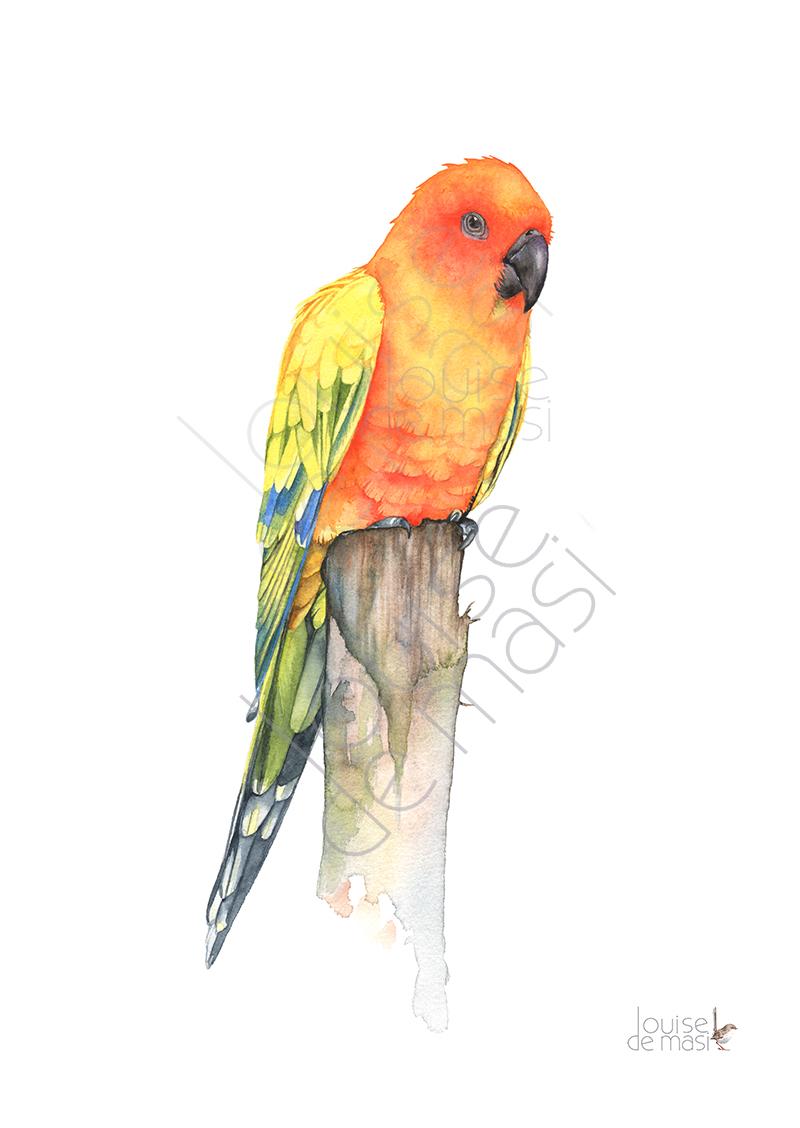
1. Trailer: My name is Louise De Masi and I'm a professional artist from Australia. I've been painting for about 20 years now. Six years ago, I started working in watercolor and I'm so glad I did. Watercolor is such a beautiful medium to work with. The way the pigment reacts with the water on the paper, the light-filled areas, the transparent darks, it's a magical and addictive medium to use. One of my favorite subjects to paint are birds. I recently visited a walking ivory in Cannes in far North Queensland and I was able to interact with some amazing birds. I took a lot of close-up photographs and in this class, I'll demonstrate how I used one of those photographs to paint this beautiful sun conure in watercolor. You can watch over my shoulder as I interpret the photo. I will incorporate a lot of different watercolor techniques, such as painting wet on wet and wet on dry. How I lift color to create highlights, and how I create deliberate blooms. I provide you with a copy of the reference photo and a line drawing of the sun conure so you can paint along with me. Join me while I show you why watercolor is my favorite medium to use.
2. Supplies: I'm about to show you all the materials that I use to complete the Sun Conure painting. Don't be concerned if you don't have the same colors or the same brushes that I use, use whatever you have. This is my favorite palette. I love it because it has sloping wells. I'll show you why I like this palette in the "Loading the Brush Listen". I use a water spray bottle to wet my paint. A mechanical pencil. This is an HP. I used an eraser to remove my pencil lines. This is my water container. I like to use a fairly large container when I paint with watercolor and some paper towel for blotting my brush on. I used a hair dryer. Now, this is always plugged in and beside me on the floor whenever I paint. I use some tracing paper to transfer the drawing onto the watercolor paper. I'll show you how I did that in the "Transferring the Drawing to Paper" lesson. This is the paper I like to paint on. It's fairly thick paper and it has a smooth, velvety surface. It's Arches watercolor paper. It's 100 percent cotton. It's hot pressed, so it has a smooth surface and it's 640 GSM and wide, so I didn't need to stretch it. Now, for the brushes I used. This is my favorite brush. It's a Da Vinci squirrel Mop. I love it because of its beautiful point, and this is a number 3. I used a Da Vinci Casaneo round brush. This is in number 8. I used this Da Vinci Nova brush, and I use this one for all the detailed work that I did. I also use these flat bristle brush for lifting paint off after it had dried. I used a black sharpie when I traced the drawing of the Sun Conure onto the tracing paper. Now for the paint. The first color I used was Daniel Smith's lemon yellow. I used imperial purple, which is another Daniel Smith color. This is cobalt blue. I used Payne's gray. This color is sepia. The last Daniel Smith color I used was cadmium orange. These are the Winsor and Newton colors that I used. I used cadmium red. This is quinacridone gold. I used sap green. I use this color quite a lot, and I used a tiny bit of lamp black for the eye. I also used a small amount of white gouache. Last but not least, I used this prismacolor pencil. The color is called grayed lavender. Now, as I said, don't be concerned if you don't have all of these supplies, just use whatever you have that's similar.
3. Transferring Drawing to Paper: In this video, I demonstrate how I transfer my drawing onto the paper. This is the method I use most often before I start painting a simple subjects like this. If I was undertaking a major painting with many different elements, I'd spend lots of time hand drawing thumbnails of compositions. But what you'll see in this video is a simple way to get your subject onto the paper. I've got my paper at the size I want, I don't need to stretch it because I'm using heavy white paper. Now, how do I get the sun conure onto the paper? Well, there are a number of different ways, but I'm about to show you the method that I use most often. I printed off my photo of the sun conure at the size that I want it. What I need to do now is to trace it onto some tracing paper. Now I'm using a black sharpie because I need to be able to see the tracing through the thick watercolor paper. Here it is, traced onto the tracing paper. Now, I haven't traced all the details, I just need the basic shape of the bird. Now I have to get my drawing onto the watercolor paper, and to do that I use a lightbox. This is a light box that I bought on eBay, it was fairly inexpensive, but it's a great tool and it saves me a lot of time. I'd rather spend my time painting than drawing. All I have to do is trace the drawing onto the paper now and I use my mechanical pencil and I press fairly lightly. There it is. What I need to do now is to sit quietly and draw in all the parts I'm missing by hand. Now, as I said, the Light-box has sped up my preparation time. I've loaded my reference photo onto my iPad and I'm ready to sit down and draw on the details. This is the time when I think about how I'm going to paint the sun conure. I think about the colors that I'm going to use and the different techniques that I'll use. It's a time for me to familiarize myself with the shape of the bird and all of the feathers. This is how I set up my painting table, I've got my water, my brushes, and my paper towel already to the right of me because I'm right-handed. All right. I'm ready to start. In the next video, I'll begin my first washes.
4. Loading the Brush: When using watercolor, a lot of people get into difficulties with the amount of water on their paper versus the amount of paint on their brush. As a general rule, if you have a lot of water on your paper, then you don't need a really wet brush. If your paper is dry, then your brush needs to be fairly wet. I found the easiest way to work with watercolor is to put your paint on a palette that has sloping wheels. When you buy a palette, look for ones that have these little sloping compartments where you put the paint. Now, I'm going to show you how I place my paint on the palette and the two different ways I pick up paint. Here's my palette full of paint. Now when I squirt my paint onto the palette, I squirt it out on the highest point of each paint well. Then, when I wet the paint with water, the watery paint pours at the bottom of the well. After a little while, the paint that we squirted out goes hard. That's when I find it the easiest to use. When I pick up the paint, I do one of two things: I either use the watery paint at the bottom of the well, usually when my paper is dry, or when my paper is wet, I wipe my wet brush through the hard paint at the top and that gives me a lot of pigment. Generally, but not always, I'll use the watery paint on dry or slightly damp paper. When I want more pigment, I use the hard paint at the top of the palette. Usually, my paper is wet when I use a hard paint. Here, you can see that I've wet the bird's head with water. Now, I'm dropping in some orange that I've picked up from the top of the palette. There's lots of pigment because all I did was wipe my wet brush through the hard paint. Here on the log, I'm using the watery paint and I'm painting it on dry paper. Now this isn't always what I do, but more often than not, it is. Let's get started.
5. First wash: It's time to begin painting. In this video, you'll see me paint the initial wash of yellow over the bird. You'll see how I place my paint on my palette, and how I prime that paper first with water before I begin painting. I've finished drawing all the detail that I think I'll need. Now I'm rubbing over the drawing lightly with my eraser. I still want to see the drawing, but I don't want the graphite lines to be too dark. Once the paint goes on it will be difficult for me to remove them. I'm softening them at the moment. Now I'm going to start with his left wing. I'm wetting it with some clean water. I don't slap the water on I painted on carefully, because wherever I wet, that's where the paint will go. Wetting the paper gives me time to apply the paint without it drying too quickly, and that stops those hard edges from forming. Here's a closer view of the water for you. It's not saturated, but it's wet enough for me to see the water on the paper. Now I've put some lemon yellow on my palette, I've placed it at the top of the palette well, so that the watery pipe will pull the bottom of the well, when I wet it. I take the lemon yellow pipe and I paint it straight onto the wet paper. The darkness of the paper allows it to go on smoothly and easily. Now I paint it on this other wing, but because this area is small, I can paint it straight onto the dry paper. I know I can paint it quickly, and I know that the paint will dry on maybe before I'm finished. I dry it off with my hairdryer, and now I'm softening some more of those pencil lines. I'm going to paint the rest of the body now. I'm just reducing that dark line on his head. I'm wetting the wrist of the bird now because I'm going to wash in some more lemon yellow. I was going to paint the body and the head of the bird a different color yellow to the wings. That's why I painted the wings first, and then I dried them. But I've since changed my mind and I've decided to keep the same yellow as the wings. I've watched my way all down the body, and now I'm painting some of the yellow onto the flight feathers. I dry it off really well with my hairdryer. Now that it's dry, I soften some more of the pencil lines before I go any further with the painting. He's already now to add the next colors, and I'll do that in the next video.
6. Second Wash - Head and Body: I introduced two new colors to the bird in this video. I re-wet the head and the body of the bird with water, and I apply the painting sections. I don't mix paint on the palette, instead, I let the paint merge and blend on the paper. I'm putting some cadmium orange on my palette, and some cadmium red. I place them both at the top of the palate. I give them a quick squat of water, and I'm ready to paint the second wash. Now my first wash has dried thoroughly and I'm now going to re-wet the head and the neck area with some water. Again, I'm painting the water on carefully, remembering wherever the water is, that's where the paint will go. Now I'm only going to take the water to the chest. I wont take it further than that because it will dry too quickly before I get to it. Now here is where I mix or blend my colors on the painting rather than on the palette. To keep my colors fresh and vibrant, I rarely premix colors. I use them straight out of the tube and I tend to let them merge together on the painting itself rather than on the palette. Now, I'm painting another layer of the lemon yellow and before it dries, I'm going to drop in some orange. I've switched to my mock brush because I want to use its beautiful point. I'm picking up some of the cadmium orange from the top of the palate where the paint hasn't been mixed with water as much. Then I drop that paint straight onto the wet yellow, paint. I'll let the moisture on the paper move the pigment around. All I do is place it where I want it. I'm going to turn my paper now because I want to paint a few little flaky feathers off the back of the head. I'm always more comfortable pulling little strokes like this towards myself rather than away for myself. I'm making sure that I've gone around the edges of the eye properly. This is why I've switched to my mock brush, I can hold it upright on its point, and that gives me lots of control of the brush. A few more dabs of orange and you can see that I haven't gone beyond where my water is. I'm pulling some of that wet paint across onto the peak just to form these little fine feathers there. Now this is cadmium red, and I'm painting it around the eye to try and bring in that red area and that I can see that surrounds the eye. I'm just dropping it onto the wet paint and I'm leaving the moisture on the paper to space the pigment. I'm using the red paint at the top of the well, just like I did with the orange. Now with all this water on my painting, I've lost the lighter area of yellow on the top of his head. I'm using a tissue to gently dab off some of the moisture and paint there. Now I'm moving the red paint away with my brush and I'm dabbing the excess paint off on some paper towel. Now I'm dropping in some more of that yellow paint to try and bring that back onto the painting. Now it's time to continue on down the body with some more water. Now I'm going to take it right down to the feet level. This is the lemon yellow paint again. I've painted it all the way down to the feet. Now I do the same thing that I did with the head. I'm using cadmium orange first, and I'm dropping it onto the wet yellow paint. Now I don't want to completely cover the yellow, what I want is for the colors to blend on the paper softly together. Now I'm using cadmium red, and I'm doing this same thing. This time there's much less of the red paint because I don't need to put as much on. I'm going to let that dry and we'll see how it looks in the next video.
7. Adding Detail: I increased the color on the head in this video and I begin to add all the fitted data on the lower half of his tummy. Now, my previous washes dried and I can see that the red area around the eye needs to be deeper in color. So I'm going to do that now. So I wet the paper where I want the pain to go, and I wet it because that area of rate has soft edges around the perimeter rather than hard edges, and the water on the paper keeps my edges soft. I've picked up some cadmium red from the top of the palate and I apply it straight onto the wet paper. I try to keep the red paint within the area that I've just wet with water. I seem to have extended the paint past my water line and I've got some hard edges there that I don't particularly like. So what I need to do is soften those hard edges with my brush and it's just water on my brush at the moment. Now, I'm painting some more water further down the neck because I wanted to deepen that color underneath the beak there. This is cadmium orange. So I've dried it off really well with my hairdryer, and now I want to add some further detail on the body. So I'm using my pencil to lightly add some guidelines for myself so that I don't go as dry with the paint. I try and keep this fairly soft when I do it. That will do it for now. I'm switching to my fine brush now, and this is the Da Vinci Nova brush, and I begin by wetting the area directly underneath the line of the feather with some water. I'm using cadmium red and I painted straight onto the wet paper, and the paper underneath the line is wet, but the paper above the line is dry. So that gives me a soft edge underneath the feather and hard edge above where I want them. The drawing paper allows me to painting those fine lines that show how the feathers have been separated slightly. Here, I'm just softening the paint with some water on my brush, and I do the same thing here and again here. I keep going like that until I'm happy with it. Now, it's time to dry it off well, and I'm removing my pencil lines here and that's what I'm left with. I will more than likely come back and deepen the color a little here when I'm further along with the painting.
8. Beak and Eye: In this video, I paint the eye and the beak. I blink color on the paper again for the beak, I use my Nova brush to add detail, and I also introduce a small amount of colored pencil underneath the eye. I'm putting some sepia on my palate. That's a deep brown color, and this is lamp black. Now a quick score of water and I'm ready to paint the eye and the beak. Now I start by painting the iris in on dry paper. I'm using some watery sepia to do that. Now as I wait for that to dry, I'm going to put the first wash on the beak. I'm wetting the top beak first with some water. Now this is imperial purple and I'll use this color on the beak first. I paint it straight onto the damp paper. Now don't need this color all over the beak, I just want it on the top and right hand side. Before the paper and the paint dries, I'll paint some lamp black onto the beak. This is really dark to begin, but I know it will lighten up as it dries and is absorbed into the paper. I didn't paint out with the purple. You can see that it's still showing. I'm going to let that dry and then I'll go back to the eye. Amazing lag black and I'm painting straight onto the iris. The paper here is dry and I'm being careful not to disturb that wet beak under my hand. To make sure I've got good control on where I'm putting the paint, I hand the brush upright on its tip. I've left a little want highlight on the iris. This is some more sepia and I'm running it around the outer edge of the iris. Now there is some watery lamp black and I'm painting in the bottom beak on dry paper. I'll leave a little gap of white paper between the top beak and the bottom beak. I'm pulling some of that rick paint from the top beak up onto the dry paper of the cere. The cere is the part above the beak with the bird's nostril cere. I've dried all the paint and I'm using my pencil to define around the outer ring of the eye. This is watery lamp black and I'm painting it onto the dry paper. This is the nostril that I'm painting in lamp black. There's a lot of pigment on my brush and very little water and the paper is dry. Now I'm using that sticky black pipe to pipe the dark area in between the top and the bottom beak. To start adding some definition to the beak, I'm using lamp black again. There's a lot of pigment again on my brush, but this time I've got some water mixed in with it. The paper is dry here. Now I've switched to my mop brush and I just have water on the brush. I'm going to use that to move some of that black pipe up onto the beak further. The beak is dry, so I'm painting on dry paper here. Back onto the eye now and I'm using some watery sepia to darken small sections of the iris. This is lamp black again on the bottom beak. I look where the color is darkest and I'll paint that part first, because as I move away from that area, I've got less paint on my brush and the color lightens just as it does on my reference photo. I pull a little bit of that pigment that's almost dry up onto the bottom of the cere. I have a Prismacolor colored pencil here. This specific color is called grayed lavender, but any pale pink or purple pencil will do. What I'm going to do is use this color around the outer edge of that ring that's around the eye. I'm going to place it underneath the eye and I'll put a little bit in front of the eye as well. I also put a little bit of it onto the beak. That's it. That's the eye and the beak completed. In the next video, I'll be working on the wings.
9. Wings Stage 1: It's time to add some definition to those wings. In this video, I work mainly on dry paper. I introduce three new colors and I paint them onto their feathers. I'm wetting the wing with some water because I want to paint on another wash of lemon yellow over the top, just to brighten it up. There's no special tricks here. I'm just painting it straight onto the dry paper. This other wing needs to be brighter too, but I can paint it straight onto the dry paper because this area is only small. I'm going off the tusk here because something caught my eye. I'm using my width bristle brush to softly lift off a highlight from the beak. I'm rubbing over it gently to take off some of the color. Now back to the wing. This is Quinacridone Gold, and I'm going to use it to paint the shadows under the feathers that I can see up high on its back. I'm using my fine brush, and I'm painting these colors straight onto the dry paper. You can lightly draw in some guidelines to resist you if you need it. But don't need to be really light in color so that you can remove them after you've painted them. I'm doing it freehand without any pencil lines. I'm going to use this color on the side of the wing to define the feathers there. The paper is still dry here, but I can see the pencil lines that I drew earlier. I do the same thing on this other wing. I'm looking at my reference photo as I paint. I'm not worrying about creating a perfect copy of the photo. I just use the reference photo to guide me as to where I should place the feathers. This is sap green that I'm putting on my palette. This is a green that I use in a lot of my paintings. This is cobalt blue. This is a really pretty semi-transparent blue that's considered a mixing blue. I like to use it just as it is without mixing it with other colors. I'll start with the sap green. I'm using the watery paint, and I'm painting it straight onto the dry paper, just as I did with the Quinacridone gold before. I'm looking at the reference photo to see where to place the color. I'm dampening the color here so there's more pigment on my brush and less water. Now for the cobalt blue. It's watery at first so I'll make sure that I've got my placement right, and then I can go in with deeper color. The same on these other wing. I'm using sap green, but I haven't washed my brush really well so I think there must be some of the blue still on the brush. There's a little feather there that I've missed that should have been painted in yellow. Now I'm brightening some of these yellow feathers with some of the lemon yellow. I'm using my mop brush and watery paint. The paper is dry. I'm increasing the yellow on these lower ones as well. I'm painting some more sap green on this front feather here. The paper is still dry. I'm deepening the color where it rests up against the feather that's next to it. Now, I'm deepening the green on this other wing. I've got lots of pigment on my brush here and only a little bit of water. Some more of the blue over here. I have to jump all over the place because I made the paint to dry on each feather before I paint the feather that's next to it. So rather than reach for my hair dryer every few minutes, I tend to move from one spot to another when I'm painting with water color. This little feather here seems to be blue at the bottom and green at the top. I paint the bottom in blue first, and then I switched to green for the top. Where the two colors meet, they'll just blend softly together. I'll finish off the wing in the next video.
10. Wing Stage 2: It's time to finish off the wing with paints of green onto the edges of some of them to help define the feathers from one another. I'll work on those long flight feathers at the base of the wing, and I'll increase the color on some of the other feathers. I'm using water to wet this little feather here, where it touches the feather above it. Now I've picked up some sap green, and I'm painting it onto the wet paper. I'll run it along the edges of the feathers that are touching this feather, and the water softly flares the paint out, and keeps the edges soft. Now, I just have water on my brush and I'm softening the color. Moving down onto the flood feathers, I'm painting over them with some more lemon yellow. Now I'm applying some sap green onto the wet paint. I'm running it down the edges, and I'm letting the moisture spread the pigment out. Now I'm deepening these corner with some of the cobalt blue, and this time I'm using my fine brush, and the same here along this edge. Now I've dried it off with my hair dryer, and I'm going to start further defining some of these feathers. I've decided that this one here needs to be darker, so I'm increasing the blue on it. I'm painting on dry paper here, and now I've got some green. I've got some water reset green on my brush, and I'm defining edges here. Now I'm rubbing it over the feather just to green it up a bit. The paper is dry here too. This is cobalt blue again, and I'm deepening the color where the two feathers meet. Now it's time to define these flight feathers. I have sap green on my brush, and I'm softly running it over those pencil line so I can still see. The paper is dry. I'm using watery paint, but it's heavily pigmented, and that just means I've mixed a lot more pigment into the water to make it quite dark. This is cobalt blue, and I'm deepening the color here. I'm rubbing it over softly with my brush, transferring the paint from my brush onto the paper. This little feather up here need some more yellow on it. That's the wing finished for now.
11. Finishing off the Body: Now, I've noticed a little area under the beak that needs some definition so I'll show you how I correct that by lifting off some paint in these video. I will paint a few more feathers on the data area of the tummy and I increase the color there. I've noticed underneath the beak here that the feathers separate on my reference photo. In my painting makes it look like those feathers go straight across there, I'm using my bristle brush to remove some of the pie. There is just water on my brush and I'm gently rubbing this the same way I removed the highlight on the beak in the other video. I'll come back to it in a minute. I'm going to increase the color along this edge where the wing meets the body, I'm painting on some water. I want the pipe to flare softly across from that edge. This is cadmium red on my mouth brush, and you can see how the water moves the pigment. Now I'm using my fine brush to take the color even darker in value. I've got lots of pigment on my brush, and the water in the pipe is moving it for me, I'm pulling it across a little further here. I'm doing the same thing here except this time the darker color is going to go on the wing instead of the body. I'm winning that edge round up against the body, and this is sepia. It helps to define the age of the body and it creates a soft shadow, the lifting the wing of the body slightly. I'm putting some water underneath these little feather here, and this is cadmium orange. The water spreads it out and all I have to do is move it where I want it. Then I can pull some of the color up onto the dry pipe to define them further. This is cadmium red and I'm doing exactly the same thing here. It's sometimes difficult to know when to stop adding data like this. I don't want to overdo it. But I do know that if I think I've gone too far and it looks too busy, I can take some of them off with some more water. The plane hasn't said, So I will remove fairly easily for me at this stage. Back to this area under the beak now, weighted with water first, and this is a drop of sepia green. Now all I have to do is move it around where I want it. A little drop of cadmium red here, and now it looks like the feathers have separated there, which is what I want. This is cadmium red again, and I'm painting it onto the drawing piper. Now I can't help myself, I've gone back to play around with the feathers is on his tummy. Now I've just quit this area here and I'm dropping in some cadmium orange. I'm done for now, and it's time to move on to the tail feathers in the next video.
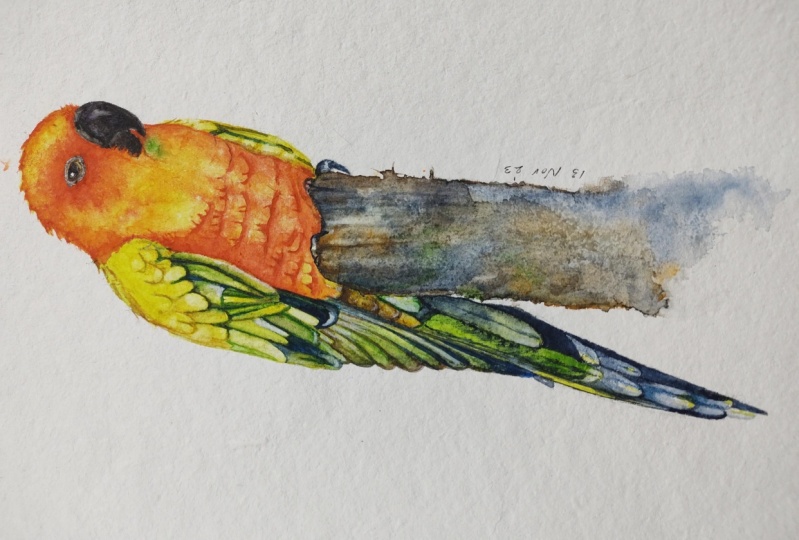
12. Tail Feathers: It's time to bring the tail to life now. In this video, I add all the details on the tail feathers. I'll weight on weight and also weight on drawing. At the end of the video, I'll go back onto that tummy area and I increase the color again there. Now before I start the tail, I have to paint in a feather that are missed on the wing. I'm painting some cobalt blue onto these flight feather. The paper is dry and I'm using my fine brush because the area is very thin. Onto the tail feathers, I've just painted in that green feather there with some watery sap green. Now I'm dampening the feather next to it so that I can paint sap green onto it. I could paint these feathers onto dry paper, but I want to make sure that the yellow underwash shows through, so I'm implying a little water first. Now I've got some lemon yellow on my brush and I'm painting that down the left side of the feather, that will blend softly with the green. I've just painted some lemon yellow onto this little feather to brighten the underwash. Now I'm painting some quinacridone gold onto the wet paint. This is sepia. Again, I'm painting straight onto the wet paint and the colors will blend together for me. Now I've got a little more sepia on my fine brush, and I'm pulling it up onto the dry paper of the feather above just to create those little feather details there. This is a lemon yellow again on this feather. Now I'm using sap green and I'm painting it onto the wet paint down the left side of the feather. I'm brightening up this feather with some more lemon yellow. This is some Payne's gray that I'm putting on my palette. I'm going to use it to paint the dark feathers that I see on the tail. These Payne's gray is really dark because I've got a lot of pigment mixed into the water. I'm painting on dry paper here. This long one down here is on dry paper too. Now with my fine brush, I'll use the Payne's gray to paint in the dark area between the feathers. Again, this is on dry paper. This is still Payne's gray, but it's water resistant. It doesn't have as much pigment in it. Now I'm deepening the color. I've got more pigment on my brush. The paper is slightly damp from the watery paint that I just painted. I'm still working with Payne's gray here and the paper is dry. I'm defining the edges of the feathers. I stay with my fine brush here rather than my mouth brush because I really need good control over where I'm putting the paint. Now I'm deepening the color with some more pigment. I'm painting some watery lemon yellow onto the tips of the feathers. The paper is dry here. Now I'm brightening up these feather with some lemon yellow. Now this is sap green, and I'm painting in onto the wet yellow paint and its bleeding across the feather softly. Now I'll draw that up quickly with my hairdryer. I'm wetting this feather with some water, and this is some watery paints graded on washing over the top. I'm using watery Payne's gray here on these feathers. The paper is dry and I'm painting around the yellow markings that I painted earlier. This is quinacridone gold that on painting onto this little feather here. The point is watery and the paper is dry. Now I have some sepia on my brush and on deepening the color. I'm waiting this feather here because I want to run some paints grade on the edge of it where it touches the log, and I want the paint to bleed softly across the feather. I also want the paint to be darkest up against the log. I've just dampen this feather with some water and now I'm using some Payne's gray to paint the dark area that I see there and I'm flicking the paint softly across in a diagonal direction. The paper is dry here and I'm using watery sepia. I'm painting it down one side of the feather. I do the same thing on this feather, but I have a little more pigment on my brush now. Now it's time to deepen the color around the feathers and paint a few shadows where one feather rests up against a another. I'm using sepia again and the paper is dry. I've switched to my smaller brush now because I want to have a little bit more control over where I'm putting the paint. The paint is dark know because I've mixed them more pigment into the watery paint. I'm deepening the color on this little area here that I painted earlier, and then I can pull some of that weight paint up onto the dry feather above just to create some more detail there. I'm almost done with the tail now. This feather here needs some quinacridone gold. The paper is dry here. Before it dries, I'll put a little bit of sepia just to deepen the color. Before I start the log that the bird is standing on, I'm going to broaden up these tummy area a little bit more. I'm painting on some water here, and this is cadmium red and the same thing here. Now I've washed the paint of my brush and I'm using my clean brush to move the paint where I want it to, and to soften some edges. This is quinacridone gold. I'm just about finished the bird now, but I still have the faith to do. In the next video, I'll paint the log. Now I've included this image for you to download. It's called, tail completed.
13. Feet and Log: We're almost there, I finish off the entire painting in this video, I paint the log and the birds feet. Now when I work on the log, I work fairly wet to begin with. You'll see how I add deliberate blooms, or some people call them backruns. Blooms are a great way to add texture and visual interest to a watercolor painting. Get your hairdryer ready because you'll need it when you start painting the log. I'm wetting the log with some water before I apply the paint. I want the paint to go on all soft and washy, and I want the colors to merge softly together. This is watery Payne's gray, and you can see how the wetness of the paper moves the paint around. I don't completely cover the white of the paper because I've got other colors that I want to use. I just push the paint where I want it. I'm going to try and keep the bottom of the log lighter in color and simpler than the top of the log where the bird sits. This is a little bit of watery sepia. I'm dropping it on and I'm letting it blend with the Payne's gray. I do the same thing with quinacridone gold, and you can see how much water I have on my paper here. Also with some cadmium orange. I'm trying to create color harmony by using the same colors that are used on the bird. Now as the paint dries, it won't stay like this. Instead, all the colors will softly fuse together. At this point, I have no idea how it's going to look, I'm just throwing the paint on here and there and I'm hoping that the paint will work its magic. Now I've switched to my fine brush and I'm painting with sepia. I'll paint some little flicks off onto the dry paper, and I run it along the edge where the bird sits. Then I paint a few little streaks into the wet paint on the surface of the log. Now I'm drying off with a hair dryer. Be careful when you do this because you don't want the air to blow the wet paint all over your painting. Just before the surface is completely dry I'm going to drop some water here and there to create some blooms. Now I don't know if I'll keep the blooms on here, but I just want to see what they look like. I've dried the log off completely and now I'm rewetting the top half with some water. Now this top half is where I will focus the detail. I don't want that log to distract from the bird, so I'll keep the detail near the bird and the bottom half of the log will be left alone. This is watery sepia. You can see that I'm using the mop brush right up on it's tip here. This gives me good control of where I put the paint. Then I just let the water on the paper softly flare it out. Now I'm just experimenting and playing with the paint. Like I said earlier, I really have no idea how it will look when it's finished. The only thing that I have in my mind is that I don't want it to detract from the bird. The bird is the star of the painting, not the log. I'm putting some more of the cadmium orange on again, I'm trying to create color harmony. Now my paper is wet enough that if I do something I don't like all I have to do is blot it off and remove it. If the paper was dry, I wouldn't be able to do that. Now I've gone back to my fine brush and I'm using sepia again. This is cobalt blue. I'm using blue because cool colors recede or move back, and I want the log to look round. I figure if I put a cool color on the left edge, hopefully it will start to create the illusion of roundness. I put a small amount of it in another place as well. Now I'll dry it off and I'll see what it looks like. I'm using watery sepia here. This time I'm painting on dry paper. I wet this area here with water and I drop some watery sap green onto the wet paper. I pull some of the green up onto the dry paper. I'm using my fine brush again here. This is sap green, but I've got lots of pigment on my brush. The paper is still wet. This is Payne's gray. Again, you can see that the paper is still wet. The paper is dry here. I'm painting some fine lines with the gray, and I do the same thing with sepia. Now I've decided to rub some of the paint off here and there. I'm using my bristle brush. It's wet with water and I'm gently rubbing on the paper. You can see that as I do that, it creates highlights as it removes the paint. Now I've wet the side of the log here and I'm applying some Payne's gray. Again, I'm trying to make the log look more round. I've washed my brush and I'm pulling some of that paint across onto the dry paper. I'm painting these lines with watery Payne's gray on dry paper. I wet it again and I'm dropping some of the sap green on as well. I'm deepening the color here with Payne's gray and the paper is dry. I'm leaving the log for now and I'll move on to the feet. I'm filling in that little claw on the side with some Payne's gray. I'm painting on dry paper here and I'm just filling in the feet with some watery Payne's gray. I'm still using Payne's gray here on the claw, but I've got more pigment on my brush. I will do the same thing with this other foot. The claws have more paint. The paint on the toes is watery. Now I'm coming back onto this toe with some more pigment. The paint hasn't dried yet. I've just noticed that I'm missing the edge of a feather here, so I'm painting that in with some Payne's gray on dry paper. I'm deepening the color on the log under the birds feet with some more Payne's gray, and the paper is dry again here. I'm wetting this part of the log one last time, because I want to deepen the color here slightly, and this is Payne's gray again. Now this is white gouache and I've mixed it with some of the cadmium orange watercolor paint. What I'm going to do is use it to paint some little fine feather flicks onto the beak. I just pull it across from the face onto the beak. I've just wet this shoulder with water and now I'm deepening the color there with some more of the cadmium orange. There is the log at the feet done. I think I'm finished now. How do I know when I'm finished a painting? Well, I get to a point where I'm fearful of ruining it if I go any further, so that's when I know it's time to stop. I've included this image for you to download. It's in the downloadable section and it's called Sun Conure Final. Thank you for joining me in this class. I hope that you've gained some new skills and understanding. Watercolor isn't easy to use, but with regular practice, you'll begin to understand it's finest qualities and you will learn how to manipulate and exploit those qualities.
 Louise De Masi, Artist - capturing beauty with watercolour