Transcripts
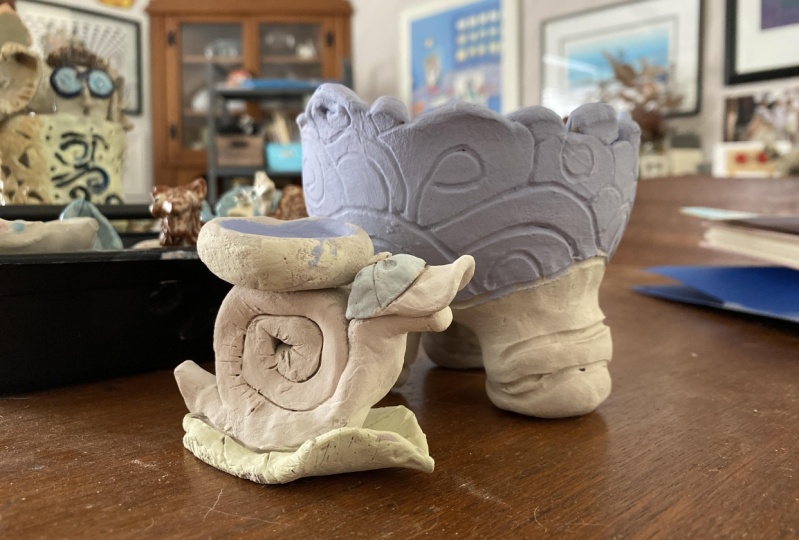
1. Making Soft Coil Pottery Intro: Hi, welcome to pinion pottery. My name is Vicki commonly in I live in Riedel so Downs, New Mexico or I've worked as a studio potter since 1982. I have my studio in the back and in this nice gallery space, I sell my pottery and my art quilts as well as lots of work by other people. In today's class, we're going to make a soft coil bowl and vase like this. This is super easy to do and you can get really unique patterns and you just build it inside of another existing bowl. Here's a little base we're going to make. You can see we've pretty much just roll up little coils and add other interesting shapes like leaves. And I built this inside of another container. So follow along in these lessons to learn how to build some really unique pieces of pottery just using coils.
2. Materials : Okay, the materials that you'll need for this class using soft coils are really simple. Of course, you need your clay. Before you buy clay, you want to already know where you're going to have your pizzas fired. And you need to check with that firing facility to find out what temperature they fire too, so that you can buy the correct kind of clay. If you're gonna do read CPU firing on your own, you need a lower fire clay. I like to use stone where for a lot of my pieces. So this is Haifa hard stone where you're going to need a bowl, either some kind of plain kitchen glass or ceramic bowl. Or in this case, I have a throne. This fireball clay won't stick to it, so you don't have to line it with clastic. If you're using a ball from your kitchen, you need some plastic like this, the plastic bag that you're going to line it with. And also to make the vase. I use this container that had disinfecting wipes, wipes in it, some kind of straight sided container that you can get your hand into. And that's a pretty good size opening because the clay will shrink a lot. And again, with that container, you'll have to line it with plastic in order to get your piece out. Then if you want, you can have some stamps. These are little stamps I made. These are some little bugs that you compress the clay into and make a little pattern with the bug. I made those stamps with from low plastic toys of the Blanca, my grandson. Here's a little face that I carve. These stamps were handmade by me and just made out of clay and then Bisk fired. So then they're fairly strong and the clay will release from them. So you can actually cut out leaves and animals and other shapes too. And you'll see that in the demonstrations. So you'll need some kind of little needle tool that you might use for cutting out shakes. And you'll need a sponge and a flexible rubber rib is really helpful to smooth the inside of your bowl at the end. So that's it. Let's get started on the lessons.
3. Making a Soft Coil Bowl: In this lesson, we're going to learn another hand building technique that uses soft coils of clay. This little vase was made with the technique that we're going to use in this little base we're going to build inside of a container. This was a container of disinfecting wipes and a fairly large size container because there is a lot of shrinkage in the clay. So we're going to line the container with plastic. So we'll be able to pull out what we make. We're also going to make a bowl and we're going to make it in this bowl. So this is a thrown pottery bowl that has only been Bisk fired. And so the technique that we use for this, if you don't have a viscous fire bowl, you can use a bowl from your kitchen just like we did on the other slab bowl. You just want to cover it with the plastic like I'm doing in the little container. So you want to start with some fairly soft clay and you're going to make lots of little coils or snakes. And you don't want to make them too terribly thin because you will be smoothing them out and pushing the clay together on the inside. You'll see what I mean in a minute. So you don't want to start with, if you make a coil that's really, really thin, like this, that is too thin and it won't work. So you want your coils about like this. Probably, I guess, three-eighths of an inch or bigger. The little under half, but more than a quarter. And they can be different links. And so after you make your little coil, you're going to roll it up like a snail. And you can, with the bowl, you're just going to start at the bottom. And then you can have bigger ones like this one is going to be really big. And we're going to put, now we're going to start building this by just setting them all next to each other and filling up the bowl. Now, if you live in a really dry place like New Mexico, you want to work fast and you may have to start smoothing things together sooner than if you live in a nice, moist place. I know I'm always talking about how dry it is. But here the wind is blowing 90 miles an hour today, and that's going to tend to make things really dry out. So I've got a couple of large ones there. Maybe I'll make another small one. And then I'll get to the point where you can see me smooth the clay together. Now the pretty side of this bowl is going to be on the outside. So what we're going to do after we get a few of these coils in here. So I'm going to put a little bitty one in that space. And can, you can just fill in this space however you need. And then what we're gonna do on the inside is start to smooth it together. So let's mix some more. Now with this Bisk fired bowl as a mold. The bowl with this pop right out, it won't stick to it as it starts to dry. But if you don't have a big bowl again, you can use a bowl from your kitchen. You just want to cover it with plastic before you start and then you'll be able to pull it out. So here's another little coil here. So that's base. We could put a little bit smaller one in there. And so we're just going to continue to build and fill in this bowl. That one we may need to squish it a little bit, fit it in there. And so you see there's some spaces in between there. But after we start smearing it, see I'm just smearing it with my fingers. No water. Water is not your friend. You just going to be smoothing it out. So the inside of the bowl will eventually be very smooth and all the little snails and coils will be mashed together on the inside. But you'll have this really pretty design on the outside. Okay, maybe I'll demonstrate one of these and put one of these in here. So another thing you can do is you can put different shapes in here besides coils, like I've made these little molds with some plastic bugs from my grandsons, plastic animal collection. And I'm just going to push some clay right into that little plaster mold. And get the little insect so you can see the little insect there. And I'm going to turn him so that he's facing outside, out again. And then again. And then when we start doing all that smearing, we don't want to push on him too much or it will flatten out the little design. But you can add all kinds of designs. You can add leaves, can make leaf shapes or you can, Here's a little face. We're sort of running out of space here. We might go the first split face over there. Let's see. These little stamps were just made out of clay like this and then disc fired. I didn't come out very good. Let's try this. Now. If I want him to be the exact shape, push him into the clay. And then I used a needle tool to cut around the shape of him. Now, here's the little face. And again, I want to put the little face facing the ball. And then when I do all the little smearing, I want to be careful not to push on him too much because I wouldn't want to flatten flattening out. And if you start to have some little holes where you really can't fit a little coil. You can just put a little ball of clay in there. See how I just filled that in. And now I'm going to start really working at smoothing these together. Got us quite a bit of a space there. You don't always have to use snails are coils. You could also use just long coils in a vertical orientation. You could make a crisscross pattern like a basket and it would look like a basket weave on the outside. And you see how I'm just smoothing this together. So that on the inside it'll be really sturdy and all act as one thing. But on the outside will have that really, really nice texture. When I get up towards the top, I really like the little unevenness of all the little coils. So sometimes I'll just put small ones right along the top. We have some over here and over there. But we're not really there. Already. Got one there. Okay. Okay, so now we're almost done adding coils, maybe just one right there. And it's just a matter of starting to scrape the clay altogether. And if you feel like you have a hole that's too big, you can just put a little ball of clay in there. Some of those coils were just a little bit dry and causing that crack in there. See, this was the insect there. It's a little more clear. So if you don't push too hard, you won't damage the pattern on the front. So I'm really trying to smooth it going across rather than pushing it against the ball back and forth. You can see because the clay is really soft, how easily it works its way into each other, becomes one. Now, make it a little scraper. So if you have kind of a rubber scraper that's round, you can also go around the balls, kind of like growing without a potter's wheel. Just scraping out. Again, I'm going kind of sideways. I'm trying not to go to push too hard against the ball. And then eventually I take a very damp sponge but not very wet. I mean, this is barely damp and smooth around the bowl. So he can set this aside now to stiffen up. And probably just in a couple of hours, it'll just pop right out of here. Or if you've used a plastic bag, you'll be able to pull it out with a plastic bag and it should hold its shape.
4. Soft coil 4 new: Okay, so for the vase, you can see that there's
holes in the vase. And I kinda like
to think of these as maybe a little candle holder because you can't
see what you're doing in there very well. But I'm gonna start with
like a little pancake that's approximately the size
of the bottom in there. I'm going to push it
all the way down to the bottom of the container. Push it down flat. Going to do the same thing. I'm going to make
coils and stand them up on edge along the side of the inside of this container. Your container can be
any shape or size, as long as it's not
curved in at the top. I cut the top off
of this because you want it to be able to
slide right out of there. Now just by feel, I'm gonna start at the bottom
and start stacking these up along the wall and try to put them right
next to each other, but you won't be able to
fill in all the space. And so that's what I said. It'll make a nice
candle holder or a vase for dried flowers. The quicker you work, the better so that the clay doesn't dry out
and that you'll have time to do all the
smearing of it together. It's kind of hard to see
what I'm doing in here. Starting with some fairly
big snails on the bottom. And then I'll probably put
smaller ones as I go up. Or maybe even make this one, this one here that I had put
some leaf shapes on there. I can make, I don't have a
mold for the leaf shapes, but I can make some leaf shapes. Kind of came up in the air. It's fun to see what kinds of
things around the house you might have to make
a mold out of. What kind of interesting
shapes that you come up with, depending on what
your mold shape was. Look around your house and see what you might
could come up with. Besides just a bowl or
a container like this. Now I've got, I'm all the
way around on the bottom. And if you can see
in there or not. But now I can at least
along the bottom, tried to smear the
pieces together. The other thing I'm
gonna do a round at the bottom where it comes
up to that pancake is make a coil and make it into
a ring and push it right around along that
little crack or siem that's at the bottom. So I'm going to take this ring and lay it flat
down at the bottom. And use that to meld together the coils on the wall with the pancake that
we put on the bottom. So that it'll at least
connect all that together. I've got the base together. I'm gonna keep putting
coils in here. Maybe another little
leaf shape could make animal shapes or leaf
shapes or faces or hearts. Hearts would be a good one. Put all kinds of
shapes in there. Now let's make them just
a little bit smaller. Just a little too big
to fit in that space. Fitting in the last one, going around the side, it's kind of hard because it's
a little bit hard to see. A lot of this you
have to do by feel. And I am moving it together. But I'm not worrying
about they're really tiny little holes going up. Okay. You can look in there and
I think it looks like I've got most of it's
smeared in together. Then it's gonna be time
to let it stiffen up. So you can see here the inside, it's smoothed out just
like the bowl was. And we will let
it stiffen up for a few hours and then
I'll pull it out and peel off the plastic and it's a little bit
of a crack there. Peel off the plastic
and we'll have a really cool design and
shape on the outside, I see a couple of
spots there were I didn't quite smeared enough. And I see a few little hole so it could be a good lantern. That's it until we come back
and when it's different up, my daughter and my nieces
came and made some of these soft coil pots over
the holiday weekend. This is one my daughter
made and you can see she used lots of
those bugs stamps. This is one my
16-year-old nice made and you see she didn't always
use a snail shape. There. She's got some long pieces. There's some snail
shapes and she puts him great petals on the top edge of the bowl to
make it look like a flower. Very creative. You can see that there's lots of interesting things that you
can do using this technique. Here's the finished lantern vase and bowl from this class. I hope you will be able to find a place to glaze
and fire your work. I fire my work to cone tin
in a high fire gas kiln. I look forward to seeing
what you have to show me. Even if you just make the
pot and don't get it fired, please post a picture
in the project section.
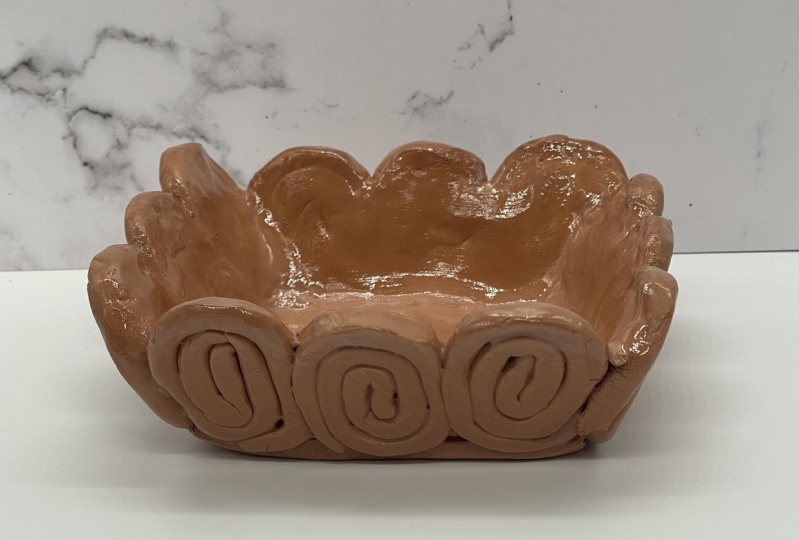
5. Soft Coil Project: Your project for this class will be to make a soft coil bowl or a soft coil vase and post a picture of it in the project section. And here for some more inspiration are a few other interesting pieces made in these techniques. This is a piece I made and I may through on the potter's wheel a large round shape about this tall. And then I Bisk fired it knowing that it would just be a throwaway in the end. After it was just fired it had acquired have a large opening at the top. I've used my snails and coils and these fish shapes to build inside of that thrown disk shape. You can tell I put the fish in first, just cut them out and decorated them and then put them inside first, and then added all the coil detail around to fill in all of the spaces around the fish. And they did that all working inside of that throne shape. Then after it was stiffened up, some I broke the outside shape that would away. And then it was the pot itself was still just under leather hard through this next shape and put the next shape on the top and added that and then did the rack Qu firing. So I hope you see that there's lots of different approaches. You can have two using this soft coil method. Here's a bowl made by another student. And you can see that she used coil shapes and just great little pieces of coil without being into this nail shape. And then she put lots of pears and fruits shapes along the inside of her bowl that she used for a mold and then filled in with all of her snails and coal coils. This is also wreck who fired with a copper glaze on the fruits. She also added a really interesting flipped to the bottom of the bowl, give it a little high. And she could have pretty decorative rim on the bowl. So I hope that you guys will be able to try different things in your approach using the techniques that I've shown. Here's the Spanish lantern vase and bowl from this class. I hope you will be able to find a place to glaze in fire your work. I fire my work to count in, in a high fire gas kiln. I look forward to seeing what you have to show me. Even if you just make the pot and don't get it fired, please post a picture in the project section.
 Vicki Conley, Art and Design