Transcripts
1. Make Your Own Watercolor Collage Terrarium: I'm Jessica from
brown paper money. And today I'm going to
show you how to make these cute watercolor
collage term barium.
2. Supplies: Here are the supplies that
you're going to need. You'll want some
watercolor paper. And I'm just using a fairly inexpensive Canson
XL watercolor paper. It's 140 pounds and it
says it's cold pressed, but honestly, I feel like it's in-between hot and cold press. And what that means
is that cold press is very rough and hot hot
press is very smooth. And I feel like this is
actually in-between. It's got a little bit
of texture to it, but it's still fairly
smooth, which I like. And I'm using some Daniel
Smith watercolor paints. I've got my Pigeon Letters, studio round brush
in size number ten. And I've also got a pinch pot water vessel with a nice little brush holder
that Peggy made as well. You'll need some scissors and you might want a
pencil, it's up to you. And then you'll need
some glue of some sort. I'm probably just going
to use a glue stick. Let's get started. What we're going to do first is just paint areas of
color on our paper. And then once it's dry, we're going to cut out the
shapes that we want to use. So you don't need to be too
precise. In this stage. It's just about filling the page with different
colors effectively.
3. Paint Your Collage Papers: And what we're going
to do first is just paint areas of
color on our paper. And then once it's dry, we're going to cut out the
shapes that we want to use. So you don't need
to be too precise. In this stage. It's
just about filling the page with different
colors effectively. Okay? Now we're
just going to let this dry before we move
on to the next step.
4. Sketch Your Terrarium: My watercolor is drying. I'm going to sketch out
the basic shape of my temporary them onto a
separate piece of card. You could also just use another spare piece
of watercolor paper. And I'm going to
do it fairly loose because I'll erase these
pencil lines at the end. I'm going to stop
with a round base. So drawing an oval at the base. And then sort of
a geometric shape for the top half of mine. Maybe a line out here, maybe a shorter
line on this side. And I want it all to be going
up into a point at the top. Okay? So it's kind of a
wonky geometric shape, which is what I'm going for. Now this will give
us a rough idea of the space we're working in. So that when we
start cutting out our shapes to collage them on, we'll sort of know how
many pieces we made.
5. Cut Out Your Plants: Hey, now my paper
is completely dry. We can go ahead
and start cutting out our shapes that
we're going to want for the plants,
for our terrorism. While this one was drawing, I also painted just
a few grays and browns and neutrals so that
I had something to use, a soil and maybe some
filtering rocks at the bottom. Let's start cutting out
some of these first. And I'm not going to draw
the shapes ahead of time. I'm just going to
stop cutting them. And they can be
pretty organic and it can be all different
sizes and that's fine. Okay, So I've cut out a little gray pieces for some
stones and I also cut out some of the brown pieces just to act as dirt in the
bottom of my tour area. And you can see I've cut
them so they fit together, but not 100% precisely. And I'm not going to
stick anything down yet. I'm just going to cut
all the pieces out. And that way I can
play around with them until I get a layout that
I'm really happy with. So I'll probably have some of
these Stearns over the top. Mix up some of the colors a little bit weaker. Okay, that's enough stones. And now I'm going to
start by cutting out some of the plants
from these colors. And for the plants I
might actually draw some leaf shapes just so I have a rough guide to cut from. E.g. I think I'm going to use this pretty bluish gray color
to be a little succulent. I'm going to stop by just drawing some kind of rough here. Dre tier can talk to tear
shaped petals or leaves. I'm going to show what you
call them on a succulent. And then I'll, um, cut all of these out and
assemble them together. Let's cut those out. K, cut out all of
those little pieces. And so I'm thinking the succulent will
probably be somewhere down the front here
because it's smaller and lower to the ground. I'm just going to a rough layout of what that might look like. The little petals in the middle. It's a bit hard to stop them from all moving when
they're not glued down yet. But hopefully you get
the general idea. So it'll be a little
succulent pair. And then I'm going to create some taller flowers and leaves to give it a little
bit of height and dimension. And there'll be behind the
succulent at the back here. So let's grab our paper
again and draw some shapes. So my use this green here. I'm just going to draw
some longer leaves. Couple of different heights and sort of leaning couple
of different directions. One more in the middle. Okay, and then we'll
cut these ones out. I'm going to switch to
some smallest scissors, which might just be easier for some of these curves
and Mike fine details. Okay, So curl our toll leads and you'll just have
to use your imagination, but there'll be poking down
sort of behind the succulent. They don't want to stay
put until they're glued. Even though I've got the frame
of the term barium here, I kept thought it'd be
fun to have some of the plants extending
out over those lines. So next we need
something in the middle here. Let's have a look. I think I want a little bit
more greenery at the back and then I might put a flower or something in front of it. So let's do something
a little bit larger for the back first. And I think I'll use
a combination of these grains through here. How big do we want it? Hey, that size. Trust him a little
bit thicker or else it'll be very
hard to cut out. I'm just going to
draw some leaves coming straight off of here. Now we'll cut this little hair. Okay, here's my little leaf. And I'm actually going to add a few details with
just with pencil. I'm going to put
some little lines. And this is totally optional. You don't have to do this. You might even want
to erase some of the pencil sketches
that you made, but I'm just going
to leave them. I kinda like it. This one's going to go somewhere
at the back there. Okay. Now I feel like
I've got a lot of leaves, so we need some sort of other contrasting
colors and shapes. Mike is this purple here to do. I don't know if this is
actually a real plant, but something kind of wiggly.
You'll see what I mean. They might go in here somewhere. Then I want some
sort of flour or something at the
front here, I think. Okay, so our flower will
go somewhere in here. Just roughly lay it out so we
can see the colors are all being taught for the center. I still feel like it
needs something else, maybe on these sides or
something at the back. Let's say my two summer larger lanes. So I might draw some lines and maybe also some little dots down here. I still feel like it needs
something in the background. Might just do some
larger shapes. I've got this
lighter purple here. Just some kind of
blocks of color. Slide that in. Yeah, that's better.
I like that. Give him just a
little bit of depth. Try one on the
other side as well. Okay. And these little guys, I really like the height
of them and the shape, but they're looking
a little bit flat. So I'm actually just going
to go along with the tips of my scissors and
cut some lines in. And I'll show you what I mean. Now what it's going
to be easier if I drew a line on the back
so I don't go all the way across because I don't want to cut
through all the way. Now if you just bend
those slightly, see, you've got this
nice sort of fan. Look. Just gives it a little bit more texture
than the flat one.
6. Glue Everything Down: Okay, The second to last
step is to actually stick everything down onto
your card or watercolor paper. And because we use watercolor paper for
all of our pieces, it's fairly thick, so you
could use a liquid glue. I'm just going to use a
permanent glue stick. And I'm going to
start with the items at the back and layer two, the items at the front. Let's do it. Sometimes it's easier
if you just have a scrap piece of paper
and that way you can just apply the glue liberally without worrying
about getting everywhere. Decided to use an extra
little circle pace to put my succulent together
because I'm having trouble keeping their the petals
in the right spots. So this way I can glue
them onto here and then glue the whole thing on
exactly where I want it. So hopefully that'll
make things. Little bit easier for me. Okay. So now I've got my little succulent and
I can turn it over, put glue on the back, and then put it exactly
where I wanted. Actually, I might put it on lost because I want
to put some of these little stones
across the bottom here and it'd be nice to have
the succulent overlapping. I think. You know what? I feel like I need one more little leaf
or something in here. Maybe this darker green. Now it's time to put the
little succulent on. Yeah, I think I want
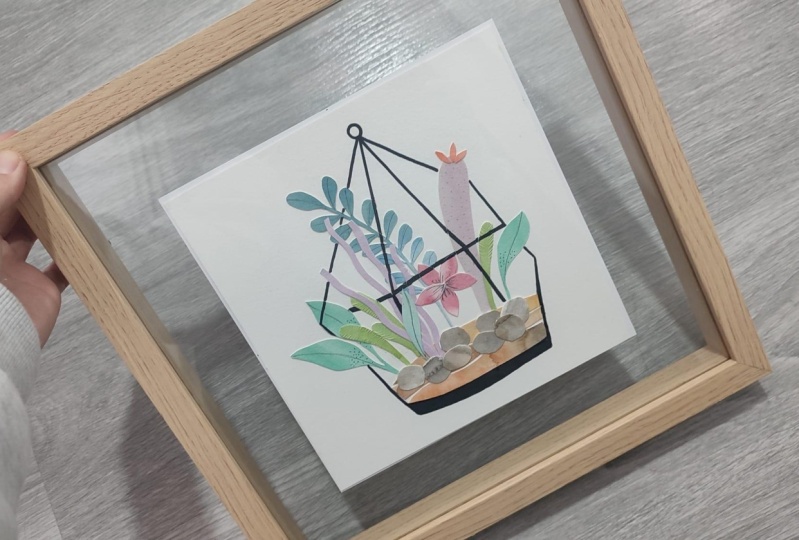
him about there sticking down really well. Okay. So now we've pretty much got our Cerium and the only thing left to do is actually draw
these outlines back in. But in black ink this
time, to really contrasts.
7. Outline Your Terrarium: I want quite a nice thick line. So I'm going to use the Tombow Mono Twin pen and I'll show you
how thick that is. So this is the bullet
tip side because it also has a ballpoint
on the other side. That's a really
nice strong line. And that's what the ballpoint looks like on the other side. So I'm just going to freehand. However, these pencil
lines that I drew. And I'm going to go across the top of some of these leaves, but others I might
leave poking out. And they got a little terrorism. And you could frame this
and hang it on the wall. It will make it cute
gift for somebody, a plant lover paths. But thanks for watching
and please subscribe to my channel and stay tuned
for the next tutorial.
 Jessica Mack, BrownPaperBunny