Transcripts
1. Introduction And Project Overview: Hello, everyone, and welcome to this class on Tiny Art Journals. I use them quite regularly when I need
to spark new ideas, or I want some
insights into things, or maybe I get some answers to questions that I didn't
even know I needed to ask. They are such a
lovely, creative, intentional process
that the things that come out of them can
often be quite a surprise. I'm Dawn Cawthra, and I usually introduce
myself as an artist, designer, and analistic
health educator, and I am those through things. But what do those labels mean? They don't come anywhere
near close to revealing. Whole person that I am. And this is where allowing yourself to play and make
these tiny art journals is a really revealing process because you can be
who you want to be. You know, you can ask the
questions. What comes next? Am I ready to step through the porko
into being somebody else? Maybe the inspired me
to write a short story. This is quite funny, actually. On the morning of
her 64th birthday, Eve suddenly remembered who
she really was a magnificent, multi dimensional being who had squeezed herself
into this tiny body. I wonder she was expanding. In all directions, she
was trying to escape. But then she realized
what she would miss, a beautiful family
and all her friends, so she decided to stay. So I can be a storyteller
if I want to be. I can make my art and just
doodle and turn it into this, but then becomes inspiration, landscapes to explore,
seascapes to delight. Mountains to take Mbath away. All in good time. This was a really lovely one
to do, actually, because it really reignited my passion for wanting to travel and see
different landscapes. And this is what
I'm trying to get over to you here
that by, you know, creating these
lovely little books, you really can be inspired in ways that you
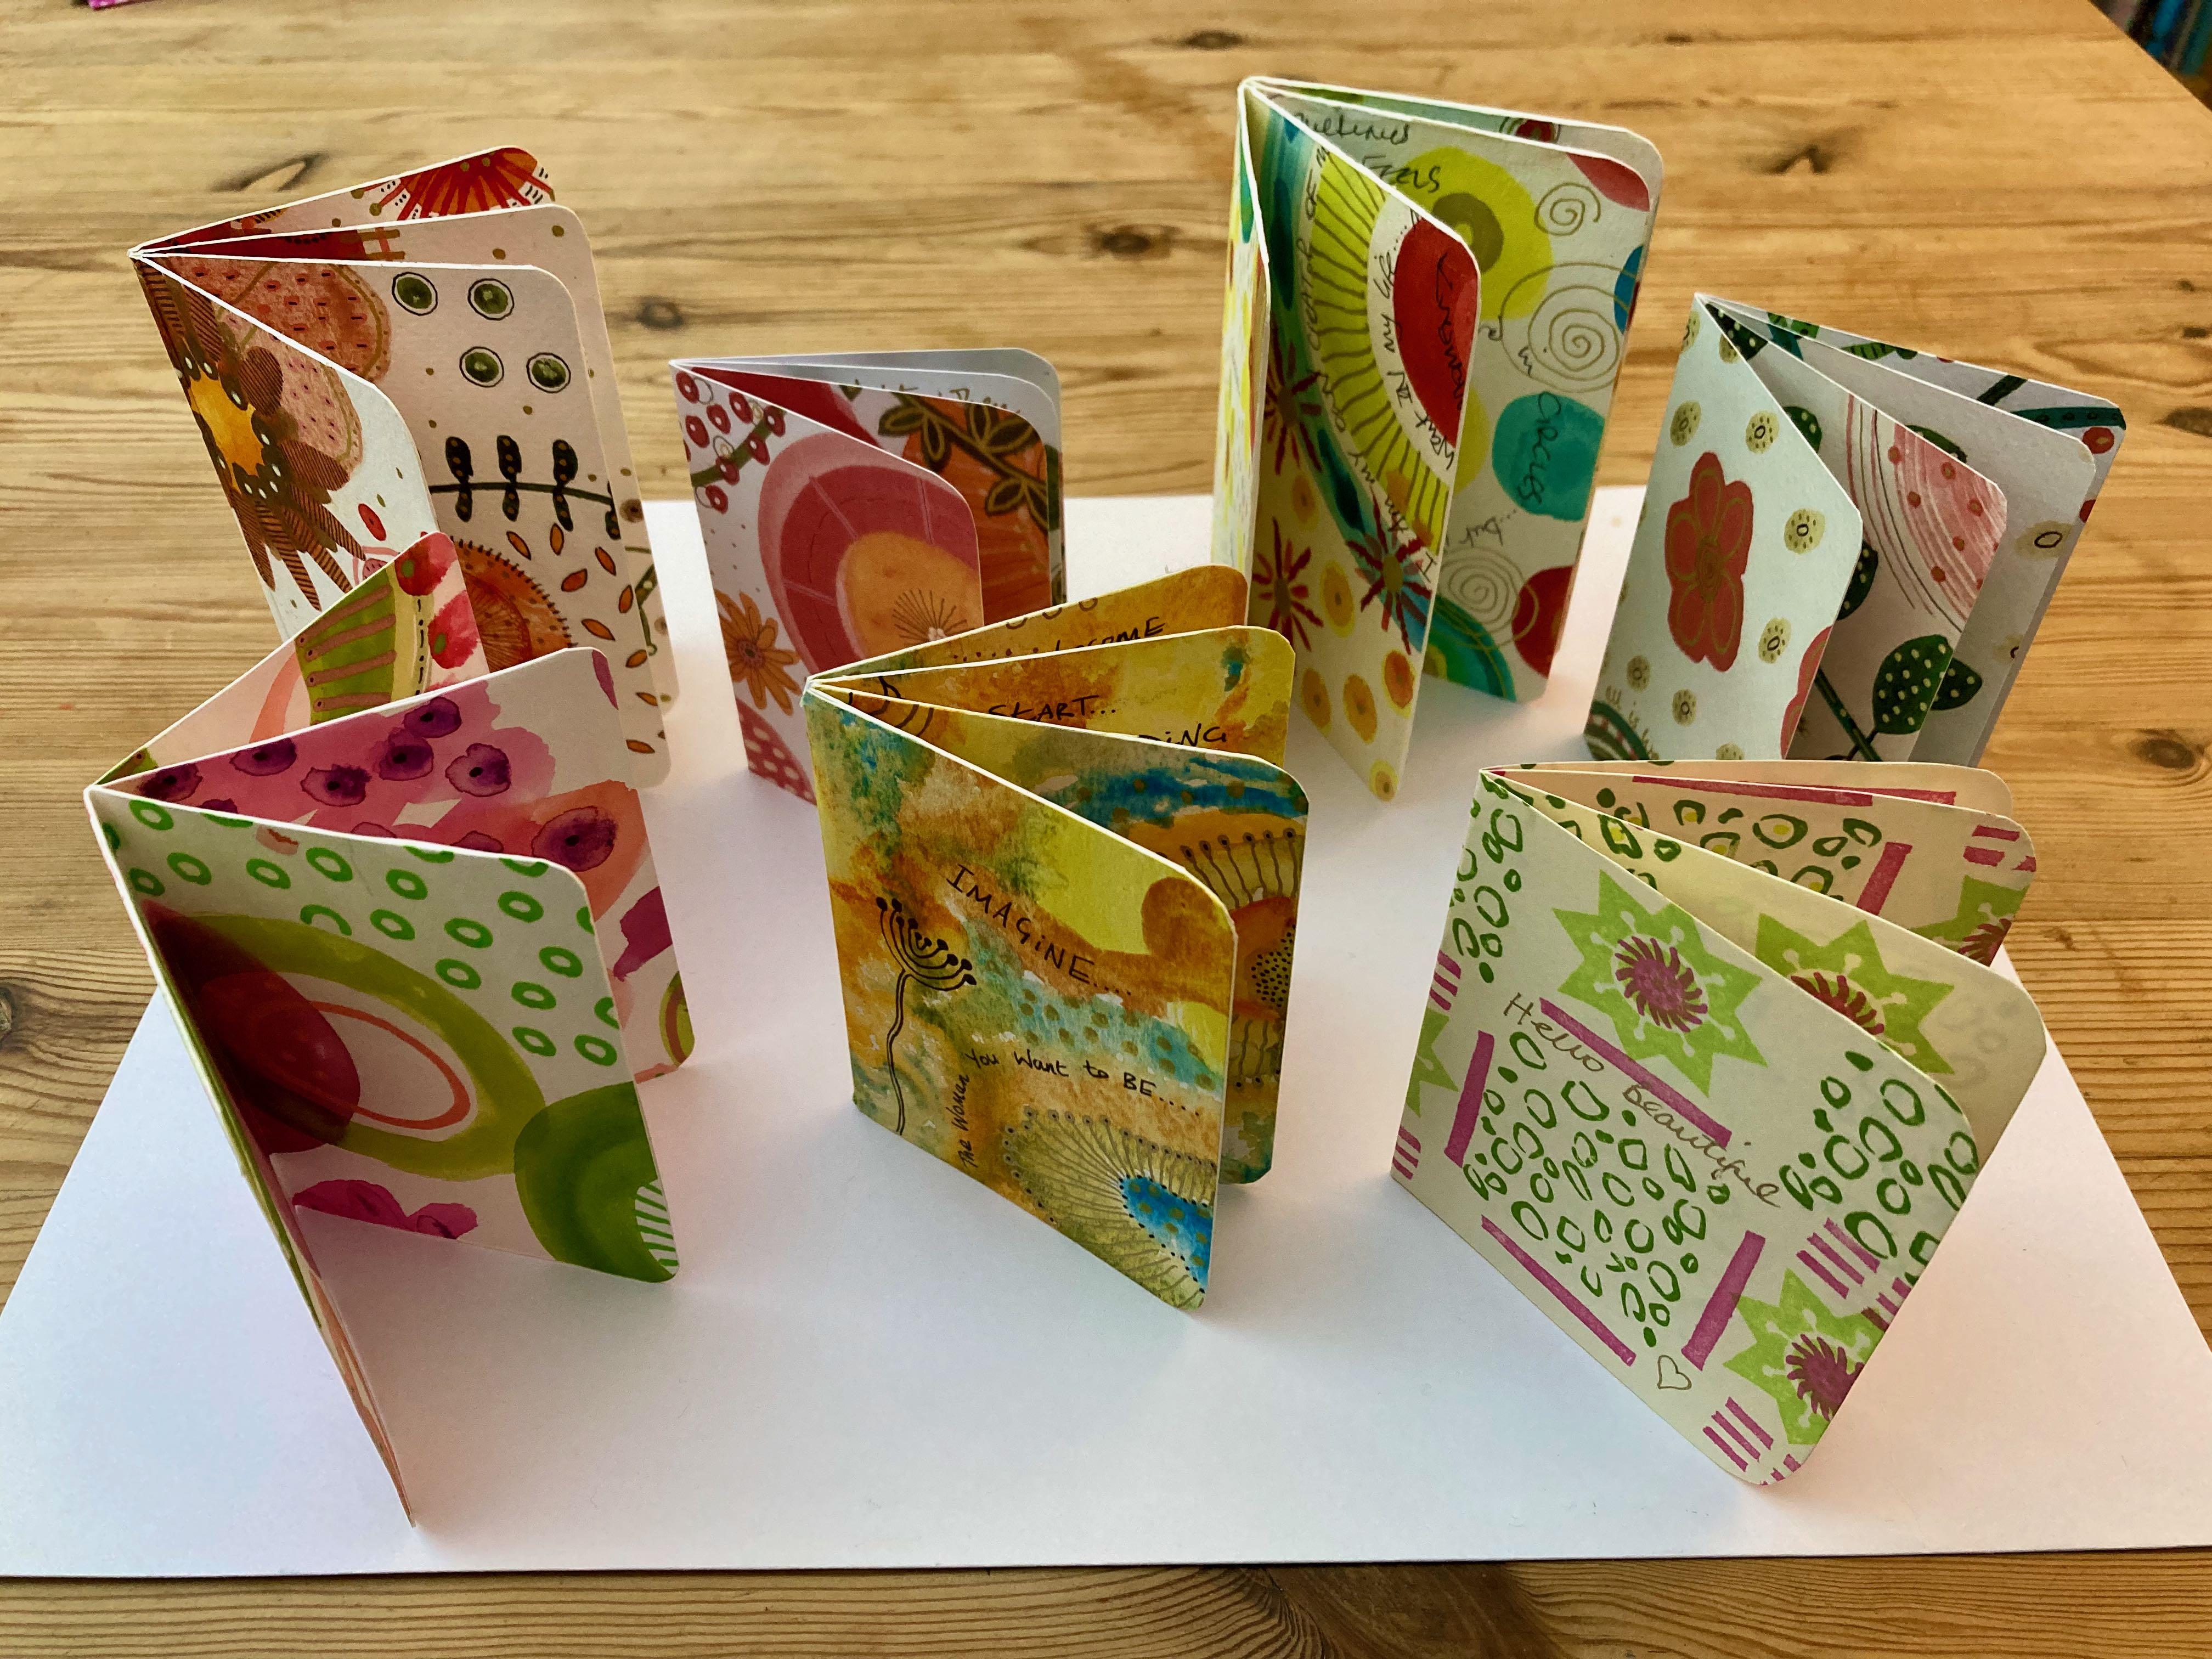
hadn't thought of previously. So, as you've probably gathered, the project for this class is to make these lovely
art journals. I'll take you through the
whole process of how we turn a flat piece of artwork
into a three D little book. And here you can see this
is the original artwork, which I haven't
turned into a book, but by taking a photocopy of it, I've been able to create
a little book anyway, and just play with it. You can do the same
process by taking a few photocopies of
your original artwork. Now, this is the original
artwork in here. And then I've taken
a photocopy of it, and I've turned it into a very different looking book by using a different
fold and have, in fact, created yet
another little story, which, by the way,
I like reading these little stories
to my grandkids. They find them quite funny. And the beauty of
creating two or three of the same one is that
you can hop it in your bag on your way
out or slip it into your pocket and just take it with you and be
inspired wherever you are, and, you know, just sit and doodle wherever you
might find yourself. So let's take a quick look at what materials you're going
to need for this class. And I'll also share with you my favorite art supplies that I'm going to
be using as well. I'll see you in
the next session.
2. Materials For Making Tiny Journals: To make these lovely
Tinir art journals, you can use any materials
that you like playing with. You could use watercolor,
go ash, acrylic, Celtic pens, crayons,
colored pencils, pastels, anything at all
that you like playing with. It doesn't matter, just
so long as you can make a mark on the
paper with it. But what you will
need, regardless of what materials you use, you will need an A
four sheet of paper. Now this is one
that I've cut down cut in half from my
mixed media pad. I'm using one that is 250 GSM, which is a good paperweight. And you can sort of tell
it's nice and stiff, or you can just go
with copy paper. Again, I'm using
navigator paper, and that's 120 M squared. So anything in between
those are absolutely fine. A pencil and a ruler,
which is optional. But as we go through
the instructions, you'll see why you
might need those. You will need a
pair of scissors. You'll need a glue stick. I'm using Pritt stick. Either a spoon or a bone folder for making
really nice creases. And if you've got one, then a cutting mat and
a little craft knife. But if you don't have
a cutting mat and a craft knife with a ruler, you can always just use
scissors. And that's it. That's the basic art supplies for making these
lovely journals. But I'll see you in the next
session where I'll show you the favorite supplies that I'm going to
be working with.
3. Choosing Favourite Supplies: I've just been gifted these lovely Kura taki
watercolor paints, and I'm going to be
using these today, mainly because working from a palette rather than
tubes, is a lot quicker. You know, the
colours are already there. They're already mixed. I don't have to go
into lots and lots of mixing because that's not
really what this is about. And yeah, I can get, you know, the paint onto the
brush so much quicker. And then, obviously, the
paint onto the paper. And because this is about finding your
rhythm and your flow, I want to be able to
do this, you know, fairly not overly fast, but, you know, with
a nice flow to it. So I'm going to go with these
gorgeous watercolor paints. And a while ago, I treated myself to
some new oil pastels, some fabrian castle oil pastels, which I haven't
even touched yet. So I thought now was a good opportunity to maybe bring some of
these in, as well. So these are going to be the main materials
that I'm using today. I'll no doubt add other little
pieces as I go along with maybe acrylic pens or
black fine liners, which are usually
my go to anyway. But we'll just see
how this process unfolds and which bits of these materials
that I end up using. I cut down a sheet
of my A three paper, and as you can see,
I didn't quite get it in two exact halves. So I'm going to do two
sheets today and paint, um, you know, one style on there and
another style on that one. And then when they're folded, you'll see the different shapes that the
books turn out to be because the papers are
slightly different dimensions. So that's good, you
know, that sort of happy accident there
happened because it gives me an opportunity to show you then how you can create books
with different shapes, depending on the size of
the paper that you use. I also just treated myself
recently to this little set of quill brushes from the
brand is called Artway. And excuse me, the
lovely thing about a quill brush is that it's a
really good all round brush. It's sort of full belly, and in its fine point, allows you to make sort of
really full sweeping marks, but also quite delicate
details as well. So you know, I'm going
to use these because they also hold a lot
of paint or water, which means that you
can paint for longer than before you
end up having to, you know, put your brush back in the paint
or in the water. But you don't have to use
quill brushes at all. The whole purpose of this really is for you to get your
favorite art supplies out. You know, don't be
going out and buying expensive things. Use
what you've already got. But the ones that
make you feel a bit excited when, you know, you take the lid
off them or you set them out on your working space, use the ones that make you
feel excited that make you want to I'll make that
first mark on the paper. That's the important thing here. So it doesn't matter
what brushes you're using or what materials
you're using. Just get the ones
out that really make you smile before
you even start.
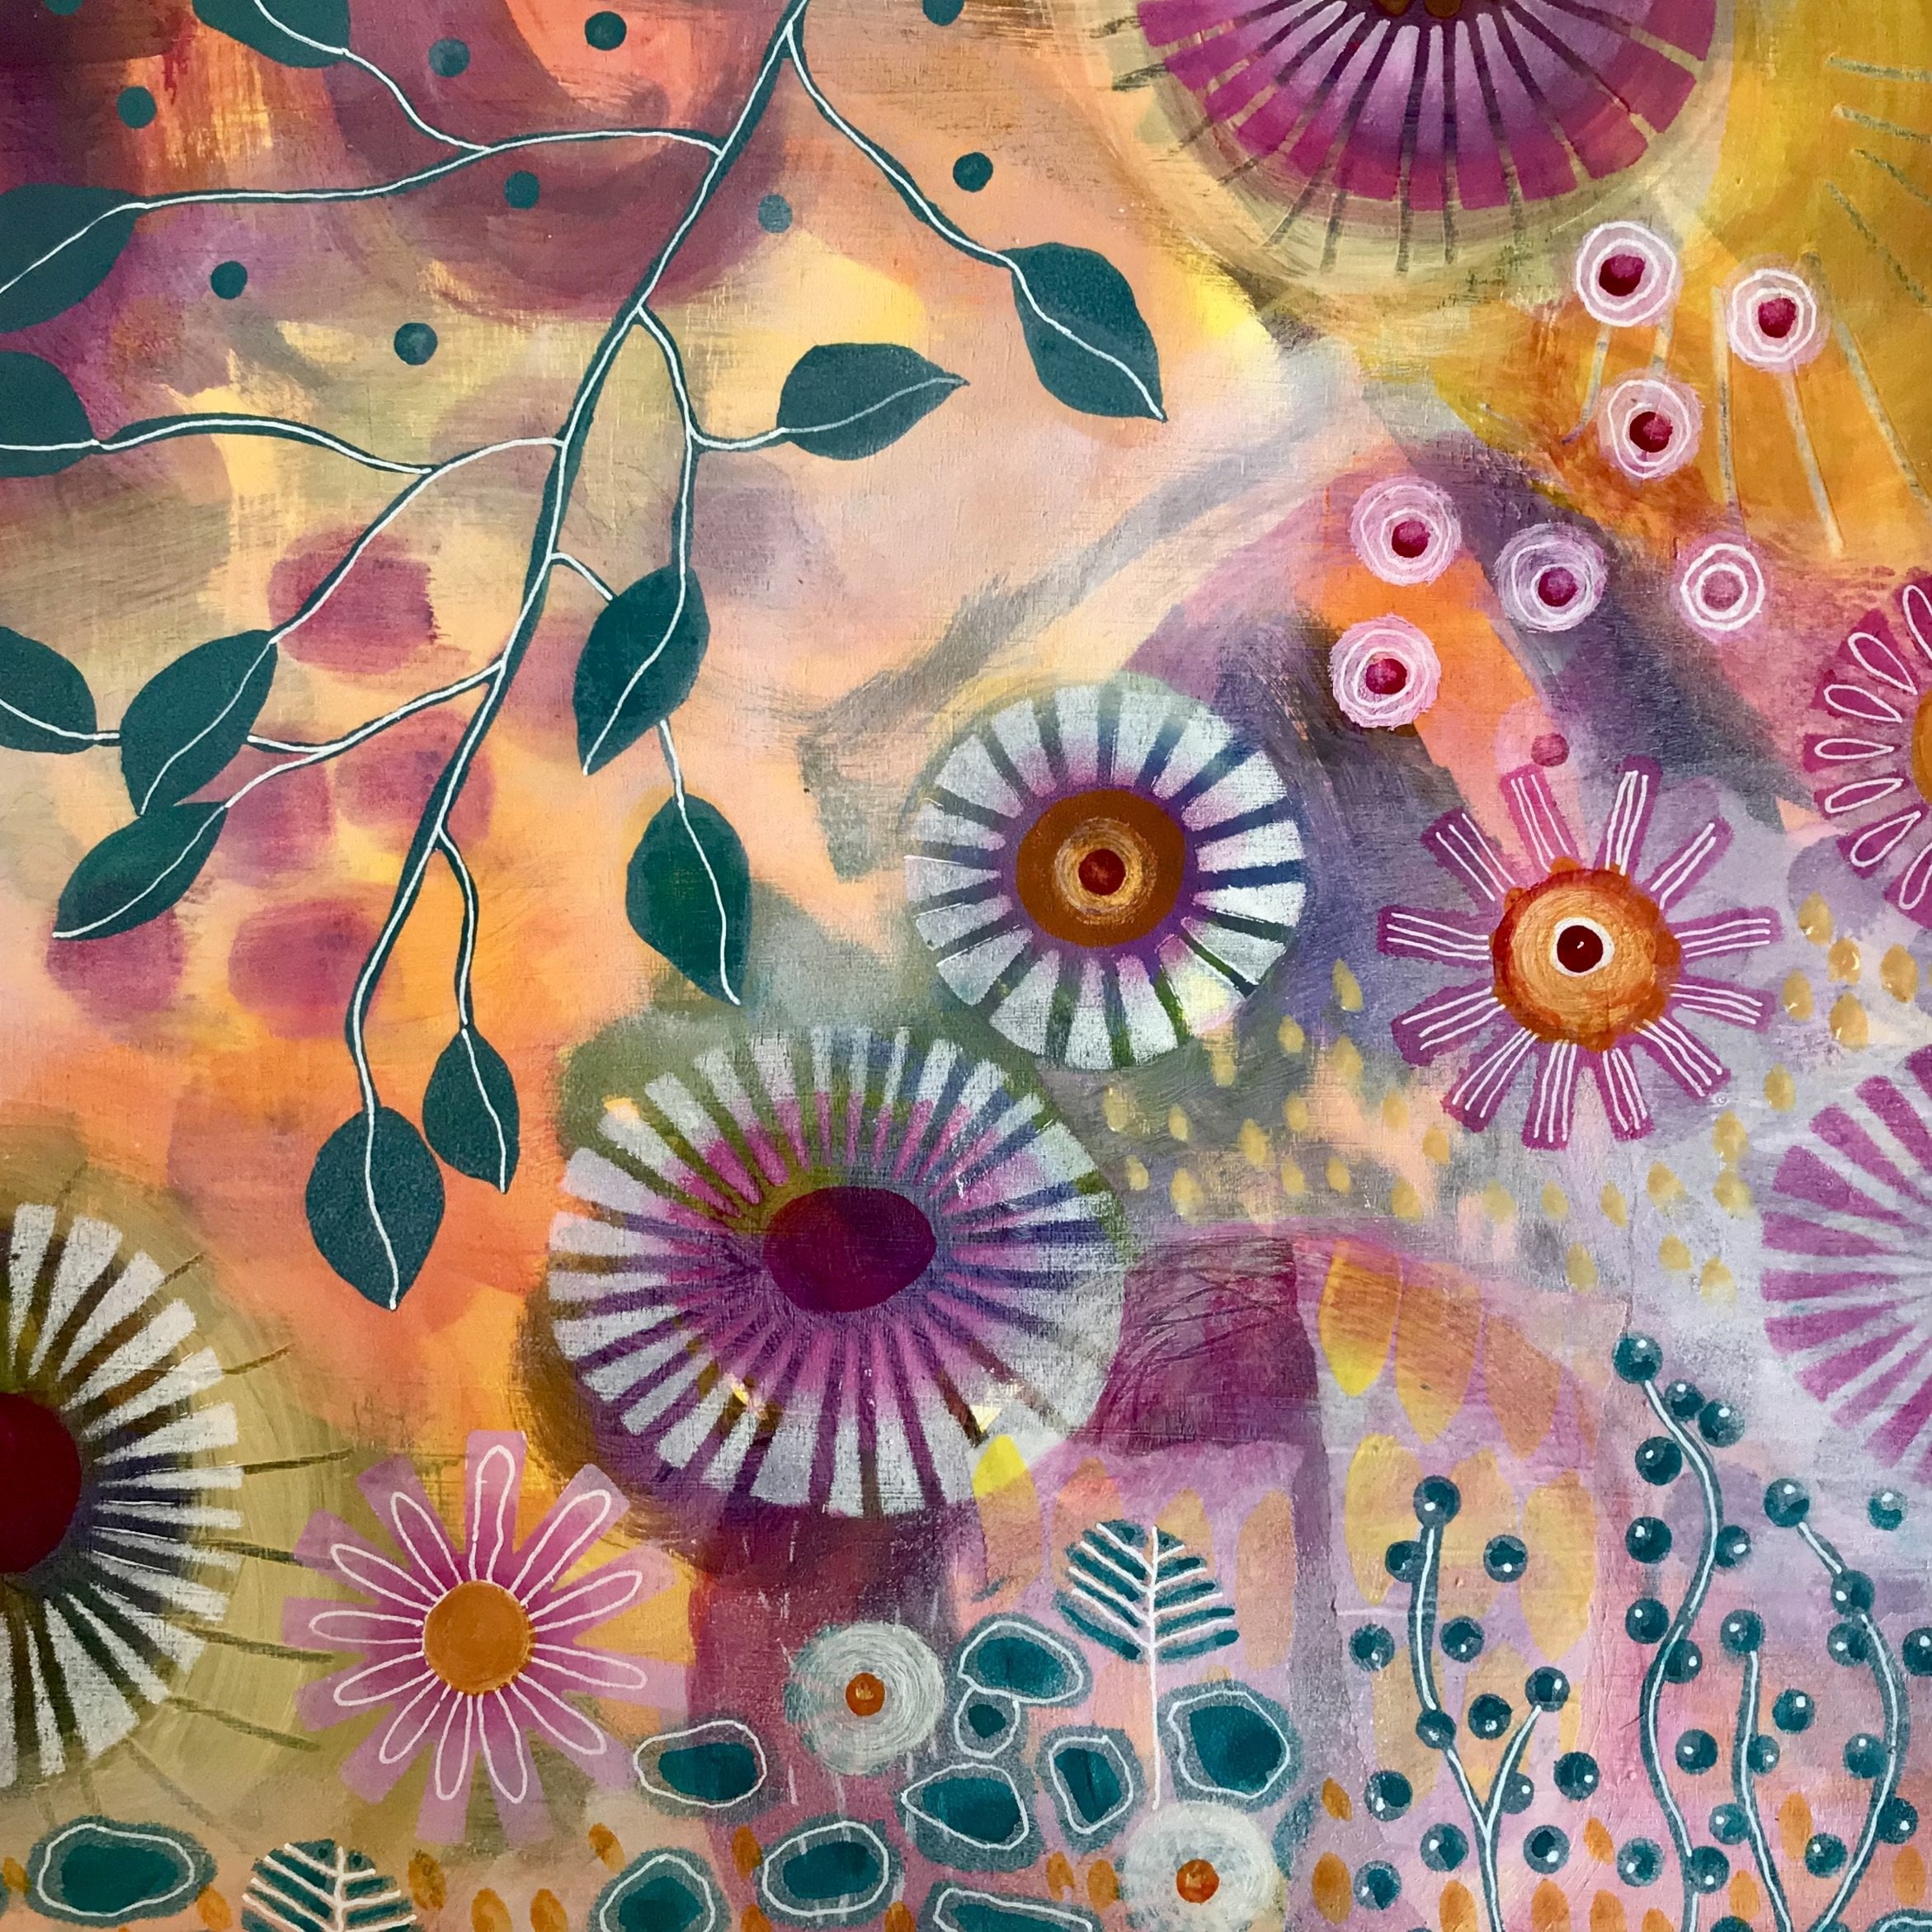
4. Painting The First Journal: I so there are absolutely no
rules to this whatsoever. It really is a
question of getting the first mark on the paper and then going with where
the flow takes you. What I would recommend, however, is that for your first one, that you maybe start off with circles because circles are
such a universal shape, and they are, I don't know, there's something very
comforting about a circle. There's nothing edgy about it or cranky or yeah,
sharp or anything. So it's like by starting
off with a circle, you're already
making the process as easy for yourself
as you possibly can. So the question is,
what colors I think I am going to explore
this row here, actually, and just keep it to
that four palette, those four colors in
that palette there. And let's see how
this turns out. So I'll be using
different brush sizes and different shapes, and curves, semicircles, full circles.
So let's just start. Wow. Wow. Oh, you know, I mean, what an amazing mark
just to start off with. Simply love it. I've got
three containers of water here because I do like to dip into the first one
to rinse the brush. Then the second one to
make sure that I've got it fully clean and if I need
to a third one there, so that I'm
definitely, you know, not contaminating the brush
each time, particularly, as you can see with
these four colors here, they are all pretty
different colours, so I don't want to
be muddying them. I love that. I love the way that has just
made its own mark there. Don't want you to
overthink this at all. I really, really don't know I say that in all my
classes don't overthink it, but it really is just
about getting you flow. So, you know, maybe you
could do what I'm doing. You could decide which colors
you're going to start with, so that you've
taken that decision before you put the
first bit on the paper. See, I mean, just look at these. Aren't these lovely?
These are so lovely. I'm just letting this
do its own thing. I really am I have absolutely
no plan at all with this. No, I must say, these are
really delightful to work with. It's lovely when you find
supplies that really, you know, work with how you
want them to work, basically. I've not used these before, so it was going to be
a bit of trial and error as to how they
would turn out. You see how easy it is
to work with circles. You know, there's nothing complicated about that
at all, is there? Oh, we've got into a
little curve there, and that's absolutely fine, too. Well, these are
beautiful together. Must say I'm very
impressed with these. Really impressed. I can see. What I was just about
to say then was, I can see these being real
inspiration for many projects. So that's the first little
insight that I've got there, and we haven't even started to fold the book, but already, I can see just by using
this color palette, obviously, particularly
these paints, that that's already given me
an idea, which is marvelous. This isn't about making
things perfect, remember? This is about playing and just seeing what comes
out in that moment. Now I can get a much fineer tip there with that lovely point
on the edge of the brush. It's rather nice, isn't it? Just take that one and
throw that one as well. Oh, liking that. Very
much liking that. Oh, this is so exciting. Let's have. Another
one there as well. See what happens sweep
it more paint on there. Let me just sweep that around. I'm twisting it as
I'm going there. There's a bit of a
curve to it there. I'm not going to
try and alter it, make it into
something different, and just leave that
exactly as it is, and get some more paint on that brush and see what happens if we do it
around that way as well. Very nice. I think I'd quite like to go back
to this color here. I'm going to swap brushes
again just because I can. Well let's try this little one. Go back into that color there. Now, I kind of feel I want to do some sort of I don't know,
petaly things maybe. That's what's inspiring
me right now. A bit more water on there. I and of course, this is the beauty of
circles that it can often lead you to
making flower shapes. Sort of want to do
something else around here. I'm just playing
with making marks, allowing that playfulness
to come through. I don't have to fill
the whole page. You know it's quite
good sometimes to leave some white blanks. Occasionally, I paint
the whole page, but in this moment, I
don't actually want to. Of course, what I could do
here is add a bit more water to that and let it bleed into
it like a watercolor would. These Kura taki paints are cross between a go ash and watercolor. You can work with them quite thick like you would
a go ash or you can really water them down into
more of a watercolor effect. As I'm showing you here. You can see as I go further
and further around, it gets lighter and lighter. I feel a spiral coming on look. We'll have a few more of those. You can see how quickly you can make something
happen here. I'm just going to do some
brush marks around this. Let's bring one or two more in. So be experimental. The thing is that
when you fold it, it won't look like this looks, and that's the
beauty of it because you can't plan it,
which is great. And that's what
brings the element of surprise and for me, joy into it as well,
because you really, really don't have a clue
how it's going to look when it's folded Oh, look at that lovely
thin line there. By using the point and
then pressing down a bit further so that using
the body of the brush, you get this lovely
contrast look. Now, again, that's a nice thing for me to have discovered with these new brushes that I can make very different
shapes of marks look. So that's something
for me to explore. So that's another thing that
I've discovered already, just by doing this piece here, which will inspire me for
doing different artworks. Now, I think I want
to bring something else into this bit here, but
what do I want to bring in? Well, look what my brush is already doing, so
let's just do that. Let's just bring an
elongated circle into it. In other words, an oval. Interesting. And I
think for the moment, I'm going to leave
that just as it is. Set that to one side
and let it dry. I might come back to it
and add some more marks, but for the moment,
that's enough. So that can just go
to one side and dry.
5. Painting The Second Journal: For this sheet, I've
turned the paper around. I've even turned
the paints around. And again, this is
part of, you know, trying something with a
slightly different perspective. And I'm going to do this
sheet also with circles, but in a more watercolor
type fashion. So whereas the other one, I did wet paint onto dry paper. I'm now going to just wet this paper all the way down
with this lovely fat brush. If you don't have
a brush like this, you could use a flat brush that would get the water onto the page, you know,
fairly quickly. I don't want to
saturate it too much. But I do want it to be wet. So there are so many elements to making these tiny journals. You know, you can be
inspired just by the colors. You can be inspired by the shapes that
come onto the page. You can be inspired by the shapes once
the book is folded, which may then even
inspire words. And yeah, I just
love this process. I find it really revealing. So I'm going to be using this
palette here of these four, and I'm also going to bring in this lovely sort of
denim blue as well. So let's start off with
this slim brush here. I'm going to start
with that denim blue. I want these to bleed into each other a little
bit, if they will. So you can see that I'm making sure that the
edges meet each other. Again, I'm not overthinking it. Now, that's got quite
thicker and you can see the difference between that color and that
and that's okay. You can also see
how that's going to bleed into that, which
is rather lovely. I'm doing this quite quickly. If I need to wet the paper
again, I'll do that. I notice my circles are
getting bigger as I'm going along. That's also fine. I'm just going to wet
the paper a bit more because it's drying
pretty quickly actually. I do want them to bleed
into each other a bit. Now, we getting
some nice merging of colors there into each other. Now, obviously, you
don't have to do this, like I'm doing it at all. You can do it however
you wish to do it. I'm just using this as one particular way of getting
circled onto the page. You can see how fast
I'm doing this. And we've got different depths of colors going on here, but, you know, it's a color palette here that's working really well. So even though
we've got different tones of the same color, it's all looking great actually loving it.
Really loving it. Again, I can see this
becoming a different artwork. That's just delightful. Okay. This bit down here is
dryer. So let's see. I just keep it dry, but let those paints
run into each other with less water actually on the background
on the surface of it. Let's just see what happens. I like the white
bits in between. It's making it feel
quite fresh, actually, although this bit
here, of course, is really kind of
blended into itself. Again, that's part of
the experimentation. Look how different
that bit there looks compared to
that bit up there. And like I say,
once it's folded, it will look very
different again. This is an interesting
process, I must say. Now what I am going to do is paint right up to
the edge here and I'm going to go back
around these edges so that I don't have any
white around the edge. Now, you will end up actually cutting off quite a
bit of the edges. So even though I'm painting
up to the edge here, it will actually get
cut off in parts. Although at this
point, you won't know which parts are going to
end up being cut off. And again, that's
the beauty of it. I simply love the idea that
we can turn these into books, and turn a two D flat sheet of paper that we've
had a lot of fun with just creating
now, like this. Even if you didn't do
anything else with it, but you just left it like this, has it slowed your
heart rate down? Has it brought a sense of calm? Has it allowed you to be fully present and not think about anything else
whilst you're doing it? Because if you can answer yes
to any of those questions, then that alone is
a reason to do it. Because you're just
giving yourself permission to fill
your own well up. That's the way I always see it. It's about filling
one's well up. Because when our own
well is quite full, then we're much, much more able to be available
for others then. But when we're running on empty, you know, we've hardly got
anything left to give really. Now, I think I started off
saying something there and I've lost my
train of thought, and that's okay as well. Sometimes it's quite
hard for me to actually talk whilst
I'm doing this. Because for me, it's a
very inner experience. And I don't always
want to add words, but obviously, if I
didn't add words, you wouldn't have a clue
what I was talking about. So I do apologize if I've lost my train of
thought a little bit there. I'm sure you will forgive me. And I think we will
call that a day. I love how that's turned out. I really do. Again, I need to let that dry completely before I start adding
anything else to it. Let's put that to one side and we can start working back on
the other one now, which, as you can see, oh, it's almost dry, not quite, so I'll just leave that
for a little bit longer, and then I'll bring you back in when that one's fully dried.
6. Making Marks: I was going to start on
the other piece first, but I've changed your mind
after a little break, and I'm going to start
with this one instead. Now, before I do
anything on that, it's a really good idea
for any of you to just take a photo of what it looks like before
you do anything with it. So not only have I
taken a photo of it, I've actually even done a couple of photocopies
of it, as well. Reason I've done that is
because I want to demonstrate a folding with you and a
different application to it, if you like, which I can't do obviously once I've put
some marks on there, but I can show you then
with the photocopied paper. So I'm now going to
use the pastels to make some more marks
onto this one here. And again, I don't
have anything. I think you might
just put that over there so that I can
keep it steady. I don't have anything in mind, but I am going to just, yeah, go in with some marks, really, see what inspires me. So I've got a color here
very similar to this. And what I want to do is to just put a little bit more
detail into this bit here that merged that
merged into itself. So I am literally just adding marks where I think it would benefit
from it, really. Probably do something
here similar. Not making this too
complicated because really it's when the page
is turned into a book, that's when even more
inspiration comes into it. Because it sort of takes on a different form to what you're seeing now and
that sparks new interest. So, you know, at this point, it's kind of like just
taking a little bit of time to see what's in there and what extra marks
you might want to make. In fact, I've pulled
out that green, but I'm going to pull
out this white color because I want to
add a bit more light to this section here. And you can see that there's a bit of
blooming went on there. So I want to just
encourage that a bit more. Somehow. Now, obviously,
these are oyal pastels, so you can, you know,
blend these in. Got something going on there. Lo with that white one
with that little bloom. So we'll just add a
bit more to there, maybe a little bit more
around there as well. Now, there may be sections of it that when you see it
on the page like this, after you've added
some marks to it, that actually you're
not all that keen on. But again, it will look very, very different once it's folded. I know I keep saying
this, and obviously, you're going to
have to trust me on this one that it
will look different. So this is a new way for me to use oil pastels on top of
these Kuri taki watercolors. So an experiment for
me here as well. And what I'm going to
do is I'm just going to carry on playing
with that a little bit using these oil pastels here and just see what extra
marks I end up making. And then I'll bring
you back into it when I've just taken
that a wee bit further. So as you can see, I've added a few marks there, a
few more marks there. And what I've also done is get some little cotton buds and just use them
for blending in. So I've not added a
huge amount more. If we just look at it
compared to the original, you know, you can
see I've added, obviously, certain bits
to it and everything. But I'm going to
leave it at that now, and then when I folded it, we'll see if I want to
add more to it or not. You can see here that I have added more to the first
painting that I did. I've used the cotton
buds again to just blend those oil pastels in a bit to make
them wee bit softer. So if I look at the original, I mean, obviously, this is the
photocopy of the original, but you can see there that
I've added quite a bit of color to that,
although still keeping, you know, the curves and the
circles, keeping that theme. So now we are ready to
do some folding and turn these lovely flat sheets of paper into gorgeous
little journals. So I'll see you in the
next session where we have a look at how to fold.
7. The Fold: Here is the photocopied version
of the original one here. I'm going to show
you how to fold by using the photocopied
version first, and then I'll show you
the same fold, obviously, but using the much
thicker paper so that you can see the
difference between folding with thinner copy paper and
thicker mixed media paper. So the first thing is, we're going to fold in half. Now, the more
accurate you can get your folding, the
better, obviously. But you will never get
the edges to meet fully, which is why we end up cutting
some of the edges off. Now, I'm using a
bone folder here. But if you don't
have a bone folder, you can just use the
edge of a spoon, and it will do the
job just the same. Turn it around and
fold it in half. Like this. Getting those edges to meet as accurately
as you can. You know, anything where you're doing a bit of paper folding, if you can fold accurately, it does make a difference, to the finished product. Open it back up again now, and where this midline is here, this middle line,
you're going to take the edge and fold that edge up to that
middle line like that. And then do the same
on the other side so that those two edges meet
in the middle like that. So you end up there with
it looking like this. Now, what I want you to do here is to just scoop that
bit up side to side, those two edges into the middle and just reinforce
those folds there. And then turn it all
the other way around and refold it again
using the same folds, but just on the other side. And the reason that
I'm suggesting you do this is because it actually just helps when you're folding it together
to make the actual book. It just helps to make it
a wee bit more flexible. You might be able to
manage without doing this, but I find it helps. So you end up then with basically either a W
shape or an M shape, depending on which way
you've just stud it. Now, what we want to do now is to take this
middle section here, so unfold it again so that you've just got that
much showing there, and you'll see that you've
got a fold right here. And very carefully,
with your scissors, you're just going to fold up to that mid line there, basically. So that's what you
end up with there. And here is the beauty of it. Turn it over, pinch those
two end pieces together, and then push towards
the middle like this. And that is how you end up with a little book.
Isn't that clever? Honestly, I just love
being able to combine art and craft together so that you end up with something
that's really functional, you know, and also
having made it yourself. So I'm going to show
you that bit again, so place your paper back down
on the surface like that. Pull these two end
pieces together like I'm doing, and then push. And bring it up here. And this is why I make
the suggestion that you fold it both ways, as in, you fold your paper one
way and then you unfold it and refold it again on
the same fold lines, but from the other
side of the paper. So it just makes it much more flexible to be able to do this. Now, what we need to do now
then is to glue it in place. So basically, you've
got number one, number two, number
three and number four. And that's where you want
to be put in your glue. So simple glue stick. Now, the reason I use
a glue stick rather than something like mod podge
is that it's a bit drier. So you don't end up
getting lots of, you know, glue coming out of the
edges because it's really important that you
actually make sure that you get your glue
on the edge itself. So let's go around
the edge first. Cover the whole of
that bit there. Then go on to number two. Now, go in the line of your cut, otherwise, you might find
that you end up tearing it. Look, if you pull
it up like that, you're kind of going
against the cut, so do your glue stick
in this direction. Doesn't matter if you go over into that one, doesn't
matter at all. Come down to number
three, again, following that line of the fold, sorry, of the cut, I mean. Make sure you get
it over the edges. Doesn't matter if it goes
over these two edges a bit. Just we want those edges
to definitely be glued. And then back up to number four, get more glue out
if you need it. Make sure that glues
right on the edge there. And then turn it
back over again. Do exactly the same. As you did before you started
to glue it just to try it and push those
two to the middle. Now, the thing here is to pinch
the edges together first. So make sure you've
got all those edges going into the center, there. Turn it over, push those edges together again so that you've got them going
into the center. Give them a good
squeeze. There we go. And then lay it flat
and basically just, you know, press it
down with your hands. All sides. Flip it out like this and glue
it that way as well. Then that way. And
there you have it. That is your book. Now, at this stage, this is when it's
really good then to decide what's going to be the front of the cover and
what is going to be the back. So you can play around, do you want it to be folded
that way, for example, so that it opens like this, or do you want that to be the front cover so that
it opens like that. So this is the point at which to play
around with it because then you need to decide which is your front uni back before
you start to cut the edges. Now, I don't know if
you can see there, but you can see that
the edges don't meet. And this is where we do
a wee bit of trimming. Let's go now onto
the original sheet. Now, this is a lot
harder to fold. So this is where, you know, I just want to bring
to your attention that it does make a difference, deciding what density of
paper you're going to use. So exactly the same principle. Going to fold that in
half. Turn it over. Fold it in half, just like
we did with the other one. Turn it round again,
fold into the middle. Then the other
side. There we go. Then I'm going to turn
it over and fold it all that way as well just
to keep it flexible, as flexible as it can be, which is even more important when you're using
a thicker paper. Fold those bits into
the middle there. Makes it much, much
easier to work with. And well worth the effort, which you'll see in a moment. Now, if you're a
bit worried about, you know, getting the cut wrong, then by all means, use a ruler to just
market for yourself. And then you've got a really
good strong line there as a guide. There we go. Have a practice at the fold
before you put the glue on. So we're going to pinch those
two ends together again. Push it together, and there we know that we've got our book. So open it back up. Number one, number two, number three and number four is where
the glue is going. Now again, even more important, it's a thicker piece
of paper to make sure that you've got that glue
right up on the edge. Okay, turn it round again. Pinch the two sides together. Now this is a bit
stiffer, obviously. And what you can do here
is actually really grab those two sides now and even stick them a little bit as
you're holding onto them. Make sure that the
top bit is meeting. Like the edges are sticking. Turn it over. Get those points right into the middle there. You can see what
I'm doing there, pushing them right
up into the middle. Now, this is what I mean
about if you haven't got enough glue on at this
stage, it will come apart. So I thought I was being
pretty careful there, but obviously I wasn't before
I stick it down completely, I'm going to add a
bit more glue to these edges just to make sure. The That's better now. That one started to come
a little bit there. But I think if I
press that down now, really press hard
with the flat of my hands, turn it over. I'm trying to be careful
because I've used pastel here. I don't want to smudge it
any more than I need to. Fold that that way
around as well. What I could do is use, a piece of kitchen roll or something and just do
it that way so that I'm not actually smudging any of
the painting that I've done. That seems pretty
well stuck down now. So again, this is
the time now to decide which is going to be the front and which
is going to be the back.
8. Trimming The Edges: I've decided that this is going to be the front
of my book here, and that's how it will open up. So because this is, you know, the thick, you can
see it's much, much thicker once it's
all glued together because you've got two
lots of thick paper glued together on each page. So I'm actually going to use a craft knife, a cutting mat, and I do have one of these lovely big rulers here that means that I can square
it up as I'm cutting. Now, if you don't
have one of these, what you can do is just
use a ruler or just, you know, do it by eye. Tell, this is not
about being perfect. It's about creating a little
something for yourself. That allows some
expression in that moment. If you don't have a knife, then just trim the edges
with your scissors. Now, what I've done there
is I have gauged it from the spine because the spine
will always be straight. So then I'm going
to turn it round, line it up with the spine
again, just like this. Pull it back a little
bit so that I make sure that I trim all those pages. You can see how thick the paper is by how long it's
taking me to do it. And that's torn it a little bit at the bottom,
but that's okay. We'll just trim that
little bit off look. And then I'll turn it
over and line it up with the spine again and then
just trim that top edge. Now, I also like to
trim the corners. There we go a little bit of
extra just on there look. I like to round the corners
off because I think it just gives it a
much softer edge. And basically, I'm just doing that with a pair of scissors. So I think that
looks a lot nicer with curved edges to it.
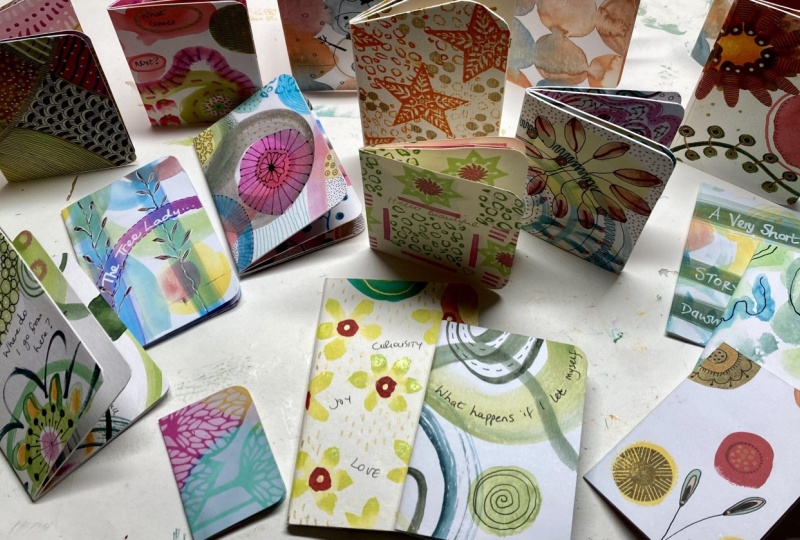
9. The Inspiration: So here I folded the first
painting that I did, and as you can see, I'm adding one or two
more details to it. And this is what
I love about this process that, you know, once it's folded
from a flat sheet, then it takes on a very
different appearance, a very different look to it. And there's an invitation
then, if you like, as to what else
you might want to add to it to make
it look even nicer, to make it look even
more beautiful. It kind of invites
questions for me, which is often how
I end up using the images on it to ask questions that I didn't
even know I wanted to ask. And then as I go through this process of carrying on
making art and decorating it, answers come up,
which is incredible. As I continued to decorate it, this was the question
that came out. Where do I go from here? Now, I didn't know I needed to ask that question particularly, but the questions come up. And as I've then followed the flow or looked at the images that were
created on the flat, it's brought out, yeah,
brought out an answer. If I stay playful
and light hearted, I feel sure that my
path will be clear. I don't need to push and pull or worry about the
future outcome or my direction of travel. I am always guided when I trust and stay in
the present moment. And this is so true for me. So absolutely true. And it's really lovely to have a reminder of that
because sometimes, you know, in the
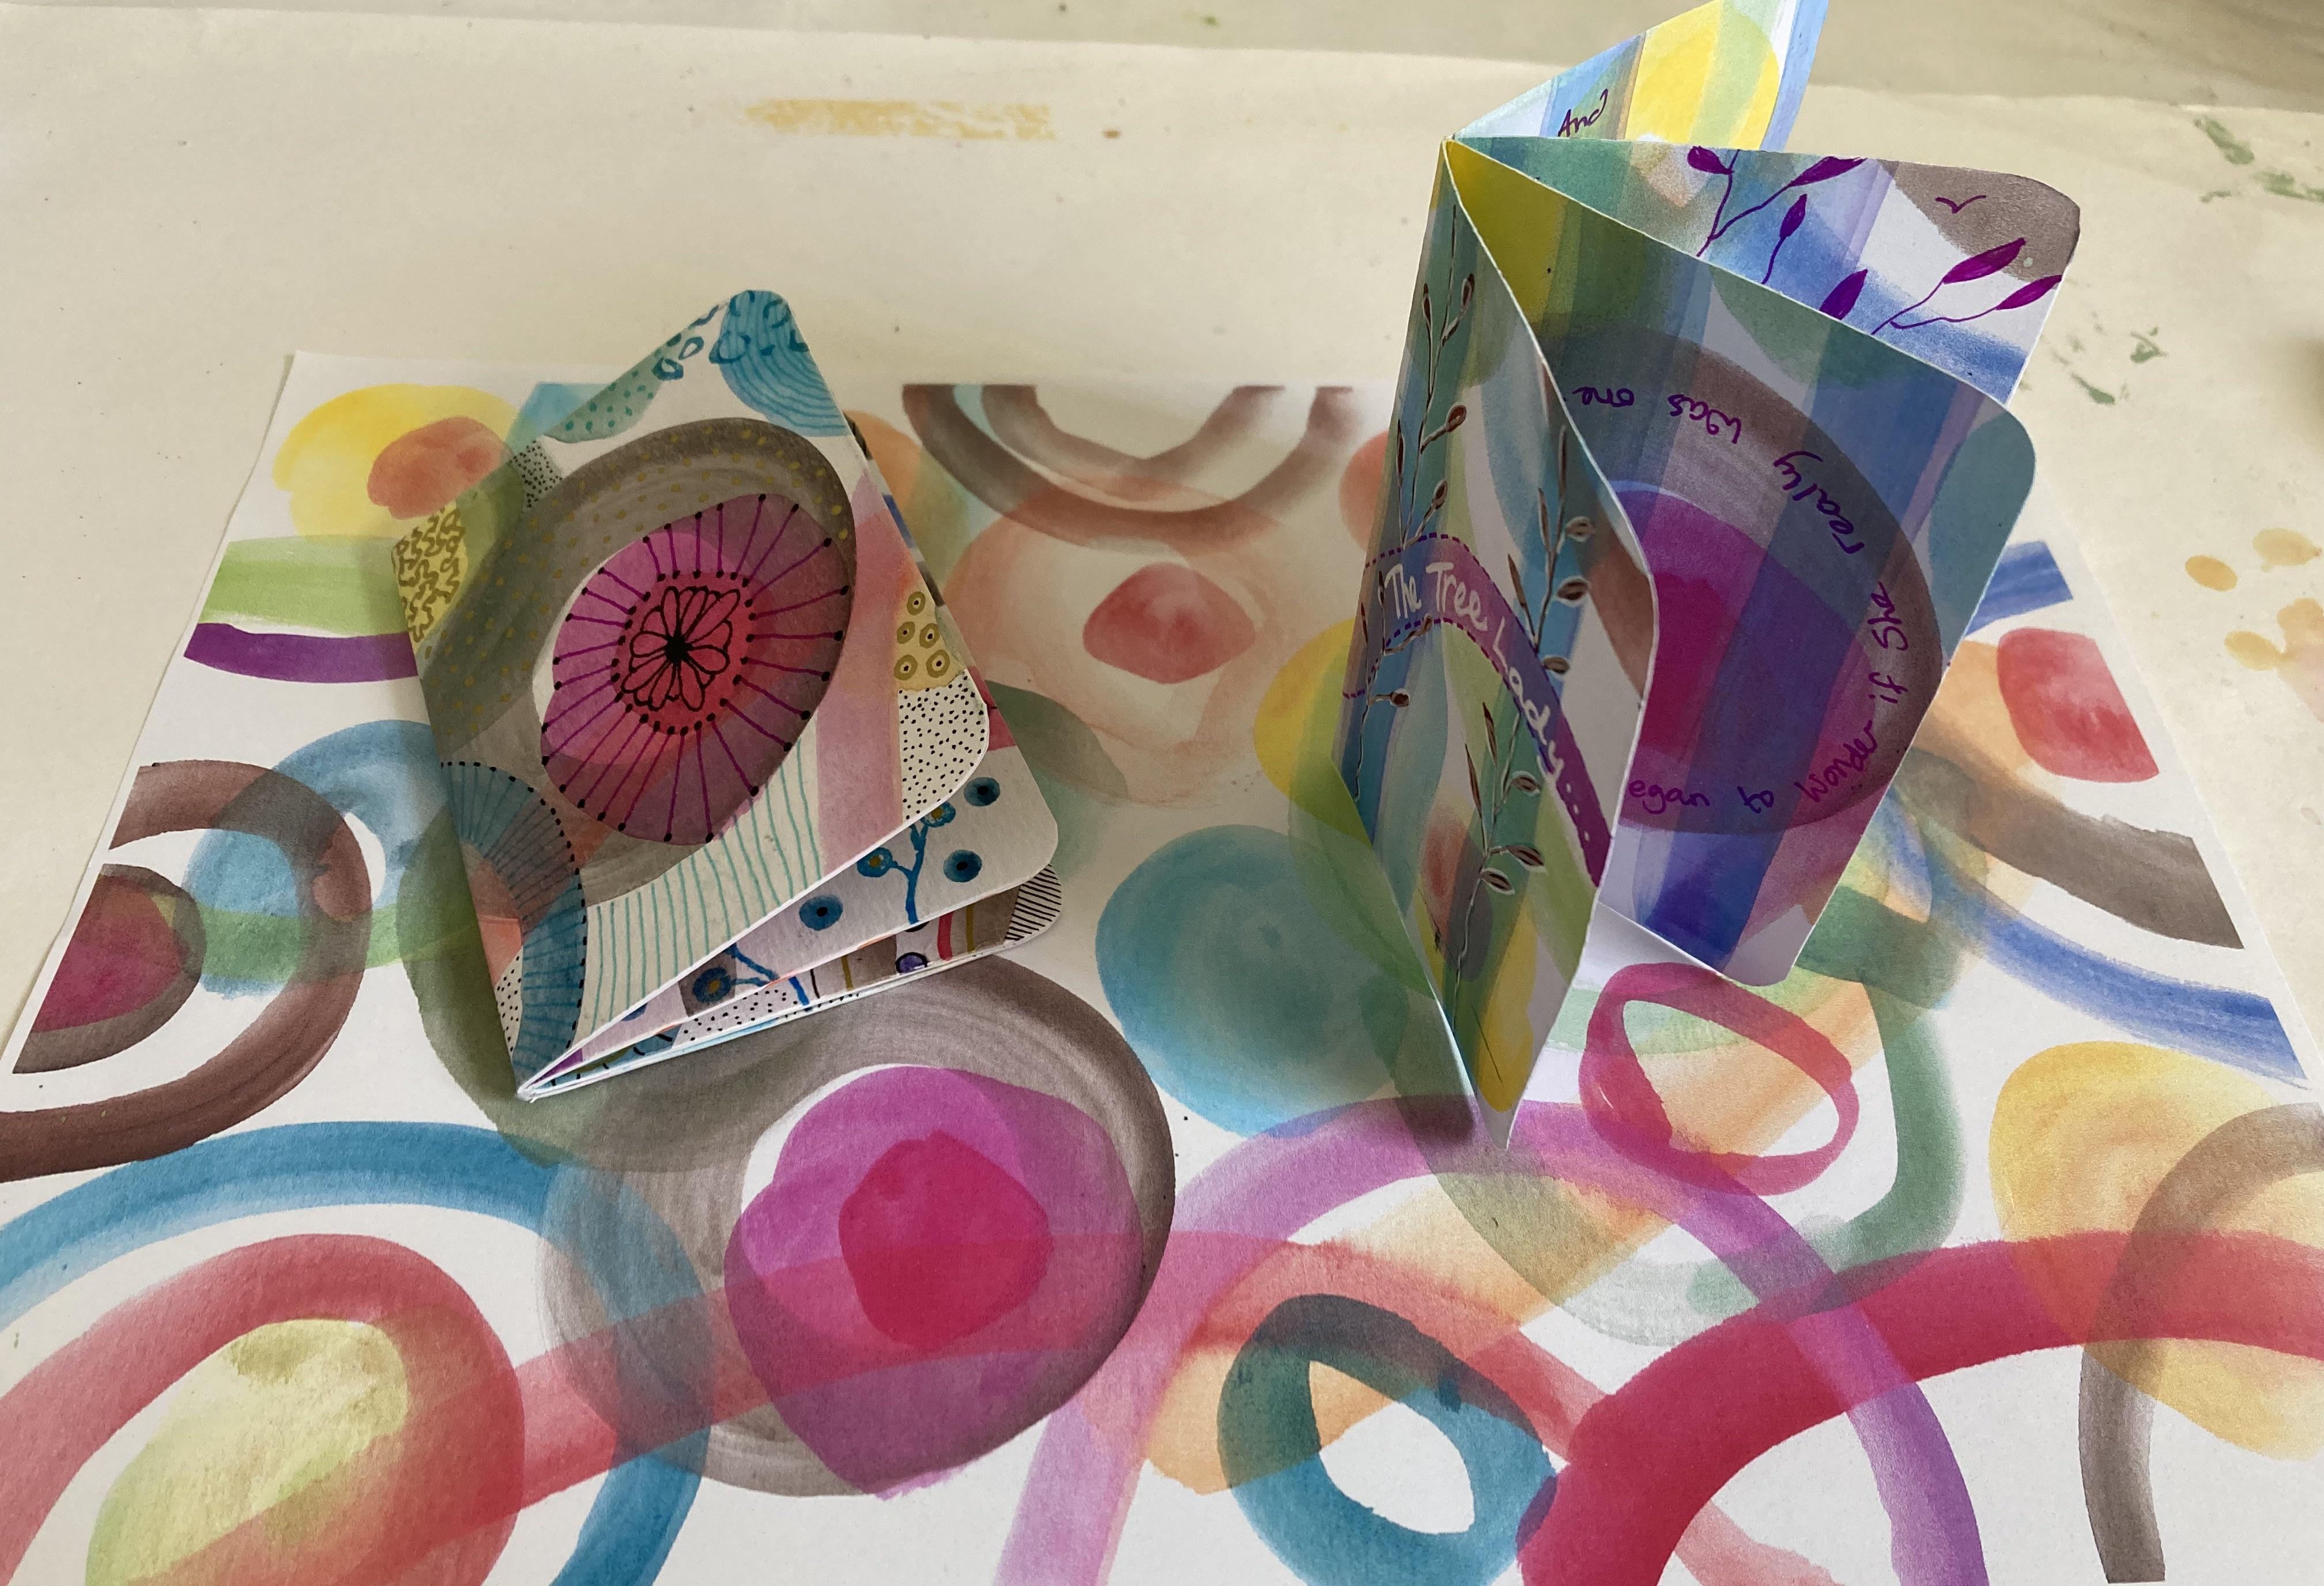
business of life, I can lose sight of that. Now, this was the
photocopied version of that original one. And that also has invited
a question as well. Now, you can see the two
covers there on the front. It was the same painting, obviously a photocopied
version of it, but I've chosen to fold
it slightly differently, so that's become the
front of that one. And the questions here, what if I let myself flow? You can see how the images
have played into this. So that when I
reach a crossroads, I can see the wider view
and understand that each direction gives me
different possibilities. What a lovely process. I'm making art,
I'm making craft, and I'm answering
life questions that I didn't even know I wanted
to ask, which is fantastic. I just love it. Now,
with this one here, This is how this little
book now has turned out, and I don't know what's going to come beyond those images, and that's okay, which means
I'll just sit with this. I don't have to find
an answer right now. I don't have to see if
there's a question in there. It might just be that that is simply a little
book, a work of art. I might end up giving
it away as a gift. I might send it as
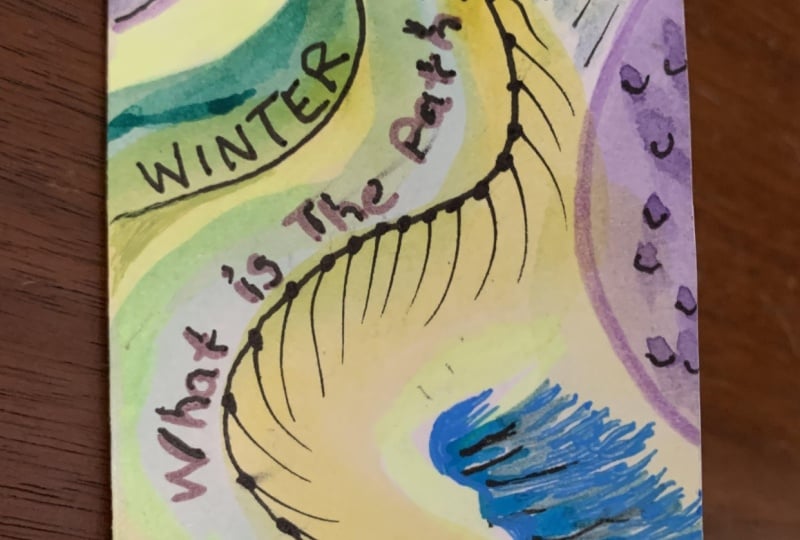
a birthday card to somebody. Who knows. But what I did do
earlier was I folded up the photocopied version. And I sat very quietly by
my window looking outside, watching the snow or looking
at the snow because we've got a very snowy
landscape here right now, and I just sat and doodled this. It's so beautifully
cold and snowy outside. I haven't been outside for four days except to
fill the bird feeders. Dream, imagine, create. It's a great opportunity for a simple quiet reflection
time and deep, deep rest. Which is exactly what my
body needs right now. So don't dig the car
out of the snow. I can bake, cook, use things from the freezer, and simply enjoy this rare, quiet, still moment in time.
10. Enjoy The Creative Sparks: So I really, really hope that you've enjoyed doing this class. I hope you've enjoyed
doing it as much as I enjoy making these journals. And, you know, if
you can start to incorporate it as a
regular practice, I think you'll really find
some great insights in it. I personally find
it a lot easier than writing in a
larger journal. I think it's because each
time I come to a fresh page, it's kind of like, yeah, there's something fresh in me that actually wants
to be expressed, even though I might not know in that particular moment exactly
what that expression is. But this is why I love them so much because it comes
through the color. It comes through the form,
it comes through the words, or sometimes, you know, one or the other, or
all three combined. I'd love to see what you
managed to create as usual. So if you'd like to upload something by hitting
the projects button, and if you could leave a review for this class,
that would be wonderful. Take care, and I'll see
you in the next class. Lots of love.
 Dawn Cawthra, Artist, Designer, Holistic Educator