Transcripts
1. Introduction and project overview: Hi, everyone. Now, what do you do if you're in the
middle of the painting, and you can only take it so
far and you've got stuck. You don't know whether
to add more color, whether to add some dark
sheds, some light shades, whether to put some
linework in it, whether to turn it
round, whether to just paint over it and
start all over again. Or maybe you want to do
some sketchbook work, but that blank page just
seems far too daunting. Well, I've got the answer for you in this lovely little class. Welcome. I'm Dawn Kodra. I'm an artist, designer,
holistic health educator, and it's a pleasure
to be offering this class now on
finding your flu. Now, we're going to be
using little art cards, which we're going to
create in this class that each little card
has got a prompt on it, and that's going to
help you to either push through that block that
you might find yourself, you know, when you're in the
middle of a piece of work or to help you start
a new piece of work. We're going to
take a look at how you can create
different backgrounds for the cards using slightly
different techniques. These are some of
the ones that I've taught in previous classes, but I'm also going
to share with you a really nice technique using acrylic paints and a roller, which is such a fun
technique to use. And it's, so simple. And it creates really lovely, bright, poppy, gorgeous
painted effects. And I think you'll
really like that one. I'm also going to
show you what to do when you create
something that turns into mud and you're
not quite as keen on it. So there's a great example here of how to restore a painting or restore your background
and get it to a place where you
actually really like it. I'll show you how we can
add some tissue to make it even more interesting and give it a little bit more depth. And then finally, how we cut up the background papers ready
to turn them into cards. I've given you two PDFs
in the resources section, and you've got 40 different
choices there of art prompts. So you've a lot there to
be playing around with. I'm sure that
you'll find lots of them really, really useful. I'll show you some
samples of how to use the cards
so that it gives you ideas for getting started or where to go next if
you're a little bit stuck, or even just how to have some playful moments
in your sketchbook, but then acts as resource
and gives you some ideas. I'll show you how we
go from this to this. I hope you'll join
me in this class and learn how to
use these tools, which I think you'll find a real benefit to your
creative practice. Let's see what
materials we need. I'll see you in
the next session.
2. Materials for Creating Art Prompt Cards: So what I've got here are
two sheets of A four paper. And what I've done on the back
of them is I have measured out 5 centimeters
by 7 centimeters. Basically, I've just
found the middle line. I've gone, you know, 7 centimeters, 14,
21, and up to 28. Oh, actually, sorry
wrong way around. I've gone 7 centimeters, 14, 21, 28, and that's left me that little
strip there on the end. Then I've turned it round
and I've measured five, ten, 15, 20 centimeters, which has left that little
strip there as well. So those are going to
be the cutting lines once we've done the painting. And what I'd like to show you today is quite a fun
technique, actually. This one here, I think it'd be rather fun
to do something like this. Now, for this, I'm going to
be using a paint roller, which you can get from
any decorator store or probably your art
and hobby craft store. If you don't have
anything like that, then just check out my class on the botanical
watercolor stationery. That will show you how you can paint these
backgrounds here, very quick and easy method, or just something
like this where you're using two or
three different colors, and you are, you
know, quite literally just putting the
color on like this, different colors, and
you're literally just blending it with a
nice fat wide brush, and you're just blending
it into each other. So there's various different ways that you can
do a background, you know, a background
on your paper. So check out this one if
that's what you prefer. That was done with watercolour and even a little bit
of salt sprinkling. So check out that class if
that's the effect you like. If that's the technique that
you would prefer to go with, then you're going to
need watercolour, either in a palette
or in some tubes, a couple of different brushes, and a water spray to get
this lovely effect here. And if you want to try
this little salt method, you'll just need some sprinkling
of table salt, as well. But as I've already
taught that one, I just thought it would
be fun to show you a different technique
using this one here. If you decide to go
with this technique that I'm going to
demonstrate in this class, then you will need a roller. You could try using a brayer that you would use for printing. That might also do the job if you don't have a roller
but I must be honest, I've never used a brayer in it, so I can't guarantee that. You'll also need a selection
of acrylic paints, and it doesn't matter
what quality you use. It can be stewart quality, it can be craft quality. You don't need to be
using an expensive paint, just whatever
you've got to hand. For both of the techniques, whether you do the watercolor or this lovely rollering technique, you'll need scissors, a pencil, a ruler and a glue stick. And that's it. No brush is involved in this
technique at all, which is what makes
it quite so fun.
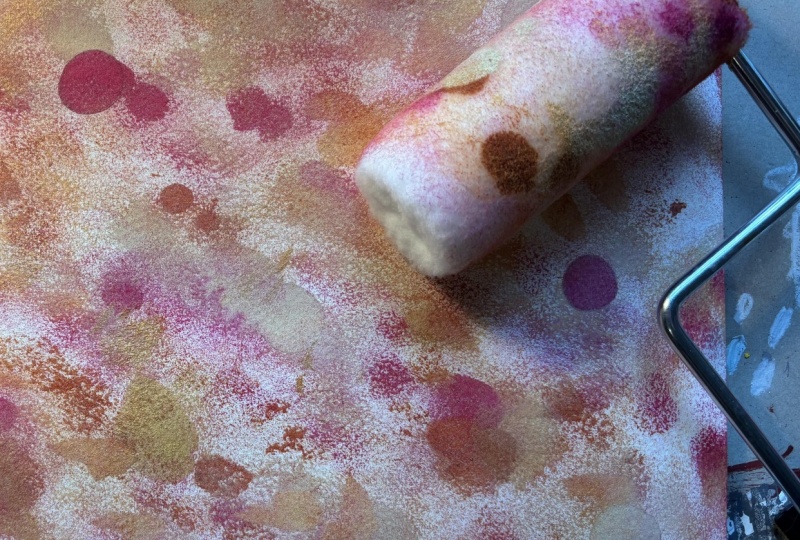
3. Roller Magic 1: So these are the paints I've
decided to try it with. If it doesn't work,
I'll do another one. That's part of the fun of it, you know, just a bit
of experimenting. So basically, you can use
any colors that you want to. Any colors, any quality, it doesn't matter at
all at this point. And this is the absolute
joy of this that literally, I'm just going to
drop some paint onto the paper straight from
the tube or the bottle. Oops. Here we go. Let's try some of this
gorgeous limey green. See what effect we get here. Now, that's going to come out
a slightly different shape because it's done
that on the paper, and that's all part
of the lovely process of just experimenting with it. So I could either roller it that way or I could
roller it that way. I think I'm going
to go that way, actually, just because it
gives me a longer roll. So let's just see what happens. This is completely dry. I haven't wet it at all,
so we're just going to Oh, now, look at that. Just look at that.
Isn't that beautiful? I mean, that's just so exciting. I love it. I absolutely love it. Now, the trick is to
not overdo it too much. Otherwise, you'll
end up spoiling. You know, you'll end up
with a bit of a muddy mess, so it can be a bit of a
trial and error on this. But isn't that just
absolutely gorgeous? Let's go back down there 'cause I don't want too
much white showing. Bring that one back down there. Up there. And here,
Presto, that's it. That's all there is to it. I mean, I just love it. So we're going to put
that to one side, and I'm going to
bring the other sheet in if I can find where
I've just put it.
4. Roller magic 2: There we go. I found the
sheet, and this time, I'm going to try the blue. I'm not going to
clean the roller. I'm going to leave the
roller just as it is. So it'll have a little bit of
those colors already on it. And this time, a pale olive green, although,
no, actually, I'm going to stick
with that lime green because it's so
lovely and vibrant. And I find it quite an
uplifting, a cheery color. And these cards are meant to cheer us on when we're
feeling a bit stuck, we don't know where to start
or we don't know where to take the work
in the next bit. Look I'm managing to get paint
all over me. That's okay. Just wipe that off. So using that same roller that's got those same colors on, but let's go this way this time. See what happens when
we take it this way. Now we're getting a
slightly muddier effect on this because I'd already got
those colors on the roller. So I'm going to show
you what to do when we get a slight muddy effect. Not liking this one as much. So I'm going to take
a clean roller. There we go. Slightly muddy. It's got a slightly
stripy effect, which I can't say I'm
that keen on that either. I'm going to add some lovely
white blobs to this now. These are coming out we a
bit big because I haven't got as much control over that. So what I will
just do is whoops, get my palette knife and
spread those out a bit better. Now, this is also a good opportunity here
to just watch when, you know, you might start
doing something and think, oh, I really don't
like that at all, but it's knowing
then how you can maybe fix it or alter it. So let's see here what
happens when I bring a clean roller in and I'm going to go up
the way this time. Got a bit too much pain on this, actually, as you can see. So I'm going to have to re
ruler those a little bit. Now, that's definitely an improvement on what
there was before, and I think I'm going to
introduce that yellow again. So the first one turned out
really nice straightaway. This one, mainly because I used a roller that
I hadn't cleaned or a fresh roller has
come out differently. So let's see what happens here now and bring that yellow in. Now that's starting
to look much nicer. And that's quite fun, actually. And of course, once
you cut them up, the cards won't look. You know, the pattern on
the other side of the card, if you know what I
mean, will look very different to what it's
looking like here. So the question
is now, do I want to bring that pink into it, or am happy to leave
it just as it is. I think I'm going to bring a bit more of that green back in. At the same time, trying
not to overwork it. But at least you get
to see a couple of processes here of how to restore something into something that you prefer if you understand
what I mean by that. And that's that. Now, I'm not liking that one
as much as this one, because it's not
as clean looking, if you understand
what I mean by that. That's sort of very
fun and poppy, and yeah, it doesn't need anything else
doing to it at all. This one here has
got rather muddy. But I quite like it, though, and I'm going to bring
something else into it. Once that's dried, I'm going
to collage a little bit of tissue on top of that in the same way that
I did here look. And that in its own way, brings in a different
element to it, as well. So you're getting to see
two different techniques here using the paint rollers. So I just need to
let this one dry. Well, I need to
let them both dry, obviously, before I
do any cutting up. The one on the right
here, you know, it's got a lot of white
background showing through, so it has a much lighter effect. This one is actually a
really good way to build up layers if that's the kind
of effect you're after. So you can see
here by, you know, doing the rollering
quite a few times on this and even having a background that I didn't
really like to begin with, I've managed to recover
that one pretty well, and I obviously need to let it dry a little bit before
I add some tissue to it, so I'll bring you in
the next session, where I can show you the technique then for
adding tissue to that one. But I'm probably not going
to do anything more on this. I could, if I wanted to, I could add some Posca pens, do some little dots and
all that kind of thing. Um and you know what I'm like, I say I'm not gonna add anymore, and then I can't help myself. I get all excited
about something, and I do end up adding
something to it. So let's just see what
happens, shall we? In the usual Dawn kind of way. Okay, I'll see you
in the next session.
5. Tissue transformation: I like to collect tissues. Either I save them
from, you know, things that people have sent me or gifts that have arrived
wrapped in tissue, or I buy my own. This is a fantastic range, actually, from museums
and galleries. They've got a really,
really great range. In fact, that one probably
came from them as well. So yeah, I've got lovely
tissues in my stash here. Got more of this spotty one here that I showed you
earlier, that one there. And I just wanted to
get a sense of how these tissues might
react, you know, once they've gone on to here
because I didn't want them to cover up what was
going on there too much. So I did a bit of a
little sample here, and the blues too much. You know, you can't see
what's going on underneath, and that's because that's
such a dark color. But you can see with
this bird and leaf one that the colors underneath are showing
through quite nice. Same with this one here. That's doing quite
well, as well. And even the circular one with all the different
circles on it, that's showing the
colors through it as well, which is quite good. So I think what I'm going to do, I don't want to overdo it. I think I'm just going to
use some of this, actually. The reason I'm going
to probably use this one here is because it is showing quite a lot of
the colors underneath it, and that's because
it's got, you know, quite a bit of white background, still still, you know, in its own design, I should say. So it's not competing. This bit is not competing
too much with this because you can still see quite a bit of that background
coming through. So I'm literally just going
to tear some strips off. Now, I'm not a fan
of, straight edges. So if I have a straight edge, then what I'll do is, you know, I'll put that against two other
straight edges like that. So as you can see, I'm doing this
fairly willy nilly. Let's put that one that way. And of course, you
know, these flowers and possibly even the birds
themselves will end up maybe being cut through
as I turn the page over and start cutting
using those cutting lines. So we'll just do one more, I think, right there,
and that'll do for now. So I'm using just a craft
glue. It's white PVA. I quite like this little
container because it comes out, you know, very easy. I've got a flat brush. So basically, I'm just going to put some glue
straight onto the page. I did water this glued down. Oh, look, I got that in the way. I did water this
glue down a little bit because it's getting to
the bottom of the bottle, and it had, you know,
gone a little bit thick. So here we are. You can see I'm not overthinking
this at all. I'm just getting glued
down and then from the middle spreading
outwards like that so that all the
edges are glued nicely. And repeat the process again
until I've done it all. You can see here
that the background is still coming through,
which is really nice. I haven't lost that
background completely, but just doing this
little tissue trick is just adding a bit
more interest to it. And like I said, when
they're all cut out, oh, I've got a neat edge yam, let's put you right up
in the corner then. Yeah, when the cards
are all cut out, you'll see different
elements to this anyway. Come on, Dawn.
There we go. Meta. You know, it might
be that there's a line there that gets cut. So you won't see that full
shape of that leaf anyway. I like this process here because it's a very spontaneous process, and it stops you from worrying about whether you're
doing it right, have you got it in
the right place. It's just very freeing
this method here. You can see how
fast I'm doing it. You know, you really
don't have to ponder it. Just get that on there. That's the only
bit of pondering, am I getting it next to
the edge. There we go. Whoops. Now, then that's just
wrinkled up a bit there. Let's see if I can push
that out a little bit. Maybe I can't without ripping
the paper, and that's okay. If that's the effect
we're gonna get, we're gonna get a ripple effect, that's right. Last
piece on there. Make sure I've got
enough glue underneath. I do want that to stick
properly out from the middle. So I've got glue
underneath the tissue, and obviously, I've got
glue on top of the tissue. And what I'm going to
do really is any of that excess glue that's
still on the painting, I'm just going to basically whoops spread it and share it
so that it's on all of it. And that's it. That's
all there is to it. So again, I'm going to
have to let that dry. You can see I've
gone over the edge a little bit there. That's okay. I can just, you know, get a craft knife just to sharpen
that up a bit, trim it off. That needs to dry, and then we will be
ready for turning it over and cutting out
the card shapes. Now, look, you can see
there that I've ended up getting paint onto
the underside. Does it matter? I
don't think it does. I'm not you know, I don't need it all
to be super neat. I want it to be my little
deck of creative prompts, and, you know, that
includes that, as well. Then just help me when I've come to a point in
the work where I think, I'm not really sure
what to do next or I've opened the sketchbook and I don't even know
where to start. So let's leave that to dry, and then I will bring you back in to start cutting them out, and we'll have a look at the prompts and how
we're going to write those prompts or print
them or whatever you want to do onto the
cards themselves. See you in the next session.
6. Creating the Art Prompt Cards: I So this is me now
cutting out the strips, as you can see, I've started cutting them up
into smaller pieces. And what I'm also doing is just trimming round
these edges here as well, because I think when
they've got a curved edge, it just looks so much
nicer than a sharp edge. And also, it's actually nicer to actually handle, as well. So that's what I'm
going to be doing here, just trimming these edges off, taking the scissors, carefully
going around like that. And that gives you a
much nicer looking card. So I'll finish doing all these, and then I'll bring you in
again once I've done that. Don't these look
deliciously yummy. I have stuck to my
decision not to decorate them any further because I don't
think they need it. I think they are absolutely
super just the way they are. So as you can see, I've
trimmed all the edges, and I took an eraser
and rubbed out any pencil lines that
were there as well. So they're ready to be shuffled
in with the other one. Now, you can see the page
here as just buckled slightly because obviously it
had a lot more water on it. It had more layers of paint, and then it's had the layer of the ink sorry, not the ink, the glue, the water down glue, underneath the tissue and
on top of the tissue. So it's buckled a little bit, but it doesn't matter. All you need to do is to just
re shape it by doing this. And if it's really, really bad, pop it in between the
pages once it's dry, of course, of a very heavy book and just leave it for
a couple of hours and that'll straighten
it up again. So I'm going to turn it over, do the cutting on
this side as well, trim the edges and
then let you see what these look like
once that's done. I'm really pleased with the
way these have turned out. I, you know, to say that it was a different process in the sense that these
were, you know, left very light and bright, and these obviously
were a lot more muted because of the different
layers that went on. I'm really pleased with
this effect, actually. I think they're rather sweet
the way they've turned out. So what I'm going
to do now is I'm going to just basically
shuffle them together, and then use the list what
I'm calling my ICD list. And you'll find this list
under the resources section. So if you just, you know, hit the resources tab, you'll see that there's
two downloads here. I've just printed it out, you know, on the
back of the other. But you can do it as two
separate ones if you want. And slowly, but surely, I'm going to write, you know, each suggestion
onto one card. And I'm only doing it in pencil because these are what
I'm going to, you know, I think of as being a really
practical set of cards here, and they're going to
get a lot of use. I mean, you know,
they're already painted on some of the sides, so I'm not going to be too
precious about those at all. If I look at the
cards that I created, though they were
created in the class, change your thoughts,
change your life, you can see here that I used a little gold
pen and then did, you know, a gold border
around the edge, as well. And, you know, they get used
in a very clean setting. So it was nice to actually add that little bit of
an extra border and just too a little bit
more time in terms of, you know, using the
gold pen and things. Here, as I say, I'm not going to get
precious about these. So they're going to be good
old workhorses of these. Now, I'd already created another sheet of
paper, which has, in fact, now been turned into a small box for the cards to
be able to sit into them. It's perfect size for them. I'm not going to
do a demonstration here because it's actually the demonstration for that is included in one of
my other classes, which you may even
get that class. Before you get this one, which will be very
handy because it's showing you how to make
paper boxes and baskets. So obviously, you can keep your cards however
you want them. But if you're wanting
to create a box, especially for them, then just have a lookout for
that demonstration.
7. Dawning of the Day: Recently bought myself
a new set of paints, 36 acrylic colors in the box. I was curious to know what
the quality would be like, what the colors
themselves would be like, how they would work on the page, viscosity, whether or not they were a good quality or not. Over the weekend, I found myself not being able to
get to sleep on evening, and so I ended up getting up
just as the sun was rising. I could hear the birds singing, and there were still some
stars out in the sky. And I knew that staying in
bed would be a waste of time and I'd just lie
there tossing and turning. And so I decided I wanted to do something
creative, but what? So I went to my little box of creative prompts and
out came the card, create a color chart.
So this is what I did. In fact, I painted
two color charts, one as a reference for all
time and the other one so that I could cut it up and
turn it into color discs. In fact, I had so much fun with it that I ended up creating more color charts and
even more color discs. So fired up by having
created these in the morning that after I'd had a little nap and felt a bit more refreshed, in the afternoon, I decided
to use the art prompt cards, open my sketchbook and see what process was
going to unfold as I delved into the
cards just to help them guide me as to what might want to
appear on the page. And this is the first
thing that happened. I pulled the card,
make a scribble, or start with a scribble, and this is the beginning of how the process unfolded that I'm now going to share with you.
8. Starting the Process: So the first card to
come out of the decor, start with a scribble
or a squiggle, and the second one
begin with one, two or more circles. So this is how the
sketchbook pages began, squiggling or scribbling
with a bit of blue, adding a spudge of gray, and then adding some
different colors in the shapes of circles
and different lines. I didn't have any direction
in mind at this point. I was just going
to allow myself to play and trust where
the process took me. Here you can see that
I've started to add more color and just get
some blocking in done. Video that follows
next is really me in the zone just really
talking to myself. So a slightly different
sound quality. Once I'd mix this turquoise, I just totally fell
in love with it. I had to put it somewhere. I had to find somewhere
where I could put it because it's just such
a yummy, yummy color. But you know what I'm
like about colors. I fall in love with
them all the time. So where else am I going
to give this turquoise? This is needing a bit more light in it and I'm starting to get a bit more intentional
now about this. I've had a lot of fun bringing
in the colors just as I've been mixing the color palettes, the color swatches and if you like even dumping
the paint onto the page. But now I'm starting to
get a bit more intentional about what I'm creating. But right now, I really
want to just get this turquoise in because I'm really rather
in love with it. So I'm color
blocking a bit here. Now, it still won't
stay like this. I'll end up going
in and doing more layering on top of
it more than likely. But just for now, that's great. Of course, I want to bring it in over here somewhere, don't I? I think. I'm just
going to do this. I'm just using the width of the brush there
to get this effect. That's rather gorgeous
as well, isn't it? This paint is covering
over this really well, actually, I'm quite surprised. To see that it's such
an inexpensive paint. One more perhaps
there. I'm skipping between two workplaces here because I've got all my paints and my palette on
the other table. That's rather yum. You can see here that I
am beginning to think a bit more now about some
composition in this. But not before I've had a really good play with just putting colour
in to start with. So this is where it's
super useful now to have a color chart because what I've done is I've created
this color chart. I've also created some cutouts. Somebody gifted me
this lovely puncher, which happens to be in
the shape of a flower. That's quite nice
because actually, given that I do
so many botanical things, it's quite nice. It gives me a clue as to where
I might put other things. I've got this to the stage
here now and I'm a bit like, where am I going to
go with it next? This is quite useful
because do I want to bring in some different colors
to make it really pop? I'm not sure. Maybe
I do, maybe I don't. What I'm actually going to
do is to leave this for now, and go himself a cup of tea and then just leave it for ten
or 15 minutes and then come back to it because
it'll have dried by then as well that might give me a bit more of an indicator as
to whether or not I want to put anything
else in it or not. Yeah, that's what
I'm going to do. I'm going to leave it for a
few minutes and then come back and then I'll
make a decision.
9. What Happens Next: I've just put a sheet of paper over there for the moment
because it's a bit hard to just focus on this when the two pages are open
at the same time. That of course is a
slight disadvantage of working in a double
spread in your sketchbook. Well, it depends
how you look at it. Anyway, I did surprise myself here by coming back after having
had me a cup of tea, and making sure it was
completely dry and placing these pink mageni colors on here because I had imagined that I would be going more
with oranges on here. Then when I put the pinks
on, I much preferred it. Another great advantage of
these little color chips. The next thing I'm going to
do is to turn it around. This is one of your
suggestions in your art prompts to just
turn it around four times. Obviously, that's the
way I painted it. Now, I really quite
like that, actually. There's something
about that that rather appeals to me. Turn
it round again. That doesn't appeal to me. And again, it's okay,
but that's better. But actually, I think I
prefer it even low like that. And what that sort
of saying to me now is that I need to
bring some kind of vertical pattern or something
into this section here. I will play with that and
see where this takes me. Now, the lovely thing about allowing yourself
to play like this and I'll just show you
another example of something very similar, which is this one here. This was a very similar
play date for myself. I limited myself to two
colors plus black and white. I think the colors were allow turquoise maybe and yellow
Ochre then black and white, and all these fantastic
colors came out. I love that one so much that
I ended up having a card. Printed from it. I have a lot of art cards
and this one here, you can see it's actually this. I got turned around and then
it got turned around again. And then it got flipped
over to the other side. That is one of my new art cards now to
add to my collection. You can also take
little windows. I've got another one in
here somewhere, this one. That's the right way around. Of course, you can take
your little square windows, as I call them to see if
there are elements of it that you think are worth
doing something with. I ended up with that section there and that also became
an art card as well. So they were literally
just play dates. That one's called
Glorious Abundance, and the other one is
called Baldy Bloom. And from two play dates
with myself, you know, I've ended up with two
more cards to add to my um, art card selection. So I'm going to carry on
playing with this one here, and then I'm going to have
a look at this one here. Now, you can see from when
I showed you the last time, I've done quite a
bit more on here. Again, I was rather
surprised to find that actually I quite like
these pink colors on it. Let's take those off a minute
and just cover that one up. Because I had thought
that there would be oranges and it might
be that I bring a little orange in
up there somewhere, that sort of salmoni color. I'm just going to carry
on playing with these. And obviously, once
I've finished them, I'll show you the
finished thing. But it's been such
a fun thing to do. So relaxing, no
outcome, just playing. I might not end up doing anything with them
other than the fact that they've given me a morning and an afternoon's
great pleasure, and that in itself
is worth doing it. I'll see you in the
next session where we see how the two of them
finally turned out.
10. Surprise Surprise: Start off with a
scribble or a squiggle, add some circles and
some other marks. Allow your art to be
perfectly imperfect. Don't judge it. Just
allow it to be. Stick with it for
another 20 minutes, even though you might
not know where it's going or you might not
even be sure of it. Don't be afraid to
change direction, even though you're going a
completely different way. Add some fine line work
if that's what it needs. And finally, just enjoy the process wherever
it leads you.
11. How and when to use your art prompts: I had such a lot of fun
creating this color chart and all these discs that I'm going to carry on
doing it actually. I've got 65 different colors now from a box of the
original 36 colors. If you can't think of
anything else to do at all, then just get some
of your art supplies out and just create a little
color chart with them and you'll be surprised
then at how that then inspires you to start making scribbles in
your sketchbook, put in a couple of circles, and who knows where
it will take you? So this is one of those times when you really don't
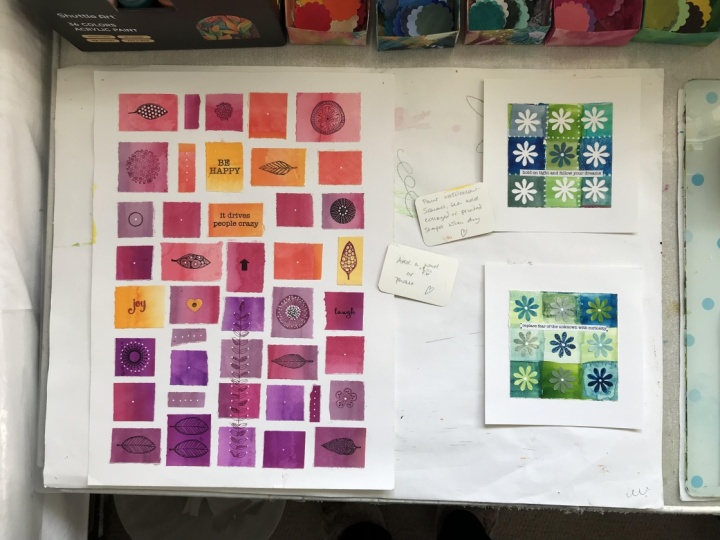
know where to start. A lovely fun exercise is to just get your watercolor paints
out, get some paper out, and paint some lovely
colors onto your paper, then take them up into strips, collage them like
I've done there. And then add some
little printing on top, or maybe you put
them together like a little quilt and you add
a word or a phrase on them. That's again, a
really simple way to do something creative without
it being too onerous, without having to think
too much about it. Here's a great example of
do I paint something onto a white background or do I go really bold and paint it
onto a dark background? This started off life as a very watery background
done with watercolors and I just allowed myself to get some playful elements by
adding some stencils, allowing myself to
experiment with them. This one also ended up being
made into an arc card. Put some fine liner on it again. I using a couple of little block prints or
printing blocks, I should say. That added a couple more
interesting elements to it. Again, I can't
emphasize this enough. It's about allowing
yourself to play. I very rarely set out to
do a specific composition. I mean, occasionally I do,
but a lot of the time I don't just start playing
and see where it takes me, and I think it's in that
freedom and spontaneity do things come out which are
often the most pleasing. So if we look at these
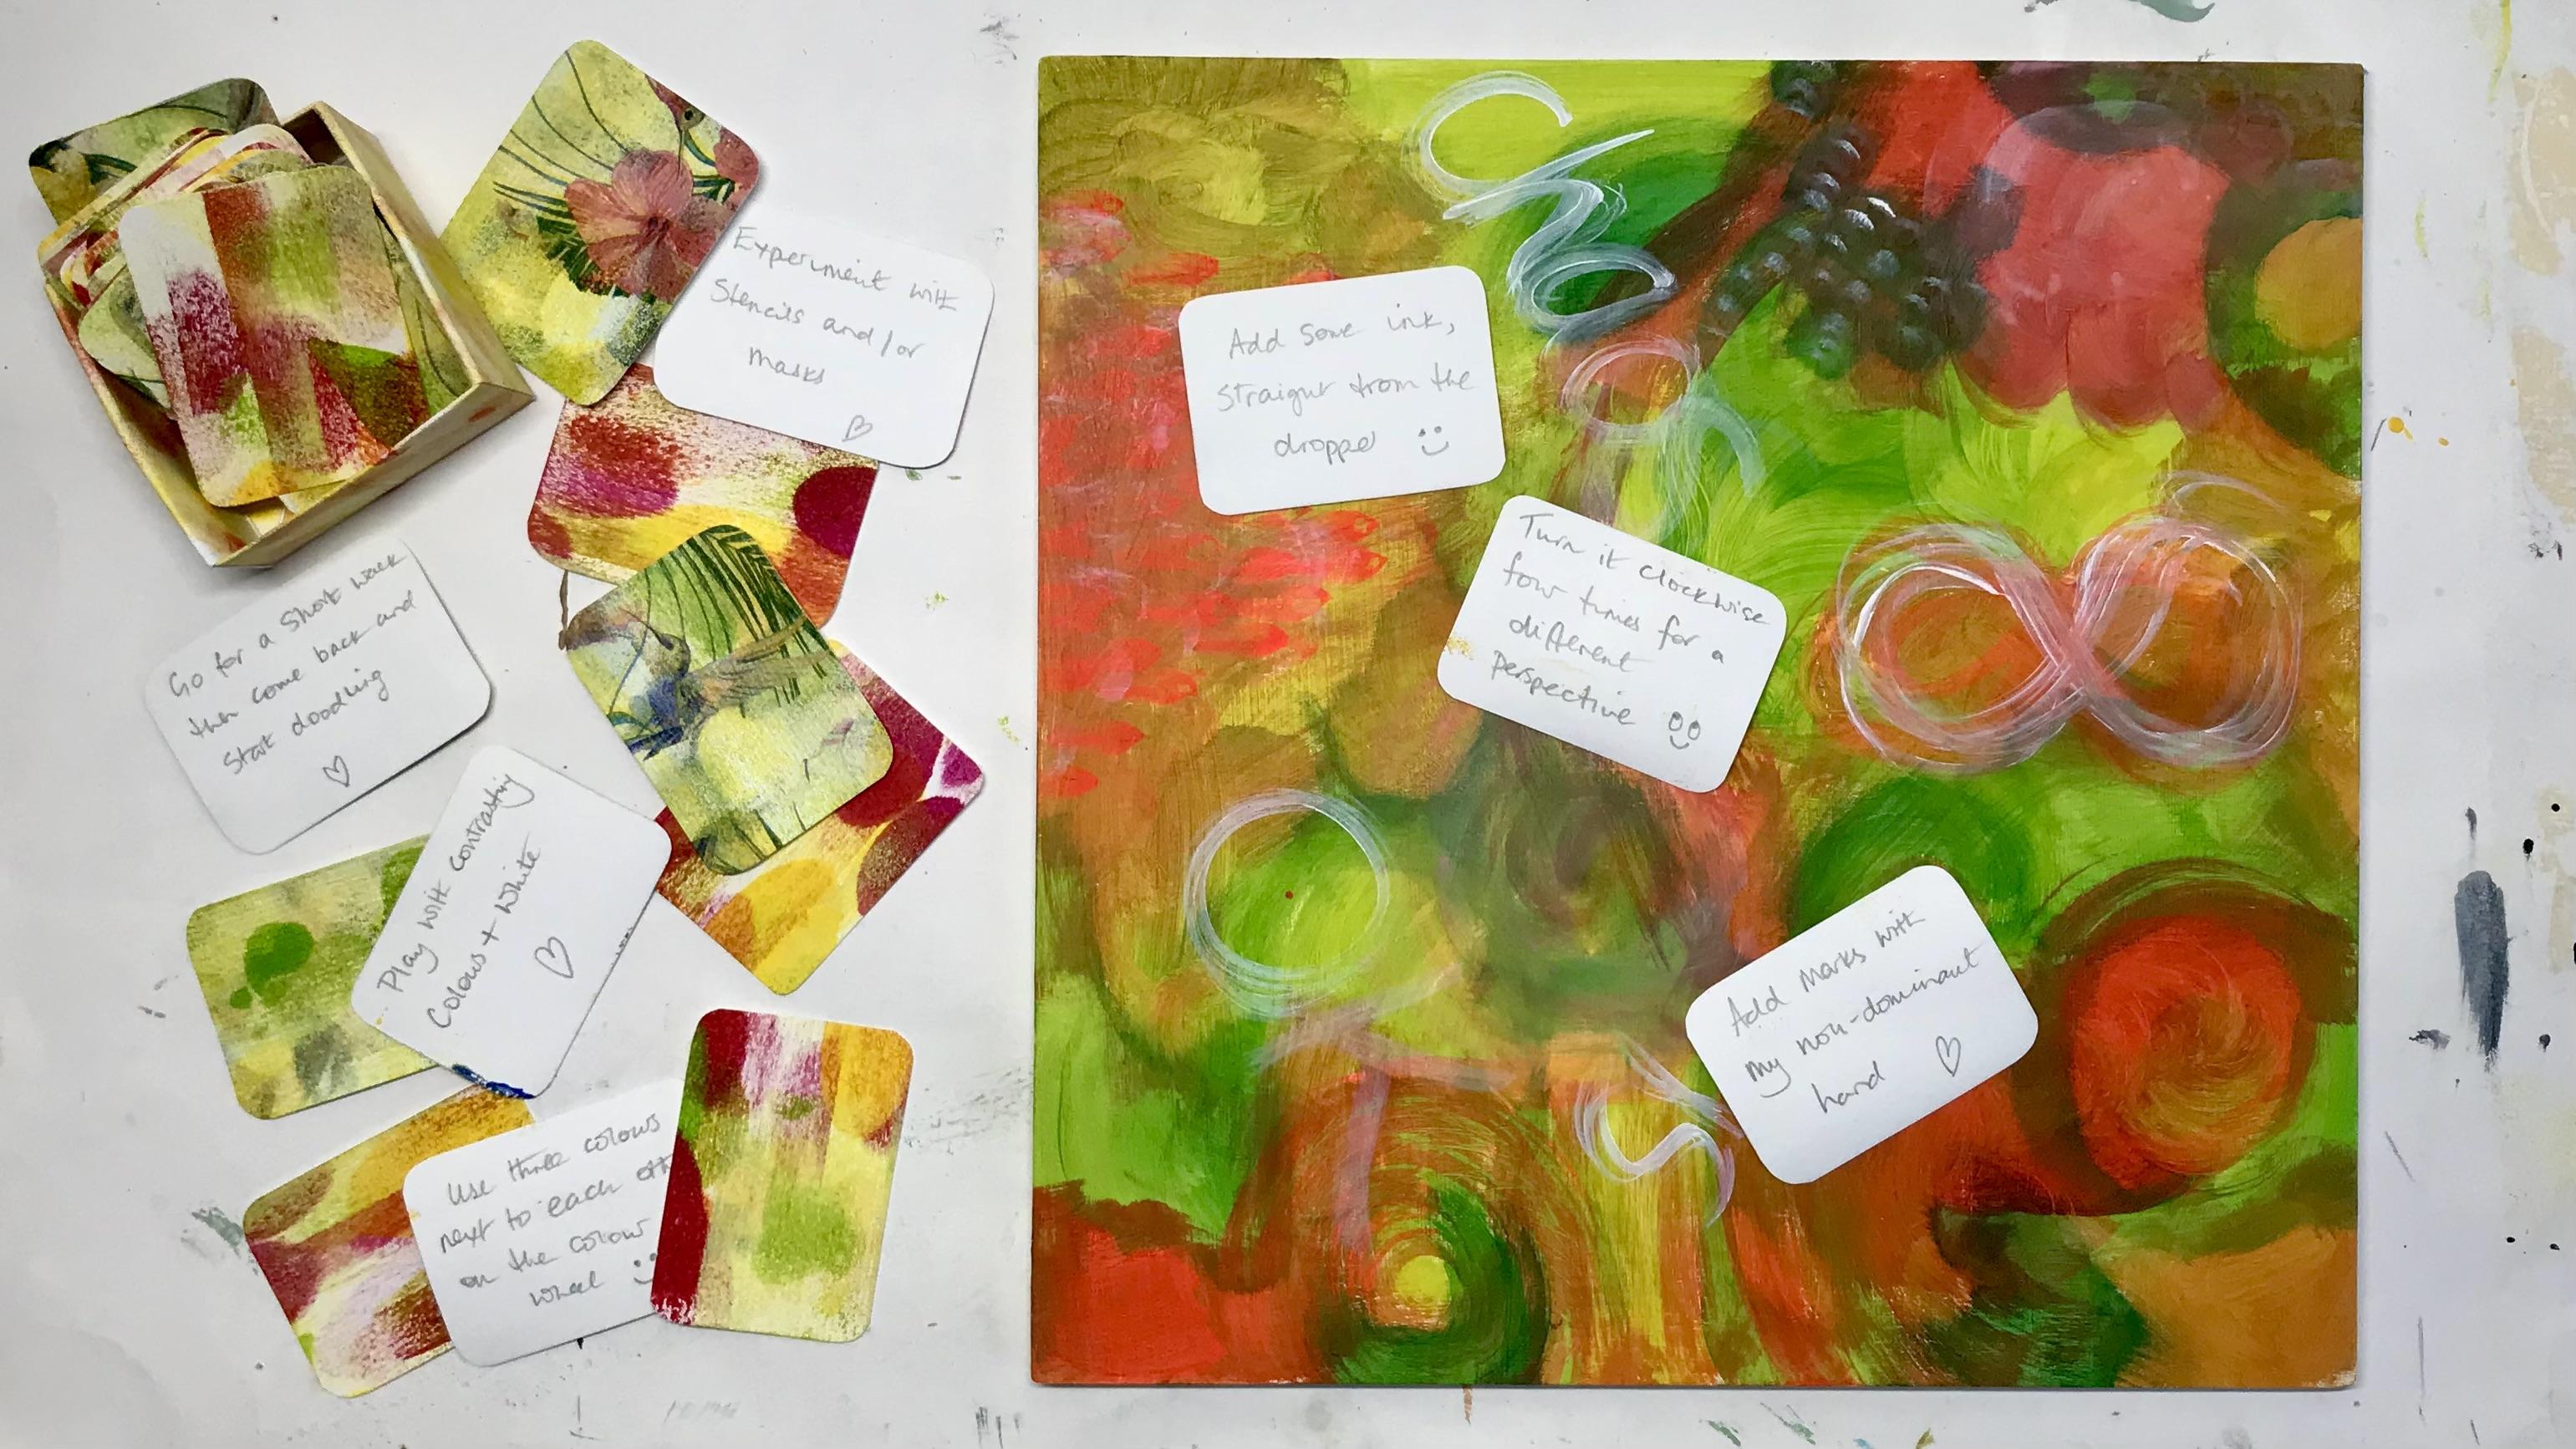
art card prompts, you can see here this one here, it's about creating a grid on the page and then working all the squares
at the same time. Basically, you're taking a page out of your sketchbook
or whatever, and using washy tape or
masking tape or frog tape, you're just laying that on the paper and creating
grids so that basically you've got
white lines then that show once you've taken that tape off and it gives
it a very clean feel. Now what I've done here again is I've painted a background with watercolor in various shades using oranges and
these lovely blues. Then we'll come
back to this one. I've experimented
with stencils here. You can see that shape of
that stencil just there. I've done it in other
bits as well to give the whole piece a cohesion. You can see little bits
of it there as well, maybe that way around,
whichever way around it was. I've added some ink
straight from the dropper. That's another one of
your prompt cards. I've literally just
take the dropper out, I won't do it now in
case I spill on it. Obviously, this is all
with the tape still on. I've just taken it
out of the bottle and then literally just
added it in parts. Then I've done some
more mark making. I've highlighted certain
areas with added mark making and I've also used obviously
different mediums. I've painted the background
with watercolor, but then I've stenciled
it on top with acrylic. I've added little bits of different mark making here
with different colored pens and I've also used the Nocrans again to just make
marks like this. This is a really nice way actually to create a
series of paintings, particularly if you like
doing abstract paintings. This is a great way
to create a series. Show you a couple more examples of how to use the art cards. Then I think you've probably got enough to be
going on with there then. I hope I haven't overwhelmed you with all these
different techniques. But, well, I'm saying you will. I'm hoping you will really get a lot out of these different
cards in giving you lots and lots of different
creative starting points or creative pushing
through points. This is another example of
painting a background there. I've done that in acrylics and then brought in some
extra texture on top. Playing with added
texture or patterns. Have you used some
bubble wrap here? Have you used a little
rubber mat over there? This is a photocopied
blown up version of this, which was the original size, and you can see the correlation here of what the marks were. That's often a
technique I use to just paint a background and then really look at it and see where do I want
to take it next? This is where the cards
come in really useful. So again, experimenting
with stencils or masks. This was done with a mask. The thing with a mask is it's an image that you put
on top of your painting, and then you paint around it so that what's underneath
it remains revealed as opposed to a stencil
where you are putting the stencil on top and then you're covering up
what's inside it. This is the opposite. Using
a mask is the opposite. So these shapes were all masks. I think that's really
effective actually. Again, I've added
my fine line work, which I often like to do. I wanted to show you
something here that I did actually quite a few
years ago back in 2021. But it's given me
such a resource of ideas and materials that I still refer
back to it even now. The starting point
for this one was start with a gorgeous
blue curvy line. That was the instruction
that was given to us to start with
a blue curvy line. This was another artist that I was doing a
workshop with here, wonderful woman called La
and that was what we did. We started with a
blue curvy line and it just went on from there. And basically, we could just take the work wherever
we wanted to take it. I just absolutely fell
in love with the idea of just doing mark making with
blues, different blues. So you can see here that I
experimented even further. I ended up using ink for this section
here and this section. I brought in gold pen
in different parts, actually, gold pen more
in this one here look. I had written there that I love the combination of
these blues and golds, which is something
that I still use now because it's such
a nice combination. I used pro markers for this bit here and just
experimenting with the different nib sizes on them from a flat nib to a really thin nib and
having a play with those, seeing what shapes I could get, what kind of sizes and
curves I could get. For this bit here, I
experimented with a rigor brush, one of these lovely thin
ones here, round brushes. Fan brushes to see
what effects I could get nice flat brushes,
different sizes. I don't know if you can see, I'll bring this a bit closer. But using a fine liner, I even then went in
with the tiniest of marks in here to add a bit
more contrast there as well. For this bit here, I
used neocolor cranes, aquel cranes, but kept it all in this blue color palette,
which was really nice. I also did a little bit of
printing in this bit here. With these lovely little
silicon stamps and using just a blue ink
block there as well. So again, there was
no outcome to it. It was just one instruction, start with a gorgeous
blue curvy line. But then I decided to play with some different
brush sizes and shapes. I highlighted certain areas
with different mark making. I experimented, as you can see, with lots and lots
of different mediums there just to see what would turn up and
how it would work. Again, that's a really quick
and easy way to again, just get your creative
juices flowing, if you're just wanting
to do something creative but not exactly
sure what you can do. You could do this in all
sorts of colors, of course. You could do a whole sketchbook of this just focusing
on one color at a time. There's another lovely
idea to get you going. And if you are stuck
in a project, again, just by bringing in a different brush size and a different shape to it and making a mark can
make all the difference or just bring in a different
medium with it and see how that takes you to the next stage of whatever it is that you're
wanting to play with. O.
12. Food For Thought: Be bold, be brave. Try to do something that's a little bit out of
your comfort zone. Use the art prompt card to take you on a creative journey that you might not
have been on before. Just play with them. Always
just play with them. Have fun with this class. I would really, really
love to see what you managed to create
with these cards. So please upload a project. Pop it in the project
gallery so that I can see, and maybe you show
me which card it was that inspired you or cards, which inspired you to do what
you do 'cause I'd really, really, really like to see them. And if you would
like to leave me a review and let me know
what you think of the class, whether you think it
could be improved in some way or whether
you've really, really enjoyed it, whatever, just leave me a review
because that's really, really helpful for me, and
I really appreciate it. So until I see you in the next class of which I'm going to give you
a little clue here, it's going to be a little
bit of a challenge, and it's going to
be something to do with your dark pumped cards. But I'm not gonna give away
any more secrets just yet. So until I see you in that class, take
care of yourselves. Lots of love. See you then.
 Dawn Cawthra, Artist, Designer, Holistic Educator