Transcripts
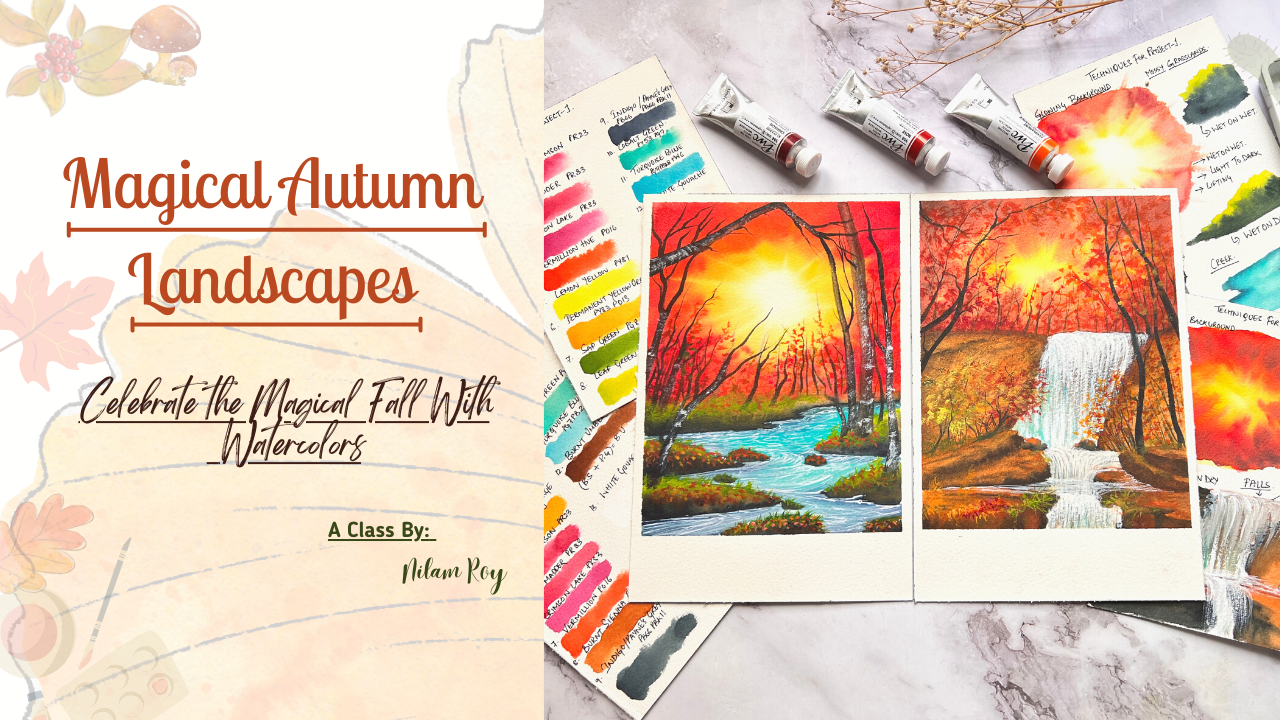
1. About The Class- Overview: When you see trees around, you explode into beautiful
shades of yellows, oranges, reds, and browns. You know, the magical season
of autumn has arrived. Mother nature treats us
to this amazing display of colors one last time
before winter sets in. Once the season has arrived, all I want to do
is get my paints out and explored the
gorgeous fall color palette. Hello guys. I'm Neil embroidery, artist or dog mom and an art instructor based
out of Bangalore, India. I go by the name as rate
Neil's artsy underscore Cove on Instagram where you could discover my passion
to paint nature. I invite you all to join
me in this class where I will be teaching you to paint
you magical landscapes, glorifying the beauty of
autumn creeks and false. Using basic watercolor
techniques. The class is structured
in such a way that even beginners can join in
without any hesitation. Let me take you through
a brief class overview. To begin with the class, we start with the basics such
as the supplies you will need to get started discussing
right from your paper, paints and other materials needed to get through the class. Right after it. I will also walk you through the basic foundational
watercolor techniques so that you are well-prepared. Before we deep dive into
our core project process. I have also curated
and exclusive fall inspired color palette for you to include in your
practice sessions. And also discussed about
how you can be creative to include these colors using a black and white
reference picture. We're also going
to discuss about the color palette for
our individual projects, followed by a separate
technique section, which will help you
to be prepared in advance rather than struggling with the process later on when we give dive into our project. As we move ahead
with the projects, I have broken down the
projects into very simple, easy steps so that even a big nerd can kick start
their process very easily. Each project is divided
into different subsections, giving you ample
opportunity to take a break in-between whenever you start feeling overwhelmed. I'm very sure that by
the end of this class, you will be so much more confident to paint
with watercolors and be bold to experiment
with different colors. Does this sound exciting? If yes, then join me in this class by grabbing
your supplies. And let's celebrate the beautiful season
of autumn together. I look forward to see you in the next lesson of this class.
2. Supplies You'll Need: Let's talk about the supplies
that you will be needing. First comes the paper. The paper that I'll be using is from St. Cuthbert mills paper. This is cold press, fine-grain paper and the color
is white, blank, natural. Now the size of this paper pad
is 12 inch into nine inch. This paper is 100% cotton as
a tree and of archival grid, whenever you are choosing
your watercolor paper, makes sure that the label must mention the
following things. Number one, it should be 100% cotton and not
100% cellulose paper. Number two, the type of the
paper that you are choosing, whether it's cold pressed
or hot pressed paper, and whether the paper
is acid free resistant. This is how your
cold pressed find green watercolor
paper looks like. Now, if you are a
beginner artists, always make sure
that you start with fine-grain or medium green paper and not on the rough paper. Here is the dimension
of the paper that we are going to use
to create our projects, which is 23 centimeter in length and 15 centimeter is a
breadth of the paper. Now, it is not a compulsion
that you need to stick to this particular
size of the paper. Feel free to choose
your comfortable size. If you are comfortable
on an A6 size paper, choose that or A5
size two is fine. Once you have decided on
the size of the paper, I would recommend that
you grab couple of this extra size
papers along with you because this will come
in handy to swatch out the colors and to practice
the techniques for the class. Now there is another
alternative to this cut or loose
sheets of paper. That is, if you are someone who is interested
in going ahead and documenting your journey
in your sketchbook you could offer for a
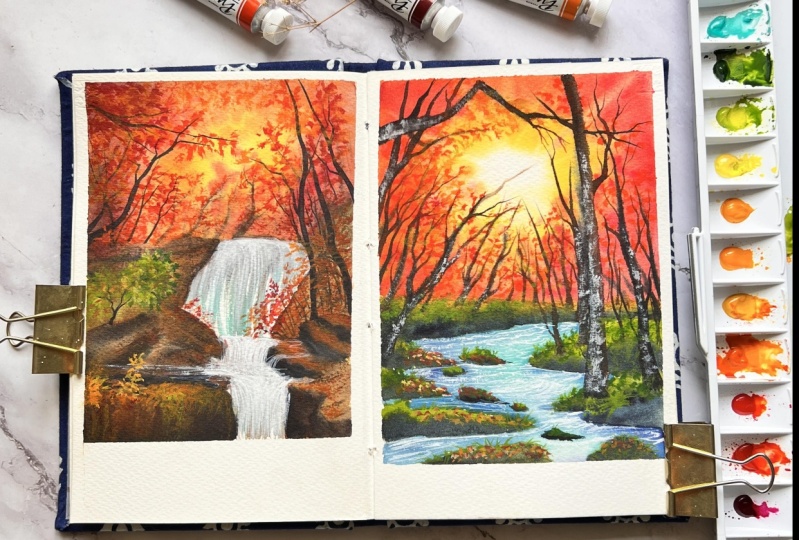
watercolor people journal. So this is a customized journal made from this Honda Ford paper, where I swatch out
the colors and practice all my watercolor
artworks over here. So if you have a sketchbook
which is made up of 100% cotton watercolor paper, then feel free to choose that. That was all about paper. Now, next is, are very important thing which is our paints or the watercolor. The pain that I'm going to use here is from the
branch and Han art. I love these paints
for their rich, intense and vibrant colors. Feel free to use whatever colors that
are available with you. It is not compulsory
that you need to have this particular
brand of color with you. Any brand of color will
be fine. Just that. The color shade or the
pigment information that I will be using for this class should
match with yours. That's the only criteria. Now, in detail, we
will be looking at all the colors that we will be using in a separate
section altogether. Now for using the colors, you will be needing a palette. Here, I'm using this watercolor polycarbonate
alert from Shannon art. I love this palette because it has quite a space for
mixing the colors. That's the speciality that
I like about this palette. This is a 42 palette in total, but it is not necessary that
you need to have this kind of pallet use whatever
is available with you. You could use this kind of
normal plastic pallets. You can use a porcelain
or a ceramic palette, or even your porcelain or
ceramic plates that are available at your kitchen
or your house, right? Even those would do. So. Ultimately, the moral of
the story is you just need something non-absorbing to mix your colors and start
painting on it, right? So now let's look at the next supplies that
we've been eating. We will be needing
two jars of water. One should be your
clean fresh water. Apart from that, you
would be needing a masking tape to
tape down your paper. Like if you are using
the sheets of paper, you would need to stick it down onto a non-absorbing
surface here, I'm using this acrylic sheet
board to tape down my paper. So this is how your acrylic
sheet board would look like. This is made up of
high-quality fiber plastic. I would say this is
not made up of glass. Many of you might
mistake it for a glass, but no, it's an acrylic sheet. Moving on to our next supply, that is our pencil and
our scale or a ruler. The pencil that I'm using
here is mechanical, but feel free to use your normal HB pencil
tool would work fine. Next would be eraser. Then comes or tissue paper. Have always some couple of
tissue paper or tissue towels handy by your side
because this would be needed to dab your brush to soak down all
the extra amount of water from your brush onto this tissue towel
or tissue paper. Last but not the least, let's discuss about brushes. I will be using this
mob quill brush from Silver Atelier series. There's a golden tattle on
quill mop brush, size 120. So this mop brush is my absolute favorite because it has quite a big
rounded belly. It helps me to spread
the color and the water. Very nice and uniform consistently on my paper with
a very sharp pointy tip, which helps me to go
and reach out for spots and areas where
flat brushes like this, not able to do the work. So instead of this quill brush, you could also go ahead
and lay off flat wash of water on your paper using
those flat brushes. Next comes the round brushes. So if you've taken my
other Skillshare classes, especially the watercolor ones, he would know how much I love using this silver
black velvet brush, especially size number 1,284.2 are always my
watercolor companion. Apart from these brushes, I also like to keep some combination brushes
mixed with synthetic brushes, as well as some
natural hair brushes. The one that I'm
holding right now is from Princeton Heritage Series and it's a synthetic brush. It has a nice soft bristles
and when dipped in water, it forms a very nice
sharp pointy tip, which comes in
handy for creating certain elements which require
fine precision lining. This brush comes
in really handy. Apart from that, I also have this Princeton Neptune
series brushes, which is purely made from squirrel hair or
natural fiber brush. This is number six, and I love it because it has a very nice rounded head of the brush where
I can easily free the Brazils and use it to
my advantage to create some dry brush textures onto
my painting whenever needed. So next is the silver
black velvet size number Fulbrighters about silver
black velvet brush I have already discussed rate. So this is a hybrid brush, meaning the bristles of this brushes combination of both natural and synthetic hair. I will not be using that brush frequently for our paintings. The next is liner brushes
are many detailing brushes. Now, you can have liner, rigger brush size
number two or three, whatever is available with you. Now, instead of a liner brush, you can also have
a mini detailing brushes of at least
size number one or two. At least one of them
you should have for you to create some detailing
in our paintings. Now, next this brushes optional. I have this angle shader brush from Princeton
velvet touch series. It's a synthetic
brush and I love it for its angle, the head. So lifting technique and
creating the sun rays. I especially prefer
this kind of brush, this you could call as
a speciality brush. Instead of this, you
could go ahead and use your short
head flat brushes. So that is all about the supplies that you
are going to need. Nothing fancy. So if you do not have this
kind of brushes with, you, feel free to use whatever
is available with you.
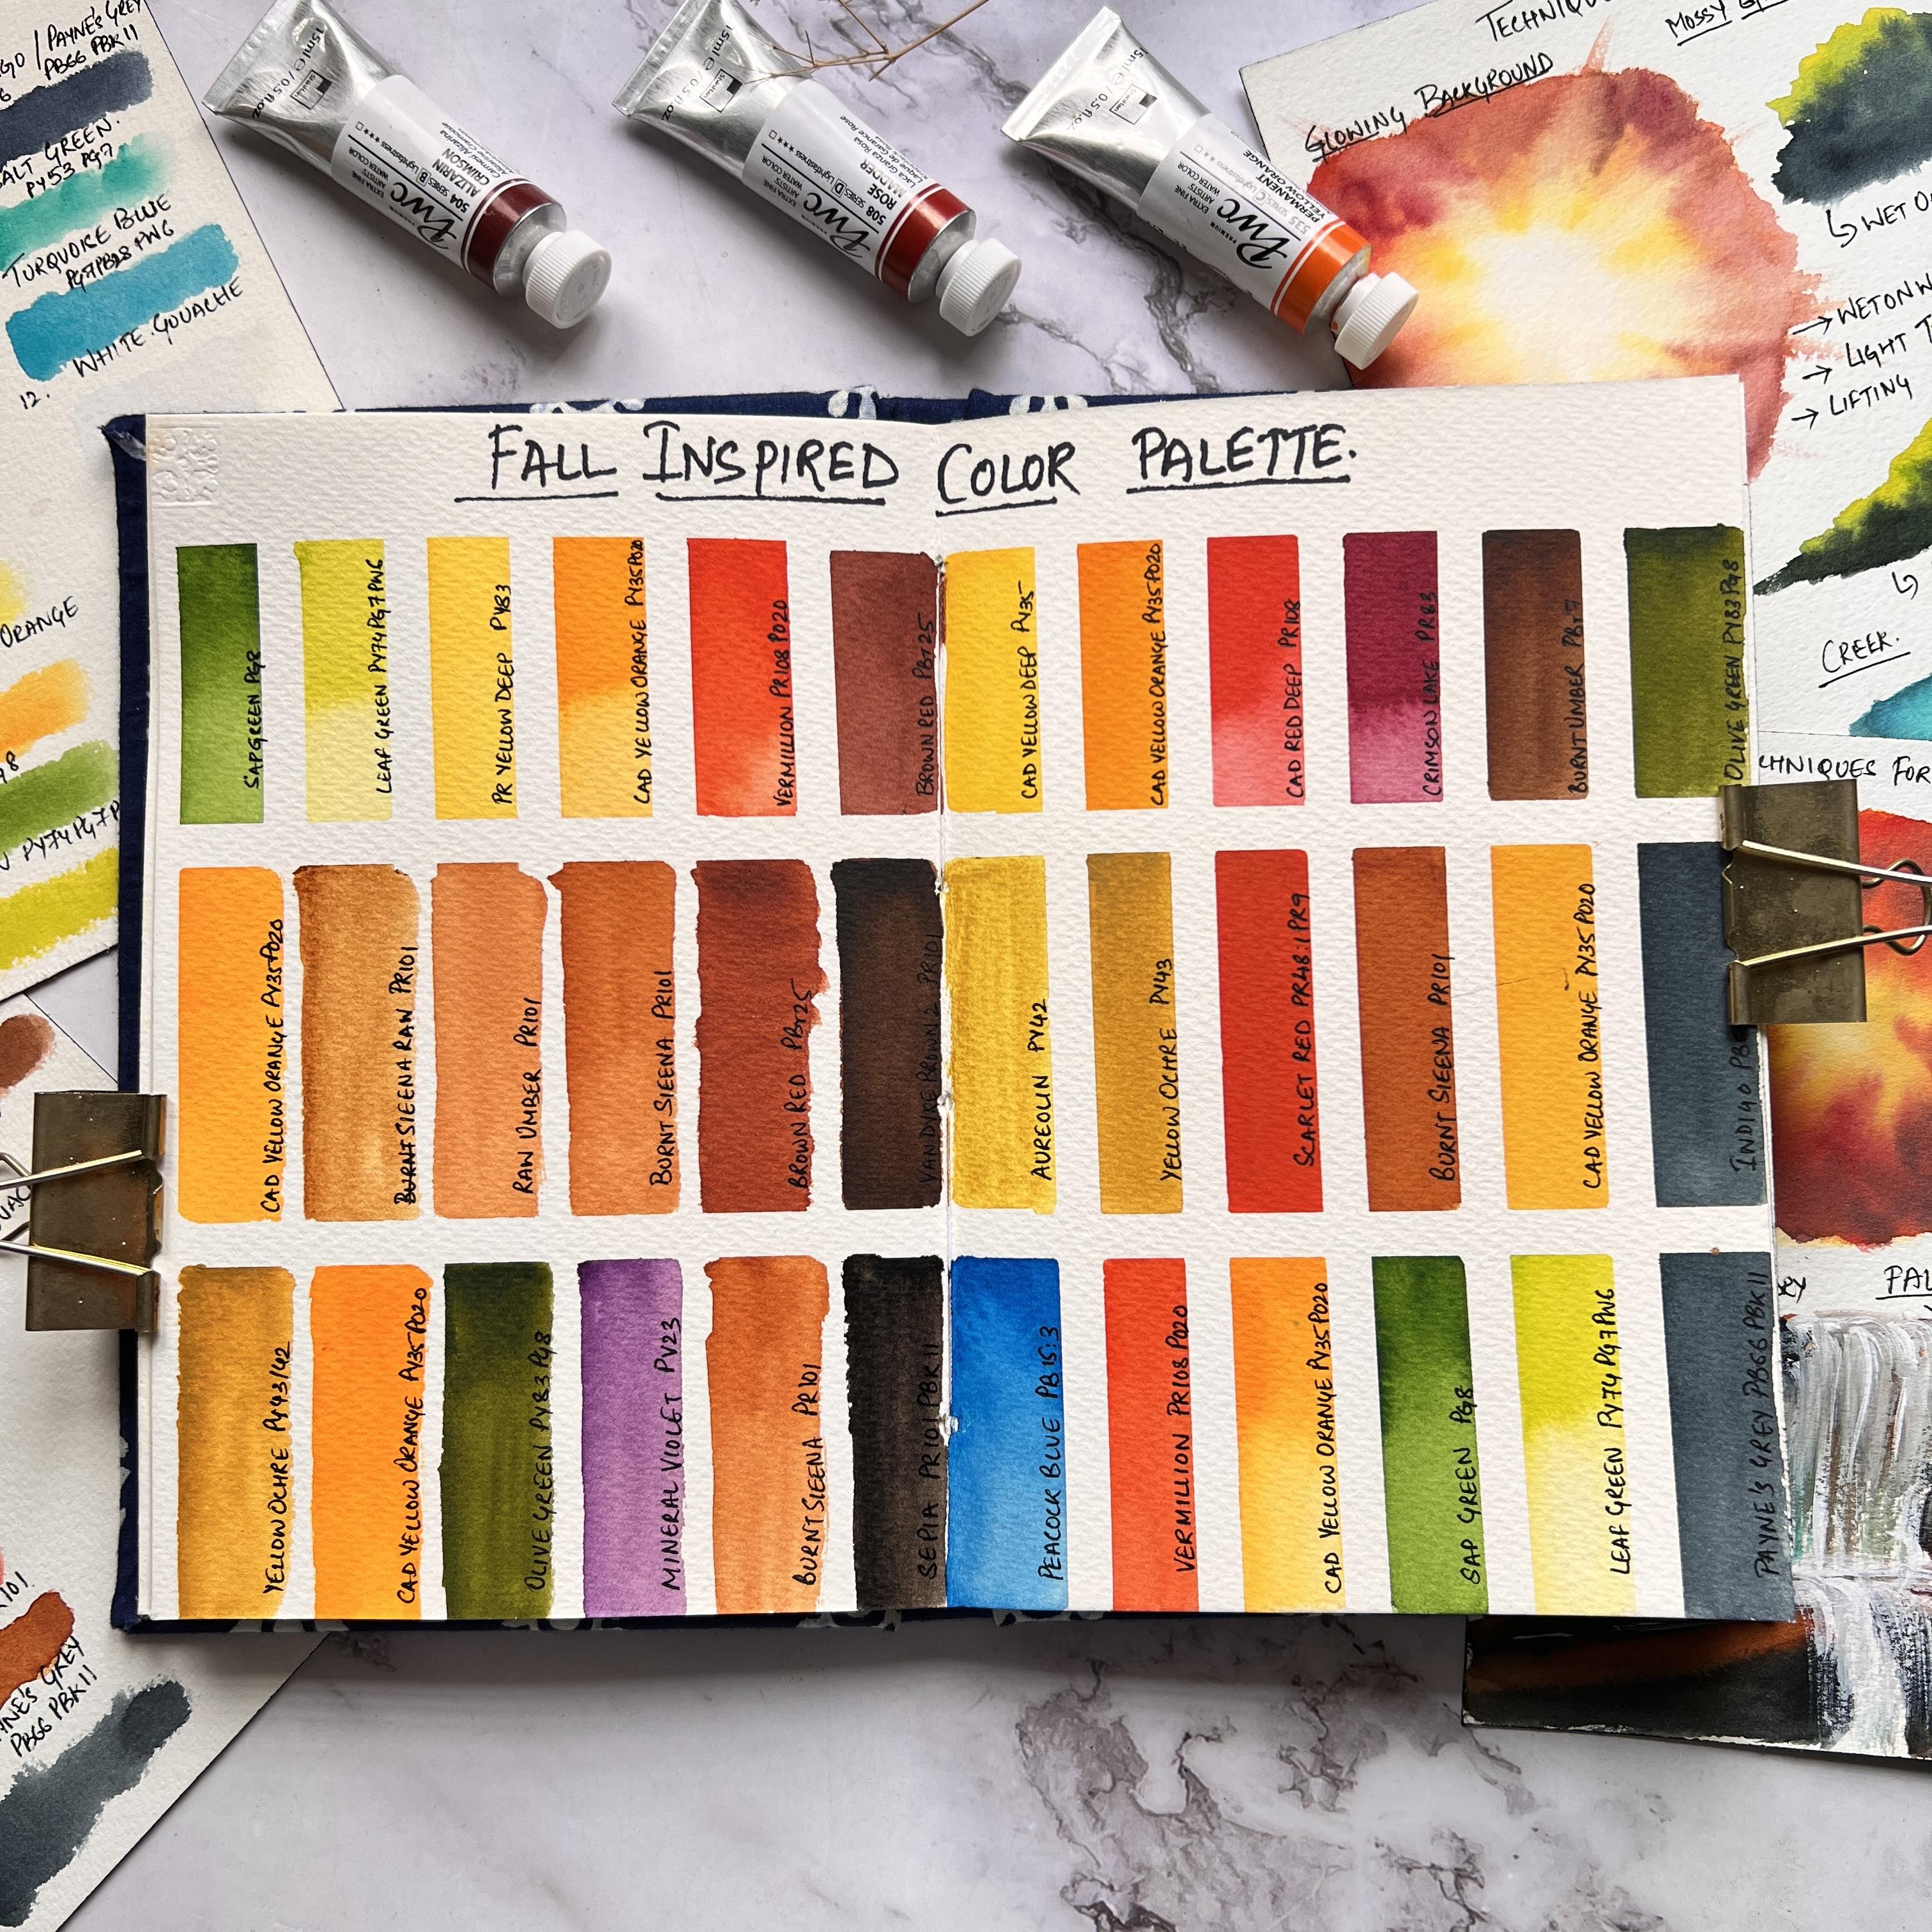
3. Fall Inspired Color Palette: Data. Here is a little surprise. Surprise for you guys. Can you guess what exactly
are the color swatches? Did you guess it? Oh, I think you must have
guessed it because it's all there in the title that
I have bended down. These are your fall
inspired color palette, which I have clubbed them
together in sets of six, which go very well when
painted altogether with them. So in total, I have six sets of fall inspired
color palette for you. Now, all the six sets have
six individual colors, ranging from your
different tones of greens or use of greens, two yellows, reds,
and browns, right? So these are all the colors
that you predominantly see in an autumn color palette
inspired from the very nature. Now, what I want you to
do is take the help of these sets of colors and don't any image,
reference image. I mean here, take
any reference image, convert them into a black
and white image, e.g. here on the screen
you can see I have recreated that black
and white image into this glowing
forest painting, which we will be
learning very soon. But before I did that, I had switched out
all the colors from those six set of
colors individually and came up with the best
possible combination that would suit best
for this landscape. And which I felt is really very attractive and
appealed to me. Okay, So in this way, you could also go
ahead and mix and match the colors from all
these six set of colors. Or you may use
even fewer colors. Like you may choose
some four colors and create the landscape
that's totally up to you. But if you do this
step and practice it, it will get your creative juices running in your
brain and you will see you will have such beautiful paintings
at the end of it. Trust me on this, try it out, give it a try. You are bound to make mistakes. If you are in big
nerve, that's fine. But you will enjoy the process, so give it a try. I'll be uploading this fall
inspired color palette under the projects and
resources section, which you can find just right underneath your
class preview page, preferably on a laptop, this feature is not available
on the mobile screen. So if you want to check
out about the class, discussions related to the class and projects and
resources section. I include some times extra reference photos and
details about the class. You may all check it
out under that header. Now, if you want to
share your projects or anything that you have
tried related to the class, you could always go
ahead and create your projects under this
header Create Project tab, which you will get
under projects and resources section under
each and every class, where all the students can
upload their projects. Okay, so now that you know
how to upload your projects, come on, let's get started. First, we'll take a look
at the color palette.
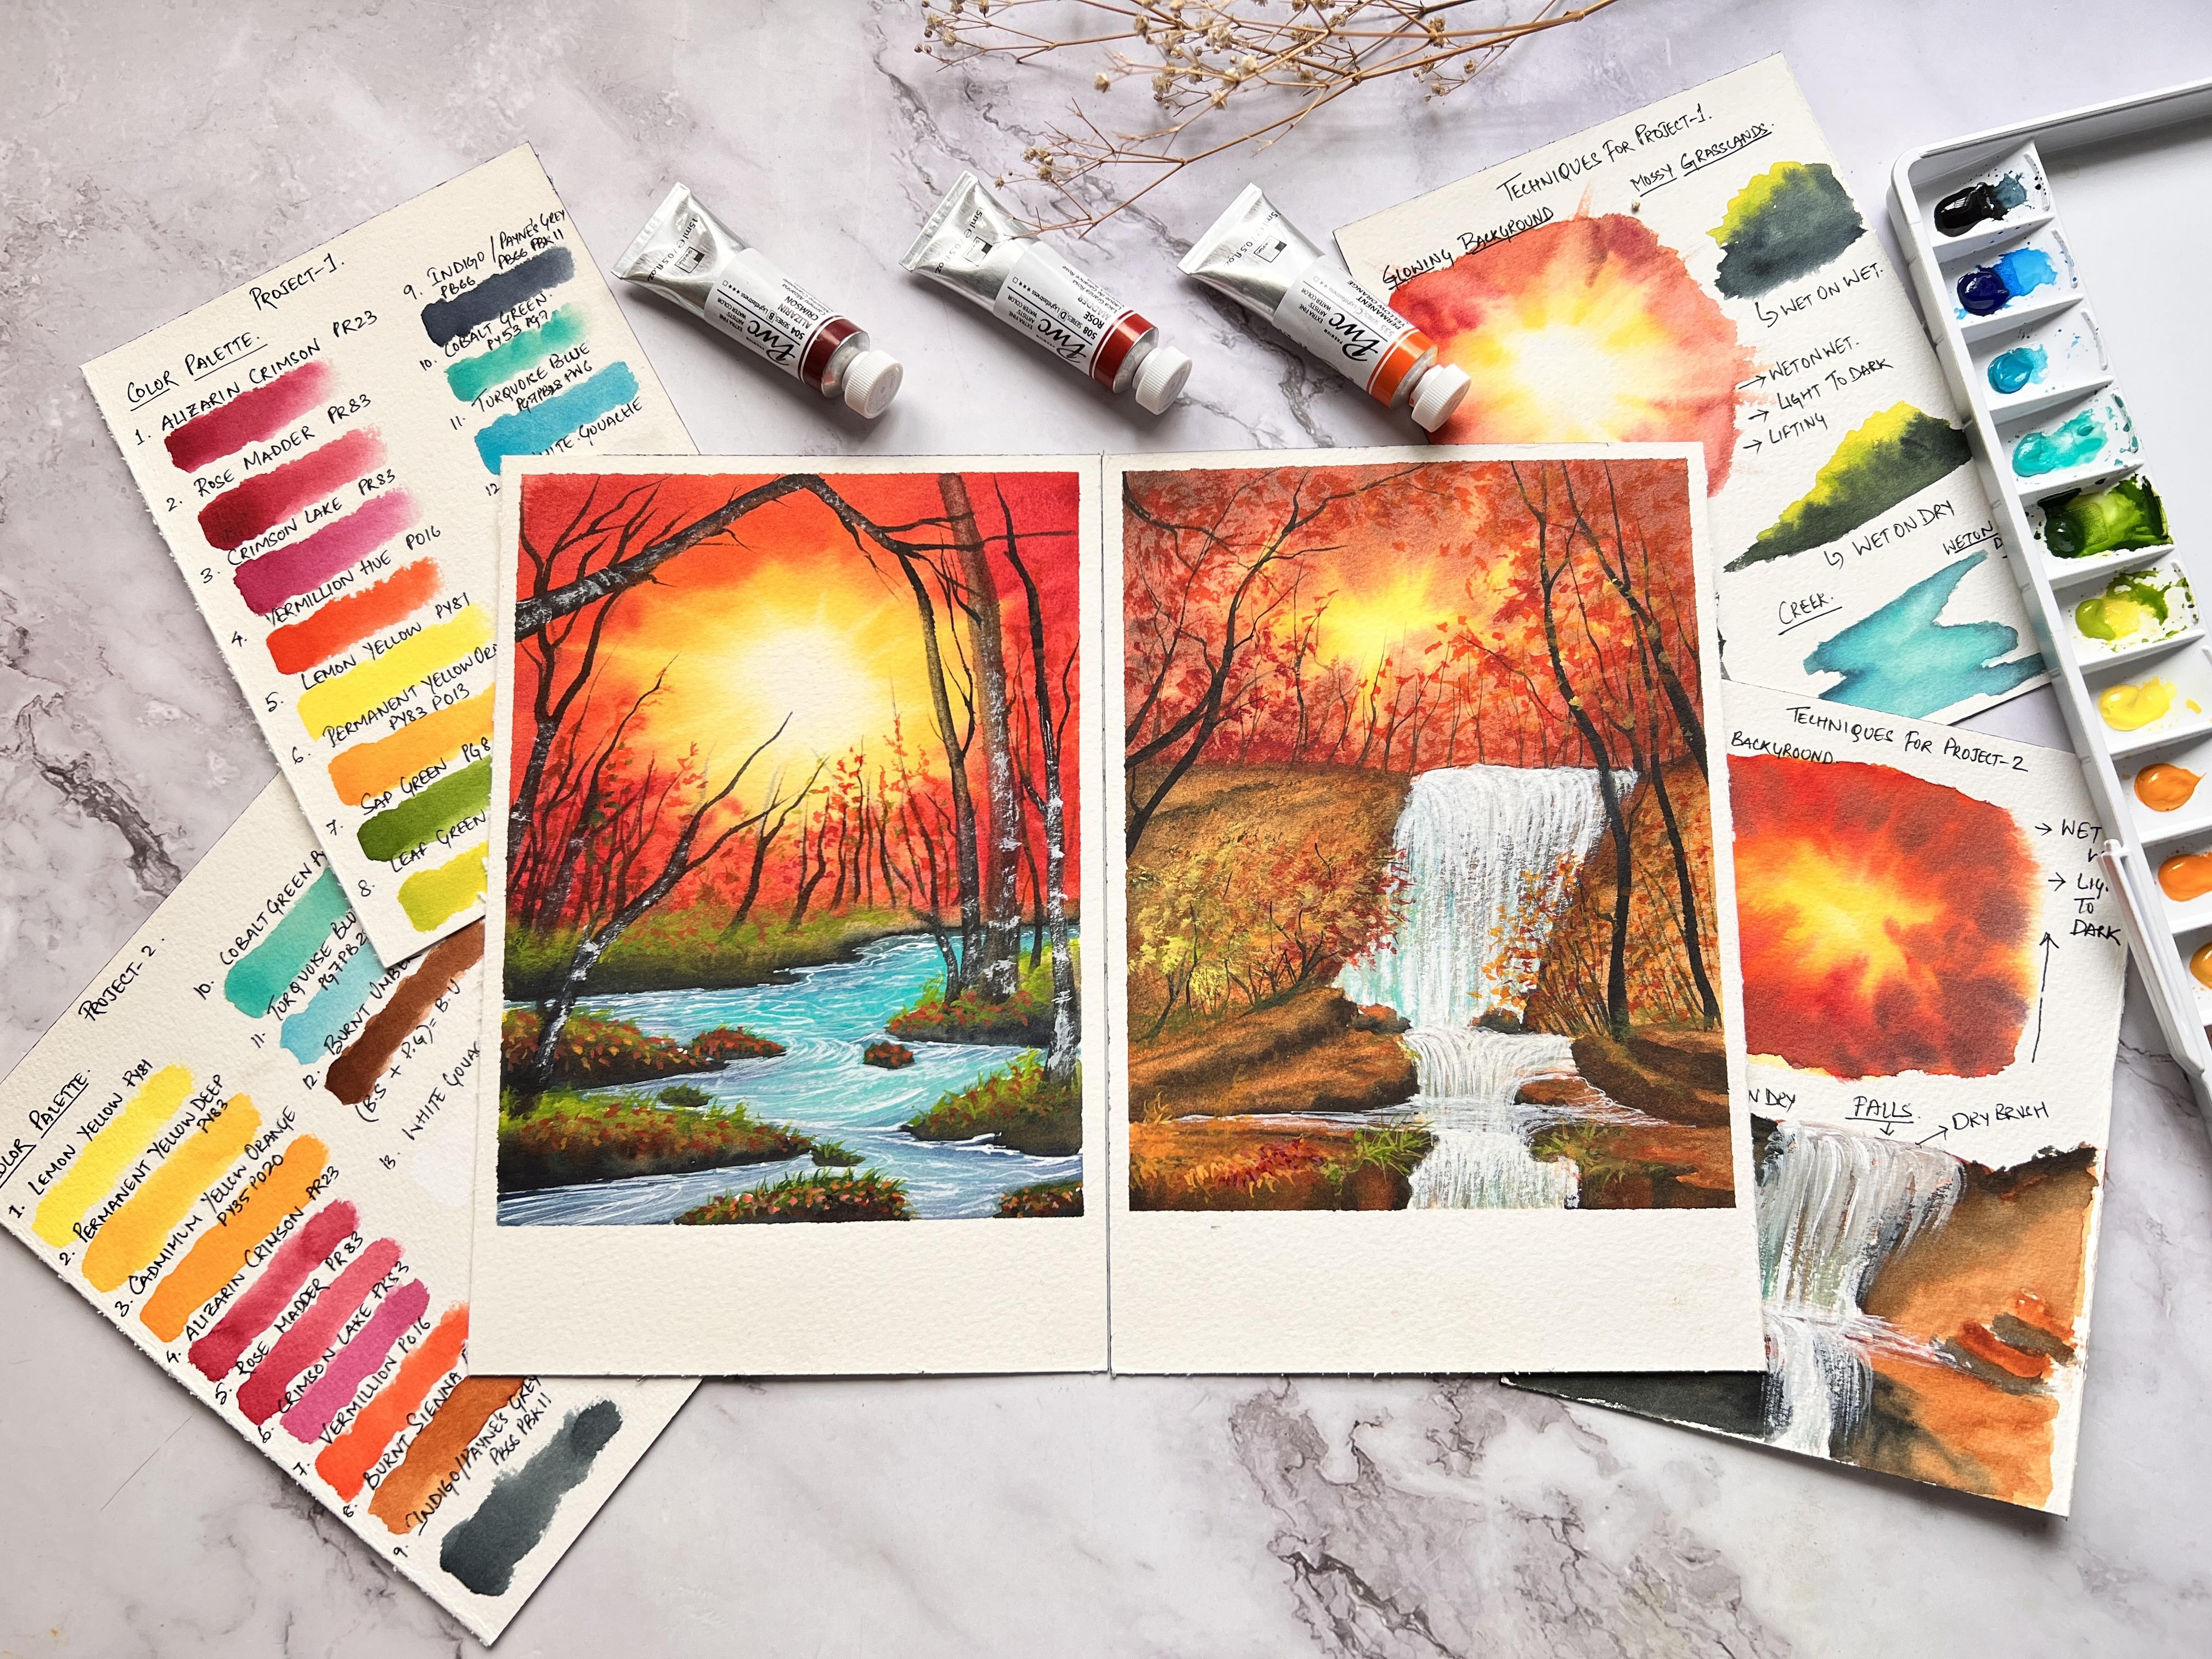
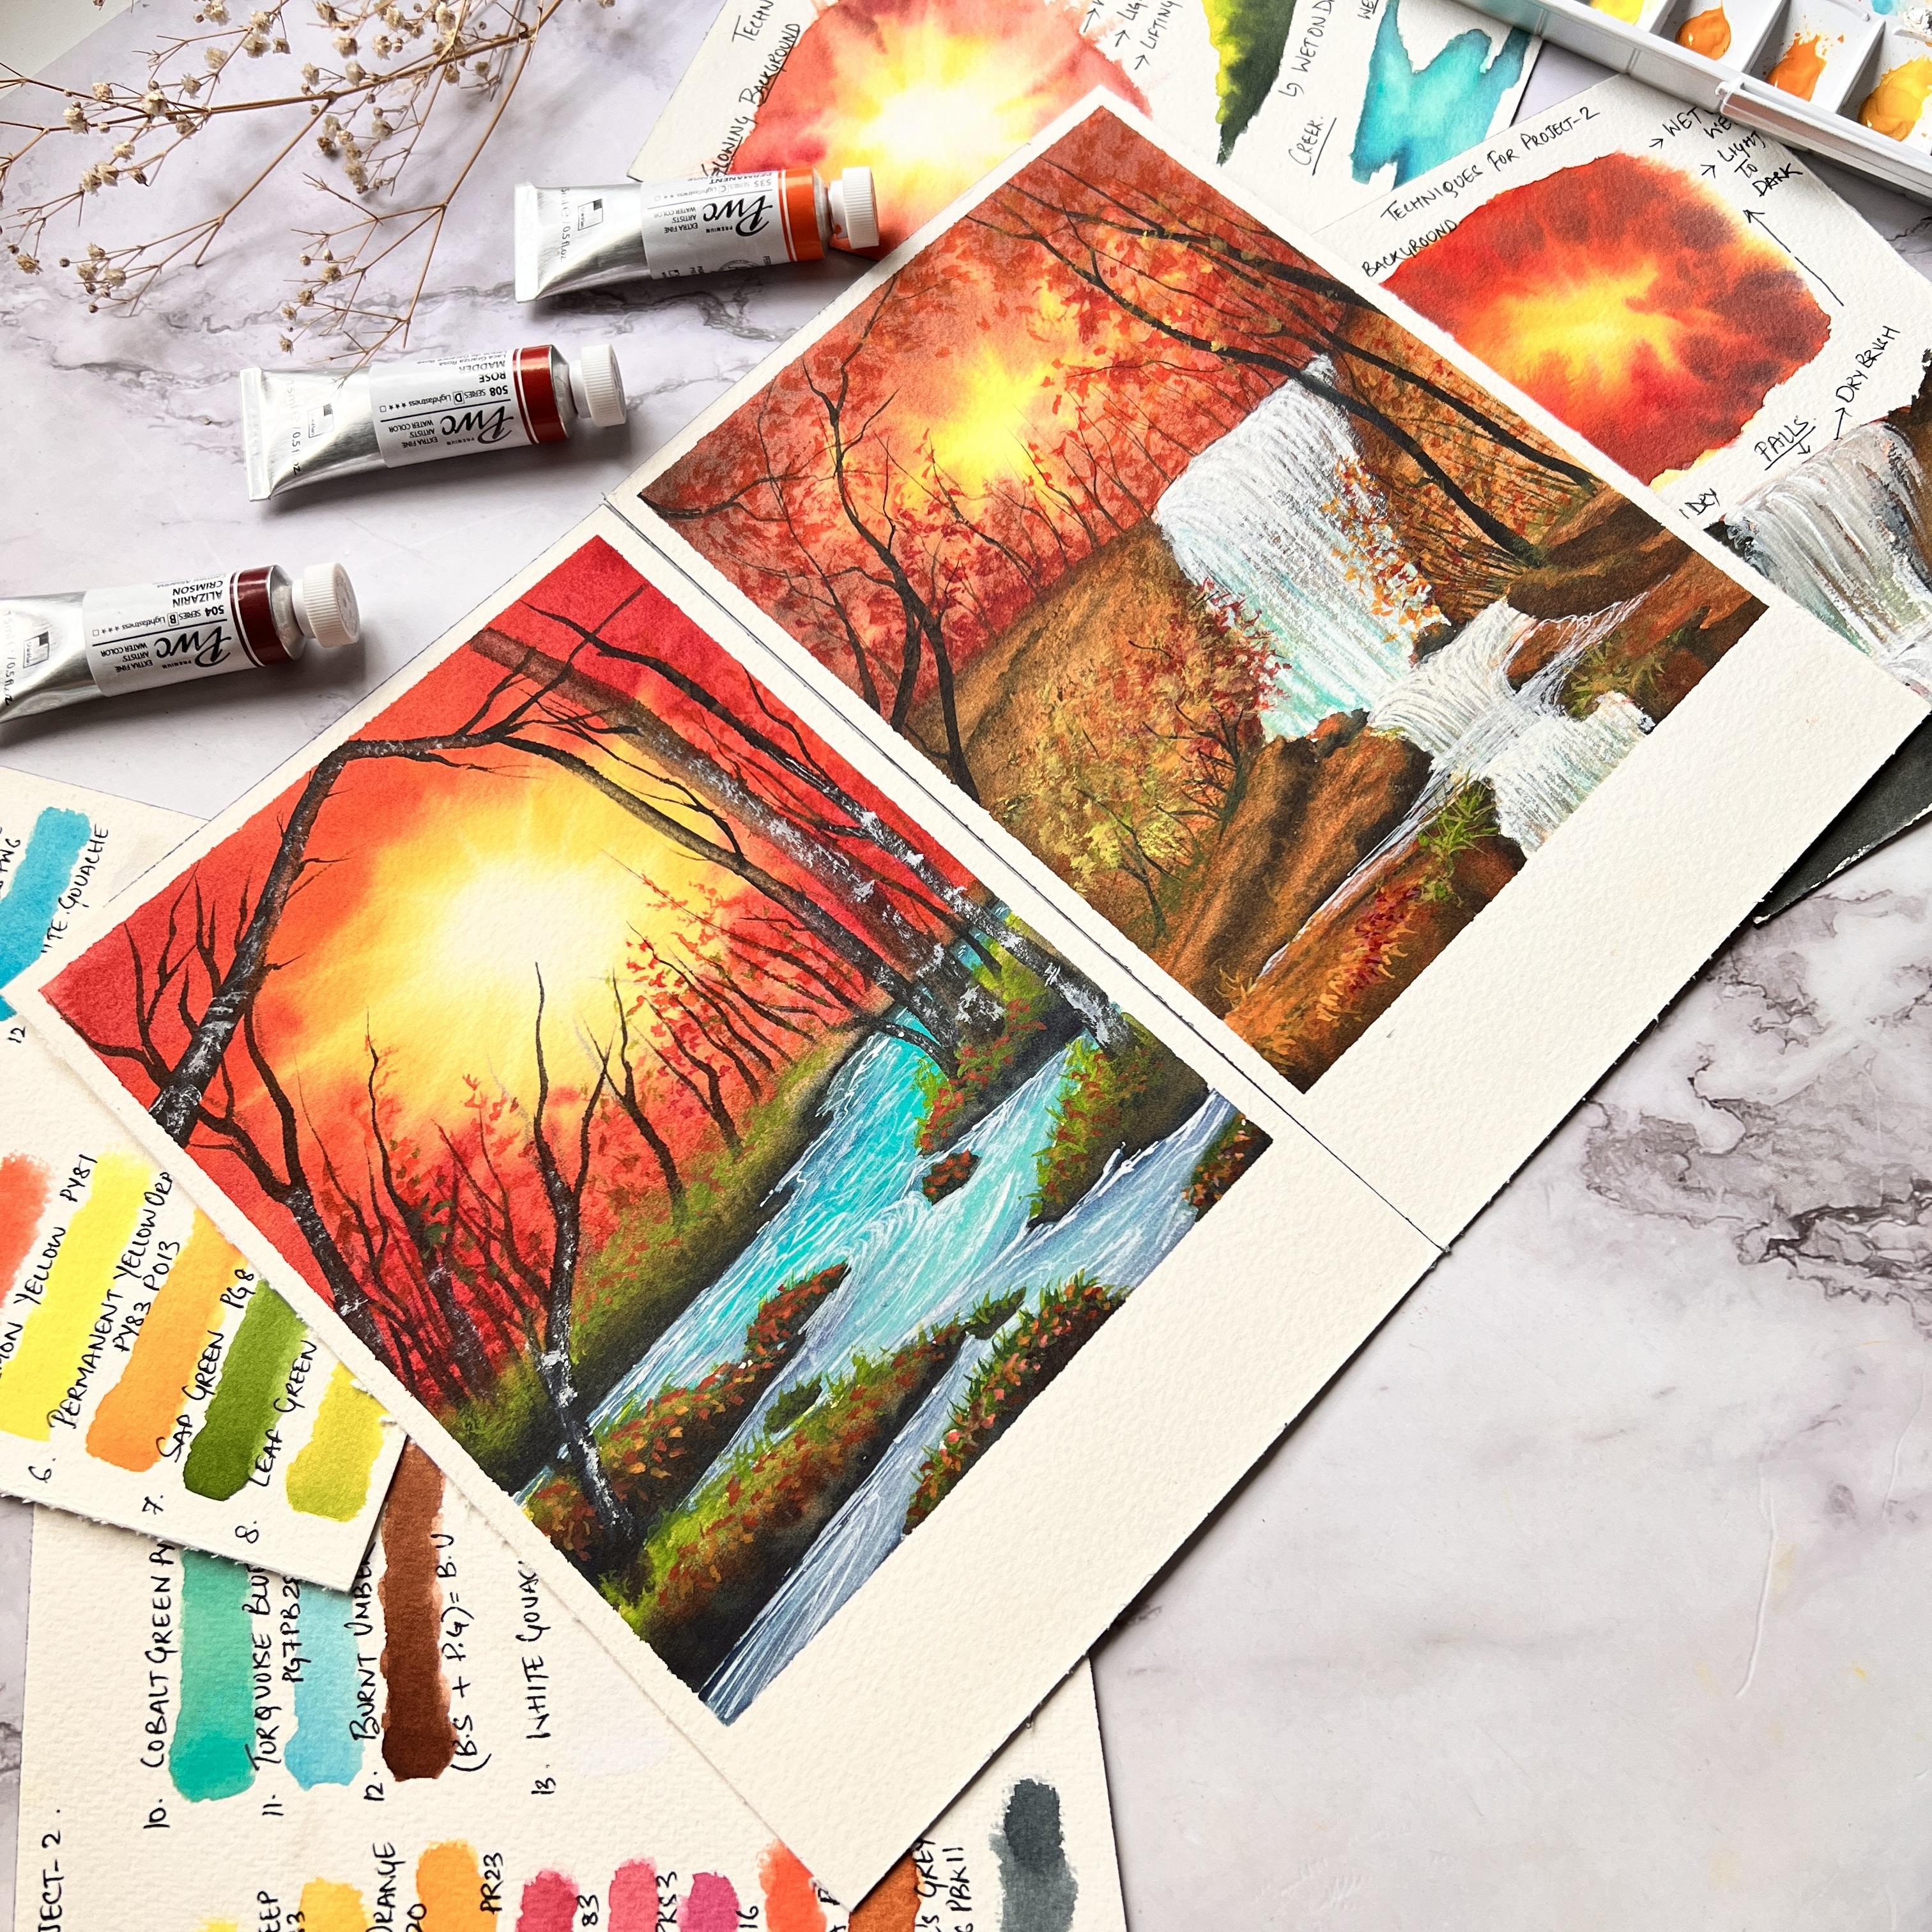
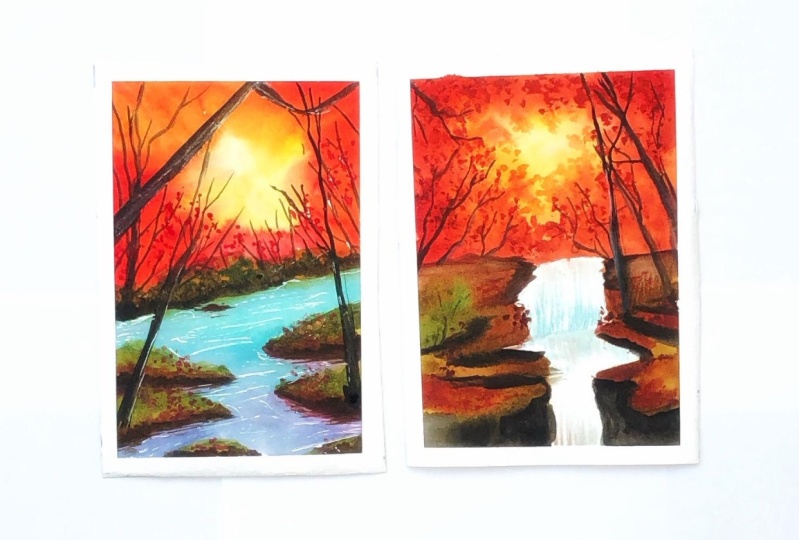
4. Color Palette Of Project 1: Autumn Creek: This is what we
are going to paint for our very first project, a warm and beautiful
autumn woods. So let's quickly take a look at the colors that you
will be needing. Here. I have watched
and listed down all the names of the colors
that I have used over here, along with some alternatives with their pigment information. Now choose your colors, whichever is available with you, select a shade which is similar
to any of these colors. And let's get started.
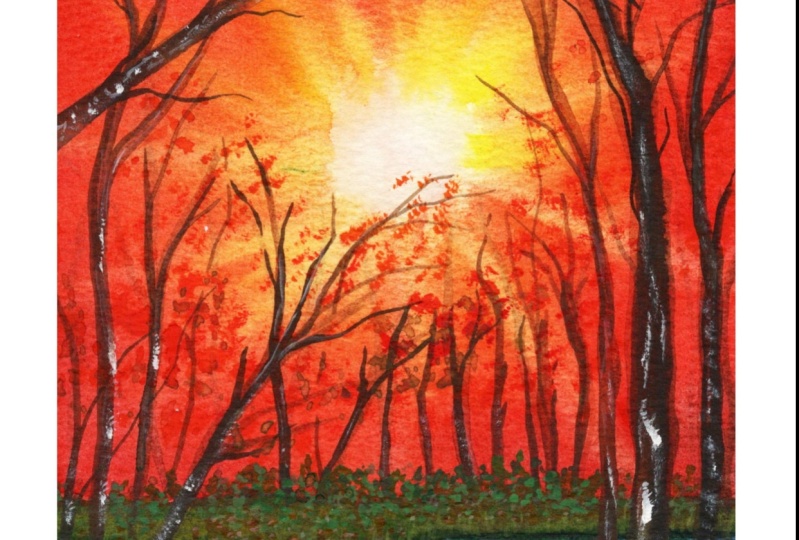
5. Techniques of Project 1: Autumn Creek : Let's quickly take a look at the techniques for project one. In this project one, our main focus element
is going to be this beautiful glowing sun peeping through
this autumn woods. Okay, so let's take
a look on how we can create the same to achieve that glowing backdrop of the forest canopy where
the sun is peeping out. We're going to go with wet on wet technique because you need the smooth transition
of colors and that's smooth soothing effect
of the glowing sun, right? So this technique is the
best suited technique. With the help of my round brush, I quoted my paper
with generous amount of water but not
excessive water. You must always take a note on the amount of water that
you have on your paper. It should be a clean, nice uniform coat of water
on wet-on-wet technique. Now, I have started with the lightest tonal
value of lemon yellow, leaving the center
area to be white. I'm going here with
round or circular shape. That is how I want this
glowing area to be. But feel free to go
with any kind of shape. It should be how
the sun is peeping out through the canopy
of the forest, right? So that is what we are
portraying out here. Now, gradually, I'm going to start layering with
darker tonal values. I'm going to play here with
different shades of yellow. First I started with
the lemon yellow, then I started with
a rich yellow. Here I have used
permanent yellow. Then I lead it with
permanent yellow, orange, then I will be going
vermilion shade. If you do not have
only one shade, you can also transition it with orange and then vermilion, and then darken it by adding some Alizarin crimson
mixed with little bit of crimson lake or rose madder and a little bit of
indigo or Payne's gray. You must lead each of
these shades next to each other till the time when
your paper is still wet. Now, with this dabbing
motion of the brush, using just the tip of my brush. As you can see, I'm layering the darker colors I have here, mixed my Alizarin crimson
with little bit of my rose madder and little bit of indigo to create this
darker hue right, around the four
corner edges, right? So this is how we're going to transition from light to dark. The darkest being the
topmost corner areas and the lightest wing,
the center area. So the light is eventually
diffusing out from the center to all the
other parts of the forest. Once we have done spreading
the colors randomly, now it's the time
that we will be starting with the
lifting technique to create the
diffusing sundries. For this lifting technique, you may use a
synthetic round brush or a flat brush as well, but makes sure the tip is
little bit stiff enough for you to live the colors easily from
this wet paper background. Now hear a word of caution. If your paper or the areas
have started drying out. If you try to lift off the
colors using your **** brush, you might just end up
ruin the painting. So it is important for you to understand no wetness
of your paper for you to go ahead and
do this lifting process. If you feel that your
paper has dried out, wait for the entire area
to dry out properly, then reword the area, and then go ahead with the entire process of light
to dark transition of colors, then come back and do
the lifting process, the entire process of rewetting, I will be explaining
you within the project. We are going to go and see the re-weighting technique
in the project section. Now, we move on to
our next element, which is this mostly grasslands. We are going to go ahead and do it in both wet on wet
and wet on dry process. So for wet on wet, I'm going to wet
around the areas here. There is no pencil outline, I'm just going randomly
with my brush. This is just an example for you to understand this process. Wet on wet process
will always help your colors to blend
with one another's sins. The paper will be wet. And even your paint will be wet. So it helps the paint to
bleed into one another, resulting into beautiful
smooth transitions. Here too, I go by
the same principle. First, start with the
lightest color tone, and then I gradually go
with the darker tones. I started with my leaf green, which is the lightest
green shade, then transitioned it into
an intermediate green, which is my sap green. And then finally with my Payne's gray or indigo there in-between
indigo and sap green, you may also use little bit of your browns to give a
more realistic effect. That's totally a personal
choice and it is up to you. Now here I'm showing you
the wet-on-dry process. For this process, you
may use a little bit of more watery paint than you would normally use in your
wet on wet paintings. This is because your
paper surface is dry and for you to smoothly
work onto the surface, you need little bit of
water content for you to work smoothly and blend
the colors with each other. The trickier in this wet-on-dry technique
to blend the colors is you need to start layering
the other color ones though. Previous color has been laid off already because that
area is still wet and the next layer of color will automatically start blending with the first layer. So now moving on to
our next element, which is our foreground trees. So for that, you may use a flat brush to create the
stems or the bark of the tree. Or you may also go ahead
and use your round brush. I would like to
recommend you going with thicker round brush
size number four or six and a thinner
liner round brush. Also, since the stem
of the trees are branches will have a very
precise and definite shape. That's why we are going to work this but wet-on-dry technique. Now, this stem of the branches you can also do with the flat brush if you're
comfortable with. And you could also use your round brush or your
liner or rigor brushes also, whichever you feel
comfortable with, you could go ahead
and do this with flat brush creating this tall, straight trees is
much easier because with just one single stroke
off your brush head, you are able to create very perfect straight
outline of a tree. Now here one more
important thing that I want to share with you. The trees will be
in certain areas of the forest where the
sun is hitting on them. So on those areas, the areas will be lighter rates since the
light is hitting upon them. That's why we are
going to go and bring out that light area with the
help of lifting technique. I'm going to exactly
repeat the same process here with the help of
my round brush as well. Always remember that
you are lifting technique will work
best only when the area where you
have lead the color is still wet enough for
you to live them out. Okay. So when your area is
still wet enough, lift out the colors
using yard clean, damp brush and with just
one stroke from one side, you drag off the
colors to remove them, will be repeating the
same exact process for this leaner or
thin tree as well. We're done with this tree. Now let's move on to
our next element, which is going to be the
creek for the creek to humans or for wet on dry
as well as wet on wet. You can do this in both ways. I'm going to show you
exactly how far the creek I have selected my color
to be cobalt green, which is a cooler
shade of bluish green. Now you may also go ahead and
use your Prussian blue or your peacock blue for
the Craig if you do not have this cobalt
green color or else, to create a mix of
this cobalt green, use your turquoise
blue mixed with a little bit of
viridian or emerald green and a little
bit of white to get a similar mixture
of cobalt green. Once you are done
spreading the color of cobalt green
around the creek, now around the corners or the grasslands to
indicate the shadows, the depth in the water. Or you might also call
it the reflection of the mostly grasslands
on the water, we will be using a darker
shade of blue here I have mixed my peacock
blue with a little bit of indigo and created that
darker mix of blue just along the lines of that growth
of the grasslands. Once you have added the darker blue shades onto
the sides of the creek, it turns into a very
dreamy and magical. The entire landscape
comes to life. We would see how beautiful
it looks when we combine all these elements and paint together in the form
of the landscape. And the last technique
that we're going to use to create textures on the stem or the
bark of the tree is the dry brush technique or
the dry on dry for that, I'm going to use this dry brush and I have
frayed the tip of the brush. So before doing that, if you are using freshly squeezed white quash
with your dry brush, you would get the best results. But if you need to reactivate
your white gouache, like I had to always remember to dab your brush tip on
your tissue paper, tissue towel, and then go ahead and create this
dry brush strokes by simply grazing the brush along the surface where you want the
dry brush technique to be. So this is how you can
add texture by using this dry brush technique and it creates such beautiful,
realistic effect. I have covered all the
techniques that we will be using to paint the landscape. The last technique that is
remaining is how to create this fallen crisp leaves
on the mostly grasslands. So for that, I'll be going
with wet-on-dry technique. This is very simple with just
the help of your brush tip. And with the colors we
are going to do the same. I'll show you that in
the project itself, the entire purpose of including this separate section for techniques before
each project is to mentally prepare
you guys what to expect and be ready to
take on the project. I hope the techniques
that I have shown here is understood and I have simplified the process
as much as I could. I hope to see you in the next section where we
will be kick starting with entire process
altogether and painting this beautiful landscape meet
you in the next section.
6. Magical Autumn Creek: Part 1: We are all set to
Kickstarter project one. For that, I have
my people ready. The size of the paper is
approximately an A5 size. I have cut down my
12 into nine inch, bigger chunk of
paper into the size. Now I'm going to tape it down with the help of
this masking tape. Masking tape to tape down
because I always prefer to have this nice clean
borders around my painting, just like you are seeing
in the sketchbook. So if you want, you can tape down
your paper to have this clean edges or
borders to your painting. Or you could avoid this step altogether and paint on
the whole paper as well. My paper is now all taped
down on all four sides. I'm going to go and paint
in this polarized style. I have left this 3.5
centimeter to be precise. This gap that you
can see over here. If you want, you can either go ahead and do the
same like I'm doing, or you could paint on
the full page as well. That's totally up to you. So here is the paper dimension, which is like 23 centimeter into 15.5 centimeter in total. But the painting
part will be just eating centimeter
into 15.5 centimeter. Now, let's go ahead
with the pencil sketch. So it's going to
be pretty simple. I'm marking out the
area from where I'll be creating
the horizon line. Just to the market, the background of the forest and the grassy or the
mossy grasslands. The pencil sketches,
pretty simple. Nothing complicated. I'm going to go ahead and
create this mostly grasslands, just too, have our outlines ready before we
start painting it. And through this mostly
grasslands are Creek is flowing. So once you get this mostly
grassland outline in place, you have an idea to wear your Greek or that
reverb would be flowing. Our outline is ready. Make sure that you are
not going ahead with too much of hard lines of pencil. Use a kneading eraser to take off all the lead
or the graphite marks. And then we will be starting
with that paint first-order, we'll be creating the
topmost part of our paper, which will be the
background or the forest. For that, I'm going to go
ahead with wet-on-wet. I'm going to use this small
quill brush of mine and start letting the water
onto this top part of my paper uniformly makes
sure that you are letting the water spreading across this topmost part till the
horizon line uniformly, there should not be any pools, puddles of water
standing on the paper. If you are a beginner starting
out with watercolors, I would suggest you guys
first to go through this entire video and then
start painting along. Because most of the times the beginners will
commit the mistake of not knowing how exactly your paper should be
laden with water. This is how the paper is
perfectly laden with water. You can see that nice, beautiful sheen on your paper. Now using my spray bottle, I'm going to spray
on my paint so that they are easily reactivated
with a wet brush. Now, I'm going to dip my
brush in water and makes sure that there is no extra amount of water in my brush by dabbing
them on tissue paper. This is very essential to have some water control in
your paint on your brush. I'm going to start
with this light, this tonal value
of lemon yellow. And around the center, I'm just going with the
circular shape at the center. I have left that whitespace
that is very important for the glowing light effect that I want you to come through. I'm going to follow the
light to dark approach. Now, I'm going to start with
a darker shade of yellow. Here. I'm using my
cadmium yellow, orange or permanent yellow deep. So here I'm just going
to go ahead with some random brushstrokes
going around the center area where we had the lightest color and
I'm just trying to spread out the colors
around posters. I'll be again, going with the darker shade since
the paper is wet, you can see that the paint is
moving towards the center, the white part that we had left. So I want to retain that
part as pure white. Hence, I'm going with
this damp mop brush and I lifted off the extra colors
that were seeping in. Next, I'll be layering with this darker shade of
my yellow orange. And here you can see
I'm trying to go from the sides not touching the lighter areas of
yellow or the white. Do make sure to observe that my paint makes us not
too watery and needed. My brushes are loaded
with much of water. Hence, water control is a very important
trick in watercolor. If you get this hang of the amount of water control
that you must exercise, yard half the battle
is won in watercolors. Now, I'm going to switch to
a smaller size brush here, I'm using my Princeton
Heritage Series size number ten brush and
loading the tip of my brush using the mix of my
Alizarin crimson mixed with little bit
of that of rose madder. And I have started
from the site corners. You can see.
7. Magical Autumn Creek Part 2: Let's start with
our masi grassland. I'm going to go here with wet on wet technique because
here we are going to cover a little larger
surface area than what we have seen in our techniques section just before we get
started our project. So when you are going
ahead with smaller areas, are smaller grassland areas. You could go ahead and
use wet-on-dry technique. But wet-on-wet will be much more efficient when
you need to cover larger surface
areas as the colors will blend smoothly,
easily and effortlessly. Let's start with are
mostly grassland. First, I'll be going with a
lighter color tone of green. Here. I'm using leaf green, but an alternative
to leave green is a Ferguson yellow
from White Nights. If you do not have
your guys in yellow, then you might offer
for mixing shade similar to that of leaf green with your lemon
yellow and sap green. When you mix two parts of lemon yellow and one
part of sap green, you get a very
yellowish green mix. Use that for creating this
topmost part of the green and then start
layering sap green just next to the topmost
part of the green, not covering up the
entire lighter green that we have just led. I've covered the sap green till the bottom or the base
of that grassland. Now it's time to start layering
our darker color here, I have used the mics off my indigo with little
bit of Payne's gray. And as you can see, since the background is wet, the Payne's gray is bleeding
into that of Sap green. Now makes sure that if you're sap green is
getting covered, use another brush and using just the tip of
that another brush layered the sap green on top of that Payne's gray
or the indigo mix. And yes, you would see
that it is automatically blending and creating this beautiful masi
grassland effect. Now here you can also add in
a little bit of brown mix. Sure, I'll be using
my red-brown. Red-brown is nothing but
when you have little bit of alizarin crimson tinge into your burnt sienna or
burnt umber mixed, you get this similar
looking shade of red brown. So just using the tip
of your another brush, go ahead and drop in
some of the browns just above your
Payne's gray layer. And you will see the colors are automatically blending
into each other. If not, use the damp
tip of your brush and try to spread it around
and blend the colors. I'm going to repeat the
same process for the rest of the other grasslands
that we need to cover. First, going with
wetting the area of the grassland and then dropping in our lighter colors first, transitioning it to
light to darkest. From here on, this part of the
process is fast forwarded. If you want to change back
to its real-time process, you can adjust the
speed of this video in your Skillshare browser
and switch it to 0.5 x and view it in
its original speed. And now here comes are the biggest chunk
of the grassland, which is near to that horizon line of
our forests background. You must be wondering, why did I leave it for the last. This is because I have let
my background sky area to dry out completely before we started on with
layering our greens. This is because I do
not want the greens to bleed into our colors if
the areas where still wet. That is the reason I have
waited and started out with the other grassland
areas first waited out till the horizon
line was perfectly dry. That I could start with
this part of the grassland. Now, I'm being cure, little cautious and careful. That's why I have switched to a smaller sized round brush
here I'm using my size two round brush to
exercise water control and the amount of water that
I have in my paint mix. And with just the tip, I'm going with the
blending strokes to blend the two distinct layers
of that browns and greens with my
size number eight, silver black velvet round brush. I have started with dabbing the Payne's gray or the
indigo mix into the brown with just the tip of
my brush carefully not covering up the entire
greens are the browns. This part of the area seems to getting dry as the
colors are not bleeding. So I'll be going with little watery paint off
my leaf green mixture. And with the dabbing strokes of this smallest sized round brush, I have blended in
the colors very light handedly, as you can see. Now, this grassland is ready. We will wait for these
areas to get dry. In the meantime,
we will be going ahead with the re-weighting
technique for our background.
8. Autumn Creek: Part 3 Rewetting & Filling Creek: Here in this section, I will be demonstrating hue,
the reweighting technique. Why via reweighting
this particular area? Because when I went ahead and did the lifting
technique for the sun rays, I found that my paper
had already started drying and hence the sundries are looking to sharp, right? I want a very diffused than mellowed sun rays streaming in through that
canopy of the forest. That is why I decided to show you the re-weighting
technique and how you can have a very mellowed version
of this sundries. Once you are done
applying a coat of water on the
darker areas first, now it's time to go
ahead and start applying fresh coat of water onto your lighter areas of
my brush movements. I am going ahead very light handedly just using the tip of my brush to spread the
water around the paper, right around the area where
I need the areas to be wet. So this is the technique
and now if there is any excess water that is
coming through your paper, you can soak it up using your tissue
paper or tissue table. Now when you tilt your board, you will be able to see
if there is any pools of water accumulated
on your paper surface. If so, then you tilt your paper. Same way like how I'm doing. And if there is any extra pool of water or color
that is flowing down, you could dab it with your tissue paper or tissue
travel from a corner. In that way, your
entire paper will be wet and you will be able to
start layering your colors. Once again, using
the tip of my brush, I'm going to just go
and blend those colors. Water that was flowing out. I will just go and spread
them across the paper. Remember one thing
led to not let this darker color flow into the glowing part or the
center part of the paper. If so, immediately have one tissue paper or tissue towel handy with
you and soak it up. Our sky area is
consistently wet. Now it's time to start
reapplying the colors. I will be starting
with my yellow. The yellow that I'm using here
is permanent yellow deep, same as what we
have used earlier. I'm following along the
lines or the direction in which way we have started
spreading the colors, making sure that I do
not completely block out the white center portion
that we had left earlier. Now we are done
spreading the yellows. Now I'll be starting with the other orange and
the vermillion cues. If you're a big nerd, you must be wondering why
we're reapplying the colors on our wet background when we already have colors on a paper. The reason being wet
on wet allows you to have smooth backgrounds
and smooth surfaces. But once when the paper
starts drying out, the color seems to
be little faded out if not used with
correct tonal value. That is why yard knowledge
about the tonal value and the usage of how much water you are adding to your pains
will matter a lot. That sounded complicated
or are you confused? If so, let me break it
down into simple terms. We are reapplying the colors on a wet background so that we retain the vibrancy of our
colors that we had originally. Wet on wet generally gives a very soft and washed out effect. That is why it is
very important to know the exact tonal value of colors that you must be using because once you're
painting has dried, it will go or shade lighter. That is why we are
going ahead with this reweighting and reapplying
the colors once again, because we want to retain the
same vibrancy of the colors and painting should not seem
very washed out and done. We're almost done reapplying the colors for our wet
background and using just the tip of my damp
brush and using the mix of Alizarin crimson with
little bit of Payne's gray. I'm creating a blurred out
the effect of that foliage. Now it's time to go for
the lifting technique to create that diffuse sundries. Here, I'm going with
the lifting technique. Every time that I go
lift off the colors, I'm using very light, gentle pressure to lift off
the colors because I do not want them to look
very distinct and sharp. That's why I'm using very, very minimal pressure
to lift up the colors. And every time
that I'm doing so, I'm washing my brush
and dabbing it on tissue paper towels so that any paint that I'm removing is not there on the
tip of my brush. So here I'm done
with my sky and I'm pretty happy the sun rays are not looking too sharp
or distinct now. Okay, so I'll let
that area get right. In the meantime, we will
be starting out with our creek or stream which is
flowing through the forest. Here I'm applying my
cobalt green color as discussed in the
technique section. I'm going here with
wet-on-dry technique. Now you can see my paint
mixes not too watery and the surface that I need to cover is quite large, right? So at this kind of situation, always go ahead and
prepare your paint mix, which will be a little watery
so that you are able to cover larger surface
areas at one go. Since I have not used
too watery paint, that trick out here is
I have dipped my brush in clean water and
using that clean water, I'm just going ahead
and trying to blend out the colors wetting the
sides of that area, right? So that when I start layering my cobalt green mix once again, it will be blending out very smoothly and will not
leave any hard lines. Can you see the green bleeds happening at the
opening of the stream? I will use my damp brush and I will just lift
off those colors. This is quite normal if
you notice any such kind of bleeds happening when you
are painting this creek, always have a damp
brush handy with you so that immediately
you can lift off those colors and do not start back in those areas until the areas have dried or use a little less watery paint
and cover up those areas. Okay, now it's time to turn our creek into a magical Creek. The trick is to apply darker shade underlying
the grasslands. So here I'm using a
mix of my peacock blue mixed with slight
tinge of indigo. And you can see I'm
just going in creating those shadowy areas underneath
those mostly grasslands. Now instead of peacock blue, you could also use mid tonal value of your
Prussian blue or use your ultramarine mixed with
a little bit of purple to give you a very dreamy
effect into this Creek. Okay, so just observe, towards the end, observe
my brushstrokes. I'm going outward
to inwards, right? I'm not going with
some random strokes. I am following the direction of the creek in which way
the water is moving. So if you follow that direction, you will be able to create a realistic effect
into your Craig. Similarly, when we will be
creating the water ripples, but the help of white gouache, we will be keeping this in
mind that you need to paint water in the same direction
that the creek is flowing. Creek was looking
little faded out. So I started back with another coat of my cobalt green mixed with a
little bit of turquoise. And I'm going ahead and blending those darker areas with
just the tip of my brush. I'm going ahead and filling
in the gaps that were left. So this white gaps, make sure that you
go very minute and precisely not trying to
activate the green layer. So if you're mostly grassland, use just the tip of your brush. Now, you may go with another round of your
darker tones underneath your grasslands because
you just lead with another coat of yard cobalt
green into the creek. So this areas will still be wet and when you start applying
the darker colors, once again, it will blend into
these areas harmoniously. I'm going here with just some
horizontal brushstrokes, a little inclined along the direction of those
mostly grasslands. So always remember to paint any moving body along the direction in which
that substance is flowing. So here my water is flowing, so I'm replicating the floor, the movement in water. With this kind of strokes, we will lead this area's
dry up completely. Then we will start creating
the trees and the foliage.
9. Magical Autumn Creek: Part 4: Our sky background
has dried completely. Now, we will be going
ahead and filling in certain blurred tree lines
into that horizon area. So for that, I will be using the lightest tonal
value of my indigo. You must be wondering
why we are using this light tonal value
of indigo to create this tree lines near
to the horizon. This is because I want
to indicate the sense of depth and perspective
into this painting. Hence, the trees which
are farther away from us, will be very blurred
and in the distance. So in normal Ice Age, we will not be able to see the outlines of this
trees very clearly. Hence, the usage of
light tonal values of indigo to create the
sense of depth or illusion. Now as you can see, I'm here using this liner brush, which is size number two from
Princeton Heritage Series. This is a synthetic liner brush. Though amount of water that
it holds is very less. That's the speciality
for synthetic brushes. To create certain thin lines. I always prefer to go with this kind of liner
or rigor brushes, but you may feel free to use any round brush
of smaller sizes, such as size number one or zero to give you the precision
of this thin lines, It's time now to mix colors for creating the
foreground trees here, I'm using a mix of my red brown mixed with a
little bit of indigo. Or you could use your burnt umber with little
bit of indigo to give you this dark shade of
almost Van **** brown. So if you have a Van **** brown readily
available with you, just go ahead and use that with my size number six round brush. I went ahead and
created this line. Now to indicate the light areas, I will be going ahead and
use the lifting technique to create the light
reflecting on this tree. I will go ahead and create some other foreground trees
using the same dark mix. The steps are going to
be the same once you create the outline of your
tree bark or trees stem, the next step is to
create the light areas. So to denote that
you must observe and notice which area of the
three faces close to sun. In those areas, you'll
have to go ahead and use the lifting technique
to create the light areas. Now with the help of my
mini detailing brush, I went ahead and created this Sharpton lines are branches stemming out from the main
bar chord stem of the tree. During this step, remember, if you feel to go and take the tree across
that glowing sun, remember that those areas will be the lightest
portion of the tree because the tree is facing right in front
of that glowing sun. So always remember to lighten
out those areas first, or hues lightest or the medium
light is tonal value of the mix that you are using to
create those lighter areas. This step now it's all
filling up the areas, the vacant areas with
this tree. So elaborate. So remember to use
different tonal values of your paint mix to create the
sense of depth and illusion. When you start working on the trees in and around
those blood trees, make sure that you do not hideout those Blurred
Lines of the trees, pine trees in around those areas with
different tonal values. That would add another level
of depth into the forest. Going ahead and creating a bigger tree branch
right overhead that glowing part of the sun. So here makes sure that you
use the lifting technique to bring out the
lighter portions of the tree which faces
towards the Sun. So I'll go ahead and create this thinner branches with the help of this
tip of my brush. Here, I'm using my size number for silver black
velvet round brush. Now, with the help of my angle shader
brush, which is damp, I'm going to go and
lift out the colors from the area which faces
towards the sun right? From this section,
I have sped up the process a little bit because here I'm going ahead and adding some more trees into the areas. If you are satisfied with the number of trees
that you have added into your painting,
stop over there. Do not go ahead and overcrowd the areas for my size of paper, the trees look little less. But if you're painting on
a smaller piece of paper, the number of trees
that you add, be mindful of that
do not make it look very clumsy or overcrowded. Just right here, I
will stop adding any further trees or stem
are branches of the trees. Okay, now it's time
to start painting the ripples of our CRE so far that I've
squeezed out gouache and use my spray bottle
to reactivate it. Now, using my liner brush or
your mini detailing brushes, you could go ahead and start painting the
ripples of the tree. In short, you need a brush which has a very sharp
point to trip and in which you have proper
control to allow you to have such TIN lines. Observe my ripples. I'm painting them along the direction in which the
creek is moving right? So you'll have to paint this
ripples and very thin lines. If you use two thick lines, it will not look very
realistic or appealing. So make sure that your gouache
is of right consistency. There should not be too much
of water so that when you start loading your brush
tip with your paint mix, there should not be blob of water and paint
sitting on it, right? So it should be just
perfect enough for you to go and create
this thin lines. I'm going ahead and filling
in some more shapes of these grassy most lands so that there is an abstraction to the waterflow and it can go and flow around those areas to just to denote that
water movement, I have went ahead and
created those smaller, grassy most land areas, observed my brush movement out here and the ripples
that I'm creating, how thin they are. More thinner you
add this ripples, the more realistic your Creek, we'll start looking to make the water bend
around the obstruction. I added in one more
smaller grassland loss or the rocky pebbles that you
may see around the water. And I will make now water
go around that area. So this is how you can
depict the flow in water. And here you might
go ahead and create some waves are the
gushing water that it's happening because of
the obstruction of those rocks or the grasslands that are present
along the screen. I'll repeat the same
process until I have filled in the creek with this
water movement form. We're almost done filling
in the creek with this water movement or the
ripples created by the water. So here is the last one. And that's all that I will add to this Creek, the ripples. Now, we'll wait for
this to dry up.
10. Magical Creek: Part 5: I hope you are not tired and
they're keeping up with me. So this is our last and final
step that we will be doing. We will be adding some more details into
our Mozi grassland. But if you want to avoid this
step and if you are happy with how your Mozi grasslands
are looking right now, you may totally award this step. I am just going to
go here and use the frayed dip off my round
brush size number two, I'll just go and create
some dry brush textures to this mostly grassland
using the mics off my sap green and
leafy green color. So that is all that we are
doing over in this section. Once I fill the
entire most land with these textures and little
bit of grass blades, we will be done with this
part of mostly grasslands. And later on, we can move into creating the foliage for the
trees in the background. One more easier way of creating this dry brush pattern
is to use a fan brush, wherein you use the
tip of your fan brush, load the thick color
and just go and dab your tip of your fan brush
in random motion and create this pattern
or use a sponge and dab the color over the
areas you want them to be. This bond should
be absolutely dry. So in that way, you
will be able to create these textures
with no time. Now it's time to add
the final details. That is our autumn foliage
using wet-on-dry technique, make sure that you are exercising water control
when doing this step. Your paint mix should
not be too watery. It should be wet enough for
you to go ahead and create this foliage using the tip of your round brush
size number two. So here I'm using my round
brush size number two. But if you are comfortable, you can go ahead and use size number three or four
round brushes as well. I'm going to add
foliage only around this horizon line area
and maybe few at the top. But if you want to fill some more of that foliage,
you could do so. But remember when you are approaching the lightest
part of the idea, your foliage colors
should also be a toned. Similarly, meaning you should be using very light tonal values of your yellows mixed with a
little bit of Vermeulen to give that light in the
leaves of the tree, right? So when it is exposed to
the sun rays over there, it should be in lighter
colors and where the light is not reaching
the foliage will be dark. So apply this principle when you are approaching the lightest
part of the painting. I'm also adding
little burst of green randomly around
those foliage areas. Near to the horizon line. I'll be going ahead and adding little more shrubby
patterns over there using my leaf
green mixture here, I'm going ahead and using this. Lighter green mixture because our background is dark enough. So only this lighter color
will be evidently shown out. Now, going ahead and adding
in the last final detail, that is adding the crest fallen
leaves on these rocks are the mossy grassland areas
using little bit of white quash into your vermilion or
your orange or yellow mix. Go ahead and use just the
tip of your brush and create this small
dabbing strokes are the leaf-like strokes. And create this fall foliage. Use different shades of
yellows, oranges, and reds, but makes sure that when you
are overlapping the colors, you are not covering up the underling darker colors
or the lighter colors. Use your strokes
in such way that darker or lighter colors are
visible against one another. Adding in one last final strokes of ripples over certain areas of gouache where the
gouache lines had dried out to be
little faded out. So pause this. We are going to go ahead and
create dry brush textures on the tree bark
using white gouache. I'll be going ahead and
adding in the textures to the tree that is too
much of white gouache, I will wipe it off
with tissue paper. Now, if you feel that your brush is loaded with
too much of gouache, debit clean on a tissue, paper, tissue towel, and then
go back and create the grazing brush movement against the tree
stem or tree bark. And you will get this
dry brush strokes. Adding this brush strokes to fill of this prominent
trees over there. I will not be adding the
ones for the thinner trees, just the ticker and the
prominent branches of the trees. I'm going to go and add them. One tip out here. If you feel that you
have covered too much of that tree with white, you can go ahead and
repaint some of those areas with the darker mix of your indigo or Payne's
gray and Viola, you have your perfect
dry brush technique for who we are done
with our painting. And it looks so
beautiful, isn't it? It's time to peel off
the masking tapes. Do this step only when you feel your paper has
dried out flat. Dpll is always so very satisfying at the end of
every painting, isn't it? I love doing this process. But this process is always so very tricky
because there is always a chance that your
paper might be just ripped. But thankfully it didn't happen. I have gardens such
beautiful clean borders. I hope you have enjoyed painting
this landscape with me. I have broken it down
into such easy steps. Do try them out and upload your projects in the
projects gallery section. I'll see you in the next lesson where we are going to
paint our project too.
11. Magical Autumn Falls: Color Palette: For project two, we
are going to create this gushing waterfall is
running through autumn votes. So let's quickly get started
with the color palette. As you can see, I have
listed down all the names of the colors along with
their pigment information. So this pigment
information is going to remain constant
across all the brands. So pick your colors based on the pigment
information rather than the generic names which may vary across
brand to brand. I will be now swatching out
all the colors one-by-one. So you do not have pigment information
labeled onto your tubes. You could swatch your
colors and compare it along with mine and choose
the color accordingly. Project two is all about using
more of the muted colors rather than using very
bright and warm colors like we did for project one. So if you want to alter the colors and go for
some brighter shades, you could use the color
combinations that we have used in project one or take help of that fall
inspired color palette sets that I have shown you
and choose your colors.
12. Magical Autumn Falls : Techniques: Let's quickly get started with the techniques for Project Two. Let's get started with
our very first element, which is creating this
forest background. We are going to work with
wet-on-wet technique. As the name suggests, we are first applying and
even coat of water post which we will start layering our
colors on this wet background. This will help our colors to bleed into the wet background, giving us the soft look
that we want to achieve. Here the main emphasis
is to bring out the light and dark
contrast in a painting. We will begin by starting with the first
lighter colors here, I'll be using my lemon yellow with this
leads tonal value. So just around the center
leaves the spaces white. We are going to
later on come and fill this color with
a very dull doubt, yellow using mostly
overland or Naples yellow or even your
cadmium yellow deep. We'll also do just around those areas of lemon
yellow where you lead, we're going to start
building darker colors. I am simply spreading around these colors into
the wet background, ensuring that the colors
blend with each other, giving us this
soft blended look. Now at this point, we start building layers
of darker colors. Now, I will switch
to my yellow orange. If you do not have
yellow orange, you could use any orange
that is available with you. Adding in my formula and
shade instead of formula, you could also offer
four years colored red and do this process, just simply go and spread
it around the areas. Remember to do this step when your background is still wet, if your background
has started drying, you will have to go with the re-weighting technique as I have shown you in project one, to ensure that the
colors are well blended and give you
that soft diffused look. The only difference
in this process is as I am spreading and blending
the colors with one another, I'm making sure
that I'm allowing the lighter colors to show through the darker
colors as well. You could do this by using just the tip of your
brush and start moving the lighter colors towards the darker colors using
just the tip of your brush. Here as you would have observed, I have not retain the
white center part. Instead, filled it up
with my cadmium yellow. Here, I have used a little bit muted shade of
yellow so you could go with your yellow ocher or even your cadmium yellow pale or cadmium yellow deep
in this regard would do. Now to bring out that
contrasting effect, use more darker tones
towards the corner areas. Here, I'm going with a mixture
of vermilion mixed with little bit of alizarin crimson and little tinge
of my brown red. Now here at this point, this area is looking very
bright and beautiful. But I want to tone down or muted look at the corner edges. I will start filling in with some muted cooler
tones of browns. Here, I've mixed my
indigo or Payne's gray into my burnt amber and mixed it up with
Alizarin crimson. If you do not have
Alizarin crimson, use your scarlet red or any darker shade of red which
has a pink tinge to it. Now, did you notice just by adding this darker shades
right at the corners, you have muted down the
colors quite a lot, right? It was bright red with yellow
in the center earlier, but now it's looking
more toned down. Effect are loose forest
background is ready for us. We will lead this area dry and we will move on
to the next part, which is our clefts or rocks from where the
waterfalls will be flowing. So I'll be going with
wet-on-dry technique right now. I have not gone with the basic pencil sketch
of this rocks or cleaves. I have directly
started out with my Payne's creating
this rough shape of the rocks color mix
that I'm using here is burnt sienna mixed with a
little bit of yellow orange. So this will give me a very bright and
lighter brown shade, which we will be using as the very first layer
for are these rocks. We're going to go with
the wet-on-dry process. And we are going to build
or adding darker layers, building the intensity of those browns slowly with
the layering technique. Now, where the water will be cascading and
falling off the cliff. There also, I'm going
to color block though areas because you're to show
the white of the colors. We are first going to go with the darker shades and
then using white gouache, we're going to create the
movement in the water where the underneath layer of the rocky areas will
also be exposed. That is why I have gone ahead and lead with
the first layer. We will let it dry and
then we will go back and start the coloring
process with darker colors. I'm doing the same for
the other clips as well. Layering the darker colors
for the darker colors. I'm here going ahead with the
shade of my Van **** brown, but you could use your
burnt umber mix and add a little bit of your
indigo or your Payne's gray to create this
darker, rich brown shade. The trick of blending
the colors with the wet-on-dry technique is to when you start layering with
your darker colors, Go back and re-read
the areas using yard fresh coat of paint to
mix with the lighter colors. In this way you are
both the light and the dark colors will start
blending with each other. You are just taking
advantage of the wet paints, wetting down the paper
temporarily for the time being. And using that to
your advantage, you are trying to blend the
colors well together so that you get a smooth
finish to your painting. I'm going to repeat this exact same process onto the other side of the
rocks or the cliffs. I'm going to repeat the
exact same process, adding darker tones to create more rugged and rough look
to this rocks and cliffs. And using the same watery mix, I have just blended
the areas out. I'm going to apply the same technique onto
the left side of the rock. And with my damp brush, I'm going to blend
out the hard edges, layering it with one more
quote of that burnt umber mix. Now to create that very rough and rugged
look to this cliff, I'm going and adding
the darker tones just like how we had
done for the right side. And with just the
watery tip of my brush, I'm going to go and add in
some of that texture by moving the brush tip around those wet areas and leaving
the brush marks over there. So this will in turn
look very nice and beautiful when you go on top of this wet dry
brush technique. Now I'm adding in some
more darker tones to that fall region because
the first layer has dried, the second layer, I'm going with minimum amount of water
in the paint mix. Now I'm going and creating the cascading
effect in the water. This is the plunge part
where I'm going ahead and creating the dry brush
patterns with the browns. And to create the illusion of
water movement over there, I added in some of
that cobalt green. The cobalt green mix
was not too watery. Now with the help of my thick gouache and my
mini detailing brush, I'm going ahead and creating the water movement
over your observed the brush movement
makes sure that your kwashiorkor
is not too runny. It should be little
take for you to go ahead and create this
illusion of water movement. Do not cover the entire
surface with white leaves, certain areas of that
brown and the blues are the greens that
you have just lead underneath that brown
to see-through, lead this initial layer
of first-quarter, try to create that
cascading effect. I went ahead with some horizontal strokes
where the water is on a platform and
then again it is jutting out from the
overhanging of the rocks. So the second fall is created. I will go back to the first source of
the fall with the same white quash after the
first initial layer of your white gouache
and straight. Now it's all about
going ahead and creating this dry brush strokes. Make sure that you have
the brush dry and create this dry brush strokes
where the water is forming up and
falling from the fall. So this is how we
are going to proceed with creating rocks and
cliffs and the waterfall. Now once the layers have dried, go ahead and create the trees in the similar way that we had seen in the very first project. So make the trees little thinner and alter the height
and the thickness of the tree stems so that you have a more realistic
approach to the painting. So once your background and your rocks of the fall
area has dried out, go ahead and start creating the trees and for the foliage, go ahead and use the dabbing
strokes with the brush.
13. Magical Autumn Falls Part 1: I have taped down, maybe put on all four sides using
my masking tape. And now we're ready to start
with our second project. This is what we are going to create for our second project. You could pause the
screen out here and create the outline of
this cliffs and rocks. I'm going to do that
in the very next step. I leave out one-third of
the people for this guy. And with the remaining one, I will start creating the
rocky areas are the cliffs. I would recommend at this step that you first watch through the entire video and then go ahead and start your
pencil sketching process. Pause the screen over
there where I have finished the outline of
the basic pencil sketch. With very light
pencil sketching, I will go ahead and
create the motion through which the water is
cascading into the cards. Sure. I will be adding a
horizontal line to indicate the breakpoint of
that Fallingwater through which the water
is again going to come down the slope of those rocks
and create a second fall. Let's get started
with the background. For the background like we have discussed in the
technique section, I'm going to go ahead with
wet-on-wet technique. This technique is my
absolute favorite technique because I loved the finish of the smooth blended
colors that it gives. Using my quill mop size brush, I'm going and
spreading the water nice and uniformly onto
the paper surface. Please bear in mind that
there should not be any pool of water
stranded on your paper. Because then your colors will behave very crazily
on your paper. To ensure that there is no
pools of water stranded tilt your paper if you see a nice
smooth reflective sheen, it means that you are good
to go with your colors. I will dip my brush in water and dab it on tissue,
paper, tissue travel. Then I will load the
paint onto my brush. Here, I'm loading my
cadmium yellow deep. If you have any other
gamboge yellow, you could also use the same. I'm going to leave the
center part to be white. Later on we'll come
back and start filling the center part with the
light tonal value of color. I'm going to simply spread
around that yellow. You can see how lighter color
yellow is looking on paper. This is because I
have went ahead and used the least tonal
value of yellow. Understanding tonal value of a color is really
very important. Be eating any medium that
you are painting with. Because when used the
correct value of colors, you can create beautiful
and stunning pieces. Tonal value basically means the lightness or darkness of
the colors in an artwork. It starts with going
with the intense color, that is the purest
value of the color, and then ranging into the
lightest form of its color by simply adding
increasing values of water to your paint. This holds good for watercolors, for any other medium. You either add black or white to increase or decrease the
intensity of the color. Keeping same principle in
mind in this painting too, I have used the same light
to dark contrast to indicate the depth and the light areas in the painting using different
tonal values of a color. Here I have used different shades of yellows
with varying tonal values, and then use the darker colors of tonal range to indicate
the darker areas. So this brings out the
sense of depth as well as the light and the dark contrasts that I want
in the painting. For darker colors here, I would be using a
mix of my red brown. Now in case we do
not have red brown, you can also create your red brown by mixing
your burnt sienna with little bit of alizarin crimson or crimson
lake or rose madder, anything like those reds, which has crimson
undertone to it, We'll create this
beautiful red brown color. So once you have got that, mix it with a little bit of indigo shade and turn it
into this darker value. Now observe my
brushstrokes out here. I'm confining the
darker colors only at the corners and little bit
towards the Med Center areas. But observe one thing, just with the tip of my brush, I'm going ahead and
creating this darker areas, trying to spread
the darker colors in-between the lighter
areas as well. To give that very nice glowing, soft diffused light effect that the light is streaming across to the canopy
of the forest. I'm happy with how this
is looking right now, but I will go ahead
with one more layer of darker tones right
at the corners. Because when this led rise, since I have gone ahead with mid tones and values
for this layer, this will eventually
fade out to be a shade lighter than
I had expected. So I will go and just drop
in some darker shades in between that layer with
the help of the brush tip. But TO make sure
that you are not lifting out any
colors from there, just go ahead and using the tip of your brush
loaded with color, just go and drop the
pins over there. The paint will
automatically bleed into other painted layer because
the area is still wet. I'm going ahead and building darker tones around the
corner areas over here. So the more darker
tones you add, especially with indigo and your Payne's gray mixed with little
bit of your burnt umber, you will get this
very nice light to dark contrast
in your painting. That's why I'm going
ahead and very gently, I'm dropping the layers
of darker colors and you see how beautiful
this is looking right now. It will look even
more beautiful when the idea has dried
out completely. Now it's time to move
on to our next element, which is the cliff. I'm exactly going to
replicate the same process of layering as we have seen
in the technique section. I will first start with a light tonal value of my burnt sienna mixed with
a little bit of my yellow, orange to create that bright and beautiful
layer of brown. Starting with my
layering process, you'll see the color
over here is kind of mid tonal value
because this when dry it will become
a shade lighter. Here I'm going with
wet on dry process. As you see, my paper is dry enough and I'm just
going ahead and layering this color onto the sketched part of those rocks and cliffs
that we have created. This would serve as your
first layer of underpainting. So on top of this layer, once this layer
starts to dry up, we will go ahead and
keep adding wet paint on top of another using
different tonal values, ranging from darker values
to MIT tonal values, we will keep building layers to create that realistic
effect on the rock. I'm going to fill
in this color on the right side of
the rock as well. Do not worry if your tonal
value is not the same, but try to go ahead and maintain the similar mid tonal values. It may go scale up or down. That doesn't matter,
but it should be in that mid tonal range. My left side of that
layer has dried. I will go ahead again with
another coat of the same mix, but with increasing
tonal values. Now I will start adding
in some darker tones of burnt umber mixed with
a little bit of red brown to denote some of
that darker areas in the rocks where the light is not reaching or is not
getting reflected. When you come across references where there are
too many elements are, there are too much of textures in painting that
you have selected. Always try to simplify
it and break it down into easy doable parts. E.g. in this
particular painting, the rocky features
where two months. So I have simplified it. I have browsed and
Google through other waterfall pictures
where there are these cliffs. So I have taken a brief
idea from there and try to bring out and
combine the elements from their simplifying
the process. So whenever you come across
this kind of things, always try to first have a
idea formed in your head and then quickly take
out your pen and paper and scribble it down
or sketch it out. The techniques that you
would like to implement on it and try it out and see
if it is working or not. If it is working, then you can more
improvise on it and bring out your
own style to it. I'm adding in this darker tones in the rocks which are angled. Now after I add this
darker tones in order to blend them together and
make them look smooth. I will go ahead and
reapply fresh coat of that initial burnt sienna
mixed with the orange mix. I will go and reapply that
paint all over again. Makes sure that you go ahead and create a little watery
mix so that it's easier for your fresh coat
of your dark paint to blend into that fresh coat
of your lighter paint.
14. Magical Autumn Falls Part 2: Now I'm going to repeat
the same process of adding in the shadows
and depth into the underside of
the rocks by adding this darker tonal
values of browns. In order to give a
more realistic data, I'm going to go ahead and
replicate the shape of the shadows in the same way
that we have sketched it out. This brush strokes are going to get retained on the
paper and hence it will give a more realistic
that when blended with the softer tones with my
damp angle shader brush. Now I'm going to just
pull down the colors, pull up and pull down
the colors in this way so that it creates a very rough, rugged look to this
underside of the rock. I've, we'll be going with some random horizontal
strokes here and there. So this is almost like dry brush strokes that I'm creating at this
part of the rock, darkening the edges or the side fringes of
the rocks as well. I will be going ahead
and replicating the same exact process on the right side of
the cliff as well. So go ahead with some
very steep slopes, as well as some staggering
brush movements over there so that the ruggedness of the
cliff or the carts in the rocks are
realistically painted. As I keep adding darker values, I'll have to match this up
with lighter values as well. The lighter values look
here, little faded out. So I'll just go and
fill the rest of the area where there's a little light is
getting reflected over there and create
that lighter values. Adding in some darker
values as well. I'm going to blend
the lighter and the darker areas
by going ahead and reapplying the fresh layer of paint on top of that
layer one more time. Now it's time to start
adding in some color and dry brush pattern to this overhanging fall
area where the water is flowing down into the guards to bring out this luminosity of water which is gushing down this rocks or
overhanging of the cliff. We are under painting the areas with darker colors so
that later on when we start applying white gouache on top of this using
dry brush patterns, it gives us a very
realistic look to the fall. Once we are done with
that darker area. Now at the free fall
area of the water, I'm going to use a little bit of my cobalt green and using
just the tip of my brush, I'm going to layer in
between those browns and create some
dry brush textures using this cobalt green two. Now, instead of cobalt green, you can always go ahead
and use your turquoise or a little bit of your cool
blues such as peacock blue, mixed in a little bit
of ultramarine blue. And go ahead with the least tonal value to create that in case
if you do not have cobalt green with you are
mixing viridian along with your turquoise
blue to create the similar shade of green, I'm going to repeat this dry brush strokes for the
second fall apart as well. Adding in some dry brush
patterns of Brown's as well. The first layering of my right side of the
cliff has dried out. So it's time to go ahead and add in the depth or
shadows to this rocks. By adding in the darker shades, I'm going to repeat the
entire process of adding in little watery paint mix of lighter as well
as darker colors so that the colors blend
well together to give me a smooth transition of
darker to lighter colors. Brown's at the origin of the fall looks to be
little faded out. So I'm just going to go and use the dry brush technique
using my angle shader brush. And I'll just go
ahead and replicate those strokes one more
time using this paint mix. See the paint mix out
there is not too watery, so you need to be little
careful about the consistency of paint mix that you are using to create this
dry brush patterns. Instead of angle shader brush. If you have a fan brush, you can go ahead and create this dry brush technique using your fan brush that
would help you to create this kind of dry brush textures and
one stretch at a go. Now, we will start with the dry brushing to create
the textures on the rock. So I will start first with
the left side and with just the dry brush tip off
my angle shader brush, I'm just randomly going ahead
and creating the strokes. Once we are done, adding depth to the rocks
by going ahead and applying a coat of my burnt
umber plus sienna mix, I will go ahead and do the same for the taller
cliffs as well. Remember Hughes, very light
handed motion to lead down the colors because
your dry brush stroke should still be visible
underneath that. Once you are done
with filling in the textures of the cliffs, now it's time to create some smaller rocks along
the path of that water. So here I'm creating two smaller size drugs along the path of that
water flowing out. The topmost part will be with a lighter burnt sienna tone and the underneath
part of the rock, I'll be covering it up with darker shade
of Van **** brown. Or you could use your
burnt umber as well. Now to add little bit more of that rugged look to
your clefts are rocks. Just use your liner brush or a rigger brush or use any long
pointed tip of the brush, but makes sure that
your brush should be dry and you should get
the dry brush patterns, do it on a separate
piece of paper, test it out and
then go ahead and start raising your
brush onto the surface.
15. Magical Autumn Falls: Part 3: Now comes the easiest part. We're just going to create
this background trees using the least tonal value of
our darker paint mix. The paint mix that I'm
using here is my burnt umber mixed go with a
very light tonal value, just like how we had created the background
trees for our project one, this will indicate
the depth that you are trying to add
into your painting. I'm going ahead and
creating this thin branches of the trees using my
liner rigger brush, feel free to use any brush
that you are comfortable with, but makes sure that you practice this trees on a separate
sheet of paper and try to create a different outline of the trees using thicker
and thinner branches. Because these trees are going
to add in a lot of beauty to this painting and it will
provide a sense of realism. Now I have switched to a mini detailing brush size number one, and I have started creating this longer branches are
the stem of the tree. So these are going to be the trees which are
there on the foreground. I would like to share here
something I have a fetish towards creating such kind
of barren looking trees. I don't know why,
but I really feel so engrossed creating and
painting this kind of trees. I love doing this
process and hence, whenever I get a chance of
creating any forest landscape, I do not miss that opportunity. So one way of observing
the shape of the trees is to browse through as many forest reference
pictures as you can. And you will see how the
branches of the trees are located in particular
reference picture. And you can take inspiration
from that and try to incorporate same into
your painting as well. I'm going to go on and create this tree lakes
lovers over here. Make sure not to
overdo the process of adding too many trees
into the painting. Because then the painting we'll start looking very cluttered. Also, you need to have little space for
creating the foliage, the autumn foliage
that we are going to do at the end of this process. So this is what I
was talking about. Checkout, my practice
thumbnail that I had created. Look at the foliage, how I've created surrounding those branches of the trees
that we just created, we're going to replicate exactly the same process of
adding the foliage later. Adding those autumn foliage is, is what is going to
give this painting, the autumn vibe to it. So that is what we
are going to create. But before that, I'm
going to go and create little bit more of this
shrubby pattern growths nearby to the Falls area. If you would have noticed
this kind of creeping bushes. Shrubs always grow out at
places where there is moisture. So that is what I'm trying
to depict out here, a sense of realism
into the painting. This is how you can create. Now with the dabbing
brushstrokes, I'm going ahead and
creating the fall foliage. I'm using the colors scarlet lake because
you're apart from the red. All the other colors will look
very dull in the painting. Either you can go ahead with
your orange, vibrant orange, warm orange shade
or Scarlett lake Alizarin crimson to prominently bring out the fall foliage. And you could also use a bit
of green if you would like. The paint mixture
out here that I'm using is not too watery. Be very careful to use an
appropriate paint mix. It should not be too watery. Use your dry brush tip to your
foliage onto the branches. I'm going to add little
bit of autumn vibes to our Mozi growth pattern also
that is totally up to you. I wanted to do this
because I really liked doing this for the first project when I created the
mostly grasslands. So I thought why not include
some autumn by going to the mosses are the algae
that grow over this rock. I will add a dash
of green as well to not make it seem
very unrealistic. So I will add a touch
of reds and oranges as well into this growth area, underside of the rocks to give
that touch of autumn vibe. Now I've switched to
size number six brush to help me create the fall foliage. Together in a better way
using just a dry brush tip. I'm going and letting this, you can use your sponge as well, spawns and even you can try out doing this with a textured
tissue paper also, you get really good results. Try them out, test
them out before you go and test it out
on your painting. Always have the habit of
tasting any experiments on a separate piece of
paper first and then bring it out onto
your final painting. I'll go and adding this foliage patterns using
this dried tip of my brush. I really love using this brush
because I can phrase it to my heart's content and then create this kind of
brushstrokes you to make, use any worn-out flat brushes. The head of those frayed
flat brushes will be just perfect for this
kind of foliage pattern. I love to do it for gouache
or even you could use a fan brush also apart from the sponge or the
tissue paper technique that I have just told. So go ahead and drop in some varying shades of
oranges, yellows, and reds. If you feel the yellows are not coming out to vividly lead them on top with some orange and you will see that there
is an instant change. Okay, So this is how I'm going to go ahead and keep creating this autumn vibe into this picture by creating
fall foliage is urine. They're randomly. Okay, I think that's enough
of that fall foliage. Now I'm bored creating them. Let's get started with our dry brush strokes
for creating the false. This is something
which we had already seen in the technique
section rate. So I'm just going to
repeat the same process. Go with the flow of the water. Your brushstrokes should denote
the water movement hens. Just remember however
you will have led the underneath the base layer
of that darker brown. Go ahead and covered it up using your dry brush
strokes off white gouache. Around this free fall area, makes sure that you
do not cover up the cobalt green layering
that we had done. So just go ahead with light dry brushing
around these areas. I'm going to repeat
the same process for the second set of falls
jutting out from there. Okay, So observed my
brushstrokes over here. First I go with very thin, delicate lines of
water movement, and then I go with the
dry brush technique. Now, this part is what going to change how the false
we'll look right now. Just go ahead and create some horizontal
brushstrokes like that. So this will dissect the falls into two parts from there. Okay. So this is like it has reached this rocky platform
over here and the water from the sides is
seeping through in and then it is creating
a cascading effect. So little minute details
such as these can really turn your painting
and beautifying it more, giving it more realistic that. So I'll just go on creating
this very thin lines. Make sure that the lines
are very thin because very thick lines will make it look a little
bit unrealistic. Okay, So go ahead with a sharp, pointy tip of your brush
and create the strokes.
16. Magical Autumn Falls: Part 4 & The End: So this is our final run, going for the finishing
touches to the painting. So I'll be adding
a little bit more of details because right now you can see the cliff is looking
too bad in an empty right? So I will just go ahead and create certain
vegetation growth over there by creating this tenor stems of the tree
branches and the lights. I'm going to fill this rock sides with little
bit of grass like shapes. The Mozi or the algal growth has totally disappeared, right? So I'm just going
to go ahead with the lighter tonal value of my sap green mixed
with leaf green. So if you do not have
leaves green mixing lemon yellow into your sap green
and create a similar mix. So go with wet on dry
technique to create this sharp blades of
leafy outgrowths. Now, I will go ahead with a little bit more lighter
tonal value of my leaf green. See here, now it's looking
much better, right? So this is predominantly
being shown onto the landscape because the background colors are dark. So if you use lighter
colors such as this, it will come out
more beautifully. Now I will use some dry brush
strokes here and there onto the surface of those rocks to
indicate the fallen dried, crisp leaves from the trees. Use the values of
oranges, yellows, and reds near to those
areas. And that's all. I will go ahead and create the foliage using the
dry brush dabbing technique for this little shrubs growing near to the fall areas. So I will create them using
the colors lemon green, mix your lemon yellow
with your leaf green and turn it into
lemony green color. You could use that color and use your fall read, fall oranges. Repeating the same for
the right side shrubs, but here I am going
to paint leaves out. You're using just the
tip of my pointy brush. Something like this, using
dabbing strokes here, the pattern of the leaves or something a little
different as you can see, not the clumped dabbing
stroke of the brush going in and adding
in some more foliage, the initial layers of the colors had faded
out completely. So, so going with the
darker tonal value, this time, for this
foliage pattern, I have used size number six, Princeton brush and dab did with leafy green light
thing and just now simply grazing though
sap green mixture onto the rocky size to
denote the masi growth. And with that, I'm going
to stop with creating the fall foliage is high will
not overdo this painting. So you need to know when
to stop so that you do not make it look overcrowded
and feel very cluttered. Yeah, we are done with
our final painting. When I compare it with the thumbnail that I
had created earlier, I liked the rocky
textured cliffs out here in our final painting much better than the one that
I had created earlier. So that is all. Now it's
time to peel off the tapes. But before that,
you couldn't add little bit of reddish foliage, leafy patterns in
there to denote the crest fallen leaves
onto this rocky areas. If you want to skip
it totally up to you. No hard and fast rule to exactly
do it the way I'm doing. Okay, Now, I'll be peeling off the tapes
from all the four sides. Peel it at an angle and always wait for your paper to dry flat. Before going ahead
and doing this step. Here, we have got those
beautiful clean borders. I'm really happy with how
this painting has turned out. Do try it out and upload your projects in the
project gallery section, I would love to see and given
my inputs and suggestions to you guys so that you can improve in your
watercolor journey. With this, we have come
to an end of our class. If you have loved the class, I would like to know your read bags in
the form of reviews. Please do upload your reviews
in the review section. I will see you again
in the next class.
 Nilam Roy, Art Instructor