Transcripts
1. Welcome & Course overview : Hello, everyone. My
name is Pakatip I am a botanical artist
and instructor specializing in creating
realistic botanical paintings. I particularly enjoy depicting local tropical
flowers and plants. My work has been exhibited
internationally, and recently, I was honored with an
award at Botanical Art worldwide 2025 in Singapore. I also exhibited at the
Plante 2025 exhibition with the Society of
Botanical Artists UK at the Mall Galleries in London. I have taught
botanical painting to many students from
around the world with diverse
backgrounds and styles. In this watercolour pencil lotus painting for beginners course, you'll learn step by
step how to paint the beautiful lotus
flower using simple, approachable watercolour
pencil techniques. We'll start small, focusing on painting a
single lotus petal. This is the perfect way to build your skills in sketching. As we progress, we'll paint overlapping petals to
build depth, and later, you'll learn to paint the full lotus flower
from different views, including the
beautiful seed pod, stem, and lotus leaves. Step by step, you'll
gain the confidence and techniques to complete a
full lotus composition. You can use my downloadable
lotus template as a guide or create your
own original composition. Step by step, I'll
guide you through a calming and enjoyable process as we bring lotus flowers
to life on paper. I'm truly delighted to be part
of this journey with you. Let's explore and enjoy every step together
as we begin creating beautiful lotus paintings. A
2. Exploring inspirations from The Lotus Scenes : Let's talk about the lotus, our subject for this course. The lotus is not only
botanically interesting, but also holds deep
significance in the artistic and spiritual
traditions of many cultures. It has long symbolized purity, transformation,
and enlightenment. This is largely because
of its growth pattern, rising from muddy water and blooming into a clean,
radiant flower. Its ability to stay untouched
by the dirt from which it emerges makes it a strong symbol of resilience
and inner peace. From an artistic point of view, the lotus offers
a valuable study in form, color, and light. The petals range from tightly closed buds to
fully open flowers with soft gradients from
pale pinks and whites to deep crimson
and golden edges. You may also notice blemishes or color variations which show the passage of time
and natural aging, details that add expression
and realism to your painting. Each setting gives us different compositional
and tonal opportunities. In this course, we will
look at lotus flowers in different contexts from
freshly cut from the market, arranged for daily offerings or growing in ponds
and wetlands. The aim is not just to copy
the flower's appearance, but to understand its
character and express it through our brushwork
layering and color blending. I hope you now see the
lotus not just as a flower, but as a symbol of
hope and renewal. Let's bring the lotus to life on our watercolor paper and create something truly
beautiful together.
3. Art supplies : In this video, I will
be introducing you to the essential art
supplies you will need for creating
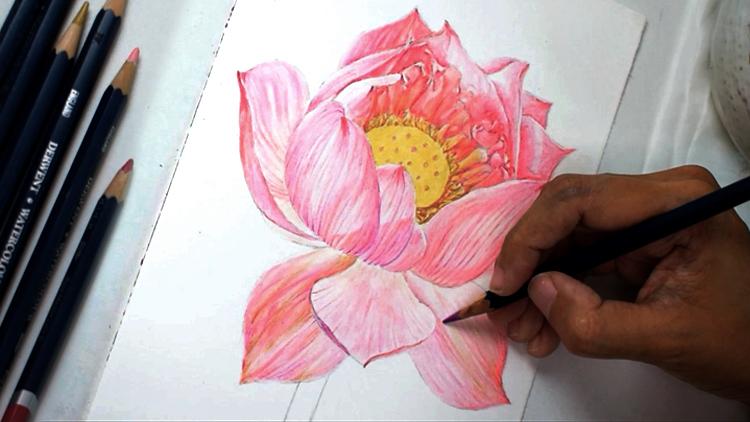
our lotus painting. First, it's watercolor pencils. I use the Derwent
watercolor pencil set, which contains 72 colors. Now, I won't be using every
single pencil in this class. We will only be working with the lotus tones from
the pink group, as well as some
greens and browns. The 72 piece set is
quite extensive, and while you can certainly use a smaller set from
another brand, I would recommend choosing
one where each pencil is clearly labeled
with its color name and number on the barrel. Is easier for beginners
when selecting colors. For me, I prefer a
larger set because I also keep it for
painting other subjects. Next is the watercolor paper. I use Canson Moulin Du Roy, 300 GSM hot press paper. The size I have is 30.5
by 45.5 centimeters. You can use any other brand, but make sure that your paper is 300 GSM cotton hot press, as this type
beautifully showcases the veins and strokes of the lotus flower we
will be painting. I usually cut the paper
into halves or quarters when I'm doing small
sampling or practice pieces. But for a complete work, I
prefer to use the full sheet. Next, are the tools. First, I always keep a
scrap piece of paper for testing colors before
painting on the actual paper. Next is the graphite
paper to transfer the reference image
I attached for you onto the watercolor paper, so the paper won't be ruined. This graphite paper is erasable and can be
reused multiple times. Also, I use tracing
paper for tracing the small paintings
when I want to create and test the composition
of the final painting. I other tools include a two B pencil for
sketching the outline. For painting brushes,
I use Marie's brand, size number three, for applying general washers and
larger strokes. For the finer details, I use a Renaissance watercolor synthetic sable
number zero brush for painting delicate details such as veins and blemishes. Next is an eraser for correcting any pencil
marks after tracing. I also have a small bowl of clean water and kitchen
towels to clean my brushes. To keep the pencils sharp, I use a cutter to sharpen watercolor pencils to
achieve an ultra fine point, which is important for
drawing fine veins and a container for
collecting pencil shavings. I also keep a mechanical
sharpener for quick sharpening of both
graphite and watercolor pencils. That's all the
essential supplies you will need for this course, and I look forward to painting
together with you soon. I
4. Detailing the lotus petals and colour exploration : In this video, I'm going
to take you through a color exploration and
swatching of the lotus petal. I've selected five
colors to swatch, and we'll be using watercolor
pencils to paint the petal. Let's start with
the lightest color, which is rose pink 18. Gently rub the watercolor
pencil onto the paper. Then take a medium
sized paint brush, dampen it slightly, and use it to gently dissolve
the pigment. Next, dip the brush in water and swell
gently to clean it. Next, I'll write down
the name of the color. The second color is a
slightly darker tone, which is Rose Mader Leg 21. Apply it to the paper
in the same way. Blend it with water
and write the name. The third color is Magenta 22, which is a deeper
purplish pink shade. This has a slight purple tone, similar to the darker
area of the lotus petal. Next, if you look closely, you'll notice a
pale yellowish tint near the base of the petal, which blends subtly
with a touch of muted green right at the bottom. For that, I've
chosen straw yellow. Apply it to the paper, then gently dissolve
it with water. The final color is May Green 48, which is a soft,
slightly dull green. Swatch it on the paper and blend it with water just
like the others. That's it for our color
exploration study of the lotus petal. Next, I'll show you how to
draw the shape of the petal. I'll begin by lightly
sketch the center line, then draw the outline
shape of the petal. Draw a circular shape at the
bottom of the center line. The width of this
circle should be about the same as the width
of the lotus petal. Next, add the tip of
the petal by sketching a curvy organic line that
rises gently from the circle. Once you're happy
with the outline, take your eraser and clean
up any unused pencil lines. Next, I'll apply the base color. I will start with the lightest
shade, which is rose pink. Gently fill in the shape using neat up and down strokes and keep it slightly darker
towards the top. Add a subtle gradient near
the bottom using straw yellow and a touch of muted green at the very
base of the petal. Now I will use a medium
sized paint brush. I'll dip it in water
and gently blend the area to soften and
unify the base layer. After that, I'll
use a darker tone, which is magenta to define the veins and deepen the
outline of the petal. Concentrated at the top
and along the outer edge. Then I'll draw the veins gently, let them curve naturally
to follow the petal shape. Then blend this
layer with water. A Once the first layer is slightly dry, I'll add more veins using a sharpened watercolor pencil in magenta to make them
clearer and more defined. A Then I'll use a small tipped brush and
softly blend along the veins. Keep the texture of the
pencil strokes visible so it doesn't become too
smooth or over blended. Next, I'll continue shading by building volume in the middle of the petal using rose pink. And gradually
intensifying the tone. I'll also deepen the outer edges and add more defined veins. At this stage, the
petal will start to take on a more three
dimensional form. A Then I'll add a touch of green at the
tip of the petal to create more depth and another small
amount of green at the base. Add a bit of yellow. Then blend this layer
throughly with water. A Next, I'll use rose madder
lake to introduce a richer red hue to
parts of the petal. I And blend once more with water. Blend this gently with a small brush to create
a natural transition. I I'll keep building up the layers gradually until the volume and details
feel complete. For the final touches, I'll use a sharpened magenta
pencil to add crisp veins. Then lightly blend
around the edges. I Lastly, I'll use a small
brush to refine and intensify the veins and
add the finishing details. And that's it for this lotus petal watercolor pencil study and color exploration. In the next video, we'll draw the whole lotus
flower together.
5. Lotus bud sketching: In this video, we'll be drawing a lotus bud
for our painting. I've bought this fresh, beautiful lotus bud
from the local market. I've documented it carefully
by filming and photographing it so we can use those images as a
reference for our artwork. Et's begin by drawing the
center line of the lotus. Then make small marks
to indicate the height and width of the bud on both
the left and right sides. Then draw a circular shape to
match the width of the bud. A Next, sketch the wrapped
petal on the left side. Imagine it emerging
from the base and curving gently around
a ball like form. Then draw the petal
on the right side, matching the height
we've marked earlier. But this time, open it slightly in the center for a
more natural look. Now, add the outline of the petal that is
beneath the others. Draw a line down from the
center to form the stem. Use this as a guide to
add the thickness of the stem on both the
left and right sides. Once the overall
structure is in place, begin refining the lines. Gently erase any construction
marks you no longer need and adjust the curves to better match the
reference image. I will make the round
base form a bit rounder. A Keep adjusting and perfecting the drawing until you're happy with the result. Then that's finished,
and we'll be painting this lotus
bud in the next video.
6. Lotus bud painting: In this video, I'll
show you how to color a lotus bud using
watercolor pencils. We'll begin with
the first layer by using the lightest shade,
which is rose pink. Apply the color with neat even strokes within
the shape of the lotus bud. Then gently dissolve the pigment by using a medium
sized wet brush. Use downward strokes to softly suggest the
veins of the petals. Next, take a darker pink
tone, pink madder lake, which has a slightly
pink orange hue and shade the tips of the petals where the
color is deeper. I Then blend with water once again. At the base of the bud,
apply straw yellow. And lightly add a touch of
may green at the very bottom, following the reference photo. Then blend softly
with a wet brush. Now, to add volume, use magenta to shade the
upper part of the bud. Draw light strokes to define
clearer veins on the petals. A blend this layer gently. I After that, deepen the petal tones
with a reddish hue, rose madder lake and blend
once more with a wet brush. We're nearly finished. To add more definition, sharpen your magenta pencil and carefully draw in the
final veins for clarity. A Blend these gently using a small tipped brush to intensify the lines
without losing sharpness. For the final touches, layer a soft rose pink at the
base to create more volume. Then follow with a
deeper rose madder lake. Blend again with a
small wet brush. And that's finished. The lotus bud is complete. In the next video, we'll
be painting the stem.
7. How to fold the lotus flower: In this video, I'll
show you how to fold a real lotus flower using a traditional
decorative method. We'll begin with a fresh,
unopened lotus bud. Hold it gently by the stem
with the bud facing upwards. Start with the outermost petal, carefully lift it
away from the bud. Now take one side
of the petal and tuck it inward towards
the base of the flower. Then do the same
with the other side. The tip of the petal
should come to a point forming a clean
triangular shape. Once the first petal is folded, continue around the flower
and repeat the process. After you've finished
the outer layer, move on to the next
row of petals beneath. Fold them in the same way, gradually working your
way towards the center. As you continue, the
flour will begin to open up in a beautifully
layered pattern. The finished result
is a refined, folded lotus flower, perfect
for display or arrangement. We will start sketching the folded lotus in the next video.
8. Folded petals lotus sketching: Hello, everyone. In this lesson, we'll learn how to
sketch the outline, ready to be painted for
our folded petal lotus. I got this lotus from
the local market, so I recorded a video and took some photos to
use as references. I picked the angle I liked and photographed it before
I began sketching. First, I'll start
with the center line. This is the core of the lotus. Then I add a round flat
shape in the center, not exactly a circle. Next, I add the thickness of the stem along
the center line. Then I add the folded petal at the front as if it's growing
from the base in the center. I Then I add more folded petals inside. Add the folded petal at the front and the one
on the other side. A Add small petals inside as if they're wrapping
around the circular form. There is a seed pod inside this, and the small
petals are wrapping and curving towards
the inner center. I'll use an eraser to remove messy lines
and keep adjusting. The small petals, although
adjusted and erased, must still look like they're growing from the central base. I'll keep adjusting and erasing
until I'm happy with it, and it looks most similar
to the reference. Add the petals at the back, which are curving
towards the front. A Then I'll start cleaning up and clearing
the messy lines on the artwork to prepare for
painting in the next step. Make sure it's tidy before
you proceed to the coloring. I And that's finished. We'll be painting this folded
lotus in the next video. If you find sketching
challenging, don't worry. I've included a
template file with a draft outline that
you can easily trace. This way, you can fully enjoy the lesson and
the painting process. I'll see you in the next step.
9. Folded petals lotus painting 1st layer: In this video, we'll begin
the painting process. This folded lotus has slightly different color
tones on the petals, so I'll start by
adding a faded nude pink called pale peach
16 as the first layer, and then use brown ochre 57 as the base on
some of the petals. First, I'll apply
the initial layer of nude color and
blend it with water. After that, I'll add a brownish tone to
the petal and blend these two colors
together to create a petal that appears
slightly wilted. Then I soften and
dissolve the color. Next, I'll paint the pink petal using a first layer
of rose pink. A Then blend this layer using a mid sized brush. Now we've finished the first
layer of base color ready to be layered and detailed
further in the next video. I
10. Lotus folded finishing: In this video, we'll
paint the second layer. I'll begin by adding more
drama to the artwork. I can see a hint of yellow
on some of the petals, so I'll apply a subtle pale
yellow to those areas. Then I'll lightly add
a touch of pale green to a few of the folded
corners on the petals. I'll blend this second
layer using a fine brush, making sure to preserve
the veins on the surface. Next, I'll use a sharpened
pink pencil to draw the veins. I'll then intensify the veins slightly using water to
blend and deepen them. I'll use the same brown to shade the areas between the
inner layers of petals. Then I'll add darker shadows to the folded petals to give
them more volume and depth. I'll continue refining the veins and gradually build
up their intensity. After that, I'll work on the shadows between
each petal to enhance the sense of depth and create a three
dimensional effect. I will also use brown ochre to add veins to the
maturing petals. Then I will blend the other petals to
refine the overall look. I'll continue building
up the shadows, deepening the darkest tones, and adding finer
details to the petals. Finally, I'll use the
darkest color Magenta 22 to draw the deepest veins and apply the darkest
shadows on the lotus. I'll carry on refining
the fine details, building up the form, contrast
and overall structure. A You'll see that the veins follow the
way the petals fold. This helps reinforce
the natural curves and dimensional
quality of the flower. A To choose which colors to paint, just have a look at
the reference image I've provided in
the attached file. You don't need to copy
exactly the colors I'm using. We all see colors
slightly differently, and that's perfectly right. Just observe closely
and trust your eye. Try to blend using a variety of shades rather than sticking
to one flat color. This will help your painting appear more natural
and less stiff, just like real flower petals which are full of
subtle transitions. Then I will gradually add the darkest spots on
the flower and deepen the shadows with
a sharp pencil to enhance the three
dimensional effect. There we have it. The
folded lotus is complete. See you in the next video. I
11. Lotus blooming in the pond sketching: Hello, everyone. In this lesson, I took a little trip to the
lotus pond near my house. The lotus flowers are blooming
beautifully at the moment, and I captured a photograph of one particularly lovely bloom to use as our reference
for this painting. This specific lotus
is truly inspiring. You can clearly see
the beautiful seed pod inside the slightly
opened red flower. We'll start by lightly
sketching the lotus. First, draw a rough
circle shape. This will help you mark the size of the
lotus on your paper. Make sure to place
guide marks for the width on both the
left and right sides, as well as for the
top of the flower. Next, draw the core
center line of the lotus, along with the stem
running downward. Inside the center, sketch a small circular shape
for the yellow seed pod. Once that's in place, refine the definition of the seed pod by adding
more structure. Then begin drawing
the rough shape of the petals surrounding
the seed pod. Now, draw the inner petals that grow outward from the
base of the center. Make sure to draw the
front facing petal with a smooth curve as it stands
out quite prominently. Continue by sketching
the side petals which slightly curve behind
the central seed pod. Keep in mind, this lotus
is beginning to bloom, but it is not yet fully open. The outer petals
are large and curvy while the side petals are
still somewhat wrapped, appearing smaller and layered. When sketching the petals, just draw the outer outline
and a rough curve at first. Don't worry about
the detail yet. Next, we'll add
the outer petals. These are starting
to bend downwards or sag slightly as if they
might soon fall off. Sketch the four
petals at the front. A Now return to the center line and add
thickness to the stem. Let's move to the seed pod and begin adding the
seed details inside. Simply count the number
of dots visible in the reference photo and draw small circular shapes on
the pod to represent them. Next, we'll start refining the curves and details
of each petal. Pay special attention to how each one folds
and curves naturally. Keep working gently, erasing
and refining as needed, aiming to perfect the
form to your liking. I I will continue focusing on the extreme details until the outline
is fully complete. Next, I will refine the details. I will adjust the curves,
angles, and edges. I will carefully draw the small inner petals and make adjustments to the
larger outer petals. I And that's finished for our outline drawing. If you find sketching
challenging, don't worry. I've included a
template file with a draft outline that
you can easily trace. This way, you can fully enjoy the lesson and
the painting process. Even if you're not confident
with freehand drawing. I'll see you in the next step.
12. Lotus blooming in the pond painting: Let's get started our
painting in this video. I will begin by
applying a soft peach pink to the petals that are
just beginning to mature. This will give a subtle hint of aging on some of the petals. Next, I'll take a
rose pink color and apply it over the
remaining petals. Then I will blend them gently with the
initial peach pink. Next, I will use a wet, medium sized paint brush
to carefully blend this first layer to create a
smooth base of pink tones. Now, if you look closely
inside the bloom, you'll notice a delicate
yellowish tint. This reflects the color of the yellow seed pods at
the center of the flower. To capture this, I'll use a straw yellow watercolor
pencil to add that subtle hue. Next, I'll add touches of rose
pink on the inner petals. I will emphasize on the
darker shadows where the petals overlap and
fold within the bloom. Now, I'll blend these two colors softly with water to create a gentle transition and capture the subtle yellow tint of
the small inner petals. I Next, I will fully color the seed pods using
straw yellow color, which is quite
striking in contrast. I'll intensify the color
by blending with water. A Finally, I'll work on the
small details to complete the first base
layer of our blooming lotus. And that's finished for the base layer of
our Blooming lotus. See you in the next video. I
13. Lotus blooming in the pond painting detailing: In this video, we are
going to continue working on the second layer
using watercolor pencil, focusing on building up
more detail and depth. I'll begin by adding a light pink shade to the
front petals of the lotus. Then I'll apply pink
to the petals behind. These petals are just
beginning to bloom, so the tones are
fresh and vibrant. Now I'll work on
the front petals to create a sense of depth, helping the lotus
appear more dimensional with petals in both the
foreground and background. Add vein like strokes, following the natural
curve of each petal, these strokes will
indicate the veins. I'll then blend them with
water using a mini brush. Carefully preserving the
structure of the veins. Keep blending to soften the tonal values while
intensifying the colors. Continue building up the
volume and depth gradually. Next, I'll work on the
edges of the front petals. Then I'll focus on
the tips of each petal where a darker pink
shade naturally occurs. A I'll move on to the shaded areas in the inner part of
the blooming bud. I'll use a deeper pink
to define the edges of each petal helping to separate
the overlapping forms. Focus on the petals that are
opening around the seed pod and then blend gently with
damp water to enrich the tone. Keep layering the darker shades to add depth
to the petals. A Next, add more veins, this time using a
slightly darker tone, making them clearer
and more defined. Slowly draw these following the natural curvature
of the petals. A then gently blend again using the mini brush. Emphasize the front petals and add shadows around
the base of each petal to give the appearance of a rounded three
dimensional lotus form. A Now I'll begin adding a yellowish brown
tone to the lowest layer of opening petals which
are starting to mature. I blend softly with water. While I wait for
these areas to dry, I'll work on the petals behind. I Then I'll add more defined veins
to these petals and intensify the pink values using water to bring
out the color. Use rose madder to
emphasize the tips of each petal and the
shadow lines between them, so the petals appear
separated yet layered. I Focus on the sharpness and clarity of the
veins at the front. Work in full detail to enhance the three dimensional effect and clearly define the
vein structure. A Add more brown ochre to the maturing petals
and any blemishes. I'll continue building
up the shadows, deepening the darkest tones, and adding finer
details to the petals. That's how we build
up detail and volume. Let's complete the entire
painting in the next video.
14. Seed pod sketching: In this video, let's draw the lotus seed pod from a
reference photo I took. First, make a mark of the width and height
roughly on the paper. Then draw the center
line of the pod. It's set at a more diagonal
angle than the stem. Next, draw the center line
of the top part of the pod. Then sketch an oval shape roughly as a guide for
the top of the pod. This oval shape is seen from
a slight perspective view. Now draw a triangular cup
shape for the pod cup. Add the connection
to the stem and then add thickness to the
center line of the stem. Add the curvy uneven lines
to the pod cup shape. Then draw some
natural jagged lines along the oval shape to
make it feel more organic. Next, erase the unused
measurement lines. Adjust and correct the
drawing lines as needed. A Then add the stamens at the base of the seed pod. I want to adjust the angle
of the stem a little more. I'm going to make it
tilt slightly further. Gently erase any pencil lines
that are no longer needed. And continue refining the lines until they resemble the reference
as closely as possible. Now let's start
drawing the seeds. Sketch a guiding oval shape and place the seeds
along that line. The seeds are oval, not circular because we're
viewing them in perspective. Place the seeds in an
alternating pattern just like in the
reference image. I and clean up the lines. Erase, adjust and tidy up the drawing until it looks
beautiful and just right. Now we're ready to move on to coloring in the next video. I
15. Seed pod painting 1st layer: In this video, let's begin
painting the first layer of the lotus seed pod
using watercolor pencils. We'll start by
applying straw yellow. If you look closely at the edge of the top
part of the seed pod, you'll notice a
subtle yellow hue. There's also a light yellow
tint around the cup area. Next, I'm adding
light green color. I'll gently erase
a few pencil lines that are a bit too dark. Now, using a medium
sized wet paint brush, I'll blend the colors and merging the yellow
and green together. A Pat gently with your brush until it's
nice and smooth. Then I'll return to straw yellow to colour the
tip of the stamen. Next, I'll use brown ochre color for the base layer of the stem. The stem looks a
bit like dried mud, so we're using this earthy
tone to represent that. Finally, I'll blend everything
lightly with water. This completes the first
layer of our lotus seed pod. Et's paint the refined
details in the next video. I
16. Seed pod finishing: In this video, let's finish the details of the
lotus seed pod. Start the second layer using may green around the top
part and the cup. Lightly touch the tip of the watercolor pencil to
add color to the top area. Avoid shading it
too dark or flat. Then blend it with water
using a medium size brush. I Next, use straw yellow to
work on the stamens. Add raw umber to darken the stem and the connecting part between the pod and the stem. I Use the tip of the watercolor pencil to lightly shade the base where
the lotus pod connects. You'll notice subtle shadows
cast by the stamens. Use fine controlled strokes to define and separate them
into individual lines. The lightest value should be
around the base of the stem, while the darkest value
should be in the middle. This helps create
a rounded form. Blend with water. Add more green around the top
part of the pod. Use short strokes
to create texture. Then use olive green to shade around the
outline of each seed. The shadow falls mostly on
the left side of each seed. I blend the overall area using a mini brush. Now use raw umber, followed by bronze to paint
the dark tips of each seed. A Then refine the hair of the stamen. Blend gently with
the mini Brush. Use cedar green for the
darkest green shade along the edge of the cup and to paint the irregular
textured shadows. Blend with water again. I Deepen the shadow on the stem. Add blemishes to the stem
for a more natural look. And begin refining the
most detailed areas, especially around the stamens. After that, revisit the
top part of the cup. It may appear too
white at this stage, so add more value to balance it. Use cedar green to
add the dark shade to the edges of the cup and
create uneven texture. I Use the tip of the watercolor pencil to lightly shade the base where
the lotus pod connects. You'll notice subtle shadows
cast by the stamens. Use fine controlled strokes to define and separate them
into individual lines. Then apply copper bleach to create the darkest
tips of the seeds. Add more green around
the top part of the pod. Use short strokes
to create texture. Deepen the shadow on the left side of the cup
and blend with water. Finally, use cedar green once more to enhance the
darkest edges of the cup. Keep refining and adjusting the details until the
painting feels complete. Now our lotus seed
pod is complete. See you in the next video. A
17. Tracing the outline: In this video, we're going to trace the lotus
painting we've already done so we can begin arranging the composition on
our watercolor paper. I've got a sheet of A
four tracing paper here, and I'm going to cut it in half. Just fold it neatly,
flatten the crease, and then slice along
the fold with a cutter. So now we've got a piece
of a five tracing paper, which is easier to handle. Put the tracing paper
over the painting and start tracing using
a drawing pencil. Make sure it doesn't move. You can hold it down with your fingers or use a
bit of tape if needed. Start with the larger
shapes and then come back in to pick
up the finer details. Y y Once you finish tracing
the blooming lotus, move on to the seed pod. Sketch in the big outline first, then work in the details
of the seeds inside. Then finish with
the stamen hairs around the bottom of the cup. Slowly work on the
fine details and check from time to time to see if
you've missed any lines. A Lastly, we'll trace the lotus bud using another piece
of tracing paper. Again, place it on top, trace the outer lines carefully and pick up any key details. A So now we've got all three stages
of the lotus, the bloom, the seed pod, and the bud fully
traced and ready for arranging into our final
composition in the next step.
18. Composition Exploration : Basic technique: This video, I'll show
you how to arrange a composition using the lotus outlines we previously
drew on tracing paper. We'll begin with an
A four size sheet of watercolor paper. First, mark approximately 3
centimeters in from the top, bottom, left, and right edges. This will serve as an
invisible frame to help us ensure that no part of the painting gets cut
off at the edges. Next, I'll place the outlines of the lotus bud and lotus bloom
to explore the composition. Try placing your traced outlines onto the paper and experiment by flipping or tilting them in different directions to explore the composition you like best. Then I'll add the
lotus seed pod. As you saw in the previous
video of the lotus pond, I'll position the bud higher and the seed pod lower to
reflect a natural scene. Make sure none of the outlines cross over the marks
we made for the frame. Now, I'll try flipping the
traced outline to change the direction of the seed pod and see if I like it better. Try placing your traced outlines onto the paper and experiment by flipping or tilting them in different directions to explore the composition you like best. If it looks good,
ensure the top and left edges don't go
beyond the marked frame. Once the composition looks
balanced, we can move on. Next, I'll use small pieces of Scotch tape to fix the
traced paper in place. To reduce stickiness, press the tape on the table
first before applying it. Then tape the top edge of both tracing papers
to the surface. Then I'll place a sheet of graphite paper under
the traced paper. On top of that, I'll add a
new piece of tracing paper and draw on this top layer to preserve the
original outline. Et's start tracing the bud. Trace only the bud for
now, not the stem, as I'll adjust the stem later to better suit the
overall composition. I Next, trace the seed pod slowly. Begin with the
large outer shape. Then add the details such
as the seeds and stamen. Make only light marks for
the stem at this stage, we'll complete it later. Now I'll work on the
stem composition. First, draw the center
line for the bud stem, then for the seed pod stem. Once those are in place, add thickness to each stem by drawing lines on either side, making sure both stems look balanced within
the composition. Next, erase any unused lines. Since I want the seed pod to
appear in the foreground, I'll tidy up its outline
to make it more defined. A Then carefully erase the guide marks we made, the ones indicating where
we should not draw beyond. Make sure to erase them cleanly. And that completes our
composition exploration on A four watercolor paper. You can go ahead and paint
using this outline. A
 Pakatip Dejaturat, Painter / Designer / Maker