Transcripts
1. About This Class: [MUSIC] Hi there and
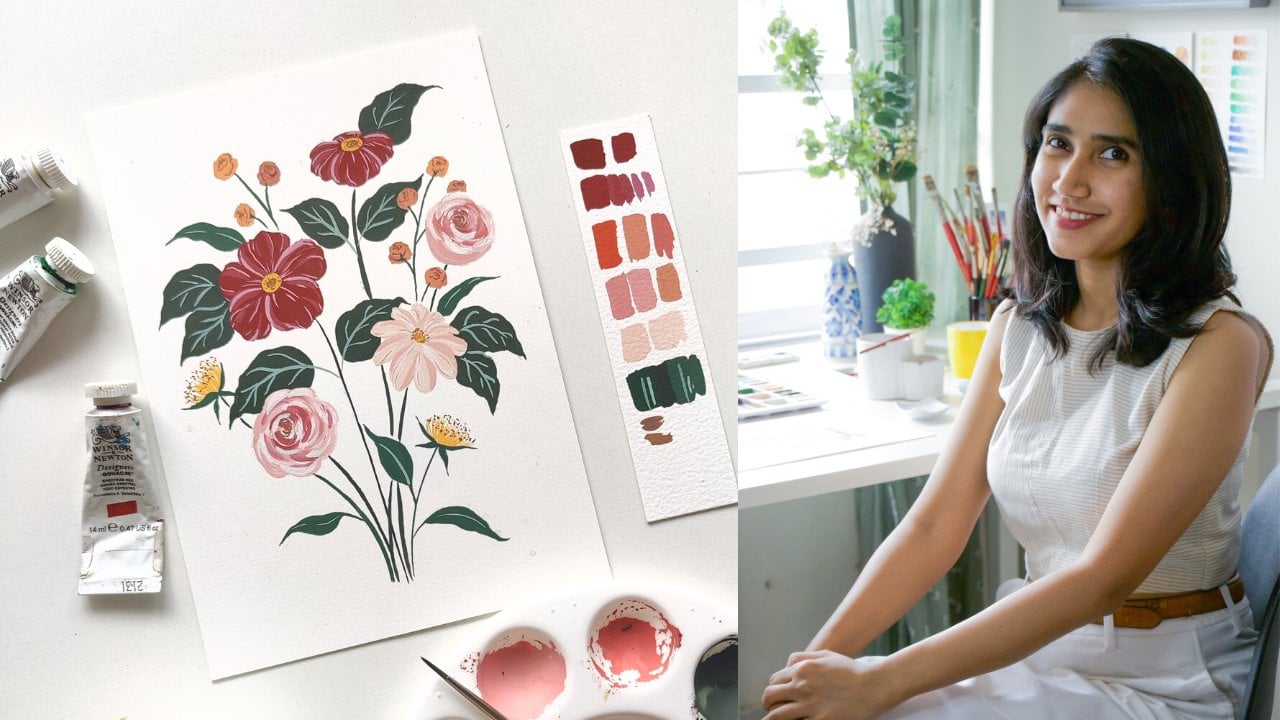
welcome to this class. My name is Shivani and
I'm a gouache artist and creative entrepreneur based in the sunny city of Chennai
in the south of India. I've been painting with gouache
for over three years now. Ever since I started
working with the medium, I absolutely fell
in love with it. I love how versatile
it is and how it adapts to so many
different styles and techniques and subjects. I personally am very inspired by the natural world and you'll see that come through in my art. I love painting anything ranging from birds and
animals and flowers, right up to beautiful
landscapes, which is what we're going to
be doing in today's class. While gouache is going to be the main medium that
I'm working with, you can absolutely
apply everything that I teach you in this class to
acrylic paints as well. The main thing that
this class is about is letting go of perfectionism. When I started my art journey, I wanted to able to
paint more loosely. But somehow I always
struggled to do that. I always struggled to let
go of my tendency towards perfectionism and just to allow my brush and my
paints to do the talking. If you struggled with
something similar, then I'm sure you
relate to that. Through this class,
I'm going to help you break through that and start painting more
loosely in a way that's more
exploitative and fun. Like I said, we're
going to do this in the form of a really
beautiful landscape. This class is suitable
for students of any skill level because we're going to keep the
landscape very simple. Even if you're not
familiar with drawing or painting or haven't worked
with any of this before, you really don't need to worry. It's going to be very simple
in terms of the sketching. We're just going to understand how to work with the medium. I'll take you through all
the beginner techniques that you need to be able
to paint in this style. I'm excited to dive into
this class with you and in the next lesson I'll tell you a little bit more
about the project. By the way, I live in a
very busy neighborhood. So in case there's any traffic
sounds in the background, I apologize in advance for that. For now, head on over to the next lesson and
I'll see you then.
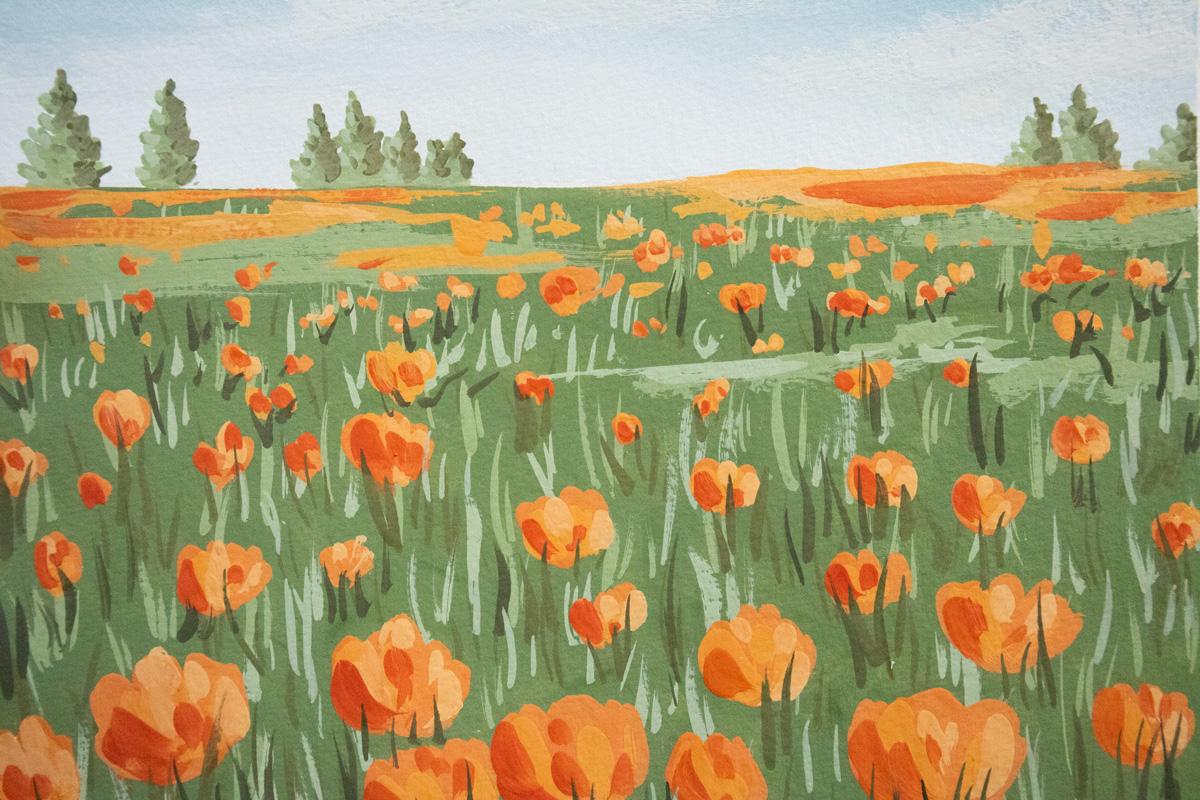
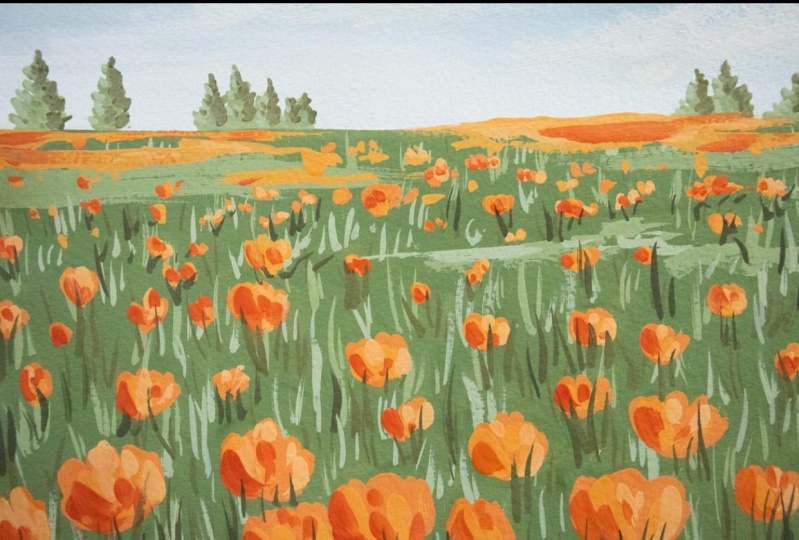
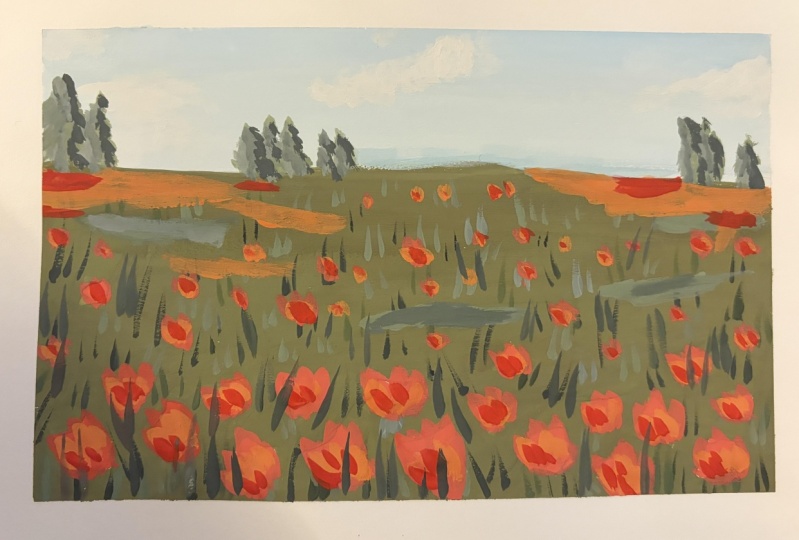
2. Here's What You'll Create: As a class project today, we're going to be creating a beautiful and expressive
landscape painting. It's going to be this
field of flowers here, and I'll leave it a
little free to use. If you want to explore
colors of your own, you can feel free
to do that as well. Through the duration
of this class, I'll take you through all the beginner techniques
that you need to know in order to be able to paint loose landscape like this. Not only that, I'll
also teach you to get more familiar
with your brush and understand the different strokes it could create so
that it becomes easier for you to
let go a little bit and loosen up
with your art style. Learning to loosen up and create more expressive
brushstrokes really took my own art game
to a whole new level. I'm really excited
to take you on that same journey of discovery. I'll see you in the next lesson
where we'll talk a little bit more about the materials
that you're going to need
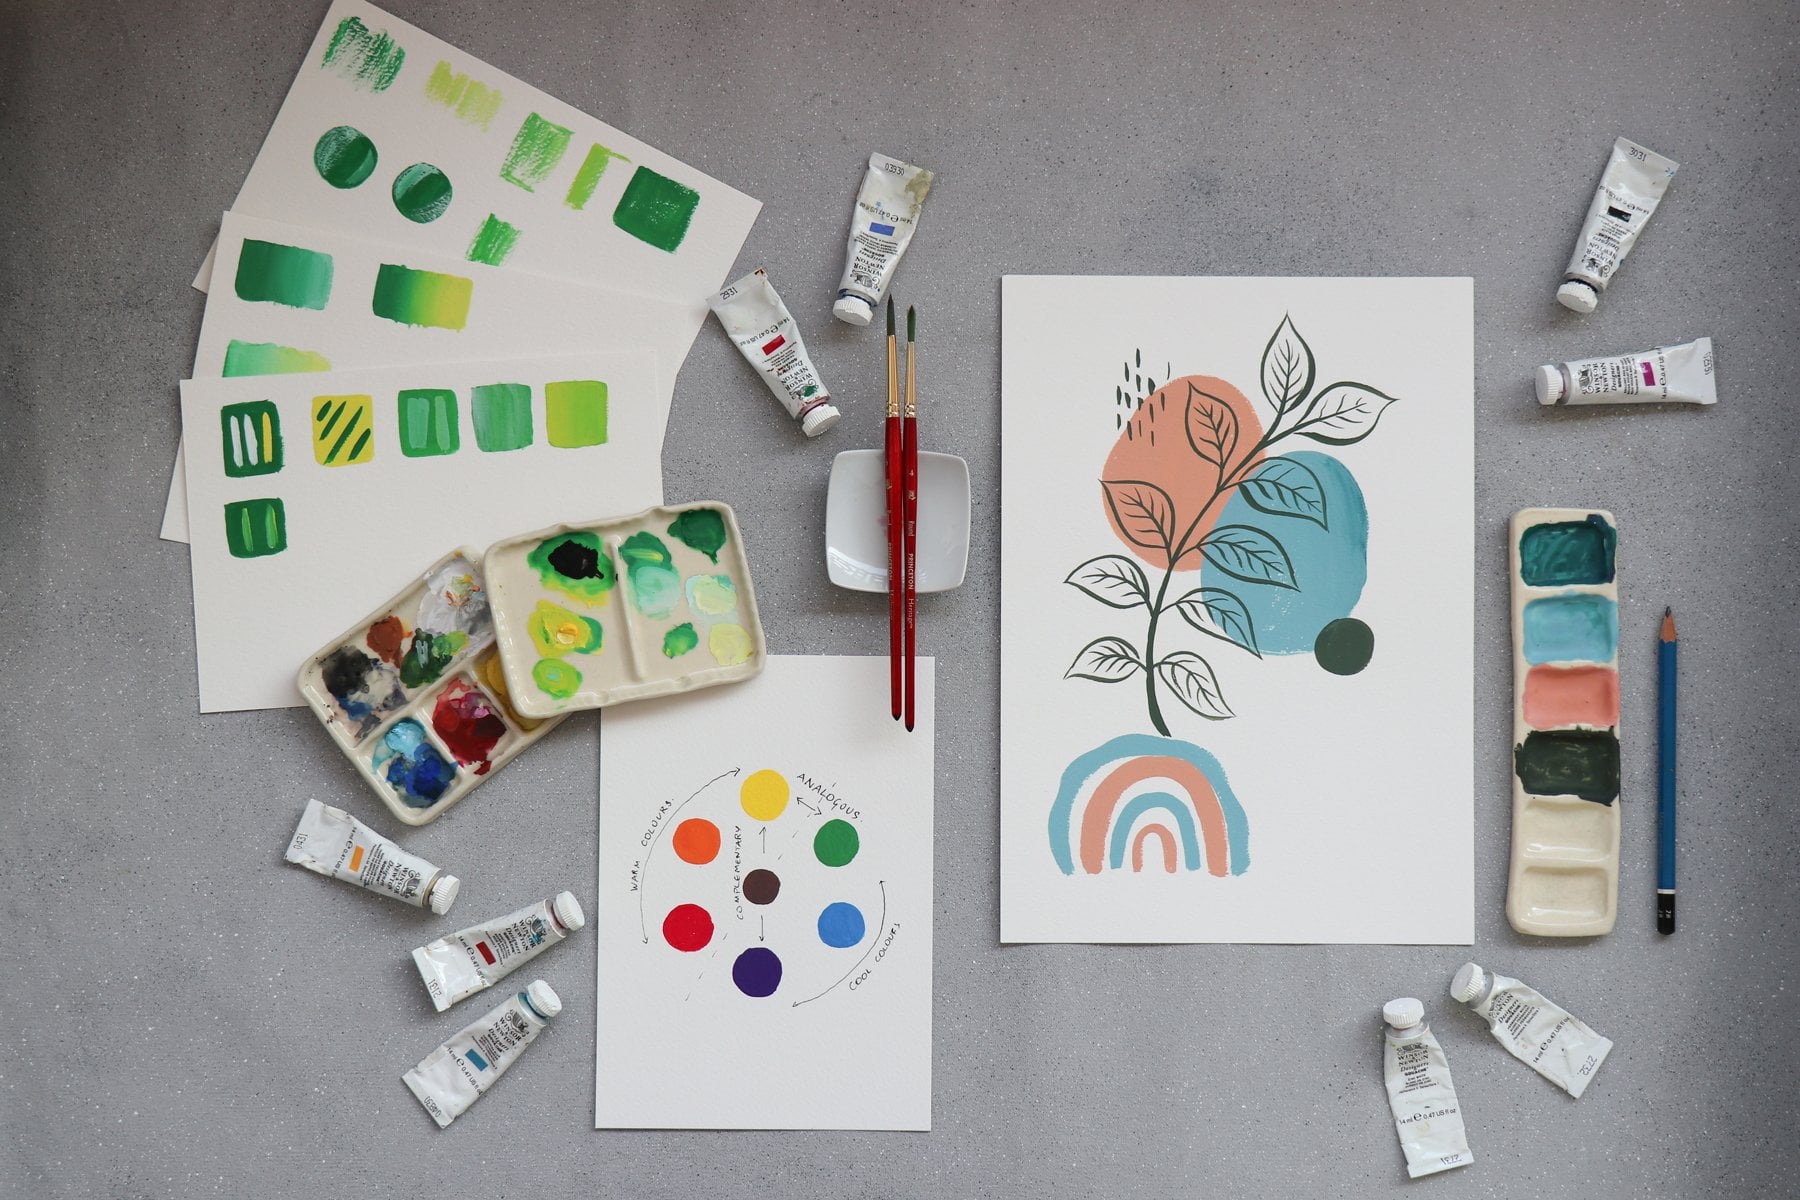
3. Materials You'll Need: [MUSIC] These are all
the materials you're going to need for today's class. Let's start with the paints. For the paints, what
I'm going to be using is Winsor and Newton
designer's gouache. I'd recommend having
a warm and cool shade of each primary color. The three primary colors
being yellow, blue, and red. If you're not sure
how to identify warm and cool primary colors and if you are
interested to know more, I recommend checking
out my color mixing class which is
linked in the description. For now, you don't need to
worry too much about that. The colors I've got
are primary yellow, permanent yellow
deep, primary blue, ultramarine, primary
red, spectrum red, permanent green middle, ivory black, and permanent white. If you have any standard set
of student grade gouache, they usually come with a good mix of warm
and cool colors. If you just have the primary set of Winsor and Newton
gouache though, that's perfectly fine as well. In that case, what you
would have are these three, so you'll have primary yellow, primary blue, primary
red, permanent green, middle ivory black, and
you'd have a tube of white. Even if that's all you have, that's perfectly fine, don't worry too much about it. If you don't own Winsor
and Newton gouache, that's fine too, you can use
any other brand of gouache. Miya HIMI gouache is one that's considered a great option for beginners and so is our desert. Aside from the paints, you'd need some paper. What I'm using is
Canson Montval paper. You don't need the
exact same paper, but it's essentially 300 GSM cellulose-based
watercolor paper, so you don't need it
to be 100% cotton. Any 25% cotton or cellulose-based paper
is perfectly fine. You can choose cold
pressed or hot pressed. Cold pressed will give
you a bit more texture and hot pressed would
be a lot more smooth. Then I just have a simple
pencil and eraser. I've got my brushes here. I'm going to be using a mix
of round and flat brushes. These are all Princeton
brushes, but again, feel free to use whatever
you have on hand. This one's a half
inch flat brush, and then I've got round
brushes in size 2, 4, and 6. Additionally, I've got
my water jars here. I've got a scrap piece of cloth, and you can even
use paper towel. There's some masking
tape or washing tape, which we'll be
using to get smooth the edges on our final painting. Finally, I just have a palette like this
with these wells. You can use any kind of palette, even a flat palette
is perfectly fine. Through the class, you'll
see me using an anti-palette like this where I've already
got my colors laid out. They're the exact same colors, but I've already laid
them out on this palette. Don't worry about
that, I'll tell you exactly what colors I'm using. You don't need to have
a palette like this. Now that we've got all
our materials ready, let's start getting
more familiar with the medium and learning
some essential techniques. I'll see you in the
next lesson. [MUSIC]
4. Gouache Consistency: [MUSIC] Before we start
getting into the techniques, let's talk about consistency. When you're working
with Gouache, one of the most
important things to be careful about is the
consistency of the paint. [MUSIC] We always want the paint to be thick enough that it's nice and
opaque and creamy. But at the same time, you want to be able to freely move your paint
both in the palette, as well as on your paper. [MUSIC] So that it needs to have just the right amount of
moisture in the paint. What you'll see is that if you add too much
water to the paint, it starts looking
something like watercolor, which is not what we want. [MUSIC] This is an example of the paint looking too thin that it's almost
like watercolor, and you're able to see the white of the paper
under the paint, which is not what you want. Sometimes your paint may be so thick that you're
not able to move it freely on the
paper and you end up getting dry
strokes like this. That's not what you want either. You want the paint to be at a perfect midpoint where
it's nice and opaque, but you're also able to move
it freely on your paper. The consistency looks creamy, somewhat like melted ice cream. Practice this a little
because it's going to be very important once you start
working with the medium. For now, let's talk
about blending. [MUSIC]
5. Technique 1 : Blending: [MUSIC] For our
activity on blending, I've used my masking
tape to just create a small rectangle
in the center of my paper. I'm going to blend from a darker color to
a lighter color. That's going to be from
red to white for me, but you can choose any
color to work with. The important thing
here is to be aware of your consistency of the
paint like we discussed. Make sure you're using it in
a nice creamy consistency. Otherwise, what
you're going to find is that it might be tough to move the pigment and blend it across the entire rectangle. Let's start doing the activity and you'll see what I mean. [MUSIC] To start off, I'm taking the pure red pigment and I'm going to put that
right on the top. [MUSIC] I'm making sure
it's nice and creamy, and also that I have picked up enough pigment on my brush. I'm blending, I don't want to be creating too thin layer of paint because then it becomes difficult for me to
spread the color. As I move downwards now, I'm going to start
lightening this red. [MUSIC] Now I'm cleaning out
my brush completely and I'm going to bring in
some pure white at the bottom and
I'll blend upwards. [MUSIC] As a next
step, I'm going to smoothen out these joints. This is where it becomes
really important that you've used enough pigment
because otherwise, you won't be able
to move it around freely to make
your blend better. I also feel like
in this section, I didn't use enough pigment so I'm just putting
a little bit more. At any point, if you feel you need to add a bit more color, please go ahead and do that. [MUSIC] Now I've
washed off my brush completely and I'm going in with a clean but damp brush to just
smoothen out these joints. [MUSIC] Keep cleaning
out your brush so that you're not dragging color from one area into another area. [MUSIC] Not to
overwork it too much. Once you're happy with it, you can just allow it to dry. Finally, we'll peel off
the masking tape. [MUSIC]
6. Technique 2 : Layering: [MUSIC] The next technique
we'll discuss is layering. With Gouache, the great
thing is that you can lay out both light to dark
or dark to light. So I'm just going to create
a few swatches here, and then we'll start layering. When you are layering
with Gouache, and if you want a
completely clean layer, make sure you're
layering on a dry color. If you layered onto
something that's wet, for example, this swatch, you will have something
like this happen where the color is bleeding
into the base layer, which is not what you want. Similarly, if you try to layer with paint that's
a little too wet, even if your base
layer is already dry, you'll have a similar
issue happening. Here I've got some extremely
wet paint on my brush. I'm not able to form
a very clean layer because the paint I'm trying to layer is just too dilute, so it's not standing out
against the background. Now let's look at the
perfect way to layer. What you want is to be layering a perfectly creamy
consistency of paint like this onto a base or background that
is completely dry. You see how in this
case we're not having those bleed issues, but this color does
still look a little transparent so maybe my
consistency wasn't 100% right. I'm just going to try to fix
that and we'll try one more. That's much better example
of how to layer correctly. Let's do one more. Finally, like I
said with Gouache, you can layer both light over dark as well
as dark over light. You just need to make sure that your
consistency is perfect so that you don't have any
bleeding happening like this. Practice this a few times till you get comfortable with it until you understand
the perfect consistency with which you can layer. We're going to be using this
a lot in our final project, so it'd be great if you
get the handle of it. For now, let's talk about the third technique which
is dry brushing. [MUSIC]
7. Technique 3 : Dry Brushing: While we may not use dry
brushing as a technique in the final project we're
going to do in this class, it's an important technique
for you to know with gouache because it's something
that just brings a lot of texture
to your paintings. The technique is very simple, but it may take a while
to get used to it. What's essential
is that you pick up a good amount of
pigment on your brush, but not too much. [MUSIC] You want to dab
off any excess pigment. Then, similar to
what we discussed in the consistency exercise where this was happening by mistake. This was not what
we were aiming for. It was unintentionally
happening because the paint was a little
too dry on our brush, but this time we're going to intentionally try to
achieve this effect. Sometimes it takes a few
strokes until you can get all the extra moisture and
paint off of your brush, but this is essentially
what we're after. We want these dry brush strokes which bring a lot of texture to our paintings and they
just look really interesting. [MUSIC] Practice
this a few times. Again, you're going
to notice that if you don't keep your paint to
the right consistency, if it's too wet, you're not going to be
able to achieve this. Make sure your paint is of the perfect consistency
and you dab off any extra moisture
and paint from your brush and you'll be
able to achieve this. If you want to dive a little
deeper into the techniques, you can go through my
Gouache 101 class as well, where I go into all of
this in much more detail. For now, let's go over some gouache tips
and tricks. [MUSIC]
8. A Few Gouache Pointers: [MUSIC] The gouache,
when you're covering large areas in your painting, it's very important for you to mix up enough paint
on your palette. Let's say, I want to cover a large area on my
page over here. If I don't mix up enough
paint on my palette, especially when you're doing backgrounds it's
very easy for you to run out of paint and then make the
mistake of diluting. Let's say this is all
the paint I've mixed. Now I start painting. We'll realize very soon
that with gouache, you need quite a lot
of paint when you will have to cover larger areas. I'm already seeing that the paint is running
out on my palette. You see and you'll be able to see the base of the palette. I'm not able to finish
this still the bottom. Your tendency here
is going to pick up more water and start
diluting your paint because that's the
only way to complete this entire area in which case you see what's
happening and this is going to be more
obvious once it dries, you're going to have
these wet patches or patches where the paint is looking a lot more transparent. It's not looking as
big as you want it to, and that's just
not going to work. The other alternate
is that you've tried mixing some
color fresh, you say, I'll mix a little more red and white together and try to
achieve that exact same shade. But what you'll find with
gouache is that it's practically impossible to mix
the exact same shade again. Even though you may
have a color that you think looks similar, you're not going to get
a 100% exact match, and therefore it's going to be very hard to patch
those colors together. The important thing
is to make sure you mix up enough paint in advance, especially when you need one consistent color
to cover a large area. My next important tip for you is to always swatch your colors and allow them to dry before you bring them
into your painting. Say you mixed up
this shade of pink. It's best to paint
a swatch of it, allow it to dry, see how the color looks before you take it into
your final painting. Now, the reason for this, I'm going to demonstrate
right now is that light colors tend to dry
darker than they seem. Dark colors tend to dry
lighter than they seem. We're going to paint a dark
swatch and a light swatch and compare how it looks when it's dry and how it
looks when it's wet. I'm just going to
go ahead and pin to swatches and allow them to dry. Then we'll discuss this. [MUSIC] Now the paint swatches are almost completely dry. I'm going to paint a wet swatch right next
to each of them so that you can compare how it looks when it's wet and how
it looks when it's dry. [MUSIC] I bring that closer to the camera
for you to see. If you notice with
the dark color, the wet swatch looks darker than how it dries and with
the light color, the wet swatch looks a little
lighter than how it dries. That's why it's really
important for you to swatch your colors on the
side or on a scrap piece of paper allow them to
dry completely and then make sure it's the right color before you bring it
into your painting. In the next lesson, let's explore brush
marks and how you can let loose with your
brush a little bit. [MUSIC]
9. Loosening Up with your Brush: [MUSIC] In this exercise, we're just going to
explore some brush marks and get to know our brushes
a little bit better. The reason we're doing
this is to start letting go of perfectionism a
little bit with art. [MUSIC] We tend to have
these preconceived notions of what we want our art to look like and when things don't seem to go the way we
hope that they will, we tend to get frustrated. That's usually a form of perfectionism and the quicker
we can let go of that, the freer we can start
being with our art. I want you to start
exploring your brush. Just explore what are the
different marks it can create. Just have fun with this, there's no guidebook, there's no rules, just wiggle it around. Try to make different
shapes with your brush, try to understand what
your brush is capable of. Maybe it'll form some shapes
like these floral shapes. I'm using a size six
round brush first. So just explore a little bit with whatever brush
you have on hand. [MUSIC] As you're doing this, you'll find that there
are certain movement that your hand and your brush
is naturally drawn to. Some of that has to do with
what brush you're using and some of it is just what's
naturally stemming from you. Try to observe that, try to see what you're enjoying, all of that is very
important when you try loosening
up with your art. [MUSIC] Once you're happy
with your explorations, with your round brush, you can move on to your flat or angled brush and
do the same activity again. [MUSIC] I hope you
enjoyed this activity and enjoyed getting to know your
brushes a little better. Now, let's move on to our
final project. [MUSIC]
10. The Class Project : Composition: [MUSIC] I hope you are
ready and excited to start working on
your final project. Before we get started, just a reminder of the
materials you're going to need. I'm using Canson cold
press 300 GSM paper. Make sure you're using at least 300 GSM
so that your paper doesn't buckle in case you apply more water
or moisture to it. Then you're of
course going to need your wash paints or actually paints if that's what you're choosing
to work with. I've got my palette, I've got my jars of
water, a pencil, an eraser for the
sketching stage, and of course, a mix of brushes. Before we get started, let's use the masking tape
along the edges so that we create a nice clean
edge for a painting. [MUSIC] By the way, the size of paper
that I'm using is approximately eight
by 10 inches. In case you're feeling a
little underconfident about painting on a larger
sheet for the first time, you could even try it
on any A5 sheet first. Now, as far as
sketching goes for this composition,
it's really simple. There's really not much, so even if you're
completely new to drawing, don't worry about it. What we're going to do first is mark out our horizon line. So I roughly want to to be here. The rule of thirds is generally a good idea for
a composition like this. So what I'm doing is
roughly marking out one-third of my
painting for the sky, and the rest is going to
be the field of flowers. We're also going to be adding
some trees around here, but that's not
something you need to worry about right now because we'll first paint the sky and
then we'll mark out those. For now, all we're going
to need is this line, and what you can do, and this is not a necessity
but I prefer to do it. What you can do is mark out a few flower blobs towards the
bottom edge of your paper. When you're painting a
field of flowers like this. The rule is that your
flowers are going to look much larger in the front,
that is over here, and as you go backwards, that is towards the horizon, the flowers are going
to get much tinier and they're going
to merge together. So you're going to see this
entire blob of just flowers. The ones in front though are going they are
to be much larger. If you want you can
leave whitespace before you paint the
background for the field. The reason I'm doing
that is with gouache, while you can layer
it like we discussed, and we will be layering a lot of the flowers
that come behind, for the flowers in the front, I want them to have
a lot of attention, I want them to be very vibrant. And you'll get a lot of
vibrancy with less number of layers when you
paint directly on white sheet as compared to painting over a
darker background. That's the reason why I'm just marking out a few flowers in front and then we'll be ready
to get started painting. So I'm just going to
continue doing that. Keep them very randomly shaped
and randomly placed so you don't want them to all be very cluttered next
to each other, you want them to be
nicely scattered. You also don't want them all to be of exactly the same size, even though I said that the
ones in front are larger, the larger ones don't have to all be exactly the same size. Let them have different
shapes and sizes, and that really helps your composition look
a lot more natural. And that's about it,
I'm not going to mark out any more flowers. The rest of them will be built
up as layers on the base. Now it's time for us
to start painting. We'll be starting with the sky and then moving onto the field.
11. The Class Project : Background: [MUSIC] I want the sky
to be a light blue, but I'm also going to be
blending in some white and also making the blue slightly grayish so that it looks more natural. I've got a big
blob of white here and I'm going to add some
blue into that first. When you're mixing light colors of gouache make sure you're mixing the color into the white rather than the
other way around. The reason for that is if you
add white into your color, it's going to take a lot of white for you to be
able to lighten it. We don't realize it
but like I said, light colors tend to dry darker. The color of this space
to blue is actually going to dry a lot darker than
how it seems on the palate. It's always better to
add a tiny touch of color into white rather than
adding white into the color. I also feel like
I've not mixed up enough color for me to spread
it freely across the sky. Like I told you if
you run out of paint, it's going to be really hard for you to mix the
same color again. I prefer to make sure I have enough paint on my palette
before I get started. That's another one of the
reasons why for beginners, I recommend starting
on a smaller sheet of paper like an A5
paper just to get some control over
your consistency and the amount of paint
you need to mix before you move on
to larger paintings. I'm just going to
swatch the color. I do like that, light blue. I wanted to maybe
have a touch of gray in it so I'm going
to add some black. When I'm adding black, you see how I'm just
using the edge of my brush and just picking
up the slightest amount onto my brush and I'm
going to mix that in because if you pick up too
much you don't realize it, but the color can change
very drastically. I'm going to start with that. Make sure your paint
isn't too thick. Especially when you're
using it for a background, you don't want it to be
really tough for you to move the paint over the sheet and you don't want to run out
of color very fast. But at the same time, don't water your
paint down too much. Keep the consistency
nice and creamy. The next thing we're
going to do is take a slightly more bluish
version of that. Again, I don't want it
to look too bright, so I'll also add a touch of black and make it
a little more gray. I'm just creating variations of the shade to blend into the sky. It's easiest if you do this
while the paint is still wet so that you're able to
blend it really easily. This will help you create a very natural-looking sky
with some color variations. Likely discussed in
the blending exercises if there's any point at which you want to smooth
out your blend, you can just use a
damp brush to do that. Try not to overwork your paint. Once you reach a
point where you're happy with it, just let it be. We'll later be painting some
clouds over that as well. For now, let's move on to
the background of the field. For the field, I'm going
to mix up my own shade of green rather than using green
straight from the tube. If you prefer to use straight from the tube you
can do that as well, but I'm going to tell you how to mix a nice shade of green. I'm starting with primary
blue and primary yellow on my palette and I'll
first mix those up. Again, make sure you
take enough paint on your palette because we have
a large area to cover here. When you make a mix like this, when you want your color to be smooth across a large area, make sure you're thoroughly
mixing it in your palette. You don't want to
have patches of blue or patches of yellow
like there are here on your palette because what
can happen while you're painting is sometimes when
you pick up the paint, you may pick it up with
more yellow or more blue, and that will cause a variation
of shade once it dries. It'll be very obvious once
it dries on your paper. Swatch that. This
as you can see is a very bright green which
is not what I want. I want it to be slightly
more muted than that. To do that, I'm going to
add some red into it. I'm using spectrum red for this. The reason I'm adding red is because it's the
complementary color of green and it helps neutralize green because
it's complementary color. If you want to know
more about color mixing and how all
of this works, I'd really recommend checking
out my color mixing class. You can immediately see how it's really deepened the
color and made it a more early olive green
which is what I'm going for, but again I want to make
the mix nice and smooth. I don't want any patches of color in my palette
or on my brush. Let's see how this
looks. You can see that. There's a huge difference
just by adding red to the color and it's much
closer to what I'm going for, but I still want it to be
a lot lighter in value. This is very dark. To change the value
of the color, I'm going to add some white. This is so much closer to
exactly what I'm going for. To paint the fills
all I'm going to do is cover this entire area. As far as possible, I'm trying to not touch these flowers
that I've marked out. Let's go ahead and do that. Make sure there isn't too much moisture
on your brush or in your paint because it can make your painting appear
really patchy once it dries. While the gouache is drying, don't worry if it feels
a little bit patchy as long as you know that your paint is of the
right consistency, don't worry about it. If you are painting with
gouache for the first time, it can seem a little confusing because as certain parts start drying it starts
appearing a little patchy even though
it isn't actually. Make sure you have a
little extra paint left over on your palette if
possible because once the base layer dries if you feel that any part is
looking patchy or imperfect you can
always just go over it with some fresh paint
and it will become fine. Like I said, while it's drying, it's really hard to judge. We're going to wait
for this to dry completely and then we'll
come back to it. [MUSIC]
12. The Class Project : Field: [MUSIC] Now the
painting is almost dry. You can still see
that it looks patchy because some parts
are still drying. That's fine. We can proceed
with the next steps. In case you find that a few areas look a
little watery or patchy, like the color seems a little
lighter in those spots, don't worry about it
because we can always go over it and cover
that area with flowers. Unless you have a
large area where it's looking like your
paint was too watery, you don't need to
worry about it. If you do have a
larger area where you're unhappy with
the consistency, then just apply something
fresh paint over it, and if needed, you
can mix up the paint again and go over the
entire area also. The next thing we're
going to need is a few different shades of green to start
creating some grass. I want to start with a
darker shade of green. I'd like to have something similar to this one
[NOISE] which we started off with before
mixing the white in. So I have mixed a
similar color again on my palette using the
same primary yellow, primary blue, and
a touch of red. I've got a darker shade here. Sometimes if your paint
doesn't feel opaque enough, which is true of some
pigments with wash, they're not as opaque
as other pigments, adding a bit of white into
your paint helps with that, so it helps to make
the paint more opaque. I'm adding a bit
of white in this. I want it to look more
opaque and greeny. That looks better. I feel like I would like
to have a little more red in it so the shade
is a bit deeper. That looks good to me. I'm just going to
go ahead and create a few strokes of grass
using this dark color. Make sure you keep it scattered. Don't fill up the
entire area because we will be doing the same with
some lighter shades as well. I'm adding a touch of
black into this green because I just want to make
it a darker value of color. Feel free to play with this and make shade of green
that you're happy with. All you want is a shade that's darker than
the background shape. So I'm going to start off by creating some strokes of grass. Try to remember the
exercises we did to understand our brush and the different
strokes it can make, and be very free with this. I want you to just let loose
a little bit and just make strokes where you feel they look nice and
they look natural, and just don't fill
up the entire area. But be free with your brush. Similar to what we said about the flowers and perspective, you want the strokes of grass
also to look larger towards the front of the painting and smaller as you move
towards the horizon. I'm just going to randomly
paint my strokes of grass. If your brush starts forming some dry strokes like
this, that's fine too. That adds a lot of texture and
interest to your painting. The next thing we're
going to do is mix up a lighter shade of green. You've been mixing two
lighter shades of green. So first add a
little bit of white, and then later we'll
add more white. I'm going to add
this to your [NOISE] original base shade of
green if you'd like. I'm trying to mix
medium shade of green. But I feel that because
there's already a lot of red and I had added some black into this as well
and brought that in, it's looking very grayish, which is not what I want. I'm going to start by
adding a bit more [NOISE] yellow into that and then
I'll see how to adjust. By adding yellow or blue
you can bring in more of the bright greenness
back into your paint. [NOISE] I'm going to add
a bit of blue as well. I like how this looks for
my medium shade of green. Swatch your color beside
your original color to make sure there's enough
of a difference in shapes. You don't want them to
be looking too similar, and once I've swatched it here, I feel like it's looking too similar and I want a
little more contrast. I think this is going
to be a lot better. Keep in mind that
it's going to dry different from how
it looks right now, so ideally allow it to
dry and then judge it. Now I'm going to do the same
with this shade as well. I'm going to create
a lot of spokes of glass randomly placed and longer in front and
shorter at the back. This is where it becomes really important for you to
let loose and let go off your perfectionism and
just allow your brush to move on the page and allow yourself to do
whatever feels right. Don't worry so much about it, and with gouache,
the good thing is, [LAUGHTER] even if you feel
you've made a mistake, if you feel you've
overdone something, you can always go over
it and fix the mistake. Just let go of that. Don't worry about anything. Just do what feels right. I also want to create some
larger patches of grass here, so I'm just going to do that. Have in mind that
we're going to be adding one more shade of green, so again, don't fill up
your entire painting. Make sure you're saving all of these greens on your palette. Because once we
paint the flower, we will come in and fill
up some spaces again. Don't mix your new colors
into your older colors. Allow them to be on your palette and mix everything
in a new palette. Now I'm going to
make a third sheet which is going to
be even lighter. Again, make sure there's enough contrast from
your previous shape. If you want, again, you can make it more
greenish by adding yellow, or blue, or both. Once you're happy
with that, let it be. [NOISE] The next thing
we're going to do is take some pure [NOISE] white
onto the palette, and we're going to use the dry brushing technique to create some
clouds in the sky. You want to load up your
brush with some white, but not too much on the brush. Make sure you have the right amount of paint
at the right consistency. You don't want it to be
too watery because you might end up smudging your sky. It's best to test
out the consistency. Make sure you're able to get dry brush strokes
before you bring it in. Then we're going to lightly
move that over the sky, create a cloudy texture. Want to overwork it, allow it to look nice
and natural and fluffy. One final thing before we move on to painting the flowers, we're going to add some
trees in the horizon. I'm going to take an
in-between shade of green. You can even take the
base green that you had. I unfortunately ran
[LAUGHTER] out of that color, so I'm using this
medium green and create these alternating strokes from the left and the right to
create a tree silhouette. Again, allow it to
be very natural. Don't try to make it perfectly symmetrical or perfect
looking in any way. Allow the trees to have
varying heights and widths. [NOISE] Perfect. Once you're
done with the base of that, let's do some shadows
and some highlights. Now I'm taking this dark shade of green and I'm just going to add a few strokes of
that onto one side. Make sure for all the trees, the shadow that is the dark color is falling
on the same side. Finally, we use the lighter shade to create
highlights on the other side. Finding that because I had run out of this base
color of green, which is ideally what I should have used for the
base of the trees, the base color of the tree and the shadow has too
much contrast, which is looking
a little odd and it's drawing too much attention. What I'm going to do is just
lighten my shadows a bit. As I said with gouache, it's quite easy to go in and fix something that you're
not quite happy with. Don't worry about it too much, just enjoy the process. [NOISE] Now it's
finally time for us to move on to the flowers. I'm going to do an
orangish base for my flowers and then we'll
shade over that. [MUSIC]
13. The Class Project : Flowers: [MUSIC] It mix my orange, I've got some spectrum red, and some primary
yellow on my palette. I'm going to go
ahead and mix that. Make sure you're mixing
sufficient paint again, because you don't want to run
out of this orange color. You're going to have
to do quite a lot of flowers across the field, not just the ones
we've drawn out, but will be layering of you
over the background as well. The gouache gingerly red is
a pretty strong pigment, so it may take a good
amount of yellow for you to be able to get a strong orange. I still feel like it's
looking too red to me, so I'm going to save some of
this paint for my shadows, and I'll add a bit
more yellow into this. At times it takes quite a lot of tweaking
to reach a shade that you're really happy
with which is where good knowledge of color
mixing daily comes handy. I'm happy with that
shade of orange, so I'm going to start
filling my flowers. I'll start with the ones where I've already left
the whitespace. If you feel that your
color is not thick enough, add more white into it
and that'll really help. To create my flowers, I'm just using the
brush strokes we played with in the
previous exercise. I'm just creating a bunch
of brush strokes to create what looks
like a flowery shape. Again, you don't need to
aim for any perfection. Just flow with it. You'll see that once we lay out more shades of orange over this, it's going to start
looking really nice. Now we'll start layering
more flowers over the green, keeping in mind
the same rule that the flowers are bigger as they
come closer to the viewer. Play with some of them
just looking like buds where you may just use a
single stroke to create them. Sometimes maybe you'll use two or three strokes
just play with it. Like I said, if there was any
part of the painting that you felt the background
was looking patchy, or you are just
not happy with it, just cover it up
with your orange. Generally, as you
move to the back, the flowers start looking
a lot more dense. Again, because of
rules of perspective. Near the horizon, don't fill too much, because once we mix a
lighter shade of orange, we're going to create
an entire streak of a floral patch so you
can leave that for now. Create as many flowers
as you'd like to, or as little, there
are no rules here. Once you are happy with that, let's mix a lighter
shade of orange. To mix the lighter shade, I'm just taking one brush
full of the existing orange, and I'm going to
take a lot of white, and a little more yellow just to create some variation
in the hue. Make sure you make it light enough so there's
enough contrast, but not too light, because we will go in and add an even lighter
shade in the end. I feel like this is too light, so I can use this
as the third shade, but I want to deepen it a
bit for the second shade. I'm happy with that
so I'm going to using that to create a few strokes
on each of these flowers. It's okay if your
paint is slightly wet and if it's blending into the base layer, that's
completely fine. Just freely create these
strokes and you'll see how your shapes start looking
more like flowers now. Now like I told you, I'm going to just use
this color to create some strips of floral
patches in the bank. Once you're done with that, move on to your lightest shade. Use this sparingly, because it will bring a lot more contrast and use it on one
side of the flowers, because on the other
side we'll use a dark shade to
create some shadows. Finally, I'm going to go in
with my really deep orange, which is almost red, which I've saved here, and I'm going to
create some shadows. It's these highlights
and shadows that really help even a simple
painting come alive. Now, as a final step, I'm just going to
go in again with a few greens to add
some strokes of grass. This just helps the entire
painting look more natural, because you can now paint a few brush strokes that go
over the flowers as well, and it looks like some of
the grass is in front of the flowers and that makes it
look so much more natural. At this stage, you
can fill up any areas of your painting that you feel are looking a little empty, or you can add more shadow, more highlights according
to what you feel it needs. I'm going to also create a few strokes that
are a lot darker, because I feel like my
painting needs that. I've added a little extra
black into my green. This is the point where
you really want to let your intuition completely take over and have fun
with the painting. Finally, I'm just going to
correct a few mistakes, like I had a little bit of red just drop
into my sky there, which I obviously don't want. I'm going to go in
with a damp brush, completely clean damp brush, and I'm just going to wet
that and lift it off. One of the things I really love about gouache is that it can be quite
a forgiving indium, especially once you
get used to it, and once you understand
what it's capable of. I'm now going to take
off my masking tape, and we can look at
the final piece. I hope you had fun painting your own landscape
just like this, and in the next lesson, let's quickly recap
everything we learn.
14. In Conclusion: Congratulations on making it
to the end of this class. While we end the class with a beautiful project of a loose
and expressive landscape, let's not forget that we learned so many techniques
in the process. We learned about gouache and the different techniques that it lends itself to like blending, dry brushing and layering. Not only that, we
learned how to bring all of that together into
an actual painting. We also learned how to understand our brush
a little bit better, how to loosen up and just get more expressive with
our painting style. I hope you had fun through this process and I hope
you're ending the class, feeling a lot more
comfortable with loosening up and letting go with your art
style a little bit more. The more you practice
in this style, the more comfortable
you'll get with it, and I promise you it's
going to be so rewarding. Before you leave,
don't forget to upload your projects to
the Project Gallery, I'd love to have a look at
them and provide my feedback. If you could leave a
review for this class, that would be really helpful to me and to future
students as well. If at any point in the
process you have questions, please leave them in the
discussion box below, I'd be happy to get back to you. For now, be sure to
follow me over here on Skillshare so that you're notified the next time
I release a class. You can also subscribe to my
channel on YouTube where I put out loads of free content
for artists just like you, and you can connect with
me over on Instagram. As a next step, I'd
recommend checking out some of my other classes
over here on Skillshare. I have Gouache 101
in case you're interested in learning
more about the medium. In case you are interested
in exploring color, then my color mixing masterclass comes very
highly recommended. [MUSIC] Thank you so much for being here and I look
forward to seeing you inside another one of my
classes. Bye. [MUSIC]
 Shivani Patel, Gouache Artist | Creative Entrepreneur