Transcripts
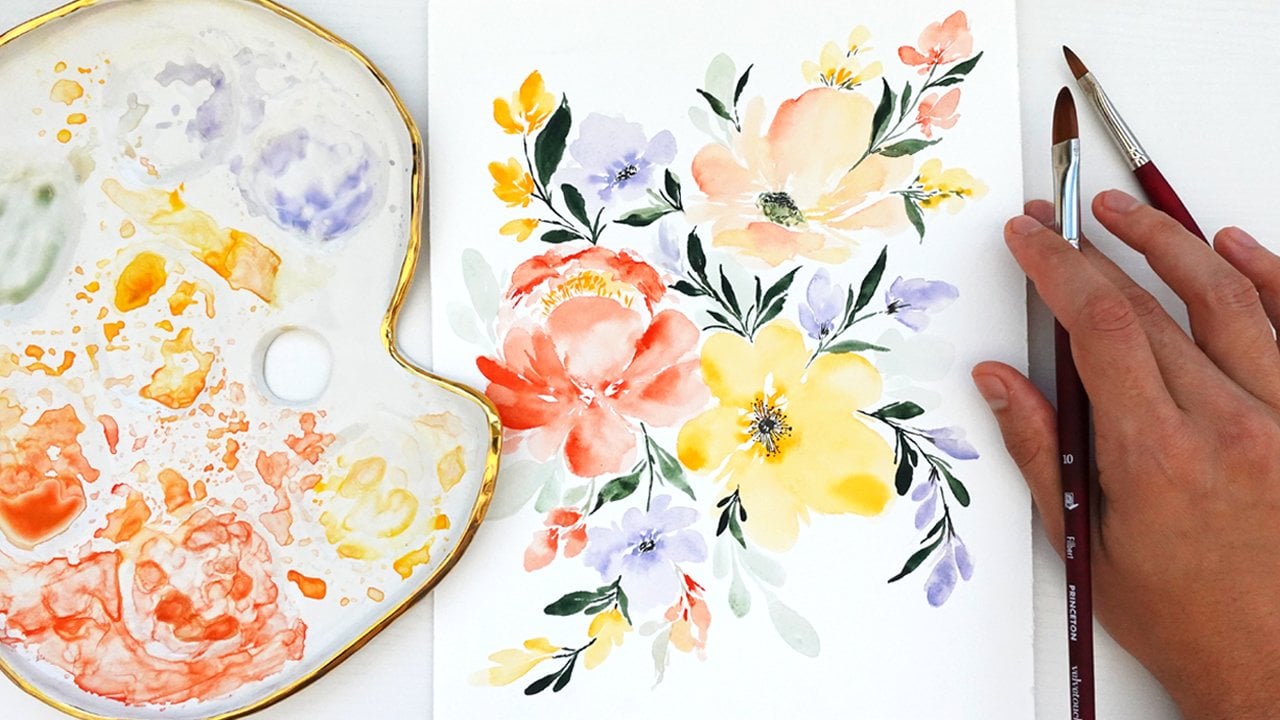
1. Welcome to Class!: [MUSIC] Thank you so much for joining
me in this class today, where you'll learn how to paint beautiful loose style
watercolor roses in five different styles. My name is Priya from Petals by Priya Watercolor designs, and I'm an artist
and a art teacher based in Honolulu, Hawaii. Over the years, I've learned many different techniques for painting roses and then I've fine-tuned my own style and process and I can't wait to
share those with you today. In this class, we'll start
by practicing the basics, including the dainty strokes you need for the center
of each rose, and the feathering technique I use for creating soft petals. We'll then start with each
of our five projects, which are the basic
loose style rose, the layered rose on
a white background, which is my go-to method, the layered rose on a
colored base layer, the expressive free
flowing rose that I love to do when I just need to paint without thinking too much, and we'll finish with the
classic upright rose stem. I also included a
bonus lesson with my top tips and tricks
for elevating your roses, and some helpful ways to fix common mistakes in
your paintings. This class is suitable
for beginner and intermediate watercolor
artists and anyone who wants to explore a new
style of loose roses. Before we dive in, if you want to learn more, you can find me on Instagram
at Petals by Priya, where I share all
of my paintings, process videos, tutorials, and
behind the scenes content. I'd love to connect
with you there and see all of your beautiful work. If you're ready to
paint some roses, let's get started. [MUSIC]
2. Projects: 5 Styles of Watercolor Roses: Let's talk about projects. Instead of one big project
at the end of the class, we'll be working through five different
projects as we go. One for each style of rose. I really encourage you to
upload your final projects. The projects section here
on Skillshare so you can receive feedback and connect
with fellow students. Skillshare has a very supportive,
welcoming communities. There's absolutely
no need to feel intimidated by
sharing your artwork. I went ahead and uploaded mine first and I hope to
see yours there soon. You can do this by
navigating to the projects and resources tab
using your laptop. Click on the green
button that says "Create Project" and upload your photos, a title, and a brief description or comment
if you'd like. I also encourage you to share your final works of
art to Instagram. And if you do, please
remember to tag me @petals.by.priya so I
can like and comment on your artwork and share
it to my audience.
3. Supplies : Here are the supplies
you'll need for this class. For watercolor paper, I'll
be using Legion Stonehenge, 100 percent cotton paper. For brushes, I'll be using primarily round
Princeton brushes, ranging from size 2-8. For the paints, I'll be
using bold vibrant shades of pink and red so you can
see my examples clearly. But you can paint your roses
in any color you'd like. Don't feel restricted to the
colors that I've chosen. I'll also be using some shades
of green for the leaves. Other supplies
we'll need include, a bowl of clean water, mixing palette,
and a paper towel for dabbing excess
water from your brush. Once you've gathered
all your supplies, I'll see you in the
next video to start practicing painting
the center of roses, which in my opinion, is
the most important step.
4. Painting the Center of the Rose: Before we get started
painting each style of rose, I want to dedicate this lesson solely to learning how to
paint the center of the rose, which is the most
important part. Take a small round brush. I usually use
either size 2 or 4. I'm just going to be using
the very tip of the brush to create these centers strokes because we want to
keep them dainty. Let's get started. Taking the very tip and
I'm just going to start making some very small
dainty strokes here. I'm just barely letting the tip of my brush
hit the paper. I'm working my way around. It usually ends up consisting of probably about 8-12 dainty
strokes for the center. You can start to see
that the center of the rose is forming nicely here. I'm going to do another
practice one right next to it. Loading up my brush. It's a very dark
value of the pink. Again, the center of
the rose is always the darkest and then it gets
wider as we go out. I'm just going to start lightly putting the tip of my
brush down on the paper. One thing to keep in
mind is whitespace. Yes, the center of the rose is tighter and darker
than the rest, but you still want to
have a little bit of whitespace so that your flower
doesn't turn into a blob. That's one of the biggest
frustration points when you're painting roses, is that they end up looking
like blobs of paint. I really want you to be mindful of your whitespace
during this class. It's better to have
too much whitespace at the end because you can always go back in and
add a few more strokes. But if you have too little
of whitespace at the end, it's really not possible to
go back and take away color. Air on the side of
too much whitespace. I also want you to practice
painting a C-curve, which is the stroke
that we'll be using to paint the majority
of these roses. A C-curve, I've
loaded up my brush. You're going to start
lightly just the tip, and then apply more pressure
as you make a C-curve. As we work our way
around the rows, we're going to be doing
the same exact stroke. Just practice a few of those. It doesn't have to be in
any particular order. Just get comfortable
with applying different amounts of
pressure on your brush. Again, using the
tip, light pressure, push down heavier pressure
and then lighten back up. Just like that. Once you're feeling confident with
your center strokes, we can move on to
the next lesson where I'll be demonstrating the feathering technique
that we'll use throughout class to create soft,
delicate petals.
5. Feathered Rose Petals: We have one more quick lesson before we get started
with the projects. I know you're probably
itching to get started painting the
roses, but again, it's really important
to get a hang of the fundamentals so you can create beautiful petals with ease and confidence
moving forward. In this lesson, we'll practice the feathering technique that I use on each petal as I build
out the more advanced roses. As an example, I'm just
going to load up my size 4 round brush with a good amount of the reddish-pink pigment. I'm just going to paint
a simple wavy line here. Now, to practice feathering, I'm going to load up
the size 8 round brush. I'm loading it up with
just water, no paint, and lightly dabbing it on my paper towel to remove
any excess water. Then I'm just going
to drag it along that line and pull some of
that pigment out with it. You can see that there's
a nice little gradient here starting to form. That's what's going to
create beautiful petals. Now, once I've
feathered it out a bit, I'm taking a really
dark value of the pigment again with
my smaller round brush and I'm just going to go back in and tap it in along
that original line. That starts to create
some more blooms. Let's practice that
a few more times. Load up your smaller
brush, paint any shape. I'm just going to
do a wavy line. Then take a clean, wet brush. [NOISE] Again, I'm using size 8. Just feather it out. Do you see those blooms
happening there? That's what I love about
painting with watercolors. These nice soft gradients, that's exactly what we want
on each of our rose petals. Once it's feathered out, I'm just going to tap in a
little bit more of the dark. I'll do that process
one more time. Now, let's practice doing
this on the centers that we painted in
the last video. Again, I'm going to paint
another center here. Just doing light dainty
strokes on the page. Now, I'm going to take
my feathering brush and just gently feather out those little strokes
on the outside. You can see really
beautiful bleeds starting to happen there. That's what we're using to
create nice soft petals. I encourage you to
keep practicing this technique so you can
fine-tune your water control. When you're ready,
you can meet me in the next lesson to
learn the basic, simple loose style rose.
6. Basic Loose Watercolor Roses: In this video, we'll be
learning how to paint a very basic loose rose
like this example here. I know it's not my primary style of rose that I typically paint, but this is a style that I
first learned when I was completely new to painting
watercolor roses. Mastering this technique give me a solid foundation so that when I was ready to move on
to more advanced roses, like the ones we'll be painting in the
rest of the class, I felt confident and ready. Now we're ready
to start painting this basic loose style rose. I've loaded up my Size 4 brush. It's a dark pigment. Try to keep in mind, the
center of the rose is always smaller and darker and
then as we expand out, our petals get
lighter and bigger. I'm going to go ahead and paint the center here,
just like we did. As I work my way out, I'm just gently applying a little bit more pressure to
get slightly bigger petals. Once I'm happy with the center, I've moving on to
my Size 8 brush, loading up some of that
pigment and I'm going to do those same seekers here, but just making them
a little bigger. I'm just starting to work my way around the center
of the rose here. Remember to leave
that white space. It's going to be
really important in preventing your rose from
turning out like a blob. Just apply some pressure
and lift back up. Now I'm nearing the
outside of the rose. I'm rinsing a little bit of
that color off my brush, diluting it and getting some really nice big petals
out here at the edge. It's the same seeker of
stroke that we practiced. The rose gets bigger
and bigger as you work your way to the
outside of the rose. Make sure you zoom out every once in awhile and take
a look at your painting. Make sure it's not
getting lopsided. Mine's a little bit
heavy on the top, so I'm just going
to round it out here and add some
petals on the side. That is looking pretty good. While it's still
a little bit wet, I'm taking my
smaller brush again, a darker pigment and I'm just going to slightly
darken the center there. I'm also going to do it on the inside of some of
these middle petals. Just doing a light little line. You can see some of these
petals are still wet, so there are slight little
blooms happening there, which is really beautiful. You don't have to do this part. If you're happy with how
it looked before this, you can definitely
leave it as is. This is just another
step I like to take to give it a
little bit more detail. You can see these ones are
looking pretty flat and that's because we're
not really using the layering technique
on this style. I just like to go back in
and just add a little bit. Now I'm pretty happy with
how this rose looks. I am taking a mixture of sap green and indigo to
get a nice deep green. While these outer petals
are still a bit wet, I'm just going to add some
leaves coming off of the rose. You can see these are
still wet so you get some nice little soft bleeds
happening between colors. I'm just applying some
pressure down on the page to create these leaf shapes. You can wiggle your
brush a little to give it a bit of a more
organic shape. I have some wispy leaves
coming out of here. I'm going to do a couple
more coming down here. I want to get some more
bleeding going on here too so I'm taking a darker value of the green and just
tapping it in here at the base and at the tips. If you're ready for
more, I'll see you in the next lesson to learn
my favorite technique, which is the layered rose
on a white background.
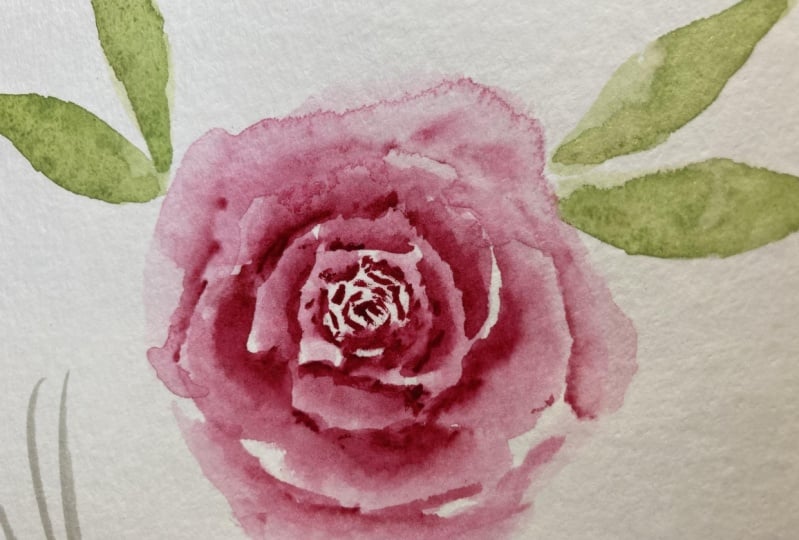
7. Layered Roses on White: Now comes my absolute favorite
style of rose to paint. If you follow me on Instagram, or if you're familiar
with my work, I'm sure you will recognize
this style of rose. Let's get to it.
Now this technique is going to use a
lot of back and forth between your
smaller round brush and the larger one to
feather out each petal, so we're going to
go petal by petal. Make sure you have both
of your brushes readily available so that you can
switch between the two. Once again, I'm going to start just by painting
the very center of the rose using small
dainty strokes. Once you get to
about this point, I'm going to start using
the feathering brush. I'm getting it nice
and wet, again, this feathering brush never
has any pigment on it, you're just using water. Now I'll just gently start feathering out some
of these petals. If you're having
a hard time with this feathering technique, just go back to the
lesson that we had the practice drills and just practice with
some basic wavy lines. A lot of it it's
about water control, so if you can get
the hang of that you'll be able to do this. Gently feathering out
each little petal with a clean wet brush, and then going back in with some darker pigment and just tapping it in to create
some more contrast. Painting another petal here, and gently feathering it out. I'm going to sound like
a broken record here, but again, white
space is your friend. See if I didn't have
this white space here it would just start
turning into a blob, which we definitely do not want. That's basically three steps
for each little petal. I paint the line, feather it out, and then I go back in with the dark pigment and
gently tap it in. I'm going just start working
my way around the rose. You can give a little
squiggle to your lines, they don't have to
be perfect C curves. You can see as I go
I'm also adding in some just little
dainty strokes here. I'm just going to repeat
this same process all the way around. You can also see that
as I work my way out these little featherings are
getting bigger and bigger. Because again, the
center of the rose is tighter and smaller, and then we get bigger
as we work our way out. I'm just adding these
little marks here in-between just to give the effect of a
little more depth. Taking a look here, so far we're only partially done with this
one but you can already see there's a lot more detail and depth as opposed to
our basic loose rose. You can slightly overlap your petals out of the
line, feather it out. Drop in a little more pigment so you can see those
bleeds forming there, which is part of what
creates these nice, soft, floaty-looking petals. Make sure you rinse off
your feathering brush every once in a while
because it can start to get a little bit muddied up with color and you want to
make sure it's nice and clean so that when
you feather out the petals it's not too pigmented and tapping
in the color. If there's big white
space gaps here, that's when I like to
add these little marks, just to give it a
little more interest and an illusion of depth. Make sure you're also varying
the size of each C curve, so like that one
was a lot smaller, you don't want it to
look too uniform. You can see I have a little bit too much water on my brush here, so I'm just going to dab it
on the paper towel and let the bristles soak up a little
bit of that excess water. It's all about water control. This is my favorite part, just tapping in that color and watching it bleed and bloom. Really we only need a
few more petals here, I'm going to add one here. When you're working with this
wet-on-wet technique here, and feathering, it's
really important to keep your time in mind. I want to feather out the
petal before that first line dries so that you can still draw out some
of that pigment, and same for this step. I want this petal to be
slightly wet so that when I tap in the pigment I can
still bleed and bloom. The little too dry, so I'm just adding a little more pigment, then I'll feather it out. I think this rose only needs one more little petal here just to make it a little
more even and balanced. I'm going to put that here, the one last little feathering [NOISE] and tapping the pigment. One of the final
steps I do is I add just a very light value of that color to my large
feathering brush, so just a very light
value of the pink. To get a lighter value all you have to do is add more water to your mixture so you can dilute
out some of that color. I just add some little petals
here in the background. This helps just even it
out, balance it out, and create the
illusion that you have some bigger fluffier
petals underneath. The rose is looking
pretty good so far. Everything is mostly dry, I'm going to go back
in with my size 4, get a dark pigment, and just outline these to
give it a little more depth, so as the paint dries it
starts to fade a little bit. I just want to bring
that vibrancy back up with an additional layer. I think everything is looking good with the rose and
now I'm going to take my green mixture again
and tap in some petals. If I were painting
these roses as part of a larger composition, I would take more care
as to where I'm placing these leaves and how
I'm painting them but since these are
just stand-alone roses, I'm just adding a few leaves here and there and
calling it good. Again, all those if still wet, I'm just taking a
darker value of the green and tapping it in along
the edges of the leaves, add maybe a couple of
leaves trailing down here. Again, if you wanted
just like a nice organic leaf shape, then just squiggle
[NOISE] your brush as you move it down and you'll get
these nice rough edges. Just squiggling my brush, and then coming to the plant. Again, I'm not caring too
much about these leaves, if I were putting
it in a bouquet or a larger floral composition, I would take more
care as to where I'm placing them and how
I'm shaping them. As I said, this is just mainly for the practice of
actually painting the roses, and the leaves they're
just secondary. In the next video we'll
use the same technique, but we're going to add
even more depth by painting it on top of
a colored base layer.
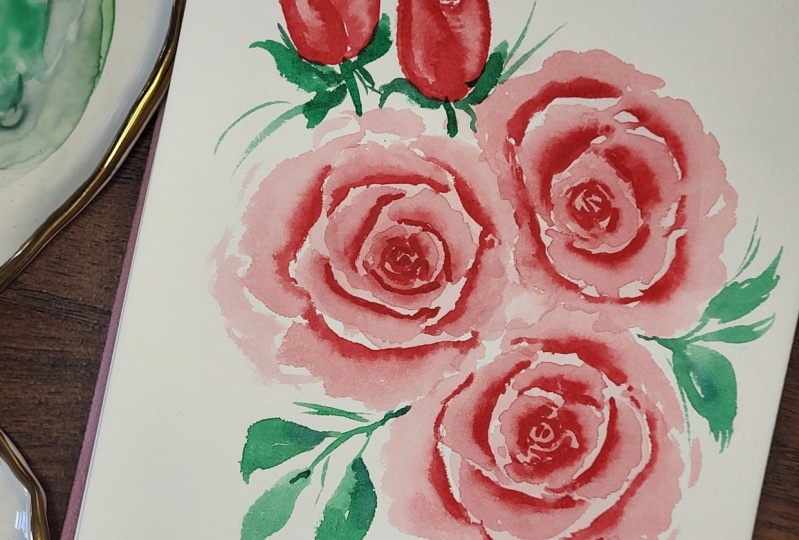
8. Layered Roses on Colored Base: As I said before, this
type of rose will be very similar to the
one we just completed. But instead of painting it
straight onto the blank paper, we're just going to paint
it on top of a base layer of color to give it
even more depth. To start out, we're going
to put our base layer down. I'm getting a very light value or a light wash of
this pink color. I'm just going to
paint a little circle. It doesn't have to
be a perfect circle. We're going to be painting
the rose on top of that and just place out where your rose is going
to sit on the page. Now I'm going to
get a darker value of the color, not too dark, but darker than this base layer and I'm just going
to tap it in in the center and you can see
that color bleeding out of it. This will serve as the base
for the rose and then again, we're going to do
the same technique, but we're just going to place
it on top of this so that instead of just plain white
paper in those whitespaces, we'll have a little
bit of color. It just gives the rose a
little bit more depth. Now we just wait for this
layer to dry completely, but you don't want it to
be even slightly wet, otherwise you'll start out
with some bleeds and blooms. But we want to have more control over that so just make sure it's completely dry before
you move on to the next part. Now this base layer
is nice and dry, so I'm going to get started
with the center of the rose. I'm loading up my Size 4
and I'm just going to do the same exact light
dainty strokes for the center that we've done
for the previous roses. The center is
looking pretty good. Now I'm going to start
that same technique that we did on the
previous rose, where I'm taking my
Size 8 round brush. I'm just going to start
to feather this out. Again, the three steps to each petal are painting
the initial line, feathering it up, and then
dropping in some more color. Also, remember to practice
your water control, especially when you're
feathering up each of the lines. Again, if you have
too much water, you'll start to get
a lot of pooling happening and what happens when your water starts to
pool on the page is you end up with really
harsh dry lines. But then again, if you
don't have enough water, then you won't be able
to get these blooms. See when I touch the
paint down on the paper, you get these nice
little blooms. If I didn't have enough water there on the feathering layer, then I wouldn't be
able to get those. Try not to get too
frustrated with yourself and start
making your way around. If you're struggling with
the feathering part, try a different brush. It could be that your
feathering brush is a little too large, which could make
the water control tougher or if it's too small, then you're not
getting enough water, that could also be tricky. Each petal is just
a little C curve. If you can get the
hang of those, you'll have a lot easier
time painting these roses. I know it can be
a little tedious practicing these fundamentals, but it really does help. Feathering it up and
tapping in the color. Like I said, if I have big
open spaces like these, I like to just add some
gestural brushstrokes there. You can already
start to see that these C curves are a little
more slanted than these. These are pretty straight. They're still curved,
but just slight. These ones are making
more exaggerated curves. It's really up to you. find a style that you feel comfortable with and that
you like the outcome of. It took me a lot of years to find a process that I
liked for painting roses, but now I feel pretty
darn comfortable with it. There's a lot of
different ways to paint really anything
in watercolor. If there's one way
that you don't like, you don't have to
do it that way. Do a nice, gentle feather and see how some of
these petals are overlapping. That really is helpful and
showing the folds of the rose. It's really starting to look
like this rose is unfolding. Don't be afraid to overlap
some of those petals, just be careful with your
again water control. If a petal is still wet and
you go and add one on top, then you're going to
get some bleeding. Just try to be aware of what's still wet before
you start the next petal. Another thing I
wanted to mention is, especially if you're seeing
a lot of other artists on Instagram or
Pinterest or TikTok, a lot of times they're posting time-lapses or just sped up
versions of their painting, which I like to do as well. But sometimes when you're
first learning and you see all those time-lapse
or sped up paintings, it can feel like that's how fast you have to actually paint. When I was first learning, I would try to speed paint every time I was painting a rose or a flower and it just caused me a lot of
stress and frustration, but that's not
actually the speed at which people are painting. Just a reminder to take your
time and enjoy the process. You don't have to speed paint. Another word of advice
I have when you're painting is if you're in the middle of painting
and you're really just not liking how your
rose is shaping out to be, try not to give up on it, especially since we're
just practicing here. Sometimes it can make all the difference to
just go back in and add some darker layers and that really can give a lot of
depth to your flower. The middle parts of
paintings are always, they feel weird and unfinished. Try not to give up on your painting because
you can always do a little bit
more to improve it. Like I said in the first one, make sure you're
taking some time to zoom out a bit
on your painting. I can see mine is getting
a little lopsided. It's a little too vertical, so I need to add some petals
here before I finish it up. Sometimes if you're just zoomed in on your
painting too much, it can be a little tricky
to keep it balanced. I'm just going to add
some petals here. You'll notice I have
some big petals here, but not so much on the top, so I'm just going to add
a few more up there. If you can work quickly, then it's okay to do a couple at a time as long as they
can stay nice and wet. Try not to get too ahead
of yourself on the petals. Then just like I did
with the other rose, I'm taking a really
light wash of the pink. I'm just adding in some really light fluffy petals just to round out the rose, give it a little more depth. Again, the final
step will be taking this dark value and just going over some
of these to darken it. Because as you paint
and as the paint dries, the vibrancy dies down
a bit so I just like to bring that back up by adding in a final layer of
the dark pigment. That rose turned
out to be quite a bit bigger than I
had planned for. But you can see that even though it's the same
technique as this one, it turned out quite
a bit different. Having that base layer gives
it a little more depth. You can see especially in the center where this has white, this has some color
underneath it. It gives it just a
little more depth, but for the most part
it's the same technique. I'm going to add a
couple of leaves to this one and then we'll
move on to the next. When you're ready to move on, meet me in the next
lesson to learn the expressive freestyle rose, which is slowly becoming my new favorite way
to paint roses.
9. Expressive Watercolor Roses: I mentioned this in the
introductory video, but the expressive, free-flowing style of
rose we'll be painting in this lesson is
what I love to paint when I just need to
chill out and get some paint on my paper
without thinking too much. This technique uses
a lot of water and quick bouncy brushstrokes,
as you can see. You can just use some
really beautiful blooms and not a lot of time. I think you'll really
enjoy this one. The processes we just practiced in the previous two
projects required a little more patience and
preciseness in our technique. But in contrast, I've found
that with this new style, it always looks much better
the less I try to control it. Now for this style of rose, I'm only going to be using
a Size 8 round brush. You want to have a brush that
has a nice pointy tip so you can still get the dainty
strokes for the middle. But you want one that can
also hold a good amount of water because we're going to use a lot of water for
this technique. First up, I'm just going to get another really light
wash of the pink and make sure I really have my
brush loaded up. Here we go. Try not to care too much about yours looking
just like mine. This method, none of my roses end up looking
the exact same. Just follow my
basic instructions, but feel free to get creative
and make it your own. Just like with the other ones, I'm starting by just
putting the very tip of my brush down to
create the center. Here's the fun part. I'm just going to start putting down some big
petals on the page. Again, I'm using lots of water. Not thinking about it too much. I'm just letting my
brush hit the paper. You still want it to be in a
circular shape like a rose. But I'm not caring
too much about exactly where I'm placing it and what my petal looks like. Again, the less you try
to control this way, I find, the better
it looks in the end. It can feel a little
uncomfortable at first if you don't know exactly
how it's going to end up. You might not like
how it ends up, but you might really like it. There's my basic rose shape. I'm going to add in
just a little bit more petal down
here at the bottom. Now I'm going in with a
really dark value of my pink. I'm just tapping it
in along the petals. Again, not overthinking it. I really love how beautiful
these bleeds are. I'm going to be a little more
careful towards the center because I still want my
center to be defined. I always mark the center of
all my roses to be defined. But for the rest
you can be playful. If you don't like some
of these harsher bleeds, then you can just
smooth it out a bit. I'm going to do one more
round of the dark pigment and just tap it in where it needs a
little more definition. That's turning out
really beautiful. Now, I'm going to do the same
technique with my leaves. Just being a little carefree, wiggling my brush and
letting those leaves flow. Just play around with
different amounts of pressure. You can, of course, always
add those wispy strokes. I really love those. As I said, when I don't want
to think too much about my painting and I
just want to get some florals down on the page, this is the technique
I always go for. I'd like there to be a little more definition to my leaves. I'm just going in with a second layer and letting that dark pigment
bleed into the base layer. Another tip is if this
is stressing you out and it's looking a little
too loose for your liking, you can always grab
a very dark pigment. I'm adding just a touch of
a deep purple to my pink. I'm just going to darken
up the center even more. Because if you have a
very defined dark center, the rest doesn't really matter. I'm just going to add that. You don't have to do this part. Like I said, it's a very loose, expressive, free-flowing rose. But if you just want to
add a little more detail, you can certainly do that. Now you can start to see that the center is a
little more defined. Then the rest of the
flower just supports that. It might sound a little weird, but at least in my experience, I have to sometimes intentionally
practice letting go of control and freeing myself to get loose
with my paints. Don't worry if this technique feels a little
difficult for you, just allow yourself to have fun. Allow yourself to be a
little uncomfortable and let your brushes
just dance on the paper. Sure some of your roses might
turn out a little wonky, maybe you won't like
how some of them look, but you'll be surprised
how many turn out absolutely beautiful
in their own way. In the next video, we'll learn
the final style of rose, which is the upright rose stem.
10. Long Stemmed Watercolor Roses: Now that we have already learned four different styles of roses, this lesson will
feel like a breeze. We'll be learning to
paint a classic upright rose stem like
this example here. In this lesson,
you'll notice that we'll still be using a lot of the same techniques we just used in all of the
previous lessons. But we'll just be adding
some of these side view overlapping petals
as well as the stem. Let's look at this
example before we start. We have a very similar center of the rose like we've been
practicing in these ones, but instead of being round, it's a lot more oval
shaped because from this view we're only seeing a little peak of the
center of the rose, so it's smaller and flatter. Another note here
is I'll be using much smaller brush
for this painting, just using a size
four round brush, because these
strokes are going to be smaller and daintier and I want to be more
careful and more intentional with my
feathering brush. Let's go ahead and start by
just painting another center, but just remember to keep it
more oval-shaped and flat. Loading up some of this dark
pigment on my size four brush and I'm just going to start tapping into
some dainty strokes here. I'm still keeping
white space in mind. Still keeping my
strokes nice and light. But just making my C curves
of little less curvy. Now, I'll do the
same thing as we've done in the previous lessons. I'm going to feather
out the outer petals, but instead of using my
size eight round brush, I'm just going to
continue to size four and be very mindful
about water control. A very little amount
of water on my brush and I'm just gently
feathering that out. Once the center is
looking pretty good, I'm getting a light wash of this pink and I'm going to start here on the left and just make a gentle U-shape and
connect it up here at the top. I'm starting with a
light wash and then I'm going to be adding
in more layers. It's always better to start light and then you can go
back in with a darker. For this left petal, this is going to be the
one in front and it's going to be overlapping
the one on the right. I'm going to just gently pull it down like that and fill it in. Now I'm going to go back in with a darker value of that pink. I'm just going to tap it in along the edges to
define that petal. Now to start on this petal, this one is going to be
behind the one on the left. I'm keeping it nice and
light and just being careful and now I'll do that same thing grabbing a darker pigment and tapping it in along the
edges of the petal. The next steps are
really up to you. I'm going to do a few
rounds of just blending, creating some softer bleeds and adding in some
more definition. You don't have to do this part. You can do more than I'm
doing. You can do less. It's really up to
your preference. I'm just going to be
gently blending these out. I want a little bit of a highlight on each
of these petals, so I rinsed off my brush, dab it on my paper towel, and I'm just going
to lift some of that color right off of the page to create
a nice highlight. I said, it's really up to you how many rounds of
those you'd like to do. Just do it until you feel happy with the definition
of your petals. You can keep it
very loose and just tap in some shadows
or you can do a few different layers of lifting and blending
like I'm doing here. Now those outer petals
are looking pretty good. I'm going to go back
in, in the center with a really dark value and just darken it up just like I've done
in the other lessons. I'm not going to go overboard because I still want there to be white space but I'm just adding
a little more definition. Once you're happy with
how the flower looks, you can go ahead and
add in your stems. I'm loading up some of my
green onto my size four brush. If you don't want there
to be any bleeding then just wait until this dries completely and then go ahead and add your stem
and your leaves. If you're okay with
a little bleeding like we've done on
the other flowers, then you can go
ahead and add that. I'm just going to gently drag my brush down to
create a nice little stem. Again, that's up to you how you want to display your leaves. I'm going to do a
couple up here. I'll probably have a couple
coming down as well. Again, I want this to
be your creations, so feel free to put your
leaves wherever you'd like. The fun part of painting
stemmed roses like these is you could create another
one and have it overlapping. You could do a little
bouquet of them, it's really up to you. I'm just going in
with a darker layer here to add a little
more definition. That's really it for
that stemmed rose. It's a very simple process. A lot of the same techniques that we did in the other ones, especially for the
center of the rose. Again, you want to make
sure it's defined, darker, tighter and then you have these side view
overlapping petals. Feel free of course to
practice a couple of more. Like I said, you can have
one overlapping this one, you can have a little bouquet of them or a bunch of them, it's really up to you. In the next video,
I'll be sharing a few of my tips and
tricks that I've learned over the years as well
as some easy ways to fix common mistakes with
your rose paintings.
11. BONUS: Tips & Tricks for Painting Roses: In this bonus lesson, I'll be sharing my favorite
tips and tricks when painting roses and
a few ways that you can fix common mistakes in your paintings along
the way that have really helped me level up my roses and feel
confident in my process. We'll start with the
tips and tricks. Number 1 is to master the
center of your roses. I know I already said
this during class, but having a dark, clearly defined center truly takes your rose to
the next level. Even if the rest of your rose
turns out to be a disaster, if you have a nice center, it will still look okay. Here's an example
where I painted a nice dainty center and I purposefully
turned the rest of the rose into just
a blob of color. This is not one
of my best roses, but even without the rest of the rose having nicely
defined petals, you can still clearly tell that this is supposed to
be a loose rose. Just keep practicing
those centers and don't forget to leave
your white space. Number 2 is to understand your petal sizes
and color values. Try to remember
that the inside of the rose will always
be smaller, daintier, and darker and your petals
should get bigger and lighter as you work your way towards the outside of the rose. If you can keep those things
in mind as you paint, your roses will
improve drastically. Number 3, try to
paint your rose rose while the outer petals
are still slightly wet, that will help you achieve those beautiful loose blooms and bleeds between the roses and the leaves that I
absolutely love. Number 4, I also said
this one during class, but whatever you do, don't give up on your rose paintings. I know the beginning and
middle parts sometimes feel awkward or even a bit ugly, but adding your darker
layers and feathering out the petals can really
make a big difference. So just try to be patient
and keep pushing through. Number 5, and this one might
just be the most important. I really encourage you to keep each and every
painting you create, even if it's just for practice, even if you hate
the final result. That way you can
watch your style and skills improve over time. On the days when I feel
frustrated with my artwork, I often look back at my old
paintings and appreciate where I'm at today and how far I've come since
the beginning. It's hard to notice
progress when you're slowly getting
better and better each time you sit down to
paint but when you compare your first few paintings to where you are later
down the road, the difference can
be hugely inspiring. Now, I want to talk about
a few easy ways to fix common mistakes or
challenges that you may run into when you're
painting your roses. Number 1, if your
roses are turning out lop-sided or a bit wonky, I found it helpful to gently trace a small circle before you start painting to help guide where you put your
petals down on the page. Number 2, after your roses dry, if they look a little bit flat or too much like
a blob of color, just go back with a
darker layer on top. Trust me, this can make all the difference in adding depth and definition and bringing
your roses back to life. Number 3, if you paint with too much water in
your brush and you're having trouble
getting soft bleeds instead of harsh dry lines, or you're struggling
with the water pooling up on your paper, just take a clean dry
brush and gently let the bristles soak up some of that excess water on your petal. Number 4 is not necessarily
how to fix a mistake, but more so how to greatly
improve your blending and layering with watercolors if that's something
you struggle with, and that is investing in high-quality 100
percent cotton paper. While student-grade paper
is fantastic for practicing new techniques and helping to build up your muscle memory, it's much harder to work with
when you're dealing with lots of water layers
and blending. If you're able to do so, I highly recommend investing in some a 100 percent cotton paper and you will notice
a huge difference. Before we move on, I also
want to mention that I have another loose floral class available that has
tons of other tips, specifically for creating
loose florals and turning them into beautiful
compositions and bouquets. If you now feel comfortable painting roses and
you want to learn how to put them together with other florals in a larger piece, I definitely recommend
checking out that class. The full title is called
Loose Watercolor Florals: Learn to Paint Easy Flower
Compositions and Bouquets. In the next and final video, we'll wrap up the class.
12. Final Thoughts & Resources: [MUSIC] Congratulations
for making it to the end of the class, I had so much fun painting
alongside you today. I hope you were able to learn some new techniques
and to just enjoy the process of learning how to paint beautiful,
loose style roses. We learned a ton of new
stuff in class today. But all technique aside, if there's one main thing I want you to take away
from this class, it is truly to just
enjoy the process and go easy on yourself as you learn these new
painting techniques. I completely understand
the frustration that can come from
learning watercolor, but I encourage you to keep practicing and
don't ever give up. Each time you sit
down to paint is another opportunity
to grow and improve, even if you don't always end up liking your final product. As a reminder, please
don't forget to share your projects and be sure to tag me on Instagram
@petals.by.priya, so I can see your
lovely artwork. Additionally, if you
have any questions, I'm always reachable
on Instagram, DMs, or by email, which I'll leave
a link to below. You can also find more
artists resources like my free watercolor
supply guide and watercolor leaves
color mixing guide on my website, which is
petalsbypriya.com. If you enjoyed this class, please take a moment to
leave a quick review. I read each and every
review and they really help me to identify areas
that I can improve on, and they give me
tons of ideas and inspiration for
future class content. I also encourage
you to check out some of my other
classes as well. I'd love to see you there. Thanks again, and happy
painting from me to you. [MUSIC]
 Petals by Priya Watercolor, Watercolor Artist & Teacher