Transcripts
1. Welcome to class!: Welcome to class. I'm
so glad you're here. Today we'll be painting a variety of realistic
style pumpkins and gourds using some of my absolute favorite beginner and intermediate
watercolor techniques. My name is Priya from Petals
by Priya watercolor designs. I'm an artist, an art teacher
based in Honolulu, Hawaii. I know firsthand just how intimidating it can be
to learn watercolors. That's why I've broken down today's project into
bite-size lessons so we can practice
basic techniques and start to build up
your muscle memory, which is a critical part in improving your
creative practice. Not only that, the
skills you'll learn in today's class
can be applied to any other watercolor
project you work on in the future,
not just pumpkins. Get ready to master new
techniques that you can add to your painting tool
belt right away to start drastically
improving your work. In class today, we'll start
by learning how to sketch pumpkins and gourds that look
realistic and have depth. This part is totally optional if you'd
rather paint freely, but I personally prefer to have a light sketch before painting. We'll then rerun the completing a few practice
exercises that will be helpful to you once we start
painting our pumpkins, including shading, blending, lifting and utilizing the wet-on-wet
watercolor technique. Once you're feeling
confident with that, we'll learn how to paint
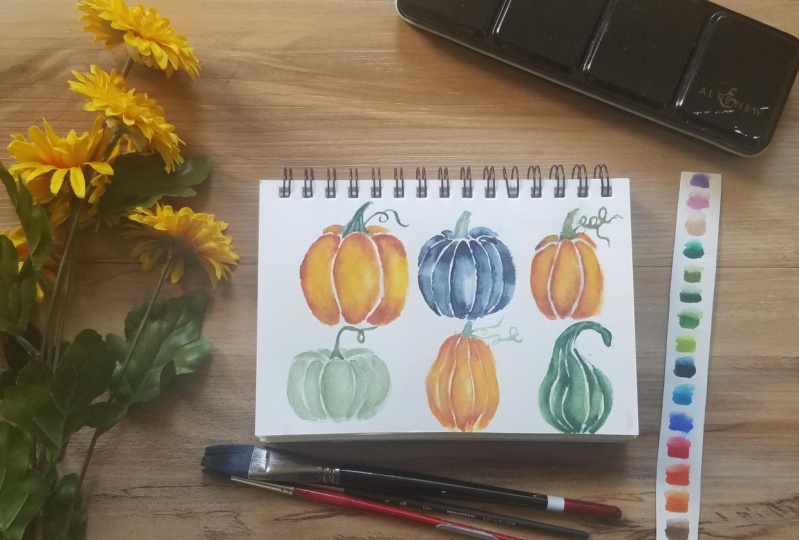
six different styles of pumpkins and gourds. I've included all the sketches you can reference throughout the class that can
be downloaded for free in the resources
section below. Our final class project will be the culmination of each of the paintings we work on
throughout the class. By the time we're finished, you'll be left with a
beautiful autumn composition that you can frame and
use for your fall decor. Before we jump in, if you want to learn more
or connect on social media, you can find me on Instagram @petals.by.priya, on my website, petalsbypriya.com or on YouTube
@PetalsbyPriyaWatercolor. Now, if you're ready to start painting some fun fall pumpkin, let's get right into it.
2. Supplies: The supplies you'll need for this class, for
watercolor paper, I'll be using Legion Stonehenge, 100% cotton paper. For brushes. I'll be using
Princeton velvet touch round brushes ranging from Size 1-6 but any round brushes that you have at home
will do just fine. For watercolor paint, feel free to use any colors you like. I'll primarily be using
shades of orange, but as you can see from
our final project. I'm also going to throw in
some greens and blues to give our composition some added
interests and contrast. Other supplies
we'll need include a jar or bowl of clean water, mixing palette and a paper towel for dabbing excess
water off your brush. Once you've gathered
all of your supplies, I'll see you in the
next lesson to start sketching out our
pumpkins and gourds.
3. Sketching Pumpkins & Gourds: In this lesson, I'll
share my process for creating quick but
realistic pumpkin sketches. Now I mentioned this in
the introductory video, but if you're not into
sketching things out before you paint,
that's totally fine. Feel free to skip this lesson and continue
on with the class. However, if you're like me
and you like to at least have a basic outline
before you start painting, then let's get started. I'll be sketching each of the
pumpkins and gourds using a fine tip Sharpie to help you see it clearly in this video. But make sure you're
using a light pencil on your end so it
doesn't show through too much underneath
your painting. Let's first start with this simple, classic pumpkin shape. Now my process for
sketching any type of pumpkin is to first start
with the center oval. Then I add on the
crescent shapes to create the side
of the pumpkin. Then I move on to
drawing the stem. I finish by adding the little curves in
the back that help give the pumpkin more
definition and it makes it look more
realistic and 3D. I'm starting here by just doing a nice big oval shape for
the center of the pumpkin. Then I move on to
adding crescent shapes. I don't start right
here at the top. I give it a little
bit further down. That way, the stem, it's not drawn yet, but you can see the stem coming down in
that little divot. Starting down here and adding
in that crescent shape. Same down here at the bottom, I'm giving a little
bit of a gap there. I'll do the same exact
process on the left here. Now I'm going to
start with the stem and you can make
your stem short, you can make it long. You can add some binds. It's really up to you. I'm just going to do kind of
a medium shaped stem here. Again, starting in
this little divot and just coming to
a point there up at the top before I
drag it back down. Now this alone would
be fine as a pumpkin. But like I said before, what really gives it that 3D effect is adding these
little curves in the back. I'm just doing a little ridge there and same on the left side. That simple detail
really gives the pumpkin some depth so you can almost
see the backside of it. Now for the second pumpkin, this process will start off the same as this one we just did. But I'm going to make it
slightly more detailed by adding a few more crescent
shapes on either side. Again, starting with the oval
here to create the center. I'm doing this one a
little bit thinner. Now I'll start adding the
crescent shapes on either side. You'll notice that each
one also goes slightly higher because you're showing
it going further back. You're just adding
some depth there, which means that
each time that it ends is going to be
slightly higher up. I'll repeat that same
process on the right side. Now that those are
done, I'm going to go ahead and add the stem. So same as last time, just bringing it up
to a bit of a point, dragging it back down. Then I'm going to add
in those back ridges to give it a 3D effect. One here on the right side. Then I'm going to actually add
a couple here on the left. This one is going to start
a little bit further down. Then one more here. There we have it. Very similar process for the first one there, just by adding a few
more on each side, it makes it look a little
bit more detailed. Now for the third style, I'm going to switch
it up a bit by making it a taller pumpkin, but just with a few curves. It'll be more similar
to the first one. We're just going to
make it a bit taller. Process will still be
the exact same though. Now I'll go ahead
and add the stem. I'm also going to add
a few curly binds here just to give this a
little bit of character. So this is really up to you. We're just going to make
some squiggly lines here, give it some curly
cues, back down. I might also do some
on this side as well. Now our fourth is going to be the last little pumpkins before
moving on to the gourds. This pumpkin is
going to be one of those tiny round decorative
pumpkin so that you can often find at the grocery
stores in the fall time. It'll be the same
process as these. But we're going to
be adding lots of crescent shapes on this
side and a very curly line. I'm going to start with a really nice round oval
here in the center. The same exact thing
as the last time. I'll just start adding
those cresents on the side. Now I'm going to go ahead
and add a really long stem, coming up to a point here, then adding a nice
long bind at the top. Now I'll start adding in these back ridges to
give it the 3D look. You don't have to follow
these sketches exactly. You can feel free to add as many or as little ridges
as you'd like. Now we're moving on to
the gourds and my process for sketching out the gourds is a little different
than the pumpkins. For each of these, we're only doing two. But I'm going to actually
start with the outline of the shape and then
I'm going to add in lines for each of the curves. This first one is just going to be a nice rounded bell-shape. So starting out by just
outlining it here. As you know, gourds come in all different types
of shapes and sizes. As I've said before, you
don't need to follow these exact sketches
if you don't want to, you can just create your own. Maybe pick some up
from the grocery store and try to drop my reference. It's really up to you. Now that that
outline is in place, I'm just going to start
dragging down some lines here to create each
of the ridges. Then for the stem,
I'm just going to do a nice little rounded top here. Same process as we just did
for our last gourd here, I'm going to start
with the outline and then drag down some of those lines to
create the ridges. Just loosely
outlining this here. We get a nice
organic round shape, and then going in and
adding each of the ridges. I'm just going to pencil
in a little bit of a stem here at the end.
There you have it. The nice thing about pumpkins
and gourds is they all look very different and they each have their own unique character. Feel free to alter
your sketches. Give some of them bumpy edges, warped, twisted vines, it's really up to you. In the next lesson, we'll start our practice
exercises for blending, shading, and lifting, which will help give our pumpkin some added realism and depth.
4. Watercolor Techniques: We're going to be using
a lot of layering, blending and lifting
techniques once we start painting each of
the pumpkins and gourds. In this lesson, we'll complete a few quick practice exercises
to get the hang of it. I'll just be using the
scrap piece of paper since we're just practicing
this time around, so I'm going to go
ahead and just sketch out the basic oval shape. It doesn't have to be perfect, we're just going to practice
some of these techniques, and we're actually going to be doing two different
practice rounds, so you can just go ahead
and sketch out two ovals. For each of the pumpkins,
we're going to be doing a few different steps, and that first step is taking a very light value
of your color, so if I'm going to be painting a pumpkin in this
burnt orange color, I'm going to do a very
light first value of this orangey yellow. To get a lighter
value of a color, you're just going to use
a more diluted color, so I'm adding a lot of
water to that mixture, and I'm just going
to lay down on my paper a very
light first layer. Now you want to make sure
that that first layer has dried completely before we
get started on the next one. Now we're going to be practicing
blending and shading, so I'm grabbing a darker
value of that orange. I'm just going to start putting in a darker value where those
shadows are going to be, which is up at the top, down along the edge, and down at the bottom, and you have to
work quickly here because you want that
layer to still be wet. When you rinse off your brush, gently dab the excess water on your paper towel and
start blending it out. You want to make sure that
this doesn't dry first, otherwise you'll get
some harsh lines that you won't be able
to blend out as well, and now you can see that
shadow start to form. One of the key skills
here is water control. You want to have enough that you can blend it out smoothly, but you don't want too
much to where you have pooling of paint and water happening because
that's just going to create some really harsh
lines once it dries. Now while that's still wet, I'm going to do one final touch, which is getting an
even darker value of that same color, so I'm just making sure
to add a lot of that deep brown to my orange
mixture and just gently tapping in
a tiny amount just to create even more
added contrast, at the top, little down at the bottom
and along the edge. Don't worry if it
takes you a few tries to get the hang of it, we're just practicing
here because this is the same process we'll
be using on each of the pumpkins and gourds by just gently tapping
in present added drama. Looking again here at
our reference sheet, you can see how similar this is to each of the
ridges on this pumpkin. This is that same process, we have the underlayer of
the light value of yellow, then we start to blend
around the edges, and then you can see
here where we tapped in an even darker value just
to add even more contrast. Now in our second
practice round, we're going to do
that same process, and we're going to add one
last step at the end to create an even sharper highlight which is called
lifting, so again, starting with a
really light value of that yellowy orange, just to lay down a base layer, making sure to keep
it a nice light value and an even amount of water. I don't want any
pooling going on, but I want enough to cover
this whole first layer. Once it's dry, I'm going to
start with my second layer, which is the median
value of that orange. Again, you don't have
to be using orange. We're just practicing here, so use whatever colors
you have available. I'm just going to start to put in where those shadows
are going to be. Up at the top, down along the edge and a
little bit at the bottom. You can also do it along
the other edge if you'd like just to get
even more practice. Now while that's still wet, I'm rinsing off my brush, dabbing off the excess water on my paper towel and
blending it out. Another thing I'll note here is these techniques
are a lot easier to do when you're using
high-quality 100% cotton paper. If you're using
student grade paper, that's totally fine, it's great for practicing. But just be aware that the
water doesn't blend as well and it doesn't absorb as well into that
level of paper, so it'll just take a
little bit more practice and effort to get a
nice smooth blend. Just like we did in the
last one and adding even more contrast by
using a darker value, and just tapping in a
little bit of that on the areas where I really want
the shadow to show through. Now, the last step I
want to do for this one is create even more of a
drastic highlight here, and to do that,
we're going to use a technique called lifting. I'm completely
renting off my brush, dabbing it on my paper towel to remove any of
that excess water, and then I'm going
to just gently lift some of that color
right off the page. You have to do this while
that layer is still wet, so that you can remove
that color from the paper and it might
take a couple of rounds. I'm just gently lifting
that color from the page to create an even
more drastic highlight. Again, looking at our
reference sheet here, you can see that the
highlight is here, and then the shadows
are on the edge, so it really gives it a
nice rounded 3D effect. If you're still feeling uneasy
about these techniques, I encourage you to keep
practicing these lessons, do it a few more times, try some different shapes and really get the hang of
your water control, and once you're
ready, we'll start painting pumpkins
in the next lesson.
5. Watercolor Pumpkins Part 1: Now comes the fun part. We're ready to start
painting our pumpkins. But one last thing
I encourage you to do before we start is to take a kneaded eraser and gently roll it over
your sketches, just to lighten your
pencil marks even more. Because once you start laying down the paint on
top of the sketch, you will not be able to erase
any of those pencil marks. The very first one we're going
to do is in the top left, and it's our basic
classic pumpkin shape. I'm going to be following
the same color scheme that I did in my reference
sheet when I was practicing for the class. But again, feel free to use whatever colors you'd
like. Let's get started. I'm just like we did in
the practice around, I'm going to start with a
really light first layer of a very light value yellow. And once I have that whole
first base layer done, I'm going to give
that some time to dry before I go in with
the next layer. Okay, now that this
base layer is dry, I'm going to go in with
my medium value, orange. I'm just going to start
putting in where I want those shadows to be. Just like we did in
the practice round, I'm doing it up at the top, around the edge, and
down at the bottom. Now, while that's still wet, I'm rinsing off my brush, dabbing off some of
that excess water, and then I'm just going to
be gently blending that out. Again, you have to work quickly here because you don't want
that first layer to dry. Otherwise, you'll get
some really harsh edges, and it'll be harder
to blend out. Don't forget to rinse off
your brush every once in a while because you
want to have it clean when you're blending, you're not dragging
in too much color. Now while this is still wet, I'm going to use the
lifting technique that we also practiced in
the previous lesson. So I'm rinsing off my brush, dabbing off all of that excess. Then just going to lift some of that color right off the page to create a nice highlight right
in the center of this oval. Once that's done,
I'm going to do one last layer here with the
darkest value of the orange. This is still wet. This is called the
wet-on-wet technique. I'm just going to gently tap in some extra shadows
here up at the top, a little bit at the bottom, and along the edges. Again, you really want to be mindful of water control here. You want enough to where
you can still get those nice bleeding and blooming
effects from the wet-on-wet. But you don't want it too much
to where it's pooling up. Now I'm going to move on
to this crescent shape to the right of this oval that
we just finished painting. Now this is where
I really want you to pay attention
because we need to leave a little bit of
whitespace in between these so that the colors
don't bleed into each other. I'll show you on my
reference sheet here, you can see a little white
line in between each section. Now, if I were to just
connect them right now, this one is still wet, so you just have colors
bleeding into each other, and it would just create a mess. I'm taking my medium
orange value, and I'm just going to gently add in where I want
those shadows up top, just like we did
in the last one. Then I'm carefully leaving a
little bit of white space in between and just making
that crescent shape. Just like we did
in our sketching. I'm making the crescent shape, leaving some whitespace and adding in where we want
those shadows to be. It's the same process as
we just did with the oval, but it's just with a
crescent shape instead. Once you have that done, you rinse off your brush, dab off the excess water,
and start blending. Again, being mindful of that whitespace because
we want to make sure we leave that intact. Rinsing off my brush again
and blending it out. It's that same
process over and over again for each of these
sections of the pumpkin. Again, make sure to rinse off
your brush every so often. When you're blending,
you really want it to be just clean. So you're not muddling
it up too much. When you're ready to
create the highlight, rinse off your brush, dab off all the excess water, and just gently lift that color off the page
to create a highlight. Now we're ready for
that final step, using the wet-on-wet
technique to add the darkest value in
those areas where you really want to create
dramatic contrast. This whole painting is a
really great exercise in water control and
understanding values. Because this is all
the same color, but we're just utilizing
different values to create depth and
make it look 3D. Lightest value, which is
a really diluted mixture, all the way to darkest value, which is highly concentrated,
and a bit darker. All I'm doing is gently
tapping in some of that dark value where I want
to create some accents. Darkest shadows, the pumpkin. We're going to just repeat the same process on
the left crescent. We'll do the same thing
on these back ridges, but just on a much
smaller scale. I'm just going to
speed this part up, but feel free to do it at your
own pace, take your time. It's the same exact
process as we did in the practice exercise
and in these first two. Now that these three
sections are done, we have two more in the back. We're going to do
the same process, but just on a much
smaller scale. So I've moved down to a size 1 brush just so I can
have more precision, but the process
will be the same. I'm adding where I want
those shadows to be. Rinsing off my brush, dabbing off the excess water, and smoothing it out. Now, the process for the
stem will be fairly similar. We're going to do a light value. Again, using a lot of water in my mixture and just laying
down a base layer of green. You're getting a lot of practice
layering in this class. These back two sections
are still a little wet, so I'm just being mindful to leave a little
bit of whitespace, so they don't bleed
into each other. While that's still wet, I'm going to take a darker value of that same green color. Load up my brush and gently
tapping of the base, a little bit more on my brush. Gently tap it in at the base, get some of that bleeding, and just add a few
shadows there. Now I'm going to add
a little bit more detail once it's dried. But for now, I can go
ahead and add in the vine. Again, this part is up to you. If you don't like the
look of the line, that's totally fine. If you want more than one
volume, also totally fine. This is your pumpkin,
your creation. I'm just going to make
a little curly cue. There's my mind. Now
we've already finished. Like I said, I'm
just going to let this stem dry a little bit, and then I'll add in
the final details. Now that the stem is mostly dry, I'm taking my really
fine size 1 brush, the dark value of the green, and I'm just adding
in a little bit of texture to that stem. And I'm also going to add some
shadows on the vine here. There we go. Now that we have the first
pumpkin under our belt, the rest will be a breeze. For the purpose
of demonstration, I'm going to go through the next three pumpkins fairly quickly. But remember, take your time, go at your own pace and really
just enjoy the process.
6. Watercolor Pumpkins Part 2: Next up, we'll be doing
this deep blue pumpkin. For that pumpkin, I'm
going to be using this really deep
smoky blue mixture. Just like for the last pumpkin, I'm taking a very light
value of that blue, so I'm just diluting it
pretty heavily with water, and laying down my first layer. Just gently covering
the entire pumpkin in a light value of blue. Now that my base layer is
dry, I'm going to go ahead, and start adding in my
shadows in this first oval. I'm being very careful, adding in where I want those
shadows to be on the oval, which is at the top, down
along the side and the bottom. Rinsing off my brush, making sure this is
staying nice and wet, and blending it out. I'm just going to gently
go over that too, because my first layer
was a little too dry, so that's what I
was saying before, you can see a little bit
more of that harsh dry line. That's why water
control comes in. I'm adding another layer
there before I blend it out. Now I'm going to create an even stronger highlight
by rinsing off my brush to having
off the excess water, and lifting some color right
in the center of the oval. You know the drill.
Now I'm going in with the dark value, and even darker value to create those really
dramatic shadows. Now our first oval
is looking great. I'm going to speed
up the next part as I finish out these ridges, but the process, again, will be the exact same
as we've been doing, I just urge you to remember to leave these white
strips in-between, little bit of whitespace, so that the pumpkin doesn't
get too muddied and messy. You don't want those colors
bleeding into each other. You want to show separation
in-between each one. Now another thing I want
to mention here is, re-using a lot skinnier ridges. On this first pumpkin
they're nice and big. You had a lot of
room to work with. But on ones like
this, where we have more crescents to show more divides around the
edge of the pumpkin, you're going to have to use
a little bit more precision. I'm switching to a number
two round brush here, because this little crescent
shape is very small, so I want to make
sure I can still accentuate the shadows
and the highlights, but I don't want it to turn
into just a blob of color. I'm using a smaller brush, using just the tip of it to create the outline
of that shape, and then being very
gentle when I blend it. I'm rinsing off my
brush completely, so not muddling up the color, and then I'm blending it out. Just something else I want
you to be mindful of. The same considerations come
into play when we start doing this process on
these back sections. Using a fine tip, round brush, leaving the whitespace in
between each of the ridges, I'm just blending it
out very carefully. Now we can move on to the stem. Since the pumpkin is
very dark and moody, I'm going to do a lighter
green for the stem, just to provide a
little bit of contrast. Just going in with
a light layer, and then as it's still wet, just going to tap in a little darker version
of that thin color, just to create a little
bit of texture and depth. Rinsing off my brush, I'm just going to
blend it out slightly. Now we can move on
to the next one. For this third pumpkin, it's extremely
similar to the first. I'm going to be using
the exact same colors, the exact same process, but we just have three
main sections here. They're nice and big,
so we'll have lots of space to blend, and add depth. A couple of small sections
in the back for added depth, and then also adding
some binds here. I won't make you sit through another whole video with
the exact same process. I'll just speed this part up. But as I always say, take your time, and
enjoy the process. We are officially
on to the last of the four pumpkins before
moving on to the two gourds. I hope you've enjoyed
the process so far. Again, it's a lot of repetition, a lot of blending, layering, using the wet on wet
technique to create depth. We're going to do
that same exact thing for this last pumpkin here. For this one, I'm
using a really light light pale green color. But as I said many times before, color choice is
completely up to you. Once again, I'm starting
with a base layer that is extremely white value
of this light green. Because this color is so light, even when we add in
the darker values, even the dark values
are still pretty light. I want this base layer
to be extremely light. Just barely a difference from
the white paper underneath. Again, if you're using
a different color, that's completely fine, but if you are following
along with my color palette, just make sure this first
layer is nice and light. Now the base layer
is nice and dry, so I'm going to get started
with our blending techniques. Using a medium value
of that green color, laying down where I
want the shadows to be. Then again, rinsing
off my brush, dabbing off the excess water, and blending it out. You guys are going to be
really good at blending by the time you're
done with this class. Which is great, because it's
a super helpful technique no matter what your painting. Now I'm ready to
add the highlights. Again, I'm rinsing off my brush, dabbing off all
the excess water. I'm just lifting off that
color right off the page. Now it's time to add
the stem on this one. This one is my favorite
stem out of all of them, because we have this nice
long curly cube vine. I'm going to make it
nice and dark to provide a good contrast from the
light pumpkin color. I'm using a Size 2
round brush here. The stem comes up to a point, and then the line
is attached to it. I'm laying down that base layer, and then again, I'll go back
in with a little darker. Just tap in a little bit
of shadow along the line. There you go. If you're
feeling pretty comfortable and confident with the pumpkin painting process, that is great. You can move on to
the next lesson, and we'll start painting
those final two gourds. If you're not totally
confident with it yet, that is completely fine, feel free to keep practicing, and really just get the
hang of your water control, blending, shading, and all of those techniques that
we've been using.
7. Watercolor Gourds: Now onto gourds. Now we'll be using a lot of the same techniques from
the previous lesson, so this one should be a breeze. Don't forget, gourds come in all different types of
wacky shapes and colors, so don't be afraid
to get creative with their painting and
color choices. Let's start with our
bell-shaped gourd. I'm going back to the
same burnt orange color that I've used on the
previous two pumpkins. Once again, I'll start
with a base layer of a very light value of yellow. Now that the base
layer is nice and dry, the process will be really similar to the pumpkins
that we just did. The only thing I'm doing
differently is I switched to a size 2 fine tip round brush. Like I said before, we
have lots of space to do our blending and mixing
in the pumpkins, but the gourds have a
lot slimmer sections. I'm just going to want to be
a little more delicate and careful with my brush strokes. I'm going to load up
the size 2 round brush with my medium value of orange. I'm just going to
get started with the same process
of adding shadows, starting here up at the top, gently outlining the
edge of that ridge, and then adding some
more shadows down here at the bottom. While that's still wet,
I'm rinsing off my brush, dabbing off the excess water, and now I start blending. Same process as we
did for the pumpkins, but you just have a
little bit less room. I'm just being very careful
with how I blend this. Now I'm going to
rinse off my brush, remove all the excess
water on my paper towel, and gently lift
some of that color off to create the highlight. Now the final step is adding this last details
and darker shadows. This layer is still wet
and I'm gently tapping in a darker value just in certain areas to give it
a more dramatic contrast. It's up to you how drastic
you want the contrast to be. If you want it to be a
really smooth blend, then you don't have to
change the value too much, but if you want it to
be a nice bold shadow, then you'll want to make it
pretty dark so it stands out. I like it somewhere
in the middle, so I'm happy with that. Now we can move on
to the next section. Just like we did
with the pumpkins, I'm going to leave a little
bit of white space in between this section and
the one we just completed. Starting by adding
my shadows up at the top and then gently lining out where I
want this section to go, but being mindful to leave a nice little white
space in-between. Again, we want to
do that to avoid dissection bleeding into
each other too much. Now rinsing off my brush, removing excess water, and blending it out. Again, the final step is
adding the darkest shadows. Just gently tapping those in. When you're doing this step, if they bleed too much like that and you're not comfortable
with how that looks, just remove excess water from your brush and blend it out just like we do
on the second layer. There's nothing a little
blending can't fix. We'll just repeat
the same process. I'll speed it up on my
end, but take your time, and then we'll meet back up
to add the stem at the end. Once you're ready
to add the stem, we can start with a
light layer of green. Before I tap in the
shadows on that, I'm just going to
go ahead and paint in the lines for this. Again, if you don't want to
add lines, totally fine. It's a personal preference. I'm just going to
add a few in here. I just think it adds a lot of character
and just fun to do. Now the stem is still
a little bit wet. I'm just going to gently tap in a little of the darker green, again, just to add
some more texture. Now rinse off my brush
and just blend out any of those harsh lines. There we go. Now for the second chord and
our final painting overall, it's going to be this nice, dark green, twisted gourd. I really like this one. The process of
painting each section will be the same as
what we've done before, but the gourd handle has
some nice twist to it. When I drew my lines for
each of the sections, I just drew some
of them diagonally here to show that
twist of the handle. But again, that's a
personal preference. Feel free to do whatever
you'd like with your gourds. Let's get started
with the base layer. I'm just using a
light value of green, the same green we just used for the stem of the previous gourd, and just gently putting
down an even layer. Now that this layer is dry, I'll be doing the same
exact process of blending, shading, and lifting that we've done in the previous ones. By now you should be pretty
familiar with it and this is just another great chance to
practice your new skills. I'll fast-forward on my end, but again, take your time. Now that all the main
sections are done, I'm just going to be very
careful here using the tip of my brush just to add the final details to
this twisted handle. I'm just adding a little bit of shadow on the
[inaudible] twisting, and then going back in with a clean damp brush
and blending it out. I'll do this one more time with an even darker value just to really make
that shadow stand out. In the next lesson,
we'll go over some project reminders and encouragement before
we wrap up the class.
8. Reminders & Encouragement: Now before we wrap up, I want to share a
few last reminders and pieces of encouragement. Number 1, please
remember to upload your work to the project
section here on Skillshare. It's a great opportunity to
share your final painting, receive feedback, and
connect with other students. Number 2, if you have any questions about
what we learned in class today or you're struggling with any
of the techniques, please feel free to post it
in the discussions tab below. This is a great place to build community with your classmates, share insights and get
your questions answered. I went ahead and started things off by asking you to share your favorite watercolor
supplies and what has helped you most so far in your
journey with watercolors. I'd love to get the conversation going so we can build community, learn from each other,
and continue to grow our creative practices. Finally, and most importantly, don't forget to be kind to
yourself and to your work. Even if you're not 100 percent happy with your painting today, I can promise you that even just working through each
of the lessons and completing this class has already improved your
skills tremendously. You might not be
able to see it now, but each time you
sit down to paint, you're learning something new, building up that muscle memory, and taking a step in
the right direction. I'll see you in the next
and final video to wrap up the class and share
a few more resources that you might find helpful.
9. Final Thoughts & Resources: Congratulations for making
it to the end of the class. I'm so grateful you
joined me today and I hope you enjoyed the process
and learned something new. Now while this class focused
on pumpkin specifically, the skills you learned
today can be applied to so many different
things you want to paint with watercolors
in the future, the possibilities
are truly endless. Now if you're ready
to take the next step and turn your artwork
into art prints, greeting cards,
or other designs. I'd love to have you join my other class called
Digitizing Your Artwork. In that class, I teach you my step-by-step process
for scanning and editing my paintings in Photoshop to turn them
into digital designs. That class is for
complete beginners and includes everything you
need to get started. You can also find more
artists resources like my free watercolor supply guide and color mixing
guide on my website, which is petals by priya.com. Just one final reminder to share your projects in
the project section and leave a quick
review of this class so I can receive your
feedback as well. Thanks again for
joining me today and happy painting
form me to you.
 Petals by Priya Watercolor, Watercolor Artist & Teacher