Transcripts
1. Introduction: Hello, Eon. Welcome to my class. I'm Raniya, a aticlar
artist based in the UA. I absolutely love
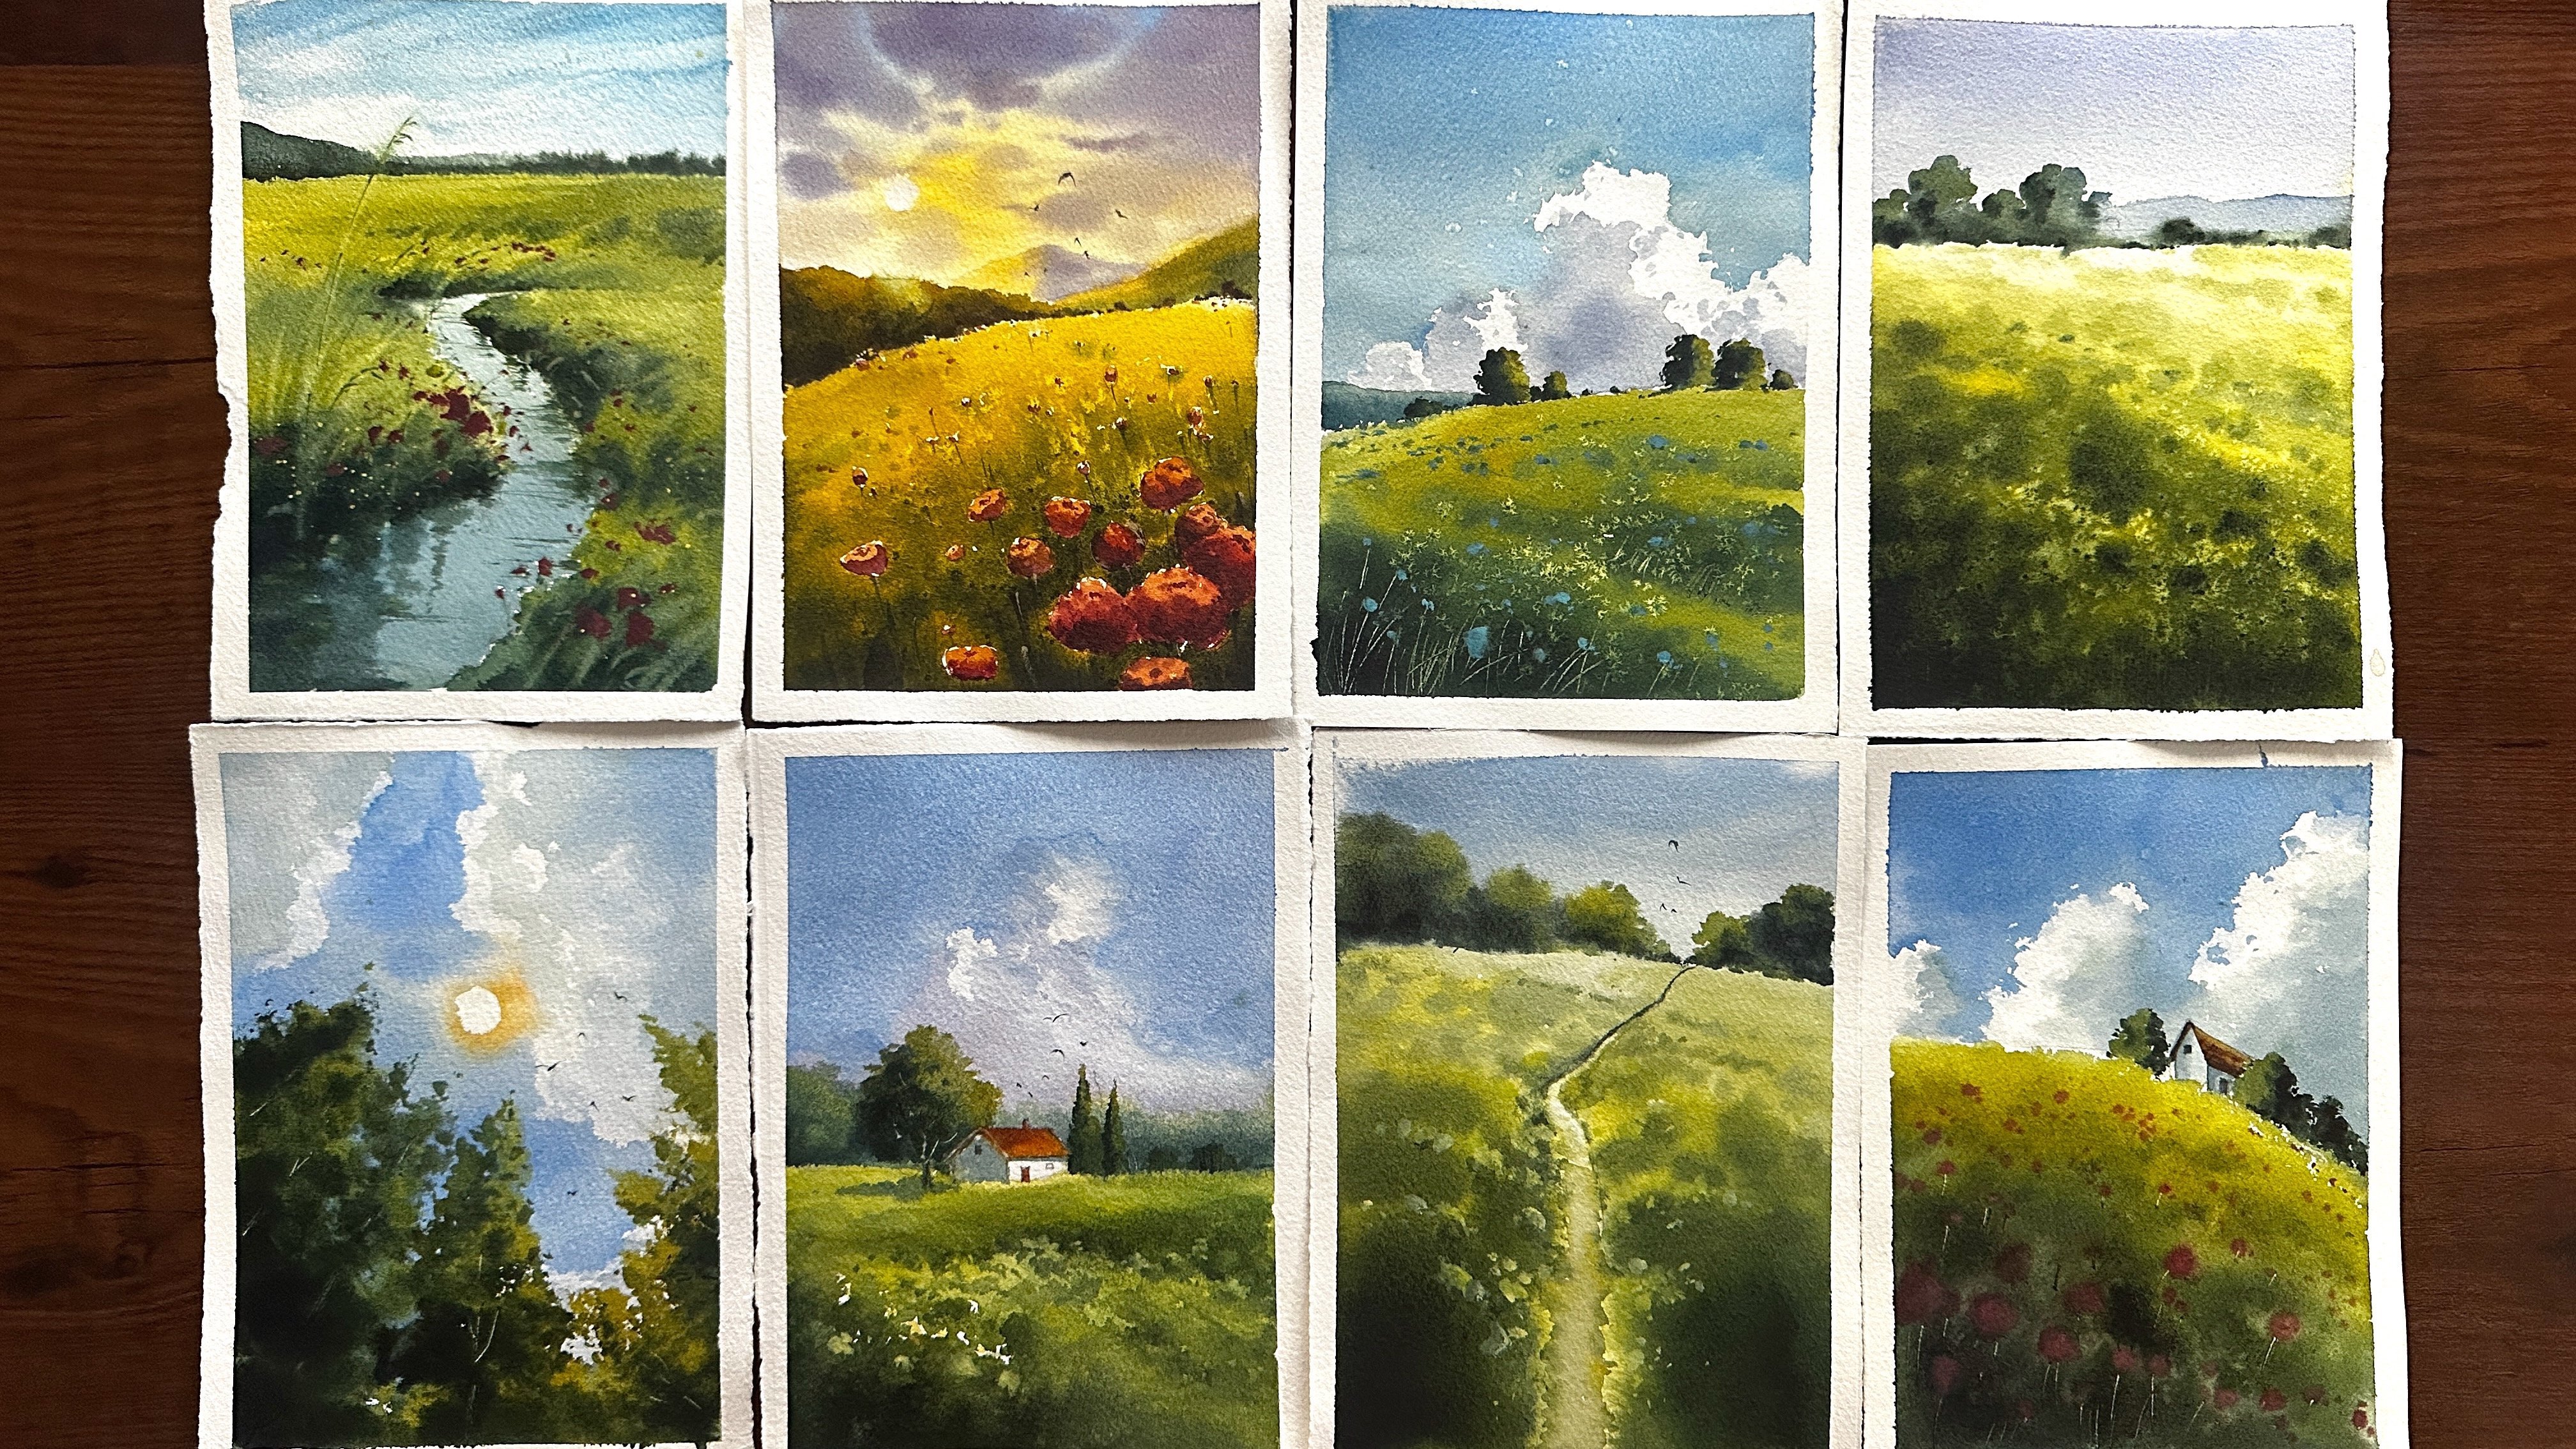
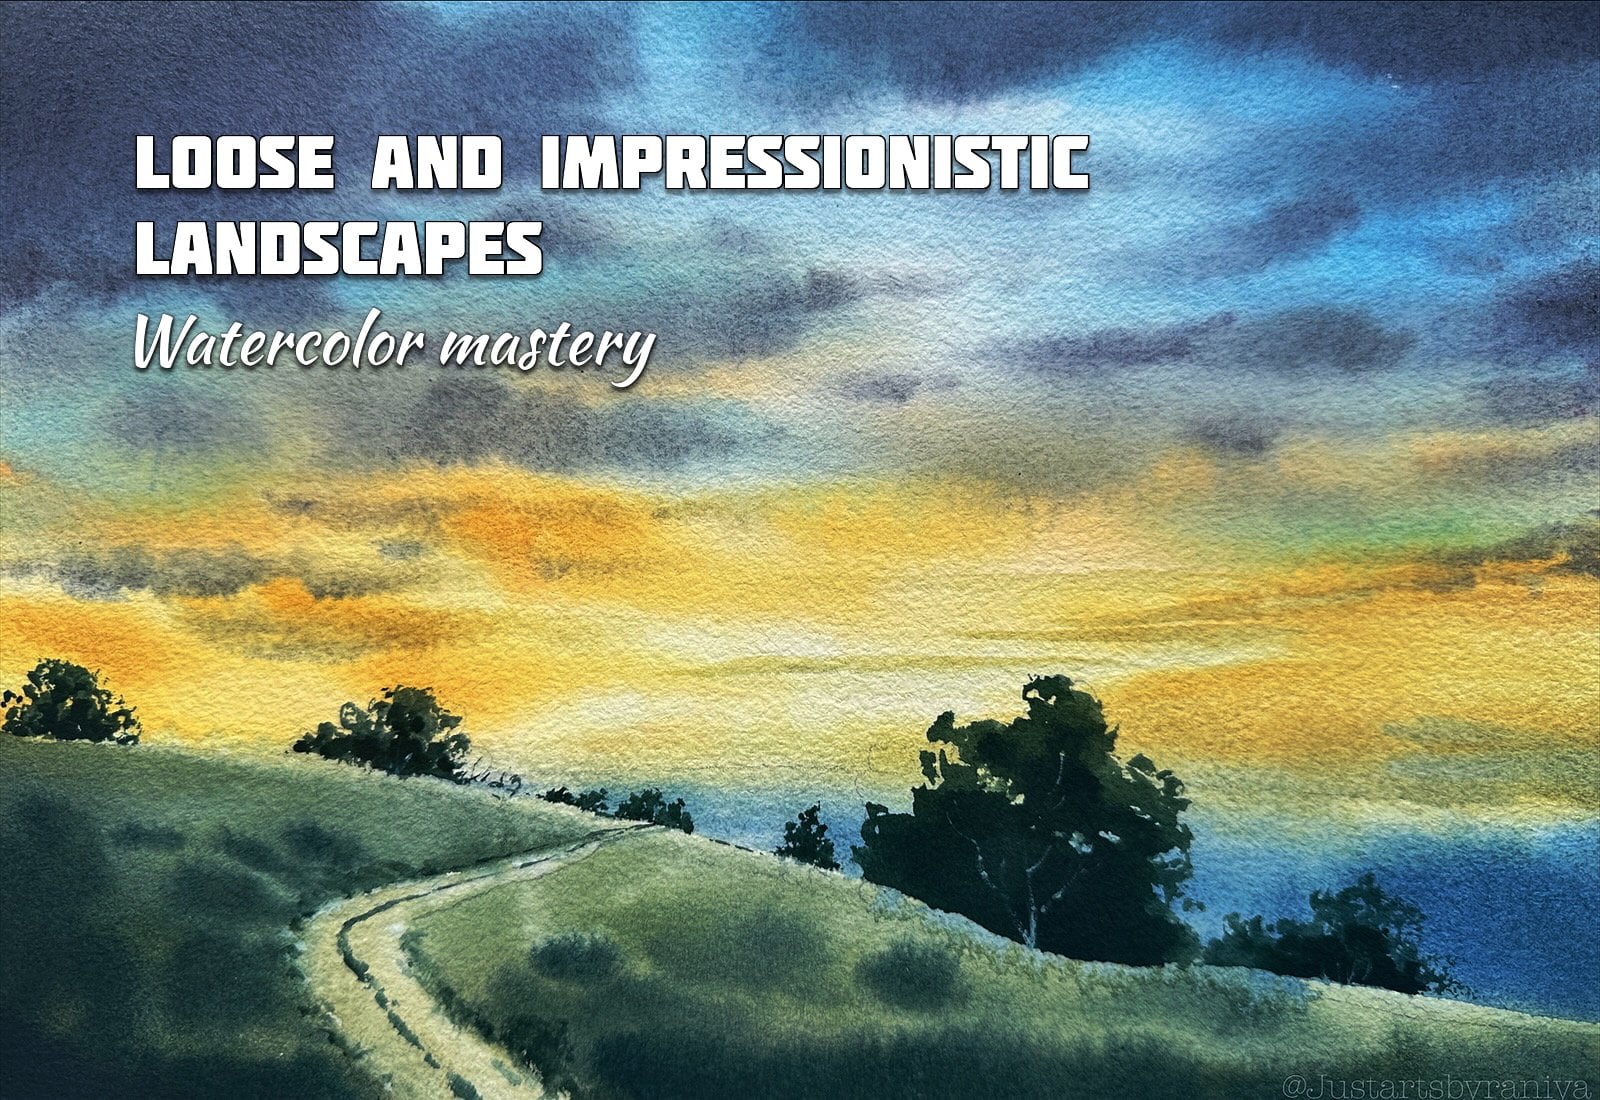
painting nature. In this class, we'll paint five beautiful landscapes in a loose and
impressionistic style. This class is actually
a part two of one of my previous classes where we painted four loose landscapes, and I'm so happy to see your beautiful projects
from that class, and this is a continuation
of that journey. We'll begin by going over all the materials and
colors we'll be using, and I'll also show you
some simple color mixes. And after that, we'll practice
a few basic techniques, especially how to paint. Lose trees, I often
get requests for tree tutorials after the Part
one class of this series. So this time, I have included a small separate lesson on some of the basic
tree techniques. Let me know if you want more detailed class
on painting trees. Then we will start our five
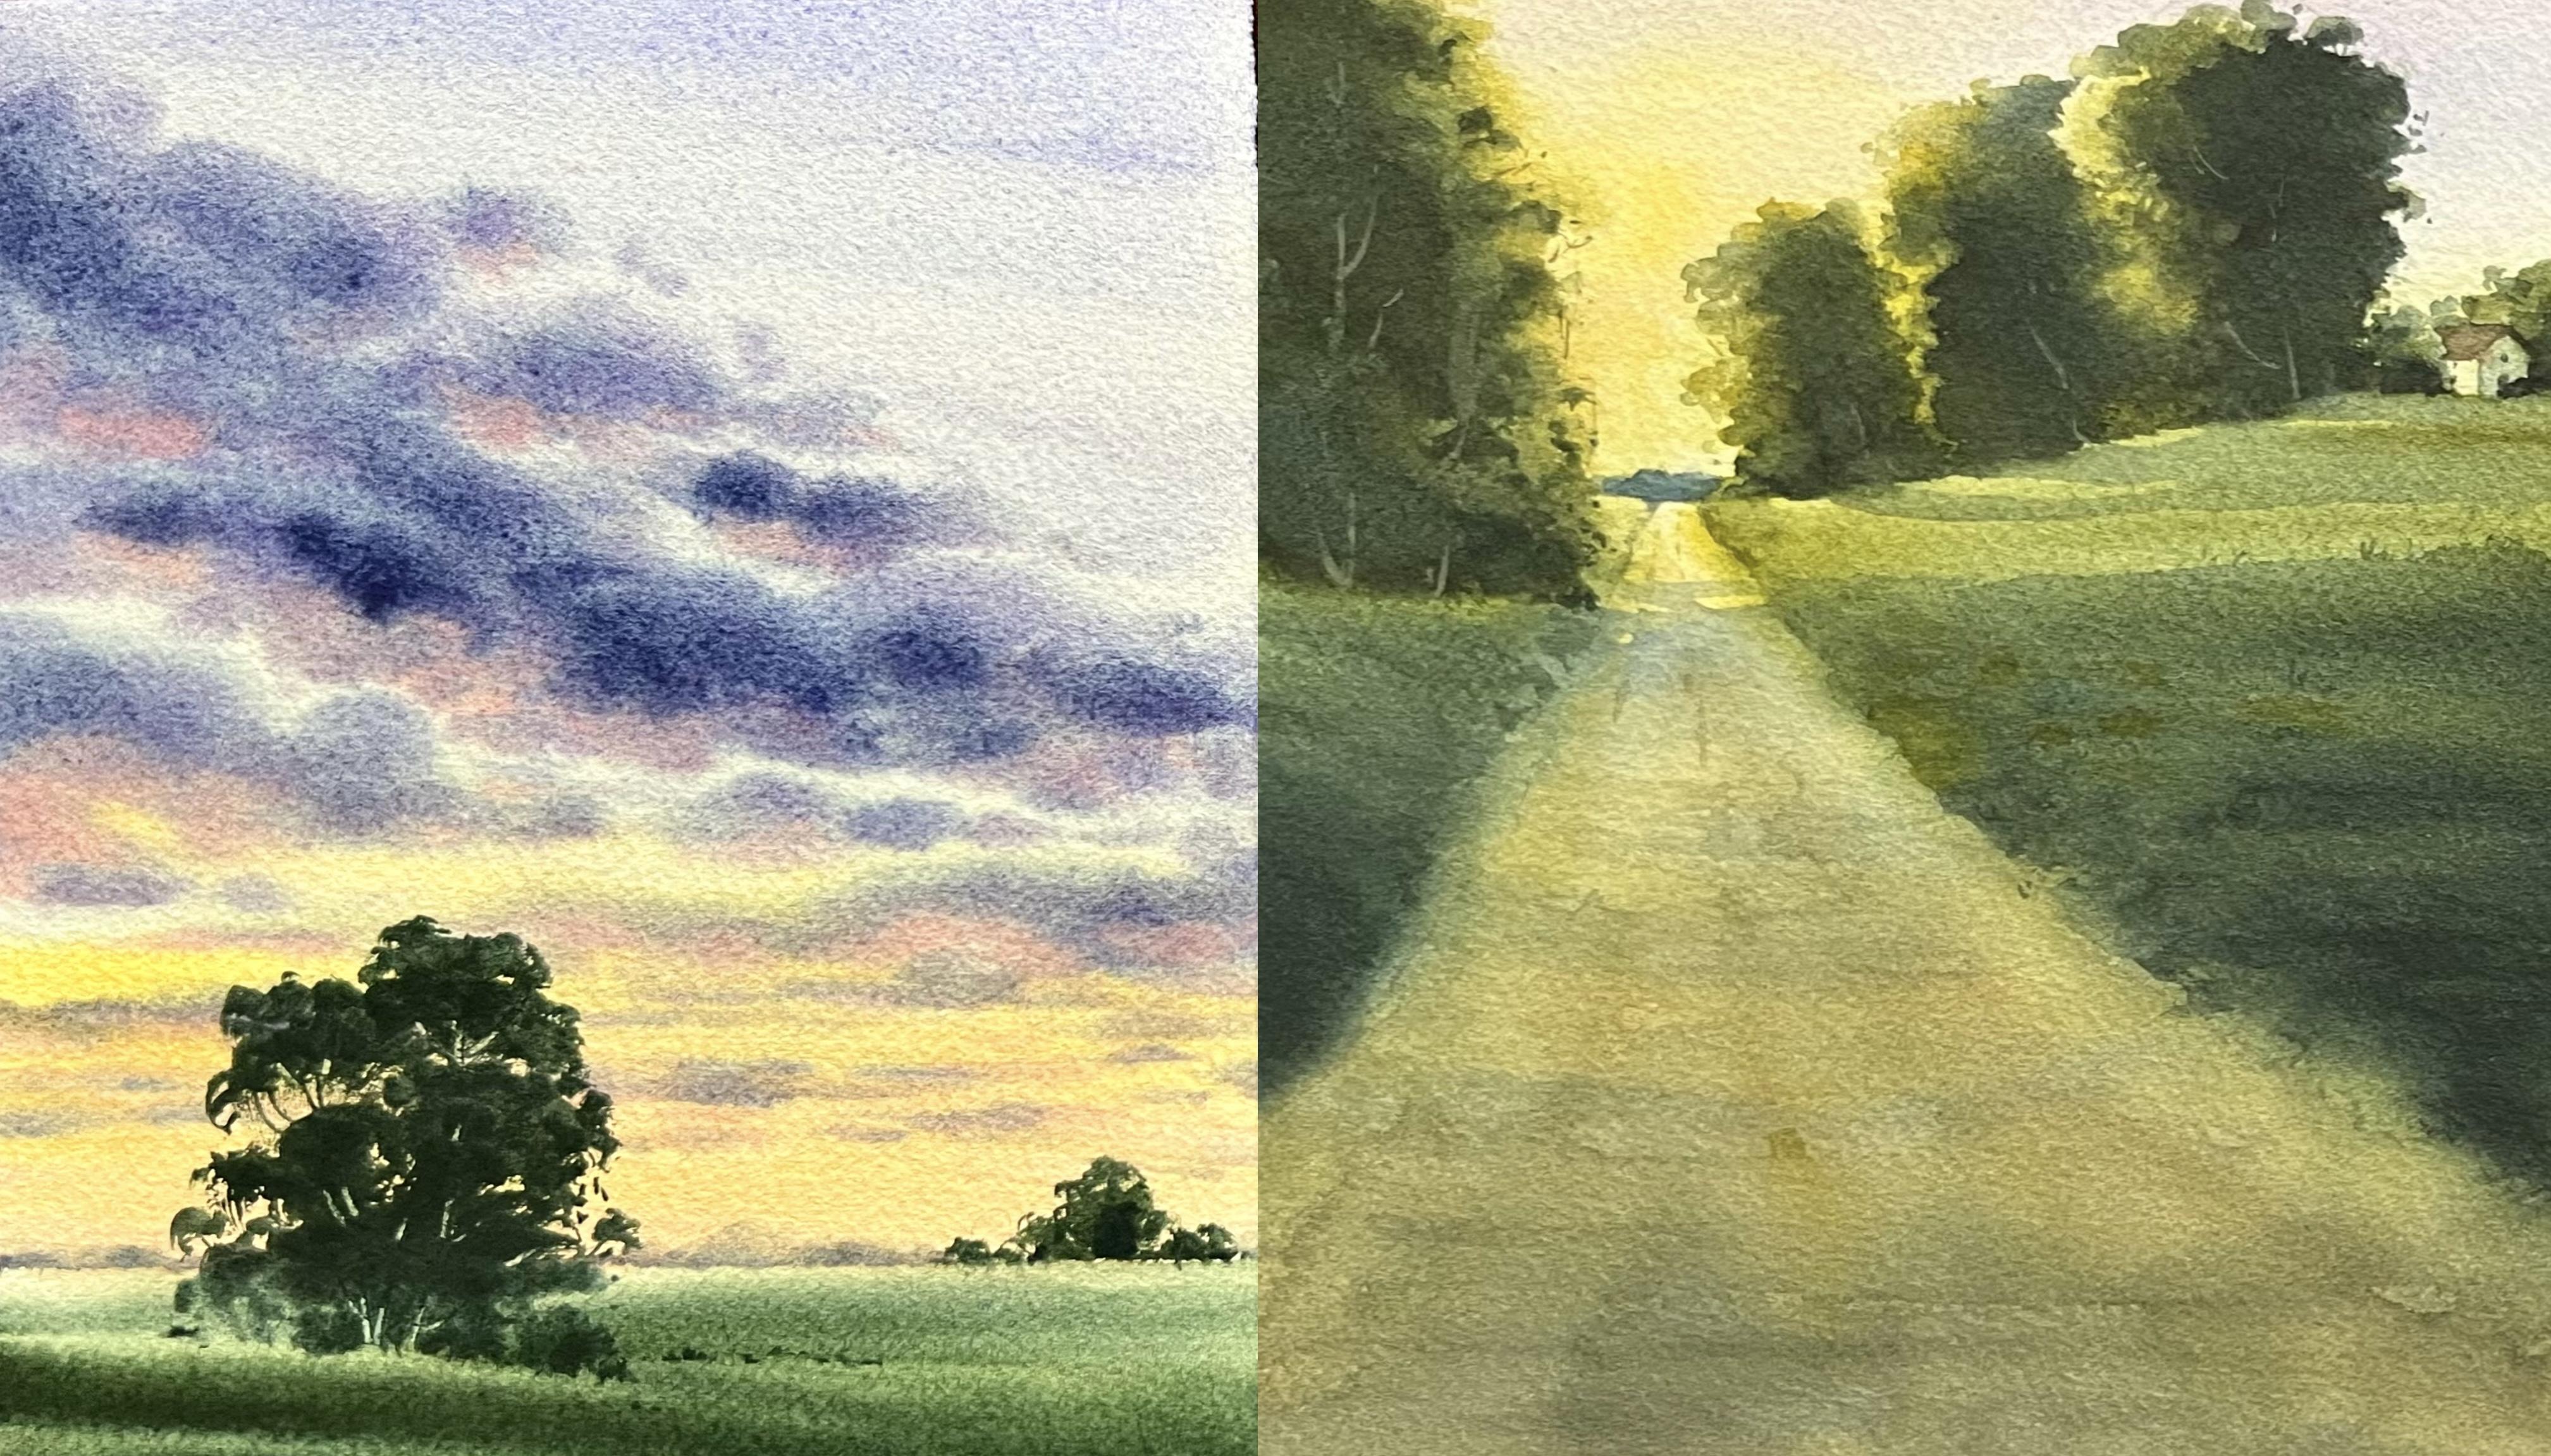
day painting challenge. For day one, we'll paint
a simple landscape with a pathway and a cloudy
sunset and some loose trees. And for day two, also we'll
paint a similar scene, but with more focus on the glowing sunset
effect on the trees. And for Day three, we will paint another landscape with
trees and a pathway. This time, we'll explore the effect of light passing
through the landscape. And for day four, we'll paint again an evening landscape
with some fine details. We'll see how to paint tiny trees and houses to
create depth in the landscape. And for day five, we'll
finish the challenge with a simple landscape focusing
on a cloudy sky and trees. By end of this class,
I hope you'll have a relaxing and enjoyable
painting experience while creating simple
yet powerful landscapes. So grab your brushes and paints. Let's start. I'll see
you in the next video.
2. Materials you'll need: Thank you so much for
joining this class. And in this video, let's see
all the materials we need. So first style, start
with the paper. I'll use fabriano
artistico 100% cotton, 300 GSM, and rough
texture paper. This is one of my favorite
to paint loose landscapes. I don't know, it's
very comfortable for me to paint on this paper. It is very good for lifting and layering kind of techniques. So yeah, but this time, I'm not using glued
pads like this. I will use loose sheets, and also I have already cut
it into a five sizes. Yeah. So I use this size paper. And this is also one of my
favorite rough texture, Arches paper, again, 300
as hundred percent cotton. And this is size
20 20 centimeters. You can use any brand
of watercolor paper with cold press
or rough texture, 100% cotton, and you need
minimum 300 Jasm thickness. Yeah. And you will also
need some extra pieces of paper to just swatch colors
in between the painting. So, yeah, that's all
about the paper we need. Now let's see the brushes. So for this class, I'll use
this set of brushes by Artifi and you can also buy this same set by using
my code, if you want. It's very good quality and
also very budget friendly. You'll get this much brushes
for a very low price. So, yeah. And for the paintings, I'll use this flat
brush to wet the paper. And this is the main
brush I'll use, size 16 round brush. For some paintings, I'll use this filbert brush for some tree techniques,
especially I'll show you. And we'll also use a liner you can use a rigor
or liner brush you have, and also we need a flat brush for some lifting
kind of techniques. So these are the
only brushes we are going to use for
these paintings. So you'll need a
big size flat brush and a medium size round
brush and a liner. This is not necessary, but I'll also use a fill
board to paint some trees, and we'll also need a small
size flat brush. Yeah. So that's all about the brushes, and we'll need a pencil
and eraser to sketch. And I'll also use this paper
knife for some scratching. And we'll also need the head dryer to dry layers
in between the painting. And we'll also need
a jar of water and some tissue papers to wipe the brush in between
the paintings. So yeah, these are some of the basic materials we
need for this class. And in next video, I'll
show you all the colors and color mixes we can
use for these paintings. So let's move to
the next lesson.
3. Colors and color mixes: Hello. So in this video, let's see the color palette
we are going to use, and for all the projects, we will use almost the
same color palette, and we'll paint a
kind of evening sky or that early morning
sunset effect for all the landscapes. So for that, we will
use the yellows. Like we'll use naples yellow, red, and opera pink,
naples yellow. And Joanne brilliant
and we'll also use gamboge to make some warmth
around that sunlight. And if you don't have
a April yellow red, you can use Joanne
Brilliant number two, by Shinhan, which is also
similar to this color. And if you don't have
both these colors, I'll show you later in
this video how you can get almost similar by
mixing two other colors. So yeah, and to paint
the sky and the clouds, we will mainly use Kobalt
blue to paint the sky. You should not use
ultramarine or any other blue because to
get that evening blow, we have to use Kobalt blue. And to paint the clouds
and some other fits, so you'll use cobalt violet. And if you don't
have cobalt blue, you can also use maybe lavender, which is also similar
to this color. Um, I'll also mix
cobalt violet and indigo to make some darker
clouds and shadow effects. Yeah. So if you don't
have cobalt violet again, I'll show you later in
this video how you can get this almost same shade by
mixing a few other shades. Yeah. So these are the
colors we are going to use for painting the
sky and sunsets. And to paint the landscape and the trees and
that green effect, we'll mainly use
sap green and to get little darker
effects for the trees, I'll mix indigo and sap green. You should not use
any black shades or any other darker colors, you have use indigo. Indigo is a very beautiful,
dark, vibrant shade. We can use to mix any shades
to make it more darker. Yeah. And to get a little more warmer
greens in some landscapes, I'll also use olive green. And if you have deep sub green, you can also use that to
get the darker green effex which also similar to a mix
of sap green and indigo. And in some projects to
make more lighter greens, I'll mix lemon yellow
and sap green. So these are the green
shades we have to use. The browns in this
class projects, I'll use mainly yellow ochre, which is a must have color
for all the projects. And in some projects, I'll also use van
**** brown and sepia. And burn dumber. Burn dumber is, again,
one of my favorite to get beautiful glory
light brown shades. So yeah, these are
the main colors you need before we start
the class projects. And I'll also show you
the search card and the colors before we start
all the class projects. In some projects, I will also
use opaque white to make little opaque and dusky kind
of effect for the painting. Yeah. Now let's see the
alternatives you can use for naples
yellow or bar twlet. Okay, here, I have already
swatched Joanne Brilliant, number two, and
naples yellow red. Joanne Brilliant is a little more lighter compared
to this color. Now, I'll show you how you can get this almost same color. By mixing these two colors, this is vermilion, and
this is naples yellow. So first I'll swatch this color, It's a very vibrant, cool orange shade, which is
almost leaning towards red. Yeah. Now I'll
swatch naple silo. Napleslo is, again, a little
opaque, light yellow shade. Not that very vibrant or strong. Yeah. Now I will mix
both these colors. Yeah. Here I have
very little vermilion and I'm going to mix it
with maple slow. Yeah. Now, let's watch it here. Yeah, now you can see this is very similar to these shades. So if you have armlion and you can use a little opaque
yellow shade you have, and with both these colors,
you'll get this shade. You need more yellow
and little this color to make it that reddish
kind of effect. So yeah, and if you want to make it a little
opaque like this color, you can see this is a little more transparent
than this one. You can see here if you are looking for the
pigment details. PW pw six is opaque white. So if you're mixing white
gouache with both these colors, you can make it a little
opaque like this. Yeah. Now let's see the
alternative for Kobal toilet. So again, I'm going to just
swatch this color here. Kobal toilet is, again, a very beautiful, oth,
muted violet shade. Yeah. Yeah. Now, let's see how
we can get that color. We can use any violet
shade that you have. Now I'm going to
use this violet, carbuzol violet by Daniel Smith. So I'm just swatching
that color here. It's a very dark violet shade. Now, I'm going to mix
this violet with ochre. I'll swatch cre again. And also, I'll mix, para pink. Yeah. You can use any rose
or pink shade that you have. Yeah. So now let's mix
all three colors. Yeah. Local. So I'm going to mix. Yeah. That is a very nice shade. But to make it a
little warm and muted, I'm going to mix locre to this. Yeah. But that is almost
similar to this shade. Now, let's mix just
loca and opera. We'll see how it works. Yeah. Now by mixing violet and
opera pink and Elocre we got almost the same this shade and also by mixing vermilion
and naples yellow, we got exactly same
shade like this, naples yellow, red
and Joan brilliant. So these are the two
alternatives that you can use the color palette we are going
to use for the paintings. And it's always
interesting to mix our own colors with
whatever we have. And that's all about the color palette we
are going to use. And I x video, let's see some of the
techniques I use to paint loose and impressionistic
kind of trees and landscape. So yeah, let's move
to the next video.
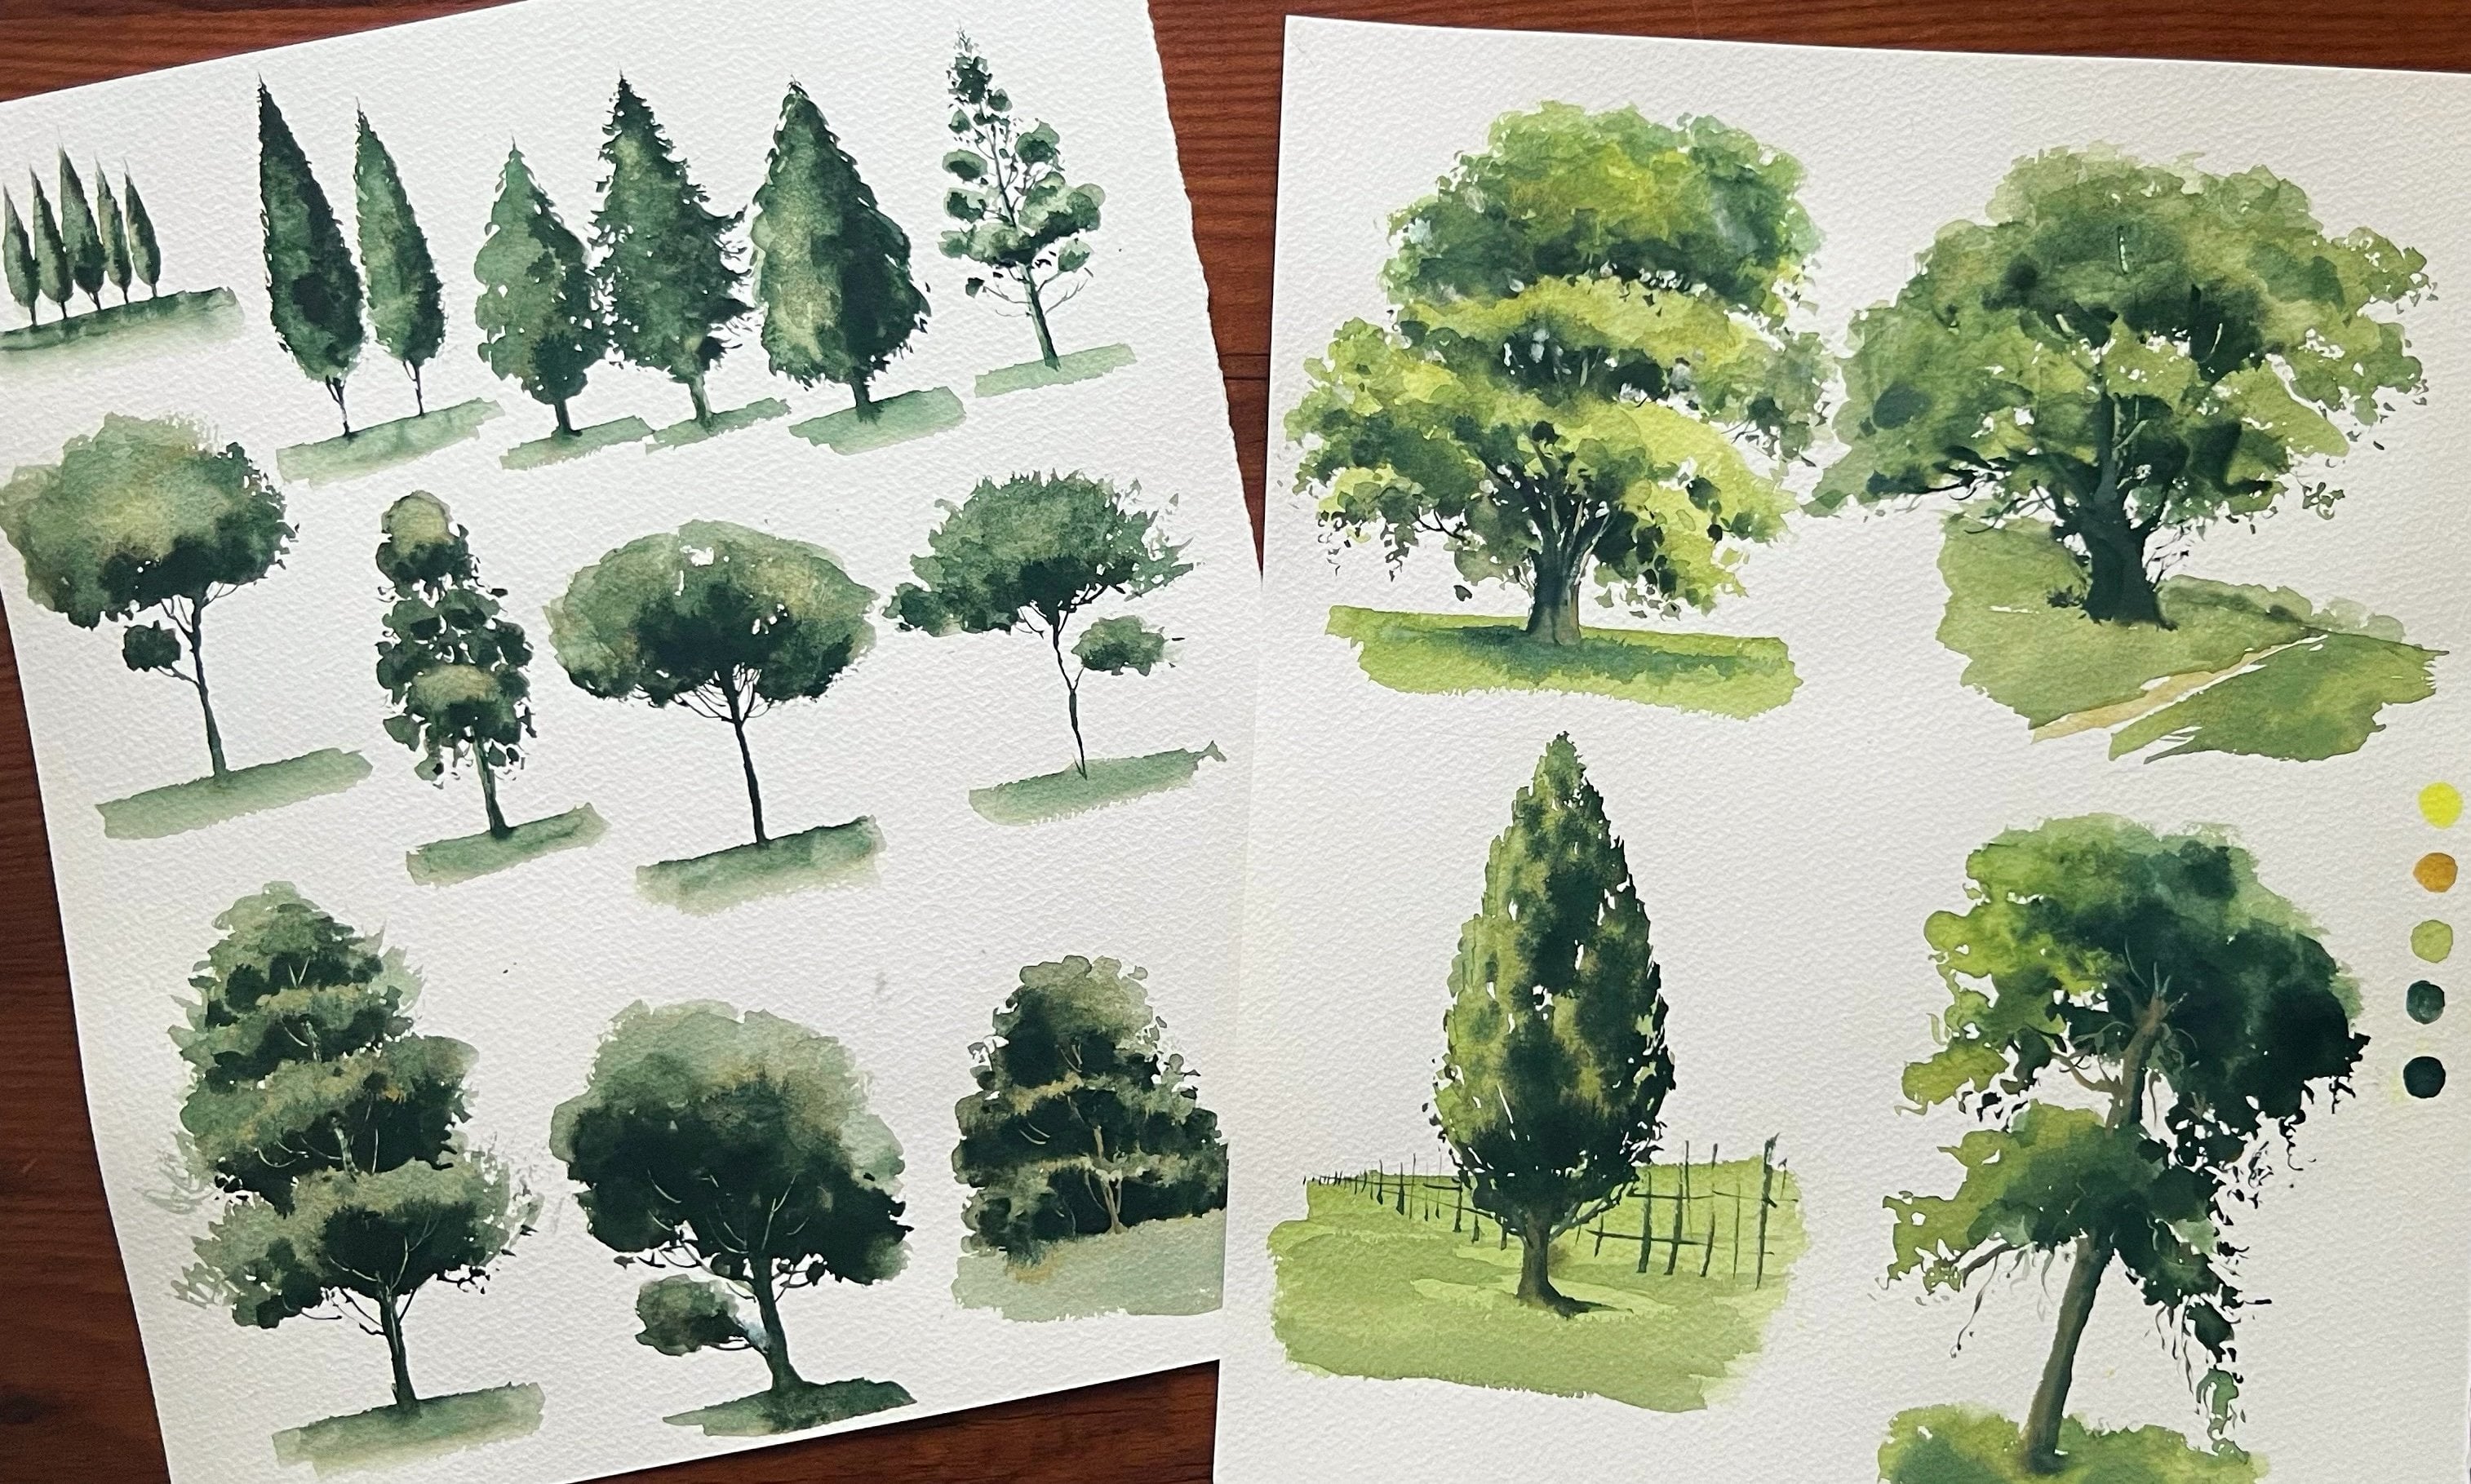
4. Basic tree painting techniques: Okay, in this video,
let's see some of the basic techniques to paint
loose watercolor trees. So first I'll show you how
we can get that lights and shadow effects for trees by using layers and different
tones of colors. So first, sketch a
very simple tree here. Yeah. Yeah. And also, I'm just fixing
the sun light from here, so we'll make it more lighter to this side and more darker
shadows to this side. So, you know. And here in my palette, I have lemon yellow and
sap green and indigo. So first, I'll start with a
very lighter green shade. Lemon yellow is already
mixed with sap green. Yeah. And from here, I'll start the tree. Yeah. Now I'll mix some sap green to this lemon yellow to make
it a little more darker. And with that, I'm just
adding more color to this. Now, I'll add indigo to
make it more darker. Yeah. And I'm just adding
that color this side. And you can also add some fine detail
acid coming outward. Now, I'll clean my
brush and I want to work for the
light turn again. So, yeah. Yeah. And now I'll add a little more thicker paint to make it even
more darker. Yeah. Like this, you can
create that kind of depth and volume to your trees. Yeah, now I'll clean
my age and I will add the trunk. Again, for that. Also we have to make the
shadows and highlights. Oh Yeah. I'll add some shadows by mixing some indigo again to
this bone tumber. Yeah. And I'm just adding
some lines here. Yeah. That's it. Now I'll just add that base to the tree by adding some shadows. Yeah, I'm just
adding that shadows. Here the sun we have added. Okay, now let's see some
of the brush trucks or brush works to
paint lose trees. So first, I'll show you how we can create that
thick foliage effect. So here my brush is
loaded with green paint. Now I'm going to use
the side of my brush and I'm going downward, starting from upside
and then going down. And with that tooth of
your cold brush paper, you can create some kind
of white spots like this, starting from upside and using the side of my bridge
and going down. And then you can add more
tiny dots as it going out to make it into more shape. Yeah, again, I'll show you. I'm using the side of my bridge, you can see how I'm
holding my brish and yeah. Going down. Now, I'll add some darker
affix to that tree. Yeah. I'm mixing some indigo, adding that color
here and there. Yeah. Also you can add some tiny
dots with a darker paint. I'm just shaping the
tree with more colors. Yeah, now I will add the
branches and the trunk, starting with the
lighter color and then going for the darker color. Now, let's add that
base to the tree. And you can always add
more tiny, tiny strokes. Y. I'm just shaping that
tree again and again. And again, you can add some more branches
from that white spots. And as you're going outdoor, we can also add some
branches, maybe. If you want more
detailed tutorial on painting loose trees, let me know when the commence
because I get a lot of requests for especially trees. So yeah. I just want to add more shadows
to the tree trunk. Yeah. Yeah. And also, if you want to make
more tris sports, you can also use lifting. I'm just using a flat brush
and lifting out some colors. So, yeah, that is another way
of painting thicker trees. We started with
the basic strokes like starting from upside, using side of the brush, and then we added more darker layers and
shadows to that strokes, and then we painted the trunk. And also, we add
some fine details, and we shaped it into
more bigger tree. So yeah. I'm just adding
again more ex here. Now, let's see the dry technique
of painting loose trays. Okay, so here I'm dipping
my brush in water and I'm just wiping
all that extra water. Now I'll take some paint. You can see here
the consistency. It's not very loose. We need a little thicker mix. And yeah, just going to
scratch it over my paper. Yeah. I hope you can hear
that scratching sound. Yeah. Now I'll take a little more darker mix. I'm just adding that for some shadows or the Now, you can see that some
tiny dots because of the tooth of this paper and
also the dryness of my brush. Now I'm going to add that trunk and
branches to this tree. It's also important
how we're adding the trunk and branches
because it can also give that dimension and depth and perspective
to the tree. So here, I'm going to add some very thin line
for the trunk. Yeah. And and you can also add some tiny branches. And now I'm just adding
that base to this tree. And also just making
some tiny dots here. I just adding more
little more darker spots to create that volume
to the painting. I mean, the tree. Yeah,
adding some dots here again, is another way of
painting trees, especially when we want to
create that seed through effect for painting a landscape. Yeah. It needs a lot of practice and that control
over your brush strokes. So yeah. Now, you can see
for these details, I'm just using the
tip of my brush only. So for thicker strokes and to create that volume
for the foliage, we can use the side of bristles or the brush and to create some tiny leaves
and thin branches, we can use the tip only you no, we can see how we can use the scratching
technique to create more fine and thin branches. So scratching will not work
on dry paint on dry paper, and also it will not
work on too wet paint. So we have to work when
the paint started to dry. So here, it just started to dry, so I am going to scratch. Yeah, you can see
that white space. So by this, we can always
make more thin branches. Almost like we're using a
jelly roll pin or white paint. Yeah. Now you can see
that white spaces. This paint is already dry. It will not work like
this. I'll show you. You can still see that space, but it's not bright like this. Yeah. You can create any
kind of effects like this. You can also create
some white spots. Yeah. You just need to use
thicker paper for this, you can create some
white spots like this. Yeah. I already showed you this
technique in my previous class, part one of this
painting loose trees. So a loose landscape class. Yeah. So yeah, these are some of the techniques I wanted to show you before we start
painting landscapes. So here I'll just
swatch the colors. It's always like we're using three tonal values for
painting the trees. We'll start with
a lighter shade, and then we'll go for
the mid tonal value, and then we will go for
the more darker one. And with more thicker paint, we can make it even more darker. Yeah. And for painting the
branches also or the trunk, also, we start with
a lighter brown, and then we mix it some darker paint to that
to make the shadows, and we added more
indigo and bon dumber, make it even more darker. Okay, okay, I'll show you
here with this darker brown, I can create more
wet on dry shadows. Yeah, here also. And you can also blend it. If you don't want to keep it that sharper, you can brand it. Yeah. That's it. That's it all about
painting the trees. And I just want to show you the technique of
painting loose trees. We have used wet technique here and more dry
technique here. And also, we learn to paint that downward strok to get this kind of
shape to the trees. And also here, we learn to use tunnel values and to add that lights and shadow
effects for the trees. So these are some of the basic techniques
to paint loose trees. So yeah, that's it
for this lesson, and let's move to our
first class project.
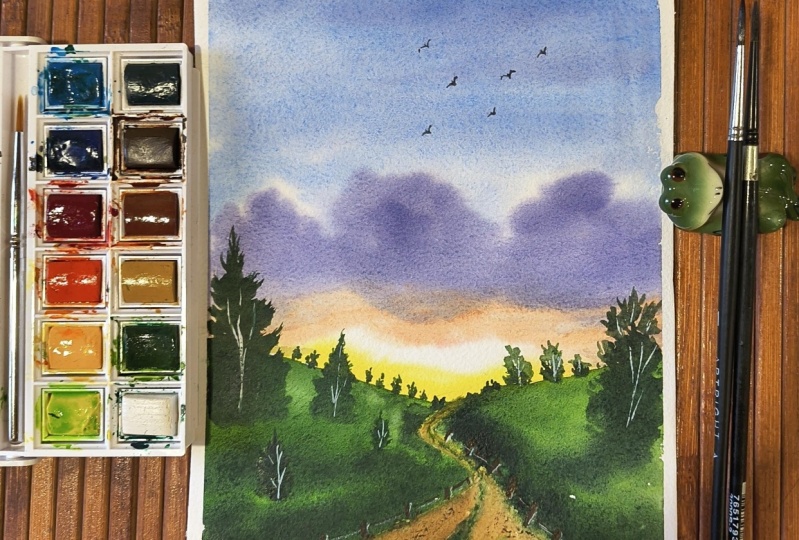
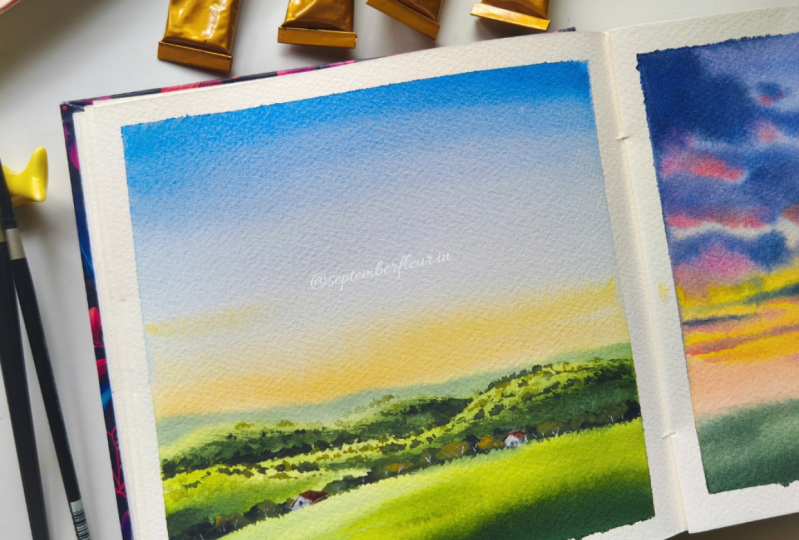
5. Day 1 - Part one - Sunset road: Hello, everyone. I hope you're
ready for the painting. So yeah, let's start
with the sketching. This is going to be a very loose and simple landscape with soft and beautiful
sunset sky and a pathway and some
trees here and there. Yeah. So first, I'm going to add the horizon
line very low. Yeah, that's it. And from there, I'm going to add this line for
the land part. Yeah. I'm going to start from
here and going down. And then from here, I'm just making it a
little higher. Yeah. That's it. And now I'm going
to erase that horizon line. Yeah. I'm adding the horizontal
line first for understanding the ratio
of land and the sky part. Yeah. So from here, I'm going to
start the pathway, like, yeah, and making it very wider towards the
foreground. Yeah, that's it. And from here, let's make
it invisible around here. Yeah. And I'm going like this. And from there, again,
I'm going whiter. So it's very important how
you are drawing this pathway because that gives a lot of perspective and depth
to your painting. Yeah. Maybe I think I want
to fix it around here. I want to make it more
narrow as it going away. Yeah. So I'll make it like this. Yeah. And from there,
I'm going to make it. Yeah. Yeah, that's it. And maybe I will add some
very small trees here and there and maybe some
bigger trees around here. Yeah. It's a very rough
and simple outlining. Not any detailed sketching. Yeah. Okay, I think I want
to fix this side also. Let's make it more wider. Yeah. And maybe we'll also add that
mid line for the pathway. Yeah. And let's make it a little whiter around here. Yeah. That's enough. You can also refer
to the resources, for this outline if you couldn't follow um with me for sketching. Yeah. Okay, so first let's
start with painting the sky. So as you can see here, I didn't use any masking tape or anything to fix the
paper to the board. So I'm going to wet
the whole paper. I mean, the both sides. So let's start by
wetting the backside. Yeah. We have to wet it evenly
without too much water. We need a very little
moist on the paper. Yeah, you can use a
flat brush like this. Yeah. Now I'm going
to flip it and yeah. And let's wet the
fringe side also. You can rub your brush
multiple times like this, Oil paper to make it very
nice thin layer of water. On paper. Yeah. That's enough. Now, let's start
painting the sky. Okay, I'll start from here to make it a little
warmer colors, like around the
sun, and then we'll go more cooler and darker
colors to the upside. Yeah. So I'm going to use
my um, artifi round brush, and first I'll use
this is naples yellow, red by wanko and it's a
very nice, soft color. Maybe I'll mix it
with some opera pink. Yeah. Yeah. Yeah, that's enough. And I'll also mix some
gamboog and preclot again. Yeah, that's enough. And before starting
the painting, I want to just wipe,
water from here. Yeah. And let's
start around here. You can wipe your brush on
a cotton cloth or a tissue. If you have too
much water on it, we need a very damp
and little dry brush. Yeah. You can start
like this and allow stroke here and then leave
a little gap here and then go upward for
that sunlight effect. Yeah, maybe I will add
this color around that to make it a little
cloudy, maybe, uh yeah. That's enough. Now I'm
going to mix indigo, and this is cobalt
violet by Rembrandt. This both color can make a
very dusk kind of color, grayish kind of color
for the clouds. Yeah, I'm mixing it with
some white gouache. I think I want to make
it a little more darker. I'll show you the color. Yeah. So with that color, I'm going to make some clouds. Yeah. You can also make some tiny dots
or like this, yeah. To make it more interesting. And maybe I will add
some here also. Yeah. Now, let's paint the
clouds. Sorry, the sky. So I'm going to take bad blue. I'll mix it with lots of water. We need a very
thin mix of color. Yeah. And then just painting
the sky very loosely. Going around here carefully. Yeah. Almost like
negative painting. Yeah. I'm just feeling the
color around the clouds. Yeah. That's enough. Maybe
let's make it a little more darker here. I'm mixing it with some
Kobal toilet again. Yeah. Okay. I think I want to work
on these clouds again. So let's mix some
more indigo and bal toilet and maybe
with white quash. Yeah. Remember to wipe your brush on a cloth to make
it a little dry. Yeah. And from here, I think paper started drying. We had to work a little faster. I'm just making
some tiny clouds. Yeah. Maybe let's add some
clouds around here also. Yeah. It's more lighter. Yeah. I think let's switch to a smaller bridge. I want to fix the clouds again. I'm wiping away this cloud. It looks too big. Yeah. So paper is still wet, so I'm just wiping that. And I want to add more koba blue there. Yeah. You can just leave a
little gap here like this for that highlight
on the clouds. By using negative
painting technique, we can paint very beautiful
clouds in watercolor. Yeah. Maybe I think
I want to make it a little darker around here. Yeah. Let's leave it like that. And let's move to
paint the land pot. Yeah. So first, I'm
going to again wet the land pot with
very little water. A. With the whole land
part in one co, don't worry about the pathway. Yeah. And first, I'm going to add
yellow ochre to the pathway. Maybe I think I want to
make it a little um, muted. So I'll mix it with
very little indigo, since the sky is
cloudy and dark. Yeah. So I mix it yellow ochre
with very little indigo. And with that color, I'm
going to fill the pathway. And around here, I'm
going to make it again warmer with a locer. Yeah. Yeah, that's enough. I'm cleaning my brush
and I'm going to take some sap green to this already mixed
kobaltilet and then they go. Yeah. And maybe I'll mix it
with some more and they go. I think I want to make
it a little more opaque, so maybe I'll use. This is joined
brilliant by Shinhan. It's like, opaque olive
green kind of shade, a pastal kind of shade. Yeah. So with that color, I'm going to fill the land part. You can notice how
I'm moving my brush. Yeah. You should not um,
fill it entirely. You have to go with
your brush like this, maybe for some scratching or some kind of
effects like that. Yeah. Now, around here, I want to make it
a little lighter, so I'm just blending that
color with a clean brush. And around here, let's make
it a little more darker. Yeah. Now let's, again, blend it with clean brush. Yeah. Maybe let's make it again a
little darker for this part, so we can make the
pathway more visible. Yeah. It's enough. I think I want to make it like some darker
effects here and there. So again, I'm going to take some indigo to this
already mixed green. And with that, I'm going
to add some darker effix. Pepper is still
wet so we can make softer effet to create some depth or some
texture for the land. Yeah. And around here also, let's do it like that. You can definitely
use your creativity. You can just, take a look at your painting from a
little distance so you'll understand
where you can add these um, darker effects. Or if you want to improve
anything, you can do that. You'll get a lot of idea. Like when you're looking at your painting from
a little distance. When I'm stuck, I
always do that. Yeah. I just want to make it a little
lighter around here. Yeah, and maybe let's add thin
line with this darker mix. Yeah. Yeah, I think
that's enough. Yeah. Now, I think let's
move to add this midline.
6. Day 1 - Part two : Same green. So again, I'm just adding that
color very loosely again. And maybe let's make it a little darker to this side. Yeah. I think I want to
make it a little more brighter green for
some highlights. Yeah. And I'm going more thinner. You can even switch
to a liner now. Yeah. That's enough. Maybe let's add some shadow or
some darker spots. Yeah, I think we want to. On wet paper, watercolor
will spread here and there, so we can work on layers
to make it a little more darker and into that shape. Yeah. Different level of wetness
will work on the paper, in different styles or
maybe different like, we'll create different
kind of effects. Yeah. I'm just wiping it from here to make
the pathway more clear. Yeah. I'm using a flat brush. And yeah, maybe we can walk around here
when it's completely dry. Now, let's leave it like that. Yeah, later we will work here. Okay, now let's start
adding the trees, my favorite part
of the painting. So again, I'm going
to use this brush. This is, I think, Filbert brush. I don't know, what's its
name like for this shape. With this, I'm going
to paint the trees. And also, you can see it's dry. It's not very pointy or
not with too much water. So with this dryness, I'm going to paint the trees. Okay, so I'm going to take very dark mix of
indigo and sap green. Maybe you can also use deep
sap green by Daniel Smith. That's also almost
like this color. Yeah. You can see the mixture. It's very dry, almost
like oil paint. I hope you can also hear the
sound of that scratching. So we need this consistency
to paint the trees. Yeah. And I'm going to add a little bigger
tree around here. So yeah. You can definitely notice how
I'm moving my brush. I need some dry texture. Yeah. And I think we want to make it a little darker around here. And maybe I will add one more
tree here. Not very big. Yeah. Maybe I will add some
dots around here. Yeah. I'm using this detailer
brush almost like a liner. Yeah. That's enough. Let's add some colour
in the foreground also. Yeah. Around here, too. Yeah. I'm just adding more
layers to the greens. That's enough. Now,
I'm using this brush. Again, I want to make it dry, so I'm squeezing all the
water from the bristles. And again, I'm going
to use this color. Maybe I will mix it with some yellow so join
brilliant by Shinhan. I need a very
opaque kind of mix. Yeah. And I think I want to
make some distant trees. Yeah. That's it. And we
have to make it in different sizes and
different shapes to make it more natural. Some very tiny dots and a little bigger around shapes, also. Yeah. And I think I want to make it a little
more bigger for this. And let's add here also. Yeah. And for this side, first, let's start
with very tiny. So by adding more tiny trees, we can create a
lot of depth yeah. And little bigot
tree around here. I think I want to add
one tree from here. Yeah, you can always
look how I'm moving my brush for this loose
kind of tree effects. Yeah, let's make it a little
darker around this spot. Yeah, to create some depth
or that kind of dimension. Yeah. And amity. He also. Yeah. Now, let's dry the paper, and then maybe we'll
add some more details. Okay, now the paper
is almost dry, and let's start painting
some more details. So again, I'm using this brush, and we have to add
some branches or some more chunks to the trees or maybe some
distant trees again. Yeah. So I'm going to take this color again
with very dry brush. And let's add some branches
or some lines here. Yeah. Yeah, I'm
going very loosely, and maybe I'll add some dots or we need a very little
moist on the brush. And if you're feeling
like it's too dark, you can just wipe it off. Yeah, that's it. And maybe
I'll lad from here also. Yeah, I just defining
the loose tree shapes. Let's make some tiny
details, maybe some grass. I think we want to make
it around here also. Some darker spots or also I'm wiping that color to make it a little more softer. Yeah. And maybe let's
make it here to make that pathway a little
more visible. Yeah. And I think you want to add more distant trees,
just some dots. Yeah. And let's fix this
part of the pathway. I'm adding that mid line. Yeah. Yeah. Yeah, and I'm going to make it very
narrow and sharp here. Yeah. And maybe let's
add some more trees. Maybe tiny trees. And you can also fix this
tree a little more darker. Yeah. Okay, I think I want
to work around here. Just some stems or
something like that. Some lines vertically and
some dots here and there. Yeah. And maybe I will
make it around here also. Little dry effects. Yeah. That's it. I think I want to fix it here. Now, I think I will
scratch some paint from here for some
branches or trunk. Yeah. You don't have
to go straight. You can break it here and there, and you can make
it more deeper or brighter on these little
darker spots or the shadow. Yeah, so you will
get some nice depth. Yeah. Maybe from here, and around here also. Yeah, it's enough. I think I want to fix around this part of this
midline of the pathway. So I'll use a lighter
green mixing gamboge and this green. Yeah. And I want to make it a little this way seem like
this side of this pathway. Yeah. And I'm going to blend
it blending the edges. And let's add a little more
darker spots here and there. Yeah. That's enough. I think we are almost done. Now, if you want to fix
anything, you can do that now. You can just again, look at your painting from a little distance and you
can work on any mistakes. It's not that difficult to
fix mistakes in watercolor. You just need some patience
to lift the colors. And also, you have to
use thicker paper. That's enough. I'm feeling like adding more
details here and there, but let's leave it like this. Yeah. It's also important
how you are placing these trees on this land part. I'm adding some more darker
dots here and there. Um, dry on dry. Yeah. And let's add some
more darker spots for this pathway with a
little more darker brown. Here I'm going to use sepia and I'll mix it
with some indigo, very little indigo. Yeah. And also some water. Yeah. And with that color,
I'm going to add some loose shadows or some kind of texture
to the pathway. O. I can add some strokes and then
blend it here and there, so you'll get some kind
of loose and nice effect. Yeah. That's enough and also make it more darker
in the foreground. You can also shape the
highlights of this grass pot. I'm just scratching my brush on the paper to get a
little dry effect. Yeah, that's it. I think I
want to wipe it from here. I always like to add pathway or walkway or something
like that in my paintings. It can invite, like, the viewers attention to
the depth of your painting. So it's a nice idea to always add a pathway in
your painting compositions. Yeah, that's it. And also, I'll just wipe it here and there to make it a
little lighter. Yeah. So that is the final
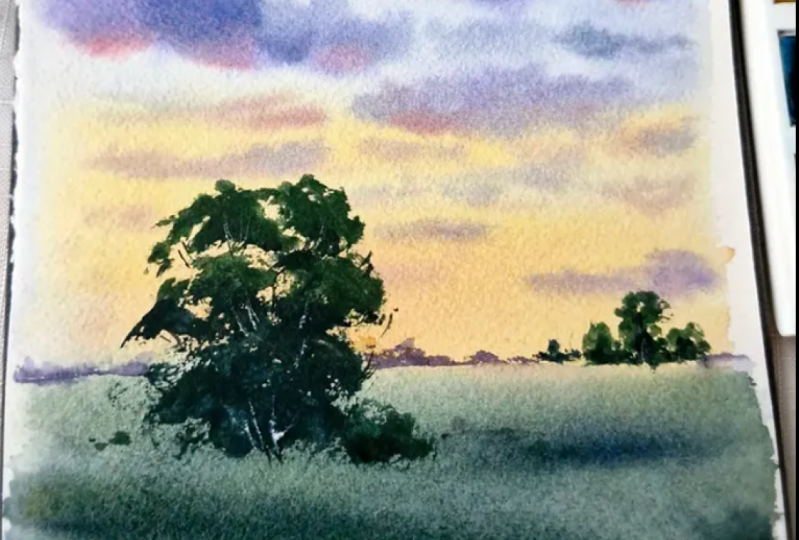
look of painting. I hope you enjoyed painting
this with me, like, beautiful clouds
and sunset and with some nice loose kind of
trees and a pathway. And yeah, you learned
some techniques. So, yeah, see you in
the next painting. Bye.
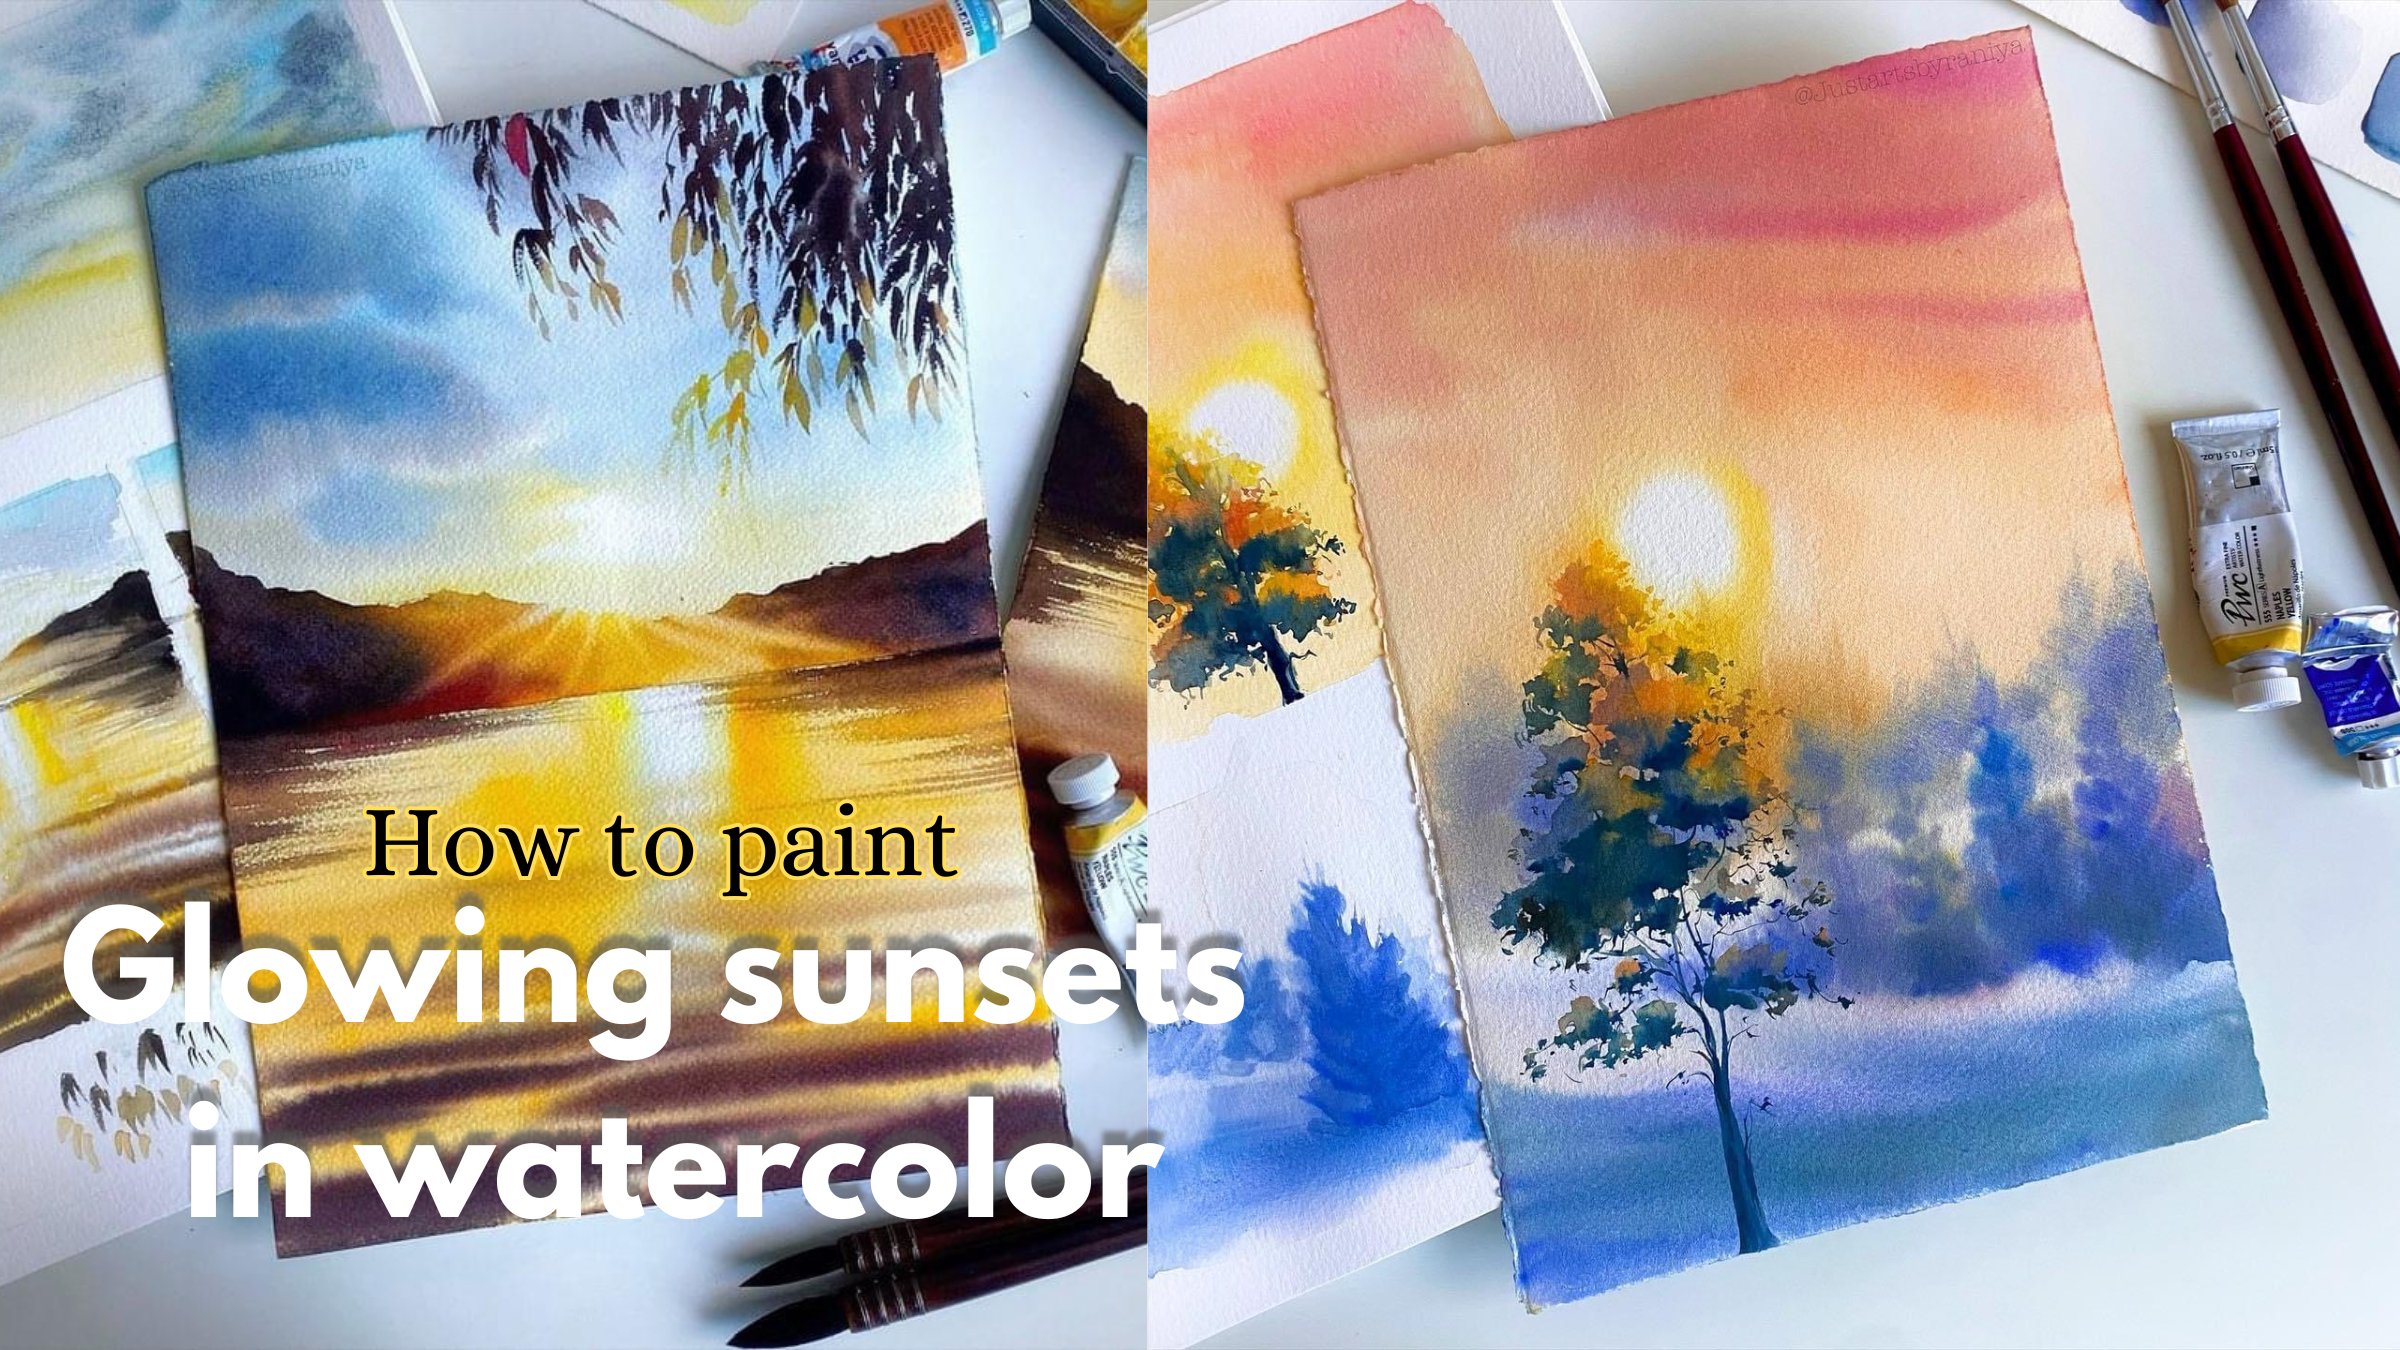
7. Day 2 - Part one - Evening light: Hello, everyone. So I hope you're ready for
today's painting. And yeah. Today, we'll paint sunset again and with some
trees here and there. And yeah, I hope you're
enjoying this class. So yeah, let's start with
a very quick sketch. So yeah, I will start
with horizon line. I'm going to fix it
very low, from here. Yeah. And maybe around here, I'll fix some trees. Oh I'm going very loosely. Yeah. And maybe in the distance, I will fix more trees. And around here, let's add
some more bigger trees, a little more taller trees. Yeah, that's it. And
maybe around here, let's add a small river that's
shining with the sunlight. But Yeah. I'm making it more narrow
here as it going disappear. I'm just fixing that line again. Yeah. That's it
for the sketching. Yeah. And maybe we will also add a very distant mountain line around the horizontal
line. Yeah. That's enough. Yeah. Yeah. So you can also check out the resources for this sketch if you couldn't
follow with me for sketching. Yeah. And also, remember to do the sketching
very lightly. Yeah, because we are going
to paint with what colors. So the pencil lines will be we can see that when
we finish the painting. So yeah. So yeah, let's
start the painting. As you can see here, I'm
not using any masking tape. I'm going to wet both
sides of my paper. So first, I'm going to
start wetting the backside. And we have already discussed about writing the
paper like this. And so, yeah, that's it. Now, let's flip it and
let's wet the French side, and we will start
painting the sky. It's like evening sunset sky or maybe an early morning sky. For all these paintings, um, I'm using almost similar
color palette. That's it. Now, let's start
painting this guy. I will fix the sunlight
around here near this tree, and we'll also make it glory for this tree
with the sunlight. So first, I will wipe the water from
here, like small circle. Yeah. And now I'm going to start with gamboellow and I'll
mix it with naples elud. And also mixing with some water. And yeah, I'm going to
paint it around here. Yeah. That's it. Maybe let's let's
wipe it taking to make it like a
perfect small circle. Yeah. Yeah, that's it. Now, I'm just going very loosely. Yeah. Now I will use opera pink, and I will mix it with
naples Cloud again. We need a soft peach
kind of shade. Yeah. And I'm going to fix like
paint that color around here. Yeah. And maybe
let's mix some more. I will mix some napleslud
and maybe Cambocillo. Let's make it a little
more darker for some cloud that's Perfect. Yeah. I'm just going around
that sunlight carefully. Yeah. Now let's move to paint a
little more bigger clouds, like for the upside
of the paper. So yeah, I'm going like this. Yeah. You can also
observe how I'm moving my bridge and also how
I'm making these strokes. Yeah. Yeah. That's it. Now I'm going
to take some Kobalt blue. Yeah, I will mix it
some Kobalt violet. And let's add that color
here for maybe the sky. Yeah. And from here also. Yeah. And let's go around here. Okay. Yeah. Let's go for another layer
for this blue colors. Yeah. And maybe And I think I will go for some tiny, tiny lines for that deck Yeah. It's a little tricky to
paint clouds in watercolor. But if you know the techniques, you can do it easily, also. So now I'm going to fix some shadows to
these peach clouds. So I'm going to
take some indigo, and I'll mix it with baltblue. Maybe let's add some
cobalt toilet again. Yeah, let's make it a
little grayish shade, a cold gray shade. Yeah. I'll show you
the swatch. Yeah. Yeah, almost like that. And also, remember to wipe your brush on the tissue paper. We need very little water or
moist on the brush. Yeah. And let's just go over that maybe for some depth
or that shadow effect. Yeah. And for her to Yeah. And let's do here. I think I want to make some
more indigo and cobalt toilet in little cobalt blue. Maybe you can also
go with paints gray for this gray effect, which sometimes I like to mix colors to get
that neutral shade. Yeah. I think I want to make it a
little more darker for this spot because
it's more near to us, like, you know, for the viewer, and the sky is going far away as it going downward to
the horizon line. Yeah. So let's make it more
darker to the foreground. Yeah, more indigo and cobalt
twlet and Cobalt Blue. Now, it's almost
like a purple shade. I don't want to cover entirely that peach color on the clouds. I'm just going over
that here and there. Paper is still wet, and we are working
a little faster because we had to fix
these clouds wet and wet. And maybe let's go down. Yep. Yeah. And yeah, maybe let's Mm hmm. Do the sky again. So again, I'm going to
take some kobath blue, and I'm adding a little
more darker blue for the sky here. So we can shape
the clouds also by adding color for this sky. Yeah. You can definitely use your creativity,
like for painting. Yeah. And maybe let's add
some blue lines around here also for that continuation. I think I want to make
some more peach clouds around the sunlight. So let's make some more gamboge and maybe some lemon yellow. Yeah. Yeah. I think that's it. Now,
let's um, stop it like that. And let's mo to
paint the land part. I hope you can see this line
we added for the river. So we have to leave that part, and then we will
paint around that. I'm going to take a little
darker mix of green, since it's almost like a silhot but still with a greenish um, color, not completely black. So yeah, here I'm mixing
sap green and indigo. Yeah. A very dark,
cool green shade. And I'm going to fill that
color in the foreground. Okay, now I'll clean my brush. I need to make it a little more warmer as it's going away, so I'll take gambochigen
and mixing it with this already
mixed green color. And with that, I'm going. There. Yeah. Okay, now I'll
clean my brush again, and I want to just Yeah. That's it. And let's make
it around here. Yeah. Yeah. Yeah. Don't make it too wide or too big. Yeah. Now, I will make it a little more darker
in the foreground. So again, indigo and sap green and maybe some yeocre and let's make it a
little darker here. Yeah. I'm going, like, very loosely for
some darker lines. Maybe some shadow or
some kind of effect. Yeah. That's it. Now let's
dry the paper, and then we'll go
for more details. Okay. Now I will
switch to this brush. This almost like a detailer. Yeah. And I will take
some cobalt blue, and maybe I'll mix it
with some cobalt violet. Yeah. Let's mute it down. So I'll mix it with
some indigo again. Yeah. And with that color, I'm going to fix a mountain
line in the distance. Yeah. Yeah, that's it. And I'm just adding a little
more color here and there. Yeah, I think that's enough. Let's make it like a
little more wavy. Yeah. Yeah. And now let's try this again because we have to
work on the trees. So yeah. Okay, now is the most challenging and most
interesting part is coming like
painting the trees. So first, we have to paint
around the sunlight. So we'll use some
yellow warm colors around that for that glow. And then we'll go for
more dark colors. And here side, we'll paint
a little more taller trees, and that is going
to break the view. So yeah, let's see how it goes, and also we'll paint some trees in the distance. So, yeah. For that, I'm going to
use this filbert brush, and I'll use some
dry techniques. So yeah, let's see. First,
I'm going to take some scolorGambo Ci and maybe I'll
mix it with some yellocre. A mix of both. And also, I think I want
to mix some lemon yellow. Yeah. And I hope you
can see now like this. This is the color, and this is the dryness
you need on your brush. Yeah. Just around that sunlight, I'm going to fix this color. Yeah. And for this side also.
8. Day 2 - Part two: I'm going loosely, yeah. And I think I will make
it like this around here. Yeah, that's it. Now let's go for the darker mix of greens. Yeah. And you can also control the wetness of your brush by wiping it on cloth or tissue. Now, you can see that texture. It is creating some
kind of tree effects. Yeah. And maybe I will go for another tree here. Yeah. Yeah. You can
see the Bristols. Yeah. Okay. I'm just making some more details, some tiny dots or that
shape for the tree. Okay, now I will make it a little more
darker here and there. So again, I'm going
to mix more and the go with this sap green, and I'm going to fix
that color around here. Yeah. And let's go down. And maybe let's blend it. Here I have a cotton cloth, um, near my palette, so I will wipe my brush in between the painting to control
the wetness. Yeah. And let's go here also. Yeah. And I think I want to make
this part a little softer. So I'm doing it very carefully. Just with a damp I'm just wiping or lifting some
colour from there. Yeah, maybe I will make it like some sun rays
hitting on the tree. Yeah. Like that. Yeah. You can see I am using a tissue
paper to wipe that water. Yeah, that's enough. And, I'm just blending it here and there. Yeah. Now, let's
make some trunk. With this palette knife, I'm going to scratch
some paint from here. We have to do this
when the paper is wet. Yeah, that's enough. And if you're feeling
like it's too bright, you can just blend
it here and there. Yeah. I think that's enough. Maybe we'll come to that later. And let's paint a little
more bigotris around here. So with the same technique, I'm going to first start
with some warmer colors. But in the same mix of colors, gamboge and lemon
yellow, and locre. Yeah, let's go carefully. We'll start from here. Let's make it a little
bended towards the sunlight. So yeah, I'm going to start like this and maybe from here, Yeah. And let's go like this. Just feeling that color here. And I'm just going down. You can notice again
my brush moment. Yeah. And I'm going to make it here because we need these trees a little
more near to us. So yeah, maybe let's
add this tree. Like this. Yeah. That's enough. Now, what we are going to do is let's take some
darker mix again. We are following
this same technique. Yeah. So sap green and indigo. And you can see the consistency
of my paint mix. Yeah. And I'm going to
start from here. And I think I want
to wipe my brush. Yeah. And with that damp brush, I'm just spreading
that color here. Yeah, maybe let's make
it a little darker here. Yeah, I'm going carefully, is it going outward? Yeah, I'm just making
some tiny, tiny details. Yeah. And let's make it a
little more darker. I'm mixing it with some gold
oakrey that's by Rembrandt. Yeah. Yeah. You can always
leave some gap like this here and there
for that highlights. Don't cover it entirely. So yeah, I'll go for a smaller brush for
some more details. Maybe I'll take
this yellow again. And I think I want to make it like this Yeah. Let's. And I think I want to make it a
little higher here. Yeah. And maybe let's add some more darker effects. Yeah. I'm making some bunches. Here. I think I started over working. This how I always end up
with making ugly paintings. But yeah, I always
enjoy it also. Yeah. I think I want to lift some
colors here and there. So I'm using my flat brush, and I'm going to
lift it from here. Yeah. And maybe from here. Lifting and then shaping it. Yeah. I want to fix it
around here again. Yeah. It's almost time to stop
painting these trees. Yeah. Working on that shadows again. So we can make the highlights
more brighter also. Yeah. I think that's enough. Now let's move to
paint this river part. So first, I'm going to use the same sunset colors
that is gambo yellow, and I'm going to fix
that color here, and then maybe this
opera pink and, um, naples lo red mix. I'm just going with that color. Yeah. And, again, I will make it a little
yellowish here. Yeah. We have to keep it very bright. So just add very little colours maybe for that sunlight
shining effect. And then you want to
make some shadow here. Like I just defining
that river line. And for this part, we have to add that
three reflections. So first, again, I'm going to
add this peach color here. Yeah, that's it. Now, let's
add some darker greens. I'm going to start like this. Making it more darker here. Yeah. Let's make it again darker here. Yeah. That's enough.
Maybe you can also fix it with some white
gouache or a pack white. And I will add some smaller dots for some
grass here and there. Let's not leave it plain. And also, we will not overwork. Let's add some tiny dots like some very
tiny lines upward. And I will add some more
trays in the very background. So again, I'm going to take this the go and sap cream mix, and also I'm using this brush, and I'm doing, like this. And I'm making it some tiny
and some little bigger one. Yeah. Let's blend it
because we don't want that to show since it's
in the background. Yeah. And just making it a
little darker here and there. I think that's enough. Now, let's add some trees
just around this mountain. So I'm going to mix
some kebal blue and this green mix to make
it a little more cooler. Yeah. And let's add
some trees here also. Yeah, that's it. Yeah, that's it. And
now I think I want to fix this river with some white. So yeah, I'm going to add some pa white directly
from the tube. Yeah. Maybe some yellow. Yeah. And to make it a
little more sharper, I'm going to add this
color just for an outline. Yeah. Yeah. No, that's perfect. Let's add this line a
little more sharper here. Yeah. Yeah. That's it. Now, let's
leave it like that. Otherwise, I will overwork. Yeah. So yeah, that is the
final look of our painting. I hope you enjoyed this session. I hope you learn to
paint the trees and that glow on the trees
and a beautiful sky. So, yeah, that's it for
this class project. See you in the next
painting. Bye.
9. Day 3 - Part one - Light through the trees: Hello. Welcome back
to today's painting. I hope you're ready for
our new class project. And today we'll paint a countryside landscape with
lots of trees and a pathway. And yeah, let's start
with sketching. So I'm going to fix
the horizon line very high Almot from here. Yeah. So most of this
frame is going to be the landscape and
very little part is going to be the sky. So from there, I'm
going to fix that line for the plant part. Yeah. And from there, I'm going
to add a pathway here. Yeah. Sorry, the line for that
land part and around here, I'm going like this. Yeah, not a straight line. Okay. And from here, I'm going to fix
a pathway that is going wider towards
the foreground. So yeah, going like this
and going to end it here. Yeah, that's it.
Now for this side, I'm going to fix like this. I'm making it like a shaky line. Yeah. Yeah, that's it. I think I will make it a little more
higher for this side. Yeah. Now, around here, let's add maybe a distant
trees or mountain. Yeah. And from there, I will add some trays
in different sizes. Yeah, that's it. And from here, let's
add one bigger tree. Yeah. And maybe let's add a small cottage or a house here. Yeah. Maybe around that, let's add some more trees. Yeah, that's enough.
For that side, also, I have to erase the
horizon line we added. Yeah. And let's
go for this side. Maybe I'll start with this. I will add a line like this. Okay. And from there, let's start this set of trees. Yeah. That's it. So we'll paint a
lot of shadows in the foreground and we'll make it more warmer around this part. Yeah, it's going to be a very loose and simple
landscape, hopefully. Yeah. So first, let's start
with wetting the paper. I'm starting from the back side. Now, I'm going to flip it and let's with the front
side of the paper. Yeah, that's it. Now, I'm going to start
with the sunlight. So I will use naplehlo red. And I will mix it with
some gambo chilo. Yeah. And with that color, I'm going to start
with a circle here. Yeah. That's it. And I'm just filling that
color, and I'm here. Yeah. And now I'll
clean my bridge, and I'll take some kobal toilet, and I'll mix it
with Kobalt blue. Yeah. Yeah, that's perfect. All the sides will cover
with these bigger trees. So yeah, you don't have
to worry about that. I'm just adding some
colors for the sky. Yeah, and just making, like, maybe some clouds like with
some lines horizontally. Yeah. I think that's enough. And I think I want to make that sunlight a little
more more circle. So I'm adding some
more color maybe. Yeah. That's it. I will add a little
more darker colors for maybe some cold blue. Yeah. Yeah, that's it. I'm going to add colors
for the pathway. So I'm going to take some yellow col and I'm going
to add that color here. Yeah. Filling that color
for this inter pathway. Yeah. Yeah. That's perfect. And maybe let's add some little
more darker browns here. So I'm going to take sepia, and I'm mixing with
yellowcre. Yeah. That's it. I'm just adding
that colour very loosely here. Yeah. Maybe let's make
it a little more darker. And Yeah. Okay, now let's paint these two land part
with some green colors. So first, I'm going
to take sap green, and I'm going to mix
it with gambocello. I need a little warmer
green for this part. Yeah, I need more gamboge. Yeah. And I'm going to
add that colour here. Yeah, that's perfect. Yeah. And on this side also. Now, I'll make some indigo to
this gamboge and sap green, and adding that color here. And also, I'm careful about
this line for the pathway. So yeah, I'm just
mixing both colors. I think I want to mix it like this with some more gamboge. Yeah. Maybe you can also make it like a little
looser around here, not like every straight line. You can make some blobs or something like that to
make it more interesting. Yeah. And let's add
that color here also. Yeah. I'm just
going very loosely. Yeah. I think that's enough. Now, I think I have
to do one more thing. I need some lines like this for the pathway
for the movement. So I'm going to take this brush and I'm going to
dip it in water, and then I will wipe it. So with that very little moist, I'm going to add some lines. Yeah. Almost like lifting. Yeah. Yeah. I just want to make it like this, making like some moment. So yeah. Instead of leaving it plain, let's add some kind
of moment here. Yeah. That's enough. Now I think I have to wipe
the colors from this side. Yeah. And I will add
more browns there. Now, let's leave it like that, and let's move to
paint the trees. And later we'll come here
to add more details, maybe. So first, I'm going to wipe
the colors from this house. We have to paint later
and also around here. Yeah. I'm just wiping
it from this side. That's okay. We'll paint
the tree. So yeah. Now I'm going to start
painting the trees. So again, I'm using this brush. This round brush. And first I will start with
the highlights of the trees. And sunlight is around here, so we'll paint some highlights
for this part of the tree, and then we'll go for more dark colors to
the opposite side. So first, I will start
with gambos yellow again, and I will mix it with very little sap cream.
Yeah, that's it. And with that color, I'm going to start with
this first tree. Here, paper is not too wet, but it is not very dry also. So yeah, let's see how it goes. So I'm going to start
like this. Yeah. You can also control the
wetness of your brush with a tissue paper or wiping on
a cloth or a towel. Yeah. And from here, I'm going
to add the other tree. Yeah. And for this tree, also, let's add the highlights. Yeah. Yeah. That's it. And from here, let's add around
this spot, Yeah. And also, let's add some tiny details
maybe here like that. Okay, now I'm going to add some more sap grain to this mix, and let's add that color here. Okay. Yeah, and going
carefully Yeah. You can see I'm leaving
a little gap here. We have already added one line there from this outline
of the pathway. So from there, I'm
starting this tree. You can always use a tissue
paper if your paint is spreading too much. Yeah. Yeah, that's it. Now I'm
going to use this brush for painting the
shadows for the tree. So again, I'm going to use a little thicker mix of paint
indigo and yellow chre. Yeah. And with that, I'm going to add
shadows to this tree. And you can go with
any shape you want. Actually, we are painting these trees in three
different colours. We'll start with
a lighter green, and then we'll go for a
little more darker and then we'll finish it with
more darker colour. That's how we can
shape the tree. So Yeah. That's it. Let's move to this side. And you can also leave
some gap like this, maybe for some highlights. Now, I will switch to a smaller
bridge, this one again, and just adding some dots
the yeah. That's it. I need this little part, brighter because this foreground is going to be more
darker and with shadow. And around this spot, we'll add some highlights. So yeah, now let's
add for this tree. You can see here by adding this color for the
shadows for this tree, I'm also shaping this
tree highlights. So you have to be careful. When you are applying
paint there. You can create some nice
effects for the highlights. Yeah. That's how
what color works. Yeah. That's it. And let's add around here. So little trees just
behind that house. Yeah. Maybe some small dots here to create that
kind of depth. Yeah, I'm adding some dots. Yeah. That's it. Now, we have to add one more
daker layer for the trees. So before that, I'm
going to dry this paper, not completely because we need a little wetness there
to paint the trees. Yeah. I just want to fix this layer before
we add more layers, that's why I used my head dryer. So yeah, now let's
add more duck layers, and it will get into more
shape. I mean, the trees. So here, I'm mixing a
little more indigo, and I'm going to add it here. I'm very careful
about this line, like the way we are placing
the tray on this land. Yeah, that's it. And let's add maybe some I'm adding some lines and dots here. Yeah. And now I will move to this tree so we can shape
this tree highlights. G. Yeah. I'm just going like this. Maybe. You can definitely practice this technique on
another sheet of paper before going to your
finer painting. Yeah. And I think I want to
wipe it from here. Yeah. From here, Yeah. And I'm going for this one. Yeah, I'm going for some tiny
dots or some leaves, again. Yeah. Yeah, I'm just wiping it, and also I'm making some
kind of texture here by lifting, doing both. Yeah. And maybe let's
move to this tree. Yeah. I hope you can hear that sound
of scratching. By working on layers, we can create some nice effect, like, highlights and shadows. Yeah. Now I think
I want to dry it again and we'll add some
dry and dry details. Yeah, that's it. Now let's move to paint some more
darker details. Like, I'm going to just
make it like this. Yeah. And let's add some more
tiny dots or some branches. A yeah. Yeah. I'm just making some details here.
10. Day 3 - Part two: Now let's move to paint
some more darker details. Like, I'm going to just
make it like this. Yeah. And let's add some more tiny dots or
some branches, also, yeah. Yeah. I'm just making
some details here. Yeah. And maybe for here. Uh, I think I want to blend it here. Yeah. We don't have to
make it that sharp. I think I want to add a little
more sharper if it's here. Yeah. And Yeah. Just adding more kind of details or interest to these trees. Yeah. By adding more layers, we can create these
effects. Yeah. I think I want to make this
tree a little more taller. Yeah. Yeah, I'm adding some dots again and again
and shaping the tree. Maybe let's add a little
more darker mix. Yeah. Yeah. I think that's enough. I think I'm just blunting
it from this side. Yeah. Yeah. That's it. Now, let's move to this side, a little more darker again. Yeah. So I'm adding some
darker paints here and there. And also, I'm shaping
the highlights. Let's add some here. So tiny dots, maybe. Yeah. And I want to make this
part a little more sharper. Yeah. Yeah. I'm just blending it. Yeah, that's it. Now, let's leave it like that. And we have to add this very distant trees
or that mountain. So here I'm using Kobal blue, and I'm just going
to add that here. We have to paint it with
very lighter colors. So I'm mixing it
with loads of water. Yeah. By adding
these distant trees, we are also shaping
this pathway. So yeah, that's it. Now, what we are going to do is we have to add the shadows. So that is the most important
part of this landscape. So again, I'm going to use
obalble I will take Yeah. And I'm going to paint the
shadows with cobalblu. So I will start from here. And also, I'm mixing
it with water. I'll show you that we don't
want to saturated color. Yeah. We need a very light
color for the shadow. So yeah, I'm going to
start from here. Yeah. And I'm going like this. And I'm going like this. Yeah. That's it. And with that color, I'm going to paint them in their shadow in
their foreground. Making it lighter
on the pathway, starting from here and then blending it with water for the pathway because we need the
pathway lighter, still, even if
it's under shadow. Yeah. Now let's go here and then washing my brush
and blending it with water. And then, again, here, I'm
going a little darker. Yeah. That's it. Now, there's more to little
more darker shadows, so I'm mixing this
kobal blue with this already mixed greens
and lots of water again. Yeah, I'm going like this. Okay. Yeah, that's it. That's what we need. And we'll also work on the pathway again. Yeah. And maybe I will splatter some
water here and there. That's it. Now I want to add some more
shadows around here. So yeah, I'm going to start from this side for Yeah,
that's perfect. Maybe let's add for this side. Yeah. That's enough. Now, what I'm going to do is I will add some more
details to the pathway. The paper is still wet
with these all layers, and I'm adding some
effect again here. Yeah. That's it. And for
this side also. So as you can see here, first we started with very
thin mix of bal blue, and we added first
layer of shadows. And then we are, again, shaping the pathway
because, yeah, watercolor will spread
here and there when we add more wet on wet layers on that. So we can add more layers to make it more
sharper or contrasting. So, yeah, that's it. Yeah. This side also. Yeah.
Now it's perfect. Maybe I will just shape
it for this little part. Okay. Yeah. Now I'm
going to blend it. And let's add around here also. Yeah. I'm just shaping that pathway. Yeah. That's it.
Maybe I will add some more darkness
for that mount here. Yeah. I think that's perfect. I think I want to make it, like, a little more
sharper shadow here. Yeah. Yeah, that's it. Maybe let's
add some shadow for this, but Yeah. Now, that's enough. And let's dry this layer again. And we have to add more
details here and there to make it a little
more um, sharper. Okay, now I want to add some
more very sharp details. So again, I'm using this brush, and I'll take indigo, and I will add some dots here. Yeah. I want to make this
part lit more sharper, so the focus towards this
side will be more sharper. Yeah. And I will add
around here also. Yeah. I want to get that focus towards this
part a little more sharper. That's why I'm just sharpening all the details around that. Yeah. And I will make it again. Sharper for this side. Yeah. This trees
around that house. Okay. That's it. Now, let's try this layer again. And I'm going to fix that house. So again, I'm going
to take Copart blue, and I'll make it like a little darker for this
side for the shadow. So yeah, yeah, that's it. I'm just adding some dots here. Yeah. And I think I want to make the roof of this
house with brown. So I'm using born temper. Maybe will mix it with indigo. Yeah. With that color, I'm going to fix that roof. Yeah, adding one line
and then blanding it. Yeah. Yeah, that's perfect. Let's add maybe some
door or window. Yeah, we're almost done. We are almost done
with the painting. I just adding some
tiny branches. Now. And I think I have to add that tree trunk
or the branches effect. So I'm going to take
some back white and mix it with locre
with a mix of both, I'm going to add
some tree trunk. You can always start
from the shadows and then break it on the highlight part and then
go again from the shadow. So like that, we can
create some kind of depth to the tree. Let's do here too. I think it's too sharp, so I'm just wiping it. Yeah, maybe let's add
some kind of dots or leaves or sort of
grass effect here. I'm just adding some dots. Maybe more texture. Yeah. Yeah, this side. And I'm blending
it here and there. Yeah. Now we are almost there. Yeah. Adding more
texture or detail. Now, I hope you got the
technique of painting shadows. By using layering technique, we can paint anything
with watercolor. We can paint beautiful
shadows in watercolor. So that is the
technique behind that. Yeah. And I think I have to make some texture or details
for this pathway part. So again, I'm going to use the locre and let's
make it a darker for the corners. No. And maybe from this side also. I'm just making some kind
of movement on the pathway. Oh, maybe let's add this in. I'm just making it
a little darker. Yeah, that's it. Just make it for this highlight part also. So I'm just adding that
combination of this line here. Yeah. Yeah. Now, we are
done with the painting. So yeah, that is the final look of our um, today's painting. And yeah, I hope you got
the technique of painting, beautiful sunlit trees
and the shadows. Yeah, a simple and loose
country landscape. I hope you enjoyed this session. So yeah, see you in the
next painting. Bye.
11. Day 4 - Part one - Hills bathed in light: Hello. Welcome back
to today's painting. And today, we'll paint a
simple landscape again, with a clear sky and some
mountains and trees here. Most of the frame is
going to be the sky. Yeah. And also, we will
create some lights and shadows hitting effect
on the landscape. We'll focus more on that. Yeah. So let's start
with sketching. I'm going to make
it a simple sketch. I will start the
horizon line from here. Yeah, that's it. And
maybe I will add a line for the foreground part
of the land. Yeah. And from there, maybe I will
add one more line like this. Like maybe a rolling hill or some kind of shape like
that for the landscape. And I'm making it like this
a little higher here. Yeah. And let's make it like a
small mountain or hill here. Yeah. It. And the horizon line is going to be not very visible. We will add a very
maybe foggy mountain or something there. That's it. Maybe we'll add
some trees here and there and just loosely
adding the sketch. I mean, the outline
for the trees. Yeah, maybe I will add some
houses here and there. Yeah, I'm just adding
that roof of the house. And let's add one here. Yeah. And let's
make it more tiny. Yeah. Let's see how it goes. I'm just adding some more trees. That's enough for the sketching. You can also check
out the resources. Um, I added this sketch there. You can download it
and you can sketch it, if you couldn't
follow it with me. Now, let's start by
wetting the paper. So I'm going to start from
the backside of the paper. Yeah, that's it. And I'm going to wet
the french side. I'm using this brush. This
is 1 " wash brush by artifi. They send it to me for testing, and I really like the quality. You know, it's not very pricey and very good quality brushes. Yeah. And you can
also use this set for all mediums like what
colour gouache or acrylic. The bristles are soft. Yeah. Now let's start
with painting the sky. First, I'm going to take
some Juan brilliant. This is by Shinhan, a very creamy light,
pastry yellow shade. And with that, I'm going to make that warmth around
the horizon line, about the horizon line. Yeah, I'm going a little faster. We need a smooth transition
of colors, maybe. I think I want to make it
a little more colorful, so I'm going to
take some gamboge, and I'm just going over that. Yeah, that's perfect. Yeah. That's enough. Now, I'll clean my brush, and I'll take some kebald blue. Yeah. My Kobal blue already
mixed it with indigo. This palette I didn't clean. I don't want to waste
the pigment here. This is from our
previous painting. So yeah, here I have Kobal
blue and a mix of indigo. Kobalt blue itself
will be very vibrant, so I don't want
that vibrant sky. So yeah, with this, I'm going to fix the sky. Yeah, I'm just adding that here. And I'm going down carefully. And I'm going a little
faster here and also making some tiny clouds or some
kind of effect like that. Yeah, I think I want
to make it a little more darker for the
upper corners because, you know, watercolor
will dry lighter. So yeah. Yeah. You can always notice
how I'm moving my bridge, if it's faster or if
it's slow, you know, if I'm using the
complete bristles or I'm painting
with the tip only, you can notice, many
factors like that. Yeah. Yeah, I think that's
enough for the sky. Now let's move to
paint the land. So first, I'm going to
start with the first layer, like the warmer colors. So I'm going to take, again, um, gamboyellow, and I'm
mixing it with koba blue. More gamboge and very
little cobalt blue, almost like an
olive green shade. Yeah. And with that color, I'm going to fix the land part. We have already added lines
here for the sections. So I'm just filling
this color one by one. Yeah. And I'm going here. I need a little gap
like this. So yeah. And from here also,
let's go Yeah. And let's go here. And it yeah. I'm just filling this color
loosely. Yeah, that's it. Now, what I'm going
to do is we need some shadows for the hills. So I'm going to
make some indigo. Yeah. Do the gamboge
and bal blue mix. Yeah. Maybe let's add some yellow core to make
it more earthy. Yeah. I think I want to make
it a little more darker. Yeah, that's it. Now, you know, I want to work with
a little dry brush. So I'm just wiping all the
water or paint from the brush. And I'm going to take this color and paint that for
the foreground. I think let's make
it a little more darker with more indigo
and more yellow cour. Yeah. That's perfect. Again, I'm wiping it. Yeah. I want to make it more
darker to the foreground. And also, I'm making
some tiny lines here for that shape of the hill. Yeah. That's it. And I'll go here by leaving that little gap for
the highlights of this spot. Yeah. Lights and shadows can make very interesting
effects in landscapes. And I'm going to just
blend that color here. Yeah. And I think I'm going
to blend it here also. And let's go for this mountain. Yeah. I think I will
make it like this. Yeah. And I'm just feeling
that color here also. Yeah. You can also add more shadows to make
it more contrasting. Yeah. Indigo, yellow
cur and yeah. If you're adding
very little water, you can also con draw how much the pigment is spreading
on your wet paper. Yeah. Yeah. That's it. And I think let's add some more details
in the background. So I'm going to use this brush, and I'll take Kabat blue. Let's make it a little um, cooler for the background. So more kabal blue, mixing it with this
already mixed greens. Yeah. And with that color, I'm going to make some
distant mountains. And I, I'm not going
over the resin line. I don't want to make it
like a straight line, so I'm making it like some very distant
foggy mountings again. Yeah. Yeah, that's it. I'm going to dry this layer, and then we'll work
on more details. Yeah, that's it. No, I think I want to add some darker trees
here and there. So I'm going to mix again
indigo and elocre Yeah, more indigo and very
little yellocre. And I'm going to add
that colour here. Paper is not completely dry. You can see the
color is spreading. Yeah. Okay. And also, I think I want to
make it a little warmer for the trees
here and there. So I'm going to start with
Elokre and yeah, like that. And then we'll add some
darker colors for that. Yeah. I will make it
a little warmer here. Sorry, darker here and there. Yeah. I think I
want to make it a little more warmer for
this side of the trees. Yeah. And as it going away, let's make it more
tinier or small trees. Yeah. So I'm going to add here Okay. And also I'm going like this. And I will add more
darker effect, so I'm cleaning my brush, and I'm going to take this mix, and let's add some shadows. Yeah, like that. Yeah. That's enough. Now, let's go for more tiny, tiny trees or details. So yeah, I'm going
to take this color. It's a very light mix, not this. This very dark. Here I
have mixed it with water, so it's a little lighter, and as it going away, let's make it more
lighter and cooler. Yeah. You can also use a
detailer or a small size brush. Yeah. I think I want to
wipe the brush again. Yeah. And let's make it
more dry and dry effect. Yeah. I just creating
some blurry effects here. Yeah. And I think I'm going
to add some darker dots. So this kind of details can make a lot of depth
to your painting. It demands some patience, but, you know, it can create
some very nice effects. Yeah. I will give
that detailed look. I think I want to work on
more darker details. Yeah. With this dry tip, I'm just creating some dots, and that itself can
make some nice effect. Yeah. Et's go for more details. I just make me some dots here. You know, if you
want to make it a little darker here and there, you can also do that. I think I will make
it a little darker. S. That is perfect. I think let's make it. Yeah. Let's make it a little more detailed here and there. Yeah, that's it. And I think I want to fix
12. Day 4 - Part two: Fix this line for
the mountain again. So again, I'm going
to mix some bal blue, and I'm mixing it
with lots of water. Yeah. And maybe I will
add some in Berlin. Let's make it a little opaque. Yeah. Yeah. And with that color, I'm going to fix that line. Yeah, that's perfect. And let's make it a little
darker here and there. So I'm mixing it
with this green and just adding that
colour here and there. Now, I think I want to make these shadows a
little more darker. So I'm going to
use the same mix, and I'm just adding that here. Yeah, I need that dry texture. Yeah. And around here also. I want to make the shadows
a little more contrasting. Yeah, like that. Yeah. And again, here, also. Don't worry, we can work on
these trees again. Yeah. So Yeah. That's perfect. Maybe let's add some
colour here, also. And Yeah. I think that's perfect. And I want to make it a
little more lighter here. I hope I can lift some
colors from there. Yeah, like that. Yeah. And also, you can just wipe it from there. Yeah, that's perfect. I'm just adding some more
dots here and there. Yeah. Making it a
little more darker. Maybe some distant trees. Yeah. That's it. I'm just making some
more trees here. Yeah. I just want to blend this sharp
edge of this mountain. Yeah. With a flat brush and very little moist
on the bristles. And I'm just, um, blending it just going with
this brush here. So yeah. And also, if you want to
wipe some colors from there, you can do that. Yeah. Yeah, that's it.
Let's dry this layer, and then maybe we'll add some houses here and
there with opaque white. So yeah, I want to make some more darker
trees around this spot. So yeah. Yeah. I'm just
making those trees a little more um sharper. I'm just going here. Me shadows. Yeah. I'm just making it more
sharper and contrasting. I mean, the shadows and the highlights. Yeah. I think that's enough. Okay, now paper is completely dry and let's add
some more details. Like we have to add some houses or cottages here and there to make it more interesting
and we'll also add a moon light here. So before starting
with Opaque white, I just want to lift some
colors, for these details. For that, I'm going to
use my flat brush again. Yeah, we have already
added the pencil lines for the houses here
and around here, but I can't see that now. So yeah, I'm going
to add now one here. You can already see a kind
of shape here, a small gap. So I'm going to make it like a house and maybe around
here and somewhere here. So, yeah, I will
lift it from there. Also, I have a dish paper, and I need to lift carefully. Yeah. That's perfect. Instead of going straightly with a pack white
for these details, you can always first lift
the colors from there, so you can make it
more transparent. Yeah, maybe I will add one here. And I think I will
add one around here. Yeah. Yeah. Now, I hope you
can see these three spaces. I'm going to make
it like a house. I will start with the roof. And also, you have to careful how you're adding the shadows and lights for the houses because the light is almost
hitting from this side. You can see um, on the trees and
on this land part. So we have to make it um, lighter from this side and
darker from this side. So yeah, we're going to
start from this house. So this time going to, um, just make it into an exact house shape by adding these darker
colors around that. Yeah. Yeah. And maybe here also. Yeah, I think that's enough. I will clean my
brush and wiping it, we don't need any
water on the brush. We need a very dry brush. Yeah. And I'm going to dry this paint before adding
colors for the house. Now, I will take oval blue. Yeah. And I'm going to
fix this side of yeah. Yeah. And now I'm going to take born tumber and I
will fix that roof. Yeah. That's it. Yeah. And I think I will add one small door. Yeah, that's now what I'm
going to do is I will take a pa quite to make
it a little more sharper. Always remember to
wipe all the water from your brush after
each time washing. Yeah. I'm going to add that
line for the roof. Yeah. And also I'm making it. For this side also, let's mix it with
some cobal blue, and I'm just making it
a little more bigger. Yeah. Yeah. Now, that's perfect.
And one more door for the other side. Yeah, maybe I will add a window. Just a small dot. If you are not
comfortable with, um, a brush for adding
these details, you can also go with
a fine liner, maybe. Yeah. That's perfect. We'll make it a little more
visible for this side. Yeah. I think I want to fix it again this side. Yeah. That's enough. Now let's
move to this side. Yeah. I think I'm going to make it a little
more bigger one. So I'll start with the roof. I'm going to take burn timber. I'm just going like this. Yeah. Yeah. That is the shape of
the roof I'm adding. And this side, I'm
just adding a line. Yeah. And I want to make this side of the house
a little more visible. So I'm going to take
some Kobal blow again and mixing it with
a pack quite. Yeah. And I'm just adding that
some lines and yeah. I'm just blending it here. Yeah. I just want
to fix this part. Yeah with Opaq white and Yeah. Opaq white and Joan Brilliant. I'm just adding that here
to make this line a little more visible or sharper
just around the houses. Yeah. And again, I'm
using opaq white, and I'm going to make this line. Yeah. That's perfect. Yeah. And I think I want
to just bland it. Yeah. That is enough. And I will add some darker effects just
here so we can make that wall of the side of the house a
little more sharper. Yeah. Yeah, that's it. And I'm just adding
one door again here. Yeah. That's it. For these two houses, now let's add one
small house here. So again, I'm going
to take burn tumber. I'll start with the roof. It looks difficult,
maybe for beginners, but if you are
following with me, um, the instructions I am
giving and you can just try it. First time making the roof. Yeah. What's it? And I will make it
a little cooler, more darker for this side. Same like this. Yeah. Yeah. That's it. And more or pack white
for the other side. Yeah. That's it. Now I will add the
door or that window. Yeah, that's enough. Maybe I
will add some more details like I want to make some
effects on the tree. Yeah. So I'm just
adding some tree trunks or very tiny and sharp. Yeah. Now, what I'm going to do is
I will add the moonlight. So with a very dry brush, I'm going to take a pack white. And also, I'm not
mixing it with water. We need a little thicker paint, and I'm just adding
a moonlight here. Yeah. That's it. Yeah. That's enough. So we are done
with the painting. Yeah. So, yeah, that is the final result
of today's painting. I hope you learned some
techniques to create depth in your paintings and also how to make
tiny details like this. For big nurse, maybe it was a little difficult
flush project, but I always want
you to come out of your comfort zone and
try out new techniques. So yeah, I am pretty
satisfied with the result. Yeah. So that's it
for today and bye.
13. Day 5 - Evening hues: So I hope you're ready
for the painting, and let's start with
a very simple sketch. For this class project, we are focusing more
on painting the sky. So yeah, I'm going to fix
the horizon line very low. Yeah. From here,
I'm going to start. That's it. And maybe just
above the horizon line. I will add a distant mountain
or some trees, maybe. Yeah. And just around here, I'll add one tree. I love painting trees. Yeah. And let's
add one more tree. And maybe I'll add more trees here just about the
horizontal line. That's it. That's it
for the sketching. And now let's start
by wetting the paper. Okay, I'm going to start from
the back side of my paper. Yeah. And now I'm wetting the
fringe side of my paper. Yeah. That's it for wetting the paper. Now let's start painting. Yeah. I'll also keep
a tissue paper on this hand to con draw the
moist from the bristles. Yeah. Okay, first,
I'm going to start with some warmer colors just
about the horizontal line, and then we'll go upward
with more cooler shades. So first, I will start
with Joan Brilliant, and maybe I'll mix it
with some opera pink. Yeah. I need a little
pinkish kind of pack shade. And with that, I'm
just going like this, to the horizontal line. Yeah, that's it. Now I'll
clean my brush, and yeah, I'm just wiping it
on the tissue paper, and I need a little
more warmer yellow. So I'm going to take gamboge and I'm going to add that
colour straightly to the paper. Yeah. I'm going carefully. Now I'll take this color again, which is a mix of opera pink and join brilliant and
just going here. Yeah, that's enough. Now I'll clean my brush again and I'm going to
take Kobal blue. Yeah. And I think I will
mix it with Kobal toilet. This is Bm Brand. Yeah. Yeah. I'll show you the swatch, a cool purple shade, which is perfect for
evening sky. Yeah. So I'm going to fill the
sky with this color. You can always notice
how I'm moving my brush. I'm going a little faster to get that perfect smooth
kind of effect. I'm going downward carefully. And also, I'm just
mixing both colors, like, by adding some
lines like this. Yeah. That's it. Now what
we're going to do is we have to
paint some clouds. So again, I'm going to take some abalblue Sorry
cobalt violet, and I'll mix it with
some kobat blue. I'm not mixing it with water, may need a little thicker
consistency of paint, and I'm going to
take some indigo. Yeah, to make it a
little more darker. Yeah, that's it. Now I'm going to paint some clouds. I'm going narrow around here and more thicker to this side. You can always notice
the moment of my brush. Yeah, I'm just
going around here. I'm just shaping
those clouds, yeah. And also, I'm adding
some tiny dots here and there to make it more detailed. And let's add more tiny
lines around here. As you know, this part is
more nearer to the viewer, and as it's going downward, it's going far away. So yeah, by adding more tiny
strokes here and there, we can create more depth, and you can also invite the viewers attention to
the depth of your painting. Yeah. Yeah, I think that's enough. Let's stop it like that. And now I want to add some light reflections on these clouds before it gets dry. So I'm going to use this
brush a little smaller one. And I'm going to
take some opera pink again and I'll mix it
with Joan brilliant. Remember, I'm not
mixing it with water. We need a thicker
consistency again. And I'm just adding
that here. Yeah. And here I'm just adding this color for the
down part of these clouds. Also, I'm just blending
that color here and there. Yeah. Let's add here. You can also adjust the
moist on a tissue paper so you will get more control
over your breast straps. I'm just shaping the
clouds again and again. Yeah, adding some
this pinkish color for these tiny, tiny clouds. Yeah, now I'll clean my brush, and I want to add more of
this color around here. Yeah, I'm just loosely adding
that color for more clouds. Yeah. And let's add a
little more purple here. Yeah. It's all about
working on layers. Yeah. I'm adding more darker tones here. Because, you know,
watercolor will dry lighter. So we can add more darker
tones here and there. Yeah, that's it. Now,
let's leave it like that. And let's start
painting the land part. So to paint the land, I'm going to take a
little moody green mix. So here I'm mixing olive green and cobalt blue,
little cobalt blue. And I think I want to
mix it with some indigo. Oh yeah. A little darker,
cool green shade. Yeah. And with that color,
I'm going to just fill the foreground part.
That's enough. Now I'll clean my
brush and yeah. And with very little
moist on my brush, I'm going to blend it upward. Yeah. And I want to add
more darker colors. Instead of going
straight like this, you can also go like this. Yeah, I think I want to make it more darker for the foreground, so more in the go
and olive green. Yeah, that's enough. That's it. Now I'll dry this layer and then we'll
go for more details. Now, I'll start
painting the trees. So with the same color, you can also notice
the consistency. Yeah. And I'm going to add some
trees. You know, here. You can also see the
tip of my brush. It's a little dry. Yeah. With that shape, I'm just adding some dry strokes for this trees. And maybe to make
it more darker. Let's add some indigo. Hi. Yeah. That's it. Now, let's add more big
trees for this side. Yeah. So with the same color. Yeah, I'm going to. Okay, I'll switch my
brush to this one again. Yeah. I had a very thick mix of pain. Yeah. And around here, I'm going to add bigger tree. You can notice the shape of the strokes I'm
adding the direction, speed, everything
you can notice. I want to make it a little
detailed around here. Yeah, now let's add
some branches, maybe. Yeah. Just adding more details and shaping the tree. Just adding some
branches and tree trunks here and there. Yeah. That's it. Since it's a
very dark and evening sky, I'm not adding that
reflections on the sky. In one other class project, we are painting almost
something similar, but with more glow on the trees. With a smaller brush,
I'm adding more details. Yeah, I think we're almost done. And let's add some dots here
and there on this land. Adding some tiny dots. And I'm blending
it here and there. Now, what I'm going to
do is I want to add some details just a
the horizontal line for these two gaps. So again, I'm going to take this same Wilt and
Kobal blue mix. Yeah. And let's add some
very tiny details there. It's very important
to make it smaller. And I'm here also. I think we're going to blend it. Just making it in
different hides. That's it. Now I want to add some trunks for this
tree by scratching. So I'm going to use
this pepper knife, and I'll start from here. You can already see a kind of
shape there for the trunk. So from there, I'm going
to start like this, yeah. And also I'm
breaking it here and there and adding some branches. Yeah. That's enough. And if you're feeling
like it's too bright, you can also blend it. Yeah, I'm just blending
it here and there. You always have to do this scratching when the
paint is still wet. On a dry paper or dry
paint, it will not work. Then you can use
a pack white or, um, white gouache for the
details. Yeah. That's it. So yeah, that is a final
look for painting. I hope you enjoyed
painting this with me, and you learned to
paint a beautiful, soft evening sky with
clouds and some trees. So, yeah, that's it for
this class project, and I'll see you in
the next video. Bye.
14. Thank you for joining!: So finally, we are at
the end of this class. Congratul on completing
all the projects. I hope you enjoyed painting
these relaxing landscapes. And I would love to see
your beautiful paintings, so don't forget to applaud your projects in the
project section, and I always enjoy going
through your work. If you like this class, please consider
leaving a review. It really helps me and also lets other students
know what to expect. And if you haven't already, you can also check
out one of the series where we painted four
landscapes together, which is also a
little more beginner friendly compared to this part. And thank you so much again
for joining this class, keep painting and
keep experimenting. I'll see you in the
next class. Bye.
 Raniya Ali, Justartsbyraniya Watercolor Artist