Transcripts
1. Welcome to the Class!: Welcome to this relaxing
watercol class, everyone. In this session, we'll explore four peaceful
landscape projects all painted in a loose and
impressionistic style. Before we begin, I'll walk you through all the
materials you'll need, keeping everything
simple and big friendly. From there, we'll start with light sketches and
slowly build our scenes, learning to paint soft
skies and clouds, expressive trees,
gentle pathways, and a quiet river view. So grab your supplies,
take a deep breath, and let's unwind together with these beautiful
landscape paintings.
2. Materials you'll need for the class: Okay. So first, let's see the materials we need
for this paintings. I will use this, Bahng
artist watercolor paper, and this is almost a size, 100% cotton and 300 GSM. You can use any brand
of watercolor paper, but you have to use 100%
cotton and 300 GSM papers. And for the brishes, I will use this hake brush
for wetting the whole paper. Um, like this hake brush
will has lot of water, and it's easy to cover
large areas for wetting. And I have the small size of the same brash.
I will use both. And maybe for some re wetting and some lifting techniques
in the paintings, I will use flat brush, and you can use a
medium size and a little bigger one for some retting and
lifting techniques. And yeah. And I will also use this
small size mob brush. You can also use
any round brush. But mob brush again, will halt a lot of water, so we can use it for loose
techniques and yeah, to paint trees and sky, clouds. This is very good. And I
will also use one detailer. And these are by
brand golden maples. I have a code, if you want to purchase
from their website, very good quality brushes. And yeah, you will need
also one pencil and eraser. And for some highlights, I will use a roll, white pen, or you can also use white gah or a pack white for some
highlights and final details. And also, you need
to jars of water, and maybe I'll use
this spray bottle for some rewetting or some,
like that techniques. And yeah, this is the
mixing palette I'm using. And for the exact colors
for each project, I will mention it in
the coming videos. That's it. That's it for
all about the materials, and yeah let's start
the paintings.
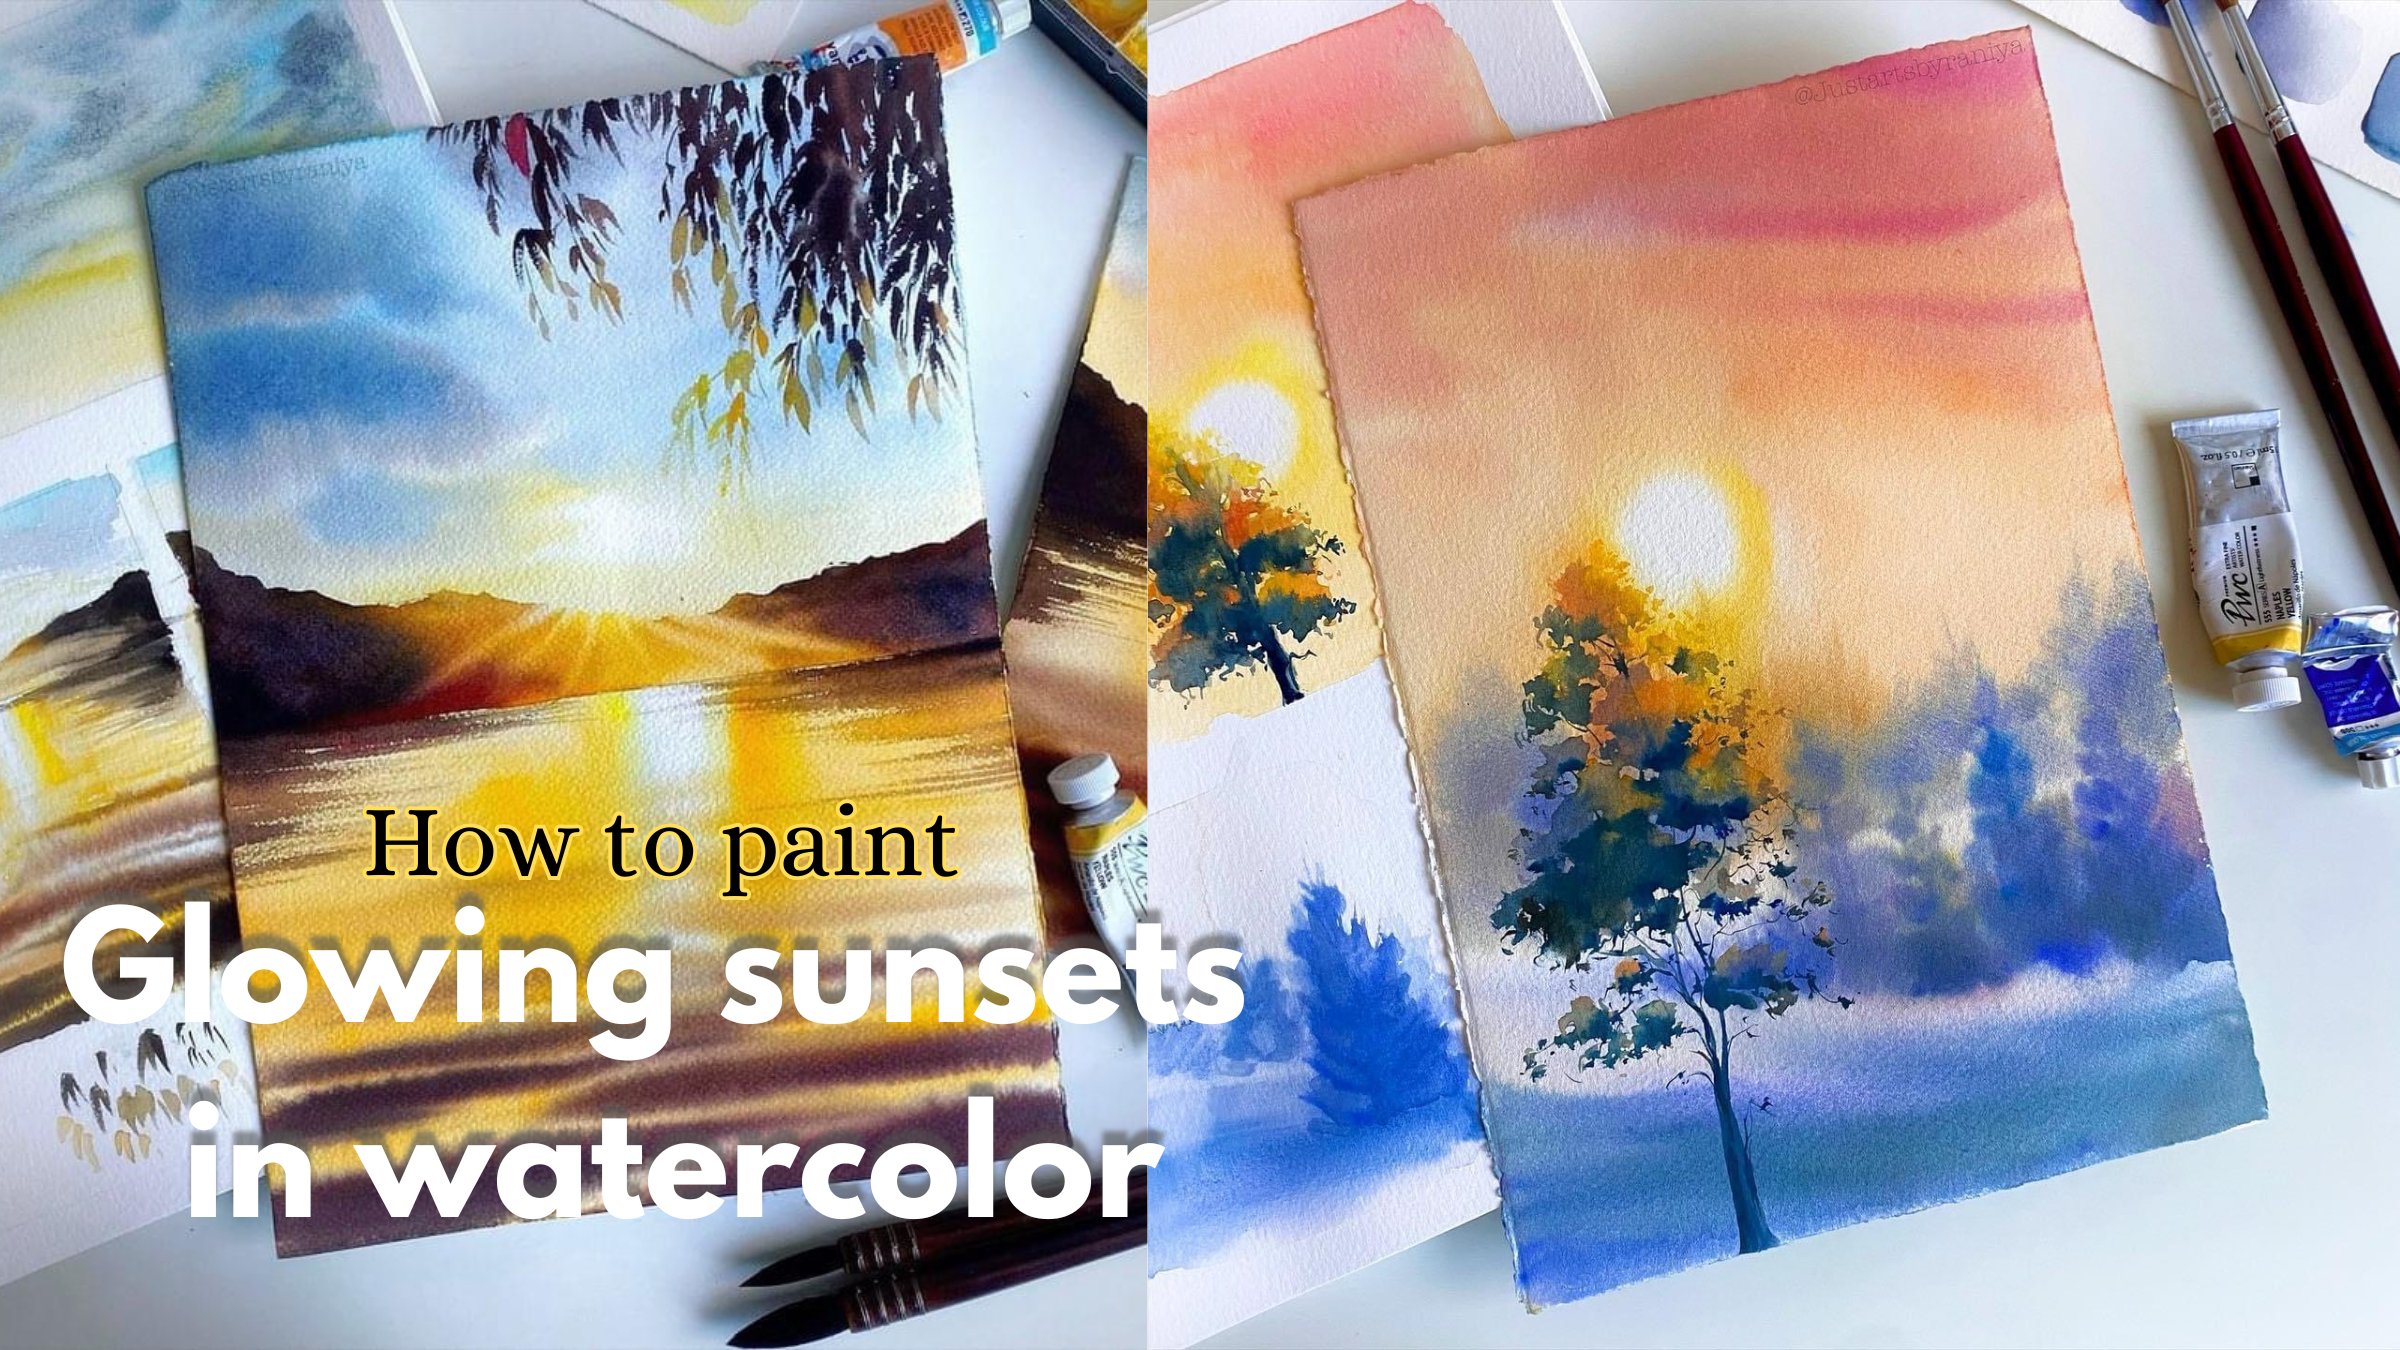
3. Class Project 1 - Sunset landscape painting: Welcome to Day one. I hope you're ready with all materials, and today we're going to paint
a very simple landscape. First, let's start with
the pencil sketching. Okay, I will fix
the horizon line. And most of the part
is going to be sky. So around here and let's make it like a
slope or a hill top. And I'm going to add
a small pathway. Pathway should be wider as it's coming for ground and
more thinner as it towards the horizon line. Yeah. That's it. Let's add a mid line for the
bathway. I think that's it. Now, we can add some trees here and around the hilltop in
different shapes and sizes. I'm adding some bigger
trees and very sh trees. And this part is going
to be very background, some blurry mountain
or some aerial view. So let's leave it like that. Yeah, and we'll paint some
clouds from here and. So that's it for the sketching. Now let's wet the paper. Now I have my small size mobrih, and let's start with the sky. I'm going to make it a little
mod sunset kind of sky. So I will take gao and let's add some yellow colors
here and there. Leave some white space almost in the center and then
paint around it. Okay, I will show
you the palette. Yeah. Now, L et's add some orange yellow mix. And just paint it
here and there. Let's take some more
bright yellow and add some small. Yeah, that's it. Now, let's take some serlin blue and mixing with some
ultramarine and let's fill the upper part. Make it lighter. Don't worry about mixing blue
and yellow orange colors. Let it make some
greenish shades also. Sky colors are very vibrant
and very different. Especially when it comes to
sunset. Yeah, that's it. Now, we have to
paint some clouds. I'll take some in the go and a orange to
make it a little purplish. Yeah, that is almost
like a reddish shade. Add some clouds here and there. Again, let's make
some indigo and red and make it lighter, not very dark clouds and some tiny details or
small clouds here and there. I think I will switch
to my small size brash and add some tiny
strokes for the clouds. Yeah, I think that's
it. Now, let's move to the land part. I think I have to wet the paper. And now let's wipe the
water from this pathway. So we can make it lighter. Yeah. Now, I will take some green mixing it with d mixed into and red
colors for the clouds. We can make it more mody and dark and fill the colors. Let's mix it with some intco. Make it more darker around
the foreground and more lighter towards the upper part. Let's add more colors. Mixing this green with
a pack to make it And that's it. Let's
fill it this side too. Remember the shape
of the pathway. Yeah. Yeah, that's it. Well, let's add some more
colors here and there. I think I will wipe some
colors with a flat brush. That. That's it. Now, let's add some more darker colors
in the fork down. We'll get the focus
towards the mid part. I think I'm mixing Sap
green and azo green and a little indigo and
adding more and more layers. Don't just filling
it completely. Oh. Oh. Now let's move to paint
the background details. Let's make it foggy and
moody mountains and details. I will take some pack
white and a little indigo and some ultramarine. Yeah. Now let's just paint it. Fill the colors. Oh. And let's soften this
edge with a wet brush. And I'm going to add
some more colors. Let's make it some details or some elements in
the very background. I'm trying to make it
more here and there. Mixing with some yellow. Don't worry about re
wetting your paper. That's okay. Because you're
using 100% 300 GSM paper. It will halt of layers
and a lot of water. Yeah, I think that's it. Now, let's just dry this layer. Okay. Now we have
to paint the trees. And yeah, I will use this same mob brush
and indigo and sub green small mix of azo green. M your brush a little drier and just just scratch
it on your paper. Remember to paint it carefully
and do not overwork. Some tiny dots
around the corners. Let's add some more
darker colors. And you have to
leave this part very sharp to get that shape and
perspective of the painting. Now I will switch to this brush and paint some smaller trees. Make it irregular and not
in a specific pattern. No symmetrical. Okay? I will add some more details like
some branches or some states. So grass. Okay, I
will paint some makes very tiny and
small details also. Make it a little darker with some indigo and a sap green mix. And here also. Yeah, that's it. Now, I will paint some very
tiny details around here. We have to be very careful
to not overwork here. Make it very sharp and tiny. In different shapes. You can also look at your painting from
a little distance. So you can see where you have to add more details or
where you have to lift or you can make any
changes as per your idea. I think I will add one
more tree around here. You can see how I'm
moving my brush. So It is not really very wet or not very dry. With a perfectly damp brig. We can do the details easily. Yeah, I think that's
it. Now we have to work on this pathway. First, I will take some
beer mixing with a little in to make it and just fill
the path with this color. That's it. Now, we had to
make it more lighter here. Yeah, that's it. Now, we have to shape it with some
darker colors. So let's add some sharp details. I'm trying to blend it
to for the other side. Yeah. That's it. Let's add some details here, and there's some tiny dots. And also we have to make it
a little more darker here. By doing this outline, we'll get the pathway
detailed and beautiful. I think that's it. Now, let's dry this
layer for the pathway. And we can add that mid
line of the pathway. Remember to make the midline to according to the shape of path. Let's add some tiny dots here
and around the mid line, so we'll get it natural. Yeah. I think we are done. Yeah. Now we have to add
some details to the trees, so I'll use some
white or pack white. And with the same detailer, I'm going to add some details to the trees. Yeah, that's it. Now here also. Let's earn some here also. Okay, I think we're
done with the painting. Now, let's say the final look. I hope it was easy to follow and simple be a friendly
one for you. So yeah. Let's say that. Final. So, let's move to the next painting.
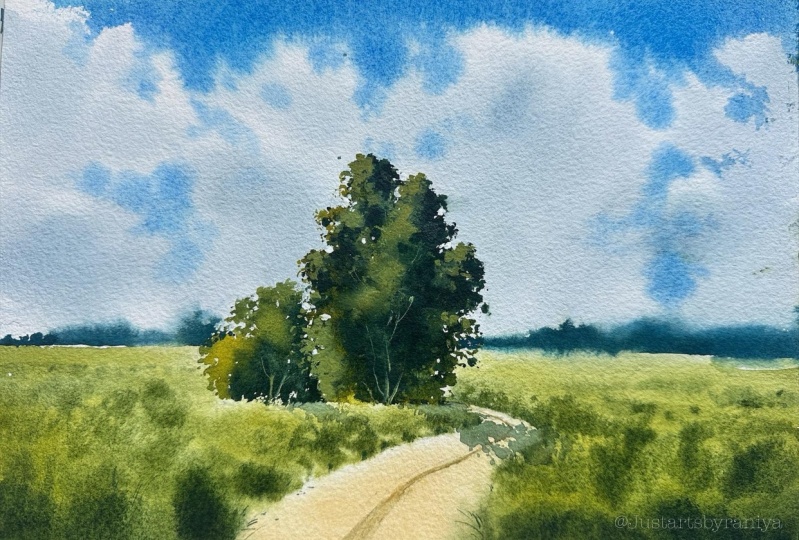
4. Class Project 2 - Country road painting: So I hope you're ready. Let's start with the
pencil sketching. I'll fix the horizon
line a little lower. Yeah, that's it. Now, I'm
going to add a pathway. This side, I'm going
to add the pathway. Remember to make it
narrow and then make it wider as it coming
to the fir ground. Yeah, that's it. Now, I'm going to add a bigger
tree around here. And some more trees around the horizon line,
some distant trees. Yeah, that's it. I want to
reshape this pathway at. So Yeah, that's enough. We'll also make the sky
a little more cloudy and still clear sky. This pathway will go invisible behind the tree.
Yeah, that's it. Let's add line to the pathway.
I think that's enough? Now, let's start the painting. First, we will
start with the sky. So let's start
wetting the paper. Let's make it more
simple and loose style. I hope I'm not going
to overwork on it. The whole paper is
perfectly wet now. Let's start painting the sky. I'm using this small
size pre again, and let's take in go
with a little black. This is paints gray, I think. The mix of both. I'm going to paint some
shadows to the clouds, make it very lighter. And paint here and there. Don't worry about any
shapes or something. Move your brush freely loosely
and a make some saves. Yeah, that's enough. This part, I just left for
painting the sky. I will take some cerline
blue with some ultramarine. I always paint clear
sky blue colors with a mix of cerline
blue and ultramarine. Even you can just
use maybe cobalt blue or similar to this mixture. Yeah, and just paint the
sky by shaping clouds. You can see how I'm
using my bridge. I'm just using the tip only to paint some
small dots like this. And just scratching it
over on the paper to paint bigger more
thicker strokes. Remember about the shape of
the clouds we are painting. Maybe I will add some here. So here. Maybe some here too. We have to do this
on the wet paper. I mean, the painting the sky, then only we'll get that
softer look for the clouds. You can also darken
the sky a with more layers because what
color will more lighter. Yeah. I think that's enough. Now, let's start
painting the land part. First, I will use
some yellow oc. Before that, let's just
the land part again. That's just paint this path with some yellow o
for the first layer. Yeah, that's enough. And let's just straightly paint
these two parts with some azure green and some sap green mix of both a and just fill
it over the space. Remember to paint it carefully
around the outline of this pathway and fill it over here around
the horizon line. Same like this side too. Azo yellow and sap green. This is actually zomthin yellow. Sorry, zomthine, green
by vanco al talents. And the same shade is
available incan by leaf green. So it's almost a lush and sunny, beautiful colorful green. I like to use in my
landscape paintings. O Remember to leave this part because we'll paint more bigger trees
here in the mid part. Now let's make
some darker colors around the foreground and
just shape the pathway. I'll take my small detailer and it's sap green and in a
little indigo and sap green. With some azo ello also a little more darker
version of this green, and it just makes some
depth and dimension. Okay. I'm going to add some
lines like this that's like overlapping some grass
or some leaves the pathway. Let's make some more colors, Sap green and indico with some zoe green and add more
layers that is wet on wet. So dots here in there. L And here also. Yeah, I'm shaping that
pathway again by adding some darker colors
around the outlines. Yeah. That's it. I hope you can see the
change or the look of the pathway by adding more
details to the sides. L et's add more
colors here in the Adding to the
already painted ds, make it and contra. J Yeah, that's it. Now, let's move to
pain the trees. Okay, I think I'll stop now, and let's paint these two trees. With more darker colors. Okay, I'll take ing
again and with. And before that, I will
start with the first layer. That is somete green, and let's just
paint it over here. Remember to paint it
very for the outline. This is the first tree,
this is a little taller and here is also one more
tree that is a sh. So we'll paint the outline. This tree is
overlapping this one. So we'll paint it here
more crispy and detailed. And this part is also important. So remember to
paint it carefully. We can paint some
tiny dots here in the I'm using this mob brish. With a mob brigh, we can
paint both loose trucks and tiny little dots also. Yeah. That's it. Now, I'm going to paint
this side with colors. Yes. Same like we did the side. I mean to make some
tiny leaves and dots and maybe stems or branches Oh. And also, let's just make
some dark dots here. Will make more sub grain and in the go and make it
like some shadows, some crispan, detailed ones. O. I will switch my
brush to this one and just carefully
painting it around here. Don't worry. We can make
more crispier details with mixing white paint
with this of green. You can just paint
it, but still you have painted it carefully. Scratch it over here for some details of grass
or something like that. Here too. Okay. And let's do it the side lighter. Yeah, that's it. I think
I have to the side. This is how I always
overwork on my paintings. But sometimes I love it. Let's make it a little
more darker around here. I think I will work on
it this side again with some pack white mixing
some azoe grain. And a little this indico
and Sab grain mix. Let's just paint it over here. Yeah. And here, also, let's
make it more white. Blend it over the space. Yeah, I'm going to
add more highlights. Yeah. I think that's enough. And
also, we have to work here. So I'll dry this layer. And I'm going to add some
highlights to this tree. And I'm going to blend
this side like that. Oh. Yeah. That's perfect. And also, let's add some details
to the tree with the same mix of opaque
white and azo green. So I'm going to add some
trunk and branches. That is going to be
very sharp and thin. Yeah. That's it. O I think I will add here to paint it
only inside the shadows. Yeah. I think that's enough. I'm still again working
on this street. And pending crispy and detailed
highlights to the tree. Love. Love Yeah. That's perfect. That's enough. Now, I'm going to add some pure white that
is on my palette. And I will add some
white dots here and there for more details. No, I think that's perfect. Let's move to paint
the horizon line. I'm going to ret the
horizon line part. I'm not wetting this part. I mean the land part. I'm just wetting
only around here. And we'll paint the
horizon line details like the distant trees and mountains within that space. Yeah. Paper is perfectly
dry so we can reve it. Yeah, that's it. I will take some in the go again
with a mix of cerli and blue. And I'm using a moody, more foggy kind of bluish shade. And let's just Bind
it over here without overlapping the I mean, the horizon line. Paint it ad the tree carefully. Here you can see I added some dots with
this mix of colors over this tree part to make
it more detailed. So y. With the straight line. Let's do it here also. Yeah. I think this side viper is dry, so I'm going to just The focus should be this tree
and this pathway. That's why I'm blending or making the distant details
softer and blurry. Painting it around the
tree very carefully. Yeah. I think I will lift
some colors from here. Yeah. That's enough. And I will add that mid
line for the pathway. With some very lighter colors. I want to make it more
wider around here. And let's add some details
in the foreground. Like some grass
or leaves that is overlapping the pathway
make it very crispy. O Yeah, I think that's enough. Okay, now I'm going to add
some shadows to this tree that is going
through the pathway. So let's take some
very lighter color. Do not make it darker. We have to use very
lighter color. This is a mix of Serling
blue and indico. I'm using that same mix
and with a lot of water, you can even taste the
color on another paper. Yeah, that's perfect. And let's paint the shadows. Veers this bridge. Yeah, that's it. We have to make it very
sharp and crispy. We can see the
things the shadows, we have to make it transparent
and very lighter colors. Yeah. That's enough. You have to paint the
shadows always by following the shape of the land and
the details there like that. Yeah. That's it. Now, let's
say the final look. We're done with the
painting. Yeah, that's it. Now, I hope you learned some technique for
painting a tree like with a detailed look by using white goche
or a pack white, and also without losing the transparency of
the whole painting. You can use white guache
or a pack white paint in verticor pains paintings with some tricks and techniques
and confidence. And yeah, I hope you got the technique for
the sky painting and the perspective of the picture and the pathway and also painting the shadows. So yeah. L et's move
to the next paint.
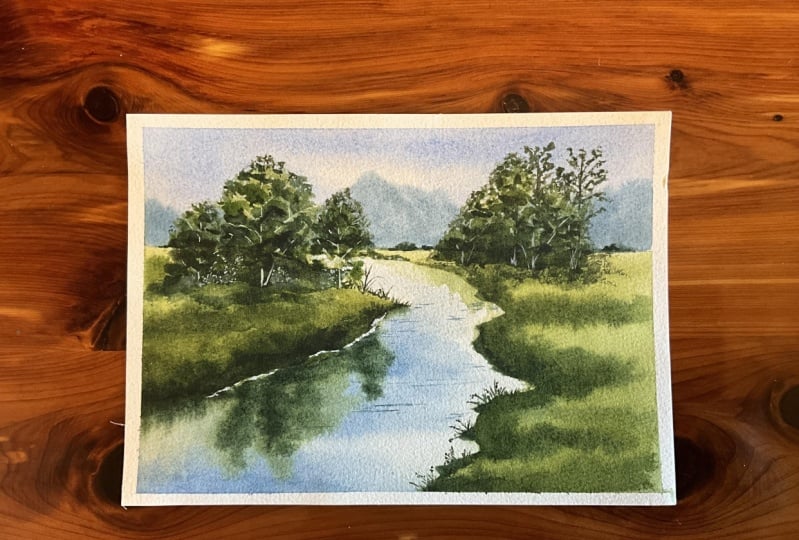
5. Class Project 3 - Riverside landscape painting: Hi, everyone. So welcome
to our third day of painting loose and
easy acal landscapes. Today, we'll paint a
simple lakeside view with some trees in the background and also
the tree reflections. First, let's start with
the pencil sketch. I'll fix the horizon line in
the center a h than center. Yeah. I'm going to fix it here. Because most of the
part is going to be the lake and and then this part is going
to be the sky and some background
blurry mountains. That's it. You can always do the pencil
sketching very lighter. And also, let's do the
outline for the lake. Yeah, that's it. And
maybe from here, I'll do the outline
for the other side. Yeah. Yeah, that's it. Let's
fix one tree here. And maybe one more here. Yeah, that's it. I will
fix one tree a here. We'll do the outline
only for the trees. Yeah. That's it. And we'll paint the reflections
of the tree here. Yeah. Okay. Let's start
wetting the paper. And also, I'm going to fix the paper like
in this direction. Yeah. That's perfect. So let's take some in the
go with some pack white. And also, I'll take some ultramarine to mix
it with this in the go. And let's just point it out here because it's
just a moody sky. The clouds and details
are not visible. So yeah. I'll make it more darker in
the upside corner and more lighter towards the horizon
line. Yeah, that's it. Let's make a little more darker. Yeah. That's enough. I will wipe colors from here because we need the lake or
the water pot more lighter. I'll wipe it here. Then let's
start painting this land. I will take some green. I'll mix it sap
green and azo green. Maybe I want to mix it
with some gambog yellow. Yeah. That's perfect. I need a little olive shade, but still like a sap green. So I'm going to paint
it around here. Make it sharp and here. More sharper. Yeah. And
let's wash the brish. And then with a clean brish, let's spread those
colors around here. Okay I will add colors. Yeah. Okay, I will more darker colors. Here. That's how we'll make it
fluffy and more dimensional. We'll start with the first
layer that is lighter, and then we'll add more darker colors around
the foreground part, and we'll make the part that is going towards the horizon
line more lighter. That's how we'll get more dimensional and stile
lose and fluffy effect. Yeah. That's enough. Okay. I will paint around here. Let's start with
more like lighter. Make it more lighter
and this part. Remember these lines
because that is going to shade the look of the lake. Yeah. The brig, I switched
to this detailer now, and let's add some details. Mixing green, Azoe green, and some gab yellow, and also. To make it, I have added indigo. Let's make it more rec
and on the fork down. Yeah, I'm adding more colors because it's getting
more lighter. Yeah. Now, let's start
painting the lake. I will use this I think five
by eight size flat brush, wash brush, and let's
just ret this part. Remember to not overlap
the land part we painted. H. Vet it here very carefully. Yeah. Now, we'll paint this
sky colors around here, that is a mix of ultramarine
and a little indigo. And some white. I'll start adding here. And also, I think I want
to lift some colors around here to make it a
little more irregular, the shape of the lake. Yeah. That's enough. Let's add some more colors in
the foreground of the lake. O Do not paint it continuously
with darker colors. You can make some white gap in between to get that dimension. Okay. I think I want to reshape
the lake around here. Yeah, that's enough. Now, let's paint the three reflections. Okay, I will take the
same mix of colors, g and d and they go and also gamboch yellow
and some opaque white. Now my brush is loaded with the paint, mix of these colors, and now I'm going
to wipe this brush on a tissue and then
start painting here. Here is going to be the tree
and I'm going to paint here. Remember the shape of the tree you're going to paint
here because we have to follow that almost similar
to this shape here also. Also here is one
more small tree. Yeah. And let's make it
a little more darker. Yeah, that's enough. Also, I
will just reshape this part. And let's do like this for the reflection
of this land part. Yeah, I think I will make it. And so here too, as the colors are spreading
around and dry more lighter. We need to add more players. Mix in the go to the
green shades to make it. Also, I think I will
add around here too. Okay, that's enough. Now we'll paint this
background details. That is going to be
some blurry mountains. I'm going to just ret
that part, the sky part. With the big size flat brush and just it without coming towards
the lake and land part. Yeah, I'm retting it
completely, the land sorry, the sky part. Yeah,
that's enough. Now, let's mot to paint
similary mountains or similary background
elements with the x of indico and white. Okay. I just going
to make it flat. And also, I'm going to wipe it a little bit because
it's going too high. Yeah, that's perfect. And also, I will add some more darker
sports here and there. With a mix of indigo
and a little. This green mix. I like some details in
the very background. Maybe some trees or some houses. Add some dots. Yeah, I think that's enough. Now I will paint some details
like reflections here. This is going to
be very lighted. I'll mix some water
to this grains, and let's make it lighted. Yeah. Yeah, I think that's enough. Okay, let's Yeah. Now, let's just dry this layer. And let's start
painting the trees. I'm going to paint it with
this small size flat brush and let's take the same mix of colors and let's
start the first layers. We'll add more darker
layers later to the trees. Remember the outline we added, scratch it over here. Because by scratching your
brush on the paper for trees, you will get some tiny
details like this by that texture. You
can do like that. F and it's also here. Yeah. That's enough now, we'll add more colors. Sap green and indigo, and add some colors around here. Like we did yesterday, and shadows to one side. Remember this part. By adding
darker colors to the trees, we're also making some sharp
or more crispy details like some leaves or grass that is overlapping
the trees around here. M it very around here also. And let's make iter here. The lake is still visible
through around here, do not cover that part. Some dots here and there. Yeah, I think that's enough, and we'll add here too. Yeah. Okay. Now, I'm you
to add one tree here with the same technique. Just pin it over here. Same like we did here, I'm to scratch on the paper. I hope you are
seeing brush moment. Let's make some small tree here. Yeah. So now let's
add the layers. We have to alas add the layers
before the first layers. So Yeah, I think I will add more
tiny dots around here. Again. Now, let's add
some more details. Like some tree branch or stem. So And also here too. Maybe from here. Okay. And I'm going to add
some dots a on that for some dry leaves. Make it dry. Make it really dy, dogs. Yeah. No, that's it. And I want to add some more darker dots to
make it more detailed. And just planting it. Yeah. No, I think let's add
some details to the tree with a. I'm going to a Oh. And add some branches. Make it very sharp. Maybe one here, more here. And also some little
dots around here. Yeah. And so I'm going to add
here also from this space. So it will look more natural. Yeah. And around here too. I want to make it more sharp. Yeah. That's enough? No, I think let's add some tiny
details around here. So I will take some
indigo and grain mix. And make the tip of
your brush very sharp. You can wipe it on your
tissue or cotton clothe. And this is already
like mix it here. With the direction
of that blend, you to add some Here. So dog hidden there
for some details. I think I will make it more dcor and this part. Yeah. That's enough. And just blending it a little. B, we don't need
it more sharper. Yeah. That's enough. Yeah. I think we
are almost done. Let's add some more details. I And I'm going to add
some details in the water. So yeah. Like some
very tiny dots and lines with some in the go. Remember to make it very
tiny and small and sharp. And some stones or
rocks in the water. And that down part of the stones I mean to blend because it's just inside
the water under the water, and just the top part is what we can see and also
maybe some here Just make it an novel shape and then blend
that color downward. Yeah. Of the more dining in here. Yeah. And also let's make it a little
dug to one side. Yeah. And also, I
think we'll add some pack white lines around
here for the highlights. Oh. O I'm just fixing some details like with pace with a mix of pace
and this in the go mix. I'm going to add
some dots around here to make it
more interesting. Yeah. You have to do this
layer very dry. Yeah, I think that's perfect. If you couldn't leave the spots like the visibility of
lake through the trees. You can add some white gash. I mean, maybe a pack
white around here. And you can create
that spot again. Yeah. I think we
are almost done. I need to fix this
part a little. To make that line between water and land partly more visible. Yeah, that's enough.
Yeah, we are done. Now, let's say the final
look. Yeah, that's it. It's like MD Lake
view with some trees. So I hope you learned the
techniques of painting MoD background and sky and lake reflections
and some trees. That is a little more
natural and detailed way. I think I love it. I really like the look of
the trees and the all over, the painting looks nice. So yeah, that's it. Let's move to the next painting. That is going to be the
fourth painting. So yeah.
6. Class Project 4 - Meadow landscape painting: Hi, everyone. I hope you're
doing great and welcome to our fourth day of painting
what color landscapes. I'm trying to make it
more simple and easy to follow than all
other classes. Because I know when
I start painting, I feel like adding
more details and more details and I
make it complicated, this time, I'm
trying my maximum. Today, we'll paint
a simple meadow with some trees in the distance and with some foreground
textures and details. Let's start. I'll fix the horizon line almost not in the center,
a little lower. Yeah, that is the center point. I'll fix the horizon
line around here. Yeah. Okay. And I will add
one tree around here. There's not really very big some small
trees in the background. And maybe one more here
and one sm tree here. And we'll also add some trees or some background elements
above the horizon line. Yeah. That's enough. And we'll also paint some grass or leaf like textures
in the foreground, we'll paint some
cloudy sky here. So yeah, first, let's start wetting the paper. Okay. Now, I'll take this same brush we used for our previous
paintings also. This is a small size more bh. I'll start with the sky colors. I'm going to take
some cline blue with e with a mix of both. That's it, and I'm going to just Just make some cloudy shapes here and there by
painting the sky also. Let's make it a little more warmer around the horizon lie. I'll take some opera pink to create a
little peachy shade. I'll take some opera
pink with some orange. Okay, I'll mix it
with some yellow. That just cam mellow. Yeah, that's nice. Maybe let's add some pack white. Yeah, that's perfect. Now with this mix of
color, let's before that, we have to wipe it
around here just under the horizon line and fill it around step
out horizon line. Don't worry about the trees. Well paint it more darker, so you can paint it
over that space. Yeah, that's nice. Also, let's just spread it. I'm going to paint
the same colors on just some clouds
here and there like some sunlight reflections on the clouds. Yeah. That's enough. What Okay. Now, before it gets dry, let's paint some clouds. I'll take some more opera
pink to this ultramarine. Yeah. Maybe I want to make
it a little more darker, so I'll add some into
ultramarine and opera pink with this mixture
and make it very lighter. You can just dab your brush
on a tissue, some paper. Okay, I think I want to
make it more darker. Yeah, some gray shade. That's perfect. I think the
spot is started drying. I will spray some water. You can spray water
from a little distance. And Yeah. Paint it over the cloud space we created Maybe let's mix some more color for the clouds. Pain and indigo and with some. Ultramarine, we have
mixed for the clouds. Yeah. Yeah, I think that's enough. And we'll paint some more. Cloud shadows around here
with this small sized bridge. If you're feeling like
you want more control over the colors you're
adding to your paper, you always have to check the wetness of your paper
and also your bash. Painting beautiful
sky and clouds is one of the important part of
painting nice landscapes. Same like trees. Yeah. That's almost done Yeah. Let's leave it like that.
I'm going to dry this layer. Now, let's start
painting the meadow. So I'll start the paper. Yeah. And I'm going to just wipe some water from
the very foreground. Yeah. And with the same bh. We to take some yellow car with a little azo yellow. And let's just add
that color in here. Scratch it over the paper. Yeah. And let's make some dark spots here and there. And now I'm going to Yeah, I think I have to
wipe it around here. And to use some dry texture like for some grass or
leaves in the meadow. The tip of some grass. That's why I'm
creating some moments like this with my brush. Okay, I will show you on
another sheet of paper, like how to load your
brush with ello cer and a zo yellow mix and
movie brush like this. So we'll Yeah. Like this. So we'll get this
texture and we'll paint it here for more
details, like from here. So it will look more
natural and interesting. Yeah. Now, I will add more
darker colors around here. So I'll take some sap
green to this mix. And just paint it over here. Yeah. And now I'm going to make that shape again upward. And I'm going to
make it more around the foreground with
indico and sap green mix. Oh. Okay. Now I'm going to add some
shadows or some more colors. In between that. So I'll take a mix of yellow
ocher and ultramarine. I have already mixed it here. Yeah. I want to
just dim it down. We don't want that bright
white spots all over. Yeah. But still it's
somewhere here like that. I'm not covering it at all. Let's add shades here and there. That's Yeah. But I think this
party started drying, so I will just ret that part. So we'll take my big
size f Let's just. Maybe you can paint
without. That's also fine. But you can always
do retting and re layering techniques in
watercolor paintings when you're using 100% cotton,
300 GSM papers. So yeah. Now I'm going to
add some this dark green and indigo mix spots
here in the meadow. Let's make some tiny tiny dots. And maybe some bigger
one as it coming towards for ground. No so
tiny and little dots. Make it irregular
here and there, not just a straight line. Also, I'm going to
add some more depth with this yellow cur Mx. Bend it around here carefully. Yeah, I'm bending it like negative painting technique
by shaping that part. We're also shaping the
foreground details. Maybe I'll make it
in the with yellow. I'm just mixing that green
and your lower a little bit. Yeah, I'm adding that dark mix. So bigger lines like this for some overlapping gas or
leaves. That's enough? Let's add some more dark dots with a the indigo. Make it irregular and Yeah. You can see that by
adding these details. I'm also shaping this part or the view of this meadow
part, like this line. So we have to paint it
around the carefully. Make it some lines and
dots here and there. Don't make it more detailed. Yeah. Also, I'm going
to add some also. Yeah, I think that's enough. And we're going to paint the
bigger tree around here. If that, let's add the details
around the horizon line. So I'm going to re just about the horizon line with
this flat brush. That is my magic brush. For rewetting mainly.
Yeah, that's enough. And let's start
painting some details. I'll take some ultramarine
and some a pack white. And I'll make some they go and mix it with some grain also. I'm mixed it with of back white and ultramarine and
let it in the code, then I'm it with some
of this green mixture. So I hope you didn't get
confused about the color mixes. Okay. Now I'm going
to blend it a bit. Blend it down a little bit. And I think I'm going
to wipe it around here because we don't
need it that higher. Okay, that's. And also, I think I have to
lift it around here. Yeah. Yeah. That's enough. And Now, let's add some bigger trees. I'll take the go sorry, Sab green and they go. And we did the
outline around here, so I'm going to I can see I'm scratching
my brush over the paper. Yeah. Make your brush very
dry and add more details. Maybe I will add some here. Some tiny details
around the tree. And maybe here also. Yeah. And make it so grass that's all will
happen the scene. Yeah. That's enough. Yeah. Maybe I I feel
like adding some here. So tiny dots. Yeah. I'm going to shape it
with more details. Maybe I will add one tree here. That is little smaller. I want it to blend it
a little bit here. Maybe I will add some
highlights here for the tree with a mix
of pack white and a little acer and some green with
this mix of greens. And let's make. We had to paint it
on the wet surface. O. Yeah. I think that's enough. And also here. So here, also. Yeah. So let's make the other
side a little more darker. So I will take
some indigo again. And let's paint it over here. O. Yeah. That's enough. Just make it a little
darker and here, too. Maybe here. Yeah. And I think I need more
details. Like some ds. I enjoy painting
trees and I can't stop painting and adding
details like this. Yeah. We are almost done. So we have to add some details around here. So let's do that. Maybe some lines. With some in the go. Yeah, like some just sharp lines in the same direction
of the meadow. And some details or some tiny dots on the tip
of that line, some madding. And also, I'm going
to do the same with some this mix of colors for we mixed it for the
tree with that same mix. I'm adding some highlights. Make it very thin and sharp. Okay. Just one line this like
in the same direction of the meadow going with the wind and adding some
leaves like that. Maybe you can paint
some like this also. In different directions,
you can add it. Yeah, that's enough. I will cover this spot. I feel like adding
some shadows here. Yeah. 00. Yeah, that's enough. And maybe I'll add some flowers like some tiny dots with some red mix
it with pack white. More red and little
pack white only. And some tiny dots
here and there don't paint it like some any
flower shapes or something. You can add some tiny dots. Maybe you can paint
over these white spots. We have here and there and so here. Maybe I think I want to
add more red flowers. And I need to add some
details to the tree like maybe some branch or trunk. Yeah. That's set enough. Yeah.
I think that's you know. Let's say the final
look of the painting. So that is the final
look of this painting? We have done some
flow di sky and some four ground
textures for the meadow and for the trees and some bigger trees
and some details and flowers as the
final details. So yeah, I hope you
enjoyed this tutorial, and you learned some
techniques to paint meadow and trees. So yeah.
7. Final thoughts and Conclusion: Yeah, thank you so much
for joining this class, and I hope you have
learned to paint water are scapes
with more confidence and in more loose and
realistic and detailed style. And if you have any
doubts regarding the class about the materials or the techniques we followed, you can ask in the
discussion box or you can mail me
through my e mail. This starts by rani@gmail.com. And always remember that watercolor landscapes are a little tricky compared
to other mediums. So painting with confidence
is very important and by understanding the proper techniques
and more practice, you can definitely paint more realistic and beautiful
watercolor landscapes. And also gradually,
you will develop a unique, your painting style. So don't forget to post your class projects in
the project section, and I can't wait to know your
feedback about the class, so I can understand where to
improve for the next class. So yeah, thank you so
much again and bye. See you soon with a new class.
 Raniya Ali, Justartsbyraniya Watercolor Artist