Transcripts
1. About the class: Hello, everyone. Welcome
to my new class. I'm Raniya. I'm a watercolor
artist based in the UA. I've been painting
with watercolors for almost six years now, and I love painting landscapes and anything inspired by nature. For more about my works, you can check out my Instagram
and YouTube page where I share some plainer videos
and free tutorials. If you're a landscape artist, painting trees
beautifully is essential. In this class, we're
going to paint watercolor trees with a
loose and relaxing approach. We'll start by talking about all the materials
we need and then practicing some brash
control exercises as a warm up session. Next, we'll paint 12
beautiful watercolor trees in a loose and doodling
kind of style. And then for class project two, we'll paint four detailed
watercolor trees using reference pictures. Show you how to simplify complicated details and to
paint it in a more low style. By the end of this
class, you'll be more confident to paint
any type of trees. So, grab your
paints and brushes. Let's paint some
beautiful trees together.
2. Materials you'll need: Thank you so much for
joining this class. And in this video, let's
see the materials. So I'll use Fabriano
artistico watercolor paper. This is 100% cotton and 300 GSM. This is size 11 into 15 ", and I'm using the
half of the paper. So this is the size,
almost a for size sheets, and you will need three
sheets because for some exercises and for the first and second
class projects. So you'll need three papers. Or you can also use
your sketchbook to paint the trees and
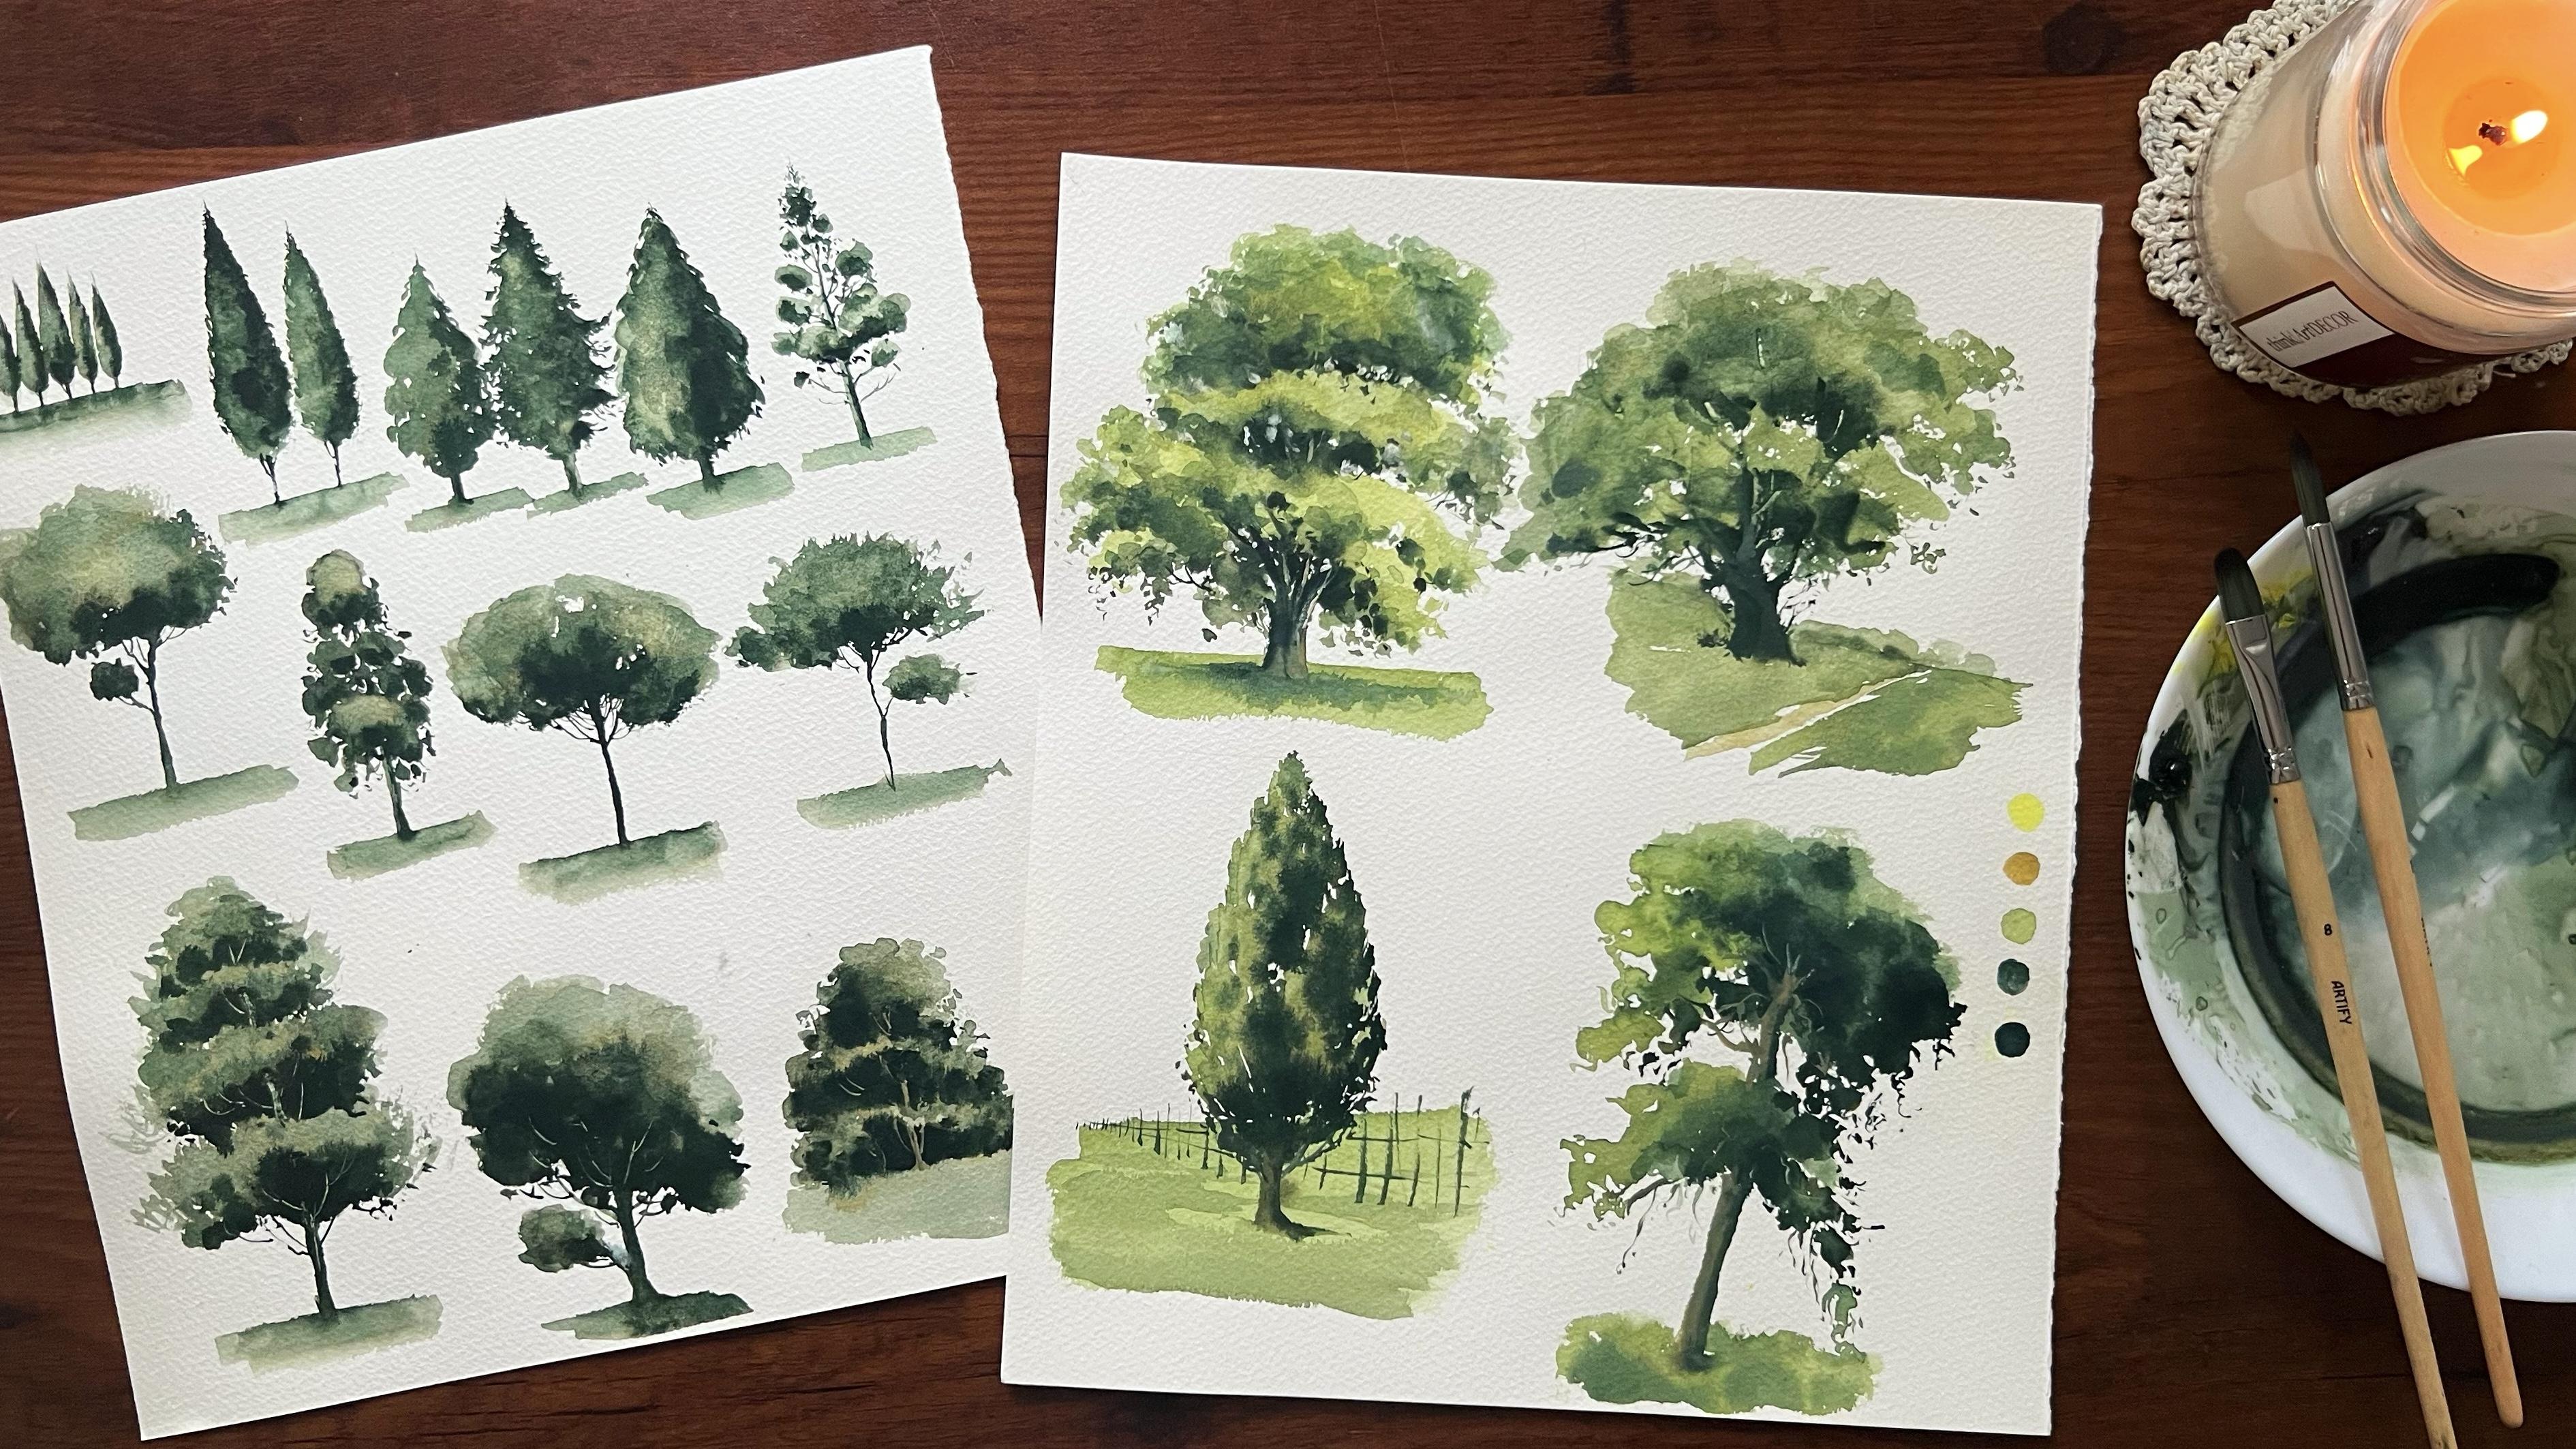
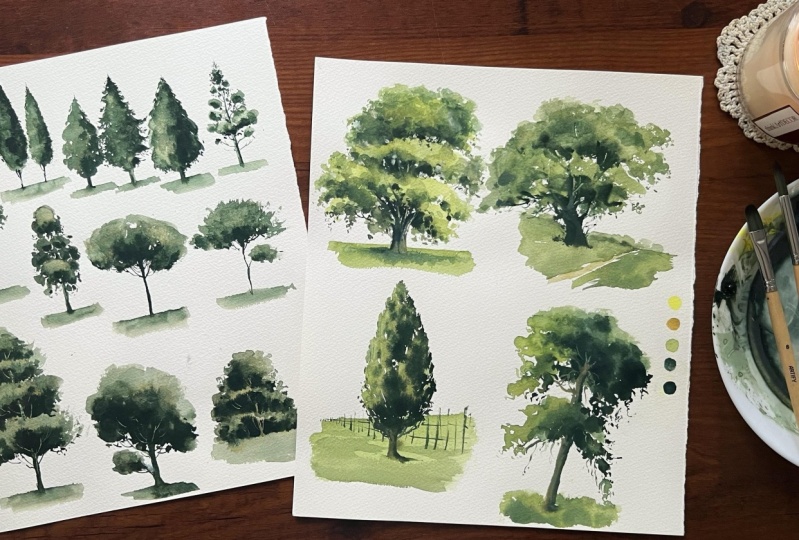
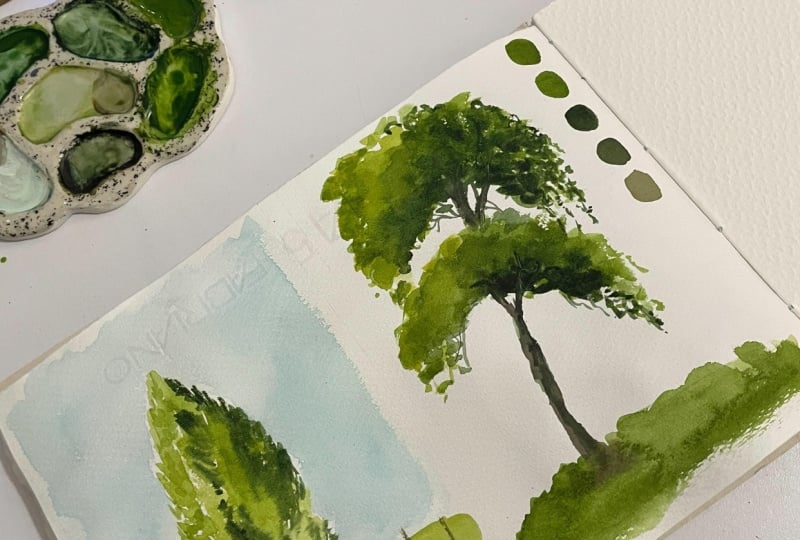
for the exercises. Yeah. And as you can see here, this is our first class project, and I just used one color
for all these trees, and that is deep sap green. You can use a little darker green because you can see here, we have used darker and lighter tones for that lights and shadow effect for all trees. So if you're using
a lighter green, you will not get
this darker effect. But if you're using a
little darker green, you can mix it with water
to get that lighter shades. Yeah. So if you don't
have a darker green, you can also mix sap green with indigo or any green that
you're using with indigo, so you can make it
a little darker. And for the second class budget, we'll use some more colours, lemon yellow, and ylolocre, sap green, indigo,
and opaque white. Yeah. So these are the
colors we'll need. And for the brushes, this is the brush I'm
going to use mainly the size ten at
five around bridge. So you have to use a
medium size round brush. Yeah. And for some techniques, I'll also use a fill board
brush that is not necessary. Yeah. And for some trees, we'll also use a fan brush, how to use this kind of brush
to paint beautiful foliage. I'll show you that. So
you'll need a fan brush, and we'll also use a flat brush, which is also a medium size one. We'll see some techniques to paint trees with a flat brush. Yeah. So these are the
brushes you will need. And to mix your colors, you will need a plate or a palette and one jar of
water and some tissue papers. I'll also use my head dryer to dry the paint in
between the layers. So yeah, these are the
materials we'll need, and let's go to the next lesson.
3. Brush control exercizes: Hello. So in this lesson, let's see some of
the basic techniques to practice brush control, which will definitely
make you more confident to paint a
detailed type of trees, and that will obviously reflect in your
landscape paintings. So yeah, let's start. So this is the brush I'm going to use. This is size ten by artifi. You have to choose a brush with a little thicker or
bigger bristles, because we are going to
practice brush strokes with only the tip of brush and
with complete bristles. So a little bigger round brush
or a mob brush will work. Don't use a liner or
very small size brush. So yeah, here, I'm going
to take some paint. Yeah. And I'm going to draw
some very thin lines with very little pressure using
only the tip of my brush. Yeah. I'm making it
as thin as I can. Yeah. Practice,
practice, practice. You have to move your brush
with very little pressure. Yeah. This will be a very fun kind of exercise
to fill your sketchbook page. Yeah, you can see I'm just
using only the tip of brush. I'm not pressing it. And you can also hold your
wrist like this to make it steady if you can't
control the shivering. Yeah. And this will
help you to paint very thin branches when
you are painting trees. Yeah. You just have to
use only the tip of your brish and with very
little pressure. Yeah. That's it. Now let's
start with thin line, then give a little pressure to make it a little
thicker and again, lift it back and make it a
little thicker again with very little pressure
and lift it back again and again,
little thicker stroke. Yeah, this will
definitely help you to control pressure that you are
adding to your breaststrok. Yeah. Start it with
very thin line. Then just give a
little pressure. And then again, very thin line. Again, little thicker stroke. You can see I'm just bending or pressing that tip of
the brush like this, and then again lifting
it back. Yeah. Practice as much as you can. So it will help you to paint more confidently
and effortlessly. Yeah. Starting with the tip of my brush and then just giving a little pressure to
make it thicker and then lifting it back and then going again with
little pressure. Yeah. It's also a fun
type of exercise. You can just practice. Yeah. That's it. Okay, now let's go for some
very thicker strokes. So here I'm going to use the
side of my brush bristles, and I'm going to paint like
this with complete bristles. Yeah. You can make it maybe wet strokes or
with very little paint, you can make it a
little dry also. Yeah. You can see I'm
using the Cplate bristles. Yeah. I'm just pressing it completely and
then going down. And just covering
it with more paint. Yeah. With this technique,
you can paint more thicker and bigger foliage. Yeah. Like that. Yeah. Now let's see some more breast stroks with little pressure. Yeah, like maybe some leaves
or something like that. You can start with only the tip and then go
with little pressure. Yeah. You can just twist
your brush like this, so you will get some
very beautiful leaves or flower petals. Yeah. You just
have to start with very little pressure and press it completely and then lift it back to make
it pointy like this. Yeah. You can use the same technique to
paint even bigger or smaller type of leaves or grass or maybe some
details for the foliage. So you have to practice
this as much as you can. You can also twist your
brush however you want to any directions That's it. Now I want to show you how
to paint smooth shadows. Yeah. So here I'm going to
start with a wet stroke. Yeah. It's very watery. Yeah. And, Yeah. That's it. And now
I'm going to take very thick paint
without any water. So let's consider this
as a first layer. And now with very thick paint, I'm going to just add
some darker effects. That is wet on wet technique. Yeah. You can see the paint is
not spreading that much because of the thick
consistency of paint. Yeah. So like this we can paint very beautiful shadows or
the layers of foliage. Yeah. We started with
a lighter layer, and then with more thicker
paint without mixing water, we painted some darker effect. And also, you can do this
same like wet on dry. I'll show you that, o.
So I'm starting with, again, the lighter paint. Water control is also
important to paint. Now I'm going to dry this. Now you can say
it's completely dry and I'm going to make the
same effect like this. Yeah. You can paint more
sharper and drought effects. Yeah. Again, I'm painting with thicker and darker paint
without mixing water. A hop, you can see
the difference now. And also, you can use this dry technique on this
already painted ton wet layer. You can see that here. So like this, you can paint very deep and dark foliage
effect or any kind of effects. You can mix both
these techniques. Yeah. So how much water
you have on your paper and also on your brush is the main factor that you can
get this kind of effects. Here also, you can
see, for some strokes, I'm just using the
tip, and for some, I'm also using a little
more thicker strokes with more pressure. Yeah, that's it. So, yeah, that's it for this lesson. And I just want to show you some basic techniques to
control brush strokes. And as I warm up before starting
the main class projects, and let's move to the
next project. Yeah.
4. Class project one - Part one - Watercolor tree doodles: So I hope you're ready
with your materials for this fun tree
doodling session, and I hope you will enjoy
this, um, relaxing tutorial. So first let's start with some pine tree
doodles. Doodle means. We'll make it more loose and, um, simple kind of techniques. So yeah. Okay, here, I'm going to make
some oval shapes, using this round brush, um, by just pressing
the bristles. Yeah, and just doing like this. And in different
sizes also yeah. And we can also make it into more detailed or little
more bigger ones. We can also make it
in different sizes. You can see I'm just using
the tip of my brush for this fine details like this
sharp top part of the tree. Yeah. Now I'm going
to make that trunk, sharp line like this. Yeah. And also, let's make
it a little darker. So I'm going to take
some thicker paint. Yeah. Maybe some shadows
or some kind of depth. You had to paint it for one
side, for all the trees. Yeah. And for the trunk, maybe let's add some
branches like yeah. And you can also paint it when the first
layer is still wet, so you will get a kind of
soft effect like this. Yeah. Now, I'm cleaning my
brush and just shaping it. Now, I'm going to give
that base to the trees. Yeah, maybe let's make it
a little darker. Yeah. So that is a very simple way
to paint group of trees. I mean, pine trees, maybe, like, some background trees or
some group of trees that you can paint on background
mountain like that. You can use this
kind of technique. Yeah. I just want to make it a
little darker for the bees. Yeah. Yeah, I'm just adding more
darker effects. Yeah. Okay, now let's um, paint a little more detailed
kind of pine trees again. So I'm going to use the same technique by
pressing the bristles, but I'm going to shake
the strok like this. I mean, the brush and I'm also adding some fine
details like this. Yeah. And you can also add more little more darker
paints for shadows. Yeah. And I'm just making that trunk. Yeah. So here we painted a little
more bigger one of the same by just shaking the brush, for some wiggly strokes. Yeah. If you want to make it a little more
light for the other side, you can also add some
water drops. Yeah. That's it? Let's see the
same technique again. I'm just pressing it and then going down by
shaking my breah. These kind of techniques
will definitely help you to loosen
your painting style. So that is the main
aim of this tutorial, to paint more loosely, more simple kind of style. Yeah. We can also add some
tiny dots and lines like this. And it's at that trunk. It's also very
important how we're painting the trunk and
branches for a tree because it can also
give a kind of perspective and
depth to the tree. Even for the whole
landscape, we're painting. Yeah. I'm just making some
very tiny sharp details there. Yeah. I think I want to
fix it here also. Don't stress out, relax and
try to make some doodles, start with some basic shape for the whole tree and then give tiny details and make it
into more shape. Yeah. That's it. Let's give that base. Yeah. I love this color. It's very deep dark green. Yeah. And you can
also notice that we are starting for the first
layer with a lighter green. And then for the details, we're using more darker
green without mixing water. So that's how we can use
layering kind of techniques. Yeah. Now, let's paint more pine trees in
different styles. I love painting
pine trees. Yeah. Yeah. I'm just going like this. The usual we always
paint pine trees. You can go irregular and more
organic and natural style. I'm just going very loosely. And now here I'm just making
it like a curvy shape. And then from there, I'm
just painting that trunk. Yeah. And let's add some
maybe some darker dots with more thicker paint. Yeah. Now I'm just adding that base. Now, you can see with a little difference
in the technique, we got three different
style of pine trees. Now, let's paint a little more detailed
kind of pine tree. So I'm going to
start with a line. Yeah. Vertically. Yeah. Now from there, I'm going to add some branches
or some sidewise foliage. You can see I just using
the um, tip of my brush. And here and there, I'm also um, pressing it gently to make
some thicker strokes. Yeah. Okay. Me tiny, tiny, sharp dots
and details here and there. Let's make some sidewise
branches and foliage. Yeah. Just starting with a
line like this and then making more tiny
lines like this. Yeah. And you can also
make it irregular. Not very perfect
and symmetrical. Try to make it irregular and not in a specific
shape or something. Yeah, make it more natural. Just making some more
details sidewise. And let's stop it here, and then let's paint the trunk. We can paint more some kind
of dots here and there. Yeah. Now, let's add the trunk. Yeah. That's a little
more detailed kind of pine tree. Yeah. Maybe let's add some darker dots here and there to make
it even more detailed. I'm just blending that dots because the paint already dried. I mean, the first
layer already dried. I think I want to add
some water drops here. You can see the effect here. We added some water drops to
make it a little lighter. Yeah. But we have to be careful, also, without adding
too much water. Yeah. That's enough. I think I want to wipe some water from here. Well, let's add some more paint. Yeah. Okay. Now let's see one more technique
to paint pine tree. So here I'm going to make the
sidewise strokes downward, so you will get a kind
of Christmas tree or a snoy pine tree
kind of effect. Yeah. Again, I'm
starting with a line, and I'm starting from that
line and going down like this. Yeah. Then make it more thicker and bigger strokes as
it coming down. You can go in different
directions, um, sidewise and maybe
straightly downward. Yeah. And I'm just stopping it here, and then let's add that trunk. And we can also add maybe some details like
some dots and lines. Yeah. And I think I want to make some more
darker effic here and there. Let's make it a little more
detail for this top part. Yeah. I think I want to add some water here because it's
looking too dark. Yeah. That's it. Now, let's add that base. So, yeah, more like a Christmas tree or
a snowy pine tree. Yeah. By adding those
sidewise branches downward, we'll get some kind of
um effect like this. And by adding the strok
sidewise, we'll get like this. Yeah. That's it. I think I want to just lift some colors from this side
to make it a little lighter. Yeah, maybe let's add more
darker paints from this side. Yeah, you can see some kind of nice effect by
adding more darker paints. Yeah. That's it. Okay, now I want to, I want to fill this space
with one more pine tree. Yeah. So I'm going to
start with the tree trunk. Let's make it a little
more dry kind of tree. So again, I'm just starting with a line and making it a little
thicker as it's going down. Yeah. Then let's add some sidewise lines.
I mean, branches. Yeah. More longer, bigger ones as it
coming down and short and thin branches for
the upper part of the tree. Yeah, and I'm just making some darker effect for the branches by adding
some more darker pan. And now I'm going to add
some leaves here and there. Yeah. Some dots
without overworking, adding some here and there. Yeah. So bigger and tiny dots. Yeah. That's it. Maybe let's add a little darker effect for this. Leaves. You can make tiny dots here and there. Yeah. More like a dry snow
pine tree, maybe. Also, let's add that base. I think I want to
add more branches. You can see that. I'm
just starting by pressing the tip of my brush and then
slowly lifting it back. Yeah. You can also paint
this kind of trees by using dry brush technique.
I'll show you that later. I think I want to add more
foliage here and there. Trees are very addictive to me. When I paint trees
in my landscapes, it's always very
difficult to stop. I always end up
with overworking. Et's stop it like that.
Okay, that's enough. And these are some of
the basic techniques to paint pine trees in the
landscape paintings. So yeah, and in next video, let's see some other
tree techniques. Yeah.
5. Class project one - Part two - Watercolor tree doodles: Now let's see some
other type of trays. So I'm just starting with a stroke in kind of round shape. You can see how I'm
moving my bridge. Yeah. And let's add some tiny, tiny dots here and
there, like this. I think I want to make
it a little more bigger. Yeah. And we can also
add some darker, thicker paint here and there. Yeah. And I think I want to
add some more tiny, tiny. Yeah. And from that, I'm going to add the trunk. Yeah, you can see here. I'm not going like a
very straight line. Yeah. And adding some branches
to different directions. Yeah. And let's add some more dots or
details like this. Yeah. Yeah, that's it. I think I want to
shape it like this. Yeah. And maybe I will
add a branch from here. And let's add it like this. Yeah. And adding some darker
paint again. Yeah. So that's also one technique
for painting loose trees. You can start with a bigger, thicker stalk by moving
your brush like this. Yeah. And then you
can add some details as it going outward
and then adding the trunk and branches and
maybe some more foliage here. So yeah, you'll get a
nice, loose kind of tree. Yeah, that's it. Now,
let's see, one other tree. So here, I'm going to
start with a line again, almost like a pine tree, but, um, it's in a
different style. And I'm just making it like
this for the upper part. Yeah. And just some dots here with
just a tip of my brush, and then I'm just
going down like this. And let's add more
here and there. Do not fill it entirely. You need some white
space like this. I think I want to
make it a little more detailed for here. Yeah. And I think I want
to add more branches. Yeah. And to make it den detail, let's add some more strokes, tiny dots here and there. It's like you can still see the trunk
through the foliage. So that is the effect I'm
trying to paint here. Yeah. So tiny dots again. Yeah. Yeah, and let's add that darker
effect for the trunk. And maybe and for
the foliage also, I'm just adding
some thicker paint. Yeah, that's it. Now,
let's add that base. Yeah. So that's, again, another type of lose tree. Yeah. Adding some more details
here and there. Yeah. I think I want to wipe
some colors from here, to make it like some
lights and shadow effect. And maybe from here also, you can just use a dam brush
and then you can lift yes. And to make it
even more lighter, let's add some more
shadows to the other side. Yeah. That's it. That's another type of tree. Now I'm going to
paint another tree, which is almost
similar to this one, but in a different style. Okay. So I'm going to use
the side of my bristles and going like this from
upside and then going down. Yeah. Okay. Now again, as always, let's add some
tiny, tiny details. And maybe let's make it
a little more darker for the down part here, yeah. That's it. And I think I
want to make it like this. So we can paint the branches in the trunk in a little
more different way. Yeah. Now, let's add the trunk. Yeah. That's it. And let's add load of branches
you on here like that. Yeah. You can make it in
different directions in different sizes, more thicker branches or
thinner branches. Yeah. And I think I want to
make it like this. And let's make it
around like this. A Yeah. Yeah, I'm just shaping
that foliage. Yeah. We can see some white dots here. We need that kind of
effect for, um, the trees. And I think we want to make it a little more
lighter around here. Okay, let's add some
more darker paints. And maybe some dots, some tiny leaves or something. Yeah. That's it. So, yeah, that is another
style for painting. Lose tree. No style. Another type
of lost. That's it. Okay, now I'm going to show you almost same like this tree, but with a fan brush. So yeah, I'm going to take some paint with this fan brush, and let's just make some
foliage with this shape. And you can also make it like
this by shaking your brush. And let's make it like a semicircle or a
kind of arch shape. Yeah. Okay. That's it. Now I will add
some darker paint here. So that is one very simple way to paint this kind of trees. And from there, I'm going
to paint the trunk. You can also notice that I'm
not going very straight. Yeah. And let's
add some branches. I'm just covering
it here and there. Yeah. And maybe we can also add some more
branches from here. Yeah. And I'm just
adding some here also. Like that. Yeah. So you just have to, um, shake your fan brush, um, like this so you'll get more kind of natural look
for your tree. Yeah. Yeah. And I'm going
to add that base. Yeah. That's it.
6. Class project one - Part three - Watercolor tree doodles: Okay. So again, with
the same technique, I'm just making some
foliage like this. And let's make it
in different sizes. Yeah, you can see,
I'm just pressing my brush and then shaking it. We don't want to
make it like this. Yeah. To make it more
natural and loose, we have to just shake the brush. Yeah. Yeah. That's it. Now, let's add some
details, okay? I'm just adding some
darker paint here. And maybe let's make it
like some tiny dots. Yeah. I'm adding more darker
paints for some shadows. Yeah. Yeah. Let's just shape
it here and there. I'm just trying to shape it. Yeah. Almost like an oak tree, maybe And uh let's add more darker beat. Yeah. I just want to make
it more irregular, so that's why I'm just
making more details. Yeah. Now let's add
the trunk. Yeah. We add the trunk
here by lifting. Yeah. Tiny, tiny details
have a lot of um, impact for any paintings,
especially trees. Yeah. Okay, now I'm going to
add that continuation of this trunk around here
by just scratching. Yeah. You can use
anything sharp. I'm just using this side
of this paint tube. Yeah. For this kind of scratching, you always have to start when
the paint started to dry. Yeah. So you'll get some
nice white lines like this. Yeah. That's it. Now,
let's add that basic. Yeah. Okay, now I'm going to show you a flat
brush technique for painting a little more
looser kind of tree. So I'm going to start
with a very lighter tone of the color I'm using here, which is deep sap green. And I'm just painting
some strokes like this. Now I'm going to add a little
more darker mix of paint, and I'm going like this. Okay. Now we have to paint
with very thick paint. Yeah. And you can also
add some dots like this. So this is a very, um, easy and loose kind
of um, technique. You can try this
technique with any brush, but I think with flat brush, we can make interesting effects. Yeah. And from there, I'm just adding the branch. Yeah. And I think, well, let's add one more here. Yeah. I'm just adding some
dots here and there. Maybe you can also use an angle brush for
this same technique. Yeah. Starting with the
lighter layer and then going for the darker layer. Yeah. I think I want to
shape it more like this. Yeah. And let's add that base. I always want to add the
base because that can also give a kind of
finishing for the tree. Yeah. That's it. That's
also another style of tree that we can paint
with a flat brush. I think I want to add
some more branches. Yeah. And you can also add
more paint if you don't want to make it that
bright. Yeah. That's it. Okay, now let's see another technique for painting the tree, a little more thicker
kind of tree, which is sitting very
flat to the land. So I'm going to
start with a base. Yeah. And from that, I'm going to add some strokes loosely like this. I'm trying to paint
a kind of tree like the trunk is hidden
inside the foliage. Yeah, I'm going to try a
kind of effect like that. When we paint a meadow
or a hillside view, we usually paint a kind
of trees like this. And now I'm adding more
thicker paint from here. Yeah, that's how we can, um, make that contrast between
the base and that tree, and you can add it
here and there. Yeah. Okay. And maybe we can also
add some tiny dots like this. Yeah. And I think they
want to blend it here. Yeah. Yeah. I Yeah, we can also add more
and more details to make it even more beautiful. But I'm just stopping
it here. Yeah. That's it. Now, let's
dry this layer, and then we'll paint the trunk. Okay. Now I'm going
to take some white. And also, I want to mix
it with yellow ochre. Yeah. And let's And let's make it like
a light brown shade by mixing white and locre. And with that, I'm
just adding that Yeah. Yeah. I just want to add more darker
pains here. Yeah. And to make it
even more lighter, I'm just adding more
darker pain here. Yeah. Around that, I'm just adding more
darker paint. Yeah. That's it. So that's also another type of tree technique you can use
in your landscape paintings. Yeah. That's it. So yeah, these are some loose kind of
techniques to paint trees. We started with some pine trees, and then we painted some
different type of trees, and we also used
some brushwork with fan brush and flat brush to
paint this type of trees. And here we have
seen how to paint a little more detailed
style for the tree trunk, a little more thicker and deep
kind of look for the tree. So, yeah, that's it
for this session. In next lesson, we'll see some
other technique. So yeah.
7. Class project two - Tree no 1 - Painting detailed trees: In this lesson, we'll see how to paint trees using
reference pictures. We will learn to paint trees in a loose and
more easier style, we'll paint the basic shapes and some details here and there. So yeah, actually, this tree
is looking very detailed. You can see some lights and shadows and some white
spots here and there, and it's very thicker
kind of foliage. But I'll show you how we can paint it in a little
more easier style. Okay, before going to
the painting, first, I'll show you how we can do a very quick sketch
of this tree. It looks very detailed here, but we will paint a
very rough outline. With the shadows only. That will also help you
to train your eyes, um, to look for the whole shape, not for the details. That's very important to paint loosely, especially
in watercolor. So that's why I added this sketching session in
the detailed tree paintings. So first, I'm going to start
with this horizon line. Yeah. And you can see this distance from this line and the trees
starting from around here. So I'm going to start that line from here. Yeah, that's enough. Now I'm going to sketch
that outline for the trunk. Yeah, I'm starting like this. You can see one straight
line like this. So I'm just making that here. Yeah. And then you can
also see one sidewise. Yeah, like that. And then there is
some more branches leaning towards this side. Yeah. Yeah. And one like this.
That's enough. Now I'm going to add this
outline for the foliage. So that is going
to shape the tree. So I'm going to start from here around this part.
Like this, I'm going. I'm making it very roughly. I'm not looking for
that many details, and from here, I'm
going to do like this. And this shape I'm
going to sketch now. You can just look at this
shape and just follow that. Yeah. That's enough. And from here, I'm
going like this. Yeah. And from here, you can see like this,
it's going like this. Yeah. So yeah, I'm
going like this. And I'm ending it here. That's enough. Now we have to add that
highlights and shadows. So first, I'm going to
add this little section. So for that, I'm just
outlining that like this. Yeah. And you can also up Yeah. And also, we can just divide this into
different sections. Yeah. That's enough. Now I'm
going to add that shadows. So from here, you can see some
shadows around this part. So I'm adding that here. You can just shade. Yeah. And that's enough. And for this part also, I'm adding some shadows. Yeah. And from here, also, you can see some
very dark shadows on the trunk and
some foliage here. So I'm adding some
shadows there also Yeah. You can also just darken
some lines here and there. Yeah. And maybe let's
add some shadows here. Yeah. And I think I'm going to make the trunk a
little more darker. Yeah. And around here also. Yeah. Maybe let's add some here. Yeah. And just making that
shape for the foliage. Yeah. Darkening the
shadows here and there. That's it. And I'm adding
that shadow in the land pot. Yeah, I'm just making it a
little darker here and there. Yeah. So, yeah, that's enough. That's a very rough and
loose sketch. For the tree. I just want to show
you how to paint it loosely by looking
the whole shape and not for the details. So yeah, now let's
start the painting. So we'll paint four
types of trees, um, using different pictures. So I'm going to divide this
paper in two, um four parts. We'll erase this
line later. Yeah. So I'm going to add one
line from here also. Yeah. Yeah. So if you are
looking the reference, you can also download it
from the resource section. Yeah. So if you're
looking at this tree, you can see some lights where you warm
sunlight effect around here and a little
more darker greens here and there and
more darker shadows. And you can also see
some white spots that we can see the sky
through the trees. You can see that
around here and there. Again, we're not going to
replicate the same tree here. We will try to paint it almost similar and in a more
loose, um, style. So here I have lemon
yellow and deep sap green and yellow
cur in my palette. So first, I'm going
to mix lemon yellow. And with this deep
sap green, yeah. We just need a very
light shade of green. And also, I'm mixing
some yellow color. I think I want to add
more lemon yellow. Yeah. And I'm going to start painting this section of foliage
can see how I'm holding my brih and I'm just focusing on
this line and then going down, okay? Yeah. And I'm just making some separate strokes
around here for this part. Yeah. And let's go for more
strokes around here. Yeah. We're just trying
to get that, um, hall shape, not going
for the details. And let's add on here also. M and I'm here for
this highlights. And here also. I'm just
adding this shape. Yeah. Yeah. You can always notice how I'm moving
or holding my bridge. I'm just adding this
highlights. Yeah. That's enough with
a light green. Now I'm going to mix some deep sap green
to this lemon yellow. And let's add some darker
effects here and there. You can always control
the amount of water you need on your
brush by wiping it. Yeah. And I think
let's add here also. And I'm going to make it more
darker for this down pot. So I'm mixing the locre
with some deep sap green. Yeah. And I'm just
starting from here. I'm adding that tree trunk. You want to add some locre for this down part of the trunk. You can see here.
Yeah. Okay. Now, let's add some more tiny
leaves here under. Yeah. And I want to also
blend the edges. Yeah. Yeah. You can add as much
as tiny strokes. Let's add here around this part. Let's add here also. Some very tiny dots and leaves. Let's add this part. Yeah. Maybe let's add
around here also. I'm just adding that
tiny dots here. And let's add some more darker
effects here and there. And I think I want to add some green effects
for this foliage. You can see that the tree is almost coming to the
same shape of this one, but still in a kind of
loose and different style. Yeah. You can see some branches around this part, so I'm just adding
something similar to that. And let's add some branches
here also. And here. I'm adding more darker
greens for this part. You can also look at the
tree, I mean, the reference, and work on more and
more details to make it. Almost similar if you want. Or you can also stop it there if you don't want to make
it seem like the reference. Yeah. I just adding more
paint here and there. The only thing we are
trying to focus here is to just simplify the process without feeling overwhelmed
with too much details. Yeah. That's it. Now, let's add that base. Before that, let's
fix this trunk. And then we'll also work
on the trunk around here. Yeah. I'm just adding that this grassy pot from here. And then let's
fill it like this. I think I want to add a
little more darker effects. So I'm going to use some indigo and mixing it with sap green. Sorry deep sap green. Yeah. And I want to add that
darker effect for the trunk. Yeah. Now, let's add the shadows. Yeah. And maybe I will also add some white quash to make some more white spots. Yeah. Like that. You can add here and there. You can just look at the
reference and then add. I'm just trying to make it
more detailed to get that all over shape. That's it. Now, let's stop it like
that, and you can see, we tried to paint
it almost similar to this one in very loose style. So that's it for this tree. Now let's move to the next one.
8. Tree no 2: Okay, for this tree, you can see a nice
pathway going here. So we'll cover that
land part also, and then we'll focus
on this tree trunk. We're not going to paint
it exactly same like this. We will just make it
like a single um, trunk, and also we will paint almost similar kind
of that foliage. So yeah, now let's see the
pencil sketch for this tree, and you can see this is a
little different shape. And yeah. So again, I'm going to
start with the land part. Yeah. And let's add
that pathway. Yeah. That's enough. And around here, I'm
going to chart the tree. You can see the trunk. It's very dark and it's very
detailed here and there. So I'm going to start like this. I'm going to start
with this line. Yeah. And it's almost
leaning to this side. Yeah. That's enough. And now I'm going
for this curve. Yeah. Like this. And yeah, that's enough. Now I'm going
straightly down. Yeah. And from there, let's
add one more branch. That's enough. We're not going for all other tiny branches. That's enough. Now I'm going
to outline this foliage. You can see here it's
going like this. Yeah. So I'm going to do, like, this. And for this part, let's
make it a little pointy. Yeah. And around here, you can see a small section for the foliage. Yeah. And let's make it a
little higher for this side. Yeah. Yeah, that's enough. Now I'm going to
add the shadows. So if you're looking
at it carefully, you can see the
lights around here and it's a little more
darker for this part. So yeah, I'm going to
add shadows like this. Just the down part. I'm just filling shadows. Yeah. And maybe let's
add some shadows here. Let's make it a little
more darker for this spot. And now let's shade. The trunk. Yeah. Let's go like this, and I'm just darkening
the trunk to get that whole shape for the tree. Yeah, and maybe let's darken
the shadows here and there. I just want you to train your eyes to look for
the basic shapes. So like that, we can
paint anything without feeling overwhelmed or without looking for so much details. So, yeah, that's, again, a
rough sketch for this tree. And you can see we just focused
on the lights and shadows and the whole shape of the
foliage and the trunk. We didn't go for the tiny, tiny leaves and details. I just want you to train
your eyes to look for the whole shape
and try to sketch it without feeling overwhelmed. So like that, we can
paint anything with a loose and easy approach,
especially in watercolor. So yeah, now let's
go for the paint. This is also very interesting,
very beautiful tree. So I wanted to include
this one in this lesson. So yeah, I'm going to
paint this land part. Like this, I'm
going to start with a line like this, yeah. And from there, let's
add that pathway. I always love to paint pathways. Yeah. Yeah. Our focus is to paint the tree. So I'm just making it very
simple effect for this land. Yeah. Yeah, that's enough. Maybe we can add some darker here. Yeah. It's enough? I think I want to make it a little more
higher for this side. Yeah. Now let's paint
this tree trunk. For that, I'm mixing
deep sap green and yellowcre and I will
add some indigo, and you can see the direction
or shape of that trunk. It's almost leaning
towards this side. So from here, I'm
going to start. Yeah. They can go like this
for this branch. Yeah. And from there, I'm going like this. Yeah. And let's add the other side also
this branch. Yeah. And, uh, from there, we can add one more branch. Yeah, that's it. Let's make
this branch like this. A little more detailed. Yeah. And I'm just adding some more branches
for here and here. Now, let's add some
details around here. You can see some darker
effets around this part. Yeah. That's it. Anything you want
to fix around here. I think I want to wipe
it from here. Yeah. Yeah, that's it. Now let's
move to paint foliage. So I'm going to start with lemon yellow and
deep up green mix, and I will start from here. Yeah. You can see, um, how I'm holding my
brush and also, um, the direction and movement
of the strokes I'm adding. Yeah. Okay. And this side, we have to make
it a little more detailed. Yeah. Okay. And let's add it like this and let's add some tiny
dots for this part. Yeah. You can just look
at the whole shape, and then you can
try to recreate. I think I want to
make it a little more darker for this spot. Yeah, mixing sap green, deep sap green, indigo
and lemon yellow. And let's focus on some shadows. Adding some more details
for the foliage. You can see one branch
going like this. Yeah. I think I want to make it more
higher this site. I'm just adding that branches. Yeah. That's it. Now, I think I want to
add some branches. Yeah. That's enough. And yeah, I think I want to
fix it around this spot. Yeah. Yeah, that's it. I'm just adding those
background trees. You can see here. So, yeah, that's
enough for this tree. And I love how it turned
out for both these trees. And let's move to
this one. Yeah.
9. Tree no 4: Okay. This is, again,
a pine tree in a very different
beautiful shape. So you can see here some dark shadows and some
sunlight reflections for this side and you can see some little white spots
or gaps here and there. So let's see how to
do very quick sketch. So again, I'm starting with
that line for the land pot, and from here, I'm going
to start the tree. Before that, let's
add that fence. So we'll get that kind of
perspective for the scene. Yeah. Yeah. And from here, I'm going to erase it because we are adding the
tree from there. So yeah, I'm going to
start with the trunk. Yeah. Yeah. That's it. And you
can see the shape. Just look for that whole
shape of the foliage. I'm doing like this
because you can see this kind of shape here. So for that, I'm just um, shaking the line I'm adding. Yeah. Just loosely adding. Yeah. Now, let's just
start shading and maybe let's make it a
little more thicker. Yeah. You can see some
kind of shape around here. Yeah. Now, you can also see the trunk here and
there, through the foliage. Yeah. Now I'm going
to add that shadows around this part here and there. It's not very sharp. I'm adding more shadows
from this side. Just darkening the
lines, we added. Yeah, I'm just
making this side a little more darker
for the shadows. And maybe around here, we can see some shadows again. Yeah. Yeah, I'm just adding that branches and
shape for the trunk. So yeah, Yeah. You can also add some little lighter shadows
here and there. Yeah, that's enough.
You can see we got that almost shape
for this sketch. But again, it's
not very detailed. We try to make it same
by adding the lights and shadows and that whole
shape for the foliage. So yeah, that's it. Now let's move to the painting. I'm going to start with
the lighter green. So I'm mixing lemon
yellow and deep sap green again. Yeah. And first time to add that
land part just like this. You can see here. Yeah. Yeah. That's it? No, almost from here. Let's start painting the tree. You can see the direction of these branches or
foliage is upward. Seem like that, I'm
going to add like this. Yeah. You can just loosen up your strokes. Yeah. I just going for
that basic shape. Yeah. Yeah. You can see some little gaps
here and there. I'm trying to create
almost seem like that. Yeah. Yeah. Yeah. Now I'm going to make some darker green using deep
sacren and indigo. And let's add some darker Yeah. I just adding some
shadows here and there. Yeah. You can also add some tiny dots like this. Yeah. That's it. Now, let's add some more
lighter greens here. Yeah. Adding some more tiny dots here. Yeah. That's it. Now, let's add the trunk. Yeah. And some branches. And some shadows. Yeah. That's it. That's enough. And let's add some shadows here. Yeah. I think I want to
add that fence. So I'm just adding it like this. Yeah. That's it. Yeah. I'm just trying to make it a little more
darker for the foreground. Yeah, that's enough. So comparatively, that is a simple one to paint. So yeah, that's enough. Now let's move to
the next tree. Yeah.
10. Tree no 5: A very unique shape. You
can see here and you can also see that trunk
around here also. But we'll paint it in a
very loose and easy style. So again, I'm going
to start with that line for this meadow
or that land part. Yeah. And from here, I'm going to start
the tree. Yeah. You can see that
very dark shadows and highlights for
the trunk, also. Yeah. Now from there, I'm going to make that shape for this foliage section, yeah. And you just have to look
for that whole shape, not for the details. Okay. And let's make it
a little thinner here. And yeah. I'm going like this.
Yeah. And maybe I'll add a small detail
around here for this. Yeah. And from there, I'm going to add that
continuation of the trunk. Yeah. And from there, you can see that shape
of the foliage here. Yeah. That's it. And I'm going down like this. And That's it. That is a very basic shape. And let's add the shadows. You can see it's very dark
from around this spot. So I'm just shading it here. Around here also. You can
see some shadows here. And let's add that
shadows for the trunk. And let's add some
branches, too. Yeah. And I think
I want to darken the shadows a little more. Yeah. That's enough now.
I'm going to add that shadows for this spot. Yeah. Yeah. And let's darken the
shadows here and there. I'm just darkening that
outline for the foliage. Yeah. And I think I want
to add some shadows here, and let's go for
the trunk, also. And just adding some dots or some kind of little shapes here. You just have to make
it very loosely. O. Okay, that's enough for a quick sketch
for this tree, and I hope you got that
technique for looking for that basic hall
shape of the tree and to sketch it very loosely, it will definitely
help you to paint it in a loose and easier style. So yeah, now let's
motor the painting. Yeah, I'm just focusing on
this section of foliage. I'm going to paint that here. Yeah, with this lighter green. You can see some
very dark shadows here and lighter for this side. Yeah. So I'm just focusing on that lighter
part of this section. Yeah. It's going a little
darker for this side. Yeah. And again, little lighter. Now I think let's
go for more darker. Yeah. And I think I want to mix it with some
deep sap green and indigo. And we can also try to
create that tiny details. Yeah. You can just use the
tip of your bra and then add some tiny
lines and strokes in a little faster and loose style. You can still see some
shadows around this spot. Yeah. Yeah. Let's
work on this shadows. Sorry, highlights again. Oh Now, let's go for this little p with again, this lighter green. Yeah. You can see
this um shape here. Yeah. And some dots here
for this part. Yeah. Let's add some shadows again. Let's go for this side. Yeah. Let's make it like this. And here also like this, some very tiny sharp details. You can also see
some branches or Yeah, let's go a
little more detailed. Yeah, we're almost done. Now let's add the trunk. I'm going to make it like this. Yeah. And let's go here. Maybe let's add some
shadows from this side. For this brown, I used a mix of yellow ochre and white
gouache or a back white. Then for shadows, I
painted it with indigo. I think I want to
make it a little more detailed for this side. Yeah. Okay. Let's go like this. Yeah. Maybe let's
add it like this. You can see some very
interesting shapes for the tree trunk there. Yeah. Yeah, I'm just adding
some branches. Yeah. That's enough. Let's
add that base. I'm just making it like a med. That's it. So we are almost done and just
scratching it like this. I think that's enough. I'm just raising that pencil
line we added. I just want to blend this part. Yeah. That's it. So now let's swatch all the colors we used
for these paintings. Yeah. So we used lemon yellow and yellow curve. And we used deep sap cream. And also indigo. So we are done
with this session. We painted four beautiful trees using different
pictures, but again, we focused to make it in a loose and easier style without focusing on
too much details. So yeah, I hope you
enjoyed this session. Yeah. I'll see you
in the next video.
11. Conclusion: Congratulations on
completing this class, and I hope you enjoyed painting
along with me and learned some techniques to paint
beautiful watercol trees. I'm so excited to see
your class projects, please applaud them in the projects and
resources section, so I can give you some feedback. And if you have any questions, please ask in the
discussion box. I'll get back to you
as soon as possible. Now, if you find
this class helpful, I really appreciate if
you could leave a review. Thank you so much for
joining this class, and I'm so grateful
for your support, and I'll say in the
next class. Bye.
 Raniya Ali, Justartsbyraniya Watercolor Artist