Transcripts
1. Introduction: Hi and welcome to the thrilling
and captivating world of watercolor painting. As a beginner, mastering
the Art of creating a loose yet accurate painting can feel overwhelming
and daunting. Where do you start? What techniques do you use? How do you bring your
vision to life on paper? In Loose Watercolor Essentials, Painting Boats and Water, you'll discover all the
essential processes and techniques that you need to turn any photograph into a stunning and
impressionistic scene. With my guidance, you'll
learn how to create a masterpiece that not only captures the
essence of the scene, but also showcases your
unique creative style. I'll demonstrate my entire
process in real time, from the initial drawing and composition of the scene to the careful layering of light, shadows and the final addition
of details and highlights. Together we'll go through
how to paint boats, water, houses, and skies. Join me on this
exhilarating adventure into the world of watercolors. And you'll learn
how to create or awe-inspiring boat
and water scenes with ease and precision. Whether you're an
experienced artist or a curious beginner, this class will equip
you with the tools and techniques to unlock your
full creative potential. I'm excited to get started. So let's unleash your
inner artist together
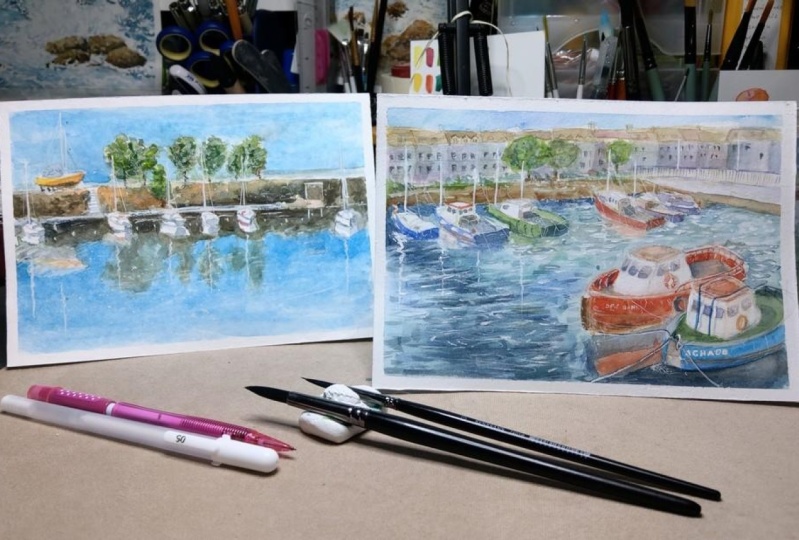
2. Materials Required: Okay, I want to talk a little
bit about materials so that you can decide what to get or if you have
materials at home, which ones to choose. And for the scene, I'm using two types
of watercolor paper. They're both made
of 100% cotton. But this is a smooth hot
press paper and this is a medium texture or
cold press paper. A little bit different because you've got texture and this one, whereas this one's completely
smooth, It's easier, I think For Beginners to
paint on a textured paper. Washers just apply more easily. It's a bit more forgiving,
whereas this stuff here, everything appears sharper
and more contrast and you also have more
vibrant colors, but it's difficult to get
in those large washes, so something to keep mine, I think try both. But yeah, that stuff is most and most used For
Beginners, I think. And most important thing
obviously is the cotton content. If you don't have any of that
cotton watercolor paper, just use what you have got. I've got a bunch
of brushes here. These are mop brushes. And the mop brushes are great. They've got a large belly, hold a lot of paint. Okay, but they also
have a sharp tip to cut around shapes. So I'm using that leaves
mop brushes for the water, the skies, large washes, even those rooftops
at the buildings. The side of this boat, even to get in those larger
shapes in one go. So you're not continually
having to reload your brush, go back to it over
and over again. So fantastic. Those are essential brushes. I've also got some of
these other brushes. These are synthetic
ones for detailing. So when you look at the windows, sales waves and the water, windows out the batteries
and stuff like that. It's mainly just the round brush and the flat brush that
I'm using over here, Tim create those shapes. And I'm also using a
bit of white gouache to whitewash is great for
bringing back some of the whites that you've lost
in your previous washes. I've actually added
some of it in back there for the fence, some of the highlights, a lot here for the sales, the mass and then going
into the water as well. Little sparkle in
reflections in the water. Super important. Sometimes you might make some mistakes and you
can just go over, over in the white again on
the other side of that boat. Really important for
these Boats scenes to have some of that
gouache if possible. I know some people like
to use masking fluid, but I'm not a big fan of that. So in terms of other colors, so we've got the sky here, bit of cerulean, blue. So it's a light blue. But if you don't
have cerulean blue, just use a bit of
ultramarine blue, but dilute that down
the buildings here. I've got yellow ocher and
also a bit of burnt sienna, nice reddish brown color, some browns here on the
sides of this wall. I'm mixing up a gray
here and neutral tint through using
the three primaries, red, blue and yellow and yellow to mix up a gray and
then dilute it down. In the Boats. I've got
a bit of parallel red, bit of orange as well
that I've mixed in here. Same sort of turquoise
see blue color. So I'm mixing turquoise and a little bit of ultramarine blue to create this
darker water scenes so that the water has to
be darker than the sky. You notice I've also got some
really dark areas of the water-like here at the back
and the reflections and stuff like that just mixed in some more ultramarine blue and also a little bit of neutral
tint where possible. So the really dark areas that they're just
more neutral tint, I've picked up a really dark
black neutral tint color can mix of black
itself by again, mixing three primaries together. Those work quite well. But that is pretty much it
3. Colorful Boats - Drawing: First thing I'm gonna
do is I'm going to mark out where the edge
of the water starts. I would say it's about
a third of the way into the scene from the top. Okay. Just about a third
of the way through. And I'm gonna just draw a line of rough line
going into the scene. This is the edge of
the water. Over here. You can see there's actually
some kind of essence, basically just a wall. Okay, So this is just, again, a quick indication that
this can change afterwards. Okay. There's a few little steps and what have you
there or that side. Then you've got this air that goes into the water like this. Okay. Something like that. And behind that, you've
got a white bridge, okay, that just juts out. And I'm going to draw
a bit of fatty and, but it's not gonna be a
huge part of my scene. Even hear this like these
little bits of haired real. So I can just pencil
that in quickly. The houses in the back. A really complicated and I think the best way
to simplify it down, it's just the drawing,
the rooftops case. So if we have a look
at the side and also want to get it a bit
of this sky as well. So I'm trying to just make sure I've got some of
these rooftops look at that. Just some of them
smaller than others. They all come across
some of them a little slightly different
sized as well. But I'm simplifying it down. I know the reference photo has a lot more detail
in these houses. But I think it's going to be a lot better
if we simplify them down. Okay. Do you get to this
back area here? You can just see the just see the houses just
overlap with one another. It gets smaller,
little bit smaller. There is a larger sort
of building here. I don't know what
it is. Just rejig this one side of
it there as well. And there we have it another. Now the building and
I can just simplify, separate out the houses by a few downward lines like this. Okay. Good. I think in the background
I'm going to have to look. There are some houses and stuff in some areas of the background, but I'm going to just
make it a bit of sky in that section, okay? So draw it and just see
what it looked like. But I think to simplify it down, it's gonna be much, much better. Okay, So we're gonna get in an indication of this boat here. And the why don't
wanna do is mark out the center of the page right
here, right in the center. Because this is where the whole the front
of the boat actually starts there. Like that. You've got this top section
of the boat like this. Okay. Inner part of the boat. And also the top of it
like this. Like that. Just straighten that up a touch. He's got some windows here. And also some windows here. Just redo these, make them
a little bit more detailed. Smaller, the middle one here. That good. Okay. The bottom of the boat
coming in like that, back of the boat just
to chat out like this. Hey, comes down and
this is where you've got another boat just coming
out the edge here like that. Top of it just sticking out and just kinda forming
forming the edge. Right to the edge there. Just that same
boxy shape on top. This alter it a little bit as you go
the front of the boat. Like that? In the bottom of the boat, which I will kind of get it to disappear off a
little bit at the base. Like that. You've got this up
of these rigging coming across like that. So it'll join this one up. That not the boat here in the back there. And you've of course got a few
more of these other Boats. And simplifying them down. Back into the boat like this. That the type of look
another one here, larger like that. And the back-end
of the boat there. Bits and pieces inside. But this is called a darker. These back sections
here a bit darker, light source coming from
the left-hand side. And I'm thinking to myself, I might exaggerate this one
here to back the Boats a little bit darker on the
left-hand side like that. Okay. Let's have a look
at another boat here. And a side of it like this. Just make the top of that a
little bit more to find that. Kate, look, what else do
we have going on in here? So far? So good, we've got a basic indication that those
ones in the background, but what are put in a few
of these other Boats? Again, just overlapping
here, red boat, the distance, the
back of the book, they're just simplify
that down again. There's lots of rigging in bits and pieces in that
boat fishing gear. Simplify that down. And most important thing is the shape of the
bottom part of the Boats, which you get further
off in the distance. That becomes more important
really to put in too much, putting some of the details just scribble domain like that. Darkness in here
and here as well. Okay, good. What do you think I'm
going to get into this pit of pathway here? It's not necessary. Okay. We've got the wall
there. We've got obviously like a little
bit of detail as well for their buildings
and simplify this down. I'm just gonna put in bunch
of these windows just to remind myself later on
to get them in with a smaller brush. Okay. There are cars and
things like that here. So we can figure, I could
just simplify this down and getting objects almost
that they look like cars, but it doesn't need
to be much at all, just a little indication
of something there. The bottle of these houses and shops as well
have a little bit of darkness which is gonna
be important here, the base. So I will get that
in location of that. That would you do some
tidying up these boats here? That one there. Okay. That okay. They should be good
for now painting
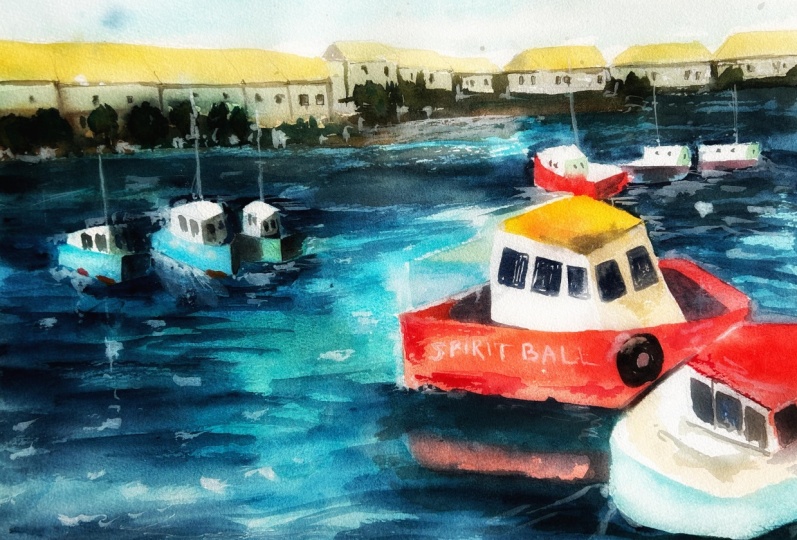
4. Colorful Boats - First Wash: Alright, so let's go
ahead and get started with our First Wash. So I have myself some color. I'm going to pick up,
pick up. I'm going to pick up a little
bit of this red. This red and maybe it's
orange mixed through very light mixture
of this color. And drag that across here. It's a pie role,
pyrolytic orange, pure lead orange. Like this. Warp that you can see
here in this boat. And be careful to cut around the white areas
of the Boats as well. So using the tibia brush. Okay. And don't stress just getting a little
Wash and that's all you need between top of this on top of the boat here as well,
the right-hand side. So I can just while I'm there, just get that one in
at the same time. And I'm using a lot of
water in this mix. Okay. It's probably about
60, 70% water. Okay. I've got that burden. Okay. Good. Okay. Let's continue working. The rest of the colors
with the Boats. There's a little bit
of yellow ocher. It's put in touch to
that on the rooftop. Like that. It's have a look
at the other the other one. I've also noticed that
this probably this side of the Boats little bit grayish. Just put it a
touch, a gray here, just due to the
shadow light source coming from the left-hand side. So I'm just dulling
that down a little bit. Do the same thing here, a
little bit of gray here. Either on the deck like that. No need for any shadows
or do you think yet? Just really light shadows, I suppose like that most that you would
have get in there. But want to just
reshape this boat with a little bit the bottom
a bit more. There we go. That's better. Okay. And fantastic. The boat at the bottom, I'm just gonna put in a bit of blue. Okay, a little bit of cerulean, or if you've got just
a bit of ultramarine blue really is fine. Tiny bit ultramarine. Alright. Remember it's all just
really light colors. I'm thinking for the
reflections as well. This one up the front. A tiny bit of red in the
water would be would be nice. Something like that. Come back to this afterwards. Like a more same or I could
dulled down red like this, like a warmer color here, the water but don't
overdo it like that. Okay. And let's have a look. All the other boats
in the background. I can pick up even
a bit of turquoise. Just blue, really light
colors for the Boats. And the boat to the
right is kinda like a yellowish color there. Just put a bit a yellow
running through it. Like that. If you do get
some mixing, Don't worry, just let it be a bit of the shadow there on
the back of the boat. Just a softer shadow. Do the others, since I'm
here at the same time, is more this orangey
red color here, tiny bit there for that
boat and the distance. And what, you're probably
going to get some mixing. Because of this. We have that one's just white ones behind or more of
like a bluish color. Okay. Okay. Well, those Boats will be
doing their own theme. And while that's
drying off a little, I'm going to just go into
the background a bit And work on yet basically just work on some
of those houses and things. They're simplifying this down. I've got some burnt sienna. Might actually get
going with a bit of yellow ocher
for the rooftops, yellow ocher and burnt sienna. Some of these, a little bit lack of
light on the rooftops, but not overdoing it, just touch of that light. This is going to help
to just draw out some light source and then the top of the
scene up get some fluid. But I'll wait for
this rooftop area to dry first before
I go in there. Now some of these houses, you could probably
just leave white. But for example, you might
pick one or two like that. Some of the bar kind of like
a bluish color as well, so that yellowy colors. So it doesn't really
matter to me, especially because
we are going to be getting into shadow on top of this color
later on anyhow. The cars and stuff below, over here, down below, this wall is darker. I'm going to pick up some brown. This is just some brown ocher. I'm not actually that dark blue, yellow ocher and
brown ocher mixed together to get into this wall. Okay. You really want to
focus on getting in a Wash that connects
everything up in terms of the the
background, the foreground. Okay. Good. Alright, so now it's time to do the Water and mix them up over here on
the right-hand side, I've got myself a bit of
blue, ultramarine blue. And I'm going to need a
few different colors here. A bit of turquoise
see color as well. Turquoise color would
be nice just over here. The ultramarine, we'll
just darken it off a bit. Just starting off around here. And notice in the water
there are some lighter bits, this turquoise color. Now, that's what I'm doing. I'm just trying to mimic that. And some of the scene. Hey, the whole First Wash that not fussed about
accuracy at all. The shadows of these bits
and pieces will come later. So don't worry, if it looks
a bit light at the moment, that's what we want. More turquoise see
color at the back. Here. Smaller brush will help. But a little mop brush here. But just cut around these Boats. Okay. Some ultramarine, I'll add some ultramarine
running through here now, some darker blues, too much
of this turquoise color. So I'll just drop it a bit with this darker color
here, ultramarine. And I've got so
neutral tint as well. That's gonna help to just shift things around a bit,
make it a bit darker. More ultramarine. Here. There's a lot darker swatch of blue that just runs
through the base here. Can you see that this large sort of darker shade of blue there? But I want this all
to join up nicely. We can get a bit of it
running downwards as well. Just some inconsistencies in their work a bit on
this back-end section. Same sort of deal. I'm just gonna pick up
that same turquoise color and cut around these Boats. Back that up a bit higher,
there doesn't matter. This all goes up
until this wall, which I've left the last minute so that I can get into more
sharper edge. Hopefully. This. Okay. Alrighty. Now this is all just drawing
off in a bit, but I'm going to
just do the sky now, some turquoise for the sky, maybe some ultramarine
and there as well. Cutting around these rooftops. These should more
or less be dry now, I guess most parts
should be dry. Especially on the left. You can leave a bit of white
showing on top as well. That helps so that it just
doesn't all mixed together. Hey, there we have it. Bit of blue. This stuff I don't want
running down too much, so I'm just going to lift
off a bit of that paint. And we'll leave this Wash to dry
6. Colorful Boats - Highlights: Finishing touches
for bits and pieces, I'm gonna put in some of the windows and stuff
of these buildings. Often the distance K, just to create a bit more
interests back there. Okay. Like that. Maybe be a shadow underneath
here the roof tops. That in. Happy to shadow. They're good. Right? Now. Some Wash need to put in some quash bit of
yellow gouache. We're basically just
got some yellow paint, watercolor paint and mix
it in with whitewash. This and I've noticed
by, for example, would be masked is more
kind of yellowish. So I can put that
one in like that. I've got enough
gouache on there, make it quite concentrated so
that it dries quite light. There. We are just
getting some more of this raking and
stuff on the boat. You see also that
you can get a bit of this reflection that the water. Okay. What else do we have? This boat doesn't have
amassed these two here. A few out the back. We can just simplify
them down like this. Just getting a bit of light and grab some
white gouache as well. Squeeze out the palate. Because this is our chance
to bring back some of the whites that we've lost. A bit of water. Let's have a look at
the front of that boat. She could do with a bit of
extra light and the mast. Just redo that bad. Maybe a little blobs on the
side of the boat as well. We can put in there and
sparkle or two in the water. This is where the magic happens. Some of this white
paint will bring back, see some hidden
complexity in this scene. But you have to be very, use it very sparingly. Reinforcing the top. These Boats and also
the side of them. We might get a bit
of light bouncing off here and there. Like that. Let's put in another
must disappears off this rigging stuff. Sometimes it comes
down like that. What that doesn't matter.
It's have a look. What else can we put in this
car, the distance there? Not a car. Them perhaps anywhere that you see that I perhaps it's
a little bit too dark. This is where you can go
in and bring back some of that that light here. I can just correct
parts of it as well. We're just not been
careful enough. Bit more. Wash here. Top of the Boats here as well. Light they're coming off. You've even got like these Boats connected BY look like
something connecting them up. But there's definitely
some rigging, some ropes and stuff just coming off the front of the Boats. He's the boat here. Like that. Hey Not just squeeze out a bit
more of that white mortality. You stop and pretty quickly. Okay. There's another
boat here, maybe. Just getting a bit of PHI must. Okay. Who put in a bit of few little dots
and things here as well because there is
a boat behind there. But I've not really
bothered to get in front of a mass that
runs through as well. Like they're this other boat. I'm good. But more just also to outline the edge of that boat
here in the front. Bring it out of touch. This one as well. And you've got a bit of this. Boats have these names. This one is an interesting
name, isn't it? Okay. This one says a KD. Okay. Now, a little
bit of magic for the reflections of the Boats I just thought are
getting a bit of white running downwards for some parts of the reflections. Stuff that went a bit more, squeeze out some more white that white coming down as well. And for the reflection
of the mast to that, just joined it on with
the water better. So it doesn't look too obvious. A few little sparkles
in the water as well. Perhaps, like just
running through. In areas like this. Painting, the background
here and there. Sparkle. Just want to redo that bit. And what I've done just as some finishing touches is again, just like added in
bit more light, little bit of gouache on top
of this section of the wall. And really for most part
of it, it's it's finished. You just picking out
some little bits and pieces that you
want to bring out. These little sparkles a
great of putting them in. And they pull together Painting make it just
look less monotonous. Here on the right side as well, thought I'd just adding a bit more color or something there. Okay. Balance it out. These little bits of speckles and things in the water do
want to overdo it though, just gotta be careful. Little bit of orangey color, orangey sort of Wash,
watercolor, paper paints. And I'm just you can see
some of the Boats is like a little bit orangey color down at the base where
it touches the water. So look at that and
just bring some of that through, right in the end. That much effort at all. This surprisingly helps to
balance that the scene a bit. Even on the rooftop, you got speed of red
up there as well. Orangey red color that some of these thicker red paint to make it the more interesting boat
is actually not the, not the best condition. Bits and pieces like this can help create that
rustic look to it. Easily like pizza just stick out the back of
the boat like that. These railing in real things. Just to get a few of those in. Just a touch here and there. You more brushstrokes contain
the indicate this re-link. It gets extra detailing
not necessary. Just something nice to add on this section you use well, there's some re-link Bridge. Quickly get that in. You set up before. Painted mostly with
just a flat brush. Really goes to show you don't need 1,000 different brushes. Just need a few. That's it. Right?
And we're finished.
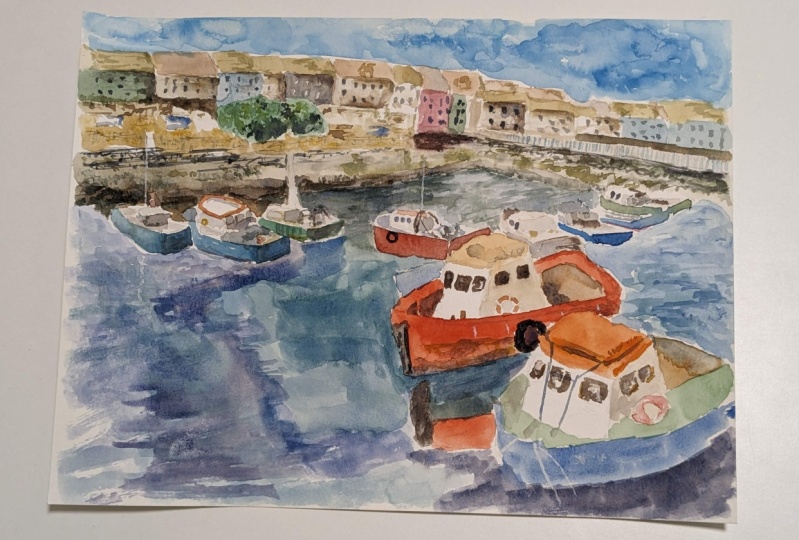
7. Simple Boats - Drawing: Okay, let's get started
with the drawing. The one thing I wanna
do is really just separate the scene
directly in half. Because we'd see with the land
at the back finishes off, brought down the back
of the steps and kind of where the Boats
start on the water. That's about halfway
through the page. So it's quite the
photographer has already done us a little
favor here in terms of separating out the
sky and the water. That's an interesting kind of composition because
there's kind of water behind as well. So it's mostly at the end of
the day, it is just water. I'm in the background and
in the front as well, but yeah, 5050 composition. So let's go ahead and do
a bit of sketching out. Now that we've got the line
through the middle there, we're gonna look at these Boats and I'm thinking to myself, well, what should we go and put them in
exactly as they are, or should we change
them up a little bit? I'm going to firstly just put in a bit of the land
here at the back. We know that it starts will
come through about here. Okay, So just a little line
roughly where the land isn't. There's a walkway up
the top there as well. And just see a little
walkway or a road, gravel road or
something like that. Can see bits of fence
and things sticking out. And there's even a
boat behind as well. Unlike that, there
are these trees here that we are
going to be able to just sketch in the rough
basic shape of these trees. Bit of a tree shape there, here. A bit of another
tree shape here. Okay? These trees are just growing right here onto the
front of this bit of land. It's kinda hard to
see with this one. Actually two trees
as one there and then another one here you
can't really see, but look, it's just me just, just
getting in a bit of detail and a lot of this stuff here will be done wet into wet anyway. I do like this. Steps just coming down. Can you see that these
little little steps just coming down into the near the Boats at the front. So I'm just going to
pencil that in like that. You've got a boat
sitting up the top here. Let's, let's give
this one a crack, K, the bottom of the boat. Let's just get the
bottom of it in here. It's sitting right there. Okay. She quite a lot of detail
going on in there actually. That's the front of it. Okay. And the bottom of it here. Little darkness and of course you've got some shadow underneath the boat as well. There'll be the shadow.
That should be good. And some details in
the Boats as well. I'm just going to
quickly scribbling a little bit of detail on this cloth or something
here in the back. Matter too much. Okay. Some of these bits
bits and pieces, and we've also got the mast. Yeah. Okay. Due to the sale. Another mask. Let's make this one a bit
taller and then we can just change this one
up a little bit, coming on a slight
more of a slope. That okay. It seems to be
something coming down. I'm just trying to get
it to there we go. Something here that
rigging off the boat. There's all kinds of details
off the back there as well. It's tricky to see exactly. But something like that. Okay. Another bit coming
up like that as well. Just change it up a
little bit taller. So there's that boat
and the background, and you've also got a
bit of a shadow here. You'll notice that the light is running from left to right. There is a little boat back there and the
distance let me just see if we can see if
we can get money in. Just a little indication of a boat there in the background. It's not a huge deal. Something like that. Okay.
It's gonna be interesting because this is all going to look like the sky
normally in a scene, but we need to imply
that it's not. And these little boats coming in from the distance is
going to help with that. But there's not necessarily
really to put them all in. Just I'll draw it in and we'll see how we
go later as to whether it makes sense to put
it in or just leave it trail behind there. Okay. So let's go ahead and
see here there's a Area, will the Boats
dark? Area here? I'm just going to draw
in. You can see there's some light there as
well, a bit of light. And I really want
to make sure we leave some of that to the end. But let's go ahead with
the Boats and let's think, what shape do we
want to make these? I think I'll start off
with this one here. And they have a hard to say, it's kinda like a mix between a cylinder
and the rectangle. Okay, so that's the
back one like that. And really trying to, you're really trying
to simplify this down. You can see there's
actually some shadow in the back of that
section of the boat. But really that's
all just white. They're where it hits the water. You've got a bit of
darkness at the base. I'm going to just
pencil in some of that. They're okay. And let's put in this
mask right here. This rigging. I find that it helps to also draw it in with
kinda broken lines. That makes sense. Some broken lines. It just makes it look like
it's catching a bit of light. It's getting this
other boat here, the back of it like that. And that section there. Let's get in the
front of the boat. It really almost reminds
me a bit of drawing cars. There are some similarities. There are also some some
small differences as well. Okay, Then they're
not as boxy shape. They're going a bit more
of an organic flowy. They kinda like, uh,
a mixture between a rectangle in a cylinder. That rectangle very
go. It's another one. It's another one in there and
you're underneath as well. You've got some darkness, so I'm gonna just draw that. So you just underneath
this area of light, you gotta be the darkness there is remembering to put that in. What else have we got about
a few more boats here. Let's get in this one. The back of it first,
probably like that, that same shapes,
semicircular shape like that. Get half-moon and getting
the solder the boat. And of course the top
part of the boat as well. This one's a little bit
easier to see like that. And again, the mask that's
going to go directly up there. Some rigging and
things like that. This one here is parked dot just more or less with the
back facing and a tiny bit to the side
showing through, tiny little bit to the
side showing through soul. Emphasize that here. Besides a bit of that, they're in a bit of
this mast also going up like that there. Now the two boats left to go. One here. So kinda facing towards as this one's docked in the
opposite direction. Opposite direction. Maybe you have it detailing on the boat as well like this. And the mast straight
up like this again. And we have one last one here. Quite a big boat
compared to the rest. Also because it is seems
to be a little closer. Something like that. Kinda similar to that one
but just a bit bigger. A little bit bigger like that. That mass going up
as well like this. And I think we have
a good sketch. Of course, you've
got some little bits of pieces of things here. I don't even know
what that stuff is, but we've got most of it in
8. Simple Boats - First Wash: Let's go ahead and get
started with the painting. And I'm gonna pick up
a bit of turquoise. You can use cerulean
blue as well. I'm just going to
use turquoise here. And I'm gonna go straight
into the top of the scene. And she tilt the paper
a little bit downwards. And I'm using pretty much mostly about a 20% mix of paint
and the rest of it water. Okay. I'm just going to
carry this Wash down the page and I'm also taking care to
potentially also just cut around things like this boat. Okay. Little loops lost anyway, but it doesn't matter
around that boat. Bring this all the way down. Important thing is
to leave human eat, leaves some of the whites. So when you get closer
to these Boats, you'll notice I'll just
kinda cut around a bit and leave some bits of whites and
things like that on here. And this is for that reason to leave some white and a
little bit of sparkle in there. Because one we're going to, some of these Boats
have a different color and a lot of them are pretty much just white
further down below. So I want to preserve that. Need the boat. You notice there's a
bit of this water color as well, that cooler color. So let's go around and these trees as well just cut around them and touch like this. I'm round them a little bit. There. Here. Just a bit of this wet
and wet because there's some slightly darker areas of the water there in the back. I thought I would just
darken that alpha touch. And as we move down, we start to find that we
have areas of green coming through and I'm
going to mix up bit of this undersea green, this undersea green
and maybe some yellow. Just to lighten it up a touch. I'll go into this a
bit later as well, but something like that. Maybe a bit of this yellow ocher or buff titanium
to just join it up in this top section as well
because we do have some area of this pathway or
whatever running through. Just want to get some of that, an indication of that in areas. And the rest of it, I'll just
make a greenish color here. Okay. Now I still want it
to be pretty light. So in terms of the
mixture I'm using, it's mostly just water. Okay. I think I'll go over
it again later on. But notice I'll just
cut around. The Boats. Doesn't have to be
perfect but just a little cutting around
like that. Yeah. This boat as well because
they're all white. So we gotta be pretty careful. Yeah. I know this area some of these
areas are actually darker, but we will put in some color wet into
wet and just a moment. Okay. But I want to get into
the lighter wash first. Okay. A lot of Wash. Same goes for these trees at the top here I've noticed
probably a little. They could be just
a touch of yellow. Maybe a yellow up here. It will be green anyway. Let's just put
that in like that. Good. If I leave a bit of white,
that's no big deal as well, just to touch that, blend that in and
because I'm doing it now rather than before, it doesn't the green doesn't bleed into
everything too much. Okay? Just tilt the paper
if you find that everything is running
together too much. Okay? The goal here is really
just to get in some of the lighter tones. Valleys, green
back here as well. I don't have to
connect it all up. I can leave some white
as you can see there. Okay. So let's continue to move on. I'm going to work a bit on the you use a small
flat brush for this Some of the darker bits, because we have some dark
bits underneath the jetty. I prefer to mix up my
own dogs actually. So if I got a bit
of purple, purple, bit of brown, blue here as well. Mutual tint. Just mix something up
that's pretty dark. And you'd be cooler as well. Just underneath this kinda
jetty area near the Boats. So this is where I really
want to cut around a touch so you can see and create
a bit of extra contrast. Leaves Boats. It's really great
opportunity to do this and encourage things
to blend together as well. You can see little bits of tiny bits of
blending back there. Okay? This allows you to create quite a dark contrast
around the Boats. Can kinda shaped them
nicely like this. Some of it will blend
upwards, no problem. But as long as we retain
that white is what we want. And some of these bridging
area at the top there as well, I want to retain some little bit of light showing through. But it is very dark here. So you're using really
the darkest value that you can find. That there's not a whole
lot of water in here. There we are. Good. Now, let's have a Work. Work a little bit on the trees and the reflections
of the trees. I'm gonna do this first
drop in a little glitch. I think what we can probably do is dropping the reflections of the trees first and then I'll
get the water around it. So the the darkness
of the trees, but then of course, you
cutting around the, is a bit of white underneath
the boat here as well. So you cutting around that leaving that reflection
of the boat there. It's it's kind of like
Greenish colored reflection. It's a dulled down, so it's not completely
green color. So I've got some
maybe some brown, a bit of blue or something
mixed in there as well. That but where you
see the Boats, you just cut around
the to leave a bit of that white to show a reflection that don't have to make it too obvious, even just a quick
thing like that. Do the trick to move this one around
and like this, that you really just
mirroring that shape. You can see shape of the ships. Ship above like that. Yeah. Good. Okay. So we've got a bit of that
going on and I'm just going to connect this
up and let's getting the rest of the reflection,
the darker reflection. Again, it's just a mixture or whatever I have on the palette. Some of these will
come down as well. Like that. I kinda, some shadows and reflections are quite soft
on the edges as well. So it's not a huge, a huge amount of darkness in
the air around the edges. But let's just get in
some of this stuff and coming down like that. These reflections
of the trees above, that's what we're
trying to imply. The background, their general
shape of them. Darker. More here. Good. Start playing around with
some of these other pigments. The same, same color as the sky and the same
consistency is this guy now picking up a round brushes, smaller round brush,
or a mop brush. We'll cover mop brush. Now this is gonna
be a little bit. It's almost the same
color as the top, but just touch a
little bit darker. So I'm picking up
more concentration of this pigment and I'm just
mixing it through this. Mixing it through you might
get a bit of joining on. That's good because it is
going to be Wet anyhow. Okay. But I want it to have some
kind of blended edges. You see, it's not perfect. And go back into
it later and add some more darker bits as well. Okay. As you can see, I'm
painting with the paper on a slight slope as well. This is really helping to
carry this paint downwards. More pop a bit of this stuff, this too much darkness in there, right? Some more of that blue. Bring some of that through here, get that to permeate
a bit through the, these little bits of speckles
and things in the water. You don't need to color the
color at all when as well, you can leave some
white there as well. I'm going to put the paper flat on now so that
it doesn't move. The pigment doesn't move
too far down widths. And let's just finish
this off like this. We have it, the rest
of the turquoise. Right? Notice there's a few little
ripples and things in the water as well. Have a play around
with that in a moment. But I'm just having
a look further up. What can we do? Well,
I think we can work on the the little trees more so some green bit of
darker green and I'm going to work just drop this in on the right-hand side of the tree. With this flat brush. Just to getting a bit of
darkness feathered in areas. Is that this tree here, this darkness in there as well. I'm just going to leave
some of the tip of the top of the tree
and some of the sides. But notice how I'm
leaving a bit of the yeah, that lovely, lighter green color
that's going to help with implying that light
coming in from the left. Something like that. It's all wet and
wet work as well. Maybe a smaller, smaller but a round brush like
this is going to help. It's just more of organic
shape that you'd find. Rather than a flat brush. This just darkening that those tree shapes
touch like that. Not only that you do
get some of these permeating further down the page so that you've got
some darkness here. Okay, the trees just casting
a shadow underneath. Like that. Really quite dark. More neutral tint perhaps
in here would be good. Really quiet, dark underneath. Join it all up. Get the paper and a bit
of a slant as well. We're going to get some
shadow here as well, but I'm going to
rejig that later on. Have a look Work and some of these Boats has touched
just adding some details. On the back of the Boats. I've noticed it's you've got a bit more of the shadow
here to the right. So just get that in the back
right-hand side of the boat. There's the back
of it like this. Can see this shadowy shape. And I'm using just
a bit of water. And the beauty of
this grayish paint that I've mixed up before. To just get it in the
darkness in the back there, in the shadow of
the water as well. You do get a bit of this
darkness permeating through. I'm going to mimic that. Mean this one's almost
just all in the front. Water as well. There's a bit of light to
the left side of the boat. So leave that in a trial. This one, the right-hand
side bit of darkness there. And I'm still using a fair
bit of water in this. But by the way, it's not all just
really dark color. I'm using decent amount
of water in there. K This one here as well, right-hand side bit
of darker paint. And we'll bring that into the
shadow as well like that. So we've got some little bit
of shadowy looking areas. I'm going to pick up
some neutral tint. And let's see if we can
get ourselves in a bit of the detail of the underneath
the Boats perhaps like here, where it touches the water. So I'm picking up
neutral tint and just drawing the brush
off a little bit and putting in a
little indication of where the boat
hits the water, that anchors it gives
it a bit more presence. All right. That maybe
have a look here, underneath here and that
one to the right as well. Okay. I've even got some
indications of like some darker shapes
inside the boat as well. Like windows and such. A window maybe
sides of the boat. Like little little
indications like that. I'm going to just work on
this boat up the top here. So she got some
yellowy color in it, some brighter yellow color. Dial that down a touch. Yellow. There. Bring that across. Bottom of the bird is actually darker and I don't know
what color is really. I'm just going to use this
brownie color there to just seal it off at
the base like that. Okay. Here we go, something like that. It's also there's some kind
of hanging off the bat. You know what, that is? Some kind of thing there. Okay. Good. Let's give it a quick dry
9. Simple Boats - Second Wash: What I've done here is that
I've just gone through, picked up a bit of
white gouache and add it in some reflections
from the Boats. And build the rigging often the back and
the distance as well. Anyway, that you think
you might want to bring back a touch of light, bit of that white gouache. I've also added in a
touch of the gouache with yellow here as well to bring back a touch of that background. Area with the road
is I'm also going to just work on some stuff
here in the foreground. You can notice there's
like a little jetty use something and he'd
lost it. We'd lost it. So I'm going to bring it
back out a little bit of yellow and white mix together. Just indication of it. I don't want to be to want it to be too much of a feature. Let's the stairs are like them. Me just get in a bit
of this rigging. Little touch apps and
things like this really, really does help to bring bring out some
highlights in detail. I didn't notice as well that
the these two little boats here probably could do with detailing would be
the detailing like that. The right-hand side here as well for this right-hand
side of this boat, little bit of darkness
there can barely even tell that it's a boat. It is reflection in the water, maybe a trail behind
like for that one, you see just where it came from. That will help to emphasize it. This one here, just a bit more darkness in there and some, the two little reflections
beneath that boat as well, maybe some white some structure to it. So the waves are just
pushing apart the water. Difficult to really see. I'm just going to erase
the remaining bit of pencil that you see
running through in this wall. I think we're just
tidy it up a little. Just raise over the top, especially on the Boats and it's going to make
the biggest difference. There's tidy it up a little bit and testing and we are finished.
 Watercolour Mentor (Darren Yeo Artist), Art Classes, Mentoring & Inspiration!