Transcripts
1. 1 - Introduction: Hi there. Welcome to my very first Skillshare class. I am Nadia and I am a professional Berlin-based artist, and we are currently at my studio. So, I studied Fine Art at four different universities in New Zealand, in Spain, in Italy and Chile. I got scholarships to go to Florence and Santiago de Chile. And in 2015, after I finished my degree, I moved to Berlin, Berlin is the artistic hotspot. And I thought if anywhere in the world, then Berlin, studying it four universities gave me a great palette of different techniques and ways and forms of art-making. And so, even though at the studio I mainly paint, I have experimented with a lot of different art forms and printmaking has been a big part of my body of work. And I really don't like to limit myself to one form of art-making. There are so many possibilities and that's what I loved about university because there I got to experiment with so many different styles and techniques and tools to bring across an idea. So I'm really excited to be able to share some of the knowledge that I've gained during my studies. And I really think that linocut is the perfect place to start. I think that printmaking has a huge potential for all levels of creatives to step in and make something really great. You can make a really great linocut without any previous skills, or experience. So that's why I really wanted to create the portrait in linocut course because I think it's accessible to absolutely everybody. I really feel like it's the perfect method to get stuck in and really have that feeling of success after a relatively short amount of time, with no previous skills. So if you're just starting out with art, this is perfect to get you motivated and if you're already quite advanced then it´s also perfect because you have a lot of possibilities to bring in your own experience. So in this class, I'm going to be hopefully giving you all the tools you need to make a really awesome linocut. So I'm gonna be telling you about what our final project's going to be. I'm going to talk to you about the materials that we're going to need and also give you some tips about that. We're going to be looking at how are we going to find an image and then how we edit it. You're going to have the option of editing your image either via Photoshop or via a free app called Snapseed, which you can download onto your phone. We will be learning how to get your image from your paper onto your linoblock. Then I'm going to show you how to cut out your image. After that, we're going to see how to print your image onto paper. Last but not least, I'm going to show you how to sign your limited edition prints and how to clean your tools. And guys, I am so excited because I'm really convinced that you can make something great. Even if you don't have any previous experience and you don't have any drawing skills. So if you're feeling motivated, take this class and let's get going.
2. 2 - Project: Hi guys, so. Before we dive into our final project, I'm just going to give you a little bit of an overview over what linocut is. So it's just gonna be a little bit of background information for those of you who haven't worked with linocut before and don't know much about it. Now, I do suggest that if you don't really have an idea of what it is, to get a better idea, just try putting the term linocut into your search engine and see what comes up. And maybe you'll be surprised how inspirational that can be for your own work. Okay, So what exactly is linocut? Well, we have a sheet of linoleum and we cut an image out of the block or the sheet. And we then print the image, which is mirrored, via a press or by hand. And there are heaps and heaps of different printmaking techniques. And this one is called a relief printmaking technique. What does it mean for us? Well, relief printing techniques are the ones where the raised areas which we haven't carved out will be the ones being printed, as opposed to other techniques, where the incisions that we make are the ones that represent the printed image. So basically, everything that you cut out is going to stay white, as the paper or the colour of your paper, and everything that is raised and is not cut out will be inked and printed. So as I mentioned before, every image that we print will be mirrored. So keep that in mind as we prepare it. And so there are some things I really like about linocut. For example, the material doesn't have a directional grain, so it doesn't split like wood sometimes does. And also it's easier to cut than wood. Sometimes a downside of linocut can be that it gets damaged if you´re using a press. But seeing as we're going to be printing by hand, that shouldn't be an issue and we should be able to get quite a high yield of limited edition prints, should we wish to do so. And when I say limited edition prints, what do I mean? Well, usually when you start, then you already decide how many prints you're going to produce. The edition number usually goes on the bottom and one corner. And I usually sign on the right. So my edition number always goes on the left. So for example, we´ll be numbering our prints from one to ten to ten of ten. So one of ten, two of ten, three of ten and so on. And usually we do this using a graphite pencil because it's harder to make a digital forgery. You can also make a handful of artist proofs which are yours and they don't usually get sold. They´re for you to keep in addition to the limited edition prints. Okay, so now that we've covered the basics, let's get on to seeing what our final project is. So you've probably guessed by the title of the lesson that we are going to be making a portrait in linocut. And you're absolutely right, if that's what you guessed. And we're going to be making 10 limited edition prints from that. And although it is specifically portrait course, I hope that with the materials I provide you with in this lesson, you'll be able to do a lot of different motifs in the future with linocut. And I'm really excited to see your projects. Please upload them and let's get started with our projects.
3. 3 - Materials: All right, so in this lesson we're going to be looking at the materials we're going to be using for our linocut. And it may well be that your local art supply shop, they have a prepackaged all you need for linocut set and you want to use that, that's fine. You might already have some tools that you want to use. That's also cool. I'm just going to be running you through the materials that I use, in my own practice and then you can just decide what feels best for you. And for that, I have prepared a list which I'll also be uploading to the resources section of this lesson. So let's just quickly look at the list together and then we'll go into the details. If you're going to be drawing your own drawing for the linocut, I suggest you think about your materials. But I would recommend obviously papers and pens or pencils and a black marker. And then for the actual linocut print, we're going to need transfer paper. We're going to need a black marker or two. We're going to need linocut tools. You can get a set at your local art supply shop. We're going to need a linoblock, I suggest to get more than one to play around a little bit. We're going to be using a soft linoblock in this lesson. You're going to need one roller and an optional one to printing if you like, or you can use a wooden spoon, then you're going to need an ink tray. You're going to need paper to print on, you're going to need printing ink and you're going to need masking tape. So as I mentioned earlier, you can use an image which you've drawn yourself for the linocut, or you can use a photograph that you've taken or an image you've found online. And I'm going to show you how to edit that later in the next lesson. And if you are going to be using your own drawing as an image for your linocut, then I would suggest you keep in mind that the print is going to be black and white. And even though you can get an effect of grey zones, by using different kinds of cuts on the linoboard, do start with a high contrast black and white drawing or image. So starting with the materials we're going to want this transfer paper, that you see here, that's the kind of has the black ink on one side so that it presses through, when you draw on it with your pen, we're going to want one thin marker and one fat marker. Next up we've got our cutting tools. And usually you can get this kind of set at your local art supply shop. It's really affordable. Usually there's a cutter, this handle thing, and then you've got three to four blades. I definitely suggest you get one of those and that you make sure there's a range of blades, so, one thin one, one medium and one fat one, so that we can get a variety of textures and your linocut. And if the tool that you see on the very right is also included in your set. That's cool, but to be honest, I hardly ever use it, so don't worry too much about it if it's not in there. Next up we have the linoboard and I've chosen a soft linoboard because it's going to be easier to be cutting out. Just take a look what you can get at your local art supply shop. And it doesn't matter if it's a different kind of linoboard. Essentially, they're all fairly easy to work with. We also need ink for printing. We're going to need an ink tray and we're going to need rollers. So I have two rollers, one large and one small one, the large roller I use for spreading the ink onto my linoblock. And the smaller one I use for printing. And the small one, or the second one, is optional. You can also use the flat part of the wooden spoon for this. You should use a water-based lino printing ink and your roller that you use to spread the ink on your tray shouldn't be larger than your tray itself. And obviously we're also going to need paper to print onto. I have the handmade Japanese rice paper on the left. And I also have a different handmade paper on the right, which is not rice paper. It's a little less fine. I prefer the rice paper, but I suggest that you just get a couple of papers and try some things out, and see what you prefer. And last but not least, we need masking tape to be able to fix the paper, the printing paper onto a table or a board, whatever we're printing on, so that it doesn't move while we're printing. So, I hope that was clear. If you do have any questions, just put them in the questions or comments section of the lesson and I'll get back to you as soon as possible with answers. But I do think as we continue, you're going to get more clarity through doing, so let's get on to the next lesson and start to edit our image.
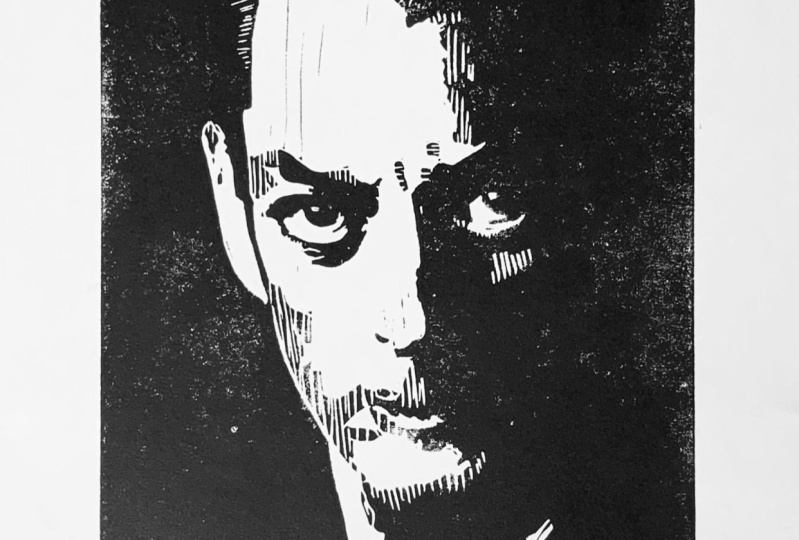
4. 04 - Finding and Editing Your Image: In this lesson, we're going to be looking at how to find our image. And I have gone with an image of Joseph Beuys, which is one of my favorite artists. So I just search for that in my search engine here, under images. So as you can see, there's a lot of images that come up and it doesn't really matter at this stage, if it's in black and white or if it's in color, what we're looking for is getting a high contrast image in the end. So we're going to be editing it, but you just have to make sure that there's light and darkness, not just that it's all uniform. So in this lesson, I'm going to be showing you how to edit the image with Photoshop and how to edit it with a free app on your telephone called Snapseed. Now if you haven't had any experience with Photoshop, I definitely recommend you edit your image via Snapseed because it's really, really easy and really simple. But if you do know your way around photoshop then that would be my preference, because it gives you more control over how you edit your image. But I just wanted to mention here that this is not a Photoshop course. So if you haven't used Photoshop before, and you don't know how to use it, I would suggest just taking one of the really great courses available here on Skillshare. I have gone ahead and saved my favorite image to my folder "images for linocut". And I've also created a new folder "edited for artworks" so that we have some kind of order after we've edited our work. So we're just going to start by creating a new document and out linoblock this 15 by 21 centimeters. So we're just gonna go ahead and create a new board here now. And I'm going to start by making my background black. Because I know that the background of my image is going to be black. And I'm just going to drag and drop my image onto the canvas and then I'm going to start adjusting it to my composition. And for me, what's important is both the faces should be in there. And for me, I would like them to be as large as possible without going over the border of the canvas. So that looks good to me and I'm just going to say, okay, and then we're going to go on to making our image high contrast. And we're gonna do that via the curves. And that way we'll get a nice high contrast image, which will make it really easy to define which areas we are going to have to cut out later of our linoblock. And the areas that we cut out will be the ones that remain white, or the color of our paper. And the areas that we don´t cut out will be the ones that will be inked and printed. And we're just going to tweak it until we're satisfied and we have the contrast that we like. Yep, So that looks good to me. I'm gonna go ahead and close there. So now we have to go ahead and flip the canvas horizontally. Because remember that the image that we're going to be printing is going to be in a mirrored image, of that which is on our linoblock. We just go up to Image Rotation, Flip Canvas Horizontally, and there we go. And now that we've finished editing our image in Photoshop with an a go to Save As, and then we're going to save it as a PDF. Because a PDF respects our original size indications. So we have especially set up a board or canvas to be A5 size. And that's going to be respected on the PDF when we print it. And I've just gone ahead and saved that, under a name that I've chosen which is "finished edited image beuys", that way I'll find that in the folder "edited for artwork". We don't need the layers and we also don't need to preserve the Photoshop Editing Capabilities. We're just going to save it as PDF. Okay, so now let's take a look how it works on Snapseed. So the first thing you're going to want to do is download the free Snapseed app from the app store. And then you're going to want to open your image in it. And then you go to look and you choose silhouette. It's right at the end there and you go on the little tick. And then you want to choose silhouette again. So you click silhouette again and give it the little tick. And then we're going to want to rotate our image, mirror, there you go. And then we're going to want to save a copy of that. We go to Export and go to Save a Copy. And that's it, it should be in your image library and you can just print it from your phone. And if you do, just make sure that it does respect our size, which is A5 or 21 by 15 centimeters. And that would be the end of this lesson. And next we're going to look at how to transfer our image onto a linoblock. I'll see you there.
5. 05 - Transferring Your Image: In this lesson, we are going to be transferring our image onto our linoblock and getting it ready for the next stage, which will be cutting out our image for the printing. And before we begin, this is really, really important: if you have made an original drawing do not use your original drawing for the transfer, please make a photocopy to size of your original drawing and use that for transferring image. Otherwise you are drawing will not be unusable afterwards. So remember that we talked the different kinds of linoblocks that we can get. This is the soft one. You can see it's very flexible. This is the one we're going to be using, and we're going to be using the shiny side. And this is the other one that I can get in my area. This one if it's got a kind of a different backing, it's more rigid. And for our purposes the soft one is going to be better. But if you can only get the other one, that's also totally fine. And so then we get our transfer paper. We saw this before. It's the kind where you have one side of ink and the other side is blank and you press on it and it kind of transfers the ink from the pinky side to your block. Now at your art shop, it might be called the transfer paper or tracing paper. If you don't want to get this or you can't get this, that's no problem at all. You just get a 6 B pencil like this. Then you just cover the back of your image with the 6 B pencil, quite tightly. And when you flip it over, you can draw on it from the drawing side and it will just transfer onto your board. So the next thing we're going to do is line up our tracing paper over our block and then line up our drawing with the tracing paper. Tracing paper, make sure that the printing side is down. Otherwise you're going to have the image on the back of your paper and not on the printing block. And if you prefer to cut out your image and make it exactly the size of your printing block. That's fine. I find it just as easy to do it this way. So I'm going to do it like this. Make sure you hold on tight to your drawing and the tracing paper and the block. So I've got my hand on this so that it doesn't move while you're trying to trace your image. And every now and then you should just lift up a part of your drawing and the tracing paper to make sure that you're transferring onto the block and not onto your paper. If you feel more comfortable, you can also fixate your image and tracing paper to your table or whatever you're working on so that it doesn't move. You'll want to be pressing down quite hard with your pen so that the image gets transferred quite clearly. We're going to be doing a retrace of our tracing with black marker after this step. So, don't forget to check every now and then that you haven't forgotten any parts of your drawing. When we finished with it and we've got a clear outline of our drawing on our linoblock, we're going to start retracing those lines with our black markers. I recommend starting with a fine liner like Sharpie, just to outline everything. And then we're going to start with a few, thicker liners to get all the black areas covered. Now in printmaking, you can't make gray areas like you can, for example, with pencil drawing, it's all going to be one flat area. And the only way to give an impression of greyness is to break up the inked area by making a few incisions. So when we're filling in the areas to be inked later, I like to use intuitive drawing, so it's quite easy to fill in the dark spaces which are just going to be filled completely, which are really high contrast. But the areas that are kind of gray on our image are a little bit more complicated. So I just like to use a looser stroke and just leave some air, so that I know that I want to take out a little bit with my knife there. So now that we've done all the outlining with the fine liner, we're going to get our fat marker and start to color in all the black areas. And this is really going to help the image emerge. And it's also going to help us at the time of cutting out our image. Because it's just going to make it a lot clear which parts we have to cut out and which parts have to stay on the block. So once that's all coloured in, we're gonna go back to the fine liner and just cover some of those details and also some of those gray areas that I was talking about before, just by using a bit of a loose stroke. And as I said, we can't really make any gray areas on our linocut. It's all going to be black and white. But we can loosen up the raised areas which we are going to be inking, by taking out a couple of strokes. So what we're trying to achieve in the step is basically get as clear as possible about what has to stay on the linoblock and what we're going to cut out. And the clearer we are about what has to stay and what has to go, and how we're going to cut it, the better it's going to be for us and the easier it's going to be at the time of cutting out. Good stuff guys. Now we're ready for the next step. So let's get started on cutting out our image. I'll see you next lesson.
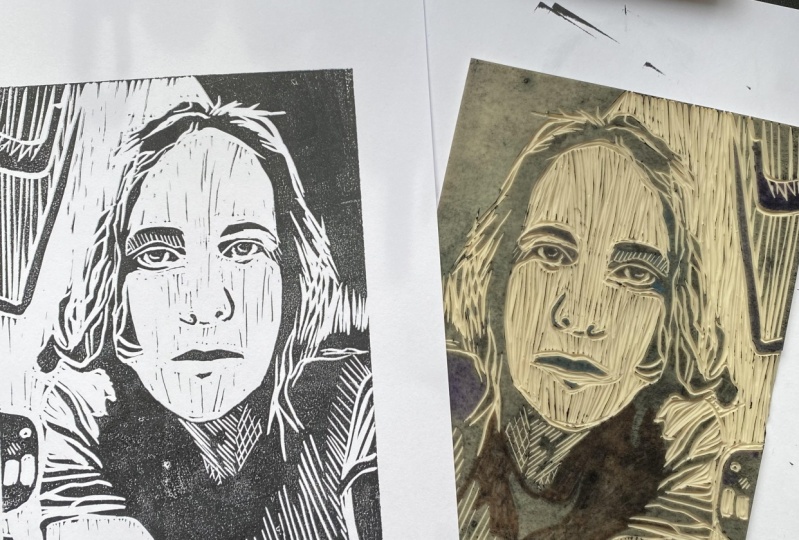
6. 06 - Cutting Out Our Image: Hi guys, Welcome to this lesson. Finally, we are going to be seeing how are we going to be cutting out our image from our linoblock. And I'm really, really excited. I'm so excited to see your projects, so please upload them as you go. And before we begin, I just want to say that it's really important when you´re cutting out the image to be using one hand to drive your knife, your cutter tool, and the other one to guide that. This is really important, for one so that you don't ruin your image by accidentally cutting into an area that you don't actually want to be cutting out. And two, so that you don't cut into your own hand. So just be careful to always have one hand that is guiding the tool and one hand that is driving it. So you're never in the position where you could cut yourself. So this process takes quite some time. And for that reason I've gone ahead and sped up the video for most of this lesson. But I do recommend that you see the whole thing because I will give you tips and pointers along the way of things you need to watch out for and what's important. So let's get started. We're going to be using the thin knife to start outlining our image. So just really carefully and slowly start outlining that. Removing the pieces that you cut out as you go. If you need to rotate your blend a lot to get in there, better control over your tools then do that. No problem. Just going to get into all the areas. All the details, be really careful when you get into those details. Because they are really tricky. You just need to really make sure that you're taking really great care there. Now outlining our drawing is great because that way we already have a ridge in the block. And when we later get to using a larger blade that's going to be harder to slide into the areas that aren't supposed to be cut out. All right. So here we're just going to be really, really careful, just a couple of really small incisions to indicate the gray area that we were talking about before. All right, so now that we've got the fine lines and the outline's pretty much done. We're going to start getting in there with the medium sized blade and we're just gonna go in one direction, and we're going to make vertical incisions. When we print the area that is going to remain the color of the paper, It's not going to be completely smooth because it's going to be quite large area that we're cutting out. So even though it's not going to be the same level as the raised areas that are going to be inked, there will be some ink stains on this area. So I really enjoy this texture. If you want to make a really smooth, I suggest you get a really broad blade as well, so that you can make one smooth surface where you want it to be completely flat. Just be really careful here so that you don't cut into the area that you don't want to be cutting into, like the hat, for example, or here and the nose. Just take your time. remember to be guiding the knife with the one hand and driving it with the other. okay, so now towards the end we'll just come back to the details and just finish that off. Just get right in there, just very carefully. And now we're going to do a proof. We're just gonna get our big marker and go over All the areas that we think are going to be inked. And that way we have an idea of what it's actually going to look like. And you just want to be going over the raised areas with the flat part of your marker. This is not to color in already carved out parts. It's really just to double check. So we get a pretty good idea of what it's going to be like once we use a roller to ink it. And then we can just make some alterations where we see fit. So that eye, for example, I wasn't happy with that. So I'm just gonna take a little more out. Just keep checking until you're satisfied. And that's all. Well, that's it, guys. There we have it, we've cut out our image and we're ready for the next step, which is printing. Really excited to see you in the next lesson and see how it turns out. I'll see you there.
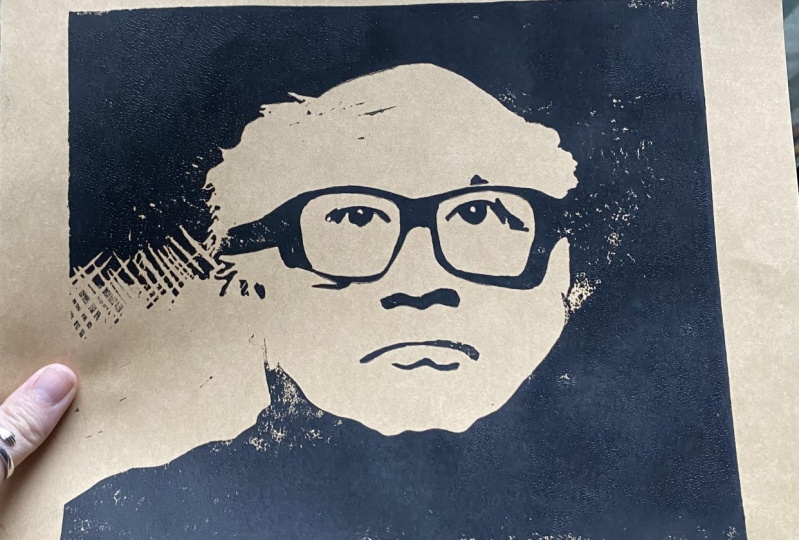
7. 07 - Printing: Hi there. In this lesson we are going to be printing our image and we're going to be trying two different types of paper. One is going to be the Japanese rice paper, and the other one is a handmade paper that´s made for printmaking, which I found in my local art supply shop. Just have a look in your art supply shop to see what papers are available and choose anyone that you wish. We're going to start by arranging a linoblock for the printing. So we're going to make kind of frame around it to know where to put it every time we want to print so that we don't get weird positioning on the paper. Okay, So as you can see, I have this really great lined board which I'm setting up my block on and it's really helpful. But I'm just going to assume that you don't have one of those at home, and tell you how to find out how to setup your linoblock so that you can print and that's going to be in the same position every time. I'm assuming we're going to be printing onto A4 size paper. We're going to want to tape an A3 size paper to a table. And then you're going to make an A4 sized outline. Now assuming we're printing on A4 size paper, our center would be at 14.85 vertically and 10.5 centimeters horizontally. And our longboard is 15 by 21 centimeters. In theory, we could work out where to place the linoboard by seeing how big the edges have to be. So subtracting our linoboard from our paper, printing paper, which would mean horizontally we have six centimeters and vertically we have 8.7 centimeters. So we could measure three centimeters each side horizontally, or 4.35 centimeters each on the vertical side. But I prefer doing it this way. So we need to find the center of our paper, how I showed you before. That would be add 14.85 centimeters vertically in 10.5 centimeters horizontally. And we know that our linoboard is 15 by 21 centimeters. So once we know where the center is, we need to measure out 7.5 centimeters, both left and right to the center and 10.5 centimeters above and below the center. So you just measure that out onto your paper matrix, which is either lying on your table or taped to your table. You make some guides to see where you're going to place your linoboard. And then you're just going to outline your linoboard. And that should make some really nice, accurate prints. And that's it. So obviously, if you do have one of these lovely lined boards at home, it's much easier. You just kind of orientate yourself, count the little squares, and then you want to be making, larger guides to see even if your papers over your block, where the edge of your paper is supposed to go. Then we get two little bits of tape and tape our paper onto our support, which is either this land board or your paper matrix which you've prepared. And then we're going to also make a little frame for the paper so that after we've printed our first print, the next paper can go in exactly the same place. And if your underground is a paper matrix, and not this line board, then you can obviously also do this in pencil by outlining your paper instead of using tape. Right? So now we've got our linocut board on the left, preferably also on some kind of paper in case we make a bit of a mess. We don't want the ink to be on our lined board or our paper matrix because then it's going to also get on our printing paper. So as you can see, I added ink to my ink tray and I´m just rolling it now until it gets a really nice, squelchy texture. And you'll know what I mean when you're doing it. We're just going to start rolling the ink onto our linoboard now, trying to get it as even as possible. And we don't want to have too much ink. We also don't want to have not enough ink: having too much ink means it goes in all the places that we that we carved out. And not enough ink means we're not going to get a very good print. And you might need to roll your roller again and just go over it again and just have a bit of a play with this because it's kind of like an intuitive thing that you get a feel for the more use this technique. And you can see I've made a bit of a mess here on the paper that my linoblock is lying on. That's exactly why we want this paper and that's exactly why we don't want it in the printing area, because otherwise it's just going to get on our print. All right, So we just line that up. In the space which we've outlined earlier. Now if your hands have got a little dirty, you just wanna go ahead and clean them quickly so that we don't get a dirty print. And then you carefully overlay your paper over your linoblock and start to smooth it down either with your roller or with your wooden spoon. And you can see the print is already coming through and we've gone with the Japanese rice paper to start with. And this is really great because as you can see, it's hardly any effort. The only thing you have to look out for as not to leave it on too long because then it sticks to the linoblock and it breaks. You just want to be lifting this up here. Seeing how it's coming along and making sure you don't move it. Okay. So you want to put it back down exactly how it was. Otherwise you're going to have a moved print and that's not, not so great. So we're just going to give it one more quick go. If you have a wooden spoon. Use your wooden spoon for this, I use my scissors. So another thing you need to be really careful of is the edges, if you're using your wooden spoon, just don't go too hard over the edges because you could also rip the paper then. And then we just really carefully lift it up really slowly and see how the print turned out. Look at that, that's a beautiful print. Okay, So let's try it with a different paper to see the differences. I've already inked my print and I'm just going to place it in the predefined area, smooth over my paper. And then I go with my roller and start rolling it. As you can see, this is a different paper. You can't see the print right away. Rolling over it, to begin with, is useful in the way that the ink start sticking to the paper and it's not going to be, so likely to move while we're using our wooden spoon, if we use a wooden spoon. I'm going to be using my scissors for this one. You'll be able to see that it's harder to get a good print with this paper or rather it's a lot more effort. If you're using a wooden spoon, use the flat part of the wooden spoon. And this is where it gets tricky with the edges. You really have to be careful. I don't know how many prints I have broken in my day by not being careful enough around the edges. So we're just going to check how that's going. Really carefully lift it up. Looks like it's going good. Just make sure you return it to its original position and it doesn't move. Otherwise, we're going to have like a double exposure effect and it doesn't really look that great. We'll just keep going really carefully around the edges. Look. Yep. And you can always see where it's and and where you need to apply more pressure. Always really carefully, obviously. Can't stress that enough. Just lift it up again, take a look and ...looks fantastic, but I'm just going to give it a little bit more up in this corner over here. Really want to have a really good print. So I'm gonna make a really big effort to get everything covered. So you just want to keep checking on your print, see how it's coming along, and keep working until you're satisfied. And I find this that the first print you make is usually a little bit less good. So I would suggest inking the board once, using any kind of paper to make the first print. And then with the second time you ink it, somehow the board is primed or something, it just works a lot better. And we're just going to keep looking until we're good. And I think we're almost there. We're just going to have a look how that turned out. Nice. Okay, so these are our two results. On the left we have the print we just made with the handmade printmaking paper. And on the right we have the Japanese rice paper. And I think they both turned out really good. I'm really, really happy with it. So I would say let's get to the next step and start signing them and seeing how we clean our tools.
8. 08 - Finishing and Cleaning Tools: Hey guys, So we've arrived at the last part of the lesson, which is finishing our limited edition prints by signing them and then cleaning out tools. Now if you're not quite happy with your image yet, you can always go back and repeat the steps of cutting out your image and keep checking until you're happy with it. I'm really happy with my prints. So I'm going to go ahead and start signing them. We had said our final project would be limited edition of 10. So we're gonna go and sign this one as one of 10 in the bottom left-hand corner. And then we're going to put our signature in the bottom right-hand corner. Now, I would suggest that you also make a few artist proofs for yourself and instead of numbering them one through 10, You put A/P in the bottom left-hand corner. Now cleaning our tools is really quite simple and seeing as we've used water-based lino printing ink, we can also clean it with water and we're going to be cleaning the tray, the roller ends the linoblock. And maybe you want to go ahead and just wipe it down with a wet towel before you start washing it. Just to not make so much of a mess. But you also want to make sure that all three things completely dry before you put them away so that nothing starts to rust or get moldy. Yeah, and that's it guys. Now you've made your first linocut and print. And when it's completely dry, you can go ahead and frame it and be really, really proud and please don't forget to upload your projects. Thanks so much for taking this lesson and please give me feedback. And any constructive criticism is really welcome. Thank you so much, so great to see you here.
 Nadia Valeska, Berlin based professional artist