Transcripts
1. Introduction: Hello, I'm Suzanne Abraham, and I'm a watercolor artist
and an urban sketcher. I love sketching on location to gather inspiration for
my watercolor paintings, which I do in the studio. Recently, I developed a love for using pen and wash
during my sketches outside. I've always loved using line and watercolor for my sketches. However, using just ink and some water made the whole
experience more enjoyable. It also proves to
be quite quick, especially when
I'm shot off time. Have you ever tried using
a fountain pen to write? If so, you may know that
it's a learning cub. If you love using
fountain pens to write, I'm sure you would love to
sketch with them as well. In this class, I
would like to show you how to sketch
using a fountain pen. We are then going
to use a brush and some water to create a
line and Wash sketch. It is perfect for
beginners who would like to know more about
line and wash technique. I would like to show how to use the pen to create
characteristic lines. I would also love to show you
the different ways to hold a fountain pen to create the certain types
of lines you need. We will also talk about
how to fill ink and the different types of ink
that you can use as well. The project of this class is rather simple and
enjoyable sketch. The reference picture is given. I will demonstrate how
to create a sketch from scratch using
simple lines and shapes. I will also share
tips on how to tweak sketches to create a visually
pleasing composition. And that means to add or eliminate certain
details as necessary. The project is completed
using a fountain pen, a brush, and some water. The process is extremely simple and incredibly
relaxing to watch. Stay on to find out more.
2. Suggested Materials: The materials for this course are quite minimal and simple. All we need is a pen of
brush and some water. Paper that I'm using here
is watercolor paper, and it is 300 GSM in weight. You do not need to have
such a heavy weight paper. It doesn't have to
be watercolor paper. You can even use a
normal mixed media or a slightly thicker sheet of
paper in your sketchbook. I'm using two smaller
sheets of paper for rough sketches and
learning the technique. They are slightly smaller
than A five size. And I have a slightly
larger sheet of paper, which is a little bit
smaller than A four size. You can even use an A
four size sheet of paper, and that is for
the final project. And for pen, I'm using a fountain pen with
extra fine nib. The ink that I'm using in
there is a fountain pen ink, and it is by manuscript, you can use any fountain
pen ink for this purpose. You can also use other
water soluble ink as long as it's compatible
with fountain pen. I'm using CPR color ink here. You can use any
color that you like. I also have a jar of
water for washes, and the brush that
I'm using here is a medium sized round
pointed brush. It can be around size ten or 12. You would also need a
pencil and an eraser for your initial sketches
and to rub off any unwanted lines
to finish off.
3. Introduction To Fountain Pens: Now, let's talk a little
bit about fountain pens. You may be familiar with these pens for
writing specially. There are different types of fountain pens that you
may find in the market. It doesn't have to be
a very expensive one. The one that I have here is ami fountain pen with
an extra fine nib. You can also get a fine nib
or a medium nib for ami pens, and I suppose that's the
case for most fountain pens. Now, let's open this pen. Inside, I have a
universal converter. So instead of using cartridges and throwing them out
when the ink is finished, I use a universal converter. Now let's see if we can
fill some ink in this pen. So the color that I'm
using here is CPR. It doesn't have to
be the same color. You can use any color
for your drawings today. So the red color which I'm
turning is the piston. So I've just drained out all
the ink that I had in there. So when I turn the
piston anticlockwise, the piston comes back up, as you can see, and that's
when it gets filled with ink. So now let's submerge the
nib into the ink completely. You need to make sure that the nib is completely
submerged in the ink. And now I'm going to turn
the piston clockwise, so it's getting
filled with ink now. And using a tissue, I can just wipe out the
excess ink on the nib. And now our ink pen is completely filled with ink
ready for it to be used. If you don't have a
universal converter, you can use a
universal cartridge. The only problem with the cartridge is that
once the ink is over, then it has to be thrown away and you have to fit it
in with a new cartridge. So let's see how that works with one of my other
fountain pens. So I'm just going to take off the universal converter
that I have with me. And the cartridge goes the same way as a
universal converter. You will need to press
it right into the pen. It will fit perfectly in
and will not come off. The inks that you use in fountain pens has to be
compatible with fountain pens. For example, Indian ink will not work with
fountain pens as it is a thicker
consistency and can damage your pen and the nibs.
4. Explore Sketching With A Fountain Pen: So we're going to experiment a little bit with using
the fountain pen. If you're new to using a
fountain pen, don't worry. It takes a while to
get a hang of it. It could feel rather challenging to use
it in the beginning, but once you are used
to how it moves, then it feels a lot more easier and you will begin
to enjoy your sketches. Start by making just some
random scribbles on your paper. I started by holding the pen nearer to the
nib to begin with, and you can see it's
almost like writing. Now, for drawing, you have the freedom to hold the
pen in different ways. So I'm going to move
away from the nib, so you can see I'm holding
it away from the nib, and the type of lines
that I make compared to the first lines that I
made is quite different. You can see how my hand can move a little
bit more freely. I can make larger
shapes, larger lines. You can also be more
expressive as well, because it's not just the
wrist that is moving, it's the whole arm that moves. See if you can hold
it in different ways. I'm going to try doing
a 90 degree angle. And you can still draw with the pen and you
can see how fine those lines are because of
the way you're holding it. And these extra fine
lines are really great for any initial sketches
that you may want to do. If you think you don't
need to use a pencil, you can always use the pen, make extra fine lines for the initial
sketches if you like. Keep practicing
the different ways you would like to hold the pen. Now I've turned the nib around to try and draw with
the other side of the nib. You can see I am able to make a few characteristic
lines here, a little bit thick
and thin lines. I can also do a
lot of scribbling, maybe press down
slightly more to see how thicker the
lines could go. Usually, it depends on the
type of nibs you're using. If it's an extra
fine or a fine nib, the lines are going
to be rather fine. If it's a medium nib, which is the case with most
writing fountain pens, you might get thicker
lines as well. And you can scribble and explore the different types
of lines that you could do with this pen and
keep going until you feel confident and comfortable
in using the pen. Uh huh.
5. Introducing Water To Your Sketches: If you're feeling
confident, let's move on. I'm going to draw three boxes. We're going to try the
different types of washes that we could use by combining fountain pen and some water. I am going to start by drawing quick thin lines placed rather close to each
other in the first box. You can see how I move the pen. It's rather quick,
abrupt movements. And you can see the result
is rather light lines. In the second box, you can see I have
pressed down a little bit more getting a bit
more bolder lines. And the third box, I'm going to start with
the same type of lines, and I am going to go
over it a second time, but drawing lines in a
different direction. So this is what we
call cross hatching. The second box and the
first box is hatching. So it doesn't always have to be straight lines to shade
or render something. You can even use scribbly lines. You can use dots, dashes, anything that you think
is best for your drawing. So I've just started
a bit of scribbles. You can see the first one that I did was rather thick
compared to the middle box, which is medium scribbly, and the first box, the one on top is very light. So I've varied the amount of lines I've used
in the three boxes. Now, let's use some water and normal round brush to try and introduce some water
into these pen lines. Starting off with
the box on the top. Introducing some water, you can see how the pen lines
have been washed off, giving me a nice
color in that box. Let's try the same with the
scribbly lines as well. You can see that the wash
is quite light and that explains why I started off
with a very light pen line. The second box where I
added a bit more pen lines, you can see that the wash
is a bit more saturated. It has more color compared to the first wash and the last box. I'm going to introduce
some water there. And you can see that I have a lot more color in those boxes compared to
the first two boxes. You can also see how
the lines are getting washed off and being replaced
by just a block of color. And this is the way we're
going to work today. Now let's try scribbling
a little bush or a shrub, so you can see you can just use scribbly lines to
create that shape. The way I'm holding the pen
it's well away from the nib, so I get more fluidity in my hands as well to
move around on paper. And you can scribble to
your heart's content. Create a very rough shrub
like looking shape. And once you get the shape, you can go in and
add some deeper, stronger lines as well. Now let's introduce some water. I'm going to start
with the darker areas, like you can see here
and see how immediately it is becoming a wash now. And now that wash in the
center there is nice and dark. And now I'd like to spread that out into the outer areas
of the shrub as well. So I'm going to hold
the brush flat down you can see all the bristles of
the brushes on the paper. I'm just gently spreading
that ink to the outer areas, and at the same time not
working too much in the center. I'd like to keep that dark area. You can see how there's a
darker area, medium area, and a lighter area on the sides, and it gives a very interesting
outcome for that shrub. Now let's try drawing geometrical shape a little bit in line with what we're going to do for the
project as well. So I am going to draw a cube at an angle where I am able to see the right side
of the cube as well. So you can see I can see the front as well
as the right side. And I'm going to shade the front using straight
lines called hatching. You can even use scribbly
lines if you like, and that's quite
personal, I feel. You can use any types of
line to render the area. Now let's try to put
a roof above that. So I'm going to do a
triangular shape on the side and finishing
off that roof. Just a very rough sketch is more than enough
at this stage. You can keep it to a very small sketch like
how I've done here. And then I am going to add another layer of
shading to that side of the roof just under the roof where I think needs to be
a little bit more darker. So let's use the brush
and some water to wash so you can see how immediately the ink
started washing off. So the more you add water, it's going to wash
off completely. So it's good to practice
just introducing some water, not having too many
brush strokes in there. So I've just introduced
water with the brush. I've not really gone in and painted with the brush
as much because I'd like to have a little bit of lines left around
the sketch as well. So I get a nice balance between
the lines and the wash. So at this stage, it's
all about having fun. You can try introducing water to the outside
of the shape as well. You can also add more details once you've
finished with the wash. So here, I'm going to
add a few windows, just some details of
that building, as well. You can also add extra
lines in the washed area. You can add those
lines while it's wet or while it's
completely dry. So I am going to leave this whole thing
to dry completely, so I can have the freedom
to add more lines on top. So you can see how some of the lines have
been washed off, but I still can see a little
bit of lines there as well. And I'd like to enhance those
lines a little bit more. So I'm going to wait
for this to completely dry or I can even use a
hair dryer at this stage. The first wash is
completely dry, and now I'm going to use my fountain pen to
add a few more lines. I could have added these lines
when that was still wet. It would give me a very
different outcome, as you can see in the house. You can see the
lines that I added while it was wet is a
little bit more darker, maybe beginning to
bleed a bit as well, but I wanted a few more
finer lines as well. So I'm going to add that now I'm going to add some more details
for the house as well. So, for example, if I
think I need more shadows, or maybe add a
couple of windows, probably add another set of foliage on the side of
the house if I like, or I can even suggest some
tiles on the roof as well. So any sort of details
that you would need, it can be added at this stage. A
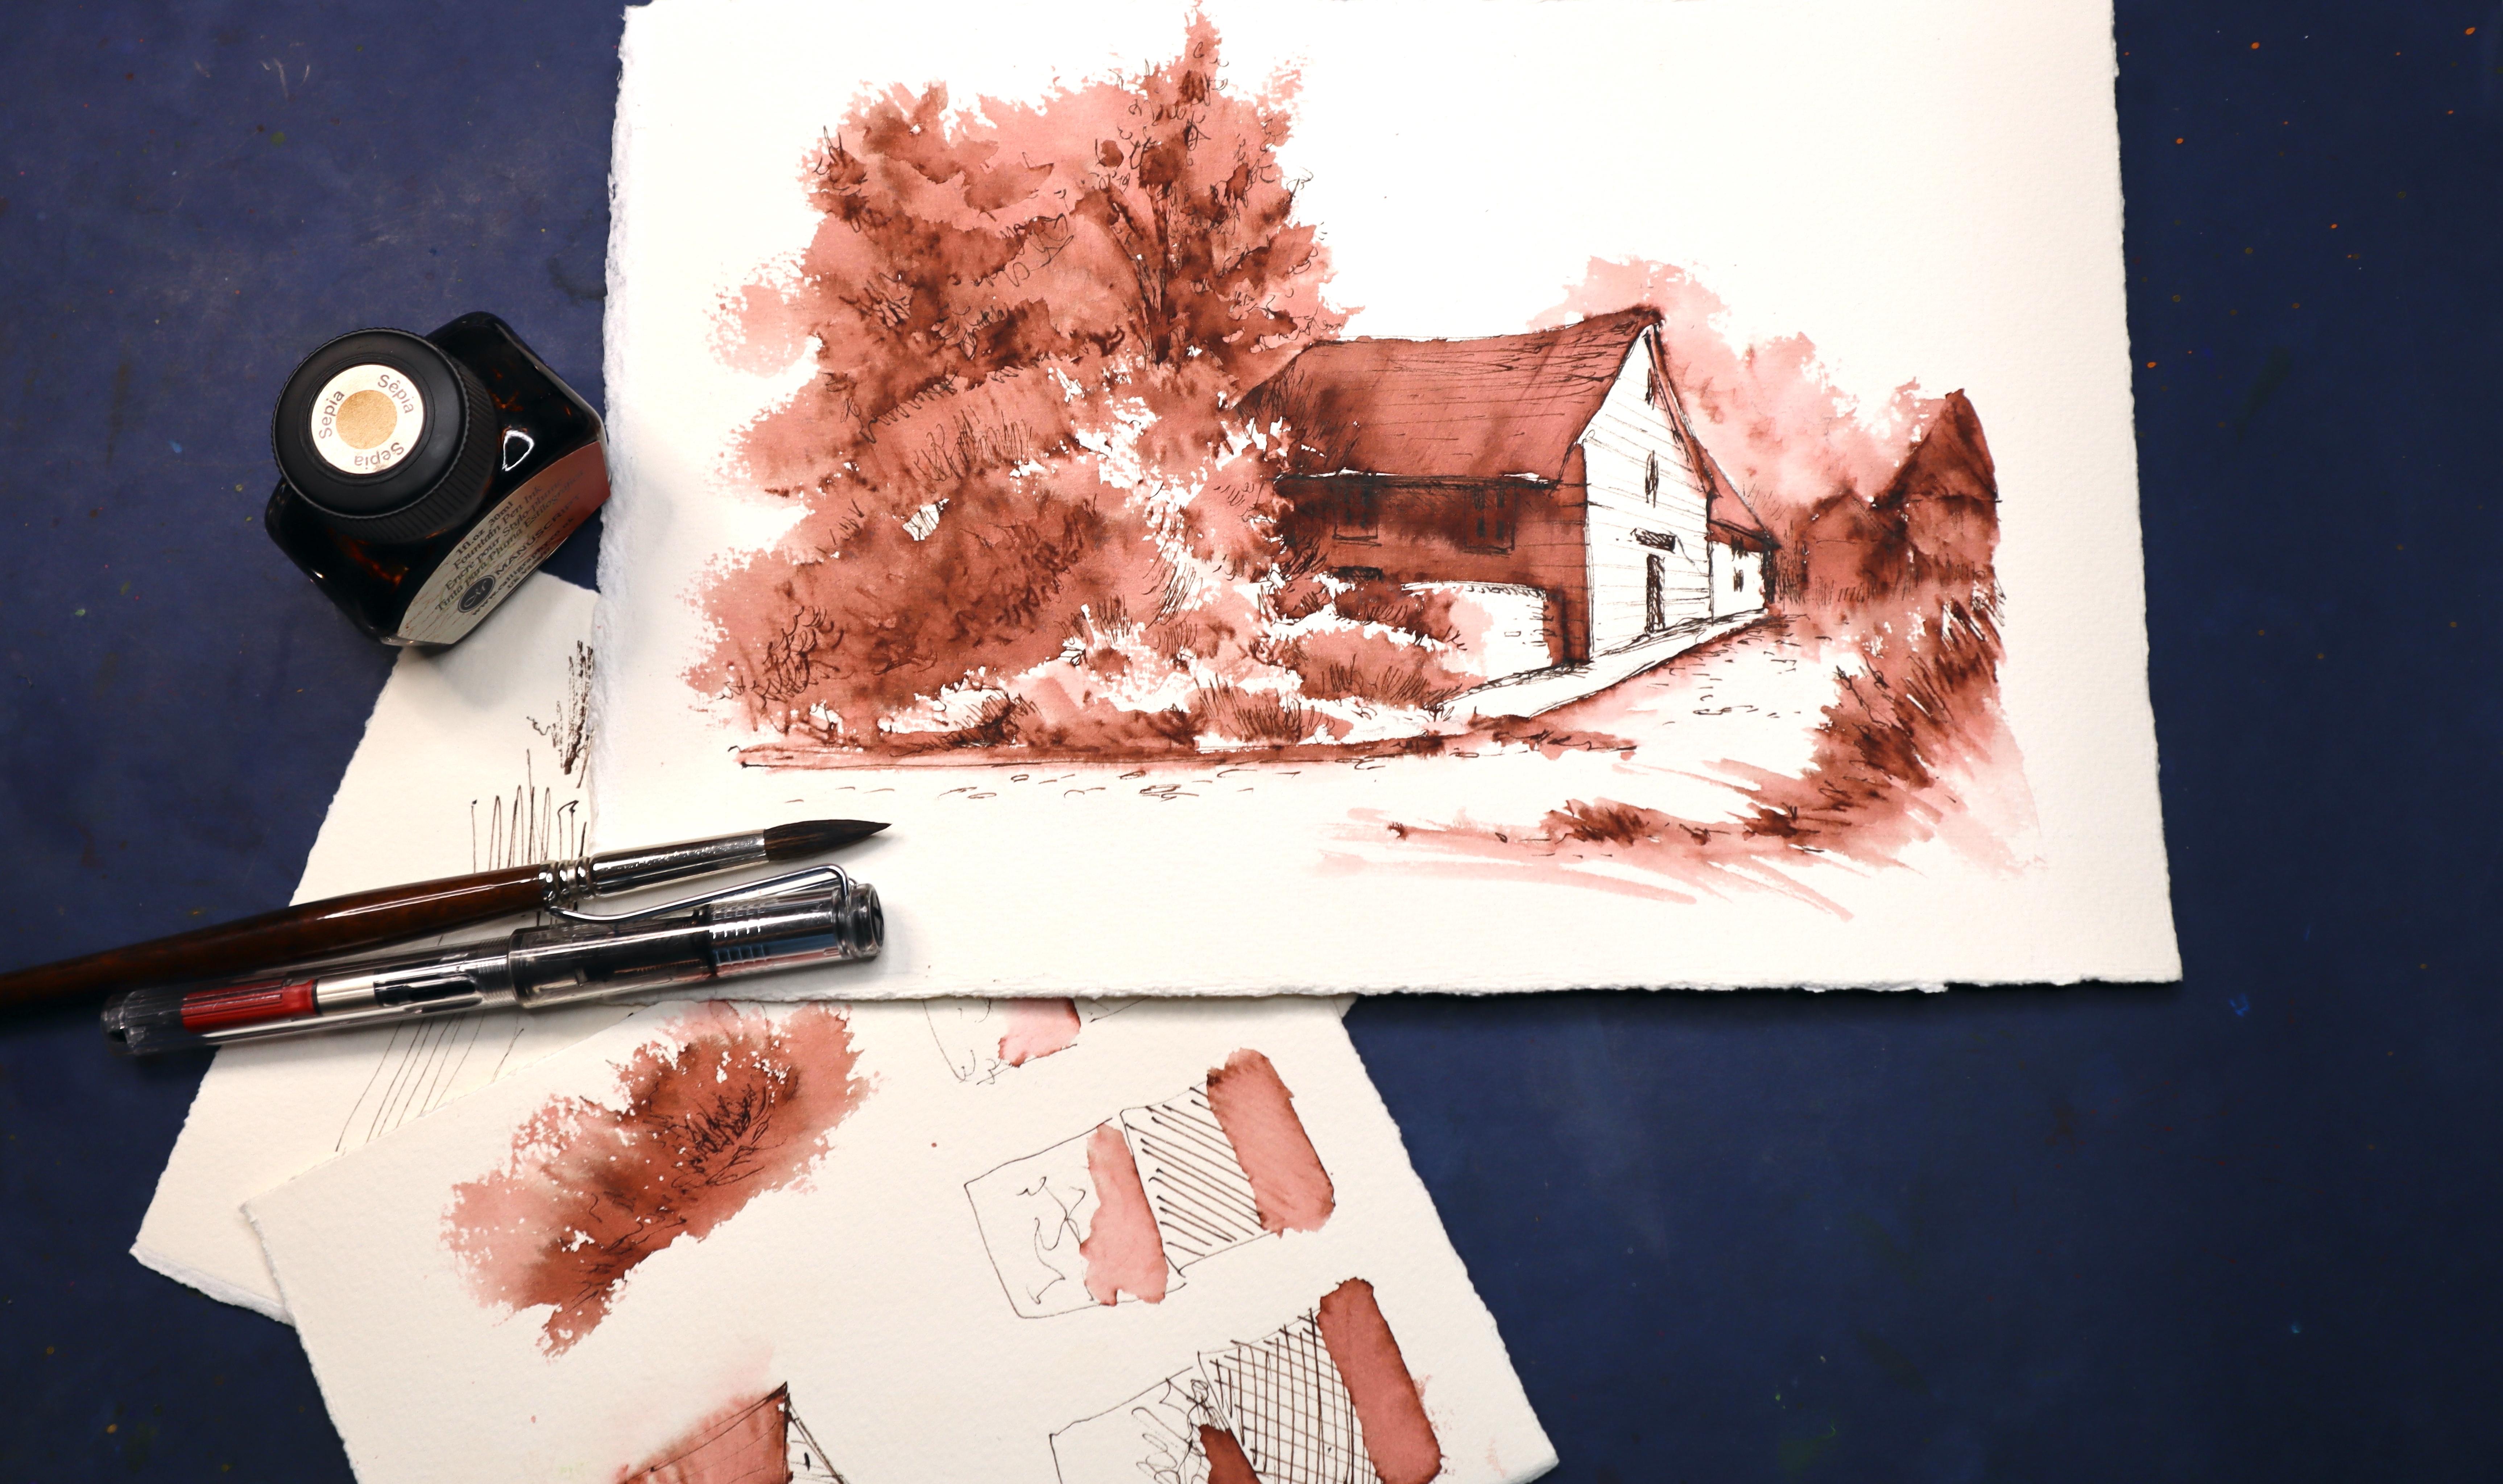
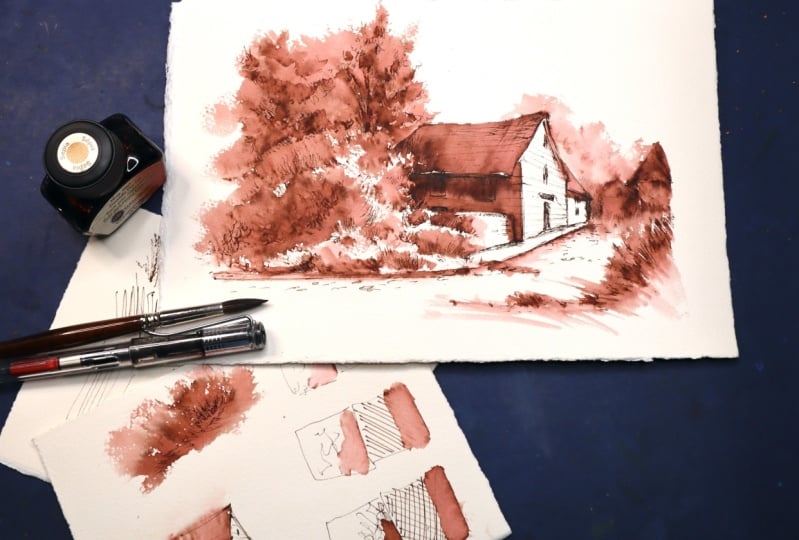
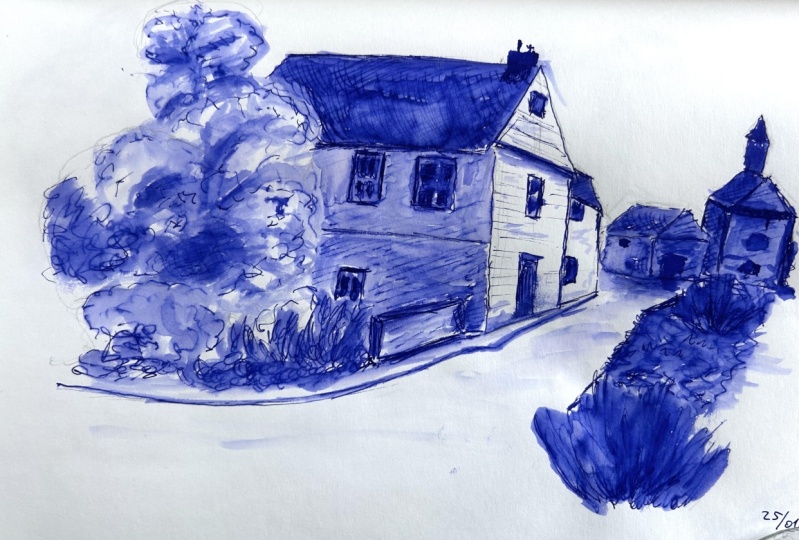
6. Project: Understanding Perspective: This is our reference
picture for the project. We are going to look at a few rules of perspective before we
start sketching this. Just to understand, let's
start lining the pencil along the top of that window there and the bottom
of that door. If I use a ruler and drew
a line from the bottom of that door all the way outside the picture and from
the top of that door, you can see that it meets these two lines
meets at a point. And this point is on a straight line that
goes across the picture, which is my eye level. That line there that goes across the picture
is my eye level. So that is the level of my eyes from when I had
taken the photograph. So the eye level will depend on each person's height or whether you're
sitting or standing. And while I was standing
taking this photograph, this was my eye level, and the point at which
the top of the windows in the bottom of that door met is called the
vanishing point. This is just a concept to help
us understand perspective, so in simple terms, for a geometric
structure like this, the site that is facing
away from us converges. The top and the bottom lines of that shape converges to create a sense of depth
within the picture. The site that is facing
us stays as a rectangle. It's only the site that is facing away from us
that shows depth.
7. Rough Pencil Sketch: Now let's try drawing that
onto a rough piece of paper. You can use your pencil
for these sketches, and it can be a rather
small sketch just to get the whole idea and to practice the sketch for
your final project. So I'm going to start by drawing
a line across the paper. It's not in the center, but it's angling towards
the bottom of the paper. And that is going
to be my viewpoint. So as we discussed, the building is sitting
on that eye level. So I'm doing the
rectangle that is facing us and the side that is facing away from us,
as we discussed, the top and the bottom
lines angle down and up, and the two lines meet at a point either on
the paper or outside the paper depending
on how you are placing your box
on the eye level. So with that line, I can get the side that is facing away from us accurately. So now I've got this
rectangular box. And also the extra structure on the side of the
main building. I have drawn that
rectangle as well. And now let's determine where
the roof is going to go. So the middle of the
first rectangle, I'm going to draw a light
line angling up vertically, and that's going
to be the center where the roof is
going to be placed. So I've drawn the
triangle of that roof on the side and on the
side that is facing us, I'm going to finish
off that roof with a straight line
that goes parallel to the top of the
rectangular box. And I'm going to
finish that roof. The roof comes a
little bit lower than the top of the
rectangular structure. I'm going to quickly suggest the roof of the building just
behind that main building. A few lines to suggest
windows and doors. It doesn't have to be a
perfect door or a window. You can just add a few
scribbles just to suggest that. So we've done the building. Now, there's a small footpath that goes in front
of the building, and it comes all the way
to the bottom of the page, and the road turns. But the area is
filled with foliage, so I'm just going to add a suggestion of
foliage over there. It doesn't have to be anything
detail at this stage. This drawing is just
for our understanding. There's also a bridge that is on the side
of that building, and the bridge sits 90
degrees to the building. So I'm just going to add that little rectangular
structure there. Now there are lots of
structures in the background, and I don't really
need to add all of that because that's
not really our focus. Our focus is the building
that we drew first, and anything else behind
it is just a suggestion. So I'm just going
to vaguely suggest some simple shapes
in the background. Absolutely no need for
any sort of details here. So you can see how light
my pencil marks are. And when it comes
to using the ink, we can make changes as
and when it's necessary. I'm also going to add suggestion of foliage
in the foreground. So I've eliminated the
post, the CCTV camera, and the bit of the card
that is in the picture instead I've just put a
nice big shrub over there. So that sort of gives a sense of depth in
the picture, as well, because we've got something in the foreground our focal point, which is the building is
in the middle ground, and we've suggested
the background with some vague structures
in the background. So that was a quick
pencil sketch. Now we're going to try and use some shading techniques just to mark out the darker
shapes in the picture. So if you look at the building, you can see a side that faces away from us
is completely white. And the side that is facing
us is in the shadow. Although that building is white, you can still see where
the light is falling from the right side and the left side is
completely in the shadow. So I'm going to use
my pencil just to do some short lines or hatching to suggest
that there's a shadow. The bridge is not in
shadow, as you can see. It's quite bright compared to
the side of that building. So when you leave
the bridge as it is, I can see some
large shadow shapes in the foliage as well. So I'm going to use my pencil to quickly scribble in
some larger shapes. That little electric
box I've eliminated, the CCDB camera I've eliminated. So all the unnecessary details you think it's not
fit for your drawing, we have the freedom
to eliminate. Now, I'm going to add
some darker lines for the deeper shadows
in the picture. So it's good to mark
out the shadows just to understand where
it has to be darker. And the same way we're
going to use the pen and wash to create darker
shadows in those areas. And all those areas that
doesn't need a lot of shadows, you can use a light pencil mark to suggest lighter
areas as well. And with this, we are done
with the rough pencil sketch. You are free to add in the details that you think
is good for your sketch. You can eliminate the
ones that you don't need.
8. Project: Initial Sketches With A Pencil: Now that we've finished
drawing the rough sketch, we're going to start
on our main project. I'm using a slightly larger
sheet of paper here, so it's not really A four. It's slightly
smaller than A four. You can go in for an A four
size of paper as well. Using my ruler, I'm going to do a quick outline for this paper. This is mainly because
I like the drawing to fit into that little rectangle
that I've drawn there. I don't mind having a few elements going outside
that little rectangle, but I'd like the majority of the picture to fit well
into this rectangular area. Now let's do this sketch just like how we
did our rough sketch. I'm going to start off with
the horizon or my eye level. That's the line that
goes across the page. So I know in the rough sketch, I've done it almost to
the center of that page. This time, I'm going to keep
it a little bit more lower. And this is only
because I'd like a little bit more
breathing space for the foliage on the left. So I'm going to start by
doing the vertical line, which is a corner
of that building, and I am going to
place it a little bit of center of the paper. So it's a little bit
angling towards the right. Now, let's add the top and the bottom of the side
facing away from us. So the bottom angles upwards, the top angles downwards. And now let's draw the
rectangle that is facing us. So we've got a
rectangular box now. Now let's draw the
little extension on the far end of that building, the little rectangular shape. Now for the roof, draw
a vertical line from the center of the
rectangular box or the site facing away from us, and then place the
triangular roof with that as the center of axis. This is just a way to make sure that our roof is not
completely distorted. And now to finish off the
roof on the side facing us, can keep your lines
as fluid as possible. It doesn't have to
be straight lines. If you think you have
slanting or wobbly lines, feel free to use that as your style and to keep it quite dynamic and
quite exciting. You can use an eraser to
rub off unwanted lines, but I would suggest that
not to use a lot of eraser because we
could be here for a long time and we end up erasing more than
we are drawing. So some of the wrong lines
are okay to be there, and if you don't want to
use an eraser at all, that's also completely fine. So now let's do the footpath
in front of that building. So the footpath
comes towards us, it turns that road turns
just after that building. So I'm going to make that
space there for the foliage. I'm going to place
the bridge that is perpendicular to the structure
of the building there. And now let's suggest foliage. Starting off with
giving a little bit of an outline for where I'd
like the foliage to be. It covers the left hand
corner of the building. It goes all the way up. As you can see,
it's going outside the border line that I
had drawn initially, which is completely fine. As I said, I'd like a little bit of breathing space there. And I'm going to add a few
simple shapes for the foliage. It doesn't have to look exactly like the foliage in the picture. You can add some other details. As long as it looks like a very exciting
foliage with lots of shadows, it is really good. Next, I'm going to suggest some shrub or foliage
in the foreground, in the right hand,
bottom corner, and then a little bit of suggestion of things in
the background as well. The corner that is just facing away from us and the background
with a bit of foliage. You can even suggest some
of the buildings there, maybe just a roof or the shape of the roof
is more than enough. You don't really need
a lot of details because that's in the background
and it's not our focus. And we are done with
our pencil sketch. You can use an eraser to
rub off any unwanted lines, any darker lines you thought
that was necessary there, or just generally to make your picture look
a bit more neater.
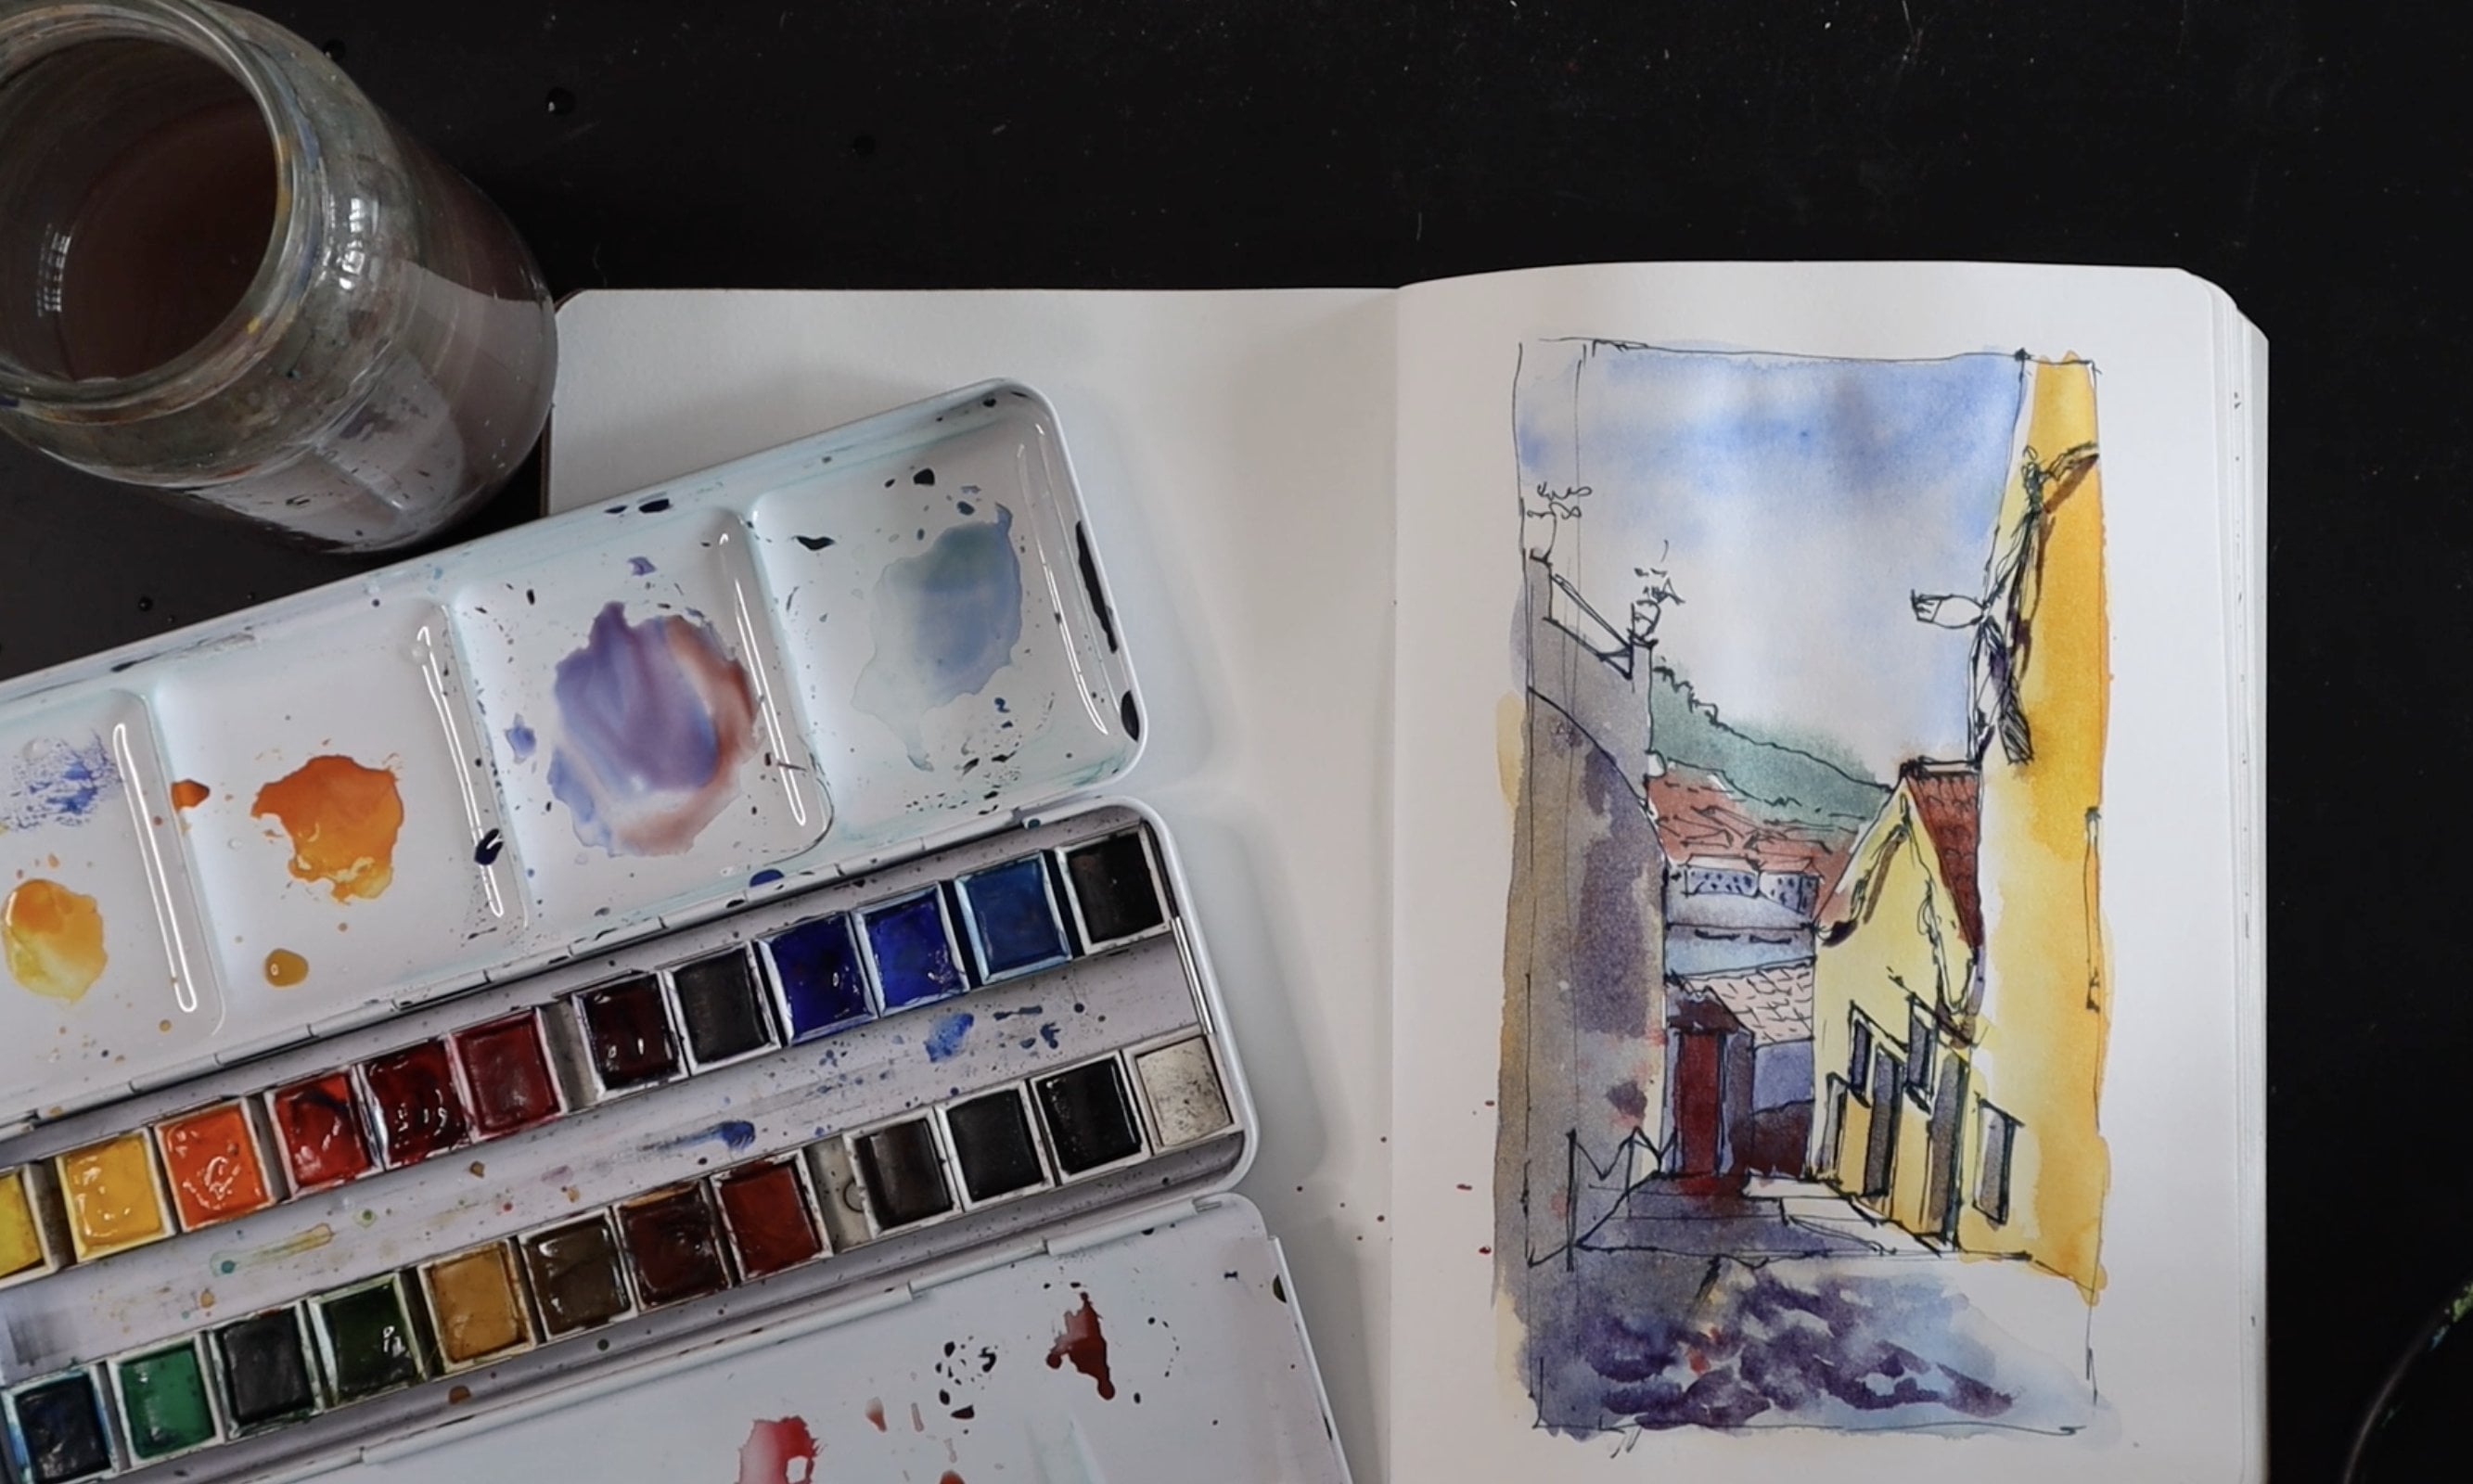
9. Sketch The Scene With A Pen: Now that we have
our pencil sketch, let's start using
fountain pen over it. So we have all the
perspectives sorted out, which means you have the freedom to play around with
your pen right now. So we're going to use quie loose and dynamic lines to do the line
drawing with the pen. It doesn't have
to be neat lines. It can be a bit of wobbly lines. It can have an edge to it. These are all just
characteristic line drawings that you can bring
into your project. And with the foliage, I'll start with a very loose,
quick outline. It doesn't have to
be a very dark line. You can start with really fine
faint lines just to start suggesting because
some areas can be lighter compared to other areas which you would
like to be darker. So it's always good to
start with very fine lines. Again, for the foliage, you don't need to
add any sort of details at this stage
because they are going to get washed off by the water we're going
to introduce very soon. So we're going to
concentrate on getting the larger shapes
in place right now. So I'm going to add a few
scribbles here and there, just where I need those lines to wash off and create a
nice brown wash for me. The trees, especially, I can just do a basic
shape of the tree, but I don't really need to
enhance our emphasis on the branches or the tree trunk
or anything at this stage. And for the background, I'd like to start with a very
faint line for the foliage, maybe some darker lines for the structure
in the background. I'm just trying to plan
ahead because when I'm going to introduce
water to these washes, they are going to wash as a slightly darker wash compared to that faint line of the
foliage in the background. And this will create a contrast compared to the bright white of the building that's
in the foreground. So which is why I'm trying to make the background a little bit darker so the white of that
building is seen clearly. And finally, let's
finish off the shrub in the foreground with
a quick few lines. Make it as dynamic as possible, we're done with our
initial line drawing.
10. Marking Out The Shadows: Now let's start adding some
shadows to our drawing. So we need to add shadows to the left side
of the building, including the roof, start
with the extension building, just a little bit
detail of a window, maybe a little bit of shadow
under the roof there. I'm going to add some details of the windows on the
side facing us. Not really a lot of
details at this stage. It's just a rough
rectangular shape. The reason why I added this is because when it begins to wash, I would get that
extra layer of color there for suggestion of windows. I'm going to suggest
the windows and doors on the other side
as well at this stage. I'm going to use bolt lines
to add shadows to the roof, as well as the side of
the building that is facing us where there is
a large amount of shadow. I For the foliage, I'm going to try out some scribbly lines because it goes really well with the
texture of the foliage. Again, I am not
concentrating a lot on the branches or the tree trunk or any of those finer details. I'm only adding some
scribbly lines to show the basic structure and the
shape of the foliage there. So the left side
of the photograph, you can see there's a lot
of shadow on that foliage. So I'm going to add a large
shape of just lines and scribbles to render
the whole thing into a darker shadow area. It's a good idea to look at
the reference picture and to mark out the areas that
is slightly darker. There's not a lot
of light falling. And if you can mark that out, we're going to find those
areas in our drawing to add a lot of scruples and lines to add some depth
into our drawing. You can use hatching, cross
hatching, scribbling. You can even use little
dots and dashes, stippling, et cetera, to
represent these darker areas. And each line that you use
is your personal style. So anything really works. And for the foliage
in the foreground, I'm going to add similar lines. You can use really bold lines, very expressive
lines if you like. And if you notice
the background, I have kind of left it like a little outline only because I don't need
a lot of color there. So I'm reducing the amount of lines that I add
in the background, so it will look a little bit as if it's receding or
going away from us. I've added a lot more
details and lines to the foreground and where
our focal point really is, which is the building
and the foliage.
11. Using Water Over Pen: So let's start
adding a little bit of water into the sketch. So I'm going to
use a jar of water and a round medium brush. So I'm going to start off
with the building itself, starting off with the roof. You can keep the introduction of water quite loose and fluid. If you like to have
the ink spread around areas outside your drawings
as well. That is also fine. See how loose you
would like to keep it. So at this stage, the process
is fairly straightforward. We are just going
to add water to the areas where we have added
some shading with the pen, and I have stopped where
the foliage starts because if I am going to bring the ink
further into the foliage, then it'll all look
like one big shape. So I'm going to keep all that water just to
the building right now. So you can see I'm
adding the water over the detail of the
windows that I had done. I have left a very faint line of unpainted area just
at the edge of the roof, just to suggest highlight. If you look at the bridge, there's a tiny bit of
shadow on the corner of the bridge where it is
attached to the building. So I'm just going to bring that ink into the beginning
of that bridge, as well. I'm going to add some
shadow just under the roof of that
extension building. I'm not going to add any
ink onto the area that is facing away from us because
you can see how bright it is with the sunlight. I'm going to give
a little color to the roof of that
extension building. Now, let's start
working on the foliage. For the foliage,
I'm going to hold the brush slightly
different way. So I'm going to hold it
flat in such a way that the bristles of the brush is touching the
paper completely, not just the tip, but
all of that bristles. And if you just rub that
brush across the paper, you can see how you
are able to create a very characteristic
outcome for the foliage. I'm going to do the same sort of action for the rest of
the foliage as well. Trying to leave a little bit of white unpainted areas
for highlights. And it is only going
to be darker in the areas where we have
used a lot of pen lines, and the rest of
the area will have a lighter consistency of ink. Now, let's finish
off the rest of the foliage as well
in a similar fashion. You can see I'm using the
bristles of the brush, all of it facing horizontally
down onto the paper. So I just feel that it creates more texture compared to
using the tip of the brush. And it is also more
expressive this way. And I hope that you're
able to have fun trying to play around with how you're holding
the brush, as well. It is very important to make sure that you're
not covering up all of that foliage area with ink because we need a little bit of highlights,
unpainted areas. Now, let's work on
the background. I'm going to start by working on the buildings
in the background, and that's where I've added a little bit more ink compared to the foliage
in the background. And for the bottom
of those buildings, I'm going to add a few
lines with the brush in such a way that it looks like foliage in the foreground
of those buildings. And for the foliage
in the background, I am going to wash my brush and just create a
quick wash over it. As you know that
we haven't added a lot of pen lines in this area. This wash is going
to be rather light. And if you think it's too light, all you need to do is
just take a little bit of ink from the corner of the buildings that
are surrounding it. Go to extend that light
wash in the foreground, as well of those buildings. Maybe I'll do a little bit of
the same for the footpath, keeping the whole
outcome quite loose, creating a nice wash around
the foreground area as well. And then I'm going to finish off the foliage in
the foreground. Again, it's just
simply adding water. And also, you can be quite expressive with your
brush, as well. It doesn't just have to
be a wash at this stage. You can add lines. You can try to flick your brush, maybe even spat or a little bit, if you think that
would look nice. So in short, it is
just about trying to activate all those pen
lines we did initially. And with this, I think we've
done with the first wash, we're going to let
it dry completely.
12. Adding Details: I have let my drawing
dry completely. If you're in a hurry, you can always use a
hair dryer as well. And now I'm going
to go back with a little bit more lines
using my fountain pen. So just a few more details, especially the inside of
the roof of that building, adding a line to show depth
for the inside of the roof. I can now add the details
of windows and doors, a bit of the roof
tiles, as well. I'd like to render the underside of the roof a
little bit more just to show that it is slightly
more darker in shadow compared to the other
areas of the building. Now, I'd like to
give some details of texture of the roof tiles. I don't really need to
draw them out completely. I can just suggest some texture and keep it rather
loose as well. Now for the texture
of the building, the building is finished
off with wooden planks, and you can see the
lines of those wood, especially you can see on the side that is
facing away from us. Those lines are also in line with the perspective that we have been
discussing initially. So the lines at the top of
the building will angle down towards the horizon
line or my eye level. You can even angle the
lines at the bottom, slightly angling
upwards, just in line with the bottom of the
building, as well. I'm going to give
a little bit of texture for the bridge, as well. It is a stone structure, and I'm going to give a little
bit of details of stones, tiles, whatever that
is on the bridge. You can also add things that are not in the reference picture
because at this stage, it is a stage where
you're going to make this drawing
quite personal. So for example, I like cobbled stones or some sort of texture on the
road in front of us. And I'm going to
add some texture of cobbled stones or just some
gravel that is in front. I can add some lines
to suggest foliage or some grass at the background where that building
is finishing off. And for the structures
in the background, you don't need to
add any details, but I personally feel that
maybe a slight suggestion of a little window or the end of a roof would
make a huge difference. So I've just added that. I'm going to add some more
details for the foliage, especially the one
in the foreground, adding a few more lines, adding it doesn't have
to look like anything, maybe just a few
dynamic quick lines would make it look
really exciting. You can bring in
a lot of movement in your sketch as well. I'm also going to add some
details for the foliage. I think at this stage, I can add some details of the branches for the
tree in the foreground. I can add some details of
the leaves, if I like, or maybe an extra scribble just to create the
impression of leaves. If you think it's necessary, you can also use your brush simultaneously as you're
working with your pen. So if you think there's
an area where you need to have a deeper shadow or some particular
detail, for example, I'd like some particular detail of the branches of that tree, and I don't want
dark lines there, so I'm just going to
use a bit of water to sort of create a
wash with it as well. And it is absolutely fine to use the brush and
the pen simultaneously. I just feel it's a
great way to add depth and more texture to the
foliage in the foreground. I really like how the tree is coming along
right now because I have a second layer of ink wash and a mixture of line, as well. So that tree is really beginning to stand
out in the picture. We I'm going to use a similar technique to represent the darker
areas of the foliage. I'm going to put in some
extra scribbles using my pen, and I'm going to use the
brush to wash and create a second layer of wash to create more depth within the foliage. And finally, adding
some finishing touches, just a few lines for
texture on the foliage, as well as the
foreground, if necessary.
13. Finishing Touches & Final Thoughts: We are done with the sketch. If you have any pencil lines in the sketch and you'd like to rub it off, you can do so now. You can also rub off the border that we drew with the
pencil initially. This was just to keep our
sketches in the center of the page and also give the
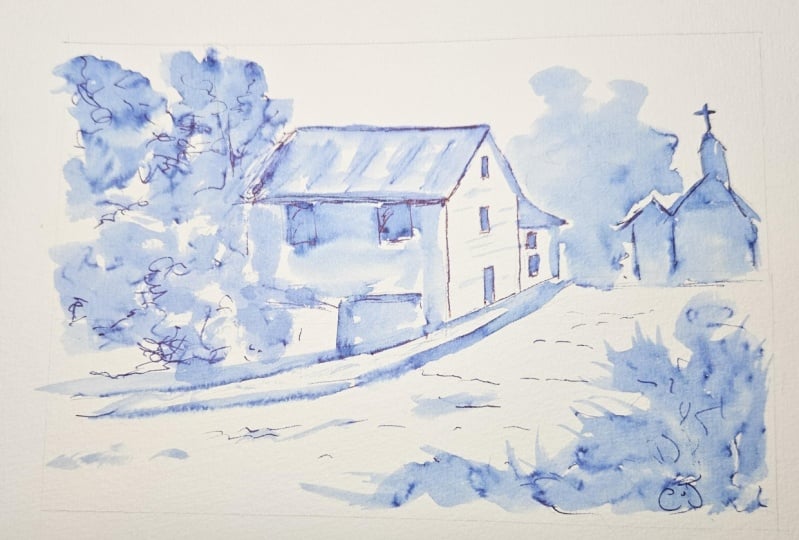
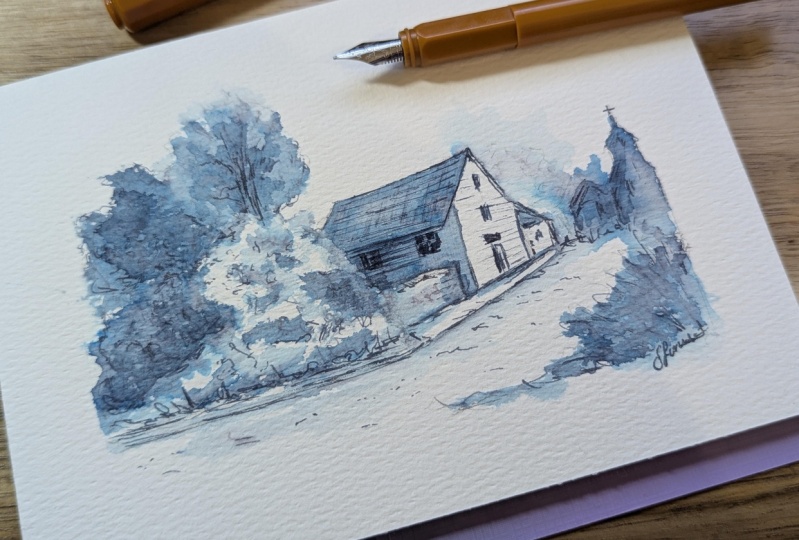
foliage some breathing space. In this project, we have used fountain pen and a
brush and some water. The fountain pen inks are
usually water soluble, but saying that you also
get waterproof ink, if you're using a waterproof
ink or a waterproof pen, you can use just one
color of watercolor to finish of the sketch
in the same manner. This technique that we have
learned in this class, you should be able to sketch
anything that is around you. It is really great to practice sketching at least 10
minutes a day and using just a pen and some water is a great way to keep your
sketches really quick. And less overwhelming. This has become my go to tools, especially when I'm out
and about and I don't have a lot of time at
hand to sit to sketch. If you feel inspired
by the techniques that we have used here and you have sketched anything else, as well, please feel free to upload it into the projects
and resources section. You can also upload your
project or just the process. Whatever stages you are in, it is still wonderful
to see your work. Happy painting, everyone.
 Suzanne Abraham, Artist