Transcripts
1. Welcome!: Hello, lovely. Are you ready for another class? You know that about four months
ago we moved to Florida. I thought it would be
fitting to do the enter this class here in my
yard surrounded by tropical plants
because the class is creating a
tropical Botanical. My goal is to do two classes. This is the one with the
quieter color palette, which if you know my work
and it's a challenge. What we're gonna do
is use these tools, inspiration, this kind
of the idea of this. Along with this
leaf composition, we're going to create a
limited color palette. Tropical Botanical. This is gonna be a lot of fun. There's details. I don't know if you can see
the metallic gold in the sun. But we're going to draw
inspiration from tropical plants. And we're going to visit some of the plants
here in my yard. And then also we're
going to go to a nursery schools by
and share some of that. And then pictures
that I've taken at nurseries, one in Austin, Texas where there
was a greenhouse with beautiful tropical foliage. And then the nursery here, getting our inspiration for the patterns and textures
and actual leaves, which in the tropical world
are pretty much endless. It's incredible. What's out there in
terms of pattern and texture and the marks that
you can borrow from nature. And I don't teach the class outside here because
it can be kind of noisy. But I at least wanted to do
the intro here and tell you I can't wait to get to in
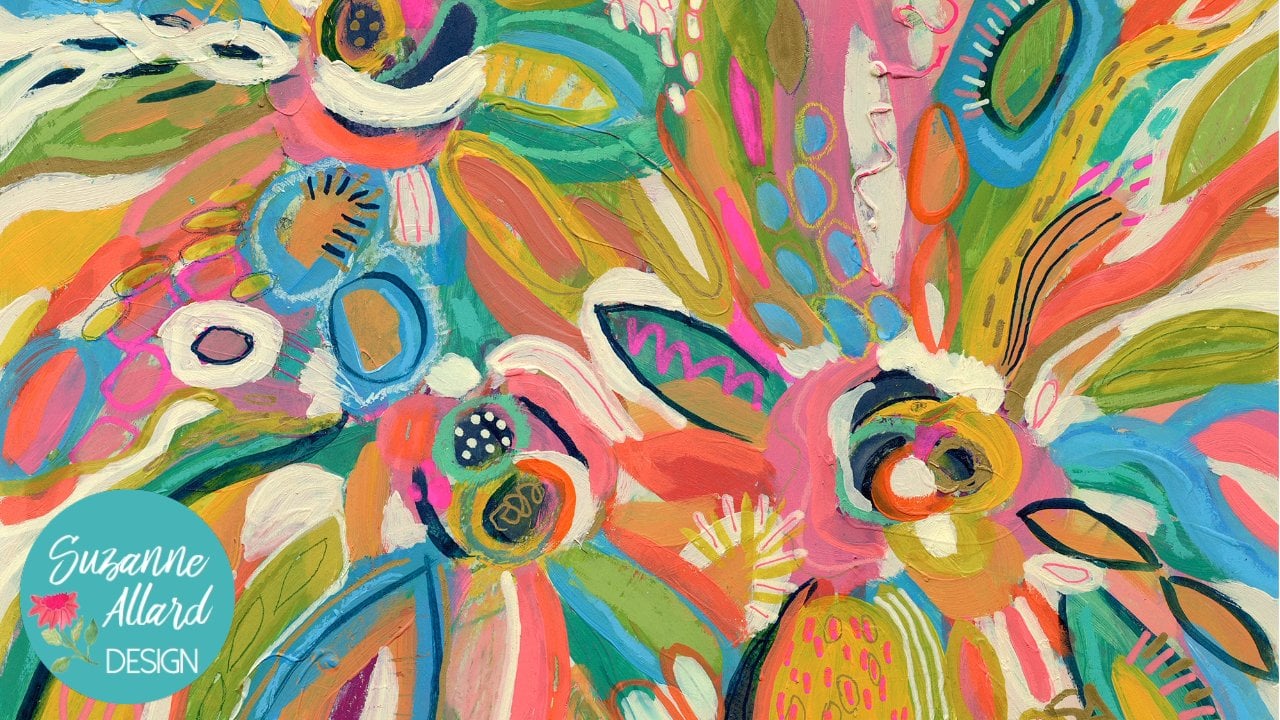
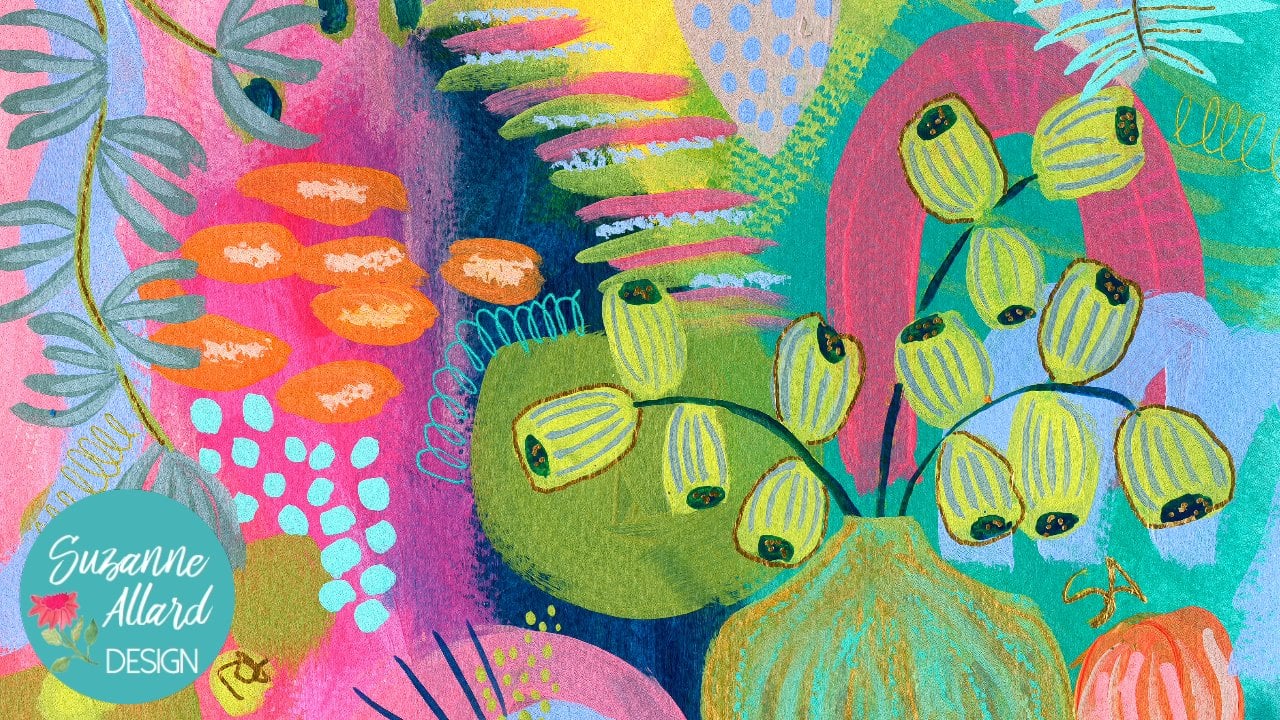
the studio in creating this. And then I'll do
another class with a very colorful
Tropical Botanical. Alright, so join
me in the class, I'll go over supplies. There are not many
since we're doing a limited color
palette and we're just using mostly paint. And I also wanted to point out that I
put on my new dress, but for my design on by bubble, which just kind of a fun, really fun feeling to
be wearing your art. But I like how to
address her note. Anyway. I will see you in class. I can't wait to see
what you create. Please put your project and
the resources tab because I comment on every single project and I love seeing
what you create. All right, see you in class.
2. Garden Inspiration: I thought we would start inspiration with
a tour of some of the leaves in my yard here
in Palm Harbor, Florida. My favorite tree in
the world is this. Mark POM. You can't get a
sense of how big it is, but leaves are probably
six feet by six feet. Oh, I see a wasp nest. That's good to know how to
solve a happy about that. Then I don't know
the names of these. And I loved these
shape, color course. Really. I'm fascinated
by all the plants here. The palms. These are
a week of palms. That's what I take my
pictures in front of. For Instagram. Let's go over here. There's some beautiful I'm
still learning the name. Remember the name of this one? This is the bird
of paradise leaf. So those get really big. Let's go out front. I wanted to show you these. I just planted these. You'd think I'd remember
the name of them. It's a type of tie
plant like Thailand. Looking at this color. I didn't say I
have my pots here. Of course, my favorite. I did three different colors. This flowering real well. I'm just felt it, this one is doing really well. Now let's go friend framingham, some of these out friends. Look. See, I wanted to do
a painting of just those. I don't know. But it's pretty. This is an interesting plant. The leaf isn't exciting, but still you just get an idea of like look
at that yellow. It goes green and then switches to yellow
just during the plant. That's an idea that
I could definitely put an accompany painting. And then this bright
pink tide plant, my goodness, with that color. Let's handle the nurse her, Hey, we're here at the
landmark nursery harbor. Look at all the tea
Thai, Thai plants. Look at back of a truck, tropical leaves, I'm going
to try to stay focused. Sandrine, an amazing shape. It's a lot of those here. This shape and pattern
was really beautiful. These are tan,
something like that. Huge jungle. Big, that is enormous. This is fuzzy. Can you see velvet? See the name of both China brand of Flora three is
something else. It's how curly
everything is pretty. Here's another one. Interesting. Then. The pots here they have amazing. Stay focused, Suzanne. Alright, let's go
inside the greenhouse. You were in the greenhouse. Wow. I'm the only one here. Cos, and look at
those, those leaves. I'm gonna take some
pictures of some of these textures to
use as inspiration. Look up those patterns. Really almost anything
you could imagine. Leaf patterns. Those are pretty beautiful. Sarah. I'll take some pictures. This will be good inspiration.
3. Supplies in This Class: All right, Let's talk
supplies, shall we? I ended up using a
variety of these, so I just wanted to show you
what I've got. For paper. You can use just any
watercolor paper. This is the Studio
Watercolor Fabriano. So it's not the highest end, but it's perfectly adequate. It's 140 pounds. That's nice, nice texture to it. I also like Canson and
Strathmore watercolor paper. So it's not as long as you
get any of the good ones. And I'm using a line by 12. Let's look at palettes next. I use, sometimes I use this, I think for most of
this class I used the pallet paper sheets of this. Let me get the PAG for you. I just pulled them in half because it's a
better size for me. Usually, they come
in gray and white. Matter. Which color you use. Those really shiny and
other great for travel too. Because what I do
when I'm traveling is I take my sketchbook. I put 30 ones like this, but I put several Cleveland's
in there and then I can use them when I'm painting
and traveling. And they are also actually great for if you paint in
your sketch book. And there's something not quite dry or needs more time to dry. I stick a clean one of these in there and it's since it's shiny, it doesn't stick, helps it drag. That's the pallet paper. Then for the end of the class, I showed you this, which I've shown in my jaw, full bouquet class and
some other classes. It's an air-tight palette, the silicone top
and these locks, and it works great for
gouache or watercolor. I tried it with acrylic and aqua brush and it's
it's okay but it will dry eventually and
then you use harder to clean out because those have
acrylic and when they dry, and once they dry,
they're in there, they're never being
reconstituted. So I recommend it more for
watercolor or gouache. But it allows you to get
the consistency right by adding your paint and
then adding some water. And to do that, I use
these little pipettes. I think I might have a
link to these as well. And then you can add,
like I can see this one needs liquid water and you can mix them up and
get them ready to use. And they're just kind of
always ready, which I love. Of course it only works
if you close them. I've done that before because I'm too much good if
you leave the top off. But since it's gouache, you just add water and mix
and you're good to go. This is great also
for travel through. The only thing is you don't want to tip it upside down
and it makes a mess. Let's go on to paints. I stayed with the palette,
this color palette. And I'll scan this
and crazy others too. Even though it's half of what I did is I made
something and then I used was messing around with
colors and a fan brush. So many used part
of it for collage, but I just love the way these
colors interacted here. And see if you save something. And now it became a guide for the colors that I wanted
to use in this piece. So I did a mix of actually
three types of paints. Technically because I have
regular gouache here. Then I have agro gouache
here, here, and here. This one is regular gouache
and then two watercolors. I mix paints all the time. As long as you know that you're mixing between the water-soluble and then if you definitely mixed acro gouache
with regular wash on paper. But there's no real
reason to do that. Let me just use
one or the other. It's just these. These are
the colors that I wanted. I brought out all the Legos to just show them to you
because I use a lot of indigo on the regular gouache, which means that it
regular gouache means that you can let it dry, but then it can be reconstituted with water if it can't be. And then it was acrylic gouache. So honestly can't remember
what I did this end. If it was accurate gouache. Yep. It was it was this olive color. See, I cannot get that. I mean, I could probably
eventually scrub it. But you use if I've used
the regular gouache, then it would be able to get it, get it dissolved
again in the water. So alright, so that's gouache, meaning it can be
reconstitute with water. Hydro collage, meaning
it cannot be, of course, watercolor Kim always be
reconstituted with water. The reason I ended up getting
out of these Indigo is because I grabbed the
Winsor and Newton, which this is my favorite. Well, I was gonna say it's my
favorite brand of gouache, but I really loved
the whole vein. It's agro gouache.
So my favorite brand of regular gouache is
the Winsor Newton. Then I like Turner. The, my favorite brand of
acro wash is the whole vein. They all come with indigo. Indigo is just my
favorite dark to use. So that's why I've become
like an indigo collector. But this indigo,
you'll see when I get out is the Winsor Newton one is a little bit
more like a royal blue. It's not very indigo.
And so as the Turner, it's, they call them indigo, but they're just more
blue than I wanted. Then turn our acro
makes this blue black. But all you have to do it. It's not hard is to take
whatever blue you have, even if it's a primary blue, not even a dark blue, darker the blue the better. And then add some
black and keep going until you get the
darkness that you want. Then I used this olive, which I had remembered
being really green, but you'll see when it paints
out that comes out yellow. And I'll show you
how I fix that. Then I do use this a lot
for different things. Ivory. Then I used a
couple of watercolors, the dual Chrome oceanic. This is the Daniel Smith
luminescent watercolors, which means they have a pearly luminescent consistency
and lots of fun. And then this is the Winsor
Newton permanent Sap Green. Now I'm just showing you all
this in case you're curious, you may hate blues and greens and want to go a completely
different direction. I just wanted to show you what I did in case you wanted to know. And I do, I think
mentioned this later, but the, this is when I favorite paints and
colors of all time. This cobalt turquoise light
by Winsor Newton gouache, very intense and beautiful. Then I also use, Let's talk brushes high, stuck with, for this painting, the highlighted like these
Princeton velvet touch rounds. So I went back and
forth between a 26 and depending
on what you need, if you want to do something
narrower, like a line, you can use, get
something like this, which is called a liner or a rigger brush
and it'll give you long fluid lines than I
did use the bright shape, that's number four, silver
Bristol and bright. And to get some kind of square-shaped
flowers for details. And once in awhile, I'll use these Tombow pen so you don't need
this in this class. I just thought I'd
show them to you. If you've never seen them. They're kind of fun because
you can take, let's say, I use my stem and let us
say do something like this. And in fact, I've
done this before. It's super fun and you can
check the different color, and so it's
essentially a marker. You can get an
interesting effect by them getting your
brush with water on it. It turns in basically into watercolor and gives you
a more painterly look. You'll get that bleeding. But with a little
bit of an outline, I did a whole page one time of these little leaves and just playing with how the markers dissolve and move,
the ink moves. Anyway. They'll change
and move as it tries. Those are Tombow. I do love the Pentel sunburst, metallic medium gel pen. I buy them a lot on Amazon
they give like about them. They go over almost everything except maybe oil pastel thing. They always just reliable
and use them to sign my paintings a lot and he's
protocol metallic details. I also use a variety of brushes. Brushes, pencils. The
brands are probably more important than the
colors because you can pick up the
colors that you like. But the super color,
this is the Qur'an dash that Swiss make her, I don't even know if I'm
pronouncing it right. And then stay below. And Faber, Castile and what
I like about holidays, and here's a Prismacolor. I don't know if this
one is soluble or not. Let's see. Because I tend to want to
get the water-soluble ones. Yeah, It's not I mean, eventually it is, but
not the way these are. These are like the Tombow. They can be free constituted. They make their great
to sketch things out or even go on top for
different things, but you can do a lot of them. And I ended up, I ended
up collecting many. But these are the colors
that I used in this class. We time I go to an art store, I get a few more colors
and they usually are the, either those two below
or the Qur'an dash. All right. Let's see. I left anything
out for water jar. I just use messenger. Nothing fancy there. We didn't use some posca. I have a passcode
collection just because I'm obsessed with these. This is how I think about my posca pens there about the
cost of a Starbucks coffee. Depending on where
you are on the world and expensive cup of coffee. So sometimes I'll say, we're out and about my
husband and I are like, No, I'll skip the Starbucks and I will stick it in
my posca budget. But I use these a lot,
especially the ivory. You'll find your
colors that you like. And I go over, I do different effects
with them and all kinds of things about supplies
that I used in the class. And you again, do not need,
please hear me on this. You do not need
call the supplies. You can go with what you
have and maybe watch the whole most of the class and get an idea of what you have and
what you'd like to create, and then get yours. Alright, let's get started.
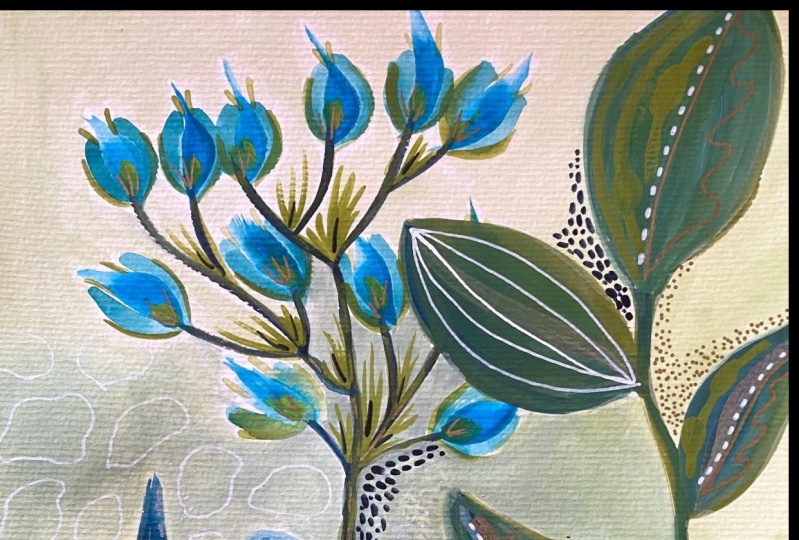
4. Beginning the Painting: This tropical leaf
composition is going to be inspired by this, these leaves. But also these leaves. I'll have both of these
kind of in front of me. And then I'm going for a little bit quieter color
palette with this one, we'll do quiet our color palette
and then the lively one. So this one will
be more assuming. I've got my hollow of gouache, this is a Cobain color. But if you don't have the
color, you can get it by mixing green and a warm yellow. Just keep playing until you
get the shade that you want. And then I've got some watercolors because
mixing gouache and watercolor is just
because there's some colors here. I really like. The turquoise here is the, you can see I'm almost
out of this one, but I have another one
because it's one of my favorite paints ever. It's the Winsor
Newton designers, gouache, cobalt,
turquoise light. It's not cheap but
lasts a long time. Then I have a Dan Smith do a Chrome oceanic watercolor
to get some of these. Turquoise has been greens. And then I think I have
another favorite watercolor. It's kind of ugly. I'm picking out
my favorite blues and greens and of course
we're gonna mix them. Permanent sap green. This is something bold I
picked up a long time ago. Greenish yellow. Play with those blues and greens
you have are fine. I mean, if you want to go
with this color palette. So the idea is that
I'm going to paint some leaf elements on plain
white paper like this. And then we'll go in afterwards. Thanks to the background. So what that does is it allows you didn't get that
bright pop of color from going write on the white paper versus this one, for example. This is just a different style. I painted the whole background, this red color, and then
paint it this over it. Now use gouache, which that's what I
love about gouache is very matte and it's opaque
as you want it to be. If you wanted to
be really opaque, you put it on fixed here. If you want it to be a
little more translucent, you have more water here. But it will subdue
the whole thing. If you do the whole
background color. So we'll do it to
different styles. For the quieter when we're gonna start with a
white background. You can look at various
leaf pictures that are in the class. Pictures of your own of leaves. We're just going to
keep it loose and playful and do sort of some
larger ones and smaller ones. And let's see where we go. I'll start with a
mixed of this color. There's also a really
pretty mustard color. The whole vein has
some beautiful colors. I'm just gonna start at
one side with large. This is going to be
in a larger piece. Coming out really yellow, green 20, because I remember
this being a lot more green. But it's kind of no color. Probably add some
turquoise to it. Found a layer was quashed
using a fat brush. This is number 12. Time would work
fine to quash works a lot like watercolor in
the sense that you can control how intense the color is by how much more are you at. I try to vary the
shape of the leaf, the size of the leaf, the direction of the leaf. I'm working quickly
though, because I want to get some
turquoise into this before it's completely dry. I'm going to do that now. Getting every last bit of this out of this one is so intense that a little
goes a long way. You can do this kind of
detail or not and whatever, whatever your preferences, that's how you
learn your style is by literally checking
in with yourself. Do I like that? Do
I not like that? Does that excite me? You
can see that the turquoise just turned green because
it blended, which is fine. When it dries. We
can go over and get true turquoise if we want. Made a really pretty
color actually. You can be as loose as you
want with your leaves are kind of more defined edges. Every, well that's drying. I do like this sort of. Locke's saying that I did here. I am going to do
that one and use the turquoise for the stems. I'll just start with. It doesn't really
matter what colors because I'll end
up covering it up. You'll probably be a variety of colors. You can even take. Sometimes I like to use these
Tombow watercolor markers because you paint over
on, Let's see here. I'm going to the focal
point, the composition wise. If you think of the
rule of thirds, imagine grid on this two lines down into lines over
and making nine blocks. The rule of thirds
is that you want your focal point in
the intersection. Those blacks
somewhere off center, in other words, not
stuck right there. I don't want to put this next
one right in the middle. So I'm gonna go kind of
habit full, the focal point, focal point here, which is if I were drawing a grid,
would be right there. Bring it branches out like this. I actually really
like this color. The Tombow. Watercolor markers
are great because you can use them this way or you can add water to them and basically turn them into watercolor. They're good for traveling. Now, these I made, let us split up the
square brush or bright. You don't have to have all
you have is around and just, just gonna take a little
more to fescue that. Let me get some turquoise paint interacts with the paper. You may not want to do
this square-shaped. You need to make a more
rounded you do you. Paying attention to what you like and don't like
and what you're drawn to and what you're not drawn to. Just varying the size
or shape, direction. And I kind of like how they
got little hairy at the top. Can you see that? The brush is dry? Just a little happy accident, but I think I'm
gonna go with it. I think I want something
dark in those winter wet. My go-to darks are
generally like an indigo. If you don't have an indigo, you are a dark gray. You can make one with
some black and some blue. I do have indigo here. I have every time I buy cars with lies and any brand
they looked for the indigo. So I have the Winsor Newton
and I have the Turner. This is to me a
pretty light indigo. It's more like a royal
blue, I would say. The Turner that I have
is called blue black. And that's nice and dark. I have it on my brush. I'll come over this stem
since generally don't like my stems to be the
same color as the leaves. Gonna go over my Tombow
marker to make it more painterly and takes away
the mockery look to it. Nothing wrong with the
mercury look because just not what I'm going for here. I like that better. I can even while it's wet. Some more Tombow and it'll
move around a little bit. Gives me some variation. Let's let that dry.
5. Adding Elements: Alright, that is dry. Let's see what we
want to do next. I'm gonna go with
this same kind of composition with
something down here. I am going to force
myself, at least for now. I'll see if I can hold
on to staying with these kinds of colors
and I want to go darker. Going to dig out my cover, indigo, my navy, you've
got a navy blue. You'll see my whole
collection here. This is the Turner and ago, I should do a video
on various indigo. And then the one
I was talking to, That's quite dark as the
hope the Turner black blue. But again, you can just take
any blue and add black. Let's try this one. See this one's a little bit, I remember it being
a little darker. Then this one is nice and dark. Any dark that you like, or you just need a
dark if you don't like indigo and you want
to use green or o. Another dark I really like
is blossom a really dark? You can take red, blue, and then just a touch
of yellow to get a deep, beautiful plum. Dark. Payne's gray is a good dark. I just don't use black. I mean, accepting mixed with
other things to get dark. All right, so let's make
something short and leafy down here with maybe a bit smaller
brush. Let's see here. Let's try this. Number eight. I'm going to try doing the
leaves and the indigo. Then maybe do bloom. We'll see where that goes. Some other leaves
in another color. I always like to vary. So we'll make these sort of
tall are long skinny leaves. Which means you put
down the brush and drag and lift off gently. This is, these are
so relaxing to do. You can do them anytime. You feel like you don't have a lot of
time to paint and you just want to do
something meditative. Leaves, again,
varying direction. Color, intensity, mixing together over here. Thinking about this yellow and it's just more yellow
than I wanted. So I'm trying to think, what do I want to do about it? If I put indigo, Let's just, this is what we'll learn, how my process of getting what I want
and just see what that toes to tone down some
of these bright yellows. Because remember on this
palette I wanted to stick to blues and greens. Just got very yellow. So let's just see. I can come in with the turquoise to as long as I use the blush, the watercolor won't
have the opacity. That's pretty this brush. It's been misbehaving lately. With some stray little
fibers, it's probably, it's really because it's not it's kind of a cheapy
that's what you get. Misbehaving brushes generally. Now I'm going to take the
turquoise, the fresh, fresh one and get some really intense turquoise
and see what happens. When I bring it up against that indigo that's still a little bit wet. That's pretty. If you look at the pictures
in the class, resources, the variety of tropical leaves,
the patterns, textures. You really can't get too
crazy because you said, do you think this just as crazy? When you'll see a leaf that's
even crazier by nature. Going to those nurseries, taken those pictures has
really helped me branch out. You tend to think
of things will be even line marks like this
won't maybe even know. Usually not really liking
this turquoise over this. Can you tell I like turquoise smiling because
this is my version of quiet or color palette. I know that for a lot of people it's pretty darn colorful. I try I really try
to subdue things. Doesn't it seems like
I'm fighting yet. My my own house. It's pretty neutral.
It's kinda crazy. I really like this
super soft green. What you could get by just
going really light with Flash. I'm going to use this. Almost has a very
slightly metallic, this duo Chrome oceanic
by Daniel Smith. They're called a luminescent watercolors. Really beautiful. So maybe I'll make some things coming off of
this that are roundish. Bigger brush, quite a bit of
water to get those. Watercolor doing fun things. Being loose and playful
with the shapes. Maybe their leaves, maybe
there's some sort of Bloom. Who knows? Some plants, they're
one and the same. Now because this is watercolor, it won't cover the
gouache underneath. It'll just be kind
of translucent. I decided I really
wanted to cover then I would put use gouache. I'm liking what this
iridescent thing is doing, so I'm gonna come
back over here. This is helping me tone
down the brighter yellow. I don't mind the yellowish part, but in this palette, I don't really want
the bright, bright. At least that's how I feel now. When it's not dominating so much. We're going to let that dry.
6. Adding Layers: All right, this is dry. This took a long time. You can kind of see
that luminescence. It's pretty better
composition and talk. I don't, I don't focus
too much on this, but it's helpful to think about the rule of thirds,
which you can see. I mean, if it were, if I were strictly following,
it'd be more like that. How did this leaf are lying
there for maybe we'll try that on the next one and
see if we like it better. But I am going to, the rule of thirds is essentially your
focal points should be along here and then one
of these intersections. So I'm gonna make
this focal point. We'll see how it turned out. One thing I noticed when I
was drawing is that I need to bring some of this
yellow are warmer. A little bit of it over here. It's just too much on that side. And plus this stammers, It's not very interesting. So I wanted to take a little
bit of that olive color. Just go over the stem. Stem. A little more interesting. Especially if I'm making
this my focal point. I think needs to draw
attention to it. Because right now this is
very jumping out, just fine. They can also be focal
point number two. Wanting to do
something else here. Let's see. I'm debating, do I want to bring one
of these colors in? What do I want to take? A little bit of turquoise. Next was in green, sap green, this is a watercolor. I'm gonna see if I do
something on the edge. I want some more bleeding. Something soft around. Let's try taking the turquoise then grabbing some of them. Green clean brush. Working a little faster. Yeah, I like that. I have to go back and forth. I'm gonna get turquoise. See if I can get three
done. You've already there. I think I can clean my brush. And get this sap green, which is fabulous color. I don't dry in some
interesting ways. Kind of looks like an exotic
tropical leaf or a flower. Definitely made that pop. Still wanting to. Painting composition is bringing things forward and
pushing them back. So I just brought that forward. I want to push this back. Lots of ways I can do that. I could go over it
with a light wash. Might do that first with a very light bit of ivory white mixed with water. I could pick a color
and do a wash in that. I'm just thinking
about my options. This is a very
conservative way to go because we can go really
light and see what we think. So let me take a
tiny bit of that. I didn't want my
brush to wet because I don't want to activate
all the colors. I wanted to just go on top
so I'm gonna be quick. I might not even do all of it a little bit. We'll do some more. This by the way, I use hot, it's the ivory white. Gouache by whole vein. You can make an ivory
though my doing white, It's just, it's surprising
how long it takes you. You have to do some
weight and then some yellow and then some red. So you get the right ivory. Usually use it this way. All right, So this
is settling back. This is coming forward. I'm liking this more, so I'm gonna let it dry.
7. Background and Details: This is dry and now I'm
going to start with the underpainting or
background painting. And then we'll come back
and take a look at what, what else do we want to do? I am trying to keep this
one on the simple side, so I'm going to resist the
temptation to take it too far, but we will as far
as background. Okay, so what I'm
gonna do on this one, since this is our
quiet or one, is, I am going to use neutrals
in the background, a variety of neutrals. I'll do some of those ivory. I'll do some. I don't know what
else I'm gonna do, but I'm going to stay with them. It could be a darker neutral, but I'm gonna stay in the
neutrals and I'm gonna stay in colors that are not going to compete with
what we have going on here. Gathers some neutrals and
start background painting. Now another tip on the
background painting is I'm going to intentionally
leave more than I did hear. Some white between things. I'm not going to paint right up to the piece or the element. And I'll leave a
little bit of white for some energy and some path. This is gouache stones, backgrounds, so it looks, you know, chalky and everything. You could use either
watercolor or gouache. I might do both. Okay. I'll speed
that packet painting and speed that up and see
you at the other side. I left this overnight. And I recommend
doing that whenever you're not sure where to go
next or just to give it some, some distance, some space. And then I looked at
the tropical leaves. Just to get that inspiration. And remember that just about
anything goes in these, these plants. Look at this. That's a fun one. I think that might be fun to do. On some of these leaves. I'm looking for
something to do on these. Beautiful, isn't it? I went to an Austin
visiting her daughter, went to this Hillary
street plant and they had a greenhouse
full of these. I'm going to do another time. I'm a class on these, doing a leaf more elaborately. For now we're just
looking for inspiration. Look at those dots. Maybe we will incorporate
that somewhere. I will include some of these photos in the
class resources. But of course you can
Google tropical plants. Tropical leaves. For now though, I think that first this pattern. It might be fun here. I've gathered my
smaller tools now. We might go back to paint, but right now I'm in the pencil and pen stage where I
like to add details. I've got here my favorite
metallic gold pen. I talked about this
a lot on Instagram. I've tried a lot of them
and this one just lays on top of almost anything
except thick oil pastel. And it's the Pentel sunburst, metallic medium gel pen. And I get them on Amazon. And then I've got a variety of pencils and the color
palette that we, that I'm sticking to my indigo, which is gonna look like black, but I'll know it's indigo. These are various brands, the Faber, Castile,
and the crown dash. Let's see what else below. They are all water-soluble, not that they need to be. You can use regular
colored pencils. I've got a job, just a jelly roll and dark blue. My posca pens, I love my posca pens and this color in particular the ivory
I use a lot of, I have lots of thicknesses of it because
I use it so much. So I've got the there's
another even smaller one. Likes to hide really fine work. Different sizes points. I use them a lot. Probably won't use
the fat one on this. The fat one is good for covering
up, pushing things back. I think that's, that's what
we're gonna start with. Playing with this idea
on some of these, maybe not on all of them. I'm thinking about what colors do I want those spots to be in. I think I want them
to be in the ivory. So we'll try that and the beauty of paint as you can do it
over if you don't like it. Let's see. Let me use this thickness. Paint pens are notorious
for leaking jamming. So if yours does, don't
despair, it's normal. This pattern has
these bigger blobs. You can see with
these smaller ones. I'm not being super
precise here. I can make it my
own, but just very, this is what I mean
by the inspiration in nature because look at these things vary in size. I bet their purpose is to
make them more attractive to more enticing to B's. I'll make some more
enticing to me. That's for sure. For me. It's just personal preference. Painting like this doesn't
really feel done to me or come together until I can get in
there with some details. I'm just going to do
some turquoise on this because the paint I'm quite show up with the oil
pastel. I like that. Now the background I just
painted in neutrals. There's something that I don't
I'm not sure I like about the kind of patchwork feel of the background right
now. I don't know. I've decided to put
that off and see if I feel differently when
I got the details in. I probably will do a couple of coats on that to
make it show up. I think I'll do this leaf too. I don't have to do
all the leaves, of course, don't
have to do anything. That's part of part and creating is deciding what you liked,
what you want to do. Like right there I just did something I didn't put the small next
to the small eye. It because you'll see
in nature that happens. Nature is perfect. For at least visually. Since I like to do threes, four odd numbers, I'm
gonna do this one as well. You could of course
do this with paint. You don't need paint marker. You could use acrylic
on top of here. Gouache watercolor
would not work, especially since there
is no white watercolor. You could use JSR. Wait, let me think about what I might want to do. These guys. Maybe some stripes. Even though they're
kind of round. These holes are kinda cool. I have an idea
where you could use the indigo to give
the effect of holes. Which would, let us see here. Something like that. Just kind of marking a center does look black, especially
on top of the green. I could definitely
do this with paint. I could also do it
with this blue, but I have a feeling
this gel is two. Really. I don't know,
purply blue almost. Just not not what
I'm looking for. But I don't really like how
that's showing up either. Let's see what else
I've got here. Looking to black. If I try this in a dark, works kind of over it. Softens a little bit.
I'll start with that. I'm going to sharpen it. I'll start with the indigo
and then I'll go over again. This could be done with paint. In fact, maybe
better with paint. I'll show you why I like
these water-soluble. Because let's say I've
blended these two colors. Let's say that I really
wish it was paint. I wanted more painterly look. I just take some
water. Maybe campaign. Let that dry. I like those. I'm going to work on the rest of these with a similar
kind of situation. I might I might do I
might switch dependent because I think it'll be easier. Honestly. The look that I want, I'm
gonna get the blue blackout. A small brush. Maybe this small, this is
312 or three would be fine. First, to give me a guide, I'm going to draw the line
which would determine how the this is just
an a white pencil. So I see it. How the
leaf will be oriented.
8. Finer Details: I really like how
those turned out. Now, I want to go through
these with a pencil just like this leaf and put some detail in there
because they're just a little for me there. The blue is showing up too much, so this will push
it back a little bit and also add some interest. Then I'm thinking
about these sort of things we created and how
this is like this here. And I'm thinking
I might play with either the pencil paint
and create something like that along those where we put that
turquoise with the green. I don't know. I'll end up
doing paint her pencil, but that's kind of what I'm thinking of
playing with next. Okay. So these would you saw me doing is trying to
white and I didn't like it. I didn't adjust, just didn't think it made he went
in the opposite direction. So this photo made me think of something like
this with the gold pen. I'm kind of loosely doing something like this.
That's what I'm gonna do. Okay, so now I'm feeling like, I mean, of course
we could stop now. But since I'm drawing
inspiration also from this one, thinking about putting in either a metallic
gold things here. Maybe he then somebody's
Navy dots up here. There's just, I think a little bit more
than I wanted to do. Detail wise. Those are the things I'm
gonna play with next. Okay, So where I am now is that I just remember that
patchwork feeling I had. I just couldn't get past. I felt like these two were competing
with the composition. So I went to push them back, which I did with my posca
pen and seeing here. Now I'm going to let
this dry and see if I think it needs anything
else and walk away.
9. Final Touches: I've let this sit for awhile. Q days, actually. And what I like about doing that is you just step away
and then you come back. Him decided if it's done or
if there's anything else. I really love how the gold see that gold metallic,
That's the Pinto. The texture that it added. When I'm looking at it. The only thing that's
bothering me is the pie. I like these and I feel
like I want a few here. Just to help. I got to go
from here up and around. I'll also put
together some colors. I use these pallets, sometimes these
air-tight palette, I have a link on my
website to it on Amazon, but they're great for gouache, not so much for the agro
gouache. I've used it. You just have to be really
careful not to let it dry out. If you let this dry out, it's no problem because
this is a regular gouache, so it's just water-soluble. Although when I was
making this dark plum, I did by mistake grab some acro gouache purple
and put it in there. So that'll be interesting. Just have to make sure
that one stays wet. I've got my navy here that
I made with black and blue. So I'm just going to go
in, grab some of that. Put some dots here. Again, this is all
personal preference, but it just felt like I
should have some here. You can see that I used different brush
there because those are like little square ones. That pressure is too small. Let's try this one. Just get the effect
that I was looking for. I think this will
finish this one up. I kind of like the shape
of leaves to be playful. Resisting the temptation
to put some up there, just to let there be some
quiet space up there. I did go over the remember
when I painted the white. These leaves probably need another coat because I
really wanted it to pop. I did do that. I think it's enough. I do anymore. You can see
that I'm messing with it. All right. I think we're done. We did. Just to recap, we started
lip the blank page. We put in. These painted the
elements first. We did three elements. Then we went in afterwards
with some neutrals. The goal was kind of a
quieter, limited palette pace. So I stayed away from the pinks
and the reds and oranges. We add a texture. We use tropical leaves
for inspiration. I like how it turned out. This was fun. Thanks for joining me. I have a lot of
other online classes and I'm gonna do one on a really colorful tropical leaf to kind of go in
contrast to this one. Thanks for joining me.
 Suzanne Allard, Landscape, Floral, Abstract Painting Teacher