Transcripts
1. Introduction: Hi. Do you like drawing eyes? Well, this class is for you. Hi. My name is Lakina. I'm a traditional
and digital artist. In this class, I
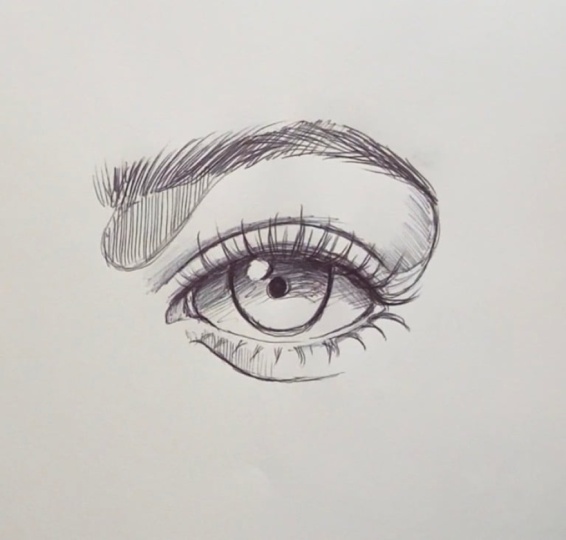
want to show you an easy way to draw this
eye using Bob Boy and pen. BallpoinPen is can be
intimidating, but in this class, I will break down how
you can draw this eye, starting with an
outline, then go into the shading
methods like gradients. This class is for beginners
and intermediate artists, and anyone who just
likes drawing eyes and wants to challenge themselves
by drawing with a pen. The materials you need
for this class are simply this paper and any random pen you like or have around you. If you have all the
materials, let's get started.
2. Shading and Art Tips: Welcome to RTIPs. For this initial drawing, I'm showing you that
usually can use for an eye. Usually, this is the
white of the eye, and then we're going to
be drawing the iris. That is a small circle where you usually
have your eye color. Next, I'm going to be
showing you a OO eye shape, and this is going to cover
what we usually see. Next, it's going to be the
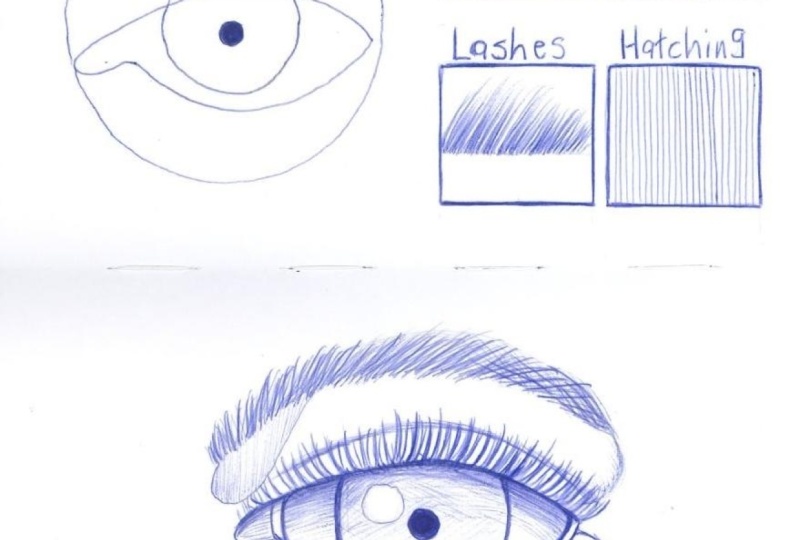
pupil using this small circle. You can use this as a diagram to start off with your drawing. Next I'm showing you the shading we'll be using for this course. I usually like to do
gradient shading. This shading is really great for anything you really want to draw and it's just simple enough where it can
give you a dynamic look. You're going to start
off from the box and draw the darkest tone you can by pressing
down on your paper. Then lightly, as you go back
and forth using your pen, go with the lighter shade. What you want to do is make sure this is blended really well. Mixt with using hatching. This is going to be
the diagonal hatching. All these lines
should be very close together and be within
the box that you create. As long as they're
even and cohesive, they will look like they're
blended together and will add a really nice
look to your drawing. This is a great
practice to do as well to get some
control of your pen. Definitely take time to do this practice before you start. Next, I'll be showing
you vertical hatching. This is also great to do. If you don't feel comfortable
with the diagonal hatching, you can definitely try
vertical hatching. In the next box,
I'll be showing you the technique that we use
to draw the eyebrows. This is just going to be a
flicking motion with your pen, and the darkest area using
this technique should be the area that is
closest to your eye. We're going to be
using this technique should make hair as
close as possible. The thicker area will be
closer to the middle where it's blended and then the
ends should be very thin. This is it. Next lesson.
3. Drawing the Outline: Let's draw the
outline of the eye. First, we're going
to start off with a line that is curved. This is going to be the
upper part of your eye. Next, we'll curve around
and under and that will be for the tear duct as well as the lower
part of the eye. This shape will be almost
like an almond shape. The next two lines we'll add
will be for the tear duct. The half circle that will
house the iris, the pupil, and the highlight
that will connect only to the upper part of
the eye in the middle. The other line I'm going
to be adding will be for the upper eyelid and
it's a half curve. The other curve for
eyelid will be shorter than the one for
your upper eyelid. Next, we'll add the pupil. This should be as
dark as possible, but a smaller circle. Put as much pressure
on your pen as you can to get that as
dark as possible. Everything else though
should be light. Then we'll add the
highlight with a small circle and we'll
go on to the next lesson.
4. Drawing the Eyebrow: Drawing the eyebrow. As we start off
with the eyebrow, we want to make sure
that we are starting close to the edge where
the tear duct is the eye. We don't go any
further than that, and we're going to be doing eye brush strokes doing our pen. A motion method that I showed
you in the artips section. You want the brush
strokes to be very close together to mimic hair. This is what we're
going to be doing where the darkest area of the eyebrow is going
to be closer to the eye, and then the lightest
brushstroke you're going to be making going to be at
the top of the eyebrow. It's easier for me
to do it right now, it's like I'm going
a little bit fast, but take your time
and just follow the directions that I'm showing you of how you do the eyebrows. I just want to make
sure this mimics hair as closely as possible. We can see that eyebrows
are not linear. They don't follow just
one or few directions, so you want to make sure that at the end of the
eyebrows that you're blending in or doing as much as you can to make the
eyebrow realistic. Also, I'll be adding
the shadow area where we'll usually see
the shadow under eye when it meets the
nose. Next lesson.
5. Shading the Eye: We will start off with
vertical hatching. I am going to be adding a
shadow underneath the eyebrows. Next, we're going to add some shading on
the upper eyelid. This will give it
more dimension. Next we're going to darken
the area where we're going to be adding the eyelashes. This dark area is needed
to give it more shadow. Then adding the area where you
usually see the tear duct. So as we start with
the eyelashes, I'm showing you the direction
that we're starting with, starting from the
corner of the eye, going to be adding these eyelashes using
a flicking motion. We're going to also
these in between and then fill those in later. The eyelashes around the eye, follow the direction or
the shape of the eye. Usually the eyelashes are longer at the very end of the eye, so you want to actually
keep that in mind. I really enjoy this process. I used to be very intimidating, but I really like
drawing eyelashes now. You can always fill in the
eyelashes however you like, but you don't want
to do too much. Now we're going to be
shading under the eyelashes. This will give you the
shadow for the upper eyelid. This is where the gradient
shading is going to come in. We want to make sure the
darkest shading is closer to the eyelashes and
the lightest shading is going to be closer
to the middle. Next, we're going to darken the area where the eye
color usual rests. I seem to have forgotten to add the eyelashes
for lower lashes, so we're going to
do that right here. Those are usually
thinner and sparser and very lighter than
the upper eyelashes. We're still following
the shape of the eye. I'm going to make sure also the shading underneath
for the lower eyelid. You don't need a lot of
shading here either. Next, we're going to make sure we usually have the
pupil and the highlight. Again, this is going to be
using a gradient shading. The darkest area is going to be closer to your eyelashes and the lightest area is closer to the lower part of
the co for your iris. You can take your time here and just do the shading
as best as you can. You want to make sure
it's blended well, so it looks very
even and cohesive. Since we're using pen
and you cannot usually blend with your finger like
how you would use a pencil, we just have to make sure
that when we're shading, we blend as evenly as possible. Other details that we
definitely need for this to enhance the drawing is I'm going to add a
little more shading. I'm going to use
very light motions to add some shading
to the upper eyelis. As you see now, that
light shading really makes the eye pop the paper. Next, I'm going to
add other shading to where eye connects
to the eyebrows. Just so that can be
visible in the drawing. And what I really like too is
when you're drawing the eye lashes to add light shading
above that as well, that makes the eye drawing pop. In, I'm just going
around and adding those. So this is the end
of the drawing and welcome to Final Thoughts.
6. Final Thoughts : Taking the time to
take this class. We learned about drawing
eyes in this quick session. Like how to draw eyes, how to shade eyes,
how to draw eyebrows, and how to use gradient. If you would like
to follow me on Skillshare, you can
follow my page. Also, be sure to leave a review and leave your project
in the project section. If you like to follow my
daily drawing sessions, you can follow my
Instagram page at Design To Art and my other
Instagram page at paper art pencil can
also follow me on YouTube at sketches by ESG, my other YouTube at
my Designs To Art. Thank you and see you next time.
 Lakena G., Digital/Traditional Artist