Transcripts
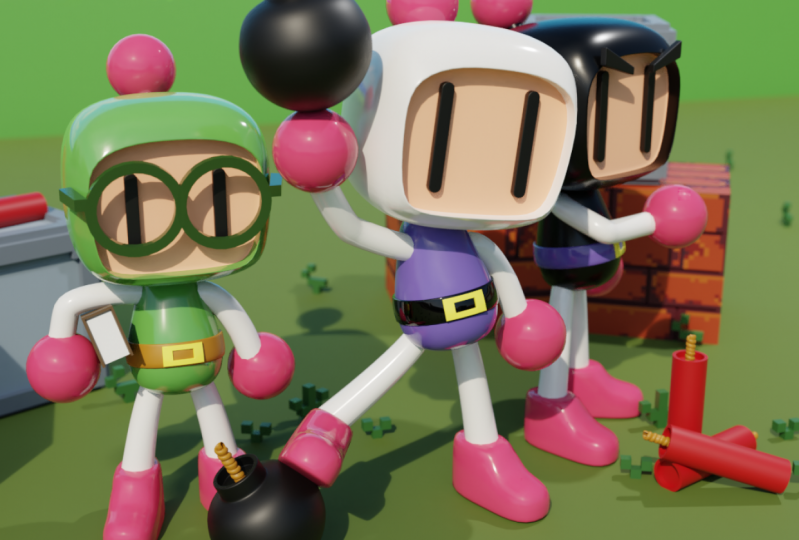
1. Class Introduction: Hello everybody and welcome to another bond. Of course, my name is Dina. In this course, we are going to create a 3D, a retro game character Baba room in this course is for beginners. But if you're an advanced user, this could help you as an exercise. And also at the end of this course, you will have cool 3D model that you can use for your portfolio or animation. For us to start by adding reference images that you can get from the link of the description of discourse. Seconds we will start muddling our head and phase details. Next we will body and body parts and we will finish the modeling trusses by adding small details for the background like platform and bumps. After that, we will use HDR image for lighten up the scene, which you can get from a to b that I have it in.com. And later we will position our camera for the final render. Next to play with the Render Settings, envy will start adding materials. In the end, I will show you the tricks and tips on how to increase quality of your final landed with compositing. So let's begin and learn how to create a 3D character using a software Blender.
2. Adding Reference Images And Modeling The Head: Everybody and welcome to our first two didn't discourse. So before we start working with Vanderbilt, who's gay dining folder, where we are going to say all the necessary files for discourse. And that's the best way to stay organized. So you can see here that on my desktop I created bumper man, new folder here. And also I have those two references, images that you can get from the link of the description of discourse. And now let's start working with vendors. So first when it's open it and tried here you can see that I am working currently IE 2.8 in the nine version. So this is the latest version. And if you can get any version about this, you should get it because it's going to be much better to work on the latest version and because of the new features and also bug fixes as well. So let's create a new file under General. And here we have our default scene with default cube and default to find lights and camera and try it. Now I'm going quickly to turn on my screencast had done so right here you can see all of that I'm going to use in this course. So first I'm going to get rid of my default cube and now I will import our FS images. So first I will breast number one on an unpaired. Also here you see the term in front orthographic view and bit shifting a, I'm going to search for the image and he's reference image. Now i'm going to navigate to bumper man folder. And here I will go and lots first this first reference image. So here we have the whole, the whole character from the front end side also test. We can go and start modelling. And now I will go and shift which shift in deed duplicate this one, I'll press right-click to cancel N moment. Changing food animal method the location. And now I will presses the air Z and 90 so I could rotate it 90 degrees. And now I'll press number three to go in right orthographic view. And now I can go and move this to be right here in the middle, this side view of bumper man. And here I will go and emptying the same. So we had this middle part and this side but as well. So now under filters at the turn on disk and therefore selection. And now if you check this, you can see that we cannot no longer a check or select and those reference images. So I'm going to real quickly select them both because I want to change a few things. So first I will go and select my surface image. I will go under images. And here I will go enter on this transparency and lower it down to, let's say 0.3. I think you're going to be just fine here. And also I will do the same for the other side. And I will disable those two from being respected, being shown in prospective view. So here you can see that we are currently in perspective. But if you go in front orthographic view or writer too graphic view, we can see. It's images. Right now. I can go and disable those two from being selected. And now with the shift and day that you go and import also, the second draft is image. So just the case. So we can see the colors of the bumper mentioned. So this one, we can go and move it to the side. So it will stay there. And now we can go and start modelling the salt. But before that, we can go and select all of this Dreamer images. And by holding shift, we can go and press M and, and move them to a new collection. Let's call this reference images. And now if you press OK, and you can see that all the images are here in this collection here. So now don't forget to check this back to collection because all new objects are going to appear in that collection. So now we can go and start modeling. So first we are going to model the head of this bumper man bursts with the shift and day. I'm going to create a new cubed arsine. And also I will add subdivision surface modifier. And now I will go in edit mode at G and G, I will move this up it control. And there I will add one edge loop in the middle and also right here on the side. And I will add one more here on the right orthographic view. So to about here. And now I will try to match this reference image as much as possible. So first I can go in x-ray mode. And here I can go and let's first scale this on the z. So to about here and wait to determine cage for now. And let's say at sea, you can see that we need also to MODIS or to be back. At. Now, I will go and scale this back but just a little bit. So to about here may be this one here is going to be the same. And now I will apply the subdivision surface modifier. And now I have this geometry that I can use to pay to the face of this bum, bum vermin. So first I can go and select Stuart C. So first I am going to pull this up passing g and z. And now I can go and select those two and move them up as well to about here. Now, I can select those two here on the site, but I'm going to scale those to the x. The next one is going to be this one here and this one here. But be careful to not select the back. So we need the front only. So now I can go and scale this down. I can grab this one here and this one. And let's move those limits down to about here. And also I'm going to select this, those two ends and move them to the side. Now I will need this bottom part we fixed. So here I will go and select those three vertices here. And I will move those down, like so. The next is going to be this one here and this one here. And I'm going to scale this down to about here, must say. And actually can go and select those two here. And I'm going to press S, x, and z. Like so now of x-ray mode here and now its width based selection. I'm going to select those phases here that are that there needs to be extruded. So first, I will go and make sure that I've selected the whole area. And don't forget to check the bacteria if you selected by mistake. And now I will need to flatten this out by pressing SY Can 0. So now we have this flat faces here. And now if you press it, you will be able to sue these dark. And now you can go and apply subdivision surface n calls to change shading to smoke, indicated the head of bumper minutes. So also you can go and add, let's extrude this a little bit more. On the back. And here you can go and add subdivision at spotting looks Soviet controlled and there, you can pull this here. And also you can add another one on the front end, recreated the head of the boundary. Also here it can go. For example, they can just go and turn on this vertex selection. And for example, you can select the whole this top part. You can move these down and maybe this one candle up. And everything here D just fine. Maybe we can go and scale this with a bit more on the z. And here we created the head of the bumper men. So that's it about this video. Stay tuned because in the next video we are going to make details and also we are going to add this spec basketball on the head of the bumper meant so see you there.
3. Adding Face Details: By the end, I'll come back to our second video discourse. So here as you can see, we have created the handout, the lumber men. And the next one is going to be details on the face. So we, we are the eyes, eyebrows and also respectful of the hat on the head. So first I'm going to create the ice. So with a shift in day, I'm going to use this time simple Duke. And also I will go and use Mirror modifier as well. By default, it's set to x and that's what we need. So if you go in edit mode, end brash G envoy to the side, we can see that we have also tube on the other side as well. So now I'm going to go and try to match the reference image as much as possible. We did this QC. So let's zoom in so you see it better. So to about here. Let us say. And now I can go in right orthographic view and G and Y, I can obese in the prompt. What about here? Now I can go and select those two here. Actually we can go and manually. So we are going to select this face here and this one here on the bottom and here b Text route. We are going to hold the left-click here, and we are going to navigate to extrude along normal. And right now I'm going to extrude those two as much as possible to match the reference images. So those two phases needs to be at the top of the ice and not here. I will go and select this edge here, this one here by holding shift. Also this one here and this one. But n naught which patrol MB. I can fill this out and we can go and increase the number of barrels by scrolling up power MOSFET. And now we can pull this a little bit up. And we can go and add subdivision surface Monday prior, number of sorrow, different tool chain, shady plus Maltese. Well, let's turn off x-rays so we can see how everything is looking so far. And you can see that we can go and add once called Earth look cobalt here. And everything should be done. See, we can try to turn on out too smart. And we are having some issue here. It is shading. I'm going to try to fix it. And maybe we can go the whole edge loop here, this point here, and dot as well. And now we can go and try to build this. And we have created the ice or our character. Let's see, parenting is k here, have clear shading there. So the next step that we are going to create is going to be, it is BEC bold here. So now it's going to be, let's see. So first I'm going to create UV sphere and try to match the reference image. So we have here. And also I believe that this ball is at the same size as the hands. So here I'm going to duplicate this one more time. I will move to the side just in case that I will need for the hand. And now we can go and add one simple cylinder here. And now I'm going to rotate it. First site, we'll scale it down. And here I will go and try to match the reference image as much as possible. So to about here. Let's see. I'm going to change shading smart here and also here as well. And here I'm going to add edge loops so people can support those two. And we have created the spec for the head. So let's see if everything is k here. The size is perfectly there. And now we can go ahead and add eyebrows as well, so it shipped and a, I will bring another cube. And here I'm going to add immediately mirror modifier because you'll need them to both sides. And now I can go and try to match the reference image. So here I'm going to model doubt. And later on we can move it in its, in its original position. So to about here. Now, we can go and select those two here. And I will go and move this down and this one here as well. So something like this. And now we can go and select everything. And now we can go and position it to its original position here. And maybe we can go and move this in the front. Like so. I'm going to scale this down. Let's pull this back. And here I'm going to go and babble DEC_OUT is front face here. We can select this face here. And two, the control MBA weekend to battle it out. So we have more geometry. And now we can go and add subnet subdivision surface. And also we will need you lopes loops. And also here on the side, I'm going to pretend shaking too smart. And also we can go and decreased number of subdivision here. And we are done with modelling Hydros. So that's it about this video. Stay tuned because in the next video we are going to start working with on a body and also you'll add arms and all so-called X. So see you there.
4. Body Parts Modeling: Hello everybody and welcome back to our third video. So here as you can see, we are done with modelling head for our longer man. And now we are going to create our body parts and also body itself. So first, let's get to this by default, Soviet shifting a, I'm going to pay it Qc, Qc. And also I will call a and add subdivision surface with number of subdivision due. And here I'm going to scale this all the way down. So now I will go and try to match the reference image as much as possible. So first, I will go and pull this down. And here in the middle I'm going to create edge loop. So I scale it up a little bit, like so. And now I'm going to turn on x-rays so to see-through. And let's add also here on the top. And now I'm going to scale this down, also this part down. I need to select the whole base here. We can go and turn on the cage because it will be much easier to see it through. I'm going to scale this acidic the call this up like song. But here I'm going to rotate to match the reference image as much as possible. And maybe we can go and all this bit in the back and may be this pull down. Also those two here gets slightly more down like so. And we have created body itself like reference image. So let's see. I'm going to change shading into smooth by pressing right-click and smooth. And now we can go and add arms and legs as well. So here you can see that this is some mechanical reference image, but the image that we are, that we are going to follow is going to be this image here. So right now, I'm going to move it closer to our character here. And now I will disable this image from being selected again. So arms and legs, we are going to create a simple curve. So first time will go and bring curve has been busier curve and also I'm going to apply mirror modifier. So right now if you go in edit mode for it to the side, you can see that we have the same, exactly the same curve on the other side as well. So now under curb properties, I'm going to go under Geometry and here I will go and incase in depth a bit. So right here you can see it the whole and how it should look like. Now, I've also rotated as well. Let's scale this all the way down. And now I will case out a bit more depth here. So now I can go and try to match the reference image as much as possible. So let's see. So first I'm going to go and move this to the site. You can grab one of these vertices here. I'm going to rotate this one here. And this one we can go and press E to extrude. And here I'm going to go and pull this two together. So first I will go and rotate this one like this. And now I'm going to go and distance size and scale this one down. And this one we can go and also scale this down. And I rotated as well. So like this and also this one here. I'm going to scale this one as well down. Let's start date this one here. And now I can go and maltose to hear. So everything is fine here. I'm just likely to move this up, scale this down. Let's rotate as well. And we created our, our arms and now we are going to go in edit mode, select everything with a. And now we are going to use the same for the legs. But this one we did meet three vertices feed just need two of these. And let's see. And go and stressed out and S, to scale this up a little bit on the bottom part here. And everything should be just fine like this. I'm going to rotate it as well. I'll pull this up like so. Now I'm going to grab this and this both have the same exactly as before here. And now I will go and train shading to smart here and by pressing currently carry chain 30. So right here you can see that Arjun point is right here. And we need to return it back to G, D cursors. So I'm going to change 0.2 3D cursor right now if you go and apply mirror modifier, you can see that we have exactly the same ball on the other side as well. And now I will go and pull this in the front. So now it will match the reference image more. So I'm going to just be sure that it's the same size here. And we are done with modelling, hands, arms, legs, and body parts. So that's it about this video. Stay tuned because in the next video.
5. Shoes And Belt Buckle: But the end, Welcome back to another video discourse. So here as you can see, we are done with modelling, but departs and we add it also buddy and they have arms and hands for our carrot debt. So next, and the last thing that we are going to muddle out on did on our character is going to be this belt here and also we need shoes as well. So first, let's start with the shoes Soviet shifted a, I'm going to bring another cube. And immediately because we will need for both, both legs, I will add mirror modifier. And now if you go in edit mode, those two cubes on this side, you will have on both sides as well. So next, also we made subdivision surface modifier on the number of subdivisions due. And now we can start modelling cout, this shows. So first I will go and let's say you could select this leg here and now I've rotated to beat two. So stays straight like this. Now I will move it until we did down like so. And now I will go back and change shading to smart here. And now I can go in and edit mode. And here I can just match the reference image as much as possible. So that we need to move this up a little bit on the back and now we can start extruding those parts out. So first, I will go and get through this one here on the front. And maybe we can grab this one here on the back and we can pull down like so. So the next step, I will add a control loop here, all the way down on the bottom, like so. And now I will go and select this edge here. And now I just messed on g and z domain does down. And also I would add one more actual up here and now go and move this down, like so. But this one, I can go and pull this back like I did here. And actually they are way too big so we can go ahead and skip them down. But it should be VQ, as you can see on our reference image. So we'll just kill it up. And now I have more discipline in the front. And now we can go and select this face here. Press I for insisting phase here. Now we can go and for example, we can extrude it down, but I think they look better like this on our character. So let's see what else we can fix for our character here. And write to pull this up a little bit. And now we can go and select all of this so that nine to unhide it and move them a little bit in the front leg. So and maybe we can go and rotate them as well. And now we can go and position them where they should be. And I believe they are way too high, so I'm going to select this top part at, I would slice them, hold them down like best seen j and z. And especially this part here. So now we can go and return them even closer together, like salt. And everything should be done here with the show's. So now we can go actually and maybe a third or turn them in. The back. 0101 dx. And Vietnam with modeling car shows. And the last, the last piece for modelling is going to be dispelled here. So first I will go and select this, this body part and i will apply and the subject subdivision surface. And now I will go in edit mode. And here I will go and select those two loops here. Now with the shifting D, I can duplicate those, cancel any moment here. But this time I will need to separate this belt here that does electrons from this mesh to make it separated. So you can press B and separate. Now if you go in edit mode, you can see that we have this belt here. And now immediately you can go and add subdivision surface and also solidify or to add thickness to it. So this time we will need to go negative. And as you can see, it's a little bit, it's rough on the edges, so you need to see, it means that we need to add subdivision surface on. So I'm going to increase it by say, minus 0.3 and the 0.03. And we have added the belt. Also, I will go and add subdivision amongst again here on our body parts once again, because I want to be around it as as it was before. And the last, the last thing that we need to muddle out is going to be this part here, the front part of the of the belt buffers thing that they are going to do. We are going to select belt and here I will apply the solidifying modifier and also subdivision surface. And for the buckle weekend go in edit mode. And here you can see that we have faces that he can select and extrude out to Kate Baco. So by holding Shift, I will select all of these vertices, all of these spaces around. And we have this buckle as on our reference image. And now the same as I did before making go and press shift in D, right click to get the lending moment. And now we can go and press before separating. And now if you go in object mode, we can go and select this buckle. And right now we can add, we can go and select they're actually everything. And here we can select this extruder along normal. And now we can just extrude it out bit. So to about here. And as you can see, we are having shading issue. And that's because we will need to turn on this outer smooth option here, on this, on this object data properties here. And now I want to do next a, and then the last is going to be the babbling of those edges here because they are way too sharp, sharp and we cannot keep it as it is. So we can select this and this part out and other parts around it as well. And here I will press Control and B. And we can go into case geometry as well. A couple of our Mao spill. So to about here and now I will go and train shading. Let's see if everything is k. Actually, I want a little bit more geometry so we can go ahead and press control bit to go back. And now to about here. So we just find the best, rightly to change shading to smoke. And as you can see, we are done with muddling our, our abandonment. So that's it about this video. Stay tuned because in the next video we are going to organize our outliner. And also we are going to add materials to its associate. There.
6. Adding Bomb And Platform: Hello everybody and welcome back to another video. So here, as you can see here down with modelling bumper men and now I'm going to create a bomb next to it. So first thing that I'm going to do, I will go and press shift and a. And here I will search for UV sphere. Now I'm going to move it to the size so I can see all the, all the necessary mesh. And here I'm going to scale it down. And also now I will go in edit mode and I will switch back to Select box. So right here, I'm going to select this and this edge here near the top. And now press x to get rid of all that, all vertices here and l here. But by holding, hovering your mouse over this mesh here, you'll be able to select everything linked and I'm going to get rid of that one as well. And now I can select this edge loop here. I can press E for excluding up. And here I'm going to scale this all the way down. Let's move it also here. And now I can go and extrude it up like so, maybe a little bit lower. And here I'm going to press F2 to fill the hole. On the top. I will change the shading to small dent also, for example, we can add subdivision surface with number of subdivision two. And here I'm going to go back to edit mode, and I will bevel this top edge here. So now I'll press Control and B to Belle this out, this top part, like so. And here, as you can see, we will need to add edge loop all the way here and do about here. It's going to be just fine for the bump. And maybe we can go and notice up my skill this also. And we have created the base of the bump. Now I'm going to go in Face Selection. And here I will press type for inserting here. Now I will press E for extruding this down to about here. And now I will press I once again all the way. And here I'm going to make hole for the rope. Like so. And as you can see here, I will add edge loops, supporting edge loops. Also here. And also that we need here on the bottom part as well. So as you can see, we have this simple low poly bond. And now the next thing that we need is going to be the rope. So first I will go and under edit, edit, you will need to go on the premises. And for this route, we are going to need this atom which is AD curve. And here you will be able to see that it's, it's about extra objects while we are searching through the curves. And also you can enable extra mesh and extra objects, so you can enable those two atoms. And now if you go with a shift and a, you will be able to go on that curve. And here you can see that we have different kinds of curves is that we can use in our projects. So for example, for the robe, the best that we can use, you're going to be this curves barrel and this Archimedean. So. And you see nothing is happening here. We have just simple row, just simple circle. But if you go under this properties here, you will be able to change the way this curve is looking. So for example here you will be able to decide the height of it. I'd spit to about here. And here you will be able to increase the number of terms. So this time I'm going to use for example seven. And immediately you will be able to go here under Bevel and add this depth as well. And also, for example, we can go and increase a little bit extra here, just because it's about the rope. And also here, you will be able to decide to reduce and reduce growth as well. And for now I'm going to keep all of this a little bit lower. Maybe to about here. Let's try to increase the geometry here. Or even lower, right? So and here you will be able to decide the resolution of, of your curve. I'm going to keep everything as it is. So now we can go and select everything here and I'm going to go and increase the level. And also we can go and increase the extrude options as well. And now we can go out vet mold. And here we will be able to scale this all the way down and place it right here where the bunk should be. So I'm going to zoom in. And here I'm going to place it in the middle of it. And we have here this simple rope. And also we can go and scale this up a little bit. Like so. Also we can go and add dynamite. So with the shifting a, I'm going to create a new cylinder to our scene. I'm going to scale this all the way down. Let's scale it up to about here. I'm going to change shading to smart end here I will go in edit mode. And also on both these sides, I'm going to press II for inserting base. And now I will go and select this extruder along normals. So we can exploit this a little bit down. And also I will turn on this outer smoked option. And here only on this side, I'm going to press i for inserting Phase IV for extruding this down. So now I will go and duplicate this. Do about here. Maybe we can go and change the extrude. So here you can play with all of the settings for the offset and we're going to keep everything as it is. And let's go and increase extort. And we have those two small details that we are going to add to our scene. And now there is only one thing that I would like to change, and that one is on the Bonk. I think it, this, this top part is way too huge. So I'm going to go in Face Selection in x-ray mode. And here I will go and scale this down. And let's move it to the site. We can also scale everything down. So let's see how everything is looking so far. And I think that now is looking much better than before. And also, for example, we can go and scale this part a little bit down. And here we have a simple bunk. And now we are going to add also platform where our character is going to stand. So with a shift and a, I'm going to create a new cylinder two arsine. Let's kill this all the way down on the z. Scale this up as well. Right now we can hide all this background images. We don't need them for now. And here I will go and pull this where it should be on floor. So to about here. Now in, in edit mode, I'm going to switch back to Select box. And here I will go and press I for inserting face cobalt. Here we can go and x2 to this part down. I will turn off proportional editing. And here for example, I can go and add two loop cuts. And for example, we can select all of these here. And I'm going to extrude them. Actually, we are going to use this extra normals. And here I will go and exclude this out like so. And also we can go and change shading to smooth and also add subdivision surface modifier. And tried here you can see the tool needs to add support loops. These edges. Also here and here. And T will need also on this site. And now we can go and grab this from here and extrude this down a little bit more. And here I will press I for inserting case. So we have this simple platform and now we can go ahead and duplicate this and use this to create interesting scene for our model. So that's it about this video. Stay tuned because in the next video we are going to start adding materials to our character associate. There.
7. Adding Materials, Lightning Up The Scene And Camera Settings: Hello everybody and welcome to another video. So here as you can see, we created the platform and also he added dynamite and bump as well. And now in this video we are going to add lightning and materials to our character. So first thing that I'm going to do, I will get rid of my point flight and I will switch to the other search, my render engine from EV to cycle because I want to have higher-quality RAM there of this model. So for the lightening, We are going to use a die. And that is the image that we'll use for lightening up the scene. And the best way to find one is going to be to go on our Internet browser and search for this HDR I haven't dot com. So this is the web page where you can get a lot of different areas that you can use for your scene. And tried now on this top menu here, you can go and search for edge Darius. And here you can see that there is a lot of different categories, handles a lot of different places that those pictures I have taken. And the best thing about this Ajeet I haven't is that all these are free to use so you can use and get any of this. So for my final render, i'm going to use this abundant tank farms so you can select it. And here you can see all the Preview on your materials, how they are going to look like. And right now I'm going to use for now two k. And here you can just select it and immediately you will be able to download all different resolutions. And right now we are going to see you're back to Blender. And here we have our model here. And if you turn on this rendered view, you can see that it's very dark. We cannot see anything here. And that's because we need to import that day-to-day I image. So first, my Workspace from layout to shading. And here we have selected object and we will need to switch the world. And right now we have those two nodes connected together, but we will need one more and that one is environmental to Soviet shifted a, I'm going to search for enlightenment, texture. And right now I'm going to connect this color to color. And here if oppressed open, you will be able to navigate and find your HDI texture. And also, for example, very useful atom is not wrangler add them. So if you search here under, under Edit profit system, under add-ons, under the search menu here you can just search for node regular add-on. And this will allow you to do use shortcuts like shifting t here, actually control anti to immediately bring texture coordinate and mapping. And this allows you to change the rotation of your image. So right now if you go to render it, you can see the whole, the whole model here and here. Under addition, you can just change the rotation and here you will have different kind of flattening for your model here. So for now I'm going to keep as dish here. I'm going to give 88. Actually, let's rotate for 90 degrees. We can go and fix that later. All the nest or all different settings that we want for our render. And I will see you back now to layout mode. So the next stage is usually is going to set up our cameras so we can go and select our camera at right now if we press 0, you will be able to enter in camera view all in, or you can toggle it here. But if you press shift and, and the key above tab on your keyboard, so that key, you can see it right here in this left corner, you'll be able to navigate with your camera by using pure keyboard V, S, and D. And if you scroll up and be able to speed up your camera and you scroll down, you will be able to slow it down. And with Q and a, you will be able to go up and down as well. So first, I will go and position it to be in the front. Like so. And here on the camera here you can go under camera settings and here we have different cameras set is that we can go and use. So first thing that I'm going to change is going to be this perspective. I will, I want to have orthographic look. So right here, we cannot see, we cannot see the perspective with this orthographic. Let's keep it for now as it is. And that's the naming of this final render. And also, for example, you can go under View for display and the compositing guides you can turn on thirds and also Center here. At if you go under pays part out, you will be able to increase it all the way up and also decrease it. And by the way, you can zoom out and zoom, zoom in by changing the orthographic seal. And the reason for that is because this, with this orthographic view, we don't have perspective and we can zoom in and zoom out. So as I said, we are going to keep as it is now. Maybe we can go and lower it down this as this platinum scale. Let's move it up a little bit. And here I'm going to keep for now everything as it is. So now here I'm going to go and switch and turn on reference images. And I'm going to hide those on the site. And here I will move it also the side. And now we can go and add materials to our character. So first we are going to select those hands. Let's switch to render a view so we can see the color of it. So I'm going to unhide the this one here. I did it by mistake. Let's move it here. Now. I will, as I would set, I'm going to select these, those hands. And for now I'm going to use just simple pink material also for this one here for the shoes. Let's see if everything's good. We actually are going to work on with the view, with the look demoed because they're going to be much faster. And here for the eyebrows, I will go and use simple black material for this one as well. And you also, I'm going to the same black material for belt. Now for the buckle, I will change the color to yellow. I'm going just to add simple base color. And later on I'm going to play with all these small details. So here also, for example, we can go and use eyedropper tool. And here I'm going to use the same purple that I had here. And the last piece is going to be Hands. And also here we have avenues, the same material for the legs and hence, and here I will use the same peak material also for these connected, connecting part for the head, the same material. And here don't think that we need to change is going to be his face. And here I will need to apply the subdivision surface modifier. Let's switch to select box. And here I will go and select with circle selection, I will select this part here that needs to be painted out for the face. So I'm going to zoom in real quickly. And here by holding constant shift, I will be able to select all these loops around. And now by using a shortcut c, I will be able to enter in circle selection. And here you will be able to scroll up and down your mouse wheel. This is the size of the brush, enters. The easiest and fastest way for creating those kinds of things are selecting actually are not painting. You are selecting enter right now, I will create a new material here by pressing plus and this one, I'm going to eyedropper tool to select the same material here. And now I will assign it to original face here. And now if you sit to render it, you, you will be able to enter how is going higher and there is going to look like. And now let's add real quick the bomb material as well, and also the Steinem mate. So I'm going to use the red color for it. And here for this OK. material, I will use brown. So here and here. And let's say for the platform, for now, I'm going to keep it gray material. So that's it about this video. Stay tuned because in the next video we are going to take all the settings and we are going to prepare this the whole scene for the final render associate. There.
8. Compositing And Final Render Settings: Hello everybody and welcome back to our last video in this course. So here as you can see, we are done with applying materials dark character, and now we are going to take some of these settings. So first thing that I want to do, I want to disable this background color here. And here, I will go under Render Settings. And if you go under, you will be able to turn on this transparent. And right now we can focus only on seeing this character here. So next, I want to go and turn on this denoising saw here under the Nozick, I'm going to use this default render denoising. And if you have any NPC Other than next, you should keep this from an device CPU, you should switch to GPU because you're rendering is going to be much faster than it is right now. Are the sampling. 128 is going to be just fine. But for the higher-quality, we can go, for example, to a 100 and here I'm going to keep 32, just the case that, that it's because I'm currently recording and 32 is going to be just fine for those kinds of settings. And also here all this we can keep as it is. There is only lasting that we can go and turn on. And that one is under color management here. And here, for example, the contrast. So right here you can see that we have hierarchical contrast. And there is also another thing that we can switch, and that one is with this curves. So if you enable this US curve, you will be able to tweak all of these how you like it. So as you can see here, we can increase and decrease the brightness of our scene as you want. So for now I'm going to keep this off and now I can go and focus on my final renders. So first let's focus on this being details. And here I would like to have a little bit darker pink, pink. So I'm going to lower the, the W here. So I might want to make it being more dark pink. And here, for example, we can go nt, decrease roughness because we want to do to have this plastic reflective look. And for example, we can play with the specular. But for now, I'm going to increase back to that in just a little bit. Sought to about here, I think is meant to be just fine. As you can see here. It also strange on all others being color on RC. So the next I wanted to real quickly changed the look of the face and you can see that it's a little bit too wide, so I'm going to make it a little bit yellow. So to about here and here for the roughness, we can increase it a little bit more. And for the specular, We are going to decrease in diesel qubit. And now this should be just fine. And also here we are going to tweak it a little bit more to go toward yellow, orange color, to have that animal OK, of the character. So for this quiet, we can go and increase the specular all the way up. C. And also for the roughness. Let's try to make it full reflective. And I think I'm going to. As it is now for this pink color here, you can see that we also should be should have a little bit lower the to have a little bit darker pink color. And also here I'm going to go and decrease roughness all the way down. And here I will earn face this specular as well. So I'm going to use the same amount that I use for the most sort of 0.06. And also here I will use the same amount. Now for the belt. Make sure that you make it unique because now it will affect only the belt. And here, as I did before, keep everything the same so 0 and the roughness. And also I will increase specular two by six. So something like this is going to be just fine. And all the other stuff are just fine as well. So here everything should be just fine. So now you can go and switch back to the settings here and the shading and here you will be able to rotate around your, your bare ground HDI. So here you will be able to select the way you're shading is going to affect your scene. So now you can decide should you go on the other side of the so maybe I'm going to increase mind. Let us go further. So actually I think 110 is going to be just fine for my scene. And now I will go and switch back to layout mode. And also I will turn on this solid you and try it. Now, we will be able to better entered those two by pressing control and p So we can arrange those. So let's rotate this for 90 degrees. And here I'm going to decrease the size of it. And here I will also duplicate it one more time here. Let's move it a little bit closer. And I want to make stock of dynamite. So now we can go and select all of this. And let's go and move, move, move them down. I'm going to switch to wireframe mode. So we can see the ending client. Let's kill them up a little bit. How they are looking. Or actually I'm, I'm not going to make stack, but I will make few of this. And you get through to them. So maybe one month, one here. Actually output, I want to have only two on my scene. And now I want to have a few bumps as well, so I'm going to present those. Let's go and duplicate also on the other side, let's rotate. And here everything should be just fine. So maybe can go. Rotated here. Let's move them back. So something like this is going to be just fine. And here you can see the tune-in to go even lower here. And now we can go and see on wireframe if our character is standing in correct position. So everything should be just fine. And actually we are going to go and select all of this. And we are going to move the whole platform a little bit up, like so. And now we can go and press 0 to go in nth, to go in camera view and try it. Now also, for example, we can go and play with it, depth of field. So for example, you can select camera. And right now we can go and turn on depth of field here. And right now you can see that I cannot see anything because blurry. And the reason for that we need to select object that is going to be in the focus. So here I select the head of it. And for example, we can go and play with the F stop. So I'm going to lower it to all the way to here. This is way too low, so I'm going to increase it. And maybe 0.4. is going to be fine. So we have this small blue effects here. And now we can go and trended at the whole scene out. So here I'm going to press render and renter image and our rendering is going to begin. And as you can see, we are done with rendering our scene. So right now we can go under compositing. Don't turn off this one, you can just write it down. And here I'm going to use notes here. So now here under compositing, we can just simply search for alpha over note. And here I'm going to link it here. And now I'm going to plug in this image here down. And also I will connect this image to compositing. But as you can see here, we cannot see anything. And that because we will need viewer note, or if you have this node wrangler on, we can go and hold control and shift. And, and to the left link we will be able to select the whole node. And here, as you can see, we compositing the whole scene with this Whiteman color here and here as you can see, we can very quickly end easy, switch at the color of the background and we have a local render or the final, or the final rendering as well. So there is also one more thing that you can use, and I mentioned it, mentioned it already before, and that one is this contrast here. So as you can see, we can go and play with this contrast. So we can use very high contrast and also, for example, all the others as well. And also, for example, we can go and turn the turn on these curves. And here you can take a little bit of brightness and all the other settings for your final renter. So now if you want to save your Final Render, this image, the whole image here, you can go under rendering here and it's already here. But you can go and re-render it by pressing, pressing, render, render image. And now you can go and save the whole image by going here under image Save s. And here you will be able to select your final destination. And also you can not forget if you want to have different resolution of your final image. You can always go here under Output Settings. And here you will be able to alicia. So right now, by default is set to 100 and actually it's pool HD. And here you can also change if you want for your, your Instagram mic and make it square. But I'm going to keep it as it is. And those are for animation, we are not going to change anything. And here you can select your output file and also file format for your final rendering sin. So that's it about this video. I hope you had fun. I hope you create something cool that you can use for your portfolio or show it to your friends and see you in the next course. Bye.
 Nodiken 3D, 3D Artist and Animator