Transcripts
1. Meet the Artist: Hi everyone. I'm Krista. I have been teaching hundreds of people how to paint and my in-person painting events
like paint instant parties, birthday parties, mom's night
outs, and church events. Well, I have taken my family on the road to explore the
country and our RV. I call myself a wandering
artists. I guess. I couldn't leave my love for teaching people how
to paint behind. So I set up a mobile
studio to offer you my easy step-by-step
painting instructions online. I will provide you with current
to trend artwork lessons, holiday lessons,
abstract lessons, and even some lessons
for the kiddos to my instructions will have a full list of all the
supplies you will need, where to find them, how to use them in detailed instructions. On each stage of the painting, I have a unique style and easy approach and
I know you'll be proud to hang your artwork on the walls and not
hide it in a closet. So grab your brushes and follow
along and let's go paint.
2. Supplies needed: Hi everyone. Let's go ahead and get started with our colors. So here I have a
classic caramel color. Vintage cream, wicker, white, black, a medium gray Barry wine color. Classic red. They get green,
chocolate sprinkle, or you can use burnt umber. Skyline, Dutch, Aqua,
the pale daffodil, apricot, golden
yellow. In Pueblo. For my brushes, we have
a two inch flat brush, a half inch flat
brush size six round, a three-eighths angle, a 1
eighth angle in a liner brush. Put all of those in your water.
3. Painting from Photo's: We've been going on these
beautiful scenic drives. And I've just been taking pictures of different
things that I like. There's been barns and grain
silos and beautiful sunsets. And I just wanted to put
all those together into one doable painting
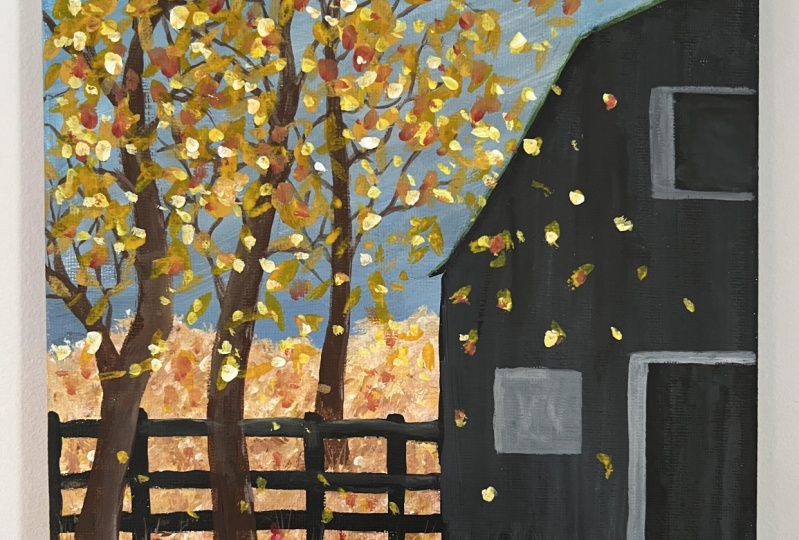
that you guys can have success painting. So here's a photo of
a barn that I took on our way to tour the one of the bourbon
distilleries that's in the area. This area is famous for its
Bourbon Trail, they call it. I just love this black barn and I loved the fence behind it. I saw some really
modern paintings in stores that were
showing half of a barn. And although they were different
colors than the black, but I really like the idea of just showing half
the bar and it shows, it gives a little bit of mystery and a little modern twist. So I thought I would take my black barn painting and do what I see
selling and stores, which shows me that it's
popular and trendy. Ended half of my
barn here as well. Also, you'll notice that
I'm painting on paper. Again, I don't paint on canvases while I'm
traveling just because I don't have the
space to store them. So, but what you can
do is you can buy any size canvas you
like and scale it. So if you want to make
this a big painting, you'll just make a big
barn and a big tree. And I can just give you
dimensions on what these are so that you'll
know where to start your painting and where to start your angles and
things like that. Another thing that I did was this black bar in
painting that I have, you'll notice doesn't have
any fall trees in it. Months and months ago when
we first started traveling, I stayed in Arkansas for the fall and it was
visiting family there. And this state park we stayed in was on the
river, the Arkansas River. And it had these
beautiful golden yellow, bright yellow trees
that were dropping these massive leaves over
the size of my entire head. And I would just sit and
watch out the window and just watch these leaves
fall like confetti, just these beautiful
falling yellow leaves. And I just thought
it was so beautiful. And although I
didn't paint this to be in front of the river, I wanted to incorporate since we're not here
in the fall and Kentucky will be
leaving this weekend. Actually. I wanted to just
kind of imagine what those bright yellow
trees would look like next to a dark black barn. And then I just added
these pretty red flowers from this picture that I saw. They weren't wild flowers, they were plotted in a plant, but they were super pretty and
I loved the color of them. So I just thought
it would be fun to kinda just incorporate those elements into
my painting as well. So I hope you enjoy it
and let's get started.
4. Painting the sky: Okay, Look in my
palette, you guys, it's so thick with paint. Rule gummy. And it's kinda funny. I'm just trying to do
like a little challenge. See how long I can use this one. Peak, one plate for my paint palette before
I have to throw it away, it's silly, I know, but whatever, it's
getting very colorful. Okay, so we're gonna
start with the sky. So we're going to use, we're going to use this Dutch aqua, this skyline, and some
white for our sky. And this is really,
really simple. We're gonna be using our bigger two-inch brush, flat brush. So just put some sky colors in there. You don't need a lot. Make sure you can see that
a little more than n. We're gonna go about halfway
down our page or Canvas. I'll probably need
more paint than that, but I'll add some more later. If I do get a considerable
amount of water on your brush, I just dip it in the water
and then I just scraping. I don't press down
too hard because I do want some water in my brush. It helps the paint just kinda glide over the paper or
the canvas very smoothly. So I'm going to triple load my brush now you
guys have heard me maybe if you've
taken other classes, double loading, but now
I'm going to triple load. So I'm just going to
go into the white. And then I'm gonna
do a corner into the blue and then a
corner into the aqua. So you can see I have
three colors on my brush. Now, what I wanna do for this
particular painting is make the darker blue on top here. So I'm going to make
sure that I position it up here on my cannabis. And you're going to go back and forth and see how that does. It just gives you stripes. Now, I don't want
strikes in my sky. So I'm pink. And I did it again. I didn't put my rubber down. 1 second. Let me get my plastic. Okay, now we can paint. What I'm doing is I'm going in a diagonal pattern and I'm going off the
canvas or off the page, whatever you're painting on. And I just want to
make sure that I am painting all the
way to the edges. If you have a Canvas,
make sure you're painting your sides too. You don't want to have
an unfinished painting with your sides and painted. When I first started painting, I would get just black and paint the edges of
my canvas is black. I kinda liked it. Give it a kind of a frame
if you wouldn't, maybe. I'm going in this diagonal
manner because I feel like the white in the painting can be
sort of like wispy clouds. I'm going to add some
water to my brush. See how the water
just makes the paint glide on even more smoothly. Just helps it a little bit. Now, you don't have
to use these colors. If you have blue already
and you're like, well, I can just add white
to it to make a light blue. That's completely fine. If you have bright white
instead of a creamy white, that's completely fine too. If you don't want to use
the turquoise color, that's completely fine too. Or maybe you want
to make it a gray sky to where it's more, more of a winter look. That's fine too. These paintings are for you. You do whatever you
feel like you wanna do. Just make sure
that you are using the same direction of
your brush strokes. Don't come in your
painting and be like, Oh, let's go this way because
that'll just mess up your sky. You want the sky to
be in that same. The usually the Cloud are typically going in the
same direction at all times. So you just want to make sure that you put your cloud's
going the same way. Now sometimes you can, sometimes I'll paint with like I'll paint clouds going this way and then I'll paint clouds
over it going this way. Sometimes that'll happen. I'm honestly not great
at painting clouds. This is typically what
my skies look like in my paintings because they're not the focal point
on my paintings. It's usually just a background. So I don't really have
to pay much attention to the details in the
clouds. Thankfully. I need to practice
my clouds more. I do enjoy painting them, but they can be difficult. I painted one cloud one time
and it looked like a sheep. And I'll never live that down. So we're just going to let
that dry for a hot second. I'm gonna put my brush back in the water and I'm gonna get the caramel colors
for the background.
5. Painting the grass: So I'm going to use
classic caramel. I'm going to use
some white again, but I'll just use this
white that's on my palette. And I also used some a touch of Pueblo
in my original painting. I kinda don't feel
like it's necessary. So if you just want to use
the caramel and the whites, and in a little bit, we'll put a little bit of a
chocolate brown in there. I think that would be fine. But just to stick to
what I did earlier, I'm going to do that too. So I'm going to take
my angled brush here. And angled brushes are typically used really well for getting
super straight lines. My angle brush, on
the other hand, has been misused so many
times that it's now very fuzzy and this
particular brush doesn't give me a straight line. So if you have a
new angle brush, I recommend not using it, but rather maybe use an older brush that you
have that maybe looks old and you can even use a
flat brush, a fan brush. I mean, wow, that was
really messed up. You can maybe use an old brush that looks like
that and it's just a little, this is a brand new brush.
It won't even bend. But just like you
just want it to have a little bit
of a Frey to it because we're gonna
get some texture with those bristles that are
all kinda messed up. If you want to use your
angle brush, that's fine. This one just happens
to smoosh very well and I like the pattern that
it leaves in my paintings. So that's the one
I'm going to use. Again, you can use an
old brush or you can use an angled brush you want to ruin just like I did with this one. So anyway, what
we're gonna do is go into our burnt I'm sorry, this is the Pueblo color. And we're gonna go into
the classic caramel. And just double load your brush with both
of those on there. And we're just going
to tap in some colors. Now this is just the background
and this is just gonna be a messy grass looking. Maybe, maybe it's
an old hay field. Maybe it's an old cornfield. I don't really know.
It's just a field. And we'll add some
other layers to it so you don't have to worry about what it looks
like right now. What I have learned
is in my paintings. There's always a point in my paintings where I'm
a little frightened. Like I start to wonder, oh my gosh, this is, how is this gonna be pretty, how am I going to fix
this ugly painting? And if you just keep going, you'll trust that every
layer you add will be good. It'll help it along
just like I often think about it like this is crazy, but when you get dressed, right? Sometimes you don't
want anyone to see you in your underwear and your
bra and stuff like that. So you got to put more
layers on, right? So I kinda feel
like that's what it is to whenever we're painting. The first couple
of layers are like private, don't show anybody. But trust that
it's going to look better when you're all finished. Anyways. Sorry, it's kind of a
strange way I look at it, but That's me. I'm
kinda strange that way. So I added a little bit
of white to my brush. And I'm going to
just keep going with this brown color,
these caramel color. And I'm just going over
what I just did here. And don't worry, we're
gonna go over it again. So you add multiple
layers will give it dimension and shadows, and it'll be fine and we're not even going all the way over because I know this part is going to be covered
in black paint. You'll notice too that you can still see a little
bit of the blue, pink and back here, that's okay. Just keep going. What
you don't want to do is keep adding to
that same area. You want to let that
dry for a few minutes. It doesn't have to
be completely dry when you add the next colors. But if you keep going over the wet paint is just
going to move wet paint. Wet paint on wet paint, just slip and slide around and nothing really gets covered. You need to let it dry and go
over it with another code. Just a little tip for you. What I don't want is patches of white because then it'll start
looking like ice or snow. And that'll just
kinda change the whole color theme
for the painting. So if you see white, just go over it with the brown and mix it in, make
it a light color. You want it to be a
light color, brown. You don't want it
to be white unless you're doing a winter scene, which you would want whites
and grays in that sense. Okay. So that has been drying
for a few minutes, so I'm gonna go back over
it with my lighter color. Notice I'm not doing
a straight line, which you absolutely could
if you really wanted to go over it, make a straight line background in the back if you wanted to, but I don't see that much
here in the country. It's all just fields and bushes and grasses
and things like that. So I wanted it to have
some layer of some, I don't know, just some texture. I'm gonna put a little bit
more caramel on my palette and I'm going to start
adding in a little bit, a little bit of the
chocolate brown because as it gets closer to
you in the foreground, it does get darker. So I just want to add
a tiny touch of that. This Carmel will add
more and more as we go. You can also add a tiny
touch of that orange just to give it the same warm warmness. It's probably a
little bit too much, so I'm going to add a little
bit of white just to kind of bring it in a little bit. I'm going to keep adding
that white because I feel like it's just
a little too brown. I don't mind. I do like to see this variation in
color because, you know, there's hills and as things
get further away from you, they get to be a
more muted tone. And as they get closer to you, they tend to get a lot darker. So this line right here
isn't bothering me too much. I will blend it in a little
bit like I'm doing here. I think that looks much better. Again, most of this is gonna be covered up in a
background anyway, so it doesn't have
to be perfect. You're just adding interest. I'm going to add a little
bit of water to my brush. The paint over here. How
much more paint came out? Okay, now I'm going to
add a little more of my chocolate brown
because I want it to be a little more
brown in this section. 22 brown somewhere. I see. Can you see that? Just a little a little darker? For me, that's probably
a little too much. So again, I'm going to add a little bit of weight to them. That's better. Now right around
this area is where my barn door is gonna be. So I'm just going
to leave that flat. I don't really care about putting anything
there because most of it's going to be
painted over anyways. I do want that to look less grassy because it is the
entrance to the barn. So we're going to change our brush stroke and
make it a lot smoother, less texture right there. A little bit of
water to my paint just because I'm
running out and I need a few more
blotches of color here. Okay? Again, keep in mind, this
is just the first layer. We'll add some more
texture as we go along. And I think I'm going
to add a little more right there because I'm going to rinse my brush out and because I have
all that dark paint, I'm going to grab some
white and some caramel. What I've last little bit I have left and I'm
going to go over this little area right here just to make sure I
cover up that blue. So what I'm doing here
is just going back over this spot right
here because I can still see a bunch of
the blue underneath. And I'm just lightening it up just a little
bit to help blend it back in with the colors
that I had used before. Alright, so the first few steps of our background are complete. And we'll get, we'll let that dry for just a minute
before we carry on.
6. Painting the barn: Okay, so now what we'll
do while this dries is we're gonna go ahead
and paint on this barn. So I've got some black
paint on my palette. And I'm going to take my one
inch flat brush right here. Make sure it's got
some water in it. Dip it in your black paint. Okay. So we're going to start
about right here. It's about an inch, maybe an internal corridor
from the corner of your top corner of your canvas. And then come out about, let's say, a quarter
of the page. Let's go a little further. Okay. Then you're going to
deepen your angle a little and you're going to stop
right above the grass. Then you're gonna
give it a little angled roof right there. And then you're
going to come down and just come straight
down after that. Now my paint is still
pretty wet right here. But I know about where I'm
going to finish and I'm going to put the end of my barn with a bottom of
my barn about right here. In that area. Okay. So let's get that paint it in. Alright, so I'm going to
start in this corner. I have too much
paint on my brush, so I'm just going to
drag some of it off. I made a really crisp edge with my paintbrush and I'm
just going to paint up. You can start and come down. That's completely up to you. Okay, now I'm going
to use the edge of my brush again to
paint in this line. Make sure you cover
your pencil line. We'll have to wait
until it's dry to go back and erase it. And then you hit run
the risk of making smudges on your painting. Alright, and then just come
straight down from here. And then painted in solid black. So you'll notice it's
just half of the barn. I see these paintings in
like Hobby Lobby or even Wayfair that have half of
a barn on the painting. And some of them are
at different angles. I just thought that
was really kind of a cool modern look to it. To put it only half the barn, just like I don't know, it just leads a little
bit of mystery into it. I really like it. So that's what I did this. Alright, I'm going to paint the bottom of my barn and
this does not have to be perfect because
it's going to have some dead grasses
growing over it. So your final
strokes of your bar and you want to try to
make sure you're going in a vertical pattern because, believe it or not, you may
not realize you see it, but your eyes see it. If you're just painting
all willy nilly, you're gonna be able to see those brushstrokes
in your painting. And it, it, it confuses. It's kinda like, oh, okay, I see what
it's supposed to be. But if you go up and
down on a wooden barn, it will show the up and down
strokes in your painting. And it'll be like It's actually would make it look
more realistic. Okay, I'm going to
switch brushes. I'm going to switch
over to my liner brush and fix this line because
I don't like that. And I'm going to
move my painting. Don't be afraid to move it just because I don't want to
stick my hand in wet paint. So I'm gonna come over
here and just fix this. Give that a little more,
a little more prominent. Okay, Now what we're gonna do
is add in our green roofs. We're gonna take our dark green. I'm using a color
called thicket. Oh goodness. Open. You don't need much again. And I'm just going to load
up my liner brush is clean. And I'm just going to follow the roof line all the way
down to this little kick out. I don't know what that's
called. I'm actually going to turn my
painting upside down. Start down here. So you're just going to follow your roof line. Going slightly above it. Keeping your sharp roof
corner right here. Here we go. Alright. Now we're done with our barn. Well, the first
step of our brain. All right, so let's let that dry and we'll move on to our trees. I'm just going to put in some
dead grass whisper was be grasped here on the barn. I'm just taking my liner brush and dragging color upwards. Getting less and less as
I get towards the center. Just want it on the corner. Alright, and I think that'll do this. Just some fun little
entertainment for you here. We'll call it a, an
accidental blooper. Maybe. As you can see, it's all in
time-lapse and that was done. I guess my camera accidentally
recorded this whole, entire section of this
painting and time-lapse, and I couldn't undo it, so I had to repaint
the painting and record it with a
different camera and to ensure that
didn't happen again. And so that was
the barn painting that I just finished with you. This was the original one
section that I do believe was kept in time-lapse was
the painting of the fence. So go ahead and
paint your fence. I just did super
easy black stripes using my smart 1 eighth
inch angled brush. Again, it's super easy. There's just for horizontal
black stripes and then the posts that go
vertical down into the grass. So it's super simple. And I have confidence that you can do this
again on your own. I know you can do it. Then of course we just
need to let the painting dry so that we can
move on to our trees.
7. Painting the tree trunks: Next step we're going to do is we're going to paint
a series of tall, thin trees right here. So we're gonna get our
burnt umber or dark brown or a chocolate sprinkle or whatever color it is
that you might be using. We're going to take our
six inch round brush and I put my hand here so
it doesn't drip water. I'm going to take off
some of that extra water. And I'm just gonna go
straight into the brown. And trees are one of my favorite things to paint because you don't have
to have a steady hand. You don't even have to
make a straight line. In fact, the, the more organic and cricket and
gnarled it is the better. So we're gonna start with
this tree here in the corner, and we're just going to press firmly with our brush so that it spreads out a little bit. And we're just kinda paint tree. And as it gets appear, I'm letting my brush, picking it up a little bit
to get a thinner line. And then as we come
up further here, I'm going to pick it up
even further and make it a really crooked line. Then we can branch off that way. Even branch off from here. And then I know that
looks terrible right now, but you can just
come in and just add more as you need to. Then of course some of them
are gonna go this way too. Okay? Okay, So that'll be
good for our first one. And for our second one. Let's go in and just
start right here. And don't be afraid to overlap your tree branches because they, they do just like
tangled little webs. They do overlap quite a bit. A little water to my
brush and put it in my brown paint just because I feel like it's getting
kind of tacky. One thing I do want
to mention right here is you'll notice I just came in from the outside of the trunk and I painted
toward the trunk. Sometimes that can help make your tree look a
little more organic. If your branches start to look a little repeating or like you're kinda doing
them all the same way. If you change the direction
in which you're painting, you can even try
turning your painting upside down because you don't want them all to
be matching, matching. You want them to be
kind of chaotic. And just, it'll just help it look a
lot more organic that way. So if you noticed that
happening in your painting, there's a few tricks that
you can do to help that. If you are having trouble
with these thin lines, you can move over to
your liner brush. If you want to
move over and make these branches a little. If you're having trouble getting the thin lines from
this big thick brush, feel free to move to the liner brush that
can sometimes help. Okay, so I'm gonna put just a little dead
branch right up in there. And I'll probably
put another one right over that way too. Alright, so let's see,
my original painting. I had four trees. This one, I might only need
to have room for three. Let's put one. Make this one a little
straighter than the other two. See, I don't like that, but I'm not going
to worry about it because I know that my leaves
that were the flat yeah, the leaves that we're
going to put on here, I'm going to cover most of that, so I'm not going to
worry too much about it. You don't want to put
too many branches because you are going to
see them in the final. You'll see them through
the leaves a little bit. And if you put too many, it's just going to
look unnatural. So I'm going to
stop right there. I'm going to put
another little branch, dead trunk thing right here. Trunk a little thicker. I think those little
bit more natural. Okay. So we'll do that and you know, what I'm gonna do next is I'm going to put
a little bit more white on my palette
because it'll dry now. I'm just going to take
a little bit of this. I'm going to use the same brush. I just put it in the
water, but that's okay. I'm going to use this to
make some highlight colors. We want to highlight these
trunks before we cover them up in leaves. It's just gonna take a very
small amount of paint. And just click on some click. Just said click. Give some areas of highlights to your trees that you don't
have to go all the way down. You can make some breaks in it. Put some light on
the tops of these little leaves out here
or stems out here. Just highlight some areas
you don't have to do it. You don't want to do dashes because that's not know
wouldn't look normal. But you don't have to do the
whole entire thing either. So you can see that
just by doing this, your tree just kinda
starts to come to life. That's what's great about trees, is you can have shaky hands, which I do most of the time. It doesn't matter. There's not there's
no such thing as a straight line on any
tree I've ever seen. So just go with it. Alright, so that's good enough. I'm happy with that. Most of it's gonna be
covered in leaves anyway, so I don't have to
worry so much about it.
8. Painting the details on the barn: Alright, the next thing we
need to do before we put the leaves on is put some
texture on our barn. So let's do that actually first, what I'm gonna do is
I'm going to put in some little grass for some, some variations in
the grass right here. And just to cover these, you probably will
barely even see them. But it just gives it a
little, a little detail. Okay? Then you can just do some
random ones out in the middle so that it doesn't look like
it's all just one thing. And another thing that
you can do while we have this brown here, is, let's put some grass on
the edge of the barn. Now remember this is dead
grass because it's fall. You're just wanting to
put some just something they're probably will end up covering that with
some red bushes, but at least there's something
there in the background. That's about it. Alright, so now
we're going to put some texture on our barn. Okay? So I'm going to put a little bit more
white on my palette. Oh, no, I'm going
to use the gray. I'm going to use
this timeless grade. Because I think white
would lighten my black just too much. So I'm going to take my
half inch round brush. I want a black, but I
want just a tiny bit lighter than this black. So we're going to take a bunch of black and we're
going to come a leader, the gray, and just start adding in a
little bit at a time. We want to really, really dark gray because you can
always lighten it, but it's a lot harder
to make it darker. So let's start with that
and see how it goes. Now. You'll see I have a
lot of paint on my brush. So what I'm gonna do is take this color and just white
most of that paint off. And I'm gonna come over
here and start making vertical wood grain
lines in my barn. Now, I'm noticing that that's
not enough of a difference, so I'm going to add
a little bit more gray so that it's a
little more visible. We don't have to do
the whole bar in this color or this pattern. But you definitely want
to have some areas where you can see some wood
green are some things, something that will
make it with green. And you'll notice too that
I'm not going all the way up to the roof line because I
do want some shadowed areas, so you're going to
leave this area dark. So watch. I'm just going to
start down here and that's much better and see how
that is a stripy look. Once I come up to the roof, I'm just going to let go
and see if you can see it. My dark paint is still there. I don't have to go back
in with the shadow color. So this is a dry
brush technique. Okay, cool. Okay. We can do the whole barn
and we'll go in and put on our windows in our
door a little bit later. One thing I'm noticing is I'm getting blobs of
where I stopped. I don't really want that. So what I'll probably have
to do is just go back in my pure black and just mute those
so they're not noticeable. Alright, so what I'll do
is I'll go in now with that black and I'm dabbing off the excess paint and
I'm just going to come in and just make those spots the blogged
out of my brush. I'm just going to mute
those other and less visible and it'll just
look like a fade. So I had very little paint
on my brush and I'm just fading in that shadow back in there that I took
away accidentally. You can see that. Okay, so next we're gonna
put in our Windows. I'm gonna put in
this window up here. You want to go in with your pure black and just make a square. You're going to decide
how big you want it and just make a square, leave some room for shutters
if you want shutters. And I'm using the edges of my
brush to make clean lines. Okay. That's good. I can always go in there and make that darker when I need to. Now I'm gonna go in with the
same black and make my door. So my window is gonna be
a little the window in the door or the same height because it's on the first level. So I'm gonna come over here and make my door
about that tall. I'm going to start here and
just decide if I want it to be bigger than this window or more narrow than this window, might need more black paint. I'm gonna go a little,
a little bigger, a little wider than
that window of time, just to make it a
little different. Barn doors have to
be big, I guess, to let tractors and I need a little more black paint
to clean up that line. Want this to be
pretty solid black. Okay. I'm gonna go back
into this gray color. And I'm going to
make a lighter gray than the graded before. Alright? So we're just gonna
go all in and make a gray that's lighter than
the gray was before. And if I have to,
I can even come in and add a little
bit of white. Just because I'm out
of green, I'm lazy. Alright, so what we're gonna
do with this is very simply, we're going to, I'm going to add a little
bit of water, then. We're just going to
make the shutters for our door in the window. And the window. Actually. Let's just make these
shutters real quick. I'm just going to take one brush stroke to
make my shutter door, my window frame, I
guess I should say. Then I'm just going to take my brush and just make
a frame for the window. And then again on this side. Well done. Then I'm gonna do
the same thing for the door, a septum to make my yeah, I'm gonna do the same
thing for the door. We're gonna go across. You don't have to
do the bottom of the door because the
door is obviously open. Okay, and now we're gonna do this little window right here. Just decide how big you want it. And I think that is
good enough for me. I'm going to add a
tiny bit more gray. To that color. So you can
see how blobby that is. I'm not going to use
this brush again. I'm going to put it
back in my water and I get my liner brush. And I twist it to make
it a nice fine point. And then I'm going to come in here and just give
it some texture. Put a little bit of wood
grain in my doors here. Not much. I mean, there's not
much that you need. We were adding in our
textures into the wood here. Now what I did for this
one as I just gave it a light frame. Alright. Now, the next thing
I'm gonna do, You can choose to leave off
or you can go ahead and do. I'm going to add in
that green color that I saw growing
on these barns. I think it was kinda
like moss maybe. I'm not sure. But it was really dark green and there was just
a little bit of it. So I'm just going to add some green and black together
to get a super dark green. And I'm going to
do the same thing. I'm just going to wipe most
of it off with my brush. And then I'm gonna
come in here and just do some areas of green. And if it's not a green enough, I can go in and lighten it up. Most of it was
down on the edges, on the corners from
the ground up. So I can't really
see that very well. So I'm going to add
a little more green, make that a little brighter. And I am still not
seeing that very well. So I'm going to add a
little bit of white, just a tiny bit. So I've got this gray green color that I
actually really love. Take most of that off my brush. Here we go. Just a little
dry brush strokes. See how it's like just whispers of color like
feathered on there. It's just barely there. If you go a little overboard
and you feel like, oh gosh, I've just messed it up. You can just go back
over it with the black, mute it down just to touch. Alright, so I'm going
to leave that alone. I like that just the way it is. Okay.
9. Painting the leaves and flowers: Now we can do the fun part. The leaves. These trees. For these trees, I started with a, the darker of the yellows because as you get
deeper into the tree, the yellows get darker. So we're going to start
with our darkest color, which is King's gold. We're gonna take our angle
brush that we used before. Make sure it's nice and clean. You don't want any of that
blue or brown on there. So we're just gonna go
straight into the yellow. We're not going to
add any white or anything right now straight to the yellow and make sure all
of this is dry and it is. So we're just gonna do
this technique watch. So what we're gonna
do is we're gonna go this way and that way, this way, and that way, and this way and that way and this
way and that way, you see how you're just
going different directions. You're not really covering. You're not putting leaves
on this branch and leaves on this branch and
then leaves on this branch. You're just giving
some background color to all areas of the tree area. You're going to
overlap some branches. I don't know why, but if I work in odd numbers,
things look much better. So I'll do 3123. If I tried to do four, then it starts to
look like dice. And it doesn't look symmetrical. It looks too symmetrical
is what I'm trying to say. So maybe that's a tip that would help you to I really don't
like this branch at all, so I'm going to cover
it as much as I can. Go all the way out here. And don't worry, we're gonna
do lots of different layers. But what you don't want to
do is hit this barn yet. We'll do that with
some different colors. You just kinda want
to cover a lot of the blue areas with
this base yellow color. And you don't have
to do every branch. There can be some branches that don't have yellow on them like I'm not going to
come this far down. Those will be fine
without the yellow. What I am going to do though, is put some floating out here in this brown area and even against
the black on the ground. Not a lot just yet. And this color, because this
is just the base color, we're going to get real heavy with it, with
a lighter yellows. You want to just make some
small little dots in here. There are some
small dark yellows. That would be fine. Okay. So I just put my brush
in the water and I shouldn't have just rinse
it out nice and clean. Alright, so we're
done with the gold. Let's do some golden yellow. This is just slightly lighter. You can see the difference
just looks more like mustard. And that's just a
brighter yellow. We're going to do
the same thing. We're just gonna
go straight into this golden yellow and we're
gonna do the same thing. See how the difference. And you're just gonna
make different swatches of color and there's quite
a bit of paint on my brush. I'm not, I'm not making small
little dabs of paint here. These are quite defined. You don't really have to
wait for this to dry, for the bottom layers to dry. It's okay if they marble each other and get mixed
in because there's a thousand different shades of yellow on the trees
and the fall. So it doesn't
matter if they mix. And lots of times
trees themselves are, the leaves themselves are
all different colors. Now here's where you
can start to kinda go in and put leaves falling on the the barn. You just don't want to have
any like really huge ones. Just here and there. In my painting,
I'm going to come, my leaves are going to float this way for falling this way. And I've noticed I
didn't put any gold or very bright yellow over here. So we'll do that. I think for now
we're good there. So now I'm going to
bring my bright yellow, pale daffodil color and I'm
gonna do the same thing, but I'm gonna get my
little angle brush again, the small one, this one. And we're going to just dip it right into that
bright yellow color. You see the differences.
There's a dark yellow and medium
yellow, light yellow. So we're gonna go
in with a light yellow and we're going
to do the same thing, but we're just going to make
smaller leave patterns. And maybe more frequent. Just all over the tree. In the sky and on the barn. Want to do too many. Less is definitely more here. But make sure you're going
in all different directions. You can go pretty crazy up
in the tree if you want to. So just going back and forth using quite a bit of
paint on your brush. And we're also going to add a tiny bit of white to this bright yellow to make
it even brighter. Okay, So I'm going to
add a little bit of white to this little
section, a yellow. You don't need a lot
here. We're just wanting a really pale yellow. And we're just gonna
do that again. We don't want it to look white, you still want it to be yellow. And you're probably not going
to put very many of these. Definitely want to be sparing with the bright, bright yellow. Go off your page. If you feel like you're painting is looking a little framed. Sometimes that happens. I'm not gonna put
any more on my barn. I don't want him to
be that covered. So definitely just pause and look at your painting and think, do I need to add more
or is what I have good? Because you, there
is such thing. There is such thing as doing
too much for my painting. I feel like I'm
right at that point where I just need to stop. Okay. Now, I'm going to
work on these bright red little flowers
that I have here. I'm going to use the same
small little angled brush. And I'm just going to decide where I want these
and how tall I want them. I think I do want them kinda just poking their
heads at a little over these corner of the barn. That's way too much water. That's okay. It'll dry. So I'm just making
these little binds. They don't have to
connect necessarily. I think I'll put some right
here, but not that many. So now we're almost done. You guys, I'm gonna go in with a berry wine or the mulberry. Some, some brands is very wine. It's just a dark maroon color. Plum. With the same little brush. I'm gonna come in and just, we're going to just
put some polka dots. Not polka dots, but
just dots of color. You want to cover
the, the stems. Stems are just there so that it connects it to the ground. If you don't put in the stems and it just makes
it look like you have flowers floating in a field and it doesn't
make sense to your eyes. You want it to resemble actual plants to give the impression that
there's plants there. Right now, I know it
doesn't look like much. We'll see what I mean by the grass and the background being
covered mostly. Okay. We'll come over here and do it. Give you some color. Notice I'm going right over
my trees, my tree trunks. Okay. Now we're going to go into
the red, the bright red. And we'll do the same thing. But focusing more on the tops
of these little flowers. So basically what
you're doing is with this dark mulberry color is you're putting in
the shadow layer. And now you're going to
put in the vibrant layer. And there's just a
tiny bit less of it. It gives it depth
and makes it look like there are flowers
behind the flowers. Now what I'm gonna do
here is totally optional. I'm just going to
mix a little bit of these two colors together to get a whole new
color in there. Bright purple. Purple
is a great fall color. You can add some
of that on here. It's like a vibrant purple. I think it kind of mutes down
a little bit that red too. Okay, now what I'm gonna do is I'm going to take a
little bit of this white. I have a tiny bit of white here. I'm just going to
add this right here. And then we're
just going to make a highlight color and you want even less of
the highlight color. You're going to stick
to the very tops. If you feel like
there needs to be a few anchoring it down. Alright, that you guys is
the painting for all done. I think it looks fantastic. I love the vibrant colors
and I love the fall. Look to it. And look how different
they turn out. And this is the first one
I did as my test painting. And this is the second one. My trees look
completely different. I love that. Same
person can paint the same painting and still get a completely
different look. Alright, so that's the painting and we're just
gonna let this dry. And I would love to see your paintings in
the Facebook page, so don't be afraid to share. No one's going to criticize you. It's all about encouragement and growing and getting
better and better. So I'll see you in there. Thanks guys.
 Christa Davis, I can teach you that ANYone can paint!