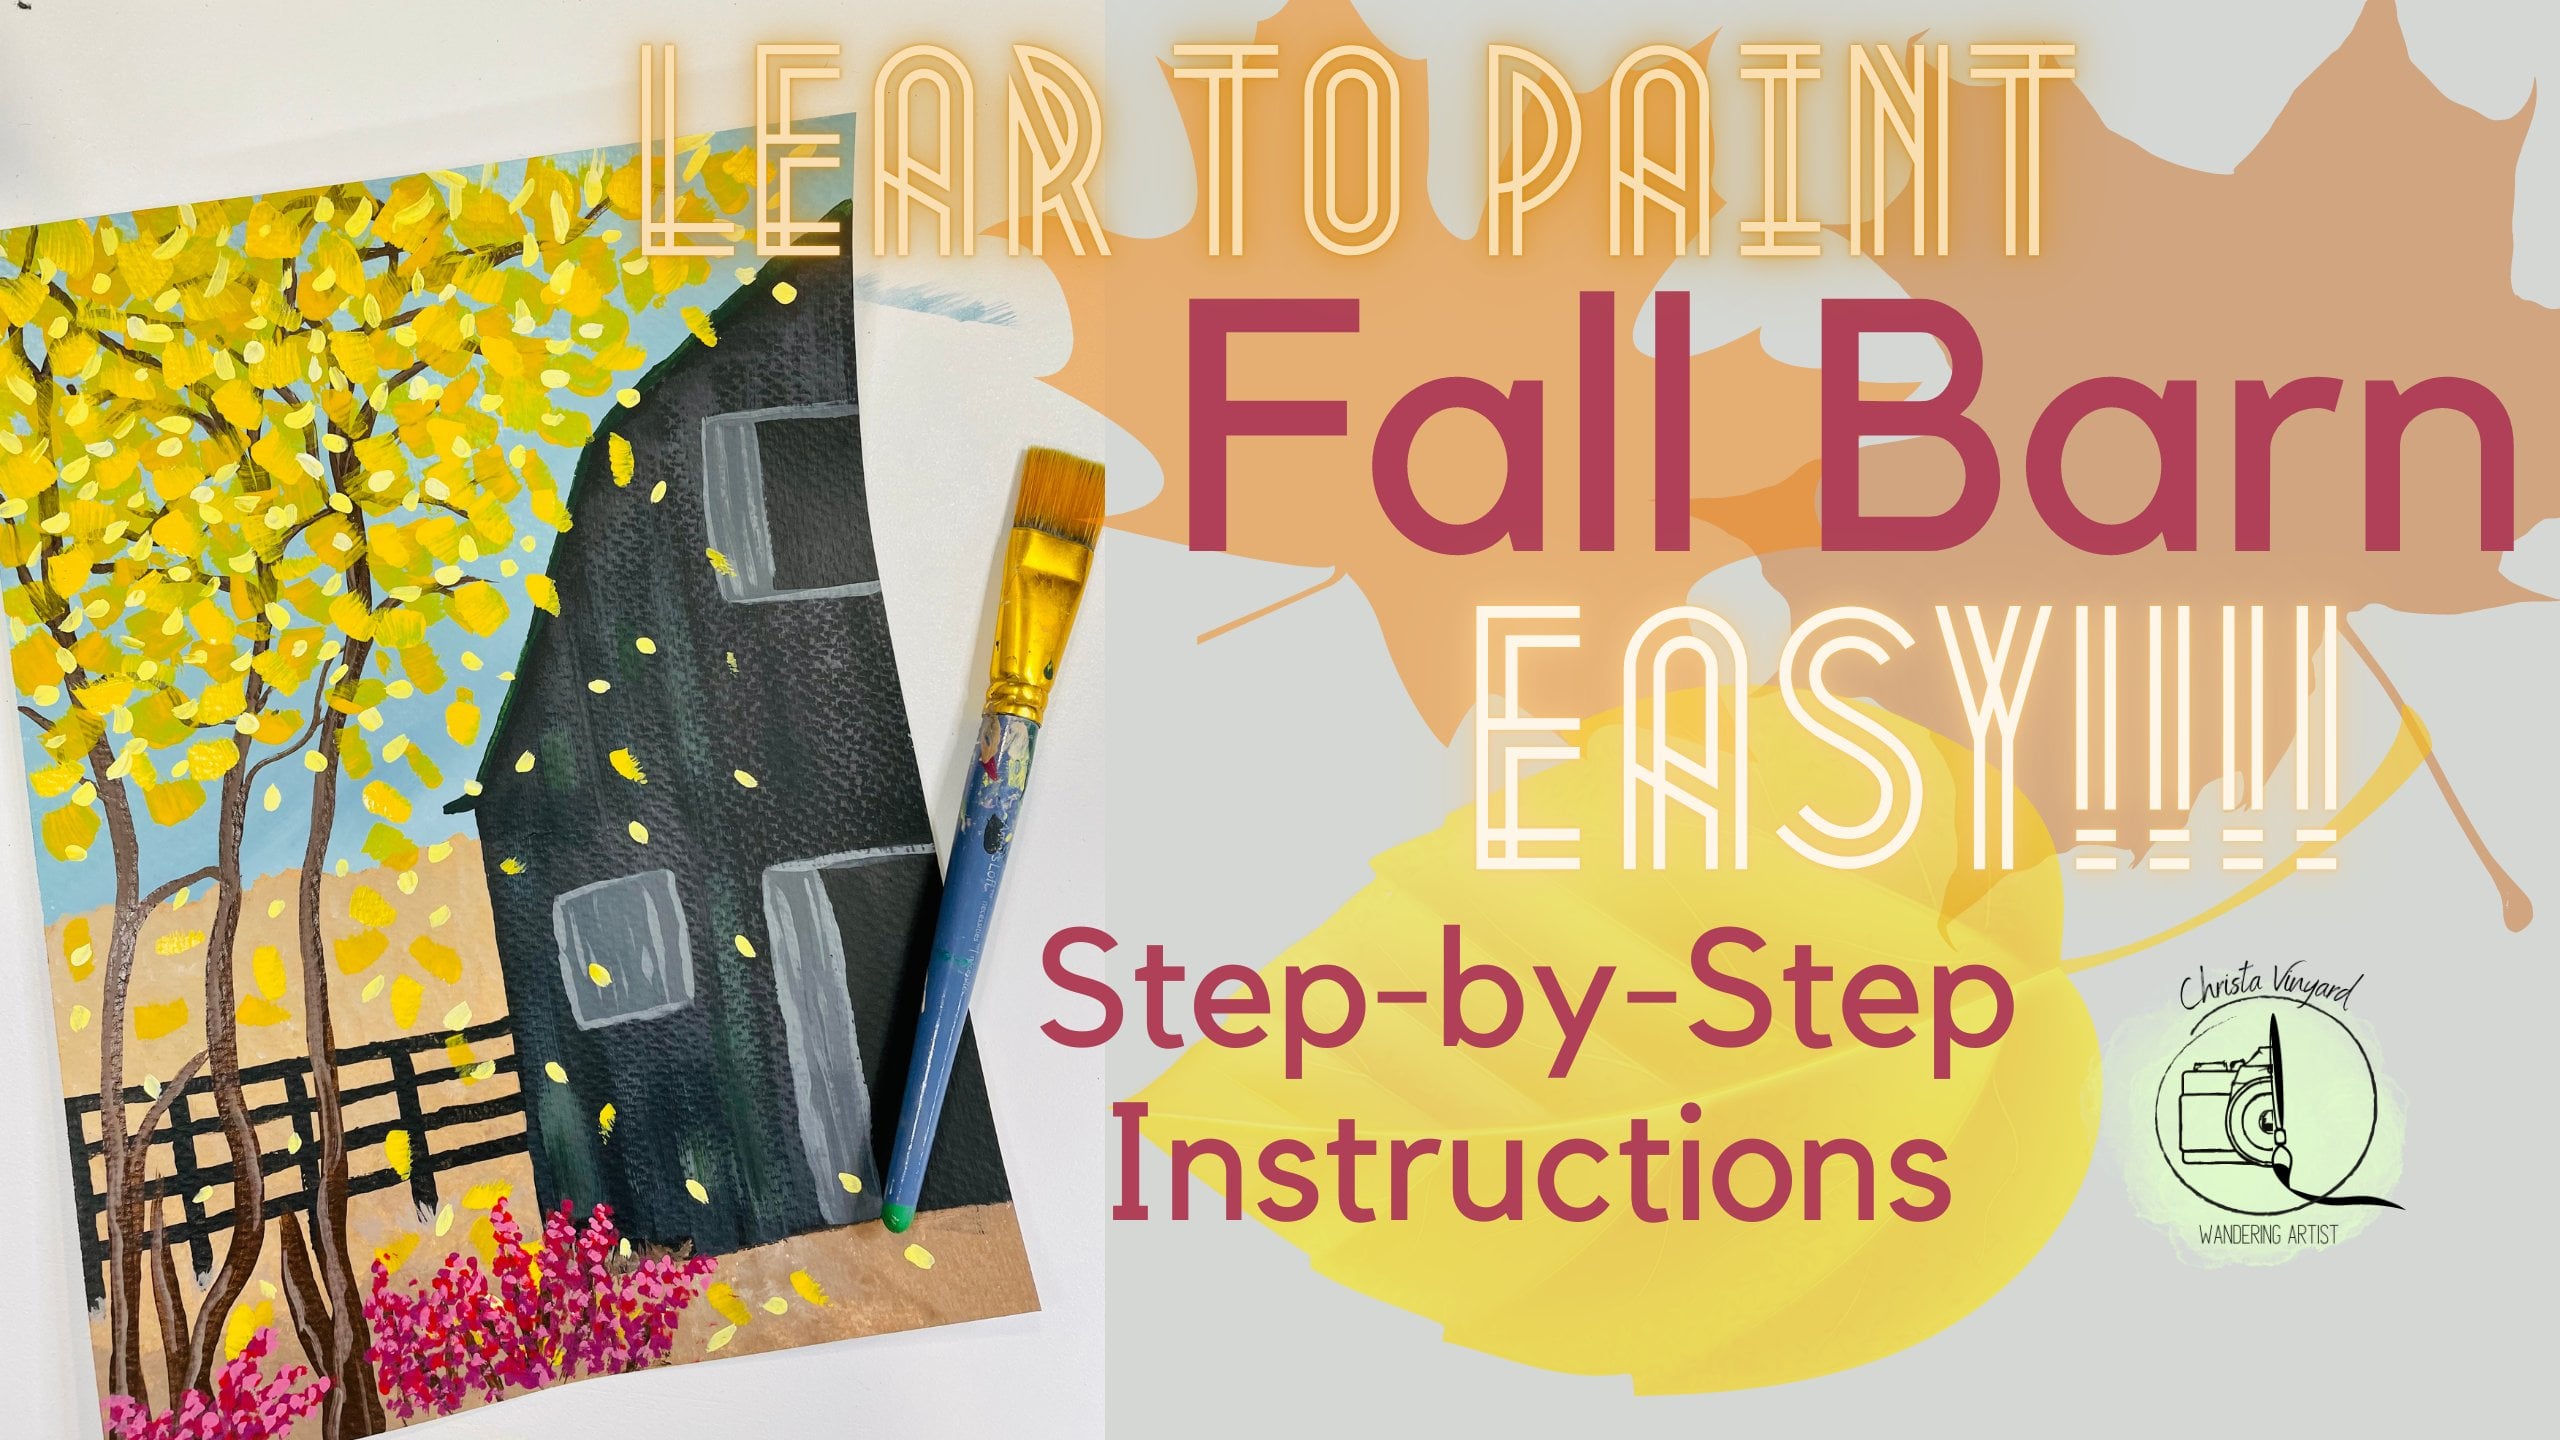
Transcripts
1. Learn to Paint a Christmas Ornament: Hello, artsy friends. I'm Christa and I am super happy to be painting with
you this Christmas season. In this painting lesson, we will practice our bokeh
effect and learn how to create an ornament that has shading and areas that
make it appear to be 3D. Please remember that you can use any colors you like
for this background. The lights or even
the ornament in this painting can be
whatever color you like, whatever you already have
on hand is perfectly fine. However, I will provide
exactly what I used in this painting just
to case you want to replicate exactly
what I've done here. The brushes I used
for this painting are my two inch flat brush. My half-inch flat brush, a quarter-inch flat brush
in number six round, a number to round and
a zero liner brush. Starting up at the
top with the black. I used black, red apple, mountain, forest
green, skyline blue, warm, buff, cream
color, burnt umber, pale daffodil, white, and a metallic gold
paint at the bottom. The skyline blue in the metallic gold are
completely optional. You can still complete this painting without
those two colors. So if you're ready, let's go to the table
and get started.
2. Painting the Background: You'll notice I'm painting
on acrylic paper. I'm not using a canvas
for this painting, but you are welcome
to use whatever Canvas you like
and whatever size, just scale the painting up
or down in order to fit it on whatever size canvas
you choose to use. Right now, I'm being lazy
and I'm just squirted the warm buff paint all over my canvas and I'm taking
my two inch flat brush. I dipped it in a
bit of white paint and I'm gonna go
ahead and just paint that warm buff all over
the canvas in vertical, up and down brushstrokes
and actually forgot to put my protect your board down there so that my tarp
doesn't get all dirty. So again, I just am painting
on this cream color paint. And I have my white on my brush in addition to
this cream color paint, just to give it a little bit more interest
in the background. I'm just making sure that I
have long even brushstrokes. I'm looking at my
background and I'm thinking what can I do to make it a little more interesting? And I think I'm going
to add a couple of little swipes of this skyline blue paint
just in the background, just to blend it in nicely. I don't want it to
be too obvious, but I don't want the
background to be just solid cream either. So I'm just going to blend that in just a little bit here. I'm gonna do the same
thing with this white. I'm just going to add a
few sections of white.
3. Painting a bokeh background: I'm going to put my big
flat brush away and grab my half inch flat brush. That's the next size, smaller. And I'm going to use some
of my light yellow paint, the pill daffodil. I'm going to water it down a lot because I want my paint
to be pretty translucent. So I'm going to
take my half-inch flat brush and I'm just going to twist it to make a circle. And you can see how
translucent the paint is. It's really difficult to see. I'm just putting my brush
flat on the canvas. I'm holding the paintbrush
straight up and down. And I'm just twisting the brush in my
between my thumb and my finger didn't make it
go in a perfect circle. Some of them aren't
quite the perfect, but they can be easily be fixed. So I'm just going
to speed this up a little bit just to
cover the rest of my Canvas and my
yellow bokeh dots. So put several of
the yellow dots on your canvas in random order. And I'm going to switch to
my smaller half inch brush. This is the quarter inch brush, and I'm gonna do the same
thing in my white paint. I got the white paint on my
palette and I'm just putting a lot of water in there to
make it really translucent. And I'm going to make sure
that I overlap most of these yellow dots with a
new circle of white on top. And I'm also going to
be putting some of the white dots by
themselves as well. You can note here too,
that if you don't have a variety of flat brushes
to make these circles, you can use the corner of
any brush that you have. You can even use
your round brush. Just make a circle pattern with very translucent
paint and paint it in. That's really translucency of the paint here is what makes
it look more like bokeh. It's also important here to make different values of
transparency in your paint. You want some of the
circles to be brighter, more densely colored
and pigmented. And you want some of
the circles to be very translucent
and barely there. And when you layer all of
those on top of each other, it really does start to
look like a bokeh or a blurred light background that you sometimes
see in photography. So just keep adding those layers and make your circles
different sizes, some smaller, some bigger. I'm going to do
the same thing in my skyline blue here that I have that I added
a lot of white too. This is a completely optional. You don't have to do the
three different colors. You can just stick with the
light yellow and the white. You can even just do
white if you wanted to. I've seen some variations of this painting where they have greens and yellows and pinks and purples and all kinds of
different colored lights, bokeh lights in the background
and it looks really cute. So you'd this part,
you can just make your own and just get
creative with it. I decided to add a fourth color. And I took my mountain
forest green and add a little bit of white
just to lighten it up. And I also of course
put it a lot of water in it to make it
really translucent. So for my final later layer, you've noticed that I
moved to my round brush and I'm just now using
pure white paint. I've stopped watering it down. I want this the final
layer to be bright white and layered on
many of the other dots. This is definitely one of those situations where you could easily just put too many. And I'm on the verge of
doing that right now. So just remember that
sometimes less is more. When you think you're done. I always like to look at it from a different angle just to
make sure it looks okay. What I'm doing here
now is I'm taking my small liner brush into
my pure white paint. And I'm just putting a little
bit of a reflection on these translucent circles just to give them a little
bit something extra. This is completely optional. I'm going to finish putting
the finishing touches on this background and then I'm going to let this dry
before we move on to painting the branches
and pine needles.
4. Painting branches and pine needles: So after I let my
background dry, I took my number
eight round brush and dipped it into my burnt
umber paint, my brown paint. And I just printed painted in some branches coming in from
the left side of the canvas. The recording didn't work, but I just figured it was a pretty easy thing to
paint just by looking. You can copy it if you need to. Know what I'm gonna do here at the bottom of the canvas is take my liner brush
and dip it into the mountain forest
green and start painting in some wispy pine needles. I'm holding my brush
straight up and down and I'm applying very little
pressure to the canvas. I'm just letting the very tip of the brush paint in
some thin lines. And I kinda angling them out on each side of the
branch that I painted here. Don't be afraid to pause
and take a look at each branch to see if you need to add more or just move on. I'm turning my Canvas
so that I can get a better angle here for
these pine needles. And I'm also trying
to avoid setting my hand in the pine needles
that I just painted. Don't be afraid to turn your Canvas any which
way you need to. It's also important here
to notice that I'm not afraid to paint
over my brown line. I feel like sometimes if
you try to put each piece of pine needle on each
side of the branch, it doesn't look realistic. You want them to overlap. You also don't want
your pine needles to be exactly the same angles. Some of them are, go a little awol and go
in different directions. You want this to look
as organic as possible, so don't worry too much about everything being very perfect. So here you can see
what I mean about painting over that
brown stem line, how it makes it look
a lot better if you do kind of hide that branch under some of
those green pine needles. I'm noticing here that
I have a little bit of a awkward bald spot
that I need to fill in. So I'm going to paint in with my brown paint
and my liner brush. Another little branch
coming off right here. I'm just rinsing out my
brush and putting green pain back onto my brush so I can
paint these pine needles. I think I'm going to add another tiny little peak of pine needles peaking in
from the edge over here. I'm going to put another
little pine branch coming in from the left over here a little
higher up as well. Just to fill in some of
that negative space. I'm gonna go into my brown
and just quickly paint in the impression of a branch being in those pine
needles there. So what I'm doing
here is just adding a little more brown
paint to my brush. And I'm painting in
some darker areas on the bottom parts of the branches just to give
them a little bit of shadow. And then I will
do the same thing after I add a little bit of white to my brush to paint on some highlights
on the branches, on the top half of the branches to give a little bit of a
highlight to each branch.
5. Painting the Ornament: Okay. So after you let that dry, I'm going to use the bottom of a jar of paint that I have and you can use anything
that you have on hand. I just happened to have
this sitting close by. You can use a lid to a jar or just anything around that you have that's
pretty small, not anything too big. And I'm just going to trace the circle all the way around so that I have that perfect round
shape for my ornament. So now what I wanna do is take my bright red paint and mix a little bit
of my burnt umber, my brown into the red paint to create a really
dark maroon color. And we're going to just paint in that circle the
solid maroon color, the dark red color. And this will serve as our
shadow layer for our ornament. She just paint
that in being real careful not to go
outside the lines. Just keep painting until you get a nice solid layer covering
the entire ornament. Now that I have my shadow layer, and I'm going to start
adding in the pure red. And I'm just going to add, I'm not even going to
rinse out my brush. I'm just going to slowly
start building up a bright side by slowly
adding in more red paint. Now you might have to let this dry for just a few minutes. If you notice that your paint is just moving
around, wet paint, just give your ornament
about five-minutes to dry before you start to go in and add your
brighter red layer. Now, while my red layer dries, I put a little bit of black on my paintbrush and I'm just
going to very carefully and slowly take
my time and paint a black line all the way
around my ornament here. And I can blend that in some just paint that black
line all the way around. And this is going to create
that 3D shadowed look, that it gets darker as it
goes around away from you. Once you have it
outlined in black, you can blend that in
toward the middle. Just to make your shadow
layer a little deeper. Again, you might want to
give this just a minute or two to dry before you
add any bright red pane. Alright, so now that minus
dry for just a few minutes, I have bright red on my paint
brush and I'm just adding in some highlights
and I'm focusing more on the left-hand
side of the ornament. I want that one to be
a little bit brighter. And it's just going to slowly fade into the darker
shade on the right side. So while my red dries again, for this next step, I'm going to start
working on the gold. I don't know what it's called, the ornament hanger.
We'll go with that. So right now I'm
just going to create an underlayer of
the pale yellow, the pale daffodil light
yellow that I have. And I'm just going to create this little part of the
ornament that holds the string. You can make this any
design that you want. I'm keeping mine real
simple and just having some little pyramid
teeth at the bottom. But you can make this super
fancy if you want to. I'm going to paint in my ring. That'll hold might hang on. I got a big drop
of water and let me clean that up before we go. Just dab it without moving. And I should be better. Okay. So just painting the rain that's going
to hold the string. I'm going to clean
off my brush and add the tiniest bit of black to
the very tip of my brush. A very, very small
amount of paint here. And I'm not putting any
pressure on the Canvas, hardly any at all. I want a very, very thin line. I'm just going to go up over that branch in front of the gold ring on this side and behind
it on the other side, and behind the branch
coming towards you. If that makes sense. I'm going to clean
off my brush and then try to add on
another layer of the yellow for the part
that holds the string. So that is a little
more covered there. Now that my red ornament has
had a little time to dry, I'm going to add go back with my my round brush and
add bright red paint. And just paint in that left side again so that the highlight
is on that side. I'm just going to keep adding in that red paint and I'm not covering that black edge. I want a little bit
of that to show all the way around the ornament. I'm also keeping
the highlights to the top portion of the ornament. And I'm letting the
bottom of the ornament stay the dark maroon
shadow color. I'm just putting in that
dark red shadow tone back in there that I over
painted a little bit. Adding a little bit of black to the bottom of the ornament. Making shadows on either side. Going back in with that bright red to put in that
middle highlight. It's really just a fun little back-and-forth
between the shadows and the highlights
before you get it right where you like it. So now that I have my shadows on my ornament where I like them, I'm gonna take my
bright white paint and I'm just going
to come in here with my liner brush and
paint in a reflection. I'm gonna do a long curved line toward the back of the ornament. And as you get closer
to the center, your lines will get
shorter and shorter. Well, my ornament dries. I'm going to add a little bit of the metallic gold
paint to my palette. And I'm gonna go over my
yellow ornament top here. And I'm gonna go over it with that gold paint just to give
it a little bit of shimmer, a little bit of detail. And I'm really just covering covering that yellow
with this gold paint. Gold paint, metallic gold
paint can be very translucent, so I use that pale yellow as and under paint layer to help that gold paint
stand out a little bit. You can use silver, you can use white or black. It really doesn't matter just whatever you happen to prefer. I added just a tiny bit of white paint to my liner
brush to highlight the string holding my
ornament on the branch.
6. Finishing details: And I'm using a little bit of my white paint to mix in with my brown to add some
highlights onto my branches. I'm not completely
covering the branches. I'm just very quickly painting
in a dry brush stroke. It's definitely a less
is best situation. You don't want to cover
the entire branch. And of course, while I was
painting my highlights, I put my hand in my red ornament and messed up my reflection so I can just real quickly go
back in there and fix that. So now I'm feeling like my pine needles
are a little flat. So what I'm gonna do
is add a little bit of white to the green that I have left on my palette and
get my liner brush in there. And I'm just going to add a few highlighted pine needles to my little bunches
of pine needles here. And I'm just doing a
few strokes to lighten each or not to lighten them, but just to add a few of
the lighter shades of green so that there's some shadow and some highlights
in each little section. I'm going to add a
little more white to my already lightened green and then put some
even brighter highlights, but just more towards the tip of each pine little
segment here. And at this stage you can pretty much call your
painting complete. Some people choose to write a word on their
ornament and cursive or in a nice-looking print that is completely optional
on totally up to you. But for now this is the finished painting and
I hope you enjoyed it. And I can't wait to paint
with you again. Thanks. Happy Holidays guys.
 Christa Davis, I can teach you that ANYone can paint!