Transcripts
1. Intro: Have you ever wanted to paint a beautiful underwater
scene watercolor in a way that feels
simple, fun, and relaxing? In this class, I'll
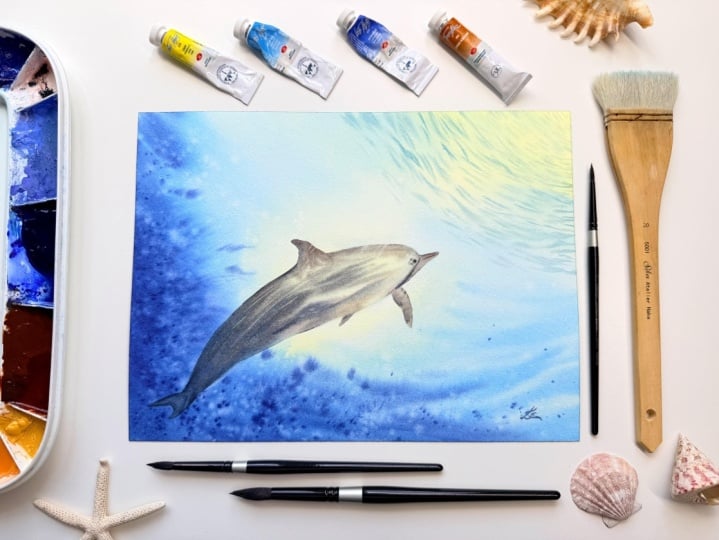
show you how to paint this beautiful dolphin swimming beneath the water surface, using soft watercolor techniques and step by step guidance. We'll begin by learning how
to transfer our drawing into our watercolor paper so
you can start painting confidently without
worrying about the sketch. Then we'll move to
painting the background, using the wet and wet technique, allowing the colors to
flow naturally so you can create that soft
underwater atmosphere. We will also add plats and textures to give the painting
more movement and life. You will learn how to
paint the surface of the water as seen
from underneath, and how to create depth to the scene that feels
spacious and full of light. Once the background is complete, we will bring
everything together by painting our main subject. This beautiful dolphin using a few simple steps that make the process approachable
and enjoyable. Along the way, I'll
share helpful tips that will make painting
underwater scene much easier and help
you understand how light color and transparency
work in watercolor. This class is designed to be relaxing and enjoyable
and it's perfect for beginners to intermediate
watercolor artists who want to explore
painting ocean scene. By the end of this class, you will learn the
techniques to paint any underwater creature that you fancy without any extra support. If you're ready to paint this
beautiful dolphin with me, gather your paint supplies, and let's just jump right in.
2. Class and Project Overview: Welcome to the class. In this class, you will paint a lovely dolphin swimming
beneath the surface of the water while learning a few simple techniques that make the process
fun and relax. You'll learn how to
transfer your drawing onto the watercolor paper
so you can preserve the sizing on the
surface of your paper. You can find the outline of the dolphin in the resources
section of the class, along with my finish painting and the watercolor palette
used in this class. After that, we'll paint a soft underwater background using the wet-on-wet technique, creating depth from an underwater
perspective and how to also add platters for
beautiful, interesting texture. In the final steps, we bring everything together. By painting the dolphin in fun, easy, and approachable stages. And as a bonus section, I will also show you how to
flatten your paintings so you can easily frame it or
gift it to a loved one. Your project for this
class is to recreate this painting using the
instructions of the class. Once you're ready, please share your projects in the project resources section of the class, and you can also start
a discussion and ask me any questions that may
arise during the class. Feel free to leave me a review so I can learn what you liked in this class and what else you would
like to learn from me. Now, let's discuss the
inspiration behind this class.
3. The Inspiration behind the class: So many of you have been impressed by this
dolphin painting. So I decided to make a little class to show you
what was the techniques behind this painting so you can create your own composition or you can be happy just
with one dolphin. It's perfectly fine. It's completely up to you. You just position
them as you wish. And as long as you're
using the same techniques, you would be perfectly fine. I'm using the same techniques
for all of my animals. So I hope that's helpful.
I hope you will enjoy.
4. Materials: For this class, we use 100% cotton watercolor paper
by Saunders Waterford. I've chosen the cold pressed one because I like
the texture in it. But it's up to you. What paper would you choose? Also, if you don't
have Sandra Swatford, any good watercolor paper will
do the job like like Arch, Windsor, Newton, or Baohong. It's completely up to you. We'll also use Plexiglass or any non absorbent
surface of your choice. We'll just water our paper on both sides so we can create
such a nice smooth blend. And we don't have to rush. We'll also use a plastic
palette or metal palette, whatever palette
you have available. And I'll use only a few colors. So any standard watercolors
will do the job. I may use a paper tissue. We'll use two jars of water. Once I'm always using to
rinse off my brushes, and the second one I'm using
to pick up a clean water. Also, I always use a cotton rag to dub off the
excess water of my brushes, and, uh we'll use a pencil and eraser to
sketch our dolphin. For applying the big
amount of water, I'll use the silver
til hack brush, but any large size brush,
who will do the job. And if you choose to optun for smaller size instead of a four, you can use a standard
large round brush. It will be perfectly fine. When we're speaking
about brushes, today, the main brushes that I
will use for the painting, two large round brushes, preferably soft so we can
apply nice smooth blends. But if you have
synthetic brushes, that would be perfectly fine. Nowadays, a lot of
brands are creating very good synthetic
brushes that are perfect imitation
of natural square here or natural sable hair. And I will use a small
small round brush. This one is synthetic. The brand doesn't really matter. A small round brush that have a very nice tip will do the job. And round brushes are
size eight and size 12. And I'll also use flat brush. This is for the
lifting techniques, and I may use a fan brush. So the fan brush, I used to smooth out a surface
if I drop a little bit of paint in areas that are
not intended to have it.
5. Class Project - How to transfer your sketch with a pencil: When you're ready, just go to the resource section
of the class, grab the pencil sketch and transfer it to your
watercolor paper. If you don't have
transfer paper, my favorite method to this
day is to use four B pencil. I just scrap on the back of the paper.
Let me just show you. So for example, that was the
pencil sketch that I created for the large painting that we use as inspiration
for this class. And I just outline it gently
first with a normal pencil, then I thicken up the lines. And once I'm ready, I just added a thick layer of graphite on the
back of the paper. Once your paper is ready, you can just position
your sketch as you wish. And once you position
your sketch, you can tape it with
a standard tip. Just make sure it's
not very adhesive, or you can tape it
up to your clothes a little bit to loosen
up the adhesion, so it's not going to stick
very very hard on your paper, so it won't remove the
sizing of the paper. As long as you
keep that in mind, everything will be
perfectly fine. I usually tape it on
two or three sides to ensure that it won't
move because once your paper move it's
very hard to position it exactly on the same
way that it was before. And I'm using the
second paper to ensure that I'm not scrubbing a lot. I'm not erasing a lot on the surface of my
watercolor paper. So once I transfer my sketch, I usually use HB pencil. You can use mechanical
pencil or any standard one. It will be perfectly fine. And yes, once you're ready, you can take your paper
and you can put it in a bathtub for 10 minutes
and soak it very well. Or you can take your hag brush and
water it on both sides. Whichever is your
preferable method, do that. And it will be great once
you're ready and you apply I'll show you also how to apply the watercolor on the surface on the front and the
back of the paper. And once you're ready,
just join me for the next part where where
we'll wet the paper.
6. Classs Project - Painting the Background: We'll start by applying a large amount of water
to our watercolor paper. Make sure that if you're
using large brush, the furrow of the brush is
not touching the paper, so it's not scoring it, or in this case, this is Hake brush, so the Hake the wooden part of the hag brush won't
touch the paper. But other than that, you can
use pretty both movements. And this process usually takes me five to 10 minutes
just to wet the paper. In this case, we won't do
a lot on the background. So even like 5
minutes of wetting the paper would be perfectly fine because we also
apply light or, we also apply lighter colors
when we start painting, and they shall keep our
paper with felongo. Once you're happier a little
bit with the foreground, we go back to the
back of our paper. And if you are using
good professional paper, you don't have to
worry on which side exactly did you put your
pencil sketch because most of the professional
quality papers have a good sizing on
both sides of the paper. So you don't have
to worry too much. Is that the correct
site for your painting? Now we will apply
a lot of water. You can see that I have puddles that's not
bothering me at all. I want to add as
much water as I can. I'll do that a few times in
the back and the front of the paper until I'm happy with how much
water it have absorbed. The paper itself, it will become heavier because it's cotton. So it's made physically
of cotton fibers, and we want to ensure
that our paper is wet, not just on the surface, but we want to ensure
that our paper is wet inside the
fibers of the paper. And then we can paint
for a very long time. And now we get our Muslim
square or kitchen towel, wherever you have, we'll place
it on top of our painting, and we'll remove the
excess wood of it. And now once you're happy
with how wet your paper is, we can get our Muslim square or any cotton rack that
you have available. We'll put it on
top of our paper. A This way, we're removing the excess
water and we're removing all the extra ebbles that may be sitting below your paper. You can lift, if you can
see some extra water, clean up your surface, and we can start painting. So now, the first
thing I will do is I'll wet the entire
front of the paper, but I won't use too much water. I will use just a little bit. And here in the
middle, I don't mind. Like I can start from the
middle or from the ends, and just make sure that
you are not introducing too much water this
time because we want we want the pigments to
be floating a little bit, but not too far away. Now, after we add
that layer of water, we can prepare our pigments. And for this stage of painting, sometimes I'm standing like
now I'm currently standing. I'm just waiting up my size
12 brush at the moment, very well with water. And I add a little
bit of water here. Two places. So if your paper palette is not with one large mixing
space like me, but you have instead, small rectangles,
maybe or squares, you can add water to two places, and the first one will
start with our yellow. That's too yellow. Like, this is too much for me. So I wash my brush. I don't want um I don't
want it to be that vibrant, to be honest. I
really don't want. So the three main colors that we use for our painting
are lemon yellow. We'll also use French tomarin and Burnt Sienna
for the dolphins, and we'll use a lot of ultramarine also for the
back of our painting, and we'll use a little bit of fallow blue for for the water, and a little bit
of Indian train. So I think now my yellow, it have really nice
water consistency. So I'll start applying it to the upper part where
the light is coming from. And we can add, we can intensify the yellow a little
bit more on the upper part. We'll also add a little bit
of yellow to our dolphin. This is very, very watery paint, and we have also a little bit of pigment here and
there. Don't worry. We can have a little bit of
light around our dolphin. And that's what the
yellow is indicating. It's just indicating
some of the light that's coming with the sun rays. On the surface of the paper. And if you have bottles
of water there, you can grab your paper tissue, and you can just go around and remove all the
excess water that you have. We don't want to run back
towards our painting. So now we have established
solo the yellow. Let's start with palo blue. We won't mix them directly. We just start painting with
a little bit of fiel blue. So we'll have our cool
colours on the background. And don't worry that
we are covering the dolphin a little
bit. It's fine. I'll add a little bit more water here some lightening
up this part. And if you are just
using round brush, this is what you can do. And I'll show you also, if you have a hat brush, you can do such a
nice effect with it. So if we grab our hat brush, let's add a little bit of
water so it's not too dry. And we can just smug it around. And because it holds
so much water, it creates very nice
and smooth blends. And the lines are
just interconnected. It's not leaving
any harsh space. Here, we can overlap
a little bit. I'm not blending it entirely. I'm just putting a little
bit of the paint over. And if you don't have
hag brush, you can just, you can just fill up your water brush with a
little bit of painting water, and you can start
overlapping, just like so. And so this way I'm going from top towards here, the
middle of the painting. And once I hit the
middle, I'm lifting up. So I'm using nice sweeping
motions like that. I'm not keeping a lot of
control over my brush, and here I cannot just
tang a little bit. And as you can see, just
because we are using pale blue, our painting is not like
this part is not very deep, so this is where we'll add a little bit of
Indian trim blue, and that will add
warmth as well. And in general, it's
good to have warmth when we're thinking
about our foreground. Just add little
movements to the water. We always start from the end of the painting towards the middle. If you want to create
such movement, and also if you fancy to create
some wave like movements, you can always start
from the middle. Just make sure that your
brush is not too wet. If you want your
paint to stay in one place to here I'm
painting wet-on-wet. And this is this is the most fun part of the
painting, to be honest. Here, let's add some
Indian trim blue. And I'll start from the bottom because this is
going to be our darkest part. Don't worry about the puddle. We can come back and pick
up all that extra water, like so, slide down your tissue. You can hold it even for
longer. Don't worry. Our paper, because we
waited on both sides, it will stay wet for
very, very long time. So we don't have to rush at all. When you are passing by
with your tissue, mixture, I'm not using the
blue part to wipe the yellow because you will mix and you will
create green line. So try to turn your
tissue a little bit and use like a clean site when you're
going around the yellow. I hope that makes sense. And we'll grab even
more dingn here. I will intensify the color
by adding a lot more of the paint to water so you can see that my
pigment is a lot fick. It's still not like
it's still moving a lot because I have
also a lot of water. But you can see when
I'm putting it down, it's already a lot darker
than what it was before. So I won't cover everything. Like, I won't cover
all the blue parts. And if you are worrying that you are covering a lot
of your pencil sketch, you can You can also wipe
clean your brush very well. You can clean it on
your cotton rack or on your paper tissue, remove all the excess water. This is only if you're worrying, like that you cannot
see it and follow the lines of your dolphin and
you can pick up the paint. It's not necessity. I feel that and you can grab look a little bit
more yellow here. Still want our paper to be
nice and moist. Mm hmm. C just grab that extra
color. Just a little bit. This is only if you're
worrying about it, okay? You don't have to. I'm I'm not really worried. I cannot see my pencil
sketch ideally, either. So sorry, I cannot see my
pencil sketch perfectly. Let me get closer.
Let me sit down. Okay? So I'm getting closer. I don't want to have,
like, super dry. But as I said, it's totally not necessary because you'll be
able to see your sketch, especially once you
dry your paper, it will lighten up a lot. I want to add maybe a little bit more dark like that
here and there. And keep one eye
on the yellow part here because we don't
want it to dry. We want to keep painting there as well whilst
it's still wet. So now I'll grab a little bit of clean water and I'll add few
splatters here and there. Just like that, just
hold your brush for the handle and you can
tap on the few gently. And the bigger the brush, the bigger your
splatters will be. And the smaller the
brush you choose, the smaller the
splatters will be. So here we saw like very, I add a lot more air and light
the water to our painting. I will now grab a little bit
of the indentrinble itself, load my brush, and I'll a few splatters
with the indentran. And here, you can cover
your painting gently, maybe with some tissue
or something because you don't want splatters
on the upper part. And I'll try to protect a little bit with
my hand as well. And you can go back
and forth, as well. So if you lost all the water
splatters that you added, you can also go back
and add some more. And if you want even
more crazy texture, you can always add a little
bit of salt, perhaps. It looks very nice. But even just by doing that, it will create very,
very lovely textures. You can use like in my case, the small size brush. It holds a lot less water, so the splatters
are more prominent. They are darker. Okay. I think
that's a lot better know. Okay. And here is so perfect. So that sounds perfect, but I think it's perfect because we had
it in the lessons. So if you're worrying
that you're going to mess up here with your painting, you can just wash your brush. Make sure it's nice and clean. So we need nice clean water. Take all the excess water, and we just blend gently because our paper is still nice and
moist and the fibers as well, so the surface still stays wet, and we can blend that. And you can also
use your fan brush here and just do that. But that's picking
up a little bit of the water on the
surface of our paper. And now while this is still wet, I want to add a little
bit of the waves, and for that, I'm mixing the yellow with the blue
that I have leftover. I won't add any more colors,
whatever I have here. I will add a little bit
of water for some places, and I'll take all the excess. Now here, we'll start creating short short lines, just like so. You just press a little bit
and left, press and left. Make sure that you are using a little bit
more yellow and a little bit more blue
in certain places. Don't make the lines, make them a little bit random. Some of them can be bigger and some of them can be smaller. This one that are closer to our dolphin and to the bottom
of the sea, there will be They will be bigger because they are closer to the viewer. So here I'm just
creating a bigger lines. You can make them even
wave if you want. Like so. And some of them can
be very, very light. In order to do that, I'm picking up just a little
bit of water and I'm using just the excess of color that I hot on my brush. I dab it on my paper tissue. I'm removing all
the excess water. I'm not going to make them very big because if I
have a lot of water, the pigment will move around. Just grab a little
bit more and you can alter between light green
with more yellow and darker, one that half a
little bit more blue. If you're getting down, make some waves bigger. And once you're happy with it, we'll dry our painting. And here you can see that
all the water that we had added to our painting
have disappeared. So no worries about that. You can just grab a
little bit of water, just clean water, and add
few splats here and there. And we'll bring back the effect
of splat. Just like that. Don't overdo it. A A little bit of splatters can
go very long way. So once you're happy with how your dolphin
is looking like, you can just dry your painting. And here I would highly
recommend you to use a hair dryer so we can lock
the pigment on our paper. And once it's dry, we use our hair dryer or
heat gun dry our paper. And once once it's dry, just come back and
we'll paint dolphin.
7. Classs Project - Painting the Dolphin: So now that our
watercolor paper is dry, you can see how the pigment have lightened up a little bit. So it shifted just
with one or two tones. But if you can still if it's too difficult for you
to see the dolphin, you can grab your pencil
and you can go back over the pencil lines that we
have used for our dolphin. So it will be easier for you because in this
part of our lesson, we already start to
paint the dolphin. So if you feel the need, you can grab your pencil and just add just tiny little
lines with your pencil. But this tip is
completely not necessary. If you already have
put the dolphin a little bit higher as
we discussed earlier, that won't be necessary
because probably the tail of the dolphin won't
be even covered with the darker blue color. If you, of course, decided to paint the dolphin exactly as I did and draw the dolphin closer
to the lower left corner, it will look a little
bit more weird, exactly like my one. So I like to include my mistakes exactly
for cases like that, so you can see that yes, there is a way that we can move the dolphin a
little bit higher, make the composition a
little bit more interesting, and our work a little
bit easier as well, but it's completely
not necessary because we learn with time
from our mistakes. And if I don't
include my mistakes, it's more difficult for
you to learn from them. So now that we discuss
the pencil drawing, we can proceed with
painting the dolphin. And the first thing I'll
do is I'll first apply a layer of water to
our entire dolphin. So to do that, I'll load
my brush with water, and I'll start applying just
inside the pencil lines. If at any point you feel that you have come out of
the outlines of our dolphin, I would highly recommend
that you stop and dry your paper back with the hair dryer and
start all over again. You can avoid so
much frustration if you do that step instead of just trying to fix mistakes afterwards because
it's a lot more difficult, even though we use a
non staining color, so it will be easy to
lift and to manipulate. It's so much easier for now to change something in
this point of time. So we'll apply a very nice layer of water to the entire dolphin. We'll gently go around
the fins and the tail. We want to be very
careful when we are adding the water
to the tail flukes, and it will be exactly the same where we are
on the front of our dolphin and we are painting the rostrum or the
mouth of the dolphin, however you understand it. So when we are applying the water, we
are taking our time. I'm not loading my
brush too much. I'm just adding enough water, so I'm releasing enough
water to the paper, but I can go back and forth. I prefer to add more water. Here you can see, I add a little bit extra water
outside of our dolphin. And if you're not feeling
like using the hair dryer, this is another thing
that you can do. But if you are not
feeling confident, I really don't recommend that. So if it's a big block of water, you better off dry
your paper with a hair dry and start back
again from zero. And if it's just
tiny a little bit, you can use your paper tissue
and just make sure that you are drying it very well
before you start painting. Here, you can see I'm
applying some extra water. And for the first time, I'll add a little bit of
water to the pectoral fins. I'll go back around the head. And I want to make sure, for me, the most important
is like the body of the dolphin will have the most water because we will
go over it multiple times. So the most important part is to keep the fence on the top, which is the dorsal fin or
this one on the side of the dolphin that are
the pectoral fins to keep them with more moisture. So if you have to,
you can I just tan a little bit more moisture there that will keep them
moist for longer. And it will give us
enough time to paint the dolphin because
we'll start with the lighter layers of paint and gradually increase
the amount of paint. That way we are
following the rules of the drying time of our paper instead of
working against it. Here you can see
that I have added a little bit more
over the lines, and I'm once again going back to my paper tissue
just to make sure that I won't leave any any paint that's going back
to our background. Once you have added
enough layers of water, we can start reactivating the paint on our
watercolor palette, and I'll clean up tiny little
bit of space because all of these colors that we
have here on our palette currently are staining colors, and we want to start using French tamarin
and bird sienna. So here, I'm just grabbing a
little bit of burn Sienna. And I'll add tiny a little
bit of French tamarin to it. By mixing French
tamarin and branziena, we are creating a
beautiful gray color, which is also
beautiful granulation. And when you're adding a little bit more
blue to the mixture, you make it more bluish. It still have beautiful
gray undertones, and it will separate
nicely because of the granulation on
the French chomarin and here you can see that I'm adding some a little bit more to to mixture and towards the
upper part of my palate, I'll add I'm adding a
little bit more of Bncena, so I'm creating warmer and
more brownish looking layer. So now I'll start first with a very watery mixture of brown, and that will help me to establish the base
color of our dolphin. I'm creating tiny little lines, and because we left our dolphin to rest whilst
we're mixing our colors, the colors are not
spreading too far away. So I'm grabbing a little bit more of the
Bnciena at the moment, I'm still working with the warmer mixture or also the mixture that is with more burn cena rather
than ultramarine. Here, I felt that I added a little bit more color on
the head of our dolphin. I'll grab a soft dump brush
or I'll wit my brush and remove the excess
water so I can lift the paint from the
dolphin around the head, so I can keep the light
that we created in our first layer of the dolphin whilst we was painting
the background. This way we preserve the
light on our dolphin. And here I'm adding a little bit more color to the rust or the mouth
of our dolphin. And I keep adding
more and more paint. To the pictoral fins. And I think something very
important is that I'm not adding more paint just to the right pictoral fin
that is more visible, but also this one that is just
have a little hint of it, that is peeking through the dolphin because
it's turned on site. Here, I just grab a little
bit more cooler mixture. It's still not very dark. And if you see that you added way too much paint
in certain places, you can go back with
your damp brush and lift some of the
color or softened edges. And that's what we do. So basically, we'll go back and forth with my large brush. I'll add more color
to certain places, and with my medium size brush, I can add like at the moment, you can see that I'm
just making sure that I'm removing
some excess water, so it's not going to bleed back into the body of the
dolphin if it's too much. And I'm trying to
keep at the moment the lines of our paint just following the lines
of our drawing as well. So it's not going over
the drawing line, but it's not stopping
before that, as well. So otherwise, we will
create harsh lines, and the pencil
drawing will be still visible and it won't look nice. So we are trying to keep a balance and here I grab
a little bit more paint, and I'm adding it
to the dorsal fin. At this stage, it's important to remember
that we're still painting the second layer
of our dolphin or the first layer of our dolphin rather
after drying our paper. So here we are setting
lightest values, and because the dorsal fin, it will be a little
bit more dark. I'm still adding
more color than like compared to the other part
of the body of our dolphin. And I'll just without
loading my brush anymore, I'm using the same
amount of water, and I'm just adding and I'm
just adding the same color to the tail of our dolphin or the flukes because
it's separated. The tail is separated
on two parts. So I'm grabbing a little
bit more cooler mixture. You can see that
I'm grabbing paint from the lower part
of my palette. And that mixture contain
more French ultramarine. So that means that my mixture will appear a little bit
more dark and cooler. I add the same mixture
on the left side of the right fin of the
right pectoral fin and to the entire
left pectoral fin. And I also soften the H
over the left pectoral fin. So it's not the
color won't bleed back to the body of our dolphin. If you feel that you have to add a little bit more color to the dorsal fin or the tail or
perhaps to the dorsal rich, which is the part
where the dorsal fin is going towards the tail. So if you feel that this part it have to be a
little bit darker, you can also add tiny a little
bit more color there or to the to the mouth of our
dolphin or the restroom. So just look after
your reference photo, and even though you're
painting with me, keep one eye always on your
reference photos because your painting will won't really be exactly
the same like mine. You may add a little
bit more pigment to your paper or tiny a little bit less pigment and just keep one eye on
what exactly you're doing. Here I'm grabbing my
small synthetic brush which hold a lot less color. So that means the paint
mixture will be thicker. And I make a fa mixture of French ultramarine
and Bn sienna. And here I'm just
double checking how cool or warmer, it appears. And I think that it looks right, but you can always double
check on your paper tissue. So here, you can see that I'm double checking
on my paper tissue, how the color appears. And we can add tiny little
bit of that darker mixture. To the parts that have
to appear darker. So here you can see that I'm just adding little
accents here and there. So the backside of
the right dorsal fin, tying a little bit
to the left one, a little bit to the rest room, and a few lines on the
body of our dolphin. We don't want to overpower the previous layers that we already have applied
or to lose the light. I think, keeping the lights that we painted on
the first layer, it's bringing the most
interest to our dolphin. And here I'm adding a little bit more color
to the dorsal fin because that usually appears the darkest because on
the reference photo, here, the t looks
appear a lot darker. I'll add a little
bit more color, and I'm always keeping an eye
on the drying of our paper. So if you feel that your
paper is drying already, just stop painting, honestly. Even though we've
been painting for like 10 minutes now or
something, the dolphin, just keeping one eye on
the drawing of your paper, it will be our best
friend, honestly. Like, if you can go back and
lift a little bit of paint, here you can see that I clean my brush and I remove
the excess moisture. So because I have a
nice synthetic brush, I can add a few
lines with water, and they will create like
like a lifting effect, but basically you
are just adding, um, that moisture with your brush, or you can just use
soft damp brush. It's completely up to you. Here, I'm basically
painting with water over the body
of our dolphin. And the water is not too much, so I'm not saturating
my brush a lot. It's because it's
synthetic brush it holds just tiny little bit of water and it's releasing fin lines, which can create beautiful, super interesting textures
on the body of our dolphin. And here I feel that
I have to darken just that upper part of our dolphin and make it a
little bit more defined. If you feel that you have
created more hash lines, you can take off the
paint and create a damp brush and
just go back and soften the edges of your paint. And that's what we are
doing back and forth. So we are using soft dn
brush if we want to soften. And if you don't want
to lift a lot of color, you can use on the same
way your fan brush. So we are keeping our fan
brush completely dry. So when you take your fan brush and you go to soften edges, you have to keep in
mind that you're removing a little bit of
the water from your paper. So you are not just
softening some edges, but you're also removing a
little bit of the water. And that means that your paper will start drying
a bit more fast. So here, I'm adding just a little bit more cooler and more saturated mixture of paint. So that means it have more french tomarin
and more burn sienna than Burnt Sienna, sorry. And I'm just adding a little bit of color to the eye
of our dolphin. And because I felt that it feels a little bit
more than what it was. I just pick it up.
You can use a tissue. In that case I
reacted very fast. I was using my finger,
but you can just use your paper tissue and just take your time and paint the
eye of the dolphin. And I'll just a tiny little
bit tiny little dot for it. So make sure you are
not going completely crazy with the eye
of your dolphin, you don't want to be too big
and to appear cartoonish. Of course, if you want to
make it more cartoonish, that's basically
what you have to do. You have to make the
eice appear bigger. But if you want to look
more like in real life, you just make the eice smaller and proportionate to the
body of our dolphin. You can add a little bit
more dark pigment and go back with your
de brush and just soften the edges here and there. So now that we are happy with the way how our
dolphin looks like, or at least if you are
happy at the moment, how your dolphin looked like, I would like to show
you another one of my favorite techniques when you are working with
nonsining colos. And rather two of my
favorite techniques, which involve exactly
the same thing. So so learn how to lift
paint on wet and after that, we'll learn how to
lift our paint on dry. For that reason, we'll use a flat brush or if you
have a angular brush, it will do exactly the same job. I'm using very small size, like, I guess, five
or six, you can say, this one exactly is not with a standard sizing because it was just a cheap synthetic
bro that I found in a local shopping
Boger on holiday. So I'm sorry if I cannot just Help you. But any cheap
synthetic brush, honestly, it will do the job as long as the bristles can stay nice and fine
when you squeeze it. Here you can see
I'm just waiting, waiting my brush or
moving the excess water, and I'm going back and forth, moving my brush left and
right to left the pigment. Once you pick up some pigment, you can clean it on your paper, tissue, cotton rack,
whatever you have available. And after two or three pickups, you can clean your brush
gently with water, remove excess moisture
the same way. So you keep your
brush just dump. And you can continue lifting
the paint from the paper. This is creating nice,
beautiful, soft edges, but I think the most fun part will be in a minute
when we start lifting the paint from dry and this will help make the more
intricate design. Of our dolphin, where the
light is peaking through the skin and creating
beautiful sunlit dolphin. So the sun rays will be transferred to
the dolphin itself. It will be beautiful. If you're not feeling confident, you can always just use the damp brush lifting
from on a wet paper, and that will be perfectly fine. Just use whichever
method you like, and once you're happy with the way how your
dolphin looks like, you can meet me
in the next part. So now that we have
dried our paper, and we make sure that it's completely dry
deep in the fiber, so we can start lifting our paint with a
clean damp brush. We use once again
our flat brush, so create beautiful fine lines, and they will represent
the sunrays peaking or rather reflecting on on
the skin of our dolphin. So if you're ready to
start with that part, the first thing we have to
do is to wet our flat brush and remove all the excess
moisture so it stays just damp. We can use our tissue paper to remove the excess
moisture, and then here, I'll go and start lifting the pad from the
dorso fin and I'll slowly clean up all
the excess paint that can go in the water. So if I'm lifting paint, I'm moving my brush
left and right. And sometimes there could be an excess pigment on
the top of the fin. So it will appear like the color is not in
the dolphin anymore, but it's rather on the water, so we can move our flat
brush perpendicularly, so we can remove
that paint as well. We lift on one side, and then we turn the
brush around like, look here on the
head of our dolphin, I will do exactly the same. So I'm moving the
brush left and right. It's just damp and clean. And after every single lifting, we clean our brush. And here you can
see that there was a little bit of pigment
left in the water. So I cleaned it quickly
with my tissue. And if it's not lifting up
with the tissue itself, you can just go back again, clean your brush, make it nice and damp and soften
exactly like that. So you go perpendicularly on the first stroke that was
using to lift the paint. So we can soften
basically left and right, but on the opposite direction. For this part of the painting
here is very important, exactly as before
when we was painting the dolphin to just
keep one eye on your exact painting
and make sure that you feel where you would like to
add some highlights, where they would
make more sense. And how do you feel that it will make your
painting more beautiful? You don't have to overdo it. Just a few if you just lift
paint on a few places, it will make your painting pop. If you overdo it and you add way too many liftings
all over the Dauphin, it will look it will
look super weird. It won't be nice and
interesting for the eyes. It will look like something
actually happened without painting instead of being intentional and made
with love and care. So here you can see on
the left pectoral fin, I have removed a
little bit and make few I make a few lines, and here I am just using clean, soft abrush just to soften the bottom or the
belly of our dolphin. Just in a few places. That will create a very nice, interesting, soft
blending effect. So we will remove just the
harsh lines from our dolphin, and it will make it just a
little bit more interesting. Here we are not
lifting the paint. We are just using the soft brush just to soften the edges. And here, just be careful on the bottom part of our dolphin towards the fin because if we move our brush way too much, we can lift some of the darker
parts of our background, and we don't really
want to do that. Like, it's up to you. If you lift a lot of paint, you rather do it on both
sides because it can make your dolphin glow
under the water, but it's completely
not necessary. Like, you can just lift a little bit on the side
and just soften the edges. That's keeping soft
and hard edges in our painting and making it a little bit
more interesting. Here, I'm just lifting
a little bit of paint from the tail flukes
of our dolphin, just because on my
reference photo, I can see some lighter parts. But if you feel that
you don't need them and you like the way how the tail looks like,
just don't do it. I also added few splatters with clean water and I'll wait for the water to reactivate
the paint of our dolphin. And then I'm taking
the clean side of our tissue or you can grab
a new tissue and gently, gently rub that's not looking very gentle because
my camera is shaking, but in fact, it was not a
harsh rubbing of the paint. And if that doesn't
really work because our paint is very dry, you can just use the tip
of your round brush, just the finest little
tip of your brush, and with half your
brush soft and damp, and you can just make a few tiny little
dots here and there, move the paint, creating
tiny little dots. And after that, you can go
back with your paper tissue, and you can just lift the
tiniest little bits of paint. This can bring a little
bit more interest, but it's not necessary. Like if you feel that you like the way how your
dolphin look like, just leave it as it is. Here, I'm just showing you
a few extra bits that you can do with your dolphin to
make it more interesting. But every single of
these parts is optional. You just keep one eye on your painting and make sure
you are not overdoing it. The more different
details you are adding, the more your risking hair
to overdo your painting, and then you will
lose the looseness and transparency and
the fun watercolor. Here, I'm reactivating
a little bit of paint, making it more dark, and you can see I'm using
the bottom of my palette. So that means I'm using the
cooler, more bluish tones. And I'm just using them to add more definition to the
eye of our dolphin. And you can also add a little bit to the
rostrum of our dolphin or the mouth and just add few little dots here and there where you feel
that it's needed. If you, of course, feel that
you have all over done it or add a little bit more
extra paint here and there, you can use your
soft down brush, the larger size and clean up. And if you drop your brush, like I kept that
moment because it's super fun and things
like that really happen, and you're just hoping that you are using literally that brush that won't make a clutch of paint on your watercolor paper, and thankfully, like I was super lucky that
it didn't happen to me, and I hope that stuff like
that won't happen to you. But I kept it just because I think
it's really lovely to see that regardless of how long time we've been
painting, we can be reckless. Things like that can happen. We can be clumsy. Our
brush can fall down. And even if you mess
up your painting, if nobody else is
there to tell you, I want to tell you
that it's okay. And if you lost a few hours of painting and
you mess up your painting, you can just come back again. You can paint it once again. And even the act of painting, and hopefully it brings you joy, this is well worth. If you have learned
something in this lesson and that will help in your
watercolor journey, I would be more than glad
that you joined my lesson. And just keep one eye here. You can see, I'm just darkening
some bits here and there. I'm just adding a little
bit more blue and brown. I'm making beautiful gray. I'm not adding a lot of water
because here I want to have a more dense pigment and just add darker
bits here and there, but they are totally
unnecessary. And once you are happy
with your painting, I would like to encourage
you also to Uh, grab a little bit of paint
and sign your painting and declare in front of the entire world that
this is your painting, even though you paint
it in my class. And just own it because you have created that
painting with me today, and I hope you like it. And even though we sign our paper, in the
next few minutes, I want to show you that even if you are not completely
happy with your paintings, you can leave them like that. Or you can also grab a soft dumb brush with
a little amount of odor enough to
reactivate some of the splatters that we've made
by mistake on our painting. This tip is completely not
necessary if you wish, and if you have such
splatters, you can do it. But even if you have splatters, if they are adding to the painting can stick
instead of taking out of it, and you feel that it looks nice. It's fine. And it's
not bothering you. You don't have to left. So here I'm just using a soft ambush and I'm
just softening gently. Some of the platters, just to show you
that is possible, even though our painting is dry. And here I just soften them with my damp brush and I
can grab my tissue. You choose a clean
side of your tissue. Make sure you want to use a side that have paint
on it because otherwise, it can be transferred
on a watercolor paper. And once you're happy, just put everything
away and just take a minute to reflect and
enjoy your own painting. At this point, you know, that you can paint any
animal on your own if you just break the steps
down to simplify them. So, for example,
for this painting, we painted for the background. We make sure that we have enough time to work
on our background to add the water and the sunbeams
peaking for the sea waves. Then we dry our paper, and we painted the dolphin. And if you wish to make it more complex and go ahead
and try, for example, to paint all of the
dolphins at once or add some fishes or at any other animal the process
is exactly the same. So if you just follow the
formula and do it step by step, you can do any
painting of your own. We just will start exactly the same way with
our simple pencil sketch, we paint the background, then we'll paint our
animal. I hope you like it.
8. How to Flatten your painting: One last thing if you are worrying that
your paper is wobbly, you can just turn it around. You can wet the
back of your paper, put it under some books, make sure that it's sitting
on absorbent surface, put few books on top, and it will be perfectly
fine within 24 hours. For me, it will be fine with, but I like to leave them there within 24 hours and
perfectly flat. Just like this one. H
9. Share your project and Last words: I'm so glad to see you reaching
the end of today's class. First, let me tell you how proud I am of you
completing this class. I hope that you learn
new tips, techniques, and lessons and you'll carry them with you in your
future painting. If you have completed
your paintings, please share them in the project and resources section
of this class. You can also ask
me any questions that may occur in the discussion
section of the class, and I'll be very pleased
if you leave me a review. So I can learn what you liked in this class and what else you
would like to learn from me. And I'll also be
able to give you a feedback if you
want it, of course, if you post your paintings
on social media, please tag me with
Ry underscore art, and I'll be sure to comment and share your paintings
and my stories. Thank you once again
for painting with me, and I'll see you
in the next class. Have a great day
and happy painting.
 Ralitsa Arnaudova, Watercolour Artist