Transcripts
1. Introduction to Camera Raw: Hello, hello, everybody.
This is Chris, and I want to welcome you
to this part of the course. Camera Raw. Before
we jump into it, I have to tell you a
few things about it. Camera raw is a beast. It's incredibly
powerful and complex. If you're into photography, this is an absolute must. But it's not reserved
for power users alone. Camera raw can help you improve a photo in
just a few clicks, even if you're the
beginner. No fuss about it. Now, I'm more for
this second part. I'm a casual user. I'm not a photographer, nor do I want to become one. Reason I got started with camera raw was out of necessity. I needed to fix some very washed out or some
very dark photos, and this was the right
tool for the job. So basically, I take
on a relaxed approach. Now, why should you care? Well, first of all, I want
to manage your expectations. In short, A, I'm not an
expert in camera raw, especially when you
compare my skills to a seasoned photographer
who uses it all day, and B, there's always more room for improvement.
Here's how I see it. I'm personally a perfectionist. I want to show my best every
time I put something out. I started working on some product photos
for my own website. And on the first
one, I spent 1 hour. On the second photo, I spent 2 hours. Now, indeed, it was better, but I looked at my
website and I saw I had 80 other
photos I had to do. I mean, 2 hours for
everyone was not feasible. That's when I decided
I need to compromise. I need to be happy with
an eight out of ten. For me, there has to
be a balance between speed and the quality
of the result. And that's what I'm going to
show you in this section. It won't be perfect projects, but I will show
you my techniques and how you can improve
your photos fast. Then it's basically up to
you if you want to spend 10 minutes or 10
hours per photo. Lastly, this is recorded in the latest photoshop and
camera raw versions. If you have an older
edition of the program, you'll have to have a
whole lot of patients. Most of the slids and
features are still there, but they're shown in
a different fashion. It's quite different. I can't say it's
going to be easy to follow along on
an older version. So my advice, please upgrade. It is worth the $10 per month. And with that, that's it. Liz get started. We'll see what's what in a
moment. Thank you.
2. The most important thing about editing photos: Whether it's working in camera raw or in photoshop in general, some students have
asked me, Chris, how do I know when I'm
done editing or Chris, how do I know if it
looks good or not? Now, those are decent questions, and they bring us to the
most important thing about editing photos. And that's the fact that
there is no finish line. There's no set point when
you know you're done. To illustrate the point, you can get any photo and
use this auto feature. It does look better
in just one click. Now, are you done? You could increase the
sharpness a bit more, or maybe the contrast. Now, are you now done? You can also apply
targeted edits, meaning you can focus on a
few key areas here and there. Then you can apply
a vignette and on and on it goes.
When are you done? The point is you
have to understand that there's no finish
line with your editing. You can do as much as you want depending on your time
and patience and skills. So you have to get
comfortable with the fact that there
is no clear end. Now, for the second question, how do you know if it looks
good? That's another part. Tell me, does this look good or does this look good or
how about this one? It's the same photo, and I can show you lots of other different effects and
moods, different vibes. You can do just about
everything you want. The whole point is to experiment
and have fun with it. Sure. There are some mistakes that are quite
obvious, you know, like too bright or too
saturated, maybe too dark. But in general,
I'm going to teach you how to avoid those issues. Beyond that, though, it's
really up to you and your eye. There's no set standard
that you have to reach. Now, if you want my
advice, you can do this. Look at galleries that you
love or stock photo websites, have a look at images
that grab your attention. See how bright, how saturated,
how sharp they are. Then try to do the same thing. Now, in most cases, you'll see that you
need a fine touch. Less is typically more. But again, to get a
sense of your edits, look at some examples
that you like. Then go back in camera raw or in photoshop
and do your thing. Go back and forth and see if you're going in
the right direction. At the end of the
day, your mindset is the most important one. Don't put pressure on
yourself with these edits. The more fun you have, the better you're going
to get at it. By understanding there is no finish point and
no set standard. This means that
you can play with your edits and see
where you end up. And if you don't like
it, simply try again. That's the spirit of
these types of projects. So please have fun.
I really mean it.
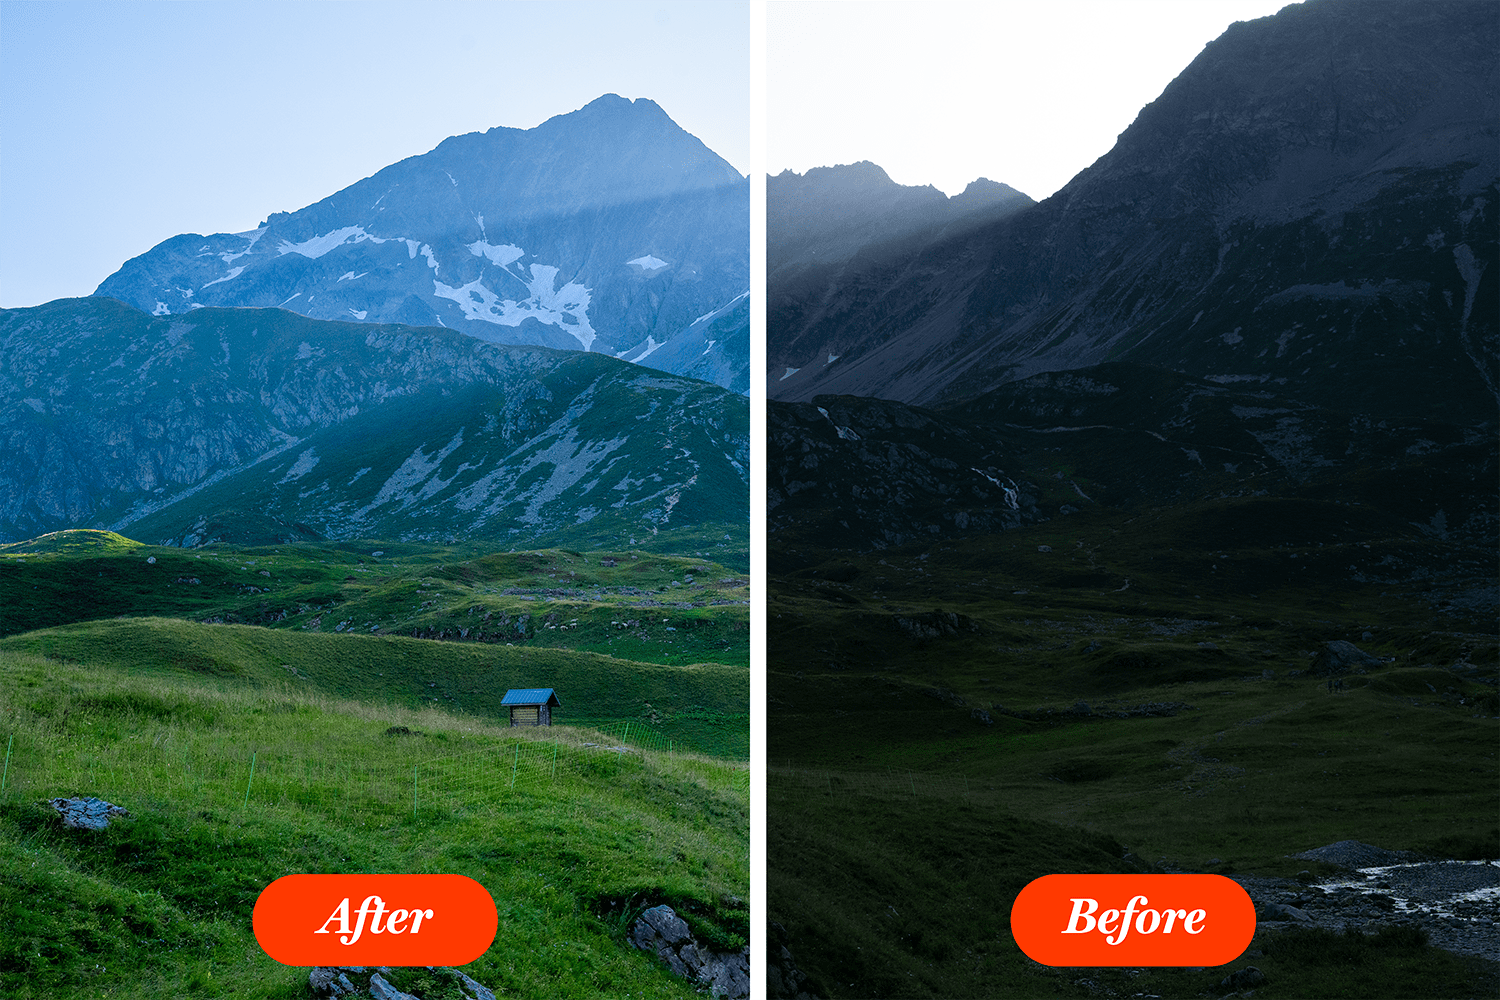
3. Most common edits in Camera Raw: Hey, there, let's dive
in and start editing this photo in camera raw by using the most
common techniques. I'm going to explain
everything in detail as we move forward. But for now, I want
you to get active. Please be aware that raw
files are typically huge. So your computer may be
quite slow at times. If you can't work on raw files, please use JPEGs
from unsplash.com. Here, we have a dark photo that doesn't look all
that great to be honest. You can always click on auto and see what
photoshop things. To be honest, the
result is quite good. It did a great job. But I want us to get familiar
with this interface and be able to do everything
ourselves. Let's get to it. Now, first of all, I want
you to notice two things. The red blotch on the sky and these blue
parts in the grass. Now, those are warning signs. Those tell us that there's no information in
that area, no detail. It's just pure white and black. Now, if you don't
see these colors, click on these two small icons. Now, they're very, very small, so if you can't tell
if they're enabled, you can look at the boarder. If you see it, then they're on, you can also use your keyboard. Hit U and O. And just like that, you should be able to see these spots. Now, again, these will show you that some parts
are not right. To fix them, we can
use these lides here. First, I'm going to lower
the highlights to -50, and that should do the
track for the sky. Now, how do I know to do that? Well, we're dealing
with too much light. There are three things
that can help us here. Exposure, highlights,
and whites. Now, let me bring
this back to zero. If we're going to play
with the exposure, the entire thing
gets way too dark. So that's not the answer. If we go back and
then we lower whites, well, it does work, but we have to use
an extreme value. So that's not all that great. So by process of elimination, highlights it is -50. Now, going back to exposure, the entire scene
needs more light. So let's raise this up
to about 1.5 or so. Now, again, how did
I get to that value? I simply went back and
forth a few times. And that's exactly how
you should work as well. Play with the slider and
see where you end up. Next on the list is contrast. I like to click here and use my up and down nados
while holding down shift. This is how you adjust the settings in ten
pixel increments. Now, in general,
a higher contrast will give you a
better looking image. Plus 30 or so should
be just fine. Now, at this point, you
may have forgotten how the original image
looked like. No worries. We have this symbol
right here that will help us see the
before and after. Click it a few times and see how far we've come in
just a few minutes. Now, if you're in to hot keys, use your slash next
to the enter key. Right next to this icon. There's another one
that helps you see the before and after in
various different modes. But to be honest, I don't
really recommend it. Hit it or better yet
hit Q on your keyboard, and you can cycle through
various viewing modes. But again, I'm not a big fan, so I don't recommend it. Again, you can use Q to
switch between these modes, but keep it simple. Okay, now, let's go
back to shadows. The blue zones tell
us there's a problem, so shadows will help us out. I'm going to use a positive
value plus 20 or so. And just like that,
the issue went away. The red and blue areas
are not a huge deal, but it's best to minimize them. Okay. Now, back to the sliders, you can play with whites, but in this case, nothing
is going to happen. This obviously varies
from photo to photo. As for blacks, well, if we make them more intense, the blue will start coming back, and that's not ideal. So I'm going to
leave it as it is. Moving down a bit,
let's go to vibrance. This is what I strongly
recommend. I use it all the time. I'm going to go with plus 30. Vibrance, makes your
colors feel more alive. Now, saturation does
somewhat the same thing, but with less refinement. You can bump it up to tendou, but here's where I'm going to repeat myself a lot of times. You can do your own versions. There's no right or wrong way. For example, I'm going to quickly drop the texture to -40, and then the clarity
to minus ten, okay? Here I'm going to
add a vignette. I'll make the edges white, like this is from a movie. This is a scene where you remember something
from a long time ago, a dreamy, ethereal space, right? Okay, so that's one
thing you could do. But then you could also drop it. For example, I could add a
lot of texture and clarity, say, plus 20 and plus ten
or something like that. And now you can see just about every single
blade of grass. The image feels rough So
this is another vibe. That's why I'm saying there's
no right or wrong way. It's all about how
you want to express a feeling. Here's another visit. We can raise the temperature to say 6,500 or even
more than that. Now, the grass doesn't
have the same freshness. It's more towards fall
than spring, right? So let's do a quick recap. Number one, there's no right
or wrong way to go about it. The second thing, if you
see red and blue zones, this means that all potential problems that you
might want to address. You can enable those
warnings by using these two icons or by hitting
U and O on your keyboard. The most common edits are
done from the basic panel. You have lots of other ones, but most of your time is
going to be spent right here. When you want to see
before and after, use the slash or this icon here. Assuming you're happy
with your edits, and you want to share this work, please open it in photoshop. I like to open it as a smart object, a
good habit to have. Okay, now, when you're in
photoshop, you can export it. Please remember that
the image is huge. So have patients, and you might want to use
the scale feature to shrink it to 30 or 40% or
something more manageable. That's how you'll be able
to share it more easily. And with that, this has been a first journey in camera raw. Please upload your own version. Sad with happy, spring or fall, cold or warm, use
whatever you want. Just play with it and have fun.
4. How to adjust parts of a photo in Camera Raw 2023: Come back. We just
saw how we can use the sliders from
the basic section to edit the entire photo. But what if you only want to adjust a certain
part of the image? Well, let's open
up this raw file, and you'll notice some
red areas on the lights. Those are over exposed, meaning that way too bright. So Photoshop lets
us know we should tone them down.
Now, a quick note. If you have this area here underneath the photo and
you want to close it off, use the slash key, the one next to shift, not the one next to enter. So again, toggle this area
by using this foward slash, the one next shift
key. Okay, back to it. To adjust a certain
part of a photo, you can use this area
here called masking. This is only available in the
latest photo shah version. Okay, this will open
up a new panel that will allow you to target
any area from the photo. For this lecture,
we're going to keep it simple. Choose brush. Now, there's a lot
going on here, but we're going to
take it step by step. First, let's change the
size from this part. If you're not sure about it, move your cursor over the photo. In this case, I think a size of around ten
should do the trick. You can also use the
square bracket keys. Okay, now, that's fine. Let's paint over these lights. As we begin to paint, the red blotches go away, and a new red comes into play. This faded red tells us where we've painted,
what we've selected. Now, we can disable it, and you can do that by
clicking here on show overlay. But my advice is
you leave it alone. You can also change it from
red to any other color. But again, it's fine as it is. Now we can move to the sliders and turn down the highlights, maybe even the exposure. Notice that as you're
moving the sliders, the red goes away so you
can see your result. Believe it or not, this is the entire workflow of adjusting a certain area in camera raw. You go to masking, you select any of these
tools, for example, the brush tool, you paint over that area that
you want to edit, and then you get to
use these sliders. It's really that simple. Now, when you're
done and you want to exit this masking mode, you can simply click here and you'll be brought to
the general edit mode. This will affect
the entire picture. Now notice that the red
blotches went away. Next, we can do various types of edits like playing
with the exposure, contrast, shadows, and so on. But I'd like to stick to
masking and the brush tool. So I'm going to leave
this part up to you, but make sure you try at
least two different vibes. Make a bright and happy look like the one I've gone for here. And maybe another
one a bit darker, maybe more cold,
something like that, something completely
different, right? Now, to practice our masking
with the brush tool, please open up this second
image. This is a raw file. But again, you can use a J peg, go to filter, camera raw filter. I want you to divide
this image into at least five different
areas and make strong edits. Here's how this goes. Go to masking and
select the brush. You can also use the
hot key K. Immediately, we're going to get a new
mask in this small panel. Now, what I'm going
to do is I'm going to go over this blue
house on the left. The problem is, if I'm going to brush too fast with
a large brush, I may go over the road
or the orange house. Now, no worries if that happens. This is very likely. Please hold down the ult
or option key on a mac, and your cursor is going
to show a minus symbol. Now you can clean it up. So if you paint way too
much, just remember, hold down the old key and
remove the unwanted parts. Now, what I suggest is
you constantly make adjustments to brush
settings and work zoomed in. Hit the Z key, and I
suggest you do this. Click and hold. Now move towards the left, and you're going to zoom out, or move towards the right, and
you're going to zoom in. Please practice this part
as it's quite essential. The final piece of
the puzzle is to move around by holding down
the space bar key. So this is going to be
your actual workflow. Zoom in, zoom out, move around, and
repeat the process. When you're done
with your painting, you can make some
crazy adjustments. I'm going to raise
the saturation, maybe the exposure,
whatever it may be. I just want to make
sure that it's obvious. Now, let's assume that
we're done with it. Even though it does
need a lot more work. Let's move on to the next house. This is critical.
Please click here on this plus symbol and
choose Brush once again, because we want
individual controls, each house should
have its own edits. In essence, this panel right here is like your layers panel. Let me quickly brush
over the house, and then we're going
to go back to it. The idea here is to stay organized and understand how
this is supposed to work. Please play with the
sliders and do a thing. Okay. Now notice we
have two masks here. To keep it clean, please
double click on the first one and rename it to
Blue House. Okay. Now, do the same to the second one. Now,
here's the thing. Like I said, individual
controls, right? Say you want to further
edit the Blue House. Just click on it, and you'll notice that the brush
is already selected. This means that you can start
painting. It's that easy. Now, I have to say that this does take time and
patience to get it right. But the actual technique
is fairly simple. Now it's your turn. Please do the other buildings, maybe even the road and the sky. Only use the brush tool
for this exercise. When you're done,
open the image in photo shop and export
it at a lower scale. Maybe 50%, maybe even less. Remember, have fun and rename your masks after you
use this plus symbol. On mask per area,
please. Thank you.
5. Here’s a smarter way to adjust specific parts in Camera Raw: Hello, and welcome back. Let's open this image
so I can show you better tools to adjust
specific parts of an image. Please go to masking, and here we've played
around with a brush tool, which is one of the things
you have to master. It's like learning how
to chop in the kitchen. If you want to be a gray chef, you need awesome knife skills. It's the same thing
in photoshop. Master the brush tool, and you'll be golden. Now, after the adult set, you can move on to
these fancy tools. For example, select
subject. This is awesome. Photoshop will use its magic to select the girl in
just a few seconds. So instead of painting
over her with a brush, photoshop does this
automatically, and now we can make any
edits that we want. I'll do some pretty
big ones so we can really spot the differences
through the recording. But my advice in general is to not exaggerate
with these edits. Just like that,
this is improved. Now, what about the background? Here's how you can work smarter. We know photo shop can select
the girl all by itself. Well, what if we flip it around? If we exclude the girl, then that means the background is going to be selected, right? So please do this. Rename the first mask to girl or subject or
anything you'd like. Next, right click and
choose duplicate. Now, don't be scared
by this crazy. Just rename it so we have
everything organized. Now, right click again, this time on, this part
here called subject one. From this list, choose invert. Now the background is selected, and we can make any
types of edits. Now, let me explain
again what we did. We first selected the
subject, meaning the girl. You can say that
we isolated her, we cut her away from
the background. And then we made some edits. Next, we wanted to
select the background. But the smarter way to work
is to duplicate the mask, then invert it, or flip it, inverse, whatever
you want to call it. Think of it this way. Let's say that we have a huge
canvas and one small dot. If you want to quickly
select the huge canvas, you can select the dot, then tell photoshop to invert. Invert, meaning, please select everything else except
this small part. It's the same thing here. It's just faster
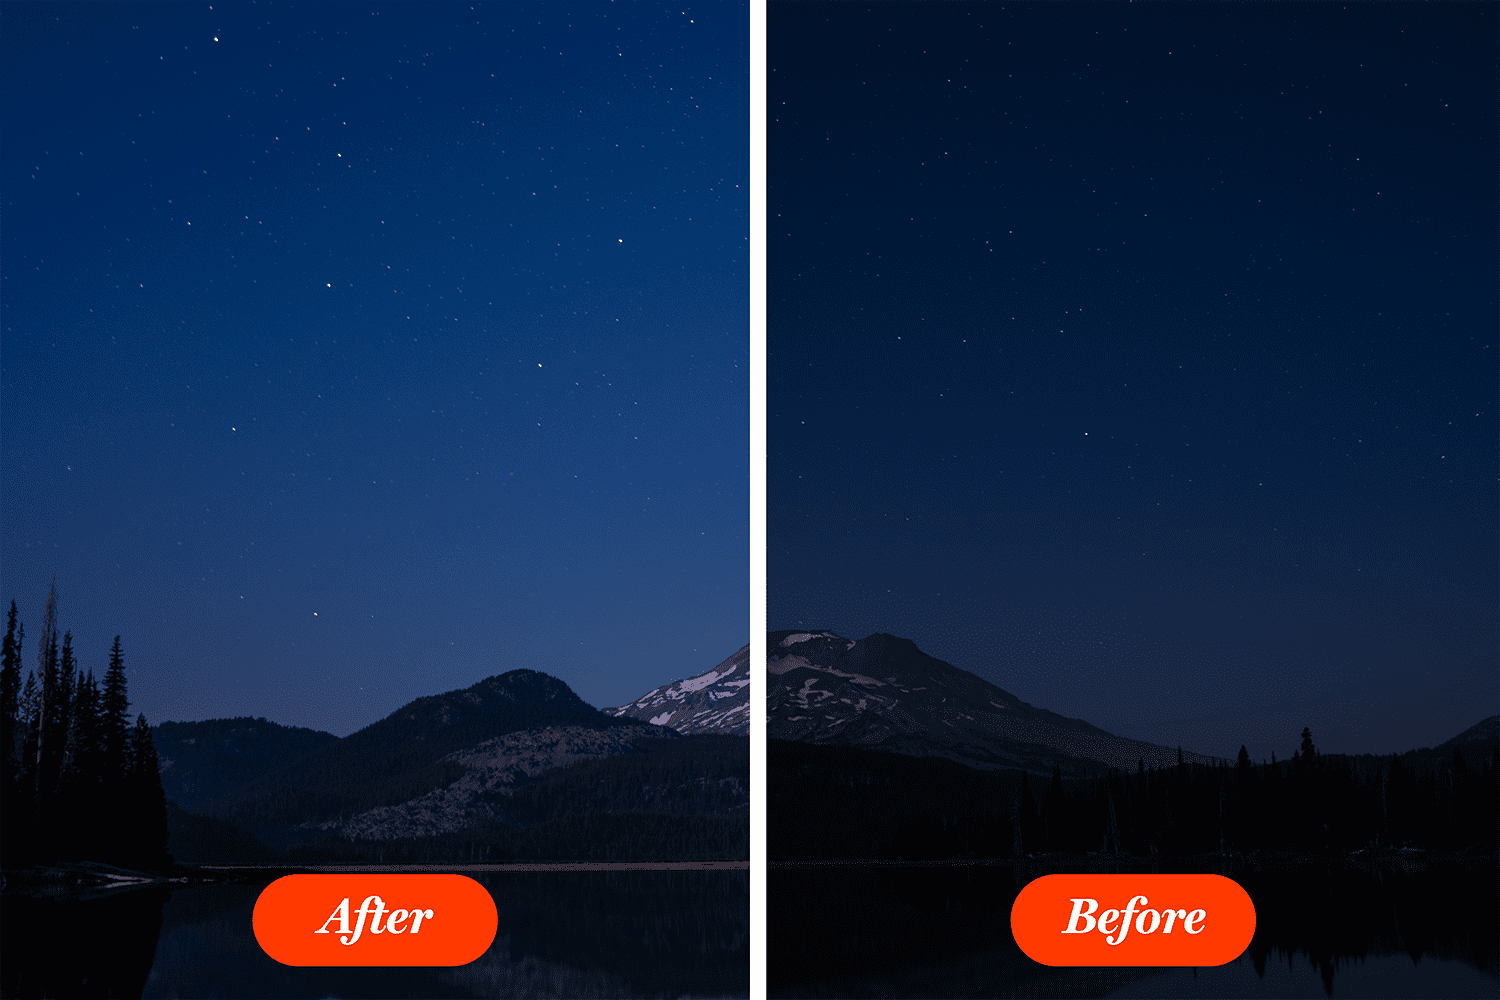
to work this way. Now, here's another example. Let's open up this
image of the sky. Choose masking, and F here, you can use select sky. Now, let's make any
types of edits, pretty big ones, so
they're quite obvious. Now, let's just assume
that the sky is perfect, even though it's obviously not. But as you can see,
at the bottom, this is way too dark. Again, instead of
selecting it manually, let's invert the mask. First, make a copy
because we want to keep all the edits
that we just did. Now the sky has two edits on it, and it's way too
much, but no worries. Move down here and right click. Now choose invert. Now I'll do something crazy like raise
up the temperature by a lot. And just like that, a big
part of our work is all set. Now, you might ask, why did I make you use
the brush tools so much when we have
these awesome tools, select subjects,
select sky, and so on. And that's because you
can't really rely on them. I'm using great examples here. Huge photos, raw files, chosen specifically
for these lectures. But in your projects, these one click wonders
may not work so well. That's why you
need to know about brushing and making
manual selections. And when you combine
both things, brushing plus these fancy
features, then you're all set. Then you're good
to go. So please practice before you
continue. Thank you.
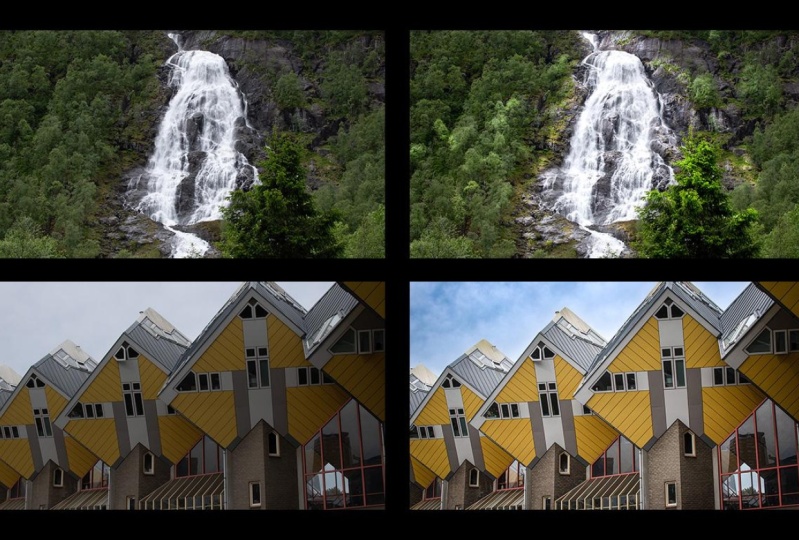
6. Discover better tools to make edits in Camera Raw: Hello and welcome back. You will truly start to enjoy working with photo
shop and camera raw, when you feel like
you have options. When you feel like you know at least two different ways
to achieve the same thing. Here's the same landscape photo. We know we can use the
select ky feature, but here's another fancy
track, linear gradient. Select that and your
cursor is going to change. Go over the photo, click
and drag. Don't let go. As we expand, you're going
to see this red area, and this means we'll adjust
that part of the image. If you hold shift, you're going to get
a straight line. Now, let's adjust the
exposure, for example. You might notice it's not the result that we're looking
for, but not a problem. Go back to it and modify it in such a way where
you're happy with it. But remember, don't rely on a single feature
for all your edits. In this case, let's add another mask this time
for the bottom part. As you can imagine, we
could use the brush tool. We could select the
sky and invert it, or we can add another
gradient, options, choices. These give you
freedom in photoshop. I'm going to go with
another gradient, and I'm going to
lighten up this area. The shadows are way too intense, and camera is showing those
blue dots to help us out. Now, what you'll notice is that even with this second gradient, well, the left side is
still not looking great. That's why I made you paint all those houses before
with the brush tool, so you can get familiar
with this panel here. Simply add another mask, a brush this time around, and target this specific area. The goal is to make
sure that you're comfortable switching
from mask to mask, from tool to tool. That's why I always
suggest you take your time with it and
always rename your masks. This way, you can go back and forth and make edits as needed. That's the thing. When
you change something, it modifies the entire
vibe of the photo. So chances are you might
need to adjust other things. Now, my advice is you remember what I said at the
beginning of this section. Have fun with it.
There's no finish line. There's no standard of
quality that you have to hit. If this looks good to
you, then so be it. In time, you're going to
get better and better, and you might even come
up with your own style. Just make sure that
you understand on which mask you're working on. And remember that a mask is used to isolate a
part of an image. If you don't want that, go back to the general
sliders from here. Now, let's take a short break.
7. Raw image format vs JPEG: Welcome to this lecture
where we'll talk about raw files and JPEGs. As I said at the
beginning of the course, most cameras will give you two files for every
photo use map. A JPEG and a raw file. Now, in short, if you
want to edit that image, there's no discussion about
it. Use the raw file. It contains much
more information, and it will respond to your
edits that much better. So always work on the raw file
if you have it available. Now, let's talk
about file format. My camera gives me a
dot CR three file. Yours might give
you something else, and that's totally fine. Actually, there are loads of raw file types depending
on your camera. Sony cameras will give
you a dot AR W file. Panasonic, RW two,
Fuji film, REF, canon, depending on
how new the camera is, will give you a dot CR two
or a dot CR three file. D NG is yet another
very popular format, and the list goes on and on. But that really doesn't matter. The essential point is that you open it in photoshop.
And that's it. Don't worry about the extension. Just go for it. Okay,
let's get started. So how do you open camera raw? Well, just in case
you have not seen a photoshop icon
on your raw file, right click it,
and then use Open W. From this list,
choose photoshop. The alternative is to right click again and hit properties. There, you'll be able to see how the file will be opened
when you double click it. Again, if photoshop isn't there, you'll need to select it. Now, this is bound to happen if you use programs like ACDC. But once you tell
your computer that it should use photoshop, you
should be good to go. Assuming you can't
find photoshop in this list and you can't browse for it for
whatever reason, you can just drag and drop the file into photoshop like so. Please be aware that camera raw takes a bit of time to load up. It's not exactly lightweight, so please be patient about it. Let's talk about editing a JPEG versus
editing a raw file. The raw version is opened, and I'll edit it by
using the auto function. The result isn't perfect, but it's a big change. I'll leave it as it is, and
next, I'm going to open it. Now, this is the raw file, and if you'll ever end out, look at the file name, CR three. Okay. Now, let me drag in
the JPEG into a new tab. Remember, when you drag, you have to go above
the Canvas area, so the image will open
in a separate tab. Okay. You can see it says
JPEG right here. Now, let's go to filter,
camera raw filter. This is how you're
supposed to open PNGs, JPEGs, and whatnot, especially if you're
using photos from unsplash.com or
similar websites. Here to keep things simple, I'll apply the exact
same changes as before. I won't use the auto function because that may give
us something else. Instead, I'll click here
on these three dots. From this list, I'll select
apply previous settings. Basically, I'm copy
pasting my edits, so it will be a fair fight. I'll change my viewing mode
so we can compare them. I have to warn you this won't be a night
and day difference, especially through
the recording. But trust me, when I say it's
not a great idea to work on a JPEG when you have the raw file available.
Okay, have a look. The JPEG has a nasty
blue tent applied to it. The raw file is
much more natural. This can be refined and chiseled into a
great looking photo. The other one, not so much. I'll zoom in to 100% on my hand. Now, the name of the
game here is natural. Here, my nails are
hilariously pink. On the other side,
they're normal. Now, again, I know that this doesn't seem like a big
deal to most people, but it is important when
you need a good result. And while we're here,
look at my shirt. This is absolutely
horrible in my book. The blue seems to have been
applied with a paintbrush. On the other side,
it looks fine. Now, let me switch back to
my normal viewing mode. I'll use consolidate
all into tabs. If that didn't convince you, here's another argument,
a more logical one. I'll focus on the control
we have over raw files. Here with the raw file opened, I want you to have a look
at the temperature slider. If you're not into photography, this may not tell
you all that much, but this is an
international standard. If we have a look at
color temperature, we can see how these values are assigned to a certain
light source. For example, anything
over the 5,000 Kalvin, that's the unit of
measurement, by the way, Calvin, is a cool blue light. Studio light falls
into this category. If you're into cars and
if you're old enough, you probably remember that most cars had yellowish
headlights back in the day. But today, they're laser blue. Senns are pretty much the standard for the
more expensive models. Well, in camera raw, we get to edit the actual
temperature of the shot. This is fantastic. This is basically us modifying the camera settings
after we take the photo. The fact that we get to edit
all these things after we snap the photo to me
is absolutely amazing. So that's the temperature
slider in the raw file. It's in Kalvin, and it's the
actual value from the image. Now, let me switch to a JPEG. Okay. Even though we're in
the same place camera raw, our control is
actually different. Focus on the temperature slider. It's set at zero, and it
ranges from -100 to plus 100, and there's no unit
of measurement. This means it's applying the
effect on top of the image. In a sense, it's forcing it. It's not an actual
value in Kelvin, and the result will never be as good as editing a raw file. Now, let's wrap this
up. In conclusion. If you have the raw file, please work on it,
not on the JPEG. If you don't have the raw file, it's perfectly okay to use
the camera raw filter. You'll have to be
smart about it and not exaggerate with
the slide does, but all in all,
that's the essence. Thank you. Let's continue.
8. How to quickly view lots of images: Hello, hello. Let's see how you can quickly preview your images. This is really helpful
if you have lots and lots of photos,
especially raw ones. Take this example. I have over 1,000 raw files here that
I personally snapped. And I know that more
than half of them, to be honest are garbage. They should be deleted. So how can we quickly sort them? How can we see which ones are great and which
ones are garbage? Well, in comes Adobe bridge. This is a free program that Adobe offers that can
really help us out. Now, here it is, and
I'll be short and sweet. I never liked Adobe
bridge because it always felt slow
and complicated. But as I started
taking my own photos, I realized that this is a must. And here's how I like to work. After I copy paste my photos to my computer from my camera, I like to click here
and copy this address. Control C. Then I
move to Adobe Bridge. Here's the address bar. Click, paste, and it enter. This is so you don't waste any time going through
lots and lots of folders. Okay. Now you can customize this space by using
this region here. I suggest film strip, and you can always
adjust the preview as needed. And now
here's the thing. You can quickly go
to your photos, but the best part is this one. To begin with, you
can delete the files immediately if they're
blurty or low quality, or you just don't like them. Hit the delete key, and you'll see this warning. It's asking us if we really
want to delete the file or just remove it from the
list. I like to delete it. So in the future,
I'm going to use control delete to
skip this part. So that's one part
taken care of. This means we can quickly
clean up all the bad photos. Next, you can give
star ratings to your photos so you
know how to sort them. Now, here's the thing. I'm
a beginner photographer. So I take lots and
lots of photos. I then go back and
forth, like so. I like to use my
ado keys for that. And then I decide
which one is better. If it's pretty good,
I'm going to give it four stars, maybe five stars. For example, in this ese here, I'm going to use Control four, and you'll notice the
stars have shown up. This one here, it's not as good, so three stars, control three. By the way, if you
don't want to use the control key,
just click here. And now you can simply use one, two, 345, and that's it. Okay, now, repeat this process, and then you can use this
filter system to the left. You can see that I already have a few five stole
photos in this folder. Now, check that box and you'll
see them at the bottom. Now you can open them by right clicking and choosing
open in camera raw. This is how I actually
work when I take photos for my oatmeal
products, for example. Again, I never
liked adobe bridge, but in this case, this is
the best way to go about it. Imagine having to
open 1,000 plus photos in camera raw to
check if they're usable. That would be
horrible. But that's why adobe bridge is great. To be honest, this program
is a beast of its own. You can customize it
in every which way. You can do many other
things with it, but I want us to stay
focused on editing photos, so we're not going to explore
the rest of its features. This is more than enough
to get you along. Again, Adobe Bridge, download it if you use
lots of raw files. And with that, let's continue.
9. My workflow in Camera Raw: Hello, hello. Let's talk about my workflow and camera raw. Here's the deal. I double
click the raw file, and that's going to open up. In the bottom part, you'll find some information
about damage. If you click it, you're going
to get these preferences. Most people agree on
the following settings. The cuddle space should
be Adobe RGB 1998, and the depth should be set
at 16 bits per channel. Having said that, 16 bits is
quite taxing on my computer. If you're using an older
model or even worse a laptop, you may want to
stick to eight bits. In short, it's all about
working with more information, and your bits are going to look nice if you're going
to use 16 bits. Considering I'm recording this, I'll leave it at eight, but
note that 16 is recommended. The next thing is crucial. Please check this option. O pen and photo shop
as a smart object. This is the most important bit. When you enable it, have a look at the open
button from the bottom. This changes to open object. Now, I'll keep this simple. Say you're not sure
about these preferences, and you just skip them. I'll hit cancel. I'll then hit the auto button
from the top right and say I'm done with it. What now? Well, this
is what's essential. Click here on this
arrow next to open. From this list, choose
openness object as before. Now, why is this
incredibly important? Because we get to
do the following. We can double click
the tumb nail, and that will allow us to
continue working on the image. All the sliders are
exactly as I've left them. And when I'm done, I can
hit ok. Back to photo shop, I can now continue to
work on the image, maybe sharpen it, maybe do some skin retouching, whatever. And when I'm done, I can
export it as a PNG or a JP, so I can share it
with my friends. But let's take it one at a time. If you only want to
work in camera raw, do you need to save
the project as a PSD? The answer is no. And that's because
of this XMP file that shows up next
to the raw file. You can see it has the
same name as the raw file. So if we close photoshop, and then we open this image
by simply double clicking it, you'll notice that all your
edits are still there. So you get to continue
working on it, and it's all due
to this XMP file that appeals automatically
when you make some edits. Now, let me close photoshop
and I'll delete it. As you would imagine, when I now double click the raw file, the sliders are going to
be back to the defaults. So to sum it up, if you're only going to work on
your image in camera raw, make sure you take care of your XMP file that automatically appears
next to your raw file. In that case, you don't need to save the project as a PSD, if you're only going
to work in camera raw. On the other hand,
in most cases, you will want to apply
other edits to the image. For example, one of my G two techniques is applying
a 50% gray layer. That's explained in another
part of the course. But the idea is
that once you have a few things in the
layers panel, well, it's best to save it as a PSD, no matter if it's
one layer or 20, save it to keep it editable. And once you do that, you don't need to worry about
the XMP file. So that's my workflow. I open the raw file, I check my settings, I make my edits, and I open it in photoshop as a smart object. If I limit my edits
to camera raw, I'll keep the XMP file safe. If I want to do other changes, I'll save it as a PSD. Then in both cases,
no matter what, I export the image
as a PNG or a JPEG, typically at a much lower size. I don't really need the
6,000 by 4,000 image. In the export window, I generally choose
to scale it down. This is a generous size,
but not humungous. And all in all,
that's my workflow.
10. How to add optimized images to a website (gallery): Hey, there, as a designer, you may get this task. Here's a website that needs photos for all these products. And when you entered
one of them, you're going to get a gallery, more photos here, right? So how should you go about it? First, you need to understand that size is crucial
in two ways. A big high quality image, maybe 5 megabytes, it
may be ten, even 20. This means the website is
going to load very slowly. So everybody hates that, so we have to do our best
to shrink that size. As a general rule, under 300 k per photo
is pretty good. Under the 100 k is fantastic. So the smaller, the
better, these two, three, four, 5 megabytes
images are a no go. Now, the second
part of the study is the actual size,
the dimensions. See, people love big
photos, 1,800 by 1,200. Beautiful, big,
beautiful photos, where you can really
see all the details. But the bigger the dimensions, the bigger the file size. Now, we could go for 900 by 600, and that would be
more reasonable. Never go for
something like 400 by 250 because that would
be way too small. So to some of this point, you have to test and see what works best for that
specific website. Your objective is to
have a small file size while the actual dimensions
are as big as possible. So here's how I personally work. I use adobe bridge
to squad my photos. I then select all
the five start ones, and I edit them in
camera raw one by one. I'm not going to show
you the entire process because this can take Os. Now, when I'm done
in camera raw, I always open it
as a smart object, and this is essential. If you don't see this option
here, please hold shift. If that doesn't work,
use control or command K. Then in this new
window, go to work flow. From here, check this option. No, Okay, back to it. Once I'm here, I can't
really use this file. We can check the Canvas
size with this hot key, and you're going to
see that this is huge. The most popular screen size
right now is 1920 by 1080. So we have to be much
smaller than that. But here's how I like to work. I don't resize this photo. Instead, I start a
new project with Control N. In the
width and height, I'm going to put in
my final values. For this oatmeal website, I chose 960 by 540. Hit o, and this is where the
magic is going to happen. First of all, drag the smart
object from the other tab. This is going to be way too big, but hit control T. The problem is that we don't
see the handles, but we can use this field here. Select the entire thing and replace it with another
value like 100. Now we can see the handles
and we can resize as needed. Now I'm going to save the PSD. This is quite important. Next, I'll add more and more smart objects
in the same way. From bridge, I'll continue with my five stop photos and I'll
open them in camera raw. If the image is very similar
to the previous one, well, here's the track. I love using this feature here. Apply previous settings. This is how you can
really be efficient. Now, every raw file is going to open up in a different
tab, like so. I'll drag them inside
my new project, and I'm going to resize
them one by one, so they're going to
fit my canvas size. This is going to take a while. Okay. Finally, when I
have all my photos here, it may be even 50 or 100, I'm going to export them. To do that, go to the Layouts panel and
select all of them. You can use control
to select them one by one, or better yet, click on the first
one, then whole shift, then click on the last one. And that's how you get them all. Now, right click and
choose Export As. This is obviously going
to take some time, so please be patient. I hope you have a
strong computer. Now, the same shift approach works here in this new window. Select all of them,
then change the format. I'd like to use JPEG with
a fairly high quality. You don't need to worry
about the dimensions because they're all set to 960 by 540, and you can see that right here. Okay, Export them anywhere, and then there's
only one more step. Use this website called mg.com, and this will
compress your images. Go to the motions, and after the few seconds, this website will make them much smaller without losing
too much quality. From a 20 megabyte file
that was 5,000 by 4,000. You now have a sub 300 K 960 by 540 photo that's
ready to be uploaded. If the quality isn't there, you can re export as PNGs. That's going to give
you a better quality, but a bigger file size. What's essential is that
you play around and see what works best for
your other website. Now, you may ask, Chris, why did you save the PSD with
all these smart objects? Well, let's assume
that you're not happy with some of the
photos, not a problem. You can double click
the stumb nail and your back in camera raw. This means you get
the full image and you get to continue editing. After you save, you can
re export and compress. This is how I actually
work on an everyday basis. You don't have to
copy my exact steps. I'm sure you can do
it in other ways, but I hope this was
helpful. Good luck.
11. One-click wonders in Camera Raw: Hello, hello. In this video, I want to talk about
one click wonders. Actions that take
little to no time, yet they produce great results. I'm using this
website to download some raw files because
I'm no photographer, and this features awesome ones. Let's open this one and we'll
use it to explore presets. To activate that part of
camera raw, please click here. As you can see, these are structured into
several categories. In general, this would be a bad thing because the
more choices you have, the harder it is to
make a decision. But here's why I love
this part of camera raw. As you go over each
one of these options, you immediately see a preview. This is fantastic. This is beginner friendly, yet the outcome is rock solid. Well, most of the
time, as you can see, some presets work
better than others, but it's up to you to
see what fits best. In this case, this is
a fairly dark image. So obviously, certain presets
are not going to work well. Let me switch to another image so we can continue
to explore them. Please remember that I'm using the latest version
of the program. If you don't have your
interface looking like mine, then you're probably using
an older photo show version. Okay, so there are tons of
presets to explore here. Please go through them and see what's what,
get used to them. Especially like the
vignette effect, which is something a
lot of people look for. This makes the
edges a bit darker, and it creates a nice mood. But here's the thing. Say you click on one of these presets. There's a good chance it's
not going to be perfect. But here's where the fun begins. Go back to the edit part
and continue working on it. B it with a brush, whatever
else you want to do. There's a lot more to
be said about presets, how you can look for new
ones on the Internet, load them up, disable them, and whatnot. But
here's the thing. The best thing that I ever
did for my website for my business was to create a
preset for my product photos. Here are some of my images. Lovely jars filled with Kia pudding and
various other things. By the way, we say Kia, but chia also works. Okay. If you've played with camera raw up until this point, you may know that auto is
a good place to start. Trouble is, depending on the
image and its background, it will give you a different
result each and every time. So because of that,
you may end up with a gallery that changes
its mood with each photo. Otherwise I said,
you may improve your images and they
may look lovely, but when you scroll
through them as a gallery, they'll
seem disjointed. That's why I created a pre
set that will ensure I have the same look and feel across tens if not hundreds of images. Just think about it. Remembering the color
temperature for each one, the texture slider,
the sharpening, the vibrant, all that is
handled through a pre set. Click on these three dots
and it save settings. This will bring up this
window from which you can pick and choose just about everything you
want to include. There's stuns here.
So professionals will feel right at home. For the regular
users, just hit save. A new window is going to show up asking you to name the preset. Notice is going to be
saved as an XMP file. Call it whatever you like. But make sure you place it somewhere where it
makes sense for you. Then when you want to use it, don't switch to the precess tab. Just click here and
load that file. It's as easy as that. While we could work on adding
more presets here, I don't really advise it. Instead, I strongly
suggest you focus on developing your own presets
for your own photos. The pre built ones are more than enough as a starting point. Okay, try it out and
have fun with it.
12. Bonus: How I work in Camera Raw for product photos (30 minutes): Welcome back. This is Chris, and this is going to
be a live session, where we're going to
take all of these photos and enhance them.
Here's the situation. I sent all of these
photos to a photographer. Then obviously, he snapped
a bunch of photos. Now, in general, what happens is the photographer fixes them. He enhances them, he does
all sorts of things, and then he comes back
with the final product. But I actually asked
for the raw files. I asked for
everything like this, so you can see some of
them are quite horrible, for example, this one, it's actually quite
under exposed. You could potentially
fix it though, to be honest, though
it's not all that great. But yeah, basically, I asked
him to send everything. B of that, it's way way cheaper. That's one of the ways I can easily save a bunch of money. Instead of getting ten photos, I get about 150 for the
same amount of money, and obviously, I can fix
quite a lot of them. Instead of having
ten final pictures, I can get maybe 30, maybe 50, maybe
something like that. So this is what I
have right here. And actually, I think I have
another one right here. Yeah. There you go. And I
need to obviously edit them. This is going to be
done in camera raw, and this is how I like to work. Now, obviously, this is
going to be completely live, so you may see a bit of gaps, a bit of hesitation
here and there. Hopefully, you can bear with me. But this is my entire process
from start to finish. And the idea is we're going
to do all of these photos, so we can actually upload
them here to my website. You can see that some of
these are already brand new. But these ones are the old ones. We obviously have to fix that. Let's have a look and
see how this goes. First of all, what I'm going
to do is I'm going to copy this URL and I'm
going to open bridge. I'm going to open bridge, I'm going to paste it right here. Now you may have a
different layout. If that's the case, go to
libraries or essential, but basically what I like
to use is film strip. Basically I paste
the location here, so I don't waste any time and
actually finding the photo. Then obviously I can just have a look here and see what's Now, some of these are
already handled. Again, you can see
them right here. I've already edited
a bunch of them, but for the cookies, I
still have to do them. These are some of the cookies, and I'd like to handle them. I'd like to fix them
and see if this is a good if these are
gray photos or not. Let's see what we can begin. With, I think these ones, these black ones, let's have a quick look here
and see what's what. Okay. There you go. Now, if you don't have adobe
bridge, that's totally fine. What you can use
is something like ACDC or something like that
and simply have a look. Obviously, in
windows, you can just zoom in and see what's what. I usually take the
last two digits or the last three digits, and that's how I can
quickly identify a photo. Now, in case you do
have adobe bridge, you actually don't need
to do a lot with it. Once you get into
film strip mode, you should be able
to simply glance at them and see which
are the better ones. Then you can actually
give them a star rating. And this star rating is
actually quite helpful in case you have hundreds and
hundreds of photos. Let's have a good
look here and see where we're going to begin. Let's see if this one
is pretty good or not. Again, some of them have
been already edited. But no, this one
hasn't been edited. This is pretty good.
Now again, in general, what I would do is I would use control five and this
would be five stars. Then have a look
here. Five stars. Basically, that are very,
very small differences here. You can actually zoom in and
see mind and minor details. Probably this one would be a bit better because it's
a bit higher up, so again, Control five. This one is the only
one control five. Though, this is
very, very wrinkled. There's a lot of
problems with it. I'm not sure if we're
going to use it. Obviously, we can correct
absolutely everything. We can fix everything in photo shop, but it's
a method of time. When you have so many files
here, it's quite difficult. Let's have a look again. This is lovely. This
is probably better. It's a bit zoomed out. We do have to take care
of the of the labels. We should make sure
there in focus this one, and I think this one. Let's do the cookies
first and foremost. Then we're going to
see what's what? No. Let's start with this
one, the C chocolate one. Double click it and
it should launch immediately in photo
shop. Let's have a look. Now, immediately, I'm going
to test the auto feature. Auto pretty good. It's a good starting
point. Let's have a look. In terms of exposure
a bit higher up, I would say temperature. Now, I'm going to copy
this default one. Now, let's see. Okay. I usually like to go to the extremes
and see what's what? Probably something like this. In general, what I like
to do is I like to make sure that all of my photos
have the same temperature, especially if there in a set. Usually that's going
to look a bit better. Then I'm going to
leave it as it is. Of highlight. It's this part right here, the white right here. I don't think we need that much. In terms of shadows. There's a big problem with
the noise level here. You can see all the
scratches and whatnot. The texture, we have to
really bring it down, and this is quite nice. As you can see, this
is a huge difference. Let me just quickly
turn it up so you can see every
single detail here, which is lovely
inside the cookie, you know, but it's
horrible right here. Let's do this. In terms of clarity we're going to leave it. We're going to ramp up noise
reduction quite a lot. Though it's it's a bit
too dreamy, so to speak. It's like in a dream,
it's a bit blurry. Let's sharpen it just a bit. Obviously, this is
going to get cropped, so I think this is
pretty fine as it is. Let's see what else
we're going to do here. In terms of color, I'm going to raise the vibrant a bit more. You can see what the difference
it makes right here. So Huge. This is zero, and this is 4250, 50. Textual, let's go with clarity, just a bit in general, I really don't like
clarity all that much. Clarity is great on
the edges of the jar. This is a glass jar, so this is quite okay. Pretty good, pretty good. Now, let's see what
we can do here. Basically, what we've done
so far is the entire scene. Now we have to take
care of the label. Let's hit k, and that's
going to open up a brush. It's this panel right here, and we're going to
shrink the brush with the left
square bracket key, and now we're just going to paint over this guy right here. Let's see what we can do. It's a bit tricky,
unfortunately. The left side is
over the exposed, the right side,
it's way too dark. Let's see exposure
first and foremost. Not all that nice. Shadow doesn't really work. We might have to
split it in two, which is not ideal,
do something on the left and something
different on the right. Let's see though
let's try a bit more. The whites may be less more contrast.
Quite tricky. This is why photographers
charge quite a lot, because you do
have to go through loads and loads of
these situations. Okay. Do we not have enough coverage the blue is actually bleeding out a bit. Let's go with Zo here. Saturation is fine. Let's decrease the texture, which should help us right here. But again, it's a bit I'm
not sure that I like it. Again, we should
potentially split this up, but we're going to
be here all day, and I'm not sure that
I want to do that. Clarity. No. We can't
actually use that. Let's have another look here and see if we can do something else. In terms of highlights, we can bring it down just a bit from this part right here. Mmm. Yeah, I can't
say that I like it. I can't say that I like it. It's okay, but it's not great. Still Let's do another mask. I just hit once again. Let's increase it, and let's
do this power right here. The actual cookie. For this one, I'm just going to increase
the texture quite a lot. You can see the
difference that this makes, something like this. Clady, I'm not sure. The
chocolate is beginning to pop, it may be a bit too much. Let's do something like this. I think that's it, maybe
a bit more contrast. You can see that
it's becoming more brown, brownish, golden yellow. Yeah I think I like
that quite a lot. This is quite nice.
This is the top part. Ms two is basically
the top part. You can call it
just that top part. But yeah, this part right here, I'm not in love with it. No. It's not great. Unfortunately, it's not great. So I just deleted it, and now let's hit K once again. Whoops, Let's go with ad. Let's go with brush. Okay. Let's try this again. This time we're only going to
focus on the left side. What's going on here?
Show over there you go. Let's try this part right
here. For the exposure. Now I don't think we can we can use the
exposure all that much. Maybe increase the feather
and paint just a bit more. Let's have a look
here. What can we do? What can we do? It's
not great to be honest. It's not great, you know. I think we're going to leave
it as it is. But yeah. It's not ideal. It's not ideal. Let's go at it. I'm not too happy about it. Quite difficult.
Quite difficult. What I'm going to do is
I'm going to hit okay. I'm just going to open
it as a smart object, and now we can continue. We can see what's what. The idea is that after
we have the first one, you can see it just
change right here. We could potentially just
open up a second one. Then once this is loaded up, we could apply the previous
settings right here. Apply boom. There we go. Now obviously, it doesn't apply the secondary mask at the
top and at the bottom. But yeah, overall, this may be it quite a better
starting point. Let's have another go here. Let's do the first
part right here, increase the contrast,
and then the texture. Maybe the clarity
a bit, just a bit. I think this is pretty good. Now, could we leave it
as it is? I think so. I think so. This might be
a bit better to be honest. Let's have to go at the whites. Then the contrast. Open the object.
Let's have a look. Yeah, this is better. It's a bit too much, though.
It's a bit too much. If we have a look here, I
think it's a bit too much. The vibrance is all
over the place. What I'm going to
do is I'm going to close this one. I don't need it. Then for this one, the vibrance is way too, I'm going
to tone it down. Let's have another look here. Vibrance, let's
turn it back down. Something like 20 maybe. Okay. I think this is pretty good. Now, at this point,
what I'm going to do, I'm not going to save
every single PSD, that wouldn't make any sense. Actually, I'm going
to do the following. I'm going to open
up a different PSD. Let me see where it is. Yeah, this is it. Basically what happens is, I have a certain size in
mind for every single photo. This is the wide one.
Sorry about that. I need the other one to
portate one, the ego. Basically, I need a certain size 800 by 1,000, whatever that is. Let's have a look actually
see, 800 by 1,000. What happens here is
I'm going to do this. This is completely
done. Let's say I'm 100% happy with it. Then I'm going to take this,
I'm going to move it here, I'm going to hold down shift. Let it go, control T, and then resize it. Obviously, it's going to
take a bit, but yeah, resize it, something like this. Okay, and that's it. Now, basically, what
I'm going to do, I can close this off,
and you're going to say, Chris, but what if we
want to change anything? No a problem, simply
double click. And camera is going to
start and we have all of savings here. Why
is that the case? Because there's an XML file that's actually saved in
this particular folder. Everything is saved. There's a separate
file for that, so we can continue working, but we have this PSD. Basically what we can do is
we can select all of them, export, and that's that. And we get the perfect size. Actually, let me do one layer. So I know where I've
left things off, we can actually change
the color and that's it. So basically, what I'm going to do is I'm going to continue. I'm going to do more and more and then I'm going
to drag them in. Now, the issue with
this aspect ratio, let me show you
the mobile version because that's the
biggest thing. In terms of the mobile version, when you click on a photo,
you get something like this. It's fair fairly
narrow and quite tall. But how are we going
to do this situation? That's the tricky bit. We're going to see, we
might simply not use that because that's going
to be quite difficult. Let's get back to it. We
did the chocolate one. You can see that before
and after right here. Quite a big difference. Let's do this one as well. We can immediately
apply this one. This doesn't look as good. It's a bit too dreamy. Let's have a look.
Contrast a bit more. For the texture, we
might raise it up just a bit and decrease the clarity. No, this is actually good. The sharpening is high. This is good. Noise reduction. Yeah I think we need
to lower this one. This one, I don't think it makes any significant
difference. We're just going
to leave it at 50. Let's have a good look here. The contrast is fine first. Let's get a brush. Do
this part right here. I think I got a bit too much. I'm going to hold
down. I'm going to remove this bed right here. Let's go for a contrast. Typically contrast is my go to choice for the most because most photos are
actually washed out. Texture clay. Just
for the fun of it, let's have a quick look,
what would happen if we actually enable this part? No, no need for that.
No need for that. Though the overlay should
actually remain active. Okay. Okay. Okay. This
is overall quite lovely. Again, quite a lot of scratches. That's not a problem.
Open the smart object. I'm holding shift when I'm using the open feature, bring it in. And actually, let's do this. Let me hit escape. What I like to do
is I like to mit the same size because obviously all the photos have
the same size, and there you go, boom
and boom boom and boom. Pretty good, pretty good. Again, we do have
some noise here, but I'm not all that
bothered by it. I think that's fine. As well, but yeah, pretty good. We have two out of four. We chose this one. Let's
do the same thing. Apply previous. Now, in general, what
tends to happen is you should actually spend
a lot more time on every single photo. To be honest, you should spend hours on hours on end to actually make every single
photo totally beautiful. What I'm doing right here is a glimpse into
what it's like to be an entrepreneur and doing everything by yourself.
It's not great. It's not ideal, you know, 'cause you're never
going to do a great job. You're never going
to do a perfect job. This is going to be
a seven out of ten. Maybe an eight out of ten. If I'm lucky, and I have a
and I'm in a great mood. But yeah, in general,
you should delegate. You should leave a designer
to do all of this stuff. A designer that's not in a
rush because I have to do a lot of things right
now, 20 other things. So obviously, my mind isn't 100% focused on this task alone. But yeah, it is what it is. So when you're busy, you try and do the
most that you can. Hold shift, open the object. Okay. Come on. Control T. So I'm sure that
you may do things a bit in a different way. But u Again, when
you're in a crunch, you have to make
sure that you're as efficient as possible. 20 minutes for the 34
photos isn't great, but it's a good starting point. Yeah. Again, we could use the Clone Stem tool
and see what's what. We have a bump here as well. But you know what? I'm
not going to do it. I'm not going to do it because I don't want to waste any time. It's a small detail, and I don't think it's worth the extra effort because I do have at least ten other
photos to handle. Previously, I've done 50, and you can see in the PSD, how many, I actually did. But yeah, right now,
I'm not going to record the entire thing and show
you the entire process. I'm just going to
do a few of them. Yeah. This is good. Shift, open the object. Let's see how many we
actually have in this one. You can see actually the scroll
is absolutely humongous. This is why I'm saying
that, as an entrepreneur, you should delegate
and you shouldn't do everything by itself. You can see this is absolutely
huge. It's massive. So yeah, this is why I'm taking this approach because
time is money, and you can't spend
too much time you know on the
very small stuff. Now, is this a clear defect? Obviously, it's a defect,
and it shouldn't be here. Could we fix it? Could
we fix it fairly fast? Yeah, sure. But again, I don't want to do
that because I still have loads more to do. So let's have a look here. We could potentially do this.
Let's have a quick look. Maybe we can use it as a
category photo, 1 second. Let's do this. Okay.
Let's do the texture, make a smaller dough. And here as well. You
go on the big ones. Contrast. Texture. Clarity, maybe
just a bit. There we go. Now, again, this is
going to be a problem because we can't
actually use it here. But let's give it a
go and see how it is. I do have another PSD
for landscape mode. This is most decent. I'm going to save it,
but it's not ideal. As you can see, it's from Dal. Let's see what if we
enlarge it actually? Nope. Nope. Save it. And let's
do the following. Let's export these guys. Quick export a PNG. Let's save them on my desktop. It's going to take a bit. And then, yeah, I was
saying that we might use the landscape one on
the category side, which is here, this
one right here. We may actually do that though
I do like this white one. Though the labels are
really washed out. We're going to have
to see let's go here. Let's select the
photos. There you go. They're huge, by
the way, initially, that always going to be huge. As you can see, a
major improvement. Now we're going to export it. Good to go. Now I'm going to
open my War Press website, and we're going to go and
see those specific products, and then we can obviously
upload every one of them. Let's have a look. Let's go to biscuit. This is Wo commas in War Press. This is pretty standard. Let's actually
upload these guys. I'm going to open them by
clicking on the scroll button. Let's have a look here
and see what's what. This is what I'm
going to replace. You can see the
actual photos here. Yeah. Let's handle it
and see what's what. Let's remove this one. This is the salted version. Boom, the salted
version is this one. It's black. The previous
version was white. I think white was a bit better. Let's go for it,
though, doesn't matter. Let's go for it.
This is this one. It does take a bit of
time for it to load up. That's why I'm going quite fast, and that's why I'm
working on three different tabs for
different tabs, because you got to
keep up the pace. Again, time is money. This is what I've learned as an entrepreneur, as
a business owner. You really got to make
sure that you're on your a game and you
keep on working. This is done. Now
we can update it. This one is done as well. Date. Yeah, this is how
I typically work. Now, to be honest, I do
actually change something. Let me show you in this new tab. Usually I do type in
something different here. This is a keyword and it usually helps for
theEO purposes. Then let's just hit update, and let's have a look if
this is looking okay or not. Let's reload. I do think I
have some caching going on. Pretty good, but a bit too big. We might need to make them a best model so they fit better. Yeah, overall, I'm
quite happy with it. I think this is on
the right track. Let's have a look
at the other ones. Here you can see that the
jars bit better placed. This is a bit too zoomed in. We would have to make them probably something like
this, something like this. A very small difference, but yeah, I think I'm
going to do that. Actually, let me just say that. Okay. For now, I think I'm
going to leave it as it is. But yeah, this is
my actual process. I have a look at all
of these photos. I give them a rating, then
I sort them by rating. So I only see the
five start ones. After that, I do my
thing in camera raw. And then once that's done, I put them in a separate PSD, and when that's done,
I'm totally good. Although, to be fair, what
I tend to do is this, let me actually show
you that part and then I'm going to close
close the recording. So This is why it really pays off to
have a strong computer. Let me do this. Then I'm going to take all of these all of these
layers. We did only five. To be honest, I'll
probably continue working on these for at
least two more hours, but I'm going to take them. I'm going to put them here.
This one fits perfectly. This is quite nice. Then I'm going to
actually all of these guys are okay. Quite okay. D, I think I may actually
leave them as they are. Although we could at any point, come inside here and obviously do a bit of
healing here and there. As you can see, this
is quite easy to do. It's a matter of just taking
the time to go for it. Boom, and there we
go, much better. Again, could we do a lot more? Totally, we can do
loads of things here. But yeah, it's a method of time. What I'm going to do
is I'm just going to save it. I'm
going to close it. I'm going to continue working
on the portrait mode. Once that's done, I'm
going to use I IMG. Then finally, I'm going to
upload them to my back end. And once this is finished, once the thumb nail is finished, I'll obviously do this part
right here at the gallery. Because when you go
inside the product, you obviously have a
galley of photos as well. And as you can see,
these are the old ones. So I do have to update them. This is the landscape
one. This is not correct. So I need to make
sure that everything is nice and updated, everything, every single photo. And I think I have about
45 photos per product, and I have about 30
products, 34 products. So that's over the 150 photos. So when you put it that way, you really have to make
sure that you're deficient. But yeah, hope you
enjoyed this process. This is how I actually work. This is how I spend my time. Hopefully this was useful, a useful glimpse into
how I can obviously sort everything out and
make sure that everything is nice and editable. The PSD is huge. This is 6 gigabytes,
5.6 gigabytes. The other one I think is
nine nearly 9 gigabytes. But yeah, I find that this is one of
the best ways to work, and I get the exact
size every single time. This is Chris signing out. Thank you so much for tuning in, and hopefully this was
insightful. Thanks.
13. Conclusion: There, this is Chris. We've
wrapped up this session, but of course, there's
loads more to learn. Camera raw is
something that would require a completely
separate course. But I hope these lessons gave you a glimpse
into its power. As I said, experiment with the sliders and make sure you mastered the
adjustment brush. As long as you do that, you'll be able to improve
your photos dramatically. While we focused on raw files, please don't be shy from using camera raw on PNGs or JPEGs. Sure, it's not the same thing, but you can still
make your photos pop. You don't have as much
freedom, but that's fine. If you don't have the raw
file, it is what it is. On a personal note, I struggled a lot with my DSLR camera when
I first bought that. Everything seemed
so complicated. I mean, loads of settings, loads of tutorials, and
the most important thing. Automatic settings were
unanimously considered terrible. And then it was all the
terms, Io, aperture, lenses, shut of speed, the works, so many terms, so many things to learn. But as I allowed myself
time to play with them, I grew more confident. There wasn't one specific moment where I felt, Nan, I got it. Instead, I didn't allow
myself to get frustrated. I think that's the
most important part. I believe it's the same
thing with camera raw, or anything else in general, that seems impossible to learn. Take a step by step. Don't put too much
pressure on yourself, and you'll learn it in due time. You're not on a deadline. Stay focused, and
you'll get there. Good luck, and remember
to have fun with it.
 Chris Barin, Certified Photoshop Expert