Transcripts
1. Welcome!: I. Hi and welcome to
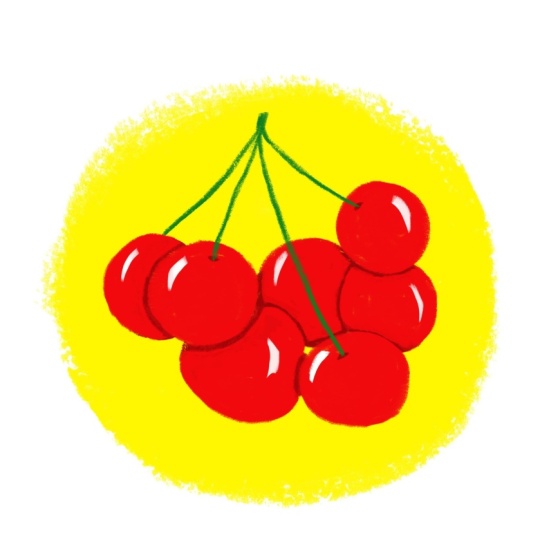
the super fun and super easy lesson on how to draw cherries
with Adobe Fresco. You learn all about drawing
with pixel brushes, learning how to blend things. And in the end, you also learn how to add texture and export this artwork. So are you ready?
Let's get started.
2. New Update: So as of May 2026, Fresco has changed its UI. That means it might
look a little different than what you see
in the next few lessons. I thought I'll make a update
video for my Fresco classes. So here you go. As
soon as you come in, if I click on Home, this
is how it looks like. Used to see your custom
sizes and stuff over here, but now it looks something
like this, but that's okay. You can click on Create New and create a new document as usual, click on your files, and this is how the homepage looks like. Create new. You have an extra
bit here called the social. You have some social
media templates there, so you can use that. I'll just go to digital
and current screen size. The first thing you notice
as soon as we move here is that the toolbar has completely moved from
left hand side to top. I know I'm not too
happy about this, but yeah, we'll just
work with it, I guess. On the left side now you
have the brush settings. So this is the smoothing
which used to, this is the smoothing,
you go up and down. This is basically the flow
or the opacity of the brush, like if you have some charcoal pencil
and then yeah let's make it black,
and then you do this. This is like you
keep it all high, and then if you keep it all low, you see it's not
flowing so well. This is the flow of the brush, and this is basically the size of the
brush that you have. Again, click and hole and everything else works
exactly the same. The settings are almost
the same as well. I don't think we need
to worry about that. And on the top bar, you have all the other tools
that you used to have. This one is pose. It is a new thing which
is not covered in any of my tutorials, so I'm not going
to go into that. But basically, you have
everything in here, the last tool,
everything's up here. The shapes are still here. Text is again here, and then this is to add your images or photos
and things like that. The eyedropper tool is here and the color palette
is over here. You might see that
the undo buttons have moved here instead of here, but that's fine because your
two fingertaps still work. Also one thing is when you
click on something else other than the brush,
this panel disappears. They used to be your animation
or motion panel here, which has moved up and they used to be shapes like
a ruler and stuff and that has moved into this
bit here or drawing aids. That's what it is, and you have all the drawing
aids over here. Then you have your
symmetry here and the perspective
grid and the grids. When you turn it on, you can have grids and
snapping is here, so you snap everything, I guess. Apart from that, everything
else is exactly the same. And when you go up, you
get a full screen mode. The only disadvantage I've seen is that when you're
on the brush mode, before even if you were in the full screen
mode and drawing, your brush, this was a floating thing which you can move everywhere
anywhere you wanted, but they have disabled that. That means when you go
to full screen mode, your brush settings disappear. So if you want to go back and adjust your brush
size or something, you have to go back in, which I think is not a good thing. The motion settings
are still here, so that hasn't changed as well. And the most important thing that I want to include
is the brushes. Instead of having three
separate brushes, they merge them into
one single brush. This was done a while ago
when you click on brush, you need to go to all brushes, and then you can choose
what brushes that you want, pixel brushes, and then you can see all the subheadings
or whatever. All the brushes are here, but only thing is it's
all bundled up together and that's the most annoying
bit for me at least. I guess that's it. That's
the main change to the UI, and since this was a
significant change, I thought I will add
a updated video. I hope you go ahead and
enjoy the next lesson.
3. Setting up: Once you open up Fresco, I want you to click
on Create New, and I want you to
go into digital and current screen size. I do have a sketch for you guys, but it's also super easy
to draw these cherries. So I'm going to go into Black. You can click here to get
to Black For brushes, we're going to go into charcoal
and then charcoal pencil. I want you to click
on this star here, and I want you go to wine Charcoal four and
click on that as well. The reason we do this is
when you click on Favorites, you can see both of
your pencils here, and then it's super easy to pick it whenever you
want to change it. I'll click on Charcoal pencil. My pencil is set to 56. You can click or you can just do like
this to go up and down, or click and hold,
and then type in 56. It need not be exactly 56. A number around
that, 50s is okay. The floor is set to 70s. It's 76 if you want, but you can again go up and down and increase
or decrease it. You can make it all the
way brighter as well. I'll keep it around 80s. Smoothing is one, which
is the default. Alright.
4. Let's Sketch!: If you want to skip
this entire process of drawing the cherries,
go ahead and do that. In a while, I'm going to
show you how to bring in the sketch if you really
want to go that route. So just draw a circle, and we're going to
make three of them. Don't worry about the size. It's okay if they are not
perfectly circle as well. We're doing a rough cherry. Now I want you to draw one
behind that like that. It could be bigger,
smaller, doesn't matter. And I want you to draw
one like this as well. And then let's go to eraser, reduce the eraser here. This is only for people who are not really used to drawing. Otherwise, you can just draw the lines I'm going to show
you what I mean by next step. Okay. I'll go back to my
pencil here, and this one, I'm just going to go and eyeball it and make a circle like that. So again, you can
make a round and then erase it.
That's fine as well. And for this one, I
want this like this, and I actually
wanted to go a bit like that and overlap
this bottom one. So let's do that. Erase this off. There you go. All right. I think we have
enough of the cherries. So let's just if you want to add more, that's
totally up to you. And I'm going to add a stalk. This one goes up here. These are the ones in the front. I go on a minute. Let
me just erase this. Okay. And this is in the back. So we're going to do
that. We need one for this, and one for that. There you go. And maybe this. Your sketch is ready. So next is time to paint.
5. Or Import the Sketch: All right, it's time
to color this thing. But before that, I just
want to quickly show you how to import this sketch.
So I'm going to hide this. And now, once you have
the sketch downloaded, you can find it in the
resources section. Then click on photos
or images, Koropoos. That's where it should be saved. If it's not, it'll be in files. Kuro photos and bring it in. And click on Done. One thing you should
know with the sketch is go here to the levels and make sure this
is set to multiply. You don't have to do this when you're doing your own sketch. This is only when you bring
in an image as a sketch. And of course, you can reduce the opacity to
whatever you want. I'm going to hide this
because I'm going to use the sketch that
I made just now. I like it. Maybe I could
make it a little bigger. So I'm going to go
ahead and click on the Transform tool and
slightly increase the size. Perfect. Click on D.
Now I've got do levels. And let's reduce this. Alright. Perfect. Now we're
gonna start painting.
6. Let's Draw - Top Layer: Plus, to create a new layer. For drawing, we're going to use the same brush that we
did for the sketch. So go here, and I want you
to pick a bright red color. So I want you to get this thing all the way to this corner. This gives the brightest of any color. This is the darkest. And then I want you to move this so that it's stationed at red. So if you want the exact colors, it is zero, hundred and hundred. You can click and
type in the number, so you have the exact
same colors as me. First, I'm going to draw
the top three cherries. Just draw it around here like
that, and then fill it in. I want strokes to be
visible because we're going to make it very
illustration style. So it's alright. If there are strokes, you
see how this is, it's okay. It doesn't matter. I'm
going to add here as well. Of course, you can fill it up. You can fill it up later as
well because we'll be getting in other kinds of brushes
to do this for us. You don't have to be super
neat about the edges. We're going to go
ahead and fix it later because once you
remove the sketch, you'll see that the edges are sometimes not exactly
how you want it to be. And that's pretty common. Our main idea here is to get the basic shapes down.
So let's do that. You can make the brush bigger
at this point, if you want. I prefer not to do
that because I like the strokes and also because
it changes the texture, the edge texture a little bit. And, yeah, that's something
I don't like personally. So if you want, go ahead
and increase the size of the brush so that it's
quicker to color this in. Okay, that's perfect. Now it's time to add the
cherries in the back.
7. Let's Draw - Second Layer: I'm going to go back or below this layer
of these cherries, and then I'm going
to click on plus. So the main idea is that
we add a little bit of darker bits and a litt
darker than the darker bits. So I'm going to go here and
I'll pull this down a little. Maybe up oops. I'm going
to go back to red. If this happens to you and you choose a different
color over there, just click back here and it's
under resins, by the way. And then it'll go back. So now you can choose
a little darker red. You don't want it too dark, but you do want it slightly
darker than before. Okay. So we are still in
the charcoal pencil. I want you to define the edgoes here and see
because it's in the back, it doesn't matter so much. So we're going to add a bit
of edgoes here like that. And this part is going to
be dark, so that's fine. And we're going to
add a bit like that. And you see here, I use really dark or high
pressure strokes. So this is so dark. But here I use lighter stroke. So this is my lighter stroke, and this is my dark stroke. I mean, high pressure stroke. So the way you apply this pressure
really matters as well. So it gives you a little bit of difference in the color
of all these things. Yeah. So I'm going to put
some here as well, and a light a bit as you
come towards the edge. Doing your pencil this way also gives a different
kind of an effect. If you want to use that option. Gonna add some here. Oops. You can use your two
fingertaps to undo things. And let's color this in Okay. And this one, we're going
to do it in the end, so I don't want to do
it on the same layer. Now, oh, here, in
the same layer, I'm going to go into my
red bright red that I had, and I will add it to the rest
of the cherry like this. And you see when it's
overlapping here. I'll use lighter strokes here. So we'll do this one now. You see here, these tubes
look like they're merged. So we need to come back and put some darker bits
which you're going to do later. Don't
worry about that. This is just a first
pass of adding colors. Let's do the same here. All right.
8. Let's Draw - Cherry in the Background: So I'm going to go ahead and concentrate on this
cherry up here. So this has to be
below this layer. Oh, no, it can be above
this layer, so plus. A were going to go
ahead and draw with a darker bit Here
Here's dark as well. I know it's merging here. Don't worry. We're
gonna fix that. And this one and this one here. And we're going
to make sure that this part over here
is nice and dark. Lots of shadows. There you go. Now let me go ahead and select
the light red, and we're going to
put it up here. And I will basically
colour this spot. I think I'm going to make
this spot dark as well. But for now, this looks okay. Okay. That looks good. Alright. Let's add some further shadows
and smoothen it out.
9. Blending: So now it's time to
blend these colors in. So I'm going to go
ahead and choose the dark red that we
have here already. And the brush, we're going
to choose wine charcoal. Go to your favorites
wine charcoal four. And the size is set to 119. Again, you can adjust
it however you want. The flow is set to 50, and that's really
important for this brush, and the smoothing is one,
which is the default. So what I'm going to do now
is I have this dark color, so I'll make sure I'm using a bit extra pressure towards the border so and then
when I come forward, I'm going to use light
pressure, as you can see. Absolutely light
pressure over here. Be careful with the edges, and then just try to go forward. Oh, I made it in
the wrong layer, so to fingertap to undo
everything that I did. Go back to your layer
with the three cherries. You can use this eye button
to figure out where you are. And we're going to add the same darker towards the
border or towards the edges, and a bit of lighter
ones up here. See here, I'm not using a
lot of pressure at all, so it's kind blending like
that. Exactly what we need. I'm going to go and switch
to the bright red now, and I'm going to fix
these things here. Oops. Don't want it out. I'm going to go ahead
and add a bed right on top of the strokes
that we made here. See, like that. Looks very blendy or
blended. Add more. Add a bit more of the
darker color over here. Okay. There you go. This is one. I'm going
to do this one now. Make sure you add it here, this part because you see it seems like it's blending
and you don't want that. So add all the way up
here and here as well. And lighter tones and
obviously go back and get your red and in a bit. It's good. But I want here a
little darker shade of that. So we're going to go
to the darker red and bring it down an
notch to make it even more darker and add this. If you can't figure out
where the original line was, go back to this
cherry and hide it, and now go back to the
three cherry things and you can clearly see where you're
supposed to be drawing. And yeah, if you use a clipping mask, this
wouldn't be a problem, but since we're not
using one here, so we'll have to
make two with this. You can go back and add a
little bit of this colour, darker color as well
because it does give a very nice dark or FX, right? So that's good. Now go back to this cherry here and you can add
a bit if you want. And I'll go back to this color which you already have,
and we're going to. That's a bit dark. So There you go and choose the
bright red because I want to mix a blend
a little bit. You're blending things without actually using the blend tool. So this is how it looks like. Use very light pressure so that it looks like it's
blending in pretty nicely. You can see what's
happening there, right? Oops. Okay. There you go. Alright. Our three
cherries are done. Let's go to the one which
we have hidden right here. Let's do this one now.
10. Blending Cont.: Okay, it's time to
do this last cherry, so unhide this by
pressing this eye button. Let's choose the darker red, the one which we
have already put, and we are in the wine
charcoal brush again. And I'm going to
go ahead and add these extra strokes like we
did for the other cherries. All right. Make sure you get the round
shape of your cherry. Otherwise, it doesn't make
sense to have it there. Yeah. I guess that's okay. It's a bit elongated, isn't it? So I'm going to make it and use the charcoal pencil for this
because that's much nicer. Okay. That looks better. Now go to red, your
wine charcoal, and we're going to go
ahead and add a bit more. You can increase the
size here, by the way. I feel like I need
darker color here. Bose. It's really in the
background, isn't it? Hm. Maybe we can add
the darkest color that we chose a little bit here create some Shadow thing. Why not? Okay. There you go. Shouldn't be too dark. So I'm adding it
right above that. So it doesn't look like
there's a line of it. It's like a blend nice texture. And there you go. I think our cherries look fine. It's time to uncheck the sketch and then fix
everything. So we're going to do
11. Let's Fix things: Go to your sketch layer and
click on this eye button. Perfect. Now go to
your charcoal pencil. And now we're going
to fix all of the cherries if you feel like
there's something wrong. You have to be in
the right layer, so maybe go to the
layer which has these three cherries
and we'll fix it. Oh. This is the wrong
color for this. So you can either
fix it by drawing on it or you can use
your eraser tool. In this case, I'm going
to use the eraser tool, and then you can erase. The size of the eraser
tool depends on your Yeah, what area you're trying
to erase, by the way. Alright. Mm, everything else looks
good. Maybe this one. I go to charcoal brush and
make it nice. Add a bit. And this as well. This is actually in
a different layer, but it doesn't matter
because you're adding it in the background. At this point, it
doesn't matter. I'll go back to this layer and fix this cherry up like that. I think this one needs
to be fixed, as well. Bit more color. That's
okay. And this one. Okay. Now, I go. Alright. Maybe this with all the white spots if you
want to fix it, of course. And then this one needs fixing, but I won't put it on the layer. So I'll go back to the layer beneath it so that it
is in the background. You see what I'm doing here? Just fixing those white spots. By adding something in the background so that you
don't mess up the layer because you have already applied these shadings and you
don't want to mess it up. So what you can do
is you can just go back to the layer beneath. Like here, I want to
add something here. But you see that it's
a mix of colors, so you don't want
to mess with it. So go back to the layer
plus below that layer. And now if you add staff, it's just going to go
behind that layer, and that's exactly what we need. Okay? This cherry needs a bit
of fixing. All right. I think we are done.
Except this one here. Tiny bit. Okay, that's good. Now, we'll go ahead
and click on plus, and we're going to
add some highlights. But let's bring in our sketchb. There you go. Our
sketch is here.
12. Highlights and Stalks: Now, go to the layer.
You just created. You're going to go
ahead and choose white. Okay, let's select the
wine charcoal four brush, and let's bring it back to
hundreds, whatever number. And we're going to use that to give some highlights
to our cherries. So I want your highlight
to be show you how it is. I want your highlight
to be in this shape, and usually it's a bit
thicker on the edge, and this side, it's thinner.
So that's the goal. But of course, you can
draw however you want, and we're going to use that
to add some highlights. Sometimes the highlight goes up here and there's a tiny bit
here. You know what to do. So I like giving these tiny white
things like that. Makes it look nicer, I guess. Okay. And Okay. There you go. Now it's time to draw the stock. And as you know, some of these stock has to
be on the cherries. Once in the background, they have to go behind the cherries. So that's exactly what
we're going to do. Click on plus, and we'll
go select some green. I want you to move this out
to circle to the green, and this one will
bring it somewhere wherever you think the
green looks good for you. Okay? If you want
the same color, it's one oh eight, 96 and 39. And let's add some greens. You're going to go
into charcoal pencil. It's at 56, so you can decrease this if you feel
like it's too thick. We're going to add it
for this cherry here. Just draw the line. And for this one. And this one. Let me just unscheck the sketch. Is that the sketch
nope it's here. Perfect. And now I'll go
all the way down here. Click plus below all the cherries, and we're
going to add this one. You can also make
it a little darker. So what you could do is
you can choose a little darker green and then
click and just hide it. I'll create a new layer
and make it darker. Make sure it's not too thick. You don't want it to be
too thick, and that's it. And add this, you take a
lighter green, add that. And let's go ahead and hide.
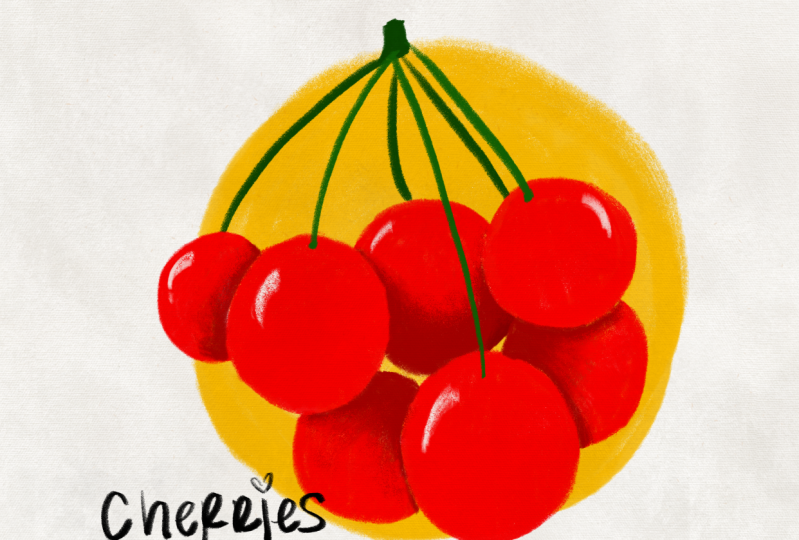
13. Final touches and Exporting Artwork: So our cherry looks pretty. Now, we're going to
add a background. So go back here again. Plus, you can choose any color, maybe I choose yellow,
bring it all the way up. Maybe around here, so
that's 5,800 and hundred. You can go to wine
charcoal so that it gives a big blob like that. There you go. You don't have to make it exact round or
anything. That's good. And you can go to black, choose a charcoal pencil, reduce the size if you want, and then you can write
O New layer, please. And then write cherries. This is optional, by the way. And then if you want to add
a texture on top of this, super simple, you can find the texture in the
resources section. So all you have to do is click
on your photos or images, and it'll be stored in
files. So go there. Select the texture
that you have and it'll apply it and zoom out a little bit with your
two fingers like that and always expand
using the corners. When you feel it looks
good, click on done. And now you see that you
can only see cherries. Where's the rest of the stuff. That's because the
texture is over here. So you're going to
click so that it highlights and bring
it all the way up. You can use your other finger to guide it down, put it on top. Now, you can't see
anything. That's okay. Go to your levels.
Click here on multiply. The same thing that we
did for our sketch, you can adjust the opacity
here to control how strong you want your texture
to be. Click on this. You can hide your
layers if you want, pinch, click on this, and your artwork is ready. Once your artwork is ready, you can export it by
clicking on Share, Publish and Export, export as and export it
anything that you want. Here you go and export it. Done. If you want to watch or export time laps,
click on Share, Preview Time labs, and in here, you can see the entire
time laps of the cherries. And then if you want
to export it as a sticker that is without a
background, let's hide it. Let's go hide the text. Let's go hide the
yellow background, and don't forget
to hide this here, the last image so that
you see the checkerboard, and now you click on Share, publish and export, export as, and make sure you
export it as a PNG. And then this gets exported as a sticker or something
without a background.
14. Class Project: And that's it. That's the end of this lesson, and
I hope you liked it. The class project is going to be creating these cherries
with Adobe Fresco. You can use either the
same brush that I've used or any other brushes that you think would
work well for you. You can use the same
technique to make cherries or any kinds of berries
that are overlapping. So, yeah, I would love to
see what you guys create and post it in the
project section. I'll see you in the
next class. Bye.
 Ashwini Pandeshwar, Artist, master procrastinator