Transcripts
1. Intro: Hello everyone. My name is Melissa images, tell artists and
creative director. I've been working from
last seven years. I've worked with major brands, including United Nations,
Pepsi railway, the candidate. In this class. I'm shading all
my techniques and experiences to guide you. So let's start the class. I will teach you Adobe
Photoshop, magical compositing. You will learn from
the idea of how to create magical digital artworks. You will learn in this class, I am revealing all my secret
methods and techniques to create different photo artworks
with the magical effect, you will learn blending
photos in the artwork, creating lightning shadows,
brushing, color blending, use of advanced
Photoshop tools and a streamlined workflow of creating magical
effect in Photoshop. So let's start the gloss.
2. Moon Child Artwork: So let's start the class. Now. In this class we will
experience how we can create a magical effect in
normal pictures. So let's start. Here. I have pictures that
we will create with effect. So this is the start, and this is after all of our
creating magical effect. So let's start. I will just drag this
picture in the Photoshop. It will just take
some time little bit. Sometimes our file is opened. After that. First of all, we will just
resize it a little bit to 15 " so that we can work more smoothly and a small file
size will be created. So in this picture, our idea is that we want
to place this in our book. So the moon will look like
it's coming out of the book. So first of all, we'll go to Select
and click on subject. So our moon will be
selected automatically. So now our moon is selected. We will press Command
J to duplicate this layer and lead
our previous layer. After that, we will just Command T and resize it a little bit. So as long and rotate
it a little bit more. Resize it a little
bit more again. And I think here it's perfect. So after that, I
want to put also some cloud on our manipulation to create some magical effect. I have already cloud PNG
downloaded from the internet. I will also share these
files with you guys. So you can also use it. After that, I will just resize. Gcloud will look
a little perfect. I think this is perfect. After that, we also need to
add some kind of effect, some kind of fairy in it. And here is our ferry. So now we're just
compositing our scene. We are composing our scene
with the elements we had. And we are composting
like we are creating what was in our mind. And after this procedure, we will create the
shadows and highlights. So it will look more realistic. So just resize it
a little bit more. And I think we can
rotate it just a little and give it above this side. Yeah, I think this is cool and
we can duplicate it again. And we're going to
add another ferry. Flip horizontal and just
resize it a little bit more. So it looks a little short. And maybe here or here. It's cool now. And then now we will
start working on how we will create
the shadow effect, or we will start giving the
effect in our illustration.
3. Moon Child Artwork P2: To create shadows
and highlights and give effect in this composting. First of all, we have to give, the effect of moon
is growing for it. We will select them
all and we will go to blending
options. After that. First of all, we need a
shadow onto the moon. We will use drop shadow to
apply shadow onto them. And we will just play with
this distance a little. Then we can change the
location of our shadow. I think here it's fine because it's on the direction
of the window. And then we can resize, change the opacity
of our Moon Shadow. After that, we need
to add Outer Glow. Just add Outer Glow. Select opacity according
to your needs. I think it will be perfect. And you can also
increase the size of your light or spread
of your light as well. I think we need to load
the clarity just a little. Yes. And after that, we will also add
Inner Glow and we will decrease the
size of poverty joke. So I love as well. Just a little note, so
maybe just a little. So it looks more glowing, more, more professional and
more in the scene. And just also increase the
stroke just a little bit. Yes, It's looking perfect Now. After that, now we will work on the shadows and
highlights of our theme. So now we will select
the drop shadow a little bit and increase the capacity of our drop shadow deciliter. It's perfect. And after that,
now we will select the shadows and highlights
so far we've seen it. We will create a new
adjustment here. And we will select curves. And we will increase
our curves little bit. I think it's fine. Then we will select
our backdrop for. Background color is black. And with the backspace, we will hide our almost. After that, we will
use the Brush tool. We will use a smooth brush tool. Then we will start applying the highlight because the
light is coming from the moon. So we will try to highlight the face area of the moon and
just a little surrounding. And after that, we'll
create the shadows. And we will make another
adjustment layer. We will go to curves again. We will lower down the shadows. Just a little. I think it's perfect here. Yes. And after that, with
the command backspace, we will hide this
mask again and we will manually add the shadows. We're, we, we feel we need it. So it will look more realistic. Also, we need to make some
color balance adjustment to match the skin
with our moonlight. We will go to color
balance and we will increase some light in it. And also after it will
go to selective color. And we will decrease our black and decrease the red little. Just a little. So it will look more smooth. I think it's perfect. Now. After that, we will try
to play with more things. We will try to add a
little extra effect in it. For it, we can just
read out our image. We hope we can add
additional things in it. E.g. I. Have the picture of the space I think
I can use in it, and it will look very cool. This image have a lot of stars. So the magical effect will come. I will just drag it on our on the front and
then make it clean. And then we will
increase the size. So yes, we will use
the stars area. It will look cool. After that. Just use the eraser tool to raise the star where you
don't want unwanted area. Read it from the face as well. Just a little. From the back to the stars will revolve around the moon and it will create
a magical effect. So we will make another
selection layer, or we can finalize our
curves again to give the final touches to
our illustration. And you can add some color
balance as well in the pool. So that's how we can create a pseudo real magical effect in a very short way for our
photo manipulations.
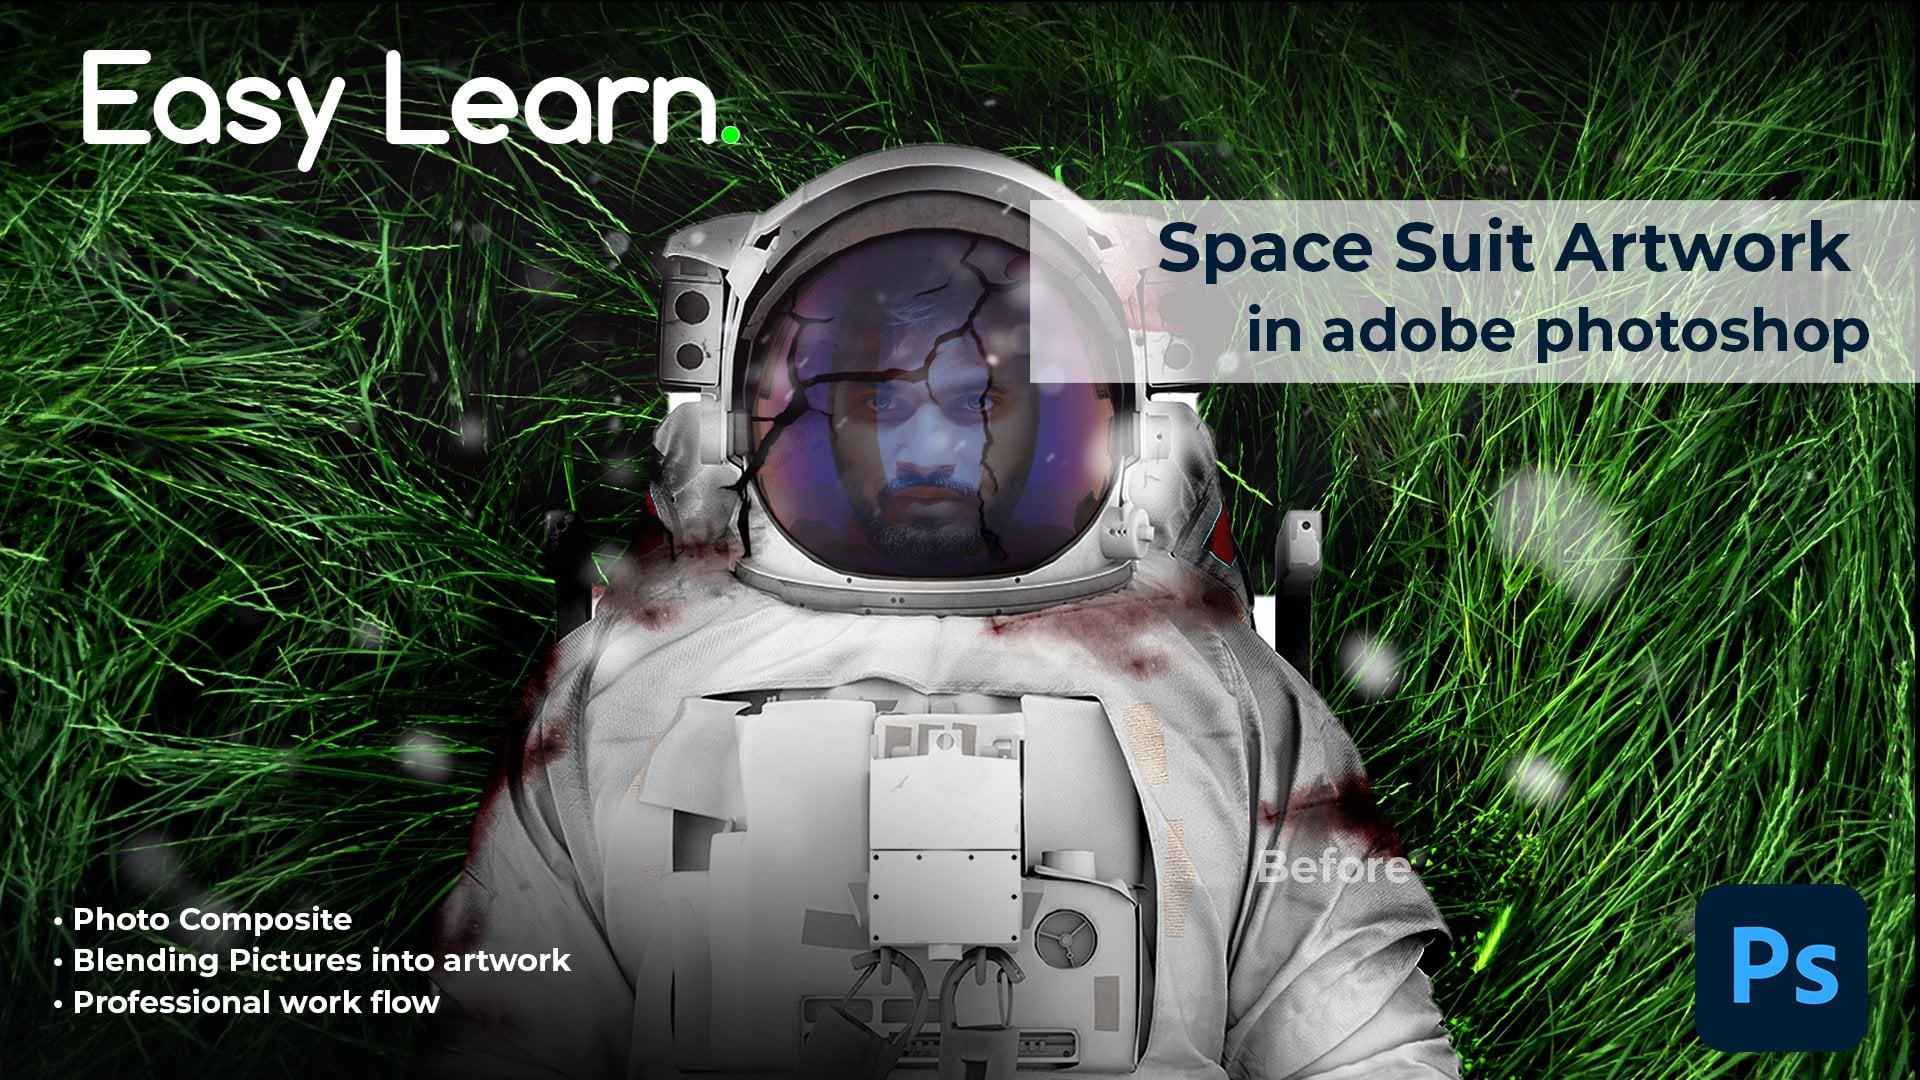
4. Space Men Artwork: So now we will try another
photo manipulation. We will try another
universe, magical effect. And we will try to
editor for this. We will select this picture
and drag it in our Photoshop. It will take time. It depends on your Photoshop. If you have great computer or slow computer.
It depends on it. Sometimes it takes time to open the file because sometime
file size are really big. So we need to resize our files according
to our requirement. If we are working for a digital
or maybe working for men. So now we will resize
our file first. We'll go to image, image size, and we
would turn it to 15 ". So it will be a bit small in the side and it will
be easy to work with it. After that, we will
drag our universe. Hey, I'm trying to set
up my scene in my mind. So accordingly, we will drag
it and we will work on it. So here is our scene. After that, we will hide it. And we will select this
layer and go to Select. And we will select our subject. So our subject will be
automatically selected. It will take time. Sometimes after that we will
use the selection tool, Quick Selection Tool,
increase the selection area. And we will just Command J. After that, I will
put this file above, so it will be front. After that, we need to make some more tweaks,
some more edits. First of all, we need
to merge it with both. For it, we will try to
give a different effect. Like we can try to give
screen effect or maybe, But I think normally it's fine. And after there,
we will just use the eraser tool to smooth
out the rough edges. So it will be merged
with each other. This Take your time. The more you focus
on the detail, the better results you will get. Will try to say just a
little bit, It's perfect. Now, after that, we need
to focus on two fronts. We need to make focus on
our highlights for it. We will just increase, we will just create a new
adjustment layer and we will go to curves and increase
the highlights. And we will mask it, or we will clip it with
our main subject layer. Then we will use beggar mode
as black and hide our mask. With the brush tool. We will highlight the area which are directly
touching the lights. So it will create unique
highlights and it will blend our image with the
scene in a more better way. It's compulsory, You can do it. It will give more
realistic result to your artworks,
to your details. After that, we will again
create another curves layer. And we will decrease the shadows to create the
shadows of our work. After that same, we
will hide our mask and clip it to the main
subject layer, and then we will just start
brushing with the brush. We will apply some highlights,
some shadows, weird. We need to add some shadows. So it will look more realistic or a little more work to do with the background. After that, we can
make it a little blur for it because our scene
is blurred from this side. So we have to make our
background blur as well. We'll go to the filter, we will go to Blur.
Gaussian Blur. You can apply a Gaussian blur according to our requirement. How much we feel like
we need to apply. And then we can just, I think four or five is fine. It's okay. We can
use it to that 5.10. We can also make its duplicate layer and
make it as screened, create a little more futuristic or return
more blended effect. And then we can erase that. So it can blend
with the picture. After that, we have
some more elements. We can use them, e.g. we have space dust
and space particles. We can use it. We will just select it and drag
it to our blend. And then we can resize these
particles just a little. So it will look like. It's going on, something
going on in our environment. Then we can also blurred. This also will go to blood, will go ahead and blur again. We can blur it a little bit less because it's close
to the subject. And then we can use our Eraser tool to clean
up our main subject. Just take your time. It is a very quick way because we have already
find our images, we have already
find our content. Just take your time and
do it in step-by-step, displaying your
idea, and then you can plan it and then you
can anything you need. We have also another
space picture. We can blend it with details. Well. We can apply screen. And then we can increase
the size just a little. Something like we
can, we can try, we can experiment if we can generate a interesting subject, and then we can use
always we can use the eraser tool to
refine that area. I think it's looking
pretty interesting if we overlay it or multiply it, it will create hole
better effect. You can keep with
screen and we will try to lower its opacity. And it's looking pretty amazing. It's just depend on how
much to assess if you want. You can use it if
you don't want. We will avoid it. Depends on our personal choices. At the end we will merge all
our layers by commodity. And then we can add some
final touches or find a level to our portrait
and our artwork is ready. We can add some highlights
just a little bit. And our artwork is almost ready. So this is how we
can make artworks with some magical effects
with our existing elements, we can use a simple picture and then we can apply
some PNG images over it to create the magical effect in very
easy and very quick way. We can also create a little bit more effect
with the other debri, like it's moving,
it's kinda motion. We will go to the filter, will again use the blood and
we will use the motion blur. We will use the radial blur. So it will look
like in the motion. You can change the
effect into the Zoom. And 29 or 30 is perfect. And it lot it's looking at perfect way like
it's in the motion. And it will give that
effect of moving away and very cinematic and very
genuine realistic effect. So that's how we can
create magical effect by using PNG is an element
in a very quick way.
5. Space Men Artwork P2: After that, we have
some more elements. We can use them, e.g. we have space dust
and space particles. We can use it. We will just select it and drag
it to our plane. Then we can resize these
particles just a little. It will look like it's going on, something going on
in our environment. Then we can also blur. This. Also will go to blood, will go ahead and blur again. We can blur it a little bit less because it's close
to the subject. And then we can use our Eraser tool to clean
up our main subject. Just take your time. It's a very quick way because we have already find our images, we have already
find our content. Just take your time and
do it in step-by-step. Explain your idea, and then you can plan it and then
anything in it. We have also another
space picture. We can blend it with it as well. We can apply screen. And then we can increase
the size just a little. Something like we can, if we can try, we
can experiment, if we can generate an
interesting subject, and then we can use that. Always. We can use the eraser
tool to refine that area. I think it's looking
pretty interesting if we overlay it
or we multiply it, it will create all
better effect. We can keep it
screen and we will try to lower its opacity. And it's looking pretty amazing. Depend on our choices. If you want, you can use
it if you don't want. We will avoid it. Depends on our personal choices. And we can also create a little bit more effect
with our debrief. Like it's moving,
it's in the motion. We will go to the filter. We will again use our blood and we would use
the motion blur. So it will use the radial blur. So it will look like
it's in the motion. We can change the
effect into the Zoom. And 29 or 30 is perfect and it's looking at perfect
way like it's in the motion. And it will give that
effect of moving away and very cinematic and very
genuine realistic effect. So that's how we can
commute magical effect by using PNGs and elements
in a very quick way.
6. Final Project & Results: So here is the final
result of our class. If you have any question
regarding the class, you can ask it in the discussion
section of the class. For the class project, you can edit a picture of
yourself or your friends. Show before and
after of editing, you can use different pictures. Are pictures from
project resources or from your own guilty. You have to follow my procedure. First of all, select your
picture and then select the extra element that you
want to add on the picture, maybe moon, something like that. And then you can add some extra pictures like
background picture, and then submit it
as a class project. So I can give you feedback
and critique and get a chance to win Amazon gift card or install ground for the show. Thank you.
 M Amir Naseem, Graphic Designer / Creative Director