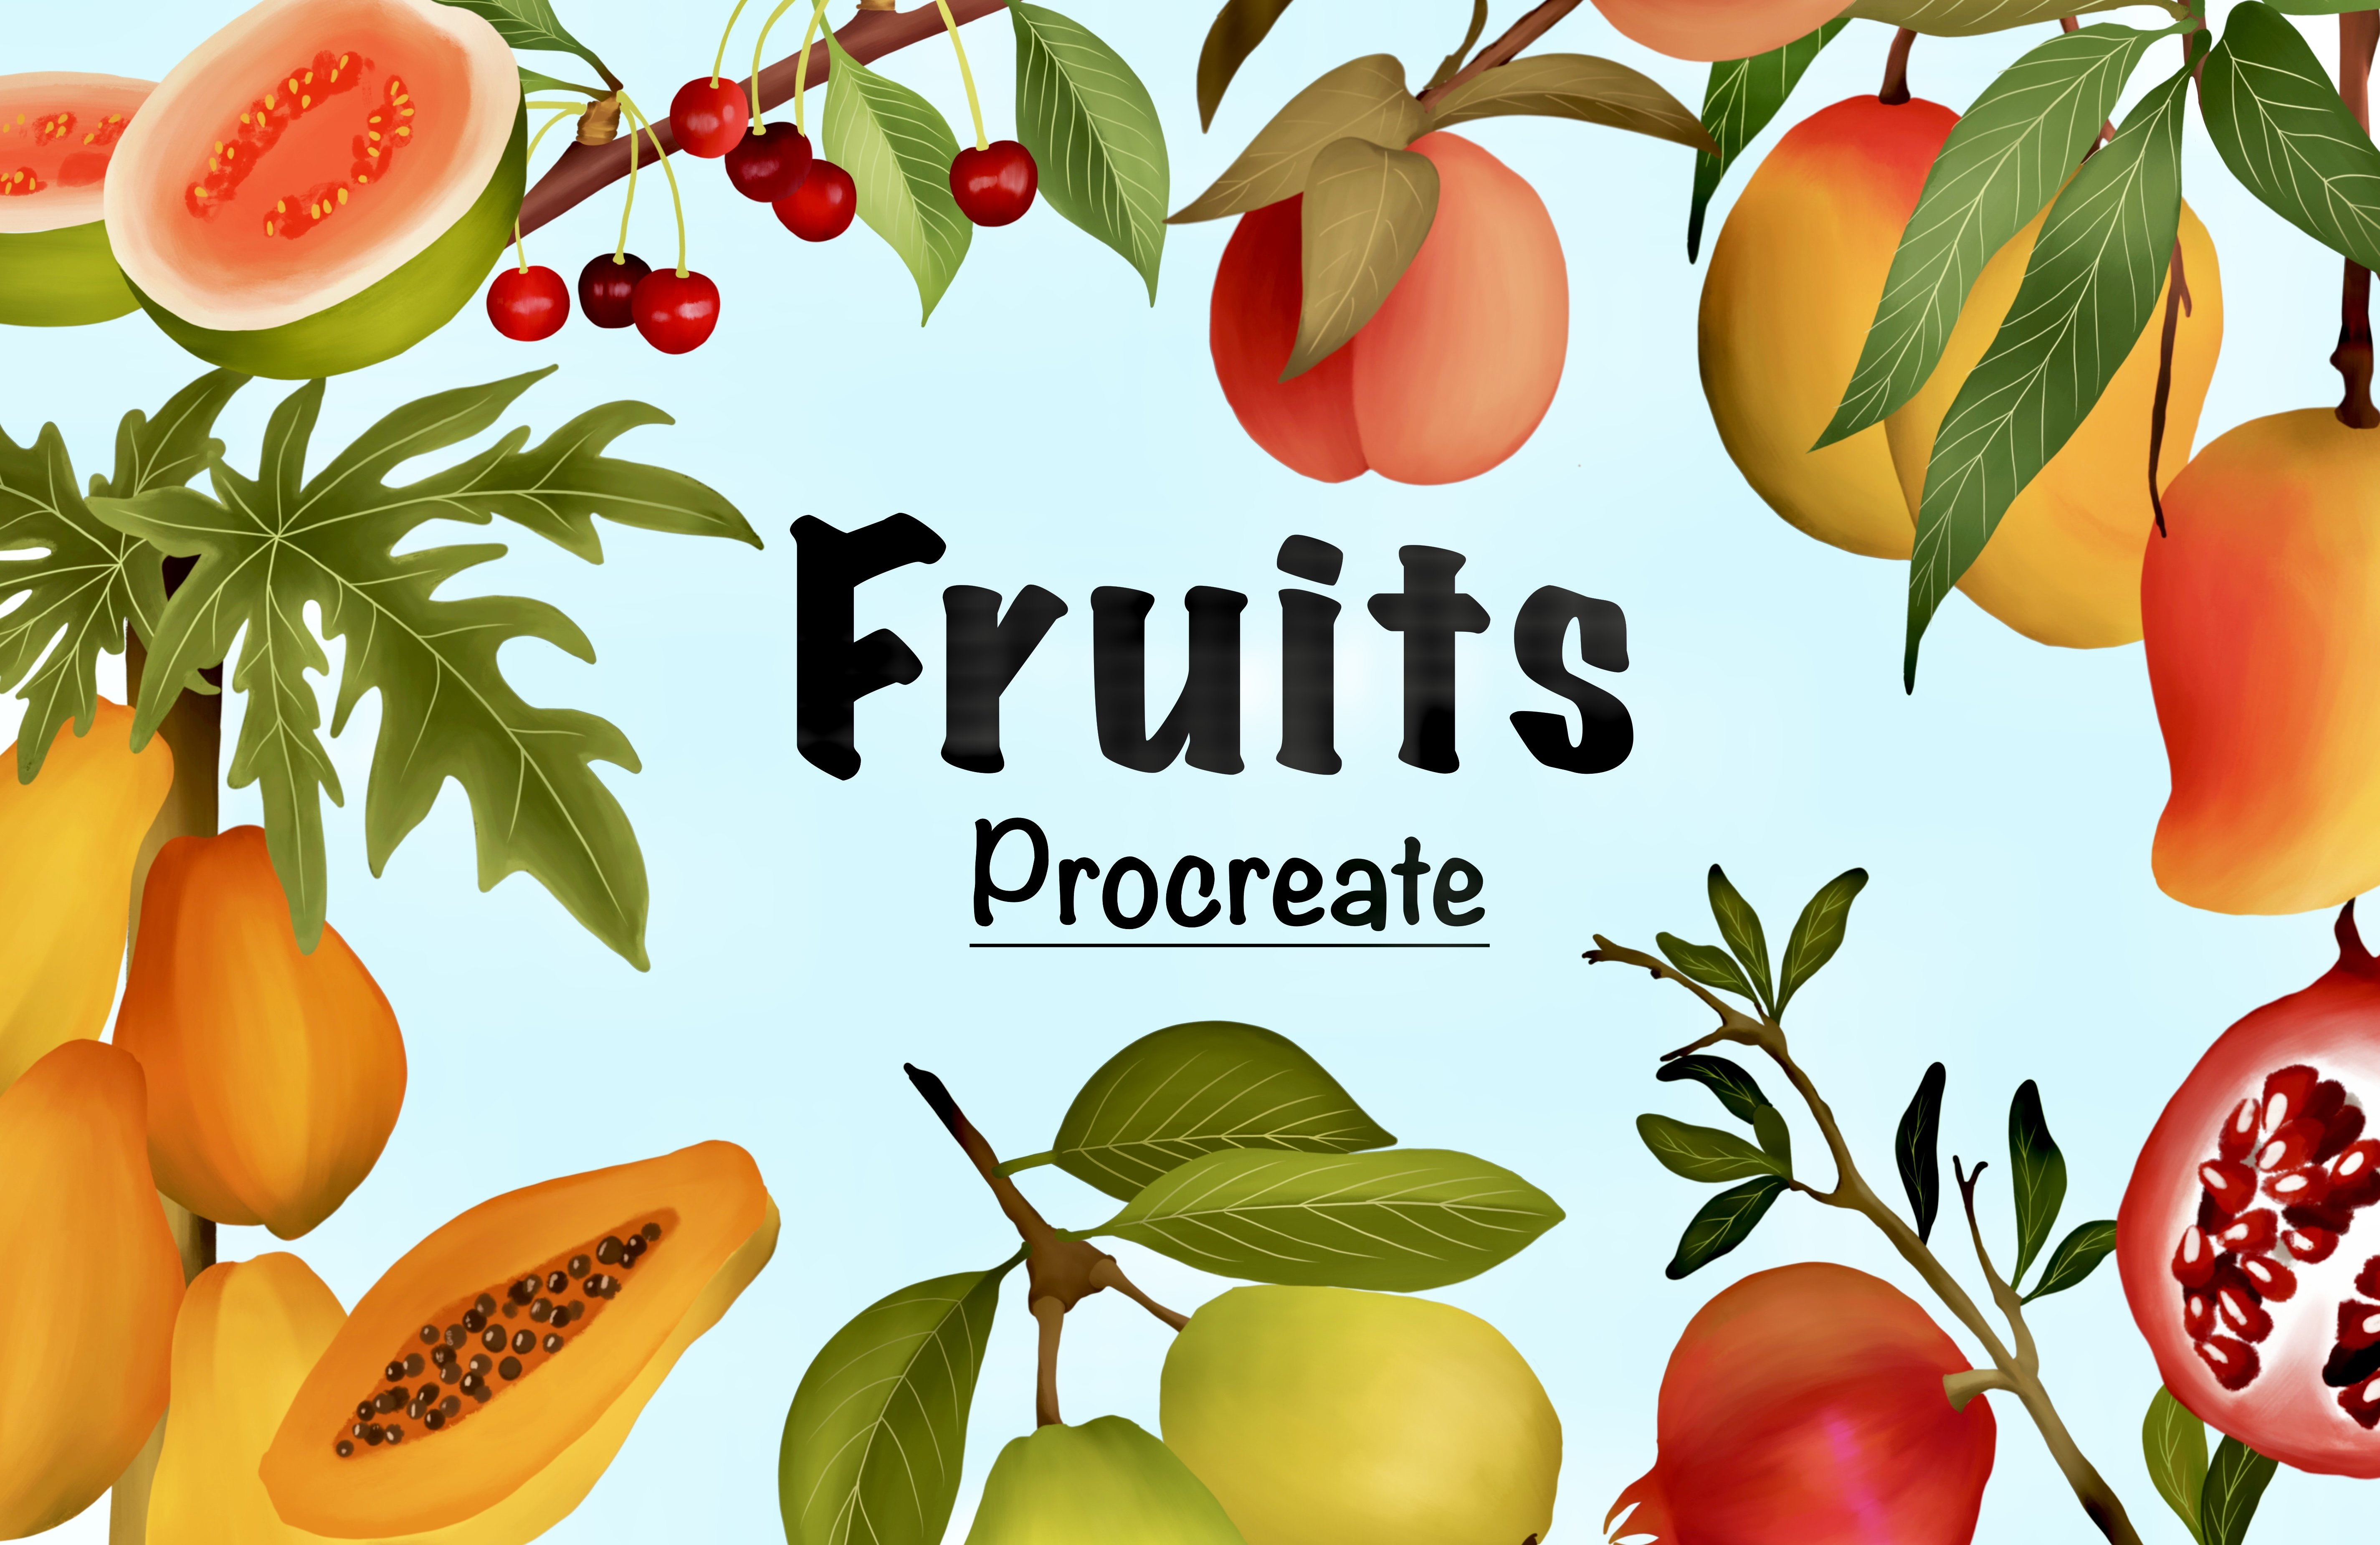
Transcripts
1. Introduction & What You'll Learn: [MUSIC] Hey guys.
My name is Vinita. I'm an illustrator and pattern designer based
in Singapore and in this class I'm going to
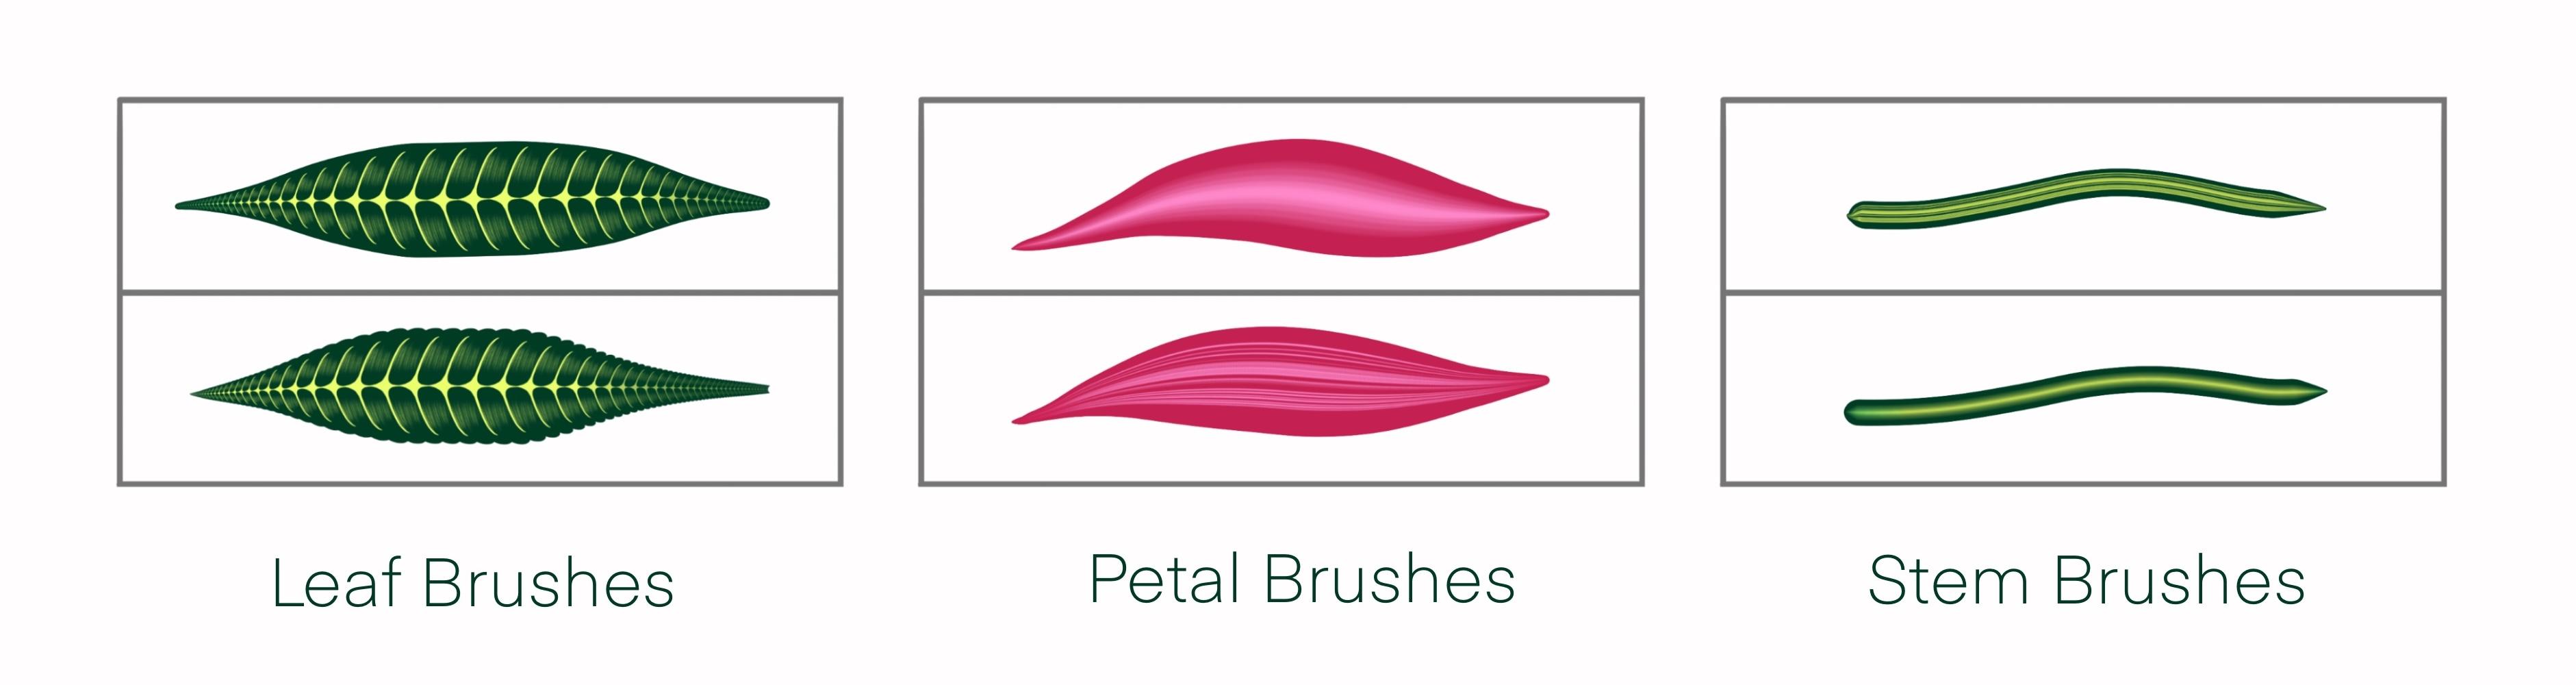
show you how I create my realistic brush in Procreate. We will be creating six
botanical brushes in this class that
will include leaf, petal, and stem brushes. I will show you step-by-step all the settings we need
to create these brushes. This is a beginner
friendly class so even if you're
new to Procreate, you will be able to
follow along just fine. There are plenty of
examples on how I use these brushes in my
illustrations and patterns. I will be showing
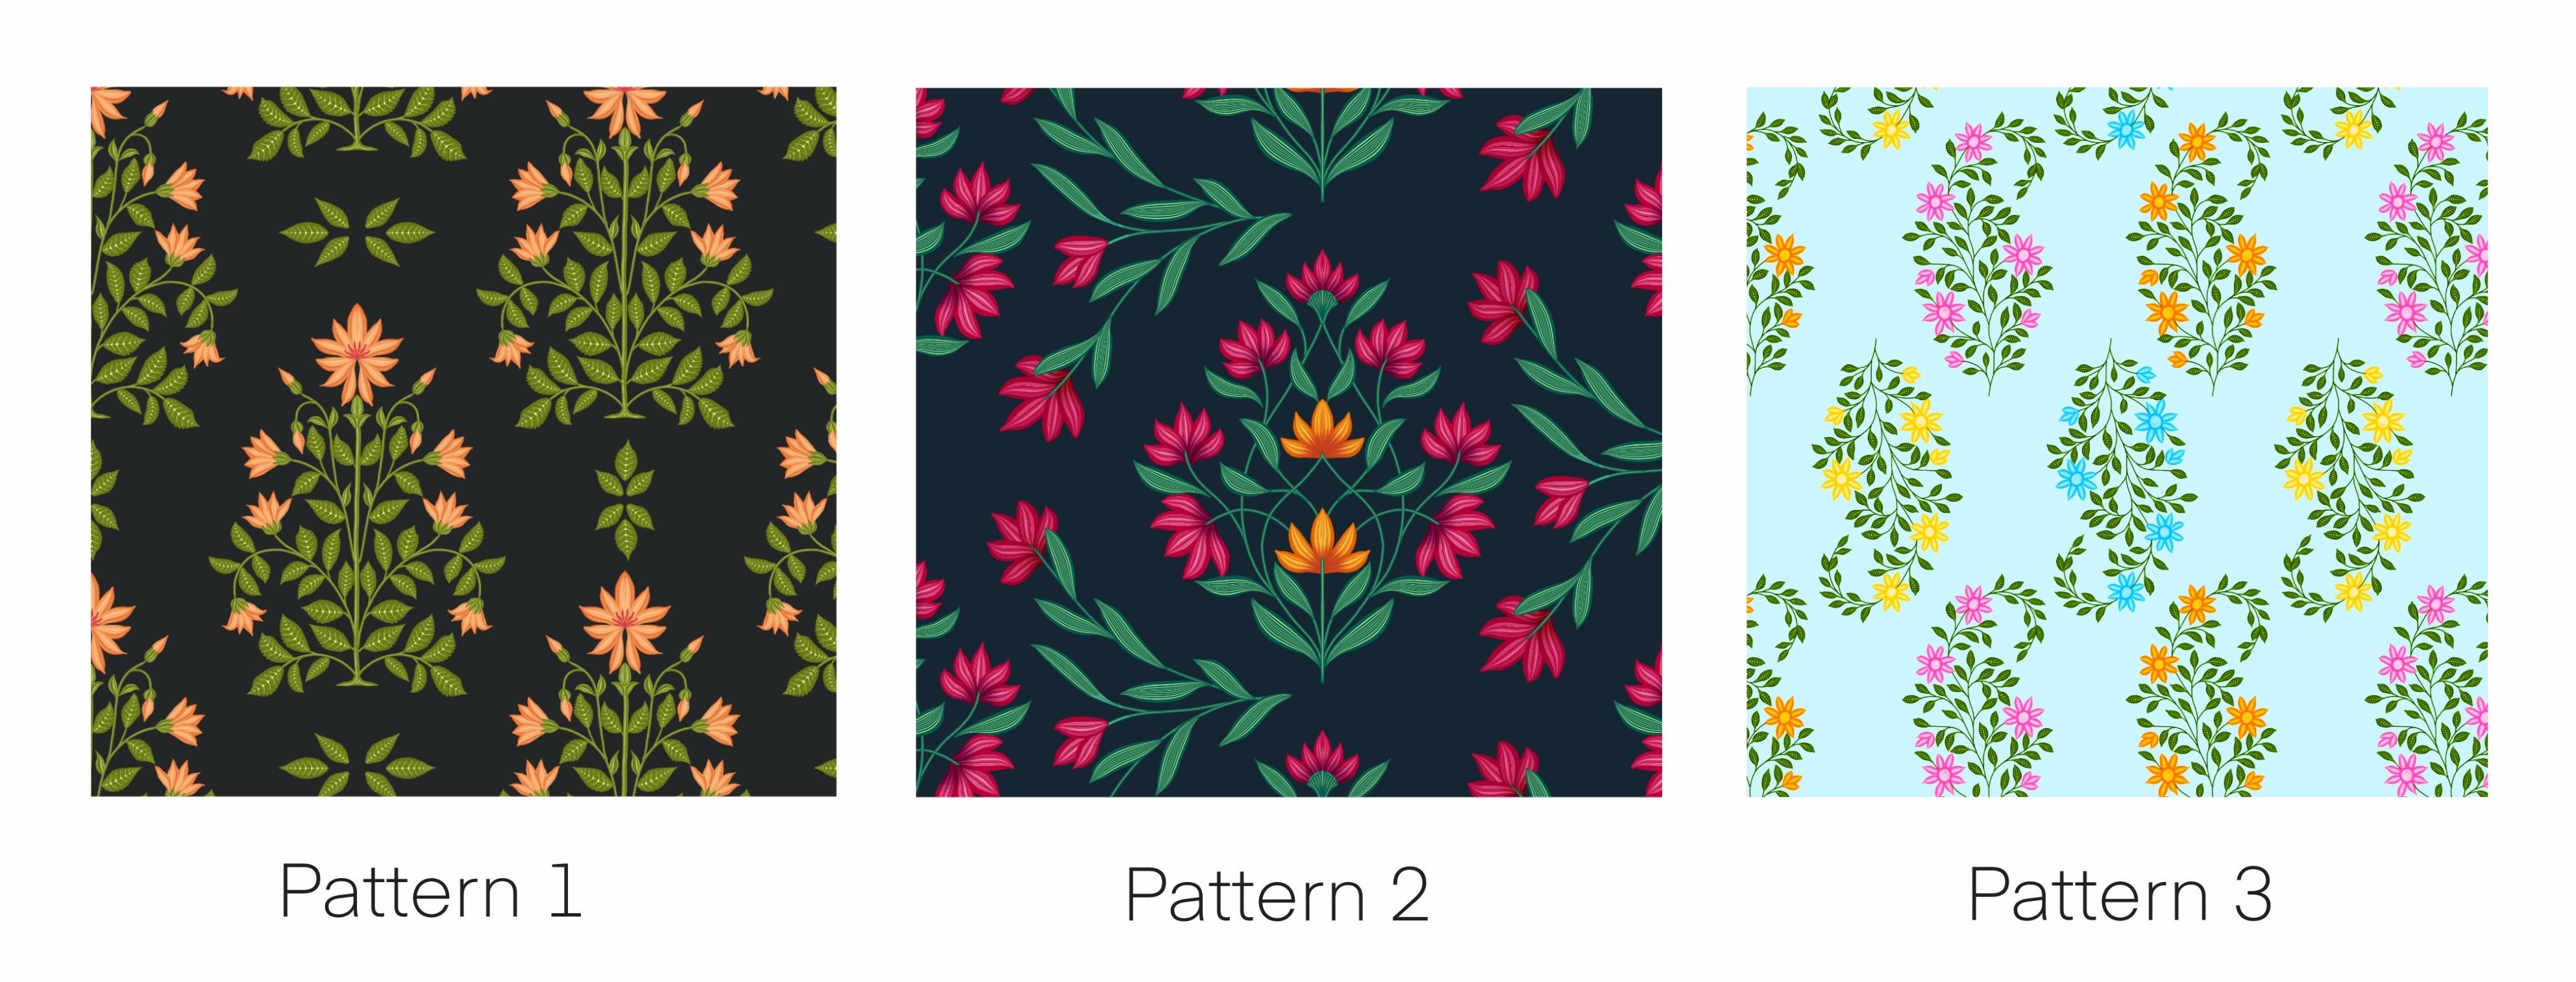
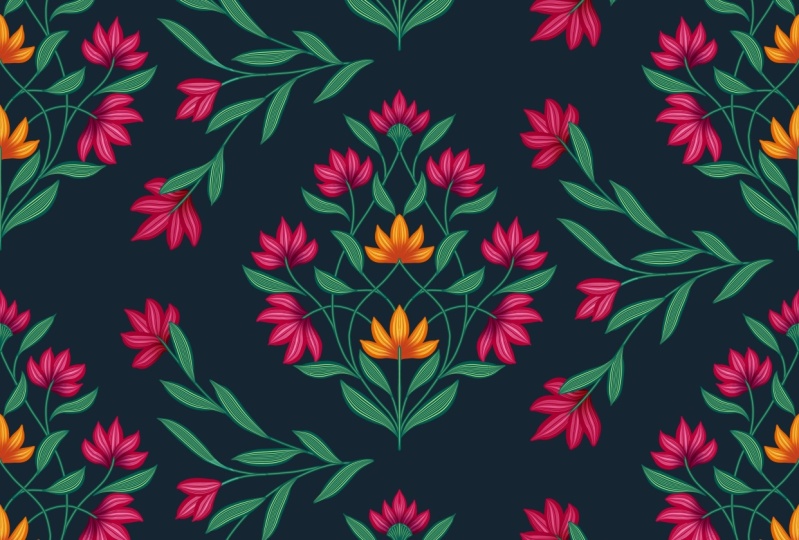
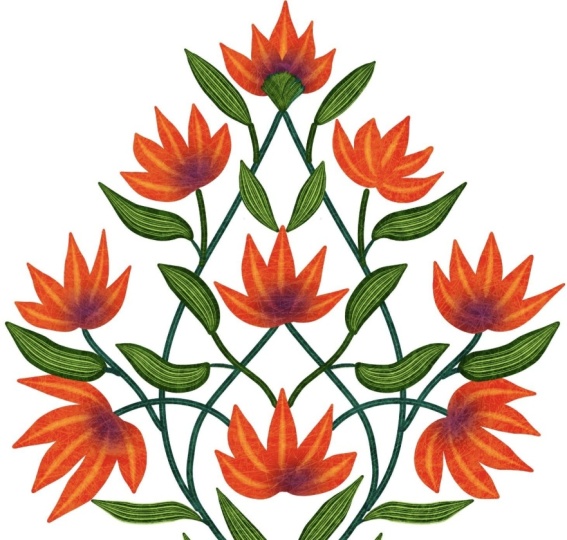
you step-by-step the process of creating the three patterns
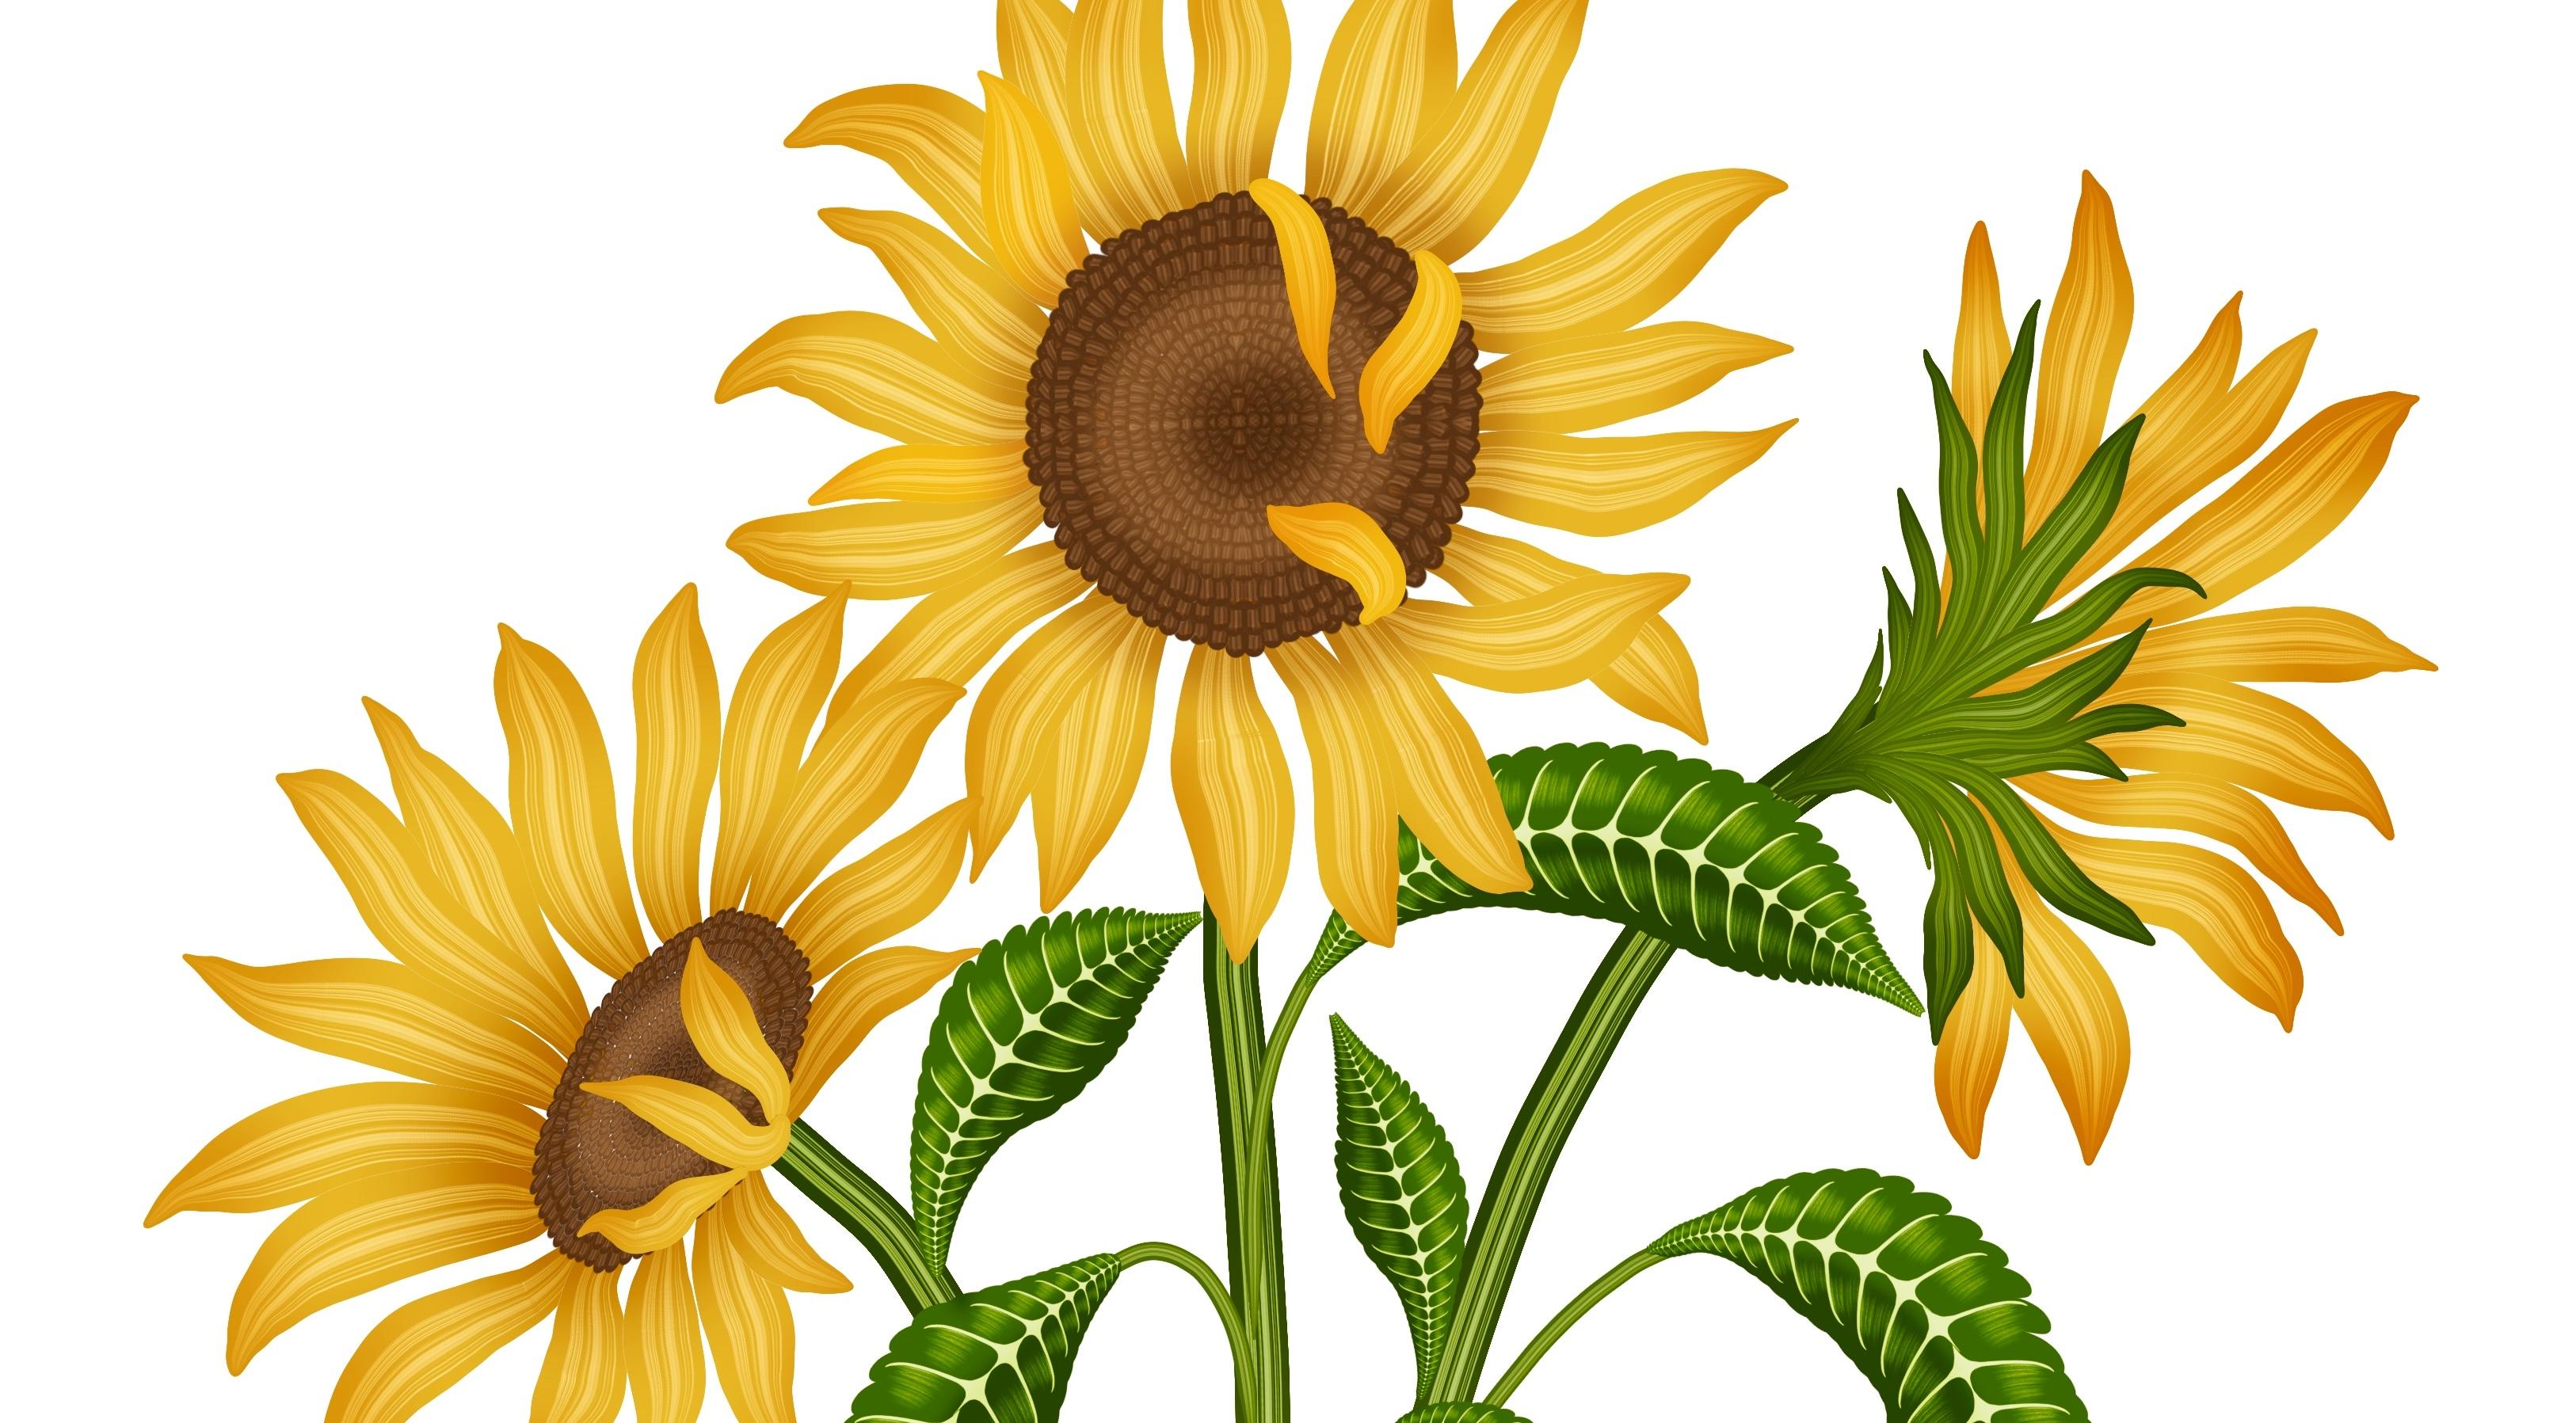
included in this class. Another project is this beautiful
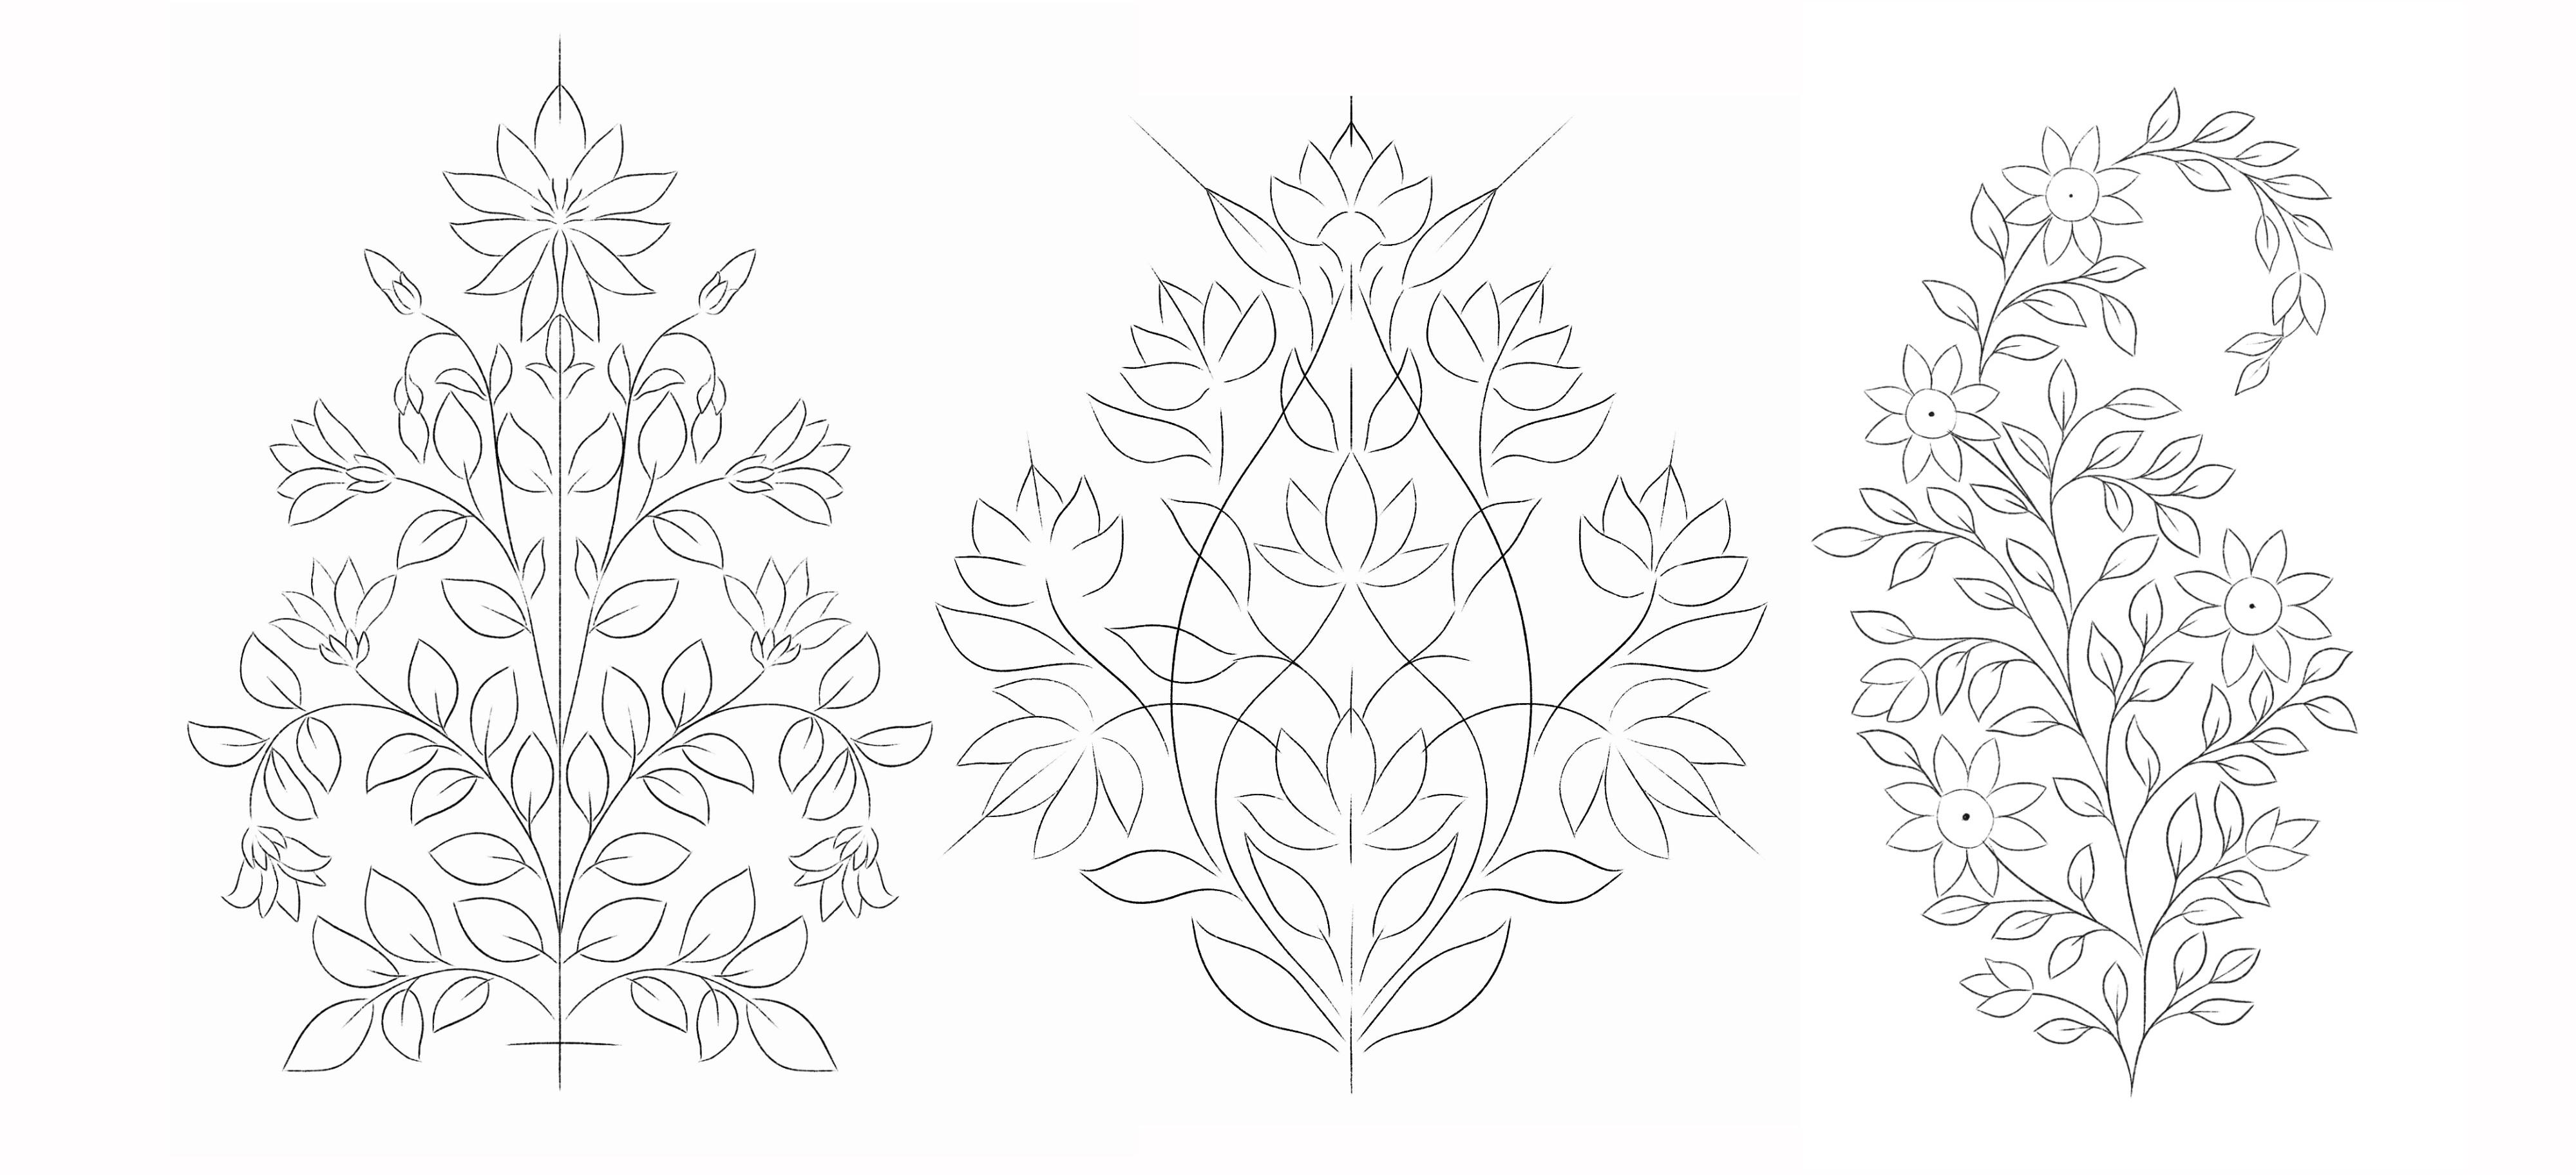
sunflower illustration. I have the sketches for these patterns and
illustrations in the resource section that you can download
and follow along. There's a bonus time-lapse
video showing one of my lettering project I
made using these brushes. By the end of this
class you will have six botanical brushes,
beautiful print projects, and a lot of tips and tricks on creating your own custom brushes and artworks Thank you for
taking this class with me.
2. Explaining Brushes: The brushes we're going to create in this class
are dual brushes. I'll go to the brush library. These are the brushes we will be creating in this class today. I'll open one of
the brushes here. When you open the brush setting, in the left corner here, you can see two brushes
here instead of one. This is when you combine
two brushes to create one. Next, I will show
you how you can choose color for this brush. In your color panel
on the right side, you can see these
two tiny boxes. These are primary
and secondary color. Just tap on the box and you can select
the color you need. Once you're done
selecting your color, the one showing in the circle here will become
your primary color. For example, now, I want the darker to
be my primary color, so I'll select the dark one. This is how the brush looks. Now let's change the color
for the secondary color. I'll change the light
pink to this yellow. I'll make sure that I have
the dark one selected first. Now, if I want the colors
to be the other way round, I'll just select yellow that
shows in the circle here. You don't have to do
anything for pink, it just becomes your
secondary color. Let's try out another
color combination. I'll try with a very dark color. Let's choose black. I'll keep yellow as it is. That's how the leaf looks like. Let's see how this looks
on a darker background. These are pressure
sensitive brushes, so the pressure you apply on the Apple pencil will change the shape of the
leaves accordingly. You will need a
little practice with these brushes to
understand them better. One of the brush
we'll be doing in this class is a petal brush. I'll select one of
these petal brushes. I will show you an example
of a plant with this brush. Let's see how this looks on
a darker background color. This is how the dual
brush looks like. Let's move on to creating
our first brush.
3. Leaf Brush - 1: We are here with
the Procreate app. If you're new to Procreate, this is how the
gallery looks like. These are all my
Illustration stack together. Let's start with our
very first leaf Brush. For that, my first step is
to create a new canvas. And to create a new canvas, I will tap on this plus sign. Again, on this tiny plus sign. This will open all
the settings we need to create a new canvas. My canvas is 3,000 by 3,000
pixel width, 300 DPI. Creating your brush with a
bigger canvas will help you with a good-quality
brush and tap Create. Now our next step is to draw the shape we need to
create this brush. For that, I'll tap on
the Brush Library. Go to the inking section. Here you need to select
your studio pen brush. Once you're done selecting your brush will
select the color. I'll go to the color panel
and select a black color. Make sure it is
completely black. If it is not completely black, you will not get the
correct Brush result. Will draw a circle
in the center. Make sure it covers maximum
part of the canvas. Fill this circled with
the same black color. Now to make sure this circle is exactly in the center
of the canvas, I'll select the sake. You'll get these
options at the bottom. Under snapping, your magnetics
and snapping should be on. Your distance should
be around 21. Now when you move this circle, you'll get these golden lines. You can see this line horizontal
and vertical both sides. That's when the circle is exactly in the center
of the canvas. Next, we'll go to
the Brush Library and we'll make a new folder. For that. I'll tap on this plus sign and that you
create a new folder for our brushes and rename
this brush as Leaf Brushes. You can even rename it as
flowers or plants Brushes, anything that you're
comfortable with. Now, our next step is
to copy this canvas. For that, I'll go to action, add and Copy Canvas. Once you're done
copying the canvas, we'll go back to
our Brush Library. Now to create a fresh new brush, we have to tap on
this plus sign. And this will open
all the settings we need to create a new brush. Here I keep my spacing as 15%. Next, I'll go to stabilization. Here under streamline. I'll type in the amount as 90 per cent and the stabilization
amount as 50 per cent. Next, under taper, I'll slide these tiny nodes
towards the center. Type in the size as 50 per cent. Reduce the pressure to none. The dip to around 60 per cent. Next, under shape. Here, I'll tap on Edit,
Import and paste. This will paste our shape
we copied from the Canvas. Tap with two finger
on the shape. And that will invert the image. Tab down. Below that, the rotation will be max. Next move down. Here, the pressure roundness
will be 30 per cent. Dealt roundness will be max. Next, under rendering. Here the mood will
be uniform glaze. Next, under Color dynamics, this is one of the
most important step. Leave all the settings
on the top as it is. Under Colour pressure. The saturation will be 50%. Brightness will be maximum. Secondary color will be maximum. Now hugest about the
secondary color, you'll find this option
called max. Tap on max. The max, you'll find this option called
numeric and pressure. Tap on pressure. You'll find this
diagonal string. You can hold this tiny node and pull the string up and
make it horizontal. This setting will
help your brush to have even color all over Saturation will be maximum. Brightness will be minus. On the opposite side, it will be minus
hundred per cent, and the secondary color
will be max again. Next, under dynamics, the
size will be maximum. Under Apple Pencil. Again, the size will be maximum. The opacity will be minimum. Next, under Properties, make sure you're orient to
screen is switched off. Next, we'll change the
size of the Brush. Keep your maximum as
300%, minimum as 1%. And tap Done. So here we are done with the
first part of our brush, and it's a Dual Brush. So now we'll start creating
the second part of our Brush. For that, I'll go to layers, reduce the opacity of our first shape to
around 50 per cent. Add a new layer to create the
second shape of our brush. We will also need the drawing
guide for this shape. For that, I'll go
to action Canvas, drawing guide, tap on
Edit Drawing Guide. You'll see these
option at the bottom. Make sure you're on symmetry. The symmetry tab on Options. Under option, make
sure your horizontal is selected and tap Done. Next, we'll select the
brush to create our shape. And the brush library
under Inking section, I'll select studio pen. And I'll draw a
shape looking like a Leaf Wayne in the
center of this circle. Make sure it is not going
outside your circle. We have this circle
as a guideline, so we don't make a mistake
of going outside the circle. Once you're done
drawing your shape, select the shape, makes sure it is exactly in the
center of your circle. You can even use
this shape as it is. But I want to add some
more detail to this wane. For that, I'll go to
the brush library. Under sketching. I'll select any Pencil brush. I'll select six
P. You can select any that you're
comfortable with. And I'll start adding these
very light shaded lines. We'll show on both sides. Because I have
updated this class, the brush in my preview might
look different than yours. You can ignore that and
just follow the steps. Once you're done with the
shape and the details. Next, I'll go to the layers, hide my circle layer. Our next step is to
copy this Canvas. For that, I'll go to action, add and Copy Canvas. Next I'll go to
our Brush Library. Go to our folder, the leaf Brush folder. Duplicate the first
brush we created. Select the top Brush, go to Shape, Edit,
Import and paste. This will paste our
shape and tap Done. Now because we duplicate
our force brush, all the settings automatically
applies on the second one to the setting we need to change on this one is
on the Stroke Path. I'll increase the spacing
to around 40 per cent. And I'll try on
this drawing pad. You can even change the
color on the preview pad, tap on the drawing pad, and you can see these
colors at the bottom. I'll select the green color. You can see the color change, adjust the spacing and reduce
the space a little bit. You can change the spacing
S for your preference to. Next color dynamics. And the stroke color to the
secondary color will be max. Under Colour pressure. The saturation will be max. Under Colour tilt. I'll get
all the settings to 0%. And we're done with
the second part of the Brush here, tap Done. Now our next step is to
combine these two brushes. For that, I'll select
both the brushes and tap on this option
called combined on the top. Tap on this brush. And now you can see
on the left side, there are two brushes
in the setting. Make sure the brush with
the Wayne is at the top. And now to rename this brush, I'll tap on about this brush and rename this brush
as Leaf Brush, one. You can rename your brush anything you're
comfortable with. And tap Done. Let's try this brush
on our Canvas. Please check my lesson where
I'm explaining you about how the color combination and choosing the color for
the Dual Brush works. This is a pressure based brush. You will need a little
practice to understand how this brush can change the shape depending on
the pressure you apply. Let's move on to
our second Brush.
4. Leaf Brush - 2: Let's start with a second brush. This brush is very
similar to our first one. The only difference
is the outer shape. This brush will be with tiny curves instead
of smooth lines. For that, I'll go to Layers, add a new layer, tap on the Layer, and tap Drawing Assist. Next, we'll draw a shape that we need to create a new brush. I'll go to the Brush Library. Under Inking, I'll
select Studio Pen. I'll create the scope shape, a crescent shape, and fill this shape with
the same black color. Make sure you've selected the jet-black color,
it's completely black. [MUSIC] Select this shape and make sure this is exactly in the center
of the Canvas. For that, make sure
under Snapping, your magnetic and
snapping is on, and the distance is around 21, and with the help
of the guideline, make sure it is in the center. Next, I'll go to Action, add, and copy Canvas. [MUSIC] Next, I'll
go to Brushes, go back to our
leaf brush folder, duplicate our first brush, tap on one of the brush, select the Base Brush here, that's the secondary brush. When you tap on that
brush, tap on Shape, Edit, Import, and paste a
shape here, and tap Done. Next, I'll tap on Stroke Path, I'll increase the spacing
of the shape here. I'll keep adjusting
the space until I achieve this leaf shape. You can see there's
a gap in-between. I'll reduce the space because
I don't want that gap. I'll try again on
the drawing pad. I further reduce those spacing. I'm happy with 24 percent. I cannot see any gap, and also the curve
looks beautiful. Next under Properties, make sure the orient to screen
is switched off. Next, I want to
rename this brush. For that, I'll go to About
this brush and I'll rename this brush as Leaf
Brush 2, tap Done. Let's try this brush
on the Canvas. All of these brushes work better with a 30 percent of brush size. You can achieve a lot of different shapes depending
on the pressure you apply. You can experiment with a lot of different shapes
of these leaves. I have a few examples
in my next class.
5. Petal Brush - 1: [MUSIC] Let's start with
our very first petal brush. For that, I'll go to Layers, add a new layer, tap on the layer and make sure you're drawing
assist is on. Next to create our
secondary shape. I'll go to the Brush Library, go to the Airbrushing
section, select Soft Brush. My brush size is
around four percent, and I'll draw this shape in
the center which will start darker in the center and gets
lighter towards the sides. I want this shape to be more
lighter and a little blur. For that, I'll go to Adjustments,
select Gaussian blur, slide right on the Canvas with your Apple Pencil
or with your finger. You can see the percentage here. You can also see when the
percentage is increasing, the shape gets more blurrier. I'll keep it as around 10%. Make sure the shape is
exactly in the center. Snapping will help you
with these golden lines, that means it is
exactly in the center. Next, we'll copy this shape. For that, I'll go to Action, Add, Copy Canvas. Now to create a new brush, we'll go to the Brush Library. Go to our leaf brush folder. We'll select and duplicate
our very first leaf brush, swipe left and tap Duplicate, and I'll hold this brush
and shift it on the top. Tap on this brush. When you duplicate your brush, you don't need to repeat all the settings
from the scratch. We will just be
adjusting few settings. Now our very first step
is to go to Shape, Edit, Import and Paste. This will paste the shape
we did on the canvas. Tap Done. Next we'll go to Stroke path and I'll reduce the
spacing to none, and that's the only setting
we need to change that done. Let's try this brush
on the Canvas. I'll hide the layer, add a new layer, and this is how the brush looks. You can see the primary color, the black color, and the
secondary color as orange. Let's try a new
color combination. Primary color as darker pink
and secondary as lighter. You can try out a
lot of shapes and sizes depending on the pressure
you apply on the pencil. I will try with my
symmetry tool on. It's under Action, Canvas, Edit Drawing Guide. Under Options, I'll select
the Radial and tap Done. Let's move on to our
second petal brush.
6. Petal Brush - 2: [MUSIC] Let's start with
a second petal brush. For that, my first step is
to select a black color. Go to Layers, add a new layer. Go to the Brush library. Under the Inking section,
select Studio pen. Now starting in the
center of the canvas, I'll draw these tiny dots. The gaps between these
dots will be uneven. You can even switch on your guideline so the dots
are in a straight line. Our next step is to
blur out these dots. For that, I'll go
to Adjustments. Select Gaussian blur. Next, you need to slide right on the canvas with your Apple
Pencil or with your fingertip. Mine is around 5%. Next to copy the canvas, I'll go to Action. Add, Copy canvas. Next step on the Brush library. Go back to a Leaf brush folder. I'll duplicate our
first petal brush. Tap on the brush, go to Shape, Edit, Input and
Paste and tap Done. This is the only
setting we need to change, tap Done again. Let's try out this
brush on a new layer. I'll add a new layer. Next, I'll go to the Color
panel and change the color. I'll keep my secondary color as lighter and primary
as darker red. These brushes can be used for flower petals and even for
a lot of other plants. For example, I'll
change the color to dark green and lighter green. I'll use this brush
for a plant leaf. In my next class, I have few flowering samples
that will give you a lot of ideas on how you can use these brushes for your flowers. Another plant example. Here, we are done with our
second petal brush.
7. Stem Brush - 1: [MUSIC] Let's start with
our first stem brush. Our first step will be to go to the Brush Library and I'll duplicate our
second petal brush. Swipe left on the brush and tap "Duplicate" and tap on the
brush to open the settings. Remember we are working
with two brushes. It's a combined brush, so we need to make the
changes on both brushes. Make sure you're on
the first brush. Next, go to "Taper." Here reduce the
tip to 10 percent. Increase the size to
around 85 percent. Next go to "Dynamics." Here reduce the size
to around 20 percent. Next, under "Apple Pencil,"
the to around zero percent. Next, we'll do the changes
on the second brush. Tap on the second
brush, go to "Taper." Here we'll do the same changes
we did for the first one, size to 85 percent, and tip to 10 percent. Next, go to "Dynamics." Here, the size to
around 40 percent. Next, under "Apple
Pencil," again, the size to zero percent. I feel the tip
looks little blunt. I'll adjust the
taper a little bit. I'll go to the "Taper,"
reduce the tip a little bit and increase
the size to around 94. Now to rename this brush, I'll go to "About this brush" and you can type
in the new name here. I'll keep it as stem
and tap "Done." Let's try this brush
on the canvas. I'll keep the size to
around six percent. Now here I cannot see the texture and
pattern in the brush. It looks too even. Now to change that, I'll go back to the Brush, tap on the "Brush." I'll go to the "Shape" and
here I'll increase the Count, I'll increase the Count to
two or three and tap "Done." This will help us darken
the texture in the center. Now you can see the difference. You can even see the
secondary color clearly. Let's change the
color combination to brown and light brown. I'll keep the primary as dark brown and secondary as a
lighter shade of brown. When you see the secondary
color doesn't look as clear, you can change the color to
a little more lighter shade. Now you can see the difference. Let's try out some leaf on them. I'll change the color
to green and light green and go back to
our first leaf brush. Let's add some leaf on them. [MUSIC] Let's move on to
our second stem brush.
8. Stem Brush - 2: [MUSIC] Let's start with
our second stem brush. We will be doing
the same shape we used for our first petal brush. Unhide the layer for
this shape first. Second, we'll go to action, add and copy Canvas. Next, we'll go to
the Brush Library and duplicate our
full stem brush. Tap on the brush, make sure you're on
the first brush, go to shape, edit, input, and paste, tap done. Now because this is a duplicate
of our first stem brush, all the setting gets copied
on the second one too. I'll change the
count to one again. Next to rename this brush, I'll go to about this
brush and rename this brush as stem
brush 2, and tap done. Let's try out this
brush on the Canvas. Let's try out with
different brush size too. [MUSIC] I'll add some leaves to them. Go back to the brushes, and select our force brush, and here we are done
with all our brushes. Let's move on to creating some patterns and illustration
with these brushes.
9. Pattern 1: [MUSIC] Let's start
with our first pattern. I have this sketch in the
resource section of this class. You can download
and follow along. This file, just have one layer, that's the sketch layer. Our first step will be
to add a new layer. For that, I'll tap
on this plus sign, pull this layer below
our sketch layer. To rename this layer, I'll tap on the layer
and tap "Rename". I'll rename it as Leaves. We'll move on to
the color palette. I have this color palette in
the resource section too. There's a combination of colors
here for the dual brush. There's a primary and
a secondary color. For the primary, I'm
taking that as dark green, and secondary as light green. Whichever color you want it
to be the primary color, should show at the top
in the circle here. Next, we'll select the brush. For that I'll tap on
the "Brush Library". I'll select our "Leaf Brush 2". We need our symmetry to be
switched on for this canvas. For that I'll go to
"Action" "Canvas", "Drawing guide", and
"Edit Drawing Guide". Under symmetry, tap
in the "Option", make sure your vertical is
selected and tap "Done". Before we start, there's a
setting I need to talk about, that is for your
time-lapse setting. If you need your
time-lapse video to be of a good quality, you can only change this setting while
creating the canvas. To check on this canvas, I'll go to "Action" "Canvas", and at the bottom
there is "Canvas information", tap on this. Here, tap on "Video setting". Here make sure your
video resolution is 4K. If you have my file, the setting is already
changed on my canvas. Let's move on to our pattern. Make sure you are on
your leaves layer. I'll start adding these
leaves following the sketch. While you're adding
these leaves, you have to add extra pressure wherever
the leaf looks wider. This will give you a
lot of practice and idea about how this brush works. To add next detail, I'll add another new layer. Pull this layer below
our Leaves layer. I'll rename this as Leaves 2. For this detail, I will
need a petal brush. I'll select our
second petal brush. Make sure your drawing assist
is on, on the new layer. I'll keep my colors
same as before. Reduce the size to
around 12 percent. This is a petal brush, but I'm not using
it for the petal. I'm using this for
another detail. We're done with this brush here. Let's move on to our next step. I'll add a new layer. Pull this layer below
our Leave 2 layer, tap on the layer and
rename this as Stem. Go to the "Brush Library", and I'll select our
full "Stem" brush. I'll keep my color as it is. You can even change it
to a little lighter, darker, or any other
color you need. Make sure your drawing
assist is on the layer. I'll reduce the brush size
to around three percent. For the center part of the stem, I will add a new layer. Pull this layer below
our Stem layer. I don't need the drawing
assist for this layer. I'll just draw a center line
for the stem in the center. Let's move on to the petals. For that I'll add a new layer, pull it at the bottom, tap on the layer and
rename this as Petals. Again, tap on the layer and make sure your
drawing assist is on. I'll change the color, I'll keep the color
as orange and yellow. Select yellow for
the secondary color, and orange for the
primary color. Select my second petal brush. I'll try to follow the
sketch for the shape. We are done with
the petals here. Our next step will be
to add some shading and depth to this illustration. Make sure you're on
the petal layer. Go to the selection tool. Here, select "Freehand", and I'll start
selecting the area where I need the detail. Just draw this circle and
tap on that tiny gray dot. That will help you
continue the selection. Once you're done
with the selection, go to this feather and you
can adjust the amount here. This helps with the
gradient effect. I'll keep this as
around 13 percent. Next I'll go to
"Adjustments" "Curves". Here when you move this
tiny node upwards, you can see the color
changing lighter, and when you move it
lower, it becomes darker. For this illustration, I
like the lighter shade. The lighter yellow looks good. If you need to change the shade, you can go back to "Adjustments" and select "Hue, Saturation". Here you can adjust
your saturation, and the brightness you can
make it lighter or darker, and under hue, you
can change the shade. This method of adding
shading and highlights are very helpful for this brush because it doesn't affect the
texture on your brush. For example, if you
zoom in and see, the primary and the
secondary color, you can see the marching and the shading blending together. But if you Alpha lock
the layer and try to use another way of shading by
selecting another brush, you can see it covers a
texture on your brush. Freehand selection works
best for this brush. We are done with the motif here. Let's move on to turning this
into a seamless pattern. I will not go too much detail into seamless pattern process. I will increase the speed
and make it a quick one. We're done with
that part in here. Let's see how it looks on
different background color. These are some mock-ups on the print on-demand
side products. Let's move on to
the second pattern.
10. Pattern 2: [MUSIC] Let's start with
our pattern to have this sketch in the resource
section of this class. You can download
and follow along. Our first step is
to go to layers, add a new layer, and pull this layer
below our sketch layer. I'll rename this
layer as Leaves. Next, we need our drawing
guide on the canvas. For that, I'll go to Action, Canvas, Drawing Guide,
Edit Drawing Guide. Here, make sure
you're on Symmetry, Option, and Vertical is
selected and tap Done. When you go to your layers, you can see assisted
on the layer. That means you're drawing
guide is on that layer. If it is not, you can tap on the layer
and tap Drawing Assist. Next, we can go to
the color panel. I have this pallet in
the resource Section 2. You can download this
into your Procreate. I'll tap on the secondary color. Tap the color I need,
that primary color. This is the brush I've made with the same process I'm
teaching in the class, just has a little variation on the secondary part of the brush. You can even use any other
leaf brush that we've done in the class for
this part of the sketch. I'm trying to follow the
shape in the sketch, just applying more pressure
on the wider area. Next, adding another
layer for the stem, go to Layers, add a new layer, pull this layer below
our leaf layer. I'll rename this as Stem. I'll select one of
our stem brush. I'll select Stem 2. You can select any
of your choice. Make sure your drawing
assist is on, on your layer. Tap, on the layer,
tap Drawing Assist. Reduce the size
of the brush too. Let's move on to our next part. That's the petal. Add a new layer, put it below our stem layer and I'll
rename this as Petal. Make sure your drawing
assist is on, on your layer. Next, I'll go to brushes. Select Petal 2. Next for the color, I'll
go to the color panel. Select a darker pink
and a lighter pink. Dark pink as my primary color. Now, let's start adding
these petals to the flowers. You can even experiment with a lot of other
color combinations. We are done with our motif here. I'll hide my sketch layer. Next, to add more
details to this motif, I will select a couple of
flowers with my free hand tool. You can select any
flower of your choice. Once you're done selecting, go to Adjustments, Gradient Map. Here you'll find a lot
of default options too and you can make your
own color combinations too. These are the few color
combinations I made. Now, here if you want to make your own color combination, you can see these tiny tabs. Just tap on one of them and you'll see
these tiny squares. Tap on the square and you
can change the color. You can even see the color
changing on our motif. You can tap on each
box and change color. You can even add and
delete these boxes. Next time changing the color
for the second square. You can even shift the
position of these squares. Now, if you need to delete
any of these squares, just hold on the square
and tap, Delete. Now, tap Done, once you're happy with
your gradient effect. We're done with our motif here. Next, I'll turn this
into a seamless pattern. I'm not going too much detail
into the pattern process, so I'll keep this a quick one. This pattern is a
half-drop repeat. Also, this is little different than the first one we did. Once I'm done splitting our
motif into a half drop, I'm going to select one
of our brushes and start drawing a little detail
in the empty area. You can see these empty space
in-between the pattern. I'm going to fill them. We are done with
our pattern here. Let's try out with different
background colors. You can even add gradient
effect to the whole pattern. Make sure your whole pattern is merged and is on one layer. Go to Adjustments
and Gradient Map. One of my favorite color
is this blue indigo. You can experiment with
a lot of colors too. We're done with our
second pattern here. These are some of
the product mockups. Let's move on to
our third pattern.
11. Pattern 3: [MUSIC] Let's start
with our third pattern. If you have My file, just have one layer
with the sketch. Our first step is
to add a new layer, pull this layer below
our sketch layer, and rename this layer as leaves. Next, we'll go to Brushes, select our first brush, go to the color panel. I'll select my primary
color as green and secondary color as this
yellowish light color. Make sure your primary
color shows on the top. My brush size is
around 12 percent. I'll start adding these
leaves following the sketch. Practicing on this sketch will help you understand
the brush better. This will give you a
lot of practice on how to apply pressure
on this brush. I have this sketch and the color palette in
the resource section. You can even download
that and follow along. I'm done with my leaves here. Let's move on to our second
part, that's the stem. For that, I'll add a new layer, pull this layer below
our leaves layer, and I'll rename this as stem. Next, I'll go to
my brush library, select my first stem brush. Now following the sketch, I'll start adding my stem
to this illustration. I'm done with my stem here. Let's move on to the next step. For that, I'll go to Layers, add a new layer, pull this layer below
our stem layer, and rename this layer as petals. You can even rename
this as flowers. Next, I'll go to brush library and select any of
the petal brush. I'll select petal 1, go to the color panel. Here, I'll select
my primary color as dark-pink and secondary
as this reddish color. You can select any other color combination of your choice. I'll use this brush
for our flowers. I'll add another
layer for our petal. We're done with the motive here. Next before I turn this
into a seamless pattern, I want to change the
color of my flower. For that, I'll select
my flower layer. Once you select
your flower layer, go to Adjustments
and gradient map. Here, I want to try
out a few colors. Because we have selected
the flower layer, we can only see the color
of the flower changing. I'll keep this purple and the
pink both in the pattern. Next, turning this into
a seamless pattern. We are done with
our pattern here. Let's try out some backgrounds. Here are some product mockups
with the same pattern.
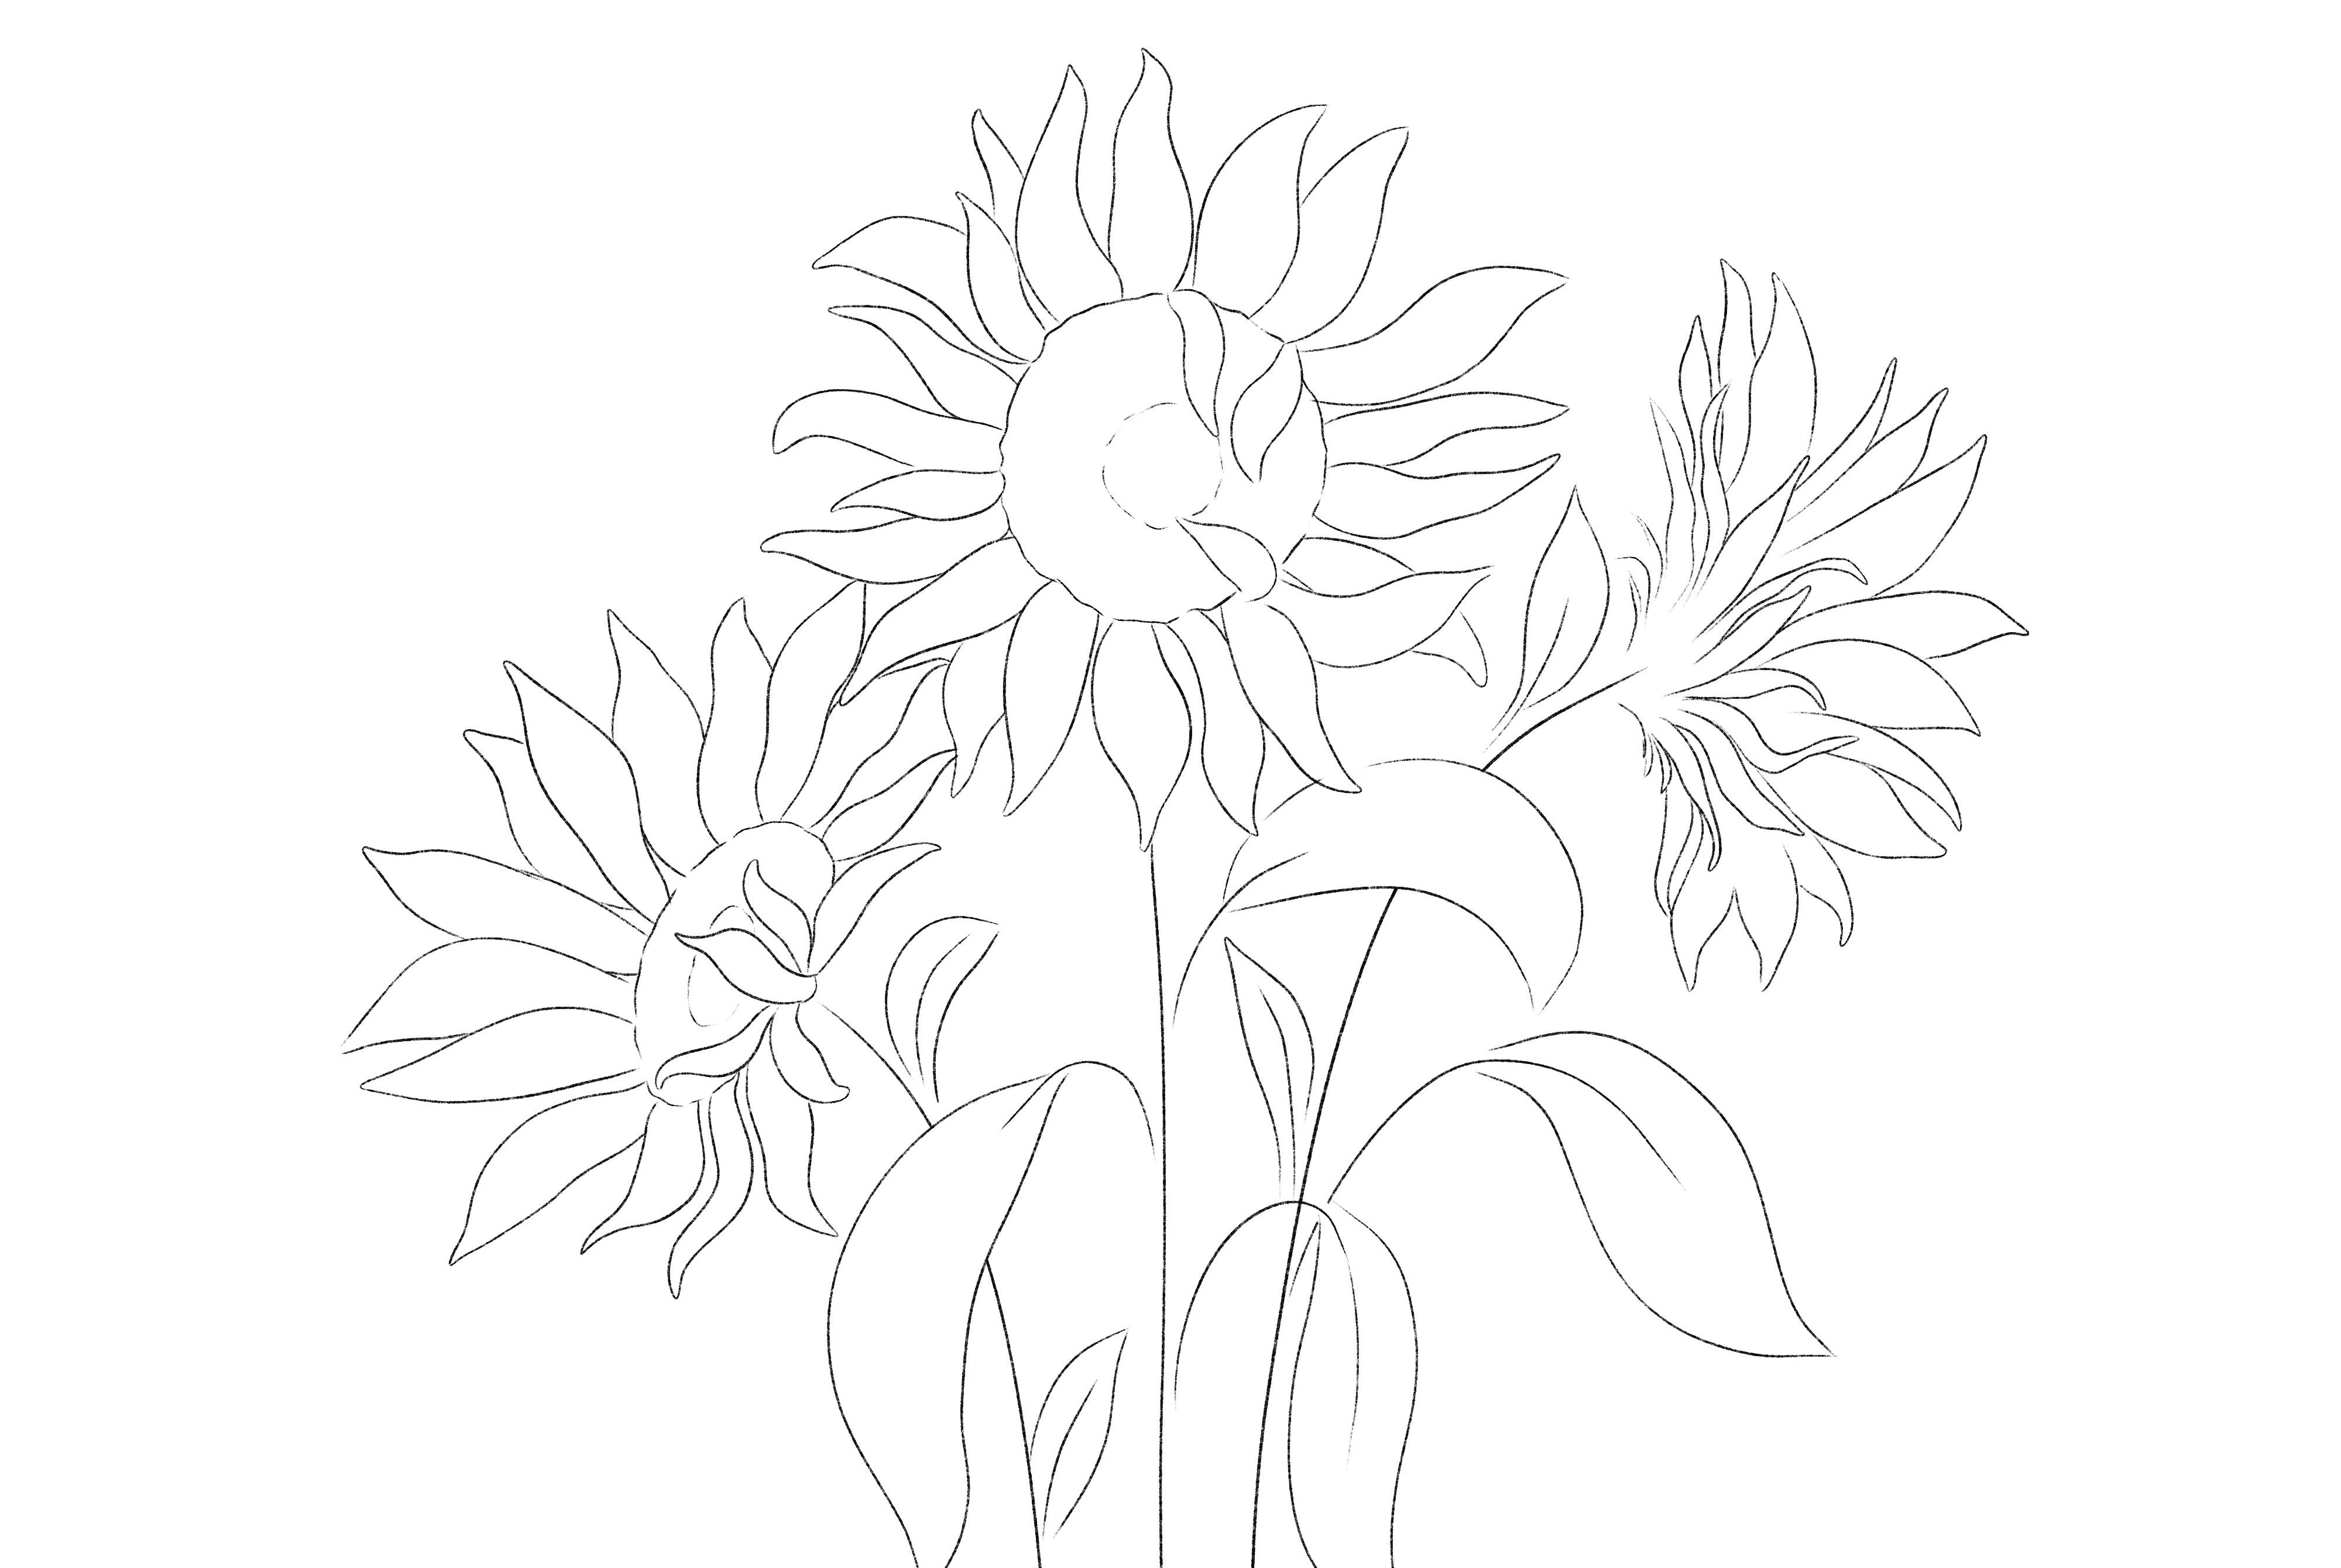
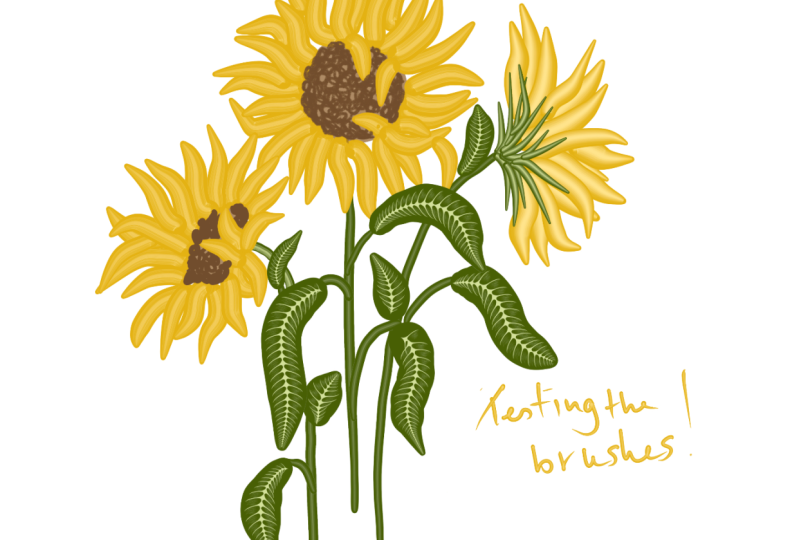
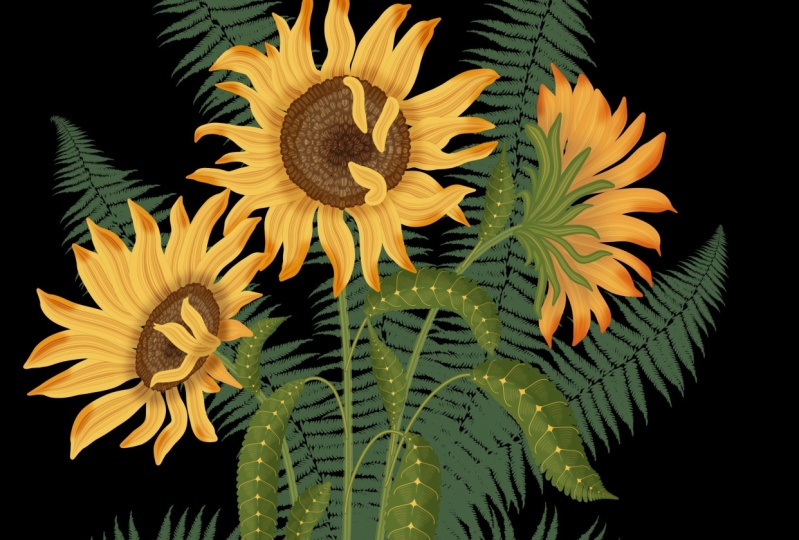
12. Sunflower Illustration : [MUSIC] Let's start with
our sunflower illustration. I have the sketch in the
resource section of this class, you can download
and follow along. This file has a sketch
and the color palette. My first step is to
add a new layer. Make sure it is
under the sketch. Tap on this layer and
rename this as the center. This will be the
center of the flower. Our next step is to switch
on our drawing guide. For that we'll go to action, canvas, drawing guide, and select Edit Drawing Guide. Now, here, under
symmetry, go to options. There are few options here. I'll select quadrant. When you zoom in, you can
see this tiny dot here. You can shift this
wherever you need. I need this in one of our
center of the flower. Once you've placed this
in the center, tap done. Next I'll go to brushes. Select our four stem brush. Next go to the color panel. I'll select this dark
brown as my primary color. Tap on the secondary color, and selecting light brown. Make sure before
you leave the panel your primary color is
selected in the circle. I'd reduce my brush size
to around 10 percent. I'll start adding
these tiny lines for the center of the flower. After three layers
of these lines, I'll reduce the size of
my brush and continue with the smaller line until
I reach to the center. Next I'll go to the
selection tool. Select Warp. With this selection,
I can adjust my illustration
according to the sketch. Next to add some
shadows and highlights, I'll go to the selection tool. Here make sure free
hand is selected. Draw a circle in the
center with the selection. Tap on this tiny gray dot, tap Invert, go to feather. I'll increase the amount
to around eight percent. Go to adjustments, curves, and I'll pull
the string little down. That will dark the
area we have selected. I will deselect
this and I need to add another little circle
in the center too. Draw another circle
in the center. I'll go to feather and
keep it around 11 percent, go to adjustments, curves. Again, following the same steps. Here we're done with the
center of our first flower. I'll be using the same center
for the second one too. For that I'll go to layers, duplicate our first
center layer. Select, make sure your
uniform is selected. Next, pull this down to the
center of the second flower. Place it exactly on the sketch. Now select this dot. I'll try to adjust this
shape to our sketch. Now to get the shape better, I'll select Warp and adjust all the corners
according to the sketch. Let's move on to the petals now. For that I'll go to layers. Add a new layer. Make sure this layer is below all the center layers and
rename this as Petal 1. Next to the brush library. Select Petal 2 next
to the color panel. I'll select my primary
color as this dark yellow and secondary
as light yellow. My brush size is around 28. Now following the sketch, I'll start adding these
petals to our first flower. [MUSIC] Now there are few petals which are on the
center of the flower. I'll add a new layer above the center layer
and add few petals. Now let's add some highlights
and details to the petals. For that, I go to our
first petal layer. Next, go to the selection tool. Make sure free hand is selected. Now I'll start selecting the
areas I need the detail in. I'm making this uneven
random curves on each petal. Close the selection by
tapping on the tiny gray dot. Go to Feather. I'll increase
the amount to around 10%. Tap on Invert, that will invert the selection. Go to Adjustments and Curves. When you pull the string down, you can see the color
changing in the flower. You can keep it darker or lighter depending
on your choice. I'm happy with a
little light orangish. I'll hide my sketch layer. This is how the
flower looks like. Now let's move on to
the second flower. I'll be following the same steps we did for the first one. Add a new layer
below the center of the second flower and
rename that as Petal 2. Make sure your Petal
2 brush is selected. I'll start adding petals
for the second one. Adding another layer to
add petals on the center. Next, adding details, same
as we did for the first one. With the free hand
selection tool, I'll start selecting these areas on the petal I need
the detail on. Done with my second flower here. I'll change the background
to a little darker shade. I'll change it to black
so you can get an idea on how this illustration
looks on a darker background. Next, moving on to
our third flower. There's another detail I
missed in my first flower. I'll go back to my
Petal 1 and I need to add this shadow detail in
the center of the flower. Select the center. The amount to around 12%. With my curves, I'll
darken the center part. I need to reduce the saturation. For that, I'll go
to Adjustments. Under Hue Saturation, I'll reduce the saturation. You can even adjust
the brightness. Let's move on to adding some leaf and stem
to these flowers. For that, I'll go to Layers. Make sure you have
this new layer under your petal layer and
rename this layer as Stem. Go to brushes. Select my first stem brush, go to the color panel, and I'll select dark and light green in my primary
and secondary color. Make sure your dark green
is selected in the circle above and start adding
stem following the sketch. Now for the leaves, I'll add a new layer
above our stem layer. Go to the brushes, I'll select my leaf brush 2
and I'll start adding leaves. Now to add detail
to these leaves, make sure you're
on the leaf layer. With your free hand selection, while selecting all the
wider leaf into half, I'll select one
part of the leaf, tap on the tiny circle to
continue multiple selection. Once you're done selecting go to feathers and increase
the amount of around 5-6% adjustments curves. You can pull this down. You can see the leaf getting
darker to the area selected. I'll rename this
layer as Leaves. Next, again, I'll add a new
layer above our stem layer. Select our second stem brush. Reduce the size of
the stem brush. These are for the tiny stem
connecting the leaves. Now we have still not
completed the third flower. We need a new layer
above our petal layer. Next, go to brushes. Select our Petal 2 brush, and with the same green color. I'll finish this part of the
stem covering the petals. We are done with our
sunflower illustration. This is another example
of an illustration with the same brushes that
you can try out.
13. Floral Lettering Timelapse: This is a time-lapse from
one of my lettering project, using the same leaf and the petal brushes we've
done in this class. [MUSIC]
14. Project: [MUSIC] For your class project, you can create any leaf petal or steam brush of your choice. You can even follow
along and create the same brushes we've
done in the class today. These are few more brush
examples for you to try. You can even create a pattern or an illustration
using these brushes. I have these sketches in the resource section
of this class. You can even download them
and create these patterns. I have the sketch for the
sunflower illustration to. You can even download them and
follow along in the class. This is another example of a tropical plant illustration, an example of a
lettering project. You can create your own
version of this project too. This is another print example. Please post your project in the project section
of this class. I cannot wait to see your beautiful brushes
and illustrations.
 Vinita Upadhya, Illustrator & Pattern Designer