Transcripts
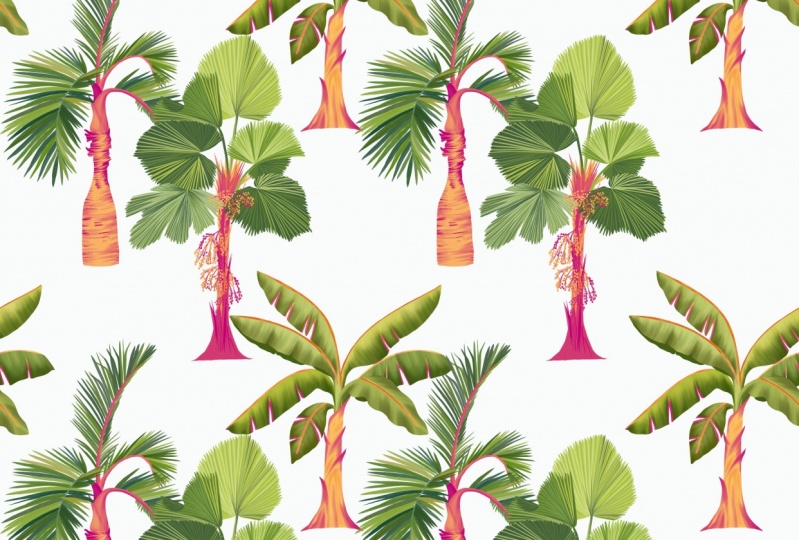
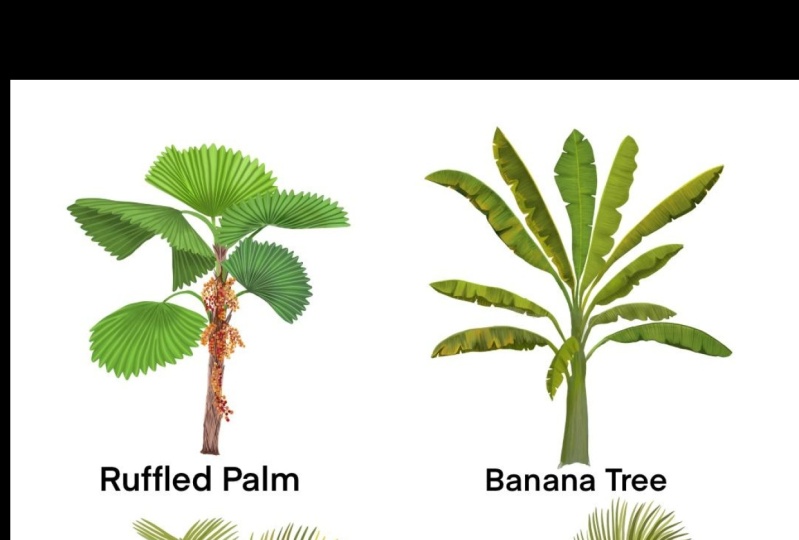
1. Introduction & What You’ll Learn: Hey everyone, My name is Vinita, I'm an illustrator and a pattern designer based in Singapore. And in this class I'm going to show you how I illustrate my palm trees In Procreate. We will be illustrating three types of palm trees. One is Ruffled Fan Palm, Bottle Palm, and Banana Palm. And for each palm, I have three different ways of using your reference image. By the end of this class, you will have a lot of tips and tricks on how you can draw any tree or plant of your choice We will be the coloring these palm trees using Gradient Map And I will show you three different ways of using Gradient Map too. I will show you how they look as a pattern And few more example of mine where I use these kind of palm trees. Thank you for taking this class.
2. Reference & Project: For the reference image, I love to take my own videos and pictures when I travel or while I'm just outside for a walk. And I have few images. Attached to the resource section of this class, including the once I've used for illustrations. So you can download these images for the class project or you can also use it to follow along in the class. Now to download these images, you should not be on your app. It should be on your webpage. Here under project and resource section. You can find few attachment on the right side of this page. Just tap on this attachment and that will open the image in the new tab. My second source of reference images is unsplash.com, which is a stock photography website where you can download images to use for free. They have tons of options and good-quality images. Let's move on to the canvas and brush setup.
3. Canvas & Brush Setup: Let's start with the brushes on the canvas. I've opened my Procreate app. The homepage looks like this. We'll start by creating a new canvas for our palm trees. For that, I'll tap on the plus sign, Again on the plus sign, we keep our canvas size of 3000 by 3000 pixel with 300 DPI, which is standard for printing. And this also gives you a good amount of maximum layers. Tap on Create. Now to go back again, you tap on gallery. And we'll duplicate this layer 2 times for each palm tree. Swipe left on the Canvas and tap Duplicate. Next, I'm going to stack all tree Canvas and do one for that. I will select them and tap on stack. And we can rename the stack as palm trees. For that, you can tap on the word stack and you will be able to type Palm trees tap done next we can rename the three Canvas in the stack. The first one is the Ruffled fan palm Second is the Bottle palm tree And the third one is the Banana Palm And let's move on to the brushes we're going to use in this class. They're all from the Procreate default library. For that, I'm going to tap on the Brush Library. And the first step is I'm going to add a new folder for our brushes. You can tap on the plus sign and rename the new folder as palm trees. The first few brushes are from the inking section of this library. So I go to inking, tap on the inking section, and I'll duplicate technical pen. Pick up this brush and drop it into a new folder. Going back to inking for the second brush. And I will duplicate this second last brush and duplicate and pick it up and drop it into a new folder. Next is again in the inking. It's tinderbox, swipe left duplicate, and drop it into the folder. Next is in the artistic section, depth on artistic. Scroll down and the second last brush, duplicate. And drop it into our folder. These are the four brushes that we're going to use the most. I'm going to show you which part of these trees I'm going to use it. For most of the illustration. I'm going to start with the technical pen because it has a nice smooth edge. The second brush is a little transparent and it gives a nice flowy effect. It's really good when you want to add details on the leaves like the winds and the tiny, delicate ones. And the cord is the tinderbox. It has a rough edge and also it is slightly transparent, which is good for the box and the rough areas of the tree. And the last one gives a really smooth and base to kind of effect which we will be using to add highlights and shadows. Now let's move on to illustrating Ruffled fan Palm tree.
4. Ruffled Fan Palm Tree: Let's start with our first palm tree that's ruffled fan palm tree. We'll start by importing our reference picture to the Canvas. For that, I'll go to action and swipe left on insert a photo and you can tap on insert a private photo. You select your reference image from your gallery and it is on your Canvas. I have this image in the resource section of this class. So you can download the image and follow along. Now the first method of using this reference image is by directly drawing on it. So let's start our illustration by adding a new layer on this image. I'll take this layer one on top of our reference image. Go to my Brush Library. And I'll select our first brush, that's technical pen. Now my next step is to draw on our reference image. I will pick up a color from the image and start drawing the basic shape of each leaf. And while you're drawing on this image, it doesn't have to be perfect. And I'll fill this leaf with the same color. And let's move on to our next leaf. I'm going to add a new layer for the next leaf. Pick up a color which is a little lighter or darker from our first leave. So the whole illustration doesn't look flat. I will be doing this for all the leaves, every leaf on different layer and different shades of greens. Adding a new layer for my leaf and hide my first leaf. So I can clearly see while I'm drawing the third one, I forgot to reduce the opacity of our reference image. And you can do that before you start your illustration, so it leaves, your illustration is much clearer to you. Next, I'm going to add a new layer for the red part of this tree. Select a bright red color. And I'll start adding these tiny dots randomly following the reference image. I will be picking up different shades of red for this too So the illustration doesn't look flat. And also I will be showing you later for the gradient map how this different shades of color gives you a nice effect. Next, I'm going to add a new layer below this. And we will be drawing the strings these are attached to I'm gonna pick up a dark brown color for that. And make sure your technical pen brushes selected. I will reduce the opacity of the reference image. So it's clear for me to draw. And I'll start drawing the stem like strings. You can follow the image. I'm not exactly following the image. And we are done with our basic shapes and unhide all the other layers. Next I'll make the opacity of our reference image to max And I'll select the layer and just minimize and shifted on the left side. So we can still clearly see our reference image. Now we'll be moving on to the trunk of the tree. For that, I'm going to add a new layer at the bottom. Select my second brush. Pick up a color from the reference image. I will start with the lighter color first and start drawing the trunk. I keep picking on darker shade and adding. I will hide the red fruit layer so I can see what I'm drawing clearly. Next, I'm going to add another new layer. On top off all the leaves. This is going to be a part of the trunk, which we've covered the stem of all the leaves. Now my next step is to add texture. And the way in like lines on these leaves. For that I'm going to add clipping mask to each leaf. For that you add a new layer for every leaf, Tap on the layer and tap clipping mask. I'll select my second brush and start drawing the lines using the image for the reference. I will be picking up different shades of green for these lines too And we'll be following the same steps for all the leaves. Hi. Hi. Okay. Okay. Okay. Next I'll go to my trunk layer. And with my eraser tool, I'm going to level this bottom of the trunk. And we are done with our ruffle fun palm tree. I’ll go to the layers, hide my reference image, select all are working layers and group them. Next year, duplicate this group, swipe left and duplicate. Hide our first group and open our duplicate group. And I will start merging all the clipping mask layers. Now you have each leaf on separate layer. So you can select individual leaf and move or adjust them. The editing part is easier. You can recolor each leaf or rearranged them between layers. You can shift them below or above the other layers do. Let's move on to our second Palm
5. Bottle Palm Tree: Let's move on to our second palm tree That's bottle palm tree. I'll tap on my second canvas. My first step is to insert a reference image for that I will go to action. Add, swipe left on Insert a photo and tap on insert a private photo. And you can select your picture from the gallery. Adjust the reference image to fit on your canvas. Next I'll go to Layers. Shift our layer one on top of our reference image and reduced opacity of our reference image. Our next step is to sketch on top of this reference image. So I'll go to my brushes, sketching, and I'll select, you can select any brush pencil that you're comfortable with, because this is anyway, our rough sketch. Now on layer 1, I will start sketching our basic shape of this tree. I'm increase the speed of the sketching process so you can pause and take your own time. And I'm done with my sketching part. Next I'll go to my layers, increase the opacity of your reference image. Select the image layer, and just minimizing shifted on the side. So you can still see the plant clearly. Next I'm going to reduce the opacity of my sketch layer around 50 percent. Add a new layer, shifted below our sketch layer. Go to Brush Library. And under our palm tree folder, I'll select our first brush, that's technical pen. And we'll start illustrating using the sketch as our guide. I'll keep picking up colors from the reference image and start drawing. Next, I'll go to layers. Add a new layer, pull it below are first Illustration, Select our second brush, again, picking up colors from our reference image. Now for this part of the plant, I'm going to keep changing and keep picking up different shades of green. This is going to help us while we're recoloring or, using gradient map, using just one color might make your illustration look a little flat. Now moving to the next leaf, again, adding a new layer on the top. Selecting technical pen for the center line. Pick up a color from the reference image, and start drawing under the sketch. Selecting my second brush. Adding the new layer, pulled a new layer below our center line layer. Pickup color from the reference image. And I will be following the same steps as the first one. Keep selecting different shades of green and adding strokes. So every leaf will have two layers to it. One is with the center line and the other one is with the leaflet. Again for the third leaf, adding a new layer shift it on the top As this leaf is on the front. Select a color. And I'll draw the center line. Adding another new layer. Shift it below our first layer. Select the second brush, and I'll start drawing the leaflet. And while drawing this leaf, keep picking up shades of green. Next, add a new layer for the stem. This leaf is attached to. This stem layer should be under the leaf layer. Select a color from the reference image. And with my technical pen brush. And we'll draw a tiny stem. Now adding a new layer for the fourth and the last leaf. Shift it on the bottom Select a color from the reference image. And I will start with the center line first. And underlayer for the leaflet. Select my second brush. Ad like all the other leaves, I will keep selecting different shades of green and adding to this leaflet, adding another new layer. For the last part of this stem. Select a color from the reference image. Select the technical pen brush, and make sure your layer is below the third leaf. Now moving on to the trunk of the tree, I'll add a new layer. Select a light grey color from the image. And I'll start drawing under the sketch. Fill it with the same color. Now my next step is to add details to this trunk, for that I will add a new layer and add a clipping mask to this layer. Select my third brush, that's tinderbox. Select a darker gray shade. And I will start adding these tiny strokes on the edges. Selecting a darker grey, this is much like a charcoal and adding feel strokes like in the reference image. Next I'm going to add a little highlight on the center part of this tree. For that, I will select my layer 12 and alpha lock it, Select my forth Brush. Select a lighter color. And I'll just add a little highlights in the center part and darker on the edges. And I'm going to repeat these steps for the other center parts too. And we are done with our bottle Palm tree. Next, I'm going to group all the layers into one. Hide your reference image, and select all your working layers and group them. Duplicate this group, hide your first group Open your duplicate group and merge all your clipping mask and center line with the leaflet together. Now you have one layer with one whole leaf. This will help you while you want to recolor or rearrange your leaves. You can select one layer and move your leaves wherever you want. You can also use these leaves individually in a pattern Let's move on to our third Palm that’s banana palm tree.
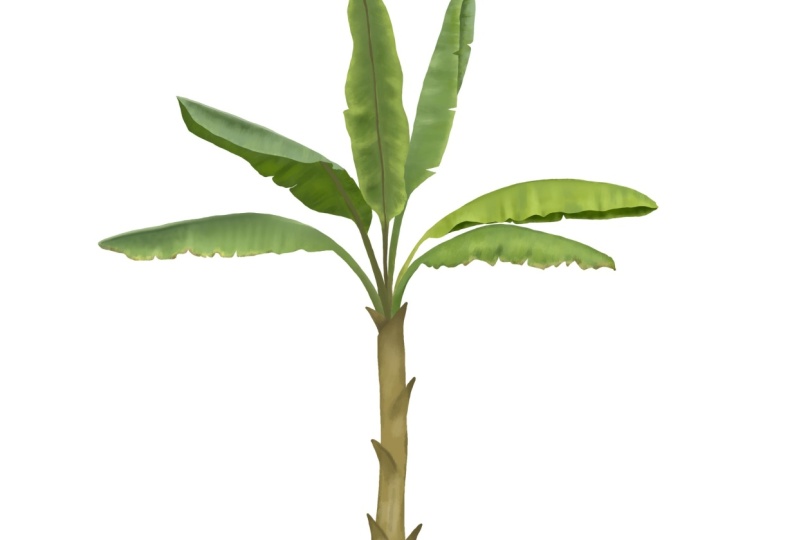
6. Banana Palm Tree: Let's move on to our third palm tree that's banana palm tree. For this palm, I'm going to pull out my Pinterest app for the reference image. I'll just type in banana tree. We will be following these images for the basic shape of this tree, you have to look for an image that is easier to follow, in which you can clearly see the shape of the leaves. The whole plant is clearly visible. I will go with this image, not on my first layer. With my technical pen brush. I will start with the trunk first I've picked up a yellowish brown color for this. Just drawing the outline and filling it with the same color Adding few rough edges on the sides to add few details to this trunk Next, we'll start with the basic shape of the leaves. For that I'll add a new layer pull it below our trunk layer. You can pick colors from the reference image or you can pick your own too I'm going to select a light, bright green And just start drawing following the reference image and fill it with the same color. Next again, for the second leaf, I'm going to add a new layer. Select a little lighter or darker, or maybe a little different tone of green. This is going to help us later while we're recoloring this tree using gradient map. Now in the same way, I'm going to draw around six to seven leaf on different layers. Having each leaf on a different Leo will help you in future while you're rearranging our editing this tree. For this leaf, I'm using my eraser to draw the getting between the leaves. Next to add details on the trunk of the tree, I'm going to add a new layer. Tap on the layer, tap clipping mask. Select our brush. Select a darker shade of brown. And I'll start adding these tiny strokes on the edges. Next, select a light color and add in the same domain. Now moving on to add details on the leaves, I don't need the reference image anymore, so I will close the Pinterest section. But if you still need it, you can keep it as it is. Select my second brush. And I will be adding clipping mask to all my leaf layer So I can start adding details and highlights on these leaves Add a center line Select my fourth brush Select a darker shade of green Start adding these tiny strokes For this, you can also follow a reference image. Moving to the second leaf. For that, I'm adding a new layer and add clipping mask to this layer. Now I want the other side of this leaf to be darker that we do on a different layer. And alpha lock on this layer, select a darker green tap on this layer again and fill layer. Now for the third leaf, adding a new layer and adding clipping mask to this layer, adding details with the darker shade first, and then we delete the sheet. Now adding clipping mask to the forth leaf hiding my third leaf so I can clearly see what I'm drawing on my fourth leaf. Now moving on to my fifth leaf. Adding clipping mask to this leaf. Again, I want this leaf to be darker, so I will alpha lock this layer and fill it with a darker green. Adding a new layer and adding clipping mask to this layer. Now adding a leaf in the front. So I can see the leaf clearly while I'm adding the highlights. Now moving on to our last one, adding a new layer and adding clipping mask to this layer. And a center line first, selecting my forth brush Selecting a darker shade. And start adding these tiny strokes on the edges. Select a lighter color for the center. I want to erase a part of this trunk. So I'll go to the trunk layer, select my eraser tool. And I'll just erase the upper pointy part of this trunk. And we are done with our banana palm tree. Next I'll go to my layers, select all my working layers, group them, and duplicate this group. This will keep our original safe, which helps us in future. If you need any editing, you can always go back to your originals and edit. Our next step is to open the duplicate group and merge all the clipping mask layers. Now you have one leaf on one layer. This will help you while you want to recolor or rearrange these leaves. You can just select one layer, move and rearrange these leaves and make a completely different looking tree. Next I'm going to select one of this leaf duplicate move this above our trunk layer, I'll try to arrange like this reference image, that tiny leaf at the bottom of the trunk. Erase the extra stem. So it looks like it's coming out of that gap. I'll do another example of the same. Duplicate, another leaf. Let's move on to the next step That's re-coloring these trees and how the look into a pattern.
7. Recolor & Patterns: I will be showing you three different ways of recoloring your palm trees and also few examples of patterns Now for this, you have to make sure the whole palm tree is on one layer. So I'll duplicate my layers, the group layers, and just merge all of them into one. Next I'll tap on adjustments, gradient map, and here if you see there are two options, layers and pencil, layer will recolor the whole layer, and the pencil will only recolor the parts where you draw. We will be selecting the pencil option. And this panel will open up at the bottom. You can choose any of these gradient options. At the bottom, I will go with the pink and the yellow and start drawing on the parts where I need this gradient effect. I'm using technical brush, you can try other brushes too This also works like a selection tool. So when you want, when you want to change the gradient effect or the colors, you can just slide the options at the bottom. And the only parts you drew on will change the color You can also edit the gradient effect by tapping on the screen. And you can shift this tiny square. Now if you want to change a particular color in the Gradient option, you just tap on the tiny square and you can change and slide the color options. Now the second way of using this gradient map, I will duplicate our second group. Open the group. And I will merge all the leaf layer in one, the fruit layers in one, and the trunk layer. So now in all we have three different layers. I will select the trunk layer and go to adjustments, gradient map, and layers You will get these gradient options at the bottom. This you can slide and choose your option. Now in this option you can see only the trunk is changing the color. You can tap on the Gradient option and slide these tiny boxes to change the gradient effect. Next, moving to the leaf layer, select the leaf layer. Same. I'll go to Adjustments, gradiant map and layers And this is how it looks when I turned it into a pattern If you upload this on Society6, this is how it looks on the product. Now moving on to the third method of recoloring this, I have this whole pattern on one layer. I will duplicate this layer and hide my first original layer. Go to Adjustment, Gradient Map and layers. Here we are adding the gradient effect to the layer. So the whole print and pattern will be of the same gradient shades. I'll change the background. These are few examples of patterns. Where I have used similar kind of palm trees and the same gradient effect.
 Vinita Upadhya, Illustrator & Pattern Designer