Transcripts
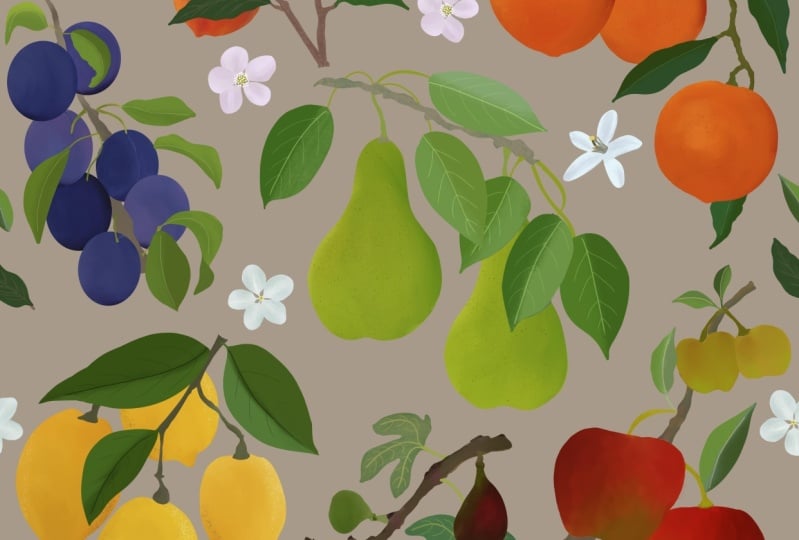
1. Introduction & What You’ll Learn : Hi everyone, my name is Vinita I'm an illustrator and a pattern designer based in Singapore. And in this class, I'm going to show you how I illustrate fruits in procreate. I will start by showing you how I use reference image for my sketching process. Also, I have an example sketch of Pears from start to finish to show you how I go about my sketching process, we will be illustrating six fruits in procreate. In this class, I have attached three sketches in the resource section of this class. So you can download these files and follow along I will be showing you my brushes and Canvas and step-by-step process in procreate each fruit. Even if you're a beginner, you can follow along and I'm going to explain you each step. I have a bonus video to show you how I turn these fruits into a seamless pattern which you can upload on print on demand sites. Also, I have a fun Vedic to show you how these fruits look as stickers. By the end of this class, you will have a lot of tips and tricks on how to draw any fruit of your choice.
2. Reference & Sketching Process: Let's start with our very first step, that reference and sketch. I'll take you through all my source of reference. The first one is Unsplash. I have installed the app on my iPad. This is the most safest and the easiest with a good-quality image. These are all royalty-free images. That means you can use it in any form for sketching reference, or in your project or on your website. Now my second app is Pinterest This is also one of my favorite because you can get plenty of inspiration on illustration or color inspiration. You can find a lot of styles of illustration in here. But yes, this is not royalty free, so you have to be careful when you try to use it as a reference. And one of my most helpful reference that I get are from the library books or some botanical books that I find in the market But again, this is not royalty free and you can only use this as a reference. Like, I love to see the composition like how the leaves and the shape of the fruit are placed Let's move on to the steps I used for sketching. The first step is to sketch, I planned my composition and use my reference images to sketch my fruits. In my next lesson, I am sketching a Pear from scratch and show you how I plan to sketch any fruit. Next is I take a picture from my iPad, imported as a private image in Procreate. Adjust it to my canvas. I'll add a new layer on the top. Reduced opacity of my sketch. And I'll go to my brushes. Under sketching, I'll take my 6B pencil brush and start tracing on the sketch. And if you're comfortable sketching your initial sketch on the iPad directly, you can always skip this step. Once I'm done with my tracing, I'll hide my sketch image. And I'm done with my sketching process.
3. Sketching Pears: In this lesson, I'm going to show you how I planned and sketch any fruit. Now my first step is to make a collage of the images that I want to use as a reference. All these images are from Unsplash. I collect these pictures because like for example, in this image you can see the stem, the, how it is connecting to each other, and how it is attached to the fruit. I can see the shape clearly. Also, I can use these leaves for reference. For example, the falling of the leaves and the shape. This image I took because I like how it is attaching. I can see the attachment and the shape of the leaves here. It's, it's nice and clear. Now this image is for the shape of the Pear. I want my shape of the Pear to be a little roundish like this in the image. And I'll start sketching my Pear I will start with the stem. Like in the image. I'll make a vertical stem. I think reference image helps you and gives you a real good idea about the shape and the details. If you are comfortable sketching your initial sketch on your iPad directly, that's also perfectly fine. You can follow these steps and start sketching on your iPad. I'm almost done with the stem. I'll start adding leaves to these stems. I'm gonna follow this image and add these two leaves at the end. You can also skip these details on the sketchbook. And while you're tracing it on the iPad, you can add the details. I'm using a 300 GSM watercolor paper. Because later, if I want to color this in watercolor or watercolor pencils, it should be on a thick paper Adding more leaves with the reference of the second image. The trick of this type of planning and sketching is in the end you have your favorite shape and your favorite element all in one sketch. Let's move on to drawing some pears I'll move on to my third image. Reference image for the shape I need for the pears. I think the stems is too long I'll make it shorter. I feel while drawing any fruit, if the lines and the shape of the fruit is irregular and not perfect, it looks more natural. This also depends on your illustration style. But if you're aiming for a botanical looking illustration, it doesn't have to be perfect. Moving to the second pair, I'm trying to achieve roundish and bumpy shape for the Pears Adding one more leaf. I'm just taking the reference image and adding another leaf. And I'm done with the sketch of the Pears
4. Resource & Project: You can find your resource under Project and the resource section of this class, you can select project and resource. And you can see three attachment on the right side of this page, When you tap on one of the attachment, it will open in a new tab, tap on download. And it will start downloading. Once it is done, Tap on, open in Procreate. This will directly open the attachment in the procreate app. You can use these sketches to follow along with me in the class and also submit the same in the project section. For the project, you can also illustrate any fruit of your choice and submit in the project section of this class. I cannot wait to see your artworks. Feel free to ask any question or doubt in the discussion section.
5. Canvas & Brush Setup: Let's talk about Canvas and brushes im going to use in this class. I already have my stack ready with all my fruit sketches. Each canvas has one fruit, will be doing six fruits in this class. It's Peach, Papaya, Pomegranate, Mango, Cherries, and Guava. The dimension of these Canvas, are 4 thousand by 4 thousand pixel and 300 dpi, which gives you 37 layers. Let's move to the brushes. I'll tap on the brush library and make a new folder for the fruits. Tap on the plus sign, and I will rename this as fruits. I'm going to drop the brushes I'm going to use in this class in this folder. My first brush is under Artistic It says Sassafras I'm not sure if I'm pronouncing it correctly. I'll duplicate this brush and I'm gonna drop it into the fruit folder. My second brush is under calligraphy. That's Monoline I'll duplicate this brush and I'm gonna drop it into our fruit folder. We are going to use these two brushes for the most part of this class. The first brush gives a very crayon pastel kind of finish. It is very soft and it smudges very well, like if I put dark and a light color and smudge it with the same brush, it gives a nice soft finish. Now again, choosing a brush also depends on the style of your illustration. If you're not very happy with this brush finish, you can go through the default brushes under the procreate library. There are plenty of them and you can try and find your own style brushes. Now the second brush is Monoline, This is basically going to be the base layer of all our fruits. As this is an opaque brush and it also gives a nice crisp finish on the sides Let's move on to our first fruit.
6. Illustrating: Peaches: Let's start with our first fruit, that's Peaches. I'm going to start with the sketch time-lapse of this illustration. Just for your reference, I have this sketch in the resource section of this glass for you to download. You can download and follow along. Now my first step is to import my reference image. I’ll go to action, canvas and reference. I will pull this to the side of the canvas. Now tap on image, import image and import your reference image. Next I'll go to layers. I have this one layer with the sketch on it. I'll add a new layer, and pull this layer below the peach layer, the sketch layer, under brushed library I'm gonna select my Monoline brush and pick up a mid tone from the image, A tone which is not too dark or too light And I'll start drawing my first peach Fill this with the same color. Add a new layer, tap on the layer and tap on clipping mask. Next, I'm going to select my first brush. Select a darker color from the reference image. And I will start adding stroke to this peach Now while you're adding the stroke, you have to follow the shape of the fruit. I'm going to keep adding colors from the image and smudging it with the same brush. While I'm smudging the opacity of the brushes around 70%. I'm going to follow this process for all the peaches. Even after smudging, if you feel you're not happy with the colors, you can keep adding more colors and smudging it. While smudging do follow the shape of the fruit. Let's move on to the second peach. Now, I'm going to take the second peach on a new layer So we'll add a new layer. Select Monoline And I will start with the second peach. Select a different color and tone for every peach. That will give your illustration an interesting look, add a new layer, tab on the layer and tap on clipping mask, and select the first brush. I'm starting with the lighter yellowish color. For this shape of the peach, you have to understand the shadow and the light part I'm going to keep the center line on the darker side. And the curvier part on the lighter side. Now selecting a darker color. If you're not happy with the color you select from the image. You can go to your pallet and, and change the tone to a little darker or lighter, or if you want to add more, red into that color Now adding darker color for the area which will be under shadow. Selecting the smudge tool with the same brush, follow the shape of the fruit while you're smudging. Its little difficult to smudge the shades which are too dark or too light with each other. So you have to make sure you have the tones which are closer to each other. For smudging you have to practice a few times to understand how this whole Smudging works with this brush. While I am smudging, I'm also trying to achieve the shape of the fruit. Let's move on to our third Peach I'm going to add a new layer, select a tone, from our last peach. Select Monoline And I'm gonna draw. And the third peach. And a new layer, tap on the layer and tap on clipping mask. Select our first brush, and I will start adding colors. I'm starting with the lighter color on one side, and I will be adding darker color on the other side. For this, I am not referring to any reference image, but you can always import an image to follow. Smudging with the same brush and following the shape of the fruit. While smudging, I'm trying to push the color and achieve the shape in the center. This will create the depth that peach usually has in the center. You can keep adding more colors and smuggling them on the same layer. Let's move on to the leaves. For the leaves, I'm going to add a new layer. Select monoline brush, pick up a color from the image, and start drawing the leafs another new layer And I will pull this layer below the leaf layer. And this is for the back side of this leaf Next we'll add clipping mask to this layer. I’ll add a New layer, tap on the layer, tap clipping mask Select our first brush. And now I'm going to keep adding colors from the image. To our illustration. I'm adding these colors, keeping in mind the light and shadow and at the same time, smudging it with the same brush. Ok Now let's move on to the stem, I am going to add a new layer Select Monoline brush and draw the whole stem. Next add Clipping mask to this layer Select are first brush. And I'm going to select color from the image. Select a tone lighter than the stem you already colored. And then the third layer will be with much lighter color and adding a much darker color on the sides. Now smudging it with the same brush. While smudging, you can push the colors and the direction and the shape you need for the stem. Okay, I'm going to hide my sketch and see how it looks. And let's start the details on the leaves. I'm going to add a new layer. For this, I will need a different brush which is under inking Technical pen, Select the lightest color from the leaves and start adding details on the leaves. I'm going to hide the sketch layer And we are done with our Peaches.
7. Illustrating: Papayas: Let's start illustrating papayas and start with the weak time-lapse sketch for your reference. And I'll move to my canvas. Our first step is to import a reference image. For that, I'll go to action canvas and reference. I'll move this damped the corner of the canvas. Dab on image, input image, and import your reference image. I'll show you how my layerslooks. Everything is on a different layer, at least one leaf. A bias and the stem will start with the fruits first So I'll go to the papaya layer and add a new layer, new layer under the sketch here. And select Monoline brush and start drawing on the first papaya. I picked up our color from the reference image and fill this with the same color. Add a new layer on top of this layer, dab on the layer that keeping mosque. Now select a darker color from your reference image. Select our first brush. And I will start adding under throught. Make sure why you are adding the colour and smudging. Both should be following the shape of the fruit First, I'm going to add all the colors I need. And then starts marching with the same brush. Tap on smudge, and select the same brush, and start smudging. The opacity of my brush is around 70%. While smudging, you can keep adding more colors, the same layer Let's move on to the next. I'm going to follow these same step for all the fruits. And start with the second one. Select a tone and the color often different from the first one that will give you an illustration and interesting look, also adds depth to the illustration. And a new layer. Tap on the layer and tap clipping mask. Select our first brush and start adding colors Next, add a new layer for the next papaya. Select rash. And I'm going to start drawing under toward one. Next, add a new layer on top of this app. On the app keeping mosque. Select offers brash, and start adding fellows from reference image. Let's move to our last papaya. Select Monoline n brush and start illustrating on the last one. Back on the layer and back keeping mosque. And now I'm going to start adding colors. Now let's move on to belief. I'm gonna hide when after sketch. So you can see the leaf clearly and willing to add a new layer for the first leaf and pull this layer below the sketch layer. Now the Monoline brush, and we're going to start illustrating our first leaf. Select a colour from the image. The colours shouldn't be too dark or to light, it should be more towards the middle. Next, add a new layer dab on the Layout tab tipping mosque. Next to add wins on the leaf, I'm going to select my technical pen, which is under inking section. And select a lighter color, like the lightest color, and start adding winds to the leaf. Next, I'm going to add another layer between the when and the leaf layer with my first brush. And I'm going to start adding highlights to the leaf, selecting my first brush, and picking up a lighter color from the image. I'm going to add lighter color on the outside, but like an outline and darker in the center part. Find a darker shade from the image. And Scott adding dogs defend dome. Now smudging with the same brush. Now moving to the second leaf, I'm willing to unhide the second leaf. I didn't knew layer below this layer below the sketch layer, I will group the first leaf and hide it so we can see our second leaf clearly. I will select all our force leaf layer and group it and hide it. Now moving on to the new layer for the second leaf, select my Monoline brush. Select one of the color from the image, and start with our second leaf. Add a new layer on this layer and tap on clipping mask. Now the technical brush, I'm going to add viens to the leaf. Next, add another New Layer and the cup falls brash and start adding highlights to delete. I'm going to unhide are forced leave to become the colors I have on Buddha leaves to look a little similar and cohesive, merging with the same brush. Next time we're going to select all the layers for the second leaf and group into one. I'm going to unhide my stem layer and add a new Layer. And with my Monoline brush, pick up our color from the reference image. And I'll start illustrating the stem. I'm going to hide all the other layers so we can see the stem adding all the fruits into one group and hide it. Next, add a new layer on the stem layer I'm tipping mosque. And with the first branch, we are going to add highlights on the stem. Next, I'm going to unhide all the fruit layers. And I'm going to add shadow under the leaf, selecting darker color from the image. And I'm going to add under the leaf ADRs and the corners near the fruit. I feel I need to move the fruits are little higher, so I'm going to select the group with the fruit and move it a little higher. Also, I feel the stem looks to take some going to select Bhutto stem layer, select free form. And I'm going, now let's move on to the last part of this illustration. I'm going to add a new layer bullet at the end. Select Monoline And I'm going to start illustrating on the last piece, selecting a value from the fluid. And I'll start drawing. Next, adding a new layer for the inner part of the papaya and adding darker orange. Next, add a new layer on top of this layer. And that now with the lighter color and the first crash, and we're going to start adding highlights. I'm just doing it on my own, but you can always import a reference image for this. Next, I'll add a new layer for the seeds. Select a dark brown color and start adding in the center. Next, add a new layer. Will this layer below our seed layer, select our darker brown, then our foresee layer, and start adding more seeds in the gaps. Now adding another new layer to add logy shine on the seeds, I'm going to select a very light color. And just adding tiny dots on the circles. I'm going to hide my sketch layer. And we are done with our second fruit, That's papaya.
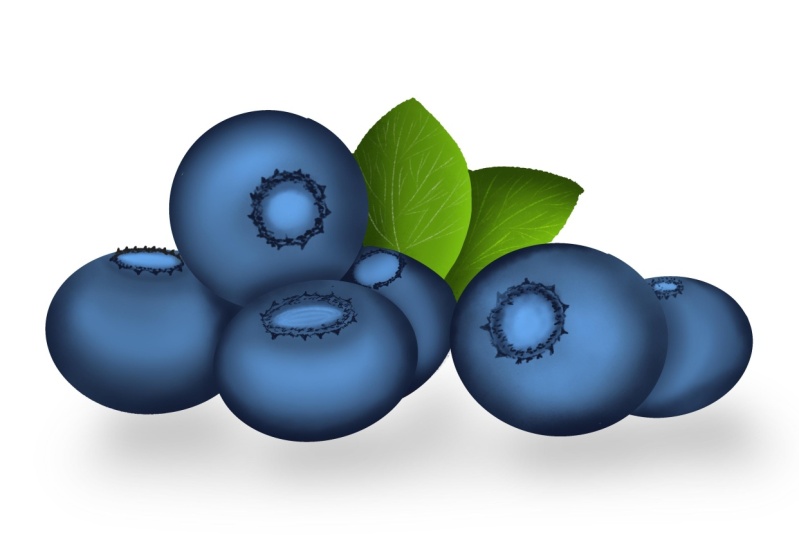
8. Illustrating: Pomogranate: Let's start with our next food that's pomegranate. I'm going to start with a time-lapse of sketch just for your reference, tap on my canvas. And my first step is to import the reference image. For that, I'll go to action canvas and reference. Tap on image, input image, and import our reference image. Next trial go to layers. I have one layer, which is the sketch layer. I'm a new layer. Select my Monoline brush, and I will start with the fruit first Add another new layer, Tap on the layer, tap on clipping mask I'm gonna select my first brush. Select a colour from the reference image, and I'll start adding strokes on the fruit. Now while adding strokes, you have to make sure that you follow the shape of the fruit. I'm following the reference image and adding the colors according to the reference image. Adding the lightest color where I can see the shine on the fruit and the darker shades for the shadow area. I tried to pick up as many colors as possible from the image. That gives a nice natural look to the illustration. Once you're done adding the colors, select the smudge tool with the same brush. And while smudging also follow the shape of the fruit. You can also add more colors while you're smudging on the same layer Let's move on to the stem. I'm going to add a new layer for the stem. Select both the fruit layer and group them. Pull the group below the sketch layer pulled the stem layer below the sketch layer Next I'm going to select the monoline brush. Select a colour from the reference image, and start with the stem. Add clipping mask to the stem layer, tap on the layer and tap on clipping mask And select my first brush Select a lighter color from the reference image. And I'll start adding on the stem. Selecting smudge tool with the same brush. And I'll start smudging Selecting a darker color from the reference image. And I'll start adding on the sides and the edges. Next, I'll starts merging this dark color with the same brush. While smudging, you can push the colors and give the stem the shape you need. Let's start with the leaves. I'm going to add a new layer for the leaves. Select monoline brush, select a colour from the reference image, and I'll start drawing. When this new layer below the layer. I like all my leaves to be off different colors. That gives an interesting and depth to the illustration. I'm going to add a new layer. Add clipping mask To this layer, select my first brush and start adding stroke to the leafs and selecting a lighter color from the reference image to add the highlights. You can also use that essence image to see how the light is falling on these leaves. Once you've done adding the colors, you can select much tuned with the same brush and starts munching. Next, adding a new layer. And I'm gonna select technical pen under inking section to add details on the leafs. I'm selecting the lightest color from the reference image. I feel the color of these wins are too bright. So I'll select the layer. I'll go to adjustment , curves layers And I'm going to adjust the saturation Hill because I want to make the viens a little more, less vibrant. You can see the saturation of the wind's going brighter and towards done. Let's move on to the other part of the Pomogranate I'm gonna click the reference image and import a new reference image. Next I'm going to group all the layers for the first pomegranate layer select monoline brush. Select a colour from the reference image and start drawing the pomegranate. Next, I'm going to add a new layer on top of this layer. Select my first brush and select a lighter color from the image and start adding strokes on no pomegranate. Selecting and I'll fight color. Adding another layer on this. I forgot to add to be mastered this layer. I'm gonna go to the layer upon layer, and I'm going to select a darker red from the image and start adding on the edges. Once I'm done adding the colors, I'm gonna smudge it with the same brush. Next, adding a new layer for the seats, gap on the layer and that clipping mask. Selecting my first crash and selecting a darker color from the image. And I'll start adding seats. I will be doing these seeds into layers. A lighter color on the top and darker color at the bottom. Next, adding a new layer and pulling it below the fourth, selecting a much darker color. And I'll start adding the second layer of the seats. Next, I'm going to alpha log my four seed layer to add shine on the seeds. You can also do this on a new layer and adding clipping mask. I'm going to select and I'll fight cholera from the reference image and start adding on the first layer. I'm going to alpha lock my second seed layer and make it a little more darker Next I'm going to go on my white layer to add more details with the light pink color. Next, I'm going to smudge the details on the white layer with the same brush. And we are done with our toward fruit that's pomegranate.
9. Illustrating: Mangoes: Let's start with Mangoes A quick time lapse video for your reference. I'll tap on my canvas. My first step is to import the reference image. I go to action Canvas, reference,tap on image, import image, and import your reference image. Now I'll move to the layers. I have three layers, with the sketches on them, one has been the Stem leaves and the Mangoes, will start with the Mangoes first, I'll add a new layer. Select my monoline brush. Pull the new layer below the mango sketch layer Select our color from the reference image and we'll start with the first mango. Next to add clipping mask to this layer, I'm going to add a new layer, dab on the layer and dab on clipping mask. Now I'm going to select my first brush. Pick up follow from the reference image. And we'll start adding these strokes on the mango You can refer to the reference image on how you want the colors to be. We start with the lighter color and layering it with the darker I tried to pick up as many colors as possible from the reference image. This helps to achieve the closest natural look. Once I'm done adding the colors, I'm going to select the smudge tool with the same brush and starts smudging to smoothen the lines. While smudging. If you need to add more colors, you can keep adding more colors and smudging it on the same layer. And we are done with our first mango. Let's move on to the second one. For that, I'll add a new layer. Select my Monoline brush, select a colour from the reference image, and I'll start drawing my second Mango Ok Next, we’ll add clipping mask to this layer I'm going to add a new layer, tap on the layer tap clipping mask. Select my first brush and pickup colors from the reference image, and I'll start adding to this mango Again, start with the lighter color and keep adding darker shade on the top. Once you're done, adding the colors selects smudge tool with the same brush. Starts smudging these colors Next, moving on to the third mango For that, I'll add a new layer. Select my monoline brush. Select a colour from the reference image, and start drawing our third mango. To add clipping mask this layer, I'm going to add a new layer, tap on the layer, tap on clipping mask, pickup color from the reference image. Select our first brush and start adding color to this mango. Once you're done adding the colors, selects smudge tool with the same brush and starts smudging the colors. Let's move on to the stem. For that, I'm going to add a new layer below the stem. Leah, select a colour from the reference image, select monoline brash. And stopped drawing our stem. I'm going to hide my leaf layer so I can see the stem clearly. Once you're done with the base layer of the stem, we are going to use the same steps, we're going to add clipping mast to this layer. Select our first brush, pick up color from the reference image. And we'll start adding to the stem. Selecting a darker color to add to the edges and the corners. Let's move on to the leaves. And we're gonna unhide my leaf layer and add a new layer and hide mango layer So I can see the leaves clearly. Select a color from the reference image, select Monoline brush, and I'll start drawing on the leaves. You can also keep each leaf with the different colors That will give your illustration an interesting finish. Next, add clipping mask to this layer, Add a new layer, tap on the layer tab clipping mask. Select my first brush, pick up a color from the reference image and start adding on the leaves. Once you're done adding the colors, selects smudge tool with the same brush and start smudging these colors Next to add viens to these leaves, I'm going to add a new layer. Select my technically pen under inking section, select the lightest color from the reference image, and then start adding viens on the leaves. And we are done with our fourth fruit, that's mango.
10. Illustrating: Cherries: Let's start with our fifth fruit that's Cherries I'll start with a quick time lapse for your reference. I have a attached this sketch in the resource section of this class. So you can download the file and follow along. Tap on my cherry canvas. And I'll go to my layers. I have four layers with the sketches. One is with the leaves. The second one is with the stem, fourth with the cherry and the branch. We'll start with the leaves first. I add a new layer. Next I’ll import my reference image for that I’ll go to action, canvas and reference, tap on image, import image, and import your reference image. I'll hide all my other layers so I can see the leaves clearly and pulled a new layer below the sketch layer. Pick up a color from the reference image. Select my Monoline brush. And I will start drawing on the leaves. I'm going to keep all my leaves with different shades of greens. That gives an interesting look to your illustration. For this, you can keep picking colors from the reference image for each leaf. For next step. Add clipping mask to this layer, Add a new layer, tap on layer tap clipping mask. Select my first brush, and we'll start adding highlights and details on the leaves. For this, you can follow the reference image to understand how the light is falling on the leaf The trick I use is to have a little different shade on both the side of the leaves from the center line, I'm adding a shade of brown where the leaf is going to attach to the stem. Once you're done adding the colors, select smudge tool with the same brush and we'll start smudging these colors, while smudging. You can keep adding more Carlos and smuggling them on the same layer. While I'm smudging the opacity of my brushe is around 70%. Next, I'm going to add viens to the leaves For that, I'm going to add a new layer and add clipping mask to this layer Select my technical pen under inking section. Select a lighter color from the reference image. And I'll start adding on the leaves. Let's move on to the branch. I'm going to unhide the branch layer and add a new layer. Pull this layer below the sketch layer. Select a colour from the reference image. Make sure the color is not too dark or too light. Select Monoline brush and we'll start drawing the stem. Next. Add clipping mask to this layer. Select a color from the reference image. Select our first brush, and we'll start adding these strokes on the stem. Once you're done adding the colors, Smudge it with the same brush. Adding a little darker color on the edges and sides, next I'm going to select both the branch layer and pull them below the leaf layer. Let's move on to the stem and a new layer. Pull it below the sketch layer Select the monoline brush. Select a colour from the reference image. And start drawing the stem. Add a new layer and pull this new layer below the leaf, select the monoline brush. And we are going to draw on this tiny attachment between the branch and the stem. Add clipping mask to this layer. Select our first brush, and we'll start adding tiny details on this stem. Select colors from the reference image. Let's move on to the cherries And I'm going to add a new layer below the cherry sketch layer select the Monoline brush, select colors from the reference image. And I'll start drawing and machetes. Again for the cherries too, I'm going to keep all the cherries into different shades of red. Now for the cherries that you need to draw behind the first layer of cherries, We have to add a new layer The new layer below the first cherry layer. And I'll draw a few behind this layer. Again, adding another new layer for the last cherry, pull it below the second cherry layer And I will draw the last one next, adding clipping mask to the fourth cherry layer. Add a new layer,tap on the layer and tap clipping mask. Select colors from the reference image, select our first brush. And we'll start adding on the cherry Now for adding these colors too, I'm following the reference image. Most of them are darker on the sides and lighter in the center. I'm trying to follow that. Even while adding the colors, I'm trying different ways for each cherry Once you're done, we'll start smudging with the same brush. Now once I'm done smudging, I'm going to add the tiny white shine on each cherry. Even for this, I'm trying to follow the reference image. Next, merging it with the same brush and smudging it very lightly. So it doesn't smudge with the base color too much. You can also add this on a new layer. Next, moving to the second, third layer of cherries. And I'm going to follow the same steps. And we're done.
11. Illustrating: Guava: Let's start with the sixth fruit, that's guava. And we're going to start with a quick time lapse. I have this file in the resource section of this class. You can download the file and follow along, tap on my canvas. I'll go to my layers. I have two layers One is with the guava and the other one is the Guava slice. And my first step is to import our reference image. For that I go to action canvas and reference tap on the image, input image and import your reference image. Next I go to my leaders and a new layer, new layer below the sketch layer. We'll start with our full guava with the leaves. I go to my brushes, select monoline brush. Select a colour from the reference image. And we'll start drawing on our force guava. Next, I'll add clipping mask to this layer For that, I'll add a new layer tap on the layer tap clipping mask. Select my first brush, select a color from the reference image and start adding under guava. While you're adding these colors make sure to follow the shape of the fruit. I'm trying to keep the sides on the darker shade and the center area on the light decide. This will give around a shape to the fruits Once you're done, adding, the gallows will start smudging with the same brush. Even while you are smudging, try to follow the shape of the fruit. Opacity of my brush is around 70% when I'm smudging. Let's move on to the second guava. I'm going to add a new layer. Select Monoline brush, select a colour from the reference image, and I'll start drawing. The second guava Will this new layer below the first guava layer. You can give both the guava with a different shade of green. That gives the illustration more depth and interesting look at clipping mask to this layer. Add a new layer, tap on layer and tap clipping mask Select our first brush. Select a colour from the reference image, and then start adding on the guava. I'm trying to follow the reference image. Like for example, the area which I feel should be under shadow, I'm keeping it dark. And the area where the light is falling, I'm trying to keep a few layers of greens, lighter shade of greens. Once I'm done adding the colors, I'm gonna smudge it with the same brush. Next, I’ll add a new layer to add detail at the end of this fruit. Selecting a dark brown color from the reference image and selecting the monoline brush. Let's move on to the stem. For the stem again, I'm going to add a new layer, Pull this layer below. Select Monoline brush, select a light brown color from the reference image. And I'll start drawing the stem. Add clipping mask to this layer and a new layer dab on the Leah and tap clipping mask. Select offers brush. Select a lighter brown color from the reference image and start adding on the stamp, smudging it with the same brush. Selecting a darker brown color for the edges and corners. Let's move on to the leaves. I'm going to add a new layer on the top. Select more Nolan brush, select. And then start drawing on the leaves. Adding a new father leave at the back. Also selecting a darker shade of green for this leaf. Add clipping mask to both the leaf layers. Select our first brush and start adding details on these leaves. You can also pull up a reference image. To add these details. Next, merging it with the same brush. Next to add viens on these leaves, I'm going to add a new layer for both the leaf layers and add clipping mask to them. And I'm gonna select my technical pen under inking, say select a lighter color. And I'm gonna start adding weights to these leaves. Next before moving on to the next part of the guava, I'm going to group all the layers off the first guava Let's start with a guava slice. I'm going to start by adding a new layer, pulling it below the sketch. Leah, selecting monoline, selecting a green color from our previous guava. And I'm gonna start join under slice. Add a new layer for the inner area of the guava. Select a color from the reference image, and I'll start drawing Add clipping master this layer. Select aka elephant, the reference image. Select offers trash. And I'll start adding details on this slice. Next to add seeds, I'm gonna use my technical Ben from inking section. Select a yellowish color from the reference image and now start adding seeds on this slice. Next adding clipping mask to the green part of the slice. To add details. I'm gonna select my first crash and follow the same steps. I just feel the red part of the slice feels a little dull So I'm gonna select the detail layer of this slice, go to adjustment curves and layers Now I'm gonna adjust the first option until I feel it's bright and nice. I'm gonna do the same with the seed layer because I can't see them too early. Next, moving on to the second part of to slice. And we're gonna add a new layer. And pull the new layer below the first slice layer And I'm gonna follow the same steps we did for the first slice. And we are done with our sixth fruit, that's guava. Now let's turn these fruits into a seamless Pattern
12. Seamless Fruit Pattern: Let's turn all of these foods into a seamless pattern. My first step is to duplicate the stack. So we have our original saved. I'll rename my full stack as fruit working. So we know which one we are working on. Tap on the stack. Now, I'm going to merge all the layers of each fruit. So we have each fruit on one layer. If you merge all the layers directly that doesn't work. We have to first merge the clipping mask of each part Once you're done merging clipping mask of each part, you can then merge all the layers together. Now we have the whole fruit on just one layer Next I'm going to repeat this for all the fruits. Next I'm going to create a new canvas, which is a little bigger than our fruit canvas. Our fruit canvas is 4 thousand by 4 thousand. But now and create a canvas which is five thousand, five hundred thousand pixel. And I'm going to pick up all the fruits and drop into this canvas. Once you're done dropping all the fruits into this canvas, I'm going to start splitting and arranging them. Once you are ready with your repeat block, create a new canvas much bigger than this, which is 8 thousand by 8 thousand pixel. That gives you six layers. Create this canvas. Go back to the gallery. Tap on your repeat block. Drop this repeat block into the bigger canvas. Make sure you're snapping and magnetic is on and you start blocking them. Next, you can change the background and see what looks better with the fruit. And if you upload this onto soceity6, it looks like this on the products.
13. Fruit Stickers: Let's see how these fruits looks when turned into stickers Now my first step for the stickers was to get all the fruits onto A4 size sheet, hide the background, and create outline with the soft Airbrush. I made a few of them on a transparent material like this guava. If I stick this onto a white base, it looks like this. And few on a white opaque base. For that you have to stick it on a darker base. And that's how these fruits illustrations look as the stickers.
 Vinita Upadhya, Illustrator & Pattern Designer