Transcripts
1. Introduction & What You’ll Learn: Hi, My name is Vinita I'm an Illustrator and a Pattern Designer based in Singapore, This class is about Macrame in Procreate I will be teaching you how to create three custom brushes for Macrame chords And with the help of reference image, we will be creating three different types of Macrame Plant hangers, first with basic knots Second with detailed knots and third will be a double Macrame plant hanger, For the plants I will be using my Leaf shaped brushes which you can refer to my previous class on Custom Leaf-Shaped Brushes You can sell this as an art print on your Etsy shop or Print-on-demand sites like Society6 and Redbubble Thank you for joining this class
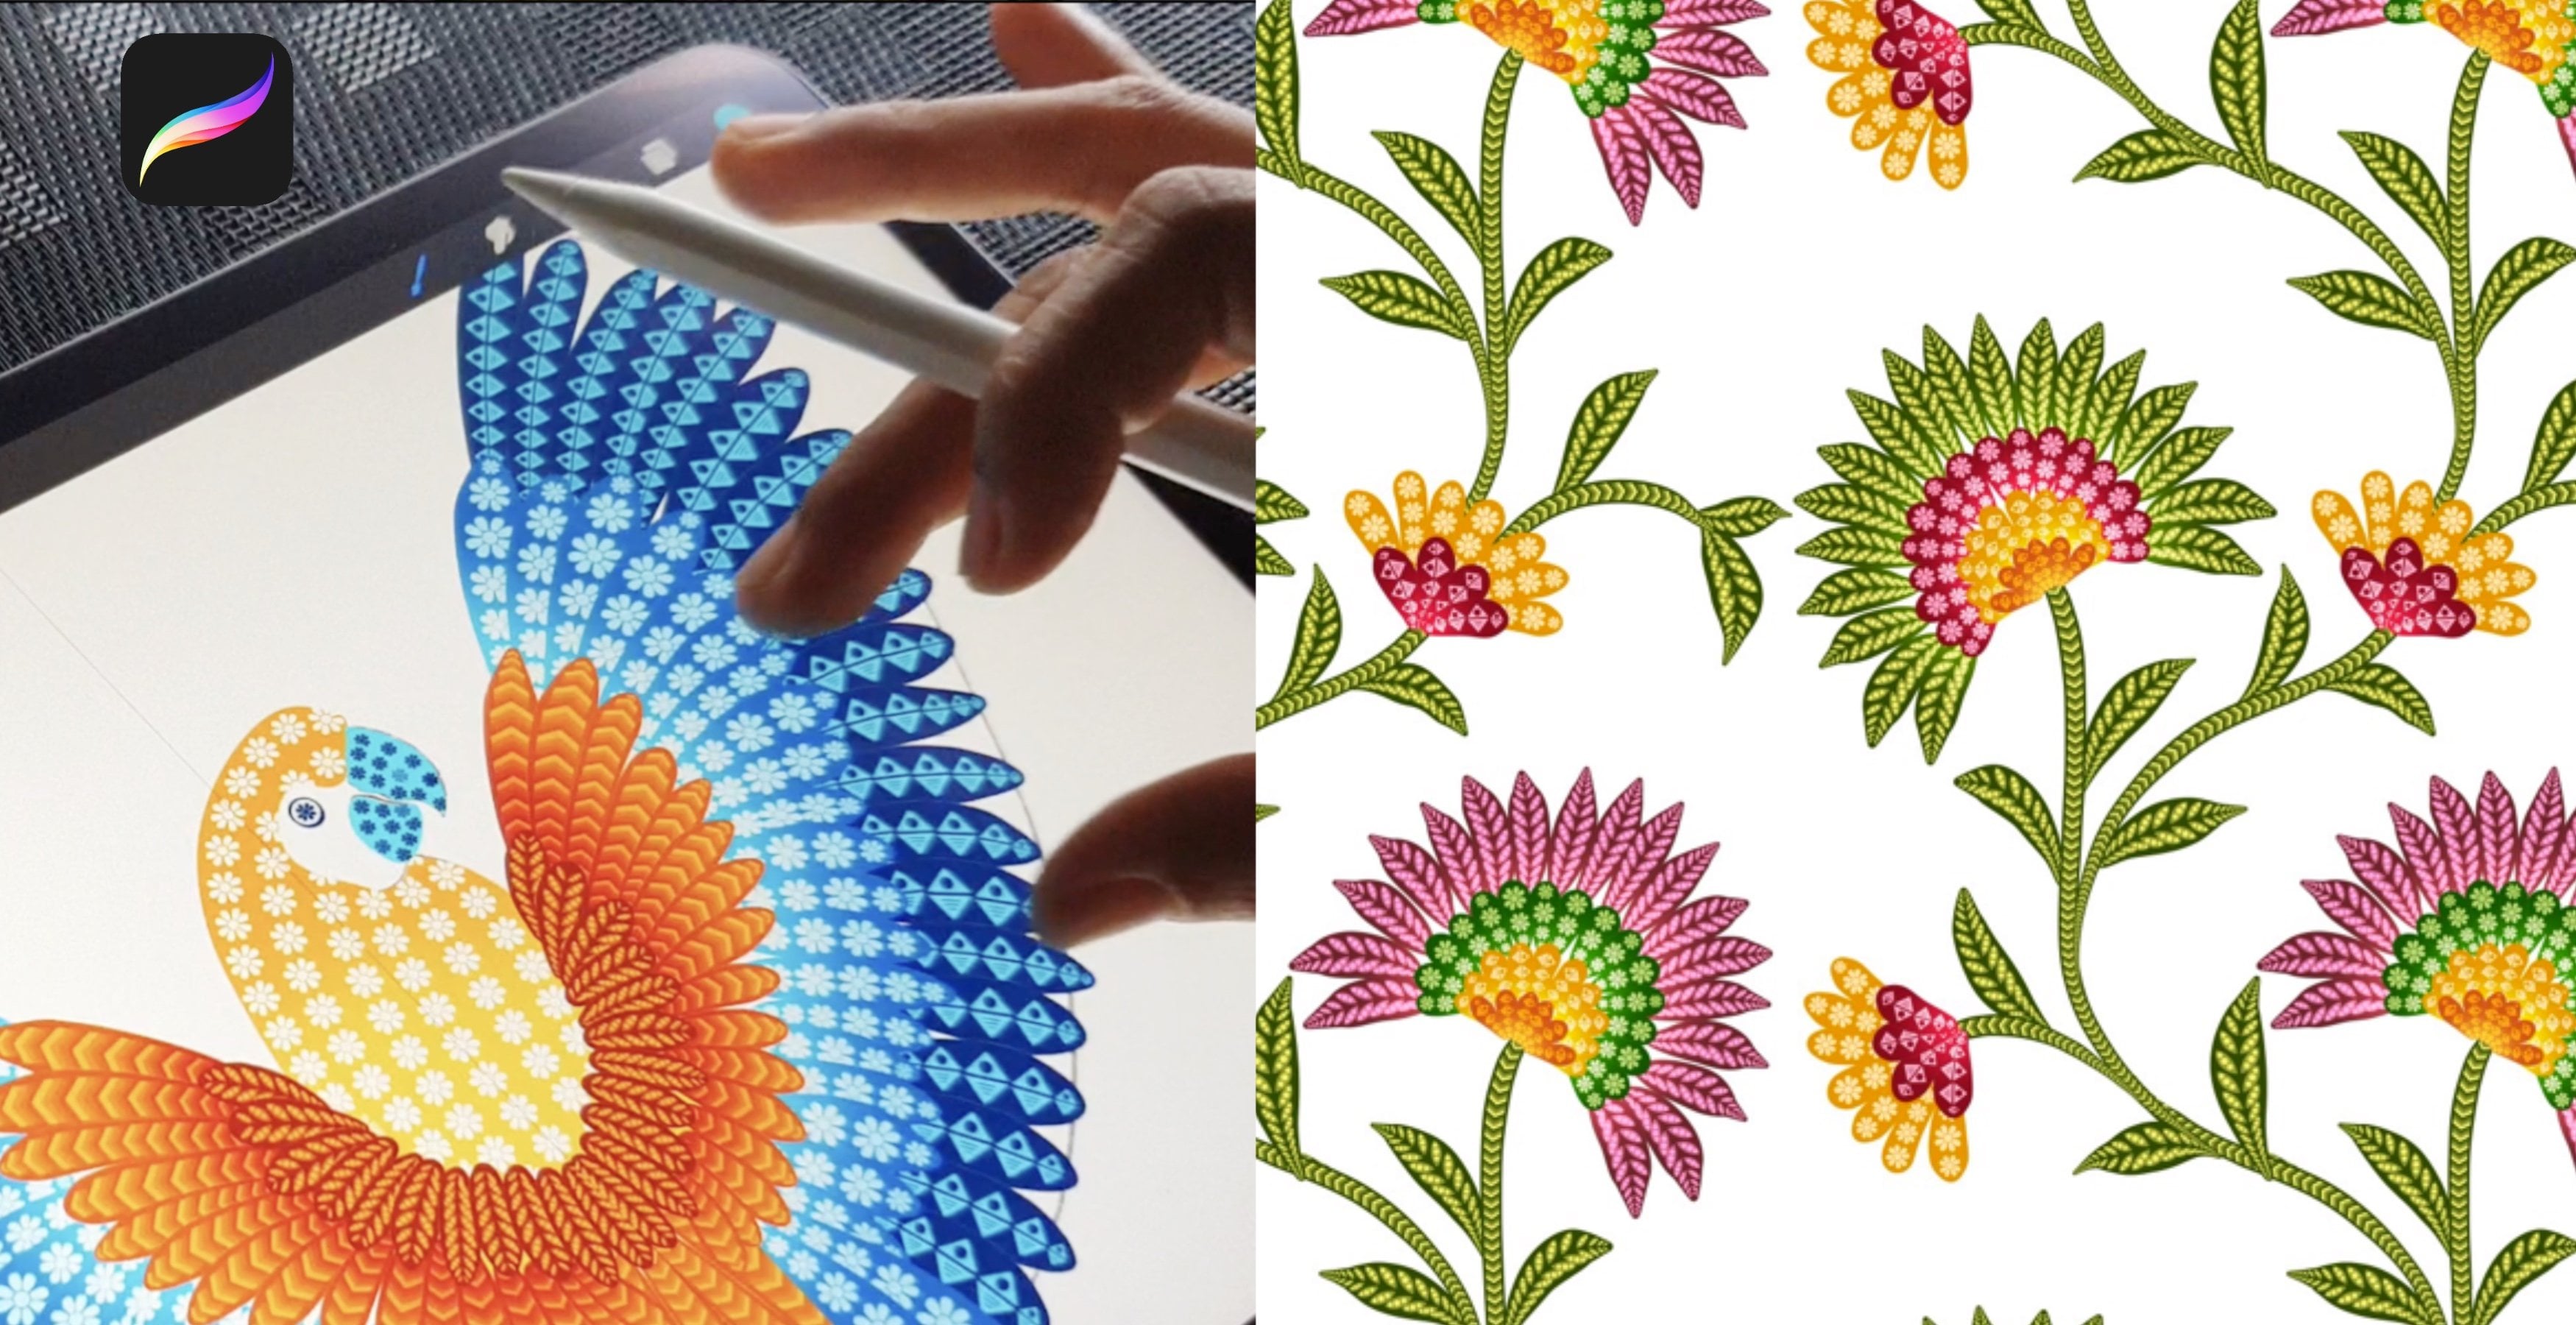
2. Canvas & Brush Setup: Let's start with our canvas and brush setup I will tap on the plus sign and create a new canvas Mine is 3 thousand by 3 thousand pixel with 300 dpi, which is standard for printing And I'll tap on create I will tap on gallery again and duplicate this four times Now, I will stack them together I'm just holding and dropping on another canvas I will rename this stack as Macrame Open the stack and rename each Canvas The first one, I will rename as Brushes The second one as Plant pot 1 third one as Plant pot 2 And the fourth one as Plant pot 3 Now we are done with our Canvas Let's move to brushes We’ll go to brush library and we'll add a section, tap on the plus sign And we'll name this as Macrame Now here in this library, we will be creating our own custom brushes that will look like ropes and strings that we use for Macrame Our next step will be to go to Calligraphy and duplicate the brush Monoline And move this to our Macrame folder And duplicate this three times because we will be creating three custom brushes There's another brush library that we need for this class Thats Leaf library We need this library to draw the plants in the pot And I already have a class on how to create these brushes You can go back and check the class Now let's move on to creating the Macrame Brushes
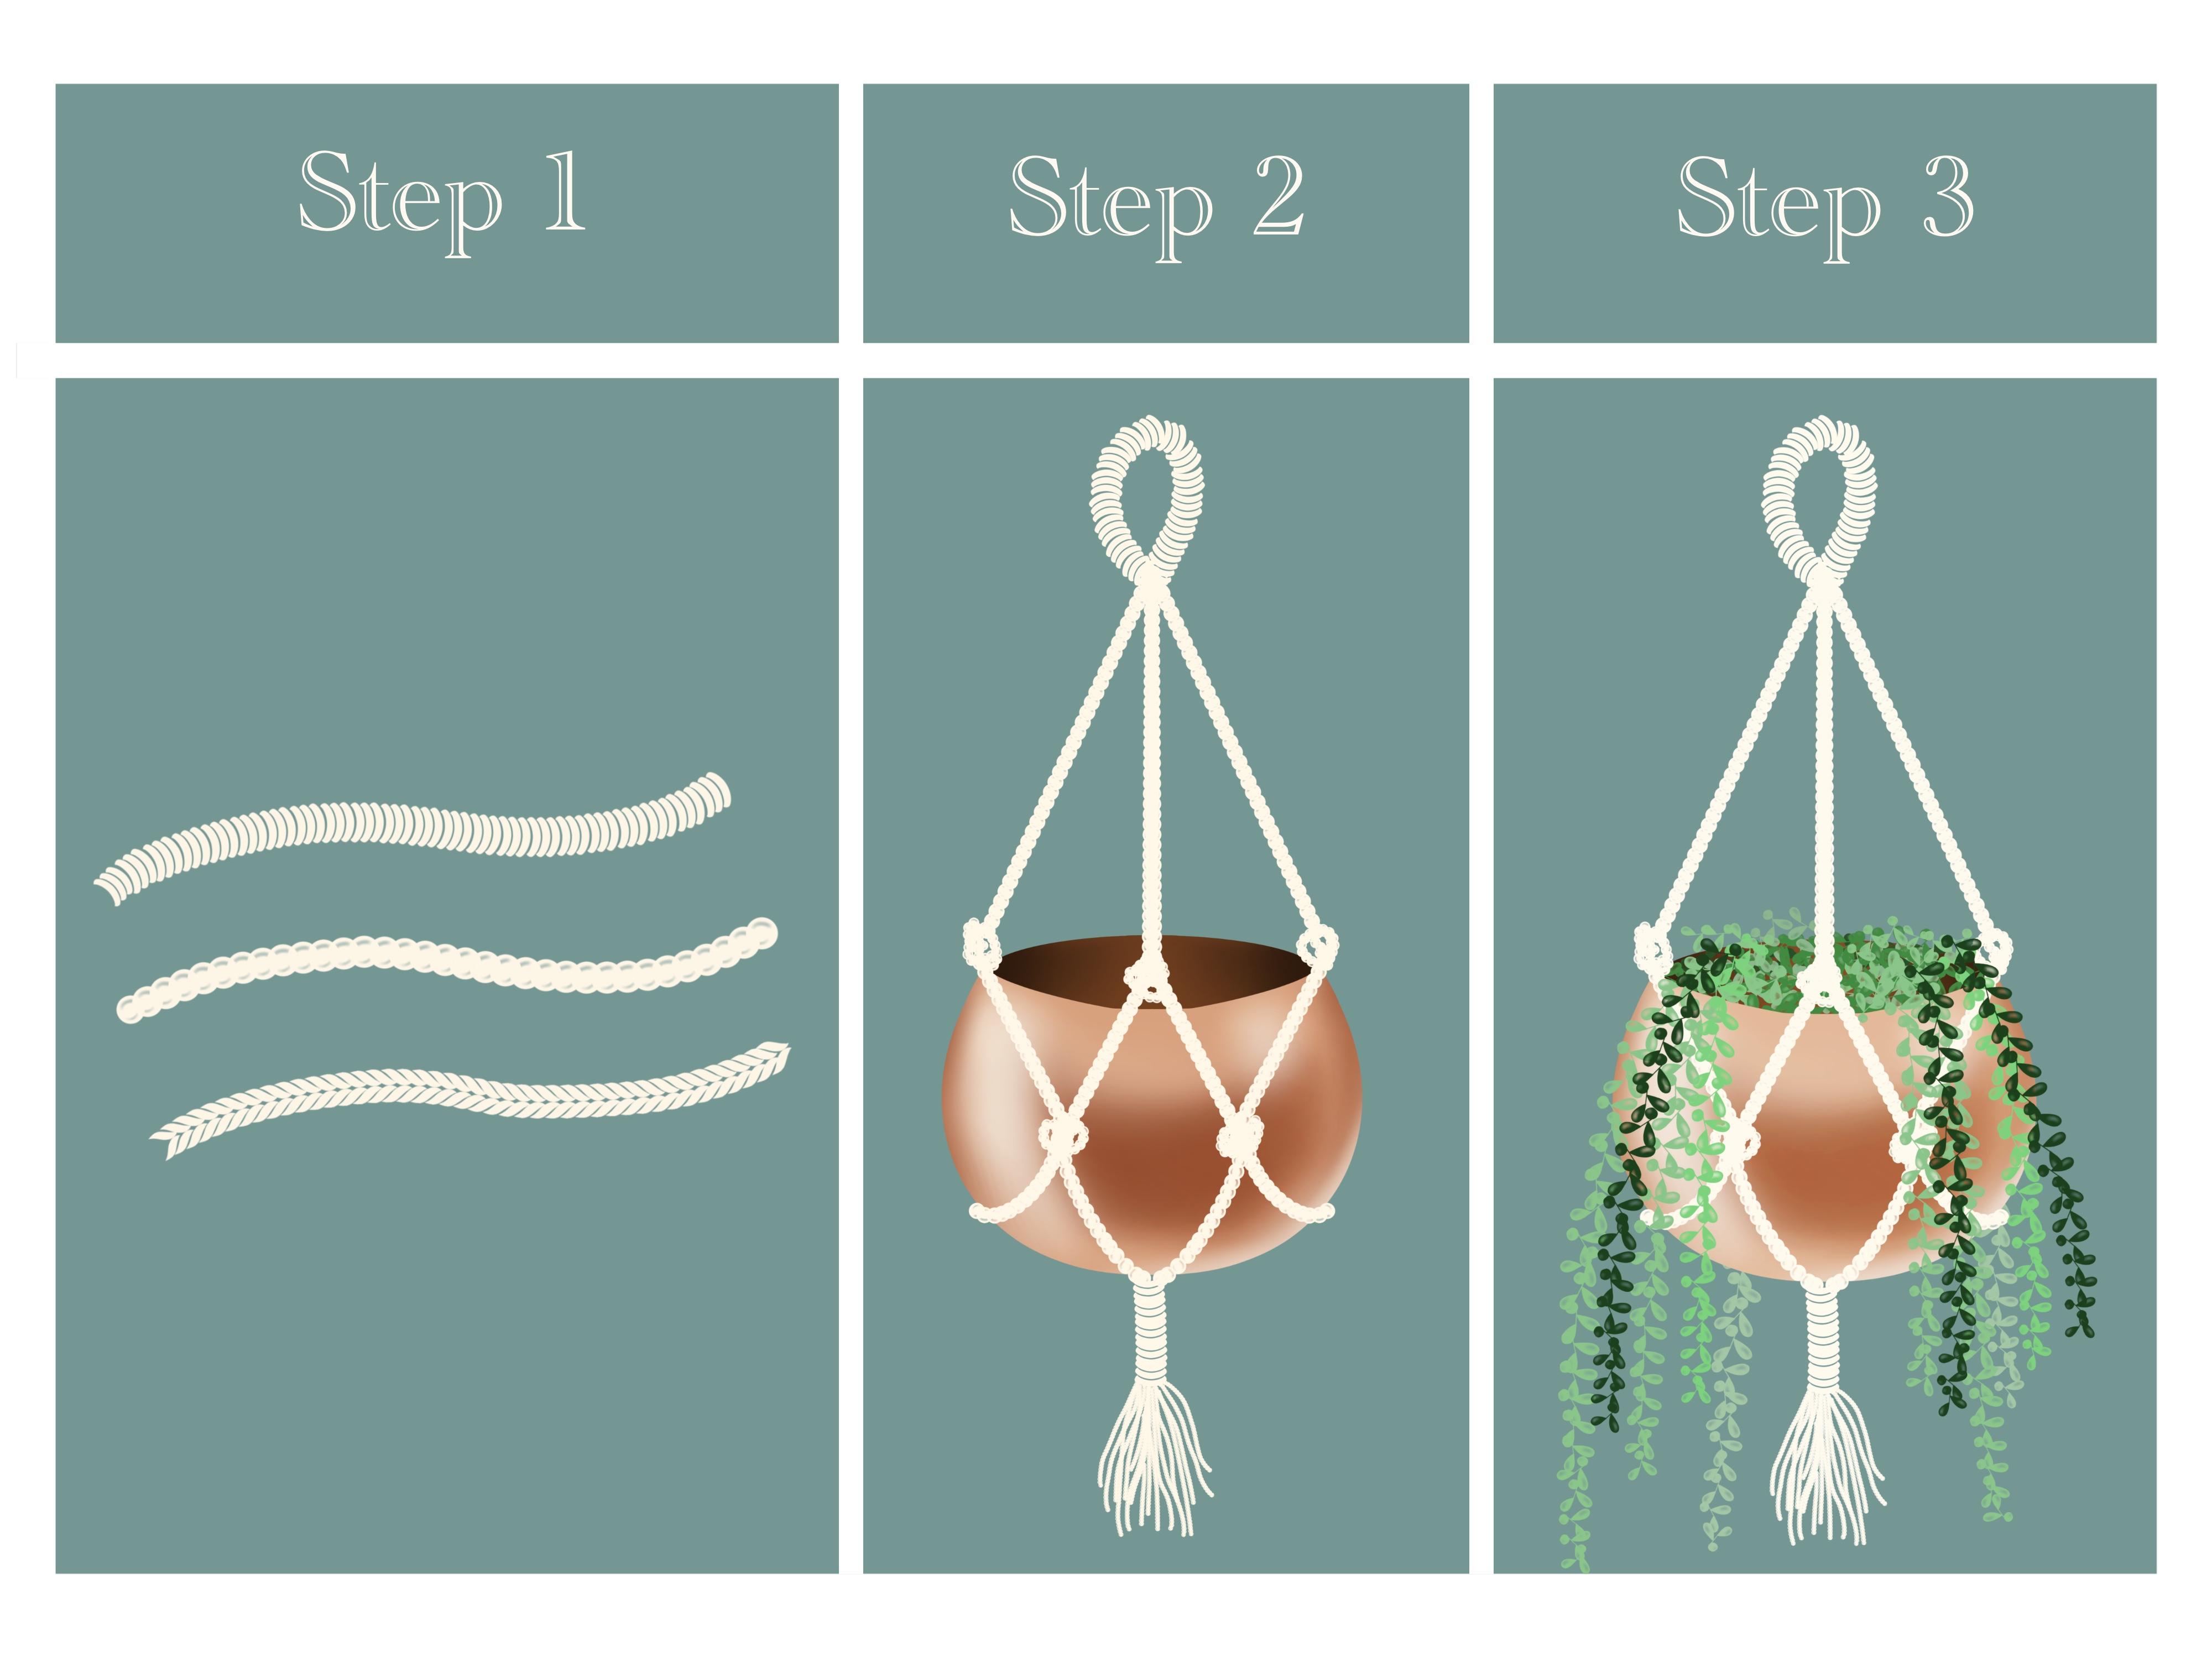
3. Brushes: Let's start with our Macrame brushes Will go to our first brush canvas and add our drawing guide Go to action Canvas, drawing guide and edit drawing guide Now go to Symmetry, Option, Horizontally and Done Next I will pick up my Monoline brush and I will start drawing a crescent shape thick curve, make sure your drawing is black and the background is white in color It's only then you will get a opaque and a clear brush Make sure under selection your magnetic and snapping is on This helps you with the guidelines while you're moving your illustration Next, duplicate this layer, two times and move it with equal distance between each other Next, group all the layers And we will export this, Share JPEG and Save Image Next I will hide this layer and add a new layer will go to our first duplicate Monoline, tap on Shape, Edit Import, Import the photo And Import our Illustration Now tap with two fingers on this image that will invert the image and done, next tap on Properties, maximize the size Tap on Shape again and Rotation to 100%, tap on Stroke path and Spacing Keep adjusting until you're satisfied Let's try this on the drawing pad I will clear the drawing pad And yeah, that looks perfect Now we'll go to About this brush and rename this brush I will rename this as Rope And done I will try this on the canvas That looks perfect Now let's move on to our second brush Go to action Canvas and Edit Drawing Guide Tap on Symmetry Option, Vertical and done For this brush, I'm going to start drawing like a shape of a leaf with the black color Again, make sure you're background is white and your illustration is black in color Next, select this layer and rotate and fit it to the screen Next to export will go to Action Share, JPEG and Save Image Next move to our brushes and tap on our second duplicate Monoline Go to Shape Edit , Import, Import a photo Import our illustration, tap with two fingers on this image that will invert the image and done Next go to Properties Maximize the size Go to Shape, Rotation to 100%. Go to Stroke Path and Spacing until you're satisfied Next, let's rename this brush and go to About this brush and edit the name here I'll rename this brush as braid and done Now let's try this on the Canvas This will give you a flat weave effect of Macrame cord Now let's move to our toward brush. I've picked up my Monoline brush and drawing a Circle Hold it, Edit Shape And Circle, fill this with black color Select this circle and fit this to the screen Next I'll go to brushes Pick up my soft brush under a Airbrushing Select white And I will add a small stroke on the top and a bigger stroke at the bottom Next, I will save this as an image I'll go to Action, Share, JPEG and Save Image Next go to layers I'll hide this layer, add a new layer, go to my brushes Under Macrame, I'll tap on my third duplicate Monoline Next tap on Shape, Edit, Import, Import a photo Import our illustration, tap with two finger on this image that will invert the image and done Next go to Properties Maximize the size, go to Shape, Rotation to 100%, tap on Stroke Path, Spacing until you're satisfied Next to rename this brush, I’ll go to, About this brush and you can rename here I'll rename this as Pearl And done I'll try this brush on the canvas We're done with all our three brushes Now we'll move on to our first plant pot
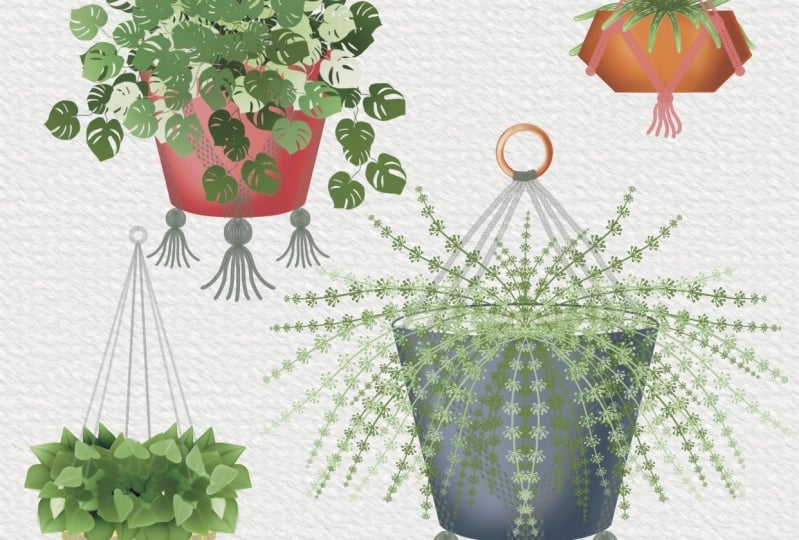
4. Macrame Plant Pot 1: Let's start with the first plant pot I'll open my first plant pot canvas My first step will be to add guidelines to this canvas For that I’ll go to Action, Canvas, Drawing guide and Edit drawing guide, tap on Symmetry, Option And make sure Assisted Drawing is switched on and done Now I will add a reference image to this canvas You can go to Action, Canvas and Reference Next tap on image, Import image and I will import a reference image Next on a new layer I'm going to select one of the color from the pot This color needs to be Mid-tone (color between lighter and darker) Next I will select a brush to draw the pot Go to brushes, go to Inking and pick up my Studio Pen And I will start drawing my pot Next I will add another layer on the top and pull it below the pot layer This layer is to draw the backside of the pot I am going to select a darker shade of the same color Make sure the drawing assist on this layer is on I'm drawing a curve shape and filling it with the same dark color Next we will Alpha lock our pot layer To add highlights and shadows to the pot I'm going to pick up my Soft brush under Airbrushing, select one of the darker tone from the reference image And I will start adding the highlights from the center towards the side Now I will remove the drawing assist for this layer because I need to add highlights to just one side of the pot I don't want it to repeat on the other side I'll select one of the lightest shade from the reference image and start adding and one of the side Now selecting one of the dark color and adding on the sides Next to smoothen the hard lines, I'm going to select the same Soft brush from the smudge library Next, I will Alpha lock the second layer of the pot To add highlights and shadows I will select a darker shade of the same color with the Soft Airbrush And we'll start adding on the edges Now with the lighter shade of the same color I’ll highlight in the center Next we'll add a new layer and tap on drawing assist I'll change the color of the background to a darker shade as the color of the Macrame cord is lighter too Next I will select one of the brush we created for Macrame I'll select our third brush, that's pearl And select an off-white color I will refer to our reference image I will not be drawing the same, but this will help me balanced the knots and the cord position I'm drawing lines and holding them until it turns straight And make sure when the cords are around the pots to give it a slight curvier lines, like they're wrapping around the pot Now with the same brush I'm going to add knots near the meeting points of these cords Next, I'll select my Rope brush And with the higher brush size, I'm going to make the knock on the top And the second one at the bottom Now for the fringes at the bottom I'll go back to my Pearl brush and reduce the size and start adding tiny fringes at the bottom Our next step is to drawing our plants For that, I'll add a new layer and we will need our Leaf brush library For this brush library you have to refer to my previous class where I'm teaching you how to create this brushes I am going to select one of the lighter green And I'm going to use one of the succulent plant brush for this Plantpot You should also use a reference image for any plant that you want to draw, because that will help you see the fall and the shape of the leaves Also, while drawing the leaves, I'm going to use different shades of the greens to give it a more depth and interesting look to the plant I'm adding another layer that goes behind the pot to add plants on the other side of the pot Now covering the whole mouth of the plant pot And we are done with our first Macrame plant hanger Let's move on to our second one
5. Macrame Plant Pot 2: Let's start with our Macrame Plant Hanger 2 I'll tap on my third canvas And my first step will be to insert our reference image We'll tap on Action, Canvas and Reference Tap on Image, Import image & Import our reference image Now my next step is to add Drawing guide to this layer I’ll go do Action, Canvas, Drawing guide and Edit drawing guide Next step on Symmetry, Option, Vertical and Done I will select a dark brown color for the pot Select my Studio Pen under Inking section and start drawing my plant pot Next, I'm going to add a new layer And we'll pull this below the pot This is to draw the back side of the pot I'll draw with a darker shade Make sure you're Drawing assist is on, tap on Drawing Assist And start drawing a curve and fill it with the same color Now, Alpha Lock the pot layer To add highlight and shadow to the pot I'll select my Soft brush under Airbrushing and select one of the lighter color of the same shade, and start adding highlights in the center of the pot Now selecting a darker shade of the same color And add on the sides Again, selecting the lighter color and adding on the edges Smudging with the same Soft Airbrush Now Alpha Lock the second pot layer Now select the darker shade of the same color And I will add on the sides Now selecting a lighter shade and adding in the centre Next we will select a darker shade for the background so that our Macrame cord will be visible as it needs to be of a lighter shade I'm adding a new layer for the Macrame cord, select one of the Macrame brush, from the brush library I'll select rope Select an off-white color Make sure you're drawing assist is on, on this layer Draw straight line starting from the edge of the pot and hold until it gets straight For the next string, I have reduced the size of the same brush, and you draw another string Next I'm going to select our second brush that's Braid Reduced the size, and start drawing another pair of string from the edge Now back to my Rope brush I'm going to draw a string in the centre Now, I'll refer to the image and I will start drawing my version of the same style I'll try to keep the cords around the pot on the curvier side So it looks like it is wrapped around the pot We're using these different types and texture of the cords on the same pot So it looks more detailed Macrame hanger I'm going back to my Rope So I can make a couple of strings that goes at the back Now for the next step, we don't need the drawing assist on So I'm going to tap drawing assist I've increased the size of the rope brush and I'm making a thick cord at the end to hold all the fringes For the fringes, I have reduced the size of the same rope brush Again, a thick cord on the top Now I'm selecting all the layers so I can take my illustration a little lower And again, putting on my drawing assist on, on this layer Because I feel I need to add more details at the bottom For the next step, I'm adding another layer for a wooden loop At the top. For this loop, I'm going to pick up my Monoline brush from Calligraphy And I'm going to draw a circle Hold it, Edit Shape And you get these nodes where you can adjust the shape and the size of the circle And going to place this on top of our Macrame Next I'm going to alpha log this layer and select my Soft brush Under Airbrushing, I'm taking this image as my reference for the loop I want my loop to have the look of this loop in the image I'm going to fill this loop with the yellowish color and select a darker color to add shadows Next I'm going to add another new layer This layer is for adding cord around the ring I'm going to pick up the same colour from the cord and pick up my Rope brush and reduce the size And I will start adding tiny loops around the wooden loop To make this hanger On the heavier side, I'm going to add fringes, even in the top Now we are done with our pot Let's move to our plant I'm going to add a new layer for the plant And I'm gonna put this on the layer above Macrame layer For the plants, we need our Leaf brush library, for which you have to refer to my previous class Where I'm teaching you how to create these brushes, I'm going to select my Fern brush and select a green color Now we don’t need the reference image here And I will start drawing my leaf And pull it between the Pot layers The leaf can be shown on the backside of the Macrame I'm going to use different shades of green for the leaves That gives a more depth and interesting look to the plant And we are done with a second Macrame hanger plant pot Let's move to our third one
6. Macrame Plant Pot 3: Let's start with our third Macrame Plant pot I'll open my fourth canvas And my first step will be to import the reference image For that you have to go to Action, Canvas & reference, Next go to Image, Import Image and Import our reference image, next I will switch on my drawing guide on this layer Go to Action, Canvas, Drawing Guide and Edit Drawing Guide, next go to Symmetry, Option, Vertical And make sure your Assisted drawing is switched on and done Next, I will change my background to light pink select my Studio Pen under Inking section And I will start drawing my Pot Next I'm going to add a new layer and pull it below the pot layer to draw the back side of the pot For the back I gonna take a darker shade of the same color Tap on the new Layer And tap on Drawing Assist And I'll start drawing a curve, fill it with the same color Now I'm going to alpha lock our pot layer To add highlights and shadows Select my Soft brush under Airbrushing, select a lighter tone of the same color I will start by adding the lighter tone in the centre first, Next, select a darker tone Only for the sides Again, a lighter tone and very lightly on the edges of the sides Now Alpha lock the second layer of the pot And with the lighter color I will add in the center And next select the darker color of the same shade and add on the edges on the side Next group, both the layers and duplicate the group Now select one of the group and make sure under Snapping, your Snapping and Magnetic is on That helps you with guidelines while you're moving your illustration I will move one of the pot below and also increase the size of the pot slightly Next, I'm going to add a new layer and tap on drawing assist And I will start with that Macrame Hanger I am going to select one of our Macrame brush The third one, that's Pearl And I'll start with the Knits first You can refer to the reference image to choose the placement of your knots For this plant hanger, I'm using our Pearl brush by reducing the size and using it with multiple strings Makes sure the strings around the pot are on the curvier side That makes it look like it is wrapping around the pot The string on the top should always be on towards the straight side because that is where the weight is going so the strings are pulled and they are looking straight Next, I'm going to select our rope brush with the higher brush size And I'm going to put a big knot on the top Now let's move on to the second pot Again with the Rope brush, I am going to add knot in the centre Now for the fringes, I am going to tap on my layer and tap on Drawing assist because I don't want to be on the symmetry side, I want them to be uneven Next, a thick loop on the top with the Rope brush to hang the pot A misses few strings in the lower pot And we're gonna go back to my pearl brush, tap on Drawing Assist Select my off-white color and add few strings So we are done with our pot Let's move to add some plants in this pot For the plants we’ll need our Leaf library for which you have to refer to my previous class, where I'm teaching you how to create these brushes for this pots I'm going to pick up my String of Nickels brush Pick up a nice green color And I will start drawing my plant Again for the plant, if you're using a reference image, it will give you a good idea about the fall and the shape of the leaves I am going to select different shades of greens for the plant That gives a more interesting and depth to the plant You can also play with the size of the leaves to make it look more natural Make sure to cover the whole mouth of the pot That makes it look more natural and beautiful And we are done with one of our pot. Let's move on to the second one Now again, adding a new layer for our second plant Move this layer below our Macrame layer Now I'm going to select my ZZ leaf brush Select a nice dark green Sorry, this layer needs to be between the pot And I'll be drawing the plant And we are done with our Third Macrame Plant Pot
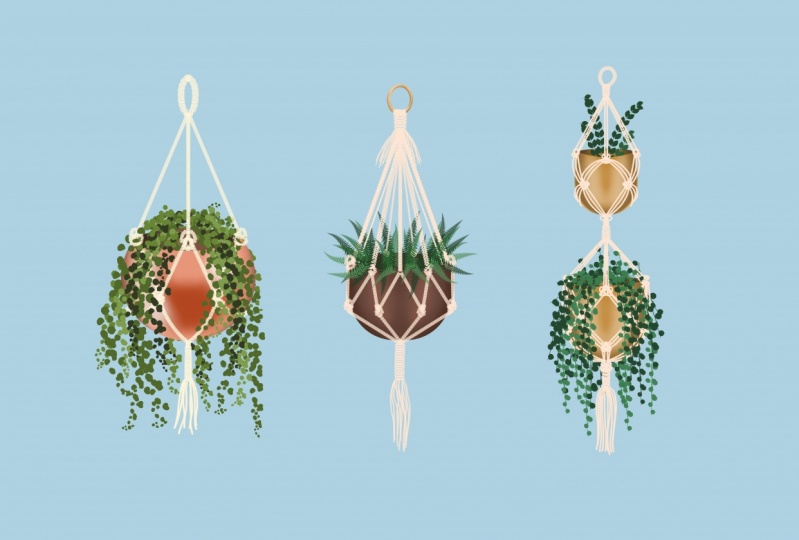
7. Composition & Class Project: Let's move to our composition and the Class project Now for the canvas, for the composition needs to be bigger It should be twice the size of the canvas we made for the illustration So I'm taking this as 6 thousand by 4 thousand Pixels Now our next step is to get all the three Macrame plant pot into this canvas I'm going to rename this canvas as Macrame House Plants I'll go to my first plant pot and group all the layers Duplicate this group, the group, and merge all the layers Now pick up that one layer, tap on gallery and drop this into our big canvas I'm going to repeat these steps with the remaining two plants and import them into this canvas Next I have grouped all 3 illustration and make sure you're snapping and magnetics are on So while moving the illustration, you can have the guidelines Next, I'm going to change the background for this illustration I'll make it a little light blue and export this as an image Go to Action, Share, JPEG and Save Image I have uploaded this artwork on Print-on-demand site, Society6, to see how this looks on a Commercial product Now for the class project, you can create your own Macrame Brush and Plant pot You can use these brushes for Lettering or Art Print or Repeat Seamless Pattern Post image of your complete artwork in the class projects section, I would love to see them
 Vinita Upadhya, Illustrator & Pattern Designer