Transcripts
1. Introduction & What You'll Learn: Hi, Amenita, an illustrator and a designer
based in Singapore. And in this course, I'm going
to show you how you can create a dual color chain
brush in Procreate. I will start this
class by showing you a few examples of the brushes that I have already created. This will help you visualize
the shape you need to create to achieve your
desired chain brush. Next, I will be
explaining you how a dual color brush works and how to choose color
for these brushes. Then we will move on
to our next step of creating our own
brush from scratch. We'll start by creating
our shape for our brush. Once we are happy with the
shape, highlights and shadows, we will move on to
the brush settings, and I will be taking you step by step to create these
dual color brushes. Next, I will be showing you
a lot of tips and tricks and comparison between
how each setting or adjustment can
improve your brush. So I will see you in the class.
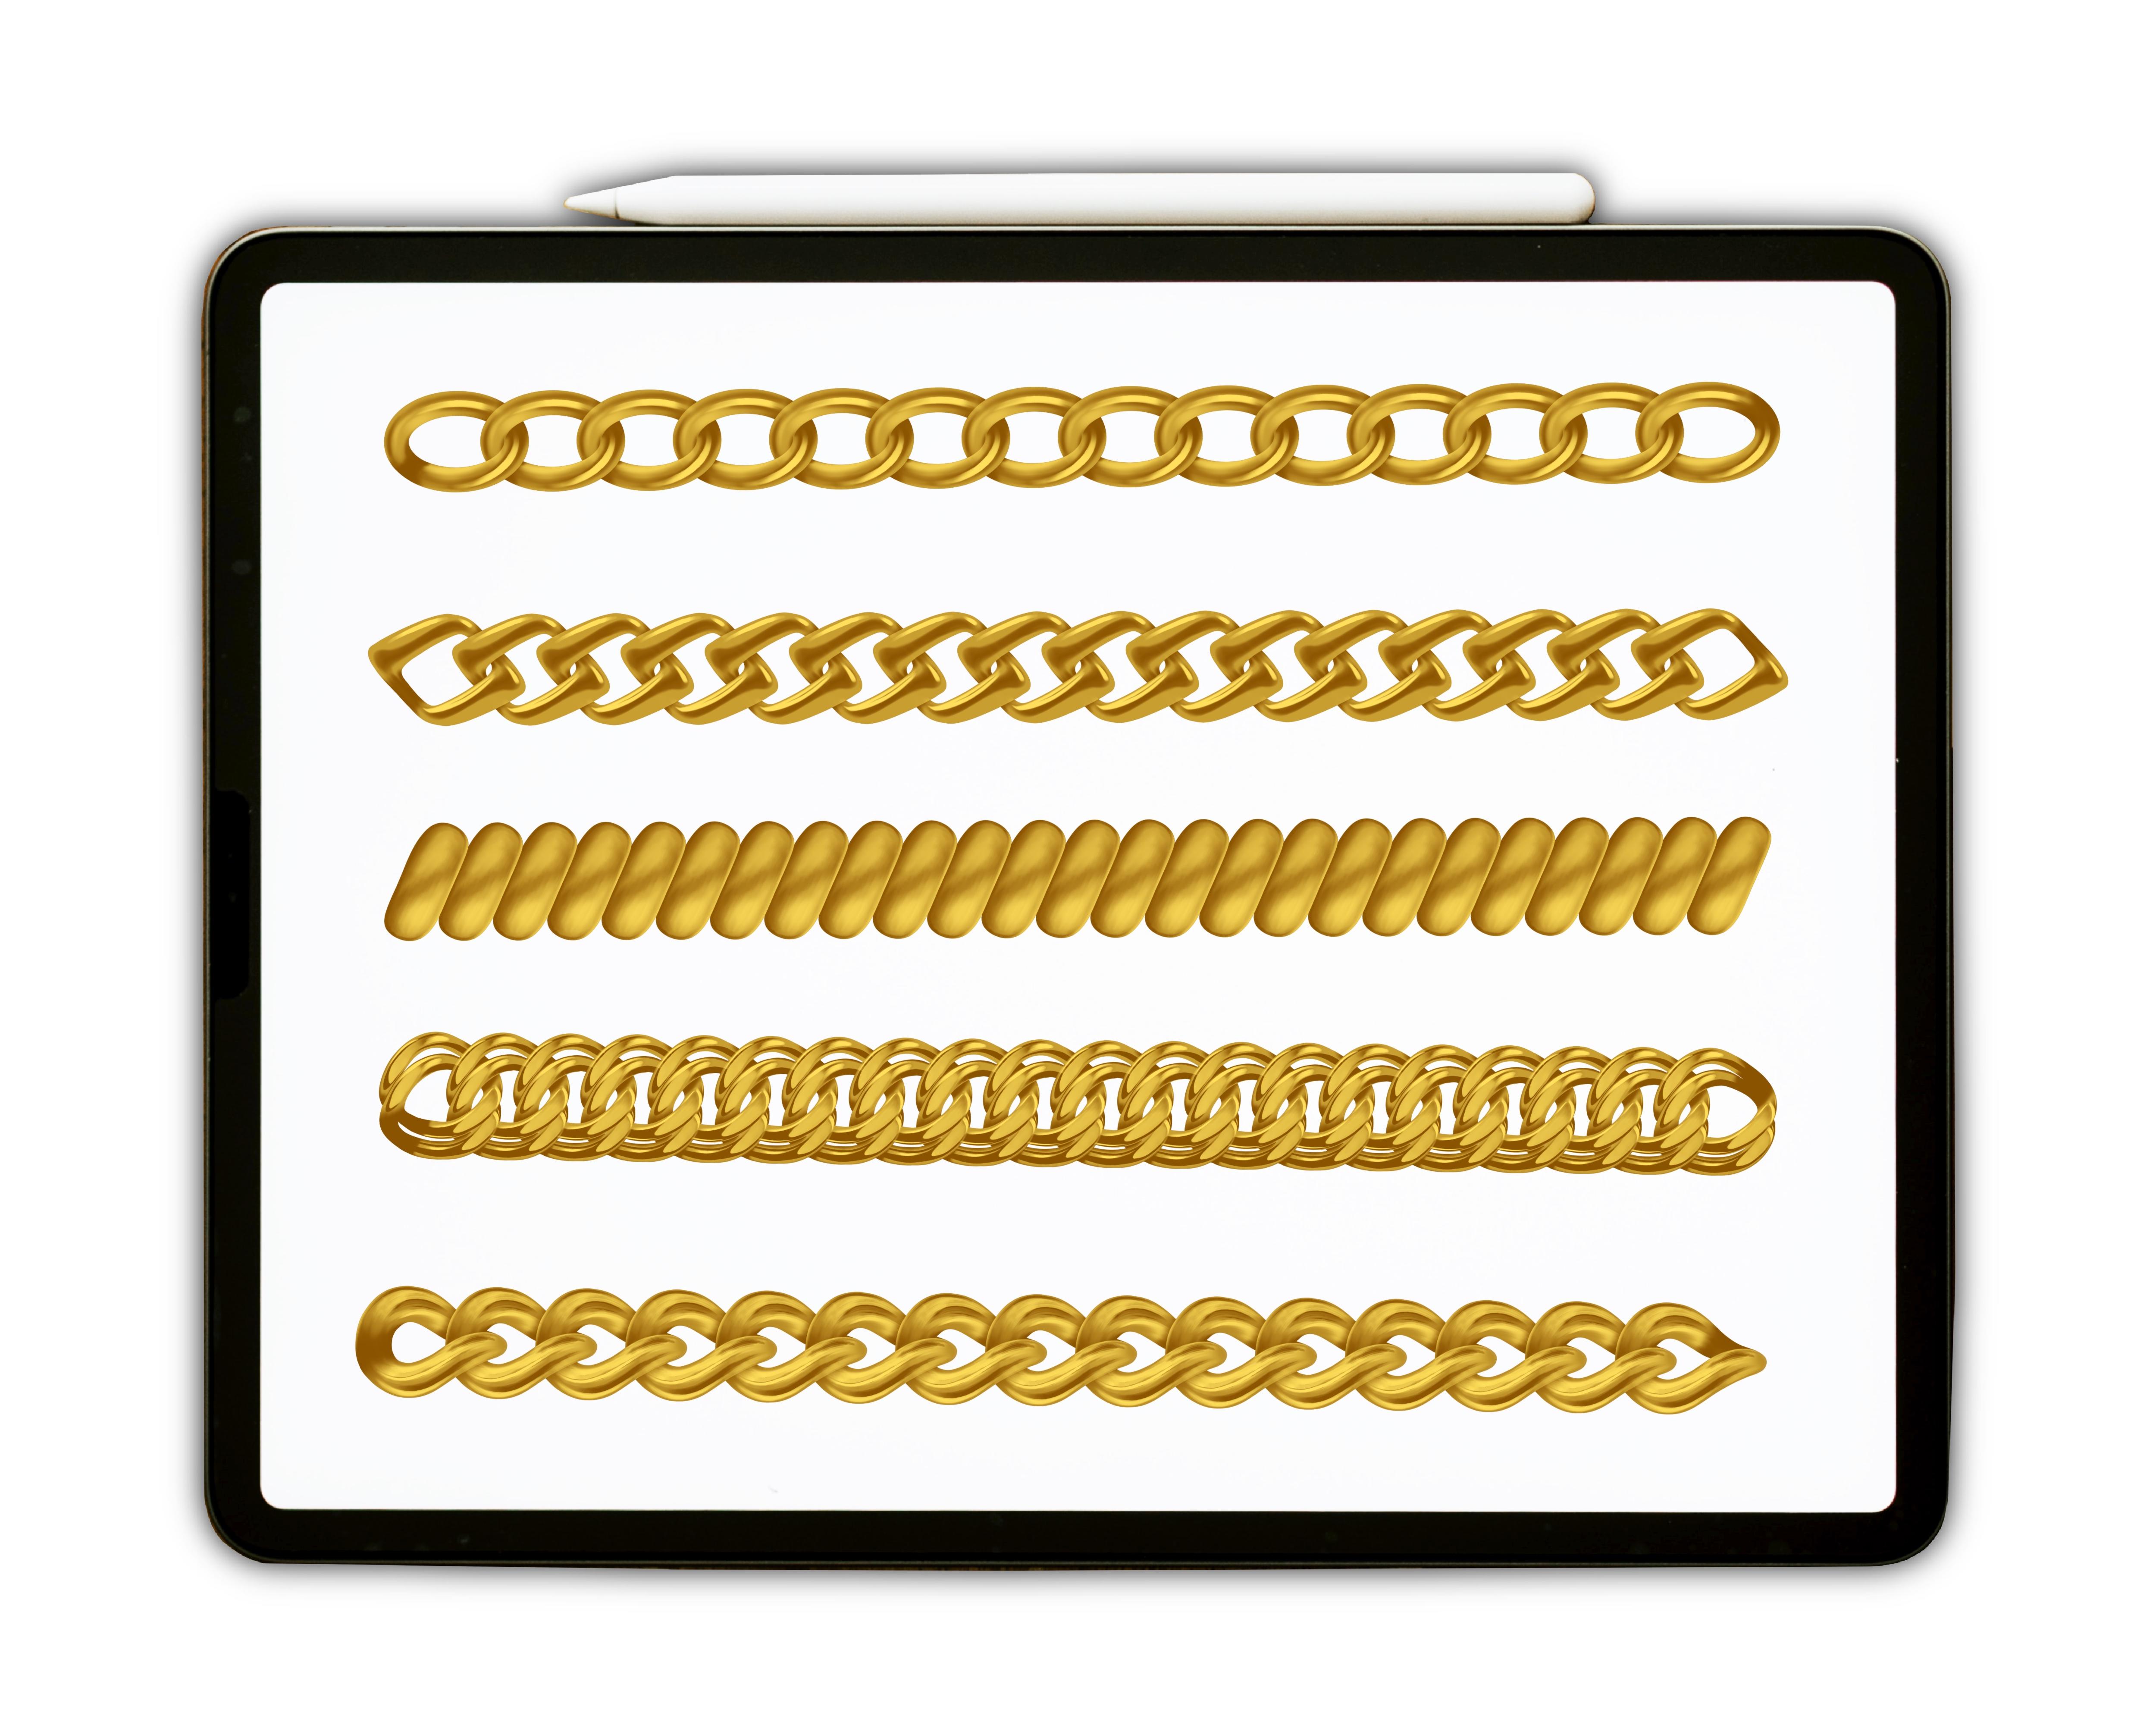
2. Project & Examples: For your class project, you can create any chain
brush of your choice. There are plenty of examples, tips and tricks for you to
decide on your project. So I want to show you a few examples before we
even start the class, so you can even choose
a shape of your choice. This is how the
brush looks like, and the shape I use to create this brush is looking
something like this. This is the second example. And this is the shape I
use to create this brush. If you see where the
brush is overlapping, I have these white shaded areas. When you choose the shape
you want to create, you have to visualize where these rings
will be overlapping. This is the third example
with the pearl effect. They are not overlapping as, but you can
experiment with a lot of different shadings and
highlights for these. This is another example which can look slightly
complicated at first. But if you give
some extra time to the details and the shadings, you can achieve a very realistic and a beautiful three D brush. Here is another example. This has a very braided effect, and this is the shape I
used to create this brush. I hope these examples
have inspired you to create your own
unique chain brush. I will be looking forward for your beautiful chain brushes in the project section
of this class.
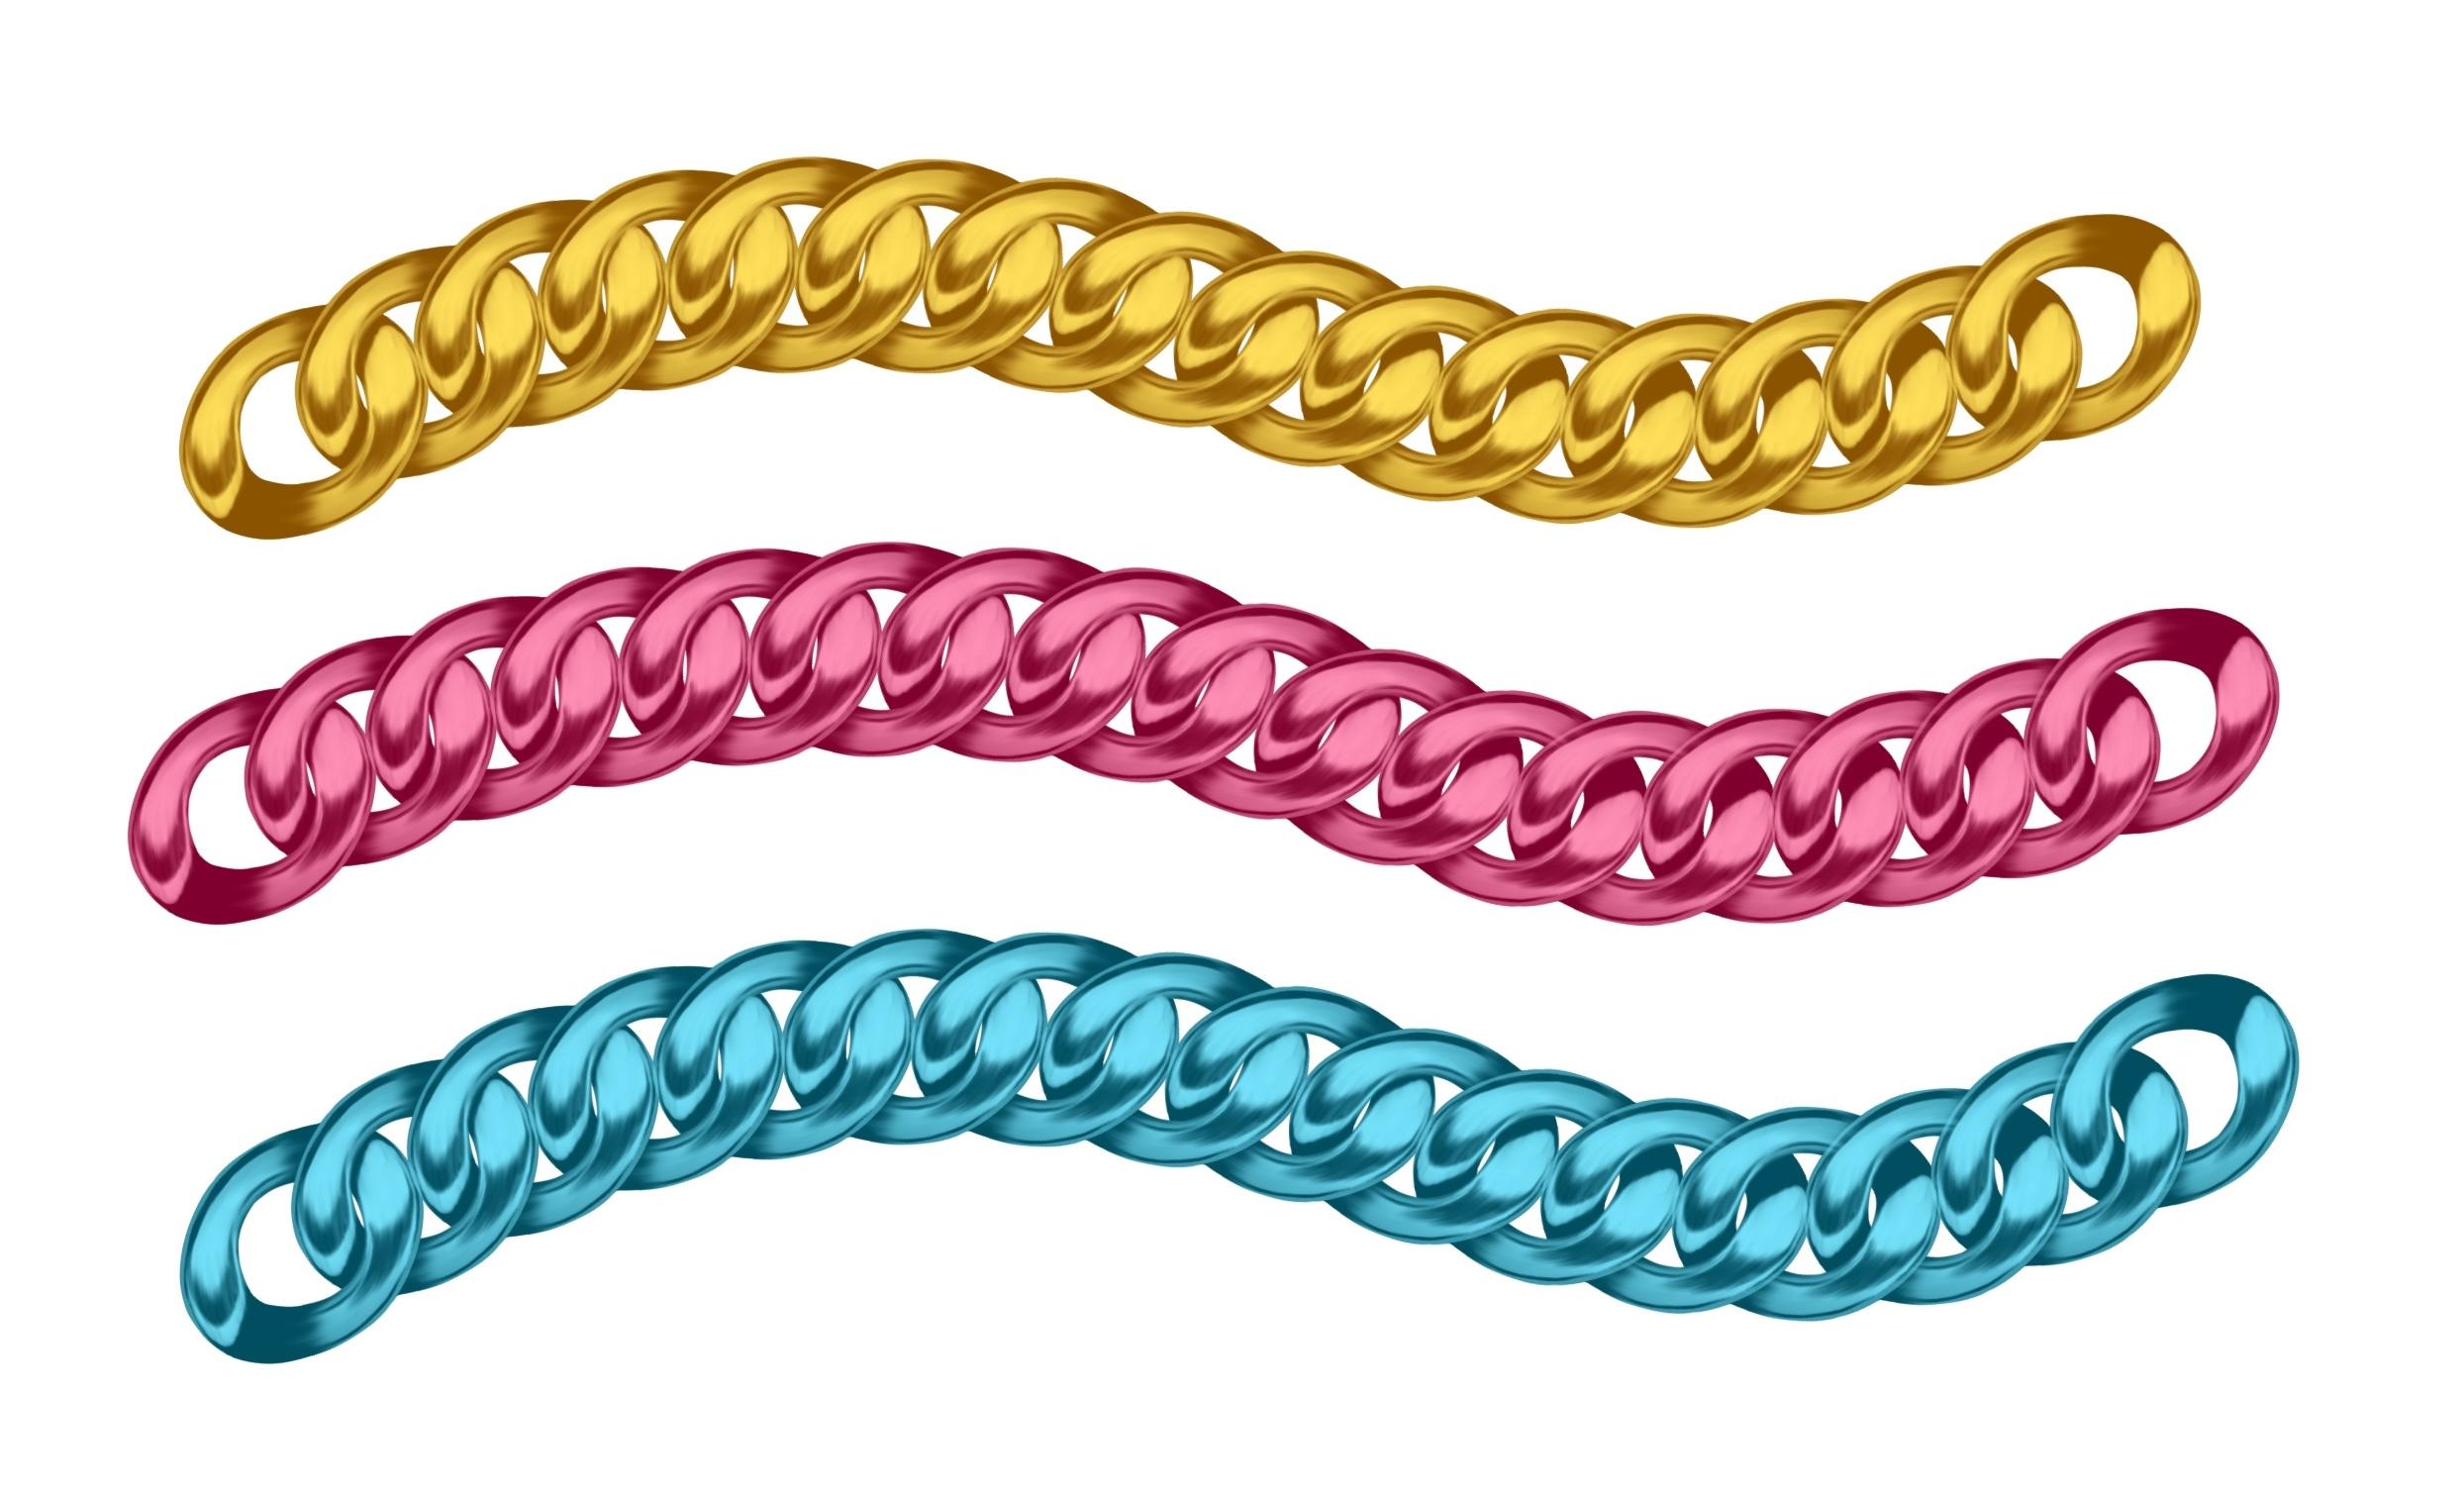
3. How Dual Colour Brush Works: Let's see how a dual
color brush works. So I have this chain brush set published on
online platforms, including skill shares
digital products, and I will be showing you the
demo using these brushes. This brush set
includes 16 brushes, and I will be selecting
one of the brush here. Before that, let's see
the color palette, tap on the color panel, and you can see
this color palette. This is also available in the resource section
of this class. So you can see there
are two rows here, one with the lighter and one with the darker of
the same color. On the top here, you can see there are two tiny rectangles, and we will be adding one lighter and one
darker shade here. Just tap on the box and
select the color you need. Now here, you have to make sure before you leave the panel. You primary color is selected and showing in this
tiny circle here. For most of the brushes, we need our primary color
to be this dark color. Tap on this color. When it is showing dark, you
leave the panel. Most of the dark
circles should be showing here as
your primary color. Now, let's go to the
brush library again. I'll select my first brush, and this is how the
brush looks like. Let's increase the
size of the brush, and this is how it looks like. Let's try a few more brushes. Let's try with a few
different color combinations. I'll select the brush,
go to the color palette, select the lighter color, select the darker color, make sure it is
showing on the top, and this is how the
brush looks like. You can even experiment with your own different
color combinations too.
4. Creating Shape: So let's start by
creating the shape we need to create the dual
color chain brush. This is how my Procreate
gallery looks like, and we'll start by
creating a new canvas. For that, we'll tap on
this tiny plus sign. Again, on this tiny plus sign. The size for our canvas
will be 3,000 by 3,000 pixel with 300 DPI.
And tap create. This will create a high resolution square
shaped canvas for us. Now, let's move on
to the brushes. When you tap on
the brush library, I've attached these brushes in the resource section
of this class, but you can find similar brushes in your brush library too. There are similar brushes like studio pen brush under
the inking section. You can either select the technical pen
brush or a gel pen, or you can even find
the studio pen here. The second brush you can find
under the artistic section. There are similar brushes here. More can be found under
painting section. These brushes can work great to add shadows and highlights. Now let's move on to our folder. Here I'll select the
studio pen brush and move on to the
color library. I'll tap on this tiny circle. I have also included this color palette in the
resource section of this class. So right now, we'll use these black gray and white
to create our shape. Select the first black color. It is completely
black. It's jet black. If your black is even
slightly lighter, you will not get the correct
result for your brush. Next, we'll bring our
reference image to our canvas. For that, you can tap on
this wrench icon menu. Make sure you're under ad. Se there's an option
called Insert a photo, swipe left, and insert
a private photo. And you'll find these images in the resource
section of this class. I'll tap and select
the first one. This will get the
image on our canvas. Now, I need just one clear
image of this chain link. I think this one looks clear. I'll zoom in and fit this particular shape
into our canvas. Make sure it is covering the
maximum area on the canvas. Once you're happy, tap D select. This particular brush can be done with the help of
the symmetry tool, so we can switch on
our drawing guide. For that, we'll go to
the wrench Cen menu. Under Canvas, tap on Canvas. There's an option
called drawing guide. Togal on this option, tap on edit drawing guide, and you'll find these
options at the bottom. Here, the symmetry option
needs to be selected. Under symmetry,
there's an option called Options. Tap
on this option. Here, make sure
horizontal is selected. Another option is
rational symmetry, Tgal on this option and tab D. Now we have our symmetry
tool activated on our canvas, but we have to make sure
it is on the right layer. We'll go to layers. I will pull this new layer on top
of our image layer. If you see there is assisted
mention on this layer. It has to be on our new layer. For that, we'll tap on this
layer and tap drawing assist. That means the symmetry is activated on our new layer too. Make sure that jet
black is selected. Under brushes, the studio
pen brush is selected. Now we can illustrate
our base shape. I'll reduce the opacity of my reference image so we
can see the shape clearly. And I'll draw an
outline following the shape from the
reference image. This can also be done
without the symmetry tool. If you want to follow
a certain shape, that doesn't have to
be same on both sides. Next, I'll draw align
following the inner shape. Once you're ready
with the outline, I'll hide my
reference image layer and fill this shape with
the same black color. Next, we can move on to the
second part of R brush. Go to layers,
duplicate this shape. Tap on the first
layer, Alpha locket, and we'll fill it with this light gray color
from R color palette. Tap on the color, tap on the layer again and
tap fill layer. Next, we need to add shading and highlights
to this layer. We'll first hide R base layer. Add a new layer on top
of our gray base layer, and we'll add clipping mask. Tap on the layer and add
clipping mask to this layer. Now let's get our reference
image on the Canvas for that I'll tap on our wrench
icon menu. Under Canvas. There's an option called
reference Tgal on this option, and you'll see this tiny box on your Canvas, tap on image. Go to layers, and I have
this reference image here. I'll pull this in our
reference box here. Now we can see our
image clear here. We can use this our reference to add details to our brush. Now let's move on to adding some highlights and shadow here. For that, I'll go to brushes. Here, I'll select
my first brush. I'll keep my brush
size around 12%. Next, we can select R color. We need to select
this jet black color from R color palette. And I will be adding
this black color to all the areas where I see the lightest color in the image. I want this first shading
to be done on symmetry, so I'll add symmetry
drawing *** to this layer. And I'll start adding these brush strokes
following this image. So whenever you're
adding a brush stroke or trying to smudge
these strokes, always try to follow
the shape of this ring. I will extend this
black color here, like in this image here. Next to blend this better, we'll go to the Smudge tool. Under Smudge tool, I will go to the air brushing and I have my medium
hard brush selected. With the medium brush size, I'll start blending these lines. Just want to make
sure the shading and following the
shape of this chain. Now let's move on
to the next color. For that, we need to
be on a new layer. I'll add a new layer and pull this layer below our
black shading layer. Make sure your shading brush is selected and a pure white color. And I will add this
to the area where I see darker shades
in the image. Okay, we need to add
symmetry to this layer. I forgot to add the symmetry, tap on this layer and
add drawing assist. I will start again. And this time, if you
see I am trying to add this white almost covering this whole part th the
ring because this is the area where the rings will
be overlapping each other. Some more detail
around other areas. Next, we can add more
details on around this area. If you zoom in your
reference image, you can see this
little dark area here, and even on the lower side here. I'll be adding this
with the white color. We'll be adding a new layer and add clipping
mass to this layer. For this detail, we will not be switching on the
symmetry on this layer. This layer is on top
of our black layer. I will start adding
this little curve shape that you see in the image. Once we are done adding this
detail with the white color, we'll go to the smudge tool
with the medium air brush. I will just thee uneven lines. Now let's move on to the bottom and we'll follow the same steps. I'll follow the same shape
like we see in the image. Once you're done adding the
detail with the white color, you can move on to
the smudge tool. And we are done with
our shape here. Let's move on to the brush
setting in the next section.
5. Brush Settings: So we are ready with
the shape here. Let's move on to
the brush settings. To create a new brush, we will go to the brush library. Here, under the same folder. I'll tap on this tiny plus sign. Now, before we go to
the brush setting, we need to copy shape. For that, we'll go to
the wrench icon menu. Under Ad, there's an
option called copy Canvas. Tap on Copy Canvas. This will copy shape. I'll go back to
the brush library. Here again, I'll tap on
this tiny plus sign. This will open all the settings we need to create a new brush. Here we'll keep our
spacing as 43%. Move to the next option,
that is stabilization. Here, the stream
line will be 90%, and the stabilization
will be 40%. We'll move to the third option, that is taper, here, the pressure will be none, and I'll togal off
this tip animation. Move to our fourth
option, that is shape. Here we need to replace shape, tap on edit, import, and paste. This will paste the image
we copied from Canvas. Tap with two finger
on this image. This will invert our
image and tap done. Here we'll move down,
and the rotation will be to Max slide 200%. Further down, till roundness
will be Max again, we'll move to the next setting
that is under rendering. Here, your rendering mode
should be uniform glaze. Next we'll move to
the next setting. Under wet mix, I'll
keep everything as none, under color dynamic. Under stroke color jitter, the secondary color will be
max, under color pressure. The saturation will be max, brightness will be max, and the secondary
will be Max two. Other than that, we'll keep
all the setting as it is, it will all be none. Next, we'll move to dynamics. We'll not touch anything here. Under Apple pencil, the
opacity will be none. Under properties, orient to
screen will be switched off. Maximum size will be one 50%, minimum will be 1%. Minimum opacity will be Max two. Now, if you see the
preview of our brush has this two tone colors
because we missed one of the setting under color
dynamics under color pressure. Under secondary
color, tap on max. On the second option, we'll pull this string
to be horizontal. Now, if you see our brush now has changed to just
one single color. Now the last setting here
can be about this brush. We can come back to this once we're ready with
both the brushes. Tap down. Now we have
just one brush here. We need to get ready
with our second brush. I'll go to layers, hide all the highlights
and shadow layer, except for the first
layer that we created, the first base with
the jet black color. Now to copy this shape, we'll go to ren check
and menu and add, copy Canvas, go back
to the brushes. I'll swipe left on our first
brush and tap duplicate. Make sure you select the
second one, tap and open, go to shape, dit,
import, and paste. Tap done. The only setting we
need to change for this brush is under
color dynamics. Scroll down, under
color pressure. I'll keep my saturation
as 50%, under color tilt, saturation as max,
brightness as -100% in secondary color as
max again, and tab done. Now you can see we have
two brushes to combine. Make sure you select
the first one. Make sure it is selected, and then you swipe left
on the second one, and you can see
there's an option called combine tap combine. Now, let's try this
on our canvas. I'll hide everything
else from the canvas. Go to the color palette. Here I'll select the dark color, and then the light color. Dark color again, make sure it is showing
on the top here. And this is how the
brush looks like. I'll increase the
size of the brush. Now I can show you
how you can tweak or adjust the settings
to fix your brush. Now if you see in this bruh, the dark area, the dark area is supposed
to be overlapping. For example, this part needs
to be overlapping here, and this part should
be overlapping here. So what we can do is
go back to our brush. Tap on the brush library,
tap on the brush. So here we can
adjust few settings, and the settings has to be
repeated for both the shapes. Make sure your first brush is selected under
shape, scroll down. And here I will be adjusting
this little circle. I will clear the drawing pad so we can see the
preview clearly. Again, I'll clear and. This will help us
see the changes when we are adjusting
the settings. Now, I'll hold this little
green dot and move it upward until they are
overlapping perfectly. I think 19 -19 looks good. I will follow the same setting
for our lower base brush. Under shape, I
will again move to this little circle
and move it until it is -19 and tab done. Now let's see how the
brush looks like. Now you can see the difference between both the brushes
after the setting. So you have to keep
adjusting the shape and the settings until you are
happy with the results. Okay. Now, there is one
thing that I want to add in this brush is I want to add a little more
darker area here. This will help us to
add depth to our brush. So what I will do is I
will go back to layers. Tap on the layers,
hide my first layer, and I'll unhide all
the layers except for our layer, the base layer. I will tap on my
white shading layer, and I want to increase
this area here, so I'll select my smudge tool, and I'll pull these white
strokes and extend them. This is how my shape
is looking right now. I'll copy the canvas again. Go to the wrench Can menu. Under add, copy Canvas. Go to the brush again. Tap on R brush. Make sure you're on
the first brush, under shape, edit, p, and paste. Tap done. And done. Now let's try brush again and compare
with the other ones. I'll go to the first layer. Now, when you compare
with our previous brush, you can see the area where
they are overlapping. Now, in our new brush, you can see it's darker and it's creating more depth and
realistic feel to it. Now, another thing
is, if you see here, they are overlapping
each other and it needs to have a little
space or a little dark area. Let's reduce the
spacing between them. I'll go back to the brush. Make sure the spacing is same on both the brush and make sure
you type instead of sliding. It was 43, I'm making
it 42% and tap down. Now let's try on the Canvas. Now, if you compare with
your previous brush, you can see it slightly darker. Another adjustment you can do is make your brush
slightly thinner here. I feel brush is still
missing some depth. For example, here, if you
see this darker area. When you compare
it with the image, you can see there is
a lot more dark here. So what I'm going to do is, I'm going to edit
our image again, even on the upper area here. So I'm going to speed up this video so the
lesson is not too long, and you can even
see the results. So I'm going back
to my first shape. I'll unhide all my layers, and on the first white layer, I'll start adding some more white details and smuching them. Next, again, I'll
copy my canvas. Go to the brush library, on the brush, go to shape, and I'll replace the shape here. Done. Let's try this on the canvas and compare
with our previous brush. O. I'll increase the size
of my brush, Let's zoom in. Now, if you compare, you can see the darker area here
and at the bottom. It creates more
depth and realism. You can keep adding more
details to your shading and highlights until you are
happy with the results. Another thing that you
can tweak a little is a little gap in
between these brushes. I made the ring slightly
thinner in the center, and now when I zoom in, you can see a
little gap in here. So this is how the
brush looks like. Now, let's rename this brush. Go to the brush library,
tap on your brush. Go to about this brush. Here we can add all our details. Before that, you go to
properties and make sure your preview size is
around ten to 20%, and you have to repeat the
same to the other brush two, the second brush two,
go to properties, and both should be same. Now, go to about this brush, type in your brush name. I'll type in as chain one or
chain brush one, tab done. You can insert your image, you can write your
name and even sign. Now, you have to
make sure create a new reset point is done. Tap safe. This will save all the setting done on
this brush, and tap done. Now you can use this brush as your base brush to create
all the other chain brushes. All you have to do is
duplicate that brush. You don't have to repeat
all the settings. All you need to change is
the shape of the brush. And depending on the brush, few more basic settings
like spacing or shading. Let's try a few more
color combinations. Tap on the color panel, select the light color, then the dark color, make sure
it is showing on the top. With this green color,
it looks like this. Let's try one more color. This blue, light blue, dark blue, and that's how
the brush looks like.
6. Final Thoughts: Congratulations for
completing this class. To recap, we learned how
a dual color brush works, how to create a tool
color chain brush. We saw plenty of
chain brush examples, tips and tricks to
create a beautiful, seamless, and a
great quality brush. I hope this class has
been beneficial to you. If there is any question or
doubt regarding this class, you can post in the discussion
section of this class. I am always here to assist you. I will be looking forward for your beautiful chain brushes in the project section
of this class. Your feedback through
review helps me improve and plan
my future classes. You can follow me on
Skillshare to get notified when I
publish a new class. You can follow me
on Instagram two. Thank you for taking
this class with me. See you in the next class.
 Vinita Upadhya, Illustrator & Pattern Designer