Transcripts
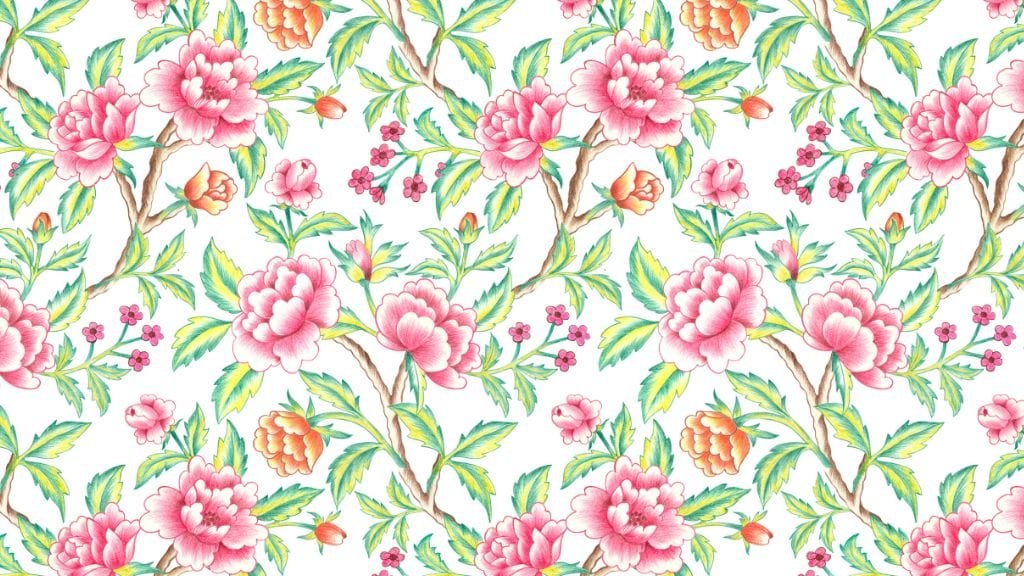
1. Introduction & What You'll Learn: Let's create a
beautiful patchwork like this in Procreate. Hi, I'm Vinita, an
illustrator and a designer. In this class, I'll
show you how to create block print inspired
brushes in Procreate. We'll design two
types of brushes. One is floral, and the
second one is paisley. I'll guide you step by step from the initial sketch to the Procreate settings needed
to create these brushes. Once your brushes are ready, I'll guide you on
how to use them to create beautiful
patchwork motifs. There are plenty of brushes and patchwork examples
to inspire you, and to help you get started, I have also included a sketch
and few color palettes. So see you in the class.
2. Project and Resouces: Your class project,
you can create your own block print
inspired brush, and once your brush is ready, you can use it to design a
beautiful patchwork motif. This is a Pinterest board, the link of which I have included in the resource
section of this class. I have saved plenty of ideas and inspiration for block
print motifs here. You can explore a wide
variety of motives and color combinations to give your design a more authentic
and traditional feel. This is a flower
motif, which is very similar to what we will
be creating in the class. You can also find some
paisley examples. While exploring, I came across some beautiful
patchwork designs and patterns that inspired me to experiment with
similar concepts. For example, like this
patchwork design, where we can combine different
patterns in a cohesive, beautiful artwork, for the
project of this class, I will also guide you through creating a floral
patchwork artwork. You'll also find a few process
videos on the board that gives you a better understanding of how traditional
block printing works, which can be really helpful for developing your own designs. To help you get started, I have a sketch and a
color palette included. Before we begin, make
sure to download them from the project and resource
section of this class.
3. Creating Brushes - Flower: Let's start creating
our block print inspired dual color brushes, for which we'll
need a new canvas. For that, I'll tap
on this plus sign, again on this tiny plus sign. We can keep the canvas
as 3,000 by 3,000 pixel. With 300 DPI and tab done. Next, we can go to
the Brush Library. Now with the updated
version of Procreate, the brush library is organized
into different sections, and each section can contain
multiple brush sets. If you want to create
a new library, you can tap on this plus icon and choose Create New library. But I want mine
inside this library. So I'll tap here and tap
on this plus icon again. Here you can see there
are two options, create new brush, and the
second one is create new set. For our block print, we need
to create a new set first. I'll rename this as block print. And tap apply. Next to create a new brush. We'll start by first
creating the shape. We need to illustrate
the source shape. For that, we need a brush. So I'll go back, and I'll tap on this default
Procreate library. Here under the pencil brush set, you can experiment with some of these pencil
like brushes. But for now, I'll choose
this brush named plan. Tap and select this brush and swipe left and tap duplicate. We can bring this
brush dragon drop into the new brush set for
the block print that we created because we'll
need this brush to create the shape whenever we want to illustrate
a new brush. Next, I want this brush
to be slightly thicker, so I'll tap and
open the settings and under properties,
tap on properties. Here, under the maximum size, I'll increase the
maximum size to around 50% and the
minimum around 5%. And tap done. Next, we need to switch
on our drawing guide. For that, I'll go to action. Under action, tap on Canvas. Here toggle on
this option called Drawing Guide and tap
on Edit Drawing Guide. You'll be able to see
a few settings at the bottom, tap on symmetry. Next under options,
I'll select quadrant. Under quadrant, make sure
your rational symmetry is toggled on and tap done. Next, we can go to
the color panel, and we need to select
a jet black color. Make sure it is
completely black. Next following the
symmetry guideline, we can start illustrating
our flow motif. A small and simple motif
is often referred to as a Buti or a Buta
depending on its size. Generally, Buti describes as a tiny delicate motif that is
repeated across the fabric, while Buta usually refers to a slightly larger version
of the same motif. While I'm illustrating
this flower, I am also referring to a variety of traditional
block print motifs. I'm mainly looking at
them for inspiration for the shapes as well as the way the wooden
blocks are carved, which helps guide the overall
structure of the motif. I Next, we need to add a new layer
below this flower layer. For that, well tap
on this plus icon, pull this layer below
our flower layer. Each time you add a new layer, you need to switch on the
drawing assist for that layer. On this layer we'll
create another layer of flour that will appear like
an outline in the brushtroke. This also gives the design a very traditional
block print vibe. Create an outline
around this flour. Make sure it is not too
close to the flour. We need to fill this outline with completely black colour. I'll start. Now let's
hide our first layer, the flour layer so we
can easily fill this. The more texture you
keep in the strokes, the more handmade the
final brush will look. A Now when you go to layers, there should be one with the flour and the second
one with the flour base. Now our next step is to select both the layers
and group them, swipe left and
duplicate this group, hide the first group, and open the second one. Here we'll add a new layer. Make sure this new layer
is inside the group. Now we'll fill this layer
with any mid tone color. Okay. I'll select this bright pink, drag and drop into this layer. Go to layers and reduce
the opacity to around 50%. So now you should have
three layers in this group, one with the color fill layer, and the other two are
the flower layers. Next, I'll close this group and duplicate this three times. So in total, you should
have four of these groups. Hide all the groups
except for the first one. Now we'll select this
group under selection, make sure uniform is selected. Under uniform, snapping, her magnetic and snapping should
be on Togo on these options. Now we can hold this group and drag in one corner until it snaps and you can see these golden lines
vertically and horizontally, and will repeat the same for
the other three groups too. Hold and drag to the second
corner until you see the golden lines hide
the third group, hold and drag to
the third corner. Now the last group,
the fourth one. I'll unhide my
center flower too. Now we'll open each group and we need to delete
the colorful layers, the pink layers, swipe left
and delete all of them. Now our next step is to
select all the flower layers, the first layer in each group, select all of them, and we'll
drag them out of the group. So we have them
all in one layer. I'll pinch and merge them. And I'll pinch and merge
all the other groups. Make sure that is only the one that we split, the corner ones. Don't merge the center for now. Next, hide the
flour based layers. Your canvas should
look like this with only the first
layers of the flour. Now, let's copy the canvas. For that, we'll tap on this
wrench icon menu under add, tap on copy canvas. Now let's move on to
creating our first brush. For that, we'll go to
the brush library. Here we'll tap on
this tiny plus sign. And tap on Create New Brush. This will open all the settings we need to create a new brush. We'll start with the first
option that is stroke path. For now to start with, we can start typing 32%. You can adjust this later, go to shape, edit, Import and source library. Here we'll select the medium
hard brush and tap Okay. Next we'll move to grain. That's where we need
to paste our pattern, for that we'll go to
edit, import, and paste. Now, to invert this image, we'll tap with two finger
on this image and tap done. Next we'll reduce
the Zoom as none. Scroll down. Here we'll toggle off this
option called offset hitter. Here in this section, you can also experiment with the option movement and scale. For now, we can keep
the scale as 25%. Next, we can move to rendering. Here we'll keep the
mode as uniform glaze. Next undercolor dynamic
Under stroke color jitter, I'll keep the secondary color as 100%, under color pressure, keep the saturation as 100%, brightness as 100%, and
secondary color as 100% too. Next, under Apple Pencil, keep the opacity as none. Next under properties, we
can increase the brush size. We can increase the
minimum size to around 12 and the maximum
to around one 50%. And tap, okay. Now to create the second
part of this brush, we'll duplicate this brush. For that, swipe left
and tap duplicate. Now before we tap on
the second brush, let's copy our shape. I'll hide both the flour layer and unhide the
flour second layer, the base that we created. Now we can move on to
the wrench icon menu under add we'll copy canvas. We'll go back to the brush, tap on the second brush. Here under grain,
we'll go to grain. Edit, import, and paste. This will paste our shape from
the canvas and tap, okay. Next setting that we
need to change for this brush is
undercolor dynamics. We'll keep everything as none. So all the settings we did
for the first brush will move everything to 0% and tap done. Now we need to combine
these brushes. Make sure the flower
brush is selected first, and then the base one, the second one, and
tap on combine. Now we have our first
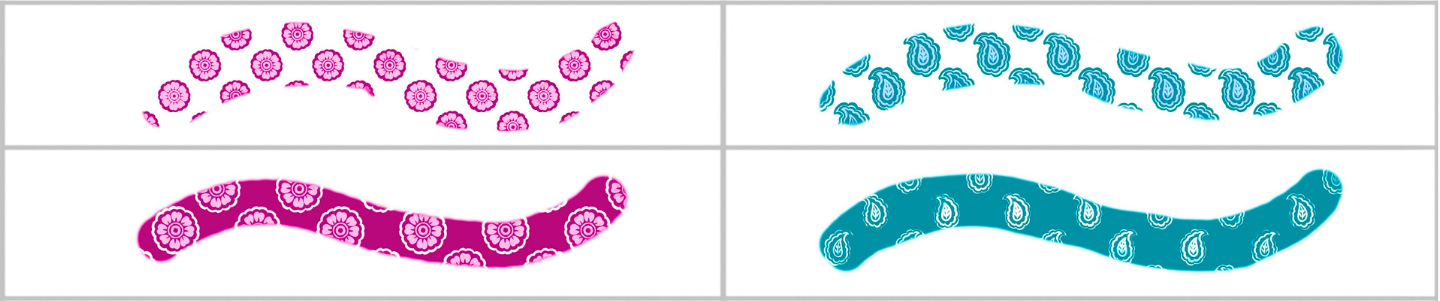
brush ready here. Let's try this on the canvas. Now, for this, we need to select a primary and a secondary color. So I'll select a
lighter shade of pink. And for the dark, I'll select
a darker shade of pink. Let's try with the light
pink as a primary first. And this is what our
final brush looks like. Let's try the darker
as the primary. Just select the dark
color and it becomes your primary you can see
compared to the first one, the colors are inverted, the darker becomes the lighter and the light
becomes the dark. Now, another setting
I want to show you is to change how the brush
looks in your preview. I'll tap on this brush
and under preview, you can change the size you can see here it's
changing the size. It's going to show you how it is going to look in your brush set. Now, to rename this brush, I'll go back to my library. Here, hold on this brush, and you'll get
this option called rename and you can
rename your brush. For example, I'm going
to rename this as block print one or maybe
Buta one or a flower one. I'll keep mine as
Buti one as this is a very tiny flower
and tap apply. So we are done with
our first brush here. Let's move on to the second
one in the next lesson.
4. Creating Brushes - Paisley: Now for the second brush, let's start by
adding a new layer. Next from the color panel, we'll select a black color. Make sure this is
completely black, and we need to select
our plan brush. I'll start by roughly
drawing a paisley shape. This will work more
like a guideline. This is not our final shape. Next, I'll reduce the
opacity of this layer to around 50% and we'll add a new layer on
top of this layer. And I'll start illustrating
my final motif. Here you can customize
the shape of the paisley in so
many different ways. There are plenty of examples
in the Pinterest bow two, or you are also welcome to follow my illustration
here in the class two. The symmetry option is still
unable on this canvas, but it won't work for this layer unless you
turn it on here as well. And Once you're ready with
your final motif, we can go back and delete
the guideline paisley shape. Or you can also
clear that layer, tap on that layer and tap clear. Make sure you make the
opacity as 100% again. Same like we did
for the first one. Here, too, I'm going
to first create an outline and then fill
it with the black color. I'll hide my first paisley layer before I start
filling the outline. Before we move on
to the next step, let's organize the layers first. I'm going to add all the layers
from the first brush into one group and close this group
so there is no confusion. Next, I'll select both
the paisley layer, which is for the second
brush and group them. So next we need
to add an outline on the second layer
of this motif. Keep the outline
slightly rough and chunky so that it can have
this hand drawn feel to it. Yeah And here we are done with the second
layer of our paisley motif. Now our next step is
to split this motif. Now you should have two
layers in this group. I'll close this group, and we need to duplicate this, swipe left and duplicate. I'll hide my first layer, open the second one, add a
new layer inside this group, select a mid tone color, dragon drop this
color on this layer, reduce the opacity of this
colorful layer to around 50%. Close this group and duplicate
this group three times. So in total, you should
have four groups. Next I'll hide all
the groups except for the first one.
Select this group. Under uniform, snapping, make sure your magnetic
snapping is on. Drag this group in
one corner until it snaps and you can see
these golden lines. We'll repeat this for all
the other three groups too. You have to make sure that
they are not overlapping, and when it snaps, you can see the golden lines vertically
and horizontally. Once you're done, we'll open each group and delete
the colorful layers. Next, we can select
all the first layers of the paisley motif, hold and drag them
out of the group, pinch and merge them. Next, pinch and merge
the remaining group, which is the base, the second layer of the motif. This step is optional, but you can select the
center paisley group, and we can flip this
motif horizontally. For that, we'll
select this group and you'll get this option
called flip horizontal. This is just a tip and we'll create a little variation
in the pattern. Next, add a new layer. Make sure this layer is below all the paisley
motif layers. Select the jet black color, select your pilon brush, and we'll create a background
around this motif. I'll just start filling
in with this brush. Now we are ready to paste our paisley shape into
the brush settings. We'll start with the first
layer of our paisley shape. I'll unhide my layers first. This is what your canvas
should look like. Next, we can copy our canvas. For that, we'll tap on
our wrench icon menu here under ad, I'll copy Canvas. Go to our brush library. Here I'll swipe left and
duplicate our first brush. Tap and open our first brush. Here under grain, edit,
import, and paste. Tap okay. Make sure you're pasting this
on the first brush. Next, we'll unhide the
second part of our brush, the base that we created. So before you copy the canvas, make sure your screen
looks like this. Go to your wrench icon menu
under add copy canvas. We'll go back to the brush, tap on the first brush. Here, make sure your
second brush is selected. Here under grain, edit, import, and paste and tap
done. Again, tap done. Now let's try this
brush on the canvas. Before we try, I'll add all the layers from the
second brush into one groove. I'll add a new layer and we can select a primary and
a secondary color. I'll select a darker and a
lighter shade of purple. And this is what the
brush looks like with light as the primary color. And let's invert the color. I think I want the purple
to be more lighter. This is what our final
brush looks like. Another example you
can create using the same paisley motif is
without the background. Let's invert the color
with dark as the primary. Now let's see the brush that we just created with
the background. You can easily see what
is the difference. So you can create
two different types of brush with the same motif. Now, another example I want
to show you how you can quickly create a different
brush with the same motif. I'll go back to the flower shape that we created in
the previous lesson. I'll unhide the base layers that we created
under the flower. Next, I'll add a new layer, select the jet black color. Select Pelon rush. Next, we need to switch on the drawing assist
for this layer. For that, we'll tap on this
layer and tap drawing assist. I'll quickly fill
in the background because we already had
our drawing assist, the symmetry on this canvas. It will not take much
time to fill this. For this brush, the only canvas
we need to paste is this. I'll copy this canvas. Go to the brush library. I'll duplicate our first brush, the one with the
flour motif on it, tap and open the brush setting. Now, select the second
brush here, go to grain, edit, import, and
paste, and tap done. Done again, now let's
try this on the canvas. I'll try this with a darker and a lighter shade of yellow. You can see the difference
between both the brushes here, one with the background, and the other one without
the background. Now that our brushes are ready, let's see if you artwork that can be created with
these brushes.
5. More Examples Brushes: In this lesson, I'll walk
you through a few examples of block print inspired
brushes I have created, and I'll also show
you the pattern that has been used to
build each of them. Let's start with
the first brush. Here I have used yellow as my primary color and
white as my secondary. I'll zoom in so you can
see the pattern clearly. The same brush with
a darker color. Let's go to the brush setting to see what the
pattern looks like. Under the green section, this is what the first
brush looks like. Let's see the second one, and this is what the
base looks like. Let's move on to
the second brush. This is very similar to what we have created
in the class. Let's quickly see what the brush looks like in the setting. This is one of my most
favorite and the simplest, also very similar to what we
have created in the class. I'll skip the pattern
for this one because it is exactly what
we did in the class. Let's move on to the fourth one. Originally, this is
a dual color brush, but I'm using brown and white. Let's see what the brush
looks like in the settings. Here I have used
a textured brush to erase the motif slightly so that it can have this uneven
feel to it. Let's see. The second brush This is slightly different
from other brushes. Let's see, the pattern I used to create this in the settings. This is paisley, again, very similar to what we
created in the class. It's just different
angle of the motif. I hope these examples have
sparked ideas and inspired you to start creating your own collection of
block print brushes. The last example. And this is what it
looks in the settings. This is the first shape. Let's see the base layer, and this is the second one.
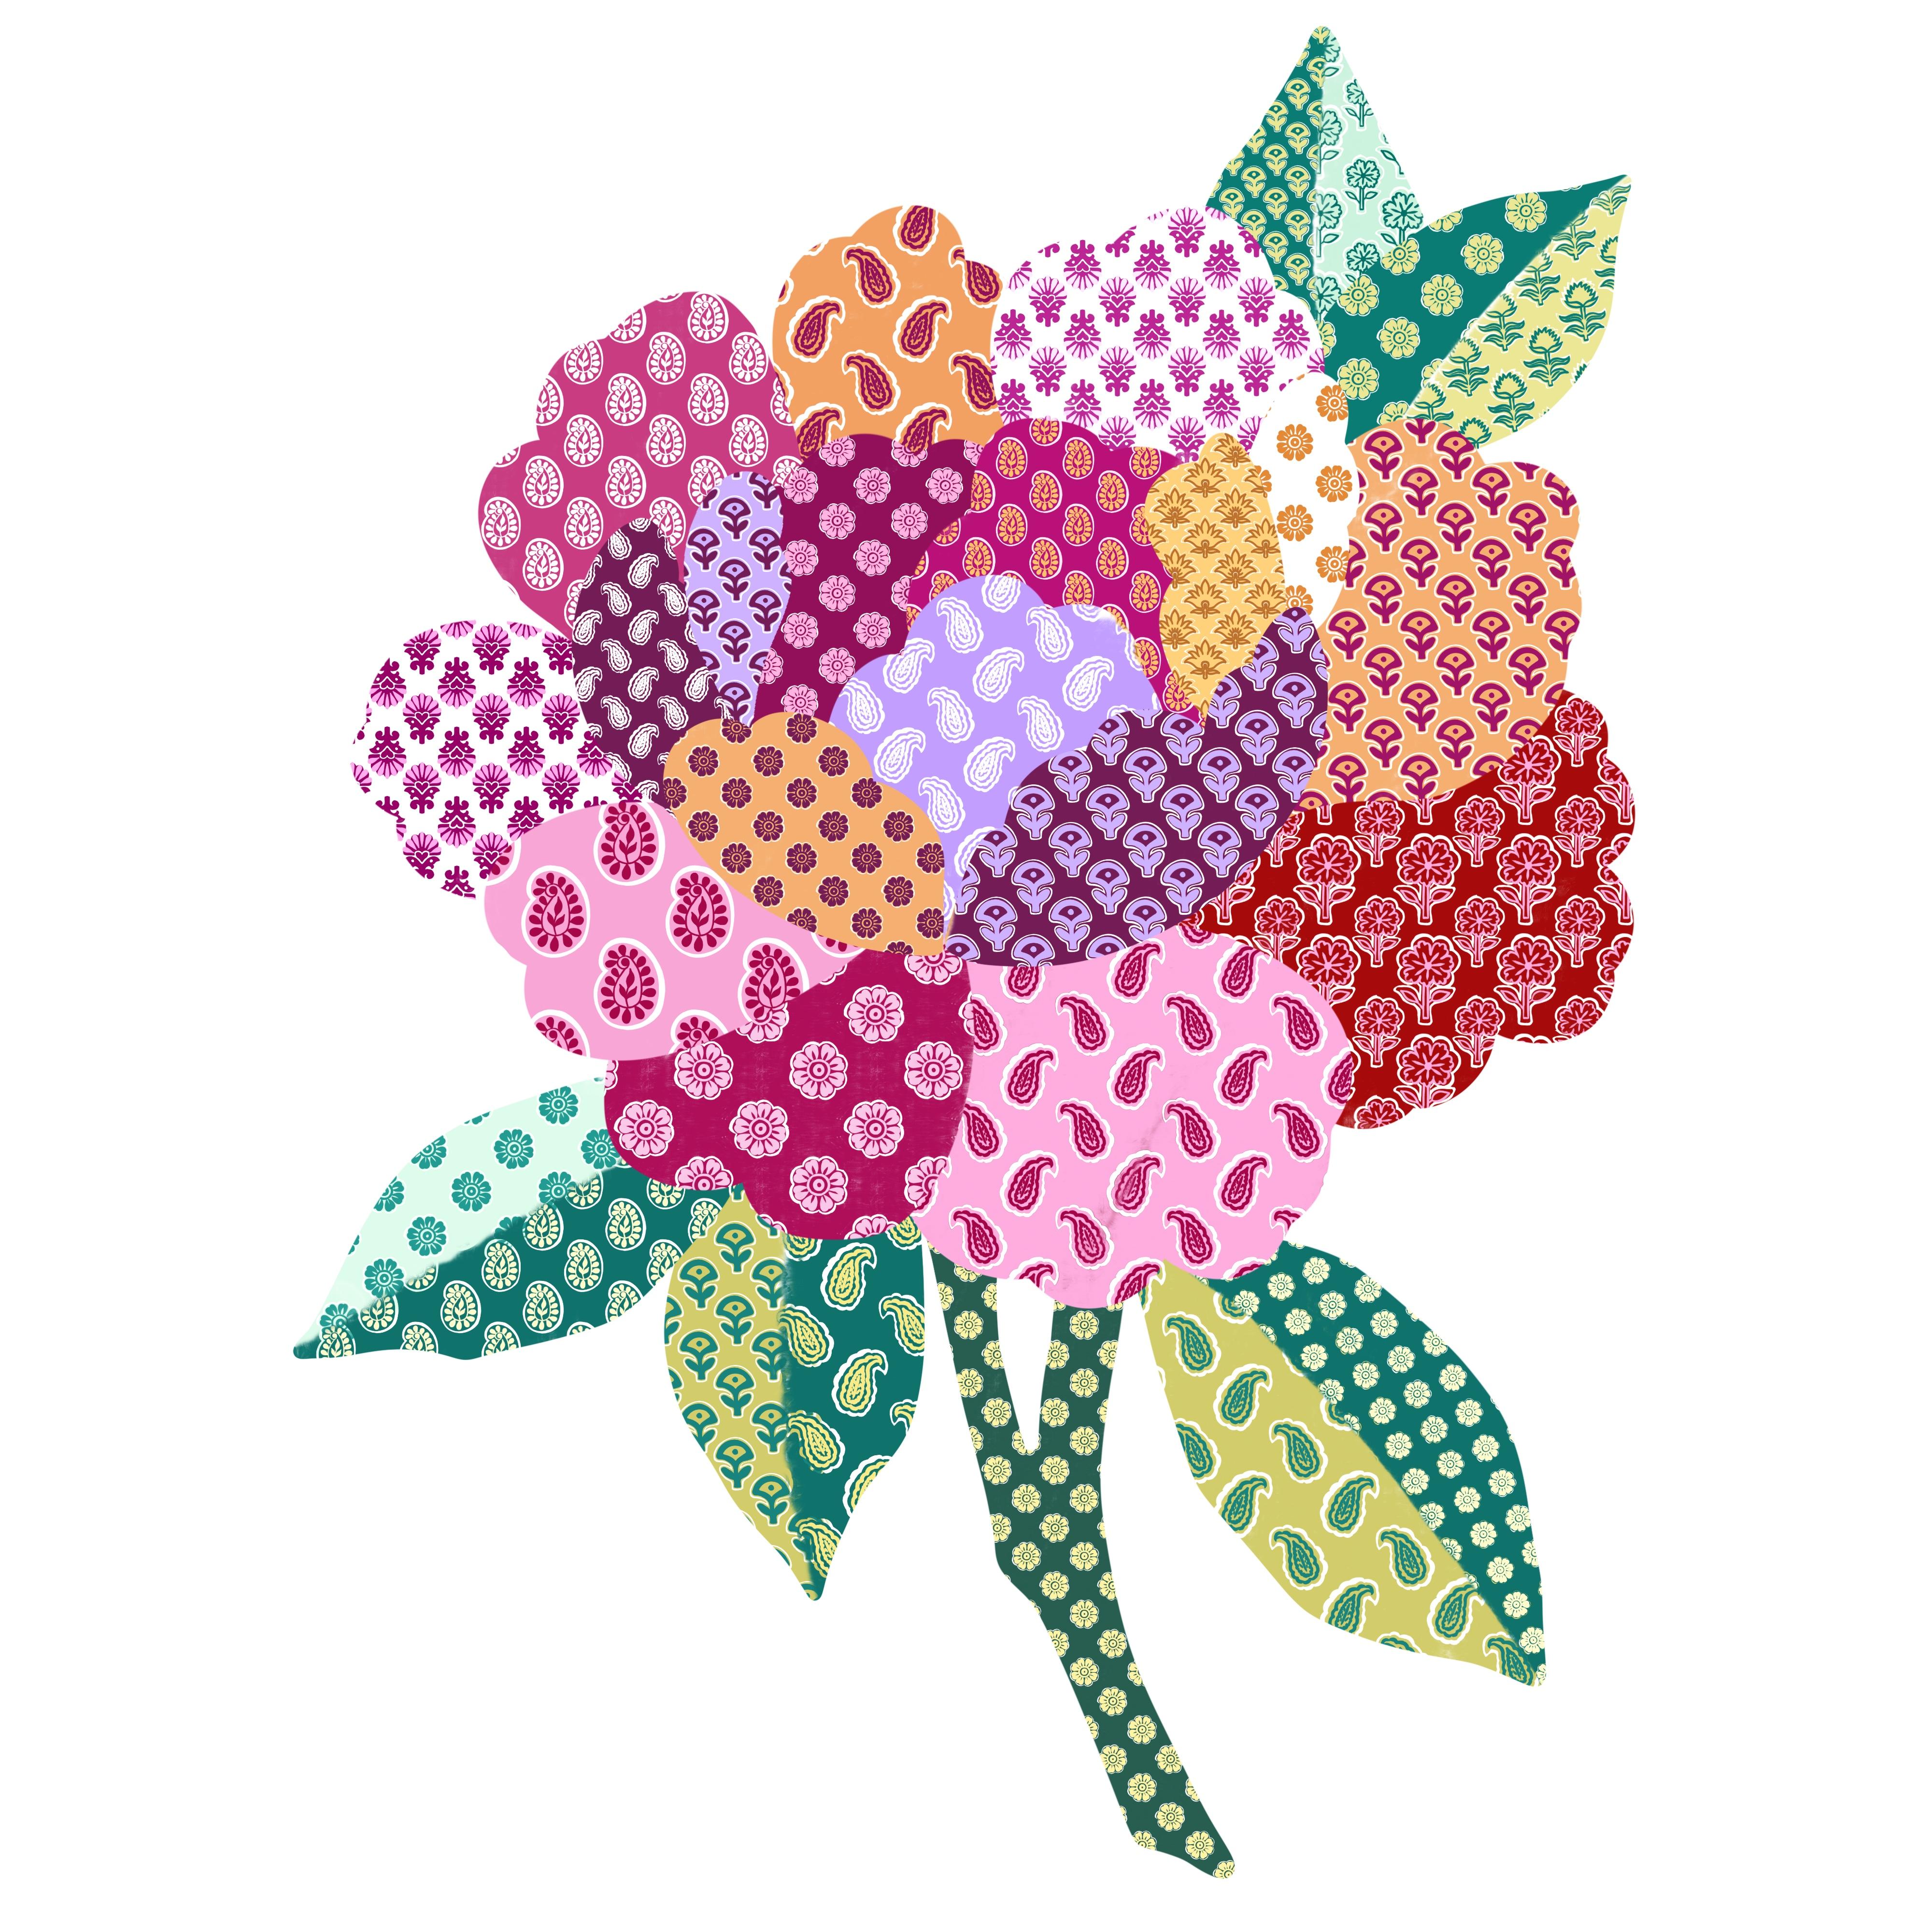
6. Floral Patchwork & Examples: Download the flower sketch
and open in Procreate, you will be able to find in
the Procreate gallery here. I have renamed this file
as patchwork flower, tap and open this file, and this is what the
sketch looks like. Now, when you go to layers, the first layer is
the sketch layer, and I have placed each of these petals on a
separate layer, and each layer has a separate
clipping mask on them. I'll be adding patterns to these petals using
brushes from my library, including the examples I
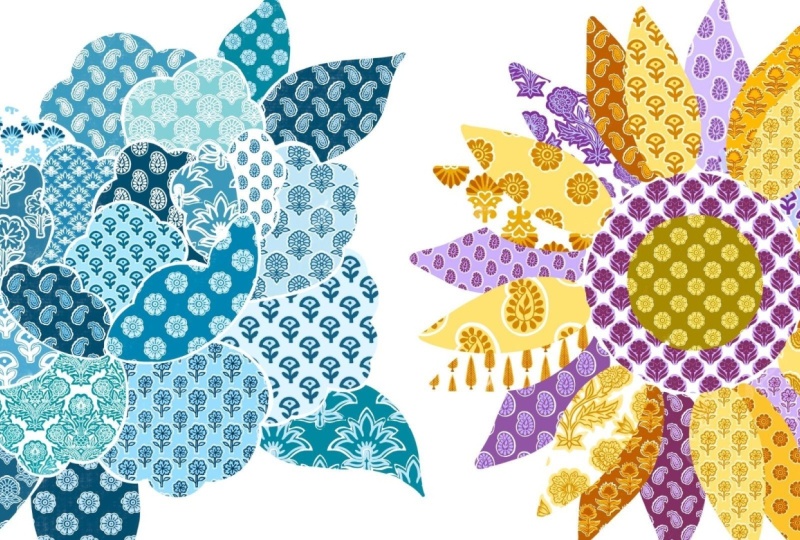
shared in the previous lesson. We can start by selecting a primary and a secondary color. I have included three different color
palette in this class. One of them features three
different shades of blue. Whenever you're
adding a pattern, make sure it is on the
clipping mask layer. I'm planning to keep
this flower within a limited palette
of indigo shades. So each time I choose a pattern, I stick to those tones. I'll keep this lesson
short and share a few tips you can follow while creating any
patchwork artwork. Start with a simple
pase shape like this floral artwork to guide
your overall composition. Break the artwork
into sections so each area can showcase
a different pattern. Use a limited color palette
to keep the design cohesive, even with multiple patterns. Mix light and dark tones to create contrast
and visual depth. Alternate between dense
and minimal patterns to avoid visual clutter. Repeat a few pattern
styles across different section to tie
the artwork together. You can add leaves or
petal extensions to break the rigid patchwork
grid and create flow. Don't aim for perfection. Slightly imperfect artwork can enhance the handmade
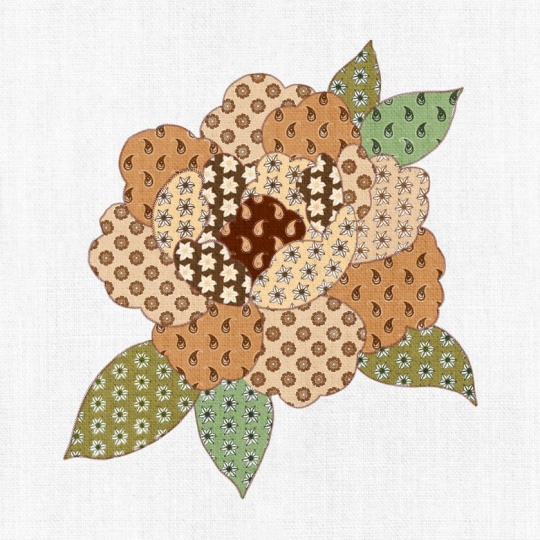
block print feel. So this is what my final
artwork looks like. If you want the flower
to look more defined, you can also add
outline to each petal. Like, for example,
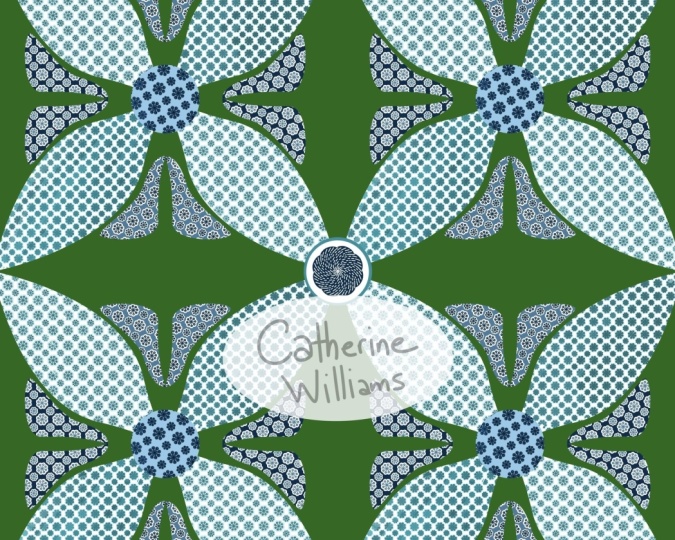
I have done here. If I zoom in, you can see I have added this white outline. This is another version of the same artwork with a
different color palette. I also have this
early brown palette in the resource section. You can experiment with
different color palettes and pattern combinations to
create a variety of looks. You can also try exploring unique shapes beyond
flowers like birds, animals, or even abstract forms. This helps you develop
your own style and make your artwork more
diverse and creative.
7. Final Thoughts: And that's all for this class. You have learned how to create a block print inspired
pattern brush, along with tips and tricks for designing a patchwork artwork. With plenty of
examples to guide you, you now have everything
you need to start creating your own brushes and
unique patchwork designs. I can't wait to see
your beautiful brushes and artwork in the project
section of this class. You can follow me on
Skillshare to get notified when I
publish a new class. If you have any questions or
doubt regarding the class, you can post in the discussion
section of this class. Your feedback through
reviews helps me improve and plan
my future classes. You can also follow
me on Instagram for some behind the scenes
and inspirations. Thank you for taking
this class with me. See you in my next class.
 Vinita Upadhya, Illustrator & Pattern Designer