Transcripts
1. Class Trailer: Hi, My name is spread on, um on instagram Artist with almost 50,000 followers which is not to back have been creating artworks for almost two years Now. On this class, we go to create one of the artwork set one wild on my program. Look at this time. This is a type of art that belongs into creepy category, but it also were beautiful and unique at the same time. In this class you will learn medical techniques and what's even more important will love them. Step by step, we will start by 80 things a collars using camera raw filter on adding some cool effects. After what, we will use porter shops through the futures where you will learn how I can transform any image inter through the sphere on. We're going to create our I both. With that technique, we will learn some basic features before shop. Pretty, after what, we will import the eyes into our original project. Later, using the liquefy tool, we're going to extend the ice on the exam liquid after what, you're going to discourage your parental more cool liquid effects and finally converted all into black and white collars. But that's not O. The last step would be to use special filters in order to view our image. Golden collars and boom chicka boom Logan that magic. I hope you're excited to Lawrence's Just like I'm excited to be set to you, my dear friends, What are waiting for this? Click next and start learning again. My name is spread on. Hopefully, I'm going to be one of your favorite portion pictures to you guys who
2. Lets Edit The Colors: Hello and welcome to the first. Listen, my dear father shop magicians high help you feeling good because we starting a journey to create this crazy. So, um, first of all, what is going to create new? We just need to create a new project on. And what I'm gonna do is I'm gonna choose which 1 to 50. Okay, sorry. I'm gonna have height. Which 1000 fight? 1 to 50. Make sure you have here picks. So selected were important results in 200 on the column or air GP color on If everything is finally just click create on the branch, you have our empty project. So first of all, let's start by importing our images on. You can download the images from the class materials area depending on where you watch this eyes. A camping separately, singled class materials, all they can be in a tap called projects on the resource area. So I'm sure you will find it. Okay, So this image that we need let me just important for the shop boom. And let's just first will make it bigger in to make sure we don't have any, um, spaces lived on. Also, we need to bring it pretty close. So you were rotated it like that. Make it bigger just on things should be fine. Let's click now That's with OK, button. So not Goto wears on. Let's leave this background where it's useless. We don't need it. On the first documentaries made to edit the colors off image, I need to make those with bright agreeing to make the background brighter. So let's go to filter on Let's go toe camera ro filter. So Kummerow fuel taps is too aided colors, and it's best to and for shipping notated colors. Andi, if you have on. So I'm using the new special photo shop. If your version for showbiz older than you Camero filter. If there is going toe differently, the effects are still the same. Adjust in terms of interface is going to appeal to different. So, for example, I'm going to have off my effect here on the right, as you can see curve details on blah, blah, blah while you are going to have them on the top. So basically your parents are going to build the top. But that's not too important white, because I have a press. It safe that we can use in order to out Want to clap eyes. Of course, that we need on you can also download from the project materials so on in order to apply the pressure, all you need to do is in your case again. If you have an older version of for show, you're going to see something like that when you click it, um, for meat Here is going to show you lot settings. Just click load settings and there is a need to choose the color. Got its Sorry, the colors Got ex MP file edges Cricket on. Wait, Wait, Bomb! Wow, How crazy is that? Felt me now tell you what actually happened here first of what we see here Temperature, As you can say, I made the temperature go from warm to a colt. It's minus 46. So as you can see it getting colder on if it's let's say warmer. As you can see, it was completely different. She looks like Shrek for some reason, trees green now, so let's just bring it back to minus 46 on as the interesting thing is that here, as you can see, I have been working with contrast, highlights shadows, white and blacks. So, for example, if you look at char does, let's say I make them darker. But what's going to happen? We don't see too much details in the background, but as soon as I make the shouters lighter, we see floats off cool details in the background, and that's really good. The same applies to the blacks else. I made him brighter in order to see all the details on what else? What else is important here? The haze. Well, the hits just helps us to make the colors pop as you can sequence on zero. It's too great, right? But as I bring it to 42 as against, the colors are now stronger and they look really nice. So now let's go toe. And also one more thing. As you can see I made the contest might have 100. There isn't for that is that one conscious is too high, is difficult, hated the colors. The colors lose their quality basically So, for example, if contest is high as you can see, everything is too dark, everything is too strong. That basically means that the courts are getting damaged. That's why make it minus 100 so that then I can go and conveniently aided my colors. So now I'm gonna go here to call a mixer, But for you, for people whose camera off filter is different, you're going to have it here on the top. You're going to have many importance here. I need to choose H and sell adjustments here on the top. Andi, I think it's number three or four in the road. I'm sure you will find it as Massachusetts, you go to see something like that. Hue saturation. Luminous Andi here. What do you basically have? We have different colors, as you can see reds, oranges, yellows and blah, blah blah. What does this, too? That helps us to age it every caller separately. So, for example, let's look at threats. If I just makes us 20 under, actually, let's make it orange. If you look with me, just, um are you feel it here in the background. This is a little bit orange now, but if I bring it to the left, you see, now it's getting a little bit Pinker. The same goes to oranges I can make or in his eyes, are yellow or with pinky. So what? See if there's a big difference. Okay, difference here. It's not that big. So depending on how strong you have colors here, the difference going to be big or small on. Let's go to our cause because I feel like they have lots of work was here or let's actually go to blues. Let's see you see blues, I think completely changed the color from Violet to sign. So as you can see, it's a big difference. Anyway, you can just copy my numbers here as well. If you don't have them, are quite already. Let just click OK now, But before we do that, we can actually compare what was before and after. So if I click here, let's see before after for you. It's also going to be something like, Why letter? If you click, you will be able to see separately anyway. That's not too important. Just click OK, and that's weight Boom. Well, that's that. How beautiful. So before we continue, I also want to add additional effect to our artwork on the right Now is going to look weird , but you'll understand later why we did it so First of all, let's not create a duplicate of this, so just click right button, go to duplicate layer unless freak okay on their here on this one. Wait. Actually want to delete the camera filter in order to delete it? All you have to do is you can just click. Actually, we know cyclic smart filter so it can just click and drag them to the trash bin. And boom, they're gone. Also, one very important thing. Let me just turn yourself. If you want traded the colors off this image again, you have to double click on camera ro filter on it will be open again and then you can click Edit them again and click. OK, If you go to filter and click Kummerow filter again here, then you actually going to create a second camera ro filter effect. You want to edit the current one? Just double click here. Okay, so let's go back. Let's Tony's on. I want to know to go to filter toe pixel it and I want to go toe point allies on dumb yellow Just click, OK, for now. This looks weird by Stay with me. Okay? Okay. So first the full. Um, let's go to normal blending more on. Let's blend this out with Britain with our background image. So let's go toe soft light. Okay on. Now let's go to a pastie because this is too strong. Let's make it, let's say 35% okay, on one more thing I wanna did the point lies effect again. So if we just double click on point twice combo, open it and let's make cell Size Street So nice you can see is the point are even smaller. Let's click. OK, so now you're probably wondering why did we do this? So now if I, for example, tortoise often on if we get closer, you will see points here so I can see this healthy skin that we talked about Now it's kind of pointing is a small adjustment on, but you don't actually need to do this, but I think it makes those with better. So because usually you know you, they make the artwork needs to have its own feeling on, uh, I give and I decided to make it out with winter. Gee, with this really, really soft point. So, for example, in the final artwork, if exhumed closer. You see here this type of little little points or hear? Swell. That's exactly why they were absent there. Because I use the pointless effect. So again, just small adjustments. But it makes things so much Cool it. That's it. For the first lesson, make sure to save this. Yeah. Don't forget Goto file on Save as I watch, your show will crash. And then you will want to kill yourself. My dear friend, I know how it feels when you're Photoshopped Crashes, so just calls us eyes out because that's basically what's happening in this artwork. Just click OK, on C is the next lesson.
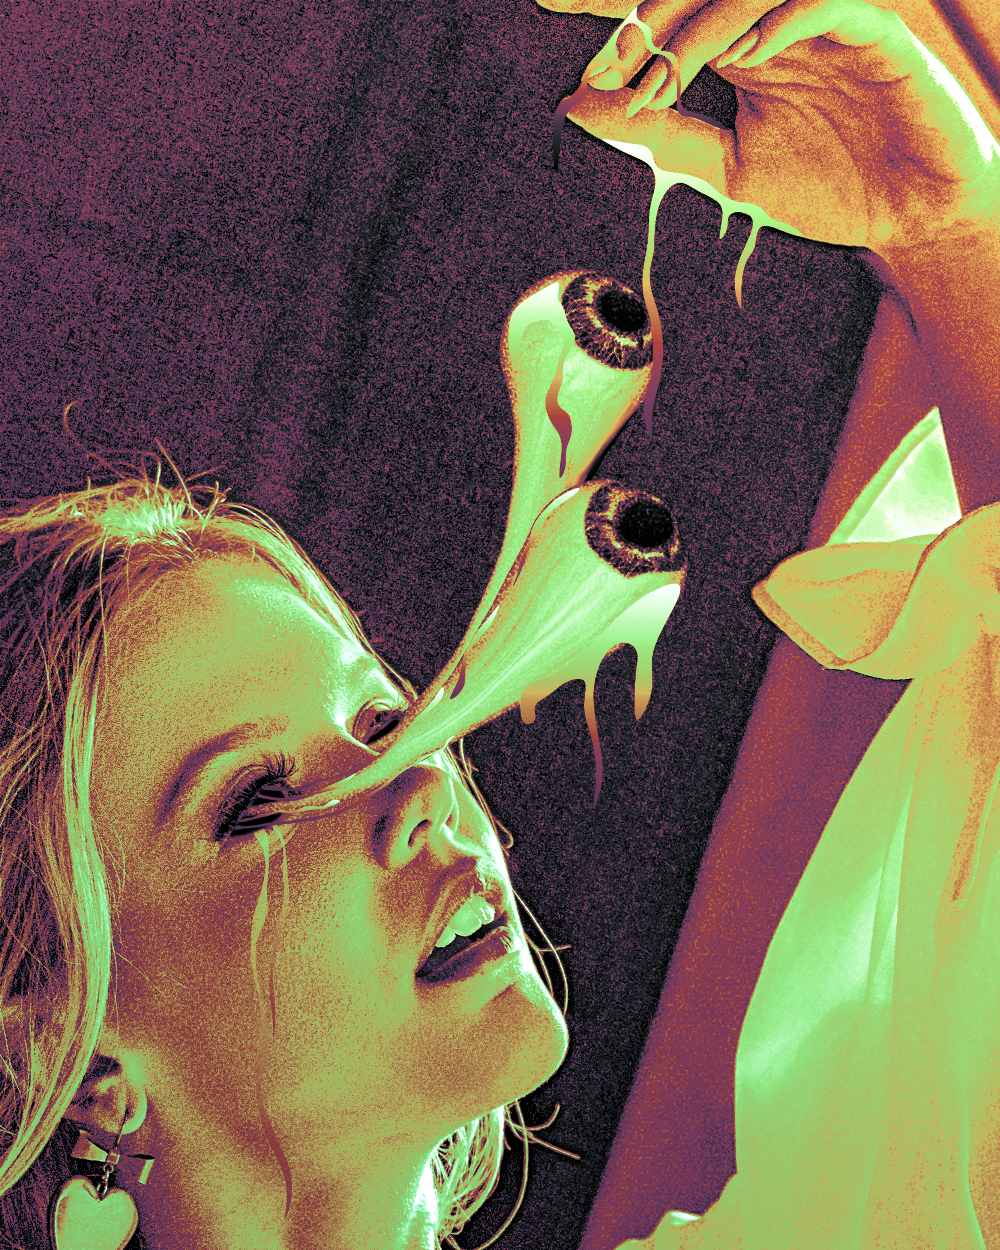
3. Create 3D Eye: Hello and welcome. My dear friends. Eat us. So do you know what? Let's listen. We added some colors and all the pointers effect today, not today. But on this lesson, we're going to create the treaty eyes. Sounds cool, right? So we're going to create this through the eyes that are coming out from her eyes. Okay, I both tether coming out from the part where I supposed to be. I don't know how it explains. So anyway, on for that first full, we'll need this image. Where is it? Worried that where is it? Oh, my God. Where have it this'll one. Okay. And also, you can download it from the project materials area on, but let's go to files. Let's creek New because we want to create new project for that on. Let's do it. Actually, which was 219 20 height, 1 80 Okay, addition defined. Let's just click create now. So I actually need to make this smaller on. I'm just gonna go to an image converse side, because this is too big for our project. So it's not common story. Well, actually, emphasize also emphasize on let's not go toe percent. And let's make it, um, Web. Remember, let's make it 50%. The same goes to high fifties percent, yet good. So now let's go here. Let's import our image. Let's make it. Let's click. OK, now, Andi, let's crop. Is this white places because we don't really need them. So what to go here? Click crop. It's crap. It'll on. Uh, make sure you have here zero so clear, so you don't have anything here on the knowledge is dropped. This like that a bit on this like that because we don't have to be done. You need to have any empty spaces. So now well, let's also believe this background where we don't need. So what is going to happen for sure is going to take this image and for sure, is going to warp it around a ball. Imagine their foot Bobo or, if you're from your, say, football tactical software. I mean, it was around, so basically, imagine around both on things for him is going to take this image on is going to warp it around the bowl. So let's go to treaty. Let's go toe, you mesh from there. Let's go to measure transit and let's select sphere. I'm a recording. You're saying I can not to wait a bit? It's going to calculate all this stuff is going to ask us whether we want toe switch to three D workspace. Please click. No. Okay. If you click Yes, by accident. I will tell you what to do. But let me just click. No, let's wait. Wait, wait, wait wait On both ka boom years our I So here a few important things. First of all, if you clicked yes, by accident. What ask you? Because I want to switch to to divert space. Just go here on go from three D back to essentials. Workspace and other were important things that in case your three D functions are great out which means that you cannot use them that miss them Something is wrong with your video card on, You need to search for solutions in Internet. Just Google. Just write something like Oh, my d functions in fourth grade out because there can be turns off solutions depending on what exactly is your problem on? That's what you to go and look in tow every case specifically So Oh, your computer is just toe week for the separation. That could also be the case. So now when we have the I and as important thing is that you I could be dark on the outside . You can see my eyes pretty bright. I can see everything here is that I need to see Andi. I want to show you how you can make your eye brighter in case you're treaty. I is too dark. Okay. If your eyes exactly like mine, it's if it's not dark, if it's bright enough that you don't need to do it. So now for the falls. People whose eyes are darker you to go to three d panel. If you don't have it here, just go to window and find to be here. Okay on. Then you need to click or environment. Okay. Uh, I need to go to properties panel on. We need to change the brightness of our environment. There is no way I could be too dark is because your environment is too dark. So he has seconds. Have caller. If I just click here on if I make it brighter, if I just bring it higher as I guess it's getting really bright. So depending going help. The dark is you are You can make it brighter or darker. You could also make it like reddish and stuff like that. But my I was actually fine. So I'm just I'm not going to change anything on, but I'm just gonna cancel. But for you if you I was just click OK on. Let's go back to treaty on. Um, let's not go to sphere. So let me explain. What do we have here now? When we have normalized, your eye brightens. First of all, here we have different layers. Okay? You don't make them to this layers visit because this letter is just to deal there for right. But here we kind of have the structure off our through this place. We have the environment basically waters around our to the object. We have the scene basically what we see inside this scene. So the I, for example, because we can have multiple to the objects. In our case, it's only wanted object way have current. Few is basically the camera from which angle the camera is looking at right now. We're just looking front on the half sphere squares Basic resides on. We're going to use it in order to, you know, rotate. I make it look to the left tridents on. And also we have infinite light. This helps us to change the light direction. So if I click here as you can see the existing activated and now using this tool here, as you can see, it's rotation talks. I can just click Ian Jacks. And when I do that, I can change the light direction that comes to that. So basically, for example, if if it is like that, that means that imagines that sun is somewhere here as bringing brightness from right side . You can also look yet this top if I changes. As you can see, it's also changing on Now, for example, I can make the likeness come from back. But we don't want this. We want this to go to come from the top, just like it was originally. So I'm just going a place it like that. Yeah, this is good. So it's not click on sphere. Good on. Um, this is fine. So far, And not or not. Now we rotate the I top so he have an atmosphere. Cannot spare my terabytes. Where? Let's actually, cause this on, I can go again to this tools. And now, if I click this toe nice going to be responsible Not for the light direction, but for the direction of power to the object knife. I just click and drag. I can just change words, eyes looking at How cool is that? Oh, yeah, baby, imagine how many cool things you can do this partnership. And also, by the way, just toe let you know have ah ab separate three deep courses for Photoshopped to date where I teach people out to use porter shops through the function or in order to create cool artwork so you can take other classes as well because it just cuts. We're going to focus only on this. I good. So now when we obsess, um, what do we need to do? Let's go to layers on there. Now, I want to bring this guy back to our original project where we had to go on your to do that I need to do is you click right button. You go duplicate layer. You choose here. Document where you want to duplicate it. We want to duplicate it. Toe ice out which is this one? Yeah, it's I called it ice out when I was saving it in last lesson. You just choose the document. That how you called it. So it was the name that he called it on. But I'm going to name it three d. I basically Yeah, let's look OK now. So it's copying. Gets a knife to go back to this project full. We have the eyes here. So now let's actually close this three d this one. We don't need it. Let me just let me just close this. No need to save this. Know it good? Yeah. In case you're wondering, what is this project here? Don't worry. It's not connected to our class. It's a different project. Okay, Nothing to do with us. So now then the abs is What do we need to the first? Well, not we have a combination off our images which are just to the object flat updates on the two D objects on the We need to select the direction of Farmer I first of four. But let's first create a duplicate of this because we need twice regret button Go to duplicate where and click OK Let's turn off one of them. Let's go here on. Let's first use this one. So we need to change the way it's looking. So let's see. I don't remember exactly which direction why I was looking actually so Well, okay. Looks like both of them are looking to the right. Let's see, How long does this tutorial OK? It's fine. Yeah, Both of them are looking to the right kind them So yeah. Let's do this. Let's select this. Let's make sure you have the rotation tool selected. Go to treaty. Make sure you have sphere selected. Not the scene, but sphere. Very important. OK, on now if I just click and, like, I can make it look to the right. Yeah, it's fine. Even more to the right. Yes, this has got So it is going toe I number one on um, let's not go here now. We need to convert toe just normal. Where? Not a dealer on. In order to do that, let's click right button here on this I So here we say stuff like Orender to dealer. We're not going to do it. We're going to use comfort, too. Smart object on. Let makes for you about is the difference. First of all, Random instead is going to render this I in the highest quality possible. Onda. It's good if you really need high quality. If you have some big object and use high quality, then you should render it. But in our case, that is going to be small on. Even if I just choose comfort to a smart object on, it's still the quantities still going to be fine. So I'll just cucumber, too. Smart object and I can just move It just clicks click more feelin just moved like a normal image. If I zoom in as you can see, the quality is fine. So this is good Onda and let's not go to a 2nd 1 Let's turn this on but again, go to today, go to sphere analysis. Also, rotate this. I wanna Tatis probably like that. So this this needs to build different from the as I I guess on, uh, let's click. Goto wears. It's actually yeah, but it's also illegal, but encumber too smart object on a boom chicka boom. So now let's go to follow. Make sure to save this on the next lesson. We're going to, you know, at things through the eyes to make them basically come out from the face. So, like that Ana, it's going to be pretty cool. So you guys in the next lesson my bike. So, for example, in the final artwork, if exhumed closer, you see here this type of little little points or here's well, that's exactly why is that we have them there because I use the pointless effect. So I get in just small adjustments. But it makes things so much cooler. That's it. For the first lesson, make sure to save this. Yeah, don't forget Goto file Andi, save as I watched a bunch of good crash and then you will want to kill yourself. My dear friend, I know how it feels when you're for the shop crashes. So it just calls us eyes out because that's basically what's happening in this artwork. Just click OK on to you in the next lesson.
4. Use Liquify Tool: Hello and welcome back, my dear. Partial magicians. How are you? So today we're going to, um, ads this week with liquid affect our beautiful eyes. So let's see how we conduct. So, um, first of all, let's go to our eyes on and I'm gonna first will make them smaller. So let's just like for so awesome on you can click on this one that you can hold control or Koeman. If using back, click on the 2nd 1 Go to edit free Transform on Just make them Sim Moeller Most smaller Ondas This should be fine. Kind of kind of. I think it's good. Yeah, I think it should be fine, Onda. Now let's first of all position on the rotate them so the 1st 1 is going to be somewhere. What is going on? So the 1st 1 is going to be somewhere here. The second was going to be somewhere here on Wilson. You to rotating shovel, Choose this month, rotated free. Transform on. I will rotated just a bit like that. This should be good. Hey, let me put it above because this one is to be above because it's caused her to us on dumb this one. Let's also rotate this on. Uh, this one. I'm actually gonna rotated and more. Put it somewhere here. Good. This is needs to be higher. Okay, so let's not select this one. First falls goto filter on liquefied, like for five basically obsessed toe liquefy object on. Let me show you how it works first. Before when you open it, you're not going to say everything. You just going to see the I most likely on in order to say everything. What you need to do is ah, let's go here. Let's close this, for example on women called us. We will get to this view options. And here you can see sure backdrop. It's turned off for you just for that. If I turn it over as you can see, it's only I if I turned on. But I say everything. I also make sure to have the same set things like I do under no, um, let's girls with closer. So books. Let's use this class button to get closer, not so cocky. And choose this tool which is called forward work toe. Basically, this will helps us to click and drag basically toe stretch objects in order for it to work . First of all, make sure pressures 100. They see those 100 now. But just give it a try. Fight three contractors for reports going to happen. Well, magic is going to happen. We can click on drugs. The I on that right now. You can see we can't. We can drink on this. Decide. We cannot do it with this one because we have only this I selected when we opens electrifying effect. And I want to make this out with bigger. Okay, enough, For example, let's click and drag. So protection needs to go down good like that. Awesome. So this approximately how being tablet? Let's not make this smaller enough. For example, went to small we can go. And, you know, at just some was a curse. Maybe producing there too harsh. Okay, I think this looks good. Now you can't just go back. Yeah, I think this looks good. Let's take okay now, because this is the first high. Let's not go on to the 2nd 1 Let's click here. Go to filter and again, liquefied, It's against you mean but selected. Let's now, go on. Um, just pushes down. Okay. Uh, now, as you can see, I cannot push it anymore. It's getting to seeing that means I need to make this bigger. So let's make it 75. And now let's go and try to push it again against he I get more off the eyes on. I can actually push it down. So let's drag get drag and drag, drag, drag. Drag it on each would work. I also actually want toe push the, um, I need to give it some curve. Basically, let's not make it smaller now. It is too big. So we need toe. Make it smaller. Began someone to play with it. Okay, this looks good. Let's think now. Okay. On the boom Donna, first full. Let's click the 1st 1 Let's create a mask. So if you just click yogic and Damascus created, let's go to our brush toe. Right, But interest, brush toe. Make sure you have black color here, selected as the first color, and also, as you can see if he has this kind of weird brush, but we just need a circle brush, so I'm just gonna go and change it on you. Most likely to go to have circle brush. But if you also have some kind of weird brush, you need to go toe brush settings. If you don't have, it's here. You can go to window and find brushing things here on now Hopes, Hopes I need Teoh. So, like just a normal brush. OK, make sure spacing is 1% on the, uh, hardness is actually around 80% on This is good. So let me go to wears. When I talk too much, it gets harder to talk. That's already sort of. Listen, I'm recording in a row now. It's doing a little bit to the 1st 1 on Dhere first for what I want to do is I won't gonna have black caller make sure passed down the percent 400%. This is normal. And make sure you're on the mask. Okay, So always one of your dancing. Make sure your settings I exactly like my so not the image, but the mask. Now, if I go and start drawing here with black color, as you can say, I'm removing some parts off the liquefy effect on. Of course, If you know how must work, then this is not going to be surprised. If you don't know how masked works then please go and which some lesson or class on mass because that is very important for in general just took great dancing in portrait. That's like the basics and you to knowing for sure. So, um, okay, this is fine. So let's creek, right? But let's actually go here. Make harness on 51. Makes out with softer. So like that should be good. Okay, okay, now let's go here To this I was Let's click here. Let's create mask for it as well on the little game. Make hardness back to 80% approximately. So now this I we need to first for making out with Sin RC Kansas eyes saying, But this one's kind of sick, so we need to make it scene and we're going to do it just by removing just by drawing here with black color on the mask, just very moving some parts of it like that on. Let's also make sure we don't have it. Um, I propose I I think I took too much, so if you took too much, we can just go back to a white color on bring back, back, back some of the stuff that you removed by accident. Let's go back to black color, Ana. Yeah, well, this is kind of fine, but I want to actually make it even seen Earth from here as well. And also, it needs to get seen that close. It was the end. Okay, this is good. So let's how long is this tutorial? Okay, um, I think we should stop here on the next lesson. We're going toe toe. Continue working on the ice. We actually, I would say 60% done with the artwork we did all the most difficult part on the arrest is going to be pretty easy, I would say on, but we're also getting closer to actually creating something really cool. Will connect this to the eyes, make some liquid drops from here. Completely changed the colors of the whole image to make it creepy on to you guys in the next. Listen, my wife I love you.
5. Adding Drips: Okay. Hello, my dear friends. And welcome toe. Another lesson. I have some bad news. Apparently I have been recording for some time and I didn't realize. Not have. Apparently. Like when I started the listen, I didn't click the recording button, and I didn't realize that. So I need to do everything again now, huh? Well, let me turns his own. Yeah, don't worry, Zisis to here. So now what we need to do is wait to actually get through those eyes inside so basic mean to make them black for that first. Well, let me turn over this ice. Okay, on, uh, I need to connect this to images, so I'm just going to put them in a group. Let's like the 1st 1 Like, hold control Common. Click on the 2nd 1 and now click on the group Boom. So I went to the group. I can just go here. I can click, create mask. As you can see, masks created andan else. Goto brush toe. Make sure black are selected and I'm going to start doing things eyes, so don't worry. It's going to be fine. Zastrow is going to look good. Feelings and so this is all worth it. She will not feel any pain. Don't for Yep. Um, this is good. Now let's go to the other. I Let's get rid off with us. Well, boom. Okay, this is not good. Let me check again. Prime recording. Just in case who I am recording. That's good. So now we have this. Let me go here on the click here and create. So it's caller, and I'm just gonna select that color click. OK? And I want to put this black color behind. So it's behind everything on DA and I want to make it a little bit noisy. The black color side. But wait for what? I forgot to do something. Let's go back to mask. Brush. Tool Under. Yep. Oh, here s well, How did that happen? No idea. Anyway, let's go back to this color. Let's not clear right about in here. Someone empty space Discover, too Smart object. Let's go Toe filter noise on add noise. As you can see, if I just add some 20 persons Which noise? As you can see, we get some really nice points that give our emission Nice feelings. This is good. Now let's turn on our images. Ice. Basically, it already looks pretty cool. Let's see if we to let's like this one. Let's go to the mask. Brush toe. I feel like I need to make it. Yeah, this is good. So Okay, now we need to create more off the drops will be me to create drops. Basically. So let me show you what I mean by drops so you can understand me better. Boom. Look at this Drops, you see, Because is Thanks. They're pretty cool. That's exactly what it means to create. I went to create this type of drops that going down on dumb is going to make everything look much more re a mystical. So let me close this. Okay? On, DA. First of all, with how long? This is not too long. Okay, so we go to create amusing pento. So not just mental, but actually Corbett shipment. Let's go here. Let's click right button on. Let's choose for richer control This mental health just automatically create curved blinds , which is very, very cool. Let's click on only on the here. What we need to do is make sure you have here shape selected. Okay, Now make sure you have here, Euler selected. Make sure we go toe feel on recon, Grady, because we actually drug radiance, Onda and the great and actually to go black to white. So this is fine. You can just click here, but now it actually is to go back through it. But black, White Grey, I would say, is that we'll click on this car. Let's make it just great. This is fine, lets people cape. Good. So now if I just go on and start driving, let's start from here. For example, let's just start create. If I just started clicking with what's going to happen when I click possible is that must be going to create this curved lines. Okay. And also what? Let's actually go back. Story back again. Back back. Okay. Why is that? Because I forgot that we need to get rid of the stroke. Let's kick here on the stroke on that click. No background. In case you don't want to go back, just go traded and here you can go underbrush toe or total estate So good. Now let's do it again on Dow. Start again. If we just click, click, click as against Bush about well, he created this curved lines When I click, if I just continue clicking boom, boom automatically lines. Wow, I can just continue clicking. I need to make it look like it's Ah, drip. Think. Basically, let's go back. Let's make it out straight. Are so okay there isn't why we actually don't see it because it's located behind I. So just put it on top of Xai hoops on Boom. Now we see it. How cool is that? So now first, let's meet Zoe's with darker because this is too bright. Let's go here. Ah, click on this line. Double click on and make it darker like that should be fine. It's like, Okay, now let's not click somewhere here. Just don't display to see how it's houses looks like. OK, and now let's go and create more off this on it. Medical with wood right now. But don't worry, it's going to be find later. So on. Let's just create in your empty layer so that we don't so we drawing on a new empty layer on Let's start doing this again. So again we can go here. We can create this really quick drops so It's like that again. It's great nuclear. Every time you have finished doing one great annular, I want to do something that is actually coming basically from here. So, like, like from inside size Good again. Something that comes from here. You can't zoom in for that if you want to. Was not see? Yeah, it starts looking really good. So let's continue. Um, let's do some more here. Some privileges going to speed this up just to, you know, So we don't I don't spend too much for your time. And you can just because it's basically repetitive work create new layer on the same we should do for this one as well. - Ah , let's do some here talking from the hands What's actually saved this as always. Gonna go crazy for trump crashes. - Good . Okay, I'm tired. Yeah, Let's again saves this on. But that's it for this lesson. We did a lot like, literally a lot. So I see you guys on the next lesson. Don't where they were going to make this look so cooed by bike
6. Final Coloring: Oh, okay, guys, this problem is the last. Listen, I can't believe that we're almost done. Who so, um, last time when I was doing this basically liquid things, I forgot to add some from Zai. So I'm just going to quickly do it as well. So basically, I mean that, you know, just I want toe at some of them coming. Kind of like, done from here. Let me go back, like, done from here from the I. I would like that. So just to add some more of the failings on natural, I'm gonna place them, like, behind the eyes. So that here? Yeah. Good. Okay, this is fine now. So now what went to do it? Let's actually select all this and put them in a group. So I'm gonna click on the 1st 1 I'm gonna hold shift Click on the last one and click Group . What up? Now? I want to go here. Just click somewhere here to make sure you don't have anything selected. Go here on choose, um, black and right. Yes. We're converting everything toe black and white. I know. Sounds crazy, but stay with me. So here, first of us against women covered everything to black and white. This, um where the liquid parts are starting to look really, really nice, Onda. And what is actually this on? How do we use this? Black and white adjustment were here We can basically say which colors you want to be black which comes We want to be wiped. So it's like a custom black and right. So, for example, let's go with threats. I can make reds brighter. I can make them darker. I can make yellows brighter. I can make them darker and so on. So like that you can't control what exactly want black? What exactly want to be right. So here, off course I have specific numbers. I don't remember them by heart to have written them down just to make sure we get exactly the same colors as we had emerging All artwork. So it's ah, it starts with minus 27 7379 44 35 on 80. 35 on Oh, that's already right. 80. Good. So that the cars that I choose or during loss artwork Okay, what is now you ask So now we actually need to comfort all of them together into a big, smart object. But first World me go and save this just in case. In case on that, let's click here. Let's hold shift and click on the last one. Let's now click right button and click Convert to smart object Boom Shaka laka Boom Miss if I'm recording So now when they have this mean to bring colors back on the first of all, let me show you what actually happened on what you can do here, just in case you want to go back and edit some of the stuff. Now everything that we did is inside the subject. If you want to go back and I did something like, let's say, change the shapes and so you just have to double click on the someday if I just double click boom, boom, boom! As you can see, a separate project has opened and I cant edit anything we want here. So, for example, let's say let's say I want to turn over the second I just click when we start off and I can goto file saves this. Okay, I know if I go back to the original project ice out as you can see now we don't have the second night. So it's like that. You double click here it opens, you do anything you say and then you go back to original project. It's not me. Turn his own what I want to show you. Not right now. You're probably wondering. Wait, But why did we edit the colors if he made in black and white anyway? Well, let me show you white. So let me opens image. Here's our images that reddit it. As you can see, it's edited. We have the Camero filter here. Let's tone of calm, unruffled and see what happens. Bomb. All the details are going so as you can see, depending on the covers off the image, black and white effect is going to be different. That's why I did it the colors and made them brighter so that we can see all the really nice details. And then I made it black and white. Okay, I hope this answers your question. Let me goto file safe to make sure this is back to normal. And let's not go to the original project, So let me closes. Good. Now let's go to filter. Other are nature's pages. So this basically will help us to bring to make it colorful again the black and white image . And it can actually work Also in black and on images that original black and white. For example, if you have downloaded an image which is black and white, you can go to H is greater, so adjustments on you can make it colorful. So, for example, if I choose here, is this parameters hs seller to be on depending on which parameters you choose, your was going to get different colors, but I'm choosing this one's Let's click. Okay. Boom. Well, that's this. So now, of course, me to change the colors. I'm gonna go here. I'm gonna open hue saturation on if I changes. Look what's going to happen. Wow. So I'm gonna do it minus 180. That's good. I'm gonna go toe brightness contrast. I'm gonna make brightness out with lower. I'm also going to make contra slower. Um, okay. This is good on, uh, not for them. Put already Looks fired as the last touch. What you can do You can goto cola balance and here for them. But we can try to aided the colors a little bit toe. Give them some additional effects if you want toe. So you know, let me just have a look. No, I want to make a total with blue ish. Maybe maybe I'm just experimenting. Um, Let's see. We can go toe highlights, for example, Now we go take is the cause of the highlights on See if we can do something cool here. No, I did. When the changes. This is cool. Yeah, I like that. Like that. So boom, Shaka laka boom. How is that too, huh? That's it, guys, for this class. I really hope you enjoy this. I mean, we created a freaking masterpiece. I hope you agree with that on. Make sure to check my other classes as well. And I'm releasing new classes every week, almost almost every week. Sometimes I makes the week because I get too much work. I have to much caught too many clients. But I try to do because every week love you guys. See you The next lesson. My wife
 Photoshop Classes By Fred, I will help you get PRO at Photoshop