Transcripts
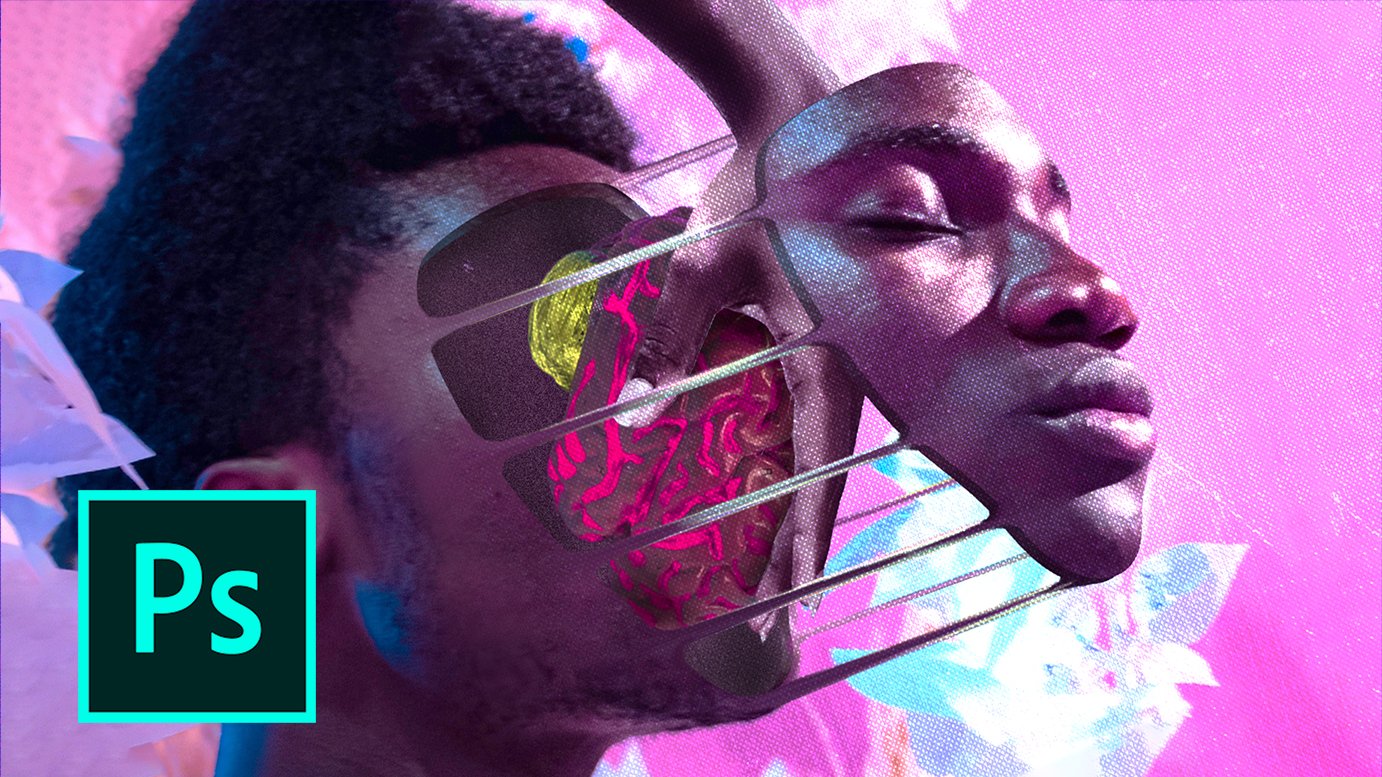
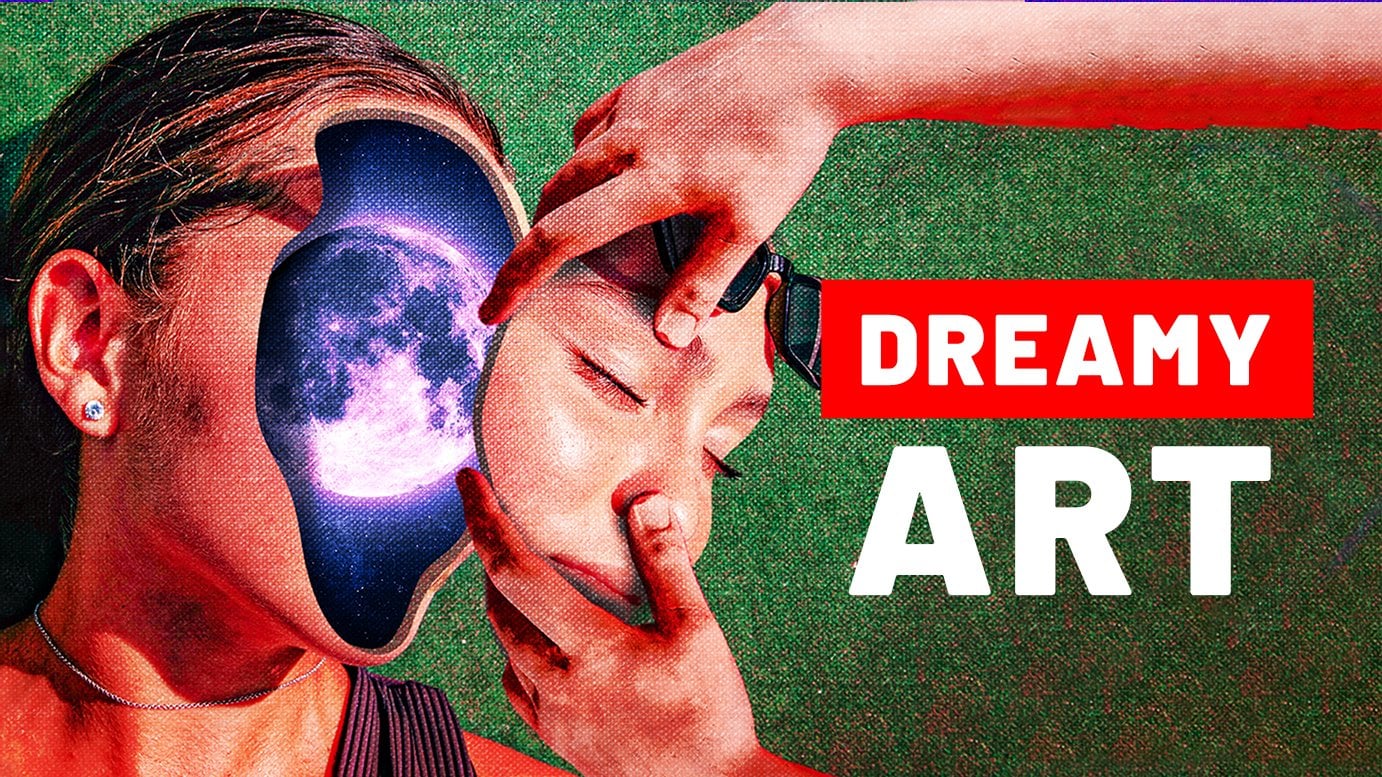
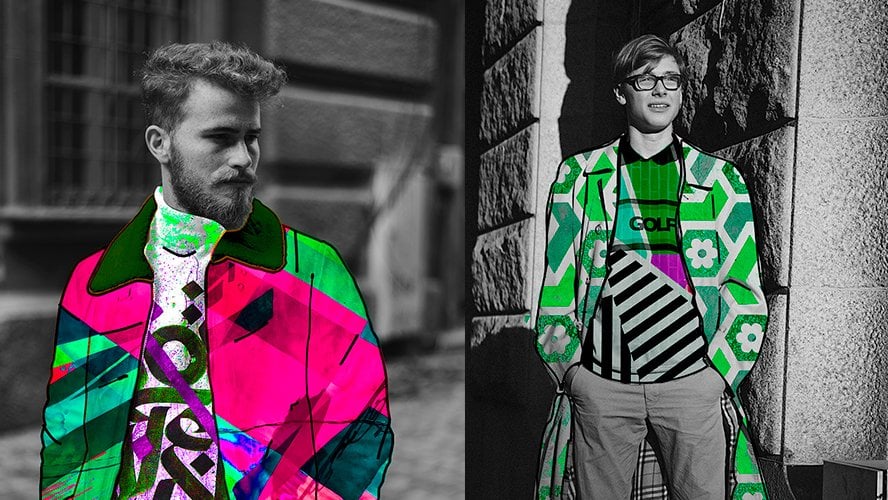
1. What will you learn?: Hey, guys, for it Here in this class, we're going to learn or to create two types off really colorful patterns and then create this artwork as a final project. Look at that. How beautiful on. We're gonna use our patterns. As you can see in the windows on. We're gonna call this supporter. So what are they actually two types of patterns that you're going to create? So this is the first type of pattern that I mean, as you can see, it's pretty colorful. The same type of pattern is also used in this image here for the texture on her mosque on it's also used, for example, in this image for her skin on. It's also used in this image as well. On the cool thing is that you actually can create this pattern from any image, like literally any image. How crazy is that? For example, this pattern was once on image off on ice cream, and now it just looks like a pattern. London's The second type of pattern is actually this type of pattern here, uh, also this type of pattern. So it's also part of that. I used a lot in my artworks on. We're gonna cut in further shop using secret evenings that I actually invented by accident . And the reason why I say it went because actually haven't seen anyone using that technique before or showing cartoon. So it's old. I was just working for the trip, and then it just excellently happen. So I was like, Whoa, that is so cool. And I will share that. Busy. Of course anymore. Guys is gonna be really interesting and crazy journey for boss offense because you're gonna learn so much new stuff that you have never seen before at this. I hope so. But it is so advanced stuff. So I'm sure you're gonna enjoy it and see you on the next lesson. My right.
2. Transforming any image into texture: What's up, guys? And welcome to the first lesson I excited. Well, I hope so, because I am really excited. So now our first listen, we're gonna start learning how to create a pattern that I used for example in just after here, as you can see this pattern or in this art or gas, you can see we have a pattern here on her mosque or, for example, this kind of pattern on all of this partners are created using the same technique on it's actually pretty easy to do. So First of all, it is Goto astrobiologist. Click Create new. We just need to create a new project. Make sure which is 1000 height is 1 to 50. Make sure of your pixel. Selected resumption is 300 Komada air typical on our port is not selected. Allegis click create. And now, in order to create the pattern, we actually need to import any image. Okay, Almost any image. So the cool thing about this pattern is it. We can use almost any image to create that pattern. Losing that you need to measure is that the image needs to be colorful on its better eaves . Er's There are lots of things happening on the image, so it's not like minimalistic on, for example, this image here. I really close this image in the project file so I can in the resources area so we can downloaded on. For example. As you can see, it has many different colors. Lots of things are happening here. We have many books and so on, so it's gonna be really good for a pattern. So let's just go to for the trouble of status image. Religious importance is from Let's make sure we have no empty spaces. Let's just make this bigger and let's click. OK, also go to layers. Let's go to background and let bridges because it over there and so useless. Let's like this are not going to go to filter on toe Blake. We fight. So what we're gonna do now is gonna make the image unrecognizable. Andi have different tools that help us to drag the image to the left right, and there's change stuff. You will see how we need to use a tool called tour clockwise, but I like to call turnout because come on, it looks like a tornado. You do agree with me, right? But for them belief I still exist on but it actually does. You will see in a moment. But before use it, make sure you have density 100% rate 100 also pressure 100 actually makes This has dealt with bigger Another example If I click as you can see, just like atonal it is going cork wise is twirling clockwise. That's what it's called work clockwise on for them so I can just click on drug as you can see, just starts twirling everything on That's actually what we need to do. So we need to mention that the image is unrecognisable Just world, anything you see Bom bom bom bom bom So this is gonna take some time and that's why I'm just gonna probably speed up this process on. You just have to troll. So now I can see, for example, here we have some holes which we need to get rid of off course. Onda. Here we have. We don't have really any cars. We only have like plain white. Oh, great. We need to bring some of the colors down on for that. We're gonna use the first tool here, which is called Just forward Work Toe and just helps us to drag things around. So here it all says brush options. So make sure everything is 100% except size size 140. Should we find So, for example, in order to get to make to get rid of this hope, we can just click and drag on as you can see, Boom. If I just click and drag, it gets written off the whole I can just throw over the whole like this. You can just, you know, to like that on it's gonna go the same here. So now what you wanna do? We actually want to drag down a little bit over the cars on here. You have to drag around, actually know for example, this. You can just drive this down. You can just drag this down, and so I can just drag it like this. So just make sure that colors are almost everywhere. Cool. A nominee of dances. Just click. OK, um, so it already looks pretty nice. Well, but we're not finished yet. So what? Actually to the right now, let's go to image. Let's go to adjustments on Let's go toa que situation and here 1st 4th bring the situation to maximum. As you can see, it's already really colorful. It looks nice. I mean, you can't play with you. We can change the here to get the course that you need And you can see we can create different beautiful patterns for them. For I didn't like this one, Ana. I'm just going to click, OK? And Boom, How cool is that? So now, for example, let's say you want to make sure that here you have different colors and here you have different colors. So it's separated for that. You can actually go here, click and then you can choose Hue saturation, Boom on Now again, I can just change the hue. As you can see, it's changing everything. But we're gonna fix it in a moment. Don't worry on what I'm gonna do right now. It's me. Just closes. So you have the mask on off course. I mean, okay, he had been using for trip for a while. You know, I masks work because that's like the basic off for the shop. We choose the musk we go here toge radiant on. We just chose gradient tool on we go here, make sure you have here black and white collar selected. Make sure great and type is lying near this one. Selected mode. Normal or possibly 1% on when I have their ask selected. So I get no damage. But the mask I can just click on drag and see what's gonna happen. Boom. Not house. Image is the original color. Another half is the cars that we just change with your situation because they have the mask . As you can see, everything wears black. We don't see the effect. This is the image that is below. So, as you can see, we see as the image below. And here, this is the effect. So I can just click twice here, and I can go again on change this year. And as you can see, we can experiment with different colors. How cool is that? Um, yeah, That's actually what I like. It looks pretty cool. Let me close this on. Now what we're gonna do, we gonna make sure that it's all together. So I select this and then I hold control or common on I click here. Boom. As I click right button on my mouth and I click convert to smart object on Now it's altogether. So now I can just use it in your way. I want to use it. So, for example, many cases off the artworks, for example, here I used it in a shape like this. As you can see first I created the shape on that I created. And then I applied the pattern on the shape on Dhere again for, for example, here. I just used Mask in order to make sure that I see the pattern only on her hands. What, We're gonna be here just something really easy I'm gonna take I don't think this image what was a guy on? I will bring it here. Let's make sure it's full size. Let's look okay on. I want to make sure that the pattern appears only on his T shirt on Let's go and I will go here. Click right, and she's quick selection toe so I can actually select the guys T shirt on. I will just selected boom. As you can see, it's much dissected because it's pretty easy selection. Now that I'm actually brings us down. Let's select damage and if I click create musk against notes on his T shirt. What we were do right now is we want to select this pattern way. Want to go to normal on that? We can actually experimented with different pattern options. For example, we can multiply it light and answer the door to create different effects on his T shirt. As you can see, overly looks pretty nice. We can just go on, you know, work with other the fates answer on so productive. This looks pretty nice. So it depends. Really, What were you want to go on? And let's also you want to change the color so you want, for example, brings the pattern to be down there up. You can just go here if you click on this link, which is the link between the image and the mask. Now this basically means that you can move the image without moving so much So, for example, nice like the mask is a image. I mean, as I go to move to. But I can just click and drag. As you can see, I'm dying the pattern, but the mask is things the same. That's why we can see it here. So right now, for example, you can just play with it. Places. Let's actually links them again. For example, if you had a different image, let's say that's just an example. You you have to repeat this. Let me just make this bigger again. Let's say I want to put this pattern inside this frame here. Lester, speak okay again. What would I do? Is ah So first of all, let him actually brings us down on Let's actually did it. This mask here, I don't need it. So I can see is a pattern again. Eventually brings us up, as you can see. Actually, if you point the pattern with image, you can get pretty cool effect. You know, if you're bringing the pattern full of his image, as you can see, you can experiment with. That s well, but whatever the right now, I want to put this inside this frame so it actually brings to normal. Let me turn this off on and I wanna go here. Click right on trees polygonal Asato on this. So actually obsessed to create lines for the selection. I can just click once as I click here. So just click on the edges as an click here, Click here and then I click as you can see, if I go here, I have to go to the starting point and click on the starting point where you can just click enter as well to finish this size against another Selection is created on the night. Need to turn this on and I just need to create the mask. Boom, as you can see now is the pattern is inside this musk. But again, um, what I what I want to do I want to cancel the link between them. I want to. Selective pattern doesn't go to age it free transform. I just want to make this really, really small on bring it up so you can actually see. Moreover, the pattern fully that match the turns is so we can see more callers. Okay, Mom, is that with that said, let's finish resist lesson. And the next lesson I will show you how to create a pattern already without an image. So we're gonna just auto generate everything from further shop on. Then we're gonna create this amazing project on. So we're gonna have to create this pattern and then we will just create the project itself . So you guys know the next lesson? Bye bye.
3. Generating colorful texture: What's up, guys? And welcome to the lesson Number two. In this lesson, we will learn how to create this standing pattern. I'm actually it's a bit frustrated because before this, I did record this lesson two times and both times I forgot to turn on this Greek order and I was just talking to the camera. So anyway, so it's actually go to for the shop on and create any empty project, just like read it first time on. Very important. When you do that, you have to make sure that column Otis Energy because that's like the most important thing on Let's actually take an image on right now for that pattern we actually need to take also almost any image but going to take a bright image. Okay, he doesn't need to be that confident. Just needs to be bright. For example. This image would be fine. Just bring it inside father shop. Let him actually make this bigger. Let's click. OK, so we're gonna use the image itself, but we will need it and you will see how so. First, we'll just great in Europe to where now let's go here. That's great, Hue, saturation. Let's just change the here toe. Something real doesn't matter. And let's make situation to the Marx. Let's close. This thief structure is very important. You need to have an image. Then you'd have a empty layer and then utf your situation. Now let's go to this image into the empty. Where? I mean, let's go here. Click right and truth mixer, brush toe. Ok, so this barstool accepts us to mix everything that we see here. Just make sure you have here. Sample were selected. Make sure all this is 100% except the last one. Make sure both of this are selected. And also, as you can see here I have I don't have a circle brush. Most off you are going to have a circle, but have a different kind of rush. Sybil just changes right now on for that I mentioned clauses. So if you have, for example, it's a different brushing. Nothing to change it. You can always go to window and then you can go to brush settings. And I don't have it. Yes, You can see this panel here and here. You can change it. Toe this. Okay? Just very important. Don't change it from here. You have to change it from here from brush settings on when I choose just a normal circle with the hardness euro Let me Let me actually makes this side sheltered bigger. Um, bigger. Okay, let me closes. So now when I start drawing on the empty let's see what's gonna happen. Tom magic is gonna happen. How cool is that? So why do we see this kind of really interesting colors on how does actually happen? The whole thing is that we're using a pro called mixer brush. This brush makes us everything that this is on the screen right now. We have here first of all, just an image on an empty layer. And then we have here Hugh situation on here. For example, if I just double click here on the U. S, you can see we have many different cars, so make sure brush just makes us all this course. And that's why we see this kind of beautiful colors. Let me actually go back here Are not, for example, always to do. We need to make sure we feel everything with this mixer brush. So we feel everything with this card, but whatever not do it actually causes. I want to go to brush settings again. And here, for example, if I get calls, as you can see, receive this kind of spacing between brushstrokes, we can see kind of like the circles going on, that's what that's because you have spacing. So it actually makes pacing to zero. Let's actually make my brush bigger and not, for example, if I start, she was gonna happen. It's a different picture already, so that's what you have to play with it. I will make it, Let's say 4%. Let's see now, Yeah, that's much. That's what I eat. So 4% is actually fine. We could also make it six on Boom. So now let's actually make this bigger. I just need to call everything Is my brush too big? So I just need to call everything with your brush. You can see we already get here. Different pattern, critical pattern. Also important thing to say that, for example, if I would use this kind of brush tip here this front, it would look differently. So, for example, again, let's makes a size bigger than if I drove. You see, we get a different type off cars so it actually go back. So now what we want to do we want to go here. We want to select Bozo's is because if I turn off the situation as you can see, it looks it doesn't look that good toe. Let me turn on. I want It's like both of them. So I click control or comment on Boom. Not both of them are selected. I mean, I hold control common and unlikely consist layer, as you can see not Brussels on my selected Onda like like right on. I just convert to smart object are not all together. And we don't need that the image so we can just turn yourself I need to go to filter on to liquefy just like we did last time And we're just going to do the same secret. We just want it makes everything. So again, I'm gonna choose this turnout at home on I'm just going to click, click, click, and as against and just gonna mix everything that I see on this house going all you can actually go just directly to this to here and can just, you know, start moving around because It's already pretty mixed. We just need to make a different, more mix. As you can see, just play visit. So this is finally just click OK, now and we'll look at that again. A beautiful pattern. So, for example, in that artwork, as you can see here, they gave you using different blending Martin or to blend them. So, for example, if I vultures, that image would actually see where it is. Where is it? Okay. Here. I found it. Then you will be able to find it as well. If I just place it here on make it bigger, bigger on logistical key. And if I now place it behind So what I need to do, I need to First of all, we need to convert it into a smart object. So it's together with liquefy. So if I just click here right on convert to smart object. As you can see now it's all one on again. Go to edit and free transform. And I can just make the smaller like this. I can put it here. Okay, I'm not, for example, if I just use different money, much as you can see, it's going to blend with screen. So I think I was using their lighten. Probably I'm not sure, but I think it was lighten on. But the thing was that, as you can see, so in that case I also make sure that it's in perspective. So I d turn it on and off course. I made the mask and so on. So here we're not going to that because this was just an example on well, actually deserve in real crazy artwork itself. That's it for this lesson. On our next lesson, we will start creating this standing artwork on DNO rule. Create not only the pattern, but we're all supposed them. Inside the windows were also change the content you can see. I also gave it beautiful colors. Who's That's it. See you guys is the next lesson by right
4. Creating our artwork: What's up, guys already? I hope you because you're finally going to create this artwork here. So let's get started. So first of all, just go to full trip and let's just create new project, just like always. Right on again. Make sure which is 1000 titles, 1 to 50 pixels. Selected results in 200 on DCAA remote air G B color and also outboards are not selected on Just click create. So let's actually get our image on. Of course, you can find the images the project files in the resources area on. Let me just bring this inside for the show on. I wanna make this bigger. So there are no empty spaces left like this. Good. Yeah. This should be finally just click. OK, now also go to his background. Landless. The first thing we actually need to do is me toe. Give our image Nice college. As you can see here on, we're gonna do that using Camero filter. So I choose image I go to filter and then we choose Camero filter. This filter helps us to change the colors. For example, ovf here, temperature attained. We can, you know, just play, visit on. You don't need to repeat this after me. I just want to show you what this actually does. And then we have here. Contrast. You know, you can make less more contrast. You can play with exposure vibrant on other stuff so you can just go and experiment on your own and also pretty causing that this has is, For example, if I go here so adjustment, which stands for hue, saturation and luminous, for example, I can go to hell and then I can choose separate cars, for example. I can choose threats. I can make the red more pink or you can make the morning. As you can see, the color of this thing here is changing, you know, and I can play with Aquila's and so on. So what we're gonna do here he is, Actually, I have ah, ready file that you can just apply here on you will have the cars that you need. So for example, if I go, if you go here and then you choose load settings. So I have created a file called colors on. You can also download it and use it. You'd have to slay this file boom and you can see cars automatically changed the way we need them to be. So as you can see here, for example, I changed my gentles. I made them or red blues. As you can see, I made them really, really blue, as against four examples. Is color beautiful? Cause that is because of this booth here. If I change them for months, you can see it's changing. So it looks beautiful on Dhere again. Everything else is done automatically going to do just click. OK, so we don't need to spend time with that. But of course you can go on. Experiment yourself. You can also make another color if you want to. So some things that is Ah, according to a taste. Really nice. So just click OK, now All we have left is to create our pattern on Just place it inside this Miralles. It sounds easy, but it takes some time. So First Villages Creek, great new empty layer was go here on credit your situation just like we did during over lost. Listen, let's make saturation maximum on. Let's just change your toe something like that. Let's close this. Let's go trouble there. Actually, let's make situational to lidless. That should be fine. So going back to our lair. And now let's go click right and chose mixer Brush toe Andi again. Let's causes me to go to brush, say things just like we're doing our last lesson. I mean to choose brush with zero hardness and also spacing a little bit smaller. Something like It should be fine, but increase the size of our brush even more. And now we can just start drawing. So like this that's increases size. And also what about to the actual Let's go to layers on us. Actually, go to situation. Click double here, Let's make it maximum. Yeah, that's much better, right? Let's close this. Let's goto our letter again and just continue driving so it. But if you go in circles like this good, this would be fine. Let's actually now come like them. So if I select this letter as in the help control common and I click here on, then I can click right on Discomfort, too. Smart object. I am not ready to go to filter on liquefy so, but this time we're gonna do liquefy in a little bit different way. I usually tell you, just do whatever you want and liquefy Just, you know, do whatever you want. But this time we actually what we want to dust against here it looks like a whole it looks like, you know, just getting, like, circle on like a tornado on. That's why we will try to replicate this effect. It's not gonna be off course exactly this one, because every time it looks differently. But we will try to do our best on first degree to do is willing to change. Take our turn, Otto. Religious. You know, going again around this place is here and just do whatever. So just rotate them and you were want toe way down. We can go here through the 1st 2 on business too will try to create this whole. So, for example, I can just go on go like that. As you can see, it looks like a tornado. So this is what I want to do, actually. So here on the borders, you can do whatever you want, but here you need to create like a tornado. I could turn out the rotation to the middle to the center, so just make sure There are no holes on the borders unless click OK, so it's Lexus on again. Let's click right on trust Cumber too Smart object. So bombs And that's all together. Let's go toe age it. Let's go Toe three transformer. Let's actually make this smaller way into place it here. But we also need Teoh. Put it in perspective. So, for example, I need to make sure that it's not like that. But it's something like that. So it's in perspective on if I just click right on just perspective. I can just click on drugs down lasers. So just like they were, is a mirror on you can actually, you know, do it according to this line here, so you can just click this button and bring it down like this from just click OK on opening to the right nights just to create the muscle mass. Returns this off and now we can go here. Click right on shoes. Quick selection to this helps us off course toe. Create selection, say if I just click, click on both. Mexican says it's elected already. We can just zoom in a little bit on dumb. We can make our brush smaller, we can choose minus toe and we can try to get rid off. So this election on her phrase good listeners a mark on Let's not turn this on and logistically create mask. But before video, we actually want to create a coffee off this where because you're also real, apply it to the left and to the right. So, in order to create a coffee can just click right here and go to duplicate on click OK from Let's turn off the coffee. Alice. I mean, the storms a liberal on. Let's just select this on. Create a mask. Delemus. You can see it's inside the window. Ho calls that now if you want to, do they actually to make sure that we also see it here on for that? Let's go Brush Creek, right? And just use normal brush. OK, well, let's make it bigger. That's also actually make hard in a 0%. Let's actually change election laws make hardness, not zero. I was wrong. Sorry about 80 85 on. Now we're gonna believe is the mask. Because, for example, if I change now is a called toe white I just click here whom now It's white ice like the mask. And if I start drawing on the muscles, you can see we start seeing the pattern to come back because of his black color. As you can see, words black, We don't see it everywhere is right. We see it. So if you know how much exercise and it shouldn't be that difficult for you to understand what's happening right now, we just need to call her here like this boom. So it actually makes a smaller. We just need toe draw over here. You hear what we actually want to do? We want to create a straight line from here to here, so it's straight on for that. We can actually do next. So it actually make my brush smaller, ultimate. And if I click ones here, just click boom. And then if you hold shift on, then you click anywhere here portrait without mostly going to draw a line from point A to point B. So we already made point A. Here we just click here as a whole, tripped and I click here whom, as you can see puncher what monthly draw a line from point A to point B and it's straight, and that's what we needed to do. So I just need to adjust some things. Now. We just need to change the 20 month Let's go to normal. Make sure have selected. The pattern was good, normal. And here we need to select pain light if I'm not wrong. Yeah, pain light. As you can see, it looks pretty good. You can also select, for example, lightened or screen, but when was like lightness, you can see we don't see it here because it's too light here. That's what I would say. Pin light is better on. If you think it's too strong, you can just go to a place that make it a little bit less, as you can see. Like this 90. Yeah, that's fun, actually, let's make it. What, 80? Yeah, like 80. Better as you can see, it already looks like a portal to different galaxy. So that's it for this lesson. On the next lesson, we will just put this pattern to the left on right windows on diff. Of course, if you can also do it on your own, your own, if you know how to do it or if you want to stop here. He just make sure to check the last video of this class. We'll show you as a cool, recommended classes that you can take in order to create some cool, advanced artworks because they also have terms of other class as well. So So you guys are the next listen. Bye bye.
5. Finishing our artwork: What's up, guys? Welcome to Gillison. Let's continue because we're almost done so close. So lost Sam, when we created this pattern here, also created a corporal fit a duplicate. Let's actually turn this on on. What? Actually want the first words? Bring this up so we can move it. And now we want to move to the left on before we applied into the window. That's also created another copy for the sort of Indo source. Click right, Go to duplicate on Just click. OK, Alice Turner off Bono's, um so that what you want to do is first of force makes it smaller, actually. Was a go toe edge it free. Transform on. Now we can just make the smaller like this and let's click. OK, let's not turn this off. Let's go here, click right and just quick selection tool. So I'm going to look a little bit quicker right now because we're just doing what we did during the last lesson. Andi. So I can just select this off story. Let's go back. I need to select plus not the minus. So I can select this from now on interest, like actually this part CSOs is gonna build with difficult, but still we can do it. First of all, I want to make my brush a little bit smaller so I can still exist. Particles here, not particles, but just parts. So, for example, this is because that's also all part off the window like this has. You can see it's pretty difficult for the father shop for do that, but still it does its best. Just like this part here. Nothing. They have done this. Let's turn on this. Let's just go here and click. Create mask on a game we can just chooses. We can go to normal. I mean, then we can go toe pin light as you can see the lots of things here that me together, it off on de. So let's go here. Let's like this mask. Let's goto a brush toe and now we just need to get rid off the parts. Where's pattern doesn't need to be actually on. How are we gonna do that? So that we actually turn this off? Let's go here. Click right where is it? And chose Magic Juan toe Boom. This will helps us to choose similar colors on Adam Tower selection So, for example, just make sure when you use it contingents is not selected. If I click here as you can see, test selected all the dark green cars and that's what we'd because now we can just do it them from the pattern so we actually see them. So if I turn on the pattern, what I want to do, he's I want to take my brush tool. I want to change the color to black because I want to deliver pattern. I want to make my brush bigger and I just want to go on through over it. As you can see, the brush is gonna draw on Lee inside the selection. That's why it's not affecting anything else. Ah, now we can go toe selection select on this select. It looks much better off course. If you want toe, you know, work more, you can get closer and you can continue working on it. For example, here, you can just, you know, make a parcel to it smaller so you can see what you're going, what you're doing. You can go back to this mask. You can make your brush smaller on. You can continue working for example here. As you can see, we need to get rid of this. So it's actually pretty long work. But off course it's worse it because that's gonna make you are to look better. For example, here we are saying to get rid off it here. So if you're a type of person that wants everything to be perfect, then it's good if you do it. And also here, as you can see, we need to get rid over here because that's actually top off the It's not the window Tom on . Let's see here it's a bit So anyway, you got hurt. I mean, it's gonna take you some time. Let's go do it by stand. Make it 100% Now. What we want to live in it to create is the same thing on the right side. So again, we have this copy let selected, but it brings it up. Let's go to our move tool, and let's move to the right and just do all over the same all the same thing over handle that sounded awful. It's going click right answers are quick selection toe on. Let's make this bigger. Let's elect our window that does make a small serving too slick, this part of the window, just like always. It's not gonna be perfect, and we'll have to fix it manually. Unfortunately, good outfit here Now we just turned his own and we create our mask again. We go toe. It's like the imagery goto penlight And then we can take brush toe but color and we can just start deleting. Just make sure of So it is a match. We can just start losing everything that we don't need in order to see what facts need to delete. We need to make a pastie less so now we can see perfectly. You can just draw, draw, draw. Or you can, for example, click here and then can hold shift and click Here on boards can sit out monthly draws from point A to point B, just like we did during our last lesson. So again, click here, you hold shift and you click here. Boom, you just draw. Good. Now let's go talk by saying make it 100% on. Um, how cool is that? So, guys, I hope you enjoy this on. Make sure to shake my other classes as well for the recommendation video next to this video after a speech so you can actually see what else am teaching on. Does that set? See you guys on run off my next lessons? At least? I hope so, so, but I
 Photoshop Classes By Fred, I will help you get PRO at Photoshop