Transcripts
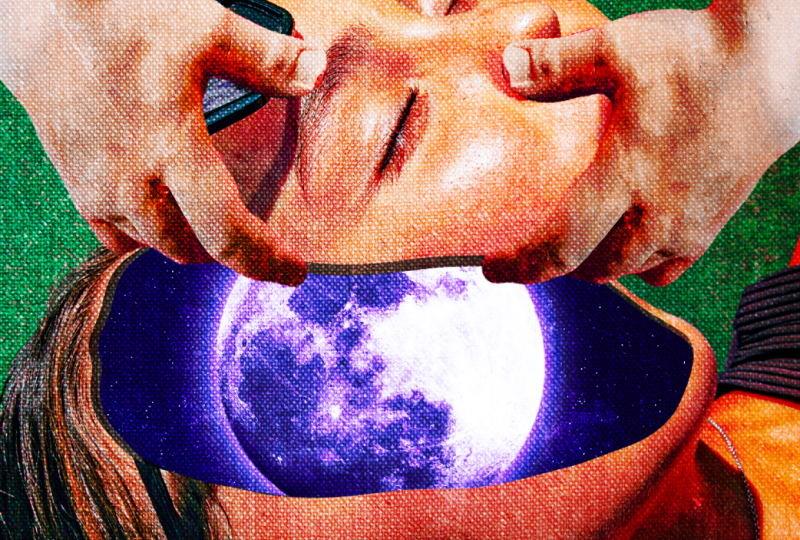
1. What will you learn and create?: What's up, friends? How are you? Welcome to this class where we're going to create a standing artwork, which I called Moon in Head. I know it's not the most creative name, but that's not important. All the cool stuff that we're going to trade in this class. That's what's important, bro. Start by removing some of the object and cutting down the face using courage for panto. Next step will be to hide the object that we don't need in our artwork. Afterward, we will add, adapts to the face to make it look like treaty and then import the image. And there, in the background rules need to. It is the cause of the image to make it look like a fine art. Next step would be to import them moon and the stars inside the face and finally replaces the hand and make sure everything fits image on. Almost forgot. Of course, you will learn how to add this interesting texture to artwork. Us. Well, I excited. I hope you're because I'm real excited. I mean, I love teaching, so I really hope you will love this too. And you'll get really was. That said, I will be waiting for you in the first lesson on waiting for Just click. Continue and go Bye bye
2. Giving our image stunning colors: What's up, guys? And welcome to the first. Are you excited? Well, I really hope so. Because I am so excited. I want to show you how this was made. So then we can discuss it later together. So OK, first of all, let's go to polish up logistically create your recon, go to file and creek new as well. So if you don't see this window for some reason, I just click create you also here we need to have with 1000. Are you making its in pixels? Okay, not points because anything else? It's in pixels with 1000 height Oneto 50. This is the birth size for Instagram artworks. I would say the results in 300. This will make sure that work artwork is high Quality column on air db caller background white onder If you got off this right and just click create. So now let's go home on import Our image on you will be able to download the files for this artwork in the resources area off this course is the resources panel or just you know, they're abyss or just a little bit less and cold, you know, downloads materials anyway, depends on which part from your we're you're seeing. This class is okay, but anywhere you will be, you will see it. It will be pretty obvious. So the first image that went is this one on when you don't know the rules? Is this image there the image off, Beautiful. Go lying down on the tennis court. Then we will have this image off a hand, which is actually a started hand. So we'll have to really tweak it around to make it look like a human hand or something like that. And then he will also download to call upon off profiles on. But I will. I will show you what it what it is later. Let's let's just take this image and places inside for the ship. And, of course to, you know, um, voyage this class, Anderson everything you to know at this, the basics off for a shop. So let me just make this bigger. So just click on Jack, click on Jack on day. I want to put this down and make it actually even bigger like that. So now, just compared to the original artwork to see, I just want to see that they're our sizing is right. So as you can see, this is ah, final. What is it is Oh, maybe Yep. So as you can see, her years here with your year, Ana, eso would see what we have so a little bit up like that. Um, hands is a little bit smaller. It don't You don't need to be perfect anyway, so just click OK now. And now the person that we need to do is mean to get rid off this boat. Off course. Naturally. The oldest click create you on DA Now I can just go here, toe. Let's click right button into sport healing brush. So this will helps us toe get rid of the things that we don't want to see now. Artwork on de. So, first, will you make sure that you have your content? They were selected. And also sample where's selected. Okay, We're gonna have to have three cameras. I don't know which one should I work. So if I look weird in the camera, just don't get scared, okay? Everything's fine. So make sure you have the same privatised like I do here on make sure you're owns a new layer on. Now we can just click on drug. Look what's gonna happen, but it's going now into the same for this shadow here. We don't need it on while I let him also make my brush smaller. And of course, you can make the brush more by going here to the size, making it smaller, bigger, or you can also click right button on your mouse boom, and we can make it here. But there are also other in a short kiss that you can use to make your brush size bigger or smaller. I'll be using short case, but you can just click right button and change the size. Or if you wanna notice what? Because you can just google them as well. Because, you know this sorrow is going to be advanced enough. So that's why I don't want to overhead your head with, you know, different short. So hot keys anyway, when they have this done on, I was good. Now you have it covert on this person. That means to me toe combined forces them into a one where, so if I just like this and then hold control or comment on, click on this first Well, now you can see both of them are selected. Click right button somewhere here on the empty space and chose cumber too. Smart object. And now it's one object together Boom. So that we can go to filter, and then we can go toe camera, ro filter. So if you don't know this filter, it really helps us to, you know, change the cars off our image and make it look just majestic. So, um, first of all, we see here like lots of different parameters, but you don't need to get scared. Okay? What you to do right now? Actually, apply the filter that I already have set on. Basically, when you were downloading the project files, you did also download. Let me show you what you did actually download. So, um Oh, yeah. So you can also download to ex MP files, details the color profiles that we're going to use on you go to his here. Main image colors on how we can apply it here. So first. Well, let's go here. Click on this May new pattern and click load settings. And now, if I go to my own folder where eyes have saved this So where is it? Here on logisticians main image colors Click open. Andi, wanna as you can see, just like that. Now the colors are totally different and it looks really beautiful. So let me just quickly explain you what we did here. So first of all I have here temperature, which helps us to make this colder or warmer. So as you can see from exist, who's lived, it gets cold. It from my sister's right. It gets for me. Okay. Please don't change this as unless you have to readjust it the game. But this was too. I remember that. That's what was said to toe. Then we have your team. Which basic helps us to have more greens or more wild colors. I usually add more wild cards to make it look. You know, like a fairy tale because you know, everything that looks like a fertile is kind of pink. Violet green is Ah. As you can see, it also doesn't look bad, but still I prefer Well, let's go back. I don't remember which numbers I had here when a 13 Yes, 13 was the number on behalf exported, which I didn't touch. It just meeting obsessed to make the image brighter or darker. So that says 20 contrast. So as you can see lots of people when they did a images, they put the contrast to the maximum. But we don't want that because, you know, I just when you put the contest to the maximum, then still difficult hated the course off the image. But if I bring it down, what's a minus 77? Now it's going to be much easier toe precisely aided every single color on I mean, like the greens, pinks and so on. And by the way, if you don't want to watch the whole core profile explanations that you can just escape on continue because we already said the course. But I will just country explain non. You can decide on your own. Then we have here. Highlights child was whites and blacks. This basically help us to, you know, manually create contrast and also decide which what we want to make a brighter or darker, for example, highlights. As you can see, they're responsible for the bright parts, and I can make them brighter, or it can make some darker. Let me go back. Um again shadows. So this here, basically, I made the shadows really dark. But if I put them 20 as you can see, we don't know, sees the details off the hair. And that's why, actually, I made them bright now because when it's brighter, we can really see all the details in the hair, and that actually brings your artwork in life. It actually, you know, brings more feelings to the image on. You know, whites. Some blacks just do the same thing, but more for white on black points on your image. So again you can just go left, tried to see what has changed texture again. If I just go close. As you can see, it's start the eight texture. If I bring, it was left, as you can see through it, smoothly, public it to the right. As you can see, we clearly see the texture. I personally love adding texture because it kind of makes the image more alive because you know how usually when you watch you know all this fashion magazines on all the girls have their like, really, really smooth skin. I always felt like that looks really unnatural on it looks like a fake beauty. And that's why I prefer to add texture because this looks morio on. I just love it, but you can decide on your on. Then we have here the haste and again, if your foot ship is too old, then you will not have here the haze function. So this is something that was added to the newest versions off photo shop. But I would advise you to update your father shop. If you want to create something really nice suddenly appear. Violence and weapons just helps us to make the image will more or less viable. Sorry for bringing to the Not down. As you can see, it's not weapon. It'll it actually also looks nice, I would say, But no, let's have more cows so but that's not oh, building to go here, which is a chess adjustment. This helps us to basically change the tone off every color one by one. So let me show you what I mean. For example, be of your rights or understand. So first of all, I'm changing the tone off Red cause I can make my Reds. Let's say really, really pink. I can make them really really orange. And if you look here, look at her skin now really, really orange. But if I make it to the left now, it's really, really pink, and you can decide on your own what you want. But for me, it's one started street. That's everyone that I think it looks good for. The same offense doles out the cars again. Oranges. We can make them like your lower can make them more Pinkett and so on or yellows became exam Green, orange grace. We can make them like to be the bluish sign or like yellow on so on so you can just play with him. Onda That's it. Basically, for what we have changed. And if, even for example, I click here, which helps us to see before and after. And you can see the difference is joy. I can t gigante. It's a big okay. It's big difference. Just click OK now on Douala Now we have a beautiful art. I mean image Onder as you can see yourself, Here's this camera ro filter now on. You know, if you want to change it, you can just double click here. Boom, boom! On the camera, Ro filter on who opened again. You can change it and then you can click. Ok, um or you can just turn it off or own. But we need of course, that's it for the first. Listen, I know this was pretty long, but I also think it was pretty useful. Especially if you have never used Camero filter on. Probably waiting for in the second. Listen, Andi. I mean, you're gonna learn so much crazy stuff.
3. Using curvature pen tool: What's up, guys? All his life. Welcome back to the second lesson. So drinkable us. Listen, we discussed the colors and also change. The colors made him look really beautifully on the This lesson will continue by already any thinking, editing and cutting out the face. But first, let's go to background unless dilated because we don't need it. It's always answer user Some. If you looked at the origin, not for that's against is a phrases captain out on. We're going to cut it and I'll say, If you look, it's cutting out really, really perfectly. It's really, really smooth on. How are you going to do that? You're probably freaking up. Well, it's actually down using a tool called curvature Parental. If I click right button here on behalf, you're pain free frontal and then sought after actor with your parental. And again, If your whole trip is really, really old, then you will not have this. But if you're for Trump is at least from 2017 then you should have Okay, so but that's what I really wanted to Abigail for trip. If you don't have this to, otherwise you have to spend toe, which is more difficult to use, so it's choose courage, your pencil on before we start drawing. Let's go here on Choose past and also make sure that here you have set to combine shapes. That's very important. So now if I start drawing, what does this basically does? It has to start magically create curved lines. So, for example, let me just show you how it works. I can click here once, as I can click here once it's a straight line, but if I click once more room no, it's a code line. If I click once more, boom, another colorblind. I can click here and so night against the mark, liquors and wines We have, of course, on the breast thing that it's really, really smooth and per. And that's really awesome. So you know, it's it's pretty easy to use. And if you want to, you know, at just times, once you can just put your mouth on the line. That's here on this point, and I can click on the product and drag it as against it really adjust as well, and again, I can do the same thing here. As you can see, it's ah It's very nice. But now, of course, we need to delete this past. We don't want it on. Also, if you look, for example, here in layers, we don't have anything new created because this past doesn't have its own there. It just draws on the screen. And if you want to do it, it we have to go to the past window. If you don't have it here, goto window and find past here enough, for example, it's Yeah, I can click here, for example, somewhere in the empty space to disabled. As you can see, it's not shown. But if I click on I can just tried button on the click delete past or just takes this on brings us to the trash bin on not going, not go back to our village. So we need to create the past now. But on the face, of course. And we're gonna go around her face on Let's start actually, from here, I can just click months as I can continue like that on. As you can see, it's start creating this really, really nice pass when you can always go back. So just if we go to edit on here we have. Let's say under you know, it's get control. Common deposit for them. But if you do something like that, if we don't want it, you can just go back like that with the hot kiss that are here under now's go click. Continue. Continue. Continue. Continue. Like that Home. Just continue toe. Get her head. Basically. So it was, um, some out ultimate. I can come here like that. Let's have a look at the image, Okay? As you can see itself with different here, so it's actually go back back. Um, I wouldn't do like that. Hasn't I'm gonna go down. It doesn't need to be exactly as the major. Of course, as the original artwork. I mean, so yeah, that's something similar. And then I'm gonna go here. Andi, here. I wanna And then in order to basically close the shape, we need to go back and click on the first point that we created. If I click boom now, it's connected. Now. The FBI is this beautiful shape off the face. Tonight when we have, this would actually do, Let's go to selection on. Basically, we going we're going to transform this past now into a selection. Let's go click selection. Make sure you have here a president. Zero on. Let's click. OK, and as you can see, it's a selection. So now we to create a copy of our image looks click right button here on the empty space somewhere, and then go to duplicate layer and click. OK, and now on the copy, we can go and click, create mask and what's gonna happen? It's gonna use this election to create a mask on this image. If I click boom now, the masses created and again ofcourse you to understand how masks work perfectly. If you're following this class, as I said, you need to know the basics of four ships on mask is like the most basic singing for a ship . If you don't know masks and you basically don't know anything about four ships. So, um, now, when we have this, if I just turn off the image because you can see the only Caesar face here a knife I just turned his back on while up. So now let's look, that will move toe enough. For example. You know I can take them move this, but we don't need to do it yet. Let me go back before we do. They actually to create a whole You heard it, right? A hole in the image below. So what we're gonna do? Let's go to the mask. Click right button on the mask and click. Add mass to selection. Now they have against a selection off this mass Here. Now let's go to this image. Were added it because you want to use this selection again. But now on a different image. And now what we're gonna do if I go and click, but say no whistle Now, if I resemble click, create mask what's gonna happen? But you don't have to repeat it by religious. Look at me. Turn off this image. If I click, create mask Look, we see now again the same things, that phrase, But what they actually need me to see Everything except the fate sort me go back to basically to have a whole here and then see everything except this place. That's what we need to invert our selection. How are we gonna do that? Let's go to select on. We can click here in verse on what's gonna happen now. It has selected everything except the face. And now if I quickly hit my school empty wanna Ah, Now, if I turned on the image as you can see, we have the face. We don't have the face. It's that easy. So now when we have it, Um So what we actually need to do is we will take this face. We will bring it up like that somewhere. So something less again, you know, Look at the original artwork to see actual pro. Bring it a little bit higher. Um, just want to make sure that it is good. We can be given to the right like that. Okay, this should be fine. Okay, Now, this looks good. Let's actually stop here because this lessens already pretty long. I'm sure you're tired to in the next lesson. Bye bye. Dear friends.
4. Hiding unnecessary objects: Hello, Difference. And welcome back to this herd. Listen. And in this listen, we're gonna get rid of the things that we don't need. So now what we need to do, Of course. We see here for your errors like this. Sunglasses. We don't need to see it there or this lips. We also need to do the lips over this sunglasses as well. Be aligned behind the image will send you to get rid off them as well. So let's start. First words Turn off the image. Let's go here and create a new empty layer. It just above this image on the first over start by getting rid off the lips. And for that, we're actually gonna use a tool called stamp toe. So if I click right button, here is the stamp. Where's my stamp? True. If you just click s here, I found or you can just click s in order to find it. Because frankly, there, but received a hot keys s. That means you can just click s on your keyboard and you will find this to this Will helps us to copy some parts of the image and prison in a different place. So, for example, let's say before you use it, you also have to go to sample and make sure you have your old were selected. That's very important. And also so make sure passes 104 100. So, basically, whenever use there to make sure that you have the same practiced like I do on don't know what this does is lets say I can copy this grass and then can place it somewhere else. How do I copy stuff you know, to Kobe stuff you to hold old if you're using windows or option if you're using Mac So again I hold hold on a second and I get this kind of icon I can click or miss with my mouse bomb. I click once with my mouse button on this area on not has copied this area. Now whenever I move my body watching, as you can see, it wants to pace it. I'm not in order to draw with this place somewhere else. I can't come here. For example, I can just click on drove just like this brush. As you can see, basically copies this place to here not to go back a long way to the same with the skin. So basically, first for let me make the brush bigger. We can just click right button and change the size. Ah, a bit more. I mean, that's what lesson size needs to be on, actually, even less like that. So and again. Or when I was, you know, asked when I was doing this thing, for example, Amber sizing my brush. And this is a short code key, which is out with difficult texts, when that's why I'm not gonna explain to you. But you can just google different court case, as I said before, or you can just click the red button and change the size and hardness from here. Okay, So, um, so what I'm gonna do, I'm gonna cook is this skin? So if I just hold old corruption and I can come on drove? Is it here? But as you can see, the problem is that, for example, if I girl to retire, he start his started cropping the grass on his drawings, aggress here so it would go back so again to be careful. For example, if I copy, let's see here, and I start drawing. But if I go up and she can't see because we have grass here. It also starts groupings Agresto here. That's why you to be careful with that first full or let's create a creek, right? Does not make hardness. Europe, that's where important. Now we'll start doing is very, very slowly cookie based, like that copy based copy paste copy paste. Can you sing from here? Copy paste, Copy paste. Scorpy based Like that Again. Copy Paste Room on DA Like that. And also we can, you know, copy paste with from here. So now let's actually go back. What went to the 1st 4? Let's go and make this ultimate smooth as you can see going to copy and paste the grass here. So if I just copy is a grass I can just played bracelet with here to make this good curve And now it kind of looks weird. That's not what we're going. If I go to a positive, I make 20% and also the same with the full. Also making around 20% on the So this basic floor basically themselves to drove really, really slow. Um, an apostle says to you know, make our what we water withdrawal without with more transparent. And that's why water is gonna happen right now when we cope and place is gonna is gonna draw. But really, really smooth. So, for example, let's say just just to show an example, that psycho pieces grass here and I start drawing here. Look what's gonna happen? It starts, right? What Really rules Modify drove more. You see, we see here green color, But it's really, really transparent. That's why. So if I draw again and again and again and again and again, as you can see, we start seeing it more and more. But we don't need this or destroyed dress an example. So let me just go back, Okay? So now I'm gonna do the same with the skin. I'm gonna cope it from here, and I'm gonna go start drink here like really, really small on that will basically upsets to smooth out this really weird edges, for example, for the Martin, now itself with Bert and I can do the same here. Copy for example, over here. And I can just start, makes it bigger and start quoting legs That on Douala, it looks good. I know this was difficult but yeah, What can I do sometimes, Like the think things are difficult driving you to If you don't, if it difficult for you and you cannot get the right result Just keep doing over and over and over, and eventually you will get it right, Especially if you have never worked with stamps or we just brush. So it's gonna be difficult for you. So not when we have dances. Well, seem to get How long is this already with Missy? Wow. Certain municipal. So we also need to get rid off. This sunglasses is gonna be easy, actually. So, for example, I can just, you know, copy here. But here's this time already. Let's make this 100%. And I can just copy this girl this grass and placed it here on again. Corpus is grass pasted here. Corpus is grass pasted here on. So what? Let's go back. Actually, as you can see, we're also it accidentally on her skin. That's why Oh, if you go to harness, make it at least that's a 60% a knife. Akopian paste is going to be more precise. Make a smaller copy in peace. By that says he can't see, you don't need to do it this part because the face is gonna be here. That's a world one We only need to do whatever is Ah, not covered by faith. So this place is, for example, on DA. What I'm gonna do is again I'm just going to, you know, copies the skin on, do the same process over and on over. So again, let me go here. Well, it's the great button. Make hardener zero. Um, Nike. An irregular. I can miss a bigger cookies. The skin again on just drove over it. Here, Copas. This place, for example, on Drover it here copy. Drove mazel with smaller copies. Aggress here. So against you can see you to be careful when you do that. Copies is drove over here. Let's see. Okay. Me too. The abs is Yeah, it's one of the heart. But what can we do? Right? I mean, to do this. So again, Copy plays GOP based copy paste. We CanDo that this is good. So again, copy paste copy placed here on again. Copy and paste. So I'm just going to repeat the copy and paste words so that you remember that you always have to cope Ian's and placed on not what we can be. No, to make this. Uh okay, this is fine. So now we need to just extend this l to retire to the barber's sunglasses. Let me just Corpuz is grass and pasted here like that. So what we to do now is to get rid off this sunglasses here on off the single swell on for us. We're going to create a new empty Where Ana, I will go here. Click right. Bottom on. Choose what? Doing? Sporting brush tool. And I'm sorry under. Not for them before try on. Go over this place, for example, to religious. What's what, huh? It's not too. But so now let's continue. And I want to go on Also go over this place here on just in journal Gober's Hope sunglasses part on. Let's see what we have few. So first. Well, what we need to do is, ah, interaction that this looks kind of fine. So that's what let's click right button, make hardener zero a knife. I just start doing things this small things here like that. Okay, also, we need to make sure we don't have here the eyebrows because they're clearly not supposed to be there. OK, I don't know what to do. I know that now you think Wait. But we we were supposed to have this really, really smooth. And now we got this. Some kind of weird mountain here thought we can do is I'm gonna go to this mask off the image, click right button, choose at master selection, and then go back toe this layer, which was the layer off this ban glasses, basically. And now I will create a math when I am on this layer. And as you can see, we also have a mask here. That's why we don't really see this place on. Duh. Well, we could also get rid of the shouters. Actually, in the original artwork, I didn't get to go, so I think I just forgot. So it's not that important, but yeah. Okay, let's start. Let's go to this layer here, so make sure you draw no on the mass, but actually insular. And we can just, you know, draw here legs there and see what this gives us. It's kind of fine. Now, finally, it looks good. Uh, that's it. That's it for this lesson removed everything that we needed to remove on. See you guys on the next list.
5. Adding depth to the face: Welcome back. How is your life? Oh, thank you. I'm doing good at school. I hope you ask, because if you send it, I will be really bad. And I will just go and cry in my room. I mean, I'm already in my room, but anyway, just just continue. Okay. Well, now, um, they are basically prepared our image for some, you know, cool stuff on what went to do now is first of all, I want to add this sunglasses here because you can see they are going on. Let's start with that. Let's like this image was good here in order to add the sunglasses. What we can actually do is I can't go to this mask as I can go to property, Spano. And here I will see the properties off the mask on. Now what I can be if I go to his density and I decrease it. Look what's gonna happen. I can kind of see the part off this image that were deleted, and that's why I can go back to the layers. I can go to this mosque. I can select my brush. Okay. Ah, select white collar. Hugh. Make sure everything is 100%. And also this hardness is around 80%. Not I can come back here and I can start bringing bags sunglasses, because I can clearly see which parts off the image are suited and which parts are stable. In which part you can see a knife. I just can go like that on da boom. I can show this. I can show this. Just make sure that you don't go behind the sun glasses. That makes it smaller like that under. Now, if I go back, if I select my mask again, go to a properties. Andi, make them sounds percent. I wanna magic. Oh, I also forgot to add this, uh, think here. Ah, I don't know what is this school, But let's just make this slow. This thing I eyelashes if I not drunk So let's go again to the mask. And I can adds eyelashes because analysis ab useful on they will only make our artwork even more beautiful. You know, it's not gonna hurt our artwork, so why not? Let's just at some beautiful eyelashes. And now I can go back to the problems and mega density of the most 100% wala Now This looks good. I mean, it looks better than booked. So now what we need to do now I will show you a secret trick. I will show you how to create the three D part off the face. How long was this tutorial? Not too long, right? Three minutes. It's fine. So how we gonna do it through the part of this face? And for that I will go First of all to the face. I will create a duplicate off this face. So basically clear. Great button chose duplicate lor click. Ok, and now let's go to the one that is located below. Okay, let's go to a did on free transform. So now we can basically change the position off our image. I can bring it out with down and we can see it going down from here. Let's click. OK, so now the problem is that we don't really see which is the first mission, which is this economic because there were similar. That's why we're gonna go like the image that is behind go to image adjustments and chose brightness. Contrast a knife. I decrease the brightness. Look. Now he sees the image that was behind on. I can also increase the contrast. Like that. Uh, it should be something like that on. Let's click. OK, on. Now it looks treaty. It looks like this is, you know, not just saying paper, but it's actually a masking. Ana, here we go. I have the same here as well. Good job, guys. Good job. Was that certain? Or we will finish with this. Listen and I will continue his next one by
6. Adding depth to the face 2: Okay, guys, have bad news. I just recorded this tutorial, but then I realized that I actually didn't click record. So everything I was being with useless. And I need to do this again. That's why I'm a little bit angry right now, but it's gonna be fine. Okay? First, we'll make sure to save your project, okay? Because I didn't say with on a Photoshopped boot crash, then I would just kill myself. You know, I live on floor number 13 and that's where I can just jump. And that's why I'm a I went and saved it on. What we're gonna do now is we're gonna on the three d part off. The image is off this image, basically with the face, OK, the trade business as a lover to co I love to hold. So basically this part, how are we going to the first of four? We need toe connect all of this layers basically the less. When we were covering up parts of, for example, where record words sunglasses on were recovered, the lips and this sunglasses went to comfort allows them together with them into a one smart object. So let's select it. Let's hold shift and click on this one. A nice guys. Everything is selected. Click right button and choose Convert to smart object are not altogether one object, not click right button here on the empty space and go to duplicate on. Okay, now, as you can see, we have a copy here on uh yeah. So now we just need to go to edit free transformer. Ana, where there is here and now brings us down. So what we need to do way to make sure we have basically thickness of the image here on the right and also on the left. So first, Well, let's start with the left. What? We can just bring it out to the left like that. Onda. Um so it's going here up. Let's see. This is fun. Let's click. OK, you know, And if I go now to image adjustments on brightness, I can decrease the brightest and I can increase contrast on. Looks fine. It looks good. I was bringing more Celtic to their left, so I need to add sickness here. Swell. And for that, I'm actually going to create a copy off this layer. So basically off this letter, click right button. Go to duplicate. Where? Click OK, on what? I'm going. I'm just gonna take it on. I'm gonna drag it to the right. So now, as you can see, we have it here. Swell. So what are? But I need to bring it down because we don't need to see. Ah, we don't need to see the seconds here. So it would do the left as well. Just a bit on. But see if it looks good. It doesn't look good. They built it was here. Yeah, nightly was good. So now the only thing that we see this part of so we don't need to see, that's what we're just gonna use masks. So I'm just going to create a mask quickly on this one. Yeah, that's it, Jay, take my brush tool. Make it bigger. Make our dinners. 1% was like black car. Because I need to kite stuff. And that's what if we just click here. Boom. Now the black color is active. Color makes a smaller my brush a bit and actually go on. Gore was displaced so that it's going now. Good job. What if I'm recording? Yes, I am. I was about to jump out of the window. So now let's again go click save with in case for the shop crashes. It's not We're gonna add the stars on the moon as well. But this already gonna be for the next lesson. And also, are you gonna find the moon and the stars in the download files as well in their project material files as well. Anyway, when you Donald, they were single season my smalls there. Okay, so it's easy on to you guys in the next lesson. I love you.
7. Combining stars and the moon: What's up? So, um, this is the images that you're going to use to create to add the moon, This one here and also this one. Where is it? Worse. Where is it? Here. Two. Adds a sky and start on the first floor. Let's start by importing this image. Religious stays on Boom. Put inside on Uh, yeah, As you can see, we see it behind the image because it's actually behind the image that's actually brings us down on click. OK, for now we want to bring it, actually tow bill below, like before, everything else that it's actually behind everything else and it's inside the image and it already looks nice. And now we need to import one. Where's our moon? Here. Let's take this and bring it inside us. Well, let's make it smaller. So, um, you know, if you're holding, if you're using an older version of photo shop, we actually to hold shift when you make stuff smaller. But in your version, you don't need to hold shift when you need stuff smaller. So I'm just gonna make the smaller just to let you know. Let's cook. Okay, So before we do anything, I want to bring this actually up to the top and I want to cancel. So I want to um Yeah, By the way, if you just accidentally click something, make sure to read Never. Just click. Ok, ok. Make sure to read. What is it telling you? Because what if What if saves you? I will destroy your whole product. And you're like, OK, so that's why, as you can see here, I asked accidentally click here. I'm gonna click Cancel so that this stays as a smart object. So, um, as I see, if I would have click Ok, then the quality of his image would go down. So what? I wanted that want to make sure that I select only someone on not the black part. And for that I'm gonna go here. Select Alex. Marty Mexico Marcato. Okay, Make sure if there is this selected. Make sure for zero. And if I just go down here on the click and drag to create a circle, Well, uh, it's a bit bigger now. So what I want to do, I want to, you know, move this out with up the selection. And again, if you have this tool selected. You can just go or you can put your mouth into the selection and you can say Get this arrow . That means I can take and drag my selection up. But if my mouth is behind the selection, as you can see, if I click, I will create a new one. That's why I can just click on drugs this like that. Or if you cannot find house, how I didn't just go to select and click transform selection and then you can just, you know, transform your selection in the water where you want with it. So anyway, I will put here I will make it actually a bit bigger. OK, but smaller. This looks good. Let's click now. Okay? And I can go Shankly create musk on Douala Easy. And I can, um, go on brings this really, really done behind everything except the stars. So it's not Bring it down here. So, as you can see, we need to change the colors of the sky and also the color off the moon and also add some brightness to it. Let's see, how long is this tutorial? OK, it's fine. So let's start first before was adding brightness to someone. Let's select it on DA If I just double If I click right butter on the image and goto blending options I will get this list. Oh, and yeah, everything called Arte Glow Logistical. As you can see now, we were really, really small glow here. Um I will show you know how to make how to change the settings and make it big Handsome. First of all, make sure the f you're blending more subtle, normal. Then opacity must bounded percent Make sure you have here decided on the color is white and now we can go to technique Technique needs to be softer So the glow soft on now spread inside What's let's make this bigger so size bigger as you can see when I make the size bigger Then we spread I can control how strong I want to see it So it's make this like that . Both would down size a little bit smaller, just a little bit bigger. They should be fine, so you can just copy my numbers If you're not sure this looks good on when we have this. Let's click OK for now And I think I wanted I want to go to image adjustments on brightness contrast on. I want to adult with brightness and also it would have contras. Lies is it looks much more shiny. Let's click. OK, now I'm gonna add I need to change the course. I'm going to change the course off both of them at the same time. So if I go sheer on True's color balance Boom first full before you change anything was goto Where's were intimations The color bands is located above the moon in the sky but below everything else just like here Now it's double click on this icon toe talking the properties So this helps us to change the colors off anything off everything that is located below. So, basically the sky as the moon in the sky on Let's start with I'm gonna start experimenting . I don't really remember exactly what cars did I us, but we're gonna get approximate with the same colors. So like that I was going out to highlights and, uh, as they go to shadows. Oh, so I lose it. Okay, Um, it looks good for now. I don't think I won't do is I want to change the but I will rotate this morning. So if I select them all I can go to edit free transform on then if I just go here, you know? I mean, you have need to know how to transform, how to rotate, starting for the shop, as always. Why you were watching this class. I mean, this is like the basic of the basics, but so you can just go here, put your mouth, and you can second rotate. Or you can also use this angle here. So what I'm gonna do, I'm just gonna rotate this, um, a bit like that on What's he? This is good. Let's click. OK? No. Awesome. And you can change the colors. Like anytime. Weight are swell. So what? I actually want to add a little bit. No, this is fine looking. So we will. We will. We will do a dural check off everything when we finish the whole artwork. So what's How long is this to Toro on? Um, we're done with the moon on next lesson. We're going to go and add the hands. Who do you guys? Bye bye.
8. Importing hands to the composition: Welcome back, my dear friends Today we going I mean in this lesson because it is still the same day for me. We're going toe at the hands Onda Let's start soldier stays on. But before we actually import this, let's go here. Click on the top layer so that when we import our image is going to be able with the top player. Okay, so it's important is so It's everywhere. Singles boomlet. Cyclical Cano. So first we need to get rid of this red background on we're gonna use here. So magic want to If I click right butter, choose here Magic want alot You can just click w on this so basically access to do it part of the image based on colors so before a kinds enforce for make sure you have fuses Selected colors is 32 on the sample loses those selective on continued use is not selected any for now Click here So I can see now it has selected all the red colors on there. Now we want to add some more cars, for example, wanted this part of the images Well, if I click when this is like this well, if I click here selected as well, not almost everything gets selected except some small colors that when it's like for some weird reason, what's in that looks good. And now if I go and click create my school was gonna happen. Yeah, it's gonna create a match, but we know like an inverted way. We need to need to have the same but inverted. That's why Let's go back. Let's go to select on the inverse. I know if I create the mosque, so now let's get less looked over brush. Let's make it bigger on the list. Luxury of your black color. Selective on now, there are few things here and here to do it. Just worry where small parts and begins at this point, they're left over from the image, so I can just go on room quote colors. There was black color on the mask on. Now they're going in. The same applies here swell. But on the night for Zoom in, we'll see here this border, which we don't need. Of course, on how we gonna change that is, let's see if it's also here. It's almost everywhere, so let's elect a REM. Ask Goto Properties and go to select and musk here we can basically change the properties off the mask on what we're going to. We're gonna shaped the edges. So if I zoom in on if I start shifting there just to the left And also, if you don't see here red color, the make sure go to view and choose the overly because this kind is the best way to see what is selected and what is not selected. So now if I zoom in a little bit on, I could go to shift edge and I bring it to the left. As you can see, it's kind of shoot it just Andi Ah, now we see less off this threat. Now click. OK, let's see how it looks. Well, we still got some food. So let's go again to select and mask once more. And let's try to do this again. Shift edge again. Let's also try to add some small business. Um, yeah, some small business is finally sleep. Okay, now, boom. Now it's gone, so Oh, no. When we have this, let's go Toe filter on Tammaro photo. We need to change the colors off this hand. Oh, yeah, uh, let's cancel what actually is. I opened Camero Filter for the mask because Moscow selected. That's like the image. And now go to full time Camero filter. I was trying to drink my tea when it's too hot. Anyway, wait toe change the colors. Here, let's go here on click loads. I things and we will use the colors. Can't color stood ex MP You we should have Donald. Is this as well? Let's click Open. What up? Let's click. OK, now. So now, of course, it doesn't look totally like a real hand, but more or less. Now, what we need to do is, um before we change the colors once more, let's actually go to free transform again. I wanna rotates this on way to make this smaller. Well, actually bigger lays up, so let's see how it was in the original truck. So we have been hearing hand here One hand here. Andi. Ah, let's see if it is. No. Yeah, it needs to be bigger because this is fine, actually. Maybe a little smaller. So here you can adjust yourself as well, depending on you know, your taste on what you want to do. Actually what you want to achieve here. But I will do something that I think it's fine. I know. Saying it looks good. Let's look okay. No. And now let's just create a copy off this, so just click. Great battle duplicate. Yes, on. Let's move this. Now to the left. Let's again open. Oh, go To transform Ashley on da sleep Horizontal. Well, tonight you can see just flips it and we can use it for the left part on this is gonna be here, But again, I need to go to edit free transform on. I need to define this. Let's see how it was here. So some single exact Yes. What's going? OK, so now let's so like both of them on put them in a group. So if I just click on the whole shift, cares well and then I click here group for most of them were selected on. I'm gonna create a mask for both of them. Let's How long is this tutorial? Okay, let's actually stop here on his next listen. We will actually create a muscular to hide some part of the fingers to make it look realistic on also add shadows again to make it look realistic. Love you guys to you. Bye bye.
9. Final touches: you remember during less less. And I was trying to drink tea. It's already next lesson on my tea is still hot. So anyway, what's let's not think about? Okay, so now last time we created the group made off to Hunt's left and right hand on. Now so exist Group, let's create a mask. Now this mask is going to bear plight. Whatever we do here is going to apply to both over the hands. That's why I put him in a group. Let's go here, click right. But since, like the airbrush, make sure you have here black color selected. Make sure this is 100%. Smoking is zero. I won't. I will make my brush with smaller on. I will start deleting sounds the fingers, for example This I don't need. Let's see here. Oh, are this again? We don't need them because they need to be behind the face. That's why we should not see them on top of the face. It doesn't make sense. Kind of right. I don't know who is so in saint a place to this fingers as well. So now when we have this, it looks good. Now I'm gonna add some shadows. No, I'm just gonna go to the slam, Gonna create any empty where this year, until I needs to be located above the image Able was a face but below the hands because the shallow needs to be behind the hunt on DNA. How we don't do the shadow. So let me It's like my brush to It's like that color And here what we're going to actually is pretty interesting. So let's go toe hardness Make it zero. We're gonna is a pastor and flow on black color to make a realistic shadow. So let me just show something. For example, one past and flew about 1% is just an example you don't need to repeat. It's OK, both of them hands percent If I just drove Boom. Just a black car, right? If a pastis, let's say 48%. I drew a black color, but with more question. But now let's actually go to flown. Let's make flow. Let's say 10% right? So what floor does is even even if I have 100%. But floor 10% is gonna start drawing. Where were you? Slow it. So what does this mean? for example, in your life when you drove. If you're drawing on the paper, let's say with a brush, the more color you put on your brush, the more color you see on the papers. Basically, the more you draw the mako food gets is the same here for them. If I start drug A what's gonna happen? Okay, um, wait, let me actually make floor 1%. Let's you know tonight for a dress you can see even if I have a past 200% it's still grows . Likes transplant. If I continue drawing, the Mar drove basically the darker it gets. And that's why, um, this is a cool effect, because against them I draw the dark it gets so we can kind of control the shadow. But they, for example, 400% on prices that's a 50 I can draw on. Doesn't matter how much I drove because it's gonna be 35% is not going to go above certified because I've said certified. But inflow, if I saw it, is why I said that 4% for example, it's gonna start drinking zero person, and every time it's gonna go 1% on top 1%. It's gonna add 1% 1% 1% and then finally gonna go totally black. So again, let me just, uh, there with this layer and creating them to wear and what's not working. And you will see what I mean. Let's make a question around 20% and flew close around 20% harden zero. And if I start drawing now, for example, here basically is a more draw, the darker it gets, something like that. Um then we'll seem to do it here. Okay, It looks fine. So shadows difficult things, That's what If you don't get it right from first time, that's I mean, most likely will not get is right from first try anyway. So just delete you away and start over again. Okay? I'm really Isn't that child. We're here to make this look more realistic. So if you look here as you can see their wish outta here on, um how are we gonna add it? So we're gonna go down. We will create Go to this color bands creating the empty where just over the color bands, but below the face a knife. I start droving as you can see, it starts adding the shoulder and it looks good. So just like that, there is a branding a shoulder to make it look like the moon is actually inside the face. That's why eso you can just go back. If you think that it's wrong, that's where you know it's to get darker like that. My it looks better. We can also try adding some shadow here through the borders to make to give it some three dimensional feelings as well. A knife I turn off and turn on. You see a big difference? No, when we have this with, Are we done? Oh, my God. We're almost done. What? I didn't expect that. So what we can do is first of all, I really can't about what We will do well at this texture here, and it's actually pretty easy. So, um, I have a special image that I used in most of my artworks, which is Ah, wait. Well, let's see. Where is it? It's, uh, here. Yeah, this texture on your you'll download it as well with the product friends and blah, blah, blah on. Uh, if we just added on. But first for would go to the toe, Claire. And now if I add this and make it bigger, that's people keep. So now, if you just go into blending modes and try to blend this book, what's gonna happen way get this kind of really cool texture on What I'm gonna choose is ah , um, overly on. I know it's too dark. That's what we're gonna do. We gonna create a brightness contrast later on, we're gonna add brightness and we're gonna decrease Ultimate of contrast. Magical. And now, for example, if you want to make this a little bit more purple while that you can just go to this color bands double click on this icon and, you know, just add a little bit of more purple like that. It was good. Um, what else they can do, For example, this is more vibrant in general. And if you want to make it more vibrant, you can just go to the top at the vibrance and you can just adult with more vibrance to this Andi here go in the situation which I wouldn't really advise because situation makes the skin orange. The skin is already pretty orange. That's why wouldn't I want you to use too much. Well, anyway, this is it. Guys would just save this. Um, what else we can do is maybe play out with the color France. So, for example, I can go here. Ah, at corner Bela's. Just make sure you select as a group when you do it at core boss on No, go to. Let's make sure is your Taliban is located. Just one label was a group is a group of the hunt A knife? I again was double click on Seiken If I click here or actually let's go toe Let's what we go the world go here click right button on the empty space on this color bands and choose here. Create clipping mask that basically make sure that we have here this arrow that points down This means that whatever we're gonna change nineties color bones is going to affect only this group, not the whole image. So I can click double. And if I start playing as you can see it on, affect the hands. Well, this is too much. Obviously we can adult bit off red nous toe make it similar to the color of the skin. Andya that looks good. Just a bit of fret and fine. What saves this on? Congratulations, my dear friends. And so happy. I'm gonna cry now. I happy to I mean, I happen because I finally finished this actor. Make sure to check my other classes. Eso because I created really, really cool stuff. Yeah, I know. My heart is amazing. No, of course I do. Create some bad some awful art as well, you know, just normal things. But I only show you the best off course. I will not show you the bad stuff. Come on, guys. No one is gonna do that. Well, anyway, I love you. I hope you love me too. And I hope you enjoy this and see you guys. But right?
 Photoshop Classes By Fred, I will help you get PRO at Photoshop