Transcripts
1. Introduction: Hi there. Welcome
to this course on vintage photo restoration with photoshop minsocate and a
instructor for this class. In this class, you'll learning
various concepts tools and techniques used in restoring old photos and adding colors. Here you will be
learning various methods such as cleaning decay photos, with spot healing brush, noise reduction
using camera filter, and changing the
value of luminance. You'll also learning
converting photo to clean black and white or the
gray scale adjustment layer. Then tone correction
for highlights, shadows, darkness and the
bright sections of the photo. You will also learn to add various adjustment
layers such as and saturation to create mask, and you're also learning
recoloring certain sections of the photos using adjustment
layers and paint brush. You will also learn to
reduce the haze or you will also learn to correct
the faintness of the photo using
luminosity and histogram. Moreover, we'll be using tone
curves with RGB channels. You will also learn to use crop, rotate, selection, and other
concepts in Photoshop. If you're curious to learn these photo restoration skills, in photoshop, start learning
right now, S in the class.
2. Cleaning and Noise reduction: Hi, friend, you are learning
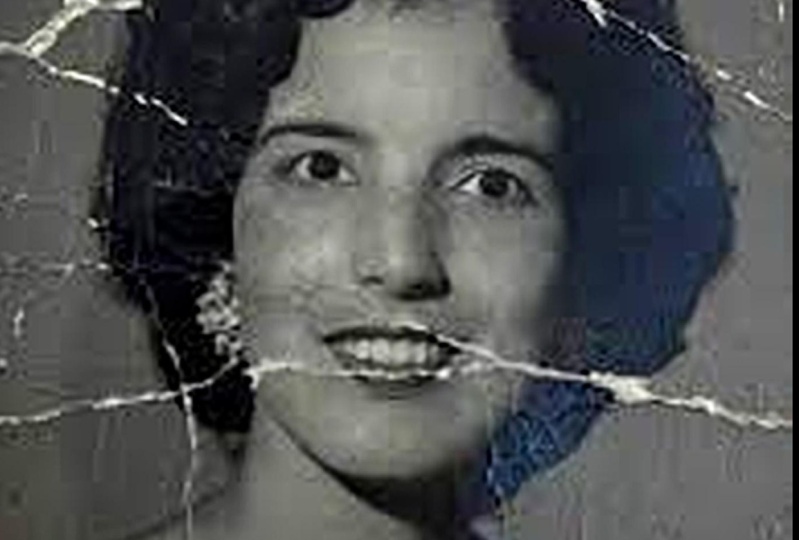
vintage photo restoration. And here in this lesson, you can learn about cleaning,
and noise reduction. When we have a vintage photo
that's generally old enough. We need to first clean
some things here. We may have some textures, folded, change in light
and a lot of noise. First, let's do the crop, make a selection and
go to image and crop. This way, we have removed few outline area and
adjusted to fit in the site. This looks like a
portrait photo. Here we'll be using the spot healing brush because there are some lights that we don't want and some spots
in the photo. Some old images
could have decayed. However, you may use a scanner or advanced
techniques like for a scanning, but then also you
may get the spot. A spot healing brush
will remove the spots. You have to just
select this spot and just apply this brush. You can change the size
of a spot healing. You can zoom into the photo
if you want, and so on. Once you are done with
remove clearing a few spots, then you can further. Here in the neck, we
also have some spots. Maybe due to lightning
or decay in the photo, There could be a variety
of vintage photos, but all are generally
in the black and white. If we don't consider
the colored photos, and with black and white photos, we have to reduce the noise
and cover the things. If your photo is quite old, early 1920s or 1800s, it may have decayed over time. And then you can use
this spot healing. Or you can also use
other selection tool like magnetic lasso magic wand to remove some selected ages. If they are very clear. Okay, you can remove.
But be careful. Don't remove some useful
information from the photo. Keep it intact like
color outlines are there clearly visible
and the buttons, short buttons and
everything else. So don't remove the
texture. We focused here. Then once we are done, we can reduce the noise by going to the
filter row filter. Just go to filter
camera row filter. And here we need to go to
the third icon on the top. That looks like a mountain.
It's called detail. And when you go to
detail options, you've got various
properties to control. But right now we are just
focused on the luminous. Because when we increase
the value of luminous, it will try to reduce the noise. So the haziness and noise, the individual pixels that
appear will be clarified. It will be removed. So keep the value higher enough, above 80%, if you
have a lot of noise. If you have minimal noise, you can keep it with 60 or 70%
or I will prefer 90% here. Once you are done with luminous, next step is to convert this photo into the
clear black NY. There could be various ways. First, duplicate this layer to keep the original
image intact, and then just go to adjustment layer and select the black and white
adjustment layer. Once you apply black and
white adjustment layer, it will convert the photo
to black and white. You can alternatively use the saturation adjustment layer and decrease the
value of saturation. You can also convert the
image to black and white. But if you convert the
image to black and white, it will convert everything to
black and white components, and here RGB data would be lost. We don't want to lose LGB
data because we can color, recolor this photo later on. So, you can use the
adjustment layer here. Try applying this
thing in your photos, keep learning,
keep moving ahead.
3. Mask recolor: Hi, welcome back friend. Here in this lesson, you're
going to learn about bringing back the colors
to our vintage photo. We have this black and
white vintage photo. And now we can bring back the colors by painting
over this photo. Okay. So first, we
need to convert it to the black and white.
There are different ways. One way is to just create and
hue and saturation layer, and you can drop the
saturation value to zero. To just left hand side,
using the slider. And next we need one more
huge saturation layer, and this time, we
will create paint. Okay. Just keep the saturation
value in the mid range, next, you can choose the
color that you want to paint. First, we'll be painting
the skin color. Then we can paint the color
for lifts, the pink color. Then we can paint the color to T shirt or the
background or the eyes. So here it is. First
paint using a skin color. Next, you need to just
select this mask, change the color
to black and just hold all key and
press back in space. This way, we have
disabled this color, and when we paint
using this brush tool, it will start appearing. When we converted this to the black color,
it created a mask, and when we painted
using the black color, this top layer is revealed. Okay. So just paint over
the face of this person. And here, the skin color
is just appearing. We are painting this skin color technically over the skin. And you can zoom into the photo
to make a fine selection. You can always change
the size of the brush. And there are two ways. First, you can paint directly using the
mouse or drawing pen. And if you have painted to an area that you
don't want to paint, you can just simply hold the key and just
repaint over that. So it will remove. It will work as an area. Okay. So first try to paint over the kin You can choose
a different color. You can also use the
color hex code for applying color if you are not comfortable in selecting
this skin color properly. You can easily get
it on Internet. Just search for skin color, and you will get the hex code. Or you can just use any color. Your photos may have a
different color combination. And if you have a variety of subjects in the photo
that you want to restore, you have to create
multiple adjustment layer. So here, this is just a
portrait photo of a person. So here we just require a skin
color pink color for lips, T shirt has different
color and the background. Four or five color would
be more than sufficient. Sometimes you may have
complex object like a state photography
of early 1920s, then you can require
more colors. It's completely on your choice,
the color you want to do. We are not actually
restoring the color. It is generally impossible
because the camera, this image doesn't
have the information for LGB or CMYK color tones. Okay. And it just only contains information for black
and white components in the gray scale mode. Because the cameras
in the earlier days, early 1920s and 1950s, we used to have just
black and white cameras. And these days, we have all
the mobile phones, cameras, and digital camera DSLRs and everything mirror less
store information as a raw file and each row
consists of a different pixels and each pixel have the
information for red, green, and blue components that just define this
photo, any photo. In the earlier days,
this was almost absent. That's why we cannot
find the colors back. We have to repaint. You can imagine it
would be easy to do this tis shirt is
in the light colors, so we can simply predict it is generally lighter tone of
blue or red, anything. Okay. So next, we can create
a new adjustment layer for, and we have done with
painting the skin color. And now, just click
the adjustment layer. You can duplicate the adjustment layer or it's better to just create a new adjustment
layer right from a scratch. Okay. So you can right click to create a new
adjustment layer or you can go below to this icon and saturation adjustment layer. So here this time we need
color for the lifts. Make it a little
bit pink in color. You can also turn the opacity to higher value or lower value, you can also increase or decrease the value
of saturation. This keep the saturation
value a little bit lower. And here we got a
soft pink color. If there's a portrait of a lady, you can paint it using a
different vibrant colors, for a lipstick,
anything like that. But if it is a person, a man, it's better
to keep it soft. Okay, so we can paint it again and we'll
create a mask here. Just repeat the same steps. You have to select the mask, hold and left click
to make it black, and then paint over this mask. Okay. So just select
this top layer, and we just want this
layer to the player. Go to the paint brush, readjust the size of this
brush if you want. If something is important,
you can zoom in. If your selection or the
component is small enough, it's better to zoom
for fine selection. You cannot hear well
because we have increased vibrance of this photo
to reduce the noise. So that's why we
can easily paint. Noise reduction was
an important step for restoring a photo because it will allow us to paint again. Okay. Here it is. Next, we can create a mask
one more adjustment layer for the eyes because we
have painted a skin color, and the eyes are generally
not in the skin color. It has to be in the white color. So it's better to
keep it either in the gray scale or the white. If you want to keep
it in the gray scale, just reduce the saturation
to minimal value, and here you can just paint over the mouse with the
same steps followed. Just go to the selection left
click with the black color. Here you can toggle and
paint over the eyes. If you're not satisfied, you can just turn the
adjustment layers one by one off and on and recheck if
it is working fine or not. Here, we have tried
to restore the photo, the color, and this is
how we can do this. So the next lesson, we will be adding more colors to the
background and the shirts. Till then, keep learning
and keep moving ahead.
4. Adding more colors: Hi, welcome back friend. In the previous list and we have added some colors to
this vintage photo. And this time, we'll be
adding some more colors. So you already know how to
create adjustment layer for hue and saturation
and black and white. Here, we can create more such layers for
painting other substances. So we have already painted
this lips, face, and the eyes. Now, we want to paint this
T shirt and the background. So just make it shade. Here, we use the blue color
and apply the same step, make the color selection black. You need to hold and
press back space. So once we created this mask, we have to move to
the paint brush. Increase the size of
the brush because of selected area is quite large. And we have to paint
over the photo. So remember to paint with the white color because when you paint with the white color, the dtment layer
starts appearing. Okay. Here we have this
blue color, it appears. But when we paint with the black color, it will disappear. It will work like an
eraser. Okay. Okay. So this was a
simple plain shirt. So here we can paint everything
with the same color. Sometimes you may have photos of a person that have a
combination of colors, the attire the
traditional attire generally for the
woman's clothes, you need to be more
careful because it requires patients to paint
with different colors. Sometimes if you have some
more details to cover, you can just simply zoom into the photo and paint
with soft brush. You can also change the flow, but I would prefer to make it uniform. Don't
change the flow. Keep it 100%, opacity
and everything. If you want to
apply some opacity, just go to individual layers. Change the value of
saturation first. If you're not satisfied with
the value of saturation, then you can use the opacity. Don't use any blending
mode here because we want every color to
be clearly visible, we don't want to have
a mixture of colors. Because it would create
difficulty in the borders. When we have borders of two different mass,
it would difficult. Here we've got this blue shirt, and let's reduce the value of saturation to make
it a little soft in the lighter tone because
this tisshut was ideally in the white color
white or blue color. Here, we have
painted this thing. So here, this photo
is just starting to appear as if it was
shot in the real time. So we are bringing
back the colors. So now next time, we need to just add this color
to the background. You can add any color. Here
I am using this green color. So make a proper selection for the hue and select
the black color. And again, alt click Alt
left click this mask. So we can start painting. What happens when we left click? This layer disappears, and when we paint
with the white color, only the particular section that we painted will have the color. There, we can paint
over the background, use the proper
size of the brush. You can take a larger
size or the smaller size, and you can change the value of the brush. Just start pending. Here, you can note that we have some darker sections
of the photo, some vibrant sections,
brighter sections. So we can also correct this
using tone correction. Or otherwise, if you
want to keep it natural, just keep it in the way. Don't do any tone correction. Just paint over the surface. Be careful in the border areas because the mixture could
be a different color, a weird color here. Just paint over this thing. The remaining areas, be careful. This be careful about painting
with the white color. Don't paint with the black. If you paint with
the black color, it will work as an eraser. Don't use any color in between. Instead of white, don't
take pink yellow, anything because you
will have a weird color. White is the brightest color and the black is the darkest. That's why we use this thing. It is somewhat similar to
the Alpha chen and it's only recognize the black
and white. Yes, that. Here we have painted over
the thing in the background, and we can change
the color anytime. But first, we focus on
painting the surface. This is how you can bring back the colors back
to the vintage photos. First converted to
black and white, apply some to correction, apply some noise reduction, use the spot healing
brush, the crop, anything, any selection and
removal that you require. Then just start painting using this hue saturation fi Here, this is how we can
bring back the color. Isn't it magical? Because the old photos
have lost a photo. If you have a grandparents, just take their photos and
take their old photos, the childhood photos, and
just bring back the colors. They would be very happy to
see what you have just done. Here we can just
experiment with any color. It's advisable to save
multiple versions. So here we can have a
background with the pink color, the red color, the green and the blue, save individual versions. And you can discuss with
your friends and the family, your collaborators,
your colleagues, discuss which photo
appears good. So here we have just changed
it to the quite red. It looks like it is a portrait photo that has
been shot in the recent time. So it doesn't look like
a black and white. So this was the
photo that we used, and this is how we have edited and brought
back the colors. Thing. Let's go to window
arrange and two view verticals. This is how you can just look at these photos and compare side by side what we have done. The earlier version of
the photo was decayed in some areas that we removed
with a spot healing brush. Then we crop the photo, then we change it to
the black and white, use noise reduction technique, and then we painted over individual colors
by creating mass. On the left hand side
of the photo that we painted looks amazing. Than the previous one, we
have enhanced this photo. Try creating your own
vintage photo restoration, and they store the photos and shared with
your grandparents. So stay creative, keep learning and keep
moving ahead. Okay.
5. Haze reduction with histogram and curves: Hi, welcome back friend
here in this lesson, you're going to learn
about restoring faded photos using histogram
in Photoshop star. Some of the old photos from the early 20th centuries
may consist of a and we can reduce it in
photoshop very smartly. Okay, first, we need to
open the histogram panel, and we can find a
histogram panel from the windows and just
go to histogram. Here, we can see
the RGB channel, red green, and blue channel, and we can select individual colors and change
the value of luminosity. Sometimes editing a photo just using a histogram could
be a little bit tricky. Here we will be
learning about this. We'll be using a tone curve. So go to this option and create a new adjustment
layer for the curves. Here, this is a tone curve, anything we modify here would be reflected both in the histogram
and the photo as well. So keep it a trail version. Here we got the values of
the dark on the lower end. On the top end, we
got the brightness, the white sections of the photo. So if we drag this thing, if we drag at any
point of this curve, either towards the
inside or the outside, it will affect the photo. Okay. So, the top second
point is just for the highlights and the lower
second point is for shadows. And anything in between will be covered as a shadow
or the highlights. So it's better to increase
the highlights and reduce the shadows that
shadow may become more dark and highlights
may appear more bright. In that case, we can
reduce the haze. This is how we have removed
the haze from the photo. You can turn the
visibility mode on and off to get a better view over
what changes we have applied. This is how we can do this. You can go to the
individual channels and apply changes to the red, green, and blue
channels as well. That was the earlier histogram
and now it has more spray. So the first four
two consists of all the color values
right versus center. There was fewer information for the extreme dark and
extreme bright colors. So here, let us try creating the tone curve using this
hand or the sample tool. We have created a new
adjustment layer, and you can select the blending mode here
for the luminosity. Here, sample any color and just drag up or down using
the left mouse click. This way, we can find this part of the color
in the tone curve. Sometimes you may be confused which color to
apply changes for. Just use this hand
picker tool and this tone curve option
here just drag it. Here just select some
sections of the photo. We'll first select the
brighter, the darker, the shadows and the
highlight to we exact and you can drag this tone
towards any direction. We have manipulated
this tone curve by just clicking on certain
points on the tone curve. We have just created a S curve, increase the highlights and
reduce the values of shadow. But here we can apply changes
to individual colors. You can create as much
point as you want. There's no restriction here. But try to make the curve a little bit in a certain format. Don't just create
a zigzag curve. In that case, it
would be confused. Okay. It will be ilgical completely illogical to
increase the value of shadows because shadows shadows tend to be dark in nature. Okay? So if you increase
the value of shadow, it means you are increasing the brightness of the shadow.
It makes no sense here. Thus, we are focused
on decreasing the value of shadows and increasing the value
of highlights. We want highlights to be more bright and shadows
to be more dark. So you can turn the visibility
mod on and off to have a preview of each
adjustment layer and how it affects the photo. We have converted this
photo to the smart objects, so that way, we are doing
non destructive edits. Destructive edit
actually destroys the photo if you
perform any changes. Alternatively, you can
keep a copy of the photo. And here we want to create one more adjustment
layer for this curve, and we will be manipulating this using individual channels.
This is the red channel. You can find individual channel, and we are just dragging
the dark values towards the center because it doesn't
have too much dark color, and we can perform change
the value of any mid tones. When we decrease the
value of the mid tones, it converts the photo
to the green because reducing red means we are
increasing the green color. The same way decrease
the value of green, it will increase the value of right color in
the photograph. Here on the right hand side, green color has less highlights, we can reduce that thing and you can go to the blue channel, and here it is generally covered in the
darker section of the photos. It is less visible in the
brighter section of the photo, so you can change the value. As you can see, when we
manipulated this lGB channel, it improves the
quality of the photo as it changed the
photo to black and. There could be
various techniques of changing a photo to the
black and white gray scale. But this was almost
unintentional and it actually got to controls
over individual RGB channels. So we have reduced the haze
and we have brought back some colors and changed the
color from CPA to gray scale. Okay. So this was how we can restore a fad photo by reducing
the haze in the photo. We have created a adjustment
layer for the curves, and we have referred a
histogram to change the values. Try creating this thing and restoring your own
photos till then, keep learning and
keep moving ahead.
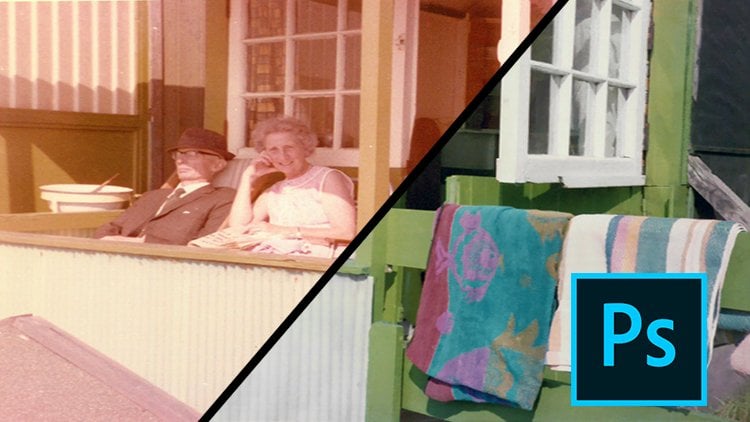
6. Fixing Decayed photo with Spot healing: Hi, welcome back friend. Here in this lesson,
we're going to learn about spot healing for fixing decayed segments of a photo in photoshop.
Let's start with this. Here we got another photo
from early 20th century, and this has decayed over time. This was shot using
a DSLR camera. This photo was not scanned, but still fix it and
perform certain operations. First step is to make a
selection and crop your photo. Here we have just
crop this photo. And we can identify
that the edges are not aligned and then we can
rotate it slightly. There could be
different options. You could either make
a selection using polygonal lasso and then crop or you can use the square
selection and then crop. So here I will be
just rotating it slightly and then making
a selection once more. And after rotation,
it should be aligned, and then we can crop
it. Align it properly. This is a portrait photo, so we should just crop it. Because we don't want
some unwanted components, other than photo itself
to appear in our edit. Just make a selection. You can keep a copy
of the same photo. In case you don't want to
perform destructive edit, or you can convert this
photo to smart object. So once you are done, just make a selection and go
to image and crop. And here, we can remove some
more segments of the photo. And after we are done, we can rotate it back to the default orientation,
image crop. Okay. Here we have
this crop this photo. Now, using the same rotate tool, just below the selection tool, and here you can fix it. This was easy to do. First step, we have crop. Second step, we want to remove some decayed segments of this photo using a
spot healing brush. We have created a duplicate
layer of the same photo. In case you want to refer
back to the original photo. Or you can create
an adjustment layer for a spot healing itself. Here spot healing is simple. You can go just below the eye dropper tool to make a selection
for a spot healing. There are two brushes for general healing brush
and the spot healing. I'm using spot healing
because it is content aware, and it perform
operations easily. If you have some complicated
segments of the photo like ice because it have surrounded with a
lot of textures, you can either zoom into the photo or make your
brush smaller in size. Okay. And just make a
selection using point we selection or select
individual pictures. So here we want some parts
of the eyes to be white, some parts to be
black and everything. So here we have just fixed it. Sometimes the paper of the
old photos could have turned out some water or different
spots may occur over time. These kinds of lost
information in the photo due to
printing issues, and other things could exist. Here we can see that
this tie is not clearly visible and there are multiple spots in this photo. So We can fix it
in different ways. The best way is to
use a spot healing. It takes time with
the spot healing. You can just paint it
over and over again. You can either paint over
the pixel or I would suggest just painting like
you're painting with a brush. Just move from one
direction to left to right, top to bottom, bottom to top,
and where you feel like. Don't worry if
you're using mouse. You can use spot healing very well with mouse and
drawing tablet alike. There's no issue. Okay. Okay. So just perform
the selection. Once if you have done
anything incorrect, the selection by mistake. You can do the changes by going to the control Z or you
can open the history tab. Here we have applied some
changes and try to heal. You can see the earlier
version and you can find that the spot healing works
very well here in this case. Also, you can remove adjust
the borders and that now. We still got some segments
of the shirt still in decay. We can just simply increase
the size of a brush, spot healing brush to sample the close y areas
and fix this thing. You can zoom into the
photograph to make a final selection. Make a slide. We have fixed right
side of the fit and we are zooming into the photo
to make a clear selection. The same thing you can apply
over the left hand side of the photo and make the
larger side of the brush, zoom into the
photograph and apply spot healing over
the decayed areas or area with the spots. Here we have just
fixed this photograph. And just be sure to correctly select the pixels
because sometimes there could be blurry
effect blur kind of effect. In that case, you can use a general healing brush rather
than using a spot healing. But for now, we just
require a spot healing. It's more than
sufficient for now. This is the best tool to restore decay segments
of the old photos. Okay. Later on, we can
apply the noise correction and if you want to repaint a photo or you can convert
it to the black and white. This is the final photo
that we have corrected, and you can zoom into the photograph to make
a finer selections. But if you feel like
it's not working, just leave it to
the default value. Over time, if you
practice a lot, you would decide what are
real shadows of the photo and what are spot and you
can fix it with this too. Here, when we zoom
out into the subject, we can just make
sure that there are no other spots remaining in
the photo and you can fix it. He just do these changes, and here it is there. This is how we have performed
it and the sto photo. Try to this thing on, keep learning, and keep moving ahead.
7. Greyscale and control properties: Hey, welcome back friend. In the previous lesson,
we have applied spot healing for fixing a
decay segment of the photo. And here in this lesson,
you're going to learn more about converting this
photo into the gray scale, various options to
convert it into gray scale and applying various changes to some
properties like highlight shadow, contrast, black white
texture, clarity in ware. So make sure that you are in
the photography dashboard, and you can go to the
adjustment layer for black and white to create a black
and white adjustment layer. You got this option to change
the value of red, yellow, green, Can blue and purple
components in the photo. So if you want to
highlight the skin color, it's better to highlight
the red color of the photo. And if there are
more red colors, you can apply the changes. So this is how we can convert our photo into
black and white and control what components in the photo should be highlighted
and not highlighted. Another way is to create an
adjustment layer for hue and saturation and decrease
the value of saturation. This way, we can also
create an adjustment layer. You can turn the visibility
mode on and off. To preview how your photo will be affected using an
individual adjustment layer. Another step is to go to image menu and the mode
and select gray scale. This way, we can convert
our image into gray scale. But this method is not
recommended because it will convert each pixel
definition to black and white. And your RGB
information is lost. Generally, all photos consist of individual pixels
that consist of red, green, and blue components, ranging from value zero to 2505. But here, when we converted
it using the mode method, it will just remove all
the RGB information. Next, we can apply camera or filter and we can change
the value of highlights, you can increase the highlights, you can decrease
the highlights to make it clearly visible
or not visible. This is very easy because you can find these
things on the go. It's easier than tone correction because tone correction could be difficult for some people, and some people would like to specifically control
individual properties. Because if you have a have some experience with light room. You would find this
very familiar because a light room classic have
a similar interface, where you can control each individual properties
using the slider controls. These controls come in
handy and you can change the value of darks and whites, and the texture you can change
the values of the blacks. You can change the
value of shadows. You can change the value of
textures, use the slider. If you want to have more
texture visible on a photo, you can add this thing,
I can remove it. The camera of filter is
used for two purpose. First, you can use it
for noise removal, and then you can also use it for controlling various
properties as controlling the highlight
shadows involved. Then you can move to the detail
tab or the mountain tab. And here you can increase
the value of luminous. If you want to
remove the pixels, it's better to increase
the value of luminous. The noise, it could be reduced. Uh, if you reduce the
value of luminous, the noise is retained. Okay. So if you want to keep your photo in
the black and white, and you don't want to add color, you can keep it
in the low value. And also if you
are going to print this photo and want
print to look natural, not an artificial, you can just keep the luminous value
to the default settings. Otherwise, increase the luminous if you want to paint
over certain sections. Or you can just keep it in the gray scale
black and white. It looks decent enough. We'll be learning more
in the coming lessons. Keep learning.
Keep moving ahead.
8. Adding colors with Gradient Map: Welcome back print.
Here in this lesson, you're going to learn
about adding colors to the old photo using gradient
map adjustment layer. So earlier, we have used the
saturation adjustment layer, and now we are going to
use this gradient map. So you can create a gradient
map adjustment layer from this option below to create a gradient
map or you can go to the adjustment layer option
to create a gradient map. There are by default
different options for dot tritone and rainbow colors, but I would prefer
this general black and white and we'll fill
multiple colors there. Just first, go to the window, two way vertical split. And here we got
this earlier photo that we have re colored. So we're just going to
extract the colors, various colors, generally
skin color from this photo. If you have a photograph
in color of the same time, generally, the old time. Okay. With the similar
lighting conditions, you can extract colors. So here we will be extracting four or five king tone colors
from this sample photo. Here we have this gradient map. Just click here in the gradient, double click to get this thing. On the left hand
side, we will be placing the darker
tones of the color, and on the right hand side, we will be placing
the brighter tones. We'll be taking
sampling this thing. Just use the eye dropper tool
here to sample some color. Take a darker tone of the skin color from the skin
where shadows are there. Then you can trick
the brighter tones. You can repeat the
same step by taking samples from different
area of the faces, and you can create multiple values of the
switches in between. So here just click anywhere
on this gradient map, and here we can add. So here we have
added five colors. Okay, you can add six color, eight color, ten color, any number of color you want. If you want to have
more preseason, it is recommended to
add a different color. But follow these steps,
on the left hand side, keep it darker
shades of the color, and on the right hand
side, make it brighter. So here we will be taking
this sample color. On the left hand
side, the dark brown in the mid tone,
we got this thing, and you can slide those colors to readjust
and make some space. If you want the mid tone
or any specific color to have some more depth in the photograph,
you can adjust it. The gradient map is
a powerful tool. When we use the hue saturation, we have this simple
tone, a single tone. But here we got multiple
color variations. Okay. When we paint
over the photograph, the multiple variations
of the photo, different colors will be
applied at the same time. It depends on the
scenario where you want. You can also extract
the photo colors from the real world these days photo, high solution photo, but should have the same lightning
condition, and here it is. If there is some error, if it looks like some hazynes, you can adjust it by going
to tone curve correction. We'll be highlighting
the shadows or highlights and the shadows
will be enhancing it. Just try to make a S curve, and everything will be okay. Here, focus on this thing. Here press and back
space to change to the black color and just use the paint brush to
paint all this thing. We can add a slight pink color to the lips of this
person's face, and you can also paint a different color and different
segments of the photo. This is how you can paint. When you paint with
a white color, the color would be visible, the layer would be visible or you would be creating a mask. If you paint with
the black color, it will work as an eraser here. Just do room into the photo
to make a fine adjustment, color it properly to cover
entire segment of this thing. If you want to make
it less crisp, just decrease the value
of opacity or flow. If you're using a
drawing tablet, it would be more efficient if you are
focused on having a flow. It will add a painting
watercolor paint look. But here we don't
require this thing because this is not a painting.
This is a photograph. So we are very well okay with this general
settings with the mouse. Here we have this mask. And you can apply different
blending mode if you require. And this is how we apply the
grid in map to add color, and we have extracted the
color from a different photo. Next, we can add more colors to this photo and add
life to this photo. Try restoring your own
vintage photos and get different photos
from grandparents, your parents childhood photos on the photos that are
in black and white. It could be decayed. Just
try to restore them. Try to restore the old memories. You grandparents and everybody would be happy to see your. They would appreciate
it. And add this thing as your
photo editing skill. If you're expert in photoshop you want to be
an expert in photoshop, you should know this vintage
photo editing skills because it will be required
in some point of your career. Okay. Stay creative. Keep learning.
Keep moving ahead.
9. Painting Remaining segments: Hi, welcome back friend
here in this lesson, you're going to learn
more about repainting, adding a color back to this vintage black
and white photo. So here, just create an adjustment layer
for individual colors that you want to paint over. So here, let us first paint
blue color to this shirt. Don't worry if you are not sure to decide the color
that you have to paint, you can change the
color anytime later. The point here is just
make a selection, hold alt and back in space to create a mask and
start painting. Once you have painted over
the area, then later on, you can modify the
color, the flow, the opacity, anything later on. You can also change the value of saturation and all
other properties. Here just create a mass. I'm making this fast
forward because it may take some time if you want to make a direct selection
using this brush. You can repeat the stuff
once you face an error. And you can paint
just like that, and there could be
two strategies. One strategy is to paint very fine using the selections and another strategy
is to just paint roughly and then start erasing
using the black color. Just paint black color
to erase this mask. In the border areas, it should be required, and here it is. So we have simply painted
over this shirt to selection. You can adjust it by making
this fine selection. And here it is. So
we have painted this shirt and we can
change the color. Adjust the saturation to
make it light or dark, or you can change the value of U to differentiate
this color. Okay. You can take any color.
It's not a problem. Then create another mask
here adjustment layer for a different t. Here we
can select for background. Let's make it green by the fall, and we can start painting. Here it is, make
the larger size of the brush because this
area is quite large. And once we have reached
the border sections, we can make a fine selection by decreasing the size of
the brush and here it is. And sometimes you may feel
like a few colors are missing, so that you can
bring back later on. For example, hairs are generally converted
into the brown color. But we don't want
this brown here. We want the black hair, so we can create
1 gray scale mask and paint over this hairs. Just make a fine selection. Here, if you want
to crop this photo, you can also use the
edge refined tool to make a clear
selection of the hairs. If you want to turn the background and
transparent, it is advisable. You can use any selection
tool like magic wand, quick selection tool or any other tool to make
a fine selection, and you can crop the subject
and delete the background. Here it is. We have we have
painted over this mass, and three layers have been
created for the saturation. We have painted the shirt, the background, the face, the lifts and we can paint
tie into a different color. So you can change the
color of the background. So this was black and white, and this is we
have added colors. We can add few
more colors if you add a gray scale color to
the eyes, it looks dramatic. Because the eyes are not in the gray color,
they are in white. So alternatively, you can paint with a white color
or you can decrease the flow or turn the
opacity a little bit down? You can paint using the
same color over the heirs. Just make the brush a little
bit soft and start painting. And here we can see the heirs have been converted
to the brown color, and we can paint
over this thing. Next, we can change the background from green
to a different color. You can turn it red pink, matching any color you want. This is how you can
add more colors. Are you learning more
in the coming lessons till then keep learning
and keep moving ahead. Okay.
10. Recolor Hairs: Hi, welcome back friend. Here in this list,
we are going to add some more colors to this
photo, so let stars. Let's create a new huge saturation layer
and we're painting the remaining segments of the photo quickly
and very easily. Here, we don't know really what colors were there
when the photo was shot. We know the color of kin, but we don't know the
color of the shirt, the background, and the
tie. We can just guess. We can guess the
logical deduction, and here I'm painting
with a purple color. You can choose magenta color, you can choose dark
green or black color. It's your choice. But here we are sure
that tie is something in the darker color while the shirt was in
the brighter color. Because highlight
components are more present in the shirt
then the shadow areas. Shadows are more
present in the tie, and we can say the tie is dark. So here, you can
choose a contrast. You can choose a combination
of color. S here. When we change the
color of the tie to say purple or the blue color, it matches with the background. Okay. So background is in
red color red or pink, and here we got this tie. So just adjust it to make
this photo beautiful. Okay. So your objective should be
there to restore the photo. The logic and the concept of
the photo should be clear. It should not alter the concept. It should just emphasize everything and bring
back the colors. Okay. So here we can see that in the gray
scale and the original photo. The hairs were completely
black and shiny. So what we can do when we edited to photo with
the skin color, heirs appear to be in sepia
tone or the brownish tone. But here we want to bring
back the color to black. Let's create a
adjustment layer for this and start painting
over the heirs. Here we are just
painting to bring back the black color
of the heirs You can also paint over
the moustache beard and eyebrows if it is visible. But here we can see that Mustas and beard are
not clearly visible. So if we try to paint
over this thing, the skin color would be lost. So it's better to keep
them intact while we can repaint the heads,
the main hairs. Okay. You can just
experiment with this thing, and if you're not sure if your adjustment
layer doesn't work, you can turn the visibility
mode off and review it. You can repaint, create
more adjustment layers. It's completely your choice. It's advisable if
you're making for a family photograph
for some article. You should take some collaborative suggestions
with your peers, friends, family, anyone to
decide what color to go with. If this photo belongs to your grandfather or
someone like that, you should consult your parents. Because they might know what colors were present in
the original photograph. So before experimenting, you
should have some discussion. And here when we try to
paint into the eyebrows, it doesn't look good. So let's leave it. Here we have added some
colors to this photo. This was the original photo, and now we have added some
colors to this photo. If you have different
components in a photograph, you can paint individual
sections by into photo. This is how you can repaint. I we're learning more
in the coming lessons, keep learning,
keep moving ahead. Okay.
11. Final Tone correction: Hi, welcome back friend. This is how we
have edited photo. We have color corrected. We have reduced the noise, we have date colors and
just to improve the photo. So we can compare this final edited photo with the black and
white photo that we have corrected by removing the spots in the photo and next We can improve it further
more using the curve. So let's create a new
adjustment layer for curves. And here you can decrease the shadows and increase
the value of highlights. Just try to make it S.
So this way for to have some contrast and where shadows are more dark and the highlights
are more visible. Okay. So this S curve will improve
the quality of your photo. Otherwise, you can
have this hazy look. Earlier, this was hazy, but with this small
tone correction, we have improved this photo. Okay, so these are
the three versions. The middle version
is the main photo that the raw photo
that was not edited. Then it was restored by cleaning and removing
the spots in the photo. And converted it in
the black and white. If you want a black
and white version, you can save this
version as well. And then we try to recolor and bring back the colors to this photo and perform
certain steps. It was a quite long
time taking approach b. Finally, we have this
fruitful result. And with the tone correction, you can finish your work. Okay. So this is how you can restore your photo
into different steps, try creating restoration,
keep learning, and keep moving ahead.
 Harshit Srivastava, Developer on IBM Cloud, Bluemix