Transcripts
1. Introduction: Hi there, welcome to
this course on creating After Effects templates
for adopt Premier Pro. My name is Jose and I'm
instructor for this class. Here in this course you will learn about motion
graphics template, just like water motion
graphic templates, how you can use them,
how you can create them with hands-on
practical examples. This course is divided
into multiple lessons. First, you will learn to
create various types of motion graphics template
in After Effects. Then, after creating a template, you can import them and use
it on adopting new flow. You will also learn about
these things in the scope. Moreover, you will
also learn to create animated lower third X2 opener, Along with a lesson to build animated Alpha Matte text
template After Effects. And much more. Curious to learn these
excuses on After Effects. And want to combine your motion graphic scales with
video editing. Excuse me, start
learning right now. See you in the class.
2. Creating a Motion Graphics template in After Effects- Text opener: Hi friends, welcome
to this lesson. We're going to learn
about creating a motion graphics template
in After Effects. So let's get started. After you open, After Effects, you get this dashboard. We are going to create
a new composition. And here we just
create a new shape. So we will draw a square shape and you can
find it as a shape layer. You can rename it so that
it will be easy to handle. You can create multiple layers of different kinds of objects, vectors, text on
different things. Just rename it to
shape animation. We're going to create
a basic animation. Will this rectangle. Then we can create a text layer. Provide some texts. Here we write a start. You can change it later on. And the purpose of creating
a motion graphics template is to use the power
of after effects, where you can create visual
effects and motion graphics. And you can export it
with some features that you can control later
on with Premier Pro. Premier Pro is used for video editing and
After Effects is used for motion graphics and
VFX. Those who don't know. If you are a premium pro user, you just need to
learn a little bit about After Effects so that you can take your video
editing to the next level. So here we create a
keyframe for the scale. Keyframe has varied over time so that we can
create animation. So in the starting, it was zero. Then it said 200%
after some time. And then we expanded it
further on the screen. You can select a
pair of key frames. Right-click keyframe
assistant, easy ease. So it will just hover around
with seamless manner. This is, we create animation. We took a one-second pause. You can increase the pause
or reduce the false, depending on if you
reduce the pause, it will just pop
up very quickly. You can increase the gap
depending on your usage. Here we created a
scale animation for the rectangle and it looks
like beautiful opener. So this is a basic thing. You can do, a complex and
advanced thing as well. Then you can animate texts are
at some kind of animation. You can do some transformation. Otherwise, the properties, this, rename this as well. Our text. Here we got two
different layers. One as a rectangle and
then as a distinct. This go to Windows and
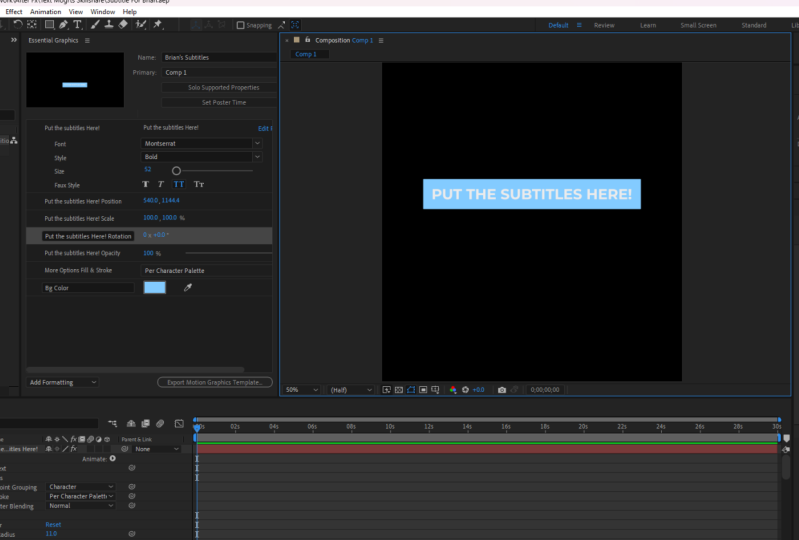
essential graphics. And from there you can create
a motion graphics template. Does provide a name and the properties that
you want to add. If you want to add a layer, it won't be able to add. You just need to provide
a particular property. So like we can edit
position, scale, rotation. But keyframes could
not be said in Premier Pro for these
properties that we add. Although Premier Pro
allows you to set keyframes on property
is that it provides. But you cannot transfer this
thing from After Effects. You can just set the properties, you can create another group. All the properties that
you paste it here would be allowed in Premier
Pro to make some edits. Like if you want to create a motion graphic
templates where you created multiple animation,
various effects. And you want your users to
just edit a few things, like basic transformation,
the phone, and other things, but
not the code animation. You can do this thing. You
can provide minimum control, maximum control or
the way you want. You can add source texts
to the Properties panel. And it will allow your
users to customize fonts. Just go to Edit Properties, and don't forget to check
the first two options where you enable the custom font selection and font
size adjustment. So these two properties
would be added so that your users can change the
font according with him. Whenever you create a
motion graphics template that consist of texts, Don't forget to provide a phone. You can use this motion
graphics template for various purpose. If you're a blocker, if you're a video editor, you
create documentaries, urine shows, you create ads, anything, just anything,
video lessons as well. You can use these lower thirds. You can create this thing
to create an opener, outro, anything, just anything. You can also use it on
various other things as well. The customer would be
able to use this thing. End-user would be able to customize the
properties for opacity, position escaped and
position that we provide. If you don't want to
provide, say, Opacity, your users won't
be able to change the opacity value of
each individual layer. Moreover, you can create
groups that allow you to categorize
various properties. So it's ideal to
create an animation consisting of multiple
layers and just provide the properties that you want your users to
change later on. Whenever they use. You can provide these things. So just try to create
motion graphics templates. And once you are
done, you can just press Export motion
graphics template. And don't forget to
save the file for, save the file and then export. And then you can go here. You can check these warnings or otherwise you can ignore it. If you want your users
to get a prompt. If they do somewhere,
it will prompt. Otherwise, you can leave it. And just provide a name for your new motion
graphics template. It will be saved as MO GIT extension motion
graphics template. And it can be used on
software such as Premier Pro. This is how you create motion graphics template
in After Effects. You are going to learn
more in the coming lessons till then keep learning
and keep moving ahead.
3. Using After Effects template in Premiere Pro- Text opener: Hi, welcome back friend. Here in this lesson
you're going to learn about how we can use an After Effects
template in Premiere Pro. Let's get started. In the previous
lesson, we created motion graphics template
in After Effects, and now it's time to
import in criminal law. We already have a video clip here added on the
timeline for Premier. And now, in order
to add a template, just go to the Window and select Essential Graphics in the
essential graphics panel. If it is not currently
open, you can check it. Or otherwise if it on
the right-hand side, just slide it over. Here. You can find various templates that can
be added to the scene. And you can import
a new template by just going to the
bottom right corner little icon to add a template. Select the template that
we created previously, a text to opener
and imported here. You can alternatively
search it as well in the existing
template folder. But if it is a new template, you'll need to import first. When it is imported, you can add it to the timeline. You can create a new
layer on the top of existing video clip or
you can just nucleus it. Does. You can see
here it is working as designed. In After Effects. We created a similar animation
where there's a text that appears in the beginning
and then the background. We can change the text. As you can find in
the Edit panel. We can change the text. So this feature was provided
in the previous lesson. We created a template
and passed on certain properties that can
be edited in Premier Pro. Then we can use, now rename it to let's fly. Because they are, this is
a scene for the airlines. We can just add this carousel. You can change it to
anything you want. So always in Premier, in After Effects
provide a source code. We can also change the font. We can change the location. Let's position it on the
lower bottom of the screen. You can turn the opacity, just make it a little
bit transparent, not completely little bit, and it will just pop up here. So this is how it appears. What we can do here is we can go to the Properties
panel, all this layer. And we can change its position. We can cut the remaining
part that we don't need without randomization
was for too long. And we don't need
that much time. We just need it to be an opener. So it will be there. You can change the font
obviously, whenever you want. By default, we added
a beavers new font. You can change it to any
other font that you decide. Just try san serif
or something like. You can also change
it to italicize bold, or just keep it regular type. Then you can change the
size and everything. Let's move to the effects
control panel for this thing. And just move a little
bit higher than what we just want to test and little
element to be displayed. Not everything is. Now just press space bar
to play this animation. Now, this thing is here. It looked like some
messages popping up. You can always customize things. So once you import a motion graphics
template in Premier Pro, this don't use it as it is prior to customize
it further on, because Premier Pro is
all full video editing software and you can always
use it to customize. I just reposition the
texts and the position, the background as well. You can also add some effects. Here. We can, we're going
to add a video transition, dip to black or extenuation. This is how you use the motion graphics
template in Premier Pro. Try to create your own template and use it in your videos. Keep learning and
keep moving ahead.
4. Creating a Lower third in After Effects and Exporting Mogrt: Hi, welcome back friend. Here in this lesson you're
going to learn about creating an animation
for lower term. And you will learn
to export it as a motion graphics
template from after effects that can be used on any other video
editing software. So let's start with this. We need two different layers. One is a shape layer for
rectangle, and other would be, or actually, let's change the
color for this rectangle. We have created a
long slim rectangle that will be placed just
below our text layer. Now just create a text and we can customize
it, changed the color, all this text, and just write it what you want things
to be written by default. The text can be changed later on in Premier Pro as well
as in After Effects. So don't worry at the
moment, the scale, the text adjusted the way you want and just
write something. Here we are writing
chapter one morning. So this kind of lower curve
can be used documentaries. It can be used for
creating video blogs, or it can be used for
different things. Use the selection tool to just
move it around the screen. And here we are going to
create a little bit animation. In this lower third,
we're going to animate both the properties, both the layers rectangle
as well as text layer. For this rectangle just
make it in the timeline, just move it a
little bit forward. So that rectangle would appear. Sometimes later on. Expand
it and move to transform. Choose the scale,
property or position. You can change it. We're going to create a
keyframe for position. But before just move the anchor point towards
the left end side. Moving the anchor point,
you would require a pan behind tool selected
and move it to. Later on. Once you are done, just hit the selection
tool and set the keyframes or an invasion. The select the scale property, hit the stopwatch icon
and make it zero. Initially at, say, 1 s, we made it as zeros, so it will appear
out of nowhere. After some time, just hit again, create a keyframe again. And this time you can scale
it 200 per cent same. You can just make it, so it will appear this way. Provide a gap, set,
another keyframe. Just make it a little bit smaller so that it will
have an animation. Select all the keyframes,
and right-click. Easy ease. You can also go to the
speed control thereof. So you can edit with
the graph as well. The y's just leave it. Then just move to the starting
of the video and play. This. It looks a very
seamless animation where a rectangle
experience from zero from left to right and then bounces back a little bit. This is a gradual animation, just moved to text and text
to the end of the animation. So when the animation
ends or text may appear, just customize this text. Increase the size or decrease the size the way you
want horizontally, vertically, anywhere you
can fit any property here. But currently we won't
be getting any property. Just move to the animation, preset, effects and presets. Just select the
animation you want. You can add, say, automation. You can add various type
of texts animation. So that will be
added by default. So a little bit difficult to create if you
use the key frames. But you can use this thing to make it a little bit easy to do. You can play with the
mechanical algorithm or other kinds of things, or just expand to the
Animation Preset texts. You will find everything here is use the one you want
and displays it. So it looks like a
D ciphering thing. You might have seen this kind of effect and various movies, documentaries as well as locks. It can be used anywhere. And once you're done
with your preset, just go to Window
Essential Graphics and create a motion
graphics template. Provided a name. Here, we used a
lower third cipher because our text looks
like a ciphertext. And this lower third. And then just drop
the properties that you want your
users to change. Our customized later on
with the Premier Pro. Don't forget to enable font selection and font
size adjustment for the source code so
that your users can change the font and
font size later on. Then you can also add some various transformation
properties on the folder difference
and so that you can customize
it in Premier Pro. Once you are done,
just hit the Export, Export motion graphics
template and exported set. Okay, Here we're done. So this is how you can create a basic lower third
template in After Effects. Tried to create your own, keep learning and keep moving.
5. Using After Effects lower third in Premiere: Hi, welcome back, friend. In the previous lesson, we created a lower third
in After Effects. And now we're going to import that motion graphics
template in Premier. So just import this
thing to select the lower third cipher
motion graphics template. And it will be here. So you can always added to
over a video or an image, or you can just add it in the
timeline. We stand alone. We're here, we got this Lower. Third, just get to the
starting and play. So this is all, or
Lord will appear. But now we don't like the font. We can change the
font anytime we want. Let's go to the Edit panel. You can change the font, just make it say Caldwell, and make it light. You can choose any other
font of your choice. We are using the car will form. So it will be light font. We can change the scale. We can move it anywhere we want and just
look at teeth and thing. You can change other
properties as well. That is provided in
this control panel. You can use other things as well to try to create various
types of lower third, because we were
told is numerous, It is very open. You can just do anything, create wonderful animations
with a combination of texts, shaped and color, font as well. And then use it on
your video projects. Keep learning and
keep moving ahead. You're going to learn more
in the coming lessons.
6. Creating Alpha Matte for Text: Hi, welcome back friend. Here in this lesson you
are going to learn about creating an Alpha matte
for text animation. So let's get started. The first we will
start by creating a text layer and just write
a long text, anything. And we are going to create
an animation over this. So here I write. Welcome back to the show. You can change the
size of the text. You can customize the font. You can change its length. And now let's understand
what we want to do. So we will create a rectangle
over this text layer, and we will create an
Alpha Matte out of it. So at any given point of time, only the text that is within the box will appear
on the screen. Whereas box won't be appearing on this green
box will be transparent. So this is called
an Alpha Matte. So whatever you placed under something that
will be visible only. So we've placed this box here in the center
of the screen. Just position the shape
layer on the top of text layer and select Alpha
from the track matte option. So as you can see,
only the text portion of the texts that is enclosed within the
rectangle is visible. Now we are going to create an animation with the position. So just go to the position, reposition your texts wherever you want it to appear
on the screen. And then we can set a keyframe. Just move to the y-axis
out of the screen. Set the initial keyframe
where no textures visible. And after some time, create another key frame. We are text will appear
from the right-hand side. The first one you find, Welcome. This is top right here. So wait for some time. Repeat the same keyframe. You to have a pause. Then create another keyframe
and move it leftwards side. Here. Just add, bring three
different words back to the. So it will look like
text is appearing out of nowhere in a sequential
manner so that your users would be
able to read each and every word with a
given frame of time. Written animated manner. This is how you
create this thing. We'll just play it again. We got combination of frames. Just remember, you
have to create two different key frames
to move an object, object and then create
another keyframe to pause it. Because nobody wants a
text to just move around. It won't be readable. If you want things to
be made it readable, just pause it over a time. Welcome back to the show. So it moves there. But here you may have
noticed that takes, takes a longer time to enter, but very small time to pause. So just increase the pause
time and move it very quickly. Decide to do this thing. So here it looks nice. We have applied easy, ease so that it will be smooth. There won't be any
linear progression. It will accelerate
in the starting. And then the
accelerate when it's about to just go
out of the screen. You can further customize
it as you want. Just select the pair of
keyframes you want to move. With the left mouse click, just draw a shape over it and you would be
able to move it. Setting a keyframe is the primary thing to
create an animation. This is a building block, and this is how you
create an alpha matte. With the text. You
can also create an alpha matte of
picture or video. We're going to have
another texts will have multitude of texts
and different layers. They just have a combination
of two different layers. Does this create a template
for this and go to windows Essentials
and just provide a name for this motion
graphics template. And we'll just drop
the properties that we want to allow our users to customize later
on in Premier Pro. So we can drop its tail
opacity but we can, we don't want to draw position. Let it be because if we allow them to
change the position, it will affect the keyframe. We don't want to enable
the animation concept because we fought a motion graphic templates
there to provide your users won't be able to set the key-frames in Premier. So this Tools licensing, try to create Alpha
Matte On the Road, keep learning and
keep moving ahead.
7. Adding alpha matte mogrt in premiere: Hi, welcome back. In the previous lesson,
you learned how to create an Alpha Matte motion graphics
template in After Effects. Now it's time to import the same template in Premier
Pro and work around it. So here we got a video clip
that we want to add it. This is skyline of
modern-day city of Dubai. And then now, if you want to add a motion
graphics template, just click on this little icon. Add a motion graphic
templates like alpha matte. It has a MOG RTF format. It will be available here, just shows the name and
drop it over your clip. So it adds this thing. So you can see the
wonder of Alpha Matte. It comes on the screen. It has a transparent background, so it will be placed
over anything. If you switch off the visibility mode for
the video for a time, this is how your text
will appear on the back. Now. Welcome to the show. Now, if you go into visibility
on the text will appear. You can change the text
and type something new. But it will change the
presentation style. You will understand what
this example like, e.g. if we change it to welcome
to this modern city. By default, when we
created the template, we added transition
based on the text. But here you can see some
letters are missing. So what we can do,
we can do some year. We can just rotate it, tilted a little bit, so forth. Just turn the visibility
of the video off and tilt it very wisely so that it
will scale it a little bit. You are, you can scale it down. And then you can choose
the orientation. We have added these
two controls, the orientation and the texts, and now we just tried
to play it again. So welcome. This modern city has worked. So sometimes you have to look
around the properties that has been provided in a motion graphics template
to fix some things. So try to create
your own template and we're format in Premier Pro. Keep learning and
keep moving ahead.
 Harshit Srivastava, Developer on IBM Cloud, Bluemix