Transcripts
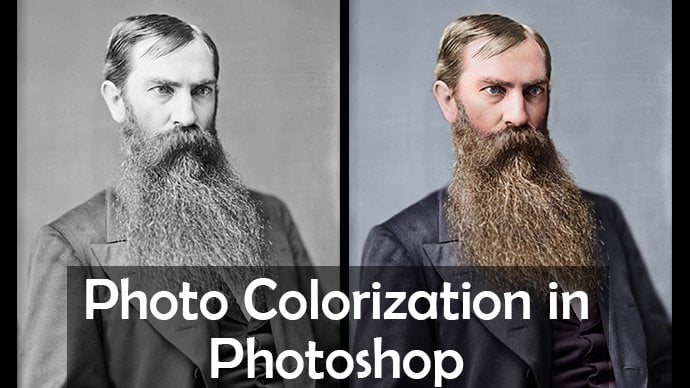
1. Course Promo: Hi, guys. Welcome to my course on photo restoration. This specific photo restoration courses gonna cover removing horrible color casts, which you tend to sometimes get on these old photos, especially they've been left out in the sun. Now the course is going to cover loads of different techniques. So we're gonna cover Cem scrapped was storing some scratches and little blips in the photo , removing some elements we don't want mainly focus in on moving colors that we don't want but painted in skin tones and painting back. Our corrections on the skills learned in this course could be applied to many, many, many other mediums and different photo restorations as well. So I hope you enjoy on. I'll see you in the course.
2. Analysing our Image : Hello. Welcome. Welcome to the first lesson. All right, Now, first of all, what we're gonna cover in this very, very important thing to do when you do invoked a restoration, it's first off, we're gonna analyze what exactly we're working with and what problems we gotta solve. Okay, so here's the scan of our image. I will be making this available to you as well. To download to work with me. See, Don't have toe try and look a different fellow. Zoom in. Now we can see. Obviously we've got nasty color casts going on here on what I will. First of all do is get my eyedropper tool, which is over here on the left on die. Know as a fact that this this window, it was supposed to be white. Now, if I use my eyedropper tool to select the color, what I can do then is come down here to the foreground color because it changed this on. We've got orange you going on there, So let's have a look. But here. Yeah, another orange hue on. Let's look at the shadows yet loads of red orange hues. Let's look at this. This is supposed to be white. Yeah, Mawr So we can see it's orangy red hues we got going on. This is actually supposed to be green Would work on. You can see this is just being completely changed on this. Come over here. Here's all orangey, orangey Hughes, This is supposed to be black. And again, it's just knowing to you. Okay, we get that. Great. OK, so that's our first thing. And what I'll always do is make a not new layer. Don't need to do that is our makesem notes. So I'm gonna get my text tool. Andi, I'll always put right. We've got an orange color cast. Um, now, when I move this color caste form experience, what I know was gonna happen is see the faces by here When we take the color out because there's gonna be oranges mainly in their their faces are going to go very, very grey or not necessary. Glaber. They're gonna lose a lot of color. So I know from experience that we may were very likely gonna have to this repaint color repaint skin tones. Okay. They've also got this by here. This is not the ground because these white this white sort of tin slate thing tense. Later, this white tin cover goes all the way down to the ground. That corner doesn't intercept it halfway up. So I know that this is something in the photographers hand. Okay, so we need to remove this. So this at that bottom, right corner removal. Now, I've also got a little if you zoom in, appear we've got a little kind of smudge going on. Appear so quite easy. One to remove. But we're gonna have to remove that as well. Okay, so let's add that to our list. See him back out. Top right corner. Who? Corner removal. Okay, let's turn this often. Have a lot. Another Look, we got any other Anything else going on? We've got a few sof little nicks by here. So we've got one Nick there, Nick. There. Um, Nick is my own technical to my guess. Just diesel spots. And these imperfections, like one of his hat, but their number, their one but there. OK, so will remove the impact factions which not take along so minor. Let's put this number here at the bottom. Actually, minor imperfection. Well, let's call it dust, because it could well, be dust when we scanned in. So minor dust removal can I have to make sure that I make this text black so that we can see what's going on otherwise hard time reading that. I also know as well we're going to crop it. We're going to crop these edges as well. So it's put that first because that's where we'll start. Right? Okay, so this is our list. We're gonna crop. We're gonna move the color caste, repainted skin tones, bottom right corner removal top, right corner removal, a minor dust removal. Okay, We're actually gonna do these bottom three before we do the color changes, but yeah, it's very, very, very important that when you get a new photo to do this, especially if you're doing it freelance, because you need to know how much to charge. So again, you could just look at a photo and think I'll move the color. Okay, It's fine. Then you may notice other stuff like this smudge appear on other stuff, and again won't take us too long at all. But if you are gonna be budgeted for this as well and charging, you need to be able to sit down and analyze a photo, and that will come with practices. Well, when you do this more, more, you'll know and learn what to look out for. So awesome, like what we'll do is we'll start a new lesson whereby will take care off a couple of these jobs. So awesome, and I'll see you guys in the next video.
3. Cropping, Dust Removal and Cloning: welcome back. So we're going to start with We're gonna start with Crop in this photo down the right way. We're then gonna do a minor dust removal on. We're gonna look at the top right corner removal on the bottom, right? Hopefully or within one lesson. So what we're left with is to spend more or less in time on the color removal, which is what this course is about. All right, So I'm going to first of all, duplicate my background. Just so I've always got a copy. Okay, on call this photo restoration. There we go with this lay selected. Let's just go to the cop too. When I'm gonna bring this down and you can see that it's actually this line by here was being scanned in. It's actually slanted. We'll bring it down to about here and then just very, very slowly rotated around like that, that we g o also gonna come in just to the edge of the color. But there, excellent. Down here, trying not to cut off any of the color. If you line up properly with the rotation and you should be good, okay? And enter. Great. We've got a little bit of line left by here, which is fine. Well, pink that back in first. So if we zoom in, um, actually, let's take care of the dust removal first. So a couple ways, we can do this because it's such small mine apart. What I'm gonna be used in is the spot healing brush tool. So just select up to on if we zoom in, have a look at this number here, its color over. Make sure you're on this layer as well on you got no excellent. There you go. Let's undo that one coming quite close to paint their lifetime so we don't carry any of the neck over. Excellent. Remember here. Go on, go on. You can see it's quite a nice quick post. It is just a matter of going on the whole image until we get rid of everything. All these little tiny, tiny imperfections. Sometimes it'll be that it's a little bit. A little bit of the photo was chipped away because again, that will happen with old photos, and I think these were actually in the scene. But I am gonna move them because they just they just don't look nice a little bit distracting. Yet, like sometimes it will be a little bit of the emotion of photos flaked off. Sometimes it'll be when you're scanning in. Always make sure that your scanners are not dusty or on the photos are not dusty. I'll always give the photos a little white first very, very, very carefully again. If they're very, very, very old. I may have always given it wiping scratch any the emotional, anything off like that. But you just want to go through, like so on. It's a nice, quick job. Sometimes I'll end up moving stuff, which is probably actually there in a photo, because it just looks a little bit distracted. As long as the client doesn't mind like that, better do it could have bean on the window. But you know, for the most part, are not gonna move that because that's the actual buckle of the door. But yes, the most part, we are good on and excellent, right? I think I am going to leave it there. Zoom back out. What we want to do next is removed this top little smudge because not very nice. In order to do that, we're gonna use a clone stamp tool, which is this little stamp right here. You can also have s on your keyboard, guys just to get it. It's a short cut. A case If I s I have not changed the time stamp to Okay. Now, the way this works is human. When I hold Ault, you'll see that it changes to a target. So, for example, if I click this target by here, I've clicked down, okay? And I'm gonna let go vault now when I come over here and start painting, I'm not holding alternate, but what is doing you can see on the left is painted in copy and pixels from one area to another. Okay, so that's what we're doing. So, in essence, we want to use that. So I hold altogether Aiken retarget on going to select this area. Okay, just that edge. So I've got that edge. Now we're making smaller with my square bracket. Keys on, basically line up under. Start painting these pixels up here. So all I've done is paying to these pixels up here. Then I'm gonna re sample again because of importantly, re sample different areas. You don't get repeating patterns on. There you go. Awesome. So we've gotten rid off Tunis labeling off. We've gotten over that smudge. It does go a little bit onto here, so let's just Yeah, go like that. Now, what we've also got is a little bit if we zoom in a little bit of a white line at the top Masters from where? The edge of the folks that was. So all I'll do for that is used clothes. Stamp too. Make rational on just like painting these little bets. Like so. Okay, so nice and easy just painted in this edge up here. Just keep re sampling. Andi should be fine on. It's just correct that there we go. Right. Okay. Also gonna do the same down its edge by here, because against the this is the edge of the photo. So sample about this grass over something but more the grass over. Just keep re Sambolin just to get, you know, a good variety. Let's get some of this terrible. But here I think the town anyway, pain to end. It's a small glass. Cool. Zoom was going up. This is gonna be quite a nice, easy area. Okay, just get some this green Excellent on to keep on going up. I was painting a still thing. We're here. That's fine. And now finally on this edge paint out these little these little bits that we don't. We clearly don't want Onda. We should We should be good. Awesome. So last little thing we want to do in this session because we've only been here six minutes is great for two minutes on African. See difference. We have mainly in this top corner. We can see little specks all over kind of disappearing. Now we want to do the same for this down here. I don't actually know what this was, but I think there's something in the top of his hand because this corn and doesn't just ranch magically run up halfway through. It just looks a bit weird. So it could be a client request to leave it in. Or or they may not actually think about asking you to take it out. You can always ask them. Look, do you want us taking out? No, what I'll do, because there's no a lot of contrast in the whites here. It is quite difficult to see. So what? I often do is go make a new levels adjustment layer, place it above, and then just, like, push this like, so just we got more contrast. Actually, you know what? I'm not going to use the labels. It's not the best one to use this to use a curves. Okay, Same thing, please. Above, give a little bit contrast. Like so. Okay, bring this downs more contrast in there. Okay, there we go now. Right. Okay. It's good that we can no see a lot more pattern in here, and I'll just help us. Um, well, just help us match it properly, because if we don't do it, if we don't match these lines properly on later on, when we do some color adjustments, it becomes more contrast. E we might actually see it. So you just wanna be careful. I'll go back on on my foot restoration layer again with this clone stamp tool. I'm going to alter clicks on old, select this area on gonna paint it in down here. You know what you want to be aware off is these lines get closer and closer together as we go over there. So if I want to use the this area. Just a paint by here. The lines are gonna match up there too big. So you want to be source in on going down? Okay, so it's got to The lines are as close together as they should be, because again, over here, lines are very, very close together. And you want to carry that through. Okay. So just keep on going through, like this accent and then keep resource in great stuff. Great stuff. Great stuff. Great stuff. Awesome. So now we've got a little bit of uniformity. It is a little bit liked over there, So I could I mean, it's not gonna be overly noticeable, so I could kind of paint in, but here. Yeah, that that's fine. So what we've done is paint that out. We've done some nice little corrections now. OK, so it's really, really good. Actually, I've just noticed on the side by here I haven't because I put this on, and that's how I noticed. Excuse, but it was hard. See, before I actually got a little bit on edge left, but so it's going in without clone stamp Tool on. Just get better. These pinks on. Just painted in like. So get some of this. I may just paint a little bit pink town like there. There you go. Awesome. Excellent. Right. Less tune off our level or delete our curves. Yeah. In this lesson, we cropped it on. We have done this little correction. So what we can do that's really good. We could now tick off some stuff. My list. So minor dust removal. Top wife bought my corn removal Done crop done on. That's really good, because now we can spend a lot more time on the important stuff on the stuff which this course was made for the major major color caste correction. I'll get you some cheers with Tune in. I'll see you in the next lesson.
4. Fixing our Colour Cast Part 1: Okay. Welcome back. Now what we're going to start doing is staff doing a orange color cast removal. Okay, let me to my text layer off on. We've got our photo restoration. Lay here on last lesson like we said Just did. Sum's off. Nice. Clean up. Tidied up a little bit. Okay, So the first thing I'm gonna do go with my lay selected. I'm gonna try doing auto tone on auto color. Gets regular auto tone. Let's just see what that does. Well, that's Ah, it's done. Pretty good job. This black is a lot more black. They're still, you know, the colors are still a little bit skew. We, um if we undo this is what we've come from. So a lot of people think are my gosh, she's done. It's not It's definitely not done. You want, You can get it 10 times more better than this. Um, and that will take a little bit work. But, you know, to be honest, that's quite nice to start with this godless 40%. 45% of the way. There next one is auto colors. Have a look at that. Um, to just go back. I prefer that that I know. I know for a fact that this is supposed to be green. This would work, so that's gotten a little bit further. Um, on what you can see if I turn on and off. I've mentioned earlier. It takes a lot of the color of the skin tones. Does the quite Graber there? Ok, now I know for a fact her hair is great, but yet that's gotten us quite a bit of weight. And I don't I don't need to worry. I'm gonna carry on teaching you other skills to make this $10 will better not just gonna charge you for courses. They click that like that. There's a lot more that you need to actually know. OK, so that gets us a lot of the way there. What we're gonna do next is we're going to reinforce the colors in each area. Okay. This this white by here, for example, this especially white, right? If I use this color picker, we are still getting pinks in here. Okay? Still getting pigs still getting picks? Um, over here. We're still getting reds. Andi, Pinks. Okay. We're not supposed to be getting them. They're supposed to be white. We look at this green by here. This is crispy green. It's yellowy green. This showing up is a bit more green in here. Definitely green in there. But you know would go in over here. It's no good. Okay, this is supposed to be white. It's probably quite close to White. Yeah, it's quite close. This supposedly black looks if Scott but blue in there Yeah, it's got blue in there and it's not supposed to. This is supposed to be a lot the wrong nervous would. So, yeah, we've got a lot to do inside is still quite greeny on those white cabinets. Okay, so there is still quite a lot of work to do on Let's look, yeah, she's got skins in pinks in there, but look, a gray that is her skin tones on my actual color pickers on 11 by 11 average. So it takes 11 pixels by 11 pixels and averages. The cull arrived was not just like one and normally pixel and even do that appear by changing it. Okay, so we've realized that actually, although this looks good, there is a lot to do. OK, actually, just out of interest. These shatters in here. Look, that that blue. And they shouldn't really be blue Those shadows. Awesome. Right, Let's dive on in. So we've got a basically fix the different areas. One of the areas. Is this supposed to be greenwood work? Okay, so what I'm gonna do is I'm going to make a new hue and saturation layer or actually, new curves layer. There we go on, and I'm just gonna dark in it. Well, I'm just gonna bite in it, like so. Okay, one night, once I've done that, this is my layer mask, but here, going to select it. And I'm gonna hit control or command. Mac and I What that does is it inverts this mass. Okay, If I had to get my brush tool, basically, it's time marks, masks work. If I paint white on a my capacity very low. If I paint white, basically, I'm painting that color adjustment back on because if you look at my layer mask down here, this color adjustment we did this Curves is only showing through the white areas and not the black. So with that in mind, what we want to do is get our last suit tool and we want to go in on start coming down. Andi Separating out. This would work of case. Let's go down to here. Come along here like so Onda, we are going to the store. Each section of this would work and, you know, some people will say Ask quite ah done. Okay, quickly. Some people say that's us. A pain and pain Obama process. It's long you get to talk about it takes a while, but the results that you'll get as a result for that taking a while a huge you'll you know , you'll get a lot better photo, Okay, so just bear with us, go around like so just get all of these bits. Um I think coming here cause that's a little bit green would work behind. So again separate, Always bit. And we will have to further this selection as well because, you know, if you look at the edges of these towels, you've actually got quite soft edges. But don't worry, We will take care of that on. Once we have gotten our first a little bit of woodwork or masked out, you will see this huge, huge, huge, huge correction. Okay, come up here, Andi? Yeah, Probably. Come and get this bit in here as well. You can. There is another approach. You can actually paint this in with the brush tool. I personally prefer to do it this way. I am. I find it a lot quicker, Onda lot easier. So let's just come out here, Okay? Up here, across, on and down, Down like so Come back across. We are getting most of it in this first. Once we know has taken a while. I don't really want to fast forward this. So do just to it along with me. Because again, there could be some people who might get a little bit lost. I want to make sure that I don't fast forward through this Just so everyone gets it. Awesome. Come back down. Come out to close on. Awesome. We are there. So let's join that last. You up. Right, resume out. We have selected ALS. This better Not everything we got still bits left to do what we can do now with our inverted lay A mask selected on this selection. Loaded. Get your brush tool. Make sure you're painted white with 100% opacity on, We are literally just gonna paint and get a big Russia's. Well, paint this color this curves correction in just this area. Like so Okay, Okay. So all painted it, you know, do control D You can also see in here that actually I'm gonna control Z That actually, because what he did to forget to do is further it. So what we can do is under control. Lt again, right? So for that, we want to do select modify feather on a further by two pixels, and I'll just give it ever so slightly softer age may not made that much difference, to be honest, but it is important that you know that. So just wondered on do that just to make sure you did. Now we can control the and what you'll see is our layer mask has got that or hassle. The white area were painted. Now a lot of people be like John. Let's not looking any better. Is always looking worse yet that's fine. So what we can do is double click this thumbnail, but here for the curves on now we can just weaken still modify it. But you know, it's just do in that area. I always do very overexposed or under exposed. Just so when I painted in, I can see what areas it's included. OK, so gonna take that out on we set Just or I did. It's dragged that point off. We're good. Now. I want to get more green in here. So first of all, I'm going to the Reds, and I'm gonna decrease the red because I know it's, um orangey Hughes in their decrease a little bit, the red increase, some of the green. It's just likely remove some of the blue as well. Maybe good. The RGB bring it down a touch. Okay, on. Bring the highlights down a little bit as well. Andi year. That's fine. We have the greens again. Increase weapons if we increase the highlights. And I don't like that. Um Okay, um, blues. We need to remove any more blue. Nothing us. All right about there on red. Just a little tweak of the reds or some kind of Okay, so if we turn this on off, you can see, especially on this front post. It's looking a lot back there. Oh, so yeah, there. That's what we want to do so in essence. Now, what you want to do is on with this layer mask selected. You want to go to all the other green bets Now you can get your brush tool. Okay, Andi, make a smaller Just painted in like so. But, you know, E, I don't like doing that way, so I will prefer to come in because he got more control. This you can feather the edge, isn't People would argue. Got more control the other way. It's just kind of up to you. But I'm just gonna come in like this on what you can do. I've got I selected. If you want to do another areas Well, like in here. If you hold shift, you can see it's got little Plus, Sophie, hold shift. You could just go across like so. I am going over the post that I did earlier this post by here, but because we've already painted it in doesn't matter. So just come in like so Onda up on around. Close that off. I may want to get this little bit, but here they know that it's some of the wood work behind them. Even if it is shadowed Okay, What else? We want to come in here or some Okay, Command. Like so It's just a matter off doing this for the whole green. So if you do wanna skip to the next video, all I'm gonna be doing in the rest of this video is focus in on the green bit, and then we're going to focus on the whites next. OK? So don't feel pressure to, you know, you can keep doing this as I'm talking in the background. But if you do want to skip to the next lesson, I'll show you our next step in this heroic voyage off saving photographs and saving memories, but completely, completely up to you guys I won't be doing. And I'll make sure I want to Anything else extra Because I don't want you guys to be out of the loop. OK, so some of you guys in a still with me. Thanks for sticking around. Andi shouldn't be too long. Now. We got this member toe hold shift or some when he's like the next one. Awesome. So other area by here. So hold shift. Great. And coming up. Excellent zoo most. Where else we got I think? You know what? I think we've got everything awesome. So now we can get our brush tool. Um, we can get our brush tool, so I don't know what happened. Then it be Andi Makeup brush large on, painted in like so. So the same correction was painted into all the other would work. And again I forgot Teoh forgot to Federated Night Select modify feather by two pixels. Um, empty. What is wrong with me? Here we go. All done. Okay, right. We're gonna do it. End the lesson there will catch up with everyone else who skipped ahead. Andi yet See you in the next lesson.
5. Fixing our Colour Cast Part 2: Hi, everyone. Welcome back. Now, What we did in the last lesson was we just corrected the paintwork. There was something which we didn't do. We didn't remove it from this area of the bucket. I know. Terrible. But that's okay, because this lesson will be about sorting out the whites. So we're fine, to be honest, right? This is zoom in. Now on this green layer that we made last time, you can see that that's actually have an effect on the bucket. So what we can do is get in there with our brush, make a night of small, remember because there's white. They're white shows. Where lets the color adjustment show food so we won't. We won't actually paint black on here. Now, the X key was switched around you two colors, but you need to select black, you know, But going in you can. But if we paint black by here, you can see actually paint in out our adjustment. Okay, so I'm just gonna do that very, very quickly. Thin Russian, Come up the handle by here. Awesome. And you're just paint moaned. We don't actually want it to appear in the bucket because it's buckets must be white, not green. I've just gone just gone over a little bit on the woodwork, but as if I search around back to white, paint it back in. Excellent. Right now we can actually worry about the whites and here because some reason look, they are still coming up the wrong color. Select that. See? They're still coming up as pinks. That's not good. So what I want to do on the first of all the names curves to woodwork Green is always good to name them, so even know what's going on. The client comes back and says, Are can you dial down the green a little bit in the woodwork? You could just come in and you can literally *** fill around them as long as you know which one it is. Cool. So let's go hue and saturation, making you one of them on What I want to do is I know from my color dropper that the area that that we're concerned about is this still saw off these pinks in here. So again, make sure I got my photo selected is thes pinks. So yes, he sort of reddish pink. So if I go on my human saturation if I go to my reds while do first walls over saturate everything on what What this is, Show me now is the areas that are getting oversaturated are the areas were targeted? These greens aren't flagging up at all because we're just targeting the Reds. Okay, so if I said this back to zero, I may also have a look at the yellows if I over saturate the yellows. Okay. It's doing woodwork now in a little bit. The inside a little bit. The bottom by here. Okay. It's all of the writers years. What about the binge? Enters the record is a bit magenta. Magenta. If we over saturate. Not too much, actually. Not too much. Okay, right. That was just a little experiment. Me to have a look. Now it's good of the Reds again oversaturated them. You can see it's wife by here. So what we actually want to do is let's have a look at what happens right? If we unsaturated reds. Right. Turn this on and off, looking at the looking at the whites by here. Boom. There. No, back toe white. Okay, Now we can have a look at increasing or decreasing lightness. I think that's nothing. That's what we want to be. To be honest finds. I see that zero. You can also see colors gone out with them, and they look a bit like zombies. And I can say that because I know who they were. They were some sort, very distant family members. So I could say that. Right? So what we want to do is yet I may leave a little bit of warmth in there, but Yeah, what we can do is control I to invert this lame ass again on. Do you know what guys? Very, very similar to before I'm gonna come in with my lawsuit tool single off this area like so , if you do shift in F six and maybe different, Mac, have a look. It brings up your feather. Okay. Stronger federal by two pixels. Again, if not to go select. Modify on fair that I should say the if it is different on Max should say what, but there s our feathered it. And now I'm gonna get my brush tool, and I'm gonna paint that adjustment layer just in that area. You see, they've still got it in a skin. Okay, next is this sort but the window frame. But here, just come on down. Like so. Okay, then. Come on, back up. And to be honest, um, I'm just gonna go very, very roughly around a hair, but because we can actually, it doesn't matter if we paint this in and a window frames as well, because there probably is a little bit of color cast in there. I'll show you what I mean now. Okay, we got this area was painted in. Yeah, it doesn't matter. Doesn't really take much out of it. De select. I'm just gonna come up nice and tight a long road ahead by here, because there were g o gruesome. Don't just doing much, but yeah, now what you can do, you don't really have to draw it for this one. Just come on down in with a brush on. Just paint in this area on again with this wouldn't go. I don't really need I don't really need to draw with a lawsuit or just coming in. I want painted in the salvia on. There is big difference. I will show you paint out some of the tones on the inside as well. Okay, so if I turn that on and off, you can see if we come in here as well. You can see this slight. You change. You can probably push it a little bit more, but I'm like, in the change we have from that. Okay. So we can come in here. Redd's there. We go on, def. We want we can bring him down even more. And that will probably probably show you the difference more there. Especially if you focus on this little bit. The window sill down here. There you go. So we've taken that act of just those areas. Excellent. So the next that would focus on is this area here if we make a new curves. Okay, I'm just gonna again dark and things like, so, districts, we can see what's going on. Control. I on that, Andi, I'm just gonna worry about this area by here. So if I get my the Sioux Tool, come in like so? Because I know this must be black top by here. And it was looking a little bit too blue when we looked at the color picker earlier. So what? I'm gonna do? Come back into here. Um, all my layabouts gonna paint in this area, okay? I didn't further them, but to be honest, I'm not fussed because it's quite hard edges. So again, de select. And now I'm gonna come to here, get rid of this, and what I want to do is take out seven up blue, good to get more true black and take out but green as well. And now touch of red take out. They're gonna come theology, people down on. And if I go in there with the eyedropper tool, that's quite to be honest. Us? Yeah, quite black is still a little bit blues in there, to be honest, but it's not the end of the world. Let's just go very quickly to the curves, maybe drag a little bit up blue. Just a touch. Come back to go into here our first fineness. You can tell you that. That is black. Isn't it awesome? Finally, I think we've got a little bit of a problem. Now this little bit off. How long is this lesson? Bingo. In this lessons on 7.5. 98 minutes. Okay, that's fine. Eight minutes we'll just tidy up this area. Okay, Um, what I want to do is just darken this by here because these look very, very bright compared to our dark. Appear on this would should be a different color. Really? So for go another curves darkness we could see was good on Invert on, focus on this Would first of all, come in like so down Andi or CIRM come up along here right further by two. So shift up six or select Modify further. Get your brush to on brush this in. Now we want to come back, get rid of that and what we will. Excuse me. What we want to do is make a brain, because again would should be more Brandon. That so it's increase in red. That's decrease and blue to give it that sort of to give it more yellows, okay. Or get into brain. Now I want to come to the RGB and just make it a little bit dark. Like so blonde highlights down. Awesome. I d select as well. Okay. Um yeah, Something about cool to go that in there. Teoh, the exposure of this towel needs to come down. So what we on? About 10 minutes. That's fine. One last thing we're gonna do, then. Actually, no, we'll do that. Last do I lost. You asked. Okay, right. We're gonna win this lesson there. The next session, we're gonna have a look at paintings of the skin tones back on. Then I'm gonna gives an extra thing to look at. Um, I want to introduce a little bit saturation in the Curtin and here just to get a match of saturation off here, maybe put some saturation in there in these people on. We also want to combat the issue of overexposure as well. OK, so thanks for joining. I'll see you in the next session.
6. Repairing skin tones and correcting exposure: Okay. Welcome back. Right. First of all, what we're gonna do is paint of skin tones into these lovely people. I am also said earlier it's a good idea to rename, So don't be named this hue and saturation. Is that the one where we took the rate at the whites Wykes correction. This was the black tar on the side black top. And this was the wouldn't post, right? So back to the job at hand, Right? Okay. I spend some skin tone into these lovely, lovely people. Okay, What we'll do is go Solid color, So new adjustment layer solid color on the solid color. I'm gonna pick a nice off rosy pink and click. OK, put it to the top. We want to do is invert this command. I actually I won't inverted yet. You want to change the blend? Demoted color. Okay, great. Awesome. Done. Finished. I'm joking. Not done. Let's now invert it. And I am going to get a brush on dykan. Start thinking about, um it's make sure one here. I can start thinking about drawing the rosy cheeks back in. That's a little bit too much, isn't it? Course it is. So What we want to do is bring the capacity of our brushed with a brush selected. Go to a past. Even that Don't. About 33% on small brush. Gradually paint in a little bit of road venous in the cheeks wherever you'd see. You know, a lot of veins. Sort of certain bridge of the nose by the eyes on the chin, and some on the neck with their or system on the rest on the edges of the fingers. There you go. Okay. Tuna on off. Very slight, but there is some color being introduced. We have a bit more armor there. Cool. We're gonna come to him on on Knows? Actually, Yeah. Come to him. We're gonna give him a little red nose worth Corker of cheeks. Years as well. You tend to have quite a bit more red on a little bit on the chin on on the gullet. But there or some A little bit for here. Excellent. So tune on. Enough. This is what we got. Okay, Just a little bit warmth. We want toe redo that. So another solid color this time was good for nice yellow. I'm gonna do the same thing Change the blending mode to color invert with same brush sleep sent in the bits that you didn't in other bets that you didn't paint the pink. You could just tap a little bit, scatter a little bit yellow in there against We got a bit of fluctuate a little bit of ah, variation like so? So if we zoom act, turn it on on off is very, very slight. Okay, but we have actually got a little bit more color in there and see it definitely in her face on his face. I don't if you can see in the recording, but does add more in there. So what may do is on here with this one. Said a little bit over there. You go on may be a little bit a hole. One on here. Okay. Just to bring it out a little bit more for you guys. Yeah. Cool. Awesome. Okay, So what? We've got orange color cast. We kind of We've kind of managed that repaint skin tones. We've done that. I'm gonna delete that. There are a couple other things that again, as you go through your notice, more things pop up that you want to do? Um, it's quite a bit of saturation missin out of their clothes. He could be. You could do with a little bit more of a darker suit. She could do it a little bit more color and neighbors over exposed. This could do it a little more saturation. Andi. Yeah? Then recover these bright areas and maybe dim the saturation down on that. Let's start with the inside. That coup didn't really, Because again, insides quite darkest white covered this quite dark. So you're not gonna get more than that in real life. So it's to be named skin, pinks, skin yellows. Um, so above this, we want another hue and saturation. Okay? It's just saturate things. Andi invert. We're just gonna paint this on our hue and saturation. We're just gonna paint in and make sure you're past the capacity of your brushes to end up for this one. But you're not gonna see a lot of change in this, But if we paint in here, paint in around here consists of the yellows populate on drowned here. Okay, so if you turn it on and off, you can see this kind of having an effect there. Now it's coming to hear and see if we go to the blues or the science. That's what that color isn't. It was it more neutral. We're gonna science to see what happens. And I was not doing too much Sony liked area. Okay, let's go back to the master developer. Changing hue of my change of color. Yeah, checking out. I give it a little bit more. So I pulled it to plus 14. We're gonna go? Yeah, like that. Andi darken it a little bit. So let's play around something like that's yes. So I've got my hue to plus for my saturation. Plus 39 my lightness toe minus one. Yeah, it was to be honest, zero. Let's have a look at what that looks like gone off. It just brings out a little bit more the color on Yeah, I think I said enough to be honest. Um, next I want have a look at this suit. So this meaning this coated. Now look, this man's suit, that's simply going to be a curves. Um, put the top on. Just bring it down. Like so. Okay, Darknet. Excellent. Invert on. Let's get along. Actually, we're gonna do that different way. I think I want to show you a different technique this time. So we've got an exposure problem. Well, really Correct his suit with this part with this with this technique Because I want to show you different things Now your new layer icon. If you hold Ault and click new layer your cough with window, what we want to call this is D and B and no, it's not drum and bass Wish it was, but it's not drama based its dodge and burn. If we changed our mode toe overlay, you're then get a little tick box which you comtech called fill with overlay neutral color , 50% gray. Give that click and then click. OK, we've got a brand new layer on top filled gray on us 50% gray. So if I show you 50% gray, 50% great is basically, um, this This is hue, saturation and brightness. Brightness will be a 50%. Okay, it's just basically halfway between the top bottom. Go now. Overlay Anything darker than this? 50% gray will dark in the image and anything lighter than its 50% agree with. Lighten the image. Okay, that's how overly works in layman's terms. So if I get my black and white brush, get my brush tool and start painting some black down here, okay? You can see what's happening black. But there on because we're overlaying it's actually darken in this area was if I got a white Andrew. What? But there is actually Brighton in the area, that's all. That's always do it. Okay, so that being said, let's manage what's going on here. So get my last suit tool come into here like so, Andi, further by two pixels, just in case they don't actually intend to go into the edges, and we're gonna do is set my brush. Opacity, towboat. 10% focus on this area first cause darker. Um, I've just been doing white on that. That was no what I wanted to do. I want to make sure that I'm paint in black at 10% capacity. Okay, so just bringing this this area through to match as a whole. So we should have the same amount of darkness or brightness across this, which is looking like that. Yeah. Cool. No, What I'm a do is just get the big Russian come over twice. There we go. So if return is on off, you can see that we're combat in a little bit of that. I know when I d select Control the orca. Mandy, zoom into this woman's blouse. Onda again on 10%. I just want to bring in paint down here to bring in some more this detail. It won't bring a lot of it back. To be honest, we can bring back to his colors. Well, just bring it some more, and it won't bring a lot of it back. Come down, arm, but it will give you a little bit to work with. So between the on off you see, that's the effect they're having on her majors very slightly. Deep down her face on putting a hat like so. Okay, that's what we've got. Great. I know the same this guy. So this is how we're gonna make the soup darker. It's very gradually painted in this area. Awesome. Because he had a suit should be darker. There we go. And again, maybe a little bit more on its face. Little bit more contrast on the same this hat. So if we have a look where we've come from. There we go. Would come back at them. Andi, just go make sure it's nice. And even as well x just to introduce a little bit of walked back and managed to make it more even. I'm gonna bring my capacity down to about eight. You the only problem with doing this with brush to it might look a little bit uneven, but to be honest, yes, right. That's cool. Um, no, this towel as well. That's a little bit the looks of it. Slept on top like a bad photo shop job. So I'm going to paint him black on here. It's to bring these colors through a lot more. This white area probably won't be able to bring much back from there. Police of these colors. You could bring it. Bring it out more. Excellent. I'll do the same on this tower. We're just food in this back in, and I probably come and do the same just in this bottom corner. Just give it a little bit more contrast in here. Excellent. Cool. You know, like that. Maybe just on the edge of this door. Okey dokey. Yeah, We're looking a lot better. So if I turn it on and off, you can see the corrections. We've had quite nice. Maybe just a little bit. Very quickly. They're cool. Why? Don't leave it there. What I do want to do before coming of summarize and finish up. What? We on 11 minutes? OK, tell you what I will do. I'll end this lesson here and we'll summarize and finish up in the next lesson.
7. Final Adjustments: right. Welcome back. Final lesson. There's two things I want to do. This post is looking a little bit out of place to me. So again, come down to the wooden post I'm gonna remove. I'm just gonna dumb this down and actually away. We could do that is if we just select the layer. Just go to the capacity. Maybe two minutes to 60%. Or maybe no. Okay. As good. A 80. Yeah. Get up for that before, right. Um, we got all these layers, so let's we got a copy of the bottom. So what I'm gonna do is in a selectable control and e, and that's flattened it. So this is where we come from. That's a huge, huge different guys. Now I'm gonna do one or two things to finish off. Chuck, A general curves on top just to introduce this spring after site just to introduce a little bit more overall contrast to just give it a slight bit and esseker. But there maybe not too much in the highlights. But there, Ugo maybe pushing it a little bit much as well We go, Andi? Yeah, something like that. Maybe something along the edges off that, I think, to be honest, do you believe that this command e these two layers nameless photo restoration again? Okay, so to summarize, this is how far we've come. So we removed little kind of dot infections removed this big thing with that little smudge , we cropped in as well. We removed the general color cast on. Then we repainted in specific bets. Okay. On again, if you're a client, the problem. The one thing if you do flatten what you do loses all the layers. So you'll only want to do that at the end. Once you're happy, owns your clients. Happy on again. I'll always Normally I'll save two versions. Ah, flattened version, which would be this andan flattened version before I do it. But you know, it's just a little tip as well, if you take away. But yes. Cheers for joined, then. Now, if you did find the course helpful, please give a view and a like Now help me out a lot. Check out our social channels. You can check them out via my profile because I've got other free content uploaded to YouTube. Tweet me A final versions do whatever but yeah, thank you so much for tune in on. I will see you guys again. Cheers.
 Jonathon Parker, Passionate MoGraph and VFX Lectu