Transcripts
1. Class Introduction: Hi guys, welcome to my third course in photo restoration. Now this course specifically focus on Voc. Hi guys, welcome to my third course on photo restoration. Now, this course specifically focuses on a very certain specific type of damage. We're going to be looking at faded photos in this course. Now the photo I'll be going through looks completely whiten. It looks as if there's no detail in there at all, but actually there is still detail in there and it's an easy method of salvage in that detail. And it looks mentor and you do it. It looks like where did that detail come from, but actually it's always there and you just got to know what to do inside of Photoshop to restore that. And that's what I'm gonna be showing you today in this skill share course. So the phone, the photo is attached. So the photo was attached. So all you need to do is download that photo or you can use a photo of you own, jump into Photoshop, follow along with the classes. And by the end of this course, you'll be able to restore these badly faded photos for yourself. So I really hope you guys enjoy less jump ball into the course.
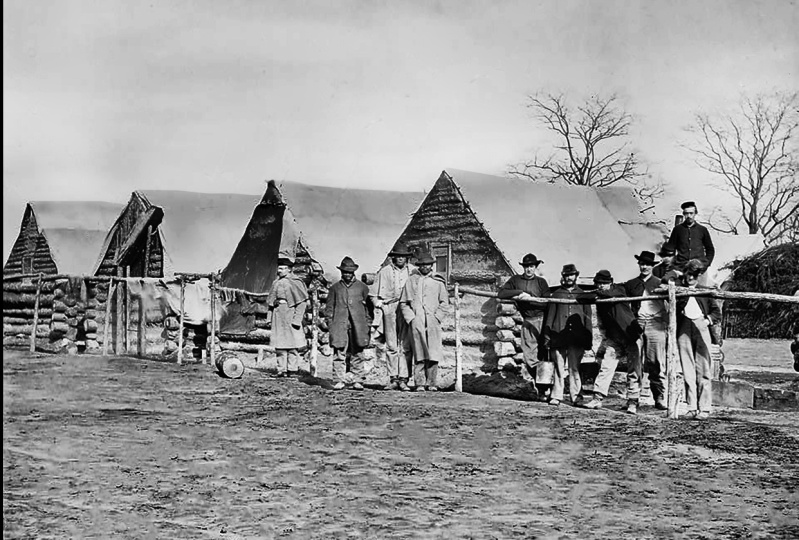
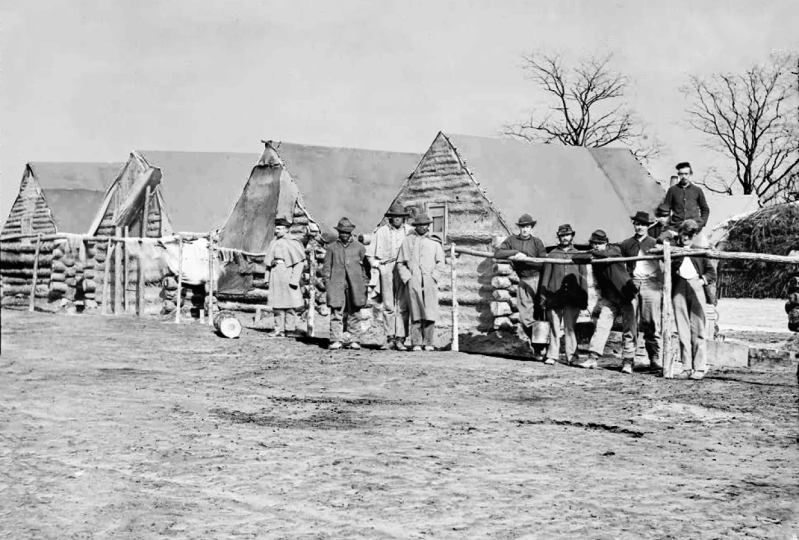
2. Lesson 1 Image Analysis: Okay then folks, let's take a look at what we're gonna be working with today. So this is the image that we're gonna be restoring. And you can see as a couple problems, you've got that damage on the edge. You've got all this off flaky, scratchy damaged by here. And also you've got the fact that this is a very overexposed photo. Or what, what's actually happened is it's faded a lot over time. Okay, so let me just show you what we will be achieved. And by the end of the lesson, all of this information is in the picture and we're just going to be retrieved in it. So we're gonna be going from this to this and it's not that difficult. Okay? So first of all, let's analyze what we've got going on. Like I said, we go by edge damage and we've got all these scratches and stuff that shouldn't be too difficult to restore. It's mainly the fade in that we're gonna be focusing on. And it's just one or two quick tips really to combat that place is more time consuming than anything. So let's check that we've got our image setup correctly. So I open the image itself Photoshop. Let's go to image, image size. And yeah, I think 1024 pixels by 1017 and thus, thus spineless, large enough. And 72 further pixels per inch. Where working on screen for this, so that's fine. If you were gonna print, maybe put that up to 300, but that's fine for me. Nine. So that's our quick little analysis. I think let's have a look. The sky is definitely overexposed. The ground is the soul of the tent by here, over exposed. When it comes to solve this graphs by here. And these guys, these are actually I would say correctly exposed. Maybe these guys by here could do with a little bit darker than this one. And these two, their coats were there and maybe some of the wood on the log cabins by here, but it's mainly the sky, this grassy area. And yeah. So last thing we got, if we have a look at the histogram, we can see that a lot of the data is towards the white end. And we just want to make sure that this data by here gets evenly spread across the mid tones. So let's dive on into the next lesson and start sought in this picture out.
3. Lesson 2 Recovering the faded regions of the image: Okay, so let's go ahead and start correcting the fading in this image. So what I'm going to do is first of all angular get my background layer and create a duplicate just by dragging attempt to New Layer icon. And I'm going to call this photo because that's what it is. Now going to go to the new Adjustment Layer icon and I'm going to go to curves. Okay, so basically now I want to spread in, if we look at history, I want to spread this data out is all in the white area at the moment. And if you see this little, if you are looking at a histogram, if you see this little arrow appear, this of explanation mark, don't lie about your fine. If you can't see the histogram and you want to just go to Window and wherever the histogram that h. Okay, so we want to spread that out. So let's start clicking and dragging over like this. And you'll start to see a loaded data is now coming back into the photo. Okay, so I'm not going to push it too much. I think roundabout. There is probably why I want to go Yeah. I think that we could go further, but there's there's just no point. But you can see is mental. There was actually a lot of detail in this photo. So think something like this is probably where we wanna go. You could have a look at a kind of alter in the mid tones by here. But while There we go, yeah, and what we've done thus starts to get nice. We've, we've spread the state of aij now equally kind of across. So a lot of it's now in the mid tones. So if you turn that on and off, That's awesome. We got loads more detail coming in. Didn't probably didn't realize it was actually that much detail. However, was that what that's done is if we look at the sky appear, which actually brought a lot more damage into it. Because we can see, if we go up, you can see that we've got more this damage coming in. And we've also got something called JPEG artifact in by that, which is going to cause us a problem when we come to restore it. So this salvage a lot of the detail, especially looking at the tree branches. It salvage a lot detail, but it has given us more damage to work with. You know, it's swings and roundabouts. So what I wanna do now is I want to mask this adjustment layer to only appear in the brand. The sort of the sky, the ground, the ground drawn by here. And the sort of the moves, the roofs of the sort of log cabins. A may kind of paint in half transparency over some of the CO2 and sum of the logs by here. But what I wanted to control i with this Layer Mask selected, and it'll invert that. And what I wanna do is I want to get my polygonal Lasso Tool. And I want to come across here now. I basically want to make a selection all around on the ground. And I'm going to do the same for the sky. And it's a bit of a, it takes a little bit of a while, but it is worth it once. We kind of see now how well this works. So I'm going to come across quickly just commanders shoes. Don't worry about being like perfectly neat. Or while I'm not worried about being perfectly need central, I do this fast for you guys. This is what you wanna do. I'll just time-lapse set as I go around these guys now. Okay, so I've got my selection loaded. I did kind of go up beyond into the spit and I probably could come in you the brush later and just brush it in those little bits. But let's get my brush now. On this layer mask must make sure I've got a white color. Unless painting our grind back in. And there we go. All the sudden, we have got my brushes only on 50%. So there we go is coming in more now, all of a sudden, we have got our ground coming in looking quite a bit darker, which is nice. Okay, so I'm gonna control D to Deselect. Now let's come through and turn it on and off. And I think it's a little bit dark in this region by here, it's a little bit dark. And now when we turn it on and off, so I'm gonna get my brush, hit acts on keyboard. And now we'll sort the columns and then stop painting it out. You can use the last Sue tool again, something I'll just come around here and there. And I'm going to be painting it out. But I'll show you a little trick now, select command yet, all the way around that. And run this, right, so I can get my blush and I can completely painted out. But yeah, CTIA weld completely painted eight. But what I could have done is I could take my brush to 50% opacity and only half painted it out. But I do think painting their doubt as a whole was the right choices. It's got a nice soft contrast them with the ground. Okay? It's just quite a bit lighter and I like that. So again, with this curves, what we can do is we can always ultimate leftover If we think we've pushed it too far. What we can always do is we can always alter it later and yeah, maybe not quite so much. But we can we've still got control of this, so don't worry about that. I would always go a little bit too dark. And then when you draw your mosque events and then you can always turn it brushed down to like 50% opacity or 70%. So I'd always go a little bit darker than I intended. But let's go kind of finance in my room there. I like that. What we wanna do now is we want to do the same again, but we wanna focus on the sky, okay? Or actually, yeah, let's focus on Skype. So I'm going to get my, my last YouTube. And I'm now going to draw around each of these tenths. And today what I will do actually is I'm going to include the tense in this. So I'm going to have the app, my Moscow night, all of the moves and is gonna do the sky at the same time. And we may need to do something additional to the tenth just to kind of differentiate them from the sky. So again, I'm gonna time-lapse mine as I go through this. Okay, so if we look at mine, what I've done is I've drawn around, you can see where Jordan round of left in that little bit there of because that's sort of on the side of the heart. And I just thought it may give some sort of sums or contrast, which would be quite nice. I've got, I've included this guy's head because I didn't want to go all around the Lasso Tool. I'm sorting, just paint that back out later and the same over here. I didn't want to go around each head with the last Youtube. I just want to paint that I would like to. And yet, so let's have a look now. I included this split as well. And again to y by including bits like this, cuz you can always painted out. So I'm going to go into the Layer Mask, get my brush tool. And then I'm going to make my brush larger as a square bracket keys. And I'm going to paint in with my white color on my paint this in in here. And yeah, you can see what's happening. You can see now if I control D to Deselect, you can see now that we've got the sky in there and it is quite flat image at the moment now. But it's quite nice. We can actually see in more detail it has bow in more damage as well. So the two issues we've got is this move by here. We really can't see a distinction between the sky and that Woof. We sort of can, with this one can be pushed a bit more. These two affine, especially as we got the tree by here. And we've also got to clean up these guys. So what I'm gonna do is I'm going to draw a New Layer Mask and new selection around the top of this roof. And it is near impossible to see whether actual line is, but you know, a little bit of guesswork would be fine. Ux is a straight line, so we're gonna draw around here. And what I'm gonna do is I'm actually going to make another curves just to kind of and give that, give that a sort of tarpaulin or whatever it is, a little bit of definition. Ok. So click, click. Now we've got that one going to do is go to curves and dark, or light and Nekhbet as I wish. So basically, we've now given that a little bit of distinction. I'm going to go over to this one as well, I think. And just include that one in there and then come down and you can do this to all of them if you wanted. It just adds a little bit more differentiation within the tones and makes it stand out more. And let's go get our brush and come on to this top curves and paint Darren. Brilliant, controlled each de-select. And to be honest, you could do it in here as well. And this one, I think what I'll do is I'll time-lapse myself doing that again, and we'll go over the top of these guys heads. But that doesn't really matter. So I'll time-lapse myself doing that. Okay, so we finished that now. And the next thing we need to do is actually I need to paint it along the top, a little bit neater by there. Like that. So let's just make that selection again and rush finger. So what we need to do now is we need to go back into each of these curves and we need to paint out the areas which we want to disclude if that's a word. So on curves to, I'm going to get my brush tool. And I'm going to, first of all, I'm gonna turn off curves one at the bottom. Or let's start with curves one actually so on or turn off curves to go into curves one. And I want to get my brush tool to ax. And I want to paint this adjustment out of this guy by here. And I wanted to do it to all the areas. The only other tent as well. So I kind of included it on the guys. Are there, the soldiers or whatever they are. So I'm gonna paint to act of this one. And we entirely edge was there and just get that mice edge wish shoulder. Ku. And I'm going to come across to these guys and just painted out of them. And again, you've probably guessed it on a time-lapse myself doing this. So it's just these guys by here way see as really, really black. So a time-lapse this again. Okay, so now that I've done it on that one, I also need to go ahead and do on curves to says I turn this on. You remember the I accidentally painted in here, so I need to paint it. Now, act of hearing is not as harsh on this one, but again, we still don't want to include it. We wanna make sure that this is perfect. So coming onto this one, again, I'll time-lapse death. Ok, so I've just noticed as another sort of tent background or tent canopy or whatever in background by here. So I'm gonna go on to have my painted these guys out of that secondary curves that we made. And I'm going to paint that curves in just over here because I think that is another another sort of canopy by that. And you don't really need to do that. But I just, I just wanted to. So this is where we come from. We turn these ONOFF, we've come quite a long way to be honest. And what I am going to do is on this layer by here. But our first curves, let's just namely so curves to was the canopies. And this one was let's just call the main one. I do think that I can probably like 10% capacity paint some of these areas. And so I'm going to go into this one and go to about 10% capacity. C, How 10% works? I think it's quite right over here now in comparison. And yeah, we could dialed down, to be honest, this zoom out. We could dial dimness curves by like the mind to t. Actually I see as kind of the pattern. We still got a lot of detail in there. But let's see what happens now if we paint some of this in. And yeah, just looking at that as a spoke quite a nice amount of detail backend and into that word. Yeah, I like that. So I'm going to keep going to keep with that. So if we turn off, it's really difficult to see. So let's zoom in. You can see it puts my stuff back in. Let's make sure we gotta everywhere. And I'm gonna do the same now on his coat by here. So just Dark Knight slightly. And the thing on his coat as well, and on his shoulder by here. And maybe just don't match. I could probably do a here. And just in here. Maybe it touched down in touch, but that, and let's just do a general OneNote on everything over here. Okay? And what we'll do is we'll bring in some, some detail again back into this good. And that's just going to strengthen our composition and our picture. So just go around like that near in most parts of that index you want to make sure you get all of it. You could combine with the marquee tool again and just like highlight and make a selection of AI and everything, but could be a strong way of doing it. But yeah, there we go. Pass mine. So if we turn this on and off, awesome, we've come quite a long way. So what I wanna do now is I'm going to get my photo. And these two layers control and drag them type New Layer icon. So we got two copies with a top copy and Control E. And I'm going to rename this to unfailing. Oh, let's go. Tones was stored on case we would stall the tones. And also we've got this below as a backup. So I'm going to select these ones and put them in a folder and you can call these the stored. So you always gotten the NFO if we need a break down of them with this layer. Now tones are stored with this layer. What I wanna do is I want to start correcting all of this damage untechnical Lita until less than two or less than three or the next Lyceum, whichever nonetheless. So I'll see you guys in the next lesson where we'll have a look at that.
4. Lesson 3 Fixing the remaining damage: Okay, so let's have a look at the store when the damage which is in here. Now, when I did this previously, I came across a bit of an issue. And that issue was the fact that it was difficult on the floor to see what was like a twig and what was actually damaged. So that's quite nice in one sense because it gives you a little bit of freedom. You can kind of make that call itself. But the method that I used a was on, let's go for tone to store this, this one here. I was using the Spot Healing Brush Tool. And so if I go in, for example, make it small and go over, there we go, we're getting rid of all this. Now there is a loss, okay? There's a lot of stuff in here and you could use some of the clone stamp tool. So in here. So I clone stamp tool, hold Alt, select an area. And then let's do it down here. Just say where does hold Alt Click. And then you can paint these pixels wherever you want. But so you can basically go here and then just paint over. But in my capacity needs to be up as well. But I don't, I don't really want to use that. You could also use the patch tool, so selection area and come here and so patched over, it just takes the texture costs. But to be honest, I find is it's just a little bit quicker. You probably won't be cookie using some of the patch tool, but I just find that pin okay, using the Spot Healing Brush Tool. So the sky is relatively easy because it's so flattish kind of it's a pretty basic texture that, and there's even, even stuff by here. So for example, scheduled is smaller. This is all very basic and not a great deal of damage on these guys. Done by here is a little bit, but they'll be put back a little bit maybe with that. And so we're just clicking through and we will store in that suit is not incredibly difficult. By us asking me overshoot M, subscript small. And yeah, there we go. It's gone up. Let's look here. And this curve here. So for the most part, is not actually that difficult. There's not a great deal on these guys of damage. It goes from there, for example. Now when it comes down here, we have a look at the one I've done. I got rid of the big sought heads by here because again, that could be a little bit do it kicked up. But I did get rid of those big areas because to be honest elasto, it's better to get rid of them than to not because they look quite dark. I think that is a rate of something. So I got big brush and kind of went through bang gone. You could probably go like that. Let me go. And yeah, I just basically got rid of these and these Definitely definitely look like so scratches and tags. But to be honest, this stuff here, it could well be well be scratches and tears, but it could also be like sort of locks or pebbles on the ground is really difficult to tell. So that's definitely a scratch because it's like a salt curved thing but there and yeah, it's kind of got with the ground a little bit of creative control. Again, if the client tells you that this is a huge amount of damage, then, then at least, you know, but in this instance it's really difficult to tell. So I kind of go through and I did get rid of this stuff time here. And I'll do this one by here. But for the most part, that set and you could, again, let's go and use Patch Tool is go round this guy. And let's just sample some stuff from down here. You possibly get some repeating patterns using that. But, you know, turn on, off where we've got, remember, we've got our folder of stuff below where clean up quite a lot of that. So what I'm gonna do is I'm going to go through mainly now with the Spot Healing Brush Tool and I'm going to get rid of most of this damage, okay? Basically going through and clicking like this, just make sure that you haven't got any so nasty edges. Like if I go there for examples, we asked not nice, but we just won't go that wild for that. So I'm gonna time-lapse myself going through now and solve in some of this damage. And I'm not going to get rid of all of it on full because like I said, it's just difficult to tell what is damaged and whatnot. Seattle time-lapse myself doing this. Okay. So this is where I've got my picture to my photograph too. I've still got a little bit of stuff up there in a corner and the side is still little bit thing. But if I turn this on and off, you can see this is where we come from. So when I was looking at the graphs, I was thinking why if there's anything that's kind of a bit of a line rather than a dot. I'm kinda going to try and get rid of that. So I got rid of big clumps of possible wear and tear. I still don't know for this b n. So I've got something that looks like that. We have got an issue of JPEG artifact in around the edge by here. And so something we can do to get rid of this is used the clone stamp tool. So let's go wherever the stamp ALT and select some pixels, hold Alt and click. And you'll want to come up with mice and close and just paint out some of that. Ok, maybe go for a bit of a hard of rush. So like 20% and just come in my small brush, alter click Source and new area and basically go around like that. It's a bit of a pain. But whoever scan this in may have not saved it properly. This is from the ALU SI website. It's almost like a bit of an archive website. So LOC.gov, I think it's an American one. So yeah, what you'll wanna do is go around and basically try and solve some of that. And you can see our tones on exactly matching up a little bit, dark them right up there. So what we can do to kind of get rid of that as either, we can have a look at the clone stamp tool. So if that evens it out, or actually when you zoom out was kinda find so kinda around the edges of these guys and these sharp edges, you may want to get the clone stamp tool and go in. And so solves some a bat, especially ran this guy by here. So less kind of alt click up here. So I'll, and Alice the wrong tool. So stamped to wherever the stamp to less alt click and GIS stop paintings with this away. Just kinda smooth that IVD and it'll take a while, but the end result will be worth it. And basically alt click, come down here and just paint all out away. And like I said, it'll take a while, but eventually it'll be worth it. And once you've done that, you will be ready to move on to the final class, which is going to be a short one. And we'll have a look at finalizing this image. So I'll see you guys in the next class.
5. Lesson 4 Removing JPEG Artefacts and Cropping the image: So this is now going to be the final step of our restoration of the specter. And I'll show you two quick things. So in the last lesson I went through that you'll want to use the clone stamp tool of a violent Ollie's heads by here to try and get rid of this artifact. And so alt click with the clone stamp and just kind of paint around. And that will be the main way to do it. There is another way that kind of helps as well. So with the image selected, if you go to image and filter noise, reduce noise. And let's kind of zoom in in here as well. What you can do is in here you've got Preview ONOFF is basically is not doing lots of moments, so we can turn strength up and ask it to preserve details. Push that to say 90 and strength to nine, and then we move JPG artifact. And what you'll notice is moving a lot of those harsh edges. And you kind of want to try and maybe bring strength down the touch and preserve more details and stuff like that. Just kind of see what this without this kind of gives you. Okay? So you could do that. Let me click cancel. So you can do that and make a copy, right? Let's go back and do again noise reduce noise and move JPEG artifact, Chuck alphabet. And this is how much it's going to shop. And obviously you don't wanna midi playback too much. So thank my Amazon twenty-five percent. So say for example, to an on off this kind of work in for you. You can click OK. You can then make a Layer Mask inverted and only painted in, in specific areas if you wanted to only appear. For example, let's turn this up. Let's say you only wanted to appear on the faces. So you're a little bit more clarity and faces or maybe you didn't want it to appear in the faces stuff at bat. You can just dictate where you want this to kind of appear. Just appear in there for now. So I have a playwright, I'm Dan, CFO, kinda work sphere, mainly together unless you want to use the clone stamp tool. But I'm not gonna go through and do that completely. It's literally get a stamp tool. So ESM cable to short alt click and just kinda painted when there. And it'll take some time, but you know, it'll look better for it in the end. Okay. So I'm up inside. Let's finish this off. So what I'm gonna do is I'm going to crop in, suddenly got my crop tool. And just don't lose any detail, I don't wanna get rid of anything. So just kind of as soon as we get rid of that blank border very and same on the side, hit enter. Now we've got these edges and I'm basically just going to clean these up, put a Spot Healing Brush Tool so make it a little bit larger. We go. And for the most part, I would have thought this tool will work. And yeah, you're just gonna carry on going around and bingo time here. This probably work fully showing that when again, actually with the premise smaller, rush. There we go. And the stalwart bad. Well, and yeah, you basically going to carry that all the way around sonar just do mine really, really quickly. And Augusts spent too much time while in on how it locks. And the o when n a bit too much. And there you go. So this is what we, this is how far we've come. So this is really good restoration. What you can do as well is make another curves just before you finish. And if you wanted to up, probably won't too much is mine. You can add just a little bit of a contrast curve. So a little bit down and a little bit up there just to add this S curve and click on off. You can see it's kinda bad in just a little bit more contrast just didn't make it not as flat. Okay. And they have your finished restoration so up to you whether you want to use this, I think it is quite nice. So there's your finished restoration. I hope you guys learned a lot in this course. I'm just going to summarize now and sort of doing a final video summary. Actually, I'll do find video summary. So yeah, I'll see you in that final lesson.
6. Lesson 5 Final Summary: So just a little summary then we've gotten our final image. So let's just click these two together, control Lee and final restoration. So stuff we learned in this session in this course is the trust that I raised a lot of detail. And now we're looking at a histogram. All the information is in the bright spot that, and what we did is we actually spread dive to the curves a lot more and we mask that certain specific areas. We saw a lot more detail can occur, a lot more detail, and a lot more detail and destruction or scratches and stuff came back in and we had to deal with that. And now we've got an image which has got a lot more, a lot more detail in it than the original one. And also we had a look at how we may also need to get rid of some artifact in. But yeah, all in all we've gotten my spinal photo and you can push that with a final curves adjustment like we did before. So that's basically the end of this course. So I really hope you guys enjoyed and check out some of our other photo restoration courses. And we've got a photo colorization calls up there as well. So cheers guys and hope to see you again.
 Jonathon Parker, Passionate MoGraph and VFX Lectu