Transcripts
1. Introduction to the Class: Hi everyone, Welcome to negative
painting with watercolors. This is my favorite course. It's my favorite topic as well. I truly got into watercolors and the first thing I started
with is negative painting. I loved every single
piece that I created, and that's why I'm
so excited to teach that technique to you as well as the class goes
in such way that we start off with what is
negative watercolors. We go into the middle,
you will speak or into the practice exercises. So usually get a, a feel
of what the technique is. And then we go into
two lovely projects. As you guys can see, the
projects are absolutely stunning and they are
really intriguing. If you've never heard of
negative watercolors, this is the class to dive into because we just go so in depth, this is a basic class and it is perfect for anyone who's even just starting with watercolors, who's just getting
into the medium. Because I usually break
down the content into fairly easy and very simple
bits of information. Let's dive right in. The other thing that I wanted
to also mention is that this is an updated version
of the previous class. The first time that I launched, the audio was a problem. There was a lot of issues
with a video because it was my first time creating a class. So Pfam Then I have updated it. So if you do see some of the
projects looking different, it's probably
because of that and also it's updated content. So over the years,
obviously I've added more techniques into my toolkit. I've added more information
into my toolkit, and that is what I'm sharing
with you guys in this class. Happy painting.
Let's get started.
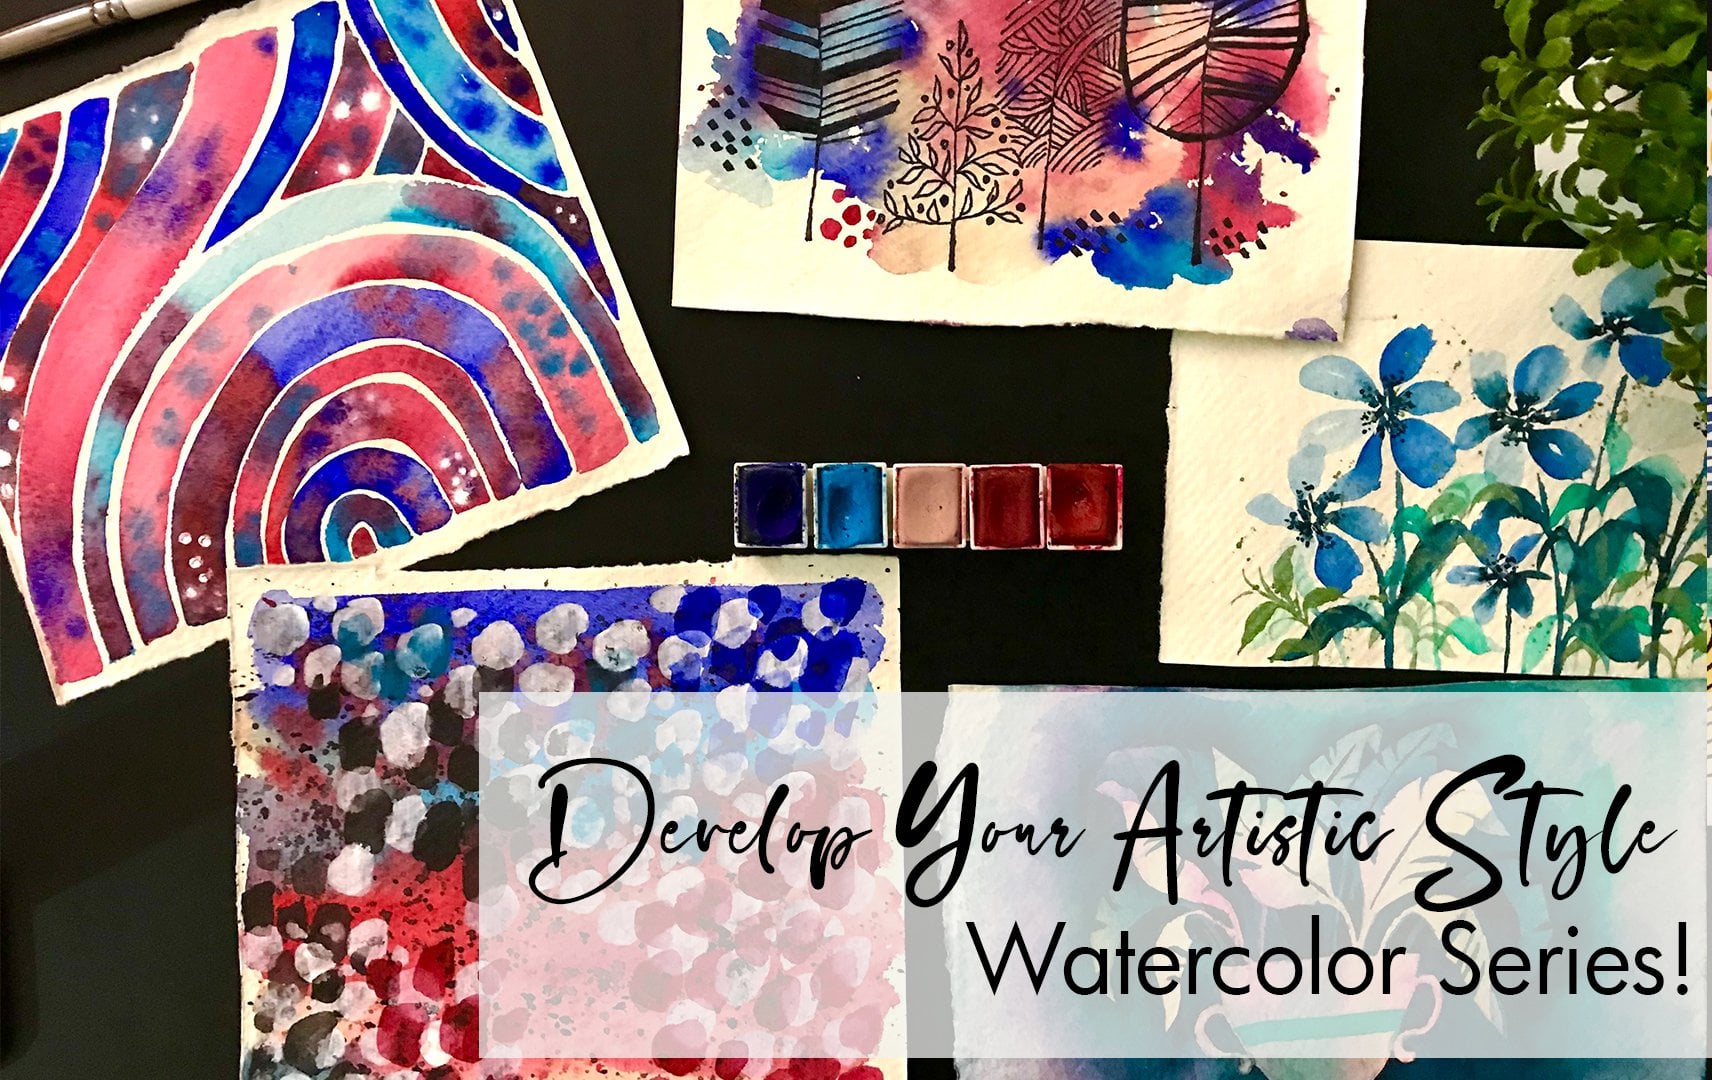
2. Materials: Now let's talk about the materials you would
need for this class. Let's start with the people. We are using, watercolor,
300 GSM people. And this is a cold press paper. We will be using
to square sizes of ten by ten centimeters for our projects and
for the practice, you can go ahead
and take an A5 or an A4 sheet just to kind of
have more space to practice. The next item we would need
is a watercolor brush. Here I'm using a round brush. This is a size six. You can also use a size four. And this is a brand
called Phoenix. It's not a very
popular brand or is it not a very artists
grid brush either. It is just something
that I had at home. If you're looking for brands that are really high-quality, I would suggest
going for Princeton. You can go for, I liked Kraft are more brushes a lot so
you can go for that. Winsor Newton brushes are
really great as well. They do really hold their shape. But the basic thing is
we want a brush that has a very pointed tip so we can really get
into those details. The next thing we would
need is our pins cure. I have a half band set
that it's ready with me. The two colors that
we're gonna be using, our indigo, blue
and forest green. Forest green is also known as haunt us green and
different brands. The brand that I'm
using is Winsor Newton. If you are looking
for other brands, you can look at Mission, my Jell-O, which is
really great as well. We have Daniel Smith. I loved the indigo, It's a beautiful color. The next thing we would need
is a pencil and an eraser. I like to use a small
eraser because we usually need to get into
those small details. Finally, we will
need masking tape. This is to tape down the edges
as well as a metallic pen. Here I have couple of options. One is Karin brush markers, as well as brushstroke, which is an acrostic markers. So you can use either for
our finishing touches. Another tool that anyone
using watercolors will really appreciate
our hairdryers. You can also use a blow dryer. There are also just
craft drivers as well. Mine is a Phillip. It's just something
that I had at home that I use for my hair. I didn't bite
specifically for this. But it improves the
process of drying, so it makes the process
a lot more faster. So I can go ahead
and start painting and kind of skip through
the drying time. You can use a craft dry or the only thing is craft
eyes are generally much more hot like they're much more focused in a specific spot. So just keep that in mind when you're
using a craft dryer. So try to keep your dry out
a little bit further away from the paper when you're
using it with watercolors. These are the main materials that we would need
for our class. Keep them had, had
before we get started.
3. What is Negative Painting: Let's start with what
is negative painting. Negative painting is
the process of painting around your actual object. In this case, we have leaves. Instead of painting
inside the leaves, which is what you
would normally do. Standard method, you're
painting around it. This gives a very
interesting effect because you're seeing
the negative space. And so the whitespace of your
paper becomes the object. And over it you can see around that so much that you can
do with negative painting. You both in the layers. You can see that depth
in the painting, which is not totally
obvious when you go into when you're trying
to do the actual object. One thing I love with
negative painting is that you can kind of
create something new, something dramatic, something interesting that
no one has ever seen before. Generally with
negative painting. What at least what I'm gonna
do is through watercolors. You can try the same
technique with other mediums. You can try it with gouache, you can try that
with oils, acrylics. It's the same exact effect. I ever go into more of what
this process looks like. As you can see. It's just so interesting. I want you to understand
because it's a little bit of a tone to what you
would normally do. It's a shift from
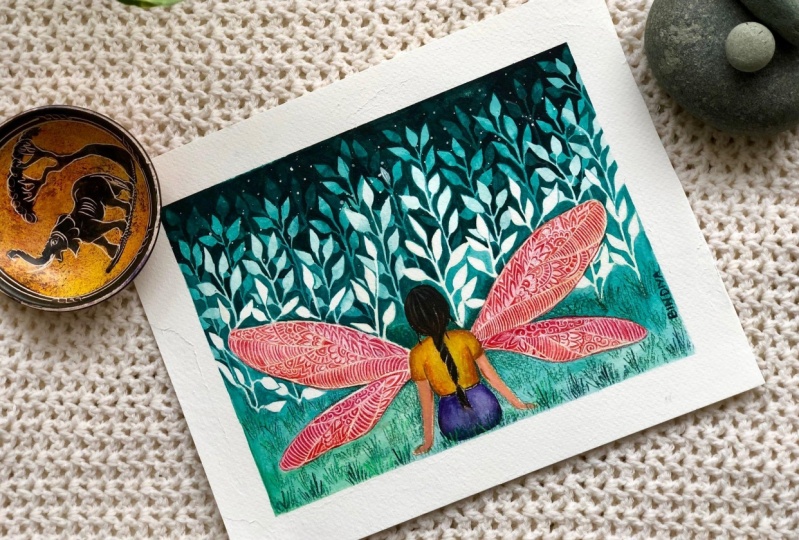
what you're used to. These two that I
have right here. The green and the blue
are our final projects, which I absolutely love. You can experiment as much as possible and you can see some of my samples that I've shared
through really pretty, you can do negative
painting with so much and I think it opens a whole new technique available. The process, as you can see, is incase, I was doing
a leaf, in this case. Really draw these
both subject matter instead of painting inside, I paint around it. So at the end of it I just see the whitespace of where the
leaf was supposed to be. As we move on, you can give maybe
even seen images before from other
artists or online. And you can try it with
different subjects. So if you see even in
the projects gallery, there are some students
who have tried fishes. They've tried other
things instead of leaves. There's just so much that
you can do. You can do how? You can actually pick any
subject matter and try to paint around it and
create something new. In all cases, we're
just doing leaves because it's a lot more
easier to explain. And once you know the
technique, it's limitless. And I've seen beautiful, beautiful artist coming up with amazing paintings that
always shocked me. And then I figured out that the whole technique was
negative painting is just done. So interesting. Is just on, in such an interesting read. Sorry. Just makes it look really fun. In this class, in this workshop, as I explained in
the introduction, we're just going
into the basics. This is the beginner level, so it's very simple. It's the easiest base level one. So when all going into
anything complicated, there's no jewel Kaunas, there's no different subjects, just something as simple
as what you guys have already seen are painted before. Even if you've never
touched watercolors. This is a class that you can experiment with and
still have fun with.
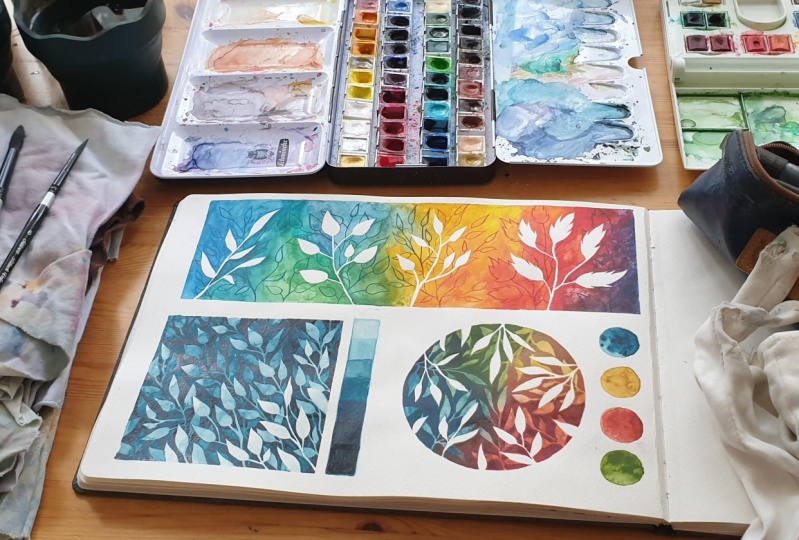
4. Watercolor control: Our first practice, I wouldn't really call it
practice to be honest, it's more of just
really understanding. Is understanding water control. First, take your damp brush. Make sure that your paint
as well as activated, which means it has water on it. So that means the
paint is moving. Take your brush and then
start painting mini squares. This step really helps you understand how
your colors work. And if you're really
new to watercolors, it's going to really
help you understand negative painting as well
as we layer in the colors. What I've done here is I've taken a little bit of the blue. I've taken an indigo blue, and then I've added water. Once I add water, I'm creating a very dilute, very light mix of blue. This is what I'm going to paint. It is a very, very
translucent layer. You can see it's
almost transparent. It is really watery. Now, if you take a little bit more blue and add it to the mix, you can see the color
becomes slightly tipo. Adding more blue. You will see it becoming
more deeper, more saturated. Now let's add even more indigo. And you will see it becoming
even more saturated. You notice the colors
becoming very thick. It's almost opaque at this point compared to
what it was before. This. I would say this property
of watercolors is what we are going to use
in our negative painting. For the final shade, I've taken indigo
directly from the pan. And you can see it's a
very, very thick layer. You can, you can't even see the paper anymore because
it's such a saturated layer. This is such a beautiful color. Now let's try this
with another color. I have taken hunger,
hunters green. I'm basically, I
added a lot of water. You can see a very light shade of green, very translucent. Adding more green
for a deeper shade. Then adding even more green
for an even deeper shade. These are two colors we're
using for our project. Whatever color you're planning
to use for your painting. Just go through
this process so you know how it's gonna
look in your final. You will notice in this
case with the green, There's not much of a difference between the third fourth sheets. It really looks very similar. And that's why I'm just going to go in and
try to add in a little bit more green so
I can see the variation. But what you can
see is also that this is the darkest
shade of green. Now when I take my brush and dip it directly
into the green pan, you can see that there's not much difference between
the fourth, fifth shade. Unlike the indigo, there will much more
variation of shades, whereas with the green
there's really not that much, so it's just slightly lesser. In case you pick a
yellow, for example, you might just have
two variations, or light yellow and
then an opaque. So this really contributes
to your final painting, which is why it's
important to do this step before we continue.
5. Practice Exercises: Let's start with our practice now this is the actual practice. And we're going to
start off with leaves. As you can see, I am going into drawing
one stem off leaves. The reason I felt like
this is super important and I think it's very
important to not skip. The step is, I've noticed that your entire final
painting is really affected by the type
of leaves you choose. So having the right
shaped leaves can conform a really
nice final project. You're sure it's gonna
work out when you have a good drawing or good
base to start off with. Don't worry about
the pencil marks. What happens with
watercolors as you can erase it out later on. Just try to keep your
marks very light. Here you can see I
created a V-shape for each off the leaves on
the right and left side. Now, for our negative
painting effect, negative painting is basically
the technique as a hit explained before of painting
around our drawing. Here you can see what
I'm doing is I'm gently painting around our leaf. Now a couple of things to
note is that I first start with outlining the
edge of the leaf. I do that with the
tip of my brush. I'm using the pointed
tip so that I can truly get a very nice thin line. Then I press down my brush
to fill in the spaces. As you can see. Now again, to keep in mind
to make the process better, I always try to make sure that
I start off with the edge. What this also does is ensure that the edge of the
leaf is a deeper color. Because when I blend, the colors tend to become
like a tad bit lighter. If you can just do
this really nice, crisp edge, it's going
to look really nice. It's just going to come out very interesting and it's
going to be very clear. The other thing, if you can see, as I go into painting
out the stem, I leave a thin line for, or a thin space for the stem. This is so important because otherwise it looks like your leaves are just
kind of in the air. We do want to make sure
that there is a stem. Now in this case, it's still the
white of the paper, so it's okay if you don't
have a stem and you can kind of go in with a
white pen to fix it. But in some cases it
may not be the case because you have a base
layer or a base paint. Try to make sure that you have this small space for the stem. It is so important
because it truly makes the final painting
look very, very nice. This is a process like
it is a slow process. Negative painting is not
something that you would do in 15 minutes or ten minutes. It is something that takes time. And I kind of seed as a very meditative process
because you keep adding and keep adding and
you can kind of go back and come back
to it another day. And you just you kind
of build in the layers. And then finally,
when you look at it, you're just so amazed by
how beautiful and logs. So don't try to
rush the process. Take your time with it, just go slowly and try to
bring all those details, making sure that the
stem is present, making sure that you have a
really nice, crisp leaf edge. This is our first practice. It is a very simple leaf
that we've chosen here. The next one we're gonna do a slightly different
leaf shape because I want you to think about
different types of Thieves. And it's also a we're going
to use for our final project. For our second practice, let's start with a branch leaf. What I'm doing is with a pencil. I am doing a nice curved stem. Now let's draw out our leaf. You can try any shape of a leaf. It can be rounded, it can be rectangle. Have fun with it. Now doing another stem. But you can see
here how I've done curved folks with them. You notice you have this
curved reshapes that are coming along
creating a branched. Look. Now in each of this, I can add another leaf. This creates a very
interesting effect. It does get a little
bit complex as we go into painting them because
there's so much happening. But it just has a
beautiful look. So it is truly helpful
to kind of practice these type of leaves as well. Let's start with
painting our leaf. I'm choosing a bright
red color for this. And exactly how you've done, which is taking our round brush. I'm starting off with
the pointed tip and just painting out in
between the leafs. Notice how I'm doing this. It is a little bit different from Wahhabi practice before. You can see how I leave a
little space between the stem. Because if I can do that on the other side as
I can make sure that I have a really nice
thin stem between the leaves. So odd leaves, an artist
dangling in the air. And this does take a
little bit of practice of even being comfortable
with your brush. You can really get that
really thin line going. You can see how I just glide my brush down when I'm trying to fill up the
space so it's faster, but always keeping
it at the tip. When I'm doing the outline, I am right-handed
or left-handed. Feel free to move the paper
based on what you prefer. I think with watercolors
or with any medium, to be honest, when
people are starting, my students have had this weird. I see them holding their paper and they just don't
want to move it because they're very
scared of moving it. So they're trying to paint all directions from
the same angle. And that is tricky. Like sometimes you can't
really paint a certain type of angle holding your brush with a paper in the
same direction. So it's okay to move
around your paper. Obviously, I'm trying
to teach you guys, so I'm gonna keep my paper
stiff and I've become very comfortable with that over
the years of teaching. But if you're just starting out, don't worry, move around
your she'd get comfortable. You can draw detail
and it upside down to get through each of the leaves. And that's okay. That's
completely fine. But just don't hold
onto your paper going water that you shouldn't
move it at all. Let go of that. And luckily, in this case, we haven't taped down up papers. You can actually move it around. And slowly, step-by-step. I'm going through
each leaf and branch. While doing this, you
can notice I'm not using too much of
water in the process. I'm keeping the water
pretty standard. But as we go into our painting, you will understand how
to change that around. But for now we'll just keep it very simple and just try to get your basic color in and understand how the
negative painting works. I like cow with
negative painting, what tends to happen is you see the final whitespace off the objects that just
gets, it's so interesting. Complete your practice. Then we can move on to our
third practice exercise. This is our final project. Here what we're gonna do is
try to live in the leaves. So I want to explain
how that works to you. Let's start with a
really nice big leaf. You can see how I'm doing this. It's just a very
simple one wave, really long leaf stem. And now let's paint it. I'm starting off with a
light sheet of color, which means that I'm
mixing more water with the paint to get a very
translucent color. And that's what I'm
going to use to paint the first layer of leaf. In case you feel like there's too much water on your brush, just dab out the
excess on a tissue. You don't kind of like
add splotches of paint. But the process of
what we're doing right now is exactly the same. You're just gently adding
in the color in a very, very light shade around the
leaf that you just drew. Make sure that you continue
using a light shade of the color throughout and you can see how
I'm on the sheet, which means what I did
is actually mixed out a small spool or
small amount of it on my palette and I'm using
it directly that way. I'm not having a mixed
match of colors happening. You know how we did
in our water control. I just took aside the paint and the water and made
a mixture offered. This really helps you control the color
that you're using. You don't want to suddenly start it was and then
suddenly you have like a dark shade coming in or it's going to mess
up your painting. So just try to create a small patch or small amount of the
mixture on your palate. Now let's allow this to dry. And generally at this point, you can start with your
second layer of leaves. Here. You can see I'm doing
the same V-shaped leaves, but they're much more smaller. And you can see how I'm doing them right next to each other. This variation is also very interesting when we
get into painting. For this layer, I'm
using a deeper color, which means that I have mixed
more of the purpose with the water to give a deeper
shade for us to use. The trick here is to paint around both the
leaves in this step. It's not just the first one you are trying to
do both of them. And it can be a little bit tricky because you're
trying to keep it in mind. Which is why I said that the pencil is really,
really important. If you are just going to, if you're just going to try
to wing it on your own, you're gonna end up
making mistakes. Even when I don't use pencil, sometimes I make a mistake
because sometimes there's so much happening on the
painting, I lose track. So if you can take the easy way of using
a benzyl, go ahead. Also. You can see how it gets a little bit tricky to
kind of plan it out. So I have had questions where
students were like, Oh, why can't I just label up the numbers and then
just do it that way. The thing is you're still
going to make mistakes. It's the best way
to do it is to kind of do one layer at a time
and build up the color. One of the really cool things is in the process has you
to the second column. You're adding the second layer on top of the first allele, which makes it look
more natural than having just adding
purple acid is. You will understand that as
we go into our projects more. But don't worry, as you can see, just continue painting
around both the leaves. I take my time to
not miss any areas, so I go about it. You can see I did an
anticlockwise direction. I don't know why I do
anticlockwise clockwise. I could do clockwise, I think because I
use the right hand, I prefer doing anticlockwise. So always do the right
side and then I move all the way to the top
and then the left side. Now that we've completed
our practice exercises, you're ready for our projects.
6. Prepping the Paper: Let's start with
prepping our paper. Here. I've taken a square piece of ten by ten centimeters. It's a fairly small piece
and it's great for us to practice because as
you get more comfortable, you can go into larger sizes. Because the idea is to
get the thick meek first. The next thing is to
tape down your paper. This is going to ensure that
you don't have water or paint seeping through the through to the
edges of the paper. Also with the amount of
water that we're gonna use. The paper might a typical
basically bend a little bit. So if it is held in place, you're gonna have a much more
flatter sheet as it dries. And that way you don't have a bent paper at the end of it. When I'm taping it down, I just like to leave
maybe half-inch taped. If you want to do a bigger size, you can definitely make it
a one-inch or even larger. I like to have a very nice thin, crisp edge That's
just half-inch. So just you can just see
the edge of the paper. When I tape it down, I make sure to really
press it gently and formally throughout so
that there's no gaps between. This is also important
to keep in mind, which is to test your
masking tape or your tape. The one that I'm using here
is called the masking tape. If it's available where
your farm and create, if not, whatever tape
you're planning to use. Take a small piece of it, taper down to a sample test and check if it's dripping
your paper when you pull it out or if it's making sure that it's all controlling
the water flows. So just check it before
you start your project. Because I do know some of my past students who
have created beautiful, beautiful paintings
and unfortunately did not check that taped tapes. And so when they ended up
completing the painting, ready to remove the tape, the tape actually
toward their paper, which is really unfortunate. So just test your tape before
you go ahead and use it. If this is the first time
you're trying masking tape. The other thing that I
like to do when I'm doing this process is to keep in mind, which was the first
side I taped down, the second side, the third, and the fourth because
once the painting is completed and I'm planning
to remote my tape, I would start from
the fourth edge, that means the last
edge that was taped and then work my way backwards. This needs to be done because you're
overlapping your tip. In case you start again
with the first tape, you're not going to be
able to actually remove it and you might end up like
ripping your people. So just have that in mind. Also. As you can see, I make
sure that the tape is larger than the edge, just so I can really
tape it down and so that there's no water
that's seeping through.
7. Project 1 - Planning the First Layer: Now that you've
prepped your paper, Let's start with
our first layer. I am starting off
with a branched leaf. Now you can notice how
I'm doing it diagonally. And I'm starting off with, It's not even three-fourths, It's 1 third of
the entire people. Also, I'm taking a
very small space of the entire paper for this step. The branched effect is going to be a little
bit tricky to paint, which is also going to create a beautiful
finished painting. So that's okay. One suggestion I would
say is to not have leaves that are overlapping because when you
paint around them, you're not gonna be able to
see the individual leaves. The next thing is to not
create too many branches. Just because, again, in the practice exercises
as you've gone through, you can utilize,
you need to kind of keep us small space
for the stem. If you have too many branches, it can be a little bit tricky to paint all of those areas. The third thing is to spread
out the leaves throughout. So you can see
diagonally right across I have been to the
longer leaf and then I've got two small sets
on either side which are much more shorter to
create a V effect. Just keep that in mind in
terms of the proportions. Now, let's take our blue. I'm starting off with
a very light shade, which means that it's
very water down. And I'm just giving a gentle bees painting around
what we have already drawn. Remember what we did
on practice exercises. Starting off with the tip of the brush for the outline and then gliding it to
fill in this space. Slowly work your way
to the next leaf. You can see how I'm working
on this quickly because I don't want any dried
edges of the watercolors. I'm trying to do
each area quicker. And as we add, as I've shared with
you guys before, I'm starting off with the dried side going
up and then for left. For some reason that
just works for me again, maybe because I'm right-handed. If you're left-handed, maybe you want to start the other side. That's okay. But kind of working in that
circular pattern, Julie helps you
make sure that you cover all the areas
that is needed. In terms of the painting. You can also see that
I'm not painting the blue all the way to
the end of the paper. Just because it really
doesn't matter. We're going to paint more. You can just kind of get it to even midway through
the painting. And that's okay. In order to avoid any Chris
crazes or anything like, you know, outlines for
the edge of the border. You can see I'm using
clear water and just blending it very roughly. That I don't have those
annoying edges that just look weird because we are going to be drawing out more leaves and
we're gonna add more layers. So this mistake can affect
your final painting. Now let's paint the other side. Again, starting off with thin line and then
just blending it, painting around the leaf. Now as we go upwards, just make sure to add more
water and just blend it out. You can see that the edge of my previously or
has already dried. I just make sure that I add a little bit more
water in that space. Continuity process, making sure that you
have this thin stem. In case you make a mistake. I am going to show you
how you can fix it. As we move to the next steps. Always add water towards
the edge so you have a really nice blend instead
of just sharp edges. Now, I find it very
comfortable to paint with a round brush that has a
size four or a size six. In case you're kind of you want to do it a little
bit more easily. You can pick in a smaller brush. So maybe a round brush
that is a size, one. That will help you
get those really. Since the brushes
smaller in size, you will be able to get to fairly small areas as
well in the painting. The negative part is that it doesn't hold that much water. Which means that as you're
painting in case you want to do the base and just
kind of blended odd. It's going to take a lot
more time as well as if you're using a
size one brush, they're generally they
generally hold lesser water. That also makes the process
a little bit tedious, but it also helps
the final painting. Now once you're happy
with this, Leo, let's allow it to dry or
you can use a hairdryer to dry out this layer before
moving on to the next step.
8. Project 1 - Adding the Second Layer: Now let's dive into layer to my painting is completely
dry and so with a pencil, I'm gonna go ahead and add another set of branched leaves. Now in this case, I'm making sure that
the level of the, or the height of the
leaf stem is higher. It is poking out more than the previous layer
that we just painted. The other thing is, I'm making sure that
I do have the stem coming all the way
to the bottom. So it is coming all the way
to the end of the people, to the end of the
edge of the people. Okay, so I wanted to actually
come all the way through. I can draw the, create, the negative effect all
the way from bottom. This is a very important step, so make sure you don't skip it. Another thing to keep in mind, and another tip is
for this layer. We're also trying
to bring in some of the branched leaves to the
other edge of the paper. So the whole level of the
painting is becoming higher. And as we paint, you'll
understand that more. And I know sometimes with the pencil marks you may not be able to see what I've done, but don't worry, as we paint, you're going to
understand this better. For this layer, I'm going
in with a deeper indigo, which means that I
have more indigo mixed in with the water. It's more saturated. But remember that it's
not completely saturated, so it's not an opaque layer. And if you can go back to
the water control exercises, this would be at level
three or level four. So it's not five yet, it's just a three. Start off, slowly painting
around both the leaf sets. Now, I make sure to take my time with
this step because it can be a little
bit confusing, especially if it's the
first time we are doing it. Don't worry, Take
your time in terms of getting all those spaces filled. As always, I'm starting
off with the right side of the painting moving up
and then the left side. So I'm really working
in that direction so I don't miss any ideas. Keep the layer of blue that
you're using consistent. So having that puddle of paint, like we discussed, is really going to help you that
mixture of paint. So I have that on my palette and I'm just using
that data CLI. Instead of taking more indigo and just kind of mixing
out on the sheets, I'm just using an existing
mixture that I created. That way there's less error
that can possibly happen. In this step. Mistake,
scan happen, you know, you may forget the fact that you have painted out as a
drawn-out a stem hour, you mix up different
branches off stem so it can happen
at this point, which is why I like to
kind of walk step-by-step. And it's okay if you make a mistake because we can always, after the painting is
dry, fix that mistake. Please don't try to fix
it right now because you are still at the stage
of filling in the spaces. It's still going to be complicated that
you're not going to be able to figure out that
you've been made the mistake. So don't make any
changes right now. Continue painting, continued
completing the deeper layer. And then as it dries, you can go ahead
and try to fix it. There are a couple
of ways to fix it. I'll talk to you
about that as well. Remember the last layer
we made sure that we didn't have very stiff edge. Following the same thing. Making sure you use clear water and just
blending it through so you don't have a
very pointed edge. You can see how this layer
that I just painted is much more taller in height compared to the previous one, you know. So you can really see that
difference in the leaves. If they were all
at the same level, I wouldn't really be able to
see the difference in leaves because these are much more
taller. You can see them. That's the trick. And
also what I've done is making sure that
I have some of the leaves that started
from the bottom. You can really see
that contrast of the white people, white leaf. This blue shade. That again brings in
contrast in the painting. Now we are slowly moving
into the last of our leaves. Really happy with the way
it's looking right now. Don't worry, we are going
to deepen it even more. And that's when you'll see
the contrast coming through. All the layers. Don't worry, it's going to
build up as we continue. Now that we've
completed painting, what I like to do at this
point is to allow just kind of check through and see if any alien needs
to be darkened. If I'm happy with the way
things are going to allow it to dry or use a
dryer to dry it up. At this point, you can also
use an eraser and erase any previous pencil marks before proceeding
to the next step. I'm so excited that big
way into the next step. I'm super proud of you for staying on and
continuing the process.
9. Project 1 - Depth through the final Layer: Ready for our final layer. Again, we're following
the same steps as before, but a couple of changes. First, we are going to start the stem of the set of
leaves from the previous. I'm kind of like behind a
leaf from the previous layer. So this way we're
kind of avoiding painting all the way from down because that gets a
little bit tedious. And also it's not gonna be
seen because as anyways, no much space at the bottom. So to avoid that we start
just from the previous layer. Maybe you can start
a stem that comes behind a leaf from
the previous layer. So that's the first change. The next is in this layer, you can again increase
the height even more. That's another
point to remember. And we are just following the same
thing of a branch leaf. You're not changing leaves, but you can't really
change around leaves if you want to add this point. But I'm going to
follow the same thing because I think it
looks really nice. Once you're happy with it. Let's take a very,
very dark indigo. This is the last shade that we had done in
our water control. So it's very saturated,
it's very thick. It's statically from the pan. And then we can start
painting with it. Now. Just painting around our drawing and following exactly
what we had done before. Slowly move from one
section to another. Starting off with the outline at the tip and then try
to blend it through. And you can see how I'm
again starting off from the right side and then
moving onto the left. Just starting off
with one section. I'm not painting this all the
way through to the bottom. And you will understand
as we keep painting, but we're just going through
each stem one at a time. This step, you can see
the colors from the previous blue peeking through, which is really, really
interesting to see. I zoomed in the video
so you can kind of see where I started
the drawing form. So you understand where you need to start the drawing form. Now, as we're painting this, how do we bring in
that change in color? Because if you're just
going to do this dark layer flat on top without painting
it all the way through, it may look really weird. What I'm going to do is create jagged lines at
that point of change. I'll explain this further. Here you can see how
I kind of bring in the deeper indigo without meeting to paint it all the
way through the bottom. What I'm doing is
these jagged lines. And so that differentiates it, kind of showing that
the color blended to a darker shade when we paint. The final thing
you'll understand, this really helps us not
make the things easier, you know, kind of
makeup painting easier. And also create a
beautiful blended effect. Starting from a light shade
going to a deeper sheet. It has a lot of benefits. Suggest you do jagged
lines at that junction or at that point between the second layer and
the first layer. Now when we're
painting generally for the edge in
the previous ones, we use clear water and
we blended it lighter. In this case, we are going. To keep the same shade. So we're gonna continue width the deep indigo blue all the
way to the end of the paper. We're not blending it, not making it lighter,
keeping that intensity. Slowly painting in the layers. This is almost final stem. The color is really deep. You can see home jars going on the top and fixing the
indigo to make it dark. Really, really dark compared
to what we had done before. You can see how that blend comes through because right now we're just painting from
the second and thirdly, we're not going to any
of the areas where there was only the
first layer of leaves. There you go. This is
our completed painting. What I like to do is just
look at it again and see if there are any areas
I need to make darker, like the indigo, I feel
like in some areas have got this light blue mix. So I'm gonna try to
fix that as well. Which means that I can just take indigo in my brush
and try to do that. The other thing I'm trying
to do is just check if the blend that I told you between looks
natural, it looks nice. Which has, you can see I'm doing with these kind of jagged lines, making sure if all my stems look okay if there's anything
that needs to be fixed. I generally do this step once the painting is trying
so it's almost dry, so it's not still wet, so it's not going to
affect the painting, but it's more like layering
up the colors in that edge. I felt like it wasn't that
obvious, the deep indigo. So I'm just going
in and fixing it. Once you're painting has dried. So at this point you
can allow it to dry or use a dryer and
dry it up completely. Once it's completely dry it up, you can use an eraser. It is at any of
your pencil marks. For this step, I
prefer not to remove the tape because if the
tape is still stuck, my sheet is not moving
around too much. So then I can really
erase out any of those pencil marks that are
kind of peeking through. Once you're happy with that, Let's move out our TPP. Remember what we had discussed. So starting off at
the last tip that you added and then working our way to the deep side
that you tape down. Sorry, I hope I'm
making sense because I'm trying to say like tape and then edge and then I'm like, these two are the same thing, but you can see what
I'm doing here, so it's going to clarify it. But this was the last taped
edge that I had done. I'm just removing that side. I always try to remote
at a 45-degree angle. This ensures that it's not
gonna rip the paper and you kind of remove your tape in
a really nice way as well. All of this is done off to
your painting has dried. This is our lovely
final painting. Look at how beautiful
those colors are. That blend of leaves
just coming through. It's absolutely stunning. I can't wait to get started
with our next project. Take a similar sheet of ten
by ten, and let's start.
10. Project 2 - Creating a Base layer: It's a bright new day and we are starting off
with a new project. I have prepped my paper, making sure that
I've taped it down. Taken a size ten by ten sheet. We're gonna start
off with drawing our first set of leaves. In this case, I'm changing
it around because I'm now going to start
off with the pencil. I'm going to start off with
the base light wash of green. You can see how it's a
very, very light shade. What's going to happen is my
first layer of leaves that I negative paint width is
going to have a green color. Insert off white of the paper. Gently blend in the color
throughout the paper. Once you're happy with
the shade of green, allow it to dry or use
a trial to just dry out the people before proceeding with a pencil to draw
out your leaves. Now, I've dried out my paper so I can start off
with my leaves. I'm gonna be doing
the first practice that leaves that we had done, which is just the
stem with the leaf. The thing that I'm doing is I'm changing around the
direction of the leaves. So this is gonna be more like a pattern than from
one direction, like our previous project. I have leaves that are coming
in from midway through, as you can see, some that are coming from the left and right
side, upside down. And I'm filling in the space, making sure that these
leaves are pretty big and very obvious. Just filling up the space,
not overcrowding it. So not having leaves
that are overlapping, but just getting enough of them so that they would
only make a statement. Now, let's start with a
medium wash of green. This is the third or the fourth, I think the third shade in
our water control exercise. So I'm creating a pool of it. So it's gonna be easier
for me to work with as I continue gently painting
around my leaf. Here I'm starting off
at one end and then I'm going to slowly work
my way through each. You can see how it really
helps to kind of get those thin lines and
because it makes sure that the edge of your
leaf is really crisp and meet. Also having a pre-made
mixture of the paint makes it so much more
easier so you don't have to think about it too
much and you know, you've got the right shade
through the process. Continue painting
around the leaf. What is really
interesting as you can see how I'm painting it is that I have leaves that are
completely overtone drive. So in this case,
the one that I'm painting around is a leaf. That is, you can see the stem at the top
and you can't see the bottom leaf or the main
leaf is at the bottom. I've turned around
the whole leaf completely and made
it upside down. As you can see, some of the
leaves are midway through. And I'm kind of giving
that illusion that it is almost speaking into a table. This is the other reason
that I had the base with a light shade of green. The other thing that I think
I really should have also talked about is the
end of the stem. Instead of just having the
end of the stem unfinished. As you can see, what I tried
to do is make a rectangle or like a squared off edge so it looks like it
finished properly. Not necessary. You can have unfinished. Nothing perfect. But
I liked the way the squared of finished stem looks. I feel like that gives a much better it feel to
each of these leaves. Again, keep in mind that we are really playing
around with this. And we do have another layer of leaves
that are gonna come in. We want to have adequate
space for those leaves. And always keeping the layer that we just painted in
one shade or one tone, not really changing
it around too much. As you can see, I've kind of
completed the entire layer. As you guys know. Now is when we allow
our painting to dry or use a dryer to just
speed up the process. We want to have a really
nice dried up painting before we proceed
to the next step.
11. Project 2 - Adding a second layer: Now, are you ready
for their two? I have taken my pencil and
I'm ready to start drawing. This case, we are going to draw much more smaller leaves and much more closed
spaced leaves as well. This is the similar
shape from what we had done in our third
practice exercises. Exercise, sorry. That's the one that
we're gonna do. And the tip here is to make sure that
you draw them in such a way that they
are still seen. New York to the previous ones. So we want to make them peek out of the previous
layer of leaves. If you're gonna do the leaves at the same point or the same area, what's going to happen as
you're can't see them. We just got our first step, making sure that these stems are in a different direction. And the leaves are pleased
in such a way that you can see them peeking through
the previously all. Keep in mind that with negative painting,
your painting around, what's going to happen is if you have things that
are in the spaces of the previously or they're
all going to be lost. Okay? So just to making sure
that you do that, again, following what
we had done before, having some of the leaves come through from outside the border, having them in
different directions and not overcrowding them. I think that's
also another point to remember because I know it can get exciting where you
want to add so many leaves. We're trying not to do too
many, just limiting them. If you feel like some
of the spaces are still empty and you still
want to add leaves. Do what I did just now, where you just add one leaf
peeking through the border. Something that's simple. Once you're happy with
the overall look, we can get started
with painting. As always, I'm
making a puddle of paint bottle of the green
that I want to use. Remember with our
practice, water control, we realize that green doesn't
really go that much deeper. It doesn't have so many layers. Unlike the blue where you were able to really build up heel, you're not gonna be
able to do that much. We're going to just
directly use the deep saturated green as it is. This is gonna be
our last layer for the painting because there's
really not much more than we can go through if this
was gonna be done in blue, for example, Example integral. We could have built even more. We could have had a third layer, even more deeper in color. But since this is the leaf that we chose and this is the
color that we chose. We are going to stick to just two layers of
negative painting. Once you've prepared your
mixture, start painting. Start working
portion by portion. So one area at a time to not get really confused
with what's happening. Because this is a stage where
you could make mistakes. And that's why I have surely
drawn out my pencil marks in such a way that I can see
them very, very clearly. When you're painting,
take your time through this process because it
is slightly intricate. But it's so what the weight, such as give yourself that time. Don't try to rush the process. Don't try to finish
the project in like two minutes. It's okay. This does take time. You can already see the variation of the
colors coming through. It's just so nice to see
that light green and then a deeper green and
then the background of this dark saturated allele. Once I'm happy with
the right side, I can slowly go into
the middle portion, gently painting first and
outline of the area that I'm going to paint
so that I have a very crisp line for the leaf. Then filling it up by gradual
sloping off the brush. In terms of placement of leaves, I think that has
so many variations that you can carry out. Like these to the ones that I've shared
with you the most. Generally having them
all from one direction, kind of step-by-step or creating a pattern
effect with it. Think about this as
not just leaves. Leaves are just a basic idea, but you can do the
same thing with any sort of element
as your focal point. Flowers, for example. Maybe you want to do birds, you want to do fishes. Anything that is shows
can be created this way. I even have samples where I have done boxes and squares and
those look so beautiful. Just let your imagination
run wild. At this point. Slowly move step-by-step
through each and every stem. Making sure to paint around the previous layer
of leaves as well. Especially during the video
painting that stem area. Make sure to keep
the stem clean. Making sure that you leave
that space for this stem. With watercolors. What tends to happen
is your layers tend to try and become lighter. As you are painting is drying, you're going to notice some of the colors becoming lighter. These slightly feed through. Because of that, it's
really important to get a very saturated layer. And you can test
it on a piece of paper before you start beating. Because this is also
something that can happen. You might think you're using a very saturated layer and it looks perfect
as you're painting. But when it dries, you will see patches. Just test it on another side paper to
check if it's saturated, complete saturated
layer before you paint to ensure it actually is. And it's not just
painting that way. I know this doesn't make sense. But you will notice this
happen where you're like, Oh wait, I took a
dark saturated green. How is this still
looking patchy? And then you realize
it's because of the watercolor effect. Sometimes it can
look a bit tricky. Because of that. Another trick that you can do, as you can see as I go over
some of the areas again, just to make sure
that everything is that deep, dark green.
12. Project 2 - Final touches: Now let's add our
finishing touch. This, I am using a metallic pen. This is from Karen markers as explained in the
material section. The reason I wanted to add metallics is so that
there's a little bit of a shine to our painting at it's going to give
a beautiful effect. Now, instead of just
slapping on those leaves, just like adding them on and
just ruining our painting. What I'm doing is
if you can see I'm adding these leaves,
binaural existing leaves. So it kind of gives you this perception that
they're underneath. That's the trick that
we're going for, creating illusions in the mind. So when someone is looking
at it, they're like, Oh, how did this person do
this? What did they do? They're like, they kind of think about it, they're
questioning it. And that creates interest. As you can see. First, I am choosing
leaves that are much more smaller and much more. I would say shorter as well. I am aiming to please them below layers of leaves
that I've done before. At the same time, some
of them can be above. As you can see in what
I'm doing right now. 1.5 of the leaf was below
and then the end is above. So playing around with that
kind of up and down effect. Now, these are very, very small, so I don't want to
add too many of them, but I want them to give NF
of shine to the painting. If you don't have
metallic markers, you can use metallic paints. If you want to use a black pen, you can use a white pen. Just kind of play around
with whatever you feel like you want to use or
whatever you have at home. There is no specific I would say no specific need to
use a metallic pen. I just found it lying around. So I'm like, Cool, let's use it. Just use what you have
available to you. But the idea is to bring in a little bit of shine
to the painting. Adding more of these
shiny and metallic leaves starting from the border, poking into the painting. Adding some of them in
areas that I feel need fix. So in case you've made a
mistake with your stem, this step, you can kind
of fix those areas. If you feel like
there was one area where you made a mistake, use the metallic pen to
cover up your mistakes. So add a leaf there. This is the stage
where you fix things. Anything that you've
made a mistaken anything you feel needs to be better. Anything that you
feel looks too empty like an area where there's
not much going on. Use the metallic pen and these smaller leaves to
fill up those spaces. Once you're happy with
the overall effect. Let's from water TPP. We've got this beautiful, beautiful painting
that we've just done. There are so many possibilities
with negative painting. I'm going to talk
about that more in the next, the next topic. Where I'm going to talk more about what you can do
with this information. How you can do your projects. Couple of ideas in terms of them and what you can do next, like what are the
next steps from here? Don't forget to erase out any of your pencil marks for this use of thin or
a smaller eraser, just so you don't it is out
any of the metallics because sometimes they don't dry as well to just try to
areas around them. And any ideas that you feel
you needed to do any fixing, you can go ahead and do that. And this is our final project. So it up second project
from this class. I love the beautiful
depth in this painting. And when you compare it
to our previous one, you can see how it's
made a difference, just the placement
of the leaves. It gives two completely
different effects. And I love how that looks.
13. Final Tips and Tricks: Congratulations on
finishing this class. If you haven't gotten
to the projects, I urge you to dive
right into it. Paint with me if you find it
a little bit more easier, or you can pause it and then paint and then come
back to the content, whichever, whichever way
makes it easier for you to really get into the information in and really
get into those projects. I would love to see your
projects as always, it makes me so excited. You can share it on
Instagram as well under the hashtag
femme visionary class. I generally be posted on my stories and shared with
other people as well. Along with that, I would love to hear your reviews
because I've really makes me happy and it kind of motivates me to
create so much more. Apart from that, I also want to talk about what comes next. Now that you've learned this, if you wanted to really
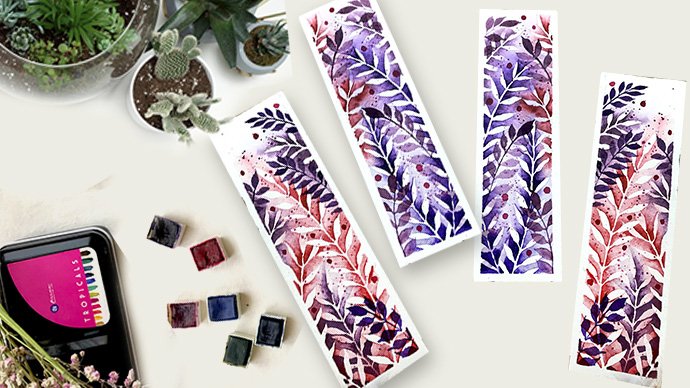
exploring what can you do? We have couple of classes
in, In technique. The second class that I would
suggest that you go for it is up level your
negative painting skills. And that is a little bit interesting because
we started playing around with the colors in
the same thing. From there. There's also negative
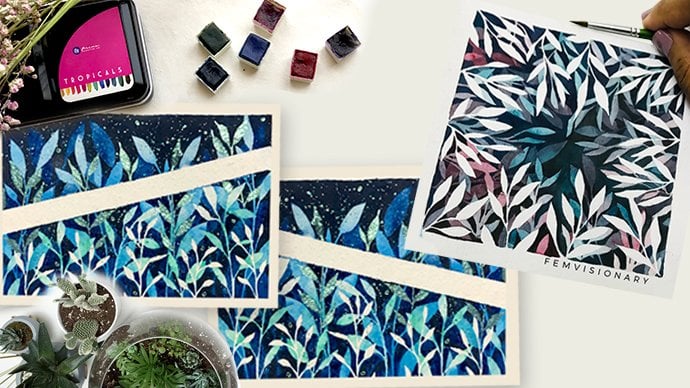
painting bookmarks. I love that clause. I think the projects
are just absolutely stunning and we also have
watercolor officious. I also have a watercolor
boards class, and they all kind of had this negative
painting, the theme. And you get to see
how you can export this theme in
different projects. I hope you really
enjoy this content. Surely dive into it. It's such a beautiful technique and have a really good day. Do follow me on
Skillshare so you can get updated information
every time I launch a class, as well as if there's giveaways
and things like that. Thank you so much for
being an amazing student.
 Femvisionary / Madhu S, Watercolor Artist and Instructor