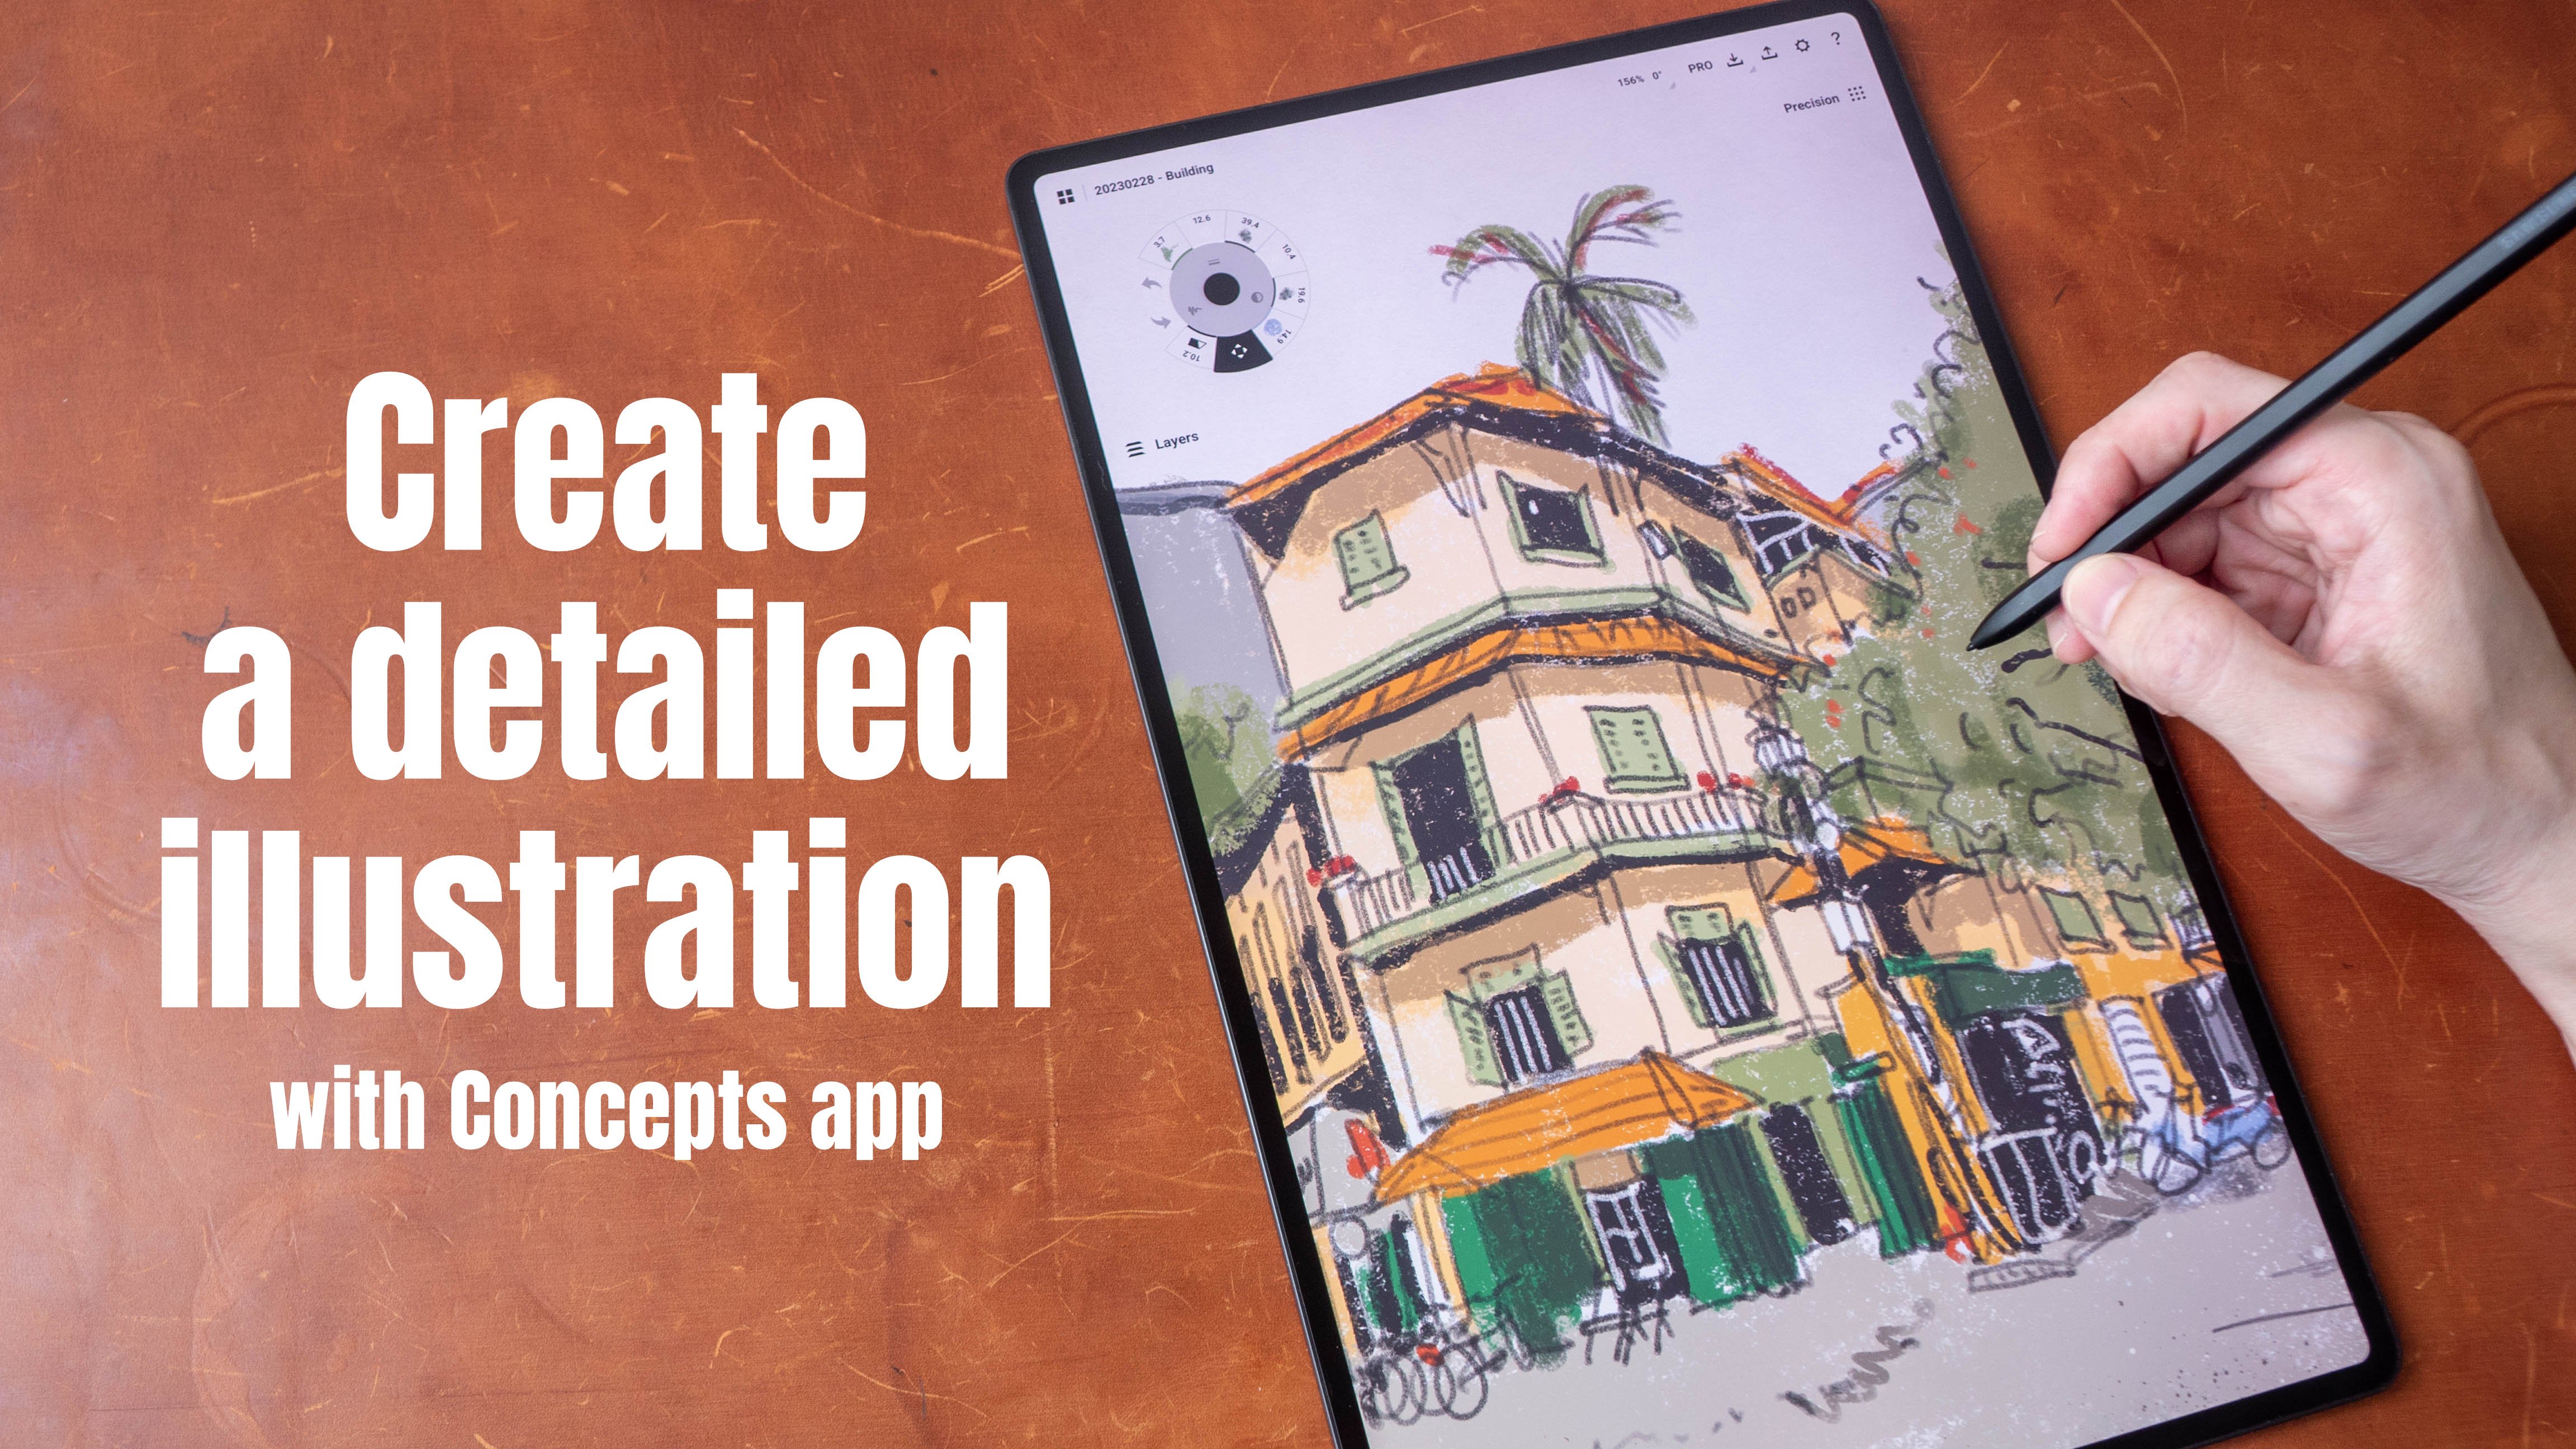
Transcripts
1. Intro: Hello, my name is teoh and I'm an artist, graphic designer, and urban sketcher who enjoy
sketching on location. I use a variety of
tools to create Art. I use both traditional as
well as digital tools. In this course, I'm going
to teach you how to create digital Art using
Infinite Painter, which is an app
that's available on the iPad, Android tablets. Infinite Painter is the capable and versatile drawing app, and it's quite easy to learn, believe it or not, I'm gonna teach you
Infinite Painter, the Digital Art workflow, the basic tools in a Day. Follow along with this course, I recommend you use a
tablet that supports an active stylus
that supports tilt, prejudice, sensitivity,
and palm rejection. While it is possible
to use a tablet that does not support
an active stylus. Though user experience
while drawing is not going to be ideal. And of course you will need
the app Infinite Painter, which is not free, but this app is not expensive. This app is just us $10
for a one-time purchase, so it's really worth the money. Let's look at Art projects we will create for this course. This course is for
beginners and I will teach you how to
draw with shapes. I'll teach you how to color
and what we've layers. I will teach you the basic
Digital Art workflow. We will learn how
to create Line Art. We will learn masking tools, and we will learn
how you can create patterns using the app that you have created
for the final project, we will draw a simple
chair using Line Art, and I will teach
you how to import pattern that you have created onto the fabric for this Chair. I will teach you how to
add shadows to the chair, how to create variations. For this Chair, we
will learn to use serveral digital tools to
complete our Art projects. And I will show
you how to create shortcuts so that you can
work more productively. I will teach you how to backup
your artworks so that in the event that you're Tablet is damaged or is gone
for whatever reason, there is a way to restore Your
Art after you have learned a basic techniques to creating digital Art and completed
Your Art projects. Do share them with me because I would love to have a look, see what you have drawn
and maybe give you some suggestions
on how to improve. And if you have any
questions along the way to write
them down so that you can contact me and I will gladly answer those questions. To get more drawing practice, you can download the
extra reference images that I have provided. Now in the next lesson, I will talk a bit more about the hardware and
software requirements. But before we hit over
to the first lesson, I have a favor to
ask of you if you enjoyed this course and
if you find is cost useful to live this
course and review so they can help other students
discover this course
2. Hardware and Software Requirement: This lesson, I want to talk briefly about the
hardware you need in order to follow along with the upcoming drawing exercises. Infinite Painter is available on Android and Apple devices. Infinite Painter can run on
phones as well as on tablets. The brand of the device that
you use is not important. What is most
important is whether your device supports
an active stylus. An active stylus is a digital
pen that can be recognized, in this case by a tablet. An active stylus will have
pressure sensitivity, so you can press down harder
to get those thicker lines. And there is palm
rejection so you can raise your hand or your palm on the display while you draw and you will not introduce
any stray strokes. And if you use a finger to draw, in this case it's just
going to move the canvas. You will not introduce
any strange strokes. If you're tablet does not
support an active stylus, and if you're Tablet cannot
differentiate the difference between a pen and your finger, you may have to use those
rubber tip or this tip stylus. You can still draw
with the rubber tip. This tip stylus is just that. There is no pressure sensitivity and there is no palm rejection. So if you have your palm on the display or finger
on your display, you will introduce
straight strokes. The drawing experience
with a rubber tip, this tip stylus
will not be ideal. You can still follow
along with the lessons. For Infinite Painter. You will definitely need to get a paid version of the average is a
one-time payment of $10. The free version
only has eight tools out of the 50 over tools
that are available. And it is not
possible to complete the Art projects
with this aid tools. In this course, I will be
drawing with an Android tablet. In this case, this is the
Samsung Galaxy tablet that supports such as pen, which is an active stylus. If you are using an iPad
with the Apple pencil, you can use that as well. Alright, in the next
lesson we will take a look at User Interface
of Infinite Painter
3. Gallery User Interface: Once you have open
infinite Painter, This is the User
Interface you will see. So this is the gallery
page where you can see all your artworks. So this is the gallery page
for our recent artworks. So if you have any features
you want to search for, you can open the user menu as
such for the feature using the search box at the
top right corner. And there are some news and artists features here as well. To create a new file or artwork, you can tap on blank canvas. You can also create a
new artwork based on an image that you have
saved on your tablet. And you can create
a pattern as well, which I will show you later on. Tap and hold on. An artwork that you
have here in this menu will appear to let you Rename, duplicate, share, restore,
or delete the file. If you select restore, this will allow you to restore Your Art to an earlier version. Now all these versions
are saved automatically, but you can save them
manually as well. So this is the current
version that I have with the strawberries
and blueberries. If I scroll back to the past, you can see this version
without the blueberries. So I can choose to restore
this if I want to. Before you restore your Art, I recommend you
duplicate your Art first so that after you restore, you can have the
current version and the restored version
to compare with. The first gallery page
shows the recent files and the second gallery page shows all the files and photos
that you may create. There is one folder
here called line test. So if I open this, there's
only one fall in it. So let me just go back here. I can select one of
the artworks here. In this case, the light has
and drag it into the folder. So now when I open a folder, I can see to false here. And if I want to move this
fall out of the folder, just tap and hold
and ungroup it. Once you have filled up your
gallery with your artworks, I'm very sure you will feel
satisfied and accomplished. The next lesson we will look at a Settings to use when
creating a new file
4. Canvas Settings: Create a new file and see what other settings
available tours. So tap on blank canvas. If you want to work from an image that you
have on your tablet, you can tap here and
choose to import it from your photo gallery
or from the folders. Or you can even take a
photo with your tablets, cameras, and important
that onto the canvas. And this is where you can choose to create a pattern file. So let's move down
under Dimensions. Now, there are some pre-program presets
that you can choose from. Just tap on the word presets, which obviously does
not look like a button. And this drop-down menu
of presets will appear. There are standard
photograph sizes for print. We have a two to eight. And here we have the social
media sizes for Instagram, which is the square
format, for stories, which is the vertical format, and for banner, which
is the web format. When you select the preset, size will be updated
automatically for you, or you can choose to
input size or dimensions here to change the units you can tap here and
select from pixels, inches, millimeters,
and centimeters. If you select pixels, you can adjust a
width and height. This is the maximum
number of layers you can create with this dimension. The maximum number of
layers you can creep. It will depend on how much
RAM you have on your tablet. If you want to
create from inches, millimeters or centimeters,
or as go with this, you can adjust the
width, the height, as well as the DPI, which is the resolution. And if you want to
work with this, I recommend you go with at least 300 DPI to make your
artworks look sharp enough. So for our projects, we will go with pixels. So when I switch from
centimeters to pixels, the dimensions will shift slightly due to some conversion. So let me just switch back
to the number earlier, which is 2160, which is the
Instagram square format. So notice as I type the
numbers for the width, the height will also
change accordingly. That's because this lock icon is now locking the numbers
to this aspect ratio, which is one-to-one, which
is the square format. If you want to enter
the numbers separately, inches tab here to
remove the lock. And now you can change
the numbers separately. And now I can see the aspect
ratio is five to four. So if you like
this aspect ratio, you can lock this aspect ratio and enter some other number. And again to height
will be updated automatically after you
have input the dimensions, you will see the aspect ratio of two canvas update instantly. So this is landscape format. And if you want
to change this to portrait or vertical
orientation, you can tap here to
switch between the two. It is possible to change
the color of the canvas. To do so, just enable
the paper option here and tab here to
co-op the color wheel. So now you can choose
any color you want. All you can tap here
on the Settings to input a very specific color. And if you want to create
a texture for the canvas, you can tap here and choose from the pre-program textures. There are many graphics and
patterns you can choose from to create your
paper textures. For all lessons, we will
just use the white canvas. So let's select white
and turn this off. Under rendering, we
have the color mode and there are many
options to choose from. So I'm just going to
go with standard. If you're working with print, you may want to choose CMYK. I'm going to leave gamma
correction disabled. And if you want to, you can record a time-lapse
of your drawing process just by enabling this
recording option here. So once you have the dimensions
you want to work with, you can tap here to create. This blank canvas
will be created. So this is the drawing
User Interface, which I will talk more
about in the next lesson.
5. Drawing Tools: Explore the drawing
user interface. This interface that
you see here may differ from what you have on your tablet because some parts of the user interface
can be moved around. For example, here I
have the toolbar. This is where I can
select the brushes, the smudge tool eraser, or select the colors. This tuba can be moved around, just tap here and hold down the
toolbar and you can move it to the left
side with docket. Move it to the top two
docket to the top. If you want the
vertical toolbar, you move into the
site so that it changes to the vertical to bar. At the top-left. That's
the home button. And you can go back to the
gallery pitch whip that. Here you can see one row
of icons at the bottom. This is from the Samsung
tablet that I'm using. At the top right,
you have more tools, if I remember correctly, with the default user interface, there is one button
here called tools, another button called layers. And this additional button, which is also Tools, was added with the settings which I will show you later on. This additional buttons here are actually shortcut tools
that I have added. If you tap on the Tools button, you will see many tools. There are two pages of twos. This is page number one. And if you swipe at
this top area here, you will see page number to
each role has one for tools, and some of the tools are
actually hidden of the pitch. Tools that are hidden will have this little arrow by the side. So this tells me there are
more tools on the right side, photos that you use frequently. I recommend you create
shortcuts for them on the screen so that you can select them and use
them very quickly. To do so is easy. Just have one 2s to
show all the tools available and tap and
hold onto to that. You want to create
a shortcut for, that's create a shortcut
for the field bucket tool. Tap and hold, and drag it
to the area that you want. So I'm going to put it here. So I highly recommend you
go into the tools here to select audit tools that
we are going to use later. So that would be filled bucket, save, Transform,
lasso, magic one. Let's take a closer look at the toolbar and what
you can do with it. So if you tap on the brush icon, you will see all the brushes
that are available to you. You can create new brushes. You can select your
favorite brushes and put them into a folder
like what I've done here. You can create a
folder of brushes. You can download brushes
that you find online, or you can change the default brushes that
are available here. So what I want you to
do now is to go into the fields brush category. So under fuels category, select solid fuel and
put this little hot. And select the other brush, which is called dab breeze, feel and put a little
hot there as well. So once you have
added a hot day will appear in the Favorites folder. So right now I have six brushes in the Favorites folder and this other brushes that we will be using for the drawing
exercises later on. So what I want you to
do now is to go into the Patterns folder and look for manga inker and cost incurred at those two brushes to
the Favorites folder. Next, go into the sprayers
folder or category and add flicks and water splitter
to the favorites folder. And you can look around at other brushes that
you may want to use as well and add them
to the Favorites folder. After you have added the brushes
to the Favorites folder, let's test them out. So inside a Favorites folder, choose the manga ink brush. After the brushes selector, you can write or
draw something on. Can we change the color? Tap on this button, which is the second
button from the bottom, and this will call up
the color palette. So select a color from
the color palette and just write or
draw something. If you find allies too thin, you can tap here and this
will increase the brush size. So now this is very thick. This last button here will adjust the opacity
or transparency. So if you want to reduce the
transparency of the color, just drag it down. And now this is at, for example, 20 per cent. And you can overlay
this row times to get the hundred percent colour
or to increase this to 100%, just dragging all the way up. You can use two fingers for
the basic navigation gestures such as pen, x2 and rotate. And you can add more
finger gesture shortcuts with the Settings here
at the top right corner. Next we'll look at smash tool. So tap on this second icon here, which is a smart or blend
to tap on it again. And you can choose
the different brushes you may want to use
for the smudge tool. I'm going to choose
sprayers, a soft airbrush. And now if I drive over the tax, you can see it will
are all smashed. Tax to undo, use
two fingers to tap. And you can do this
several times. An eraser is that the icon here? Type on it. Again,
you can choose the different brushes
to use, S, the eraser. So let's choose a pen Among got inker that
I wanted to use. Ask that you raise her. So now we can erase this. If you find is too slow, you can increase the
size of the eraser. All you can choose
another eraser. I'm going to use the fields, solid field, which is a
eraser that I like to use. And I can just draw over an area just to cut out everything. There is actually
a color picker or eyedropper tool hidden
in the toolbar. So let me show you
how to use that. Let's select a brush. I select hunger incurred again, Let's choose a different color. Now the one which is blue, to use the eyedropper
and just drag from this color button here
onto the color you want, which is on the canvas. So now it's red. Let's switch to this green. Just drag again from the color button to
the color you want. And now we can switch colors
or pick colors very easily. This color wheel is
based on hitch S V, which is hue,
saturation and color. So hue is this circle
here that allows you to select the color as
is the saturation. So on the left side, we have the pastel
light or dark colors. On the right side, we have
to saturate the colors. And V represents value. So at the top we have the lighter values and at the bottom we have
the darker values. You can choose a color, you can choose how saturated
it is and how dark it is. Using this color wheel, you can choose from a
preset color here and adjusts from the
color wheel later on. If you need to input
precise and values, you can tab here
under Settings to input precise color
that you need. If you find tedious to co-op, the color will repeat the lead. Just to change colors, you can crop the color, will use two fingers and
drag this onto the canvas. And if you don't want this, you can just drag
it to the center to where the cross
is to remove it. Next, let's look at
their layers palette, which you can find by tapping on the list button at
the top right corner. The layers palette is
small to make this bigger, just have on a first
layer and swipe it out. Now you can see
more layer tools. The name of the layer,
the visibility icon, which is designed like an
eyeball and you can tap on it to enable or disable the
visibility of that layer. And you can also see their paper layer where
you can change to cut off the paper or the
texture of the paper. So when it comes to
creating digital ad, we will work with layers. So we can create
layers by tapping on this plus button here. And now we have Molly years. We can create Line
Art on one layer, maybe at colors
on another layer, maybe draw something
else on another layer. And this will allow us to
work more productively. I'll show you how later on. This button here
is the adjustment controls where we can change how the layer or
the colors look. This folder button will
collect the layers into a folder to help
us organize the layers. This layer, but then will
control the rendering, which is also going to control how your
artwork will look. Will have more hands-on
with the tools and layers palette with the upcoming
drawing exercises. In this lesson, I just
want to show you that this 2s exists and where
you can find them. In the next lesson, we will
look at useful Settings that can make your drawing
workflow more productive.
6. Useful Settings: Welcome back. In this lesson we will look
at the settings that can help us improve our
workflow when drawing. So tap on the three dots
button at the corner to open the options panel
and tap on Settings. So this is the Settings page. You can choose to sign into your Infinite Painter
account if you want to, but there are no
advantages to doing so. So my User Interface is black. And if you want to, you
can change the color. I'll just go with black. And this is where you can
select different color wheels. You can choose your
preferred color wheel from the six provided. The one that I prefer is
this color wheel with the square insight because there is an actual
will and this square is easier to use when it
comes to picking colors, because you can think
of the corners as zero or 100 per cent of the
hue saturation or brightness. Next, you can change the scale of the
texts if you want to. For height navigation
been able this, this will hide the navigation
bar at the bottom, which will vary
depending on which. You can change the
size of the EU and the tax with
this slider here. Next area is this height
navigation option. So when you enable this, this will hide the navigation
bar at the bottom, which will vary depending on
which Tablet you are using. This split tools
setup is important. I want you to enable this
with a split tools enable, you will have two buttons
here instead of one button. So if there is just one button, you will have to
swipe left and right for the two pages of tools. Now with the two buttons, each button represents
one pitch of tools. There are too many Settings for me to go through one-by-one, so I'll just show you the
ones that we'll be using. And workflow will take
canvas enabled that because we will want to rotate the canvas while we are drawing. You can leave rendering
options as default. Now, under saving, this is where you can choose
how many versions you want to save. So let's say if you save maybe ten versions in
the home gallery, you can choose to restore
which version you prefer. So tomorrow version is you have the better and how many
version is you can save will depend on how
much RAM you have. We feel tablet under gestures, these other finger gestures. So I have set double-tap to fit into
canvas on the screen. And for a long press, which is tap and
hold on the screen, we will have to eyedropper. If you prefer to see the cursor while you move
your pen on the screen, you can choose to
enable the Draw cursor. For Shape Detection. This will automatically
change your lines into a certain shape
if the software, things that you're
trying to draw a shape. For example, if you're
trying to draw a circle and you want it to
be an actual circle. Just enable that option here. This is where it can change
the pressure sensitivity for the pressure velocity and 2D. And for volume keys, you can actually use
your volume keys on your tablet as
shortcuts as well. I don't do that, so I'll just leave
that as not being. If you want to disable back, which can be quite useful, you can enable here. What this does is
when you swipe from the left and right off
the Android Tablet, sometimes they will go back to the previous page or
to the previous app. And if you don't want that
to happen, enabled this. And under stylus, this is
where you will need to choose to move the canvas with your finger because otherwise your finger will
actually draw on Canvas. So will this enabled? Now we can use your
finger to move to Canvas. Folder stylus, Front button. I have set it to
Eyedropper because I'm using a pen with a
set button here. If there is, if
you're using a pen with another button or
with a back button, you can set a shortcut here as well from the options panel, which you can assess from
the three dots button, you can choose to
create a new file, Burn a file, save your
file, import images, adjust the time lapse recording
settings if you do not do so while you are
setting up your Canvas, you can export your file
for sharing online. You get checkout, the artworks created by the community
and you can check our other tutorials
right now that I have introduced you to the User
Interface and Settings. In the next lesson, we will draw
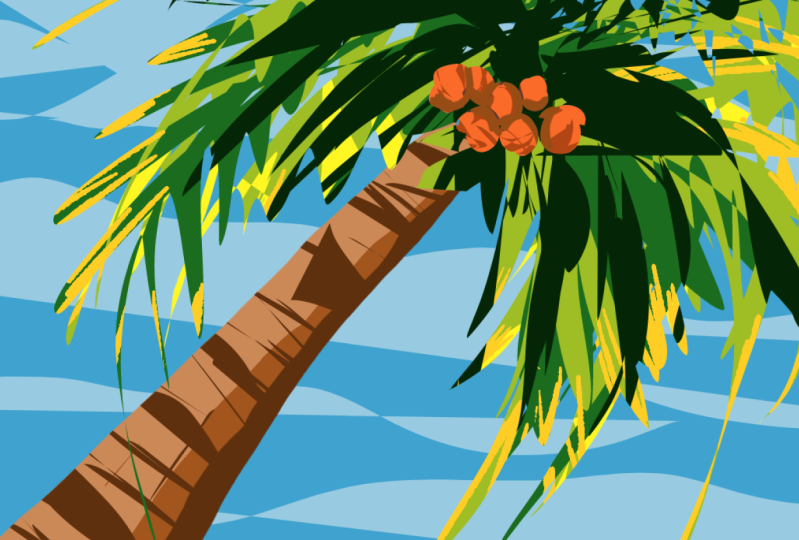
7. Let's Draw a Tree with Shapes: For our first drawing exercise, we will draw some things simple. We will draw a coconut tree. Since we all know how
a coconut tree looks, we don't even need
to use a reference. So let's go to the home
gallery and create a blank canvas and select from the presets, the
Instagram canvas. Because I feel like drawing on a square canvas and scroll
down to the bottom to disable time-lapse because we will
not record a time-lapse this tab here to create eight. So first thing to do for me when it comes to drawing is
to create a few layers. If you cannot see the layers palette tab here on the layers. But if this is too small, just swipe this out. So tap on the Plus button
to create a few layers and tap here in the middle
to rename the layer. This will be the
tree trunk layer. Next, select a brush. I'm going to select
solid fuel brush. If you cannot find this brush, it's actually under
the feels category, which I have saved into
the Favorites folder. Next, let's select a
color and I'm going to select this brown color
for the tree trunk. Let's Draw the tree trunk from the bottom left
to the top right. We're going to have the top smaller and the bottom thicker. Hair K. This looks fine. So this is the solid fuel brush, which you can use to
draw Shapes very easily. If you want to undo,
use two fingers to do. Alright, so these colour
seems to be too dark for me. So I don't think this tree
trunk lighter to do that. Just tap on the tree trunk layer and tap here to
create an Alpha Lock. So now select the color
that is lighter by selecting the color dyes on the lambda site of
the color will. And draw over this area here. So now we have a
lighter tree trunk. Let's see, the light source
is coming from the left side. So that's something darker
on the shadow side. So open up the color
wheel again and select a color that
is on the right side. And we can draw half of
the tree trunk in shade. And I'm going to open up the
color wheel again to select an even darker color
for the darker shadows. And you can also choose to
add textures if you want to, under a tree trunk. Now for the textures, I'm going to create all credit textures
on a separate layer, which I will call
the texture layer. That's quite textures. Okay? So if you draw the textures now you may
notice the textures. We will go out of
the tree trunk, which is what we do not want. We wanna do is to create
a selection based on this tree trunk so
that we can draw with thin a Tree trying to do that, select the tree trunk layer, tap on it again on
this Select button, and a selection will
be created for you. Now under textures
layer, when you draw, all the lines will be within
we would drawing with thin selection and my
lines are too thick. So let me just draw
the thinner lines. This looks good. Now the line should be
curved because we are looking at this tree
from the bottom. So let's make the lines curve. Okay? As the lines curve up, the lines will be
thinner and thinner. So we can see some
parallel lines, which means we are still
in the selection mode. We're still drawing
within the selection. So to get out of this mode, just tap here on this
button and we're back to the canvas because we have the textures on its own layer. If you do not like the textures, you can turn off
the visibility of the textures or you can
just delete this layer. Remember the double-tap shortcut we have from the Settings, you can double-tap on
a canvas to zoom in, to have the canvas feed
that tablet size, right? Let's Draw the leaves. Let's rename the layer beneath
the tree trunk leaves. And use the same feel. Brush, solid fuel, brush, select the green color. I'm going to use this
green and draw the leaves. So as you are
drawing the leaves, try and figure out
how the field brush Works because this view
brush is actually quite convenient when it
comes to drawing and also feeling shapes. Next, we may want to add some color variation
to the leaves. So once again, I'm going
to create an alpha mask, tap on the leaves layer, tap on the Alpha Lock button
and select the color that is closer to yellow and just
draw paint onto the leaves. Yeah. Okay. It is looks good. I'm going to paint yellow onto the leaves that outer edges. If you make any mistakes, you can always use
two fingers to undo. Let's just add some
yellow, that's enough. And next I want to add
the darker greens. Because when we look at a Tree, the leaves on the underside is usually quite dark,
sometimes lack. So I'm going to select this
green using the eyedropper. If you have customized the
eyedropper to the side button, you can tap on the
site button to co-op the eyedropper and now
that color is selected. The other way to use the
eyedropper is to tap here, tap and hold, and drag it
to the color that you want. Now the color is selected. So using this color, I'm going to select a darker
version of this color. I'm going to select the
color that is tau here. And alpha lock is due on. So when we draw or paint, we will be painting
within shapes, within the pixels that are
already on the canvas. So I'm gonna make this
area a bit darker. Now when we are
drawing, we should always think of contrast. How we can create contrast with values, light versus dark. Dark versus light. We can create
contrast with colors. Are colors versus
saturated colors. We can create contrast
with details. More details versus
less details. So what is Pat? I actually want to draw the leaves outside
onto this white area, but I cannot do so
because the alpha lock is due to Draw Outside. Let me just tell on this layer
and unlock the Alpha Lock. So now I can draw outside here. So once in awhile you
should zoom out and have a look at your drawing and
see how it actually looks. Oops, I actually drew
on the wrong layer. Always make sure you are
drawing on the correct layer. Okay, This looks great. I like this. I like
how this looks. Next, let's draw some coconuts. Coconuts will be on
top of the tree trunk. I'm going to place
the coconuts here. I'm going to draw it
at the top layer. Let me just rename
this layer routes. So the light source is
coming from the left side. So let me just choose a
color, Florida coconut. I'm going to choose maybe
this light brown color. Let's see how it looks. Make sure you are 21
to current layer. Okay, this looks alright. That's have one here, one here, and maybe one here, maybe another one here. Okay? So this style is very stylized. I wanted to YouTube draw this because we don't have to worry
too much about accuracy. I just want you to
get familiar with the 2's data available to us. So now that we
have the coconuts, Let's Draw the shadow side. So let's select
the color palette. Select a darker version of this coconut color
and just draw. Now, if you draw outside and
you don't want to Draw site, you can always create an
alpha lock so that you can draw inside like this. Okay? So this Coconuts are
actually under the leaves. So much of the coconut is
gonna be like just darker. Okay. And we will go back to the tree trunk layer to color this part,
this part darker. And I want to use this color. So I'll just call
up the eyedropper again just to color this part. And I also wanted to add
some little details here. Okay, so this looks
pretty good to me so far. Next we will add the sky. To add a sky, we will use
the layer at the bottom because the sky has to be beneath everything that
we have just drawn. So select that layer and select First page of the tools. Choose the few Gradient tool and choose the
linear option here. And drag the pen from the bottom left to the top right to
create that gradient. Now, if this is the
color that you'd like, great, but chances are heart is not a color
that you like. So tap here on the color, but then, and this color
palette will appear. I'm going to choose me
be a lighter color. At the bottom. We will
see how it looks. And taps here, add a color button at the
top or at the anode, a slider, and choose
a different toddler. See whether or not
you liked the color. So I'm going to
maybe have this guy lighter and autumn here, darker. Yeah, maybe that's
have this guy right there so as to create contrast. And for this blue, I think this blue looks nicer. Okay, Let's tap here on the
tick to apply the gradient. Alright, so this
looks nice to me. If you don't like this guy. Again, you can either
delete this layer or just disable the visibility
of this layer. One good thing about
working with layers is if you don't
like what you see, you can turn off
the visibility of that layer and try a
different variation. So I'm going to try another
variation for this guy. I'm going to create a new layer
here for the seconds guy. I'm going to select a blue. Maybe it is blue here. And I'm going to select
a solid fuel to again. So let me just zoom down
and I'm going to draw over the hello area. And I can see the contrast
is not that great. So let me just make the
top part and lighter. Okay, this looks good on this
can be this can be Clouds. Let me make this even lighter. Yeah, this can
definitely be clouds. So when you're drawing,
always think of contrast. Remember the double-tap
shortcut that we sat in a Settings earlier. You can use that to scale
or zoom into Your Art. So let's look at
the two variations. I do prefer the
second variation, so I'm going to keep this. The last thing I
want you to do is to select them
manga income brush, select a different
color on his case, I'm going to select
a darker blue and just write the date. So today's the aid
of August 2023. And before you close this file, I'll save this file. Tap on the plus button again
to create an empty layer. This is the protective layers. So in the future, if you opened a file and you accidentally add some
lines on a file, that protective layer is there. So you can just delete that protective
layer and Your Art will be back to the
original state, right? Just to recap, this drawing was drawn with the solid fuel brush. So we were just
drawing with shapes and will learn how
to select colors, will learn how to apply
the gradient for the sky. We create a multiple layers and we know how the layers work. We also learn how to
use the alpha mask to draw with thin the shapes. In the next lesson, we will learn how
to create Art with Line Art and learn
more techniques
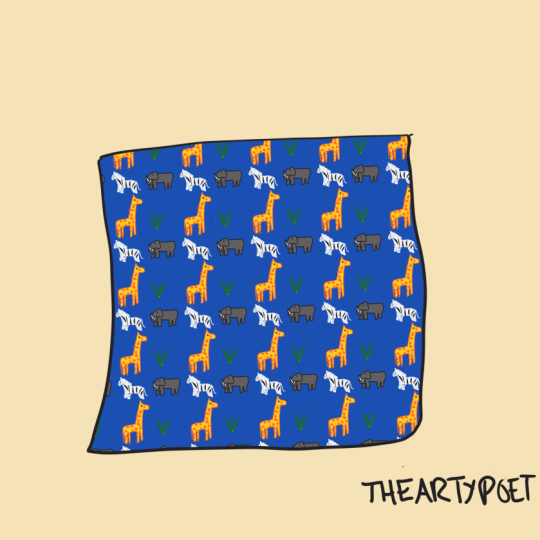
8. Let's Draw Animals with Line Art: Welcome back. Our next project will
require more time to calm late because I have many techniques and
workflow is to show you. So to make this project
more manageable, I have split lessons into shorter lessons so that you
can follow along easily. So let's see what we will learn. We will learn how to create
the Line Art for this Chair. We will add colors
below the Line Art. We will then add shadows to make this look
more dimensional. And if we do don't
like the colors, we will create a variation for the Chair and we will be
drawing some, and in moles. We will draw it
Animals and we will create a pattern
using the Animals and then we will import that
pattern onto the cushion, the fabric of this Chair. So this will be our
completed project. Let's create our new file. Because we want to
create a pattern. We will tap here to create that. Let's tap on presets
to choose a preset, I'm going to choose Instagram, which will help me create this square format
canvas and disable time-lapse because we
will not be recording any time elapsed
for this artwork. So let's tap create it
to create this file. So you can see two
squares on the canvas. We will be drawing on
the smaller square. And the next thing
I want to do is to create a few layers. Now, if your layer
palette is not visible under layers
button here to show it. And Tim has swipe it out
so that this is beaker. We will want to add
a few more layers. So just have on the
Plus button there. And that's import
some reference photos or images to help us
draw with reference. Tap on the Options button
at the top right corner, and choose to import. And you can choose to
import from a gallery, from your tablets camera
off from your folders. I'm going to choose to
import from the gallery, look for the images that
you have downloaded. So for this artwork, I will import pictures for this zebra
Elephant, Angie rough. So I'm going to import
the zebra first, import it as the reference
instead of a year. And with the reference
on the canvas, you can use two fingers
to move it around. You can also rotate this if
you want to and resize it. I'm going to place this here. So do the same for the
other two images as well. So I've already imported the three images and I'm
going to have to go on top so that I can see that
picture more clearly. Now the difference between importing this images
as a reference versus layer is with
this references, you can move around. Your canvas will
take pen and X2, and your references
will not be affected. If you import these
images as a layer, this images will scale, rotate depending on the canvas. Gestures because they are
actually your artwork. But right now if
they are references, alright, Let's Draw, select one of the layers
on the right side. Choose a brush. I'm gonna choose manga inker, and I'm going to choose a
color from the color picker. I'm going to choose lack. Let's Draw Maybe
the elephant first. Don't worry too much about drawing exactly
what you will see. You can draw our cartoony
version of this elephant. What I want you
to take away from this lesson is to get
familiar with the 2s. Get familiar with
switching between the 2s. Okay, So let's see
how big our brush is. This is kinda thick. So maybe I wrote one to
reduce the brush size by tapping and dragging here. Alright, so that's draw. If you need to undo, just use two fingers, tap on the canvas to undo this. To draw more confidently, you can draw faster so
they allies are smoother. Okay, So we have the legs, one leg after another link here. And we have to hind leg
and other link here. Oops, dislike is too long. So to erased, select the eraser and choose
which eraser you want, and erase the longer leg. So you can use the
eraser to fix mistakes and switch back to the
brush to continue drawing. So now we have an elephant and we will
want to draw the task Here in front as well. So I'm going to give this
elephant a big task. This looks fine. And I'm going to switch
to the eraser to erase this part here. And here. Try to erase properly so
that you drawing looks good. I always shot here slightly. Okay, Let's see what we have. I think it looks fine. Let me erase this part as well. So just zoom out and have a
look at your elephant and see whether or not you need
to do any corrections. You raise any lines that
overshoot when you zoom out. And now you can see the elephant drawing being
repeated elsewhere. So this is the pattern
that you will create it. And I can see that I may need
to erase the leg here to redraw this leg so that lake
is actually on the row. So let me just redraw this. Okay. Too big, too big. Let me just undo
this and redraw it. Okay, Now it looks
slightly better. Next thing I wanna do is
to rename the layers. I'm going to tap on
this layer three, tap on the new model layer
and rename this layer. I'm gonna call this Line Art. If you are working on a
very complex artwork, it's good to rename
your layers so that you can know which layer
you're working from. And it's just better
for organizing layers. Now I'm going to
colour this elephant. I'm going to select the
layer beneath a Line, Art. Tap on debt. Renamed is the your color. And tap away. Now to add color
beneath the Line Art, select the color layer
which is beneath. And Line Art. Always
make sure you have the correct layer selected
before you draw or colour. So I'm going to select a brush. Nope, I'm going to use the fill bucket to
fill this drawing. And I'm going to fill this
Line Art with this gray color. Okay? So go into the tools
palette and select Fill. If you have not track
the field shortcut here. So I'm going to select
bill and I'm going to tap here to
fill this drawing. Okay, so what happened here? So what happened here is
the field bucket actually sample the color layer
which has nothing on it. So if feel the color
onto the whole liter, what you want to do is to have the fill bucket
sample or the layers. So another options here, the sample all layers. You have to tap on
this button here which shows one layer right now. So tap on it and now you can see another layer being added. Once you have sample
all layers selected, I want you to undo using two fingers to tap
on the screen. And now you can use
the fill bucket to, to tap within this shape
to fill this with color. Once again, make
sure that you are filling on to the color layer. And once you're done, you can
tap here on that check box. Now you for some reason
when you are filling the elephant with colour and
how Canvas is still gray, equal mean you did not close
up your lines for some all. Let me just draw something
on this lineup layer. So I have this circle here
which is not close up, and I have another circle
which is closed up. So now when I tried to
feel the color for this, let me select a simple
all the years selection. So now if I fill this, you can see the color is filled. Insight is enclosed shape. Lady, if I tap here to fill it, you can see that the color
actually leaks out from GAP. So when you're creating
your Line, Art, makes sure to close up the gaps, do not leave any open gaps
for the colors to leak out. Once you are done with
your field bucket, just tap on Check
button, button here. The next Animals that I
want to draw is the Giraph, which is now hidden
behind elephants. So let me use two
fingers to move the reference on top
of the elephant. And I'm going to choose the
manga inker brush again. And I will choose this route handler for
orange color for the Giraph. Let me test a line.
Okay, this looks good. Let me select a
Line Art layer to make sure that I'm drawing
on the Line Art layer. And I'm going to Draw cartoony version of
this Giraph as well. Hey, we need a NAK
to be much longer. So this is not that long. That's draw a longer neck. As zoom-out. Have a look. Okay. Let's make sure that leaks are thicker at the bottom here. Here, here, and we have
another loop here. Okay? Once again, make sure you
close up all your gaps. Make sure you're Line Art
does not have any gaps. Okay, Let's have
to tell at a bag. Now, this looks alright. And now we can add the
patterns on the giraffe. So remember, this pattern is going on top of the
fabric on the cushion. So we will want to
draw the pattern here on the giraffe and bigger sizes so that when this
is scaled down later on we can still see the pattern K. So this is that you
rough with the pet, then I think it looks nice.
9. Let's Draw Animals with Shapes: What I think I shall
put one eye on the elephant as well because
it looks without the eye. So make sure you select
the Line Art layer and draw the eye on
the Line Art layer. And I will be on top here, just above the task, right? So now this elephant
looks so nice. Next we will draw the zebra, and I'm going to keep the body
of the zebra young white. It's difficult to draw
white on a white canvas. So to help me, I'm going to tap on
this paper layer here, on this little symbol here, and change the color of the
paper to something else. It can be any color white. So tap away and now go to the color layer because we wanted to draw the
shape of the zebra. So select the color layer. Select maybe a brush that's
used manga inker again, which is very useful. Select white as your colour. So this is the colour we have
and Let's Draw the zebra. Me just resize that. And I'm going to
draw the head here. With the years. The head. Body hopes. Does this look good? Okay, We have two legs. We have another link
here, the system body. The body is curved
slightly, okay. We have to lag behind. Another. Notice here. If their legs are not obvious, you may want to make
them more obvious. So I'm going to be the delete
this link that is supposed to be behind you raised that way and draw
the ADA ligament, this so that it's very clear
that this giraffe zebra has four legs and you may
want to add the tail as well. Okay, so now I can use the, let me erase this
part here first. So now I can use the field. Get again to fill this shape. Make sure there are no
open gaps and tap inside. So now you can see this
problem that I have here, because CDA feel bucket did not fill up the ship complete. So what we wanna do is to use another way to color
this in an a method. So go into the, let me tap on this, check
a set button first. So select the magic one tool, which you can find here. If you have it
here, I'll go into the 2s pitch and
look for magic one. It's on page two
in the first row. So once you select magic one, you will see it is parallel
diagonal stripe appear. So right now nothing
is selected. I want you to tap
in this area here. So once you time in this area, you can see the little
matching ends up here. I want you to tap here
to add selection. Once you select that, you can add more selections. So now I can tap here for the feed or the link
behind here as well. So I've added this to selection, to the mean selection. The next thing I'm gonna do
is to expand a selection. So that selection actually
goes over the white lines. So look at the options below, and there are many
options and look for Ben. And there's this
slider, that book here. So just drag a slider so that selection expense
slightly into the white area. Once you're done, just
hit the step button to take their and press again. So now you have this selection. Next, we can use the fill brush, the solid fuel brush, and draw over this
area here like this. And once you're done, tap here on the wrist sub-goal to exit out from the selection. Now go and have a
look at your zebra. See if you have colored
everything correctly. If not, you can use the
brush to add colors back Okay, Obviously the other
way to color this is to just use the brush to do
this. Let me show you. Select a manga incur. Just do this. Colour like this. If the area is small, you can use these
coloring method, but if the area is big, you may want to use
the Selection matter. So again, there are just
many ways you can go about it comes to coloring K. So now I'm using the manga incur to touch up this drawing, using the eraser to
erase some shapes. And I want to have the
hair of the Zebra as well. So I'm going to use manga
inker again to draw the shape of the hair. Okay. So next I want to
draw the stripes. So how do I Draw
the stripes are, Let's select manga inker again. Select black. Now, if you are going to
draw the stripes like this, Your strikes me. Go out of the zebra, which is what we do not want. So why do we want to do is
to draw within this shape. And to do that you can tap on the color layer, just tap on it. And there will be, it is option
here to lock this layer. And this is actually
the Alpha Lock feature. So tap on that lock button. And now you have
created an alpha lock. So what this does now is this allows you to draw
within the talent areas, within the pixels that you have already painted
onto the canvas. So now we can draw
the black lines, make sure you are using
the correct brush. So as you draw it and see if
you draw out on the zebra, the lines we will not go out of the zebra, which is very nice. So now you can add your pattern. This is too close. So this is to close-ups. Yeah, correct. Let
me just erase. Let me just paint
with the wider story. Remember the paper color
is this color right now. So if you raise the white, you are going to see
that paper color, which is this color. I'm going to paint
back the white. This part here. For the hat here. Let's have the parallel lines. Make sure you put in the eye at a correct
location which is here. I think that is too big, but it's okay because this is a cartoony version of the zebra. So erase all the
stray marks that you may see occasionally. All right, so now we have
G, sorry, the zebra. I think it looks alright. It looks fine. Maybe I need to stretch it slightly because
mine is kinda. So now I'm going to
make my zebra wider. To do that, I'm going to
use the lasso tool to make a selection around a zebra
and then make it wider. So go into page two of the tools and look
for the lasso tool. Make sure you select a zebra
that's on the color layer. If there is a selection which is a really creative for
you for some reason, you can tap here to
clear that selection so that you can draw
your on selection. Now that you have this
selection that you like, tap here on the tick to
receptors and go into pitch two of the tools again to look for the Transform to
the basic Transform to. Once you have selected
basic transform, this grid will appear
and you can use this to adjust your drawing, to transform your drawing. So I'm gonna make
this zebra wider. Okay? Yeah, so let's make
this zebra wider. This, okay, so now I think it
looks fine when it's wider. So let's zoom down and have
a look at what we have. Okay, I will need
to colour the task. So let's select brush I
need and the color that I need and colour the task
here. Make it white. It's important to
colour this wide. If you move down to the Jira, you can see through
the Line Art onto the paper which is
currently it is colour. So let's colour the body white. You can either use the fill bucket tool or you
can use the Selection tool, make a selection for the
space between the shapes and fill into colour
with the solid field. Or in this case, I'm just going to select A solid fuel brush, select white and just
color this hopes. Make sure you are working
on the correct layer. Make sure you're coloring on layered beneath the Line Art. So with this feel brush, I can feel this Giraph
with white as well. So there are many ways for
to achieve the same results. So notice that I
have actually colour it out of the lines. Yeah. So notice I call it out of the lines here, doesn't matter. Select the eraser to, I'm going to select a solid fuel to erase this part
here like this, I will want to make the zeros molar because the elephant
should be bigger. Or I can make the
elephant eager. Who make the elephant bigger, will use the Lasso tool
to select the elephant. You should see parallel lines. If you don't see the parallel
lines after you enter the selection tool tab here
to clear the selection. So use the lasso tool, make sure it's lasso
deselect that. Select the elephant. If you'd like to selection
a septa selection. And now I want to transform
this sort. I can skew it. So tap on the Transform, the basic Transform Tool. And you will also want
to select Line Art. So right now I'm
selecting the color. I want to select a
Line Art as well. So tap on everything you want to transform and scale this up. Oops, why are there
is not moving. So then it looks
like a glitch to me. So I'm going to go out to the home gallery
and come in again. And I'm gonna do the
same thing again. Select this other fern, a septa selection, select
a basic Transform Tool. And I can see the selection
is just over the elephant. And I wonder Transform to apply on both the Line Art
and the color layer. So I need to select a Line
Art and the color layer. And now I can scale this up. You may want to choose basic
instead of this thought. Yeah. So once you have basic selected, it will still this uniformly and you can move
this around as well. So I'm going to move this
elephant down to this area here where it has most bees. And yeah, so you can
move this Giraph up. I'm going to move
this Giraph up. I'm going to use
the selection tool. Select this giraffe
and set the selection. Select basic Transform
to move this up. Oops, I did not
select the Line Art. Make sure to select the
Line Art and the color. And move this up. I may move down to have a look. I think this looks fine, although the transform box is a bit weird due to a glitch. I think this looks fine. Yeah, this looks fine. Next I want to add
some greenery, some bush on the ground. So I'm going to select a
monk or inker brush again, select a green, maybe a darker
green, and just draw us. Just draw some bush
on the ground. If you don't like the Line Art, you can switch to the solid fill and maybe draw this and
switch to a different color, maybe a lighter color. Yeah. This looks fine. Let me erase the
bottom part here. Correct. So now we
have little bush here. This drawing is now complete. Now you may want to move
the animals around, maybe have them face
different direction. I think the zebra will
look better if it faces the face into the
pitch, into the canvas. So what I wanna do is to the zebra is on
this color layer, I want to use the
selection tool to select this zebra, a subnet selection. Select the basic Transform
tool and tap here, this flip button
here to flip it to the other side and maybe
move it inside here. Alright, so that's a step. And lastly, let's make the
paper white gain. Okay? You may not see the shape
of the zebra right now. But later on when we import
this onto the fabric, onto the cushion, you
will see why this works. And now let's tap on the
reference button here to hide the reference for those
so that we can zoom out and have a look at
our repeated pattern. Now, if you feel like there is not a lot of space between
the Animals, you can, again go and select a Animals and skilled and down
so that there is more breathing space
between the Animals, which I am actually going to do. So I've just used a
selection and Transform to, to make up the Animals
smaller and also positioned further
apart from one another. And I have also moved
Bushehr down to the level that the
elephant is walking on. By the way, Infinite
Painter will save your artwork automatically, but you can also choose to
save your artwork manually. And whenever you tap
on the Save button here or from the options panel, you will create a version of that file that you can
refer back or restore to. You are at home gallery
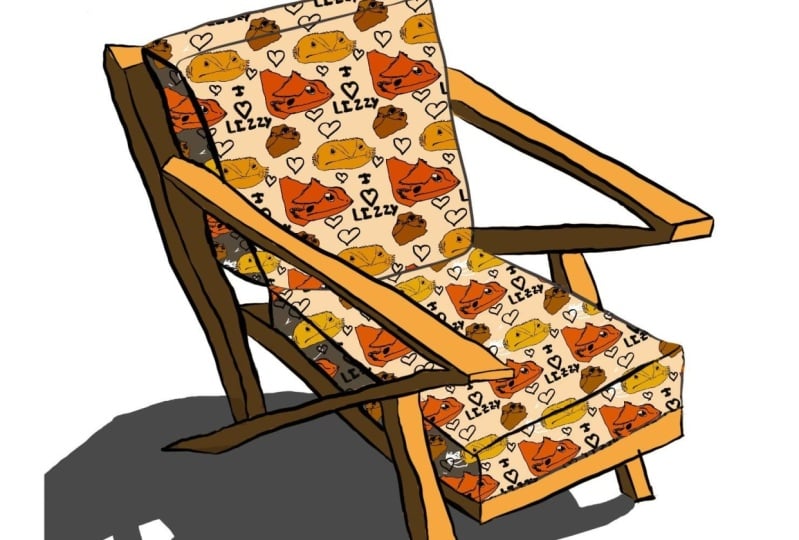
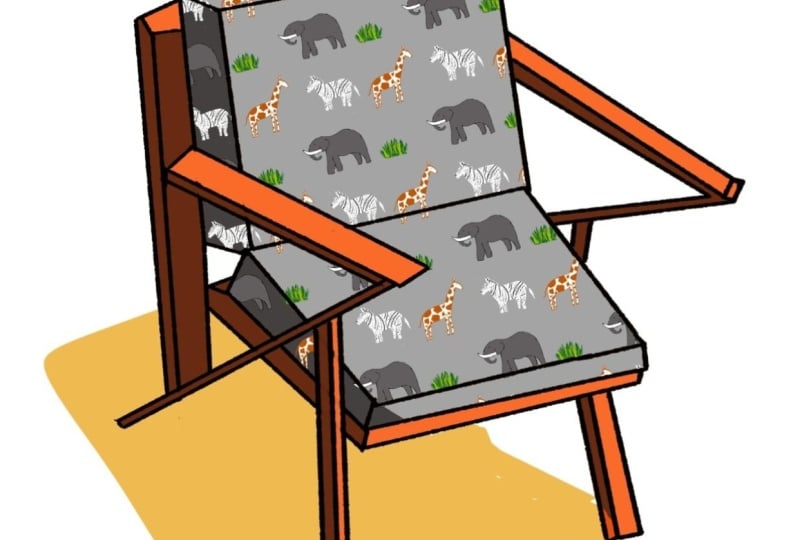
10. Let's Draw a Chair: Welcome back. In this lesson we are going
to Draw a Chair and import is repeat a pattern
onto the chair. So let's create a
new blank canvas. Let's create a new file. I'm going to use the same
square format again. And I'm going to
create a few years and rename this layer in
the middle line up. Next, I want to import
the reference photo of the Chair type two options panel here and import
from the category. That's import that
file as a reference and position it here
on the left side. Let's Draw what to select
monger inker brush. Or maybe I prefer to
cause inker brush, which has texture lines, and this is how
thick that brush is. Let me just increase
the brush size. I think this looks fine. Let's Draw the cushion first. Let's Draw the
cushion and make it three dimensionally. If you can. Just erase the ops, this is the airbrush eraser. So let me select the eraser and select the brush for the eraser, I'm going to use the
solid fuel eraser. We have a little cushion here. And we have another
question here. Okay, Looks good. I will not be drawing that
orange cushion at a top. Okay. Next I wanted to draw the wooden frame of the Chair. For it wouldn't
frame. I'm going to draw on the layer
above to Line Art. So select that layer first, select your brush and
draw the wooden frame. We have the handle
that comes out here, the mid section here. Hopes. Okay, and we have leaks somewhere. There is a wooden pot here. So that looks will
actually end row here due to the perspective. So i'm, I'm going to start by drawing here and joint
to the arms there. Okay. I find easier to do it this way. Okay. So the reason why
I have the arms or the wooden part on
top of the cushion, is that if I need to
erase the cushion, I can erase easily. I can select a cushion layer
and erase this very easily. So sometimes when
you are drawing, you may want to think
in advance on how you meet one to the
sequence of how to create Your Art that can actually help
you save some time. As for this part here, this is actually
on the same layer, so we will have to
erase this carefully. Okay, it's fine. It looks fine so far. Let's go back to
drawing the frame. Have this part that goes
all the way it would, will maybe N here. This is the wooden part. And we have to Lake step here. Let me draw the legs
down like this. Okay. Maybe give them some thickness. And again, I can erase the back. Or you can choose to
Draw the Line Art. Order Line Art on the same
layer is really up to you. Let's Draw the, the arm
which will end here. Let me just rotate this. Draw it. This. Let's have more thickness
to the arm here. And this will go down
at the same angle. Okay. Looks fine. And we have the lakes here. This should be at an angle. I just noticed that
in the photo on this front part here is actually flush to the to the lakes. But for my chair
you can see that my leg is actually
behind a bottom piece. So let's just put with that. Okay. This looks, or write
to me, this looks fine. I just need to maybe
much does to layers now. Select the layer on top, my name, and tap
and select much. So this will match
with Line Art. And now I'm going to use
the basic Transform Tool to move this Chair in to, to center on you until you
can scale this slightly. So let's tap a step. I mean, need to tuck shop this pot here at the
back because right now it's not obvious
that this shape, how to ship actually looks. I think this looks fine. Next we'll add
colors to the chair. So select the layer beneath, renamed that layer color. So by now, the
workflow should be familiar to you because we
have drawn many animals here. So let's select, Let's fill this with
the field bucket to. So I'm going to use
the fill bucket. Where is it? Okay, it's here. Feel bucket to remember to select or sample all the layers. And you can choose a color for the field bucket here
I'm going to choose is orange color for
the wooden frame and just tapping into the area. And we can go into check to see whether the colors
have been filled properly. Because this is a texture brush, we need to make sure
the colors actually few into the iris here. So you can see a little
bit of white here. That's fine. But if the field bucket is not able to fill into
the white areas, you may have to use
the selection to select areas you want to colour, expand the selection
and fill it with a few brush instead
of the fill bucket. Okay, So I managed to
colour this really quickly. Let's accept this. And I wanted to select
this brush again to color this part here you can see
it's not colored properly. Next, R1 to select
another later. And this layer will be
called the cushion the year because this is the
cushion colour the year. Okay. Same thing. I'm going to
use the fill bucket to maybe fill this with gray. Select sample. All layers, change
the color to gray and just tap on the cushion
to fill the colors. Okay. So I want to add some shadows to this drawing because
now it looks kinda flat. So for the shadows, I'm going
to select a layer on top of the Line Art and
renamed the year shadows. And now I select maybe
are darker gray. Should I use to fill all
shall use to fill brush. I'm deciding whether
to use the fill bucket or the field brush
to add my shadows. I shall use the fill brush. Let's select the brush here, so that's solid fill. And select dark gray color. I'm going to select maybe
40 per cent of 50% gray. And I'm going to tap on
the shadows layer here. Set the blending mode to
Multiply and tap away. Once you have selected the multiply blend mode
that a little weren't multiply will be visible
here on this shadow layer. So now when I use the fill
brush to draw on this layer, the color will be multiplied
on top of the other colors. So I can actually use
this to add shadows. Okay? This part here, Let's say that light
source is coming from this from the right side. So I need to make sure we have the shadows on the
left side of the Chair You may want to use the
fill bucket or instead, because I just realized that this is not
as far as compared to coloring with
the field brush is not as fast compared to coloring
with the fill bucket to. But I'm just showing you
different ways of working. Hey, we have shadows
here as well. And we have shadows
here as well. And also on this side, the left-hand side of the here. Okay? If the shadows
are not obvious, in this case you
can see the shadows are actually kinda pale. Contrast is not there. Why do you can do is
tap here on the layer. Select Alpha Lock. Select a darker shadow
and draw over the chair. What alpha lock stars is, you are just went over
as this thing pixels. So you can use these to
adjust how much shadow, how dark the shadow. It's. Okay. I think
this looks good enough. And I may also want to add
some shadows on the ground. So that's used solid fuel again to add shadows
on the ground. Ops. Notice nothing happens. That's because we need to
unlock the Alpha Lock. So now we can draw the
shadows on the grill or you can switch to
a different color. May be, I'll use a pale version
of this chair's colour. Maybe this will make the
shadow look more interesting. And that's erase this part here. Oops. We need to add the
shadow back here. Let's use gray again. This is not the correct
color of the shadow earlier. So what we need to do is to remove the amine Chair colour, use this eyedropper and
select a same color again to colour back the shadow that we accidentally removed earlier. And now we can add the
armchair collared back. The nice thing about
working with layers is let's say you want to change
the color of the cushion. You can do so very easily. Just select cushion layer, select Alpha Lock, and choose a different
color you can choose. Let's choose maybe this
very bright color. Select the solid fuel brush
and just draw over it. And when you draw over it, you will notice that the shadows have been retained because
the shadows are actually on a separate layer
and the shadow is multiplied onto the
cushion colors. So you can actually change
the cushion to which app or colour you prefer and
you will retain the shadow. You can do the same
for the arms as well, because the arms are
on their own layer. That's hide the reference
because we don't need that anymore or you can use the
trash button here to trash it. Let me just hide
11. Using Patterns and the Transform Tool: Okay, so now let's import the pattern that we have
created onto the cushion. So open your pattern file tab here on the Options panel
and tap or select Export. I'm going to rename
this fall as any moles. I'm going to choose the format PNG because this format allows me to save the background as
a transparent background. And I'm going to disable
this background here. If you choose to save this with a background, the
background will be white. But I don't want a
white background. I wonder transparent background. So let me disable that and
Export this into your gallery. If you go into the folder
that you have saved, fall to, you can see this
file will look like this. And the background
is black because it's supposed to be transparent
and now it's white. Let's go back to the
drawing with the chair to create a new empty
layer and select that layer and select
the fill tool, select the peptide that
I have created earlier. And that's create
the pattern again. This time I'm going to have
like way more Animals. Okay? Once you're done, tap on the tick here to
apply the pattern. So now if you, Let's tab on to take care to
apply the pattern as well. So now you can see this repeated pattern which
you can actually skill by selecting the
Transform basic tool. So now I can scale
this pattern here. Now that the pattern has
been important and Resize, we need to apply
onto the cushion. And we may need to do this for backup in
case things go wrong. So let's duplicate this as a
backup and high the Backup. Remember earlier I saved artworks with
transparent background. That is why we can see that transparent
transparency here. So if I change the
color of the cushion, if I select here to change
the color up the cushion. Now you can see I have to
transparent background. I can change the color
of cushion very easily. Let me just undo that. So now I want to select
the layer with a pattern, select the Transform tool, and change the Transform tool
from basic to this thought. So that I can distort this transformation
to make sure that the perspective matches the
perspective of the Chair. And once you liked
transformation that you see tap on the tick
here to apply. Okay? So we need to erase or hide the animals that are
outside of the cushion. To do that is very simple. We will use a Layer Mask. To use a Layer Mask, we will select the
cushion layer, tap on a cushion layers
name and tap here to select a selection
will be created based on that layer,
that cushion layer. And now on the layer
with the pattern, tap on the name and tap
on the Mask button. Once you select
that mask button, the pattern will be
pasted into that mosque. Or should I say, the Animals outside
will be masked away. Now, if you want to
make adjustments to it, Patterns odd, you
can still do so. Just select the layer
with the pattern Art, which I'm going to rename
right now to bet on Kushan. Okay? So once you have
selected that layer, you can use Transform
Tool to move this around. And notice if you
move it around, it doesn't look right. So let me just undo
hopes, do and do. Okay. Let me apply here. So what you need to do is
to tap on the layer mask here and tap here to unlink. So once you unlink, you can select the
pattern again. I've to Transform Tool and
you can move the Art around. You can also skew the Art. If you want to. Let
me use the basic. Yeah. You can also
skew the artwork, the pattern that you
want to rotate it to whichever angle you like and just reposition
this onto the chair. And once you like this, just have one does seven button. I notice there is something weird happening here. Oh, okay. This is actually
the elephants, but One thing to note
is the perspective for this part here is
not exactly correct. So what you have to do is duplicate the Backup
pattern layer again. Let me just duplicate it. And you have to mask
out this area here. Select the mask. And I'm going to use the brush. And I'm going to use black. Yeah. So once you use
black on the mask layer, you will mask out
all those Animals. I'm going to mask out this part here because this is the
perspective that is wrong. The perspective here
is correct because this perspective matches
just perspective. Yeah, so let me
just must this out. And now let's make the pattern
for this cushion visible. Just tap here on the eyeball. And if you find is
too complicated, you may want to hide
the other textures. So let's transform this again, make sure you select
the correct layer and tap on this thought. And now, oops, now you can distort this to the
correct perspective. Okay, just try and get
that perspective right. If you need to move it around, change the Transform
Tool to basic, and move it around. Okay, I think this looks good. So let's apply. Once again, we need to create
a mask for this. So we'll use the
cushion layer again. Select cushion layer, tap on the Select button and tap
on this pattern layer, tap on it again and select Mask. And now if this mask, we will remove the
textures here. So I'm going to use solid feel
black to remove this part because we already have
the pattern for this year, which we, which we will
enable by tapping here. We need to erase
this part as well. Okay, so let's have a look. Now. This looks alright, uh, to me. The perspective
of the Animals on a cushion looks alright to me. After I zoom out to
look at a Chair, I'm not sure if Greg, colour for the fabric. Actually, it looks nice. So I'm going to create a
variation for the fabric color. I'm going to duplicate
this gray fabric layer, duplicate, hide the
original fabric layer, the cushion layer. And on the new cushion layer, I'm going to tap here to
create an Alpha Lock. So now I want to use
the solid fuel brush. I'm gonna use this shadow colors here and maybe
lightened shadow color. Today's color. And I'm going to draw
over the fabric. So I think this works. All looks bad. Anyway. Now I have two
versions to compare. So you can create as
many variation for the fabric as you like. Next, I want to tap on the
new cushion layer to rename this cushion as quiet cushion H. And for the other layer
I'm going to call it, I'm going to rename it again
and call it cushion gray. When you look at your
layers palette now you can see many layers. To help organize your layers. You can create a group or layer folder for
all these layers. And in this case I have the Line Art and colors
and shadows for a Chair. So it makes sense to
group all this together. There are two ways
to group the layers. The first way is to use this pinching action to
pinch the layers together. Now the layers are
in this group, group one, and you can
rename the group later. The second way is
to select one of the layers and tap
here to add group. The second layer to
creating layer groups is more suitable if you have
layers all over the place. So now that I have
this layer selected, I'm going to tap
here to add group. I'm going to add Line
Art into the group. Just drag and drop that layer
into the group and arrange the layer accordingly because somebody who has
have to be above, as some have to be below, the sequence is
actually important. So take your time to arrange the layers after
DR. insight group. And now you can make
this long list of layers shorter by collapsing
this folder. Just tap here on the Folder icon and this will collapse
into the group. Remember to rename the group, I'm going to call it is Chair. Okay, and the last thing
I want to do is to tap on the top most layer to create an empty layer to
protect my artwork. And that's it for this project.
12. Crop, Resize and Export Your Art: In this lesson, I
want to show you how you can export your
artworks so that you can share them online on your social media
pages or on your blog. The first thing I want you to do is to duplicate an artwork. It can be any artwork
and opened a duplicate. So in case anything goes wrong, you have your original
to fall back on. So we have the chair again. Let's open up the Tools menu. And on the second page, I want you to look at the
canvas options crop lets you remove unwanted or
unused space on your Canvas. Resize, Let's see, Resize the
resolution of your artwork. Street turn allows you
to rotate your canvas so that everything looks right. And panels allows you
to draw comic panels. Let's see what you can do
with the straighten tool. So select the straighten tool. And now you can drag left or
right to rotate your canvas. And once you like what you see, once you get the
correction right, you can tap here to accept. And if you need to undo, you can always tap here to
undo or use two fingers. To do. The other way to rotate
your artwork is to select all the elements and use the basic Transform
tool to rotate, in which case you
will only rotate your artwork but not the canvas. Next we'll look at
the Resize tool, which lets you do two things. You can either resize
the resolution of your artwork or you can
add more canvas base. In this case, it will add more
whitespace around a Chair. So let's see how
you can do that. Select the Resize tool, and depending on
which mode you use. And you can change
the mode by tapping on this lock button here. It will either change
the resolution AKI, few more canvas space. So just tap on the lock button there and
we will see what it does. So this allows you to
add more canvas space, and that's increased
a canvas space by this much per help. And tap here to a set. You may notice there
are some artworks here from the Animals. Artwork. That's because after you Resize, you will notice that this
area here is not masked out. So if you want to
mask out this area, you will have to create
a new a new mask. You have to apply the
mask over that area. So I'm going to select
the mask and I'm going to draw over this area here. And okay, now it's done. So now that is gone. Now you have more
space to work with. Should you want to add more
elements to your artworks? Let's go into the Resize to again this time I want to
change the resolution. So tab here and tap
on the lock again. So right now the
resolution is 2555. When you tap on the
law and you Resize, now, you will see the resolution
will update instantly. So this will allow you to Resize the resolution to whichever
resolution you want. And should you want a
very precise resolution? You can tap on the number
here and enter the number. Right now as I scale, the aspect ratio is locked
to this square format. If you want to unlock
the aspect ratio, you can do so just have on the link button and
now you can unlock it. But in this case it
just transforms or scale the image
which I do not want. So let me just do and
tap here to a set. So let's say you have a lot of whitespace now
that you do not need. What can you do? And that's where you
can use the crop tool. So tap on the crop tool and
the same grid will appear. So now you can adjust
the crop to the, to remove the whitespace. And notice as I adjust the crop, the aspect ratio is not a lot. So if you want to lock
the aspect ratio, tap on the link button. But now it's too late
to tap on the link. But then because I have
already moved crop, so let me just
cross to cancer and go into crop mode again
and tap on the link. But then, first. And this will lock
the aspect ratio in this case to the square format. And let me crop with
a square format. If you want to crop
this to a rectangle, just tap here to
unlink and adjust, adjusted crop to the rectangle. And once you'd like what
you see, tap a set. So this is composition
doesn't look good. So I'm going to undo
and I'm going to crop this using the link. But then here, crop it back
to that school web format. Alright, so now I have
an image that I like. And to export this, I can tap here on the
Options button and type here to export each file format
here has its pros and cons. With P and G, you will get
the highest image quality, but the file size will be
quite big for sharing online. One nice thing about
P&G is you can choose to save a transparent
background. The next format is JPEG, which is a very common format. And this gives you the
option to compress your artwork to a
smaller file size. And usually I will go with 60 To 70%. So one downside of
Infinite Painter when it comes to
exploiting files is as you track
compressions slider here, you cannot see your
artwork update instantly. So after you Export, you have to check your
artwork to see whether you liked the image
quality that you see. If you don't like that, you have to come back to the
Export page again to choose a different
compressional limit or quality and Export
again and check. The next file format
is Google's web P, which gives you a
compression options, as well as the ability to save
a transparent background. The fourth option is
Photoshop file, PSD. So this will save your
Infinite Painter file with multiple layers
with the layer mask. However, depending
on which version of Infinite Painter you use and which version of
Photoshop you use. Sometimes you may not get all those layers to
come out correctly. But this is definitely the
layer or the option to choose. If you want to work
with this file on another drawing software. And we have zip format, which will export the layers as multiple PNG files and zip
them together into zip file. So inside the zip file, all the layers will be saved as a separate files and
you will have to check to see whether the layers
have exported correctly. So let me just open
this file here. I'm not sure why, but
the first image you saw earlier was
completely blank. So this looks like
the shadow layer. This is the Line Art layer, and this is the color for wood. This is the color
for the cushion, and this is also the
color for the cushion. The last two file formats are Painter project and template. So if you export your artwork
as a Painter project, you can actually open fall using Infinite
Painter on another Tablet. And now that you have a
separate Painter project file, you can also choose to backup that fall onto external storage. And lastly, there
is the template. So you can create a template with Infinite
Painter that you can reuse over and over again, especially if you
need to work with size that you use
quite frequently. So for this fall, we will choose to
export it as a JPEG. And I want you to export it at 100% and Export it
at 70 per cent. Just to compare the file sizes after you have
exported your artwork, will look for your artwork
inside your folder or inside your gallery
and open one of the files to take a look at the file size and also
the image quality. So this phone has a
full size of 209 kb, which is, I'll say good
enough or sharing online. And the quantity
looks pretty good. Let's look at the next file. This file is 766 kb, so this value is more
than three times larger in terms of file
size compared to this. Far from what I can see, I don't really see any
difference in visual quality. So it's actually better
to export this file at 70% compression to
save on the file size. And this will also
mean your artwork will look much faster online. If you'd like to
export that artwork, you will see you
can now share it on your social media
pages or on your luck.
13. How to Backup Your iPad: This lesson, I will
show you how to backup your artworks if you use Infinite Painter on an iPad and if you use and
Android Tablet, you can skip this
lesson and watch the next video in state
four, Android tablet users. So having a backup is very important because you
really do not want to lose the months
and years that you have spent creating
the artworks. So on the iPad, there
are two backup options. You can choose to
backup the Tablet wireless lead to iCloud, which is an online
cloud storage service provided by Apple, which
is subscription-based. So you have to pay manly, but it's really worth the money because you can backup
everything on the tablet. So on the iPad, just have on your username and tap on the icon option here. Now, assuming you have subscribed
to iCloud and assuming you have enough storage
from your iCloud, you can tap here iCloud backup. So attempt here on this toggle
to enable iCloud backup. So after you have enabled
the Backup option, you have to type
here to Backup now. And the backup process
will take a long time. And after you have backed up, your Tablet, backups
will appear here. So if for some reason
your Tablet is stolen or is damaged
beyond repair, you can get a new iPad, sign-in with your Apple
ID, enter your password, and everything, including your
artworks will be restored. So this is a pretty
straightforward Backup option. If you do not want to use
iCloud to Backup Your iPad. A second option is to
Backup Your iPad to a computer using a
cable connection. If you are using a computer
that's running Windows, you have to use the app, iTunes. And if you are using a Mac, you can use whereas finder for Backup using the iTunes
software on Windows, you first have to
select your tablet, then go to the back GFS section and under automatically backup, choose to backup to this computer and click
here to Backup Your iPad. And in the future, sure, you need to restore to a new
iPad or to a repair iPad. You can tap here, I'll click
here to restore backup. If you wanted to
Backup Your iPad to a computer and just
make sure you have enough storage on your computer if you wanted to Backup
Your iPad using iCloud, that's great because
the background will happen in the background
automatically for you. If you want to Backup Your iPad manually
with a compute her, I recommend you set
up an alarm with Google Calendar so that
you will not forget to Backup Your Tablet
Monday so that you can remember to Backup
Your tablet regularly. Now, there's one other very
important thing you need to know when it comes
to backing up. If you want to
delete or uninstall Infinite Painter
for some reason, maybe the app has some features and you want
to reset the app by reading, installing it, and you
choose to delete the app. All the artworks within
that app will be remove. All the artworks will be lost. If you want to restore Infinite Painter
with those artworks, you will have to
reset your iPad. You will have to wipe out
the iPad and set this up as the new Tablet sign with your Apple ID to
restore everything. It's not possible for
you to restore just that one app and
falls within the app. You have to factory reset your iPad and restore
everything using your Apple ID. So that's one very, very important thing
you need to remember. As long as you Backup
Your iPad regularly, you don't really have to worry about losing
your artworks.
14. How to Backup Your Android Tablet: Now let's see how it can
Backup and Android Tablet. There are many companies
selling Android tablets and backup options provided by
those companies may differ. I would highly recommend
you Backup Your Tablet using those options
provided by the company. But you should also manually backup the fowls a second time. And I'll tell you why. For example, with
this Samsung tablet, there are three backup options. You have some, some cloud, Google Drive and backup
to external storage. For some reason. Some, some Cloud
and Google Drive, not backed up the whole Tablet. More specifically,
they do not backup the files saved within the abs. So to backup the whole tablet, to backup everything
you have to choose to backup to external storage. So I've connected
and external storage to the USB port here, and I'm going to tap
here before you Backup, make sure to read up on what's
actually being backed up. So here it says it's going
to backup everything. So now I can tap
nicks and everything will be packed up onto
a disk external drive. Now, based on my experience for some reason when I tried to restore the content from this external drive
to a new Tablet, not everything was
restored over. So some of my artworks from Infinite Painter will
not restart over. Which is why earlier I said, you should always create another backup in addition to
the one that's provided by the tablet shown on the
screen right now is the exact location where the Infinite Painter artworks as taught on the Android Tablet. And this is the
folder that you need to backup because this folder
has all your artworks. Let me show you where your
artworks or more specifically. So open infinite Painter folder. And depending on the
fowls app you're using, you may or may not be able
to assess the folder. If you cannot assess the folder, you may have to connect
Your Android Tablet to a computer to assess your
folder from your computer. So let's find where
our files are opened. Infinite Painter
folder, go into files, Infinite studio into
the Painter folder, and go into the projects folder. So this is where all
your artworks are. This is the folder that
you should backup. And if you use
other drawing apps, I would recommend you
Backup those folders as well just in case you
need them in the future. The app that I'm using
here is called soda Explorer and is a software
and it's pretty good. So to Backup this folder, just tap on it and
tap here to share. And now we can pick this up onto Microsoft OneDrive or
Google Drive or Dropbox, and from this long
list of options here, you can also choose to save that folder onto
external storage. If you use the default
files app from your Tablet. That false app may not
be able to show you the Infinite Painter
folder because that folder is hidden somewhere inside
the Android system. And you need special
permission to see that folder before you can even select a folder for Backup. So that's why I prefer to use this app called solid Explorer. Or you can just
connect your tablet to a computer and use your
computer to copy the folder. Outfall, backup if you need to delete or uninstall Infinite
Painter for some reason, maybe the app has a
glitch and one way to solve is to delete an
install Infinite Painter. Again, there is one very important
thing you need to know. When you tap here to uninstall, a pop-up box will appear asking you whether you want
to keep your app data. And yes, you will want to keep your app data because
these are your artworks. But before you delete or
uninstall Infinite Painter. In addition to this, I want you to Backup Your
Infinite Painter folder to an external
storage just in case. So these are the
steps you have to go through to make
sure that you have properly backed up your artworks
15. Your Homework: We will get better at
drawing and to help you get more familiar
with Infinite Painter, I have provided you with
some reference images that I have found online for
your practice purposes. So let's take a look
at some of them. So this is the Chair from
the earlier project. You can try to draw this person who is
seated on the chair. You can draw a portrait. You can also draw your desktop or your kitchen tabled Hall. Let me show you that
artworks that I have created using the reference images. So this is the person
seated on the chair. And I have created this drawing with Line
Art and colors beneath. So for the person, I have used black lines
and for a Chair I use this orange line and I
added the colors beneath. Now for the coloring, I actually painted
the shadows on the same layer as the colors. So if I need to change
the color of the shirt, it's going to be more tedious because I will have to repaint the **** and
add shadows again, which is why it's better to just colored shirt on its
own layer and have the shadow on another layer
and just multiply the shadow over the **** where you can change the color of
the shed very easily. And you may also want to separate colour for the intro
on its own layer as well, and also the colors for a Chair
on its own layer as well. Now if you find is drawing
too challenging for you, you can always create
a draft burst, like what I've done here. So this is my quick drive. I then reduce the
opacity for the draft. So this is how it looks, just basically to help me
get their proportion right, to help me feed the
drawing onto the pitch. Because sometimes when drawing, I find that I tend to draw bigger and bigger
and I run out of space. So having that dropped later can really help you feed your
drawing onto to pitch, to help you draw at
the correct size. Let's take a look at
the under sketch. So this is a portrait, and you can see my style is
very stylized, very simple. Let's turn off the colors. So this is the Line odd. I use a single brush to draw
the thick and thin lines. Now when drawing the scarf here, make sure you create the
illusion of overlap. And to create the
illusion of overlap, you should have all this
OBS or this T sections. There's all these cross sections like this cross-sections. So when you have
the cross section, you will know which is on top of which pediment is on
top of which elements. Now for the coloring, this is again, very
simple coloring style. I just painted colors and the shadows on
the same layer in. So again, if I need to
change the color of shirt, will have to repaint this part. So for this particular image, it may be better to separate
a scarf on its own layer and separate the dress
on its own layer and also their skin hood and
the hair on its own layers. But this is just a quick sketch, so I'm just painting everything
like that in a very, with a very simple style. This is how my background looks. That's a very simple
background just to create a contrast with details
versus the lack of details. This is my computer table. So this is just a very simple
black and white sketch. This is the Line Art and this is with some black
and gray is added. And I have created a dropped for this as well on a
separate layer a year. And this is a drawing of a Tree from ground level looking up. Let me show you the Line Art. So the lines were created with this brush with a
lot of texture. And if I remember correctly, this brush is called dry inker. I want you to go into the
brush library to look for your favorite brushes
and at dam to the Favorites folder so
that you can reuse them easily so that you can find
them easily in the future. I have also added textures
on to the tree trunk And depending on
a Tablet you use, you may be able to get
some cute with your head. What I mean by tilde is when you draw with
a pen vertically, you can get the thin lines. But when you tilt
the pan at an angle, you can get those broad strokes. So you can vary the angle of the pen to
get you the thin and the extra brush strokes
in addition to the pressure sensitivity
that's already provided by the pen. So let me add some brown
to the tree trunk. So this is how the color looks. Yeah. I have highlights on the left side and the
shadows on the right side. And I have use 12344
colors for the tree trunk. Let me turn on the lines in and I have leaves
in the background. The leaves were
drawn with shapes. So it not create a Line
Art for the leaves. I just use shapes to
suggest the leaves. So it's good to create a
drawing with combination of Line Art and also shapes to make your drawing
look more interesting. And this drawing
actually you can still look nice
without a Line Art. And let me put some
leaves above as well. So I have some leaves
on top as well. These are the leaves that
are above the tree trunk. And a tree trunk is above
the leaves at the bottom. Me turn off the Line Art again. This drawing can
work with Line Art. And lastly, I have
to sky beneath, which is created
with a gradient. So this is how to sketch looks. I wasn't able to find a
reference photo that are used for that particular
tree drawing. So I have provided you with to the Tree images they can use. Now for this tree, you can see the tree trunk is
actually kinda dark, but this is digital painting
we are talking about. So you can always make this much lighter and apply the shadows, add the shadow areas. This flowers, these
flowers on these leaves, this looks like flowers. Anyway, you can make this
the US, if you want to. You don't have to
draw them as flowers, but you can draw them as
low as if you want to. This is a quick sketch of
my daughter sketching. And this is my younger
daughter with slipping. And this shape here
was created using the dad breeze FIO2 with
the Debra's view to, you can actually get some
texture in the shape, which can make your drawing
look more textured. The more you draw, the more familiar you will be with using Infinite Painter. So definitely get as
much practice as you can
16. Outro: We are now at the
end of the cost. I hope you have enjoyed
the cause and hope that you are now more familiar
with Infinite Painter. The basic tools, techniques, and Digital Art workflow. Don't forget to shower me Your Art projects
because I would love to have a look and see
what you have created. And if you have any questions, feel free to contact me before you go to live
this course and review to help other students
find is cause and also let other
students know whether this course is useful or not. And if you have any suggestions on how I can improve
this course or suggestions for future courses that I may make for
Infinite Painter. Let me know as well
in the review. Thanks for watching.
Thanks for following me. See you guys in the next cos phi
 Teoh Yi Chie, Sketcher, watercolour lover