Transcripts
1. 001 Course intro: Hi everyone. My name is Mara hussein. I'm a 3D artist and today I want to share with you my
new blender course. And this course we will
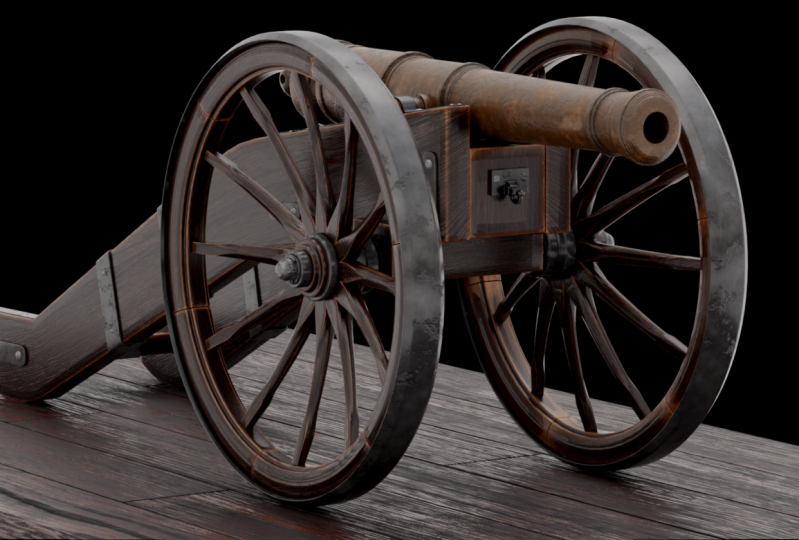
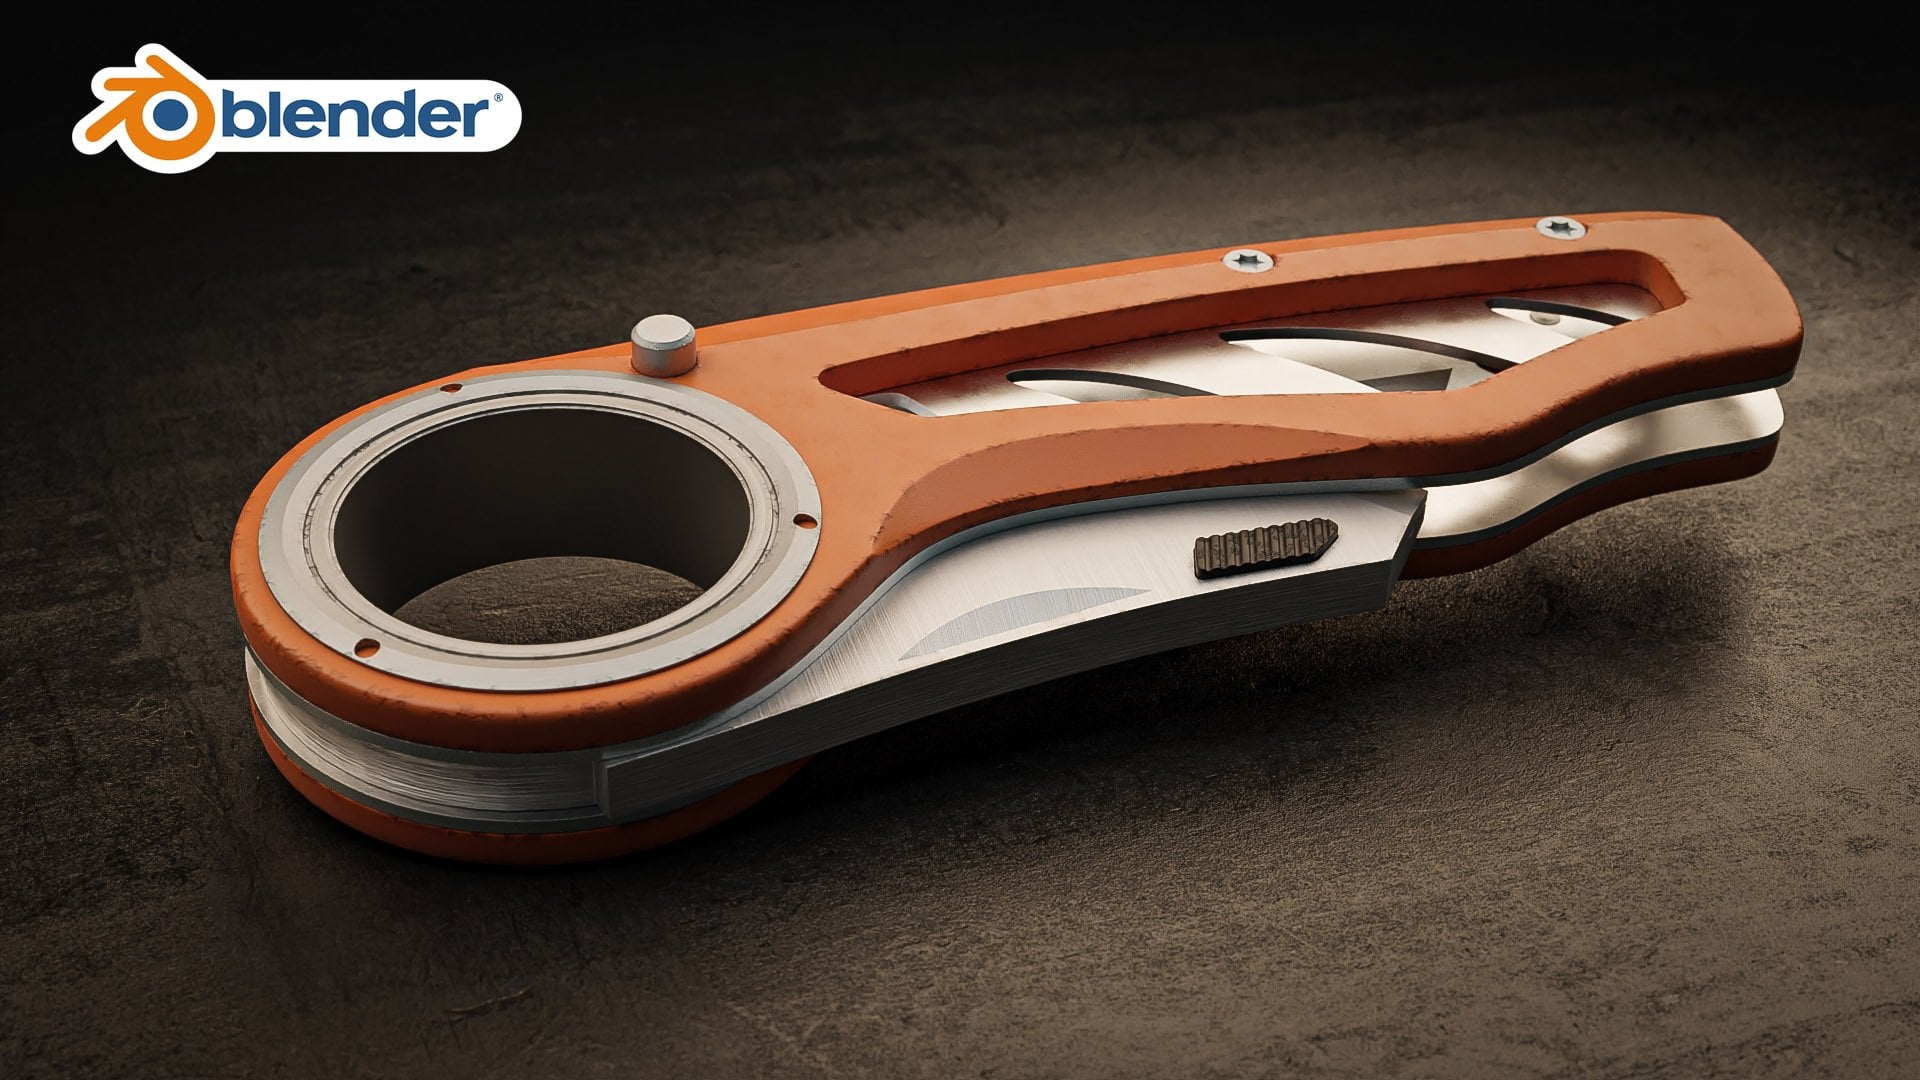
learn how to create this cannon from
start to finish. As you can see, we
have a lot of details. And step-by-step, we will learn how to create all of
that with the blender. The result that
you see right now, it's the final render results. We will use cycle tool or
under the final image. And we will use compositor to post-process the image
and make it ready. I have multiple images. Let's see them together. As you can see here, we
have a lot of details. Then materials looks
nice and the realistic, we will learn how to create the metal material or let's
say realistic material. And how can we add them
bumpiness in specific places? And how can we add
darkness between the crevices to make the
result looks realistic? And the same scenario
for the world, as you can see. The edges, we have
imperfection and we have some variation that we will learn step-by-step
how to achieve that. And for the modelling, we will model all of the
details that you see right now. And after the modeling, we will rub the whole canon to make us ready to receive the texture
and the correct way. And after the rubbing, we will start creating
the material. And as you can see, this is the final
result of the material. When the material
section is done, we will use HDR image to
illuminate the scene and we will make our final
render using cycle engine. When Darren there is finished, we will go to the
compositor to make some post-processing
editing to the image, to make it looks nice and
ready for hearing this, browse the other images. All right, as you can
see, we have a lot of details and it is
looks realistic. We will learn how to use ambient occlusion technique to put some bumpiness
in specific places, as you can see here. In this area, for the
backside of the payroll, we have some bumpiness
in this area. And we will learn how to create a specific mask that could help us to achieve
something like this. And we will do
that step-by-step. In this same scenario, we will use it on the ward
and on the metal material. This, as you can see here. Alright, let's go
to another image. We will learn how to use
depth of field inside the blender to
achieve nice focus, render or image like this one. Alright, this is another
clause short here. You can kick the details. Even if you have a clause short, you will still have
very nice details, or let's say very
nice result here. Alright, this is
another chart here. Alright, I think that's it. If you find this result
nice and beautiful, you can join me today and
let's create this together. Alright. See you inside.
2. 002 Before you start: Hello everyone and
welcome to this video. Before you start,
I just wanted to mention something
important here. At the bottom, I will
leave a folder there. I will call it project folder. Inside that project folder, you will find some folders
and materials here. Blueprints. Alright? That these images are very helpful if you want to, if you want to use them
to create a Canon. I have the back, front, left, right, top view, all
these images here. And I have the final render. If you want to check
the final results, all of these images that I
made, you'll find right here. And I have the reference images, all the images that I used. I put them inside
this folder and I have a folder for the ticket
sure. All the tickets Sure. I use you'll find
them right here. And here you have
two blender file. This is for the final result and is for the
modelling section. And here we have this
tool is called PRF, this file and satisfy all, find all of the
reference images. You will find them
here and here as well. But if you want to
open this tool, you will need to
download a free tool. It's called purify. You can download this tool. You can have problems
the images like what I like this e.g. you can zoom in, zoom out. You can move some
images and you can double-click on any image
and famous, alright, e.g. like this, and hit
double-click and zoom back. So this tool is very helpful. I advise you to use it. So download this tool from pure ref.com and try to use it. This is the website
of pure of tool. Just go here and
hit get the pure rough or you can go to
the download section. And after that, you will find the download button to
download this tool. So I guess that's it for this video and see
you in the next one.
3. 003 Modeling Adding the referace images to start the modeling: Hello everyone, and
we'll come back here. Alright, let's see how
can we create the Canon? Okay, I have this folder. Inside this folder, I
have a bunch of images. I collected them from the Internet and I have
this image, very nice. It's opening together. I got some information here, the length of the camera itself, and I don't have much
information here. Just this, this
piece right here. And maybe by using the
scale as we have here, I think we can, I
guess the size of the other parts list for now. And let's go to Blender and maybe we can
open a new window here. And it's triggered
us to image editor. Or actually we can
do something else. We can sublet this
to two, sorry. The sublattice to two. And let's switch this
window to image editor and let's drag and drop
the image right here. And for any reason, if we
want to maximize this, just drag this and the closest. Alright, It's very
nice and beautiful way to navigate your image. All right, so now we have the
scale of this, the canon. And it's about 1 m, or let's say 1.5 meter. Okay, let's see how can
we start with this piece? I think we can bring it here
inside the 3D viewport, and I don't need all of these, we can delete them, just
hit a to select them, and then hit X to open the delete menu and
hit D to delete. Or you can hit delete if you
like. Let's go to the front. Just hit number one
from that I'm bad, or you can go to view and the view port
and front from here. Alright, let's go back
to the same folder. Just drag and drop
them in here and say, Alright, so now we
have the image, but it is not in the middle. That's not a problem actually, but I will put things
in the middle. Just selected and
hit Alt guitar, say that but I think I need
to activate secrete Karski. Alright, now whatever
button I will praise. You will know it. So I will hit all the key
after selecting the image. Tourists sets the location. Because if I go here
to the bottom right, as you can see, we have
a number here and the x, the image goes to the
X-direction about six meter into the
z-axis, about 1-meter. The middle dot here
and at the center. So any tourists right here? All what I want to do is
hit Alt key, and that's it. As you can see. Now all the x's becomes zero. That's cool. What else? We need
to add a guide here. Let's take this back
just a little bit. Tumble around and hit G, and push this back
to the y-axis, you need to hit G and then y. To book this to the y-axis. Or you can activate
the gizmo from here and the crop it gives myself and
move it to the other. I feel like I've taught it. That's because the 3D
cursor is in the middle. I will add a new geometry
and this dough to add. Actually, I can go
to the front and hit Shift a to add and
let's add e.g. what? A cylinder maybe. Now
we got a cylinder. And because we are
in the front view, I can open them in you
right here and go to Alignment section and
align this to the view, to rotate this
cylinder to the view. I can't rotate it to the x-axis, but this idea to be faster,
something like this. Alright, so that's cool. Or actually I can leave it. Yeah, I can leave it. Shift a and add the cylinder and rotate it to their y itself. Ry 90-degree, something like this to
align it to the image. And let's give this length by using maybe the
dimension here. So this is the dimension to the Z and this is two the
y and this is to the x, as you can see here. Don't forget, we are rotated
the cylinder because of that these ices are not matching the dimension that you
see here in a few board. Anyway. So now we know that if
we move the z-axis, we will have scale
to the x-axis. We need to add this number
right here, 1.53 meter. So let's add this. Alright. Now with the dimension is the skill
according to meters. We can think that if you
like for any reason, you can go here and go to Units, and go to length and the length to whatever option
here you want to pick. Okay, Let's go back here
and let's add in the z, 1.53, 0.53, and then hit Enter. And now we got the
skill for the x and y. You can grab them like
this and maybe you can add any number because this
is just like Guide. E.g. I. Will add points 1515 centimeter. And that will be good
and okay. All right. Now what's next? Now this cylinder
become our guide and we need to scale the image to
match the cylinder size. I just need to scale the
crop the image Farris, and then I can go to
scale it from here and scale it by
using this circle. Or I can stick with this option select box and
just hit S to scale the image. And it gets to move it
and let's match it. Or something like this. By the way, you can
do a nice trick here. I can, by the way, I just need to make
him something. The dimension from this edge
to this edge right here. Alright, from here to here. So what I will do is I will
move the image in a line, that image right here and this
area, something like this. And I will go to transform pivot points and its
readers to 3D cursor, because I need to scale
according to 3D cursor. If I make us care right now, the scale works according to
the point that I have here. But if I switch
this to 3D cursor, the skill will work according
to the 3D cursor position. Okay, now, 3D cursor
is right here. I will move it two inputs here. Okay, to do this,
just hold Shift and then right-click
and click here. And now 3D cursor become here. Now if I make us killing this killing bulwark
from here out. Alright? The idea, so it s
until this edge, match this edge here. All right, Now we got
the correct scale. As a PR thing. I've taught her that
I need to trace the image here and create
all of the details. And by the way, just need
to make him something. I collected and images
from the Internet. As I mentioned recently, I got a nice tool is
called pure ref tool. I collected all the images
inside pure ref tool. Okay, let's go to bureau
for endless openness. Alright, this pure ref. And here we have all the images. And actually inside the
folder I have more images. If I crop them. Let's move those just a
little bit, maybe right here, and maybe I can hit Control a to select all the images
and drop them here. As you can see this how to work the pure ref, it's
very nice tool. Alright, if you use the
middle mouse button, you can pan, rotate the wheel, zoom in, zoom out. You can select one
image and move it in any place you like. You can scale any image, e.g. I. Can grab this and
scale it like this. Or I can hit Control with Alt and left-click and move
the mouse to the left. Arthritis scale it. I can hit Alt Shift
and left-click to flip the image to the
side that I want. And it's very nice tool. So, yeah. Alright,
That's very cool. Alright, I have all of
these images and I can pick any one of these and use
it as a reference for me. But I'm not going to
focus on one model. I will focus on all of
them and pick the idea from them and creates my Canon. Okay, let's take
this out for now. And maybe we need just to
mix some scaling for these. Alright, I think that's
what be better or at least move those here and
maybe club those, Control Alt and kill
those just a little bit. Maybe those here because
they are very small. And maybe we can club those Alt Shift and
scale those as well. Alright, now grab them
all and let's hit Control V to
organize them again. And maybe the big images we can club them and make them,
make them smaller. Maybe this one, alright, this one maybe, or maybe this
one alone, make it smaller. Club them again like that. Alright, let's select
those, move those away. We don't need them for now. Club those can throw be to organize them like
this. And that's great. Okay. Alright, let's focus on
this piece right here. I need to create something
close to what I have here. It's very nice and similar to the image that we have here. So we will use this, okay? By the way, we have
some duplicate images. We don't need them, e.g. those we can delete them. This one, this one right here, this one here, and
whatever else. Right? I think that's all. Let's kill those
just a little bit. We want them to be big. Alright, this one,
we don't need this. I just delete it. And
what, what about this? Alright, let's put
this right here. All right, That's cool. Yeah, We have two of them. Is delete this one as well. Can throw P in the
organism again. Those images, we don't
need them accurately. I will delete them,
just hit Delete. And I'll stick with those. Alright. Now I need to pick
this image and puts it inside the blender
to use that as a guide. Okay, let's take this out
and let's go back here. Now we have the guide. And I can use this one, or I can bring a new image
and use it as a guide. So we can add pure
rough right here. And we can make the tool pure of tool a little bit smaller
because we don't need it to take too much space
from the 3D view port. So in this case, e.g. I. Will assume just a
little bit to make this image at this size. And I will select it, hit Control Shift R to resize the tool to this image,
something like this. And that's very nice. I will put this right
here as a guide and I can flip it Alt,
Shift and click. I can flip it like
this if I want. I can use it as a guide. And it's almost similar
to what we have here. Alright, I will put
this right here. And let's start tracing
the image as we got here. Let's see from
where we can start. Alright, let's go to
the France and let's hit Shift a and let's
add plane maybe. Okay, now we have the
plant right here. What I will do it, sorry, I will hit G and maybe
I can move right here, scale it to make it small. Let's kill still rocking
according to the 3D cursor. We don't need that. Let's bring this
back to bounding box and tap to edit mode. Hit a select all the vertices, hit M to open them Erica menu, and hit me right to the center. Now we got just one point
here in the middle. Now if I hit E to extrude, I will extrude the vertex
and create another vertex. In between. These two vertices have an edge. So let's make one
extrusion just like that. And now let's go
to the front end. I will use this vertex
to trace the canon here. Heartless, extrude
this right here. Okay? And let's
explore this down, maybe here, and maybe
see what we got here. Maybe we need to extrude
this just a little bit. Go to the front. If number one, extra this right here. And maybe one down
just a little bit. Maybe when it's
written like that. When it's freaking
up. The idea here is just to trace the lines. Hit E and extrude
here e to the z, e to the x and the
x through this. By the way, I'm not hits x
and z when I make x true, can I use the middle
mouse button? When I hit E, I hit the wheel, press it, and go to
the x-direction. You will activate x-axis. You can use the Smith
or that it's very fast. Let's make one extrusion down to the sea and make a long
story can right here. One up, one like this. One here, another
one right here. And it's through
this right here. And now we have one
next week in there. Think of this down due to the
Z and move this right here. It's e to extrude, another
extrusion to the x, e to the z, another E here. Alright, keep doing that. Until you trace the whole canon. Let's see what we have here. Has a very cool hit E again, at least, sorry, Let's
go to the front again. It's easy to make shrieking
like this and like this. Something like that. Something like this. Maybe you want x region here. So now we traced this and maybe we can
club this vertex here, and he can move it. And let's put it right here
maybe or maybe here for now. Sorry. Well, this right here. Let's see how can
we create this? Alright, this area similar
to what we have here, we can create
something like this. In this case, I will hit E2
mixed extrusion like that. And one like this. Just maybe two-step. One extrusion like this. One again. Now I can grab those and
just select them like that. And hit G and move it just
a little bit to the x-axis. Okay, now I can crop
this vertex and maybe just extrudes right
here, and that's it. I will leave it like
this and later I will. Create the details have here. Alright, so now we
traced all the details. Okay, now let's see
what else we can do. We have all the vertices. As you can see here. The origin dots for
this line is here. This area. Alright? Origin of the plane when
we added the first time. When I need to do is I
need to move this origin dots up right here
in the middle. Because I need to use
a modifier here to rotate this egg around an axis. Let's assume that we
have a vertex right here and the origin dot here. If I use this modifier, the modifier will it
create a geometry around the origin dot? Alright, if I have the vertex here and the origin
dot right here, I will get a result like this. But if I move this away, I will have a result like this. So that depend on
the position of the origin dot that's been
any to take it right here. Because if I don't, I will get very big circle right here. I will get the correct circle. I think you've got the idea. Okay, now how can we do that? I will tap out. Now we are in the edit mode. I will go to object
mode and then go to the option
here and use origin. If I activate origin now I have the ability to move
the origin itself. I will hit G to grab and
move and specify the axis, z axis, and move the
origin dot right here. When you combine, let's just go back here and turn off the
origin, and that's it. Now we move that. Right. Now Let's select the image and maybe we
can hide this for now. Now we got this. Alright, That's very cool. What else? Now we can hit Control
a to apply the skill or anything, e.g. I. Need to apply the rotation. Alright, so hit Control a and the bladder are taken
up by the scaling case. We have any, any problem here. And now let's go to
the modifier list. And here we have a
modifier is called sick screw, just added. Now let's crew is
using the z axis, rotates the humerus, I need to rotate it
along the x axis. Let's use x and gather we go. Now we got something nice
here, as you can see. But don't forget, if we
move the origin dot away. Let's move this to the z. I
will get a result like that. Because of that,
I moved this up. All right, That's very cool. Very nice. And I applied the rotation
for the geometry too. Make sure when I choose
the axis right here, it will be applied
correctly here. Now I can move the canon
inputs in the correct place. And yeah, that's
it for this video. The next video we will
start adding details here. Okay, so that's it
and see you next.
4. 004 Modeling Creating the Barrel: Hello again. Let's see what's the next step. We have the screw modifier. And maybe I need to
see the wireframe. I can go here to the
objects properties and in the Viewport Display I can activate
wireframe from here. And okay, that is
all that I got. Let's go back to the synchro and here we have some options. E.g. this tip of
your work you can, if you want to create this, you will increase the number
of segments on the site. And if you do that, you
will have smooth result. But I'm not going
to increase this. I will hit Control Z. And here we have the angle, the screw and iteration. Don't mess with these. Just accept what we have here and then apply
them with the fire. Apply then we defer means. Okay, Thank you so
much. That's it. And we don't need anything else. Just go, alright,
I will apply it. You can go to this URL
and hit Control a, or you can hover
over here and hit Control a to apply
them with the fire. And now we got this result. Okay, I've started that, so let's make some
tweaking here. I am now in the object mode. I will tap hit tab from the keyboard to go
to the edit mode. And let's select these edges. Go to the edge mode,
hit number two, or you can select edges
from here, right here. And let's select these edges. You can select them one by one. Club the one, the first one, hold, Shift, grab the rest. How do you can hit Alt and
click to select the edge loop. When you do that,
hit E to extrude. And let's extrude this inside. What if I do that? I can't see the
extrusion length. This way, I will activate
wireframe or you can hit Z from the keyboard to go to the wireframe
and go to the front. And let's hit E to extrude this, and hit X to extrude
this to the x axis. And let's move this almost
maybe, maybe right here. Alright, and now
we have this tube inside and we need to fill this tube now
this tool, but it's open. If I go to the solid, hit Z and go to
solid, it's open. I need to fill it with
something so I will hit F with these edges selected, I will hit F to fill IT. Assets and maybe I
need to bevel it. Let's go to wireframe, as you can see now we have
it here in the middle. I will hit Control
V two bullets. And let's plot like this. You can rotate the wheel to
have more segments like this. You can add maybe, I don't know, two
and the middle. And then had lifted collect to accept the result. Overwrites. Let's close this panel.
We don't need this. Here's Z2 of the wireframe mode. All right, now let's
see what else we can do. Let's start from here. We have a curve
here that's being, I will select this, starts with this head can
throw me to bevel it. And let's pivot to fall, maybe. Just like this. And just make
it like a care of the crop. This one, alt click, Control V to bevel It's, and it's bivalent like this. Just eyeball it. And maybe I can
select those here. And it can throw all
be to bevel this. Yes, a little bit like that. And maybe I can grab this one. It can throw be to Buffalo it
as well. Like this. Maybe. Those here. I'll
click Alt, Shift, click Alt, you have to click
and select them, the ACLU. And maybe those, they should receive the same bevel amount. And maybe even those right here, Alt Shift and left-click. And now let's give them
a bevel can throw, be endless pebble them.
Let's add the three. Maybe that's enough.
And that's very cool. Alright, maybe this one as well, Alt click Control B. And let's put bullets
three, something like this. And maybe this one as well. Alt click Control B and move
the mouse to bevel this. And let's focus on this side. Alt click, Alt
Shift, click, sorry, alt click, Alt Shift
and click here. And Control V and
respirable dose. I think before we beveled those, I think I can go to Face
ID number three and hit Alt and click
here on this edge. The edge and the middle
select the face loop. This direction.
Because if you want, if you put the mouse
here and hit Alt click. We'll select the face or
this direction like this. But we don't need that. We need this alkyne. This case I need to be close to the edge here and then hit Alt. Click. After that, I need just to move these phases up
just a little bit. I will hit Alt and then
S and move them out just a little bit to push
these faces away like that. That's enough. I've started that. You can go to the edge, alt click here, all
you have to click here and then Control
V to bubble dose. And let's put them like this. Club, this one, alt click, alte of the Glick can throw me and Elizabeth
bulldoze as well like that. Alright, let's go here. Let's select these edges. Maybe and maybe, yeah,
let's start with those. Can throw a, b and let's
give them a level. And maybe those here
as well, can throw be. Do we need to target those? Sorry, just those here, control V and the volume. And this egg here. It's important to selected
alt click and ambivalence. And maybe we, maybe
we will add four here because we will use subdivision surface and
we need this error to be to be sharp. And we don't need any stretch when we add the
subdivision surface. Because of that, I added
extra years right here. I need this area to
be round and clean. Alright? Okay. I'm not finished yet here. Bots, I will add a subdivision surface
to make this smooth, and then I will go back
and make some fixing here. So I will tap to go out from the Edit Mode
to the object mode. And I will go to them modifier properties and open the list and add
subdivision surface. Subdivision surface. This modifier helps me to make the objects smooth like what you see right now if
I turn this off, this before and after, now it's become smooth, maybe I can add two level
to make this even smoother. And I will turn off wireframe. And as you can see
this as a result that I got here, right? You can accept this results or you can tweak
it if you're like. Okay, let me show you something. Let's go to them with the fire. And I will turn
this off and I will show you why I need
to turn this off. Let's go back to the
objects properties and let's activate wireframe. Now we have the wireframe, but we don't see the real
wireframe of the object. Okay, if I turn this off, I can see all the wireframe
as you can see, now, we have all the polygons that I got because of
subdivision surface. You can see here e.g. this polygons here are small as compared to the polygons that
we have right here. Because here we have
citric towards the middle. If I want to eliminate
this strike, I can add edges here
in the middle and that will help to make
these squares small. Alright, I need to add
an edge right here, e.g. right here, to prevent the stroke that I have
here in this area. If I touch this mode, look what will happen if I hit Control R to add an H here. And I will hit left-click
and move the edge. See what will happen
to the polygons. When I do that? How
would they are moved? So now I need to
add more polygons here or push more polygons
to this corner to make this care for a
nice without adding edge toward be stretched
like this or like this. But if I add extra edges here, that will be around
like this and nice and then go like that. So adding edges here
to support the corner, this corner right here. If I turn this off, you can see it's
this corner here. I need to add the
edge like this. So let's activate this, hits twice and move the air
can elicit 28 right here. Now we have more geometry
here and this area, the same scenario for
the site Control R. And let's add it here. Now as you can see, we
have more edges here. Now this area, nice and curvy. The same scene over
here, control are. Here can throw aren't
out there here. Okay, Now we got the idea
I can turn this off. I can see better. Let's hit can throw
off to attack here. And one here as well. One here, Control R
can throw off, sorry. Let's add H right
here and one here. And maybe we can add two
edges here in the middle or three just to make
this area, even when, when subdivision is activated, as you can see now the square
are a little bit even, but if I hit Control
Z and delete it, now we have huge
a sequence here. So if I add three, I guess I can help to make
this a little bit even. That's why Let's turn this off. All right, maybe
one here as well, Control R and maybe here, why don't I can't
add in the middle. And for this area, I think we don't need
to add anything. And for this side, well, do we need to
add anything here? I think we don't want
maybe one H right here as a support, a loop. And the rest is okay now this activated and let's turn
off wireframe tab out. Go to the object properties
and turn off wireframe. Okay, Now we got very nice, clean Kennan, I think. Okay, now let's see
how can we create these details selected
in tablet mode. And let's go to the edge mode. Hit number two
from the keyboard. Note from that I'm bad. Alt click to select this rank. And let's see how
can we create it. Overwrites. I will hit E to extrude that just
a little bit like this, to create this neck here. And then I will hit E to extrude this again
and then hit S to push the new extrusion up. I can turn off subdivision surface for
now to create all of that. And make another extrusion like this to create this edge here. And now I need to
create this bowl. So what I will do is I will make an extrusion
right here maybe. And let's see what
else we can do here. Maybe I can hit F to
fill this area and then hit I to insects like this. Just as I move the mouse. And maybe we can hit E to
X through this like that. And then hit I will make another insert and another
e to explore this. And now you can hit S from the keyboard just to scale
this just a little bit. All right, what about the
bowl that we have here? Okay, lets you create
this manually. I will hit Control R to add one edge and rotate the
wheel to add two here. And left-click to confirm and right-click to
leave it in the center. S to scale this just a
little bit like that. Yeah, that's cool. And I will just
activate subdivision surface and let's
see what we got. We can go to the front so
we can see the result. Maybe I can select
this edge and had key to the x and take
this back a little bit. Maybe this one as well. And maybe I can add one
here in the middle. No, I can't because
I will lose the care of I think it's very nice
to leave it like that. We don't need to focus too
much on these details. Alright, now let's add some support a globe to make
this a little bit tighter. E.g. a. Glove,
this alt click can throw me to bevel this to two, maybe two edges like this. Turn off subdivision surface Control R to support
this egg here, and support this a here as well. Can throw our list, add one H right here, and, and one here maybe. And here as well. Alright, that's great.
What about this area? Okay, I can hit Alt click
to grab the egg loop. And all, you have to click
to grab this one as well. And maybe this one as well. Hit Control V to bubble
dose to three edges. And what else? I can hit Control R to add one. Right here just to
support this one. That's cool. Now let's activate
the subdivision surface. How about we got this result? Actually, I can go to the front of you at number
one from the number and type of the
ethmoid that can hit Z to go to wireframe
and hit somebody. Or I can go here to
select these vertices. I can grab all these vertices and move them just a
little bit like this. I think that will be better. And then tab out
and z to excite. Alright, That's very cool.
Now we got very nice result. The guy that we have here, we don't need that anymore,
so I will delete it. And alright, we
call this result, and it is nice and I like it. Alright? Alright. I will end this video and
see you in the next one.
5. 005 Modeling Creating the trunnion: Hello everyone and welcome back. In this video, we need
to learn how can we create the trillion
that we have here? They call it the training. Okay? Okay, okay, okay. Let's go to the front. Let's see, do we have information
about that and damage? Will? Okay, we don't have information. Where are the 3D
cursor is right here. I can put the 3D cursor here, hold Shift and right-click and put the 3D cross right here. Hit Shift a and
let's add maybe you can start with a
cylinder is very big. Let's go here and the
vertices I can add 16, I think that's what will
be enough for me to start. The radius is very big. I can change the radius. Omega is very small. The depth that too much I can make it small like
that and that's it. And maybe I can align
it to the view because I'm looking at the scene
from the front view. So I will switch to that
alignment to the view to rotate the cylinder
towards us like that. And they will accept
it, yes, close this. Let's zoom in a little bit and you will use in my eye just to see if that fits what
I have here or not. Maybe, I don't know. Do we need to scale it? I think that's okay. As a start. Let's move this right here out and maybe you can scale
it, make it small. Something like this. When you do any scaling gets hit Control a to open the apply
menu and apply the skill. Because sometime if
you don't do that, you will get some problem. Okay, now I will hit
Tab you though to the Edit Mode tab and go to the face at number
three from the keyboard. Select this face and then it's
E to extrude it like that. Somebody like this
maybe, maybe right here, and hit alt, click here
to select these faces. If you click here, you'll
select these faces. But make sure to select
one of these edges. But the most on it and hit Alt click to select this face loop. Okay, now I need to extrude
these phase out like this. If I hit E, that's not going
to work because I will have just one that I can Control Z that's
not going to work. I need to open the
extrude menu to do that, unit to unit to hit Alt with
E two omega extra menu, and choose extrude
faces along normals. And not. When you select this option and move the mouse up, I
will have this result. Because through those just
a little bit like that. And maybe I can hit Alt
click to select these faces. And more of those
just a little bit. Somebody like this, I just
need to give this a thickness. Alright, that's great. Now what we need to do, well, now I need to move these faces inside the, the Canada itself. I think it seemed that
pyrrole, this one. All right, to do that, actually you can
select one phase and you can hit Control with the plus from the numbered can throw with
blas to grow the silicon. I think we have it right here. I don't know where. But alright, should be here. More control with them. But plus to grow the silicon. And you can actually
push it inside, feel like like this. That's kinda walk. And after that you can give this subdivision surface and
everything will be nice. This is an option you can use. You can use a modifier right here is called the
shrink wrap modifier. To shrink wrap these faces on this face to get our
results almost like this. Push these edges. I'll write two rabbits against the face of
the pyramid like this. So here we have to open for me, I will use the easiest one. I will put this insight
and leave it like this. But I need to give it
a subdivision surface. I will hit slash to isolate
this and delete these faces. I don't want them actually, because they will
be hidden inside, hit XF to delete them. And for these phases, I can hit Control V to. Level this area. The violet with four
maybe edges like this. And because here we have very long faces and here
we have very small face. I will support the edges that I have here
and I have there. So Control R to add, support a yellow here
and one here as well to prevent any stretch goes
through the center. When I add a subdivision
surface here. The same scenario here, grab those and just bevel this can throw me
and let's bevel this two, maybe three, I think
that's enough. Can throw off the support this side and I think that's it. Okay. Now, how about go to them with the fire less and
our subdivision surface. And let's add two
iteration here. Right-click Shade Smooth,
Tool, make this smooth. And hit slash to excite, by the way, we have
it right here view. And let's call local, local view numbered slash. Now we have this. Alright, that's great, but we
have one problem actually. What we created, It's not in
the middle, in the middle. And we need to fix that and it is easing on something hard. When we created this payroll, the origin dot still
in the middle. In this case, what we can do is I can bring the 3D
cursor in the middle, hit Shift S to open the
payment for the 3D cursor and go to this option course
or through the world origin. Now the 3D cursor
is in the middle. After that, I will select the
payroll and hit Shift S to open the 3D cursor Pie Menu and move the mouse up
to select this option, selection to cursor, to move the parallel to the
position of the 3D cursor. Now we got this result.
Alright? Now the middle e to the z to move this
up just a little bit. If you'd like, you can go to the front and hit G and
take this bag and both. It's roughly here in the middle. And now you can select this and manually Hickey and bullets. And the place that you would
like, e.g. right here. And you can hit G
and take this out. And what's right
here? Alright, I've heard that's all what I need to do is to take a Colby and
put it on the other side. And the top view we can do that. I think we can push
this just a little bit inside like that. And because we have the
3D cursor in the middle, I will use it as a pivot point. So I will go to the transform
pivot point and the three, that's two or 3D cursor. And I will hit Shift
D to take a Coby. Now, that new Coby
following the mouse, and I need to, I need to leave this new Coby in the same position so I
will hit right-click. And now we have Coby above Coby. And I. I need to mirror it
on the other side. So I will go to mirror, mirror on the y-axis. The y-axis. So go to object and go to mirror or a mirror to the
y. And there we go. Now we have it. Now, mirroring happen according to the 3D cursor position. Why? Because we
selected from here, we say let 3D cursor. When you complete, go
back to bounding box. And now we've got this. That's very cool. Very nice. All right, Let's see
what else we can do. Let's select this one and
let's tap it is mod n. Can we, can we do something right here? We have this hole right here. Let's see if we
can create or not. Alright, to do that, I will go to the front
and hit Control R to add. Let's see how many we need here. I will add to it is right here. And because we added
two edges right here, we lost the care. After you adding these two edges just hit S and scale this out to bring back the care
of. And now we got this. Alright. Now what I will do
is I will go to Face and select this
face right here. And I will make some inserts on this side and on this side
as well, the same thing. Select these faces
on the other side. Alright, I think we selected the correct faces. All
right, that's cool. And after that I will
hit I to n sets. Make some incident like this. The middle. And now we got this, but I need to make
this like a circle. I need to make a circle. Let's see how can we
keep this. In this case. I can go to the ellipse and
then go to Preferences and go to the ADA and Section
to activate one of these other ones that comes
default with the blender. Let's go to the search
bar and less steric For Loop tool L double 0. Here we have the Loop
tool just activated. Okay? And when you activate it, go to this burger icon and hit Save Preferences to
save the changes. And then excited. If you want to access
the loop tool. While you are in the edit mode, just hit right-click and
you will see it right here. Alright, the option that I
need from the loop tool when you select your faces and
when you do all of that. And it twice
right-click and go to circle to make this
like a circle. And now it's become
like a circle. After that, maybe we can
rotate that just to fix the rotation and scale it just a little bit,
make it smaller. But if you scale this scale, we'll work through the center because we have the bounding box activated it to scale each of these phases to their own faces or to
their own billboards. In this way. I can shrink this to
individual Oregon. And now when I mix kill, each side will
scale to the local, local origin dots or to the
local area of these faces. The scale will not push these
faces towards the middle. All right, when you complete, you can take this back. Alright, now we've got
this very cool, Very nice. All right, now let's see
what else we can do here. Actually, we can bridge
between these faces, but we got, just
want a problem here. I need to rotate
those on this side, so I will hit Control
and deselect those. And I will rotate
this to the y-axis. So here's our y. And rotate
this just a little bit. When you're complete, go
back here and select hold, Shift and select
these faces. Alright? When you select the both side, hit right-click and go to break, face to break between these. Now we have approach, but we're not finished
here actually. I will turn off
subdivision service temporarily to do
some extra stuff. I will hit Control F to add
one H here in the middle and heterocyclic to leave it
in with this selected, I will hit Control V to bevel it to two edges,
almost right here. And go to face. With these faces still selected. I will hit Alt E to open
extraordinary enqueues, extrude faces along normal
and move the mouse up or down until you reach
through those inside just a little bit. Now
we got this result. After that lists. Let's add some
support edge loops. Alt, click on these edges here. All you have to click on this here and target those
all of them. All. You have to click
this one as well. When you grab them all, it
can throw the interval. Those are the three ages
and the scope tab out. And now this activity
subdivision surface, and now we have this result. Okay, Very cool. All right, so I will end this video with a grade here
and we got this result. And by the way, you can use
the same scenario of the, I will show you the Loop tool. If you want to
create those here. Okay, you can subdivide
this area and select some faces and use circle to make them like
circle and then extrude them. If you want this Turonian, I think they call it 20. And if you want this to
be part of their payroll, but for me I will
accept its results. And that's alright. See you next.
6. 006 Modeling Creating the carriage: Hello again and welcome back. Okay, Let's see what
else we can create. I think now we can go
to the front of you and bring you this empty bag. And let's put that reference
images right here. And maybe we can
create the tire. Alright, maybe we can,
we can do that spotless. Let's select the image and
I just need to move it and put it in the correct place. Lying bureau. Just align the payroll and
everything will be okay. Okay, that's cool. That's great. Let's
create a circle here, or let's add the
cylinder for the tire. Wear the 3D cursor. 3d cursor is in the middle here. Hit Shift a. By
the way, couldn't. You can select the image and you can go to the image
properties here. So right here. And you can decrease the
opacity if you like. All right, I think we can do that and make it transparent
just a little bit. I think that's better. All right, let's go. I will hit Shift a and add
the cylinder here. Now we have the cylinder
or three small. And let's see how many
vertices we have. We have 16 vertices. I will increase this to maybe, I don't know, 70. And lists make very big,
something like this. And let's align it to
the view like that. 70 vertices. Alright, for now, just accept that this
number right here. Alright, I will accept
it, so that's it. I will close this. And let's see what we got. We got this result. But as you go to
the front again, hit G. And let's put this almost right here and
then use S to scale it. Make it big just a
little bit like that. Alright? And maybe we can move with just a little bit dry, a little bit right here. And the scalar to the YS to the y and scale just a
little bit like that. That's cool. Very cool. Now, I can hit Control
a to apply the skill. Because we scale this
would give IT skill. And I can tap it is okay, or I can hit tab and go
to face number three. You can select this face hold
shift and grab this face, and then hit I to insert. Let's insert this just a little
bit, something like this, and hit right-click and choose approach phase to break
between these phases, I want to use this as a guide. Maybe I can. They read this
later if I don't like it. Just go to the top of view. What number seven
and from the numpad, hit Shift D and
roughly let's add another one maybe, right here. You can count these blocks. Alright, it's 123-451-2345,
something like this. Maybe should be
right here maybe. All right. That's cool. And I think now we can
start with courage. All right, For this, maybe. Alright, let's go to
their front again. And let's hit Shift a to add
in the boot can add cube. The cube is very big,
hit S and make it small. Heads you to move it. Let's move this up. And maybe I can go
to the wireframe. It number, sorry, z from the keyboard to
go to the wireframe. And they will tab to go to
the edit mode for this cube. Hit number one to go to vertices
to control the vertices. Get this, select
these vertices and let's move them just a
little bit like this. Alright, and let's
take a look here. Let's see how much we
need to move those. All right, it's okay for us to select these
vertices and move those up. And maybe those, I can move
them and put them right here, because here I think
we have a coordinate. And it got up these
top vertices here and hit G to move
them and move them. And let's put them right here. And I think we got them
wrong mistake here. We need to move these vertices
down just a little bit. Grab those Hickey to the
z, or you can move them. Like this. Now we got herself similar
to this result here. Alright. Now let's select these four vertices and hit E to extrude them and extrude them almost
right here, Timberlake. And manually select
these vertices, moves its vertices here, and select those here, and move them right here. And now let's select
these four vertices again and hit E to make
another extrusion. Okay, and I will select those. Let's put those right here. And maybe those we
can put them right here. Something like this. We can move those
just a little bit. Can always hit Control R to
add maybe three or four ages. When you hit cantor or
a new hit Control R, rotate the wheel to add extra pages and
manually select those. Let's put those here. Okay, Let's cool. And let's see what we have done
in the top here. Alright. It's very thick. I will select this side in the wireframe mode
and take this bag. Something roughly close to the thickness that we have here. Just eyeball it. Something
like this will work. And it should be, it should cover the
this piece right here. The Iranian might think, okay, the top, if you
will, we can do that. Okay, top outs. And let's move this hit G, or we can activate this
gizmo and move this, and let's move it
right here maybe, I think is still thick
because now it's almost attached to
the, to the biro. I will scale this to the y-axis, scale it like this. If I do that, I will
have some problem. Why? Because there aren't
getting dots now become far away from this piece. I need to bring this
back to them at all. Because if I don't, if I
scale this to the white, check, what will happen? So I need to scale this
in the same place. In this case. All what I want
to do is hit right-click. Go to set origin to sit and
choose origin to geometry. And now we have it
here in the middle. Now I can hit X to the Y. And the scale is just a
little bit like this. And then move this out just a little bit, maybe right here. And now we got this result. I can go to solid and
now we have this. Really cool. That's
one thing here. We need to mention
that this area here is wider than this area. This piece should be rotated just a little
bit. And that's easy. Actually, we can go
to the top view and we can put the 3D cursor right here to use it
as a billboard point, to rotate this from here. From the pivot point,
this like this. Because if I hit R, Now the rotation will happen from the middle here because
the origin dot here. But if I choose 3D course for my 3D cursor right
here now when I hit R, This is the difference. Alright? What we need to do
is just a little bit of rotation, not too much. You can eyeball it. Something like this
will be enough. Maybe it will be enough just
to rotate it like this. And maybe now we can take another couple
and on the other side. But before we do that, Let's list the carriers. Okay. I will tap the edit mode and let's see now what we can, what we can do. First is go to the edge and
let's target all the edges. You can do that and target those manually and
select them all. Here we have an option. If you go to select,
you can select sharp the CEO or
is it sharp edges? That will help you to
select all the pages? And that's great, but we need
to target this one as well. Alt Shift and click,
and there we go. And maybe this one here. When you target
all of these edges hit Control V to level them. And let's give them a bevel, small bubble like
this that will be enough rights to prevent any
citric happen in this area. And this area. I will add extra edges here. Because I need to use
subdivision surface. And if I do that, all
the edges will go to the center because of the algorithm or the
subdivision surface, because here we have a huge face and here we have
very tiny small phases here. So I will hit Control R just
to make the result even e.g. I. Don't know, two. For six edges you can adhere and maybe here you can add three or four,
something like this. That's, will be better. And maybe we can add to the middle like this
and that's it. Cool. Now let's see what
we will get out and go to them with the fire. Search for a subdivision
surface at two level. And now it's become clean. You can see that we have
some citrate goes like this. If you noticed. We can fix that. We need, we can go
to Edit mode and add some extra edges like this. Maybe one like
this on this side, one on this side to
prevent any stretch, and maybe one right here and maybe one
right here if you like. If you want to make
the result better. Maybe you want here
Control R and add one here to prevent any story can maybe on this side, control R. On this side as well.
We can do that. And now the result is better. This top out and now it's
become better and cleaner. The corners now
become a cleaner. Alright, right-click. And here the small to
make this smooth ER. That's cool. That's cool. Okay? No, Maybe we can take another
copy on the other side. Or maybe we can add
all, all of these, all of these details
before we do that. If you're like, we have this quote here in the
middle, we need to add it. But I think I can cope with
this one on the other side. Okay, let's put the 3D
cursor in the middle, hit Shift S and closer
to the world origin. And lets readers to 3D cursor to use it as a pivot point and then hit Shift D to take a Coby. Alright, Do we need to
do anything else here? Alright, we don't chef de take a COBie or right-click to leave the new copy the same place. And we need to copy
it on the y-axis. Go to objects mirror. By the way, with the
new Coby selected, go home object mirror
and two as y axis hand. Great. Done. Very cool. Alright. Alright, alright, alright. Alright, here we have
a piece of food. Let's see how can we create it. Let's select one of
these pieces and let's tap the ethmoid and
maybe we can manually, we can select any phase we like. E.g. I. Will select this
face, hit Shift D to cope with this
face and move it to the over to the y-axis,
this interface. And we need to make some
tweaking to this phase, okay? Alright, ferrous heads p to separate this two
openness spread, menu and choose selection to separate this phase
from the group because we, we take this face from this
group and we don't need this face related to
these faces here. Alright, so this phase
and this phase is here. Now they are sharing the same. It is more than I need to
detach this phase from it. Just hit P and
venture selection. And now is detached after
that tab out from this. And let's select this one alone and topped
with the mood for this. And now let's mix some tweaking. Select these two
vertices in any of these two vertices to be aligned
like this to the z-axis. As you can see, we
have variation this vertex up and this one down. The line goes like that. We need to make this perfect. It's flat. Just select those. The idea is we
just need to scale those to the z, just hit S. But if you do that, we have the devotes working
through the 3D cursor. And if I do that, if I, if I hit S to the
Z and zero Enter, it will go up according
to their position. The 3D cursor, we don t think that I need to turn this off, or let's say switcher
two bounding box. Select those here at S through Z and zero and throw those two s, z zero and throw those
here as x zero Enter. And those here as
well, Sx Enter. Now it's become perfect. Hit a, select all the vertices
and hit E to extrude it. And now we have this extra, this on this side and you can grab those and move
those on this side. Sorry, I guess forget
to take this vertex here and move those here. Now we can go to
the edge, hit a, select all the edges, and hit Control V
to be volt them. Like this. And now very cool. From the top of you
can go to the top. And I think the results
goes the wrong direction. We got some problem here. Alright, but they
will do is I will hit can throw us a
couple of time before I, before the extrusion because this face is not
aligned to the y-axis. So we need to scale all the
vertices to the wire as well. That's why zero Enter. And that will become flats. And by the way, you
can add the new, you can add the new cube
and scale it and created. But I need to teach
you some stuff here. When you select all
the vertices or you can select this face, yes, hit E and extruded this here, more of this face right here. And because subdivisions still exist, we have this result. Now if we add the extra
edges around this cube, the edges will become
tight and I will fix. That is what I have here. Okay, go to the edge, it's a select all the edges and it can told
me to provoke them all. And now we have this
result in the top view. Now I can go to the vertex mode and hit
Z to go to wireframe. And they can select this and
move them just a little bit. I don't know, maybe right here. And those here, I can move
them back, maybe here. And I can I don't know. Can we scale them
up or that's it. I think that's it. Now I can hit Tab and accept
this result right here. Alright, Very cool. Very nice. All right, so this is it for
this video and see you next.
7. 007 Modeling Creating the carriage front parts: Hello again and welcome back. Okay, Let's see what
else we can create. By the way, I use this image
to create some details, but I can't, I can use another image file like there is no reason to
stick with one image. If you'd like. You can stick
with one image end-users. Or you can use any
image from here and take details from another. Can only feel like, okay, now let's see what
else we can create. What we need to do
here in this area. Let's see, do we have
any information, e.g. this right here, I can take
some information from it. Alright, we have a big piece
of food here and this place. Okay? All right. Okay, Let's see, create. This should be easy to create. I can go to the front
and hit Shift a and B. We can add a new Q of n scale and make it
small like this. Scale it to the y. I need
something like this one I hear. And I think it should
be like a rectangle. So I will just kill
this just a little bit and give it a length. Scale. This to the z gets a
little bit, not too much. And I will move this up. And if I want to use
this image here, I need to cut it. Because I think it
should be like this. Okay? As you can see this area, Let's see how can we achieve
a result like this one? Actually it is easier
or something difficult. You can scale this back. Somebody like that. And when
you complete your sets, can throw a apply the
skill and tuplet is more than you can hit
Control R to add one. Right here. And now you can go to Face, select this face and extrude it. Gets a little bit
roughly right here. And you can go to
the front again. It's another extrusion, something
like this hyper wallet. And you can sort this down and match it with
this one or alignments. Maybe we can take this down
just a little bit like this. Alright, that's cool. That's maybe walking. And in the wireframe, I
think I need to grab all of these vertices and move them just a little
bit like that. Or I don't know, maybe I need to scale those away
just a little bit. Anyway. Let's go to solid his Yan, good, solid endless. Use this result. And maybe it is Vic. Let's move this up. And it should be aligned with
this with a carrier. So let's put this
corner right here. And maybe I can sweetest, sweetest with 3D cursor and
put the 3D cursor here in the corner and hit R
to rotate like that. Okay, something like this maybe. And now move it up just
a little bit again. Alright, So that makes sense. I think the bill should
lay on this piece of wood. That's me. Maybe we need to move it up or extruded
up just a little bit and take the site and
move it up to be like this. Okay, with this one
selected tablet, it's more than go to wireframe so we can
see what we have here. Okay, how can I move
this vertex diagonally? Because if I take this up, I will lose this data. It will be like this. That's not going to work. In this case, we have
a trick here we can use after selecting these two
vertices and the wireframe, I can hit G twice. And take this down. I've started that hit Alt and move this up to the
place that you like. Now, I still have this edge stripe and nice
for this one right here, don't worry, you can
select it and e.g. of moles right here if you
like this one as well. It's not a problem to
move this right here. This one you can, actually, you can move it forward. I will have some problem, but it's easy to fix. I can align them with this edge. That's fine as well. Key and move this
one to this edge. And now I can select this and
move it up with a barrel. But now we need to align all
of these vertices together. In this case, this tree, this back to bounding box, the transform of the point. And let's go to the snap and
let's choose a vertex, snap. I will use vertex snapping,
snap these vertices. All right, let's e.g.
start with this one. Maybe I can move it right here
and that's what we'll be. Okay? And now I need to move this one and snap it with
this vertex here. Grab those two vertices, grab them and move
them to the z-axis and then hold Control and take her mouth there to
snap it to this vertex. The same scenario for this. Over to the z-axis. Hold control and
snap it to this one. This one. Move this
to the z-axis, hold control and stopped, stopped with this vertex. And now we can write h. Alright, That's cool. Now let's tap out his Yan go to solid.
And now we got this. But we just need to scale it. To the y is x to the y endless
killer to them at all. And I know we have
some open area here. I will fix it. Alright. Can we scale it even more? Something like
this will be okay. Alright, let's go to
the top and see how can we fix this problem. Actually, I can delete half of this and
this will be better. So tablet is more to
hit Control R and add one H right here and
then hit right-click to leave it in the middle. We've got the top. His Yan go to wireframe
SelectHealth of these vertices x. And then by the way, when you hit X, you will
open the Delete Menu. We just need to delete
all of these phases. So K2, so choose faces. Now we just deleted
all of these faces. That's cool. Now I
can edit one side. And then after that
it is the other side. Okay, in this case I can put the 3D cursor exactly
on this vertex. So hold Shift and then hold, right-click and
move the mouse and then hold Control and stop
this vertex right here. Makes sure that you
activate a vertex snap. And now his Z grab all
of these vertices. His ear, again to excite was transform pivot point
according to the 3D cursor. And then hit R to rotate.
Let's move this up. It's out. Rotate. Sorry. Hit R to rotate and rotate
all of these. Just a little bit. We align these vertices
with the water. We will have some misalignments. Because we rotated this. That's not gonna
be obvious because the rotation is just small. But if we rotate, if we rotate this too much, Toby, obvious as you can see. But something like
this, it will be okay. Alright, we've finished. Let's bring this back
to bounding box. And let's go to solid. And maybe now we can
add mirror modifier. I feel I don t think this
image, I want to close this. Alright, let's go to the modifier list,
modifier, modifier list, and let's use me or to mirror, to add mirror modifier
team to mirror this. On the other side.
We got problem. Now, mirroring work
to the x-axis. And we need the y-axis.
Just choose why. Turn off X. And that's it. Has great. Alright, if we have this new piece in the
correct position, that's me. We need to make some editing
here for the courage. And we will do that later. Because I have not decided
yet if this works or not. But I think we can
add a small curve here that carried the selected and let's tap
it as more than this. How can we achieve this? All right, so maybe we
can add one H right here. And this edge selected hit
Control V to bevel it. Let's pivot a tool
maybe I don't know. Three, something like this. We can determine
that from the top. And the other school. That was kinda is okay, it's working. Does he go to or
from the side view? The front? Alright. Now I will go to the
wireframe and select these vertices and move those down just a
little bit like this. We came up with like this. And I need to make
this area tighter. As you can see, we
have a curve here. If I add edge loop
right here and here, I will make this airtight. So I will hit Control R
to add an edge loop here. And maybe here as well. For now. And now, let's grab
these vertices. And maybe we can scale those just a little bit to the eggs. Somebody like this. Maybe move them down
just a little bit. And now we have this result. If you like, you
can add an H right here and right here. That's
what we're like as well. I think that's enough. Now let's see the results and
the object mode. Alright, that's, we'll walk. I can select the biro and the trillions and
move them down maybe. And don't worry about
the overlapping that we have here,
we can fix it. Let's go to the side view and let's move this
just a little bit. And what's in the right
position. Now we got this. Alright, for the
overlapping that we got here, it's very easy. We can select this and go
to the site and select all of these vertices
and the wireframe mode, we can take those down
just a little bit like this, something like that. And maybe these vertices, we can move them like
this. And that's it. Don't worry about the
overlapping that we have here. The camera will not
treat this area. You can ignore it. Alright, let's hit
tab and go to solid. And now we got this result. What about the other side here? Actually, it's really easy. You can delete then
COVID this one. Feel like deletes. Select this one with the
3D cursor in the middle, you have the S cursor
to the world origin. Sweetest with 3D cursor. Hefty, their Coby. With this COVID selected
object mirror to the why. And that's it. Alright, let's see what
else we can do here. Alright, lets you
create the piece of food that we have here. Connect this wheel to this real. And we have a shaft
here in the middle. Actually think this is
the head of the shaft. Maybe we can start
with the shaft. The easiest way to do that. We can select this
wheel and hits, or maybe this realizable, grab them and hit Shift S
and coarser two selected to bring the 3D cursor
in the center of these wheels and go to the front and hit Shift
a to add a cylinder. Sorry, no circle, Shift
a and add cylinder. Now we have a cylinder here. Let's go here and let's decrease this number to maybe therapy vertices and align
this to the view. Scale it to make it very small. Maybe something like this. You can eyeball it and
scale it to the y. Something like that. You can go to the top and
make it a little bit bigger, taller from let's say a little bit far from
the wheels like this. All right, that's
what would be enough. And let's see what else. Alright, that's what
we'll be. Okay. And let's add another cube here in the middle at
the S and scale it. Make it small like this. Should be here in
the middle. Okay. Epaulets and then scale
it out like that. All right. Something like
this. I think that's too much. We can take it down back. And by the way,
these tires a little bit far from the canon,
that's too much. We can take those back. I mean, we can move this,
move it right here. We can go to the top. And let's check this distance. I don't know. It's almost eight centimeter. Something like this would work. Let's scale. This gets a little bit
back, maybe right here. And they got this wheel. And let's move with
something like this. Just keep it as
small distance here. And this wheel, we can
delete it actually. And the shaft we can
scale it to the y. And that's what big enough. And select this new
piece that we added. And let's see what
else we can do here. Alright. I think we can move it up
just a little bit like this. And we need to create a
hole here in the middle. Okay, to do this, I can hit Shift D to
make a copy from this. And leave this
down right here in tablet mode and go to
the edge number two. To go to the edge mode, select this edge and hold shift and select
this edge as well. Then it can throw
me to the village. And let's give it a bevel. Rotate the wheel to add extra
edges to make this smooth, to get a result like this. But before that, sorry, I just need to scale it and
make it a little bit smaller. Tub out hit S and
make it smaller. But I think we can go to the bounding box and the scale
this from the side view, I can understand that better. That should be okay, something like this maybe. Alright, after that, I just need this space
and this space here. Let's take this down here. Can throw, lay apply
the scale tab, select this edge, this edge, and then hit control V. And let's have a
circle like this. Make it round from
this side. Sorry. Maybe I don't know. Maybe we can take this face and make it a little bit taller. Alright, the tub
out hit S and make it taller to the white as well. And now let's go to
the site of you. This and let's put this
almost right here. Something like this maybe. And less cuts. This would I need to
add care of here like That's took out that
result like this. That's why. This way I can use a
Boolean to do this. I have an add on,
It's very nice. Hold on. Can help me to do that. Let's go to the Edit and
then go to Preferences. And here in the other section, go to bull tool, search for bool bowl tool activated and then save your
preferences after that. Okay, to use bool tool, we need to select
fairest, the cutter. So this piece, it will be the Ketterle and this
one will be the targets. First, select the caterer and then hold shift
and grab the target. And now I need to
reach the portal. To reach us, open the arrow
and go to Edit and open it. Now we have the portal. But the fastest way
to reach Pull tool, you can hit Control Shift B
and then you have portal. After that, just
chose difference. And we done here, it's finished. We have what we need. And maybe we can select
the health and make it a little bit bigger
to fill this area. And the front of the top,
maybe we can make it a little bit shorter like this
and thus will be enough. All right, That's great. Alright, I will
end this video and I will complete in
the next videos. Okay, see you next.
8. 008 Modeling Creating the axel box: Hello everyone and
welcome back here. Okay, Let's complete
what we lived here. Starting with. I don't know. Let's talk with this
one, grab it and it's like from the
number two isolated. This make this smooth. To get rid of these
jagged lines, right-click here the smooth. After you do that, we need to bring
back the hard edges. So I will go to object
data properties here and go to the normal
and activate auto smooth. And let's target the edges and make the egg is
ground and nice. I will go to the modify
properties and Bevel modifier, the vole, not working correctly. As you can see here. It's okay, nice,
but here it's very citrate because we
didn't apply the skill. That's why I always
say apply the skill. Alright. This way, if I hit control a obliged scale,
it will be fixed. The bill amount is big. Point 1 m. I will
add maybe 0.0, 1 cm. Still too much, less. 05. Something like this. Maybe it will work. And if you don't like
to as 0.00 this stuff, you can go to the sea where it was human properties and here and the lymph change,
these two centimeter. Now, I think that's
what would be better. Okay, so now maybe we can
add 0.03, maybe very small. Zero point. Yeah, that's too much small. 0.1, let's say solar
small, 0.30, 0.3. That's what Rocky. Let's add extra segment here
to make this motor. Maybe I think two or
three, you can't see them. But if I go to the wireframe, you can see I have two
here. These are the three. And let's make this nicer. I, if I want to make
the hidden better, I can go to the heading section and activate harder than normal. Now the healing is better. Let's see before and after. If I turn the
wireframe of you can see this before or
after. Very cool. Now it's become a clean for now. And now let's see what
else we can do here. Alright? Do we need to make
any tweaking right here? We can make some tweaking
if we go to the side. If I go to the edit
mode and easy to go to wireframe and hit number one to select the vertices or
to activate vertex mode. Select these vertices. And you can move those up just
a little bit, if you like. And make the world a
little bit smaller. Or we can grab the
top area and move this down just a little bit. And I think that's better. Maybe moving this up
just a little bit. And maybe these vertices, I can select them like this. And those here as
well and move them up. Somebody like that. Alright, I have this
one was selected. Somebody like this. Maybe
from the side view we can do that better. Okay. Okay. What about
this piece of food? I think we can make some
tweaking right here. Okay. Let's stop to it more
than maybe we can. I don't know if maybe we
can add an H right here and move those face bag. Or I can't accept this results. If this was a doesn't
match to this one, does not affect anything. So I will accept this
result and just be valid. I can go here to the
bevel and Art Nouveau, but I can't Coby the
bevel right here. To do that, select this
one as the first one. Hold Shift, grab the
piece with the bevel, and then go to the arrow. Hit Copy to select it. And notice go back here. Now we have mirror,
we have bevel, we have awarding right here
tells you that enabled, that you should enable
the auto smooth. I need to go here and
activate auto smooth to get better heading as you can
see this before and after. And now we got very
nice result here. Very cool. If you want to
make the bevel here bigger. To match this care
of that I have here. You can select this piece and
go through the level here, and let's add 0.5 maybe
and make it bigger. I feel like that's better. For the haves, less selected and tablet mode and
select the site. Alt, click in this one as well. All you have to click
here. And let's pivot. Let's, because here
we have some level. Can throw be in purple this but the vole not working
correctly because skill or a tab out
control a apply the skill tab and select
the both side here. And then it can throw me
to build them and just rotate the wheel back until
you have to cite like this. Cool. Okay, lets you create
this one right here. How can we do that? I will hit
Control R to add one here, maybe somebody like this, and maybe one H right
here from the top view I can determine where
should I put this? Yeah, something like this. And Alt click to select
all these phases. And then hit Shift D to take a Coby and right-click to
leave it in same place. And now we have Coby above Coby, The new Coby, The select one. I will separate it. So I will hit P to open the spray paint you
into a selection. Now tub out. And I will
select this new piece. Right-click Set Origin, origin to geometry to bring the origin dots to the
middle of this piece. Okay, That's great. Okay, now let's see what else
we can do here. We can scale it and make
it just a little bit, but we need to ignore
the y scaling. When he was killed. This will be very big
to the white as well. So I need to ignore the y and I need to scale
to the x and z. If you want to ignore the y, just hit Shift Y. Now the scale, we'll
work through this C N to the x. I just need to scale it just a
little bit, not too much. All right, Let's see what
else we can do here. I will talk to it more than hit Control R to add an egg
here, one here maybe. And I will go to face Alt
click to select these faces. It's Alt E to 0 and extrude menu and extrude along
normal and extrude. This gets a little
bit like that. Okay, That's cool. I can throw a lot to add
one H right here. And select these faces all t and make another extrusion log-normal,
something like this. Maybe these edges, I can move them just a
little bit like that. Can throw our two, add
one H here in the middle. And maybe I can bevel can
throw a beatable this H22. Maybe I can select these faces Alt click and hit Alt
S to move those out. I don't know, maybe
something like that. Make it a little bit
bigger. Can epaulets. And make this piece looks like it's bigger than
the woods as we have here. Here we have two options. We can ignore that size
or we can make it bigger. Or at least hit Alt S Again, let's make this a little
bit bigger like this. And maybe Control R to
add one H right here. And go to face Alt click. And let's extrude this
just a little bit. Owltest, sorry not all tell us. It's Alt E. And choose
extrude faces along normal. And a little bit of
extrusion like that. Okay, Go to edge, Alt click, and the skill that's
inside just a little bit. Alt click scale this up. Maybe we can move with just
a little bit like this. And now it's the time to, it's like to isolate it. Let's talk about this control V. Let's give it the
bubble like that. Maybe for a club, this one Control V and this
bevel, this makes smooth. This one is here, control V and make it smooth.
Oswald like that. Crop this one and
this one can throw, be giving them a verbal like
this just a little bit. This one as well,
Alt click Control V. And the will this add
four edges right here. Maybe this one as well. I
can't select it and hit Control V and the
bullets with a three. When you complete, like
maybe this one as well. We can select it and can
throw the ambivalence. Yeah, that's great. When
it will be satisfy. Top of arthritis like Hey, this mouth and nose
becomes smooth. Okay, something like this. If you want to make this bigger, you can select it in
tablet mode and hit H, select all the faces. And you can't hit S to scale
its path, ignore the y-axis. Hit Shift Y does kill this fuel like to
make it bigger like this. You have this option. Alright? We can
isolate it again. We have this hole right here. We can select this and hit
F and just bevel this. Let's add four maybe
ages for this area. This area we can
fill it if you like, at F and that's it. Let's see what we've got so far. Well, we got
something like this. I don't know. Maybe you can make it taller just a little bit. Maybe. This case we can go
to the top tablet. It's more to go to the
vertices with number one here, Z to go to wireframe. So I can select all
the vertices here. And I can activate
proportional editing. Now if I move this with
proportional editing, activated, hit G to the Y, but rotate the wheel
until you make the circle a little bit
smaller, the effect. And now I can move this and
I will have nice effect like this over just a
little bit like that. And now we have nice transition. Alright. Now we just
need to move the tire just a little bit away
and select the Hertz. And actually I can
leave it like this for now. Let's go to solid. And I think now the
result is better. Okay, and yeah, it's very nice. I said this was off. If you want to make this even smooth, smooth or you can add
subdivision surface. But when you add
subdivision surface, just add one, don't
add too much. I mean the level. And now
it's become very nice. Okay, Let's see what
else we can do here. Let's see this side.
How can we create this? Maybe we can select this piece
and tap to edit mode and select some faces, e.g. or even edges. Let's select these edges. Alt click to grab
all of these edges, and then hit Shift D to the y. And let's take a
cobra right here. And with this code we selected
hit E to X through this. Just a little bit to
create this ring. And then from the top
go to wireframe is z caught up all of these
new faces and then hit P and choose selection
to separate it. Has, Yeah, Again to exert
all the wireframe mode. Top, select this one. Top again, hits a, select all of these,
all of these faces. And then it's all
too easy to open, extrude menu and extrude along the normal and it's through those inside
just a little bit. Just a little bit,
something like this. And top outs. Right-click here the smooth to make this smooth. Okay? Now we need to tap Enter
again and I need to crop these edges all
theoretically club those and hit Control
V to level them. Give them a bolus, add three edges right here,
that's will work. For the side. I can select
those here, and those here. Hit Control V to bevel them, this purple, the
purple them to two. And with these edges selected, I can pull them as well. Very small amount
of beveling Control V. And let's pull them through
to maybe or even three. We can do that to
have the same effect that we have here.
Now we got this. Very cool. I think we need to make this arrange
a little bit thicker. We can tap it, it's more the internal subdivision
surface timbre leaves and go to face Alt click
to grab this face inside. Can throw a plus to grow
silicon couple of time. With these faces selected. Hit S to scale those inside, but ignore the y axis. Turn off proportional
editing as well as, and then Shift Y and give it just a
little bit of thickness. Maybe somebody like
that and then type out turned on subdivision
surfaces for like. Alright, let's take
another Coby from this heavy right here maybe. And hit S and scale, It's alright, so the
Oregon dot is far away. I will hit right-click and set origin to geometry to bring this back to the middle of
this ring and hit S and scale. It's just a little
bit like this. Maybe I can make it a little bit wider and make it smaller. Alright, that's cool. I think that's all work. And I think we
need another copy. I think we can target
the interfaces here. Alt click select these faces and hit Shift D and take those out, and then hit P and Q
selection to separate it. Tab, I'll select this new Coby and Tab to go to the Edit
mode, hits a silicon. All these faces. Then Alt E to open extrude menu and choose
extrude along normal and make small inserts.
Something like that. Maybe. Now let's targets
all of these edges. And it can throw
me to bubble them, give them small
amount of beveling. We have some problem with the with the bevel
because of the scale, but does not, it's
not a problem. Alright, let's go to the top
and see what we got so far. That's cool. All right. We have a piece of wood from
this string to a string. This, how can we create it? I will select this and touch it. It's more than maybe we can
go to the edge and select these these edges here. Hit Shift D to take a Coby and right-click to
live within siblings and then hit P and Q
selection to separators. Okay, now we have a new
circle here. Scale it. But before you scale
it just to bring the origin dot here
and the middle, right-click Set
Origin, origin to geometry and then scale it because a little bit
bigger like that. And then turn off
subdivision surface. We don't need this for
now. Tablet is moot. It's a select all the
edges or vertices, and it's E and extrude this
to the y just a little bit. And you can hit S and scale it. Or actually I can hit
E again to extrude it, an extra insight like that. And E to suit like this, and E to extrude and S2
through this inside like that. Now I can select all of these. I just hit Control
V to level them. Let's add four maybe. And now I can call this
one in the middle, hit Control V to bevel it. Let's add two or three. And I can hit Select to
isolate it and can crop this, hit E and S to extrude
this insight and beveled edge can be
small bevel here. And I can ignore this. I think Let's select to excite. And those, I can move those
just a little bit out. And this one should
be inside here. Right-click create a
smooth if you want to activate subdivision with
one level, that's okay. So the problem, now we
got this and all of the, all of these details. We can move them inside. Not too much
something like this. And the beam should be
out. In the wireframe. I can cut up all
of these vertices and move those vertices are just a little bit.
So maybe right here. Okay? Something like
this will be okay. And by the way, I will delete half of this and give
it the mirror modifier, but later on, not now. Alright, cool. So this
is it for this video. And see you next.
9. 009 Modeling Creating the Wheel spoke: Hello again. Welcome back. Okay, let's complete
the actual box details. By the way, I think we
can start with the wheel. Can create the wheels now. And they could be
easy to create. I think. Let's start with this one and
let's see what we can do. Ferrous, the position
is not correct. I think we need to move with just a little bit
according to this image. If we need to use this
one as a reference, otherwise you can
use another image and create something
else if you like. But for me I will stick
with this one. I like it. Here we have some care of if you noticed here this circle, it should be a little bit
far from the core here. Something like this, not too
much, you can eyeball it. Alright, now let's create
these wheel spokes. And maybe we can
go to the site of view and hit Shift a and
maybe we can add plane here, align the planes with that view. And now we can scale it, scale up even more and take it up right here
temporarily skillet, make it small like this. And the Alright, Do we
have another image? All right, we have some
details here actually. Anyway, let's kill this. And I felt that apply the
skill when you combine, let's make it bigger. It gets a little bit. This, how can we create
something like this? Let's take this out
right here, Kimberly. And maybe we can talk to its mood and extruded
it e and sweet like this. Right, That's cool. Hey, maybe now we can
grab this face and go to the side view and move
this up almost right here. And the crop, this face. And the wireframe would then
move this almost right here. Let's add one here
in the middle. And it can throw off to
add one H right here. Before we do that, I will select this face and the
scale-up make it smaller. And it can throw off
to add one H right here and one right here. Something like this. Eyeball it. I think this H is not
going to come to work. Should be almost right here. In the side view we can determine because we
need some distance here. Alright. Alright, that's cool. Alright, now let's add
one here in the middle. Can throw R and hit
Control V two bullets to, to maybe something like this. Alright, the distance here
is not even. This way. Maybe we can hit Control
Shift R to offset the age. I think this will be better. I mean, when you add
the egg in the middle, don't hit Control
V to the bullet. Hit control shift after
officer this h. Alright, This result is better for me. Now what I will do is I will add egg is here in
the middle list. See how many we
need to add here. Just add edges here
and from here, when you confirm it, I will have this
window right here. I can specify the number
that I want the cats. This at ten maybe or less to
my textualists, add eight. I think this will be better. And see what's the next step. Now let's go to the edge
and lists selects e.g. these two edges and the middle, and kill them together
like that to the x-axis. And the club those. We can do that. And now I can go to the vertex I
call this vertex or this vertex and scale it like this. And we can do the same
scenario for those here. It S and scale them. I can select those here in
the skeleton like this. Alright, hit Select to
isolate it because we need to do the same
thing on the other side, but I prefer to delete half and give it smear
after that crop, the half of this hit
XF to delete it, and then it has got the solid. All right, Maybe I
can select all of these vertices here to
grab those as well. And maybe we can move those
down just a little bit. And it can throw off to
add one H right here and select this one
and this one it is. And the scale just a little bit. Maybe. I don't know. We can scale those
just a little bit. And yeah, that's cool.
That's very cool. Cool. Let's select those and the wireframe
and take those up. I can throw it off to
add a globe right here. Go to solid. Maybe we can kill those inside
just a little bit. Alright, now we need
to add a support, a clue for these edges, because if I add
subdivision surface now, I will ruined the results. So anytime any to add
support a Clubs tab out, first, these phases,
we don't need them. Alright, maybe I will
keep those here. Turn off subdivision
surface, Kimberly. Let's go to the edges
and let's select these edges here,
alt, click Alt. You have to collect and targets all of these necessary ages. Those here as well. And yeah, I will keep all
of these ages actually, I will, I will keep them. Select all of these edges. And those here hold Alt Shift and the club
those here as well. When you would target
to everything, it can throw me and
give them global level. Let's add the three. And
let's pivot them like that. Alright, here we have this phase and here we
have very big face. In this case, I can add one
H right here or here to support this area because the strike will go down
like this to the central. This case, I can add a loop
here to support the site. The site Control R to add
another a club right here. And the same scenario
up here as well. And from here as well. Because this area I needed, I needed to be very tight. Because of that I added support the edge loop from here
and from here as well. When you'll be satisfied
with the results. Now you can activate
subdivision surface and now we've got
some nice results. Right-click here
the smooth to make this smooth. And we got this. Okay, When you complete, now we need to add
mirror modifier to mirror this on the other
side, on the other side. But the problem that
we have right now, the origin dot is not in the
correct place. From the top. The origin dot should be right
here. Here in this area. In this case, we can
touch it as smooth. Because the edge Alt click to select the
entire edge loop. You have to Essentials
course are selected to bring the 3D cursor exactly
here in the middle. And then how about now we have the 3D cursor in the middle and the position that we want. Now I need to move the origin to the position
of the 3D cursor, right leg, origin,
origin to 3D cursor. Now we done when a company that go to the mural
art mirror modifier, and let's choose y-axis, turn off x. Alright, seems like we have
problem right here. Because I don't know. Because we rotated the plane when we added the first time. Let's try z-axis or IZ isis
is working as very cool. Alright, That's cool. Okay,
Now we got this result. Let's see what we
can do with this. Let's put the subdivision
underneath mirror modifier because I need the
mirror and then subdivision. Now we have it. When you combine it with
the mirror modifier, check is everything is okay. Do we have an overlapping Okay. Let's activate wireframe. All right. It seems like
we have a problem right here is not working
in the correct way. Okay, Let's go back to the modifier and see
why that's happening. Because we have y is still
activated in the atlas right? Now the result is better. We should have the z-axis alone. When you complete, apply them or we don't
need it anymore. And now we can actually. Touch it, it's
moved in the club. The head from the
side of you will go to wireframe cop ahead and
activate proportional editing. And now I can scale, but I can make the effect big. And the scale like that. Just a little bit. If I like. Not too much, something
like this will be enough. Go to solid. And that's it. Okay. Now let's hit slice to excite and let's
go to the top, hits key or grab it
like this and puts in the correct place,
should be right here. Let's see what we have here. Do we have any space?
Alright, it's fit. Now I can tap it as
smooth and grab the head and the wireframe mode and
activate proportional editing. And move it just a little bit. I need small curve maybe from the top I can
determine that. Maybe from the side view. Go to wireframe Hickey Hill is move this just a
little bit spots. I will have very ugly care of. As you can see, it
goes like this. I don't like that. I want it
to be like this. This way. I can change the the follow-up of the proportional
editing to the sharp. Maybe let's try the sharp. Yeah, Now this one is working. Alright, something like
this will be nice. Let's go to solid and
let's see what we got. Okay, very cool.
Turn off wireframe. We don't need it
anymore. And maybe we can move the wheel
just a little bit. The wireframe, we can
move it right here. Or maybe in the side. Something like
this. Go to solid. That's very cool.
Alright, Now, what else? Now we need to use array
modifier to add copies here. Alright, we need to
add 12 books here. And let's start doing that. First thing. I need the origin dot
of this piece to be in them in the middle of the array. The middle, I mean in the
middle of the shaft itself. To do that, I will, e.g. I. Will bring the 3D
cursor right here to this phase
shift, this course. So to select it and then
talk about select this one. Right-click origin to 3D cursor. Now if I rotate this to the y, I will rotate it around the
shaft and that's what I want. Alright, so after that I
will go to the modifier, this activity subdivision
surface and close it. And let's add array modifier. Modifier will help me to
duplicate this object. And if I add more
here in the account, I can see the duplicated, but I don't want
that duplicate to go to go to one direction. I need to go around
the shaft here. So in this case, I will reset all of these axes, crowd them like that,
hit 0.0 because I don't need any CoV-2,
go to any direction. I need. The array works according
to the objects offsets. So I need to add a helper
here in the middle, use it as an object, hit Shift a and go to the empty, and let's add an empty. Now we have this
empty in this area. Select the spokes here, spoke and choose this
empty as a helper. As you can see, we
have something, but it's not working
in the correct way. I will select this and hit Control a to apply the
rotation to avoid any problem. And now it's applied at school. We have a problem
with the scale. As you can see, I will hit Control a and apply
the scale as well. Now, as cool, we don't
have any problem. Cool, because we selected this as an object, offsets the empty. Now if I rotate the
empty to the y, I will have some something here. Alright, so let's go back here. We need to add 12. So
let's add one to 12. And we need to rotate
this around the y-axis. Alright, so this is the y-axis, whereas it's the
rotation, this one, the y-axis here in the y
at 360/12, then hit Enter. And now we have the
Covey's that we wanted. Let's go back to the modifier. Endless. I don't know if you want
to put the array the next has the second modifier. That's okay, but now
we got the result. Alright, so this is
it for this video. And see you next.
10. 010 Modeling Creating the wheel ring: Hello again, we'll come back. We didn't finish the wheel. Let's see what we can
add and tweak here. Okay, let's select this piece
and let's tap to edit mode. Alright. Alright, alright. We have a small edge, as you can see right here. And it's a little bit
scary here on the side. The shell can do all of that. What I will do is I will hit
Control R to add one H right here in the middle and hit
right-click to leave it in the middle and go
to the other side. It Control R to add one H, confirm it, and right-click
to leave it in the middle. So with this one selected, hit Alt Shift and grab
this one and then hit Control Shift R to offset this offset to
this almost right here, because I need an egg here. And I need one H right here. Alright, cool. This edge. I think we don't need it. All. You have to click grab this, and I need to
dissolve these ages. Amy and I need to delete these edges and have the
face is keep the phases. To do that. Just hit
Control X and that's it. This one in the middle, maybe. I don't think it's for now. All you have to click. This one, can throw
eggs and dissolve them. Go to face, Alt click to
grab this entire face loop, Alt Shift click to
grab this one as well. Alt E to obey an extra menu and extrude those
out just a little bit like this. That's great. Now, this H right here, all triptych Luck Club, this one can throw
X to dissolve them. I don't give them. Hit Control R to add, maybe, I don't know. Let's add two edges here maybe. And can throw R2, R2 here as well. With those selected alt Shift, click and click here and is killed those just
a little bit away. But turn off
proportional editing. We don't need it anymore. And it's killed those just
a little bits like that. Maybe. I don't know. If
you're like cool. If you want to label them, you can give them a bevel to
have a small care of here. And yeah, we got nice job. All right, now I'll
click on this side. All you have to click on this side and maybe we can move on. Lets you can throw be less spit bullets just a little bit. Maybe we cannot for ages. And those here as
well, Alt click, Alt Shift, click to
crop those here. And maybe those here as well. And give them their
swivel can throw a, b and the volume like that. And we just have these edges. And this one here. Give them a small bubble. Maybe, sorry, Control B. And let's add three.
That will be enough. Something like this.
Tab out and that's it. Right-click. Hey, this mouth. And that's very cool. Okay, Now let's go to
another omega because we have some edges here. This real sublet it to
12345626 sides or six pieces. We need to do
something like that. To do that I can go
to the site of view, hit Shift a, and let's add e.g. a. Circle. And let's align
the circle to the view. And let's add six site
and scale it down, make it small like this. And rotate it. And hold Control to
snap the rotation and rotate it 15 degree. You can find this right
here, the number. And I will use these
tips to create an edges. Alright, that's cool. Now let's select the wheel endless top. And the, this edge is the
closest one to this tip. So I will grab it and use it. The select the rest. Alright, select this one here, Alt Shift, and click
this one here. And you can click
this one right here, and this one right here. And this may be you
want right here. When you select all of
these necessary edges, you can hit Control B for bevel eligible those just
a little bit like this. And that's cool. Now we have this. We bubble
those with three edges. Which we can do is
we can hit control minus to shrink the selection, to select this edge
in the middle. And now hit Alt S to
book these edges inside. But not too much. Something like this may be. Alright, I think we got
problem with the novel itself. I think we gave them
too much approval. Okay, let's give
them another bevel, but I need it to be very small. Can throw B and give it a very, very tiny bubble
like this maybe. And yeah, let's, let's
try another scenario. Let's go to face with
these faces selected. Hit X to delete all of this. And now I will go to
edge Alt click to grab this entire edge
loop and then hit F to add a big face here. And Alt have to click to, sorry, alt click and hit F2
either face right here. Grab this face and
this face and then hit Control Alt S maybe to move
those just a little bit. But I think that's
not going to work. I think doesn't work. Let's try to bulldoze
them like this. Alright, it's very nice, but we got small gap right here. And I don't like this gap. That's too much actually. In this case, I will, I can
throw a couple of times and let's go back and let's
make it even smaller. Very tiny bubble. Go to face, hit X to delete all
of these phases. And now we have this edges. Now we can hit, alright, let's go to Edge, or let's go to Face, select all the faces. And then I can go to select and select loop and
select the boundary loop. Just the boundary blender automatically will
crop the boundary. Now let's see if
that works or not. I will hit F and let's
see what will happen. Is you go to the side view. Let's zoom in here instead. Let's see do we have
any overlapping here? Alright, I think all
the phases now are filled with these edges
selected, are still selected. I can hit Control V to
bevel all of them at once. Alright, small bubble
like that will work. Tab out. And now we
got something nice, but the shading is not nice. It's bad. To fix this. I have a modifier
here is very nice. It's called weighted normal can help me to fix the heading. I added the weight normal, but still we have problem because we didn't activate
auto smooth here. Alright, so check the result
now before and after this, before, after, before, after. And now we get very
nice results here. All right, we
didn't finish here. We need to add a ring
around the wheel. Okay, in this case, I can select maybe
this one and use it. Let's tap it is more than
maybe I can go to face, Alt click to grab these faces. Hit Shift D to take a Coby and right-click to live
with and assemblies. And maybe the snake
cobra can scale it and make it fit like this. A line, It's from the top. Maybe we can move with just
a little bit like this. And I don't know from the fraud, maybe the wireframe mode, we can align it better. That's better. Go to solid. Now I need to sublet it. It's P to open the spread menu and choose,
Select and selection. And that's great. What
selecting, selecting. Alright, anyway, alright,
alright, alright. Tub outs from this geometry and let's select this one
and let's tap to edit mode. Tap Control R to add one
egg here in the middle and can throw a little bevel
it, maybe like that. And now let's select this edge and this edge right
here and this kill them inside
just a little bit. That's great. Now hit a to select
everything and then Alt E to open
extrude menu and extrude along normal and give
them a small of extrusion. I mean thickness. Now we have nice thickness here. It's like to isolate this turn off subdivision surface
for now temporarily. And all these phases,
we don't need them. All. Click Alt, you
have to click X, F to delete them because
they are hidden. Grab the outer edges
and the egg mode. And this one as well, and this one right here and
give them bevel can throw be three, this will be enough. And they'd be this side and this side we can
be bullet control V. And we can add to maybe
think this will be enough. How about activites? Subdivision surfaces
slash to excite. If you want more,
you can add more. But let's think too much. The result is very beautiful
actually, I like it. If you want to make the
wheel thin or you can grab everything and
scale its fuel like. Alright, I will
decide that later. I don't know, do we
need to scale it? Will actually, I think
we need to scale it. I think we need to. All right, Let's bring the origin dot over the
wheel in the middle. And now we have it
and this one as well, we need to bring
it in the middle. Right-click and sit origin,
origin to Geometry. Whereas it's alright, let's call this one
as well. That's cool. This piece and this
piece now sharing the same or the same position. Select those from the top, maybe hit S to the y
and make it smaller. Maybe. I think now
it's makes sense. And the close to my image. Yeah, I think that's
always better vehicle. Alright, so I think
that's it for this video. And let's see what we can
do next. Okay, Goodbye.
11. 011 Modeling Creating the wheel core lock: Hello everyone, Welcome back. We have some details here
we need to add to that I have this selected and
hit rhotic liquid smooth. Let's activate auto
smooth for this one. Tablet is more than this target, this edge and this
edge right here. And let's pivot
them, get Control D, and let's give them a
small amount of beveling. This are the three I
think that will be okay. The sobering one
image right here. And let's see what
else we cannot say. Alright, let's try
to find another I make maybe the semi dry here. We have this beam,
we need to add it. Let's go to the side view and let's see how can we ask
something like this? Actually, I can select one vertex from the beam
itself from the left, and maybe hit Shift D to
take this vertex as a Coby, I can use this vertex, hit E to H through
this vertex down. Something like this. Maybe, let's see, grab those. We can move them right here. And maybe we can, I don't know if you
can move this here. And it's e to x
through this here. Sorry, and then E to throw this up here and the club those hit S and scale
them like that. And hit E to throw
those up here. Alright. Now let's
scrub one side, hit E. And let's make some
extrusion like that. This one here is E, and let's mix some
extrusion like this. That's great. Club those. All right, Actually, what I
need to do is I need to go to the H Alt click to
crop this in your egg, and then it's p and two
selection to separate it out. Select this tab and
go to a vertices, grab those two
vertices, endless. Level those vertices. To level the vertex, you need to it not just
control unit to press Control, Shift P to do that. Let's pivot of those like this. And from here, we can pull
those may be eligible. Or maybe we can hit,
can throw it out to add one vertex right here, grab it and move it down. Club those, all of them. Those inside here.
Alright, that's great. Maybe we can scale this, make it just a little bit. Those here as well. Okay. Maybe I can grab those
and give them a bevel. To be Pb three. This one as well
controlled here to be something like this, maybe. Now let's tap out. Can we scale it's the spring, the origin.in the middle, right-click, origin to geometry. Let's kill this just a
little bit, make it bigger. And when you complete it, right-click and
convert this to curve. Now it is Make and this is
the icon of the mission. We need to convert. This took care of a
few notes right here. Now we have this convert, this took care of it. Now we have cared. Go to the curve properties and
scroll down to the geometry, open it and go to
the bevel section and just give it depth. Somebody like this who can hold, shift and move this or
something like that. What rock and move this inside. We have this side segment. We don't need that much. Maybe we can take this
back to, I don't know. Two, I think this
will be enough. And now we can how we can
convert this back to mesh. So we can make
some tweaking tab. Go to edge Alt, click, hit F to fill
this ambivalence. Let's put volatile with
two edges or three thus will be okay like this. The same side as well. Alt click, hit F to full. It can throw B2B velocity
and let's pivot like this. Has a very cool.
Now, we just need to make smooth in this
ad subdivision surface. But if I right-click here, this mouth and
nose becomes more. Okay, that's great. Now we can touch it. It would actually, if we want to make this thicker,
it's optional. We can see, if I go to the edit mode with the
subdivision modifier active, I can see the cake and the result of the
subdivisions servers. As you can see, it's
become thinner. If I want to make this thicker, I can select all the faces
and hit Alt S to make it roughly like this
and move the mouse. And now it's become thicker. If you like this,
you can keep it. I like it. I like it to be
big like this and move it. It should be close to the half. This seam right here. It should prevent
that have to go out. This is the idea. This
is the why behind this. Alright, yeah, that's
it for this video. By the way, I think we we
didn't complete the side, but yeah, before
I end this video, I will complete this side. Let's go to the top because
I just need to make sure that the heft exactly
in the center. Alright? Alright, it's not in the center because
if I compare it, we have some space here. I'm okay, That's okay.
I will bring this back, hit Control. This case. I will talk to it,
smoothens, go to wireframe. It Control R to add one here. And let's put this
edge in the center. Let's see how can we do that? Or at least zero out the
z-axis or zero Enter. Let's see if that
will work or not. That's local to global. And we need to zero out this
to the y-axis, I think. Yeah, I'd say right here. Now it's become in the
center of this edge. And does it close this panel? Now let's scrub this side. We don't need it,
It's XF to delete it. Now we have Hall of this. Okay, that's great. Now let's hit Alt click
to grab the spring hits Shift S and costs
are to select it. Right-click or sit origin, origin to 3D cursor. And now we have the origin
dot exactly in the middle of the foreign reserve. We have problem with
the orientation. I can apply the rotation
or I will live with. Let's add mirror modifier. Now. Mirror modifier has exist, but we need to pick the correct
position theorem of this. And let's try this or try this. Now, the z axis is
the working one. That's very cool.
That's very cool. Now we've fixed the
problem. Vehicle. Alright, yeah, now I
can end this video. See you next.
12. 012 Modeling Creating the Barrel holder: Hello everyone and
welcome back here. Alright, let's see what's next. I think now we can create
these these things, metal stuff here to hold
the, to hold the Piero. If I print my reference images. Alright, let's try to
find images from top e.g. as you can see here,
we need to create. I don't know what they call it. I like the style. I like this image, so I'm not going to create
something like this one. I don't like this sign here, but I think this one is better. Okay, in this case, I
think we better to bring the image and both
inside the blender and tried to create
something like this. This is an option or you
can what does that put them at right here and try to
create something similar. The easiest way is to bring
the image accurately. So disappearing the image. Okay, here we have
all the images. I just need this image, so just click and drag
and boots right here. All right, now we have it. Let's take this out. We don't think it's for now. I will hit Alt key for
this image tourists said the location and Alt R
to reset the rotation. And you can accurately, we can put this
right here for now, maybe take it down
just a little bit. And now we can start tracing this design
right from the tube. I think we can rotate that
just rotated like this. Alright, It's Shift
a to add plane. And here we have the plane. Let's move the plane right here and scale it, make it small. And let's put it right here. You can scale it even
more if you like. And we don't need to
create the both sides. I will create one side and
then use mirror modifier to create that their side. Alright, so can throw a apply the skill hit tab to
go to the other mode, or you can switch it from here. And let's go to the vertices, and let's move those
vertices right here. And those may be here. Okay, something like that. And I will use this vertex. Let's move that
just a little bit. I will use this vertex
to trace the hip here, hit E to extrude it. And let's start maybe from here. Hit E to extrude this,
maybe right here, and e to x through this here and start
following this path. Something like that. Alright? Alright, That's great. And what about this? I think I've told
that we can then crop all of these vertices and move them just a little bit to
make this sits rights. And yeah, that's very cool. And now I think now we can
take those down and activates vertex snap in the snub these two vertices with
this one right here. So Cloud them, move them like that hold control and
starts right here. And now we can select
this with this and hit F to create a connection
between them. And you can hit Alt click
to grab the entire loop, just this edge loop. And then hit F to
create a big face here. And it's very important to
make some connection here. Use the knife tool, hit K, e.g. make a cut from here to here. Because we need to add a
subdivision surface and it is wrong to leave this face like this in 3D when you
want to create something, make sure that you
always have quiet. There's two type, three
type of surface we have. We have a surface
with three vertices, a triangle and triangle
maybe could be like this. Or could be like this,
could be anything. Any phase with three
vertices, we call a triangle. And we have quad. Quad means face with four
vertices, something like this. Or even could be like this. Or could be like this. 234, this color quite. We have in Gone ink on
the surface that have more than four vertices, e.g. this one, we have 4567. So this face, this big face, it's quiet and we always
need to avoid quad. When we use subdivision modifier because you will
have a bad result. Because of that, I need to make some connection and
cuts. Cuts there. I will use an F tool, hit K and just make cut from here to here maybe and use the knife tool
again from here to here. And maybe this one as well. Use the knife tool again and let's make cuts
me because like that knife tool hit K
and make cut, hit Enter. It, kick in and make
cut from here to here. It's Enter. And hit K again. Make a cut here. What else? Maybe on here. Okay. We can other category here
to make it a squad as well. And for this error here, I can make a cut goes
from here to here. And now I have a quad here, four vertices, and here we
have four vertices as well. 12341234. And the same scenario here, we cannot cut here, hit Enter it k may cut here. And I just forget to
activate screencast. I don't know all the
ways I forget that. Let's move this right here. It's n to hide this
already. That's great. Okay? Now we need to put the
origin.in the middle so we can use a mirror modifier
without any problem. And maybe we can make
it a little bit taller. And all. I can
determine that later. Alright, let's see. Grab this vertex hit Shift S to open their
pain meaning of for the 3D cursor and take them down to the course
author selected. Now we have 3D
cursor right here. Top outs, go to the object mode and then hit right-click
and go to set origin, origin to the position of the 3D cursor to move the
origin dot from here to here. So this one, I
mean, that's great. Alright, can throw
a Apply rotation of life scale in case
we have Adam problem. And now we need to
use mirror modifier and mirror this on the y axis. The y axis. Cool. Let's go to them with
a fire at mirror or turn off x to y and done. Alright. Let's see everything. Okay? Alright, maybe now I can apply the mirror modifier and I
can, alright, let's leave it. There was no problem
until leave it. I will ask subdivision
surface after that. Now we've got it's very
clean and smooth result, but we need to make some
tweaking right here, Okay? Okay, Okay. I think I don't think it's
mirror modifier anymore because I got what I want. So I will hit Control. I end up light and
lips have the vegan. But before that, I
just need to give it a little bit of thickness. And let's add a solid
define modifier or a C or is it this far I hear. Solidify helps you to king the surface to something thick like what you
see right here. And I think this
thickness is okay, don't forget, this piece is very big. We need to scale it. And go to the top view and the smoke with endless puts into place would be right here. And you can scale it
to feel like skill, it's like what you want. And from the front maybe we can put them their position
should be right here. Candace Kelly, just a little
bit more all on and off. That's what should be, should end right here. Alright. Let's begin. We
need to rotate it. After that, I will
just kill it just a little bit and give it a
little bit of thickness. Or you can apply the
skill first and then can throw the thickness if you like, or something like that. I think it's okay. Well, now I need to put
the Oregon dot right here. I will apply this will
defy because that's it. I got what I want to take out. The thickness. Can throw
light and light and touch it. It's not able to
grab this vertex and hit Shift S and the bringing the 3D cursor right here. And then we'll switch to 3D cursor transform
the word point. Because I need to control this according to the
3D cursor position. Now, I will tap out and hit R and rotate this and
put it in your hand. I want odd again, hold shift to more to
make them movement slow. And maybe I just need to
take this down like that. And we'd just a little
bit right here. Alright, from the tub. We can put this right here. And then the 3D cursor here, you can tap it, got
one vertex, Shift S, cross her to a selected tab
out and then R to rotate and then hold shift
to make that rotation slowly rotate like this. Well, last night about this. There's a little bit too big. We can scale it for like
Oregon to rotate this. You can move it
just a little bit. Rotate this again. Well, as cool. Okay, I think we can, I don't know, we
can scale these. Make it smaller or I can
scale the whole shape. But I need to make it taller. Alright, I will hit
Alt auditory sets that are taken because I need
to make some kinks here. Well ferrous, Let's top it. Within the wireframe,
I would look up all of these vertices and move them just a little
bit right here. Make this a little bit taller. And now I will tap out. And let's move. This is the corner right here. And put, put the 3D cursor
here, hold Shift, right-click. I just need to use this as the pivot points and
then hit R and rotate this and then move it manually and what's
in the position? Alright, now, from
the side view. Okay, we can move this
down in any tuple, the 3D cursor right
here, hold Shift, right-click and use
this as a big word. Hold, hit our hold
shift and rotate this. Something like that. And I think we are done
here for this piece. Now we just need to give it a subdivision surface,
but does not get to work. We need to make some tweaking
thought to the smooth end. Let's see how can
we accept that? I will hit Select to
isolate this piece alone. And maybe we can, I don't know, maybe we can
target the sharp edges. All of them. Those here and
those here as well. And those here. And this one here as well, those edges, because we
need to give them a devil. Alright, now this one just here. And let's continue
grabbing these edges. Alt Shift, click,
keep doing that. Even this edge here I wanted, and I want those here. I want those here. And they want these edges. Select this one, hold control, it got this hold, Shift, grab this hold Control
and drag this. Alright, so that's cool. Maybe this one as well.
Okay, that's very nice. Now I can label those, but I just need to
make sure that I selected all the
unnecessary pages. That's very important. With
all of these I just selected, just hit Control B2 bevel this. You can add three edges
actually as a rock. Okay, here we have
very huge face. So in this case, maybe I cannot four axes here and just support
the side with a globe. Because I don't need
the algorithm of subdivision surface
pushes the result or the face is towards
the center because we have a big face here and
the small piece right here. So just support it with a club. Okay, now let's see what
we got so far by activists of the weekend surface or
the liquid smooth crates. Crates, it's likely to excite. Now we got something here. Alright, let's bring
this image and let's see what else
we can do, right? This one is easy actually. I will use this to
create this, this image. I don't need it anymore. I can delete it. Okay, and I will use this
reference image here. From the side I can circle
and align it to the view. Now, this circle
have 32 vertices, I just need 12,
will be okay, 12. And the scale, let's
make it small. This point, this right here. Okay, let's change the transform
pivot 0.2 bounding box. Scale this, something like that. And let's move this right here. Timberlake can throw
light up, let's kill it. Mood, go to vertices
in number one. Okay? Go to vertices, selects this side of vertices and hit X and Q is vertices to
delete the vertices. But I just deleted
those as well. I want those, I need, I don't want those. X vertex. Cool. Now I will select this and hit E to throw this to the side. And the club those hit
E to extrude this on the other side.
Somebody like that. I can move this
just a little bit. Then it's a select them all
0s to throw those here. Great. Maybe just
a little bit more, cut up those and
take those back. Maybe right here. Maybe this one a little
bit here. What about this? I will hit Control
Shift B to have a bevel level like this work. But I just need to make some connection because
here we have a big quad. This case. I want to
go out with this, with this hidden J to make a connection between
them. Don't use F. And here I will add two edges, and let's connect those. Here. Had k, sorry, sorry. K. This one with this one had k. And now we have coauthored here. Okay, as you can see, this one is quad, four vertices. Quad, quad, quad, quite quiet. And for this side, maybe we can add one H
right here to sub-divide and make those even.
Alright, that's great. How was well, here
we have a whole, we need to create Hall
according to this image. Because I decided to use
this as my reference. Maybe I can add one
H right here and go to Face, select these faces. And then hit I to insert. And then right-click
usable tool and just circle to create
a circle right here from the top you can
rotate the circle and correct it and then scale
it's small like that. And then hit X to delete this. And now we got something here. Very cool, very nice. Okay, what about this
edge right here? I can grab this with
this Alt Shift click and Bevel them Control-V to
three, that will be enough. And now we just need to give
them a thickness tab out. And who we need to make
sure of something. I just need to make
sure that the faces, the normal of the phases, are in the correct direction. If I want to check that, I can go to the you bought it overlays and here we
have face orientation. When you check this, you can see your result. Anything that's not acceptable, anything blue is acceptable. When you complete your modeling. Always go here and
kick face orientation. Anything great unit
of lipids to blue. Okay, to do that, e.g. the B-roll, it's a right. The faces are flipped. Inside 3D. We have the surface and
the surface has two sides. We call it a normal. One side should be visible to the camera and the other
side should not be visible. The visible side, when you
activate this tool at all, be blue, That's me
and that's okay. But if you see the red color, that's mean these
phases are flipped. Alright? This case the barrel. We have a problem
with the bureau, we have a problem
with this rank. We are problem with this. I just forget spokes,
I think they call it. And we need to fix
all of that. E.g. I. Just need to teach you how
can how can you do that? Go up the top to the motor, hits a to select all the faces. Even if you are in the edge or vertex offices, there
was no problem. You just hit a and then
hit shifts with n, k. Shift N. When you do that, Blender
will recalculate the normal and fix it for you to
all of Flaubert's like that. And now I just fix it. This same scenario should
happen to this one. Top a shift and tap out, got this top, it's a shift
and club out, grab this top. It's a shifting to about the
same CNR for this topic HF. Then we have this one as well. We've got this tab
hit a half done. Now we just fixed everything. What about this
piece right here? Well, I have no problem
problem with this because I will give it a
thickness and if I do that, it will be fixed automatically. E.g. if I go to them with the fire and give this solidify, as you can see, it's fixed. But the question now is. Which data or can
we need to use? Solidify to this direction
or this direction? I will use this data to avoid any overlapping
here because we have vertex here
and here and here. And when, when we use the
modified to this direction, these vertices will overlap each other and they
will have a mass here. Okay? If I, if I, if I hit Control a
or if I could go to the edit mode and kick this. As you can see, these vertices are almost married to one vertex here, and
that's not going to work. If I flip, as you can
see here, kick this. If I flip this to
the other side, I will fix the problem. So give it a
thickness but to the correct that oxygen when
you'll be satisfied, just hit Control a and
apply the modifier, but top out, apply
them in the fire. And there we go. We've
done tabbing again because I just need to
give the edges a bevel. Alt click, grab all
of these to Kent, hit Select to isolate this. Halting, have to
click here and here, and here and here. And those here as well. Alright, when you select all of these edges and those here, hit Control V to bevel them. Or I saw, I guess,
forget to pick this one. Yeah, that's okay. Cool. So now Control V and give
them a bubble like this. And now we can give it subdivision surface and
right-click Shade Smooth. And now we're done. After that. It's like to go to
the top number seven. And now let's put this
in the correct position. Move it from here, rotate it just a little bit. Align it to the woodblock. And from the side view I
can move this down here, maybe, something like that and rotate it just a little bit. Something like this
maybe and move this up. And I think we can make
some tweaking here. Alright, it's a
little bit vague. We can scale it like this. Maybe what I need to take this side and the
wireframe mode to crop those all of them and just move them down just
a little bit like this. That's what would be better. Okay. That's cool. Tub. I
would go to the top. And let's put this in the correct position
maybe right here. And let's Tumblr on
Elizabeth. We've got so far. All right, It's, it's nice, accurately and cool
and I can accept it. Alright, so yeah, this is it for this
video and you're next.
13. 013 Modeling Creating the rivets: Hello again. Welcome back. Okay, Let's see what's next. We didn't finish it
here, we just need to add more details. I think we can start
with the side here, because you go to
the side of your top and grab these vertices in the wireframe to
select them all. And manually just move them. Hit key, sorry, I just hit F, G and let's move those
to the tip here. I don't know, maybe right here. Let's put this right here. Rights. That's cool. Let's go to the top because
we have misalignment here, we need to move it manually and put it in the correct position. Right? That's right.
And now let's try to create this ring here. I don't know what is this bus? Let's try to create it. Okay, listen, let's
some edges from here. Maybe those edges
here hit Shift D to the Z and the state of
Coby from this and then p and two selection to survive this tab out and bring the
origin dot here to the circle. Right-click Set Origin,
origin to the geometry. And now let's move this
circle right here for now. Actually before we do this, I need to scale this to the
z so I can make it floods. S. Z is zero. Enter what's not having s z? Zero. Answer. Oh, that's weird. Top
hit a zero Enter. Yeah, now it's working. How about let's put this here.
Alright, I've heard that. Let's go to the side view. We can hit Z to go
to the wireframe. Feel like now we have this here. I need to extrude it like this. Okay, Let's see how can we
get something like this? And the editing mode. If I go to this more turn off subdivision
surface Timberlake, I have this nice, nice
tool is called Sprint. I can use this butt to
spin walk according to the 3D cursor position. I need to have a
shape goes like that. That's being an almost, a 3D cursor should
be right here. So let's put the 3D cursor here. And now let's, okay, let's use the Y axis, the y axis and rotate this
just a little bit like that. Until we get to
hear that you like. If you don't like
it, you can keep their position our 3D cursor. And you can start again, but you need to hit
Control Z to cancel that. Now you have the ability to move the result that you got, e.g. if you want to move
it to the y axis, we can use this
arrow or to the y. As you can see, these edges go, goes to, I don't like the
direction of these edges. Alright, That's mean we
have some problem to fix. The problem is we just need to take this up
just a little bit. I mean, to fix the problem, I will move this to the
x-axis until I have, is it just goes
through the center. Okay? When that is done, but we fixed it. Here. We have the menu to control the, what we have here, the
steps, that's too much. Maybe I can't review
it and I'm broth or something like
that to eight maybe. When you complete. All right, let's see
what we got here and the solid of you. That's cool. Guys, go to the box, select and you've
got this result. It's very nice to hit Select
to isolate this piece. And I think we can, I don't know if we
can rotate it just a little bit according to
their 3D cursor position. Okay, that's me. We need to tweak that
transformed to 3D cursor and top out and hit R to
rotate this like that, something like this,
and then move it down. Make sure that you
put this exactly in the center when it'd be satisfied that
everything is good. Activists subdivision or
right-click a small thing. Yeah, that's it.
You're done here. Alright, so we have these Paltz. Let's try to create them. I can put the 3D cursor
right here and then go add Shift a and
let's add e.g. what we can add accurately, can add cubed is very big. We are inside the cube
this and scale it down and scale it down like that. And take this up
can throw layer, let us kill target a. So everything can throw me to bubble and this
bubble is all right, Somebody like this.
Alright, that's cool. Now we got this. Cool. Let's select these faces. Hit X to delete them. And the club bond face from here hit L to link
select, to select. The faces that length
through this face, and then hit x, f x to
open the Delete Menu, F2, delete the faces. Now we got this tub
arthritis liquid smoke. And I can use this. Feel like you can
scale this with a Z according to the origin dots. So I will throw this back to bounding as to the t and make it flat just a little
bit from the side. I just need to do
something here. The origin dot, as you
can see, it's right here. I just need to move it up
and align it with this line. And I will tell you why. Let's go to the option
activity, Oregon. Take this up. Are
there z axes goes up? There's yeah. Yeah.
That's right. Let's keep it like this for now and turn off
organ, that's it. And now we need to scale up, make it small, and then can throw light.
I would like to scale. And now we need to distribute this on this piece of metal. I can use a snob to face. Okay? And here we have this
option ally of rotation. Because when we want, because here we have
some tilt here. If I don't activate the
alliance rotation, I will. This piece will not aligned to the rotation of this
piece of metal. Okay? I mean, if I go to
the site of you, the result will be like this. And that's wrong. I needed to be like this. Okay? This is the difference. Okay. Let's activate a
lateral rotation. And now I will hit G to move
and hold Control to snap. And now we have something
here and now we can stop it nicely on the surface. And let's see how
much we have here. How many we have two here. So let's grab this from the top, hit the key, hold control
and establish right here. Scale it. Scale it.
Yeah, that's cool. Surely we can activate the center to make the snapping working
through the center. That's cool. Hold Shift D to their Coby hold control and
establish new Cobra here. Shift to detect Coby holds, can throw all this time is here. Okay, heft to D Coby hold
control and snobbish here. This process is
very fast and nice. The other copy here, have the hold can
throw a lot Coby here. The Gobi here, the Coby here, hit the Copy here, hold control. And what else from the top
cavity or the Coby here? Shift the other Coby
here, another shifty. But the skill is
just a little bit, make it big and hit key and hold Control
and standard again. Now we got all of these. When you will be satisfy. Know you can merge them,
but I'm not going to marry this right now because I need to maybe I can use some
of them in another place. So I will leave them like
that, like this for now. But now we got something nice to create a piece of
metal right here. And this area to hold
this piece of work. But if I want to do this and I need to make
some tweaking here. Let's go to the side view
and go to wireframe. And let's see what we got here. And I just need to move
them just a little bit to this direction
right here maybe. And maybe, I don't know, maybe take this down
just a little bit and put this right here and
this one here for now. Okay? You know what? I think this what do we have here
is not going to work because we didn't gave
the barrel to be rotated. Along this axis. A twelv hit the wards. And thus actually
not, not correct. We need to fix this. In this case, when
we go to this side, we can move this down, but we need to check the
vertices were out there. Let's hit Select to
isolate this piece and try to understand that
what we have done here. Okay, maybe I can add
an edge right here and this area and then go
and take those down, all of them from the side. It's like to anxiety,
go to the side. Let's take those down. Because I just need
this piece here. Okay. Somebody like this,
I don't know, maybe sort of work. Alright, now let's select this. Let's put this file here. What about this one? I don't know. Maybe we can select those and move them down
just a little bit here. Okay. Something like that. Yeah. Now we got
this from the top. We need to make some
which we can grab these vertices and
more than right here. This tried to check the wrists. Maybe I'll rotate those
just a little bit as well. It's got a solid
and I was working. I was very cool. Now
let's try to create this. I will put the 3D
cursor hand this area, hit Shift a to add, but the top outs first, shift a to add and
let's add plane, align the plane to the
view IT S and scale up, make it small like this. And then a scalar like that, I will make it a little bit too big and can throw layer
by the scale of top. And maybe before I taught, I will take this out to
grab these vertices. And those there can
throw shift B to bevel, to bevel the vertices. Let's make a bubble like that. Now we've got this hits
like to isolate this. And let's make some connection
between these vertices, has k, those here
as well, hit J. Because I don't want
this to be an gone. Can throw off to add
maybe two edges here. Yeah. And just connect
those here at J. Sorry. Those here as well. Sorry, this one with
this one hit J. Club this with this. This with this, it's key. Can throw it out to somebody. The side can throw
out what the site. Okay, that's cool. Now
let's go to face the select all these faces and
those here as well. It's I2 insets. And then right-click circle. And then let's go
have ice kill those. They will go to the center. But if I choose individual, I will scale those and their position.
That's what I want. Actually, we don't need
all of that by the way, because I will add these boats above them
and they will be hidden. So I will ignore
what I did here. With just a waste of time. Top hits a silicon
everything and then it's E and give this a little bit
of thickness like that. And yeah, that's cool. Okay. Let's go to the
face has alt click to select this entire face loop. And it will go to Selection. And q is select a little
bit and select boundary to select these edges and give
them a verbal control. Be scribble those 23. Don't add much. Something like this. All right. How about right here, this one with fewer
like we can add one subdivision
surface to increase the number to anxiety and I
will just align it from tub. Alright, kicked the center first and then you
can rotate it. And as great. Okay, Now let's see. Grab one of these pieces, have the hold control and
here's one right here. Alright, but as you can see now, does interest not snap to, it doesn't snap on this
face from outside, but it's snapped from inside. That's me in this phase is a
flipped we need to fix that. Let's repeat that again. When you snap this snapped, but inside nodes,
nodes from both sides. That's mean we need
to flip the normal. So the normal of the face
goes inside like this. And that's correct. We need this normal to be out. If I go to face orientation, as you can see, it's alright. Okay, let's take this piece out. Select this tab, hit a shift M, had a cold Kool-Aid
than normal and tap out and now turn this off. Now if I crop this and had key
hold control and snobbish, as you can see now it's
working correctly. So keep that in mind. Skill, this Hickey,
hold control and stamp. We can shift the hold control
and stamp this right here. And we did something nice. Alright, alright,
alright, alright. Alright, Can we take another
Coby and what it may be? I don't know, right
here in the front hip, the end state where we are
right here from the side view, we can just take it
up here from the tub. We need to rotate it. I think. That's it. We got this
here. I was very cool. Even this NOT exists. What we can do that. Or actually, yeah, we have
one here. I like this. Alright, that's great. All right, the check
the other canons. What else we can create here? Alright, I will
end this video and let's see what we can
create next week. Goodbye.
14. 014 Modeling Adding extra accessory to the cannon carriage: Hello everyone, welcome back. Okay. As you can see here
in this image, I have this piece right
here, this petal plate. They try to create something
similar to this one. I'm not going to
create a new one, but I will copy this and use it. Just selected and then hit Shift D and take a
copy of it right here. Maybe we can flip it, hit Control M to activate
mirror and just give it access it x to a mirrored on the x axis and hit
Enter to apply it. From the side of you. I can take this down here maybe, and maybe rotate it
just a little bit. Hold I can hit Alt R to reset the rotation and
tabulated points. Okay, I think let's turn
off subdivision service for now and let's delete these
edges that I added here. Grabbed them all. Alt
click, Alt Shift click. And it can throw X
to dissolve them. And the wireframe
mode to grab all of these vertices and
just make this short. Okay, now, let's go to
the side view tab out. And let's move this. Let's see where should we
move on paper right here. And maybe we can rotate it. All right, let's put this here. And it's auto rotate
this whole case, something like that to hold hip to make the rotation slowly. And then let's move this here. And let's see what we have
in the 3D view board. Okay, this is more
of this right here. Alright, I think
that's too much. We can go back to the site of you and hit you in this move, this just a little
bit like that. And yeah, that's better. But we need to add
an H right here. Control R, sorry, touch it. It was furious. Hit Control R. And let's add H here. And in the side, if you
go to the wireframe in the crop this and
take this up in, rotate this just a little bit. It rotates like this. And here we need to
make some tweaking. Something like this. Maybe
we can rotate this as well. Hit Control V to give
us a bubble like that. And now we got this. Let's grab these vertices and
moving them to the end here. Let's go
to the site of you. At least see is everything makes sense in the 3D view port. Hit Z to go to solid
and tap outside. Let's go to the top of
your head number seven. And let's make some
which we can first is take this and let's
put it in the middle. Maybe we can rotate
this just a little bit. Something like this. I think that's enough. All right, now we've got this, activates a subdivision
surface after that. And maybe we can cope
with some robots. Maybe select this with this one selected
hit Shift D to take a Coby and hold Control
and stamp it right here. Okay, Now we have one here. Maybe we can scale up, make
it to pick us a little bit. Shifty hold control. And this one here
in the middle here, the one here, have the
hot one right here. And let's add one here. And this area. I think we can call this
objects and put one right here. I mean, this one here, the selected, select all
of these shift to D. And let's take a Coby here. And let's move
this down from the top to see what we have.
Let's put this right here. Something like this. Okay, I think it's maybe we
can move it here. Let's go to the side of you. And yeah, I think that's okay. Position. That's cool. We can take this and the wood plank wheel-like can move them just a
little bit like that. That's kinda walk. But we need to push this side. That's very cool. Okay, what's next?
Maybe what Kenny craft some, something like this. Okay. Let's delete this one. Tablet mode hit Control R
to add one H right here. And this 8-bit
voltage control B. Let's pivot something like
this. That will be okay. And let's select some
faces from here. Maybe those, I think that's
okay to cut up those. Hit Shift D to take a Coby and
right-click to live it and assemblies and then
p and q are silicon, or you can hit S, P, S, P, S to separate
the geometry. Alright? Now we have this Jacobi tab out, and let's select
the scenario and turn off subdivision surface. Similarly, it's like to isolate this one to
work with this alone. Tabs it is more than, let's see what we
can we can make here are listed like this. Here. Alt click to select it, select the edge loop, and then it can throw veto by palettes, almost right here. And then let's
select these edges, this edge and this edge. And let's hit E to extrude it. Something like
this will be okay. And hit Control R. And maybe we can add,
I can add two here, two aqueous and scale them
back that somebody like this, and we can select those
and scale them like this. Let's kill those back just
a little bit to the y-axis. It is individual or journalists. Read this back to bounding box. For this killed them. Maybe we can add one H
right here ands kill this inside, like this. And for any reason, if you want this to be perfect circle, you can select them, right-click and create a circle. But we got some problem because, because of the scale, as you can see, it's
not a perfect circle. And we got another
problem with this tool. In this case, I need to
apply the skill so all he can throw that
and tap out control. I apply the scale to
avoid any problem. And then top Right-click, go to the Bowl Tool
circle. Now it's perfect. Let's move this
just a little bit right here, and
that's what we'll be. Okay. Alright, That's cool. Now let's hit I to insert those insights
homeless right here, and then hit X to
delete the rest. And we just need to give
this a thickness, I think. Okay, let's give this
a thickness. Maybe. I think we need to make
this a little bit bigger. So Alt click on the
aqueous and ligate the face loop and
then S to scale it. And as you can see, we have some overlapping here. Try to avoid it. Move this out and that's it. Out and that's okay.
Thickness. Okay, let's go to modify our lists. And lists are the solid defy to have some thickness
and yeah, that's it. Recall. If we have some problem
here with the corner, we have this option is
called even thickness. If you want to activate it, go ahead and back 32
and apply the salt. If I control a and we
don't need that anymore, top it is more than n. Now let's see what else we can acute. Good to face, Alt click to
select the entire face though, as you can see here. And then move this just a little bit here
and go to Select, and go select loop boundary
tool, select the boundary. And maybe I can add this
edge and those ages as well. Because I need to make a bevel. Maybe those I need to
bevel this area as well. Because this area, I
want it to be tight. Because of that, I
selected this edge. Okay, corners, we need to
target them. This one as well. I hear this corner here
and this one as well. And I think that's it. Okay, now let's hit
Control B for bevel. This parabola like this. Oops, I guess forget
those Alt Shift, click here, click
here, control V. And that's cool. We have some problems. You'll notice we have some overlapping happening
right here, that's wrong. It's manually. I can fix it, grab this over to pack
this one as well. Move it back like this. That's it. Tub of outs, activists subdivision
surface and now we got something
nice and smooth. In case you want to ask
support a glue right here, That's better as you can see, the difference if I hit G and move kick was what will
happen here in this area. Even the header become
better key twice in sliders. So it will add one here
and maybe one right here. As you can see the difference, you can see the stretch. I can make it less here as well. That will be better. And maybe one support
the AQL up here. That's great. We can throw up top out at
slash to exert the local mode. And now we've got this
list are some rivets here. Select this one here, D
hold Control, snap here. Maybe you can make this
a little bit bigger. G to move hold control
and stamped again cavity. Snug this here, grab this
with this here with d and take those two
here and there. Amazing. Cool. What else we can add to that? Let's try to find another one. Alright, can we
create this hook? Okay, I think we need to add
a hook here in the front. All right, Let's do that. Select this Type two ethmoid and maybe we can take
this face to use it here. D take this face right here, and then p as two separate it. How about grabbed this
and you want to add more, delis me the smaller
crop this with this. More than like this. Sorry. Those here, take them down. And maybe those just a
little bit like that, hit a and then E to extrude this forward just a little
bit. Now we got that. Okay, turn off bevel for
now we don't need this. And what else? Mirror modifier tab out
and up light controller. Okay, Very cool. Now let's see how can we
create something like that? With this selected here in the middle Alt
click to select it, to select the edge loop and then it controlled with a bullet. Or I can throw B is
not going to work. And I think I will
show you why because here we have a face inside. I will hit Control Z couple of time just to show you
why that's happening. When I selected the whole
face and hit E to extrude it. The extrusion is done. But here we have the face. In this area, we
have a piece inside. This face, kills
us some problem. Okay? If you have mirror modifier
and if you have a surface, you want to give it a thickness. When you do that, be careful, you need to delete
this face insight. In this case, I will go
to wireframe and select this face in the middle
and hit X to delete it, and then go back to solid. And now I can apply them here and with the fire without any problem, internal bevel. Now this tab again, if I go to this edge Alt click, and if I hit Control V, now it will be baffled
without any problem. Alright, That's cool.
Let's hit Control R. Let's add one H right here. And maybe we can select
this with this hit I to insert something like that. Maybe, maybe extruded just
a little bit like that. Okay. Maybe we can hit
Control Z because I think I can extrude
this directly like this. This one with this
one hits I to insets. And the skill this
make it like a square. There, right-click and
choose circle, mixed circle, and the same CNR you will have problem with
the scale control Z. Talk to OPIA with motor control, I apply the skill. Tab again, right-click Loop tool to a circle.
Now it's better. Scale it down. And let's hit
Select to isolate this one. Let's go to the site
of you, I mean fronts. And maybe you can
use the spin again. Let's put the 3D costs
are almost right here. Something like this.
And activate spin. And let's choose the axis which acts is
renamed the y-axis, go to y and make some
rotation like this. And if you satisfy as okay, if you don't, you can
move it here or here. You have all of these options. Maybe we can make it
a little bit bigger. We can do that and
make sure not to add too many edges right here because you will add a
subdivision surface. We can decrease the number here, six, okay, for me, when you'd be satisfied it half the space and go to
select books and that's it, or you can select from here. All right, what about
this area above this? Hit E to F through this, and then S to scale it. And E to extrude
this up and S to scale this lag that can throw
an hour or two H's here, S to scale this. And now we got this. Okay,
I will add control are, I'd like here because when I add subdivision surface, this error, this error will be too smooth
if I didn't add an edge, but if I add edge, it
will be like this. Okay? Maybe you can throw out to
add one H right here as well. Okay? Okay, okay, what about
these edges here? Let's make some tweaking. Let's select those. And maybe even this age had key to
this and move this up. Okay. What else? I think that's it.
Now we can add a subdivision surface and
see what we will get. Maybe from the side view, we can go to wireframe and
club all these vertices and just move those back a
little bit like that. And that's your grades. Okay? Now let's target to
some edges here. Those here. Alright, so right. All right. See if that works or not. Select this edge and this edge. These edges here as well. Okay? And bubble them. And let's see what's
going to happen if we do that control B. Actually, I will have some
overlapping if I do that, overlapping right here, okay? But I think we can fix it. If we go to the edge, we can grab those and we can move them just a
little bit like that. That's what rock can throw a lot to add one
here on this area. Okay. If you ask why I did that, because if I don't if I
add a subdivision surface, I will have a small throws
out goes like that. And I will lose the neck shape. This. This Toby Toby care
of it like that. And I will lose the
details here of the neck. But if I add an H right here, told me like this,
That's what I want. So it can throw off
to add it here. And what else? Let's add an egg here as well. To make this area, when I add subdivision
surface to make it tight. Because if I don't,
it will be like this. One here as well. Can throw a lot to add HY here. Okay, and I added it right here. Because if I don't
want to be like this, what if I add an H right here? It will be like this. And yeah, that's cool. Maybe. Yeah, That's it for now. Maybe one here, I think. Okay. Now let's tap out and
delete some bevel. We don't need this. Let's
add subdivision surface. And lists are two tracing
right-click here. And actually we got
something nice here. We can delete, auto,
smooth the activated. Okay, Let's tab again and
we forget something here. Because I noticed that the
smoothness goes like that. Very treat this area and I think we can fix that in case we added
an H right here, and that will show it before
and after I activate this, hit Control R. What will happen? Now? It goes like that. But if I hit Control R, How can I control it? That's why I added these
ages as a support the globe. We got something nice.
It's like to excite. And now we can scale
it, make it big. Alright, the Oregon
dot a little bit far away from the geometry, in this case, Radical exit
or it can take geometry. And now hit S to make it
pick somebody like this. Rights. And maybe we can put it right here and then
move it back a little bit. Because you go to the side view, front view for the Canon. And I think we can end
the wireframe mode. Just move those here and make it smaller
just a little bit. Okay, you can eyeball,
it's something like this. I think that's better. And now we need to
add the rivets. So let's select this here. If I hold Control
and stops here. The hold Control on
this tab is right here. And that's amazing. Alright, Very cool. All right, this is it for
this video and see you next.
15. 015 Modeling Adding belts to the carriage legs: Hello again and welcome back. In this video, I need
to create this material builds around the carry eight legs here, one
here, and one here. If I bring the
reference amateurs, see, as you can see, we have these stuff here. They tried to create
something like this. Maybe I can use this as
our reference image. Okay, let's leave this here, this tablet with more than, maybe I can select
this edge right here. Or maybe I can add
timber or DNA here. Okay? And maybe Control R to add. I don't know, maybe
add one right here. And go to Face ID number
three to go to Face to face, Arctic lip to select
this face loop, all you have to click to
grab this one as well. Shifted D to take a Coby from this right-click to leave
it in the same place and then p has to separate
it out from the group. Tap out. And let's put
this image right here. Now let's select
these new pieces. Okay. Let's turn off subdivision
surface temporarily. And let's give this a
thickness. Let's go to solid. If I open the modifier
list and give this a solid phase Mic to
solidify out node inside. And let's move
this to the minus. Now we have some thickness here. I think I can accept
this thickness or cannot reduce it just a
little bit, but not too much. Can throw a and apply the solid. If I were talking about anymore. Tap to edit mode,
go to edges, Alt, click on this edge
and rights hits. Maybe I can move this G
twice and move it like that. I don't know if
that makes sense. Oh, I will just select
this and this one. Let's hit Select to isolate
them thus will be better. Okay? Let's select all of these
edges here and level them. The same scenario
for those Alt Shift, click and select the edges. Can throw B for bevel. Something like this. Tap out and keep this
subdivision surface. And then we got those here. And for the edges that we add
here, we can delete them. Alt click, Alt Shift, right-click and select this one. It can throw extra
dissolve them. That's fair. And hit slash to
exert over the local modes. And now we got this result. Okay, If you want to add here
in the middle and bevel, this will be better to support the support this egg here to prevent the subdivision
to go to the center. I mean, to prevent any citrate. The same scenario here. At one age you can throw the bevel it to the
edge like that. Top box. And now it's better. We don't need to add two level. One level is okay. And the other says, Okay, this image, we don't
need this anymore so I can hide this. And okay, what else we need
to add a rabbit here maybe. So let's select this. Hit Shift D hold
Control and add one. Here. We have some problem I
feel I don't know why. Alright, let's check
the face orientation. Everything is okay. Sorry, we didn't switch
this to face to face, choose center and activate
a lateral rotation. Now he'd key hold
control and snap it. And yeah, now it's working. One here, Shift D. And on the side hip
the add one here. You have the hold
can throw one here, the hold Control one there. The envelope control
and add one right here. Are the set as well. I
think we need to do that. Hit the hold Control, Shift D intake or Coby and hold Control here and the
same scene over here. Very cool. Cool. All right then so this, how to create these pellets. And yeah, that's it for this
video and see you next.
16. 016 Unwrapping unwrap the barrel: Hello again, we'll come back. Okay, now is the time
to make some Arab. I need to copy all of these
details on the other side, but I need to unwrap them
first and then copy them. First thing you need to. We want to make our app. We need to sublet
the window to two. Okay, something like this. So put your mouse right
here at the corner and click and drag to have
a new window here. This one, I will just read
this to UV, this row. Now we are inside UV it. Okay, That's great. Okay, maybe we can start
with the barrel itself. Okay. So hits like to isolate it and let's
work with this one. Let's check the
wireframe first to see how many polygons we have here on this
activity wireframe. Alright, we have a lot, a lot of polygons
here. Very cool. Let's turn off wireframe
and let's see what's going to happen if I add
one subdivision surface. Let's turn off wireframe and let's see what's the
difference here? I feel there is no difference
still nice and clean. So I will add to use one level and I will apply the subdivision
surface. So that's it. Yes, it can throw
light and light. Now this hits like
to isolate it. And now let's add
some themes here. First, we need to go
to the Edit mode. Tablet is more to endless. Go to the edge, hit number two. And now we have the UV, but this UV is not correct, so we need to add some
theme and cut some parts. Let's start with this. Let's add assume right here. Just hit Alt click and select this entire edge loop and
right-clicking and mark scheme. So now we see right here it's like you have a
Caesar and you cut this area. Alright, maybe wants
him here as well. We can add Tool, Help tool to help the algorithm of the orbit
of the UV to open this, so select this one
right-click magazine. And let's go to the back here. Maybe I can either
see him right here. Right-click mark scheme. Okay? And what else? Okay, Once him here
to cut this area. And this area as well. Maxime. And let's select the edge
loop starting from here. And alright, let's
select from the top. I think that's where
whatever because when you have seen sometime when
you add the ticket sure. Because of this team, it could be noticeable. So I try I want to
choose my seems wisely, I need to try as much as I can to hide them
high the scenes. If I pick this
edge, are the same. Any problem, any noticeable thing
happened with the texture? I can see it right here. Because most, most,
most of the time I will add the camera at
an angle like this. But from here, if I add my seam right here is better because this
area will be hidden. All the weights, lists
are the same here. Hold Celtic love this one. Hold can totally got this
right-click mark scheme. Creates. Okay, What else? Alright. Maybe we can
add the seam right here. Maybe here, right-click mark
scheme to open this area. And we can add the
same here as well. Going like this. And maybe it could
end right here. And another team right here. Mark scheme. Now we have a seam here.
And one seam here as well, just to help the old
guard them to work easily. Maybe right here. I can throw this. And maybe here, right-click mark scheme. Okay. Very cool. Alright, let's see what
else we can do here. Now we need to add an edge loop from the
top, from the bottom. Like this, hold Control
and select this. And then hold Control. And let's pick
this one, I think. Yeah. I can hold Control and
select this one as well. Hold control and pick this. I've started that
translate marketing. Okay, so now we added as humans
to the unnecessary edges, but I think we need to add seam inside right here.
Yes, my seam here. I clicked magazine. To open this one as well. Hence, let's pick this edge. Okay? Hold can throw
and crop this and this, and mark this as scheme. That's cool, That's better. Okay, Now is the time
to arrive this and let's see what we will get
hit a select everything. And here in the UV site, again, it's a to select all the UV and then hit U twice
u and u again. Now we got this results. When you make the Rob, you'll find here a method
for the algorithm. Here we have angled
base and you're here, we have confirmable.
Let's try confirmable. Alright, sometime
confirmable walks and sometime angle based works. This triangular base again. Okay, So this is the
result that we got so far. Okay? If we want to check
them material, sorry, if once you check the results, I can add a texture
to see to see the UV. If I have any distortion, I can continue to
create a new texture. And here we have multiple
options for the generator type, I will use UV grade, or you can choose color
grid if you like. Let's pick this one.
And let's call this, I don't know,
checker to gesture. And then hits,
okay, to add this. Now we have this as you can see. Okay, after that,
Let's the sublet, this window to window, and let's go to
the shader editor so we can add this header, the header for this hitting you. And let's hit Shift a to go
to texture and let's add MH. Took us sure, we could
have tried here. And here. Let's open the arrow and
let's find that checker. And now we have it like this
to the base color and go to this arrow and change
the color to texture. So we can see that texture. As you can see this is that
take a shower or we can hit Control T. Alright, I will hit. Okay, Let's hit.
And to open this, this finger here are two
tickets to a mapping here. I just need to make the
scale a little bit smaller. Crop these acts is all of them. Click and drag. And let's add here five. Let's see if that can affect the result here. Alright,
that's not going to work. But if I go to the
material preview, I can see that as well as you can see now we've
scaled working. If you go to the
material preview, six, it will be smaller. So let's add four maybe. Okay, So this is
the result of uv. Now let's try to see if
we have any distortion. Here. We don't have any distortion, but we have a twist. As you can see. We have a twist. We can eliminate this twist by adding another team
here if you like, shoe or the seam here, That's all I have to eliminate it and make it a
little bit less. Okay, Let's tab and
let's see the UV. Alright, I can rotate this. If I like five control space, I can make the spec. I can grab this side, just hover over here and
hit L to link select. And I can rotate it
just a little bit like that. Let's put this right here. Maybe it's to scale it
down. That's better. Hit Control Space again, Indiana, It's, it's better. We still have some twisting, but that's what we can do. Or I saw this, how
to rob the barrel. And now let's go to solid. And I will turn off texture. I will go to material
that's better. And let's select those here. Okay? Let's select to
isolate the things. Here we have
subdivision surface, so let's see if we,
can we add one? Yeah, we can add one subdivision and I will hit
Control a top light, touch to it more than, I will select this edge loop and mark this as a seem to,
others seem right here. And I will add seem
from this side. Hold can thoroughly grab this. When you select these edges, right-click Marxian, and then hit a select
all the faces in here. Hit a again to select the
UV and then hit U twice. Now we have something. Let's
try to see that confirmable. Oh, okay. I can stick with confirmable.
Confirm all know. Gave me a better result. I will push the margin just a little bit
to have some space. Okay, That's it. So
he'd done with this. Now we can apply the
material on it. Right? It's alright. I think we name it
checker or not. No, we don't. So
I think we don't. Let's call this checker. All right, Let's close this here and now let's go to
material preview. As you can see now
we have the result, but we got one
problem right here. That is the wrong tool. Make some variation between
the size of the star. The size of the texture here is very small as
compared to this one. We need to make the size equal. In this case, manually,
we will do that. Just tap it is more than
select all the faces here and you can
scale this down. When you do that, the UV will be small according to the image. And now we can make this even. Okay, something like this. You can compare the numbers and now the numbers are
equal tau about this part. I don't want it deleted because
I will cover this later. Alright, So this
how to rob rights. We don't have that
Mike distortion. As you can see, the size of the squares or the
texts are equal. Just here and this air we have just a little bit scaling
but does not have, There's not a huge problem. I can't accept it. And here we have the texture a little bit smaller as
compared to this one. But I will accept this result. Alright, that's cool. Now I can go to solid and this
is how to Arab Bureau. I've taught that if you will,
or rub all of these pieces. And when we complete, we will mirror them
on the other sides. And after that we can say we are finished
with the arriving. So this is it for this
video and see you next.
17. 017 Unwrapping Unwrapping wheel and some accessory: Hello everyone and welcome back. Let's start with a
carriage, this Arabic. Let's select this
piece first and let's hit Select to isolate it. And let's go to the
modifier and let's see the wireframe turn off optimal display so we can see the wireframe and
activate wireframe. All right, let's see what's going to happen if
I add one or two. Turn off wireframe. Okay, It's still
smooth and nice. So I will accept a subdivision one and I will hit Control
a top light tablet mode. And let's start adding
some teams here. Let's target the corner,
as you can see here. This achy, I can hit Alt click and the agent
will stop here. I can use this one and the same here,
right-click Marxian. And let's select this
entire edge loop tool. Go along the whole, the whole geometry, and
then right-click magazine. And maybe this edge and
this egg we can select it. And this wall right here,
and this part right here. And all I have to
click this as well. Right-click Maxime. Alright, what about this one? We can add the seam right
here. That's great. You combine, it, just hits a
select everything in here. Go to the UV, select a as well, and then you hit U
twice, u and u again. Now it's arrived.
Let's try to I don't know if confirmable
walks here or not. Let's go to angle base and let's see what's the difference. Alright, that's called lists. Tab out and let's
apply the material. Let's go to the material section
and go to this arrow and search for the
checker and his Yan, go to Materials, Review. And you just need to check
in case I have a distortion. Very nice, Very cool. I
like it's slice to excite. And now let's select a new
geometry to start with. Let's select this one. It's like two isolated. And let's go to them
with your foreignness. What we have here, we
have bevel and mirror. Apply the mirror modifier. I just opened the arrow
and hover over here, hit Control a to apply it
and apply bevel as well. It can throw a light. Now tablet mode and
let's select the edges. I'll click on this egg to select the entire edge loop
and give it a seam. And this one as well,
look robert, mark scheme. And what else? Maybe we
can add one seam here. Okay? And I don't know, maybe one seen here as well. And maybe I can cut this areas will mark scheme and let's
try to arrive with hit a, select everything
in here as well. Hit a and hit you and you. I can't draw a rabbit. I love this tool confirmable,
that will be better. And now it's done. I started that tab out and
go to the Modify, sorry, go to the material
section and let's add checker material
that we just created. His Yan go-to
material IRB review. And as you can see, we
don't have any distortion. Everything is cool. It's likes to excite. And now let's select another geometry is
Z and go to solid. Let's select this one.
It's like to isolate it. First, let's go to the modifiers and let's
see what we have. We have bevel applied
control a top. After a tablet is mode, alt click, select this edge
right here, all thick. And then right-click mark
scheme are the same here. I see him on the
other side as well. Alt click here, mark scheme, and maybe one seam here. And that's it, hits
a and hear it again. And you and you again. Done assets. Tab. Go to the material
section, go to this URL, I'll check or material
has Yan go-to material preview and done? It's like, alright, now
we need to make all of these UV that we have here. We need to make them, we need to make them equal. In this case, I can select,
I can select this one. I started with this top hits a, and here in the UV, hit S and scale the
UV and make it big. Alright, and I can
select this one as well. This one, tau
again, it's a club, those skill that was
just a little bit down. Alright, you can now
check the texts. All the texts, all
the text looks equal. And that's what we want. I've heard that talk about
what what else we can do here. Maybe we can start with this. All right, Let's
select this one. It's like to isolate it. And let's see what we have here. We have subdivision modifier, can throw a applied
and just tap it. It's more, this one
is easy to Arab. I just going to grab one egg. Alt click like this and
rather collect mark scheme. And one edge from here, Maxime, Alt click and Maxime
hit a in here had a again and
you and you again. And now it's done. Okay, The same CNR, we go to the material,
open the arrow, checker material, go
to Material Review, and now we don't
have any distortion. The squares are good
and everything is cool. Okay, Let's hit Select
to excite and let's select maybe this
one right here. Alright, we have a
subdivision surface modifier, can throw a end up light. It's like to isolate
this one top. And now let's select maybe this edge right-click
mark scheme hit a in here as well as a
and you enjoy again. And now it's done, I think. Okay, confirmable,
not working here. I will use annual base. Alright, we have a
problem with the skill. As a few notes right here we have a warning about the skill. So tub out can throw a, apply the skill tab
and again hits a. And here, select all the UV, hit a again and hit U
twice, u and u again. This sea of corn thermal
works here. Alright. It's nice that buyouts and let's add the
material checker. Go to Materials, Review
and cool. Recall. The same thing. Let's
select this one. Slice to isolate it. It is more to endless select. Sorry, let's apply
the subdivision Control a. And let's go here. Go to the age at number
two from the keyboard, Alt click to select the entire loop
right-click mark scheme. And as it hit a and
here today as well, you twice and done type
out. It's like to excite. You can give it the same
material if you like. Yeah, cool. Done. This piece as well. Slash tab. Apply there. By the way, you don't need to go to them with the
far end up life. You can, it can throw light
and I've loved geometry, Tamika, and it will
apply it here. Then Modifier, tab, go to edge, Alt, click, mark scheme, it's a. And by the way, you can
hear with this selected, you can hit U twice here as well and you will get the Arab top. I'll grab this one. And there's something
I need to mention. There's no reason
to love this one. I can copy the Arab information and from here to there, okay. Let's apply the modifier
Ferraris cancel I applied because the
human transformation select this hold Shift, select this one, can throw L and here we have Coby UV map. Okay, cool view, Coby
UV map, Coby it. And let's go here and
let's check a tub. And as you can see
now we have UV map. The same scenario for
this piece right here. Can throw light, apply
a visual estimation selected hold Shift, grab this one because this
one is abrupt and completed. His control L And Coby UV map. And now let's select
this tab and let's see, yeah, that's right,
we have the ovary. What about those here? It's
like to isolate them top. And before we do anything, I will go to, sorry, I just need to apply the
subdivision modifier, activates and then it can
throw light of light tab, go to face these faces. Instead we don't,
we don't need them. Grow this election and delete
those x f to delete them. Here as well, Alt, click, Alt you have to click can
throw plus x f to delete them. When you complete, you just need to add maybe one seam here, alt click, and here
as well as well. Alt Shift click here. When you select these edges,
right-click marching. It's a silicate, everything
in here as well, you again. And as you can see right
here, problem with the skill. So tub out, sorry, How about you can throw a, Apply SQL tab and hit a. And here I can use
and you again. Let's try corn base. Alright, there, you don't
have much difference here. How about apply the material? Has Yan go-to material
preview and done? That's it. It's like to ignite. Alright, that's cool. Let's
add the material right here. We applied this. Now we don't have to have
this, as you can see, the material destroyed here. Alright, tub or less, apply the modifier here. I can throw a end-of-life tab, go to a Alt click,
select this again, the middle right-click
mark seam hit a, and here you enjoy
can hand done. Alright, so let's
try that again. U and U again. Let's try. Aha, I noticed that
we have some problem. As you can see here. We got
problem with the scale. Can throw a ablaze,
kill top hits a year. It's you and you again. And let's pick angled base
and see a difference here. Writes, this torsion become
less with with angle based. So I will accept this.
Okay. That's it. It's like, well
right, That's great. What else we need to do here? Kill us to lay this ring. It's like to isolate this and apply the
subdivision surface. And before that I just need
to see what's going to happen if I add one. Alright, let's see
the wireframe. Activate wireframe. Let's go back here. Hit two. Alright, I will
accept to us to mark, I know, but that's okay. I will accept. It. Can
throw light up like this. Okay, Let's select lists. Let's talk about this more
at the end, go to the edges. Maybe we can pick this edge, hold, Alt, Shift click
and this one as well. Let's cut it to right-click
mark seam at a and do twice. And it's erupt. Yeah. Can, you can apply, by the way, we have
problem with the scale, but let's apply the material and let's see if we
have any distortion. Okay. Go to material preview. I think we have just a little bit distortion to the center. So in this case, what I will
do is it can throw light, apply the skill, tap it
a, and here as well. You and you again. And this Robert, and
now that's better. That's it's thrown
off wireframe. Okay. It's like to his aid. And let's start with this and go to solid hits like
to isolate it. Let's see if we have
any modifier here. We have void abnormal cancer, a lay-up light in case we have
a problem with the scale, can throw light applies to kill. And now let's tap. And let's see what
we can do here. Alright, let's
maximize the viewport first and let's target this. Okay, let's target
this. Just fairest. And mark scheme. All of these edges. And those here as well. Maxime. Because we need to separate these phases
insight. That's why. Okay. Alright, this is an option. By the way, we have
another options. We can delete these phases
insight and with one seam, I can wrap all of that. If I like. I can
do that as well. All right, do we
need these faces? I think we don't
need these faces. So in this case, I will hit can throw a couple of times to delete
what I did there. And what I will do is I will go to the
site of view and go to Wireframe, go to face. And let's use Lasso Select and let's select these faces
here inside one-by-one. Hold shift and grab those here. And this will look up those. And hold Shift, grab
those here. Those here. Alright. When you come with it, it can throw minus to
shrink the selection until you target
the faces inside. Now we have all the
faces inside targeted. Just hit X to delete them, and now they delete it. I've taught it that
maybe I can add one here for each side. I just need to use it to convert it to seem
Control R can throw off, sorry, not here, that's wrong. Control R. Alright. I'll select all of these edges. Alt, sorry, alt, you have
to click, convert to seem. Hit a and Control Space
to minimize the viewport. And here at a again
and hits you and you again to Arab everything. And let's use confirmable. I think that's what be throw. And let's apply that material and let's see what we will get. His Yan and go to
material preview. And it looks fine. Very cool. I will accept this
fits likes to excite. The material goes with
the circle nicely. You remember when I create
the array modifier for this, but I didn't apply
them with the fire yet because I don't want
to rub all of these. Now I can rub one
and use the array. So turn off array for now and go to the
subdivision surface. It's like to isolate
this one alone. And let's see what we have here. We have subdivision
surface level one. I will accept it can
throw a applied. And let's start with
endless targets. Some edges, sorry, target
these edges at the corners. E.g. those, those here as well, you can target them. And those here, those Alt Shift and select this right-click mark scheme
to mark all of these. Seem like she was going to
happen if we add it like this, hit a and here, it's akin to you and you twice. Alright, this confirmable, think it's not going
to work. I don't know. Let's check angle paste. Okay. We don't have that
Mike different spots. Let's apply the let's add
the check-out tickets. Sure. Let's see the result. Alright, that's cool. But you know what? I think we are the same
in the wrong direction. I can add the same actual
right here and hide it behind behind
the stomach itself. I guess for getting
this right here. Anyway, I will
accept the results. Okay. Oh, actually, I don't like to do that. To be honest with you. I will hit a and
select everything and then hit right-click
and the clearer same. And they will start over. Because I need the
seems to be here. Select this, select
this edge Alt. By the way, all you
have to collect. And select this edge, this one right here.
This right here. When you combine, please. Sorry, maybe we need
to cut this from here. Okay? Right-click mark
scheme can throw space at a and here it's
you and you again. And now we have the same Haydn tub outs his Yan go to Material Review
and now it's better. Now we have this heme here. Alright, it's like to excite. And as you can see, we
have some problem with this when we, other
than your age, in this case, I will
add with normal again to fix it and
up light. That's it. Alright, let's go back here. And this case now I can activate the array
modifier and I will have all of
these details back. And that's as cool as cool. Alright. I can apply them with the fire, the arrow modifier, and
this will be one piece. Now I can tap for all of them. And now we have
Coby above COBie. So in this case, I
can go to UV and bake islands to beg
those, all of them. Let's change the market
analysts make it smaller, hold, shift and take the margin, the bag gets a little bit. So now all of these
pieces now inside one UV can go to Materials, Review tab out, and
yeah, that's better. Very cool. All
right, What's next? Maybe I can select this one
and hit Select to isolate it. We have subdivision
one can throw a apply, it can throw light up like
a scale in case we have a problem with the scale tab. And maybe we can
target this edge are the coordinate here and this one here as well.
Right-click my team. And maybe we can add
an H right here, starting from here,
and ends here. To cut it. So right-click mark seam
at a and here as well hit a and hit U twice.
Now we got this. Alright, that's great. Tub outs at your material. It's like to go to
material IRB review. And yeah, that's very cool. Okay, this one as well. It's like to isolate it.
Let's see what we have. Okay, apply them with the fire. Can throw light up
like this kill tap. And let's select this range. Maybe. I don't know. Let's add one edge right here, right-click my same end. One cat here, Maxime
hits a and here at a, and you are twice. As it's done. It's all wrapped tab out and
let's add that material. Okay, Very cool. It's like to excite, select
this hit slash to isolate it. Apply the subdivision surface can throw all that
apply the skill. Tap. Let's go to edges, Alt click to select this age
maybe I think that's it. Mark seam, hit a and here it's a and venue and you again done. How about applaud the material? Okay, Very cool. This
one right here as well, slash to isolate it and
apply volumetric mesh top. Maybe, I don't know, maybe one H right
here and one here. Right-click mark scheme, it's
a and here is a view again. Alright, scale, the scale
SQL a lot by the skill. Tab again, hits a in here, u and u again as okay. The material. Very cool. Let's see what we have. We
have mirror applied tab. And let's select this
and this one as well. Right-click mark scheme and one edge if from inside or maybe from here,
because it's hidden. It's hidden. Alright, yeah, Now we got the same age, right? Right-click much steam hits
a and here hit a again. You done. Let's apply the
material to this. Okay, Very cool. Okay, this piece may
be as well, can throw, or I can throw a Top Glove, this egg here, this
one right here. My team tab out control ALS, kill, hits a select
everything in here as well. You end to again, done top outs the select this one
and let's do the same thing. Let's see what we have. Subdivision, cancer,
lay up lights. Top secret, one
entire edge loop. Maybe, I don't know. Maybe this edge loop. Okay, Right-click mark scheme. Let's pick this one. Or maybe this one right here. Okay, I need the egg
that's greet the center. Right, left mark scheme. It's a and here it's air. Can you, and you again. We have some distortion
here happened in this area. That's because we need to help the algorithm
to work better. In this case, I
will add seam here. And same on the other
side as we'll hear. Just help. Blender. Blender works better. I select my scene and hits a select
everything, hit U twice. This. Try to use confirmable.
That's not going to work. Stick with ankle, please. Okay. That's cool. Tab out. It's like let's add the checker material and
cool this one as well. Check our material. All right, That's great. All right, so this is, it's we almost
arrived everything. Now we need to complete
that and COBie, the object from this
side to the other side. So yeah, that's will do it for this video and see you next.
18. 018 Unwrapping finishing the unwrapping for all objects: Hello again, we'll come back. Okay. We didn't. I'll rub this and this one. Let's select this one. It's like to isolate it and let's see what
modifier we have here. Subdivision surface
with Level two. Alright, Do we need that? I think one will be okay. Or even why did we have
subdivision surface? Alright, let's go
to the wireframe. We have bevel applied here. We don't need any
subdivision surface, actually, just delete it. Maybe we just need to always normal and activates
Auto Smooth and assets. Let's turn off wireframe. Yeah, That's very cool. This case, I will apply the weight normal
and now we'll stop. Let's target the
edges, this one. And this one actually can make it one bit if you like e.g. they can target this edge. And this one here, this one right here. And you can open it
from here as well. And from here and
convert all of these to seem all rights. And one seam here as well. And here are they. Forget to select this and this. I click mark scheme. Right now hit a and here
it's a, uh, can you, you and yeah, skill. Always kill a health problem. Sql, tab, out control ALS kill tab and hit a
and here u and u. And let's choose confirm all because confirmable works with
these kinds of hip better. It's very cool. We lost the shading because
we apply the skill. I will go back and add
weight normal and up lights flashing and let's
add the material to this. Very cool done this piece
as well right here. It's like to isolate it. Let's check them with the fire. To level. Let's add
one and that's enough. Up lights, top, go to
a crop these edges, I'll click Alt haptic like
to grab the entire loop. Right leg marks
him at a and a U. Done. Confirm all yeah,
it's working right here. Very cool. The material here. This slash to excite
and yeah, that's cool. Now I think we
arrived everything. Let's add the material for this. Are those select
them, hold Shift. Select those three pieces. Hold Shift and pick any
objects with the material e.g. the carriage
altogether grab this, can throw L, and let's link
the material to these pieces. Alright, so that's very cool. Okay, I started that.
One thing here. I just need to mention we have some variation
in the skill. I mean, the UV. I need to fix the variation
that we have here, e.g. this leg here and this piece of food should receive the same
scale of the material. And if we don't fix this
kill or the checker, as you can see, the text here. As big as compared to this one. If we don't fix this, when we add the material
or the image texture, we will have some problem. The image tickets your
heel here will be small and here
will be zoomed in. So we need to fix
that variation. Let's select all the pieces that received the wood material, this one and this one as well. And I don't know, maybe this one, yeah, this
one right here. Okay. Let's select them all. Hit Select to isolate them. And let's start with this
top two ethmoid first, as you go to a
material and review. And let's see the variation. Alright, so we don't
have much variation. I just need to scale this down. And now the texts become close and assets select
this one top, It's a hit. A is killed this
down and scale it, make it smaller
and the AI School. And let's select
this one right here. Taobao to grab this top, hit a and this, and scale this make
it very small. All right, So now
it's become equal. This one as well. Select
this top hits a. Alright, I think I will leave this as is, because this one related
to weight to the wheel. It's like do exactly
an obvious target that we'll tap out, grab all of these
pieces and this one, and this piece here
in the middle. I think that's, it's, it's like to isolate this and lets his young go-to
material preview. Alright, lists. Let's make some comparison. We don't have problem
with this and this. We just have problem
with this ring. Alright? Select this tab, hit a and
hit S to scale it down. And now this takes
similar to the text that I have here and
the assets tab out. Very cool. Alright. It's like to anxiety and
listed with this one. We don't need that. And I can say one
more thing here. This piece of metal, they should receive
the same size as well. So let's select them one by one. So like those here,
this file right here, and this one here, this here, and this
piece right here. And even for the wheel, the select all the metal parts. This, this the shaft. And this piece here. This one here. Select to isolate them. And now let's start with them. Has Z and go to material
preview and let's kill them. Okay, I think I can use
that as a reference. Let's make it the size of all of these pieces similar
to the shaft. Stuff with this one tab hit
a S and scale this down. Alright, let's kill
this down even more. Okay? Now the text, okay, uh, similar to the
text that I have here. So now they got the same size. This one as well. Tab hit
a and the skill is down, make it big enough, grab this top. It's a skillet. Or there's enough
called the spinal tap. It a skill this down. Let's move this to this text. I just need to kill the
text. Or this enough. I think about select
this one tab, it's a hit S and scale down. Alright. Silica swan type, it's
a, Let's kill this down. Or there's too much,
maybe scale it back out, grab this top, hit a
and the skill is down. Somebody like this will be okay. Alright, tab article up this tab hit a and
scale this down. And let's select this
one and this one because they have
the same size tab, hit a and the scale them all. The UV. Or somebody like this.
Oh, that's cool. Maybe I can make it this
big just a little bit. Okay, so now we fix this. All what we need
to do is we need to select V is the rivets. Crop them all. Let's select those
and merge them. Hit Control J to
make them one piece. And tab hit a and
here hit a again, you and you rub it and scale it feel like
something like that. And let's select those here. Can throw the j, make
them one piece tab hit a and here at a, U and U again, I love them. And let's select those here. Control J and make them one
piece and listed like those. And those here. And those here as well. Make them one piece can throw J, top hit a, and here is a and hit U twice you and
you again to our rub them. Tab out. And now let's
focus on those here. Grab those, sorry. And it can throw the
J to measure them. And then tab hit a and here
it's a, U and U again. The same scenario for these pieces that
got them one-by-one. Let's select those here. And here as well. Tab, sorry, Control J, make them one piece tab hit a, and here it's a and U and
U. I can throw out of them. Alright, so I think now we
can merge all the robots. Select this hold here, the club, those here, and
those here as well. And even those I can do that. Those here. Okay, they should receive
the same material. So I will hit Control
J to marry them all and make them one piece. Alright, that's great. And even for these
pieces actually I can select them and make them
one piece if I like. Control J and make them
one piece and halt, have to call those as well, Control J heart rates. Alright, so I think this, yeah, let's kill
the UV for this. Top hits a and scale it down.
I think that's too much. Somebody like this
will be enough. Alright, I select this
whole thing here they call this can throw j, make them one piece
with it. That's it. Even though I can
crop them one by one. Alright, I think a lot
of those here Control J, make them one piece. This one, Control J. Or I will leave this
because I need to mirror those on the other side and this one in the center. So I will ignore this. What else we need to do here? I can, alright, I think
we we can make this one. I don't know. Alright. I just
need to make sure. Yeah, I can make
this with this and with this one. Make
them one piece. So it can throw j and
make them one piece. Pop out. Sorry. I'm not saying they did mode.
And what about this one? We just forget us. And
we didn't rabbits. Alright, let's see what's going to happen if I
use subdivision one. Alright? Alright, let's use two. And let's check the wireframe. Let's go back to them. Modify modifier, turn
off optimal display. Alright, let's apply
the subdivision surface and it's like to
isolate this one. We forget to rub it. Okay, tablet, it's more the
nth lists target some edges. Let's take these
edges at the corners. Grabbed those. Actually, we
don't need to pick this one, so I will start with this
and grab those here. And those here as well. Those Right-click Maxime. Something like this. And what about this era here? Let's add the seam right here, Maxime and seem
should go like this. Starting from here, hold
control and select this color. But this hold Control,
select this one. And maybe ends here, right-click mark
scheme and club this Maxime and this one as well. Actually I can, I don't know. Maybe we can add
once him right here. Reach this area. And what else? What about this
arrow right here? Let's see what we
can do with it. Alright? Okay, I think I can add
seam here to cut this. Alright, right-click magazine. And maybe one seam here. Okay, Now hit a select
everything in here. Hit 8 h will view. I can. Alright. Now let's add the
material tab out, and let's add the material here. Alright, we have some distortion
happening right here. Because of the
algorithm that we use. Tub again, hits a and
hit you and do it again. And let's choose angled base. I think angled base is better. And yeah, I will accept
this result facets. Let's go to solid. It's like turn off wireframe. Let's take it up those here, tap it a and here is
a new view again. And merge those with
those, sorry, Control J. And with all of these
rivets selected, tab, hit a select
all the robots. As you can see here, we have immerse hit
apes all the UV, and then hit U and U again
to all of them at once, like this top box. And let's give them
the same material. If you're like, Oh,
you can't ignore that. Alright, so yeah,
we done with a Rob, we just need just kill this. Alright, tab, it's
a skill this down. And make the size
similar to this one. Because this and this, they should share
the same material. It's very cool. Okay, now I can mirror or Coby and mural
this side on the other side. Let's start with the courage and the details of the carriage, the rivets, and all
of these metal stuff. Alright, so one more thing
I just need to do here. They will do is from the top, I will delete those here. Sorry. Alright, x f, because I
have one on this side, and if I copy those
on the other side, I will have some overlap. So just the those
and keep those here. First, let's put the 3D
cursor in the center. Hit Shift S and courseware
to the world origin. And after that hit Shift D to take a Coby.
Now we have a cubby. Leave it in the same
place, hit right-click, and then go to
Transform if at point 2.3 this to 3D cursor because we want to use 3D cursor and then go to
Object and mirror, mirror to the why global.
And now we have this. Alright, that's cool. Now let's select the wheel. All the details here. Deselect the hat
hold Control and deselect this,
de-select the empty. We don't need it. Alright, Now shift D, take a Coby, go to objects
mirror to the y, little y. Now we have this problem. We have here. We have
duplicates Kravitz here, so we forget to
delete one of them. And this case, let's try
to delete one of these. Let's say grab one, face, hit Control L two links and let XF to delete one and
this one as well. You can throw L XF him that. There we go. That's it. Alright, so now we are
ready to add the material. And everything is erupt.
Everything is ready. All what we need to do is
adding the material and assets. Alright, so we just forget
to COVID this one here. D, right-click, leave
it in the same place. Objects mirror to the global y. That's very cool. Yeah, that's it for this
video and see you next.
19. 019 Material Creating material to the Barrel part 1: Hello, I look, come back here. Okay, let's, let's
create a material. Okay, let's start with
deleting some stuff. Let's select this empty is
we don't need them anymore. Let's select this
one and delete it. And here we have this window and we have
this one right here. So let's use this for the header at the top hits and to hide this
panel right here, for now we don't need it. And before we start, I just need to add a light. I can use one of
these slide thing, but I prefer to use HDRI,
image and lighting. So in this case, we can speak the mode from objects material to
the world material. And I will go to the
folder where you can find HDRI image will be provided with
projects folder. So we will have this
eax, our image. You can drop the two
inputs right here. But if you plug this directly
to there in the background, that's wrong because we, It's not correct
to use this node, we need to switch it. I've told you it, drag
it and drop it here, just hit Shift S to open the switch manure and I just need to activate
sic green cards. They just forget to do that. So you can watch patterns of
eye pressing here, Shift S, and let's go to texture and let's choose
environment texture. So now this becomes
environment texture, a blog, this to the color, and
go to the setting here, sweetest from EBITDA cycle. And now if I hit
Z and go through and I have some lighting here, we don't need to see the
background in this case, we can go to the the film here and turn on
transparent transparency. Too high the environment. Alright. Now we can still receiving the lighting
from the environment, but without viewing the
environment itself. That's it first. That's the first thing that we need to go back to the object we finished with
the environment and maybe we can start
with the barrel. So let's select it and we have this checker material
applied on it. We need to delete it,
we don't need it. And let's hit Select to
isolate the torque with this one along this annuity, create a new material
and list-style. See from where we can start. Alright, first thing, I
need to target the need to target these lines that we
have on the payroll itself. Let's open the
reference images first. All right, here we have
the repressed images. And maybe we can create a material similar to
this one right here. As you can see here, we
have in the crevices, some dark blocking is
here and this area. We have some, let's say
a price material here. We need to try to get a close results similar to
this one or close to this one. So let's put this
right here and maybe we can make this smaller. Alright, let's put
this right here so we can use it as a reference. And let's add a node here. Let's start with maybe we can add the humans vary
the search for geometry. The geometry we have an option right here is called pointless. We need to use it. If I hit Control
Shift and click Node, Wrangler can help you to
review all of these sockets. If you don't have that, you can go to the Edit
and then Preferences. And in the other section you
can go to the search bar, searching for W R
to find node the triangular and just
activated and then go to the burger icon and then
hit Save Preferences. Let's use that from here. After that, I can hit
Control Shift, click, no triangular that
we just activated can hold me to review
the sockets here. I just need to check
the pointless. As you can see, this option right here can help me to define
some area here. If I, if I use
another node here, I can make the stronger e.g. if I add a ramp, color ramp, by the way,
if you want to add, you need to hit Shift a
and then go to Search and search for the node
that you want to find. So let's search for rum. Color ramp. I bought by using
color and I can define that even more by pushing
these sliders like that. As you can see now I
have the ability to. Target the white area like this. Maybe take this forward
just a little bit. Let's move this just a
little bit back here, right? As you can see now, I guess
he created a mask right here. And we can maybe
use a math nodes. Let's search for math. Ellis blog the math
and was right here. And maybe we can use a multiply, multiply the value here, and let's reset this and
the CO2 will get here. Alright? So as you can see now
I have the ability to define these areas. You just need to manipulate
it just a little bit until you find the
result that you want. Something like this. There's a nice mask here we got. Alright. Let's see what we, as you can see here by using the, the math, the math multiply mode here, you can make this
stronger or less, can control that from
this slider if you like. So here we have more control. If we want to make this
a thinner or thicker. And I think we can
use power as well. I don't know. Maybe that can help us. This scenario. I think you can do that as well, but for me I will stick
with the multiply. Alright? I don't remember the
value that I used, but something like
this, 1.5 maybe. Alright, so this
is the first step. We created a mask here to trying to mimic this affects. Alright. And here we have two
option actually we can accept this as an OT. We can, we can use this. And we have another scenario. We can bake this results. And let's try to bake
it because here in this course we need
to learn stuff. Alright, so in this case, I will switch this to image editor and
delete this checker. We don't need this anymore. As you can see these notes, the final results
as this right here. But I can, I can kick this
node image to mask a MetaMask, let's say, by using the baking system that comes
default with the blender. And let's learn how
can we do this? Alright, to give this, I need to create in
the image editor, I need to create
a new image here. And I need to make
the resolution higher because you'll make
their resolution higher. The image will be not
going to be pixelated. And we, if we have close shots, we can see some
details and the mask. So let's grab those, click and drag to those two. And let's multiply this with two maybe and
then hit Enter, and now they are multiplied. You can multiply those
with three if you like. If I can, if I hit control Z or at least exact
as the New here. And let's try again. Let's multiply those with three. The Enter to make the
texture even bigger. And turn off alpha, but turn on 32 bits and then hit Okay to
accept the result, but give this a name, let's call this parallel mask. And then go to Okay, hit Okay. And now we have this black image right here and the
setting right here, we have the image
setting, calories space. We don't, we don't
have any color. So we go to three this to none because it's
black and white image. When you complete. Let's go back here and let's
search for image texture. And let's add the image
to Castro right here and go to this arrow. And let's search
for beer or mask. So now when we bake
whatever think Blender, we'll, we'll bake from here. We'll paste it on the
image right here and the image take a straw that we have here
at the same time. So as you go to the
Render Settings, and let's go to the
baking second here. And we don't need to
change much here. We just too big type to emit. And we're going to hit back and give blenders some time to bake. To bake the image. But there's something
important here. We need to mention. If I go to UV and if I hit tab, go to solid for now tap, you need to have all the UV
inside the UV square here. We should not have
any overlapping e.g. something like this,
That's not going to work. That's wrong. Or scale like that, that's not going to work. That's mean in case we have
some UVs out of the UV, we need to put them inside the cell for this
geometry or for the rest. Alright, now let's go back to the image editor
and then tap out. Let's go to the render here. Alright, now let's go to bake. And with all of these
options change, Let's hit peak and let's
give some time to bake. Baking now is finished. If I go to the or
not, right now, I can see the mask throw
these nodes that we created. And the same time if I plug
this, if I hit control, shift to click to make
a quick point of view, as you can see now, I approve of previewing
the mask from this image and this
is the results. Let's readers to image
texture and lists tab. You can understand what's
happening as you can see it. That's what seven.
Alright, this is a UV. And now as you can see, how the picking is walking, walking out according to the UV. Alright, so let's go back
to the image texture here. Alright, I've tried that. Let's see what else we can do. Now we got the picking list. How about let's see how can
we can throw that further? I can put those temporary right here in case we need
to use them later. And now I can use
this image alone. Now, if I, in case I need
to break this result, e.g. as you can see, it is just black and white and the
white is very sharp. In case we need to
make some freaking here where we can
use noise texture. Let's search for noise. This is nice texture, and let's put this right here. Let's hit Control Shift
right-click just to preview it. As you can see, we have
some straight here. Because of the coordinates, the victor soil is search
for coordinate C double 0. And you will find this a blog
that UV because you are, remember we unwrap this speaker, the speaker, the supply of
the UV in the vector and now the noise texture
working correctly. And by the way, you can use
object as well if you like. So you can use UV
or objects for now. I've started that, lets
me the skill a little bit smaller here. All right. And maybe I can go to
the material preview. I think that would be faster. All right, and let's, alright, so now let's
add a math note here. Hit Shift a to add
endless search for Math. And let's go back to the lender because I just need to save
the result in the render. Let's oblige with this, with this value and its
readers to multiply. Alright, so now I can
control the results here. And this value, I will
use the killer here. And I need to control that
even more by using color ramp, e.g. search for ramp. Let's put color on
a curb right here. And now as you can see, I can break this these rings
or let's say the mask. But we need to control
the noise even more. As you can see the rest of
the spoof of the noise. Let's take the details
to number seven, maybe in darkness to 0.8 to
make the noise even sharper. And now if I go
to the color ramp and manipulate the
darker values, you can see we have
this dark value, we can play with it. We can change the scale e.g. to make it very small it Let's
go back to the multiply, hit cancel here to
click, to activate it. Now I can break the result
or say I can break the mask. Let's change this tool, maybe 20, because that's too much. All right, so now I
can control this. And that's great. And maybe I can use power as well
in this scenario. But if you use power,
the mask, we'll, we'll go beyond these white ring and you will have some
blocking this right here. Because of that, I will
stick with multiply. So that's a great. All
right, What's next? Now, I've turned that list
search for a mix RGB. And let's put the mics
are Hebrew right here. I will use the result of
the multiplier as a factor, and that can give me. To color here, Let's block
this hit Control Shift click. I just need to preview the mix. E.g. if I add a
blue here and e.g. yellow or right here, as you can see now I can
control the color here. Alright, so for the blue, I need to pick a color
similar to what I have here. So let's, let's go to the blue and let's pick a color close to this one,
something like this. Maybe make it darker. And for the red. Maybe let's try to pick, I would just come to take the same color and
make it brighter. And as you can see now we
have some variation here. That's something great. But I don't like to accept this killer because it's consistent and we don't
need that. So let's search. I will grab the result
that I have here. I have the duplicated the noise and the tickets truck
coordinate because we need to use the
noise here as well. Alright, lists of blood, the
color to the color here. Now I can have the information from the noise
plugged to the scalar one. I just need to target the cuts. I just need to target this, this color right here. Alright? The black value of
the mask, let's say. And we need to add a color. I'm here. Let's
search for problem. Let's put the color
on bright here. As you can see now we have
to value black and white, and here we have two color, black and white.
Alright, that's great. Now let's go to the, let's cut the connection
because I just need to cope with this Coby, this color right here
and plug it here. So I'm just going to click and drag and put this right here
because we need this color. And then I will plug back cool. For this one, I need
to make this dark. And for the whites, I need to crop this one. And now we got the same result, but I can have more arrow
here between those. So this hits blas and e.g. select this one and let's
have something dark. As you can see now how
I have the ability to have even more
dark colors here. And now we can add
another one right here, and we can block this one. This scene, make it even darker. And by manipulating
these sliders, we can have even more control. So as you can see now we have some Plotinus almost similar
to what we have here. And we can control
that even more. Alright, let's change this color maybe to something I don't know. Alright, this, sorry. Let's pick this one. Alright. That's very cool. When you will be satisfied
with this now you can blog it to the base color
and use it as a base color. And now let's see the
principal P as the F results. Just to flag it hit
control shift click. And now we have
something right here. Alright, those
grades, but we can control that even
more if we like. Let's see how can we do this. So the first step, we create them as can
now let's see how can we target the crevices. As you can see here, we have some dark area
between these rings. To do that. I can search for MPT
occlusion and you will, you will find that as
a first option here. And let's put this right here. If I hit Control Shift
click just to preview it. This is the result and I
can make this stronger by adding a rump
colorRamp right here. And by manipulating this, I can have even more
control if I, if I like. But I can add math note here. And using multiply, that
can give us even more rank. Special if I push this number. Alright, let's see
what we can get here. Well, there's changes to power. Yeah, let's use
power in this case. We can control the
distance right here. That should help to
suppress this even more. As you can see now, by using
the ambit of collusion node, I can target the curve is us. And now we can use this
as a mask as well. And we can merge it with
this final mix results. Before we mix between those, I just need to add
extra stuff here. Let's say grab the
noise and the texture coordinate with Shift D. And
let's put this right here. We can move those just
a little bit back here. So this is the final result
of the ambient occlusion. And here we have
the nuestras here. And let's add a ramp here. And maybe we can, sorry, Maybe we can go
with this one hip the end. Let's put
this right here. And they see the results. All right, I just need some, some plotting is right here. And now I can mix between
the MPD occlusion and the noise texture
that I got it right here. So let's hit Control. Shift, right-click from
this node to this node. And because we activated
Node Wrangler, we will have mixed RGB added factor to one and
multiply those together. Now we have the n-bit collusion and we have some Plotinus above. Or at least try to
manipulate this. Let's add small
number, maybe 0.1. I think that's not
going to affect anything here in this case, so I can ignore it. Alright, This result
is very nice. And now we need to duplicate
this mixed node D, but I need to copy it. And these links or these lines, I need them to be
connected to it. So I'm going to hit
delete this one. And I'm going to hit
Control Shift D naught, just Control D. Alright, so those still kinda
three right here, and that's what I wanted. I guess they need
more room here. I will move those just
a little bit right here. And that's great. Alright, this result right here, that comes from
this mix, I need, I need it to be even more
darker if I plugged this, if I can talk, you
have to click. This is what I got. But if I, if I go to search, let's search for Carol. Cubic care of I can add
the RGB cube right here. I can make it darker. I need this darker to
block it with this one. Okay, So now what we got so far, Let's make this symbol. We got this one as a result, and this one and
this mix as well. We got those three. So for this one, I needed to use it as
a fact, as a factor. Lists duplicated this mix. And let's put it right here. And let's use this
as a factor here. And I will use this one as a cat R2 and this
one as a killer one. And let's see the results. As you can see what we got. And let's see what's
going to happen if we plug this to the base color. And let's see the result here. Alright, the result
is a very dark and we can control
that by the way. There is something
else we got here. It's not as we expected. And all of that because
of the node that we still have the
multiply blend mode. So I'm going to
switch this to mix. Now we have another result here. Or less readers through
screen to see that. Alright, here we have
different plain mode. We can check them. Alright. Let's
stick with the eye. Let's leave it on screen. If you want. If you want to block the
ambient occlusion itself, you will get a result
like this, sorry. As you can see. And if you want extra effect, you can block the noise texture to gets some Plotinus
there and there. And you can make the effects settled by manipulating
the slider. You can, can throw that. And we, they didn't finish here. But I will end this video
because it becomes too long and I will finish in the
next one. So see you next.
20. 020 Material Adding roughness and Bump map to the Barrel: Hello again, we'll come back. All right, let's see
what's the next step. Let's go to the
render and let's see the result that we got so far. Okay, so that's what we
got is nice and cool. In case we need to tweak it, we have the ability to do this. E.g. if I want to
make this brighter, I can control that by
using this color tool. And I think that's very cool. And if I want to control
the dark spots here, I can control this one here. Has very cool. Alright, now we need to add a
roughness to the barrel. The softness slider here. And we don't make sense
to you as this one, but we need to add
some variation. So I'm going to use
noise to Coursera. And maybe we can use this one. I can cope with
them accurately hit Shift D and let's
move those there. And let's hit Control
Shift right-click. I just need to see the result
of the noise. That's great. And maybe we can
move those consulted with right here and the
bloggers to that office. And let's see the result with
the noise texture applied. We need to tweak that even
more because as you can see, the result is white
and white Caribbean. Too much trough and
black mean glossy. So I'm going to the curve
here to control that. If I take this down, I
can make it dark and thus can make the results
glossy, as you can see here. Let's take the y-value
down just a little bit. I will, I will hit
Control V. Guess I need to target small error here. If I want to review that often spit or I can cut the killer in that
can make this dark. In this case, I can focus
on the roughness itself. Alright, let's add
color ramp here. Let's search for rum. And let's make this
a little bit dark. I just need to have
some variation here, or that's too much. And let's see the final
results right here. Alright, let's take the black
value up just a little bit. Something like this maybe. Alright, now it's become
rough and we have some glossy plugging this here. And for the noise itself, I just need to kick
the material here. Sorry, the texture here.
Alright, I don't know. Maybe we can make this
either offer 0.85 or assembly like this. It's okay and I accepted. Now, I can have like
bag this Keller here. I've taught all of
that. Now we need to have height information. Let's move these nodes
just a little bit here. Alright, lets those here. And I need to use this node
to blog it to the normal. But let's search for RGB
to be w, black and white. And let's apply
this to the color. And now this node
can help me to get black and whites information. Let's put this node,
e.g. right here. And I will. Hit shifts and tall tried to
click and move the mouse. To add rewrote this node, I can use it to achieve the doctrine of
the connection line. And let's add another
one right here. Maybe I can add, I don't
know, maybe you want here. And hit key and let's pull
this maybe right here. Alright. And after that, Let's hit
Shift a listserv for bump, BWM and block the bump here. And Dr Block to the normal, plug it to the height and cut the normal information here. I've taught it. You can
plug it through the normal. And let's see, hit Control
Shift, click on the principal. So we conducted, so we can
connect it to the output. Now we have some
height information. Or if they will
cut the base color and I will change the color to something darker so I can see and focus on
the bump itself. And this is what I got so far. Let's see what else
we can do here. I will add color
ramp right here. I just need to control
that even more. Enlist take the
white Friday, e.g. towards the black. Let's
see what we can get. As you can see now, we can
control the bump even more. If the bumps it's wrong. We can, many believe
this strength here. Let's add points. One, e.g. alright, 0.3. I just need to make the
effects setup layer. Now we can still, we still have bump effects. And yeah, that's very nice. I like it. According to the masks, mask that we used. Now the bump affects focused on the crevasses
and that's very nice. And we have some
area with a bump in that makes the result
even more realistic. The see the result here. Alright, so I will
accept this bump, and after that I will plug
this back to their base color. And now we have all the
notes back and ready. And this is the result
that we got so far. In case we have too much bump, we can still can control it by manipulating
these sliders. And we can reduces or less. That's cool. I will
hit Control Alt and V to get rid of the square. And yeah, that's pretty cool. Let's go now to solid
enlisted dislike to anxiety. And we need to give
the same material for this piece and this piece. So let's say like
this, hold Shift, grab this and then hold Shift, grab this one and make this
one the active hit Control. L and Q is linked material. So that's being in all of these now have the
same material. When you complete,
select the object and then go to the material and give it a name because we
didn't give it a name. And let's call this parallel
empty for material. And as you can see,
it's applied for three object because
we have 12.3. Notice his Yan go
to render and let's see the results so far. Actually it is very
nice and beautiful. Alright? In case you want to
make this reflective, you can cancel the roughness. Alright, this is the roughness. You can control it from here. You have the ability to do this. And if you want to
see that better, you can cut the connection
and make it dark. So you can see the result here. I think that's too much glossy. Let's try to manipulate the color ramp and
lists of blog this bag. Let's isolate this
piece alone again. Let's move this away
just a little bit. That's too much. I
think we can take the black value up just a little bit to make it more even rough. Something like this.
It's okay and cool. We have some reflecting here. So I'm going to block
the color back. And I will stick
with this result in for any reason if I want
to make any change, I can do that later. And yeah, let's end this video
and I will see you next.
21. 021 Material Creating metal material for the metal parts: Hello everyone, Welcome back. Let's select these parts and let's try to create
a material for them. I think I can use the same
material as I create with it to the barrel and we
can make some changes. So select these and delete
the old material on this. Grab the parent material, but we need to make some change. First, we need to duplicate
it because any king we will make here will apply
it on the pedal itself. So I will hit duplicate. And let's call these
mental baby and hit Enter. And let's select to
isolate these parts. And you remember
when, when I created a mask for for the barrel, this mask because I created, it's not going to
work for these parts. This case, I can use the same notes that I created
in the blog is right here. And ignore this mask or let's say delete
it, we don't need it. His Yan, go to the render and let's see what we got so far. All right, first thing we
need to change the color. We don't need these colors here. So let's go to the RAM
and lists, select these, and let's take the saturation illicitly this one and
take the saturation back. This same scenario for this one. You can make some
variation here. Take some value, make them brighter or darker
or something like that. Alright, let's check
the, the masks first. Right? We got nice mask here. Or with the multiply
and with the, with the noise texture, we got very nice mask. So very cool. Let's check the rest. Here we have the results
of the n-bit collusion. Okay, this Weber's conclusion. We still have this killer. Let's take, let's take the saturation to zero
and make it white and this one as well. All right. I'll, what we need to do here
is just make some which we can until we got that
is all that we want. Let's start with this node here. Let's try to fix
the variation here. Alright, let's crop some
points and make them dark. Maybe this one and
this one as well. Because I need to,
I need to introduce some aqueous here,
as you can see here. And maybe by manipulating the color ramp for
the noise texture. For the mask, I can take the effect
bag, gets a little bit. Alright, so this is
what I got here, and this is with the mics. Okay? Let's make this whiter. And with about this
one right here. Alright, I think we can delete the delete the AMP seclusion. I'm not sure, quite sure yet. But let's see the effect of
the empty collusion Ferriss. Alright, we have some
in-between right here. And I just need to
kick the rest here. Let's see the final
result here with them. Alright, still, okay,
and acceptable. And after I applied
the principle, because the F now I can
see a different result. It's nice actually. I think we have some variation. We have some white
area here at the ages, and we have some dark spots here because of the
n-bit occlusion. And that's makes the results
nice and surrealistic. As you can see, we have aqueous. So I'm going to accept this result and it's
likely to excite. And let's select the other side. And let's give it
the metal material and these rivets as well. And let's select those first, and let's add metal for them. And these as well. And don't worry about the UV dot worry about for
these in case we have some geometry out because
we didn't pay anything. But if you want to bake, you want to make sure that all the parts inside the square, I think these parts, we could give them the
metal material list, select them, all of them. And maybe what else? This one right here, alright? And this shaft here. And these rings here, this and this one and this
and this one as well. Hold, shift and grab. Anyone have the material e.g. this, and then hit Control
L and linking the material. Now, all of these sharing the same material has got listed here
and go to Render. Alright, this geometry as well. We need to give it the same
material solid selected. And maybe we can select it and hold Shift
and select this one. And hold Shift, grab this
one because we gave it a material and then hit
Control L and link material. And I noticed that we
have some variation here. And that's okay, we
can fix it later. It's not a huge problem. Maybe some problem with
the symmetry or maybe this is not in the
correct place. I think this piece of wood. I don't know. Maybe
we can move this in this slide that just a little bit and centroids and that's it. Alright, now let's
go back again to the render and let's
see the result here. And by the way, just
to mention something, if you noticed the bump effects become very strong and
separated even more. Control B, to focus in
on a small area here. You will notice that the
bomb a separate too much. And that's because if I go back to the same material
for the payroll, you remember when we take the bump information from this
texture and don't forget, we plugged that with the empty collusion,
empathetic Luke. And when you put
geometry next to, next to another geometry, empty pollution will be
strong because we added e.g. because we have this
next by the payroll. Because of that the, the, the empirically we can all
be too much to throw in here in this area and
even in this era here. If you want to get rid of that, you can tick this
option right here. It can turn this
on all the local to make n-bit inclusion
work in the local way. E.g. if I activate this, as you can see, I just
eliminated that effect. So here we have this option. If you want to turn
this on or off, you can make it local, local, or you can make it effected
by the other geometry. Okay, let's go back
to the Render. And I can select this material, the metal material and
activate local as well. Let's see, before and after. Alright, so I'm going
to make this on. If I want to if I wanted to, I can turn this off
debtor for any reason. And I think we just forget to give those some material or not. No, we gave them material, but I think we got some problem
because there are notes. Looks like what I want. Let's try to tweak
the material for these rivets and let's see
what we can do with them. If I made any change here. These, the other material, the metal material
will be affected. So I will copy the
material for the rivets, just select them and hit
duplicate, a duplicate. And let's give them a
special name here, e.g. metal robots. Robots. And now we can
make some tweaking here. And let's start with, I don't know from where it,
let's check the result of the MHC region.
What we got here. Alright. All right, It seems like we're
getting nothing from here. Maybe we can take
this value back. I don't know if that's
prolific or notes. Alright, there's no
difference here. Alright, let's see the final
result here of the solution. I think we are not going to use empathy glucan in this case. So I'm going to hit
Control X and dissolve it and solve this one as well. Let's see what's an X here. What we have here. Alright, so we have these here. Let's see the results of
the point this mask here. Alright, we need to make
some tweaking year. Alright, let's see the
mixed with noise too. Sure. Maybe we can change the scale of
the noise and make it smaller by taking this value and make it bigger,
something like that. And let's see where
that will take us. All right. All right. This one should be here. And right here we
have two notes. Alright, see, do we
need this or not? We can block it with the
principal P as the F4, and then we can decide
if we need it or not. That's going to total
row gets a little bit. And I think we can still
have the ability to cancel the brightness by using
the outer QP care of here. Alright, let's see this
from a far distance. Maybe we can work with
the roughness just a little bit and make
this reflective. I don't know. Let's cut the base color and let's
see the reflectivity. Firstly, check the
noise texture may, because of the skill
is very small. Let's add 50 year. Alright, we can see
some variation here. Let's move this
just a little bit, and let's go back here. Alright, let's check the
results of that roughness. Now, this is a bug, this
control here, if click. Now we have some
reflection here. Let's take this farther. Suddenly like this will work and that will
supply this back to the base color. Already. That's cool. Let's go back to the metal material itself and maybe that's what's going to happen if I make this darker. I think it'd be nice if
I make this doctoral. Yeah, I will accept this. I will hit Control Alt V to
get rid of this square here. And that's great. All right, now let's create
a wood material. I'm not going to
get to the details, but I just need to add
material and give it a name. It's called wards.
And then hit Enter. And let's give this
dark material for now. And let's apply for the wrists. And let's see crop
the spokes here. Let's select this and
go to this site here, picking up those Saltillo, pick up this club, this one as well here, this piece here and
this one right here. Hold skeptical of this hit
Control L and linked material. And let's see, did we
gave this a material? We didn't give it a metal
material is add the middle and those rivets and yeah, this one, this side, we need to give it
a rivet material. Okay, that's great. And let's kick
this side as well. We didn't give those
same material, so let's give this one a middle. This one right here could take a metal and this piece
here as well maybe. What about this one?
Let's give it a metal. And this one we gave it already. And this piece as well, we
gave it this one. That's cool. That's great. And
the wood material. Now let's see. That's great. Let's check the UV for this box. Let's see that from here. Let's go to the UV.
All the spokes said one UV for those and for that
spoke as well, the site. And let's check the woods. Alright, that's cool. We have them in one movie. That's being, we
have the ability to to bake them in case we need to use baking system or
picking technique. And this is for the
metal and how to apply and can give us sitting
to get another material. And yeah, that's it for this
video and see you next.
22. 022 Material Creating the Wood material: Hello again, we'll
come back here. And this video we need to
move to the wood material. And fairest is go to
the texture folder. I have these tickets. Sure.
I download them or download them from the Texture haven.com. Let's open them. Here we have the woods and
we have the displacement. I think we don't need that. Here we have the normal map
and we have the roughness. Let's see how can we use those. We created a wood material
and the previews video. And maybe we can start
with this wood plank. It's like to isolate it. And this is the end. Let's go to the render,
and this is what we got. Let's go to the folder again. And this e.g. the drag and drop
the Mh right here. This is a blog, this to
that base color first. And now we have
something right here. We have a board. That's great. Let's go back to
the same folder and let's see crop that
softness despite the reference right here and the supply get to our office. But because the
roughness is black and whites and maybe we
don't need any color here. As you can see, we
have color space, RGB, red, green, blue. We don't need those, we need none because it's
black and white image. If I hit Control Shift and left-click to preview it,
It's black and white. Now we have the roughness here. That's cool. Let's go back to the same folder here we
have the normal map. Let's see, grab it and let's
put it right here as well. And it is wrong to
connect the normal map, normal life that we need to add. Normal, normal. Not this one, sorry, hit Shift a to
search and let's search for normal again. Normal map. Let's apply the normal
to the normal and the color to the
color right here. Now we should see some
height information. And as you can see, we have some height
information and we can control it by
using the string. But for now, let's leave
it like that. That's cool. It's very simple
to create what we don't need to
accept this result, we need to tweak it even
more because we need it to be old and we need to
add some variation, especially if I bring
them it right here. So you can see here
we have some data, we have some dark spots, e.g. this right here, we got
some dark spots and we need to have something
similar to this one. Or the first thing that
we are going to do. Let's hit Select to
excite and maybe we can Coby some notes from here, e.g. these notes, let's try them
and let's see what we can. How can we use them? As you go back to the ward? And let's hit Select to
isolate this one alone. And I will hit Control
V to paste these here. And now let's check
these notes on this. I will hit Control left-click. And very cool. We have some big right here. I think we can control
it if we like. Make it a stronger, maybe
somebody like that. Okay, Now let's try to
break the effect here. I don't like to
leave it like this. In this case, I can use tickets
your noise because Joe, and let's put this right here. I will hit Control Shift to
click just to preview it. And let's add a
texture coordinate. Let's search for coordinates. The block, the UV because we are using UV or you can
plug the object, feel like, Let's increase the scale so we can
see something details. Maybe we can add
a roughness 0.8. Now we have roughly
saying this stuff and lists are a killer rum. And this right here. This makes some variation here. And now we need to
mix between those. I will hit Control Shift
right-click from this to this. Now we have mix. This book is a factor to one, and let's change
this to multiply, to multiply those together. And no pie manipulate
this color ramp. I can break that
effect as I like. That's what I want here. So all what I did here, just a mask here. Right? All of that as a mask. Alright, now let's see. Grab this texture. I will copy its right here. And I will add another
mix, our QV here. And I will use this as a factor, the result of the mask. And we'll put this one
in the base color. And this is something
that I got. Everything is white. But here we have
two images of vote. I need to write one of them in, make the other one dark. E.g. if I make this
white and this one blue, I'm going to get, especially if I make this dark and this one white, as you can see here. So the dark lord should
be plugged here. And the white who would
be plugged right here. Let's start with a dark coat, I guess going to the care of QP, care of this for
this right here, a blood get to the
dark, plug the world. And now we have the word, if I take this down
and I can make it dark, and that's it. Now this become dark. I can copy the RGB care of
hefty and add another one, another one right here, and delete this dots and the lightest tool with this
one and plug it to the white. Now we have the white value. I can make this even more brighter because
something like that. Or it's for the prideful they will make
this even a predator. Because we need to see some
variation here eventually. And yeah, that's very cool now we have
something nice here. Alright, what about the dark? Good. All right, let's
see what we can do here. I can leave it like this. This is an option, or I can add some Plotinus to
the order itself. Alright, let's add
dark Plotinus to the wood itself,
to the dark one. Select those and let's
move those right here. And let's search for, alright, we don't need to
search for noise texture. We have it already right here. So I'm going to use those hit Shift D and
thicker code right here. And this is the results. And even the killer rum, maybe I can copy it and use
it as well because we need these dark Plotinus and listen Shift a and let's
search for mixed RGB. And let's put this
right here and plug this to the factor. And let's put this one
to color Juan for now. And let's see that
is of the mixes. This is the results that
we got from the mix. Let's see the difference if
we were this right here. Alright. Let's put
this to color. In the color tool. We
need to make this dark. Alright, and we need to
change this to multiply. Maybe. Let's see the difference here. I think we can control that with this option here
with a color ramp. Let's make this wrong.
Just go back here. You can see we've got
some documents here. And maybe we can add in the color section here we
have hue and saturation. Maybe we can take the saturation of the world just a little bit. At this one, Let's
maybe we can add 0.8 to make it less saturation here. I mean, what else
we can do here? The sublime, all of these. And let's see what we got here. Alright. The egg is over the
world should not be a smart lock that leg this. Alright, we need to add
some height information. And if we go to
the, our mask here. The result that we
got from the mask. And we can use the
mask directly to the displacement option that we got right here to have
some height information. And let's see how can we
achieve something like this? Actually, I think
we can copy all of these notes and use
them to a displacement. I think that's what
we better too. Because if we do that, we will have more control. Alright, so in this
case I'm going to add a new node here is
called displacement. And the displacement to
the displacement here. And the blog of the
killer to the scale here. To the heights. Sorry, I
think you had the height. Okay, I've heard
that as you can see, the effect is not visible. What I'm going to do is I
will cut the connection of the base color and I will
make this even darker. I just need to
focus on this area. And I still have nothing. Even if I take the scale
up, I can't see nothing. Let's invert that and the results because
for the displacement, displacement will
displace the white value up to, we'll take it up. And I don t think that I need
the opposite, this effect. So I'm going to invert
the color hits, search and search for inverse, the inverse node right here. So this node inverted
the information. Alright, after that, as you can see, I
still have nothing. Maybe if I take the
number of the bump back, I can see this. Add 0.5. Yeah, that's right now. I can see something right here. Now, as you can see, we have the ability to target the acres. And by pushing this forward, we can reduce the effect gets a little bit and thus can make the result even more realistic. All right, Very cool. Now let's connects the color
to the base color here. Now we have some imperfect
can happen to the world. Or at least hits like and
let's see what we got so far. We didn't apply the same
material to the, to the wheel. Let's select this. Halt here, pick up this, and then let's select any one with the material
or the other. This books, e.g. hit Control
L and link the material. Alright, we then
gave the material or not, something goes wrong. We have here, we'll
fix it later. For the spokes,
everything looks fine. But for the wheel itself, the texture is not
acting normally. And that's been we need
to make some tweaking. But if I make any tweak, I will affect the whole material for the whole geometries because all of them hearing one material furthest
apply the same material, the wood material to
this one as well. We just forget to do that. And now we have
it here. Alright? In this case, I
will sublet there wouldn't material
two to material. So for the ring here, maybe we can duplicate it
and we can call it dots. We'll just to recognize it and I will hit slice to
isolate this wheel alone. They just need to see how
can I make this better? What's this node is? I think we just forget to
block this to the Keller one. Okay? And let's see how
can we control that. Alright, so this is the
whites brights awards. Here, we got this is the
effect and this is the mask. Let's check that mask lists or it's yours that
affects make a subtle I think the
wear and tear masks that we created is not acting correctly
here for the wheels. This try to check it here. See why that's happening. Alright, so we could manipulate
those until the weekend. It's good result here. But let's see how
can we keep that? Alright, for any reason, if that doesn't
work for the wheel, because maybe the wheel is low Bali, no, it's
high-resolution. E.g. as you can see, the results were the
geometry technique. But if we grab the wheel
and if we gave it e.g. subdivision surface, that's can give us another result because now
it's become harder to do. Now I can control that even more nicely
without any problem. So just add one
subdivision surface because this technique
using geometry, this needs the object
to be high resolution. You need to make the object have too many
vertices to make this one works. So in this case, now, when I add a
subdivision surface, now I can define
the edges easily. Now let's go back to this. Maybe I need to take this bag. Sorry. Something like this maybe. Alright, so that's great. Now I can go back to
the material itself. Now we can see something here. All right, it looks nice
accurately, It's very beautiful. And let's go to
the dark Plotinus. Alright, let's see what
we can do with them. Alright, let's make
it even more darker. And let's see the final result. I think it's very cool. And for the bumpiness and the displacements are listed Slack and listing site
from the local mode. Okay, let's take a look
through the results. Let's see, can we do
anything else even for this piece of
food right here, because it's not
high-resolution geometry. As you can see, the wear and tear texture is not applied
on this in the correct way. But although that we still
have nice wood here, even if this doesn't
apply the correct way. From the back, it
doesn't look a cool. Alright, We have no problem. I will hit Select to
isolate this one. And let's go to
the solid spheres. Let's see the wireframe
List tickets. Xiaomi wireframe we have here. Alright, it's low Bali. And in this case we can increase the number
of the subdivision. I'm not going to add a
subdivision surface, but I can. Let's go to the modifier. Okay, I have nothing. I can tab and hit Control R and add extra
geometry like that. And confirm it's here and here. Just hit Control. R interrupted the wheel to have
geometry like this. Maybe here I can add extra hand here as well,
the same scenario. And here and here on this side. And that should not
affect the UV by the way, if you do that, the UV could still work correctly.
And here as well. Now let's go back to the
render and let's see the results with these chains. Let's tab out and let's
turn off wireframe here. And as you can see now, the result become better. And if you increase e.g. the subdivision here, you can make it even better
as you can see here. For this area or this area here, if we are to hear as well. I can get even better results. All right, Notice it's like
two sides of the local mode. Let's check the result now. Right now it's better
for this vote here, the bridge, this one as well. We can do the same
scenario here. We can add extra
edge loop here, e.g. let's add, yes, rotate the wheel and add
extra edge loop here. And maybe here as well. That's can help to give
us better results. And here as well.
And by the way, I can create another way, another mask to avoid that, but I don't need to duplicate
the material for each part. Adding edges. It's easier for me. Alright, so what else? Maybe on this side
we can add or no. Let's add three or four
here. And here Oswald. Let's see sites. Alright, I don't like
the war to show how applied on this piece right here in the half that as well. But this video become too long, so I'm going to end
in the next video, we'll try to find a solution
for, solution for this. So that's it for this
video and see you next.
23. 023 Material Fixing some issues: Hello again, we'll come back. I didn't like the result of
the material of the shaft. If I go to the Render, should be similar to
this one right here. But it is not saintly.
See what That's. Why is that? Alright, so this ring right here
and the health itself, they are hearing the
same material. Alright. I will hit slash to
isolate this one. And let's see why
that's happening. Maybe I think that's
because of the glucan. I'm also quite sure yet. Or maybe because we didn't give it enough enough segments. I think that's the issue. If I go to the wireframe
and the other sprite. In this case, if we increase the number of the subdivision, we can have another result. In this case, I can
tap to edit mode and I can add extra Hs here. Or let's say 18 right here. Something like this.
And one here as well. One here. I think this will be better. And maybe Yeah, I
think that's it. You don't need to add
too many edges here. That will be enough.
Notice that the slide, alright, now the
result is better. But what about this beam here? I think we have
the same problem. And maybe we can give
it the rivets material. Yeah, that's what we read through this to
dislike, to excite. What about the woods
material here? Listed? Select to isolate it. I think the material is not
applied in the correct way. It should be circular. It goes like this, but it's not. Alright, let's go
to the UV here. I just need to check the
UV itself. This is a UV. Alright, for this piece, I think we need to
King the UV to. As you can see, this
is the result of the UV. Goes like that. I needed to go sit
right like this. In this case, we need to make
some tweaking right here. And I will select the UV and
rotate it first like this. I need to rotate it
because I need one of these polygons to align these polygons to
decorate like that. And I will focus on this. A face right here. I need to tweak it. E.g. I need to make these
vertices aligned together. Let's select those
and his right-click and choose auto align. And let's say Club
those as well. It's auto aligned in
those here as well. And those here as well. So now we have perfect
square hair or less. Let's say all of these vertices now a
line in the perfect way. But those notes, alright, in this case I will select
the whole UV and I just need to find this face right here. And the 3D view board, I can activate this
option right here. It's called Sync UV. And now if I select the face, I should find it here as well. Now, I can just recognize
it is right here. I will hit a to
select all the UV and keep this phase,
the active one. If you don't know
how to do that, just a click and click. Again. It will be
the active one. Alright. Now what I will do
is I will go to UV and go to where it sets. Whereas as well as this
follow active acquired, choose this option right here, and then hit Okay, if I hit Okay, all the polygons of the UV wolf follow this face right here, and the UV will be corrected
as you can see here. So it is very nice trick to do, but I just need to
make one mistake here. In case you didn't align these vertices in the
correct way, e.g. like this. Now if I hit a
to select all the vertices, and now this one is
still the active. If I go to UV and
cues follow actively, quiet and hit Okay? The UV will nodes. You will not get the
correct result because you didn't align these vertices. So I'm going to hit Control
Z couple time to fix that. So that's very important thing. Alright, let me get this
one, the active, correct. Or let's say a line all the
vertices by using auto. Align, a line auto
and then go to UV, follow, activate
quiet and then hit. Okay, and there we go. Alright, now if I tap
out, as you can see, the, the material now applied in a circular way and
that's what I wanted here. Alright, And one more
thing I need to do here. I think I can duplicate this material because it's not applied here in the correct way. So I'm going to duplicate
it and maybe I can call it would want to know underscore. We'll just to recognize its, Let's call this core. And let's see what
we can do here. Or at least check the mask here, because most of the problem
comes in from this mask. Let's mix some king here. So alright, pushing this
slider, I think that's it. That's the only thing
that we need to do. And lists of like the
material and let's see. Yeah, that's it. We
don't need to do much. That's it. Alright. What
about the displacements? Can we tweak that to even
more and make it more subtle? Now, let's go back here. And now we got something nice. It's like to excite. Now we've fixed the site and we need to do the same
scenario for the other side. I'm not going to go to UV and fix the UV as
I did recently. I will delete this and
delete the wheel itself because you remember when we add a subdivision surface
to the wheel. So let's delete those and
now we can copy them again. The 3D cursor still
in the middle. So I will hit Shift
D to their Coby and then can throw em to open the mirror and then hit Y to choose the axis,
and then hit Enter. Now we have another co-PI there. And for the wheel, let's see, grab this, have detailed Coby right-click, leave it in assemblies can
throw MY and then enter. Now we have another Coby. And in case you want to make
variation, you can do that. You can rotate the
wheel itself or you can go to the UV and slide that
over just a little bit. Make some variation, but no one could not
start by the way. Let's go to the render
and let's see what else we can do here. Everything looks okay. I think this is very nice result. We have here. We fixed almost all the problem. And we can add more staff
alike in case if we want to add dust and use the
ambient occlusion technique, we can have even more
interesting result and we can leave it like this because according to
the reference images, there is not a condition to add a dust on the ward or
something like this. So you can accept
this results as a realistic result or
you can add some dots. Assuming that this is
outside for a time. But for me I will
accept this result and I will end this
video and see you next.
24. 024 Modeling a platform to the cannon: Hello everyone. Welcome back. This video, we need to create a platform to put
this cannon on. I have this image right here
and a lie this platform. And let's try to
create something, let's say similar to it. Or maybe we can
make some change. I can put this reference
image right here. And let's start
doing that first, I will select the canon and
let's go to the site of you. I will put it on the
x-axis here, e to the z, and move this up almost right here. As
something like this. Maybe we can move with
just a little bit down. And we just need to
rotate the legs just a little bit to align them
with the x-axis as well. Alright, so in this case
we can go to the top view and we can select all the
details that we have here. All of them, and even
the shaft as well. But before we do that, before we do that, I will
select the shift itself. And they just need to make sure that the origin
is in the center. And I will hit Shift S to bring the 3D cursor to the selected. And now the 3D cursor
is right here. After that I will
hit Shift a to add, and let's add an empty. Now we have this empty. Alright? Now let's
go to the top and let's select these geometries. All of them. Move them. I just need to make sure that I selected the correct geometries, de-select the empty
and then hold, shift, grow, grab the empty and make the empty, the active one. And then it can throw B2 to open the parents menu here and
choose parents to object. And now all of these details
parented to the empty. Now if I rotate the empty, all of these details will
be rotated with the Mt. I go to the right view. Now if I rotate the empty, I will, I will have access
right here to rotate. This licks on. Alright, so in this
case I can zoom here and hit R and hold, shift and rotate this
just a little bit and aligned to the ground. Alright, now let's hit, Let's hit Shift S and the bringing the 3D cross with the center
and then hit Shift a. And let's start
maybe with a cube. Okay, let's go to the side
of your head as to the z. Scale, this make it smaller,
something like this, maybe to the Z key and move this maybe right here underneath the canon and give it a length. Something like that.
You can eyeball it. And maybe we can move
with input like this. And that's great. And I will hit S to scale
this just a little bit, maybe something like that. And then hit Control a and apply the scale because we scale this. Let's move this
right here maybe. And let's have
another duplicate, maybe beside this, hit Shift D, and let's take another copy next to it, something like that. And maybe we can make some
variation like scaling this like that and moving
to this maybe right here. And adding another
Coby maybe here, or something like this. And maybe we can. Alright, let's take
those two and hit Shift D to take another
cookie maybe right here. Something like this. And let's make some variation. I will move this right
here or maybe alright, and touch it, it, it,
it's more the glove, this tab to hit more the
club is four vertices and the surrealists spree this tool, select box, club is four
vertices and from the top, you can align these
vertices here. And you can grab those as
well here if you'd like, or you can call me this
one here at the end, Let's add one right here, top. And let's select
these four vertices and you can activate
them or if you like, and move this just a
little bit right here. The idea here we
just need to make, we want to make some
variation here, tab out and maybe we can
now less, I don't know. We can't select this row here, hit Shift D and take
a copy right here. And the same scenario as well. This makes them very convinced
bookstores here maybe, and take this one and maybe hit key and
move with right here. All right, That's
not going to work maybe here, I don't know. And maybe we can move this one. Let's take off these vertices. Sorry. Go to Wireframe, grab these vertices
and move them just a little bit, maybe right here. And for this geometry,
we don't need it. And now we've got
some variation here. Maybe I can select this piece and this one as well and tab. And in the wireframe mode, I can't get up
those four vertices and move them like that. All right, now let's
select all of these. And hit Shift D to
take another copy here to cover the canon. And yeah, I think that's it. Alright, let's make
some variation here. Maybe we can stop and the club these four vertices and
the club those right here. You can activate the vertex snap and turn off
a light rotation. And it's not these
vertices here. To camp e.g. we can have got
up all of these and tap to edit mode and go to the vertex
and the wireframe mode, you can grab all of these
vertices and hit us to the experimenter to
align them like that. Alright, let's go to solid. And now we got this result here. Alright, the same CNR for the sidecar of all of these top, go to the vertices, has Z
to go to the Wireframe, grab all of these, and hit S
through the exit or enter, tab outs and go to y. Two solid model. Alright,
I will use these as wood planks and I will
select them all like that. And it can throw light,
apply the skill for all of them. And that's great. All right, now, with
all of these objects selected and this one as
well, we need to grab it. I will hit Control J to
make them one piece. So now they become one piece. Okay? This one as well, we need
to select it Control J, and now they become one piece. And let's open the
panel right here. I just need to kick the scale. We don't have any problem, any problem with the scale
because all of the axes are r1 and cool. Alright, let's see what
else we can do here. Alright, now, let's try to
these wood blocks here. And I think we can
start with the cube. I had a cube and the
smoothest right here, it's s and make it small. And let's move it here
to the white maybe. And splits right here, e.g. and what else? Let's
move this down. Something like this. Let's talk this mode and let's select this face, go to the face mode. Let's move this maybe here. And this side as well we
came up with right here. And we don't need to
make it that high. So I will take this up. Somebody like that. Let's give this a length, e.g. let's move this
maybe right here. Somebody like this. And for this side of the same scenario,
Let's move with me, but I hear somebody like that. I think
that's what will work. And let's hit Control R
to add one H right here. And this area, I will grab
this face with this one, and I will extrude those out. So I will hit Alt E and use extrude faces along and
non-normal and throw those out. Something like this.
I think it will work. And here we have offset even
because if I go to the top, as you can see, it's not extraordinary
in the correct way. It could be like this. Alright, this option right
here could solve the problem. So activated and there we go. Now we need to bevel this. So I'm going to select
these two edges, this one and this one, and hit Control V to bevel. And let's pivot this and
let's add some edges right here, except the bevel. After that, when you
accept the bevel, you will have this menu right
here and go to the profile, Profile tab and choose costume. And from here, whatever
habe you will draw, you will have the
result right here. Alright? I think we have here some option to pick
something like this. It's exist with the
blender, you can choose it. And we have, I think this one, alright, I think
this option is nice. You can see I have
very nice result here. If you want to make this even
smoother or you can go to the sigma and increase the number of the segment
to have better results. All right, Very cool
result we got here. Very nice. Alright, Do we need to flip
it? We don't need to flip it. It's very cool and nice. Alright, so that's cool. So I will accept this. And let's close the
panel right here. And now we got this result. And one more thing
here maybe we can do. We need to extrude those up. All right, now let's try to make some
tweaking right here. I need to extrude this face just a little bit
or let's say take it up, go to the face mode
selected, hit E to the Z. Take this up right here, but
I need to cut some area. I don't like it to be like that. I will hit heavily to
take this face up, shift e to the z and
take this up right here. And then hit P to open this
approach menu and hit sf from the keyboard to pick the
fairest option selection, or you can click on
it and that's it. Now, we are still in the
edit mode of this object. I will tap out and select this one and tap to edit
mode for the senior face. Hit a to select the face, hit E to extrude this up right here. And
that's it for now. From the top view, let's move this image right
here just a little bit. The select this face florist
and go to the top at this, more of this almost right
here, something like this. And the side as well go to
the top. Let's move this one. I don't know, maybe right here. I will use this new
phase as a cutout. And it took catalysts by
using a Boolean modifier. But before we do that, I will tap out and I will
go to the face orientation. I just need to kick. If I have a red if I have a problem with the face that I just
extrude this one. I mean, if this become
red unit to flip it, in case you have a problem
with that, e.g. I. Will flip this intentionally. I just need to show
you what I mean. If I hit Alt and into the flip, I got something like this. I need to flip this
back and corrected. To do this, select
the Object tab to it, It's mode hit a to
select everything. Naught z, hit a,
and then hit Alt. And to open the normal menu includes a recalculate outside. Or you can hit Shift
and to do that. And now it's fixed
because if you don't, the Boolean operation is not going to work
correctly. After that. Tab out and go here and
turn off face orientation. And now let's take
this as a Katara. As you can see, the origin dot is right here. It's
not in the middle. So I'm going to
right-click and set origin to the cumulative free
to bring the old can do it to the middle
of this geometry. Now let's take this down
almost maybe right here. And now I will use it
to cut this block. Alright, so let's see how can
we achieve something like this? In this case. What I need to do is I need
to select the geometry. All right, I think I'm
going to activate one of the other ones that comes
default with the blender. Go to Edit and then Preferences, and go to the admin section. And let's search
for bull tool B 0 L. You will find this
right here we just activated and then Save
Preferences from here. When you do that, if you go to the panel, this panel, you will
find the pulse tool is right here. Alright? You need to open it and all
the option you got here, you can reach it by going here, hit N and open this panel. You can hit Control Shift B. For me, I will use
Control Shift B. Okay. How can I make this work? To do that, I need to select the cutter and
then the targets. So the first thing, you need to select
the cutter and then hold Shift,
grab the target. The target should
be the active one. After that, just hit Control. Shift, be to open
the Bowl Tool menu. In here we have two options. Either you use this
group or this group. I'm not going to use the scrub. This one is faster if
I choose difference, as you can see now I
have some Boolean here. But we got some issue. If you noticed I
will hit Control Z. I need to extend the length of the cube
just a little bit, because as you can see, we have very thin face here. I need to avoid that. It's very easy just
to tablet mode and put this here and this one, push this just a little bit to extend it and make it bigger than the block to cut
that geometry, all of it. And then tap out and that's it. So like this hold Shift a cop, the target can throw shifts, be open, the bull tool,
choose difference. And now we got this nice
cuts. Or you gotta cut here. That's great. And
now we just need to duplicate this one on the other sites and we
will be good to go. And before we do
that, I will go to the edit mode and let's
go to the vertices. I think we can move these vertices inside
just a little bit. Taking this here back, and take this side here as
well, you can eyeball it. Alright, That's great. That's very cool.
That's very cool. Let's go to the top now and
let's select these two. This one, sorry, it's healthy
to take a copyright here. And let's hit Control M to open the mirror and just give it the oxygen
when you hit control. And the mouse will be like this. Four arrows, as you can see. Now, the mural is
activated by the mirror. Now need access. When you hit Control M
guest, give it the axis. For me, I need the y axis. So hit white and then hit Enter. And now we can move this and
put it in the correct place. Now I can grab those to hit
Shift D. And by the way, before you hit the end
Coby them you can, I'll rub them and I've taught that you can cope with them. You can arrive one
and then transfer them the UV for the rest.
I think that's better. So I'm going to skip the I
Can and move those right here and then hit Control
M to activate the mirror. And I've told her that I
need to give it the axis. So I'm going to hit
X and then Enter, and then move those
just a little bit and put them in the correct place. If that's too much or let's say that's big,
become very big. The platform. We
can scale it down. Let's go to this site, e.g. and we can scale it and make it small in case we want that. We have this option actually. Alright, now it's become
small and beautiful. You can scale it even more if
you'd like the sun option. Alright, so now I will
hit Control a and apply the skill in case we
have problem with the scale. Okay, Now let's give
this some a bevel. Let's go to the modifier
and add Bevel modifier. Bevel is very strong
in big amounts, so I will add 0.5 to make the
salary points five Enter. And now we have nice bubble. Maybe we can add two
segments right here. And we can go to the object data properties and
activate auto smooth here, and go back here and
activate harder than normal to make the
result pattern. Here we have some open area, we can fix them. And I think we need to fix them, but maybe we can do that later. Now we got the result here. And for these objects, Let's do the same scenario. Maybe we can, fairest, I think we can right-click,
Shade Smooth fist. And I ruined everything. I can fix it by activating the auto smooth and then
add a bevel above this. So I will copy the bevel from
this geometry to this one. Okay, to, to, to do that, select the geometry that doesn't have the bevel and
then hold shift and select another geometry with the
bevel and then hit Control L. Or we can go to the
modifier and go to this URL. And two is Coby to select it. Now we just copied the
bevel to the selected one. I mean, this one right here. Now we have a double right here. And we can do the same
scenario for the rest. So I'm going to
select all of these. And I will go to the
Object Data Properties. And I will hit Alt and click to activate auto smooth
for more than one object. Because if you hits Porter's
model for your activated, it will be activated
to the active object. But if you want it to be
activated for the all, you need to hit Alt and then
click. And now we got it. Alright, the same scenario
for the heyday smooth. Grab them, Right-click,
Alt, click, and activate here this
month for the rest. Now we just need to add Bevel, select those three here, hold, Shift, grab this
one with modifier. We go to the oral
and Kavita selected and those should receive the
modifier or all of them. Has greats. Okay, I've
started like I just need to add a plane underneath
this tool block. All of these open areas that we have here
between the wood planks. In this case, I can add cube and skill this with
a Z and make it very thin and move it down
underneath this, we can go to the site of you and let's
put this right here, e.g. and tablet mode and
go to Wireframe, grab these vertices
and let's move those maybe right
here, club those. We can move them here. Something like this and
the same scenario here. And we can go through the fronts from the front
side and move those e.g. right here and those
here, maybe here. And thus it's actually
something like that. When you complete control a lighter scale and you can give them a
bevel if you like. Sit like this, hold here
to grab anyone with bevel and go to this arrow
Coby to select it. Now we have a bubble here. Either you can go to the 0 Object Data Properties
and activate auto smooth for this to
get better results. All right, So we
finished right here. We just need to maybe I'll rub it and then give
it the material. And we can say we are finished. And before we do that, I think we can select all of these details and hit M
to open a new collection. Just hit New Collection
and we can call this e.g. plots form. And then hit Enter twice to
recognize the US platform. And now we can
hide or unhide it. We can hide the camera
itself if we like. So this is it for this video. And see you next.
25. 025 Texturing the Platform: Hello again, welcome back. This outcrop, the platform. Okay, first thing
that we can do here, we can apply all them where the fire is
because that's it. We accepted them modifiers. So let's grab them
all like that. Select all of them. And you can hit Control a and apply because too
much information. Now all the modifiers applied
and the sublet, the view. And we need to open
value vi editor. And let's select those e.g. talk to the nth mode, hit a. I've told you that
here you can hit a and select all the UV as well. And in the UV here we
have multiple options. We have a cube projection and we have smart UV projection. Let's try smart UV
projection in this case. And if that doesn't
work with us, we can use a qp projection and the smart UV projection
when you choose us, we have this Menu and
we have this angle. And we have some
information here. I will accept everything
as is and I will hit OK. And let's
see what we got. Alright, Now we
got very nice UV, unwrap it and I will
accept this results. And that's very cool. Here we can manipulate
the margin in case we need to have some
space between the islands. And maybe we can add 0.001. All right, whereas it's, we just need a very small
space here and this area. That's very cool. And for the angle, angle
limits, That's very cool. Alright? It's
controllable if we, we can control it, but that will
affect the results. So 66 is very cool number
here. And that's cool. And now we can see that
we are wrapped all of these and this is very fast. Okay, let's try the same
scenario for this one. Or let's say this one. Top hits a select all the
UV here at eight as well. You go to the UV and it will smart UV projection
except everything hit, Okay, and it's done. Finished assets tab. Let's select this and let's
see how can we arrive. This tab has a selected art, the whole UV and go to UV, Smart UV and hit. Okay. And as you can see, we got a result, but it's not like what we want. Alright, in this case, maybe manually we can rub this. I think that will be better. So I will hit Control
Z to undo that. And I'm still here
in the Edit mode. I will hit Control Space to
maximize the view board. And it's like to isolate this. First, let's make some
which we can, e.g. let's add some H right here
between those two vertices. Hit J because I need to
cut this area to two. And let's see what
else we can do here. Alright, so I'm going
to arrow this manually. And let's see how
can we do that. Let's go to the agent
Alt click to grab this entire edge loop that you could go around
the whole geometry. And right-click mark scheme. Now we marked this as the same, so this side will be splitted. The same scenario for this site, Alt click to grab this, but I need to just delete those. We don't need to target
these edges here. This one and this one as well. Because I need this small faces. I need them to be
connected to this site. And when you do that, when you
select all of these edges, just hit right-click
and mark scheme. As you can see, I just
mark this one I've seen and the same
should break here. Even this one, I can
delete this heme here, right-click, clear theme. Alright, something like this. And so this side is open, and this side is opened as well. Let's see what else
we can do. Now. Maybe we can add
an H to cut this. Cut all of this maybe. Alright, let's see what's
the best way to this list. Select this edge right here. Hold can throw the grub this and keep selecting these edges. Hold Control, select this one. Hold control or club this. Go here. Or it can
throw all the crop, this one as well, until you reach here,
right-click mark scheme. And as you can see, I added a seam right
here. That's great. And I'm going to add an H
right here to connect those to make the seam reach
this area like this. So select these two vertices, hit the J to make a connection. This unit you'll pick, you can grab it and mark scheme. Okay, now, I will
select this and this edge should
reach this area, and this one as well as it
should reach this area. So I'm going to speak those
two seem to sublet them. And what's about this
site right here? I think we can do
the same scenario, but I will select this edge and this edge here and
right-click marking scheme. And that will delete this one. I don t think that's I don't want this area to be
opened like this. So grab it. Clear, seem OK, and now Control
Space to go back, hit a, and here it's you and you're again twice
and now it's around, but it's working to
them. Angled base. I will expect this
to confirm all that can give me a better
result. Now it's done. But because we did some
geometry changing, now I can to transform
the UV for the rest because I connected some
vertices and did some stuff. In this case, I
will delete all of these and pre-COVID this one. Let's go to the top first, the 3D cursor in the middle. And I will change that
transform to 3D cursor. Okay? Heavily today a Coby
can throw em to the y, and now we have another
copy on the other side. But that doesn't happen because the platform is
not exactly in the center. In this case, if we want this
to work in the correct way, I will accept this
and delete it. And I will put the 3D cursor
in the center of the, the center of this platform. I have this option
or I can manually move the object that I created and I think that's faster on. We don't need to do all of
that. It kept the club. Those can throw em to the x, sorry, because we activate the 3D cursor if
they jumped here. Anyway, we have no
problem with that. Move them manually key and
move them just a little bit. And let's put us right here. Now though, all of these
objects have the same UV. And that's great. We can say now we
are finished here, but we just need
to make sure that the size of the UV is correct. I will turn off the
canon Collection and let's select
one of these and let's add the checker
material applied. And let's go to the
material preview. Let's see the result
of the kicker. Alright, we can't see anything because we didn't give it
a material by the way. So we could choose the
checker from here. From here. Alright, let's select this
one and let's give it the same material that
we have some variations. So grab those, this one and all theoretical
or this and this hold, Shift scrub the platform Control L to link
the same material. And this one as
well collaborates. And let's give it
the same material. All right, now, we
need to kinda you for the rest of the materials, select those of them. And you can tap it is mode and hit eight
acidic the whole UV. And you can scale this
down just a little bit until the texts become, the size of the texts
become similar to the size of the text or
the platform itself. For this one, you can ignore it. It's not a big deal because
no one will notice this. When you'll be
satisfied with that. Now we can give it the wood material
that will be created. Alright. The woods. Alright, there would
apply it for this one. Okay, We have no problem. The syllabus and select the
rest of the geometries here. Hold shift and grab this. It can throw L and
link the material. And now all of these hearing
the same material here. But we have some
problem. I think. Let's go to the Render. Alright, now we got this result, but we have some
problem right here. Let's go to the
material IRB review. I think that's what
would be better. I just need to change
the direction of the result of the UV, e.g. a. High top here. I need to change the direction
of these geometries. This side, I need to go to
this oxygen notes like this. In this case, I can grab
parts of them and hit Control L to link selects
to select the rest I think. Or I can go to this
option, turned off this, and let's go to the
islands selection and pick the islands. And hit G and move it just a little bit here and rotate it. Hold control to an orthopedist, nine degree like
this. And we're done. Let's make this bigger and make it smaller
just a little bit. I need to focus here. And now we change the
direction as you can see here. The same scenario for the site hits a silicon,
the whole geometry. And now we need to
focus on this side. Just want to click because we choose the island selection. Hit R and rotate it 90 degree. And we need to, we need to do the same thing for the rest here. Grab those. And I think we can
select all of these. And top for all of them. Hit a and here we
can select all the, you can select the,
all the islands. Alright, I think we can. Let's see how can we do that. Let's move those away
just a little bit. Alright. Crop them like this, and then r and rotate
them ninth degree. I rotated this geometry, this island, and you think
it is just one island. But this one island is
for the three blocks. I mean, now, if I rotate
it to effect this one, and it will affect
this one as well. And this one right here, because we have UV above uv. That's why when you
complete the club, this is our ninth degree of
control and rotate 90 degree. And maybe we came up with
just a little bit right here. And alright, we
rectify the material, but the material is zoomed in, we need to scale it
so I will select everything and then top and
hit a select the whole UV. And in this scenario we can
kill the UV and make it big. Or we can manipulate
the material itself. And I think we can go to the scale of the
material and changes. Alright, first thing,
let's duplicate this. I think that's what would
be better is duplicated. And let's give it a new name. Wood platform e.g. enter just to recognize it. And now all of these should hearing the word platform
because we just copy it. Select the rest
hold here to crop. This can throw L
and link material. So now all of these geometries
hearing the word platform. So whatever king
we will make here too all affect the
word platform itself. And now we can scale the material and make it small by adding
coordinates and mapping. And we need to block
this for all of these all of these images
to get correct results. And as I said,
this is an option. If that's a lot for you, you can kill the movie itself. You can go to the UV map and the skeleton
and make it big. And that's e.g. if I select all of
these top hits, a, select the whole UV
and here as well at a and the scale of
this and make it big. And when you do that, the scale of the texture
will be smaller. You can use this option if
you'd like. And then tap out. Well, to be honest with you, and this one is easier. But the problem
with this one now, I can't use the peak. I can't pick the material
in case I want to bake a mask because the UV become bigger than
the square space. But I will accept this and I'm not going to
bake anything here. Alright, now let's
go to the Render and I just need to see the
result in that window. I don't like this
result actual end. Let's see how can we fix this? If I go to the mask, the mask is not working
in the correct way. And the way that I like. Let's check this. Alright, we can't see any
targeting for the edges. And this way I will use
another scenario of masking. Let's learn something
in your hero. I will search for geometry. So no human survival. And let's add double right here. And I will search for geometry.
We have this geometry. I will hit Shift D to copy it. And let's put one right here. And let's go and let's
search for math. Math notes. Alright, now lists of lists, sorry, not math, Victor, math, I guess I made
a mistake here. Shift eight to search and
search for Vic, tour math. Now I will like the big
vault with a vector here, and I will plug the normal
to the victory here. And I will sweep the
blend two dots products. Okay? And after that I will hit Control Shift click just
to see the results. And this is what I got so far. This changed the
sample to six maybe. And here we have the radius. We can control the
effect if we like. As you can see now we
have something here. Okay? Alright, I will cut the displacements To have a
better view here for now. And let's try to control
this with romp Shift a. And let's search for
Fromm color ramp. And let's push it up. Lagged value just a little bit. And the y-value as well. Alright, let's invert
the information here is Shift to add
listed for inverse. Let's put the
inverse right here. I will hit Control. I will hit Alt and move
the inverted from here and width right here before the, before the color ramp. And we have a mask here. Okay, let's see how can we
tweak this and make it better? Alright, we gave it
a radius 0.3 lists, add one and let's see
the difference here. That's too much. I will add 0.1 and make
the radius smaller. The sampling error will attain maybe to make it even smoother. But adding more sample, I will make this. It will be 12. 12 takes time to turn dark, so I will add seven, maybe just reduce a little bit. And maybe now we
can, I don't know, maybe we can manipulate
the color ramp. As you can see now we have
some mask. We can use, alright, I will
use this mask and instead of this mask
that I have here. So I will cut the connection from here and move those away. Because the pointless method doesn't work right here
because this geometry is no, it's not higher resolution. And I will use this one instead. Let's move those right here. And I will like that color to that her to the
color right here. And lists of like the
the principal PACF. And now we should see
some variation here. And in case we don't see
anybody can just check this. Or maybe we can reduce
the effect of the, of the, of the
noise texture here. Just take the killer arm
back just a little bit, and then let's go back here. Add the principal PACF. And let's see what
we got so far. All right. Now I can see something here. This make this a
dark color maybe. What about the displacement? The displacement will not
work in the correct way because we still using the
the point in this method. And so I will rub them and hit Control X to dissolve
them and delete them. And I can call this
a group of nodes, Shift D to copy them. And let's add those right here. And plug that color to
the color right here. And let's see the result
of the mask here. Alright. I will
reduce the effects. I don't know, maybe, maybe I can make it a little bit
stronger, the white value. And I will upload this
to the displacement. And let's see what we get here. Like bug that principle to
control Shift left-click. And now we should see some
height information here. I will hit Control V to render
a small area like that. We can tweak that even more. Let's see how can
we achieve that. Let's make the effect stronger. That black and white value. And let's see how can
hold that can affect the the displacements
list of blog bug of this. All right. Above this material, I can add another material. E.g. I will, I will
duplicate this principle, PACF and I will put
this right here. Let's have more space. And let's add a railroad
hall hold Shift and right-click to do that too. At this point, I just need
to have more space here. Let's put this here maybe, and this with this
material and this area. More than displacement
down maybe here. This one right here. Alright, let's go to this
material. Can throw hips, lift. I just need to see
this material. We need this to be
or off to my trough. And we need to add some
normal map here and this way, and this socket here
or the normal map. So I will copy maybe
these nodes crop them, hit Shift D and
have a Coby here. And maybe I can move all of
these notes down right here. I just need some space. Those. And let's check for normal map. Normal map right here,
sorry, this one, shift a normal map and
plug the normal to the normal and the results of the noise texture here
and this area and the, alright, and the
color right here. And let's see the results. Sorry, I guess I made them, I just made that
mistake right here. It's wrong to use a normal map. We need to use a bump
map because we are adding black and white
image to the normal. So that's not going to work. We need to change this to
bump. I just forget that. I will hit Shift S to
open the switch menu and go to the inputs. The inputs are the C and the
victory here. We have bumpy. Now the result should be okay, but we need to connect
this to the heights, not to normal and
cut the normal. And now that itself is correct. As you can see here. The question is why
we created this? Because we need to create
a mask with MPD collusion. So let's search for ambient occlusion will be
the first option here. Hit Control Shift click just to see the result of
the n-bit inclusion. This is what I got. I will add ramp, color ramp to omega,
the effect stronger. Okay? And let's try to
add a math here. Like it's right here. And
let's change this to multiply. And lists can throw this to separate the effect
just a little bit. Something like this. Or at least surprised that even more. And now we have a new mask here. We need to use it for
the MPT collusion. So after that, let's move those just a
little bit right here. And I need to mix between this
material and the old one. I will hit Control, Shift right-click and move
the most from here to here. And no triangular, we'll add
mixed header automatically. After that, I need to like the the result of the
ambient occlusion. Blog it to the factor here, and now plug this back. And now we should see
something right here. We should see this material
on the geometry as well. Alright, It's not
so quite visible. We can control the color
ramp to see something. Let's see the result. If we take this back, what's going to happen? Right? Let's check the mask itself. I think I can flip
the colors here. And let's see what's going
to happen if I flip this. I think now we got
what we wanted because we need this material to be
applied on the crevasses. And I think we got
something like this. Alright, for this material, maybe I can control the
roughness just a little bit and make it, make it rough. I will add care of power QB and push this up just a little bit
to make this a rougher. Alright, now it's
become rougher. And maybe this for
this material I can kink the color to
something like dust. Because now if I go to right, if I make it right
as you can see, where this material applied. So I will try to
pick something like dust and make it dark. Like we have dust
here and the corners. Alright, that's can
give the results, make it more realistic. I will hit Control
Alt V to excite. And this is what we got so far. Okay, So this is it
in See you next.
26. 026 The final render: Hello again, we'll come back. Okay, now we can render the scene first as you
go to the side of you. And let's select
everything and let's pull the platform above
the ground like that. And the 3D cursor
is in the center. I will hit Shift a
and add plane here. Hit S to scale. Let's make
it a little bit vague. Something like this maybe. And school. Now, let's add a camera. I hit Shift a and let's
go to the camera. And let's add a camera. Now we have the camera here. I need to move the
camera and put it in the position that I want, but I'm not going to
move it manually. By the way, let's go back
to the bounding box. I'm not going to move this manually because that
takes too much time. The easiest way to frame the camera to the
position that you like. Just pick any position
from the viewport, e.g. I. Need to take an image
for the cannon from here. Maybe just pick the
position that you like, the ankle that you like, and then hit Control Alt zero. The camera will be
framed automatically to the to the position
that you like. And if you want to control
the camera as well, select the frame of the
camera and then hit the press shift
and tilt the key, tilda key, you'll find it underneath the escape or
beside the number one. And now you can move the
mouse and the camera will follow your mouse and you
can hit W to move forward. A, S, D, like you
are playing a game. As you can see here. And now I can move it
in any place I like. Let's go to the Camera
Settings and let's change the focal length to 120. And I will move the camera bag. I will hit Shift a Tilda and
hit us to go back like this. And the frame it I can hit Q
to go down and e to go up. A few. Like if you elect to make
the movement slowly, you can rotate the wheel
of the mouse back, and now you can move in slowly. So let's, alright, let's zoom in just
a little bit like that. Alright, that's great. So this is what we got so far. Because we are
going to use cycle. Now we can select
the plane and we can make it the object data properties here we can go to their visibility and
activate shadow catcher. Okay, This option
is nice option. If we want to hide the ground and make it received the shadow. And I will tap to edit mode and go to the
age of select this a, this edge hit e to the
z to extrude those up. Maybe. And listicle up
those three edges, hit Control V to bevel them.
And this pivotal them. But the bevel, as you remember, we still have the profile
type switch to costume. I will switch this back to this option and reduce the number of the
segment right here. Let's shrink the segment to ten. And thus, That's okay. Tab, right-click hated smooth to make this smooth
and that's it. Let's go back to the camera and notice his ear
and go to the render. And let's see what
we will get here. Alright. I will, I can't accept this results because I activated
in the film the transparency. I can see the plane. And if I want to unhide it, I can turn this off. In the same time. I need to make some
adjustments to the, to the I just forget
to the HDRI image. So I will go to solid for now and I will
show you this too. No, I don't need to sweetness, I will use this window. And I will go to World. And to bring my notes. I need the lighting
from the environment, but I don't see I don't want to see the
environment itself. To do that, I need to duplicate the background here to the
anterior code right here, and mix those together. Hold Control Shift,
right-click from this to this. And now we have mixed shader. The factor we need
to use light path, hit Shift a to search for light. Just type path. And you will find this like the first option camera array
to the factor right here. And now if I hit Z
and go to the render, I still have the lighting, but I just hide the background and I can
see the plane itself. If I want to make the
background darker, I can go to the
second option here, the background and make it as darker and thus will affect
my background as well. In case I want to
make this darker. Above that. You can add
material if you like. Sorry, you can't add lighting. If you want to increase
the light or you can go here and increase the strength
of the light from here. This another option. And now we got something nice. We just need to render it
and see what we will get. For the ground. I don't know. Maybe we can make some tweaking. I'm not so quite sure. I mean, by Qin king this just a little bit
and make it darker. Can somebody like this? And maybe I can make the
roughness a little bit high. So I will take the dark
value up just a little bit. And take this up as well to make it rough, not reflective. And now we can take a shot
and see if the results. So if I want to render
this, Let's go to solid. They don't need to
be in the render and then go to the
Render and render image. And here we have
some option, Farris. We need to go to the Render
Settings here, note viewport. And we need to activate
the noise so we can clear the image
after that is done. For the noise threshold. I'm not going to use the
noise a threshold method. I will use the samples and I will add the
number that I like. E.g. I. Can add to 100 samples when these
200 samples finished, render will be done. And I can add a time
here if I like. And after the lender is fitting, the noise will be
activated to de-noise the image to clean any noise
happened to the image. And here we have two option. If you'd like to use
GPU or CPU for me, I will stick with the
CPU, and that's it. We don't have to do
anything else here. Now if we are under, we can have realistic render before you
render just hit Control S to save your work and now go to the Render,
render the image. And in case you need to change the dimension
of the image, you need to go to the
output properties. And here we have the
ability to change the dimension of
the final image. And here we can double
the number here. And yeah, Very cool. Now we can go to the Render
and render the image. I will render it and when it's
finished, I will be back. Okay? Okay, now the render is done
and we got this results. And because we picked
cloudy HDR image, we got this kind of lighting. And alright, let's, let's take this took her
to the combustor and let's see what
we can do there. Let's excite from the render. And let's tweak this view to, let's see, sweetness
to image editor. And let's change this. Let's move the
header. Let's change the editor to the combustor. And inside the image, totally search for the render. Whereas the results
are under-resourced. And here just hit U is not. Okay. Now we have the render result, and here we have the output, whatever thing we
add it right here, it will affect the
final results. And let's add something here. Let's search and the cursor, Can we have color balance? We can add this node right here to control the color balance. We have these three circle. This one is for the shadow, this one for the mid tones, and this one for the
highlight. For the hairdo. I think we can take, I can make it a little bit contrasts biting by
taking this slider down. And for the highlights,
maybe I can take this up to make some variation. And I can make the shadow
a little bit bluish. 12, give my results. Say can make it a
little bit interesting. And here we have the mid tone
of we want to control it. We can do that. And let's move this just a
little bit and let's hit Shift a lit search for the filter and let's
add a filter node here. The upper right
here is soft and it will make the results soft. I need to use carbon and reduce
the factor to maybe 0.1. That's will make the
result a little bit sharp, but I think that's too much. Let's add 0.03, maybe. Make it a little bit sharp. Think that's better. And you can use, you can search for care if
you like, or cubic curve. And you can't control that
even more if you like, if you want to make
this brighter, you have the ability to do this. You can add two nodes here
to control the care of. I can give you a better results. This image is nice, okay? Actually, this result, I
don't want it to be bright, but I need to focus on the private area and
make it brighter. Or That's great. Let's see the result before and
after it M muted. Send any mutators. Alright, this nice. We can put a lot of notes here. Anything that we need we can put here and whatever we will add, we will see the final
result right here. I don't need to add
too many notes. The result that I got. Now, it's very nice and
I like it, the shadow, the lighting, and it's very nice and
unrealistic actually. And yeah, it's, and this is how to create the cannon
at this, how to render it. And this how to create a
create realistic or under, or at least maximize the
image control space. And let's zoom in here. Alright, so this is the result. In case you want to save it, you just need to go
to the image and save as and you can pick whatever
folder you would like. And from here where you can change the format
to whatever format. And I save it and give
it a name from here. And he'd say, okay,
let's kinda slot, we run this in the
slot number one, I will kill you this
tool slot number two because I need to make
another render here. It can throw the
space to excite. And let's make this small
Swedish back to 3D view port. And now let's try to
pick another angle. And I need to, I need to
use depth of field in the, in the camera setting here. Okay, I will duplicate
the camera had helped the end add another copy
in any place you like. And as you can see, this camera, the era of the camera is black. That's this camera
is that active? If you hit zero, you will
switch to this camera, but I need to make this one the active, this camera right here. If I wanted to make this active, I need to hit Control
zero to make it active. And after that, pick
the view that you like. E.g. I. Need to pick this view. And then it can throw out
zero to frame the camera. And now I can hit the Shift tilda to control the camera and put
the camera in any place. Like maybe we can go from
behind and put the camera e.g. right here, I just need to targets some area maybe
like this or less, focus on the core. I need to rotate
this so I'm going to hit R for the Z
and rotate like that. Let's go to the
camera and let's see. Yeah, that's cool. I need to focus on the shaft right here or
let's say the rings. And this way I will go
to the camera and go to the camera setting and
activity depth of field. Now the depth of
field is activated. Here we have. An option tells you, if you want to focus according to the object
position, you can do that. In this case, what I will do is I will select this object and hit Shift S and open the pie
menu and choose coursework, the selected to bring
the 3D cross right here. The position of the 3D cursor, I will hit Shift
a and add empty. Now we have an empty. Let's go back to the
camera and let's pick the empty it as a fork, as a focus point. Now, whatever, when I take this empty or
any place I like, the camera will focus on the, on the position of the Mt. And we can do something here for the camera
in case we want, we can select the
camera and go to the constraint and add
one of these constraints. E.g. let's use dump truck. I need this camera
to point to the empty wherever the empty goes. So let's pick the target. The target should be the empty. And after that we need to
pick the correct axis. Alright? Alright, minus z. And now if I grab the MTN movie, the camera will follow it. As you can see here. E.g. if I go to the
camera and I need to focus on the payroll,
I can do that. And if I want to attach the empty to the
surface of the barrel, I can go to the face, snap and I move the
MTA and hold control, it will be snapped
to the surface. I think that's
could happen. Yeah. Now I can snap the empty to any place that I like and
the camera will follow it. And the focus,
point a to point B. The B, the position
of the, of the empty. And thus can make the
process a little bit fast. Or if you'd like to do this. So for, for me, I will hit G and hold Control
and snap this right here. And now I will go to
the back to the camera. And now I have the
ability to move it in any place, what I like. And let's give this a try. You remember, in
the render view, we switch to this too slow too. That's great. Now, let's see
what's going to happen if I, his hand go to the Render. See the depth of field here. I can control the
depth of field and I can make a strong or not strong. Let's pick the frame
of the camera and let's go to the
camera setting here. Here we can control the f-stop to make the depth of
field strong or less. E.g. I. Will add number
one, or let's say 0.1. That's what make the depth
of field very strong, as you can see here. So smaller numbers mean
means depth of field. First drawing. And
bigger number mean. It means depth of field
is a less Sichuan. If you want to take this
to the default value, just hover over here
and hit backspace. And it will, it will be
switched to the default folder. A number for me, I maybe I can add
number one and use it. And now, as you can see here, we have some fluor here as well in the
focus just on this area. And that's almost what I wanted. And in case that's too much, we can add maybe 1.3 maybe, and make, make it
a little bit less. That's great. All right, now we can make another render or whatever notes we added, the competitor, the
effect will still remain and we will have it when
the render is finished. Okay, so we're not
going to lose that. So let's go to solid and hit Control S to
save your project. Then I will go to Render
and render the image. And when the lender is
finished, I will be back. The render is done. This is the result that we got. It's very beautiful.
The depth of field is very nice.
As you can see here. The compensator still
walking and now we have the effect of the compositor
applied on the image. And yeah, I think that's it
and that's it for the course. And I hope you'll enjoy the course and I hope you
learned something here. My name is Mara Hussein and
see you in future courses. Goodbye.
 Marwan Hussain, 3D Artist and tutor