Transcripts
1. 001 Dune Intro: Hello, everyone. My
name is Marwan Hussein, and I welcome you to my
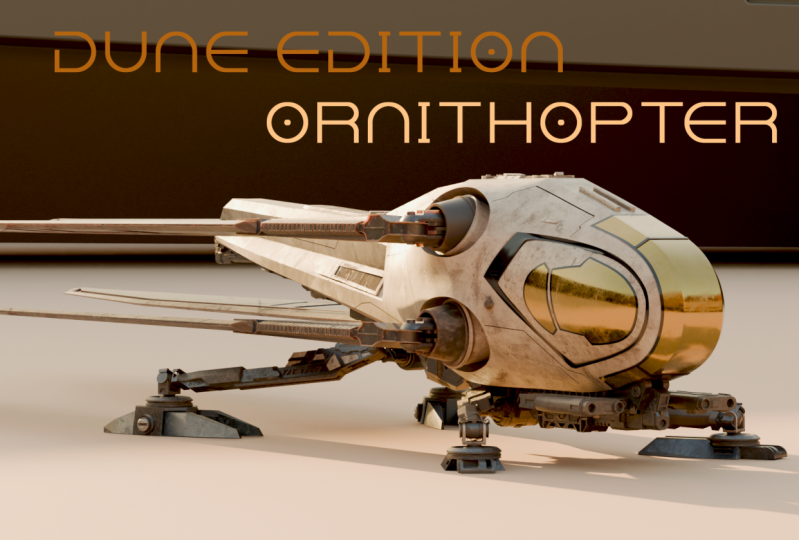
course how to create the Dune Onothopter with
Blender and substance painter from start to finish. Many blender users,
including myself, often watch movies and get inspired to create what
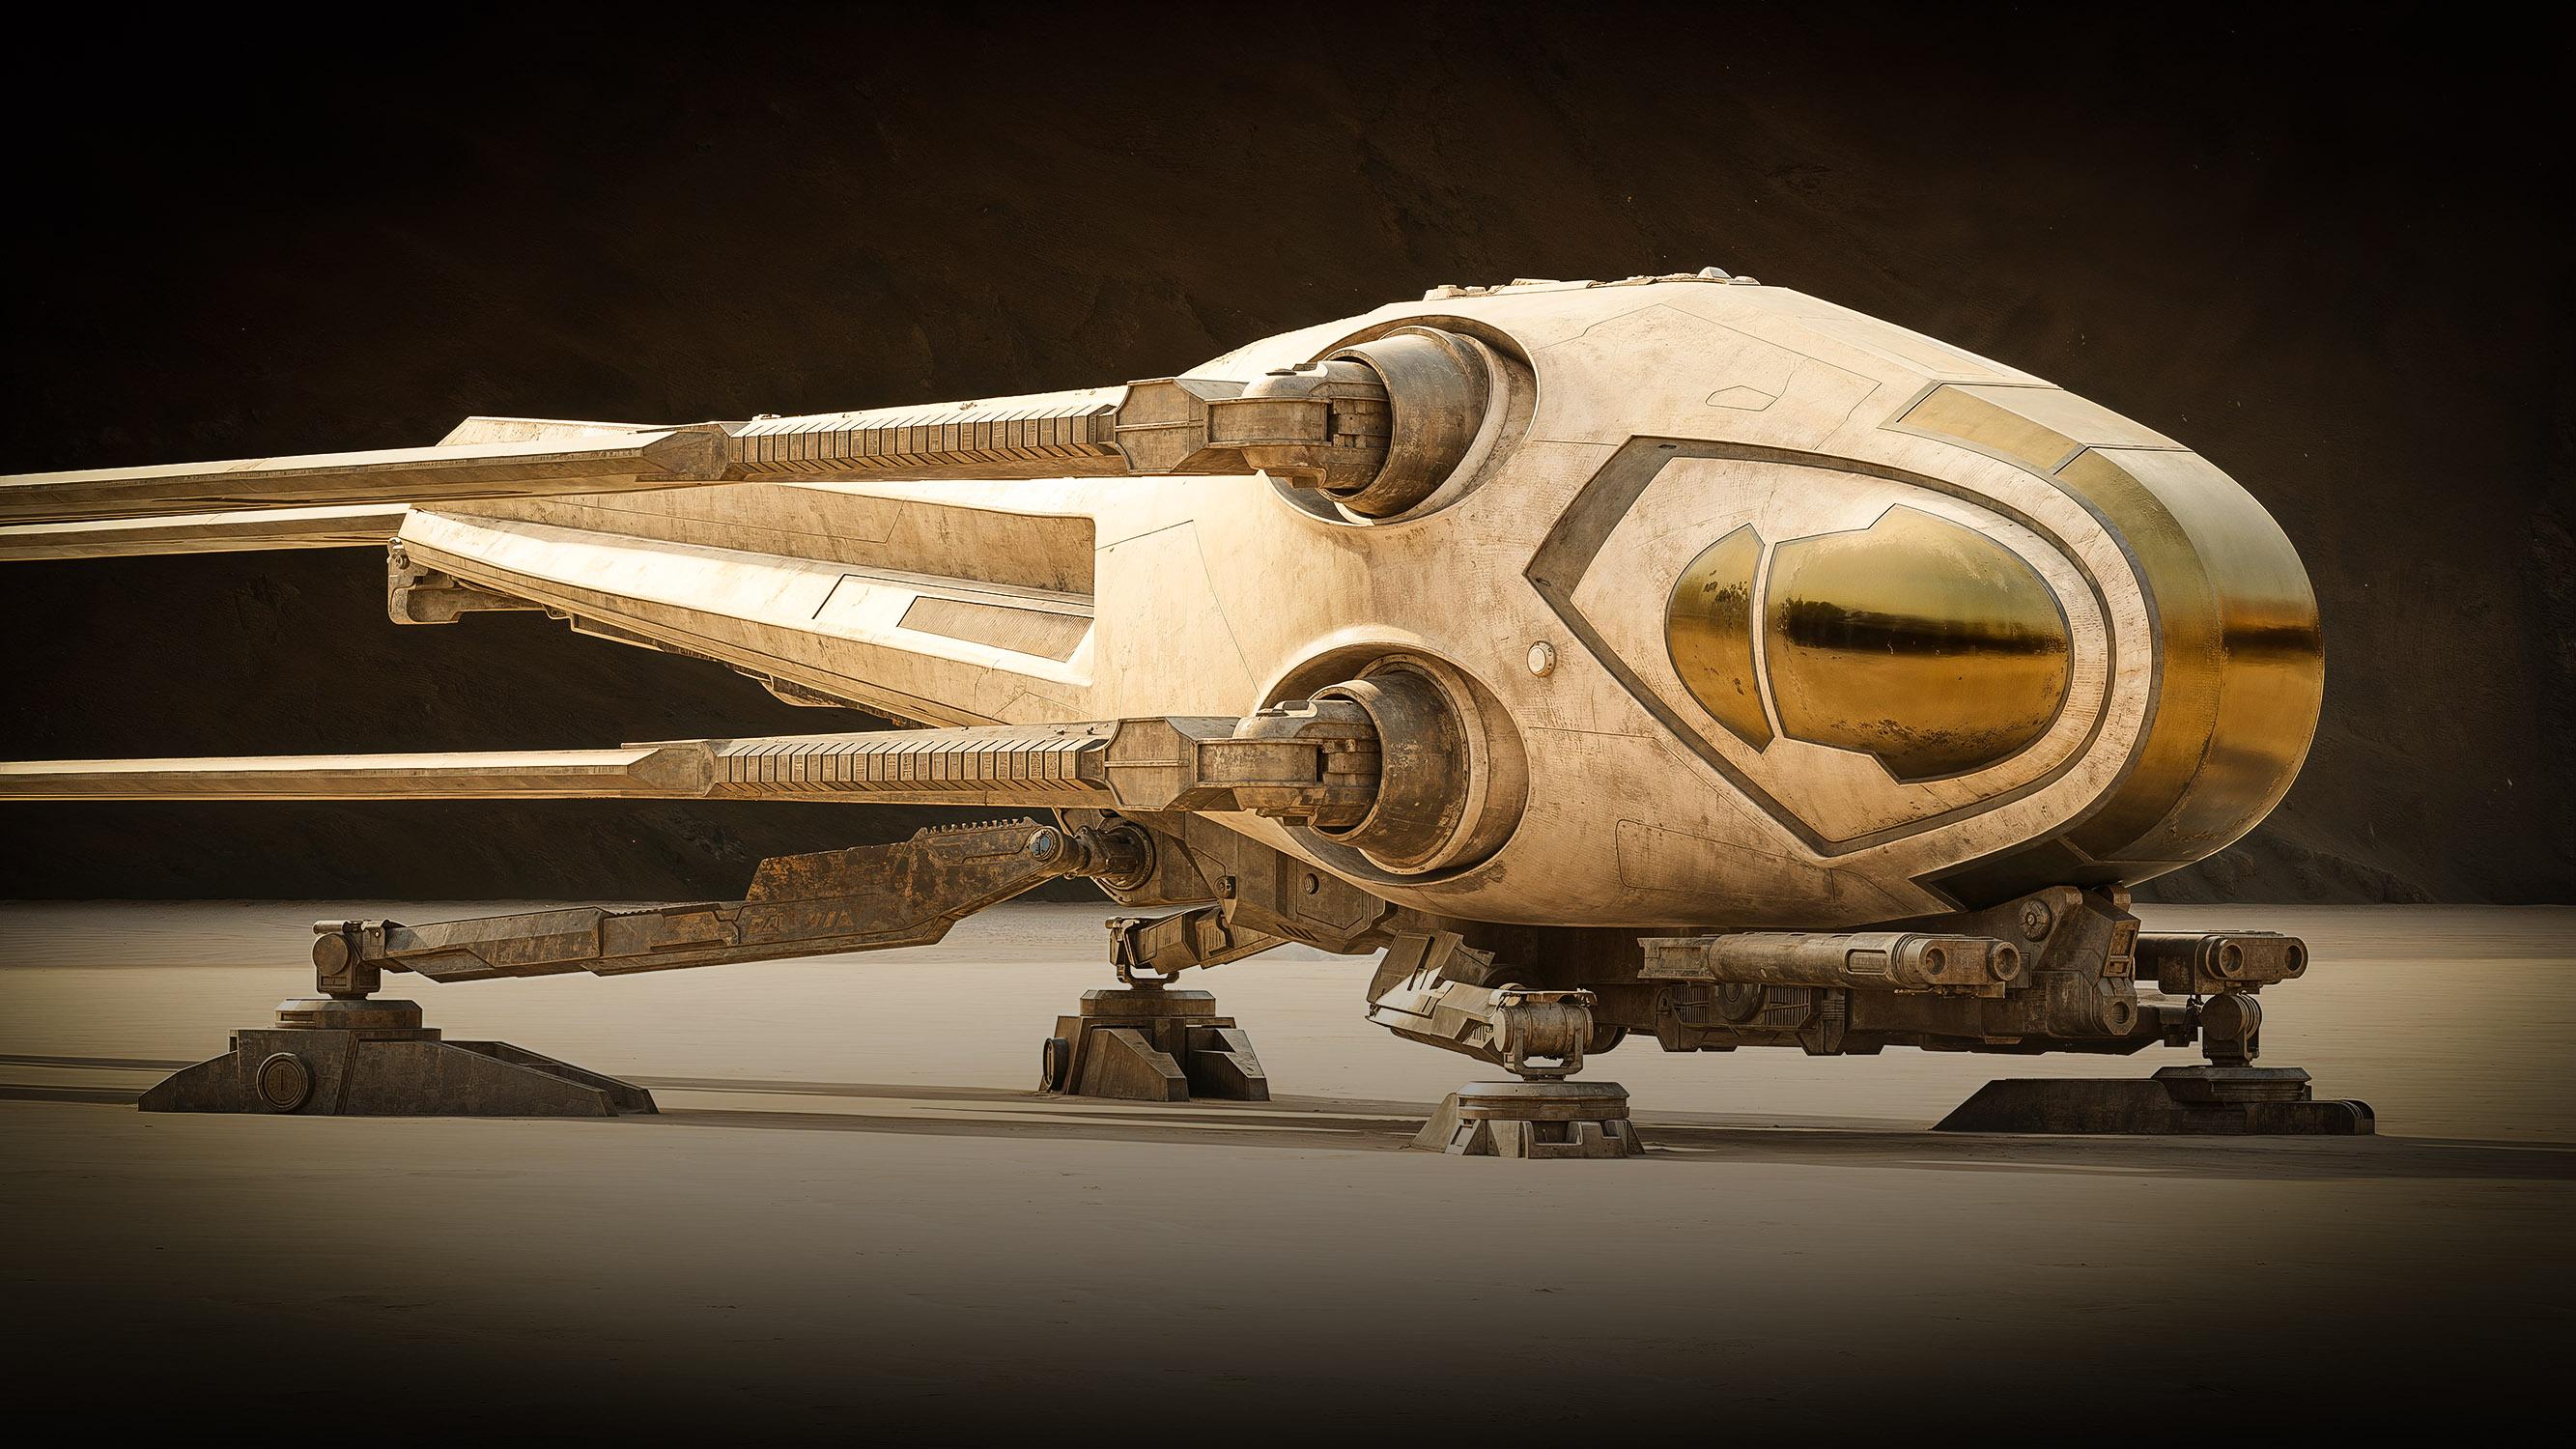
they see on the screen. When I watched the Dune movie, I was captivated by the two seat Onothopter
used by the Freeman. It was challenging to recreate,
but ultimately rewarding. In this course, we'll cover the entire process
from start to finish. We'll begin with
modeling the Onothopter, using the provided
blueprint images. You'll learn clean and
efficient techniques to create all its
intricate parts. Next, we'll dive
into unwrapping. This section is perfect for those struggling
with UV creation. You'll master unwrapping
and learn how to use U dims for high
resolution textures, crucial for close up
shots and detailed work. Once modeling and
unwrapping are done, we'll move to substance
painter for texturing. You'll see how to take
full advantage of UDMs to achieve highly
detailed textures. After texturing, we'll
rig the ornitthopter, from wings to legs. I'll guide you through creating
a complete bone system, preparing your model for
animation or posing. With the rigging complete, we'll create a
stunning environment to showcase your ornethopter. You'll learn techniques
to seamlessly tile textures and set up the
perfect scene for rendering. Finally, we'll finish
with post processing, both in Blender and photoshop, adding those final touches to make your
rendering stand out. I hope you find this course
useful and entertaining. I'm Marwan Hussein, and I can't wait to see
what you create. Let's get started.
2. 003 Adding the reference images: Hi, Von, and welcome
to this video. All right. Let's see
from where we can start, how can we create
the oring thepor? First thing, let's talk about
Let's talk about blender. I will use Blender 3.2. All right, you can
download it from the official website. All right. As you can see now, we have camera cube,
and the sort of light, we don't need all of these, so I'm going to grab
them like this, and I'm going to delete them. Delete from the
keyboard. And we need to use reference images. I have this folder.
Inside this folder, you will find all the
necessary blueprints to start the journey. I have two type here. I have I have images have the full details
of the final results. For example, if I open this, As you can see, we
have the full details, we have the wings,
we have the licks, and all of these details, and I have images
have just the body. So we're going to
start with the body. When we complete the body, we will king or replace the images with the
full details images to create the details. The first thing that
we need to do is to put these blueprints inside the environment
here and we need to put them in
the correct way. All right. Let's go
back to the software, and we need to start
with the front. Okay, to go to the front, you can use the bad
if you have an bad. You can hit number one
to go to the front. If you don't have a bad, you can go to the view and go to the viewboard
and ques front from here. You have all the views here. Or you can use the Tilda key
underneath the s k pattern. Just hit the Telda key and
pick whatever view you like. You have the top, front, top, back, and right and left, and all of these options. So for me, I need to go to the front view and go
back to the folder, and I'm going to use
the body type images. Body front, body
left, body right. I need to start with the front, so I'm going to pick this image, click any drug and put it inside the software like this,
and now we have it. Now we have the image
inside the blender. All right. Now we need to put
this image in the center. If I go to the panel, this panel, you can
hit from the keyboard. Here we have in the location, as you can see, we
have some number, that's mean the image is
not exactly in the center. Now, if you click
any drug, like this. If you add a zero right
here in one of these slots, you will bring the
image to the center. But I have an easier
way to do that. You can select the image itself, and you can hit old g
to rest the location. I have this screen, whatever button I will press, you can see it right
here in this area. Okay, now we put the, the front image in
the correct way. And now I can see the
details and I can use it. But as you can see, it's in
the center in the school, but we need to push your guess
a little bit in the y axis because I need to create the
airplane here in this area. So I need some space. I don't need any overlapping happen between my
geometry and the image. Will move it back a little bit. But be careful, don't move it to the x and don't
move it to the Z, just to the Y. All right. Hit G, select it hit G to grab
and move and give it axis, just hit y and move
it back to the y, just a little bit right here. A now we're done with
the front image. Let's pick the other. Before
I put any image right here, I need to pick the V first.
We're done with the front. Let's go for example, to the left or to the right. If you want to go to the left, you need to hit number
three from the numpad. If you don't have a num bad, you can go to the view viewboard
and Que left. All right. Yeah, right, not left
sorry. All right. So I'm going to hit three from the number to go
to the right view, and now I need to bring the right view image
from the folder. Let's go back to the folder, and let's choose body right. This right here. I'm going to
drag it and mot right here. And it's not in the
correct location. Select the image and hit
G to reset the location, and now it's correct. When you combte, just
move it just a little bit to the x axis. Hit G. And move this to the x axis. You can boot in any place. I just leave a little
bit of space right here. All right now we done with
the right view image. Let's go back to
the same folder, and let's see which
one we can pick. We can bring the top view image. Let's go back to blender and hit number seven to jump to top, or you can hit the tilda
key and seed this to top. After that, go to
the same folder and for body top,
this one right here. Click any drug and
boot right here. All right, see where is it. We have some problem, maybe. Is it again. Yeah, there we go. When you complete it old
get to set the location. And by the way, we
just made a mistake. When I clicked and dragged, I put the image above this one, and that's replaced the image. If I go back here, where is the right, if I bring this image
and put it like this, it will replace the image. And that's something nice.
All right. We can use it. So grab the mage g to the Z, G to move to use the axis and
move this down right here. The same scenario, I
just need space here to model the ordinary tpter. Okay. What else we
need the bag view. If you want to
switch to bag view, you need to control
number one from the and control one to
go to the back. And as you can see when
I switched to back view, I can see the front
as well because the front image is visible on both side the side and the side, and that's not correct
actually B if I put the bag view
image, I can see it. I will see the front side,
and I don't want that. In this case, I can go to the option of the images
and make some change there. For example, we have
a problem right here. We can see this image
from the both side, and I just need to see one side. In this case, select the
image that you want and go to the properties of the image
right here, and this section. And here we have the side, the visibility of the side. We need front, not
both, not pack. For this one, I just
need the front side, so just use front. Now if I tumble around as
you can see from the bag, I can see the image. The same scenario, we need to replicate it for the images. Grab this one, as you can see, I can see it from both sides. I will chose front and
done this one as well, grab se front D. We done. By the way, this
is the top image. It should be right here, that's correct, and this is the front, and now we need to add the
bag view image. All right. To go to the bag, hit the
Tila key and go to Bag view, or you can hit troll number
one from the Nam bad. You can find it right here. All right, Let's go back to the same folder and let's
bring the body back. At small here, grab
it and b right here. Put it away from the images
to avoid any replacing. When you do that, grab the image old get to
set the location, and as you can see now,
it's in the correct place. If I go to the back, if
I control number one, I can see the back of
you not the front. And if I go to the
front, as you can see, I still see the bag view because we didn't
change the option, the side option
for the bag image. So I'm going to or
I'm going to choose the front for the bag to
correct this problem. And there we go.
That's very cool. Now we need to add the
bottom view image. Let's go to the bottom. If you want to speak
to the bottom, you can hit control
seven from the bad, or you can hit the tail that key and go to bottom,
where it's right here. When you do that,
just go back to the same folder and
let's search for bottom body bottom.
This one right here. Click and drag but right
here away from the images. When you completed old to set the location and then move it up just a little bit g to the Z and let's
put it right here. And turn off the both sides switch to front and that's cool. For the left ag, you can use this
one if you want, you can duplicate but
right here if you like, but I'm not going to do that because I can draw
one side and use mirror modifier to flip the information from
or let say to mirror the information from one
side to the other side. Al right now, we put
all the images in the correct way and we fix
the visibility problem. I will end this video,
and in the next video, I will fix the scale
problem and we will start the modeling
journey, right. That's for this video and
see you in the next one.
3. 004 Scaling the images: Hello, everyone, and
welcome back here. All right, let's see,
what should we do now? We added all the images, and we need to kick the scale. After kicking the scale, we can start modeling, okay. But how can we know the scale? When I created the orifapor, I got this result as you
can see in the images. I kicked the images
in the Internet, and I guess made some comparison
between the human and the size of the orifapor. And I concluded that The Odin thepor has a
length about 14 meter. I mean, from this
point to this point, it could be 14 meter.
Yeah, 40 meter. So I'm going to scale this. But first, I need
to add a guide. I will add a box here and
use this box as a guide to or to make sure that I didn't scale
this in the wrong way. The three d coorsor
is in the center. If the three decorsor
not in the center, you can hit Hft C to
bring it in the center. For example, I will put right here and hit Hf C. It
will be in the center. After that, just hit
heft A, and let's add, for example, cube, and we
need to scale it, okay? Let's open the panel right here and let's go to the item scion, and here we have the
size of the cube. I need to scale to the
y about 14 meters. Scale it. We need to scale
the y. I'm going to add 1414 meter for the cube. After that, I need to select all the images and
scale them according to this according
to the cube size. So select all the
images like this. As you can see the cube
is selected with them, hold control and
deselect the cube. Now if I ma scale, I will scale the cube alone. Let's go to the top
view, for example, and H Z to jump to
the wire framewo. Or you can use these
icons right here. If you want to go to
the wire framewod, I need to go to the wire framewo
so I can see the images. H Z, now I can see the images, and this is the cube. I will hit S to scale the
images, something like this. Until the end, the
front point and the endpoint of the airplane
wreak the edges of the cube. Something like this. It goes
beyond just a little bit. And from this side, I think we have
the same distance. If I move the cube
just a little bit forward like this, I think. All right we corrected
the scale and now This ipor is ready to model it because now
we character the scale. After that, if I
go to the front, as you can see it is
underneath the zero level, let's say the x axis. I need to take it above
the x axis because this This axis is the ground, right, so I need to move
this above the ground. It's very easy just
select everything and hit ey and take this up almost right here for now
temporarily because later I will move this a
little bit higher, or you can, by the way, you can go back to the Images
if you like, for example. Let's go back to the images
for the Images folder, and here we have the front side, the full details, W is it
where is it right here. You can see the legs here
we have. We have them. You can replace the fronts the front image
temporarily like this, and you can use it as a guide. I'm going to grab them again. I just replace the front image, and let's go to the front
like that and hit to the Z and put the legs above
the ground like this. You can move a little bit up, but make sure to select all the images like
what I did like this. Now when you com bete we can go back to the same
folder and chose body front and replace the
image like that. That's it. Now we are ready to go. After that, we don't
need the cube anymore. It's just a guide.
I will delete it. Let's select all the images. Grab the first one, hold have to grab the last one to
select this between. And I'm going to hit to open the collection menu
and hit a new collection, and I will call this Sorry, blue prints, and then
hit or enter twice. And now we just created a new
collection for the images. Now I can select like
this and hide it or unhide it. So that's great. After that, we need
to do something else. As you can see, now I'm
in the perspective, and here you can read
user perspective. But if you hit this
patter right here, you can sak between
orthographic and perspective. And when you do that,
you can see that this change to orthographic.
All right. I don't need to see
these images in the perspective while I model. I need to see these images
in the orthographic. For example, if I use the
num bat and go to the front, I need to see the
image when I go to the front orthographic or
left, right, top bottom. But if I tumble around, I need these images to be disappeared because I
don't need to see them. There's no reason to see them. In this case, if I go to
the option of the images, I have this two
option right here is called show in first option, show in orthographic,
show in perespective. I need to turn off
perspective. All right. As you can see, I just
selected all the images, and this image right here,
it's the active one. And that's according
to the color. The color for this one is
a little bit brighter as compare with the rest, right? So this means this image
is the active image. If I turn this off, it will affect the active image. I need to deactivate this for
all of them with one click. To do that, after you
select all of these images, you just need to hit all and click to hide
all of these images. All right, that's cool. Now all of these images are exist, but not in the perspective, just in the orthographic. Now, if I hit number
one to go to the front, I can see the front view. If I go to the right, I
can see the right view. If I go to the back, control number one
from the num bat, I can see the back view, the top view, the bottom view. Of these images are exist
just in the orthographic. Even if I tumble around, as you can see, I can see them, but if I activate
orthographic view, I can see the images again. So this is something useful. That's help to make
the scene a little bit cleaner. All right, that's it. In the next video, I
will bring the images to understand the Oni thepor and let's see from
where we can start, and how can we model it. That's it for this
video and see next.
4. 005 Modeling section start modeling the Ornithopter: Hello again. Before we
start the modeling, let's try to browse the mes
of the iffter in the movie, and let's try to understand. I have these mics. I will leave these images
in the project folder. I collected these makes from the Internet and from
the movie itself. Okay. So as you can see, this is the Onipor. This is the details. All right. We need to see it first. This nice image can't o you, what's going on here, the
door and the curves here, and these lines, the tail, the holes, another
image from the front. This another type of
Onipor, it's military one. I think it's for Harkinon. I just forget the name. But this one for the
Freeman and the movie. This nice mage can't How
you, what's going on here. We have some nice details. I think these are lights. All right. And here we have
the brokin light here. To make this behind the scene. They preparing for the movie. Release shots, I took
them from the movie, can't you, the One
from the top of view. And the length of the wings, as you can see here, they
are a little bit tall. This is how far the leg
should be open. All right. Okay, this image
from the bag side, it can show just a
little bit information here in the tail, what
should we do here? But the information
here are not so clear. We just see the silhouette. But this image is nice
because it can give you some idea about
the wing diaxen. For example, this one goes like this to this diaion
nod like this, and this one should be
strike when this ornithopor when before it take off,
it should be like this. This is side view image. All right. These are the images. Let's see what
else we have here. We have some details here. This is a nice image can show a little bit of the interior, what we should do
here and the door, how it's open and where's
the joint exactly. There's another mage here. Nice image. This is another nice image can have a bit the size of
the to the ortho. And we can see some
details here in the legs and behind the lights, have some details here. And for the wings join here. It's a nice image. All right, so we're going to
use these images, but not just these images. We're going to we're going to use my images
because I created this, and I'm going to
show you something. Let's move this away
on my another screen, and I take some shots
from the viewboard, to the three D model
that I created Here, we have very detailed images. Almost we're going to track
the details that I created. All right. We have
a bunch of images. I can show you the details,
as you can see here. All right. So we're going
to use these images to use them as a reference to create all of
these details right here. The details that you are seeing right now is not
necessarily similar to the details that exist in the movie for the inpter because I don't have enough information About the details
of the One chapter. Because of that, I just created some details using
my machination. Almost close to what
we have in the movie. So feel free to add any details you like or you
can track what I did here. This is for the legs. You can see we should
create all of that. And for any reason, if I reached any area and
I don't have information, I will take a new shots
to cover that area. But for now, we need
to focus on the body, and after creating the
body and finish it, we will go to the details
and create them one by one. All right, that's great. Now let's close this folder. We don't need it for now.
And we added all the images. Now we should create the
body, okay? All right. Let's go to the
top fair top view, and let's see. All right. This is the image as
you can see here. We can start from the top view. You can start from
the right view. You have the freedom to
start wherever you want. For me, I will
start from the top, and I will add plane
right here in the center, make sure that the three
d coorsor in the center, you can hit Heft C to put the three decorsor in
the center and then hit heft A to open the ad menu. And from the section, I will choose plane to
add plane right here. All right. I'm going to move this new plane hit
key to grab and move. And when you do that, just use
the axis when you hit key, G, y, G X, G. All right. So I'm going to
move this to the y, so I'm going to hit G and then y to move this
to the Y axis. Let's put this right
here. All right. Now I need to cut this to two. I will jump to the edit mode. Just you can go to the edit mode from here
by using this list, or you can hit tub from the keyboard this week
between OPT and Edit mode. And I will hit
control r and move my mouse close to this or this
to add an like this here. You will see a
preview right here. When you see it,
you can confirm it by using the left mouse, one click and, you can hit right click to
live it in the center. When you do that, you
can delete half of this, so I'm going to ose
this hal, for example, and hit X to open
the delete menu and hit F from the
keyboard to e faces. I mean, delete fases, right? So this menu for
delete delete phases. Right now I have half of this plane and I have the
origin.in the center. That's mean when I
add mirror modifier, it will mirror it
perfectly on the side. So tab out, and now let's
go to the modifier list. Open the list, and let's
add mirror modifier. And now we mirror this
on the other side. Now, if I make any
manipulation here, the other side will follow it. All right, let's move
those two vertices now, hit key, and move
those to the y. Let's move those right here, and maybe those we
can start here. We can create the whole body, and then we can I just going
to show something here. I can create the whole body, this care, for
example, and this one. And when I complete, I can cut the wind healed area
and cut the door area, or I can create create the body parts py
parts piece pi piece. You have this option, and I
think I'm going to do that. So yeah, let's move those two vertices,
just a little bit, maybe right here, align
them with the line with this line. All right. And if you like, you can make it a little bit
smaller like this, and maybe move those just
a little bit right here. And that's great for now. In the right view, you can
see it's on the ground. We need to move this up. So I'm going to hit three
to go to the right view, and we need to hit eight, select all the vertices
and move this up. So hit and move this up, and let's put it in the
correct place right here. And as you can see, the origin dots
still here, right. So later I will fix this and put it in
the correct place, right. So for now, let's
leave it right here, it's not a Q problem. So I just aligned the side, this vertex right here, and this one should go
up just a little bit, should reach this area. So I'm going to grab it and make sure of
something, by the way, you should switch to the wire frame because if you don't, you will
have some problem. So H Z and go to the wire frame, and the grab these vertices and hit key and
move those up right here. All right, that's great. Now let's go to the top again, and now we put these vertices in the correct position. All right. Now I can extrude these vertices
at e end, extrude those, and maybe let's move
this one right here, and maybe this one should be right there,
following the door. All right. Something
like this for now. And as you go to the right view, and we could take those down. Maybe in the front, we can do
that if I go to the front, I can move this vertex
and take this one right here and this one as well at and move this
one right there. And I know that we have a e right here. We
will fix it later. And let's add another
edge right here in the middle and let's try to
put it in the correct place. Let's go to the top again. Let's see how can we deal
with this. All right. Let's move this it get
wise, to slide the edge, just a little bit and
let's move this right here and grab this vertex. Maybe we can align it it
get wise and slide it. Let's put this right
here in this area. All right. I don't need
to go like this for now. Now let's go to the. Let's grab this
one and hit g key, and let's move it manually
here. Something like this. In the front lets see,
where should we put it or maybe in the right view, hit key and take this up. Maybe this one, I can
move it right here, this one, it should
be maybe right here. Something like this.
For this vertex, maybe I can take this by key twice and let's
move this for now right here. All right. That's cool. Let's go to the top and let's
see what we got so far. All right, everything looks
in the correct position, and from the front as well. When you hit number one, the
same scenery we have here. Let's go back to the right
and let's see how can we extrude these vertices
and follow this curve. I can use one vertex here
and start extruding this. So let's hit E to
extrude this and try to create big polygons here or
big extrion, not like this. That's wrong because
you can't control it. So use big extrions. For me, I will hit E and
move this right here. And make another
extragion like this. And when you reach this area, this curve here, try to make the distance a little bit
smaller between the extragion. All right. Something like this. Let's make the extrusions
a little bit big. A, that's great.
In the right view, I just followed this curve, and I don't know what's
going on in the front. Let's go to the front
or maybe to the top, let's see what we got so far. Because this edge
should go straight, we have no problem in the top
and in the front as well. If I go to the front,
everything looks fine. All right now, we need to
this edge as well and try to create the sit or
let's say this part. Spot. Let's go to the right again and let's see grab this vertex and let's
make some extrusion. The new extriion that you
are making right here, they could match or aligned with the vertices
that you created. So it e to make an
extri right here, and let's make at here,
and here as well. One here. Keep doing that until you reach
the same points. On here as well. And one here. And one here maybe,
something like this. All right. That's great.
Now we created those. But we need to edit this line. This line should go
strike this cool, but this one, we
have some curve. We can interstin in the front of you if I go to the front. Now I can grab or
I need to select all these vertices and move them like this to the x axis and align
them with this curve. So I just selected all the
vertices and move them. And now I just align this
vertex to this curve. After that, I need to deselect this one
because I done with this and do the same scenary for those whole control and click and track to
deselect this one. Key and move this right here, control and select the
same thing for the rest. Move the es a little
bits like that. And maybe and now I
need to select those. I just need to move
the che a little bit, maybe those here as well, key and move those right here and move those
here a little bit. And let's move this one as well. Let's go to the right view and let's see what we have done. All right. Maybe I can move
this just a little bit right here. Something like this. And let's see in the
front what's going on. I think we need to
move it slightly, a bit like that. All right. I think everything is cool, except this area right
here, we need to fix it. We need to move those
just a little bit. Maybe this one, we need to
move it here. That's great. Maybe moving this
one a little bit. Just be careful and deeper
size to follow the curve. I just feel there is
some wave ine this here. I don't know.
Anyway, that's cool. That's very close.
When you do that, you can Z and go to solid view. Now we can select these
two vertices and hit F to fill this area, fill these bogs or
to say this area. If you choose this age or
these two vertices and it F, you will grow you will grow the polygons to
fill these vertices. Keep using F button to fill
all of these polygons. And now we got this.
Let's go to the right. Now we got something here. All right, that's
cool. All right. Now what we have done is cool We just follow
the necessary edges. But keep in your mind, don't follow these edges. These edges are just
for decoration. Don't follow them and
don't create them ever. We will leave these edges to the last when we
come believe the body, we will learn how
to create them. So ignore them. You just need to
follow the door and follow the wind healed and that's it and
follow these holes. But for now, I will
end this video because I don't want to
make this video along, and I will see you next.
5. 006 Modeling section Modeling the front side of the Thopter: Hello again, and
welcome back here. All right, let's try to
comb this area here. Okay? So let's start. I think we can start with these vertices,
these two vertices. Let's go to the top view it number seven from that and Bad, and I'm going to grab these two vertices and hit E to extrude those
all over here. Okay, guess right extrusion. And I don't know,
maybe I can grab this vertex and extrude this. I don't know, maybe
right here for now, something like this. And maybe we can add
one vertex right here. I can hit control our to add one vertex here and hit left
to click to confirm it. And I can select
these four vertices and hit F to create
a big phase here in this area. All right. Let's see from the right
view what we can do as well. First, we need to grab
these two vertices. I mean, those here, and we need to take them
up in the right view, let's go to the right view, hit key to the z, and move those up all
the way right here. And this vertex, we could put in the middle almost right
here, something like this. L et's go out to the top of you and let's see what
else we could do. This image in the front, maybe we can take it up, I think, could be right here, and we can move this
one as well to make this line straight because as you can see, it's like this. So let's grab this
vertex here and take this up almost right here. That's cool. Let's go
to the right again, and let's see how can we create, how can we these vertices? By the way, you can see
the wire frame here, but you can see
them when we go to the right view because we
are working on this side. But if you like, you can
hit control three to jump to the left view and
you can use the left view. But if you go to the left view, you can see the image because we have the image
in the right view. If you like, you can hit ft D to duplicate this image
and boots right here and go to the
properties and s this two back to see it here as well. And now, if you go to the right go to the
right view, a left view, control three from the number, when you work, you
can see the ages. So you can work
with the left view. All right, let's see
what we can do here. I'm going to control r to add one edge right here
in this area in the middle. And maybe I can grab
this vertex and hit e to extrude it and let's
extrude it to this point. But I don't know what's
going on in the front, so I need to go to the
front to see where is it right as you can see
here, we need to move it. So let's move this just
a little bit right here. And this one as well, we
need to move it right here. Right now, I can grab those four vertexes and hit F
to create a big phase here. L et's you go back to the
right to the left view ip. And maybe now we can
extrude this vertex hit E and move it right
here. All right. Maybe we can move it just a little bit right
here in this area. And now let's struck
this curve it E and make some small
extion like this. I don't know, maybe two
or three. All right. But I need to connect
these two vertices, so I'm going to grab them
and hit F to connect them. All right. That's cool.
Now we have two vertices. We need to make some cuts
goes like this, maybe. So Fer let's grab
these four vertices, and let's hit F to
create a phase here, and hit control to
add one right here, and grab this one
and this one hits F and F again to fill this area. Now we got this. All right. For any reason, if there
are some misalignments, you can grab these
vertices and move them, you like All right. So this vertex should be
aligned with the curve, or yeah, with the curve. So we need to move the
keys a little bit, I think, put it right here. And in the right,
let's see in the left. This one, as well,
and this one as well, we need to move
them in the front. So let's start with this
one hit key and move it right here and grab this one as well it key
and move it right there. That's great let's see
what we got so far. We got this shape. That's cool. For now, All right, let's go to the left again, control the three, and let's
see what else we can create. I will grab this vertex and
hit e to extrude it alone, and let's extrude this vertex
right here to this area. And let's try to create
some a scales like this, maybe, something like this, maybe two, I don't know. Let's see how can we do that? I will grab this vertex and hit e to make one extrusion here, and maybe one
extrusion right here, and then grab this
vertex with this vertex and then hit F to
make some connection. But these new extrusions are
not in the correct position. I mean, we need to go to the front and put them
in the correct place. Lest it like this one
and go to the front. As you can see, it's not
in the correct place. I will hit key to move this, and let's put this right here and de grub those
and move them and align those to the curve,
something like this. All right. And as you can
see here, we have a curve. So one vertex, I think it's
not going to be enough. Maybe we can duplicate
this vertex, this one vertex right here. If you want to do that, you
can hit control, shift, B to bivol it like this, to change this 22
vertices like this. And after that, you
can hit control r to the side to add one vertex as you can see,
now, we have a preview. But if you rotate the
wheel of the mouse, you can add two here as well. All right. When you do that, confirm it with left click and right click to leave
them in the center. Or maybe you don't need
to use right click. Grab this, hit key, and let's move this here,
and this one as well. Maybe we could move
this right here. And now I can grab
this with this, hold Hi grab this, and then hit F to fill
these faces like this. All right, that's
cool. That's great. As you can see here, we
have some variation in the distance between
these vertices if you noticed. All right. We can fix that by using an don comes default
with the blender. If you go to the edit, go to preferences and go to the Auden section and
search for loop tool, L O P loop tool. Just activate the loop tool, right activate it from here, I should be like this activated, and then go to the Barger icon and save preferences to
save the preferences. After that, if you hit right click while you
are at the edit mode, you should see the
loop tool right here. It's not going to be right here, but it will be right here. Sometimes I use the tool to fix the distance
between the vertices. For example, I can select the first one and the last
one and the vertices between and his
right click and use space to correct the
space between them. It is very nice tool. But after that, you need to go to the view and see
what you have done. We need to move the e a
little bit slightly here. Put in the center,
maybe this one as well. You can do that in the wire
frame if you like as well. A, that's great. That's
cool. All right. So now we put these vertices
in the correct place, let's go to the right and let's see what else
we can do here. We have this area. We need to fill it. I think we should create
something like that. I don't know. I'm
not quite sure. All right Let's
grab this vertex, and let's hit E, and let's extrude it to the
coroner right here. Maybe we can grab this one. Let's go to the bottom
view, control number seven, and let's see what we have
here in this area. All right. It's not easy to
understand what we have here because we have
some overlapping here. In this case, you can go to the wire frame
wood and you can select all of these vertices of the top area and you
can each to hide them. And now we can go to the bottom view, and
now it's better. At least like this
one, hit E and let's extrude this to this point and make another
extrusion until you make these two vertices
meet each other. But make sure that this vertex could stop in
the center right here. The overlapping like
this, it's wrong. To prevent that, you can go to the modifier itself and
you can use clipping. Activating this
option will help to force this vertex to
stop in the middle. Activate clipping and move
this vertex to the side, and it will stop automatically. All right. After
that, you can hit E to make a new extrusion. I don't know. Maybe it
should reach this area. Don't forget, we are looking at the model from the
bottom view, right? Hit and make some extrusion. Move this new vertex right here. And maybe we can grab this one, hit E and make
another extrusion. Sorry, that's not
going to happen. You need to grab this and hit E and make some extrusion here, and move it slightly like this. Grab those four vertices and
hit F to fill this area. But I think we got some
problem right here because we we used the e letter
to extrude this twice. So that's mean we have
some overlapping vertices, if I turn the mirror
modifier off, and if I grab one
vertex and move it, as you can see here,
we have two vertices. To fix this, to fix that, you can grab these two
vertices and hit M to open the mart menu
and Qs by distance. And as you can see here, we have some notification tells you one, one vertex removed. That's mean now we have just
one vertex in the middle. All right, we just
made a mistake. Let's activate the
mirror again. All right. In the right view will see, is there these two vertices
in the correct position? Let's go to the right or to the left if you
like. All right. But we need to move those down, and take those down, right here. And those as well, it take those down right there. All right, that's great.
All right. That's cool. Let's see what else
we could do here. That's great. Let's go back to the right
view or to the left, and let's try to
create this area. I will use this vertex
and make some extruion it E and extrude this
maybe right here. And let's see grab
those four vertices and let's hit F to create
a big phase here. For this area, I just going
to show you where is it. This area, I'm going to hit
control r to cut this 22. Hit control r. When you
see the preview hit left li click and the right click to leave it in the center, and now we can select those four vertices and
hit F to fill this area. That's cool. Let's go to the
rights, A, that's great. Okay. Now what we need
to do is we need to make we need to create this area like this and connect them to create
this parts of the ornithop. Let's hit t to bring
the id and vertices. And let's see what's
the next step. I think now we can
grab this vertex and this vertex and hit F to make some connection
between them, and maybe we can slightly
move this just a little bit. This vertex puts
right here for now. All right. That's cool. Let's select this vertex, and let's hit e to extrude this almost right
here in the middle. And let's hit another E
to extrude this up here. And try to follow this
scare to extrude this. Maybe one vertex will be enough, grab those and hit F to
make cono between them and hit control to add one vertex
right here in the middle. Now you can grab this with
hit F to create a phase. I think that's not going to
happen. Let's kick this. All right, let's grab
this with this let's hit F. All that's
not going to happen. In this case, we need to select those four vertices
and hit F and grab those hit F. But
these new vertices are not in the correct position. We need to go to the top, maybe. I don't know, maybe
to the front, and let's select the
vertices that we need to select ers. Th here, sorry. Grab them and go to go to the fronts and hit
key and move them, put them right here,
and grab those in the wireframe mode and hit key and let's move
those right here. I think for those we can use the top view, I think
that would be better. The curve, it goes underneath
underneath the wing, right? But you can tell where
it goes like this. That's mean we
need to move these vertices just a little bit. Let's grab them. The two of
them and move them like that. Something like this. The s grab this vertex and in the top, we can kick if this is in
the correct position or not. For this one, we can use the front side and
we can take it back just a little bit like
this. That's great. Let's go back to the left of view control number three and let's grab those and
hit E to extrude those down like that. A try to track this c as well. Hit and let's move this just
a little bit right here. Let's grab this vertex hit
to make some like this. Something like that. We can
trike it almost right here, and we can when we com
believe this area, we will see what
else we could do. But for now, let's strike it
almost right here for now, and let's make some
connection there. First, we have four vertices
here, we can hit F two, create a big phase here, and we need to subdivide this big line and
make some connection. I'm going to hit control
R to add, I don't know, maybe three vertices for now
and leave them like this. Let's degra hit F to
create a phase here. You can grub those as well here. You can hit F to create
a face here. All right. You can create a big
connection between those, but I think that's
not going to work. We need to add one a here
in the middle or two. And let's see how
can we do that. But first, these two
vertices, you remember them. Now we can grab them and
go back those right here, and we can hit e tote almost
right here in this area. Something like this.
From the bottom view, control number seven
from D and bad. We just need to track this line because in the bottom
view, we have the spice. The same scenario, if we
have some overlapping, we can select these
vertices that we don't need those maybe as well, and we can hit to hide them. And now we can go back to the bottom view
control number seven. And we're going to add maybe three vertices
here, three ages. Just hit control r and rotate
the wheel of the mouse, and add three,
confirm them with the left click and right click to leave them in the same place. Now, one by one, grab this vertex and try
to track this s. Grab this hit key and move to the x axis key X and
move this right here. And this one should
be right here. Something like this.
That's very cool. When you complete
it out to bring back the other vertices. Let's go to the left view, and let's see what we have
done. Right that's cool. Now we have three
vertices, one, two, three, and we have
this one as well. We have four. And let's see
how can we create this area? Can we do that? Maybe we
add tra vertices here. Maybe I can delete one
of them. All a sis. Let's check this new
egg that we created here and the front maybe
let's go to the front, and we need to put these vertices in
the correct position in this here as well. Grab them hit key, grab this one, for example, and let's track this
care. This one as well. Let's move this to the x axis
and this one as well here. I would be here.
And this vertex, as well, we need
to move it just a little bit slightly right here. Something like
this. That's cool. For this here, let's start with this move it
in boots right here, and this one should be here. This one, we need to move
it to the x, this as well. Select this and keep
tracking this curve. Let's move those here, and this one as well here. All right. What about
this vertex right here? In the front, I think we need to move it
just a little bit. This check, no. Yeah. Yeah, it's in
the correct position. I thought I should move it, but I don't need to do that.
All right. That's cool. All right. I think
I'm going to add extra vertices
here in this area. I will select this vertex, and I will hit control
have to be two pivle it, and let's pivl this 22. And I need to I need to keep the distance
between these vertices even, so I will select
this one as a as a first vertex and hold control and grab this
one as a last vertex. And I will use the loop
tool right click and use space from the loop
tool option. All right. That will help to fix the distance between
these vertices. Now we have two. Now we
can go to the front, and maybe we can
track the curve of the door a little
bit better. I think. Something like this. All right. Now let's grab those hit F
to make a big face here, and maybe another F here, maybe another F here to
create a big face right here. That's great. Let's
hit control two and maybe add one
here in this area. Can we add two, I don't know. Maybe we can add two here. Yeah, let's add two here. Just to do that. You
just need to control r. And when you see the review
line, rotate the wheel, to have two and left click
to accept and right click, to leave them in the same place. Because if you don't, they can move to the left
or to the right. So Ht click, to leave
them at the center. A right now, we can
make some connection between between these vertices. Let's start with this one. I can select this
and select this one and then hit F to create a
connection between them. And let's see how can
we fix this area with what we could do
here. All right. Let's go to the left view
control number three, and let's select this vertex. Hit e to extrude this like
this, make another ext. And maybe we need last
extrusion should be right here. And we need to put this new
line in the correct position, because this one
should be between these two side, the
side and the side. This one should
be in the middle. So manually, I
will move and move this vertex right
here and this one as well grab it and move
this right here. This one as well.
Maybe in the front, I don't know, be in the front. We can understand a little
bit what we should do. We don't have a guide here. Something like this temporarily. Now we can era those for it
F to create a big face here, and we canrub those
for As and hit F. We go to sold, I think
that will be better. And this edge, we don't need it, so I will grab it and hit control X to dissolve it
control X to dissolve it. And now let's go back to the vertex sot hit number
one and select those four here and hit F and grab those here hit F
to fill those as well. Maybe I can grab
those hit F. Grab those as well and hit
F, maybe. That's cool. Now I need to add
one vertex here hit control R and left
click to confirm it. Select those four hit F, and grab those four hit F as well to create
a bi phase here. And In this area, I mean, this one, I can't track the blueprints images because
I don't have a guide. So I'm going to use my
machination because I just need a small curve,
not a huge curve. All right. As you can see, this one right here, it goes too much
to this direction. I need to take it
back as a little bit. So I'm going to pick an S view and move the gas
a little bit right here. And I just forget to
speak this to right. It could be on the bounding box, the transform ivot
points. All right. And this one as well,
where should we take it? Maybe we can move it just
a little bit like this. Write this one as well,
et wise and slide it. All right. For now, I
will accept this results. And we did great. We
created all of that. Maybe we can make
some cleaning here by moving these in the
correct position or you can select this one. Hold control grab this,
right click space. The same thing here, grab this, hold control grab this, right click and key space, and you can correct
the space between those as well,
right click space. This is a nice way to do that. Manually, you can hit
key twice to slide the vertex a little bit.
And what right here. By the way, there
is some difference between sliding and moving. If you move, if you
pick, for example, a view like this,
and if you move this vertex, as you can see, I can make some I can move it and it's not going to it will
go to another direction, and that will ruin my model. But if I slide it, if I hit key twice to slide it, it's not going to go
to any direction. It will be constraint
to the line. S. Select this vertex
and I need to slide it. Don't use alone because
as you can see, you're not going to move
it in the correct way. Use twice to slide
it on this egg. That's better. This one as well, twice, and, and slide it
a little bit like this. All right. Now we
degrate for now. It's very nice results. We have and we have a
little bit of tweaking. I know, but we will
do that a later. All right, so I will end this video and see you
in the next one.
6. 007 Modeling section Modeling the top area of the body: Hello, everyone, and
welcome back here. A let's continue
creating the body. And maybe now we can start with the top completing
this error here. Okay okay? All right. Let's go to the top of
you hot number seven from the Lambat or use the TL that key and
go to top like this. Select the body and tap to
the edit mode. All right. We need to go to the
wire frame would hit. We have some overlapping between the top area and
the bottom area. We can as we learned, we can grab halve of the
model and hit to hide it. And now we can go to
the top and select the vertice that we
need and hit E to extrude those almost right here. And after that, we need
to track this arc. And I think I've not to do
that in the right view, sorry, left view,
control number three. All right, so let's sit
this vertex right here and hit E to track this area. Let's add Let's make
some tru like this. Almost right here. And how many
vertices we created, one, two, three, four, five, six, I will
select this one and this one and hit F to create
a connection between them. And I need to put these in the correct position
from the top of you, go to the top and start moving these vertices one by one and put them in the
correct position, and then hit after you
select the vertex. This one as well
and move this here, and this one as well
and move this here, and this one, the same scenario. All right, so one,
two, three, four, five, we need to add five
edges right here, control r, one, two, three, four, five, and confirm that and right to leave them
in the same place. Alright, that's cool.
Now we're going to select this vertex and this vertex and hit F
to create a connection, and the grab those four vertices and hit F to create a face. Now I can selate this vertex
with this vertex and keep creating faces until
I reach the site. Okay? And I need one here
in the middle to make some connection between
this vertex and the new that I will add here. Hit control to add one right here and leave it in the
center, H right click. Grab this with this.
Okay. Let's go to the perspective so we can see and his Z and
go to airframe. Sorry, Z and go to solid view. Now, as you can see, we
have this open area. I'm going to select these for
vertices and it F and grab those it F to fill
this side. All right. That looks nice and cool. I think we don't need to make any tweaking here. All right. I think the result is correct. Let's go to the left again, and let's see what
else we could do. I'm going to hit Alt to bring
the other details here. That is great. Cool. Let's keep working with the top side. Let's extrude this
vertex to create this and maybe this
one right here, and maybe extruding this
vertex to follow the car. And let's see how can
we fill this area. Let's select those two vertices, let's go to the top view or maybe just tumble around and grab
those, go to the top. And I will hit e to extrude those almost
right here to this area. We can determine that
from the side view, the left view, it can
roll three from the bat. And here we have some Uh, we have a small curve here, or let's say a small bend. Grab these two vertices, but make sure that you are in the wire frame with it
and go to wireframe, grab those two and hit key
and move those all way here. All right. Maybe we need to move it slightly just a little bit. I don't know, or maybe
we can leave it. All right, this is the result. And as you noticed here, we have some care in this area. I think I'm not going to create this curve because I
think it's not correct. Is not exist in the
original orita. So I will ignore this care. So I will leave this ge
goes straight like this. After that, let's see grub this vertex right here
and I'm going to move it or extrude it until
I reach this area here. But I need to go to the top of you to see where I move this. Let's move it slightly, just a little bit and put
in the correct position. And this one as well, hit
and move it slightly like this. Okay, that's great. Now I can maybe make
connection between those, grab this with this at F to create a connection
between those. And I can create a big phase
right here, by the way, at F to create a big phase
like this. That's great. Let's go to the left view, and let's see what else
we can create right here. All right, let's select
this vertex right here, and let's go to the top of w. It should be right here,
and the that's cool. I'm going to extrude this and follow the curve of the
oritator like this. All right. Don't forget. I just selected this
vertex here in the middle. All right. This one right here. Be you go to top and
hit E and let's start extruding and following
the curve of the oripor. Something like this,
and keep extruding this vertex until
you reak this area. Almost would be right
here in the middle. Here. We can go to
the right view or to the left view to understand that right here in the
middle less correct. Maybe we can take this
back a little bit, slide it twice and
slide it like this. And now we got this. Let's
make this the distance even. Grab this one hole,
control, grab this. Her go to the loop toole and c space to make the space
even between those. Alright, so I'm going
to use this guide. After that, let's combo the
care that we have here. We can start with this one it E and extrude this almost right here and keep extruding this
vertex and follow the care. Grob this one with
this one and hit F two fill or make
connection between them. Okay, after you make the connection between
these two vertices, you need to go to
the top of view again and put these new vertices
in the correct position. So I'm going to move
those one by one, and let's try to
follow the care. Got up this one and let's
put this right here. This one should
be here, I think, select this and try
to put it maybe right here. All right,
something like that. Now let's tumble around. And let's see what
we got so far. All we got this. A nice result, let's go to the right
or to the left. And let's see what's
going to happen if I select all of
these vertices, and if I choose spate, see what's going to happen.
A, that's not going to work. So I will leave it
like this. All right. Maybe we can make the space here even between this
vertex and this vertex. So let's select those here. At let's see what's
going to happen. I don't know. Maybe
that's better. Alright. Right now we need
to fill this area, and let's see, how
can we do this? Let's start with these
vertices with this one, it F to fill to add
a face right here, and hit F again
to do that again. But I can't do that again because that's not going to
work to add a face like this. We need to do something else. I think I can make
some connection between this vertex and
this one right here. Grab this one with
this one and hit F to make a connection
between them, and we can use this one
as a guide as well. And maybe I can add
one vertex here. Let's tumble around, and
let's see what we have here. All right. I will add an between those, grab this one with this
one hit F to create an e and add one vertex
here in the middle. And maybe we can grab
this with this one hit F to create
another line here, and grab those for F
to create a phase. And we have one,
two, three vertices. So I'm going to hit
control R and rotate the wheel of the mouse
to add three edges, left alacritic ally to leave
them in the same place. And now we can grab those here. F, those four, F
to create a phase, grab those two F and F again. And now let's grab this area, a F to create a big
phase right here. And for this side, I think
we can we have three here, so I'm going to hit
control r to add one, two, three or maybe four. And let's select
those four here, hit F to create a
big phase here. Grab those here, hit F
to create a phase here, and we have two here all
right let's delete one. I'll click, grab this one. Go to the A hit number two from the keyboard, not
from the embed. And we need to delete
maybe this one, and grab this with this one,
just dissolve these edges. I control x to dissolve them. And go to the vertex number
one from the keyboard, grab this vertex and
move it right here, but use the slide method hit gate wise and
slide it right here. And maybe we can
grub those here, slide those and put them
in the center as well. Grab those here and hit F to create a big phase.
Something like this. Grab those here as well, create a big phase right here. But leaving triangle here
that's not going to work. We will try to find a way to
go around that. All right. The A that we have here,
maybe we can ignore it by adding another
goes like this. So I'm going to
use a knife tool. If you want to activate
the knife tool, hit K from the keyboard
and make cut from here, just put your mouse right here. As you can see, we have small
green square. Hit click. And when we do that, you will see a preview, and M cut goes from here to
the center of this edge. Go to this edge and
hit another left click and then hit enter
to confirm the cut. When you do that, go to
the ge, move it number. Two from the keyboard, sit like this, hold
he to grab this, Hold he to grab this, and then control X to dis orbit because
we don't need this. All right. So this result
looks better, I think. But this area is not going
to sit right like this. We just have a small care. We need to pick a nice view or maybe from the top
view, I don't know. And I think we need to move this slightly
as a little bit, not too much,
something like this. You can watch the side what's going to happen here
by when you move the side. Let's tab this
vertex and key and let's add a small
care of s ale bit. Maybe this one a,
something like this. Let's tumble around and
now we got this result. Now, I think we can
make the distance even between these vertices
by selecting this one, hold can troll grab this one, heretic click and go to the
loop tool and use space, the same scenery for those space and the same
scenery for these here space. That's cool. Alright. We
have an go right here. Ingo means pace has more
than four vertices, but we will go around
this and fix it later. Let's see what else we can
do here. I don't know. I feel that I can
take those back. And move these
vertices like this. Let's go to the left
view and let's see if that makes sense
or not. All right? Maybe we can move these
vertices right here and king the olygon flow and make
them goes like that. I think that makes more sense. And after that, we
can make some extion and create this area and keep
extruding to create this. I think that's better
because here we have very strong angle happening
here in this area. All right. Let's try to do that and let's see what's
going to happen. I will z to go to
the wireframe mode and select those
two vertices here. There are two, by the
way, as you can see. All right, it get wise
and let slide those s a little bit like this and
grab those here as well, heat wise and slide
them like that. Grab those here as well. And grab those here and slide
those almost right here. The same sc for those. All right. Maybe we can slide those even
more like this here, those as well key twice and
slight those right here. Something like this. And
those as well, maybe. Let's take those just a
little bit like this and those here, and those here. The same sc for these
es, something like this. And for this vertex, I
think I'm going to merc this one with this
vertex right here. To do that, you just need
to activate the auto merc. You will find it right
here, activate it. Okay, it would be here, and I think it's
right here as well. Yeah. All right. It's right here, automerc. Activate the automrc, and
de grab this vertex and slide this vertex
until a tack this one. So ewe and move it
like this and when gti we a move it right here and leave it.
Now they become one. To make this distance even, you can slick this one hole, cant grab this heroic
click and space. The same sciner for those if you want to make the
distance even, if you like. We can do that, maybe
like this. I don't know. It looks even as cool. Now I'm going to grab these two vertices and
make some extrusion here. It's e to extrude
those right here. To this area, and
the grab this vertex and hit E to extrude
this almost right here. And let's see create a
phase between those, okay? Go to the slid view,
Z and go to solid. Grob those here, all of them, and hit F to create a big phase. And it can troll to add
one vertex right here. Or you can use the
NF too by the way, H it K activate the NIF tool
and put the N here click. And if you want to cut this from the center, just hold Heft, it will cut it in the center, another left to click and
then enter done. All right. With this new vertex selected, we can go to the top view to put it in the correct position. Hit key and move
it to this edge. And the same scenario
for this one, I need to move it just
a little bit like this, and maybe this one, we need to take it and move
it right here. I'm right? Yeah, that's cool. Maybe I can slide this
and put it in the middle. Let's check it in the
perspective and let's see what we got so far.
Al right now it's better. Let's check the right
view or the left view. Everything looks
okay. All right. This result, I think
is better. Okay? Yeah, I think that's
it for this video. I will end this video and
see you in the next one.
7. 008 Modeling section Modeling the middle bottom side of the Thopter: Hello, everyone, and
welcome back here. Let's try to create
this site as well. Okay. Let's start with
this vertex right here. I can extrude it and create another egg goes like
this and ends here. And from here we can start
creating the whole area. Grab this one, hits E
to extrude this vertex, and let's extrude it
almost right here. And let's try to put
it in the correct bus. Maybe by going to the pack view, control number one
from that and bad. And I think we have nice view. Yeah, that's cool. And
let's put this right here in this area. That's great. And L et's go back to the right
view or to the left view, and let's make some extrusion goes right here to
the curve here. From the bottom view
control number seven, maybe we can put in
the correct place, but we need to hide the faces in the war from we
grab those hit to hide them. Let's go back to the bottom
view control number seven. Grab this one and move it and let's put
this almost right here. All right, Let's go to the back of view control number one, and let's see if we are if what we're doing
is correct or not, maybe we can take this
out just a little bit. That's great. That's very cool. All right, let's go
to the right view again or to the left. Now let's try to
follow the curve. Grab this hit E and keep
extruding this that's too much. Extruding this
extruding like that, and now grab those two and hit F to make connection
between them. The same scenario for this side, it E and keep
following the curve. K. Gob this with this hit F. And let's check. Do we have two vertices here? Or I thought I made a mistake. All right. Let's go to the bottom view control number
seven from Dan and Bad, and let's put these
new vertices in the correct position. All right. Hit key and move this here, and those here as well, hit key and let's
move this way here. I don't know what I'm selecting. Yeah, that's correct.
Let's go to. Let's go to the bottom,
et number seven, and move this one and
let's put this way here, and this one as well,
and this one right here. All right. This edge, we could edit it from the top, but this one we could edit from the bottom as
we are doing right now. I think we could sit like this and move this
one right here. This one, we can move it
and here, this one as well. We can do that from the
top of you as well. For this one, I can go
to the top number seven. I think we can see it. Am I right? I can't see
it because, I can see it. Maybe from the back
can row number one. Yeah. I think we just need to
move it slightly like this. Then that's it. All right. So now we have nice circle
here. That's very cool. And let's see what
else we can do here. In the lift view. Control three, and
let's go to the left. And maybe I can bring
back the other phases? Alt to bring back these
phases. That's cool. Now, what else? I think I can slide this vertex
right here and create connection hit F. And maybe can create a connection here
with those hit F. All right. But what about this area,
how can we fill it? I'm going to control
r to add the vertex, rotate the wheel to add
two vertices right here, it click to confirm them, and let's make some
connection between those four vertices to
create one phase here, and grab this with this hit F to create a phase right here. Let's try to find a
solution for this area. Maybe we can fill it first and then decide
what we need to do. Hit F to create a giant
phase here in this area. And maybe I can e grab this vertex in this vertex and make connection
between them. But don't use F in
this situation, okay? Because we have a face
here in this area. You need to a to make connection and cut
the face in the same time. All right, that's great. Okay, I think I'm going to make
a cut goes like that. I just need to create
an edge on the side, almost similar to
what we have here. Okay. Let's try to do that and let's see
what we will got. I will use the knife tool, just hit k from the
keyboard to activate it. Let's make cut from here
from the center hold shift to make sure
from the center. Click and go to here. All right, almost
right here hold shift, and make another cut, and then enter to confirm it. All right now, maybe we can make connection
between those. Does that make sense? Let's
hit gave to make connection. And maybe I can
delete this, grab it, go to the A motet number two, grab it and hit control
X to dissolve it, and now we got this result. Something similar to
what we have here. Okay. And here we have an
on on mean face like this, but it has more
than four vertices, one, two, three, four, five. All right. To make this polygon, polygon mean face
has four vertices. I can make cut goes from here to the center here,
and then hit enter. Now we have polygon
here and polygon here. All right. That's cool. Now we need to make some tweaking. Let's select this edge, hold t this one, and let's make the distance
even between these. Okay. Hold right click, go to just right click. Don't hold it, and go to
the Lo tool and use space. The same scenario
for those maybe. We can use space. I think that helps. Maybe. We can do the
same thing here, that's not going to in anything. I don't know, but
I feel this result is better. All right. And now we need to
make some connection between these vertices as well. We need to I don't
know, maybe we can make cuts like that, right like this. Maybe this one
could go and follow this edge like this and
those who goes like this. Maybe. And this one could go like this as
well. Something like this. All right, Let's go
to the wire frame, Z and go to wireframe. Select maybe these vertices. I need to hide them because I
need to work in the bottom. I need to work here, this area. After you select all
of these phases, just sit to hide them and
let's go to the bottom. Control number seven. All right Let's select this one, and let's hit e
to ext this here. Keep following this
care of one here. And one vertex right here. And let's do the same
scenario for this one. And one here, maybe
maybe one here for now. Something like that. Let's see in the perspective of
what we've got so far, go to the slid view and let's select these two vertices it F. Grab those four, hit
F to create a phase, grab those two and then hit F to fill this area
with these phases. Hit control r, maybe we
can add 18 right here. And now I can select those four hit F to create a phase and
those here as well. Or we can select those here, F. Or even if you
select those maybe, we can hit F, and that's right. L et's hit Alt to bring
the other face here. Let's make the distance even from this vertex to this one. Grab those, grab this, holt control, select this one. Right click, go to loop tool, space, to make the space even. T here as well, grab
them, right click space. All right. All
right, right, right. Let's go to the left view
control number three. And we need to move these
new vertices and put them in the correct position because I just
forget to do that. All right. Let's
select this, it key to the n move it, this one as well. Key to the zn move it. This one as well, and this
one would be right here. This one as well, who goes
here, and this one here. In this case, we need to
move those as well it key. Try to move them in
the center like this. Let's timble around.
Let's see what we got in the pair perspective. I think they are okay. Very nice, very cool. Very cool. Let's go to the
left of view again. Let's see what else
we can do here. Maybe I can select the
verte and extrude it almost maybe right here because
this egg is a right egg. Tu goes like that, and it's fad away when it
treak to this point. I turn to curve or
the smooth face. Yeah, to smooth. It
will be smooth egg. It's not going to be harp like this when it treak
this point and beyond it. So let's extrude
this to this age, and maybe from the back view, control number one, we can put it in the correct position. And I think we did that. Let's move it a little bit
like this, and that's it. That's very cool. Let's go back to the left
control number three, and let's see what
else we can do here. I think we can select
these two vertices and make another
true goes like that. And from the bottom view, control number seven, let's see. I think we need to move
it a little bit and track this line.
Okay. That's cool. And Let's make
connection between this vertex and this
one right here. It F, and that is great. Now we have something like this. Alright, now, how can
we fill this area? Let's see, how can we do that? Let's go back to the left
view control number three. And let's see where
should we take this vertex? All right. Maybe those should go like that. I don't know. And this
one should go like this. And this one, maybe we can take it right there.
Can we do that? Let's take this vertex and hit E to extrude maybe
this right here. And make another extrusion here, and grab this with this
one hit F to create a connection and control out to add one vertex right
here in this area. But we need to kick this in the perspective. Let's
see what we got. I think I'm going to use I'm going to move
those manually here in the perspective like this and see if that
makes sense or not. Even if that doesn't make sense, I can always k whatever
thing I need All right, let's make some
connection between those, grab those two hit F, or maybe those four hit F, tell you a this area, and now let's check the faces. Kick the faces from
different angles. Let's see what we need to do. All right. What else
we need to do here? Maybe we can add one
vertex right here. Grab those four hit
F to create a phase. Grab those two F F again. And what about this area? I'm going to select
all the vertices here and select them hit F
to create a big phase. And now we can see what
we could do with this. All right, Let's add
one a right here. And maybe we need to
move it a little bit to have some small
curve, not too much. And let's make connecting goes from this vertex
to this vertex, and then hit enter, and maybe
another conn. I don't know. Let's try that. It
goes from this vertex to this one, and then hit enter. That makes sense. The key
wise and slide it right here. Maybe slide it just a
little bit like this. Alright, this
results make sense, but we need to take
this vertex and mark it with this
one. All right? You can select this one
as a fs vertex and hold it and select this one and make this one the active
because it's a brighter, and then hit to open the merc and meerc at to merge
this one to this one. Or you can grab this and
activate the atomerc, it's right here and hit gi
and slide it to a tree here, and it will be
amercs well. Rites. I mean, for this one,
kee wise and sorry, eat wise and make it like this. Now let's make the distance
even between these vertices. Let's move this verte, just
a little bit right here, maybe and this one as
well just slide it. And maybe I can move those. Make them king here,
grab this one, key wise, and let's
move this here. Something like this,
maybe this one as well, key wise, and let's
move this right here. Let's make the distance
even, I will slick this one. Hold can troll grab this, right click and Q space. The same thing here, grab this. Hold cantro grab this, right click and Qe space. The same cleaner for
those grab this salt can grab this one,
right Q space. Those here as well, Qpace. Maybe those here
as well, Q space. I think that's cleaner.
Do you think that? Okay. What if we select all of these Q space,
what's going to happen? That's not going
to work correctly. Okay. Something
like this. I think we have a lot of vertices here in this area to
create this care, but I don't think we need
all of these vertices. What if we delete one
of them like this one, and let's check
the distance now? We can do something
like that and maybe hit key twice
and slide this here. This one as well, slide this. All right? Maybe this vertex, we can slide it just atle bit. Because actually we don't
need that much of vertices. We always need to reduce the number because
we're going to a subdivision surface to
make this smooth eventually. If what we done here
affected the circle, we always can go
to the left view and move these new vertices or these vertices and put them back in the correct
position from the bottom view and from the left view as well
as I'm doing right now. And I think it's better. And I think I can reduce
the number here as well, but I think I will do that
later, not right now. I just need to
focus on the body. I just need to create
it. After that, I will make some clean up. All right, after we
doing all of that, I will select these vertices, starting from this one,
hold can troll grab this, to select all of these,
it e to trough those. But as you can see, we have
some curve goes like that. What I will do is I
will make this line stri like this by scale
this to the x axis. A right this is the ax
axis goes like this. Hit S to the x and
then zero from the keyboard and then enter
to make this lines str. When you do that, move this until they meet
each other like that. And now we're done with
this side. Oh, right? That's very cool. Okay, so yeah, let's end this video, and I
will see you in the next one.
8. 009 Modeling section Modeling the tail of the Thopter: Hello again, and
welcome back. Okay. Let's go to the to tab and
what we need to do here. What else? Let's go to the left view,
control number three. All right, control number three. That's cool. All right. Okay. Let's go to
the wireframe Z and select these vertices here because I think
I can, what is this? I can extrude those vertices. To the end to this point, maybe. Select all of these and hit E, and let's trod those right here. Don't worry about
these vertices. Just put this in the
correct position first. Let's zoom in just
a little bit here. And it key. Let's move this one and let's put this
right here and grab this. Let's move this
here, crop this one, and let's put this
almost right here. Okay. And let's see what's
happened in the top view, go to the top view
hit number seven. And, let's move this one or all of these vertexes hit key, and let's
move them here. Align this vertex
to this corner, Align this one to
the center here, Align this one to this area. All right. That's cool, but we
need to add right here to move this just a
little bit and align it. So I'm going to hit control
r to add one right here. Click and drag and move it here. All right, I'm going
to repeat that again. Control R confirm it, move the mouse here
and another to click. When you do that, this one, hit key, and let's move
it ale bit like that. And this one, hit key
twice and slide it, and let's put this in
the middle. All right. I think I can delete this g in the middle
four now, temporarily, can delete it dissolve
it control X, and I can put this later.
When I complete that. Let's go to the top again
and Z, go to the wireframe, and we still have a curve it control r to add
another g right here. Grab this vertex, hit key
and move this right here. Another control r, and
let's add one right here. Grab this one hit key and
move this just a little bit. That's great one
right here as well. Grab this in move
as a little bit. Let's strike the result, and I think everything
looks cool. When you be satisfied
with the result, and everything, hit control R, and let's add one here, right click to leave
it in the center, and now you can go
to the slid view, grab this vertex, hold,
you have to grab this one, and then hit F, g to make connection and
to cut this face to two. Okay. That's cool. Let's go back to the left view, control number three, and let's
see what's the next step. Okay, Maybe now I can select this vertex E and extrude
it almost right here. Let's go to the back view, control number one, and let's put this in the
correct position. It should goes here. Okay. Right, right, right. What else? Maybe we can
go to the left view, control number three from the bat and extrude this vertex, hit, extrude this down here and guess move
it a little bit, hit key and put it
here in the corner. And after that, we need to timble around and
move it inside, but I think we can do that. Let's go to the
top and let's see, do we have visual
or we can see it. Let's go to the back,
roll number one. And yeah, I think we
can use this view, move this vertex and align
the edge with this edge. I know you can see the corner, but it could be almost right
here, something like this. Grab this key and move it
all the way right here. Okay, that's cool. Now, it
is in the correct position. Now you can select this
vertex and this one and hit F to make a
connection between them. In the perspective,
this is what I have done so far. All right. Now I can select those vertices and hit F to create
a connection, and maybe I can grab
this with this and hit K to make a cut
here in the middle. That's great. Now I can select this vertex
with this one right here and I can hit F to make
a connection between them. We have one vertex, two, three, four, five cuts. It control r to add one vertex, rotate the wheel at two, three, four, five, and then
confirm them at left click. That's cool. Now let's create
a big phase here hit F. Now select this one with this one hit F and another
F here and F again. But we need to slide
some vertices, gro this one ket was, and let's move this here, maybe. With this one selected,
hold can't grub this and tic and space. That is amazing. What else? Maybe we can go to the left
view, can row number three, select this vertex right here, it's e to extrude it all way
right here to this area, to this corner here, and we can go to the back view, C row number one and move this to the correct position,
which it goes here. All right. I have
some care here. Leaving this right line
that's not going to work. So we need to make some
tweaking here in this area. See how can we achieve
something like this. I'm going to control R
to add one vertex here, and when you do that,
gewis and slide it. Maybe from the left view, we can see where should
we move it control three. I don't know if we
can determine that. Maybe from the top, let's go
to the top, number seven. Yeah, from the top. That
should be right here. Hit key and move this
vertex almost right here. That's great. As you can see, we
have a small curve. We need to do that,
the same scenario for those here. Same idea. But let's move it
just a little bit. Let's focus on this area. Yeah, that's cool. That's great. Now let's select
those four vertices and hit F to create a phase. And how many vertices
we have here, one, two, three, four,
let's add four here, control r, rotate
the wheel, one, two, three, four, and then
left click. That's great. C this with this hit F, F F and F again. Now let's go to the
top view in Z to go to wire frame and let's put these vertices in the
correct position. Move them a little
bit, like that. Go to this one and move
it and this one as well, move it just a little bit. That's great. Now we've done. H Z and go to solid. All right, let's s like
this one. O can grab this. Right click to space to space these. I think
that's not going to work. Yeah, because I will
lose this angle here. I'm not going to
do that, but maybe I can slide this
or I can leave it. That's cool. Let's go to the left again, control number three, and let's see what else we
can a keep here. Maybe I can select
this vertex this time and hit E to make a big
extrusion to these points. A t end right here. And from the bag view, we can determine that
control number one. Go to wire frame and hit key
and move this mo right here. Let's select this with this one, hit F to make a
connection between them. Let's go to that salt view. Okay. All right. Let's go
to the bottom view, C turn number seven. Let's see if what we have
done is correct or not, where the t started from here. Let's go back to the
bottom view. All right. I think we should
do the same thing. We need to add vertex
right here and move this A here to follow this angle. I think we should do that. I'm going to control
to add one vertex and heat key twice and slide
it all the way right here. Let's go to the bottom view, Hz to go to wire
frame heat key and move it and let's
move this right here. And let's tumble around and let's see how many
vertices we need to add here. But first, let's make
some connection of those hit F to add the face
right here in this area. And how many vertices
we need here. We need four vertices. Control, this one, two, three, four, confirm them. Let's make some S asm phases. Grab those at FF. Keep using the F until
you reach the end here. From the bottom view,
go to the bottom. Let's move the vertices
in the correct position. They should be here.
Maybe this one as well, we could move it right here. All right leave this
one. Let's go to this one here.
Let's move it here. All right. That's great. Let's go to solid, and let's see what we have done so far. That's cool. Now,
we've done with this. Let's go back to the left view and let's see what
else we can do. Maybe we can go
to the back view. All right. We have this age. We need to track it
as well. Am I right? Okay. I think I'm going to grab the side and hide
it at to hide it. And maybe I can grab the side as well and
hide them as well at. I just need to make the modeling a little bit easier for me. Let's go to the back
view control number one, and let's extrude this
vertex right here to this corner and make another extruding goes like that until I trick
the middle here. And from the left view, go up those two vertices and the wire frame and move
to this angle, maybe. I think I can move
them all of them. Scrub them and move them like
that. Something like this. Let's go back to the
bottom back of view story. Let's select this vertic
hold here to crop this one and it to create
a connecting between them. But how many vertices
we need to add here? We have one, two, three, four, five, so maybe
we can add five, control r. Here we have one
rotate the wheel forward, two, three, four, five, confirm them, Lift telick. And let's create some phases. C those F C those four F and hit F until
you reach this area. That's not going to
work. Let's select those like this and hit F
to create a big phase here. Now I can grab all of them, and extrude them to the middle. Or let's leave the last one. Let's grab the rest. Maybe I can cancel
this one as well, it E and extrude them. But we need to scale
to the x axis after you to the x zero and hit g and move it
until they meet each other. Now I can select those here f, and I can select
those right here and hit F. And after that, I can hit control r
to add one H right here and connect this one with this one by
using the button. All right. Now, what about this
area right here? Let's go to the back of
view control number one and try to create this area. Let's hit two almost right here. And maybe I can grab those
and hit extrude those up. Put this one here, and move
this right here in this area. Grab this vertex, it to extrude
that almost right here. You can snap this one with
this one if you like, go to the snap and activate
vertex snap, and that's it. After that hit g
and move the x xs hold control to activate
the snap temporarily. And when you hold control, move them out to this one
to snap this with this. Now, select those vertices, all of them to create a
giant face, cover this area. Hit F, and now we have it. Let's the face here
to cover this area. Grab those four
vertices and hit F. What about the rest?
I will hit H to bring back the other faces, but I think I need to hide
those hit to hide them. Let's go back to
the back of you. Okay. What else do
we need to do here? Let's sagra this verte CE to extrude this
and let's extrude it right here,
something like that. The question is, do we need
to create this for now? I think I can cup it. It's not so quite necessary
to create this area for now. So I think we can cover it, Let's move those to the center and move this one as
well E to the center. Let's create phase here, and create a phase here
as well at F. Let's create a phase here as
well between those F, but let's move this
one to the center or, and what about those right here? I think I'm going to
delete these phases, x and Q's phase. Let's move this one to the
center, this one alone, k to the x x to the center. And what about this vertex, control x to dissolve
it? We don't need it. This phase actual, I think
we don't need it x f, and I'm going to select these vertices and hit F to
create a big phase here. Select this one as we
don't forget it, F. I think that's better. Later,
when I complete the body, I will create the whole. Okay. All right we finished here. Maybe we can hit k to make
cut from here to here. Enter, and another cut goes from here to here
and then hit enter. All right, let's hit
old to bring back the other phases. Okay cool. Very cool. We have a
problem right here. We need to fix it. And
what else we have here? Okay, I think that's
it for this video. In the next video, let's
see what we can do. Maybe we can fix this area and com creating the
in for the wings, that's it for this
video and see next.
9. 010 Modeling section fixing some issues: Hello, everyone.
Welcome back here. Okay, let's see
what we can do now. We have this problem
we need to fix, and let's see how
can we do that. I just have a problem with
this eight that I added. Actually, I don't like it, and I just need to delete it. But let's see how to fix
the area we do that. What if we move these vertices for key wise and slide
them right here? For example, let me be
slide this one here. And what's going to happen
if we move this here, ke wise, All right. I think we've got some
problem right here. We have two vertices, maybe. And yeah, that's correct. And maybe here as well. Al right in this
case, I'm going to go to the wireframe
and select those here and hit and Q center to
merge them at the center. Now if I move them, yeah, now they become one. That's always happen
when you modeling. Hit g tie and slide this, maybe here in the middle,
and this one as well. You can do that. Okay. And let's go to the
g. I'll click to select this entire
He lope and hit control x to dissolve
it. All right. We don't have a huge k here. Settle. All right,
maybe let's try that. Let's make connecting goes
from here to this vertex. And what else? Maybe we can cancel the
conneing that we have here. And let's delete this age, all of it can to delete it. For this vertex right here, maybe I can hit heat wise and
slide it and mark it here. Now we have triangle right
here, and we don't need that. Let's see how can
we go around it. What's happened if we grab those two and hit M and
mic to the center? We will have a
triangle right here. Maybe I can grub this one
heat wise and move it here. I think that's a
little bit cleaner, but we have ic phases
here and the size. Maybe we can move this just
a little bit right here. But for me, this is better. Now I can grab those, for example, a key
twice and slide them. Or you can use another
technique, grab those edges, radically ace space and grab those que space to
put this in the center. I think that will be better. And the same thing for those
edges, grab those edges, radically a space to make
the distance here even, and I don't know, maybe
for those as well. That will be better.
And maybe For those, let's try and let's
see what we got. That's not go to
work, cancel it. And maybe we can move
those just a little bit, heat wise, and slide
it right here. Slide this vertex, heat wise, and slide it here and
make the distance even. We have a curve of
goals like that. You actually, I can
from the bottom view, control seven I can make this area a little
bit flat, like that. I'm going to key and move it to the x and well control
and snap it right here, but make sure to activate
vertex snap and ee closest and the
project onto self. This one as well, key and move this and stump
it right here. This one stump it as
well with the rest. Just keep this area
a little bit flat. That even if this not exist in the reference
image, that's okay. I think this is nicer. What else do we need to do here? The problem that
I got until now, I have this phase. It's in gone. We have one, two, three, four, five vertices. It's not going to make a uk problem if I
leave it like this, but let's try to go around it. Let's try to add an
edge right here, goes to the center
of this edge hold gift and keep cutting these Edges, and let's make cut here, and maybe I can take it up until a treak this vertex right here and then
enter to confirm it. All right. This edge fix the
problem that I have here. Now, I have a quad here
and quot here as well. But let's see what
we can do here. We have triangle here, and we have t angle right here. And this way, I will
select this vertex, hold here the grab this, and Keep this one, this vertex selected,
make the last selection. Select this one as a
first one, this one, second one and this
one as a third vertex. All right. As you can see now, this vertex is brighter as you compare to this
one and this one. That's me this vertex
is the active one. After that hit M and to the center to mirge
them right here. And you can move it
just a little bit. Okay? All right. What else we could do here? We have this triangle. We have. All right. Let's go to the
edge and maybe we can make the distance even
between this and this. I mean, I just need to move this vertex from here to here. So select those as
right click and Q space and select this
with this right Q space. The same scenery here. And the same thing
for this one Q space. All right, let's try to make another change here to the side. I don't know, but I still
don't like this area. Okay. Let's go to
the naive tool, maybe and make cut goes
from here to this vertex, and let's see what's going
happen if I do that. Well, I got this result. And let's see what's
going to happen if I merge those maybe merge those, grab this and it M
and Qs distance. And merge this one as
well at and's center. Sorry s center, and the grab this one at
control X to dissolve it. Right here, we have sorry. Here we have Quad one,
two, three, four vertices. And I think this is better. Especially if I grab those here and right to
click and space to put this in the
center or maybe grab those three edges and space. The same thing
here. Let's do it. So I will accept this result
for now for the side. And let's see what we can
do for the side right here. All right. All right, the problem that we have here, we have a triangle
this triangle, and we need to get rid of it. We need everything to be quad. And I can actually, I can make a cut goes like that. If I want by hold shift, I can goes like this
and delete this one. But I like to have an goes
like this at the corner. That will make the
result better. What I did here is
working as well. But I just try to find as much
as I can a better result. All right, let's make a
connection goes from this corner to this corner and grab this, select this one, control, grab this and hit control,
x to dissolve it. Select this with this
with hit control, x to dissolve it, and
leave it like this. And for this era here, I will select this
vertex twice and slide it here and put
this one in the middle, you can grab this edge
and this edge and hydrate and space to put this
one in the middle. And if you like, you
can baffle this by the way to two and if you like. This an option. Okay.
What about this area? After that, I will grab this
vertex and hit key twice, and I will merge
it with this one, but make sure that you
have the auto activated. And if you like, you can king
the direction of this edge. You can make a new
cut here and hit enter and delete this edge
right here, go to the edge, and hit control X
to dissolve it and make the distance even for this edge and this
one and this one, select the three of them, select this one, hold control, grab this, H atical go to
the loop tool into space. All right. What about
this a right here? I will hit control x
to dissolve this age. I will leave it like this
because it's almost flat, so that's not going to
make a huge problem. What about this area? I think I can make I can slide some vertices and align them together
like those here. Let's slide those here as well. Let's tru these four vertices and let's hit F to create
a big phase right here. All right. Maybe I
can select those these edges and het rit Q space to make that distance even here. And even for those
right Q space, this one and this one as well. Okay? All right, I just need to
count the number of the vertices here
for this circle. I will go to the bottom bar
here that we have here. And hit vert click and activate scene statistic and that's. Now, I will go to
the vertex mode and it t click to select
all these vertices. As you can see, we have
19 vertices selected. Let's select the vertices
that we have here, see how many vertices
we have here. We have 20 vertices. So that's me maybe we can
add a new vertex right here or delete one
vertex from here. And I prefer to
delete one vertex from this area because
we have two t vertices, early on the side. Okay. So I think we can grab
this vertex and control x to dissolve these vertices
here, and slide those. Let's select. Let's select this these edges right to space. Grab those as well space. Grab those here to space and the same thing
for these two space. So now if I go to the vertex to select
all these vertices, I'll click, we have 19 vertices, and here as well, we have 19 vertices. That's great. All right. So now's the time to align
these vertices and put them back in the right position. So I will hit Out click to select these
vertices and then hit control I to invert the selection and hit
to hide the rest. So I just have these vertices. Let's go to the right view and let's make sure that
to the direct view, and let's make sure
that these vertices are in the correct position. Let's move those just a
little bit right here. Let's go to the top if you and let's check them from the top. Let's see do we have
any misalignment? Everything looks
nice and perfect. Okay? Maybe we can move
this just a little bit. All right, that's
cool. Now let's hit to break back the other, and let's select this again and it right click
and let's use space. And let's see what's
going to happen. All right. So now I just fix the distance
between these vertices. That's rotate the vertices
just a little bit. So this is before
and this after. Okay, I think I
going to accept it. I don't know. Or maybe
I can ignore it. Let's see what's
going to happen if I do the same thing
for those here, right click and use space. It is not a huge difference, so I will accept this result. And after selecting
these vertices, I will hit control I to invert the selection and hit
H to hide the rest, and let's kick the alignment. Let's go to the left
view control three, and let's put these vertices
in the correct position as you can see here we
have some mislignment. And grab those here.
A, that's great. Let's go to the bottom view Cro number seven and let's see. Do we have any
misalignment here, right? It looks nice. That's great. I will hit Alt H to bring
back the other vertices. All right. That's
cool. All right. So now we got this result, and we just need to
kick something when you complete the shape, you need to go to
the ewboard overlays and activate pace orientation. As you can see here, we have everything blue
except this era right here. Right. And that's wrong. That's don't can work. It's wrong to leave
them like that. And that's happened
because we use the the vertices
technique to model. If you use the vertices
technique, I mean, extruding vertices, sometime you will have
a problem like this. But this is very easy to fix, but just keep it in your mind. Because if you
don't, for example, if you don't do that, if
you add subdivisan surface, let's add three, as you can see, we have some artfts, and that's all that's
happened because of the phase orientation. So to fix that, tape to the edit mode and hit a, select all the faces
and just yes hit ft with N to recall
gate the normal, and now it's fixed. All right. Now let's turn off subdivision surface and let's deactivate
phase orientation. By the way, subdivision surface, just to modifier
smooth the polygons. But we have a lot of work to do here, we
didn't finish here. Let's check the
smoothness of this area after adding the
subdivision surface, see what we've got so far. Okay. All right, we
can't see any problem. Everything looks nice and
smooth and beautiful. All right. So yeah, what we have done here
is very nice. Very cool. Nice. Let's turn off
subdivision surface and yeah, I think that's it
for this video. And the next video will comply this area, these rings. Okay. So that's it for this
video and see you next.
10. 011 Modeling section completing the wings hols and adding subdivision surface: Hello again. And
welcome back here. Okay. Let's work with
these holes and let's see what we can do for them. Go to the left view,
control three, and let's start
with the top one, hit out click to select
the entire a loop here, and I will hit E
to extrude them, and then hit S to scale
to scale those inside. All right scale those just
a little bit like that. Not too much. Make sure that you select the bounding box
or or medium point. After that, let's hit key
to move those inside. Or you can actually
you can hit F to fill this area if you
like and use this phase, go to the face more,
select this phase and hit Alts to
push this inside. Turn off proportional
editing. We don't need it. It Alt S and move this inside
like that a little bit. Somebody like this
will work, maybe. But we need to do the same
thing for those here. I need to get the same result. So to do that, I will delete what I did here. I will hit control plus to
grow the selection, control, and plus the number, or you can select
those manually, I'll colect select who
have to crop this, and then hit x f to delete it. I will select this circle
and the circle as well, and I will hit E to extrude
and S to scale those inside. But if I do that, if I hit S, the scale will go to the center of of these selected edges. I don't want that.
I need to switch the transform point
to individual organ. I will controls it
and then hit S, and now I got what I
want. Scat like this. And then if you like, you can hit F to fill
these two faces. And with these two
faces selected, the face mot number three hit d S to move those
inside like that. Okay. Now, I got the same
result for both of them. Maybe I can scale. Let's make it big,
something like this. That's cool. Now I will hit
e to int to inset this, and I will hit write it
lick and use loop tool and circle to make this like a circle and scale these
two circles like this. Something like this. I need to make sure that these circles are they have the same size. It's wrong to make a
variation between them. After we do that, let's go
to the right view to compare the rest or to the
left. All right. Now let's work with
the top one first, and let's move this up. Maybe right here and
let's take this out. It and take this out to
the x axis like this. I think that's too much.
Maybe we should take it back. Somebody like this. Let's go back to the left you, control number three and
go to the wire frame. And I think we can scale
it even more, make it big. Somebody like this. L
et's go to the solid, and let's see what
we got so far. All we got some overlapbing. Try to avoid it,
make it smaller, yes a little bit. That's cool. Now I will hit e two
inside this inside, a little bit, not too much, and hit e two extrude this bag. Palmos right here,
something like this. And if you got any overlabing,
like what I have here, that's not a big issue because I will add a big ball right here and
everything will be hidden. And you can, if you like,
you can erupt these edges, and you can scale them, make them a little bit
bigger if you like. That will help a little bit. Okay? Now, I think now I
can select this edge loop. I can hit control be to Bival it to get a
circle like this. If you like, you can do that, or you can actually you can
ignore it and delete it. It's not necessary to
create something like this. But maybe you can create it just to help you to create the pole. I mean, with these
selected faces, you can hit HD and CV
them like this to create the pole and put it exactly
in the center here, and it will be perfect. Or you can create another pole and
put in the center and scale it, and I
think that's better. So for me, I will hit
control and delete this space for now it x F delete it and maybe grab these edges and move them just
a little bit out, ket wise, and let's
move them right here. I think that will be enough. And we need to make some tweaking right
here in this area. According to the images. Let's bring the reference
images right here and let's see what we have here. We need to add an edge loop like this and make
some chin here, pushing some edge and make
something table like this. All right. So, let's do
something like this. I need to add an edge loop
right here in this area, so I'm going to add control r and add an edge loop like that. And I need to make sure
that this edge loop is aligned with this edge. Okay. But it looks like
there's some variation here. I will control to cancel that. All right. Let's do
that. Let's control r to add one g right here. But as you can see, the g is not aligned
with this with this. That's not correct.
We need to align it. All right, Let's cancel this. I will hit control r again, and I will hit e to
activate even distance. And now that should
be aligned correctly. If the alignment works on
the other side, I mean, on this side, yes it F to flip it like this. Now we got this. All right. With this
new edge added, I will control be to pvalv
this to two, yes it control, rotate the wheel of the mouse
back to a two segment here, and de grab this second edge, and it is to scale it inside. Something like this. I think that's too much, a little
bit, not too much. Maybe I can hit g twice and take this back get a little bit. Right. That's cool. Something like this for now. All right now, we need to do
the same thing for the side. Let's go to the face,
selected number three from the keyboard
and select this face. Let's go to the left view
control three from the num bad. And let's go to wire frame. I'm going to to move the
circle almost right here. K in the middle, and it
is to scale it like that. To move it up just a little bit. And we need to take
this out after that and move this out. Maybe we need to
go to the front. I think I think we need to rotate this a little bit because for this one is goes like that. We need to rotate this.
I will let r to rotate. Writ, and let's rotate
this like that. And hit and take this
out just a little bit. And let's see what we
cut in the perspective. All we cut this results as cool. Now we need to do
the same thing. I will hit two inst
something like this. The same scenario
that we did here, and then hit E tot this
back, something like this. Maybe in the left
view control three, maybe we can take this
up just a little bit to avoid any overlapping,
something like this. Okay, I think that's
not going to work. I will accept my
extragion result. I will hit control Z, and I will select these
edges right here. I will out click and hit to
the Z and move those down. Something like this. Now I can delete this space. We don't need xF to delete it. Now we can create
the A right here, it control R and then hit E, and let's move this just
a little bit right here. Control B to Bival it to two. Croft this 10 click Alt to move this inside or you can hit S
to scale this just ale bit. Now we got this. That's cool. Okay, now let's bring back the images and let's
see what's next? We have something else
we need to create here. We need to extrude some images to create
this another line. We need to do it now. Let's
see how can we create. Let's move this out, and let's go to the left view
control number three, and let's select these
edges, entire group. You can hit Alt click, and you can hit e two extrude
and S two scale inside. E and S, scale is just a little bit and put
your eyes on this area and kick it don't scale
it to scale it when these edges reach this
edge of the blueprints. After that, manually, go to the vertex mode
and start grubbing these vertices and move
them and put them in the place like this. Keep following this edge. The same thing here. L
et's select this one. Let's put this right here. And the same thing for the rest. Rob this and this that's cool. One more thing here
we need to do. After doing that extruding
these new edges inside, I'm going to select the entire face loop click
to select the face loop, put your mouse on
one of these edges in the middle and hit and click. Yeah. After that, I
will hit E to extrude. Hit E, and I will move this manually to the
x axis, when you hit E, right click to cancel
the extrusion, and then hit G and take this
manually to the x axis, and just move it a little
bit, not too much. Very a little bit of extrusion. Something similar
to what I did here. When you do that, you will
have another face here. You can out click
on it to select the face loop and
hit x and's face or you can hit x f to delete these faces immediately,
because we don't it them. Right now we that grace. Now let's see what's
going to happen if we added subdivision surface. I add a subdivision surface, but I will add this again, just go to the modifier, open the list and a
subdivision surface and increase the subdivision
level to three, for example. Now this is what we got, but that's not correct. We need to do
something. Let's go to the edit mode and let's
open this panel right here. You can hit, go to the
atom and go to the edges. We need to select some
edges and make them sharp. If I turn this off and let's
bring the images right here. We have this edge sharp and this from the top as well sharp, and we have this circle, I should be sharp as well. What else? This one
should be sharp as well, and this area. We need to sharpen these edges. Let's start with this
edge, select this edge. Hold control and select this one and maybe this
one as well, and go to the Mini crease and pug this
21 to make it sharp. And as you can see, we have red color indicate that
this edge become sharp, the same thing for this one,
and this edge right here, grab them and p this two. Now, if I activate
subdivision surface, as you can see, these
edges become sharp, and we need to do the same
scenery for the rest. Tab, and let's select this
circle and let's add one here. As you can see
this become sharp. Tab again, grab the inner circle this one right here and add one here. Now it's become sharp. As you can see, and we can target those as
well I'll click, and let's add one here
to make those as well, and those here as well, grab them and book this to one. All right. So this
is what we got. Or let's stab again and
let's start with the side, grab those add one here, and grab all of these and
let's add number one here, and the circle here inside, go to the wire frame to
see it and add one here. And that's cool. K less turn off subdivision surface
to select this edge loop, K this outer edge loop selected and select
the inner as well. A shift to click
and add one here. And now those become sharp. Now if I activate this,
they become sharp. One more thing here
we need to do, we need to add make
this one as well sharp. I'm going to show you what's going to happen if you do that, as you can see, and the same thing for
this one right here. Grab it and make this sharp. And what else? What about this one right here? Activate subdivision
surface to see the result. It's too much curve. If I bring the refs
image, as you can see, we have a little
bit of curve here, but the other corners we
don't, they are sharp. Get this one right here make it. So I'm going to select
this edge right here and manipulate the crease
just a little bit, and let's see how much
we need to give it. Something like this will work. 0.3. Yeah, 0.3 maybe. All right. That's cool. Let's go to the bottom and let's
see what we can do. Let's select those. I think
we should make those harp. This ge, as well, the
entire edge loop, even this one here, and this edge as well. Select them like
that and add one here. Now they become sharp. This one as we give it a
crease to make it harp. This edge, this edge, and the rest, this
one, as you can see. Let's add number one
here to make this harp. We have two angle right here. If I turn this off,
I need to select this triangle and add number
one here to make it harp. All those here as
well, this edge, selected, hold here to
glove this, hold control, and select this one, and let's add one here
to make it harp, and what else we
need to select this? Hold control glove this. Let's add number one
here. And what else? Maybe this edge right
here, let's make it harp, that should be harp. All right. This edge, I think, that's
right this one as well, we need to make it harp,
select it all way right here, and let's add one. Did we forget anything? We forget this one.
Let's add one here. Maybe I can select
this edge with this edge and make it
sharp or leave it. Yeah, I will make those sharp, I think, just this edge here. Let's add number one right here. Okay Let's go to the left, let's see. Is
everything correct? That's cool. Did we
forget anything here? Let's activate
subdivision service and let's see what
we got so far. Or that's cool. Let's check the
smoothness of the npter, and let's check if
we have any problem. Actually we have
problem right here. I think we need to
select these images as well and give
them crease to one. Something like this. Let's
bring the reference images, and let's see what we done. All right. It's not
quite sharp actually. So we can reduce
the effect. Okay. Let's stop and let's
select these edges, and let's add not one. Let's add 0.3, maybe.
All right. That's 2.2. Sorry, this at 0.5. Make small curve here. One more thing here,
we need to kick. I just need to see the
I just need to see the wire frame of the
object itself. All right. To do that, I need to go to the object properties
and go to the visibility view display
and activate wire frame. Now I can see the wireframe, but not all the
edges and vertices. I need to go back to
the modifier and I need to turn off optimal
display so I can see the edges. I just need to see
the resolution. If you like, you
can create quick. You can put this in the Ft menu. The wireframe, for example, I will put the axis in the Fu. Hit right click and
Qs add to Quick Ft. When you click this and add it, when you hit Q to
open the quick Ft, you will find the display
wire frame is here. I add this recently. Now, I don't need to go here to the obviate properties
to activate it. I can quickly hit Q. And turn this off or
on quickly from here. So do that to make
that faster for you. And when you comb, go to the edit and
preferences and go to this burger icon and it save preferences to save this change. All right, let's turn
the wire frame off. And yeah, that's very cool. Now, we did very
nice result here. Everything looks
smooth. By the way, you need to radically chose head smooth to make this smooth. And if you like, you can activate auto
smooth from here, from the oia properties. A to bring back the
harp edges if you like. Cool. As you can see here, we can see the hard edges. You just need to reduce the number of the auto
smooth the angle. Take this back until you see all the hard edges
that you created. All right, we have
a hard age here. We can take this back, es a little bit to
see the hard edges. Oh, you can ignore it because we are not going
to count on this. We have another way to
bring back these hard ages. Alright, I think that's
it for this video. And see you next.
11. 012 Modeling section Creating the windshield: Hello again. Welcome back here. We didn't finish here. We
just need to fix some issues. For this edge right here, I think it should be
extended a little bit, should reach to this area. Okay. So let's
stop the edit mode and let's select
this ge as well, and let's give it crease to one. And I think that's it for this. Later, we will we will see
what we can do for this. For the door area, we need to select this age and this ag and we need to give it decrease to one as
well to make this sharp. This ge this one right here, we need to give it
the same amount that we gave it right here 0.3. Select this one
and let type 0.3. By the way, I'm in
the wireframe mode and go back to solid. All right, that's great. All right now we need to
fix this area as well. This area should be harp. So I will go to the vertex
moot it number one, sect this vertex and give
it vertex decrease to one. Not decrease. This
one as well grab it and let's add number one right here to make
this area sharp. All right, that's great. Or let step eight mode
and the C because I note that I think this
vertex I don't know, but there are some
kind of problem. Maybe we need to grab this
vertex and take this up. This one right
here. I will hit to move out according to the
normal direction of the vertex. Again, a little bit, this one as well
gs a little bit. Maybe that helps
es a little bit. Yeah, I think the
result is better. C. Let's turn off subdivision
surface for now. And we need to create
the front windill. Let's go to not right. Let's go to the lift view. And let's see how
can we create that. First, I think I can
select the outer edges, click, select all
of these edges and hit it D to take a KV of. And then when you take a B, just hit right click to leave
this V in the same place. But now we have a KV. Need to separate
this separate this, to open the separate
menu just hit P from the keyboard and
choose selection. Or you can quickly
hit P S quickly, I'm going to hit P S, and now this a separate it. Tap out and select this
new age that we created, and you go to the left, tab to the mode for this a, go to the vertices. Let's start with this vertex. I will hit ex through this vertex and try to follow
the curve of the windhill. It another e two rough
this right here. And another e to extrude this
here and keep doing that. Let's extrude this right here, make another extruion here
and one here as well, one right here, one right here, one here, and select this vertex with this vertex here and hit F to make a
connection between them. Let's see in the
perspective of what we got. This is what we got. After that, when you comb, select these four vertices
and hit f2c phase and now just select those and keep it F to fill this area
until you reach the end. That's great. Now, you can
select the side of vertices, grab them all and
hit e to extrude them and move them
to the x axis, activates vertex snap
when you move this, hit key and snap it to
the vertex to the center. When you do that, move this one vertex just to see is everything
is welded or not, and activate automerc.
Don't forget that. All right. So now we
created the winhiel. What I need to do
now, I need to select this gg loop and give
it mini crease to one. And I need to
select this vertex. I think I think it
have mini crease. Yeah, that's right. Now I can add subdivision surface
for this one as well, and we already have, this become smooth,
similar to this one. Now we got very nice results, except for this era here, we go some weird problem and let's try to figure
out why that's happened. I think that's
happened because we have two vertices here, so I'm going to move this
vertex to the middle, and I think now we fix it. Yeah, that's cool.
That's very cool. Now we can go to the
door to create it, see, how can we do that? First, I think I need
to make some change to the lens that I'm
using right now. If I go to the view, here
we have the focal length. If I change this, that's
the focal length. I'm going to k or at this to almost 250 because
I like to work like this. I like to see the oro thepor like this because in the movie, I noted that I think
they are using 200 millimeter lens
to take these shots, and I need to see
my three D models similar to the
images in the movie. So yeah, let's change this to 200 millimeter,
something like this, and let's work with
this focal length. Okay. All right. Now we need to create the door. And let's see how
can we do that. All right. I guess need to make some tweaking
here to this area. If I move the angle, for example, from here, I can see that this edge goes out. I guess need to type the
mode, tape the mode, and select this vertix and
guess move it a little bit inside like
that to avoid that. A. I think the same
thing could goes to for these edges. Start with those. S g and move this inside just
a little bit and align it. Maybe we can move the as a bit more. Something like
this will work. For this vertex as well, let's move the as a
little bit inside. Now let's out. Now the effect become. That's cool. All right, to create the door, we need to go to the
left view first, and I just need to kick the curve according to
the reference image. I will hit Z and
go to wire frame. I have some difference here, and let's try to avoid this. Let's go to Let's go to the edit mode
and select this edge. This edge and this edge
right here in the corner. Let's go back to the left view. Maybe we can reduce
the mean crease, hold heft and move the slider forward until you get a results similar to what we
have in the reference image. Something like this will work. I think. Let's go solid
in almost. Let's go. All right now, let's go
back to the left view, and this is the shape of the
door from the side view. And if you go to the top,
it should be like this, it has a little bit of curve, goes like that, as you can see. And if we bring the
reference images here, this is the door. I don't have age for the door, but it should be
similar to this one. All right? We have two glass here
and we have some kind of frame separate these
two pieces of glass. There's another
image, if you want to understand what's
going on here. All right. We have a
little bit of pol care. Okay, let's see how
can we do that? All right, let's go
to the left of view first and all right. You start from here. I don't know. I'm thinking of
taking B the vertices that I created and use these
vertices to create the door. I just I think that's
going to work. I mean, if I select the body, I can grab these vertices, I'll click and there B and from there I can create the door. But I just need to
kick them first. Is everything is okay. And I don't know, I feel this
vertex goes out too much. I think I can take this back to the x axis just a little
bit, move it inside. Just be careful of that
because if you use these vertices to
create the door, any mistake that
you are doing here, it will be difficult to fix it. I will controls
it. And all right. Let's take this to the x axis, x just a little bit. K,
something like this. All right, I think I'm not
going to copy these vertices. I will create the
door from scratch. Let's go to the left and
tab out and let's hit ft A, let's add a plane. Or you can copy one of these
vertices of the thefo. For example, I can Grab this vertex and hit E to extrude it and let's have this
vertex right here. Go to, grab this
new A that we have, and then hit P to
separate this age. And now this age is separated, but it has the Mor modifier
and the subdivision surface. So whatever thing that you're
going to do with this edge, it will be reflected
on the set as well. Let's go back to the left view
and let's start from here, tap to the edit mode, and let's the vertex
vertex right here. Let's align this grab this key, and let's align this maybe
right here and this one here. Let's keep extruding
these vertices. All right. First, let's go to
the front view. I just need to see where
should I move this new vertex? Maybe I just need to move
it a little bit right here. Let's go back to the le view. I will turn off the wire
frame for the body. Sorry, turn off the subdivian
surface temporarily. Let's go back here because I need to follow the position of these edges or vertices.
Let's start with this one. I'm going to hit E
to extrude this and let's make one
extrusion right here. And if you like, you can hit G and hold control to
snub the vertex, if you like, and turn off the subdiviion surface
for this edge. Hit again and hold control
and snub this right here. And the same thing for those I can cope with this
area if I like. That's not a big difference, stump here, hit E and extrude
and stump is right here. Right now let's go
to this vertex, and let's do the same thing hit E and extrude this right here, and hit E again to
extrude this almost right here and keep extruding
these vertices. Something like this. I need to make one more
extrusion right here. And now we need to put these new vertices in
the correct position, maybe from the top
view, we can see that. I will hit key and move
this just a little bit. Yeah, I think, I'm selecting
the correct vertex. Hit key and let's
move this right here. Let's select this vertex. Key and let's move this here. This one, this one here, grab it and align it. What about this
one right here is it right as you go to the top. By the way, you can silate the window to two
window if you like. If you can't know what
vertex you are selecting, you can sib the window
22, like what I did. I will repeat that if
you didn't notice. Put the mouse right here
and click any trike. All right, if that
doesn't work for you, just put the mouse until the mouse curs be
double headed mouse. Etic click and two siplet a vertical splete and
put the siblette right here, the split line, and the click. And now we have two window. And or rotate this
one g a little bit, sold and select the vertex
that you like and from here, you can edit it like this. And I'll select this one key. But I can't see it anymore. All right. In this case, I think we got some
weird problem here. Am I tracking the correct edge? Okay. No, I'm not tracking
the correct edge. Let's start over because I think this vertex
could be right here. Yeah. Yeah, I could truck
this edge right here. I guess I made a mistake. This part of the process,
making mistakes. Let's select this one and hit key and let's move this here. Select this one as well, hit key, and let's
move this right here. Now maybe we need to
go to the fronts, number one, and let this vertex. It's in the correct
place, this one, moves a little bit like
this. This one as well. This one should be right here, this one should be there. From the bottom view, maybe you can put these vertexes
in the correct position. For example, this one. Or let's see what else we
have to do here. We got some weird
problem happening right here when we snap the vertices, I will turn off
mirror temporarily just to move these vertices because I just snap them in the correct in the wrong place. I'm going to take those pack. Take those bag, and align them. Let's snap them again here. For example, grab this one. And let's activate
the wire frame for the body so I can
see the vertices tab out, grab the body. Go to the quick rite and hit Q, I mean and activate wire frame. If you didn't add the
option in the quick rite, you need to go to the
object properties and go to the viewbod display
and activate wire frame. All right now, let's go
back to the same edge and tab and let's signal of this vertex it key and
hold control and snap it. Let's do the same
thing for the rest. Snap it with the body.
This one as well, should be here.
This one as well. And this one, hit key
and stamp it right here. When you combate, go back to the modifier and
activate mirror, and everything should be okay. All right now let's select those four vertices and
hit F to create a phase, and we just need to select those hit F couple time until
you fill the whole area. Now we got this. Let's go to the top view
and let's see what we got. Is everything is
okay and correct. Everything looks cool. And now we need to we
need to combate the rest. All right. I think I'm going to end this video because I don't
need this video to be long, and I will combate creating the door in the
next one. So See you next.
12. 013 Modeling section Creating the door: Hello, everyone.
Welcome back here. Okay. We didn't finish with
the door. Let's complete it. Let's go to the left view and let's tap the mode
for this piece, and let's see what
we can do here. Let's go to the vertices
and what we need to do? We need to create this area. This care of the
stuff right here. All right. Let's
start from here, and I think I need to see
the wire frame of the body. So I'm going to
use the quick for varie menu and display wire. And right now let's track
these vertices hit key, and let's snub this
one right here. I just I just need to
make sure that the snap doesn't go to the center
like what we had recently. Now I think it's correct. Let's go back to the
left control three andro this and let's snub
it right here. T this and let's stub
this vertex right here and let's tumble around
and lea. Everything is cool. Now I will grab this vertex and hit e two through
this here and let's struck this shape
that I have here. Maybe I can add
two vertices here. And let's grab those. We before we do that, let's put these vertices in the
correct position. Maybe we can go to the top. I think, we can go to the top and let's move this one.
Let's put this right here. This one as well. Let's
move it and right here and this one
could be right here. Let's move this a little bit. That's great. Let's
go back to the lift. All right. Now I need to select those vertices and hit F
to create a phase here, and let's see what
else we can do here. I will select this vertex
and hit e to extrude this y here in
this area and make another extrusion here
maybe and make connection between these two hit F. But
this vertex and this vertex, we need to move them
and put them in the correct position
from the top of view. Let's start with this
one, it key and move it, and let's put this y
here, grab this hit key and move it and
let's put this y here. Let's go back to the left
control number three, and let's select
this vertex here, E and hold control
and snab it here. Another E hold control
and snap it right here. Timble around,
just need to kick. Yeah. We have the same mistake. I think I'm going to do it
in the perspective, it E, and stub is here, stub is
here, and the same thing here. I think one extrude right here. Let's go back to the
left, control three. Let's select this one. Let's see how can we create this area? I think I'm going to
extrude this vertex maybe here and select those four and create a
phase in this area. And Let's grab this
one. Let's make another extrusion
goes right here. Other one, maybe goes here, another one maybe
goes right here. Let's make the distance even.
I will select this one. We can't grab this, right click, go to the Loop tool and Q space to make the distance even. I don't need this
view. That's great. Now, these new vertices, I need to put them in
the correct position, from the top view,
maybe I can decide. Let's start with this one
hit key and let's move it. Let's put this right
here. Rub this. I don't know, that right? I'm selecting the
correct vertex. Yeah. But this one, this one, I need to select
from the top view, it K and move it right here,
this one, and this one. We need to move them as well. Let's move this
here, and this one, maybe I can see it in the bottom from the bottom
view, control seven. I think, that's correct. Let's put this right here.
What about the front? I think yeah, I can see
it in the front as well. I can control it using
the front view as well. That's going to work as well. Now let's sit like this with
this and let's hit F to fill this area with
phases. All right. What about this area here? We didn't give it a phase. Let's see grab the F to
create a big phase here. Control to add one
A in the middle and let's connect this
vertex with this vertex, and grab them in K to make a connection
between them like this. All right. That's cool. Let's go back to the left and let's
see what else we can do here. L et's select this
vertex and let's hit e to make extra maybe right here. Another e to make an
extruion goes here, maybe one here as well. Until I reach this points. Let's put these new vertices
in the correct position, or maybe we need to correct
the distance between them. I will select this one,
hold contra corrupt this trotic go to the
loophol and Q space. That's awesome. Now let's
select these vertices, and let's go to the front view and let's put them in
the correct position. All right. I think I'm going
to use this view as well to select the
correct vertex, starting with this one, grab it, and you just need to move it
as a little bit right here. Let's select this, it key. And as you can see, we have a lot of wires here. We can see better. In this case, I can go to the top of view and there's a nice option here
to cut the view. I think it's Alt B. Alt B. Let's see
what's going to have. This option will help
us to cut the view. As you can see now,
I cut the rest. The rest of the Odin
tatter hide it now. That will help me to
work with few geometry. And when I complete, I will
bring those back. All right. T's go back to the door and L et's select
the next vertex, and let's go to the front. As you can see now,
I have better view. Hit key, let's put this
in the correct position. I think front of view
will not hell me for now. Let's go to the
bottom view Central seven to see the eight rol. Let's select this
one right here. Hit key let's move this. Let's put this right
here in this area. This one as well, it key. Let's put this right
there. That's great. Let's go back to the left. And let's make some
connection here. I think I need to extrude this vertex and
snap it right here, one here as well,
and one right here, and one more should
be right there. Let's go to solid view. Let's select those four, hit F to create a big
phase right here. Grab this with this,
grab those here, hit F, grab those here. I think that's not
going to work. I will select all of these
faces vertices and hit F. Maybe I can make a cut
here in this area. Let's go back to the left and let's see what else
we can do here. I will select this vertex and
hit e to extrude this right here and make another
ext goes here. Let's check from
the bottom view. Let's put these new vertices
in the correct position. Move them a little
bit to the x axis, and let's put this here and this one should
take it back here. That's great. Now I will select this vertex with this vertex and hit F to create one
and the same thing here, I will hit F and select all of them and hit F
to create a big phase here. Well, that's great. Let's
go back to the left. Now let's add some s here. I don't know, maybe we can add four here to create the curve. Let's go from the top, select those first and
let's go to the top. Let's move those just a bit maybe right here.
They should be here. And select those here, it key and move them, and they would be
maybe right here, and move those
just a little bit. I can't maybe I can
go to the front. I think that will be better. AR. Maybe we need to move
just a litle bit more here, and those here as S Ts here. Got those as well, hit key and move
them right here. Now we got this All right,
Let's go to so view. I think we've done with this. Everything looks cool. Let's go back to
the left view and let's see what else
we can do here. All right. Let's select
this vertex and this one. Grab all of these F to
create a phase here, and maybe we can select
this vertex and go to the perspective to extrude this vertex and hold
controlled sabes here, and maybe we can make another extruion right
here and merk it. Don't forget to activate
automic, because if you do that, if you don't activate autom, these vertexes will not merit. Let's go back to the left view. I will select this
vertex here and hit e to make one
extrusion here, grab this with this and hit F to make a connection
between them. Let's select all of
these vertices that we have and let's create a
big phase here, hit F. I will use the F tool
to make a cut goes from here and ends here,
and then hit Enter. Control R to add one
A in the middle. Connect those two together. It's not F because we
already have a phase, and use the NF tool again, hit K and make a cut from here, and hold to make
cut in the center, keep holding KF until you reach this area and leave the
ft and then hit enter. Now let's kick these vertices. Let's kick this one because this one is not in
the correct position. I will go to the bottom
control seven and go to wire frame and I will move this and let's put this right
here in this position. This one as well, it could be moved and I need to
put it right here. If I do that, I need to fix the position of this
vertex because I need to take this out, is to move to the vertex normal. I think that's correct. Maybe this one as well, A
S, and let's take this. All right. I think d
S will not work here. Hit ey and pick nice view and
move it out a little bit. All right, cool. All right. That's great. Okay.
What's the next step? Okay. Let's isolate the door? Hit slash from the num bad, or if you don't have ambad, you can go to the view and go to the local view and tocal local
view, this one right here. I just need to select
some vertices. I need to apply
subdivision surface. I mean, at subdivision surface. And this is the result
that I will go. I need some vertices, I need them to be sharp,
see what we have here. Why this vertex is not smooth? Do we have any vertex
crease or maybe H crease? That's rare. H. All right. I think we don't have a
connection between those. No, we have Anyway. I need this vertex
to keep it sharp. Selected and cos, go to the vertex crease and
add number one here. This one, as we'll grab
it and add one here, this one here, the same
scenario add number one here. And this vertex and this one, this t this vertex as
well, and this one. That's great. Sorry. I need to delete the crease and select the
vertex alone and add one. Something like this. The same scorer for this one. Let's add vertex crease,
this one as well. And this one here. That's cool. And this one, I guess forget it. L et's top out and let's
see what we've got so far. We don't need edge
crease in this area. I will grab this edge
and take the crease 20. The same thing for this
one, take this 20. Add vertex crease, grab this, and let's add one here. The same thing for this one, let's add one here.
And this one. This one may be. We got some problem here and we will see
how can we fix them. Cool. If you want to get
better results, As you can see, we have
some problem and if I add a crease for
the edge, sorry. If I add a crease here, I will have a sharp
edge in this area. I can fix it, but that can
leave you with sharp edge. In this case, we can use the ring crop
modifier technique. But if we need to do this, we need to create a shape here and a ring crop
the door on this shape. I think I will do that. Let's go to the to
the left view here. I will add plan, see where is it.
I'll be right here. Go to the option here and change the
alignment to the view, and we could have it
here, where is it. We can't see it because it
is in the isolated area, so I will hit g to move it
until I see it right here. All right. So now we have the plane. I will scale it down for now and take it out just a
little bit right here. And let's go back to the
left view and tap it move. I will grab this vertex and hit and snap it to this
corner and the grove, this vertex maybe and snap it here to this
corner right here, and add one are in the middle, and the grab this vertex
hit and snap it right here. Try to create a bicape. And Let's add one H right here, maybe and grab this vertex, go to the wire frame, grab this. Hit he and snap this maybe
right here in the middle. Let's add subdivision
surface to this plane. Go to the object mode, a tab, go to the modifier and
add subdivision surface, and let's add maybe three or
four subdivision surface. We need to move these
vertices and follow the curve of the door. Something like that. Maybe this one I
can put right here. I don't know. I can
stab this right here. And maybe I can stab this one
right here for now and snub this one right
here to the middle and snub this one
maybe right here. And later I can grab them. When I put them in the
correct position later, I can move them one by one
and move them until I create. Let's grab this and I
will hit to hide it. Let's go back to the left view and select this one, type moot. Let's select this vertex, and let's give this
vertex decrease to one, this one as well,
vertex decrease to one and this vertex
right here, the same thing. All right. Maybe
we can add one e here in this area and
let's move this vertex up. Let's try to follow
the curve of the door. Let's see grab this
vertex right here, it key and let's move this
I think I need to activate subdivision surface for the body and let's turn off
wire frame for them, and let's grab the
door again tab. I don't know, I feel
that I need to king the material for the body
maybe or for the door, just to make some difference
between the colors here. Let's go to this
here and maybe I can king this two single and
king the color for this one. That will affect everything. That's not what I want here. Let's select this and let's
go back to the material. Select this one. Let's give
it a material from here, go to the material sec and add the new material like
this, hit the new. Go to the material review here. Viewboard display and keying
the color to something dark. I just need to recognize it. That's better. Tap
to the move now. Grab this vertex and hit key and try to align the c with
the c of the body, and try to be precise and this. Hit key, let's move
this right here. It's a little bit annoying me but I will give you
very beautiful results. This one, maybe I need
to move it right here. This vertex, I don't need
to give it decrease, so I'm going to
take this to zero. And I will move this just
a little bit down here. For the crease that I have here that I gave it to the body, I will grab these vertices, this one, and this
vertex right here. Select this sorry, and this
and let's take this 20. Let's take this
21, and make harp. For now, we will fix this later. Let's go back to the
top, grab the door, go to the lift view
control three, and let's keep editing these. Let's see what else we
can do here. Grab this. Don't worry if the vertices
goes far away from the edge. Your goal is to make the curve match the curve of the body. That's what we need. Let's select this one and
maybe we can move it ale bit. We have some open right here. Let's try to see how
can we avoid it. What about this one?
Maybe we can take this back and fix this area here. Oh. Fix this area right here. Maybe we need another edge here. Let's grab this
vertex and hit key and let's move this
up just a little bit. Maybe right here. Grab this
one and take this up a b, may I don't know, maybe. It's a bit hard to control. I know that, but that will give you a very nice
result when you come bele. Even if this goes off a
bit, it's not a uk problem. That's okay. All right. Let's see what we got
in the per perspective. Let's move this vertex
inside almost right here. This one as well,
maybe we need to move as a little bit key and move this that could
follow the curve. Maybe this one as well. Maybe we can move
as a little bit key and take this inside. What about this
vertice right here? We have some open area here. I will hit key and move
this just a little bit. Inside. I need these two vertices
to go out a little bit. Let's go to the top
of view and let's try to have this curve again. With these two
vertices selected, I can go to the top
of view and hit key and move this out like this. Something like this. Let's see what we got in the perspective. Maybe I can grab
this vertex and go to the left of view and key
to this e and take this up. Use your eye and kick the curve. Maybe I can move this
forward just a little bit. What about this one right here? I don't know, but
maybe we can move this out a little bit as well? Let's see from the top
what we got so far. Let's take up those
and let's take those back because
that's too much. I think we need another edge especially here in this area. I will add a new edge here
and leave it in the center, and I will grab this vertex. Hit g wise and mark
it right here. This edge can help
me just a little bit to get better results. Let's grab those here and
let's go to the top of you and let's move them and
let's see the alignments. Let's move those right here. Now I can grab those two
vertices and hit G s, grab those G and move them
forward just a little bit. All right. We need just
to find some way to control to control
this area here. I think I need to add
one acre right here, goes like that, and change the position
of these vertices. I will hit twice and take
this down just a little bit. Adding this vertex right
here will help me. Let's take the crease
to zero because I have a c here and I can make it if I didn't add
the vertex here. But now I can control it. Now the result is better. I think I will hit key to the x and take
this bag just a little bit. And from the left of view, I can move this vertex just a little bit and align
the edge better. Let's see what we have done
when we added this new edge. Go to wire frame, maybe. Yeah, we need to take this bag, key and let's take this bag. Wise, slide this here, and maybe slide this right here. Or maybe I can go to the edge, all of these edges and his tic space to correct the
space between them. That's be better. What about those? Let's see what's going to
happen if I do that? I think that's better.
Now we can do that again and and bring the edge back. T I will and take this
back just a little bit. What about this one right here? All right. Everything
looks fine, I think. Now I can select
these two vertices. Maybe this one as well. Let's go to the top of view. I think that's not
going to work. I need to make sure
that these vertices. I think this I should move it
forward just a little bit. Now I need to control
the three of them. Let's go to the top of view, and let's kick the alignment. First let's seg those here, and move the ale bit out. Now let's sera those three here. Like that, and maybe we can move those just a
little bit forward. Well, I think now we
got nice results. Turn go to the object mode and let's check the smoothness. Is everything? We have this open
air right here. Maybe we can take
some vertices out. Maybe this vertex right here, key to the x, and take this out, maybe a little bit. I don't know if
that works or not. But let's try to do that,
maybe this vertex right here. We need to take it
out key to the x. It's not aligned. Let's
go to the left again and hit key and let's
move it a bit down here. Grab this one as well. And hit key and let's
move it a little bit. I think this one, we need
to take it out as well, ke to the x. That's cool. What about this one right here? I need to take it or push
it inside ke to the x. Let's move this inside. Let's go to the left control
three and let's try to move this vertex and put it in the correct position,
Something like this. To the x. Something
like this will work. I'm going to use
this as a guide. Radically hit smooth,
mixed smooth. Now I think it's ready to
ring grab the door on it. But I'm not going
to do this now. I will do that in the next video because this video
become too long. That for this video
and see you next.
13. 014 Modeling section Using shrinkwrap modifier to fix the door shading issues: Hello again, come
back. Okay. Let's com bele creating the door. I just note that I have a small gap here and
let's try to fix it. Just tap the mode and
move these vertices fid to the x axis. That's will help to fix it. Grab this one and move it and
this one as well, Qu the x. This one, I think this is fixed, and this one as well. U x. We just have one
vertex right here. But I think I made
mistake when I moved this vertex. I
should not move it. But that doesn't make you
change, I can ignore it. I just need to focus
on this vertex alone because we just have
one vertex here right here. Let's go to the left view. Yeah, it's in the
middle. Because we have a triangle right
here in this area. I think I will add one
vertex right here. Control R, and
let's add one here. Now we have one vertex here. For this one, I will slide it
up just a little bit here. That will help me to
control this better. I will hit key to the
x and move this a bit. Maybe I can hit key
twice and slide up key to the x
and take this out. And this vertex will help me to control to control
this area better. So I will grab this with
this with this one and rack and choose space to
put this in the center. And now I will hit key to the x and take this out
just a little bit. Now I just fixed this
area. All right. Anyway, now our age now
is ready and we can use it to shrink the door that
we created on this one. Check it, and yeah, everything looks
fine. All right. Let's bring back the door, whereas it would be right here, this one right here.
So this is the door. Okay. I will go to the modifier and I will leave mirror exist and leave
subdivision activated. And I will add
ring crab modifier underneath the mirror
and subdivision surface. And ring crab modifier, it helps to r a
surface on surface. It's very nice modifier. And I think we need to make a quick example
so you can understand it. Let's bring back
the other umetry, it can throw A B, I
think, or Al B again. So yes, it'll be again. And let's have a quick example
here to see how this work. I will add, for example, a uveosphe right here and
increase the sigment. Okay. And create the ring as well and erotically
mix smooth. And I will add plane here, a key and let's move this
plane above above the sphere, abide the scale for the plane, and I will subdivide the plane. So I will add subdivision
surface to subdivide it, but I will choose a symbol
subdivision technique and a in create the level. Going to similar wire
frame so you can see What I'm doing here. I don't know why I can see it. That's weird. Let's activate
s turn of optimal display, and let's subdivide
it five times maybe. And now I will add a churn
crab modifier for this plane. Now if I if I use the t, if the target become the sphere, this plane will take the
shape of the sphere. As you can see now. This is the idea of the
shrinker modifier. This before this after,
before and after. I need to use the shrinker
modifier and by the way, you can move it and it
still shrink on the sphere. Okay. So I'm going to
use this technique to fix the door and give
it better result. So with the door selected, I will choose the target, and the target will
be this new plane that we created, this care. And as you can see now. Now the door is
following the smoothness of the new plane that we added. And it is very it's very
important to increase the level subdivision for the helo let's say
for the plane. Because if you don't, the result will not be smooth for the door. After that, you can put
this a new collection. I will hit to create
a new collection. Let's call this new
collection extra. And we can hide it after that. Okay. And as you can see, now, the door is rank rubbed
on on the plane here. But we got some problem right
here, as you can see here. We need to try to fix it. Alrst isolate this one, it's from the keyboard and let's see why do we have this problem? We have this problem
because this door is a bigger than the guide
that we added the plane. Because of that, we
will have this problem. Let's unhide this. All right, let's select the
door and the guide. It's to isolate
them, both of them. Now, if I select the guide, for example, if I move
this up just a little bit. All right. I think I can
get rid of this problem. Let's move those a little bit. All right let's elect
the door and let's see why that's happened. Okay. Let's let's turn
of mineral modifier. Yeah, that's, sorry. That was because of
the mineral modifier. Because it shrinked when the mirror modifier
I can't select it. When the mirror modifier was on the other side shrinked on this as well because of
that we got this problem. So we need to put
the mirror modifier underneath the shrink crop
to get correct result. And this is the result
that we got here. We just fixed the sharp
area that we have here. And we still have
some problem here. I think we need to sorry, select the door and tab. I will hide this plane, go to the extra and
hide the extra, and we need to make some
tweaking right here, for example, this
one right here. We have some problem. I will grab this edge and give
a decrease to one. And that's not going
to affect anything because the shrink rub
will solve the problem. As you can see, we don't
have any sharp edge. And for this edge right here, maybe I can slide this just a little bit of key twice
and slide this here. And I can give this crease to get rid of this artifact
that we have here. And what else I think we don't
have any further problem, erotic and head smooth
to make this smooth. And as you can see, we got very nice and the clear result and the see the results
here as well. If you have any problem, any misalignment,
for example, here, we have open area, you need to go to the guide
and edit the guide, and the door will
follow it, okay? Yes, keep that in
mind. Let's bring the guide back and here
we have some open area. I can interrupt this vertex and hit the key and
move it to the X, and the door will follow
it, and it will be fixed. But this is not an issue
because if I bring the images, Even in the movie, we
have some iperf in here, for example, the door, it goes underneath the frame
just a little bit here. We have some gap here, and what else we
have some gap here, if you notice So don't
worry about these too much. You don't need to be
perfect that much. For me, I like to be
accurate and I don't know if you if you are following me
and see my other courses, I always like to
care about details, but you don't, by the way,
you can't ignore this. As you can see here,
we have some cave here and some variation in the thickness
here and maybe here. So don't worry about
that too much. I mean, I can ignore this. It's not a big issue. We have a gap here as well. And by the way, when you comb, you can move the door inside and you can kill all
of these artifacts. All right, let's
delete this sphere. We don't need it. And
now we convlet the door. Now it's become
smooth and ready. Let's check the wire frame. We have a lot of aches here. I think I don't know,
I feel that there's something right here
and maybe here as well. Do we have double vertices here? No, we don't. I will hit select all the vertices and hit to open the mage menu
and Qs by distance. I don't know if there
are any double vertices. Or maybe I think we got sorry. We got problem with
the phase orientation. Yeah, that's right,
phase orientation. It's very easy to
fix, select the door, hit A and the hit shift and
to recalculate the normal, and that's will help to fix it. And here we have some care because of
the phase orientation. It's very easy to fix, select this vertex and give this
crease to one, and that's it. Let's try to check it again. Now, we killed any
artifacts here. Everything out here
become smooth and nice. Okay? Cool. Always when
you complete your model, go to the phase orientation and activate and kick if
there are eth flipped. For example, the
windhel is flipped, and I need to fix it tab, it A, Hit N and that's it. All right. Now, everything
is blue, everything is cool. And don't worry about
the right inside because the camera will not see what's going on inside. So
don't worry about this. This turn of phase orientation. And by the way, you can
take this out feel, you can at rat click and
add to quick for variety. And now if I hit Q, I can reach the phase orientation
easily and quickly. Fuel. Right now, I
will end this video, and end the next video, we will create the glass, right? We have a piece of glass
here and here as well. And I'm going to
use the guide that I created here to get
perfect results, right? So that's it for this
video ends here next.
14. 015 Modeling section Creating the door window part 1: Hello again. Welcome back here. And this you, I just need to create the glass of the door. I need to bring back the extra, and I will hide the door, scrap the door, and
hit to hide it. And let's go to the left view
control number three from the um bad and Z to
go to wire frame. And let's hit shift
to add and let's add a new plane and align this
new plane to the view, I think, and it and let's
move this right here. Just take this out maybe
right here for now, and let's go back
to the right view. S a mixed small, scale it
down, something like this. Let's start with the side,
move the plane right here. Let's see what else we can do. I will let control A and apply
a scale and tap the mot. Now, let's start following
the shape that we have here. Call this one key,
and let's move this right here. All right. Because we need to ring
this on the plane, right. We need to go to the
snap and snap on face, and Q center snap center. Why I did that, I just
going to show you. When I move the vertex, I need to snap the
vertex on the surface. If I hit key and hold control, the vertex will be
snapped on the surface, and that's what I want,
as you can see now. I can hit key and snap
this on the surface and this one as well it key
and snapped on the surface. So I need to do that.
Let's go back to the left, activate we frame
and let's do that. Hit key and snap this on the surface, the
same thing here, hit key, and stab this one
on the surface as well. Grab this it key, let's move this right
here and snap it on the surface and the same
scenario for this one. Let's extrude this
it and snub it, extrude it again, it end
snub it, extrude it again. It and snub it. Hit key and hold control and snub it right
here and the same thing here. Now we got this. Maybe I can grab those all of
them and hit to the y and a zero enter to
make this line perfect, and maybe we can rotate it gas a little bit, something like this. Let's go to the perspective and let's see what we go so far. All these new vertices are snapped perfectly
on the surface. Let's go back to the left
view hit control three again. Let's swick to wire frame mood, and let's grab this one. A hit E, hold control and stop this vertex right here and
let's follow this sc here. Hit E and let's
snap this one here. This vertex could meet
this vertex right here. Hit E and extrusion maybe
move this right here. Let's have another ext, could be right here and hit another E to extrude and
snap this maybe right here. Etruion, and snap
this one right here. Extrusion here, and
snap this here, grab this with this hit F. That's cool. Or let's see grab this vertex and
grab this one as well, radical and fix the space
between these vertices. I will select this vertex with
this vertex and I will hit F to add the phase here and
add one phase right here. But I think I need to add
extra vertex right here. I will hit control r and
add one vertex right here. Maybe I can fix the
space between them. Like this, and I will select
this with this hit F to add. But that will leave me
with the triangle here. I will accept that. I will
select those three and hit F. Let's go to the perspective and let's see what
we got so far. This is what I got
here. Okay. Let's try to make some k here. I will add a new right here by using the
tool just hit K and make cuts from here to this age or to this vertex
and hit enter after that. And maybe I can make
another cut goes from this vertex to this
one temporarily. And I will show you
why I did that. I will delete this
egg. I don't need it. I will ad control
x to dissolve it. All right? And after that,
I can grab this, keep wise, activate automo here, kee
wise and slide it and, weld it with this
one. All right. After that, I can select this as a first vertex and hold
control grab this one, and then triticale the
loophole and Q space to make the distance even. And now I got better results. Let's go to the left
view and let's check the result over
there. All right. Everything looks nice. Now if I want, I can add one egg
here in the middle. All right. That's
cool. Now I can select these vertices and give them vertex crease to one, and I can give them subdivigan surface
to make them smooth. Increases to two, maybe. Let's go back to the
right view left view. Let's see the result. We have a little
bit misalignment. We can grab these
vertices and G wise, take those back and hit all to move those
forward, a little bit. Somebody like that.
Manually maybe I can move this one
just a little bit. Let's move this right
here. All right. When you com belete,
I'm going to add sr crab modifier again
and let's pick the guide, and now this sing
crab on my guide. If I hide the guide, now I
got this perfect result here. Pratically, had
smooth to mi smooth. If I bring back, if I hit
t to bring back the door, let's hide the guide as well. Okay. Now I got this
aligned and beautiful. We still have some
mislignment here, if you notice here. I can go to front and I think I need to
move some vertices back, hit key wise and take
those back a little bit. Maybe this one, I
need to move it manually and align it better. Something like this, maybe
this fine heat wise, and take this back
just a little bit. This one as well, heat wise, and let's take this back. Okay, I think we need to move these vertices again
and align them again. Let's take this bag, it
all to move this forward, and let's move this
out a bit like this. Let's check this one. I think I need to move
this one right here. Don't worry about if you move the vertex
in any direction, it will still shrin crab on
the surface on the guide. Don't worry about anything. Align the edges and's it. Let's crop this one, it key
and let's move this right there maybe this one as well it key and let's
move this one here. Maybe this one, I need
to move it again. A little bit. Grab this and let's move this
just a little bit. This one as well. This vertex, I need to move it
and put right here. What about this? Align.
This vertex as you can control and snab it if
you like right here. Okay. R W is the vertex. Let's go to the Yeah. Cool. It's in the
correct position. You can stab the vertex
to the door, if you like. For example, I can hit control
and tab this right here, but make sure to
activate vertex stab. If you like, I think
that will be better. Hit k and stab this
to this vertex. This one, maybe I can
stab it to this vertex. I have vertex here, and this one as well, I can move it and hit control
and stab it to this vertex, and the same skin I re for
this vertex right here, grab it and stab it right here. What about this one, Stab it. Let's go back to the left of view and let's check the site. Let's try to avoid any
overlapping happening right here, it key, hold control and
snap this, maybe right here. This one as well, Hit Key
and snubs right here. Try to find the vertex
to snap this on, like what I'm doing right
here. Something like this. Okay. I think I need to move the case
a little bit and this one as key and stab it. All right. What about those? But everything else is okay. We don't need to
do anything else. Now let's stab out, and yeah, that's cool now it's perfect. It's aligned and perfect. Okay, I think that's it for this video and the next video, I will complete this part. Okay yeah see you next.
15. 016 Modeling section Creating the second door window: Again, and welcome back here. Let's create the second window. Let's activate the
guide that we created, and I will select and select
the door frame as well. Let's select the door and the guide and
its to isolate this. Let's go to the left view. And let's see how
can we do this? Maybe I can select one
vertex from the door, and it's H D to CB it. Let's put it in any
place you like. And you go to wireframe. Now we have this vertex. You can extrude the timber
like this and select those, and hit Ps to separate them and tap out and select it again to
work with this one. I will tap it mod, and this should be a urn crop automatically
on the geometry itself, but we don't need any
subdivision surface for now. We just need to track
the heap of the door. Let's sit like
this, and let's add this vertex here starting
from here, and hit G, let's add another at another bar right here and
its e to make an extruion, and let's extrude this
right here in this area. And I'm using now
the vertic tab. I will swede this to face stab, and let's swede this
two bounding books. Hs Z and let's go to salt view, and now we we should
have this one. But it should be ring cropped. We got a small problem here. I will turn off
miro timers to move this away and then activate it. Okay. All right. Now, let's go back to the
left view control three and let's start doing
that. All right. I will hit Alt Z to
activate X ray mode, or you can toggle it on and off from this icon right here. Let's work in x ray, grab this, hit hold control, and let's
snub this right here. Grab this one, it key, hold control, sna
this right here. And hold control, snub this
one right here as well. And I think I'm going
to select this. Let's put it in
the correct place. Maybe right here. You
can zoom in if you like. And yeah, that's cool. I will hit E to
make one extrusion. Maybe right here. All right. Maybe I can grab this vertex and move it right
here in this area. To this corner, hold
and stab it here. Let's add some edges
here control r, let's I don't know, maybe three. We need just let's add four vertices here
and confirm them. Let's try to move them
just a little bit. Put them in the correct place, hit key, and move those just
a little bit right here. And I will select these
vertices one by one and put them on the surface. Hit key, hold control, and snab this right here. Grab this one, hit key. Hold control and snap
it here as well. This one as well. And this one as well it key and hold control, let's snap
it right here. Let's see in the perspective of what we got so far, right. So this is what we got. Let you go back to the left. And maybe I can grab this
vertex and its e to extrude and snap this here on vertix right here and another vertex
here to this corner. It key and let's snap
this almost right here. And this one, we just need
to move as a little bit, maybe here, something like this. And what else we need to do? We need to make some
connection between those. I'm going to grab this and dera this one as well and hit F to create a connection
between them. I control R to add four
vertices here as well. Grab these four vertices, hit key and hold
control and snap them, and try to put them
in the correct place. Something like this. Let's tumble around and let's see what we got so
far. All right. I think I'm going to
use individual organ and let's see what's
the difference here if we do that, it
key and move those. That will help to ring
cb or let's say Yeah, sing crab these vertices on
the surface individually. Am I right? I think
that doesn't work. That's mean we need to
move them one by one. Hit key twice and slide it. All right, sliding this,
not going to work. So it key alone and
slide it one by one. I try to avoid that, but it seems like we don't
have another option. E and let's move
those All right. That's cool. Okay. Now, what's next? Let's
grab those vertices it F, and hit F cou time. When you reach this point hit F, grab this hit K,
and hold shifts, make cut to the center
and leave the shift and make the final cut
right here and then hit enter to
confirm the cut. So this is what we got so far. Let's go back to the left, control number three, and let's see what else we can do here. I'm going to select this vertex, hold control and snap this
vertex on the surface to this corner. Right here. And let's follow the
care that we got here. I will hit e two extrude and let's extrude this
one, maybe right here. Let's go to the But I think
we got some problem here. We need to kick it from different angle from
the top maybe as well. So I will hit and
move this right here. Okay, something
like this. Let's go to the left again
and hit E tot this. Let's make one ext here
and maybe one right here. Something like that. All
right one, maybe right here. And one here, one here,
and maybe one here. When you do that, select all of these new edges or vertices and tratli into space to make the distance even
between those here. Now we need to kick them from different angle from
the top of you, maybe. See is everything is
aligned and perfect. Maybe I need this window. All right. Everything
looks fine and aligned. We don't have any problem here. Let's go back to the left. Select this vertex with this one and hit F to make a
connection between them, and let's see what's the next, what we should do next. Let's select this vertex
and do the same thing. I will hit e to extrude
and let's extrude one here and keep doing that. All right. But keep the distance between those it e to make
another extruion. Maybe one here. All right. Keep holding control to
snap it on the surface. Don't forget that
it's very important. Otherwise, you
will get res don't like And let's scrub
this with this, let hit F to make a connection. And the same
scenario grab all of these vertices and
right click and Q space to correct the
space between them. Now I can erupt those four
and hit F, to create a face. Corrupt those two
hit F cable time until you fill this area with phases like
that. All right. What about this? I will
select this with this and hit F to create a
connection between them. This one and this
one as will hit F. And I will select those four and have
to create a big face here, it control to add
some edges, maybe. I don't know, maybe I
need four here to add, and let's confirm
them and there we go. But we need to align these
vertices with the shapes. I'm going to start
with this one it key, hold control and
estamea on the face. This one as well, hold control
and estoma on the face. Key hold control, key hold
control and esta on the face because if you don't do that, this is the result
that you will go. But if you snap them,
key and snap this, as you can see,
the same thing for this one G H can row
and snap it right here. That's cool. Now, let's select this these
edges, all of them. All right. And let's go to
phase and Q's grid fill. Using this option will help
you to fill this with quad, and we need to do the
same thing for the site. Grab all of these edges
and go to phase and Qs. The result doesn't like it, you can rotate or
spin it from here, open this menu right
here and try to add different numbers here until you've got something you like. All right. I think
the new vertices that be added by using the fill. I think they aligned with
the surface automatically. All right. Now, what
else we need to do? Now we can select this sorry. Yeah, let's select this window, and let's target these vertices, and let's give them
mini crease to one because we need these vertices to be
harp and grab this, hold here to grab this, and
the same thing for those. Now, I need to add
subdivision surface for them, and we already have, I think, let's activate it. And by the way, it will be shrin crab automatically on
the surface because we have a shing crab already exists
because don't forget that we take this
piece from the door. If you remember, we duplicated the vertex and we
started from there. Okay, now let's check
if everything is okay. I think everything is perfect, especially if I grab
the guide this one, k? Maybe I can call it rink. Hn just to recognize it. If I turn this off
as you can see that is off of the of the window. We got small gap right here. Let's try to fix it. All right, fixing
this. Let's try to turn off sng temporally. All right, we need to fix it. To fix this, we can
go to the front, and we can select these vertices and slide
them just a little bit. Maybe in the right we
can do that, I think. I think that's
going to be better. Just move these vertices
out a bit, all of them. That will help to
fill this area. You can do it manually like
this. Something like that. This one, as well
as key and move it. And this one as well. And this vertex, I need to
move it just a little bit. Maybe put right here. And what about this? It's already in
the correct place. This one as well, we just
need to move it a bit. Let's take this up a
bit and as perfect. What about those here? Let's select this one and
move it up to fill this gap. Okay, let's grow up
this one in key, and let's move this up just
a little bit. All right. Maybe I can take this back a little bit and
move this forward. That's great. Now, I think we fix everything
except this area. I think we just need to fix it. All right. I think
we can't fix it. I don't know. Let's try to move it just a bit.
Yeah, that helps. Anything else here,
we need to do. Okay. Now, the result
looks perfect and clean. Let's get rid of the X ray mode, hit lz and give
this head smooth, right click head
smooth, to make it smooth and there we go. All right. Now let's
hit slash to excite, and now we got the window
very beautiful. Okay. Very nice. Smooth.
Cool. Very cool. Alright, I think now we've finished with the second window. We just need to add mira
Modifier for this one, and I think I will take the mirror Modifier
that I added for this. But I think the origin
dot is not in the center, so we need to put it in
the center. All right. What I will do is I will add
an empty here in the middle, make sure that the three D
corsor is in the middle, it heft C to pot in the middle. And hit heft A, and let's go to the empty section
and just add empty. All right. Now we
have this empty. I will move this empty
right here in the middle. Don't move it to the x axis,
leave it in the middle. And to the Z, and let's
put this right here. Scale. Let make it big
so you can see it. And let's bring the
three D corsor to the position of the
empty it heft S and corso to select it, and now select this window
and then rat in set organ, I just need to change the organ. Organ mean this small
dot right here because miro modifier depend on
the organ of this sorry, the miomdifer depends on
the organ of the umatry. I mean, now, if I select
this, isolate it, if I add a mirror
modifier to this, The Mramidifier will
work according to the position of the organ
dots, and we don't need that. We need to boot the organ dot just a little bit and
put it in the center to mirror this on
the other side like that. Something like this. I think you got the idea. So I'm going to delete the
mirror for now. It's lash, and the three
d courser is right here. We put it right here. Select this piece, right elix organ to three D courser,
and there we go. Now I can add mirror. Select this hot, select
this one because I need to B mirror from this
geometry to this one. So select this, holt he
to this one and go to this row of the mirror
and use CV to select it. And it should be selected sorry. It should be mirrored
on the other side, but that doesn't
happen y because we rotated the plane when we
added it, if you remember. In this case, I will hit control A and apply
the rotation. Applying the rotation
will fix the A. As you can see now, it's mirrored perfectly
without any problem. When you complete, just go to phase orientation and
kick everything is okay? And yeah, everything
is cool and clean. Let's go back here and turn
off phase orientation. And yeah, that's it. Cool. So I want this video
and see you next.
16. 017 Modeling section Creating the door and windshield frame: Hello, everyone, and
welcome back here. Okay. Let's see what
else we can do. We finish the windows, and we finish the door as well. But let's bring the
reference images. According to the
reference images, I can notice that I
have a small border here between the metal
and the window itself. And I just need to create it Let's see how
can we a keep that. I will take this out and
let's select this window. Let's start with this. Let's see how much level we have here. We have two level. Let's
activate wire frame. I will use the quick for variety because I
add it right here, this simply wire frame, and this is the result. So this is with level two, let's see it with
level one, level one. I will use level one. Shrink crab modifier is
okay, everything is cool. What I'm going to do is I will apply the subdivision surface. I control A and apply it. Before you apply this, I will take a copy of this window
and this window as well, and I will put them
inside a new collection, and I will call this Extra. We already have
the extra folder. What I'm going to do is,
I will have d to take a copy of this and leave
it in the same place. And maybe I can change
the name for this one. Let's call this Extra. Window. And I'm
going to move it, just hit M to move it to
the extra collection. I did that because
for any reason, if, for example, if
I made a mistake, or if I want to go back
to the original meg, I can go back and I can do
whatever thing I need to do. So I will keep it right here and turn this off in the render
and in the viewboard, as well, because we
don't need to see it. And the same scener
for this small one, just hit H D teak Her to click, leave it in the same place, and let's change
the name to extra, for example, or let's
call this small window. Extra. Just to recognize it. Hit to open the collection menu and choose Extra to
put in the extra. And there we go. All right. Now, now I can apply the
subdivision surface, and I have another geometry in case I got
problem or anything. So I will control A to app and apply the
ring crab modifier. I don't need it anymore.
I done with this. Let's go to this one and
let's activate wire frame. It is very smooth. I will reduce the number
of the subdivision. I will use one and apply the ring crob and
subdivision surface. By the way, applying
the modifiers, you just need to hit control
A if you knots right here. To apply the modifier, just
have over and control A. Okay. Now I can select
this with this one, and I can let's turn
this off. All right. I think I apply the
modifier for this one. I'm going to control
z couple time. Yeah. I need to hide this,
and let's do that again. Grab this, activate wireframe. I need to see the wireframe. Swede this back to
one, control A here, control A here as
well. And that's cool. Select this with this and hit control A to merge them
and make them one piece, so now they become one piece, if I move it, it's one
piece, as you can see. We still have the
mirror Modifier exist. If I turn this off and on I can see it. All
right, that's great. I will tap the edit mode now, and I will hit eight,
select all the faces. Go to the face mode if you like, and just hit two inset. And you can ie pall it because I don't know how
much I should inset this. But according to this image
it's just a little bit, and according to this one is just a little bit of
inst we need to make. So hit two inst. Let's insert those or
something like this, maybe about I don't know. Why we are working with meter. I think I can go to
the scene properties. Yeah, and king the unit
to centimeter. All right. I think that's better.
So about I don't know, two centimeter or three
centimeter maybe. Yeah, three centimeter border. Yeah, that's cool,
three centimeter. Okay thickness,
three centimeter. I'm not quite sure if this real three centimeter because
that's too much actually. Let's try to use the major tool. Let's activate the vertex. I just need to see if this really three
centimeter or not. Yeah, that's right,
three centimeter. Weird. Away, I will delete this. Let's go back to to
the box selects. All right, something like
this. Now we got the border, when you comb, gues hits A P to open the separate menu and is to separate
the selected faces. And now we got border,
and we got this. All right, let's turn off wire frame for this
one, and for this one. And maybe I can go
to the material sec add a new material for this. And I need to recognize it. Maybe I can give this a little blue color and this
one, maybe this border, I can give it a
material as well, and I can give it
something dark, darker color just
to recognize it. And yeah, something like that. And that's very cool.
As you can see, we have some heading problem. That's because when we changed the auto smooth to low
amount here, we got this. I need to speed this back to 30, a 30 and to be dp. After that, you can add you can add subdivision surface to make it smooth if you like. If you want to bring back
the smoothness of this one, and you can add subdivision
surface for this one as well. Selected hold H to c
this window because we already added subdivision
surface for this one. So I'm going to select
this the border, and then hold the c the window and go to this arrow
and COVID selected. Now border and the window, the both of them has subdivision
surface with level one. And that's cool. We
got small gap here. When we give those a thickness, we will get rid of this gap here. All right, that's great. That's very cool. Now the
result is makes sense. One more thing here
we need to do. I just I think we need to make somewhat
weaken right here. For the windshield, as you can see the line goes like that, and this one goes like this. I think we need to make a
little bit of tweaking. I need to bring this vertex right here to make
it looks like this. If I bring the images
according to these images, the curve is following the door curve this
curve right here. It's not leaving the door curve. For me for my result, I think we are going away from the door curve,
as you can see here. I think I need to bring this pack a little
bit and move it. And If I make some
conversion here between my result and this The windheld goes a little
bit deep from this area, but my result, no. I need to make this
a little bit bigger. Let's take this out
and select the body. We didn't apply anything. That's means we have the full control to make
whatever change we need. Go to the Edit mode
tab to the E mode, and let's slate this vertex. I'm going to slide it g wise and slide this ale
bit not too much, and you can go to the
left view if you like. To see what you need
to do it key wise and slide this as well
to have nice care. We don't have
anything to follow. All right. I mean, use
your eye to do that. After that, when you combate
grab this, the wind held, and the grab this vertex
hit and snub it right here, and the grab this hit key and snub this to this
vertex here here. Let's see what we got
so far tub out and everything should be nice
and clean. That's cool. Now we can say that we
fixed this area, I think. And maybe one more thing here we need to
do for this area, I think we need to make a
little bit of king here. I need to move this
forward just a little bit, maybe right here and
take it down like this. I think that will be better, and that's according to this image as well
or maybe the C one, or maybe this one as well because here we have some depth, and we need to simulate that. Let's move this away, and let's grab the
body, tap the move. Go to the wire frame Z
and de grab this vertex. I'm going to hit and take this
down, something like this, maybe right here,
and grab this one as key and move this one right here and make sure that
you got stright line. Grab it to this, maybe I can move it
up just a little bit. For this one, I will grab those twice and hit all to
move those forward. Something like this.
When we satisfy tab out, grab the windiel, tab in, grab these vertices and hit
key and align those here. You can't tumble
around and you can put this vertex exactly in
the correct position. Gas this week, the stab
to vertex and Q center, hit key hold control,
stab this right here. And for this one, hit
key hold control, and stamp this one
to the middle. Okay, something like that. Let's see grab
those two vertices, go to the left view and hit key, and let's move those
manually like that. Okay, something like
this. I don't know, but I feel this
result is better. All right. All right,
I think that's cool. I feel that I have
a small curve here. Let's try to fix this. Let's go to the left view, select this, and let's
stop to the mode. I will select this vertex
and select this vertex, and I will hit F to make a
connection between them. And let's check this
vertex right here. All right. Align it with this edge and
everything will be perfect. And what about this?
You may ask why I made a connection between these two vertices,
this one and this one. I made a connection. I
just hit F to add an edge, and this age, I will
use it as a guide. When you comb grab it
and hit control, sorry, hit X E, open the delete menu and to
delete edge, and that's it. I always use this method. So let's see if everything
is cool and okay. I will hit end to hide
this panel for now. All right. Something off here. We need to fix it. I don't know, but I feel that there's
something here. We need to fix it. Okay,
Listen like this and this one. These two vertices. If
you can d and take a CB right here and hit F to make a connection between them and
you can use it as a guide. Let's go to the left and
use this as a guide. As you can see this vertex, it goes a little bit of from the guide that
we just created. I'm going to grab
these two vertices in the wireframe and hit key and take this and
align with the guide. When you comble, grab the guide, this one right here, hit x
E to delete, and that's it. Use this method, is
very nice method. What else we could
do right here. We have a little bit
of problem here, this area heading problem. We just need to go
to the auto smooth and cring this up to 30, and this should
solve the problem. For the body, we still
have some problem. I will push this 210 maybe to kill this
artifact that we got here. A we didn't fit it here. I think we need to make some tweaking to
the windhiil again. Because if I bring
these reference images, let's try to kick
this one right here. If I compare the distance
that I got here, I can see that the distance here is It's almost similar to the distance that
we got right here. And when the wind
hell reach this area, I have very big gap here. That's mean we need to bring this vertex a little
bit more, move it down. Let's go to the top of you, and let's see where we move it. Let's grab the by the tap move and let's take this
vertex right here. Hit get twice, and let's
move this almost right here. Now tab out. Try to get an
ice cave goes like this. I can draw it correctly. But this point looks fine. The distance here, it's almost similar to the distance
that we have right here. This point is very cool. After that, I need to grab
this one and tweak it as well, hit ket wise, and
take this down a bit. Maybe this one as
well. I don't know, maybe I can move it a bit, wise and move this down. I think that will be enough. Okay. Let's go to the top
and let's see the curve. The curve looks
amazing actually. They're very beautiful and nice. From the left view as well as
it looks nice. As we call. Now, all what we
need to do is bring the wind hell vertices and snap them to the
vertices of the body. Let's start with this one key, hold control and snap
this right here. This one as well. But I can't see the
vertices of the body. Grab this, activates wire
frame for this object. I think I need to display this,
activate optimal display. Grab this, grab this vertex hit key and snap it right here. Grab this one, hit key and
let's nab this to this vertex. I think everything
else looks okay. We have some misalignment here. In this case, we can turn off subdivision surface and snub the vertices of the windhll
to the vertices of the body. Grab this and snub it
to the vertices of the body with the
subdivision surface of to get better results. Do we have any problem here? No, we don't have any
problem right here. All what we need to do now is activate the
subdivision surface for the body and turn off wire
frame, and that's it. Okay, that's very cool. One more thing here
we need to do. I just noticed that in
the reference images. If you notice here, we have a little bit of curve, the windheld line, this edge, it's not goes st right. As you can see, we
have a little bit of curve. This one right here. We need to create something like this by moving the vertices
just a little bit. It's visible here as
well, if you noticed. It goes to this darum, a little bit like that. Let's see how can we
do that? All right. Let's move these images out and let's go to the top of view. I will select the body
and tap the edit mode. I will select this vertex, and I will move it off
just a little bit, something like
this, not too much, and move this one
as well, a bit. And this one slightly right there and this one as
well, something like that. We can hold and move it. Let's go to the wind
heel, the gab is vertex, it here and move
it and snap it to this one and move this
just a little bit. Just slightly right here, and this one as well.
Something like that. I think that's would be enough. Now we got o correct result, close to the image that
we have right here. We got this small curve. Now the result has
become better and close to the movie or theater. That is very cool.
All, let's see, is there anything else
we need to do here? Everything looks fine and nice. Maybe I can slide this vertex just a little bit right here. It's not a ik problem.
You can leave it. Now I need to create a
border to the windheld. Let's select the wind hield, and I will duplicate it and keep one V and the extra folder. D to take a KV and the right to leave it
in the same place. Let's go to the scene viewer and change the name to
maybe wind hill two. Windhel two, and let's hit and let's move this to
the extra and hide it and the viewboard
and in the ender. For reason, maybe we can
go back and need it. And now we got the windhel. We have mirror modifier and
we have subdivision surface. Let's activate wireframe. I just need to see
the resolution. That's too much. I will
reduce this to two. That will be enough for me, and I will apply the mirror and apply the subdivision surface. We don't need them anymore. Tab and hit a to select all the faces, go
to the face mode, and then I will hit to in hit I and inset is
just a little bit. Something like this. You can
go here and add maybe 5.3, for example, as a thickness. This, this thickness
is k for me. We have some overlapping
right here, if you noticed. We will fix it. Let's reduce the amount of the thickness to avoid
this overlapping. 4.5 maybe, something like that. Right. I will hit control and cancel that
because I think I need to grab these ags and hit control x to dissolve
them to avoid this problem, grab this with this
one and disolve them. I will hit eight to select
all the phases again and ins this again. It to ins. Let's in this one.
Let's add 5.4 maybe. All right. That's very cool. When will we satisfy
with that hit P and then S to
separate the selection, tub out, crab this turn off wire frame for this
one, and for this one. Let's give it the same material that we gave it to the glass, grabs hold here
the grabs control L and chose link material. I think I'm going to change the material color to
something else, yellowish, and maybe give it
some metalin make it metallic and make uhns
control thun a little bit. Something similar
to the movie color. Cb this one, right
click head smooth to make it smooth
and there we go. For the border, we need to give it dark color, maybe
taking this one. Hold he to crop this, control L and link in the
material and there we go. That's very nice.
That's very cool. All right, I think we'll do it for this video and
see you in the next one.
17. 018 Modeling section Adding details to the body part 1: Hello, everyone.
Welcome back here. Okay. Let's work with the body.
Let's see what we can do. First, let's check let's
check the subdivision level. I will hit. I will
activate wire frame. All right. It is
very high raise. Here we have. I will reduce the level to
two because three, I think that's too much.
We don't need three. Even if I add one, it will be nice and acceptable. But I will use two. But before I apply anything, I will take a CV of this body. I will d to take a Copy and rit to leave it in
the same place. Let's call this body. Body maybe two, just to recognize it and I will move
this to the extra folder and leave it here and turn
off the body or you can turn off the whole folder
of the extra. Now, for any reason,
if I want to go back, I can bring back the original
body and work with this. Now we got this. Let's see is everything is okay. It seems like we don't
have any problem. Now we can go forward. According to the
reference images, I have this area, I
need to create it. We have some holes here and
we have some hole in the bag. I don't have any
before the bag of. Something right here, some details here we need to create. Let's see how can we
create all of these. M. First, let's tap to
the it moot here and let's add an around the circle. I will hit control r to add a here and I will hit e to
activate even thickness. As you can see, now it's working
on this side right here. I need to flip it hit F to
flip it to the circle side. And when you do that, just give it a little bit of
space like this. And then we have this circle. After that, just hit ts and just move this down just
ale bit like this. And we need to do
the same thing maybe for For this one as well, hit control r to add an like this and E or even and move
its a little bit like this. Maybe I can hit right. You can do that right
now or maybe you can delay this and do it later when you apply
the subdivision. But for me, I will
do it right now. I will hit t S and just move
this ale bit down like this. All right? That's very cool. I just need a small curve
here. That's why I did that. And for these new edges, just select them, and
maybe we can bible them. I can roll and let's
bibble them to two, maybe. Something like this. I think
that's will be enough. That's very cool. All right. Okay. Let's activate
the wireframe. Let's see what we got here.
Can we create this hole that we got here and the hole that we could
create right here as well. And I think yeah we can do that when we activate
the subdivision. So I will have it over
here on hit control A to apply the result of
the subdivision surface. That's it. Now, I
just accepted this. After that, I can go to tap the mode and go
to the wire frame, and I just need to select
this area. These faces. I can see to activate this
circle select and select these faces and heri click to turn the circle
selection off. With this face selected, I will bring the reference MCs. I just need to see
what else we could do. We just need to
make a small inset inside something like this. Very subtle inset. Great. Let's move this
right here for now, so we can see what
we need to do here. I will hit I to insert. Let's insert this
just a little bit. If any overlapping come in, as you can see right here, we can avoid that by
deleting these edges. For example, after selecting
all of these faces, you can go to the
face mode and hit control x to dissolve these face and make it one pig face, right? And then with this
big face selected, I will hit I again to inset. Let's see what we
will got or we still have problem because of
this edge right here. So I will delete it to
avoid this problem. Go to the edge, grab this, h, control x to dsolve it. Go to the face, grab this
face and then hit I again. Let's make some ins. The same scenario, we've
got problem right here. I will hit control z
and move this vertex away just a little bit maybe
right here temporarily, crop this and hit to init again. And now everything
should be okay. When you combate
gues hit E to make extrusion and don't extrude it to the direction of the ext, Gs hit E and then tritical
to cancel the extruion, and manually move it to the y axis hit e to the y
and move it to the y axis. Just a little bit
inside like this. School. What about this thing that we have here, this shape. Let's go to the left
via control three and go to the wire frame. Let's see how can
we create that? We can move some
vertices here or we can cut this area if we like?
We have two option. Let's go to the vertex
and maybe I can erupt these vertices and Q wis and slide those just
a little bit right here? Something like this. As I say, we can cut this area or we
can use these vertices. All right. Let's put
this vertex right there, key wise and slide this up here, and maybe this one as
well, slide this here. Keise, and let's move this
just at bit to this corner. Let's bring this this
vertex maybe key wise, and let's move this right here, and let's move this here
as well Kwe and slide it. Let's align this one as well, kee wise, and let's
align this here. And the cor all of these vertices right
and slay those down. Key wise, and let's move
those almost right here. What I'm going to do, I
will select this vertex and I think I need to let's
grab this vertex as well. And this one as well,
it keep wise and take those down
and move this one, keep wise and slide it here. So I will grab this vertex and the grab this vertex
right here and I will hit F to create
a guide this line. Temporarily. Now I will move the I will move these
vertices to this line, hit ke wise and slide those. You you can activate
the edge snap, and you can move these vertices, slide them and hit control
and snap it to the edge. Or maybe without sliding
the vertex hit key end, snap it to the edge, and
let's see what we will got. I think the result will be nice. Let's go to the left view. Let's do the same thing hit key, hold control, snap
it to this edge. The same thing for
this one as well. This one. This one
as well at the end. Let's move this right here. That's very cool. All right, what else we can do here? I will grab this vertex and hit E to create a
guide right here, and I will move these vertices to the guide, hit heat wise, and align with the
guide, but don't snap it because this vertex goes up. Grab this one, hit key and heat wise to slide it and slide
this right here in this area. Maybe I can grab
this one and hit at wise and slide
this right there. Something like this.
When you be satisfied, grab this guide to delete the a. This big guide that we created, grab it hit E to delete it as well. We don't
need it anymore. We need to create another
guide for this area, hit key twice and
move this up here, grab this vertex, hold, grab this vertex and hit
F to create a big g here. The same scenario, grab this, hit key snub it to
this, this one as well. Let's do that again. Hit key, let's move this
here. And this one as well. This one as well here. When
you comblet go to the edge, you crab the big edge, it E two deleted. All right
now we got this. Now let's select the faces that we need to
select, Crab this one. Hold control to
select the area and select big this one
to select the area. Let's go back to
the left. I just need to make sure
that I selected the correct faces and school. After that, you can hit to extrude those inside like that. Something like this.
That's very cool. Let's go back to the left view, and let's see what
else we could do here. Okay, now we need to
create this shape, I will hit D to take
a COVA of this face and hit to bush these
faces out again like this, almost right here, and then hit P S to separate these new faces. If I move these faces, as you can see, this is
the result that I got. Let's go back to the right view and let's see what
we can do here. With this new face selected, I will use the N tool and make
a cut and let's cut this. Right hit enter, and now let's go to the
perspective and let's see, how can we connect
these vertices to this to this new edges
that we created. Go to the face,
grab these faces, select this one, as a ers face, hold control if and pick this
one to select the area and hit F to delete them. Now we have an open area. And let's connect
this vertex with this vertex K because I don't like to leave
this floating vertices? We need to connect
them with something, grab this with this K. And maybe this one to this
corner right here it K to make a connection in this
one as well with this one hit K. That's cool. After that, when you be
satisfied, tap mooted A, select everything and hit to open the extrude menu and
extrude along the normal, and let's extrude
those inside a bit, give them a little
bit of thickness. Something like that. Tab out. You can give it a
different material. You can make it from the border, select this new geometry, hold hefty crop the border, and then hit control L and link material to make
this a little bit darker to recognize it.
A, select this one. It's Q to open the quick fit and turn off display wireframe and this one for
the body, I think. Okay, what about this area? Let's try to create something similar to
what we have here. Let's put this
right here for now. Grab the body tap
to the eight mood, and let's grab this edge
that we have right here. Hit Ht D to take CV from this and hit right click to leave
the cop in the same place, and then hit P S to separate it. Tab out from the body and
select this new edge. Now we got it. Tab to the eight mood, and
go to the vertices. This vertex is very close. I don't need it. I will delete
it in this one as well. Maybe I can delete
this one as well. In case I need to make any inst. I don't need to have
any overlapping. Maybe these vertices,
we don't need them because this line, I think it's flat, and maybe this one
is flat as well, yeah, I can delete it. I can keep those. For
any reason, if I won't, I can reduce the
number by deleting one vertex and leave
one like this. All right, select all of these vertices and then hit
F to create a big face, and then I will hit to ins. Let's inset this, gas a
little bit like this. And then hit E to extrude, but cancel the extrudion, just hit right click
and manually move the new face back to the Y axis, Q Y and move this inside,
a little bit like that. And now I can hit Alt click on one of these
edges to select the face loop and its get wise and hit to
move those, sorry. Let's take those back. I think
that's not going to work, but we can select
these faces and hit to move these faces
out just a little bit. Something like this
maybe. Not too much. Maybe I can grab this edge and hit E to extrude it
and y to move this bag. All right, if that makes sense. Alright, I think that's
not going to work. In this case, let's select this face and hit e to
extrude it forward. The extruion will go to
the wrong direction. I think Let's see the results. Yeah, that's not going to work
like this. He controls it. I think we have the
extrusion, just hit E, and herat click and
manually move it to the y, Q to the Y, and move it
ale bit like that maybe. And now it's better.
Just take it out. That's it. Now we
got this. Cool. A All right. This is how to create this. Maybe we can move this
inside a little bit, a key to the y and move it back. No too a little bit. That's very cool. You can give it the same material
that we add right here, select this one H to clove this. I control L and
link the material. And for now, that's it. We still have the mirror and everything reflected
on the other side, and that's what we
want. That's very cool. All right, I will
end this video. And in the next one.
18. 019 Modeling section Adding Bevel modifier: Hello, again. Welcome back. We have a hole here in the back. We need to create it. Okay.
Let's see how can we do this? Let's go to the back
view it control number one and Hazy to
go to the wireframe, and this is what we
are talking about. All right. I think I
can cut this area from the top of view if I go to the
top of view. I will hit B. I guess need this
area to work with, so I will choose it
and hide the rest. And now I will hit control
number one to go to the top. And that will make make
things easier for me. All right, Let's tap the mode, and I think I can
use the n tool. Hit K to make cuts
starting from here and maybe one cut here and one
here as well, right here. K. And confirm its. Let's go back to the back view, activate an F to let
K and let's make cut goes from here and
maybe ends right here. Hold control to
ignore the snabbing, something like that,
and hit to confirm it. And this vertex, I can merge it k twice and
merge it with this one. Make sure to activate
the auto meer. And now let's see what else
we can do here. All right. Let's tumble around
and go to solid view, and this is what we got. All right. Let's select
this with this vertex. Maybe we can connect
them it gay, and I will select these faces. I can see to
activate the circle, select and select these faces. We don't need them. And maybe this one as well, grab those. And then hit x F to
delete those here. Activate the circle tool again, its C and let's e
these phases as well. Its x F to delete those as well, and we have this phase with this one hit x F delete,
we don't need it. And what else, maybe this, we don't need it s this one
hold control grab this, control x to dissolve it. Maybe I can make connection between this vertex
and this one as well. It, that's better because it's better to it's better
than leave it like this. Okay, let's connect
those together. And what about this vertex
right here and this one? I think I can
dissolve this egg to make the egg a little
bit cleaner and this one as well.
Go to the vertex. Is there anything
else we can do it? Maybe I can connect
this vertex with this one. Yeah, I
think that's it. Now let's go to the edge mode, select these edges, hold control and select
all of these edges. It E and let's move
those inside like that. Trough them like
this, and that's it. At I can grab this one
and disolve it as well. I don't need it. S, do we
have any problem right here, Any overlapping.
Try to avoid it. All right, cool. We
don't have any problem. I guess notice something
we're tapping right here when we apply the
subdivision surface. I got this open area, and I need to fix it. Let's tap to it
mode and let's move these vertices to
the other side. Move this one and this one as well until they meet each other. And this vertex
right here hit key and move on the other side, and it will be merrid
automatically. Okay, that's cool. Let's
go to the top of you. And then you just need to move
this to this egg, getwise, to slide it and hit to move
it to the opposite direction until it trek the
wind hill border, gewise, and take this
back just a little bit. And the same scenario
we need to do it. But if you like, you can
add a guide if you like, or you can snap these vertices. To the edge. For example, yeah, I just activated the
edge recently, it key. Let's move this, snap
it to this edge, and this one as well hit key, and snap it to this edge,
and this one as well. Now let's tumble around, and let's see what
we got so far. That's cool. All right. I will use the F tool to
correct the MCAT goes here and go to the edge ltclex select this
ge control x to dissolve it. The same problem we have right here on the side
and this fix it. Go to the vertex mode, grab this vertex, hit
and move it to the side. And this one as we hit
and move it to the side. And this one, Let's
slide this key wise, it alts and move this forward. Let's go to the bottom of you, control seven so
we can control it. Hit key and hold control and snap to the edge of the border, and the same thing for those
key, and this one as well. This one right here. And let's make a new cut start
from here and ends here. Hit enter, go to the get
click to select this age you look control of it.
Oh, that's very cool. You may ask why that's happened. I mean, the problem right here. I will he let's go to the extra and let's go to
the body's activate it. We still have the
subdivision, that's cool. Okay. Where is the old body? This one, I will hide
this one temporarily. Let's unhide the body two. I will h heavy techo Coby up. Let's hide the body two
and leave this one. We have the mirror and we
have subdivian surface. If I apply the
subdivision surface, before applying the mirror,
I will guide the problem. But if I apply the mirror and
then subdivision surface, everything will be fine. So because of that, we
got this problem, right. Applying the
subdivision, leaving the mirror will
cause this problem. If you want to avoid that, if you want to apply
subdivian surface without having this problem. You need to go to the
vertex mode and select this vertex and select this
vertex right here and give them vertex decrease to one. And now, if you apply
the subdivian surface, you will not have any problem. Just keep that in
mind. I will delete this geometry because I
don't need it for now. And let's go back to the plan
two and let's activate it. You can give it a name
if you like. All right. Do we have anything else
we need to do here? Now, I think it's the time
to add ble modifier to the, the sharp aches and
make them smooth. Let's selate the
body and let's go to the modifier list from
the modifier section, and let's add the modifier. What I need is, I need to target specific edges and
give them a bible. For example, I need
to target those, and I need to bivle them
by using the modifier. To do that, I need to change
some setting right here. The limit method. I need to change the
limit method to weight, and I will give these edges a specific weight and Bival
modifier will affect them. Okay. I will leave the amount
ten centimeter for now. And if I want to
make that working, I need to open this
panel right here. And with these edges selected, I will give this, for example, v weight, for example, to one, as you can
see now, I right. As you can see now, we have some vivl,
but it is very big. We don't need this
amount of beveling. We need to be subtle. So maybe 0.1 will be okay. You can see it is very subtle. If I tab out and
activate wire frame, you can see the vl amount here. I need to add three edges. Just change this segment to two. You will have three here. Okay. You can leave
the amount pig and you can control it
by using the vl weight. Let's tab again and let's
select these edges, grab this one, hold
control grab this. And L et's add vl weight to 0.1, the same thing, the same val
amount that we add here. Let's grab this edge as well, hot cant grab this. At this hold to grab this one, and these edges here, and grab this hot can
troll grab this one. Select all of these
necessary edges. Grab them one by one,
and let's give them val 0.1, that's great. Let's select these edges here, and those here as this one,
this one as well here. Okay. Crab those and de crab
this one right here, and maybe this one, and
let's add 0.1, the school. Now let's crab
those here as well. And the crab those
here. Add 0.1. The idea is just
selected the carbge. But sometimes when you do that, you will have some problem. For example, I added 0.1, but the Bible reeked reach some edges and that
causes some overlapping, as you can see here we
have a bad heading. As you can see, now, the val is growing, and this edge should not
touch this edge. That's having we will gust some problem. As
you can see here. In this case, to avoid that, when you add the val 0.1, you can turn off the
val temporarily and select these edges
the close edges, and you can move them a little bit up heat wise
and slide those up. Move them away a little bit and tab out and
activate the val. And now the result is better. Let's tab again and select the other edges because I need to select these edges as well. Grab those all of them. And the crop those
here, all can control. I do this one, crop
this and this, and let's add 0.1. L's cool. And I need
to select these edges. If I give this 0.1, for example, 0.1, I will
have some overlapping here. In this case, I will move these vertice at these
edges a little bit away, wise and slide those down just a little bit to
avoid this problem. Something like this.
Now I can select these edges and give
them val weight 0.1. Let's select those, and select this one right
here or maybe right here, and let's add 0.1, cool. Select this sharp edge as well. Hold can grab the site, and let's add 0.1.
That's very cool. This one as well, hold grab this to select these edges
between and L let's add 0.1. What else may be
those here as well, we can grab them and give
them 0.1 vel weight. And let's select this and select all of these
edges 0.1 level weights. Let's check that
area right here. Let's see if everything is okay. We can try another
Another technique here in the v. In the
geometry section, here we have miter, maybe outer, we can
change this to arc. This can give us another result. This sharp, as you can see, that's the difference,
and this one, this is the arc, and
you can increase the Sigment level to make this
even smoother if you like. You have two types of
bl if you want to try. All right. This is
sharp and this is arc. I think I can add ble
here maybe or here. I just need to extend the vel. I think that can give
me a better result. Selling this one, at least
give this 0.1 le weight. And let's stop out and let's
see what we got so far. I will turn off wire frame. You just need to see
the heading. All right. That's okay and nice. I will increase the auto smooth. I think I need to do that. To get better heading. Let's add here. That's cool. And I think we
just forget to add able here. I don't know. That we gave
this a able or at 0.1 a enter. All right. Maybe I can
turn off auto smooth. I don't know. I feel
that I can do that. At least any craze is
just a little bit, but not too much, something
like this to fix this area. All right. What else
we could do here? I think we didn't give
these vol weights. No, we gave them. All right. Let's select, let's hide the other gumetry,
isolate the body. We have these very close
edges. We don't need them. It click to select the
entire edge loop and then hit control to dissolve it, and this one as
well and this one. And now I will hit Alt click
to grab the door edge. All of these edges, and
let's add vl weight here, 0.05, small amount
of a vivl here. I think that's very small. Let's add maybe 0.08,
something like this. You can target the corners
as well grab them like that, and let's give them maybe
how many 0.08, that's cool. Maybe these edges inside
the same scenario, we need to give them a vel
to get better results. So let's add 0.08 that enter. The stop out, as
you can see now, we god very nice smooth result
here. That's very cool. The same thing here, I think. For this area, for these
edges, I can grab those, and I can I can increase
the val amount and have an nice angle right here because we need to
have s some care here. Or maybe manually, I can bevate it control
be ambivalent like this and add some
edges right here to make this smooth,
something like this. Maybe I can grab
this edge and hit control x to dissolve it
because I don't need it. That's very cool. All right. I think we need to select these edges and give
them a vl weight. But let's select this
edge right here. I just need to co the
amount from here. It control C to CB it and go
here, select these edges, and go here, it control and
then enter. O that's cool. Maybe I need to move this
edge ale bit right here. I think that's affecting
the biv ale bit. Moving this here is better. All right. We have a little
bit of H with the heading. We can ignore it,
it's not a big deal. But if we need to fix it, I think we can add, try. We can add Ach here. We'll fix the problem
a little bit. All right. I think that's notes. Maybe adding a cut
goes like that. I don't know.
Something like this. I will turn off Auto smooth for an now
and keep everything smooth. Let's check the border. Did we miss anything? All right. Everything
looks okay. What about this
error right here? Let's top the mod and
let's select these edges. Cb those and select these
edges, all of them. And maybe those here as well. How can I see it? This here in the corner and this one here, that one, let's add 0.08 maybe. Give them a small amount of beveling and maybe
those here as well. Or if you like, you
can actually can delete those. Do we need them? Can grab them like
that and d x F to delete them and leave
this area empty. Maybe now we can grab
these edges as well. Let click to grab them all, and let's add 0.08. And you can target those here. This age is here as well. How can I calculate
the swan right here? Sorry. Hold the hep tale of this and select the
swan right here. And this egg and let's add 0.08. Let's enter. Right. I
think that's it for now. I will end this video
and see you next.
19. 020 Modeling section Using solidify to create rims: Hello, again. Welcome back. Let's combte adding
v to the harp edges. Select the body and
tap the t mode, and let's start with
these edges right here. We have these edges. They are very close
to those here. That's mean if we add the iv and if we
increase the amount, the bevel will wreak these edges and we
will gut the problem. In this case, I can select those and control
x to dissolve them. Those edges right here. I don't know, I can't move this just out up or I can
leave it right here. It's not a problem. Let's select these edges. Hold control grab those here. Keep selecting
these sharp edges. Now let's sil these the corners. This one right here,
and this one here, slate them and go to the bible
weight and let's add 0.1, and everything is cool. That's nice. That's cool.
All right. What else? Let's start with these circles. Let's top the edit mode and I'll click to select
this entire edge loop, and Let's see how much
bible we need to give it. I think this edge right
here we don't need it. Just hit I'll click
and hit control x to dissolve it because if I don't, the bible will touch this edge and I will
got the problem. I'll click on this
one, I add maybe 0.1. Or, I don't know, maybe
0.2, we can give this. 0.2, I think 0.2 is okay. Let's tub out and
let's see the result. All right point
0.2 is very nice. The same scenery for this one, grab this edge, control x
dissolve it, delete it. Let's grab the harp edge, and let's add here 0.2. And accept it. That's very cool. Let's go here to this area, and let's delete these
as we don't need them. I'll click. It to click click, Ctrol X to disolve them. And those here as well. I'll click It to click and the click and
cantrol X to dissolve them. Maybe those here, we
don't need them as well. I click and have to click
control to dissolve them. Now let's select these edges. I'll click, I'll have to click, click and the click here, and let's add 0.1 level. Let's make those smooth. The same scenario for
this one, let's add 0.1. Now I think we've
done with this side. We need to go to
the side here, tab. Let's select these
unnecessary edges. I'll click the same
scenario for those here. Control x to dissolve them. Select this with this with
this one right here and let's a 0.1. What about this one? This one is very close. I don't know if 0.1
works or not here. Let's try that. I'll
click and this a 0.1. I works. Let's tab out and
let's see the wireframe. It's very close.
I can ignore it. The same thing here, I'll click, select the entire
a loop and then add 0.1, and that's great. All right. Do we forget anything? I think we gave
everything Bible weights. T here as well.
Yeah, we gave them. We have some heading problem, as you can see right here
and right here for the door. It's easy to fix, by the way. You can go to the modifier
and add weighted normal. And as you can see here, we have warning t you could
enable the auto smooth. If you enable the at smooth, you can get better heading. So this is before
and this is after. This phase right here,
we don't need it. I will select it like this a H X F to deleted.
That will be better. And that's very cool.
For any reason, if I want to give a specific a specific
bible, I can do that. I have the full control to do that because it's a modifier. One more thing here
we need to do, we just need to add
some thickness here, for example, I just need
to ext these ages inside. Let's see how can we do that? If I turn the bible off and
we normal, I can tap it I can select these
eggs one by one and it rough and through those as well to this and make some
connection between them. But that will take
a lot of time. Let's try to find another way. But I can do here, I can
add solidify modifier. Slidify modifier can give us
thickness for the umetry. As you can see now, I can
manipulate the thickness. But I don't need to add
thickness for the whole umetry. I just need to target the M. I don't need to add double face. I just need to have RM. Here we have an option is
called Rm. I can't choose it. By activating this option, I can delete the other phase that I got from the solidify
and I can keep the m. I guess can give you
an example as you can see kick this area right here. This is with the RM on and off. But I will go m for all
the holes for this one, this one, this one, and for the circle
that we got here. And I don't need that.
I just need to add m just for this side and
maybe the door as well. How can I do that?
To achieve that, I will grab the body and tap the mode and I will
select these edges. Select the edges that you'd
like to give them a m, select them one by one, select those and those, and the door as well. I have to click to select the entire edge loop
that we have right here. So we just select these
edges, as you can see. Now we need to go to the
object data properties right here and go to the vertex
group and add group, and I will hit a sign after
you adding the group, just hit a sign and assign
it is very important. And that's it. Now tab out, go back to the modifier, and let's go to the solidify. Okay. Now, as you can see, solidify, give me a
rim for all the holes. As you can see
this as well here. I if I want to
target these edges, I can go to the vertice group of the solidify and que the
group that I already created. By the way, if you didn't
understand what I did here, let's go back here. I guess assign these vertices or these edges here and this
group when I had assigned. Let's go back to the modifier. Now I will que this group. Now as you can see,
the solidify modifier is just alight on
the selected edges, and that's something
powerful and nice. After that, you just
need to kick this one, even thickness to
have even thickness. Just keep this on.
And when you comb, control a two alight. But kick the thickness first. I think This thickness two centimeter or
1.9 is okay for me. I will accept it. After
you complete that, we just need to apply
the solidified control A and then activate the vole
and activate weight normal. But we got really mass result. That's happen because of the vl. Let's go to the option, and here we have the geometry, we have a clam overlap, turn off this option right here, and that will help to
solve the problem, and we just need to add some I don't know why
that's happen, really. I don't know. But anyway, this how to solve it. Let's check the human
before we go further. It seems like we don't
have any problem here. Everything is okay. We just need to add amble weight for these new
edges that we just created. Let's select this, I'll click, and then I'll have the click
to grab this one as well. Let's select this one
as well and grab this. And this here in the corner
and let's give them a ble. Mean weight and this
one maybe as well, or I will add for this letter. Let's add 0.05, I think
that will be okay. For this one, if I tab out and activate display wire frame,
and let's tab it again. Let's give this manually, maybe. Hold if and give this something
similar to this edge. Or you can grab this edge
and it control C to C V the number and you
can go here and it control V, something like this. The same cenar right here. Grab this one, go here, control V and enter to
give it the same v amount. What about this age, I'll click to select
the entire age loop and I'm going to give it v 0.05 maybe. Let's scrub this one and
let's give this a as well, 0.05, and maybe
this e here, 0.05. What else? I think that's it. All right. As you can see, we got
very weird vl result, and that's because the edge. We have a corner right here, and this edge is aligned with this one because of that vl
will not work correctly here. But if you move this
edge, for example, like this, you will
have correct results. For example, if I go to this vertex and he keep
twice and slide it. As you can see that will affect the vl and can give
you better result. But I don't know if
moving this vertex right here will affect
the heading or not. Let's stop out and let's see. Hit Q and display
wire, turn it off. Yeah, that's not going
to make a problem. I mean, I will
accept this result. We have some problem right here. Let's see what is it?
Let's se this age. All right. Maybe we need to move this vertex a little bit. We have this phase here. Let's select this phase and hit x f to deleted and that's it. Let's check the other side. We have the same
problem. I think we have the same thing here, it x f to delete this phase. Tub out and check the results. Now we got nes frame. Okay, what else we can do here? Now let's hit a slide to get
out of the oscillation mode, and now we got
very cool results. We need to do the same
thing for the windhield. Grab the windel, hold
it to and grab the body and lets CV the ble
modifier to the windel, just hit CBD to select it. Now go to the windiel tab
and click to grab this edge, go to the edge number two. Alt click, grab this and lets add or 0.1 maybe the same ble amount
that we add right here, and click smooth to
make this smooth. Or the smooth amount
is very lowss, increase this to 30. The same thing for
this one, grab this hold hefty grab the wind heel, and let's co the same ble. COVID is selected,
and tab grab this, and let's add 0.1 le
amount for this one, for this side as
well, grab this, and let's add 0.1 dole amount. We have some weird
things happen here. Let's grab the
wind held and tab, and maybe we can move this
manually just a little bit. Like that, and grab this
one as well tab and move this manually
like this as cool. Let's fix the heading, go to the auto auto smooth
and the normal section, and let's increase this to 30 k and radically head smooth. All right. One more
thing, we need to do it. I will salve the body and
it's like to isolate it. I created another a here inside, but I need to do something else. Let's top to the edit mode, and what I'm going to do is, I'm going to hit control
to add one are in the middle. Something like this. I will turn off Bevel, just to make the performance
a little bit faster. I will go to I click to select the entire phase
clop that I have here. I will hit E to extrude
this along the normal. Let's extrude this out just
a bit, something like this. When you do that, just
go to the menu here and activate offset even
to get better results. I just need this
frame for the door. Something like this will work. That's cool. After that, you
just need to select these new edges and give
them a bevel amount. Let's go to the mean val
weight and let's add 0.05, and let's select
this one as well. I'll click. I'll have to
click this one as 0.05. This one and this one, 0.05. What else maybe this
corner as well grab those, and this one as well. Let's add 0.05. I just forget to add
Bevel to this one, 0.05. That's cool. Now I
can turn on Bevel. If any overlapping
happen right here, we can reduce the number here, as you can see now we
go some overlapping. That's mean 0.05 is
not going to work. Let's reduce the number
to 0.04. I to enter. Let's reduce that
even more 0.02, maybe, I will work 0.02. Just give it a little
bit of vel not too much. Tab outs, and let's activate
wire frame and we go so far. That's cool. I created this frame right here. This frame will be for the door. Because if I bring
the reference images, according to this
image, as you can see, I have a frame, and I try to
create something like this. But I think the frame that
I got is at bit small. Maybe let's try to
make it bigger. Let's these faces again and sit. Let's move this even more and make it a little bit bigger. And let's activate offsite even. Maybe even more ds and move
this just a little bit more. I think now the
result is better. Yeah, that's cool. Now we got something similar to
the image and that's cool. After that, what
I need to do is, I just need to move the
door just a little bit inside to get better result. But I'm not going to
do this right now. Maybe I will do that
later because I don't need to focus on
the door right now. We finish the most important
stuff for the door, but we still have some
details we need to create. I mean, adding
some thickness for the window for the frame
and for the door itself. But I think that we'll do it for this video and see you next.
20. 021 Modeling section Learn how to use Bool Tool: Hello, everyone, and
welcome back here. All right. Until
now we decorate. The body is almost we
will almost finish it. We don't have mac here. We just need to add some details if we bring
the reference images here. As you can see, we have some
lines here, we can add them. But for now, I'm not
going to focus on the body and the door
or the windshield. From now on, I will
focus on the details of the wings and these details above the Opter for
example, the stuff. We will learn how
to create them. And here from this view, we have some details here
underneath the thepor. As you can see, here we
have a lot of details. When I complete all of that, I will go back to the
body and together, we will see what we need to
do and we will finish it. Okay? All right. Let's see from
where we can start. For me, I think we
can start from here. We have some details
here we need to create. If I go to the top view, we don't need to go
to the top view. Maybe we can sorry,
activate orthographic view. We don't have anything here in these images because we
have two types of images, and we talked about that. In this case, I will go back to the reference images,
these images, and as we say, if you remember, we say that we
have just the body and we have the full image. All right. Let's
start with the top because we have some
details we need to create. I'm going to bring
the top view mag, not body top. There's
a difference. If I open this ma,
as you can see, now I can see all the details, and I have some stuff right
here I need to create. I will replace this image
with this one right here. Just have it over here,
go to the folder, and don't forget to speak
to the orthographic. As you can see here, we
have orthographic view. Right here, in this area. I will click any
drug, the top view, and I will release
it right here, this mage will be
replaced automatically. This is the easiest way to replace an image.
It's very nice. Okay. Now I can go to the top view and start
creating these details, but I don't want to
see the whole age. I just need to see this area. Okay. Let's say
this a right here. In this case, we can cut it. For example, if I go to
the left or right view, I can hit B to open
this selection box, and I just select this area
and hide the rest Okay? Let's give this just
a little bit of time. As you can see now, I
just isolated this area, and now I can focus
on this alone. Let's go to the top
of you. Now I can see the reference image and all the details that
I want. That's great. But if you added anything, I just need to remind you,
if you added anything, any geometry anemic
and the three d coorsor in the middle
outside of this area, you will not see it because
it will be isolated. To do that, if you want to create something
and you want to see, you need to bring
the three D coorsor right here in this area, and then you can add anything
and you will see it. So let's go to the top
of you and I will I will put the three D
courser here in the middle because I need to
use Mor modifier. I will grab the body
and tap the edit mode, and I will pick this
A, for example. I will open the Pi menu
for the three D coorsor. I will hit Shift S to open the Pi menu for
the three D coursor, and use courser to select it, and that's it. Tub out. Now we have the three D
coorsor in the correct place. Shift A and we can start with whatever thing we
need to start with here. Right. Before we do anything, I'm going to use the bul in method to create
all of these stuff. And to do this, I need to activate one of the add ons that comes
default with blender. If you go to the edit and then preferences,
go to the add ons, just search and the
search bar for Bull Tool, P O P O maybe. Risor B. Yeah, this
one right here. Pull tool just activate it, and then go to the Barger
icon and save preferences. After that, you will
find the pull tool right here in the section
under the editing. And you can open it and use this stuff. This
is very important. Don't forget to activate
another add on, but I think we're
going to use it later. For now, let's focus
on the bull tool. Okay. The question is
how to use ball tool. For now, temporarily,
I will hit Alt B to unhig the rest of the model because I just need
to explain something. And I will bring the three D
courser in the middle again, H S and coser to
the world organ. Lets add, for example, let's add cube, H A and let's add Qube. Now we have a Que. All right. Bull tool
is very nice tool. We can use it to
create some booleans. We can use it to
unite two objects, make some subtraction, union, intersection and
all of the stuff, and even if you want
to create slides. I have this cube,
and I will create, for example, a cylinder
here right here. Let's take the cylinder out. I need the cylinder
to cut this cube. For example, if I put
this maybe right here. I just need to make
a cut in this area. To do that, let's isolate those. I just forget to activate
screen cast sorry. Let's activate it. Now we have screen cast open. Now you can see whatever
button I will press. All right, how to use bull tool. Fair thing, let's understand
what's going on here. We have the cutter, and we have the target object. We need to cut this
area from the box. So to activate or to
use the bull tool, you need to choose
the cutter first, and then you need to choose
the box as a second object. I mean, the target would be always active,
the active one. As you can see, there is some difference in the
color of the selection. This one is b, c bright orange and
this one dark orange. That's mean this one
is the active one. Always keep the target active
or second object to select. Then open the spino and go to the dits and open the pool tool. I will talk about the
first option right here. Autobolan, and here
we have a pub. The both of them will
give you the same result, but there is a little bit of difference we
will talk about it. Okay? So if I choose difference, as you can see now, the cylinder cut the cube, and now I have a hole. But I lost the cylinder. I have no control, and
in the modifier list, I have nothing right here. These options of the auto ban. They will give you the
job that you want, but they will delete the cutter. They will delete it.
You have no control. You can control it. You can bring it back unless
you controls it. So this is how this section
is work. I will control Z. Now you will learn how to use difference or how
difference works, as you can see,
this is the result. I will hit controls. Union will help you to unite these two
objects if you hit union. Now they become one.
If I go inside it, let's try to go inside.
Can we go inside? All right. I think we can't. But if I go to the
wireframe, as you can see, the cylinder is no longer
goes through the cube. Now it's become part of this. The intersect, I will
have controls a couple of time. Let's select those. The intersects, this is the
result of the intersect, and this is the
result of the slice. It will give you just slices. Now if I take this
out, I just slices. All right. This is
the section one, the auto bully and let's see how this section is work
and what's the difference. The same scenario, just select
the cutter and then select the target and make
the target the active one and
choose difference. Now we get the same result, but we still have the object. The cutter, we still
got the cutter, and you can call it
brush if you like. Now, I have the ability to move it and put it in any
place that I like. When I comb it, I
can leave it like this if I like or if you want, you can hit apply brush, and it will be applied. Now if I move it, it's no
longer affect anything. But we still have the cylinder. If you go to the
object properties, if you go down
here to display s, you can swag this pack to
texture, so we can see it. Now I can use it again.
I will to move it, and I will make some
intersect right here and select the cutter, then hold to grab the
target and hit difference. And you can use union, and we can use intersect. I can move this, you
can see the difference. Let's controls the cable time. I can choose slice,
and I can move or put my object in any place and I can change the
position of the slices, even I can make some scale bile. The it controls it. So
this is the difference. But for me, I don't like to
go to the menu right here. I like to use the shortcut. When I use poll in, I like to control H B and
open this menu quickly. I don't need to go to the
menu right here and search for the edit and open the
poll tool and use the stuff. I always lay the target and then hold heft to grab the
cube and hit control Hft, B and choose whatever
thing I need to choose. And apply whatever
thing I need to apply. If you go to the modifier,
if, for example, if you made some difference, the ble tool will add the
modifier automatically. The bul. And it will hide the object and
swing this to bound box. All right. There is another shortcut is
very important as well. If you have an bad, you can, for example, hit
control z cole time. Let's select this,
hold to grab this. You can hit control shifts minus Let's put the
mots right here. Put the mo right here
for a while and you will see the shortcuts. So to activate the autoboon, the shortcut for this section, you need to hit control
shifts minus for the difference and shift
plus for the union, control shift multiply umbad for the intersect. And for the slides,
you need to use control shift slash
for the slides. For this section, you
just need to control minus control plus multiply
or let's say star. I don't know what's
called and control slash. Let's do that, and let's
see how this works. Let's select this one and
hold you have to grab this, and I will use this section. All what I need to do is
control minus for difference. That's it, or control
plus for union, or control star for intersect or control
slash for slides. So here you have two options, either you can use control H B to open
this meno quo or you can hit control minus
plus slash, et cetera, o. This is how to use pool tool. You can add multiple
object if you like. I will make some cut
control minus, for example, I can duplicate this one hit D, and I will put this right here, and I will select
the object again and hit control minus to
make another cut. Or I can grab the cutter
and tap to the edit mode and hit a select all the
umatry and H D to CV, and I can take the new CV
and put it in another place, and I will have
multiple cuts HD. But make sure not to
make any intersection because you will
lose the effect. When you comb tab
out and that's it. Now you can move all of
these cylinders together. It's a very nice addon, and it is very
smooth and fast use. We will use this tool to
create these details. Let's grab all of these objects and I will delete to delete these and hit to
bring back the body, and I will go to the any view and I will cut this area or
let's say hide the rest, it be grab this area. And now we can go to the top, go to the wire frame, or we can go to the X ray Z. Before you do that, just select that body, bring the three D
coors right here in the middle Hit coors
selected tub out, and go to the X framed. I think that will be easier. And now let's start
creating the stuff. We have images to understand
what's going on there. And, let's do it. All right. I will end this video, and we will create all of the
stuff in the next one. Se next.
21. 022 Modeling section Start modeling the top body details part 1: Hello, everyone, and
we'll come back here. Now let's get started. We have the three d cluster
right here and everything is ready. Now
let's add something. I will add cube, gas it
heft A and let's add Cube. The cube will be
very big as I think, and we can't see it
because it's very big. We just need to scale
it down, so scale it. Scale it like this. Let's
go to the top view. And as you can see
now, we have the cube. Let's put in the right place, for example, right here, to scale it, make it
a little bit big. And try to make it big
let's say try to match the size of the cube with the size of this design
that we have here. When you do that, just
go to the side and scale this down just a
little bit to the Z. Let's bring the
reference images right here and let's see
what we got here. As to the Z,
Something like this. Let's put this
above the surface. You can exact of the
extra mood here. Let's put this maybe right
here, something like that. All right. This thickness
is cool, I think. If you want to be more precise, you can go back to the images, and you can go back
to the same folder. You can bring the L et's see
which one we need to bring. The left side, Image,
just replace it. Click drug, and put
it right there. All right. We got some problem. It will be flipped. In this case, I think let's maybe we can
bring another image. Maybe this one,
let's try to use it. Let's see what we will have. We can use the right side
and put it right here, and we will understand
how much we need to extrude the stuff. We can control the thickness
by using this image. Now, if I go to the
left, for example, now I can see that what I did here is very
accurate. All right. Now let's go back
to the top of you, and let's see what
else we need to do. We have a cut right
here in this area, and we have some details
here we need to create. And we have some extrusion, as you can see
here in this area, and let's see how to
achieve all of that. All right. The fair
thing, this area, how can we create
it? To do this. What I will do is, I will
select the cube and d to the z, and I just going to duplicate
it and scale this to the just a little
bit like this and maybe make it small and
scale it again like that. Let's go to the top again
and go to the wire frame, and let's move this new B in the correct place right
here, for example. Maybe we need to
scale this to the Y, just a little bit and
make it big like this. And then I will tap
the mode And sorry. Let's grub these four vertices, just hit number one
from the keyboard. Grab these vertices and
scale those to the y. Something like this, grab those and move them just a little bit and try to align these
edges with the image. And now we got this.
Now if I tumble around, this is what I got so far. This piece is intersected with this one right here,
and that's what I want. The same scenario as we learned recently, I
will select this one, hold he to grab this one and make the target, the active one. Let's do that again, grab
this, hold to grab this, and I will control HT B to open the pool tool and
I will que difference. I still have the cutter. I can control its If I like, I can move it in
any place I like. After that, I will
select this cube, and I will add mirror modifier. After I delete half of this, so I'm going to tab to
go to the Edit mode. Tab to the mooted tab, and I'm going to control
our to add one H in the middle and leave it in the same place just a rightly to leave it
in the same place. And just z to go to wire frame, grab the sit xF to
delete the faces, and then now you can
add mirror modifier. Go to the modifier and go to
the mirror mirror modifier, and now we got the result
flipped on the other side, and that's what we
want. That's great. Right. What about the cut that we got right here
we need to create. Let's see how can we achieve
something like this. All right, Let's
create another cube, if A and let's add a cube. The cube is very big, but
what I'm going to do, I will king the size from here. I will add, for example,
five centimeter. And from now on,
when I add a cube, it will always remember the size that I
add it right here. I will scale this to the Y and make it t just a
little bit and move it, put it in the middle, it to the z and take this
up, maybe right here. Scale just a little
bit like that. Maybe something like this. Now we have some
intersection with this one. Select this cube, ho,
have to grab this, and then hit control H to B and choose difference.
Now we have some cut. Grab this new cube,
hit key to the Z, and take it down to make
the cut a little bit deep. And if you like, you can tap
the mode for this cutter, and you can grab these
vertices and scale them if you like like
this to make some tab. And you can grab the
side and you can move it like this if you like, and now we got this result. When you com beole,
what you need to do, you need to put the mirror
as the last modifier to make sure to flip this side on
the other side correctly. So I'm going to move the Mal
modifier and put it down, and now we get
very cool results. But we still have a
problem right here. As you can see, I
lost this area, and I will show you
why that's happened. That's happened because when we added the mirror modifier, if you remember,
let's select this. Let's turn off the Momdifier. We deleted this phase. Pull tool, always love
the closed object. This object is not closed. It's opened. We lost
this phase right here. To get better results, just go to the
moot, for example, grab all of these edges I click and then it F to
fill it and tab out, and now you will be good to go. Now you can activate miomdfi. What we did here is
a good solution, but at the same time, it is wrongly say because this phase will
always be in the middle, and that will cause some
problem if you add Bevel. Adding this phase right here
will solve the problem, but it is not the
correct solution. To make this correct solution, you just need to move
a bit like this. You can move the pace
a bit from the center. And then you can tab out and activate the
mirror modifier. That's great, but we got
something right here. We got some overlapping
having right here. To avoid this kind
of overlapping, we can go to the mirror
modifier and activate clip. Sorry, activate
bicect, not clip. Bicect will help to prevent
any overlapping happening. But when you
activate the bicect, you may have a result like this. The result will be flipped. In this case, you need to flip this bag and you to get this. Now, if I go to the wire frame, as you can see, I just
have one seam here, or say one here in the middle, and I go to it mode, I don't have a face here in the middle, and
that's very important. Now, the result is very cool. If you feel that's become a little bit complicated to you, you will understand that more and more because we
will take a lot of example and we will
use miror modifier a lot and this will be easier
for you to understand. Don't worry right
now if you didn't understand that that much. Let's see what else
we can do right here. We have this design
we need to create. Maybe we can go to the top
of you at number seven. And we can go to the wire frame. Let's see, how can we
create this right here? I think we can start with the
cube again, add Qbe here. And let's move it and let's put it in the correct position. We can scale it
just a little bit. For example, we can scale it like this, scale it to the y. And align these vertices
with this area. I mean, scale at the cube
in general like this. Now you can touch the
E two control it, go to the vertex number one. Grab those and move them just
a little bit right here. You can grab those, and you can move them just a
little bit right here. You can control r
to add one edge, and you can move it right here. Grab these two edges to the
x and scale them like that. We can move them just a
little bit like that. Maybe leaving those right here. Let's go to the perspective
and let's see what we can do. Now I will select these faces and take those up Q to the z. Let's take those up
almost I don't know, maybe right here,
something like this. Maybe I can grab
those Q to the Z and take those right here. For example, just
give it a little bit of thickness, and that's great. Now, what's next? All right. Let's go to the top again
and hit heft A and let's add another cube
to make some cuts. Go to the wire frame, move the new cube, and
let's put it right here. You can scale it just a
little bit like this, and you can tap the
ethmota, control it better. Hit number one to go to the, grab these vertices and
move those right here. Grab those, for example, and I don't know, maybe you can move
those out if you like, and scale those like
that to the x axis, make sure to cue the x axis, and align these edges
with the edge of the age. And what else we
need to do here. As you can see in
the reference M, we have some tilt here in
this, we have some corner. We need to achieve In this
case, what I'm going to do, I will hit control R to
add one H, for example, right here, and I will grab these vertices
and take those out. By the way, I need to move these faces a little
bit out the side, it to the Z, take this out, grab this lower
side, it to the Z. Let's move it out as
well temporarily. I will grab those
and hit to the Z, and I will move those just a
little bit down like that. And when I complete, I will grab everything, all of these vertices and move them down to
the z, like this. Something like this. All right. I think that's too much. Maybe I need to take this out to the Z. Maybe something like this. And maybe I can grab the side and let's go to the top of you and let's see what we can do with the side. I will hit key twice
and slide those back until I read this area because I don't
need to go further. And I think that's it. Sorry. Now I can make cut and I just need to see what's going to happen
if I make a cut here. I grab this hold, you
have to grab this one, control, H to be
and use difference. Now we got this result. If this result doesn't
match this one, we can make to weak to
this object to the cutter. It's very easy. Let's
put this right here. All right. What I'm
going to do is, I will select the cutter and
type the mode and the grab these vertices and
move them up to the z. Let's take those up right here maybe, something like this. Now I think we got
what we need to do. But we need this
cutter, the same cuter, we need to use it to cut
this geometry as well. I will select it and
hold to grab this and control H B and difference, and now we got another cut. Or if that doesn't give
you the correct result, what we can do is we can make a hole or we can use another umatry to
cut this object. And I think I prefer to use another box for
this one alone. Let's add another box or cube and let's move
this right here. You can hit to Z and take
this up if you like. Hit and scale, scale to
the X and scale to the Y, and you can use it just
to cut this geometry. Select this hol to get up this, control and use difference, and let's make it small
because that's too much. We don't need the hol to be
that big and hit to the Z, and let's take this down, and
now we got what we needed. By the way, don't worry about
these lines or these cals. We will delete them
when we comble. Let's see how can
we create those. We can use the same CNR. We can use a cube. I had shift A and use a cube. And let's move this one, let's put it right here, scale it just a little bit to the y. Hit Q to the, take this out, for example, right here. Something like this, scale
it down just a little bit. You can go to the top of view to understand how much
you need to scale it. Something like this, maybe.
And now we cut this result. Tap to the I mode, grab the sit, hit Q to the Z, and let's
move it down right here. And I'm just going to make this a little
bit wider like that. And now we cut this
result. All right. What else? I will take this up to the z,
something like this. I think we need
to take this down just a little bit, ke to the z. Let's move this down,
maybe right here. Let's make some tweaking tab, grab these two vertices, it key to the Z and let's
move those up. That's great. That's why I didn't
apply these obvious because always I need to
go back and do something. Now we got the scatter. I think we added in the
correct place. Q to the Z. Maybe we can push
it deber like this. Am I right or not. I think that's too
much. I will take this j a little bit Q to Z, for example, right here. Let's go to the top
and go to wire frame. We need to take a CB it shift
D to take a cop right here, and we need to scale ttle
bit to the x like that, it HD and take another copy right here or you can
use the Mor modifier. I'm going to delete this
one. I don't need it. Delete. Let's tumble around and let's go to
the p perspective. This cutter one and
this cutter two. Grab cutter one, hold, grab two to grab this
object. And make that cut. But you will have one
problem right here because we have some
intersection here in this area. That's mean we need to
make some tweaking here. Let's tab to the edit
mode for this geometry, and as you go to the wireframe, grab these vertices, and let's move those just a
little bit away like this. That will be enough.
Something like this maybe. All right. Now let's see grab Cater one
C two hold to the target. Had control H B
and Qs difference, and now we got what we need. All right. Let's see what
else we can do right here. That's very cool. Now I can go back to this geometry and put the Mor modifier in
as last modifier. Sorry, I'm sorry, I guess
forget to do something. I need to add modifier
for this object, to achieve the stuff.
That's very cool. Let's say that we
finished with this object and we all the cuts. If you want to
apply all of that, you can select the
geometry itself and it control A and apply
Vcal geometry to me. Now when you do that, now you
have the ability to delete all these cutters
for this geometry, and you still have the cut. Even if you move it, you will still have everything. Now I will add mirror
Modifier for this geometry, go to the modifier less
and add mirror Modifier. And as you can see,
Mr Modifier now working in the wrong
way to rectify that, activate bicect, and
then choose a flip. Sometime when you
activate bicect, the results will be rectified. But if that doesn't happen, just choose flip to flip this. And now we got what we wanted. Let's see what else we
can keep right here. Let's add another cube as a tor hit ft A and
add another cube. Bring this cube right
here, for example, I will scale it just a little
bit and hit S to the Z and let's make it a little bit t. Tap to move, go
to the top of view, let's control it, even more, grab these vertices and let's
scale those s. Hit S and scale those ale bit like this maybe and move them like this. I just need to make
some cuts right here. It's not exist here, but
I just like to do it. You have the freedom
to do anything, and you have the freedom to
create whatever object is not necessary to stick to
what I created right here. Grab this hole, grab this body, control he, B, and chose
difference, and now we got this. If you want to bovis deeper, you can do this key
and book deeper. If that make the result
even more beautiful, or if you like you can hit r to the x and rotate
this if you like, and hit Q to the z and
move it like this. If you would like to have
something like this, A, I think it's nice. I'm doing that to t r to
the x to rotate this. I think this will be
interesting and nice. I will keep this result. You can scale this like that
and make the whole cut, if you like like this. That's interesting as well. Yeah, I will keep this result. I like it to add some
table like this. The last thing that we need to create is this small
t um right here. Maybe we can go to
the top Z to go to the wireframe so we can see what we need to
create right here, and we need to start
with the cube. Gift a cube hit key, and move it. Let's
move this right here. Scale ite tt bit maybe
right here if you like, and then let's tap
to the eth mot. Grab these vertices, hit key, and let's move those right here. Maybe we can grab those and
scale those to the x axis. Something like this,
grab those as well, scale those down to the x axis. Move those right here, maybe
and scale those to the x. Because I selected
four vertices dow, I can hit E to
extrude this right here. Let's timber around. Let's see what we got so far. Tab out it to the z
to move this out. Let's put this
timber right here. Tab again and let's add
an edge right here. Let's see grab
these two vertices. Let's go to the top of view, and let's move those back maybe right here
and scale those. Say let's grab those
four vertices. And from the top view, we can scale them
inside like that. And we need to grab those as well here and
let's go to the top of view and scale those
inside as like this. Now we can grab
those, all of them, and we can go to the left
view and hit key to the Z, and take this here, and the grab those and
hit key to the Z, and let's move those
almost right here. Now we've got this
shape as you can see, and we have a hole right here. We can see it from
the top of view. Let's add some cube right here to use it to cut this area. Or even you can
ignore it because that's not going to
make a huge difference. That's very nice. Maybe we can make some overlapping
if we like. We can make a taller can
give us another result. That's okay. We can accept it. Maybe we can move those and
move this just a little bit. Feel free to do whatever
thing you'd like to do. This. I like this
result actually. Let's see what's going to
happen if I move those. If I move those right here. Let's leave it right
here. That's very cool. I don't know. Please move those just a little bit
like this. Maybe. That will make those of
the event more beautiful. Alright, cool.
This is very nice. I will accept it.
That's very cool. When you com belete and when you be satisfied
with the result, grab this object,
start with this one, hit control A apply
visual human time. And now you can delete
all the caters because we don't need them anymore and
they will not affect anymore. Let's say they will not
affect anything anymore. And delete this one as well because we applied
all the motifier, when we hit control A and
apply visual human time. This option will apply all
the modifier right here. That's been you will
accept anything. And now we can say that
we done with this. That's it, I think,
and see you next.
22. 023 Modeling section Start modeling the top body details part 2: Hello, everyone. Welcome back. And this video let's try
to create this shape. Okay. Let's put the
reference image right here, and let's go to the top of you at number seven
from the Num bat. All right. I will z to go to the wireframe so I can
see what I need to do. So I need to create
this shape, I mean. Okay. I will use a cube F A to open the advenu and from the mech use
cube, the same scenario. And I'm going to move
this cube right here. And when I comb
creating the side, I will mirror it to the side. Let's select this cube and scale just a tit, may be right here. I will tap the e mode so I
can control the vertices. Grab these 24 vertices and g, and let's move this
to right here. Select those and move
them maybe here. And those as well, grab those
and move them right here. We can go to the left view and I will select those
and move them up. Instil those and move them down. Something like this,
and maybe this vertex, I can take it down. All right. Let's
go back to the top of you and let's see
what else we can do. We have something
right here we need to create We can see it here better in the in
the reference mage. All right to kube this, I'm going to add another cube here. Go to the object
moot tub out and then hit ft A and let's
add another cube. Let's take this cube and let's put it right
here temporarily. I will scale this to
the x axis and scale it to the Y as well like this and move it a
bit, maybe right here. As you go to the Lift
view control three, I will move this I will use this cube as
a cater to cut this. In the perspective, we can
understand that even more. I will select the
cutter and then hold shifts and select the target
and make it the active one, and I will have control shift
B and chose difference, and now we have a cut. Move this down just a
little bit keep the Z, and let's move it maybe right
here. Something like this. And I just need to make some tweaking to the cutter itself. Select the cutter
and type the moot. I will grab these vertices, this one and this one, and just move them a
little bit like this. And maybe I will grab
those four vertices, all of them and
take them back key, and let's move them
back, maybe right here. I just need to get a result
similar to what I have here. One more thing here, we
need to move the side just a little bit right here
to the edge and give it a little bit of
thickness on the side. Let's move those
just a little bit right here. That's cool. Now, tab out, select this
object tab control r, and let's add g right here. Maybe we can piv control. Let's eval it to two like this. And tap. We you combate, select this object,
hit control A, and apply vital geometry to me to apply it and delete the cater, we
don't need it anymore. And now we can tap the
mode for this object. And here we have the edge
role that we created. But because we added a cutter, we lost the connection. We will bring this back, I will hit control r to add one edge right
here and move it here and make connection between those hit
G. Don't use K. Sorry don't use F it G.
The same thing here, control R and let's
add one A here. Grab this with this, hit a and here as well,
the same thing. All right now I can select
this face, for example, and I can move it to
the right like this. Maybe from the top of view,
we can do that better. Let's move the just a
little bit right here, and I will select this face
as well and take this back. All right. Something like this. I can control the vertices
as well and move those just a little bit right here
to get the same results, and I can select those vertices
as well and move those here and the grab those and key and move
those right here to the Y. Now, let's go to the perspective and let's see what we go so far. All right, something cool. That's very nice. Okay, now, I can mirror this
on the other side, and I think I can
use mirror modifier, but the origin dot
is right here, and if I mirror this, the mirror will not
work like what I want. In this case, I need
to move the origin dot and put it in the middle and the position
of the three ds. After that, when I mirror, the next B should be right here. All right, select the object
and hit right click and set origin origin to the
position of the three dicser. And we did that. All right. Now I can go to the
modifier and s Mirror. Everything will be
correct and nice. So we finished with this. Maybe now we can start
working with this one. All right, let's go
to the top of you. And I will shift A, and maybe I can use cube again. Now we got the cube right here, it key and move it here, to go to wire frame,
scale it to the x axis. Scale it to the y axis. Maybe we can put it in the middle and then scale
it to the y axis like this. Right now, I can tap it move, and I will select these vertices and key and let's
move this right here. Right. That's cool. Let's
go to the left view, Control three, and
let's see the heights. Let's sec up those and stay
those up and those as well, let's stake those up
almost right here. I will add an right here, control r and add here, and we need to select these vertices and scale them
to the x axis like this. To make this taper
and that cool. Let's go back to the top of you, and we have a cut here in
this air we need to make. I'm going to select
these two vertices and bring the three d
corsor here in the middle. Heft and corsor to select it, and now become here
in the middle. Tap out heft A, and let's add another cube. Scale this cube like that. Move it just a little
bit of the y like this. Tap to the mod, grab those four vertices and scale
them to the x like this. S x and now we got this. After that, give
this cutter length grab these vertices and
take them all the way down to cut this object. When you combine doing that, select the cutter hole, you
have to grab up the target. Control have to be
cued difference, and there we go. We did that. All right, what's the next step? Let's go to the
top of you again. We have this have we need
to cut here as well. I'm going to use another cube, and I'm going to hit key
to the y and move it here. Maybe right here, scale it
to the x, scale it to the y. Key and move it right here. All right. That's cool. So,
I'm going to use as a cutter. Grab this, hold to
grab the target, Ctl H B, Cues difference. D. All right, let's go back to the top of
you and to go to wire frame, t A to add a cube. Let's move this cube
maybe right here. Let's scale it to the x xs, scale it s to the x to
the y, and then to the x. Let's try to create
this matro right here. All right. Maybe we need to
go to the lifts, cro three, and let's take this
up almost right here, and then tp, take out
these vertices down, g and move them down like that. Maybe we can move this
just a little bit. Let's go back to the
top of you. All right. All right, I think
we done with this. We don't need to
do anything else. You can leave it like
this. That's okay. Let's go back to the top of view and let's try to
create these holes. I will shift A to add cube, but I need to go to
the object mode, tap out shift A and add cube. And the cube here in the
position of the cursor. I will move right here to the Y, g to the Y, and scale this
to the Y gets a little bit. Something like this, similar
to the size of this hole. And the scale to the x as
well, maybe right here. Maybe scale gets a
little bit to the y, give it a little
bit of thickness. That's great. Let's go
to the perspective, and let's see what we have done. That's cool. After you do
that, we need to eval it. I will tap to the edit mode
and I will go to the edge, number two, I will
select these four edges. You can select them
manually one by one, or you can hit control
A E click one of them, and the rest will be selected. After that, you need to eval it, but you will got one problem,
and I will show you. I I hit control to vl, as you can see, vl not
working in the correct way. And that's happen,
I will tab out. That's happened
because of the scale. Because we scale
this to the x axis, We got a problem with the il. All of these numbers
should be one, in this case, you
need to apply it. So I'm going to
control A and apply scale to avoid the problem. Now all of these
axes are one that's mean ivl or whatever
modifier you will use. Everything will be correct. All right. So let's
move those right here. Now let's top the mode. And with these four
edges selected, I will had control
to bufle those. Control B and move the mouse, and I need to add more edges, rotate the wheel,
just a little bit. Hold, you have to control
that better, if you like. And let's let's pack it
smooth, something like this. Will work. About six segments. By the way, the menu to be like this and
you need to open it. And, that's cool. If you want to
manuelate the width, you can do that, if you like, but be careful to
avoid any overlapping. Something like this. It's okay. When you be satisfied
with the result, tap out, grab this as a cat
hold here to grab the target. Hit control shift B to open the pool tool and use
difference. Now we got this. But it's a little bit deep. I will hit to the z
and take this out. Maybe right here,
it will be enough. We need to cop it. Let's go to the top of you
and to go to wire frame. What I'm going to do
is I will copy this in the It is moot because let's
go to the perspective here. If I hit D to the cutter and move right
here, nothing will happen. But if I grab this
and tap the mode and select all the faces hit
A and hit HD and move it, I will got another cut. That's what I wanted to do. Let's go to the top
of you here and Z and let's move this
new CV right here. Hit HD again and take another
COV here and ift D again, and let's move this
COV right here. And now we got what we wanted. All right. That's cool. Let's tab out, and now
we've done with this. After that, we have
some shape here. We need to create slis. Let's see how can we achieve it. Let's go to the Tab view again, to go to wire frame, hit if
eight to add another cube. Hit g and let's move
this right here. Scale this just a little bit. Scale this to the
Y axis like that. At let tap move now, grabs vertices, hit G, and let's move this right here. And what else maybe we can
move those just a little bit here. All right. That's cool. After that tab out, control I apply the scale to
avoid any problem. Tab and again, go to the edge, move it number two
from the keyboard, control out and click on this
edge to select the ring, and I mean, make ring selection, and then it control to b. Let's give this a little
bit of corner like this. Something like this, you can add seven sigment if you like. And that's cool. Tub out. Now I need another
be on another side. I can make the slides right
here, and after that, I can use mirror
midifier to mirror this or I can mirror
the catar itself. But I need to move the gan dot and put it right here in the
middle to achieve that. He right click and
set og23d courser, and then go to the modifier and use mineral modifier,
and now we got it. After that, you can apply the modifier because we
don't need it anymore. Now, we have two cars. I will hit dz and move this object a little bit because
I don't want to go deep. And with this object selected, hold H to grab the target, and then hit control Hit. But this time, I'm not
going to use difference, I'm going to use slice
to make slides like this. Now we got slide. It has a great. All right.
We almost finished. We just need to move
these new slides in just a little bit to the
Z and take those inside. Maybe right here.
It will be enough. The final thing that
we need to do is add a bunch of cubes
here to create this, and it will be easy. So let's go to the
top of you again, hit Shift A and let's add cube. Move this que right here, scale it just a little bit
to the x, scale to the y, make it smaller like
this and hit S to the z, scale to the z as well, and hit key to the Z and move it inside. Something like this. Let's add one here, and maybe we can hit sift D and take another VE right here. And hit heft r coup time to
repeat the last operation. And let's add several CVs here. After that, I think I can
select those all of them, and hit control J to
make them one piece, just make them one
piece like this, and you can join
them with the body. You can select them,
Hold he to grab this. Hit control Hit B, and let's use union this
time to merge them, and now they become one piece. All right, that's
great. Now when you will be satisfied with that, now let's apply everything. Let's start with as you can see, these are all the modifiers
applied to this object. Let's see how can we do that? Let's take grab the body
and I will control it. Sorry, control, I to
open the apply menu, and I will apply
visual umetry to me. But let's see what's going
to happen I do that. If I do this, I will apply it, but I will use the slice, and that's a problem. Everything will be okay, except the s. It's not going
to work as we expected. And this way to apply
things correctly, you can You can select
start with the slices, select it, and then go to the
edit to the tool and apply. Apply it first. Now
you can move it, and you can delete
it if you like. And then you can
apply anything else. The same scenario for the body, you can grab it
and you can apply all to apply everything, and now the body will be ready. Now, if you move
whatever thing you like, if I move the cutter here, it will not affect anything because everything is applied. Now you can grab these cutters and you can hit delete
to delete them, and now you've got your head. R N nice to go. I'm thinking of give this
area a little bit of distance to avoid
any future problem if I need to add the
val moodifier to those. I will select this
tab and I'm going to use face mod hit number
three from the keyboard. Select these faces.
Just move a b, give this a little bit of
space, something like this. Even if you move this here, it's okay. That's great. T's see what's going happen
if I add a ivl right here, Let's grab those and hit control be to add some vl like this. That will make the
result nicer or not? All right. Can we accept this? I think we don't. I'm
not going to do that. What's going to happen if
I move this like this? Yeah, maybe I can make
a tilt like this. It's don't exist here,
but as I told you before, you can do whatever
thing you like. Yeah, that's very cool. So I will accept this result and that's it for this
video and S next.
23. 024 Modeling section Start modeling the top body details part 3: Hello, everyone. I
will come back here. Let's create the third
bars. This one right here. I will put the reference here, the Pure RF tool, and let's go to the top of vi. All right Z, and let's
go to the wireframe. We have three D
courser in the middle. That means whatever thing we will add here, it
will be in the middle. Shift a to add and
let's add another cube, a key, and let's move this. Let's put this right here. Let's make some scaling
S to the x axis, S to the Y. Something like this. I just aligned the
site with the image. What about the site? I will tap the mode and hit one
to go to the vertex. Vertices, I will hit g
to move this right here, maybe hit E to extrude because I just selected
four vertices, by the way. Let's move this a
little bit more here. That's great. I will
scale those two x axes like this. All right. That's cool. Let's go to the
side of view number three and control three to go to the left and let's select
these vertices key, and let's move those
down maybe right here. And maybe those, we need
to move them just a little bit here.
As will be enough. I will control r to
add one control r to add one right here. What else? I think I need to
select these vertices, all of them, and
from the top view, we can scale them to the middle maybe or let's say to
the x axis like this. Manually, I will
select those here and g and move them to the
y axis right here. That's great. Now let's
go back to the left view. We need to add one edge
right here in this area, maybe and move these vertices just
a little bit like that. Maybe we can grab them and move them to the
y axis like this. All right. That's cool.
What else we could do here? Let's go to the solid view. I will select these faces, all of them and hit
X, F to delete them. I will go to the g at
number two and select D three edges F to
create a phase here, crave this edge and hit F to create a phase
right here as well. All right. That's great. Now, let's see how can we
create this shape here. Let's see if we can
add an g right here? We can add g. Or I'm not going to add g. I will bring
the three D corsor here in the middle select this g and the middle a shift
and go down Corsor to select it tab out shift A, and let's add Q right
here in this area. Now we can go to the tab
view to go to wire frame, and we can scale this just
a little bit like this, and maybe we can move it
here and tab g tes key, and let's move those,
maybe right here. What else we could do here? All right, I think now we need to move
these vertices down. All of them, it to the Z, and let's take those
down right here. And those as well, we can go to the left view at control three, and let's move those to the Z and let's move
those right here. Hit control r to add
one right here and control r to add
one here as well. And I think we have two options. Yeah, I think we
should extrude it. So I'm going to select
those four vertices. Here we have four
vertices. By the way. And again, in the left view, I will hit e to extrude those
up and grab those hit key, and let's move those right here and these vertices right here. And I think we can take those down sorry back
just a little bit. Let's tile around at least
see what we got so far. We got this result. This is all what we want. If you like, if you want to merge this with the object,
it's okay to do that. We have some intersection
and that's very important. It's strong to leave it
like this, like this. You should push it inside
a little bit from the side and to the side as well. When you be satisfied, I think we just need to give it a little bit of space
here. I don't know. Maybe we can grab
this in top and grab these vertices and move them back just a
little bit like this. It's okay. And now I
can select this one. And I need to select this
one as a target and then hit control Hft B to open the
bull tool and chose Union. Now they because there's
no back to this one, I don't need to go back
and edit anything. What I will do is I will control Z and hit
control Hft B again. And I'm going to use the
union in this section because I don't want to go
back and edit anything. So just merge them like
this, and that's enough. So now they become
one ps. All right. That's cool. What
else we need to do? We have these holes
we need to create. Let's see how can
we achieve them. All right. I think we can take a COB of what we
did here, for example. I can tap the mode
for this geometry, and I can go to phase, select this phase,
for example, and I. Where is the screen cast? Yeah, that's activated, sorry. And I can hit
control plus to grow the selen like this and hit it D to take COVID to
the z axis like this. But we got one
problem right here. You noticed when I moved those, the vertices merged because of the auto merge right
here we got it's on. We we could keep it off. Us remember that when
you want to activate it, and when you don't turn
this off is very important, as you can see now
we got problem. If you didn't know that's
happened because of the autom it will be weird to you and you will
ask why that's happening. All right, so yeah, it's
because of the auto meg. Hit Control Z. I will turn
this off hit F d to the Z and hit the P to open the separate menu and hit S
to separate the selection. Tab out now. Grab this alone. Tab go to the edge, Old click to select the entire edge that
we have right here. And then hit F to create
a phase. Now we got this. All right. The
problem that we got is this geometry is a flipped. I mean, phase orientation. If I tab out and go to the
phase orientation, it's red. In this case, it's
very easy to fix, tap the mode for this geometry, hit A, select everything, and then hit shift N to
recalculate the normal, and then tab out and turn
off phase orientation. All right, I'm
going to use this. I don't need to
add box and deval. This one maybe it
will be faster. Let's go to the top view, and let's move this
maybe right here, and maybe we can
start with this sit. Tab, go to the vertices
Z to go to wire frame. Grab these vertices, let's
move those right here. Grab those as hit key and
move those right here. And I will grab the
whole vertices, hit key and move them and let's
put them in the position. For example, right here. Maybe we can move those
just a little bit here. That's great. In the Edit mode, we can duplicate these faces or this geometry, we
can duplicate it. He d to the y axis,
add one here, heat Ht r to duplicate this
cou time, and that's it. For now, let's go back to solid. And now tab out and
hit key to the Z, and let's move
those inside right here to create the
car that we want. When you be satisfied
with the result, with the selected, hold
have to grab the target. Control have to be
there is no going back, I will hit chose difference. And now we got a cut. When you comble it,
grab the umatry, and now let's give
it a miro modifier. Go to the modifier and
add miro modifier. As you can see miro
modifier now works on to the wrong direction, I will activate bicect first
and then flip the result. All right, that's cool.
Now we got what we want, and let's compare
the result with the reference. It's very cool. We have two cylinders
here we need to add, and let's add them right now, Shift A, and let's
search for a cylinder. It's very vague.
What we can do now, we can go to the radius
and add, for example, ten centimeter and
the radius and the depth ten centimeter as well. And make it
small like this. We can go to the top view, hit key, and let's
add this right here. It S and scale like
this, maybe hit key. Let's target one side. Let's put this right here,
and maybe we can hit this, can move it up just a
little bit like this. What else we need to
do here. All right. I will hit control a to abate
scale to avoid any problem. Tap and let's grab these edges. Go to the edge mode, hit control B two to b voit and
let's eval it like that. Let's give it a little
bit amount of beveling, and with these phase selected
Q to Z and take this down. And you just need to
merge it with the metre. With this selected hold you
have to grow up the uma tree, it control to B and Q's
union, and that's great. But you will have one problem. If you you remember when
I added Momi fi if I had control Z cout As you can see, we have or Modifier
applied for the umetry. And if you use this section, the option in this section, you will lose the modifier. In this case, what
I'm going to do is, I will control heft B
and use union here, and I will put the
mural Modifier underneath it to mirror
this on the other side. When you be satisfied
with the result, just select this and hit control have to be
again Qs apply aprich, and then delete the cylinder we don't need anymore
because it mired. And now we apply the modifier at the same time because we hit Apply aprich, and we got mirror modifier
still work. And that's great. All right. That's very cool. Now we can say that we
are finished with these. Maybe we can make
somewhat taking, for example, to this one. I think if I grab this egg and
hit control B to beval it, I feel this will give me a better result,
something like this. Maybe. Let's see
what's going happen if I eval those here. I control. There's some kind of
problem with the scale. I will hit control
the couple time, tap out control I apply scale, tap and grab this pivalit again. All right now the
result is better. It control before those,
let's see what you can get. All right. That's not cool. I will cancel it. But I think we can add some
cut here. I don't know. Let's go to the top of you hit
Hit A, and let's add cube. Hit G, and let's move
this right here, maybe, scale it
just a little bit. Tab grab these vertices
and the wire frame. It's very important to select the other vertices
on the other side, it S to scale them
like this and tab out. I will use this as a cutter, hold the grab to grab this. Control heft B and
Qs difference. And I think now it's better. And if I like, I can grab this face and move it just
a little bit like this. Okay. One more thing
here I can do. I think I can move these
vertices just a little bit from the top of you maybe and align them
with those here. To make them look
they are one piece. Okay, I think we reached
the end of this video. So yeah, that's it for this
video and see you next.
24. 025 Modeling section Start start with the top tail details: Hello, everyone, and
welcome back here. This ideo we need to create complete the other details
that we have here. We have this design,
we need to create this. This one right here. The image right here
is not completed. I think if we go
to the top view, we can see that better,
especially if we s to wire frame. We have this shape, let's see, how can we create it. All right. To get better view, I can go to the left view and hit B to open the box, select, select the area that I want
to cut or to work with. Let's cut this area, something like this, maybe. All right. That's very cool. One more thing here, select the body and tap
to more, grab one, for example, and
hit the S and bring the three dicrsor in the
middle, and then tap out. Now let's go to the
tab view and let's hit x ray C to see the
details better here, and as you can see, this
is what we should create. All right. Let's
start with cube. F to A, and maybe we can add cube or maybe we can
add plane if we like. Yeah, let's add plane. Let's scale this down
maybe right here and let's see from
where we can start. Let's start from this point. I will move the plane hit
key and move it right here. I will tap the move and select these vertices and
scale them like this and grab those
and hit key and let's move those right here and
scale those like that. And the grab these vertices
hit E and extrude those right here and scale those out
just a little bit like this. Now we got this results. Grab these two vertices or maybe grab this one and go to the
left view control three. Let's move this up
and let's put it in the correct position
and grab those here, it key and grab and move
it maybe right here. This one as well,
we should move it, let's move this right here. Don't worry about the gap that we have right
here, just ignore it. Let's select these vertices,
all of them maybe. Let's hit E to the
z or let's hit to extrude them just a
little bit like this. Let's go to solid view. All right. All right. Let's see now what
we can do here. Let's start with those here. First thing, we don't
need these faces, or I will leave them for now. Let's scrab these two edges
and let's go to the top, and let's go to the wireframe, for example, and let's
move those just a little bit and scale those
out like this. As you go to the left control
three and let's move those down key to the and let's move those and align
them with the body. That's cool. Now let's grab
these two vertices key, and let's move those up and align them with
the body as well. Something like this.
What about this area? I think we can grab
those here and hit key, and maybe we can move them, I don't know, maybe right here. Something like this,
or maybe we can move it key and let's
move those maybe here. All right, something like that. Yeah, something like this. And let's go to the
top of you and let's see what else we could
do for this area. I think I need to scale this
out, something like this. Now we got something
here. If I go to the perspective, I
get this result. What I will do is, I will
select this vertex with this one and hit to make a
connection between them. Grove this with this it J, and grove this one
with this one and hit J. That's very cool. After that, now we can
give those above modifier. Let's slide those
just a little bit like this, something like this. All right. Until now
we almost finish here. We just need to
create this shape. And let's do that right now. All right. Let's
go to the top of view and to go to wireframe. I think we can start
with the cube, tap out and shift A, and let's add cube right here, it key, and let's
move this cube. Maybe we can start from here. Scale this to the x axis. Sorry. Scale this right
here and grab the forwards, hit key, and let's move
those right here, maybe. And let's go to the left
view. Control number three. Let's grab those,
hit key to the Z, and let's move those there. Grab those, let's move
them almost right here, align them with the body. And what about this side? Let's move a little bit down. Grab those two hit key, and let's move those right here. And what else? I think
I need to add 18 here, something like this and
take these two vertices and align them with a body,
something like that. Now let's go to the perspective and let's see what
we have done so far. Okay. What about vertices? I think I will gewis
and slide those out. Something like this
will work. All right. So now it's become two biases, and we just need to give
it a bevel modifier. I you like we can give it a vel right now,
and I will do that. Let's select this. Let's go to the modifier and
let's add vel modifier. I don't want val to
target everything. I just need to target
specific edges, so I'm going to swing
this to weight. The method will be weight, and I will open this
panel right here and select this object and top to the mode and go to the edge. I will select specific edges and give them abovel. Let's tb. I need to give
thebvl those here, this edge, and this edge, I need to give tbovle, and this. I think I can isolate it. This one, this,
this edge as well. This edge right here. And on the other side as well, those. Actually, I can give all
the edges Bible, I think. That's mean I can
hit A and go to the Bible and I will
add 0.1 as a Bible, weight, and let's increase the
segment and let's tab out. One more thing here
you need to do, if you have any problem
with the scale as you can you can hit control,
I and apply the scale. That's would be better.
The result is very smooth, so that's mean 0.1 is two max. So let's add 0.0 maybe three to make the bible
settle and small like this. I can see some
jagged lines here. I can go to the
heading to fix those, go to the heading and
activate hard and normal. As you can see, we have
a warning tells you enable auto smooth and
oj data properties. Let's go to the obj
data properties and open the normal menu and
activate auto smooth. Right now, it's become
very nice and smooth. This hits to excite, grab this, and I guess need to copy the
bevel from here to here. To do that, grab this
hold hip, grab this. Make this object the active one because we need to
copy the vl from it. So go to the modifier and go to this arrow and
hit CV to selected. One more thing here, I just
need to check the scale. As you can see in the ax axis, we have a very huge scale. That's been v not
work correctly. I need to apply the scale
for this object control. I apply the scale, that's it. And I don't know. We didn't activate
it. All right. Now, it should work.
Yeah. That's cool. I can't see anything
because I didn't target the edges and I didn't
give it any level weight. So I will tap the mode and
select specific edges. I can slash to isolate it. The select the necessary
edges that I need to target those here as well. And those, I think, and let's go to Man
Bival weight les a 0.03. Tap out. A we got nice, beautiful vl right here. All right, that's very cool. So I think we done
with this part. Everything looks nice. If you don't like the
edges from inside, you can delete them if you like. For example, I can erupt
this one and I can select these faces and hit
X F to delete them. Let's see what's going
to happen if I do that. All right. I think
there's no difference. I can do that, and
I can still get better results. It's still nice. All right. Very cool.
Yeah, you can do that. You can delete these face
from inside. All right. Grab those at X F to delete
them tab out and All right. I, I will leave it like this. I don't have any
further editing. Cool. Yeah, so this is how to create this piece right here. I will end this video
and see you next.
25. 026 Modeling section Start with the top tail details 2: Hello, everyone. And
we'll come back here. Let's create this. All right. Let's go to the left
view, Control three. Let's cut this area,
its old B to open this box selection and then
cut this area like this. Now let's go to the top view. It's z to go to the x ray mood, and let's see where the
three d coors is right here, Heft A and lets Q. Where is the cube?
Yeah, it's right here. That's cool. Let's take
the cube up for now. Let's go to the top view, hit key, and let's move
it, maybe right here. Maybe I can exit
of the x ray and z to go to wireframe.
I think that's better. Let's scale the
cube to the x axis almost right here and scale this to the y. M a t,
something like this. Control A apply
the scale tub and let's grab the vertices,
let's control them. Hit and let's move
those over there. Hit E to extrude
those over here, and let's scale
those to the x axis. Something like that,
and now we can go to the left of view again and tap out it key to move this
down almost right here. I need to align the
corner to the body. So let's move this atle
bit more right here. And let's see what
I should do next. I think I can model
everything and then I can rotate it and put
it in the correct place. I mean, I can leave
it like this for now. Let's bring back the
reference images, and let's see what
else we can do. As you can see, we
have some tab here. That's mean we need to select
this edge and this edge, and we can scale them
inside just a little bit. Those hit and scale them
to the x axis like this. And this edge, we can move it just a little
bit to the y like that, and that's it,
something like this. After that, I can add, let's see how many edges
we need to add one, two, three. We
need to add three. Control R and let's
add one, two, three, and then confirm that, hydratic to leave them
in the same place. After that, you need to vel those or you
can go to the face, hit number three, and select all of these faces and hit e to inset and hit e to inset
individually like this. Let's make some inset like this. And then I think
that's too much. It controls it I to inset. You don't need to hit I
twice because blender will remember the
last thing you used, something like
this, and then hit e to extrude this inside a little bit.
Something like that. And then what we can do
is we can all right, I will hit I again to inset, something like this,
and then e to extrude, and you can hold control, but don't forget to
activate vertex snap and these faces with this
vertex or with this age. You just need to make
them at one level. After that, you can go to
the mode it control lt, grab these for edges, corners, and lt control Alt have to click to grab those
as well and add them. And the same scenario
for the rest, control Alt have to click here, Control Alt to click here, and here, and here
here and here as well. When you comble it control
B and give them a pivle, pivle them a little bit. Alright let's pivle
them like this. And let's see, do we
have any problem here because seems like we have something right
here is not working. Al something weird a in here. Alright? Why that's an? All right, let's grab one
corner, it control B. All right, we will
have some overlap. In this case, to avoid this, I can control click to
grab those four edges. I think and the same
thing for the rest, control to click
and here as well, and here and go to the select and go to the select loop and e loop
to grow the selection, and just select the loop. As you can see, All right. Got select, select
loop, chos loop. And now I got this result. All right, that's cool. But we don't need these
edges right here, I can cancel them. We don't need to vl those. Hold control and keep the selecting these edges.
We don't need them. When you come Blet when you
select the necessary edges, just hit control
bee and bevel them, and now you should get
correct results like this. All right. So now
we got this result. And Bevel is almost
two centimeter. You can add two centimeter
here if you like. Al right now, I can go
to the face mode again, and I can select these
faces or actually, I don't need to
select these faces. Maybe I just need to select
this one and hit Heft S and then bring the
three d courser in the middle and tap out Heft A, and let's add a cube in
the top view, maybe. We can go to the top view and go to wire frame
and scale this just a little bit to the x axis and make a thin
to the y as well. And this is what we got so
far, something like this. Can scale it just a
little bit to the x. Let's go back to the top of vi. Hit G and let's put this in the correct place,
maybe right here, control A apply
the scale and hit shift D to take a CB and let's
move the small right here, and then hit shift arc time
to repeat the last operation. Let's duplicate this. And as you can see now we cut
a result like this. Crab all of these pieces, and let's move them just
a little bit like this, put them in the
middle, and then hit control J to merge
them together. Now we can hit have d to
take another B right here. And have to D again, let's take a cop here as well. H D and let's tk a cobra here. All right. I think they
are a little bit deep, so I'm going to select
them all like this and hit control to merge them and make them one piece and
hit key to the z, and let's take this out a
bit, something like this. All right, that's cool. Now
I can use them as a cutter, with the selected, hold
to grab the target, it control shift B
and Q's difference. Now we got this shape. When you com belet,
you can now move this new geometry and put
it in the correct place. I will use the left view, go to the left and I will tap the mode
and go to wireframe, I will select these two vertices and hit if S and then bring
the three dcorsor right here. And I will tab out. I will sweak the transform
Bevot point to three dcorsor. I need to use three D
coorsor, as a Bevot point, and then because we added the
three dcorsor right here, it will be the Bevot
point for this object. Now I can hit r and rotate this. Right hold shift to
make the rotation slowly and rotate it like that. If you like you can hit
to the y scale to the y, and hit y again to scale to the local and scale like this. That's great. Let's go to the perspective and let's
see what we've got so far. Don't worry about the scaling. I know that will distort
the shape a little bit, but it's not going to be noticeable because it's
very little scaling. When you comb control A and apply the scale
and now we can hit B two exit of this view and we can grab this
one, go to the top. It shift D to take
a COB from this, and let's put this right
here, scale it down, but scaling working according to the position of
the three d courser. Switch this back
to bounding book, scale this down, and let's move this just a
little bit right here, and we can go to
the left view and we can hit key to the z
and move this right here, and we can rotate
a little bit like this and key to the Z, and let's take this down here. And we need to make
some adjustment here. I just need to go to
face, grab this face, control plus to
grow the selection, and then hit X F to
delete these faces. Go to the number
two, I'll click, I'll to click, and then
hit F to fill this area, and then go to face
with this one selected, hold here to grab
this and this and hit control X to dissolve everything
and make it one face. All right. Now I can grab this one and hit Shift
D to take another Kobe, and we can put right
here and All right, Let's til it down and make it a little bit smaller like this. We can go to the lift and take
this up almost right here. We can make it pick, and let's tile around and les
see what we've got so far. If you like, you can
mirror it if you want or you can leave it
like this, it will work. I don't know. Maybe we can
mirror this if we like. A, that's very cool. Do we have anything
else to add here? Okay, I think that's it for
this video and see you next.
26. 027 Modeling section Add Bevel modifier to the top details of the Ornithopter: Hello again, and
welcome back here. Let's add Bevel Modifier for all of these stuff
that we created. And let's start with
any one or any piece. We can start with
this one. All right. Let's add Bevel Modifier. Go to the Modifier
list and add Bevel. And I will work with Angle, I think, and I need to
control the amount. Maybe I can start
with 1 centimeter. A that's too much 0.5. Or maybe I can apply the scale. I think we got some
problem with the scale, or everything is
okay, I don't know. Yeah, the scale is
correct. All right. So 0.4, maybe. 0.3. All right, maybe 0.3. I will add two segment here, and I need to target this
edge as well as you can see according to the
angle, I can't do this. And this way, I
can take the angle down until this edge
is be targeted. I think we need to
reduce the amount 2.1. I think that will be better. And then go to the heading activate hard normal
and then go to the object data properties
activate auto smooth. Now we got very smooth result. I need to apply the same level to this piece and for the rest. I'm going to select
them all of them. Hold if, grub this, then go to the modifier
and use COB two selected. All right. All of
these pieces now, they got the level modifier. Let's start with
this one. Let's see if everything is okay or not. The only thing that we
need to do here is just to add auto smooth for this, and now we got nice results. And keep in mind,
just add two segment. To segment will be okay. Let's grub this and let's
activate auto smooth. And let's grab this one and
let's activate ato smooth. This one as well auto smooth. All right, here we got
some problem for this one. Because we reduce the
amount of the angle here, we got this problem. I don't know. But if I activate
wire frame, all right, it seems like no, it's it's not from the angle. This problem. It's from
the shading smooth, if I hydro click
and shade smooth, it should fix the problem yeah. And yeah, that's correct. Let's select this one and
activate auto smooth. I think I will add auto smooth
here and the quick variet ht click and add to
a quick variety. We should find an option like
this I L et's add this one. Radical add Quick variety. The same scenario here. Just add this one to the
Quick fo variety, and then just hit Q and then
try to reach it from here. Grab this auto smooth. As you can see, it's
faster, radically hit smooth and done. That's very cool. We need to
select these pieces as well. Grab them, hold shift to
grab any one of these, and then go to the modifier and COVID the same
to the selected. Now let's go to this
one. Let's start with this auto smooth. Everything is cool, I
think. That's correct. This one as well auto smooth. But as you can see for this one, the ble didn't work
correctly, I think. We have Bible applied, but it doesn't work,
let's see this one. All right, quick for auto
smooth, that's very cool. Now, let's try to see why
Bible doesn't work for this. Select it and it's
like to isolate it. And that's happened because
I think we got very, very close vertices somewhere
here in this object. Because if I go to the geometry here and
turn off clam overlap, it will be fixed, but we
still have a problem. All right. But I don't
know where is it exactly. In this case, sometimes
you need to tap the edit mode and
hit A to select all the vertices and then hit to open the marriage
and marriage by distance. If you see any merged
vertices right here, that's most of the time will be the solution
for the problem. And if that doesn't
work for you, you need to kick the vertices, see where's the problem exactly. For me, I'm not so quite
sure where is the problem. But we should find it actually. All right. Now, if
I turn this on, I will lose the bible. All right. That will take a lot of time to figure
out where's the problem. For me, I will leave the clam overlap off to get the
bible that I want. All right. All right. I think, yeah, that's it. One more thing here
we need to do. It's better to make connection
between some vertices. As you can see here,
this is one face. And we have a corner right here. It's okay to leave it like
this inside the blender, but in case you
want to take this, for example, to
subistance venter, substance venter can't read
the geometry like the blender and you will have some problem right here when you explore this two
substance venter. It's very important to
make some connection, for example, here and here, to divide these faces, to help substance ventr or any other software to read
this geometry correctly. For blender, it's
not a huge issue, but if you want to explore this geometry,
you need to do that. And it's very easy to just select one vertex
and for example, grab this hit, this with this one hit J,
something like this. It's very let's say, very bad mission, but we
need to do it. All right. Let's select this
and this hit K, and even these vertices, we need to make some
connection between them to avoid any overlapping phases. Let's se like this
with this and hit K, to make connection between them, and those as well, maybe in those here. Maybe this one with this one, we can make some connection. The idea is, don't leave a face like this,
for example, this one. It's wrong to leave
it open like this. Always make some
cuts. All right. Make some cuts here and
there to get better result. Grob this with this J. Grab maybe this with this HJ. Maybe use knife to cut
from here to here, and let's use it, maybe, sorry. Let's use it again to make a cut maybe from here to here.
Something like this. Could have this with this
it K, and maybe, yeah, something like that. All right. Actually, other software should read the meas like blender
without any problem. But I don't know,
sometimes when you export the age to
another software, you got weird results, and that's push you to go
back to the same software, and you need to fix all of these stuff
and add some edges. Let's grab those, and
let's them with this, for example, Let's make some
connection between them, J. Okay? Maybe this with this
make some connection. As you can see, I will hit
control Z two or something. As you can see,
this is a big face, as you can see, it goes
here and there's one pace. If I go to the pace
mood and click here, just kick what I got here. All of that is one phase. This
is what I'm talking about. That's wrong. You need to
sublit it into pieces, okay? Sorry. Sorry, sorry, sorry. I K, let's make cut here, maybe and cut here, maybe something like this. Now if I go to the face
mode, I just sublet it. Maybe one cut here, can go to the knife tool
may cut, goes here. The same thing for this one, as you can see
this huge big face may cut from here, for example, to here, cut from here to here, and other cuts for this area. And those here as well. Or the same thing to this side. This piece is the most
annoying piece here. I think the rest of
the cumetry will be a little bit easier to fix And yeah, I think
that's it for this one. Keep clam overlapping for this one of to make Bible
work correctly, and now we can see that we are done with adding Bivle
for these pieces. One more thing here, I
noticed to the body, if I zoom in here, I can see something weird tab
into this area. All right. I will select the body
and turn off Mural, and I will tap to mode and
I will go to vertices. I moved this vertex
a little bit, and I noticed that we have
double vertices right here. All right. In this case, if you've
got a problem like this, and just keep in your mind, problem always happen
when you model. All right? It's part
of the journey. Just keep that in your mind. So for a problem like this, you need to hit eight to
select all the vertices and just hit M and
merit by distance. Now as you can see, we have 377 vertices me as you can see. But keep in mind to
check the distance here because sometime
auto merge by distance, merge some vertices you don't want and cause some problem. Keep in kick the uma you can it like to isolate
it if you like. It seems like we don't
have any problem. I think Mr by distance just mir the unnecessary vertices that we don't like,
and that's it. All Now if I tap out and
if I activate mirror, now I fixed the problem. One more thing here we got, I think some weird thing
here happen to the Bible. Vivle doesn't work at
this corner correctly. I think I can tape the
mode and I can move this vertex up and just notice when I hit gee
wise and slide this, check how that
affect the bibble. As you can see here.
And if I activate auto merge and if I get
wise and merge this up, as you can see now ivle works correctly here at
this corner and just see how how the stuff affecting
the bible at the corner. If you have a corner like this, and you want to bevel it, the egg should not be like this, and it should not be like this
because Bvl will not work. I should goes like that. And
I will give you an example here if I grab this one and
if I to move this right here, as you can see, see
what's happening here. Anyway, now I will grab this
egg. Maybe I can delete it. I don't want it, control X. And yeah, everything
will be cool. This a flat face. Even if you delete this egg, nothing will happen. All right. And even if you leave this
edge, it's almost okay. I will hit control the end. Let's see what's going
to happen if I step out and let's see the
bibble here, how it works. Alright, there's no
problem actually. I thought this edge
may cause some problem and do some variation
in the bibble. That didn't happen here. We don't have any problem, so I will hit turn
off wireframe. Or at least it's like to
exit of the isolation mood. And yeah, let's go back to this geometry and Let's see
what else we can do here. As you can see,
this is a big face, if I go to the face mode. What I need to do
here, I just need to make some connection
to avoid any problem, or something like this, and some connection like that. All right. That can
give you a good result. And maybe this one is one phase, so I'm going to make some
cuts start from here and end there to the side and maybe
to this side as well. I think we have
mirror that's mean, we don't need to do
that for the side. All right. I just did it. Is there anything else? If
I like to isolate this, we have a big face here as well. Maybe we can make
some one cat here and one cat here as
well. All right. That's it's All right. Maybe we can grab this. Let's check. As you can see, this is very, very big phase. We need to divide it. Let's add one segment here, and maybe one
segment right here. And maybe what else? Maybe one segment here. We can go to the vertex
moth number one and K something like this. All right. Let's se this one
twice is merge. Make sure to
activate auto merge. Maybe we can make one
cut right here as well. To get better results. Let's select. This one, J connection between them. Use the tool may cut
from here to here. K again. Let's cut here, maybe can make cut here as well. A Maybe cut from here
to here, and that's it. Yeah, Let's exit. All
right. I think that's it. Yeah. After that, we will
start with the details. We have we have some design
here we need to create. It could be underneath
the Oni thepter, and we could start with them
and create them, right? That's it for this
video and see you next.
27. 028 Modeling section Learn how to use Carver tool: Hello again, and
welcome back here. Let's start with we have we have design here underneath
the order thepter. We need to start with it. Let's bring the reference
images as you can see here. According to this image. We have some stuff here
we need to create. I think these are
lights, front light. And I remember that I
got an image right here, but I don't know where exactly. I think the lights were on All right. I don't
know where is it. Anyway, so let's see how
can we create those. Okay? I got some image. It can show you the
details here that we have and the project folder
and the blueprint images, I got these images as well. We can replace them with
the bottom and top images. And we can create
those And what else? Let's see what I got here. All right. I think we
have an MQ right here can show you just the details without the wing. A
yeah, that's right. This one right
here. We can maybe used as well if we want. To understand what's
going on here. I just hide the legs and
the wings because we just need to focus on these details and let's see
how can we create them. Okay? All right, let's excite, and let's take this out
temporarily. All right. Before we start doing anything, I need to introduce
a new tool here. It's called Carbo tool. It's very powerful tool, and I'm going to use this
a lot with the bull tool. You need to go to the dit
and then two preferences, go to the Addo section and
let's search for carver CAR, carver tool, just activate it, and then go to the Barger
ic and save preferences. Let's exact. All right. Now we need to
let's add anything. Let's add cube. Let's put the three d corso in the sender, shaft S N corser to
the world organ. And Heft A and let's
add Que, for example, is very small, I will hit S to scale, let's
pick a pig like this. I will pick any view, for example, I can go
to the right view, hit number three and
go to the right view, I think I will isolate
this cube alone. I just need to
focus on this cube. All right, Carol is
a nice tool to make cuts to make sli or
to create objects. If you want to activate Carver, you need to control Heft X. When you do that, you will find the carver tool activated, and here we have some option. When you select an object, just I need to demonstrate that. When you select objects, and if you activate carver tool after
selecting any object, you will find the difference and the options with
the difference. Right. Now you can make cuts because you already
selected an object. Now, if I click, for example, right here, we just make one click
and just move the mouse, you will have this rectangle. And if this rectangle
attach the umetry, and if you made another click, left to click, you can
make a cut like this. And you can do that
again and again. Just click, and make
cuts, click, ma cut. Right. As you can see, it's very nice and
powerful tool, we can use I can create very nice habe quickly with the cover tool as you
can see right now. All right. Now if you tumble
around, this is what we got. So this is how to use cover tool when
you select an object. As you can see, I just
worked with rectangle. I have another way
to cut things. I can hit space to
switch to line. If you choose line, now you can Line. I will click, for
example right here. As you can see, I have the
freedom to click anywhere. For example, I will click here and here and here and here. And when I be satisfied
with the result, for example, I need
this air to be cut it. After that, I can
space to confirm that, and now we got this
result. All right. Let's go for example.
Let's go to the front, maybe, and let's draw
a line like this. Click, click, click. When you come bet
just hit space, and now we got this,
as you can see here. All right. If you want
to change if you space, you can change the cut method to another one or
say the cut type. Here we have the circle.
If you want to use circle, click and move the mouse. Now we have circle, we
can make holes here. All right. So this is how to use difference when you
activate carver tool. I will delete this
cube, just delete, and, let's try to
take another example. I will add another
cube right here. I just need to explain how to use the slice with
the carver tool. I will like to exact because I can't in the local view, okay? I will pick a view, for example, I can go to the right
or to the left, pick whatever view you like, and activate carver
tool and control heft X to activate it. We learned how to
use difference. Now we need to learn
how to use pull. If you hit heft
from the keyboard, you can switch between
pull and difference. Pall help you to create slices. With the box selected, hold shift and click and move the mouse to create a
rectangle and the click again. And as you can see, I just
created a slice here. Now, if I hit right click
to cancel the Carver tool, and if I hit left
click to select this, hit ge, as you can see, I just created this slide. I will controls to go back, and let's go back
to the right view, and I will activate Carver tool, let's select the big piece. Control Shift X,
activate Carver tool. Hold Shift and let's create
another slides like this. Click and move the
mouse and click again, but keep holding
the shift button. Now we got another one. It's very important
and nice trick we need to learn here when you click to create If you didn't like the
position of the rectangle, you don't need to
cancel it and activate carver tool again to kick the
position of the rectangle. When you create the rectangle, you can hit ult to
free the rectangle and free the position of the rectangle and put it
in any place you like. For example, I can
move right here, and I can start over or take it up it lt and move it right here. Hold shift to switch to re pull and hit left,
click. Let's activate. Sorry, I just forget. Something happened
here, let's activate. Screen cast. I can. Let's
move it right here. All right. Let's make another
slice hit control shift x, and I can sweak to different type if you hit
space from the keyboard. Hit space, I will use
line to create slices. Hold shift, click, click. For example, I can create
a slice here like this. When you comble, as
you can see now, I got the shape with
the shaft selected. If you hit a click, you are
not going to create slice, but you're going to
create another point for the line to apply the result and if you
want to create slice, hit space, and as you can
see now, I got the slice. Let's do that again. Click,
click here, click here. For example, I need to create a slice like
that when you com belet, hold shift to speak to ripple, and then hit space
to confirm it. Okay, that's great. Let's
do that again here here. Click something like this, hold shift, and then hit
space to confirm it. I will hit right click to
cancel the cover tool, and now I can move
those as you can see. I got all of these slices. It's a very fast and nice way to create slices
with a carver tool. It's very important tool. We will use this a lot. And it's very important to
understand that slice tool, you can't use it
in the local mood. When you go to the local mood, if I slice to go
to the local mood, and if I use the slice tool, control if X, right. The tool will not work
in the correct way. Just keep that in your mind. Always try to work away from the local mood. That's great. And if you like to work
in the perspective, you need to switch to the orthographic view
to avoid any problem, it number five and work
in the orthographic, make your cuts and then excite hit number five from
the numb bad again. And if you want to use the circle tool with the
difference or with the re pol, activate the carver tool
hit control shift X and switch from rectangle to
line to circle hit space. Click and move the mouse, and now we have a circle. If you want to
ching the position, hold t and move the mouse, for example, I will
make a cut right here. Release the lt and then left
to click to make a cut. I will do that again,
click and move the mouse. Hit Alt, and I will
move this right here. I will make slice hold shift, and then click to
make the slide. All right. You just
need to practice it. As a very nice tool. One more thing here we
need to talk about. I need to mention the distance
of the three D coursor. Here we have the courser depth, and the shortcut for this
option is D and it is now of. If I make, for example,
arctangle cut, as you can see, it can go
through it to the other side. But I can use the
three D coursor. And I can make the cut stop to the position of
the three d courser. For example, I will bring the
three decosor right here, hold shift, hold,
right click and move the mouse and put the
three decosor right here. Let's go back to the
right view and just remember the distance
between the edge and the three decosor,
just a little bit. Let's go to the right, and I will make cut control shift x. But this time, I will d to activate the depth
courser depth, and I will make cut like this. We got the cut, I tumble
around, I got the cut, but the cut reached
the position of the three decosor and stopped
there. It's very important. I will make the distance
a little bit smaller. I will put the three
decosor right here, and I will go back to the right. I will control shift x and make cut like this and tumble around, and as you can
see, the cut totop to the position of
the three decosor. I will go back again
here and maybe make a cut right here,
the same scenario. The cut stop with the position
of the three decosor. Again, let's go back and I
will to turn this off and I will make cut as you can
see the cut goes through. Just keep that in mind. One more thing here, we need to mention about Carver tool. If you exit of the tool, and if you select nothing, and if you activate
the carver tool, you will find a create
option right here. Now you can create
with the carver tool. For example, I will
create rectangle, it left click left click again. Now I got this cube. Let's go back again here. I will hit control shift, but keep in mind not
to select anything. Hit control shift X. And I will switch to line. Let's try to create something
from line like this. And here we have nice
option is called clause. If you create a line, and if you didn't hit X, it will create like a paper. If I hit base to confirm that, and if I tumble around, I will guide this result, but let's try to
do something else. Let's go back to the left
and I will hit control, shift x to activate carver tool, and I will switch to line, and let's try to create
something like this maybe. But this time I will hit x
and then space to confirm, I got this result.
This is a difference. And even if you
didn't, for example, if you select an object and
if you hit control shift X, now we are working
with the difference. You can still have
the ability to switch to create if you
hit C from the keyboard, you can cycle between
the operations. If you hit C, you can
go back to create and you can create again
without any problem. So it's not a problem if you selected an object and
activate a carver tool. You can see and switch
to create easily. All right, so this is
how to use Carver tool. Try to use to it. Use it and make cuts, make slices, train your hands. And yeah, I think I will end this video and see
you in the next one.
28. 029 Modeling section Creating the front light detials: Hello again. Welcome back. Okay. Let's start
creating this light. Okay. Let's see
how can we create. I think I will leave the
reference image right here, but I think I need to make it a little bit smaller.
Something like this. I will select the
image and control heft R to resize the tool, and maybe we can
leave right here. And, let's hit five from the Nam bat to speak
to the orthographic. So I can see all the images. Okay, here we have the tb, and here we have the bottom. I think I'm going to change the bottom and the tub
with the new images. I have these images
just for the light. You can replace them. Here we have light bottom mage. You can replace this with
the bottom mage here. So lets click any drug and
let's replace it with this. Okay? I think we replaced,
I don't know what this. Yeah. All right. Yeah, that's correct. Let's go back to
the same folder. This is the bottom, and
we should put in the top. And now we need to bring
the top and but right here. Click any drug and
replace it with this one. And there we go. All right, we don't need the
body. We can hide it. Maybe we can hide the
whole collection, and we can now start
creating these lights. A Let's see from
where we can start. Let's try to analyze it, try to understand the shape. And if I go to another image, if you want to see
what it this exactly, I have some images right here. They can explain a little
bit what they are. We have a so we
have a lie source right here, and
this one as well. And some stuff, I don't
understand what they are. If you want to create
this one exactly, it's okay, but I just
create something close. All right. So I'm going
to stick with my design. Let's go back to this one right here and let's see
how can we create it. Let's start with
this uma right here. Let's see how can we create it. I'm going to hit seven to
go to the top view from the Lambat and L where is the
three d coors right here? All right. We should put it in the middle shift S and
cursor to the world origin. It's right here, and
maybe we can move it. If we go to the Cursor
and then go to the tool, we can we can move it actually. I think. Let's go to where
it would be right here. Yeah, go to the view, and here we have the three D
courser location. If you want, you can move it to the y to the position
that you like, for example, right
here, if you like. You can do that, and you can add your new
ometries right here. Anyway, I will had
shift A and sorry. I think we made a mistake. Let's move it again.
All right. That's cool. R because I activated the tool, when you hit left click, the mouse will the three
D corser will follow. So put it again in the
middle and move it to the y, and then switch
back to box select. And now when you
hit left to click, the three D coors will
not follow the mouse. Hit ft A to add let's add cube. Cube is very big two meter. We going to change this two to ten
centimeter maybe and hit, and let's move this right here. Let's stop the mood. Go to wire frame,
stick to wire frame, grab those four vertices.
Let's move those here. Grab those as well,
move those right here. Maybe we can grub those here key and move
those right here. It's E to extrude this, and let's extrude this
almost right here. And maybe we can grub
those two vertices, K and move them over here.
Something like this. We can grab those all of them and slide them just a little
bit, maybe right here. And that's great. Now let's
go to the front number one, and let's see what we
got here. All right? We can see the details because we replaced
the front image. We didn't use the whole
body details. All right. In this case, we can go back
to the same folder here and we can go to the front view, not body front, just to front. I don't know where
is it. Huld be right here. Where is it? Yeah. This one. Click and drag and replace
it with the front. And everything should
work correctly. All right, let's tab out first. Go back again, click and
drag and replace it. And yeah, now it's working. Okay, now let's go back here and hit one, to go to the front, and we need to move this and
put in the correct place, hit to the Z, and let's move
this all way right here. And we just need to scale it up, hit s2z, and the scale
it almost right here. When you be satisfied
with the scaling, control A and late the scale. Right now, I will tap
to the edit mode, and I will select these edges, this one, and this one and this one and this
one right here. And I will go to
the front again. I need to vl those,
so I'm going to control B to vl those. Let's add some segment right here, and increase the number, and let's add, let's make it Curvy, something
like this maybe. And let's see what
else we can do here. All right, that's cool.
Now, what we need to do is, I think we need to
delete some faces. So I'm going to
grab these fases, tweak to face mood,
grab those here, and hit x F to delete them all, and then we can give this
a little bit of thickness. I will tab out and then go
to the modifier list and add the solidify and we will give this just a
little bit of thickness. All, that's cool. Let's see how much we how much
we need for thickness. Let's go to the front again, and let's compare the results. All right, Z to go to wireframe, and let's compare the thickness. Maybe we can add 1.4 maybe
something like this. The thickness is okay. But we got one problem. The thickness is going
inside a little bit, and that's not going to work. From this area, and this area, as well, everything is cool. But from here, the thickness
goes a little bit inside, and we need to avoid that. In this case, I will apply the solidify. I will accept it. Control A and apply it, and I will go to
the top view again, and I will use Carver
tool to cut this. So I'm going to hit control Hits x to open the Carver tool, and with this one selected, I will click to
create a rectangle, and I will cut it from here. When you do that,
everything will be okay. I click to excite. And now if I tumble around, as you can see now
it's become flat. And that's what we want it. But we need to move it
a little bit forward. So I'm going to g to go to the edit mode and
go back to the top. Go to wireframe. Grab
all of these vertices. He get wise and it t. All
right let's try to do that. Let's see if that's
works or not. Alright, maybe
manually, we can move those G and move those to the to the y and
leave it like this. It's okay. If you like, you can make some
connection between some vertices to
avoid any problem. Grob this with this hit K if you like this with this one hit K in case you want to explore this to another software,
something like this. I think connecting
these vertices will be enough Or by the way, you can do something else. When you connect those, you can grab this phase
and this phase, at x F to delete it, and you can go to the
edge I'll click to grab this edge loop and then go to
phase and hit a great fill, and it will fill
it in a nice way. I'll click here to grab this entire edge
loop, go to the face, a great fill, and now it's
become good as in you. All right. Is there anything
else we need to do here? Alright, let's go
to the top again. I think we got some weird
result here we got. I will scale those to
the y en this zero er. All right now is better. I think. All right, cool. Now, what else we
need to do here? We have this area a little
bit smooth, I think. That's mean maybe
we can bevel it, I click grab it, and then hit control B. Let's give it a little
bit of beveling contro. Let's add three, for example, something like
this will be okay. And maybe right head smooth
to make this smooth, and we can target these
edges and give them level, but now let's activate
auto smooth for this. We can go to the obvio
data properties and activate auto smooth
under the normal menu. All right, what's the next
step that we need to do here? We need to create this circle, let's go to the
front number one, and three D crosor still
wears it right here. Maybe we can move
it here at Heft S and crosso to selected to
bring the decosor right here. Heft A to add, maybe
we can add a cylinder. We can start a cylinder.
It will be very huge. I'm going to change
the radio and the depth for I don't know, maybe ten centimeter
and make it small and align it with the
view, use the align. Menu here and use view align
to rotate it towards us. And yeah, that's cool. The
verts 32 is okay and nice. I will hit S to scale it, it ke to move it
and let's put it in the position it S and scale
it just a little bit. You can Z to go to
wireframe if you like. And I don't know, do we
have another nice image? Let's try to find another image, so we can see y this one. L's work. Alright. What
we can do after that, from the top view, we
can move this forward. Hit and let's put this
almost right here, maybe. And then go to sold, control a ali scale, maybe. And then tap to the mode, hit number three
to go to the face, grab this face, hit
to int, Inset this, something like that, and then
hit E to put this inside, contro inside, and we need
to create these arms here. This one and this one as well. We can go to the front, I think, and we can use boxes to
create those. That's okay. If you want to do that,
y, let's do that. Itit A, and let's add cube, and I'm going to
scale to the Z axis, and maybe we can take this out right here and scale it just a little
bit to the y like this. And go back to the front. Hit ke and let's move this and let's put this
right here, maybe. We can scale this to
the z, a bit more. All right, control A a scale, shift d to the z and let's duplicate this one right
here, and now we got this. All right, what's the next
step? We need to cut this. We don't need to see
this stuff right here. Maybe we go too far
when we extrude this. I will tap the mode and hit key tic and slide this
out, maybe right here. That will be enough.
And yeah, that's cool. And we have a small heap right here. We
need to create As. Maybe we can go to
the front again and cut up this it heap the copy
and let's put it right here. S2dz scale it like that. And then maybe we can
make some bullion here. I will hit control
I and the scale, hit HD to take a CV right here. This new COB, I will
scale this to the Z, S to the Z and push it inside, maybe right here and make
it a little bit taller. I will use it to cut this, so let's select this one
as a cutter Holt to crab, this hit Control Shift B and use difference from
the auto bul in. All right. And now
we got this cut. And here we have some
angle. We need to do. We can use Carver tool
with this one selected, I will go to the top and maybe we can go to
the wire frame. And I will hit control
shift x to activate carver and s to lie in a space, and then just make a cut
goes like that, click here, and click here and try
to cover it like that, and then hit space to cut it. And there we go. After that, he try to click to
exit of the tool, and now if you tumble
around, this is what we got. If you like, you can grab
this with this hit G, make some connection that
will be better and tab out. In the front view, you can put this in the
correct position, go to the front, and maybe we can move it just
a little bit right here. And that will be enough. If you like you can grab these vertices in
the wireframe move like this and a
key and move them, maybe you can move
them right here. Okay, tub out and let's stumble around. And
this is what we got. I think we could move
this a little bit out, maybe right here. That will be enough, I think. Am I right. Alright, ya, something like this.
That's very cool. Alright. We have some slices
here we need to create. Let's go to the front again, and maybe we can
use this box here. It d two CVs r to rotated hold control
to snap the rotation, and rotate nine degree. Its to scale and make
it small like this. And let's use this one. I think we can move
this forward for now. And the scale to the z,
something like this, maybe, not too much.
Let's move this one. Maybe we can put it right here, and maybe we can push
it inside just a little bit and take it out
maybe right here. And then we can duplicate it. But let's try to make some
editing for this piece. I will hit slack to isolate
it and type the mode. We don't need this phase this
phase and this one as well. We don't need them,
X F to delete them. Control, maybe we
can add right here, and maybe we can add
right here as well. Just move them and
make them close. And then maybe we can grab this one and this one and
scale them out like this. All right. We can use
it like this, maybe. All right. Now, let's
hits like to Excite. And let's duplicate
this couple of times, but we need to move this
back just a little bit. Maybe right here. All right, Let's move this
ale bit like this. And then hit shift
D to Dega Cobi and give small distance like this and then hit
shift couple time. Let's duplicate this couple
time until you reach the end. When you be satisfied,
you can merge them all. Let's move this just a little
bit forward. All right. So now I think we can let's
grab this with those here. Let's try to move them
just a little bit forward. All right now I
can select all of these copies one
by one like this. And we can merge them. When you select them all, cant roll the J to merge them, and now they become one Bs. We have some thing. We
can see it right here. We can grab them all
and hit S to the z to scale them inside like
this. And that's it. After that, you can add
vel modifier to them. Let's apply the scale for
all of these pieces in case we have a problem
with the scale. All right. And this one as well control
and apply all scale. When you be satisfied
with the results, you need to add doble
modifier for them. All right. I think
I'm going to cove the vel modifier that I added
right here. Or why not? We can add a new
Vivel modifier here. Let's grab this, and let's go to the modifier and add vil. Here we have let's add
maybe 0.2 centimeter, and let's add two segments here, and let's activate
harder normal, and we already
activated auto smooth. Now this become smooth and
nice as you can see here. And we need to cope the
same bevel modifier for the rest of the matry here. All right, to grab
those. I don't know. Can we grab those as well? Let's try and let's see
what's going to happen. Grab them all,
have to grab this. Go to the modifier and
use COVI to select it. And let's give them auto
smooth one by one, this one. And let's give this head smooth to get rid of
these jagged lines. And this one as well. Had smooth and auto
smooth as well. This one auto smooth.
All right, that's cool. This one as well auto smooth. Let's see, what about those? I think we can reduce
the oval for this one. Let's add 0.1. And those
here as well, 0.1 will work. They should be
halve a little bit. Even the big piece, I
think we can mir those, grab those control k, make them one piece,
and let amount 2.1. Even this one, let's
change this 2.1. And now we got this.
We just complete this. This phase from the
back, we don't need it, so I'm going to delete it, select this cylinder
and go tab to mode, grab this, hit x F to delete it. We don't need it. Some
phases in the bag, we can delete them accurately. Even for these boxes, tab, you can grab this, and this hit X F because they are not
visible to the camera. Even for this one, you can tab and you can select this phase
that we got right here, as you can see, and you
can hit x F to delete it. That's will be okay. And
as you can see from here, everything is nice, and from
here, everything is deleted. And that's what we
want. All right. That's very cool. Okay, so I think that's it
for this video. I will end it and see
you on the next one.
29. 030 Modeling section Creating the front light details part 2: Hello again, and
welcome back here. All right, let's see what
else we can do here. I think we didn't
finish with this piece. We need to complete it. According to this
mic right here, we need to fill this
area because we have some boolean stuff we
need to add All right, let's try to find an M.
This one right here. We have something here
we need to create. Let's select this and
let's start with the mode. I will head control r to add one H, for example, right here. And I will go to phase, and I'm going to
select these faces. Grab this, hold
control, grab this one. I think yeah, hold shifts
and grab these faces. The same thing here, grab those. And I think now we can delete those or even maybe those here. And these faces. When you comblete hit x F to
delete all of these phases. And then now go to the
edge, grab these edges, and let's hit F to create
a big phase right here, and let's select those
edges right here. Let's hit F to fill this, and I will grab
this hit F C time. Until I cup everything. I'll click, and then hit F. All right now I can create
this shape right here. Let's see how can we do
this? The three d courser still in the middle.
Okay, that's cool. I will tap out and shift A, and maybe we can add
plane. It's very big. I will change this to
maybe ten centimeter and hit to the z, and let's move this down here. And maybe we can move it
right here just a little bit. Let's go to the bottom
view control seven, so we can see where
should we put this it e and let's
move this right here. And I will tap to
the mode and go to vertex hit number
one from the keyboard. Grab those right here, hit M to open the marriage menu and
Que marriage at center. And now we got this triangle. Grab the whole triangle, it e, and let's move it, and
let's put it right here. After that, you can scale it
and make it big like this. Aligning the edges with the
edges of the reference image. Hit and let's move this just a little bit,
maybe right here. Maybe we can scale it just a
little bit more like that. All right when you comblet, grab these vertices
and hit control. Don't use control B because
control to bevel the ages. We need to vl the vertices. I will hit control shift
to target the vertices and let's increase the number of the segment here until
we got something nice. All right, something like
this may be it will work. If we need, we can I will hit control Z. I will repeat
that again, control Shift B. And let's do that again.
Something like this. Here, I can control the width if you like the segment
from this area. And we can use the shape to control the
shape as you can see here. For me, I need to control
it just a little bit. All right, something
like this, maybe 0.442. You can ignore it if you like. I will hit here and move this just a little bit right here, or maybe I can
leave it like this. It's okay. All right. What we can do now, I will tab agate to the
eight mode and then hit a to select all the
vertices and then hit E to extrude this and give it
a little bit of thickness. But I need to make sure that
I didn't extrude this to the wrong direction
because I will got some problem when I do that. As you can see now,
the phases are flip. The inside phases now come out, and we need to flip that. All right it A and then shift
n to recalculate normal, and now it's fixed. Now, if I go back to phase
orientation, it's blue. A right. Let's go back to
the bottom, Control seven, and to go to wire frame, hit shift, D to take a CV and let's put
this co right here. Control M to activate mirror
and use the axis, hit y, and then confirm it, and let's move this, and
let's put this right here. And now we grab
this with this and hit control J to mirror them and to excite of
the wire frame mood. And now we need to check the
phase orientation again. Because we mirrored this, when you mirror object, the phase will be flipped.
I don't know why. But just keep in your mind
when you make a mirror, just tab the mood and correct the normal
shift N, and that's it. All right, now, let's turn
of phase orientation. It to the z, and let's put this inside if
you're right here. Grab this whole heft to
grab the body control Ht p, and I will use difference. I will choose this one. I need to use this one because I
don't need to lose the vl. Because if I choose
the first option, it will give you the
result that you want, but it will apply them with the file right here. All right. So now I got this, and we have another thing
we need to add here. That I will grab this triangle at sift S and bring the three
dcorso to select it. Shift A, and let's add cube S
to the z scale it to the z, and maybe we can move
it just a little bit right here and it key to the Z, scale it a little bit to the x, and make sure to put
this in the middle. Let's go to the bottom. Go to wire frame, and you can i pale it. Yeah, some the
gliders will be nice. And maybe we can hit g to the z, and put this right here. We need some table here. To do that, I will hit control
A and a the scale first. And tab to the mood, go to H eight number
two crab this edge. Hold shift to crab
this, control B, and let's pvel
this to two edges, rotate the wheel of the mouse back until you get
a result like this. All right. When
you be satisfied, tap out hold shift
to grab the body, control shift B, and s
difference. And now we got this. If you don't like
it, you can scale it a little bit more,
something like this. All right, that's very cool. Maybe we can move with
just a little bits and centers. Something
like this, maybe. You can move it up if you like as well, something like this. All right. We got
something nice. If you like, you can
do something here. As you can see, I can
see this shape here, and this one as well here. You can try another You can
try some option right here, for example, the cavity, if you like when
you activate it, activate cavity and
sw this to both, and here you can control the to get better
results, if you like. All right for me. I think
the settings is okay. And now I can see the
stuff. That's better. But will affect your
performance a little bit. The computer performance. Alright, so now we got what
we need. That's very cool. Now we need to apply
this modifier. I want Bible, but I need to apply the bullion
breaking that I did. All right. Let's
start with this one. I control A and apply it. Because we applied,
we don't need these cutters, we
can delete them. And now we still
have bevel modifier and it should be applied
on the geometry. In case it doesn't applied. That's means there's
some kind of problem, right and we need
to fix All right. As you can see Bivle is not
working in the correct way. That's mean we have
some close vertices to prevent Pivl to work
correctly. All right. Now we need to search
for these vertices, where are the fair
thing to avoid that, hit A, and then hit
M and e merc by distance and try to use very
small amount right here. As you can see zero merc, that's means we don't
have very close vertices. All right. Let's
do something else. I will go to the geometry
and turn off clam overlap. And keep it off. And I
need to check the edges. If you see any dark
any artifacts, that's mean the problem
is right there. All right. For me, I don't
see any problem yet. Maybe because this
edge right here, maybe because of this
edge goes like that, that affect the
above, to check this, I will activate clam overlap, and I will grab this
edge and this edge, and I will hit control X,
and yeah, that's right. Because of these edges. As I told you before, it's wrong when you have a corner to leave the edge
like this or like this. It's better to
leave it like this. I mean, if I hit control Z, I lost the bovel, but if I grab this vertex
and this vertex, and if I G twice, Or maybe we can grub
the whole edge, maybe I'll click and
cancel this one. Cancel this one,
cancel this one. I just need to move
the outer edge. He key wise and slide and see what's going to
happen to the bubble. All right. I think
you got the idea. If you want to get
better result, you need to move
it back a little bit, or something like this. It will be good. There we go. One more problem we
have right here, when we created this triangle, we didn't give
them shady smooth. Because of that, we still have these jagged lines comes
from these triangles. To avoid that, just select the mic shade smooth
and you will fix it. And now we got
very nice results. Sometime when you make or
apply the bool and modifier, sometime you got some very
close vertices like this. That will affect the vl and prevent it from
working as you can see. Something like this maybe. To avoid this, you need to
grab the vertex if it was close and move it away like this to make vl work correctly. Or if you want you can market
twice and market like this, that will be better and cleaner. This one as well,
you can market, and everything will be nice. That's cool. What else
we need to do here? As you can see, if I go to
face and select this face, try to see the face.
How big is it? If you find the face is
very big and not divide it, you need to divide it. Okay. I will use
ni tool quickly. Maybe we can divide this
face to 22 or to three. KnolK. And let's make a
cut goes maybe from here. And maybe ends here. If
you want to add a new cut, hit right click, and
start adding a new cut. Let's see where
should we add one, maybe right here to here
and one here to here, maybe. And what else? Maybe one cut goes from here
to here or to this vertex. When you will be satisfied
with the result, hit enter to confirm
all of that. That will give us
better results. Alright, that's very
cool. If you like, you can delete these
edges or leave them. It's not a ic problem. You can grow them like this,
and it can troll X. Ctrol X to dissolve. All right, cool. Or if you like, you can
grab these vertices at M and mick to the
center and those here as well mir to the center
and merc them here as well to the center because
here we have flat phase. That's mean you're not going to get any problem
if you do that. I think that will be
better in the cleaner. Andy, t out, and
that's very cool. We did this. This is not exist actually in the real
images if I go here. If I Zoom here, it's not exist. But as I told you, you
have the freedom to add, whatever effect, whatever shape you like to do, you
would like to add. Maybe we need to create
some extrusion right here. I don't know. I feel that we got something here in the back. I didn't create this, but we can't do it together. As I say, always, feel free to add
anything you like. For example, we can go to
the bag if you control one, and maybe we can make a cut from the bag using
the knife tool, it K, Ma cuts start from here from this
vertex and end here. Try to make the age strike. You can hit A to do that and click again and
then hit Enter. And now we got the cuts. Grab this face, for
example, or this age. Maybe we can make it
a little bit bigger. Slide it right here, maybe. And let's select this face, and I will extrude it just
a little bit like this. And maybe I can go
to the edge and era this age and
key and slide it. Something like this. Yeah,
that will be very cool. And if you want to
add some holes here, that's okay, feel
free to do that. For example, you can
grab those, and yeah, maybe get those, I think, and hit to inset. Make some int, make
some extrusion. And if you like, you can bring these this geometry that
we create here, it D, taka cob from it, move
right here, control, and choose y axis
to mirror to the y, and manually put this
right here, maybe. Something like
this. Maybe we can push this inside
just a little bit. And now we got
this. If you like, you can delete the
unnecessary faces. For example, those right here, we can grab them hit X F
and tab out, and there. Alright, I think that's better. Let's he this slide, and let's see what else
we can create here. All right. What about this one? I think I will leave this one
to the next lecture, okay? So yeah, see you next.
30. 031 Modeling section Creating the front light details part 3: Hello again. Welcome
back. All right. Let's see, what's the next. I think we need to create
the light itself, ok? I mean this geometry. And let's see from
where we can start. Let's go to our reference,
this one right here. This one is not necessarily
similar to this one. I mean, the details. All right. But you can create something similar
to this one exactly. Or you can stick to
what I made here. All right. It's your is here. All right. Let's see
from where we can start. Let's go to the front first. And I don't know, maybe we
can start with the cue. And then we can vl the edges. Vl them and make them round. And from there we can go, right? Let's try to do that. I think I can Yeah,
I will hit heft A, the three decors right here. I will hit heft A at the cube. Hit and let's move this
cube, maybe right here. For example, you can
move right here, it S to the z and scale it up, maybe here, something like this, and scale it to the Y. Scale to the x s. We
scale this first. And I can tap to
the mode and go to the vertices and go
to wire frame H Z. Cor this key, and let's
move this right here. Corp those two and let's move those right here to the x axis. And then we can
grab these edges, and we can vl the edges. But I need to switch to the edge mode and
grab these edges. The four of them, if
you tumble around, you will see what I picked
here. Let's go back. And with these edges selected
head control B to bile, and let's pivle,
this spot bivle, not working correctly because we forget to apply the scale, tab out control A,
apply the scale, tab and control B to bivle. Let's add some edges. Make it round and align
it with the image. Something like this will work. I don't know, maybe
something like that. And accept it and tumble around. You need to kick the edges
if that enough or not. Maybe we can increase this
to ten, something like this. I will accept this result, and I will change the
shape back to 0.5. And I will go back to the front. I just need to make
some comparison here. Maybe we need to manipulate the with just a little bit more, and I think now it's perfect. I think All right. All right. Very cool. All right. After that, let's go to the top of you and let's
see why should we put this. Tab out and hit
key to move this, and I will move this y here. Go to the wire frame, and this is what
we've got so far. All Let's see do we need
to move this? All right. I think it is another layer, this body right here, and
this one should be inside it. All right, I will
leave it like this, and I will make a cut
goes like that. Okay. So I will use Carver tool with this one
selected, go to the top. I control shift X
and activate carver. We don't need to use rectangle, I will hit space
to switch to line, and let's add a line like this. If the line doesn't the line position is not in the correct position is not
in the correct position, you can hit and move the
first point of the line. You can put it in
any place you like. For example, I will put
this right here and make a cut like this and just try to contain it
like that and then hit space to confirm the cut. And now we got this. If I go to tic to exit of the carver, Z, and this is what I got. Let's go to the front, and
let's go to wire frame. Let's see what else we can do. We have a circle right here. I will bring the
three D corso in the position of
this new geometry. Select it hit Shift S
and corso to select it. Shift A to add, and maybe
we can add the cylinder. Align the cylinder to the view, and let's move it right here. Or yeah, I'm going to
move it right here. And scale it down just a little
bit. Something like this. It and take this out
just a little bit. There we go. I will use
this to cut this one. And there is another scenario, if you like, by the way, I
will delete the cylinder. I just need to teach
you something here. And I will put the three dcorer,
for example, right here. I will use Carver tool
to create a cut goes and ends here to this level because I added
the three dcorer right here. Go back to front,
select the geometry, control heft x activate carver. Go to wire frame first, z, and activate Carver tool, and head space to
swa from line to circle and click and
create a circle like this. The circle and any
place you like. If the resolution of
the circle not enough, you can use w and x to increase or decrease
the resolution. And if the coarser depth
is of d to activate it, and now cut, make a cut. Now tumble around
and let's excite. Go to solid. As you can see, is what we got very
nice b powerful tool. All let's see what
we can do here. Let's go to the front again, it sift a to a and let's add a cylinder again and let's align the cylinder to the view, and I will hit and
move it right here. And his Z to go to wire frame, scale this down, align
it with this one here. It and scale it up
maybe right here. Something like this. Timble around. Least
see what we got so far. I will move this just a
little bit right here, tab the mod, grab this face, hold have to grab this face, hit I two inside those
both, something like this, and a bridge between those right click and Qs bridge faces. And now you can put this inside key and move
this inside like this. And you can merge them right
grab this, Hl to grab this. Ctrol H to and Qs union, and now they become
one piece here. All right, we need to
create this fab here. I will hit heft A to add cube. Move the cube in the
correct position. Tap, go to the vertices, Z, go to wireframe,
grab the side key, and let's move this
almost right here, maybe. Something like this.
We can go to the top of and grab those and move them just a little
bit maybe right here. Grab those as well
and take those back. All right, Let's
go to the front. I think I need to move this age just a little bit
to this direction. I don't know, but
let's check this. Let's go to the front
and go to wire frame, and yeah, that's right.
We need to move it. Tab out and select this, tab in, go to the
edge, grab this A, key to the x, and
move this right here. Now, that's cool. Tab out, grab this, tab in, go to the vertices, grab those key and move those
almost right here. You can hold control
and align it, but being sure to activate
a snap vertex snap. And let's move those here. Grab those hit key and
move those right here. And I think we need to slide this a little bit
to this diaction. Something like this,
as you can see, and now we need
to take one phase out key and take this phase and align
this phase with this. Now we got this result, right. Now tab out this and control have to be a
Qs union to mark them. And now they become
one piece, tub out, and if you like, you can
delete this edge. All right. We need to we need to do
something right here, okay. I will grab this vertex and grab this J to make
connection between them. This one as well with this one hit k to make connection
between them. Let's select this vertex. Let's see how many
vertices we have here. As we can see, we have
multiple vertices. Hit a select everything, hit M and Q's
mirage by distance. And here we have four
vertices marriage. I think the four
means those here, two here and two here. Let's move this one and move it and now it's
become one vertex. This a right here,
I don't need it. You can delete it. K,
and that's very cool. All right, maybe we can do
something here as well. We have multiple
vertices right here, we can corrupt them and
control x dissolve them. And do we have any
problem right here? I will select this vertex, maybe, and I don't know, maybe we can make a
connecting goes like this, K, something like this, and maybe another cut like that. And then when you complete it
enter, that's will be okay. That's very cool. Maybe we can make a connection
between those hit, this one, with this one, maybe
it J, something like this. Avoid any big phase. All right. What else tub out? Radically hit smooth,
activate auto smooth here, and that's very cool. What about the other details? Let's see how can
we create those? All right. Let's tap the mode, and I think we can select
this phase right here. Hit D to duplicate it, trial to leave it in the same place and then
hit P s to separate it. Tap out and grab this new phase. Hit S two scale, a little bit, make it big, maybe
something like this. Let's go to the front and
let's see what we got so far. I think we need to
scale it to the Z. Or I will hit control Z
and scale this again. Something like this, and S to the Z and scale
to the Z as well. And control a to a skill. Tab hit A, select the face, hit E to extrude
it back like that. You go to the top
of you and let's make some comparison here. All right. I think we need
to cut it, but not now, I will hit key and move it right here and hit to extrude it here, something like this,
and grab these vertices and key and let's
move those like that. We need to cut it
from this area. Let's see how can we do that. Right. Let's see what we
have here. All right. What I'm going to
do is I will tap out and I will activate carver
tool at control shift x. Sorry, just select
select the geometry, control shift X,
and hold shift and e and let's make this big slice. But turn of depth, turn this off D and
make the slice. That's very cool. Now, I will make another slice hold
ift, but select this one. Grab this, Cr aft x. Let's make another
slice hold heift, and let's slice this area. Now exit, grab this, canter Haft x and use
difference to make a cut gut this area, and now let's stumble around, and now we gut the
result that we want. All right. Let's
go to the front. I think we need to
move those down. Okay? Let's select this
step to the edit mode, and let's select this phase. Maybe we can start with this phase right here
and this one as well, and maybe we can grab
those down ke to the z and move those down here. It S to the z zero
enter to make this flat and control x to dissolve all of these phases
and make them one phase. Here we have some vertices
we need to grab them all. Grab those, control x, and grab those and
keep the corners. Control and dissolve them. Now let's go back
to the front and let's see what else we could do. Let's go to the edge and s this edge and this
one here as well. I will key this
and move this up, and then maybe we can
bubble them, control B. Let's bubble them
like that. All right. We don't need the bubble
to work like this. We need something
else. Let's hit control r and let's add
an right here, maybe. G twice and slide it
down maybe right here. For the other side control r, and let's add one
edge right here. Try to align this
edge with this one. To align those, you can grab
this one and move it up, hit g to the z, and hold control and snap
it with this one. Now I will grab this and
this go to the front, and I will hit z to go to wire frame and hit
control to val those. Now, when you bevl, the bival will stop at the
new edge that we created, and they will be pushed to the f to the free side
and to the free side. As you can see. All right. So now we need to
create this arc, least increase the
number of the segment. Or something like this. Maybe it will work, and you
can control this if you like. And you can control the segments the stumble around.
That's very cool. One more thing you should do
after you make the bevel, you need to merk
these new edges. Go to the vertex hit A and then hit M and mer by distance. Here we have four vertices mer. That's great. All right. What is the next step? Let's you go to the fronts. Let's make some comparison here. Okay. I think I'm going to select this face
and move this down, but with proportional
editing activated, activate this one, hit to the Z, rotate the wheel forward
to make the effect small because I just need to
make it a little bit curvy. Something like this,
maybe it will work. I think it's become better. Turn this off after that. All right, something
like this, I think. Now I can bivle all of these. Tab out, select this one
tab and go to the edge. I'd click.Gu these edges. D select this edge right
here. With those selected. I will control be to buzle those to two edges,
something like this. And what about this? You
can leave it like this? It's okay or if you
like you can vl it. That's very cool. Let's see what else we should
do right here. If you like you
can vl one vertex, can I grab this one control
have to vl one vertex, and you can get a
result like this. That's okay if you
like it. All right. All right, what
else we should do? We need to create
these cuts here. So let's tap the
e moved control, and let's add one right here, control B to bevel
this x to two, and I will select
this one and this one and shift and bring the
three decosor right here. And in the position
of the three decors, I will add and scales like
this and make a and to, let's move this right here. Let's go back here,
grab this with this ft S and the bring the
three D Cursor right there. Tab out, grab this. Hit Shift D, take a copy,
leave it right here. Hit Shift S and
selection to courser. And there we go. And
now align this with this one. Almost right here. Now let's use those as a
cutter, grab this with this. Hold Shift to grab this
one had control Shift B, and let's use difference. And now we got this
result. That's very cool. All right, so until now
we did a great job. We still have a lot to do here. But for now, we did the difficult part
creating the stuff. And these details, they
will be easy to create. All right. So I will end this video right now and
see you in the next one.
31. 032 Modeling section Creating the front light details part 4: K. Hello, everyone, and
we'll come back here. Let's bring the
reference images, and let's see what
else we can do. I think here we need to make some bulion operation here
in this area. All right. I mean, if I tumble around here, maybe right here, I need to add some books to cut this area. Let's see how can
we achieve this. I will grab this
and tap it mode. Maybe I can select this
face and this one and it shift S and coosor to selected to bring the
three Dcosor right here. Tap out and he shift A, and let's add cube to make
to use this as a cutter. And let's move this down just
a little bit key to the z, maybe right here, and
I will scale it all way like this,
something like that. And tap it move, go to vertices, go to wireframe Z, grab those for vertices. And the key and let's move
this to maybe right here. And those as well
here, grab those. I mean this face. And I think
we can leave it right here. All right, Let's go to
the bottom control seven, and from there, we
could understand a little bit what we could do. Let's go to wireframe
and let's and let's move this maybe
right here in this area. All right. We got
something close. Al right now, I'm going
to use this as a cutter, so tub out easy to
go to solid mood. Hold shift to grab the target. It control shift, B,
and use difference. I I picked this option because maybe I need to move this to the
left or to the right. I'm not decided yet
what I need to do, or maybe take it down a little
bit, something like this. We can go to the front to determine where
could we put this? Make the cuts aligned
with this edge. I mean, the cutter
as you can see, the end of the cutter
it's right here. I get to the Z and move
this up almost right here. Now, I got something nice
as you can see here. All right, that's cool. Now
we can create some details. Maybe we can start
with this. All right. So to do that, I will grab this and control R to maybe add an edge right here, control R again and maybe
add edge right here. You can go to the right view. You can see what you
do at this edge. Get wise and slide it,
and let's put this here. And what else? What else? What else? All
right. Grab tab out. And I think we need to move this just a
little bit forward, but I will ignore that. It's not a big hue. All right now, Tub the it mode, go to face, grab this face, hold he the grub.
This one as well. Sorry, grab this, hold control, grab this, control, grab this. To select I mean, just
select these faces. All right, you can
select them like that if you like hold heft
and the clop those. When you comb it Hf D
and take a CV and then hetic to leave the KB in the same place and separate
it from the group, just hit PS tub out now. All right now,
select this new KV. As you can see, this new KB is affected with the
bulion operation. And that's cool, but we don't
need any modifier here. We need to apply the
modifier for this CV. Or at least see from the
top where you would end, that you would end right here. I mean, if you type the
mo and go to vertices, now you can grab those G
and slide them right here. Something like this.
And right now, we need to give this a
little bit of thickness. As you can see here, we
have some thickness. Select it, and let's
go to the modifier, and let's add solidify here. And let's put the solidify
to the negative number and activate even thickness in case we have some problem
with the thickness. All this thickness is okay. Looks fine, looks nice.
I will accept it. And I think we can Yeah,
that's very cool, I think. One thing we can do here. I'm just going to grab those and move those just a
little bit to the x axis. Move it away from this the idea. And one more thing, maybe we can do it
or do it later. All right. I will
apply the solidified. I accepted the results
-1.7 centimeter, control A and apply it. And I will tap to the Ed
mode for the sintometry. Go to the HD number two
and select these edges. The corners, this one
right here as well, and it can troll be for
bevel to bovele this. Let's give this
corner nice bvling. Something like this. You can
add nine segment or ten. After that, I will grab
these outer edges, all of them like
this he to click, and those here as well. When you complete, beveled them, it can troll be for bible, and let's add two segments. Something like this will work. And now we got this result. After that, we need to
create this hole right here. In this case, I will
select this phase here at heft S and bring the
three D coor right here. Tab out heft A to add a cube. Scale the cube
just a little bit, maybe right here to this area. You can go to the
left view control three to see the thickness. The thickness is okay, and the position as
well is okay for me. Control A and apply the
scale is very important. Tap to the edit mode, and go to the edge. Let's see grab those four edges. Cantl click here to
selecting these edges, and then you can go to the left view and let's
give this abovel, Control B. L increase
the segment. Try to make it like a two circle Something
close to this result. You can increase the number of the resolution or the segment, and this looks nice. Tab out. With this one selected, hold, have to craft the set control
H B and use difference. Now we've got very nice cut
here. That's very cool. Let's see what else
we can create here. Okay. All right. Now, let's try to create
this uma right here. Let's see how can we do it. All right. Let's go
to the top view, and as you can see, it's right here, we can
see a little bit of it. I will use cube, ft a to add cube. Move the cube, and
let's put this maybe anywhere,
maybe right here. And let's go to the left. I just need to kick the scale. Yeah, we need to scale
to the Z to the Z, and the scale it
just a little bit. Something like this.
Tap move to vertices, grab those, and let's
move those to the side. And crab those as well, and maybe we can move the
temporarily to the side here. Let's go to the bottom
control seven and let's see. Why should we move
those? Maybe we can de crab those as well and
move this right here. Hit control to at one
edge here in the middle. Crab this hit key and let's
move this to this place. Crab those, and let's move
those maybe right here, and crab those here it key,
and let's move this here. Something like this. All right, it E to extrude this and let's
extrude this right here. And then it again to extrude this here, crop those vertices. G, and let's move to this area. That's very cool. All right. Let's see what else we can do. As you can see here, we have
some cuts we need to create. I will tap out, and
with this one selected, I will use Carver
tool to make my cut. I will hit control shift
x to activate carver, and I will sweep this
to line hit space, and click and make
one to click here. W to click here and click here, its space to confirm.
Now I got to cut here. One cut right here,
click click here, W to click here,
and one click here, it space. Now we
got to click here. Keep the course or depth
of. Don't forget that. And let's tumble around, and let's see what we got
so far in the sold view. All right. Now we got this
result. All right, cool. We need to see this
from this side, and maybe we could see it
from the top as well or not. Try to see another image here. It could be hidden. I think. Let's go to the
bottom Cal seven. All right. I will grab this and maybe I
can move it just a little bit down because I
should see it right here. You have two options.
You can move this down, or you can take
this up k to the z, something like this and give it a little bit of thickness. Almost right here. And we
need to create these shapes, as you can see right here. I will go to the bottom
at control seven. Z to go to wireframe. And now we need to create something like those right here. I will hit Alt A to D
select the geometry. You can hit A A twice. And I will hit control
aft x to use Carver tool, but I will use create. And I will hit space to
jump to line create, and I will start following
these shapes. Click here. Want to click here, click here. I want to click here and then
hit space to confirm it, but don't forget to hit x to
activate the close option, it x, and then hit space, and now we got this shape. Ctrol shift x again
and weak to sorry, don't forget don't
select anything. Even if you select
and forget that, you can see to Jump to create and hit space to
Jump to line and create. Activate X, clause, hit X, and now start drawing.
W to click here. Click here, click here. W to click here and then
hit space to fill cumetry. This is the last one, Ctrol H x, it C to switch to create, space to go to line, x to activate clause.
Want to click here. Maybe click here and click
here and then hit space. Now this is what we got so far. These three objects,
as you can see. I will grab them and hit S
to the z and scale them. So this object will be a catter. I will tap the mode. I got one right here. I don't want to control x, and I just need to align all
of these vertices together. Grab those all in
the wireframe mode, and hit S to the x zero
enter to align them. From the bottom
view control seven, you can put those in
the right position. Maybe just move
them a little bit here. And that will be okay. What else? I think we can
do something else here. For example, I can
select this cutter. Hold have to grab
this cutter as well, and you can cut them if you
like, this and this one. Grab this, hold
to grab this one. Go to the bottom, control seven, and use carver
tool to make the cut nice. Had control shift x
and switch to line, and let's bk cut start from
here and maybe ends here. Try to contain them and
then had bas to cut. And as you can see, now,
we got very nice cut. Let's go to solid. I got this one. I don't
need it, deleted. Let's go back and I think we still have a
problem right here. I will cut this again,
control shift x, go to line, and let's start from here and let's move the line
a little bit hold, something like this and
it's space and there we go. All right. Now, grab those, the three of them, and
all right let's start. We need to give them a bobble. Go back to the bottom view, tap to the its mood, and let's go to the ages. Select the corners. For example, grab this corner, it can troll be tobvle it, and let's give it a nice bobble. All right, ten vertices here.
I think that's too much. I will accept this
number, ten segment. Grab this one control B to
bevel it, give it nice pl. Grab this with this or maybe
this one alone control B, and give it nice level.
Something like this. This one as well control B, and grab those control. Let's see grab this corner
and this corner control B. G this corner
with this corner, C control B,
something like this, and this one as well control. All right. Now I
got this. Tap out. With these three
objects selected, I will had control
J to make them one piece and just put them
inside the uma tree, keep the z, and put them
inside just a little bit. Not too much. Hold
have to grab this, control shift B and
use difference. And now we got this
cut nice cuts. As. That's very
cool. That's cool. Okay, what else we
should do here? Let's go the ft control three. Here we got a cut here as well. I will select this
geometry and hit tab. Maybe I can grab this edge to put the three D
corso in the middle. Shift S and corso to select
tab out shift A use cube. Put the cube right here in the correct position
in the middle. Tab the mot control to
add one edge right here. Grab those phases hit
S to the z or sorry, I will add one edge
right here as well. Grab those hit S
to the z and scale this Maybe we can move it out a little
bit and scale it again. Tub out. Let's use
this as a cutter. It S and scale it. At, let's move it right here. Grove grave control have
to be used difference. Now we got this. And let's see what else we could do here. All right. We need to
see this from the back. Or before we go to the back, I will create this shape
here in this area. Let's go here, grab this A, Shift S course or
to select tab out. Shift A add cube. Scale this cube, make
it tall like this. Let's try to find another image. Something like this,
maybe we will work. I don't know, maybe I can take this out just a little bit. And the grab this
hold the grab this, control HFT P and
use difference. And you can control this by moving the car
inside or outside. If you like, you can do
something like that, do whatever thing
you'd like to do. And I will grab this tub, and I will select this pace. H S to select tub out. H A to add and I will
add the cube here. And I will scale this to the Z a little bit like this and
scale this to the Y as. And I will a control A
and apply the scale tub, grab the corner, go to
the e, control Out click. Control B to Bevel, and let's give them
nice pval like this. And maybe we can go to the
vertex mode. I don't know. Maybe we can move those just
a little b to the x axis, and we can bush them deep inside in the
wireframe mode like this. When you be satisfied
with the results, corrupt this hole
to cru the body, control he to B and
use difference. Now we got this hole inside. That's very cool. What
else we could do here? Let's go to the bottom and let's see how can we create
this geometry? Maybe we can start with this. We can tap the mode and we can grab all of these
vertices and e to extrude it. I mean, extrude this pace. Let's extrude this
almost right here, and the grab the side of
vertices key and let's move this to this side,
something like that. That will be nice.
Let's see that in the perspective. That's cool. But it seems like that we got some connection between these u. This way I can hit control are to add one e
here in the middle. And it control be to beval
it to two like this. Three control B. Let's eval to go to the face, grab this face and hit E to extrude this
face to the site. Something like this.
That will be enough. Maybe we can move this
just a little bit more. And we can take it
back, not too much. Let's go All right. After that, I can
tap out and maybe we can select this geometry
that we create recently, and from the top of view, I can hit D and take
a Cob right here, and I can move this b here
and use it here again, hit key and let's
move this right here. Let's move it here first. Push it inside a little bit. Maybe we can from the
bag, control one. We can hit C D and take a Cobi. Let's move this b
maybe right here. Cut up this with
this hit control J to make them one piece. You can center this new COB
here to close this area. You can take this
back if you like the y. That's something cool. Let's see from the
top view what else we can do. All right. We need to create these shapes, but I think I will create
those in the next lecture, o. So that's it for this
video and see you next.
32. 033 Modeling section Creating the front light details part 5: Hello, everyone, and
welcome back here. Okay. Let's see. What's next? Lisa bring the reference C. And let's try to
create something here. Maybe we can start
with the top area. All right. The stuff. We can hit seven, to
go to the top of you. All right now we
are in the top of. Go to the wire frame, and let's
try to create those here. All right. Where is the three
D crosor? It's right there. Hit A and let's add. Cube. Let's move the
cube right here. We can start with the cube or maybe I can delete
it and at plane. Let's bring the three
dequs right here. C to A, let's start
with the plane and hit key. Let's move this here. Tap it number one, to go to the vertex mod, let's move these vertices
a little bit here and align them with
the shape. Crab those. Let's move those here, hit E to the y. Extrude them to the Y. A little bit, crab this hit key, and let's move this right here. Crab those both, it E. Let's
move those right here. Another extrusion
may be right here. And now let's crab this
and move it right there. We just need to
move them a little bit and extrude them again here, and one extrusion should be almost right here and
select this vertex, le moves to the x drogin. What about those, we can move them and hit E and
extrude them to the y. Another extrion here, and another extruion almost
right here and one here, and one to the end. All right now let's erupt those, and move them there. All right. And maybe this one we can take
it a little bit to the x. And what about those? Grab those, and let's move
those here. That's very cool. And we have this s as I will grab this vertex and
hit shaft d to CoBate. And let's start from here. Hit E to extrude this
almost right here. Grab this one hit E, and let's extrude this here. And let's make
another extrusion. I don't know, maybe
here, temporarily, grab this hit E, and let's
extrude this right here. Grab those and hit S to the
y zero er to align them, and then to gather hit E
and extrude them here. Another extruion. And one more
here. Let's select those. I think we need to
mow them a little bit. Something like this. And we can move this
forward maybe right here and select this with this hit F to
make a connection. And now let's stumble around, and let's see what
we've got so far. All we got this result, but this is not a
surface just lines. Let's select those vertices, and let's hit F to
create a phase here. Now we got phase,
select those here, hit F to create another phase, F again and F, and
now we just filled. Alright, that's cool. We have some overlapping right here. We can avoid it by
taking those back. Let's move those maybe
here and this vertex, we need to move it a little bit. G and move it right here. Try to keep the distance
similar or the say even. Now hit a select
the whole cmatry, and we can extrude it, I think, but we got
some difference here. We need to take those
k wise to slide them, and let's move those right here. It's not going to be similar to the reference mag,
but that's okay. This one, as well, maybe
we can take it back. Now hit A, select
everything and hit E, and let's extrude this up, give it a little
bit of thickness, something like this, and we just need to check
the face orientation. All right. This one
is right, it A, select everything and then shift to recalculate the normal. All right, now we got this
results. What's next? Let's go to the top again. H Z go to wireframe. We need to create
this shape here and maybe this one
as well. All right. We can start with
the cube actually. Tab out shaft A and add cube. Hit G, put it in the position. Scale it a little bit to the x. Scale it to the i like this. Move it down. Control A, apply the scale that's
very important. Tab, go to the edge, number two, grab these
edges, the four of them. And by the way, if
you tumble around, you can see that
I selected them. After that it
control B for bevel, and let's bevel those, and
let's give it a nice segment. Try to make it round like this. And you can control the
resolution from here, maybe we can attain to make
it smooth. And that's it. Tab out, tumble around, HZ to exit of the wire frame
mood and now select this. Hold have to grab this
and let's make cut but. Before we do that, let's
go back again to the top, and maybe we can
take another C H D. Let's add this co right here, and let's see the result
in the perspective. All right. It's almost nice, but I will take this
back maybe right here. I can put it. Something
like this, to work. Grab this with this, merge them, make them one piece, control J, and now this one and this one, they are become cutter, and we need to cut this. So select those as cutter, hold you have to grab this
and make this object active, and then control
B and difference. We just need to cut the N acid. There we go. That's
very cool. All right. Now we can say that we are
finished from this side. Now we can jump to this side and let's see what we
can create here. All right, right, right. Let's bring this right
here, and right. Maybe we can create this shape. Okay? Let's try to create it. Let's see
how can we do that? Let's go to the
bottom control seven, z to go to wire frame. And yeah, let's start from here. Shift A, maybe we can add plane, the same scenario, key, and let's start maybe from here. Just align it, scale it a
little bit, try to match it. Something like this, Tab, go to the vertex, grab those. G, move those here, extrude them a little bit, scale them to the x, extrude those again almost right here. You can hit E again here
as to scale them a bit. Extrude those again here. Move this a little bit
forward like this. Now let's grab those together, hit E and let's extrude
those almost right here. And one another extrion here, and we need to make
another extrusion. But I will take this
back and put it here, and this one as well,
something like this. And I will move this here. Maybe this one forward
just a little bit, and select them hit E and
extrude them right here. Hit S to the y z enter
to make it flat, or yeah, it E again here. Put this to the x axis. You can align it with
this one control and don't forget to
activate vertenap. Grab those both of them, hit E and lest them here. When you coblet, we need to give these vertices and those
are right here the same vl. So hold shift to crop those. Until now, we just selected
those four vertices, one, two, three, four. To bivle them, control shift B, and let's buzzle those.
Something like this. When you combate, try to
manipulate the shape, All right, that's
not going to happen because I just forget something. Because we scaled the object. We scaled the plane when we added the plane
in the beginning. So I'm going to tab
out and a control. I apply the scale, and now
scale should work correctly. Tab again, with these
four vertices selected, control B control shift be
sorry, and let's pvele those. All right now, p
will work correctly. Let's add 0.5. Let's bring this
back the number, or maybe we can move it e a little bit and align
it and that's cool. Very cool. All right. Let's see what next. All right. Now we got this shape.
I will tap out and to the Z and take
this to the site. All right G to the z, and um take this out. I can't tell where
is it exactly. What I can do is
I can tab hit A, sorry, take this tab, hit A, and hit E
to extrude it and give it a little bit of
thickness, and then tab out. Or before you tap out,
you can tab in again, guess it a shift to make sure that normal is work
correctly and then tab out. Now let's move this to the Z, and let's align it
with the surface. Is something like this, that will be okay. And I think we need to make a cut here to this area
to make this work. All right, at similar
to what we have here. All right, that should be easy. Maybe I can bring the three
d cost to this vertex, Sift S and cos selected tab out. Sift A en less a cube, and maybe we can scale like
this, something like that. And then we can tab
and we can select this phase and scale this phase. Try to make a table, hit a, select all the phases
and scale like that. And that's great. Tab out, control the scale in
case we have a problem. Grab this, hold
heft to grab this, Cume, control Hft, B
and us difference. All right, I will use the second object
because I don't know, maybe I need to
move it up or down. And I think it's okay. I will move this up
just a little bit, z, something like that. All right. It looks nice. All right, Let's make
some comparison. Let's see what else
we should do here. We just have some details
here we need to create. All right, let's try to
create a shape here. Use it as a cutter
to cut this area. What I can do is, I
can grab this and tap the edge mode and I can select this entire edge
loop go to the edge. All right. We can use the control method to grab
this hold control and keep Click here until you
grab the whole a loop, and I can hit shift D to the
Z and take a cobra here, and then hit P has
to separate it. And then tab out,
grab this alone, tab and hit A and
then hit F to fill this and give it a little
bit of extrusion like this. Hit a shift to recalculate
the normal in case we have problem and the normal
is flipped, then tub outs. All right, so I will
use this as a cutter. Let's go to the
bottom, control seven, and this is easy to
go to wireframe, a key to move this
maybe right here, and the scallets
make it very small. All right, The scaling now working according
to the organ dot. It's far away from the object. I will rat click and set
or organ to eumetry, and then scale it like this. Make it small, similar to the have that we got in
the reference Image. When you do that, tab, go to the vertices,
grab the side, g to the Y and move this here, grab the side, ke to the Y
and move this right here. And you will be good to go. Now we can use as a car tab out, Tumble around Z,
go to two solid. G to the Z, move this up. And hold H to c this, Ctrol Shift P use
difference create. All right. What else
here we should do? Go to the bottom again. Easy to go to airframe. We have this a cat here
we need to create. Maybe I can use Carver
tool to create this shape. I will control shift x to activate carver and C
to switch to create, and I will base to
switch to line, create, and I will create
something like this. Right want to click here and activate close it x and
then space to confirm it. And now we got this shape. It is very tall. S2z, scale,
sorry. Selt this one. S2z and scale. All
right, that's cool. Now we can use to cut this area. So I think we got some
weird problem right here. Something going
happen right here. I know it's. We have
double geometry. All right I will delete this one and let's see what's
wrong with this. Let's use the cutter again. And, now it's okay. That's happened
because I activated the create tool with
this object selected. I seems to be wrong to do that. Let's check this geometry. Everything is okay.
All right, great. Grab this hold to grab this. Control H B s difference. Now we got this. And we have some shape right
here in need to create. All right, we should
create it. I don't know. Do we have a hole
right here? All right. Seems like we don't have a hole, but we have this extrude shape. All right, I will
keep my result. I think it will be
nice, especially if we veled the edges. So in this case, I will select the geometry and it control A to apply and apply
visual geometry to mesh. That's mean I don't need
these cutters anymore. So grab these tab and
let's target the edges. The four of them control out and click here to select
the four edges here, and it control B to buvle them. Give them nice bovl. L et me reduce the number of
the segment a little bit. Let's get something like that. Well, I think it's nice. All right. A what's next? Let's All right. We have this shape we
need to create here. Let's go to the bottom here, and let's put the three
d coosor in this area, shift A and let's
add the cylinder. Scale the cylinder,
something like this. Hit he and let's move
it almost right here. Try to align it. Let's
put this here as well, and move it to this area, and let's move it down, maybe right here.
Or that's cool. Control A apply the scale. Tap to the edit mode, go to face it three
and grab this one. H keep it dasy let's move
this up almost right here. Let S to scale it.
Like that, maybe. And then it I two insides and e to throw this
inside like that, and S two scale this inside.
A little bit, not too much. A the cool. Now, with
this phase selected, I will a heft S and bring the three d courser and the
position of this phase. Tap out heft A a cube. Scale it make it small. S to the y, S to the z, give it a little
bit of thickness. Ke to the z, and let's move
this down almost right here, and we need to control
all the scale. All right now, let's tap to the edit mode and let's
select this g and this g right here and
I'm going to scale them like that to the x axis. And now we got this. But try to move this edge a little
bit away from this one because we don't need to have
any close edges like this. We just need to have some space. That will be better.
All right, that's cool. Tab out select this, hold to c the target, control H V and
chose difference. I think I can pick this one.
All right, that's wrong. I will hit control Z, I think, and I will use this one because I think I need to
control it a little bit. Like, I don't know,
maybe I can take this down to d Z,
something like this. But it's not going to be
similar to this image. So right. I will hit
and take this up again. Let's make that cut.
It's not an issue. I will accept it. Let's say
that we done with this. We need to create
this H as well. How can we do this? Let's
select this geometry. I don't know, maybe we
can start with this one. Hit HD and let's take
a copy right here. And maybe we can scale it. I think, or before we scale, let's step the mode and
select this phase three, Ctrol plus to grow selection, grow it again and control x to dissolve all of these phases
and make them one phase. Scale this just a little
bit, something like this, and now tab out, scale
this the wholecumatre. From the bottom view, cant
seven, we can see that better. All right now, let's move this, and let's
put it right here. Maybe we can move it just a
little bit and center it. And maybe we can move it
just a little bit here. As to the Z, H ke to the Z, and let's move this right here. A that's cool. What about
this shape? Alright. With this one selected
tub, grab this face, Hft S and cursor to selected tub out Hft A
and let's add the cube. As a cutter. Scale
it, make it small. H, let's move this right here. Control I apply a scale tab, go to the edge, grab this edge, and this one, control B, and let's pffle those
22 edges like this. And that's it. Tab out G and move this
inside a little bit. Hold H to grab the target, control shift B, and
let's use difference. And now we got the cuts. If that too deep, we can control Z and
use this method, and we can grab this, g to the Z and move this back. And maybe we can scale
it just a little bit. I don't know. Maybe
we can make it big. I just want to move the
cut a little bit from this age to avoid any future
problems when I add Bible. Something like this,
maybe will work. I will hit and move this
a little bit more and tab and grub these vertices
and take those out. That's very cool. When you
come bet grub the uma tree, control A, apply vital
uma ret to apply it. Go back to the bottom view. Shift D, take a b, and let's move this
B maybe right here, and I need to flip this
control and flip it like this. All right, that's
cool. And now we got this. That's very cool. I can select this one in this one and hit slash
to isolate them. Tab, go to face, grab this face with this face, it X F to delete them. We don't need these
face. Tab out. Hit slash to excite. All right, that's very cool. I will end this video, and I will complete in the next one. See you next.
33. 034 Modeling section Creating the front light details part 6: Hello, everyone. Welcome back. All right, let's continue
completing this side. All right. Let's try to find yeah, this image right here, and
let's see what's the next. All right. I think we should
create something like this. And let's see how
can we create this. We have the three
D coos right here. At N. Maybe we can start with the cylinder at the cylinder, maybe I can increase increase
the number two, maybe 42. Hit enter. All right or I don't know, maybe we can add 62 and make it smooth like
this. Hit g to the z. Let's move this
right here. Maybe we can scale this two
the z a little bit. Can Troll I apply the
scale. All right. Tap the mood, go to the edges. I'll click. C Troll to biv this. Let's pivle it like that, maybe, something like this. Let's select this
phase, H S course or to selected and top out to A
and let's add the cube here. Scale the cube down. All right? Maybe we can make it a
little bit tall and let's take a cop right here. Maybe. Let's key to this
z and let's move this here to this area. I need to add another
CV on the other side, but I need to use the three
D coosor as a vote point, so let's go to the
transform vote point and tweak this to
a three D coosor. It HD to take a CBI from this cube and then hit
control M to activate mirror and just choose the axis y axis this time
and then hit ner. All righty grab this with this. We can hit control k to
make them one piece, and you need to tap to mood and the flip the normal
in case we have a problem with the
normal because when you use mirror, all right, The other object, the
flipped object will lose the normal diakin
it will be flipped. In this case, tab it
a shift N, that's it. All right. Now we
got this result. I will tap to the edit
mode and go to the edge. I will select this edge
and this right here, and I will scale
those to the center. I just need a little
bit of taper, and maybe we need to
make it a little bit wide like that, maybe,
something like this. And then tap out, Hl
Hit to grab this, control Shift B, and
let's use difference. All right, there we go. Now, let's see what's
the next step. I will select this
and hit shift A, and maybe we can add another
cylinder right here and scale it down like that.
Something like this. All right. Yeah, we can do that. Or maybe we can do
something else. I will select this
and type to Edd. Select this face, it to inset, and let's insert this
almost right here, and then hit I again
to inset this again, something like that, and grab these faces I'll click and
hit E to trough this inside. All right. I think that will
be better, and then tap out. And that's cool. Now, I will hit
shift A to add cube, make the Que very small,
something like this. And all right let's see
what else we can do. Let's hit S to scale
this to the x axis, and let's move this
maybe right here. Maybe we can make it
a little bit shorter. Let's put this right
here and try to make it to make the size similar to the size that we have right
here, the distance. So now we have one
ue right here, and we need to add another
cube on the other side. I will use mirror
HD, right click, control and x to mirror
on the x axis, hit enter, grab this with this,
hit control J, tape a Haft N to co the normal in case we have
a problem with the normal. S to the z, scale it like that, G to the Z, and let's move
those right here, maybe. And we need to trim this area. With those selected, the cutter, hold you have to
grab this, control heft P, and use difference. That's cool. Okay, what's
next that we should do here? I think that we can
apply everything, grab this control A and apply
this visual Qmatrc to me. And now I can grab
these cutters and delete them because
everything now looks fine. Alright, that's
very cool. Alright. It right click shade smooth, and then go here and
activate auto smooth. And now we get this. Where should we put this? All right. We have
one here to add, so I'm going to hit Control seven to go to the bottom view. And I will select this geometry. I need to apply the
modifiers here. Control A, apply visual
geometry damage. All right. We don't need
this cutter anymore. Grab it deleted. Go back
to the bottom view. Or maybe I can select this. It shifts Cursor to select it, grab this selection to cursor, and I can scale it
and put this inside. Grab this with this, hit shift, and let's take a CV and let's
put this here in this area. And maybe we can move this
just a little bit out, something like that,
and maybe we can manipulate this
just a little bit. We can go to the edit mode
and we can grab this face here and key to the z and move this up here and go back to the bounding box to scale
this like that, maybe. Something like this. Or maybe we don't
need to do that. I will ad control Z and
cancel that scaling. Just tap out and that's
it. What about this one? We don't need this piece
right here, I will delete it. We need something else,
we need this shape. A let's see how
can we create it. I think we can
start with a cube. Let's add cube right here, shift A at cube, scale it down. Let's go back to the
bottom, yeah that's cool. The size is nice to
the scale like that, let's move this right here. Control A apply the scale. Tap to the edit mode, go to the edge, grab
this one and this one. I control b to bole them, and let's give them nice bvling. Something round
like that, maybe. That's very cool. I will hit control to add
one edge right here, and I will grab this face
and hit e to extrude. Maybe right here. I. All right. Let's see what else
we could do here. I will hit E again to
extrude this almost right here and the grab this
phase and this phase, and I will hit e to
open the extrude menu. And this time, I will
use extrude phase along normal to extrude
them like that. Something like this. Maybe
we can move those just a little bit. Here.
That's very cool. All right, let's go
to the wire frame, and I will hit key
and take this p. Maybe here, I can put it. Okay? All right. What else?
Maybe we can move this just a little bit
to this direction, but move the cutter with it. A and let's move this a
little bit right here. And now let's select this one. And let's see what
we can do here. All right. Now, I think we
need to make some trim. Let's go to the front, and I think I will use a carver tool at control shift x with this
one selected and use line. And let's make a
cut case like that. And it's space to confirm it, and now we got this
cut. That's very cool. Now, what else we need to puzzle some edges here tab to the
edit mode acrob this edge. Hold shift across this edge,
and let's puzzle them, control let's puzle
them to two edges, something like that, maybe. And now I can grab this
edge and this edge and scale them to the center because I need to bivle those. Control be and
let's puzle those, and let's make them
round like that. All right. All right. After that, maybe
now I can go to the face, hit number three, and
I can grab those and. Maybe we can move
them like that. If that makes sense.
In the front of you, we can go to the front and go to the wire frame, go to vertices. I will grab all of these
vertices and hit key to this, let's move those up here. Or something like
that. Maybe I can grub those and move them
down just a little bit. And what about those? We
have some gap right here. All right. Maybe
I can grab those and take those
back a little bit. Let's go to the bottom of view
and let's see. All right. Actually, the shave is small as compared to
what we got here. So in this case, let's
try to fix this problem. I will select all
of these vertices, and I will scale those, but cancel the Z axis scale. Hit S and then hit shaft to cancel the Z axis
and make it small like that. And then with this
vertices selected HK and take those back,
right here, maybe. Something like this. Maybe we can in those and he
can move those a little bit. And yeah, no, we just got
close results, I think. Maybe those s will we can move them just a
little bit right here. And we can move
them here, maybe. Something like this
will work. All right. What else? I think now we can
cut this area. All right. So I will select
those hit shift S and bring the three D cos
right here in the middle. And then top out shift A, and let's add a cylinder here. Let's take the number
back to maybe 42, and hit S and scale like that, and let's use this as a cutter. Hold shift to grab this, control shift B and
choose difference. Now we cut the
hole that we want. Right now, I will take a B from the scumetry, H D take a B, and then at Heft Z to cancel the Z axis and
move it to the x and y, and let's put it right here, and we just need to move
this down just att bit. The three D corsor is
still in the position, so I will select this at heft
S and selection to Corsor. That's very cool. Maybe we need to scale just
a little bit like that, and maybe we can go to
the bottom to make sure that this one is exactly in
the center and the does. All right. What next? We have some editing
here we need to do. I will select this tab, go to the face, grub this face, and this face hit to inst, and then hits E to extrude this and maybe S
to scale those inside. What else? Maybe we can
erupt this with this? This one with this one, and I will I will hit I to inst again, and I don't know, maybe we can hit E to extrude
this just a little bit. But the extrusion is working
in the wrong direction, I think, because we need to
use extrude along normal. Its E or med menu of the extrude and Q
extrude along normal, and let's push this inside.
Something like that. And if we need to tailor this, if we need to have
some tailor there, we can go to the select and loop and use the boundary to
select just the boundary, and we can pavl the boundary, control be, and let's
pavl the boundary. But as you can see, we have some
overlapping right here. When you combine activate clam overlap to prevent
the vl to go farther, or something like this, maybe will work, All right. I think that's too
much. What we can do. We can take the number
back just ale bit. All right. Something
like this, maybe. It will be okay. When you be
satisfied with the result, A, go ahead and
activate auto merge. I'll click to select
this entire edge loop. Git wise, and let's
move this and merge it. Now we got this result here. And we should do the
same scenario here. I'll click git wise, and let's move this right here. And now we got the tab
that we like with the help of Bevel. All right. If that's very deep, you can grab those faces, and it is to move the face
out to the normal direction. And now we got this results. All right. Tub out, and now we got this shape. And let's see what
else we could do here. Do we forget anything here? All right. We need to
create this bridge here. Let's go to the bottom and hit shift A, and
let's add the cube. We have the cube right here,
it key, and let's move it. Hit S to scale it like that, scale it to the x, maybe hit key to move it and put it in
the right position. And from the front, we can determine where
should we add this. Hit key, and let's move
this maybe right here. S to the z scale it a little
bit, maybe like that. Ke to the z, and let's
move it. All right. We got this. All
right, that's cool. Now, let's tap the emote
or let's say control A, apply the scale first. Tap the mood control r, let's add 18 here or maybe two. With these two selected, I will hit control be to level
them to two edges as well, and I will grab this space
and hit ts and move it back. And maybe I can grab
these edges I click, I'll have to click
and hit S to the z and the scale those just
a little bit like that. Maybe even more to
have this shape. And we have a triangle here. Maybe we can tab out and
select this and tap the mode, and can hit I'll click
to select this face. Maybe H d to the z. Take a CV right here, P S to separate it. Tab out grab this, right click, sit organ organ to gumetry, to bring the organ dot here. I will use this as a cutter. Let's go to the
bottom, control seven. And maybe I can hit key
and move this right here. Hit arter rotates, hold
control to snap the rotation. Let's rotate this 180 degree, and we can scale it just
a little bit like that. And what we can do now, We can give this a
thickness tab it A, and then hit E to
extrude this up, but make sure to
correct the normal in case we extrude this
with the wrong direction. Hit A and then hit shift and to recalculate the normal,
and then tab out. One more thing here
we need to do. We have level already
exist. I will delete it. Hold have to grab this, control shift B, e difference. Or you can use this
difference if you want. Select this one and activate
auto smooth to correct the heading. And
now we got this. Maybe from the top of you, we can add some cut here tab, go up this edge, H S and bring the three D cos here, tub out. H A, let's add cut cube, and I will scale this like that, maybe and scale
this a little bit. Ct apply the scale tab,
go to the vertices, and the wire frame I will
scale those out like that and make them a
little bit smaller. Something less will be okay. And who have to cut up this, control have to be
and use difference. Let's make a cut here. But we need to move this cut
a little bit down, cut this, to the z. That's very cool. All right. Maybe we can add the cube
right here and make some cuts. We can do all of that tab, and I think we can
grab these faces and move them just a little bit
like that and center them. Alright. All right, so
now we cut this bridge. Let's see what else
we could do here. All right. We have
these cylinders. We need to add
here to this area. We need to add them now. And to do that, I will put the three cos
right here. Hit shifts. Hold shift, hold right click
and move the mouse here. Sift A, and let's
add the cylinder. It has to scale it
down like that. And hit key to the Z. Take it out a bit. Maybe we can scale
it key to the Z. Like this, control I
apply the scale tab. Crab this face it and
scale like this Matera. Maybe we can duplicate
this one hit HD and let's take another
COVID, maybe right here. Hold this with this
with this body, control H and let's use union. Now they become one piece. That's cool. All right. What else we could do here? If you like, you can go to the original images
of the itapor, and you can add whatever
thing you like from here. If you prefer these details. Okay? For example, for these
cylinders that we added, we can make some
editing if we like. I can erupt this with this and then hit eye to make some ints, and maybe some ex, and I can s to individual origin to scale
those to their origin. All right. That will
make the result a little bit better. All right. What else we can take from here. An hap you like, you can take
it and apply it to cumetry. All right. All right. So yeah, I think that's
it for this video. We didn't finish here. We got a lot of thing to do, but I will end this video
and see you in the next one.
34. 035 Modeling section Adding Bevel to the light part 1: Hello, everyone. Welcome back. Let's create this geometry. All right, it should
be right here. Where is it? I think.
Yeah, I think this one. All right. Let's see
how can we create it. First, let's go to
the bottom view. I control seven and let's
see it from this view. Alright, let's start
creating this. Let's add cube,
start with the cube. And I don't know, maybe we can start from here. Okay. Tap the eight mode, go to the vertices and
steak to wire frame. Sorry. Not material review. Gob those and let's move those right here. And those here. And grab these retices, and let's move those
almost right here. And don't worry about the overlapping that
we got right here. We will find the
solution for it. Let's go to the front or to the bag. Can we go to the back? All right, we didn't
add an image for this. Let's go to the front. To the right or to the left. It seems like we can't
see anything here. But according to this, we can understand what we need
to do, All right Tab, it to the Z and let's move this up Maybe here we can add it. And let's see what
else we can do here. We need to create this shape, and let's check it. From here, we have some
extrusion. We need to do. All right, let's stop the
eth mood hit control, and let's add right
here, go to the face, gob this face right here, it and let's extrude it. Something like that,
maybe. All right. And maybe we can scale
this phases a little bit. A key to this Z and s
move this up, maybe here. And we have a cut here. We have a cut here as well. I will hit control R
to add one A here. Control B to bev 22 like that. I'll click, I'll have
to click, grab those. And I think we or
let's go to the. I will bv those, control
B, something like that. And then I will grab this phase and hit key
to move this back. Something like this.
Maybe I can scale this to the z. All right. Let's see what else
we can do here. Now I can select
this phase and shift and bring the three
D crosser here, tap out shift a to add
cube here in this area, scale the cube a little bit. K to the Z, let's take it down. Maybe we can make it
a little bit wider, then we can tap to the, go to move this phase up and scale like that to
have some taper here. And then hold Shift grub. This geometry can throw Shift B and use difference.
Now we got this. For this geometry, I can tap and go the vertices,
and in the wire frame, I can grub those and move them just a little bit
to have some space. That will be enough for me. All right here, we have a
cut in this area as well. I will select this
tub. All right. I think we can grab the
same geometry and use a heavy D to take
a CoV and we can bring the shape back by changing the option right
here from bounds to texture, and we can rotate
this to the x axis, X right 90 degree. You can hold control, H z and let's move
this right here, and let's take this out. Hold have to grab this, have to be and s difference.
Now we got this. You can make this a
little bit taller. What else we could do here? I think we need to add the
cylinder here and mark it, grab this face, or let's put the three decs right here,
let's add the cylinder. And let's scale this down,
something like this. We can go to the
bottom view control seven to center this input
in the correct place. G to the Z and let's
move this down a little bit to, grab this face. Let's move it here and
scale it a little bit. Maybe we can hit to
make some inst like that and make some extion,
something like this. And I will hit HD to take
another COVID to this side. Hold shift to grab this, control to merge them. Hold shift to grab this body, control shift, B and Qs union. A. That's cool. Let's see what details
we should add here. Let's make some
comparison and let's see. Do we have any
problem right here? All right. You remember when I added this met to cut this area, I think I can move
these vertices just a bit back almost right here. What else I should do here? I will tap out ins like this, maybe and tap to the edit
mode, go to the vertices. I can grab the side and
move it just a little bit. Deep like this inside this geometry and leave it
like this. It will be okay. All right, That's very cool.
Let's go to the front. Let's see what we have there. All right. It seems
like we need to move this up just a bit. Maybe I can key to the
Z and move this up, but I need to select all
the cutters as well. Grab this with this one, and let's go to the front. Go to the wire frame,
H key to the Z and let's move this ale
bit, maybe right here. I think it is thick, we can make it a bit thinner. All right by grabbing this side. Let's go to the front view tab, go to wire frame let's
see grab these vertices, and maybe we can
move those down. Let's go to the perspective and let's see what
we got so far. All right, we got a
result like this. If you like, we can make
those wider S to the z, but swa this from individual to bounding box,
something like this. That's co. When you be satisfied with the
result, grab control A, apply visual geometry damage, and then apply the
scale in case we got problem and then
delete all the caters. We don't need them
anymore. Now we got this. All right, let's see what
else we should do here. I think we can move those
just a little bit back. Not too much. All
right, that's great. Now, is the time to add bible
for all of these umetry? You remember that we added a bival right here
to this emetry, and maybe we can cop it
and add it for the rest. Let's start with this one here. Let's go to the
modifier and let's see, do we have any modifier? We don't. Or I select
this whole shifty grab this umetry because we
added a bival to this umetry. And I'm going to co abivl from this geometry
to this umetry. All right. With this one active, I will go to this arrow
and COB to selected. Now level CB to selected. Control, I up the scale in case we got a problem
with the scale. Hit slack to isolate this alone, to work with this one alone, and let's see what
we can do here. Because we don't need
this side and this side, because these two
sides are hidden. What I will do is,
I will hit slash to isolate this and tab with the
edit mode and go to face. I will grab these faces and delete them. X F to delete them. We don't need them. Tab
out it slash to exit. All right. So now
we can say that we done with this.
We have no problem. Bevel works correctly
without any problem. Everything looks cool. Let's by the same bevel
to something else. For example, we can
start with this one. Hold Chef to grab this. Go to the Bevel
Coby to select it. And now we co the bv grab
this its to isolate it. And we just need to
make some editing here, right click head smooth, go to the auto smooth
here and activate it. It's very important to
get better heading. And it looks that we
don't have any problem. Everything looks
nice and working. Maybe if we go to the edit mode, we can fix some faces
or let's say big faces. To avoid any problem, we can use the ni tool
and may cut, for example, from here to here, and maybe
cut from here to here, and then enter to
confirm the cuts. Or maybe hit K may
cut. I don't know. Let's go to the vertex hit K. Cut maybe from
here to this corner, right click to add another
cut from here to here, right click to add the new. Let's make cut goes here, and maybe another cut
goes here. All right. What else? I think
that's it it enter. That's very cool. Now, tub
out, everything looks nice. Let's hit slack to excite. All right now, what else? Which geometry we should choose. Let's select this one and hold
H to grab this to give it above COBI to select it,
and now let's select this. It's like to isolate it. And let's see what we can do. F right click he smooth, to make it smooth, and activate auto smooth
right here is activated? Everything looks nice here. I think we don't have any
problem here to avoid? We can't kick the wire here, maybe, I don't know, I think we don't need
to do anything here. Everything looks
fine. If you like you can grab those two vertices hit J to make a connection
between them. That's okay. Tab out, slack to
excite, and that's it. All right. What else? Let's add the bubble
to this geometry. Grab this, CV to select it, select this one, this slack to isolate it, and let's check it. Everything looks nice. We don't have any problem. Tab and let's check
the faces here. All right. Maybe we can make quick connection
between those vertices. Avoid big faces. I always say that. All right. This one right here
is not a huge Hue. I will slide to excite. I just need to see right. I think I wanted to delete
this face right here, but from this angle, I can see it, so
I will leave it. Tub out, we finished
with this one. Maybe I can start with this one, hold to up this to
give it a vl CBvl, to select it, and now select this teumetry,
to isolate it. Ric shade smooth, activate
auto smooth here. And do we have any problem? We have very close vertices
here in this area. Let's see, do we need to solve this place or
we can ignore it. All right, I think
we can ignore it. Except these
vertices, we can make connection to avoid
any big pace. The same scenario
for those here at J, and this one with this one J. Sorry, this one with this one J. I think that's it. That's cool. For these edges, these edges are not a huge issue
because they are far. But if they become close like this, you will
have a problem. If you've got a
problem like this, that's because of these edges. Move them away, everything
will be nice and beautiful. Tub out, and I think that's it. We can't to excite. What else? Let's
add bible for this. I think we applied
everything as cool. Hold, you have to grab this and go to the Bovell and
COBI to select it. Select this, it's
like to isolate it, radically head smooth,
and activate auto smooth, and everything should be fine. That's very cool.
Let's like to excite. One more thing here,
I need to mention, I like to isolate this. Actually, we don't
need this face. Why would we keep this face? I will see to open Ph
select or circle select. And I will select
all of these faces. Rotate the wheel of the
most to control the ph. All right, let's move
here, his C again, and let's select these faces. I will hit F to delete
these faces and keep this phase because this phase is visible to the camera,
and that's what I want. Here in this area,
we have big face. I think we need to make
connection goes like that. Grab this vertex
with this vertex and then hit, make connection. Maybe this one
with this one H K, maybe this one or
this vertex with this one H K to
avoid any problem. And the same thing for those All right. This one with this
one K. That's very cool. If you like, you can select
these phases, go to phase, hit C to open circle select, and you can hit control x to make them one
phase feel like. All right. That's
not going to happen. We can hit F to
delete this phase and go to the Alt
click and then hit F to fill this again and grab those two vertices
and it to make connection. The idea is I just try to
avoid this shape here. Let's do that again. I will see. By this time, I will select
those here in the face mode. Go to the phase three, and select those right here. Cancel this. Control X. Why does doesn't happen. Control X yeah,
now it's working. Select those control X and
make them one big face. Cloud this vertex maybe with this one a k, and there we go. That's a little bit cleaner and the act
for this geometry, we can hit slash to excite, top out, and let's
check the piv. Pivle works correctly. The same scenario for those. I think we up these. Yeah, that's right.
I will delete this one and delete this one. We don't need it anymore. I will grab this with this hit control J to make them one
geometry, maybe. What else? R smooth,
activate auto smooth. Hold H to c this to CB the ivle, and let's hit V to select it. Now it should work correctly
without any problem. Maybe we have a problem
with the scale. Bile as you can see, we have some variation here. Bivle here is small as
compared to this one here. I'm going to hit control and double the scale and now it's working better.
That's very cool. Hart until now, we don't have any problem with applying
oval on the geometry, but sometime we will
have grab this one, Hold have to grab this
to give it a ibl. CB Bival to select it. As you can see here,
we got some problem. We have some overlapping
here happened to the bivl. Ctrol, I apply the scale
in case we got a problem. In this scenario, we're going to reduce the amount
of bevel here. But first, radically head smooth and then
activate auto smooth, and let's go back to the Bivel, and let's add 0.05, and let's make Bivl
amount very subtle. Something like
this will work for this shape, and that's cool. Let's apply the same
bival to this metre. Grab this, Bival
to COVID selected, select this, shade is smooth, and we have auto smooth
that is very cool. Control I apply the scale
in case we got a problem. I don't know, but I feel that there is
something weird here. Pivle is not working in
the correct way, right. As you can see here, Bivle doesn't you can move it farther because of
clam overlab is activated. But it seems like we have very close vertices prevent
Bivl from working correctly. Let's turn off clam overlab, and I think we got them. The problem is
here in this area. I will tap mo and try to
investigate why that's happened. To avoid that, just welt
these vertices like that. Maybe that will help
to fix the problem, or maybe I can erupt this phase with this
one here and hit key to the z and move those awakes a little bit
from the bottom. All right, something like that, that will help to
solve the problem. And now we got this results. It is very nice, I think. Well, we got some problem right
here as you can see here, and we need to avoid
anything like that. Maybe we can make a
connection goes like this. Help to correctly. Ctrol x for this one
and this one cantro x. This one as we cant x. For this one, key wise
and slide it here. Give it space. It K to activate knife tool and
let's make cut like that. Grab this with this
control x to dissolve it. This one as well, if you like, keep wise, let's move this away. And I think we got the same
problem here or we don't. All right, everything
here looks nice. Except for this area here, I will grab this one, kee wise and mick this one
here, and this one as well. I think that will work as well. The same thing here. Yeah, that's very. What else? We got some problem
because these edges very close
to these vertices. In this case, maybe
I don't know, maybe we can take those back. Go this heat wise, let's move this right here and merge it, and
this one as well. But that's not going to give
you correct pile because we learned we could get something like this
when we have a corner. In this case, I will
hit K to activate knife tool and goes like that, and another cut goes like that. We need to do the same
thing for the side. Or we can ignore the side because I think
we don't have a problem. Eight gig wise, and
let's move this here. Yeah, let's do the
same thing, git wise and let's move
this right here maybe. K cut goes like this. Another Ku goes like that. That will be very nice. Tub out and now
everything looks fine, I think, if you like, you can delete this pace. It's like to excite. And maybe we can go to the edit mode wire frame
and move those down. Leave them right here.
That will be enough. You remember that
we copy this here, and we don't have
time to fix this one. What I will do is I will
select this one and aft S and bring the courser
here and delete this, and I will select this one as H D taker CB right elect to
leave it in the same place, and then heft S and
Corser to select it. And now we got the same V here. Maybe we can do
the same scenario for this one as well if we like. We can select this, Ht
S crosser to selected. Grab this deleted,
grab this one, H D take a CV Heft
selection to Corso. That will be faster.
That's very cool. We add bobble for these
geometries and we got ins result, but we didn't finish here. We got a lot of work here. But I will end this
video and see you next.
35. 036 Modeling section Adding Bevel to the light and fixing some problems part 2: Hello, again. Welcome back. Adding Bible for the
rest of the umetry. Okay. Let's start with this. And we already gave a
bubble for this one. So I'm going to Kobe
bubble from here to here. Select this hot, tab this. Kobe Bubble to select
it. And now we have it. A, select this one. Hits
like to isolate it. All right, to get rid
of these jagged line, right click it smooth. Okay. And, we still have the Bolan modifier exists. That's we didn't alight, so it control I alight, and now that's will
work head smooth. Guess I need to mention
something by the way. This Jagt line, we have them because of the of the
cutter that we added. We didn't give this
smooth because of that, this umetry effect
this one. All right. So just apply the y,
we just applied it. We grab this end delete.
We don't need it anymore. Right click head is smooth. We have already
activated auto smooth. And now we got this results. We got some weird shading
here because maybe we have to close vertices to avoid that
Kewirg some vertices here. Maybe merge those. When you work in this way using bullying, you just need to put in
your mind that you have a cleaning mission
after the bullying. Like what I'm doing right now. Maybe this one as
well we can mark it. Now it's become better. That's cool. What else
we should do here? Okay. Let's apply
bubble for this one. Let's check the modifier. We don't have any modifier. Hold shifty grub
bubble from this. I think we got a
problem with the scale. I will apply the
scale for the metre. All right. We don't
have any problem, but I think there's
something wrong here. I don't know, I need to fix. Because I activated
clam overlap. Seems like Bible something
prevented to work correctly. And that's mean we got
some close vertices here. Some problem somewhere
here in this area. And we need to find it. I think the problem
here, let's merge those. I don't know where it's
exactly, to be honest, but I will hit a select all the vertices and hit
M and merge by distance. A, we don't have
very close vertices within this threshold.
That's very cool. All right, Let's try to find out why Bevel doesn't
work correctly. I will activate clam overlap, turn off clam overlap, and I will check this again. Okay. Let's search more and let's see where's
the problem exactly. I don't know, but I think
the problem is here. Anyway, I will leave the clam overlap of
for this geometry, and I will out and let's
go to the next one. The next one should be this. We don't have any modifier here. Hold shift to grab this one because we already
gave it a bible, and let's cop it a bible
from it to this geometry. Control I apply the scale
in case we got a problem. It's like to isolate it. Let's try to kick it. Do
we have any problem here? Type to the edit mood to kick, do we have any huge phase? And it seems like we need to fix this area by adding
some edges here, J to make some cut. Maybe I can add we can add the edge right here to add
connection in this area. As I said, avoid any big
gon. This one as well. This very big face
as you can see here. Let's try to cut this area
by adding between those, K, make connection between them. And what else may be with
this one with this one hit K. We can make a connection,
this one with this one. Even those that's
okay if you like. That's very cool. That's nice. I think that will be enough. You can grab this vertex if you like in this one. M connection. Okay. It's slash two excites, and we can say that
we've done with this. What about those here? Hold shift to grab this, Kobe bevel to them. All right, radical
shade smooth and then activate auto smooth here
to get better shading. And let's check it. I think we don't have any
problem. We can't skip it. All right, no, do we have
some problem right here. I will just like to isolate it, and let's try to find out
why that's happened here. Well, I will turn off
Bevel temporarily. This edge right here, it's strong to
leave it like this. It's very close to this area when Bevel
work to attach it. In this case, I will use knife tool to make one
cut here and here, and I will grab this
vertex C ketwise to move this edge away. From this side and
the same scenario from this side as well. I will hit k to activate
knife and add cut like that. I, grab this keywise,
and slide it away. After that, you
can grab this with this it J to make a
connection between them, that's will be okay, and
this one and this one hit K. What else? Maybe we can make some connection with those K? Maybe the same scenario here. And just keep in mind, I don't know, but we
don't need the side. We can actually delete
this side if you like. You can go to the front, go to wire frame, and can grab the side and
delete it at x F to delete, and we can stick with
the side and that's it. Now, tub out and activate level. All right now, Bevel, work
correctly without any problem. What about this geometry? As you can see, we
still have all the. All the Bolan modifier story. Croll A, apply visual
geometry to mesh, and delete all of these
cutters. We don't need them. Now it's become all
right. Grab this hole? You have to grab anyone with the vl and cub l to select it. Select this its to
isolated end list. Try to find any
problem, Ric it smooth. Yeah, we got some problem
right here as you can see, we have some artifacts. To fix this, t and
see what we got here. We got very close vertices. Yet wise merge them. Don't forget to activate atomrg. Do we have any problem here? L et's activate auto
smooth to make sure that we don't have any problem
with the heading here. The same scenario for the site, tab K wise merit
as c. All right. Everything looks nice. We just need to kick this area. Let's check this
phase, as you can see this huge phase
goes like that. That's wrong. Maybe
we can add the vertex goes like that or
he goes like this. For me, I think we can go
to the vertex hit K to add a cut goes there.
That will be better. For this area, we can add a cut. I don't know, maybe goes
here, something like this. For this side, as we hit K, let's add a cut goes here. And cut maybe goes here, and use the knife tool again. Let's goes like that. The same thing, grab
those with those J, and then activate knife tool, and let's make cuts
here, other cuts there. Something like this. A H enter. That's very cool. Let's see, do we have
anything else here to do? Tap out and now let's check
the shading. All right. Maybe I can move
this just a little bit to fix the shading
that we got here. I should do this for
this side as well. And here as well, and here. For this one, ket wise and mark those because
we got the problem, and this one as well, eat
wise and Mr those. Tub out. We don't see that we got a
sharp here in this area. To fix this, I can
go to the bible here and take this bag just
atle bit the angle. A because the angle right here is the number here is
very big for this angle. Take this bag and it will
include it. That's very cool. I think now I can hit slack
to exact from this geometry, and I can pick another one. I can add bubble to
this, grab this, hold here to grab this one, COBI to selected, select this
hit slack to isolate it. Let's try to find is
there any problem any heating problem here
or everything looks fine. I didn't apply the
bulion, apply this one. And now let's
Everything looks nice. Maybe I can add one edge right here and make connection
between this and this. That will be better. Maybe
for this side as well. K as cool. K wise, and let's move this to have
better level here, as well. Everything looks
nice. All right. I think Bevel here is
not working correctly. We can grab this in this and he key tie and
slide them like that. That will be better,
and maybe I can make a connection between those
to avoid any big face. To make sure that when
we send the umetry to another software,
everything works correctly. All right, what else? Do
we need these cutters? We don't need this one deleted. Let's move this and L lets see. We don't need this deleted. We have this cutter
here as well. Move it. We don't need it deleted. Okay, Let's try to
kick everything. All right. This
one, this uma tree, I think we didn't give it above? No, we gave it. But we didn't give
it here the smooth. And now we fix it. All right. Is there anything
else we need to do here? We don't have a sharp
ech here in this area. In this case, maybe we can I will duplicate
the duplicate it. For this one, I'm not going
to use the method with angle. I will use weight, and I
will tap to the e mode and grab this g
right here and go to the tim and give
it vl weight to one, and it will be targeted
with the group. But we have very big
phase like this. We need to make some
cuts maybe like that. I will go to the vertex
to grab this with this K, and maybe this one
with this one, a K. I think we can use the n
to make cut like that and cut like
this and hit enter. That doesn't work. Why
that doesn't work. Maybe with this one and this one K. I can delete
this one control X. Let's do the same thing here,
see what's going to happen. Control X for this. That's weird. Control
because that doesn't work. Let's see how can we avoid this because it's wrong to
leave it like this. Let's see what's
going to happen if I make connection between them. Yeah, that's not going to work. A cat like that again. Another cat goes like this. Something weird happened here.
I don't know what is it. We just have one
vertex right here. I don't know, maybe
we can slide this. Key wise and slide it here, and maybe we can a key to
this here and move this up. I think that will help to solve
the problem a little bit. Almost. Let's try to make another cut goes
like that, maybe. Okay. Let's try to use
another scenario here. I will grab those
and a control X, and I will make cut
goes like that. I think that will be better. K at a cut goes like this. But what about the sit here? Maybe the same thing we
can make a cut goes like that with K. Yeah, that's pat. That's very cool. All right. Here we have
double hard and normal. As you can see, we activated
the hard normal for this pval and we have hard and normal
for this one as well. That doesn't work, and if you've got any problem
because of that. Before I complete
the situation here, I think we got
some problem here. I will make a cut goes like this and cut goes
like that as well. I feel that's something weird happen here in this area,
but I don't know what is it. Anyway, if you've
got any problem, you can use this modifiers
call weighted normal. I will always fix your
problem with the heating. You can see this
before and after, can give us better heading. You can keep it and when you
want to apply everything, you can keep this one
and apply the modifiers. I think we add bubble for all
the necessary geometries. I think I can make some
kink here, Bubble this. I think that will be
more interesting. What else we could do here? I have some hold right here, but I just ignored it because I think it's
not n, not beautiful. Yeah, I think that's it. We just add the level for all
of these geometries, and now we don't have any
problem with the heading. And this, we can say it's ready. If you like, you
have the ability to delete unnecessary phases. Any face camera will not see it, you can delete it okay. For example, this
hut right here, we got this face in this area. It's okay to grab it like
this and hit x F to deleted. Keep it open from here. The same scenario for
this one, if you like, you can grab this side
or these faces here, use C, and you can brah
those and select them. You can delete the side, XF to deleted and
keep the outer faces, the same result we got here. It's still nice. All right, is there anything else? Art, I think I will end this
video and see you next.
36. 037 Modeling section Bottom parts part 1: Hello, everyone. Welcome back. We can't believe
the first light. What I will do now, I will grab all the
geometry of the light, and I will hit to create
a new collection. Let's create a new collection. Maybe we can call this light. Something like this, maybe, or you can call it whatever
name and then hit enter. All right. Now we
have the light, I can hide it or hide it. And now we need to create
the details that should be underneath Neor in the
middle, these details. All of the stuff. All right. Let's see how can
we create them. In the project folder, I added a new image sc
left bottom detail. The image from the left view, and from here we can see
what we need to create, and we have the bottom
view already exist. So we're going to use those two images to make
the process easier for us. I will take those out temporarily and let's
exit from here. Let's make sure that screens is working, that's very cool. And now let's go to the left, and let's see what we
got there. All right. We have the image
with all the details. I need to replace the image, tumble around and
switch to orthographic, to see the images. And let's go to the
folder of the images. I will click and drag and
replace this with this. All right. I think
we got some problem. Maybe we need to flip this. Let's go to the orthographic hit number five
from that and Bad. All right. Let's kick,
do we have any problem. All right. Anyway. Now,
if I go to the left, I will guard this result. And that's not going to work. That's not going to help because I created the
umetry to this direction. In this case, I can
select the image itself, and I can flip it to
get better results. So I'm going to hit five to
bring the reference images, and I will select this one, hit control to activate mirror
and mirror it like this. That's all what I need.
Now, I will turn of the collection because I
don't need to see the body. I just need to see
these details. Yeah, that's very
cool. Now let's go to the left control three, and I will hire the light group. We don't need them. We just need to work with those.
Let's go to the bottom. Let's see what we got
there. All right. In the bottom view,
We got the lights. In this case, what
I'm going to do is, let's hit five to go
to the orthographic. This is the bottom image. I will replace it
with another image. I have this bottom
without licks. This one will help because I can see all the
details right here. I will select it and click and drag and replace
it with this one. Not like this. Delete it. Let's go back here. All right. I think I made a mistake.
I deleted this image. Click any a drug and put
try here and there we go. Now, everything good. Let's go to the bottom, Control seven, and now
I can see my details. And the stuff, we
don't need them. Let's grab them like this. Maybe we can create
a new collection. Or maybe we can add
them with the body. Let's hit to create
a new collection, and let's call those
maybe body top details. Call them whatever name you
like, and let's hide them. And now we have the bottom view and we have the left view, and now we can start
creating the stuff. All right, cool. I will both the three D
coursor in the middle, Heft S cursor to
the world organ, and I will ft a to cube, and I think we can
start from here. Okay. Hit key and let's put the corner
right here and maybe we can tap to the edit mode and go to the vertices and
swi to wire frame. Grab those, hit key
and take those back. Maybe we can move those down, maybe right here and move this just a little bit
like that. Tap it. Maybe we can add
an A here and move this a up, something like that. We can go to the front
to see the thickness, hit A, and then hit S
and scale it like this. For these vertices, I will hit key and move
those up almost right here. And those I will leave
them here in this place. Let's go back to the left, and let's see what
else we could do. We need to move those back
almost right here, maybe. And these vertices, maybe we need to move them just
a little bit like this, and we can end it anywhere because this
air will be hidden, will be covered with this
one with this geometry. All right, that's very
cool. Now we got this. Let's go to the
perspective here to these images and let's see
what we could do here. We have some extrusion here. So I will go to solid and
tap the mode it control. Actually, I am in the mode. At one right here, leave it in the center, control and lets pval to two like this. Then grab this face. Yeah, I grab this face,
hit to extrude it. Let's extrude this just
a little bit like that. Let's go to the front
to the left story. And let's see the
results. All right. That's cool. Yeah, I think
we extrude the wrong side. I need to grab
this, not that one. It to extrude like this, and let's go to the left. That's very cool.
We just need to move those a little bit. Hit key and let's
move those pack. Something like this.
Maybe this vertex, I can move this pack as well. Story down to the Z. Maybe I can put right here. I can move a bit forward
like this. That's very cool. I think we extruded the face too much it wise and slide back. Maybe right here, and we need
to create two holes here. I will hit control r
again to add one a here. We need to give this
a thickness volt, control B or before you eval kit wise and slide it up and then bevol it,
something like this. You can go to the front and see. Yeah, that's very
cool and very close. After that, I will hit
control r to add one A here. Sorry, control, one right here and one here,
and one there. Now I can select these faces and hit E
to extrude those back, something like this, and
there we go. All right. Let's go to the left
again, to go to wireframe. Let's try to create
this right here. What I will do is I
will select this face and bring the three d cluster
right here in the middle. That will be easier for me. Let's go to the left
again and tap out Heft A, and let's add ube again. Hit Q to move this
qub right here. And maybe we can put here. Tab go to the vertices. Let's move those up here, and these vertices may be here, and those here.
Something like this. Let's mick those vertices, we and mark those like that. Let's move those
almost right here. Now I will go to the edge, grab this g and bev it. You can see the
selected from here, but if you tumble around, you can see that I
selected one here. Go back to the left.
Hit control B to bevol. Give this segment
how many 11 segment maybe that will be okay to
make this a smooth like this. Now let's select this one, it cantro B and let's beval it. And this one as well
cantro be and beivolit. After that, you can go
to the front and you can hit eight c the hole umetry and hit key and let's
move one side here. Grab the side key and let's
move the side right here, and keep the close or if you
want to attack that key, and move it a little bit here. That's very cool. When
you comble, you can. You can go to the
modifier and add mirror modifier to mirror
it on the other side. Let's create this faber here. Let's go to the front. Maybe
we can start with the front. Okay, that's very cool.
I think I don't know, but I feel that we have some
problem with the mirror. Something not looks correct. I think I'm going to add
mirror to this metry. Let's add mirror with the fire and let's see what's
going to happen. Let's hit bisects and flip. The same result,
let's delete it. In this case, I will
select this one. I got some problem. Fit
in the correct place. In this case, maybe
we can move it a little bit or make
it a little bit wider or ignore it because something is not correct
here in this area. Maybe the pace that we selected is not
exactly in the center. In this case, to make sure that everything
works correctly, I will bring the
three d crosor in the middle here,
and then Heft A, let's add t. Let's
go to the left, and I will use this MT, I will move it and with here, and I will use it
as a reference if I want to put the
three d crosor here. So, let's put the three d crosor to the position of the empty, Heft S and cosort selected, and let's go to the front. Let's make some comparison here. Let's move the position of this umetry to the
position of the empty. Right click, set organ
organ to three decorsor, and now I will give
it mirror modifier and let's see what's
going to happen. The same thing. We didn't
fill this area here. That's been this umetr is
exactly in the center. Let's try to move the organ dot for this one to the position of the
three decorsor. Right click, set
organ to the cursor. All right, that's cool.
Now, it's better. We fix the problem. Let's try to create this. Shift A to add, and
let's add cube. Move the new cube down here, scale this, like that,
scale this like this. And let's go to the left, let's see what we can do there. Hit key and move this
maybe right here. Tab, go to the vertices. Grab these vertices, hit key, and move those down here, grab those hit key,
and move those here. Let's go to the front. That's very cool. Now we need to make some bible.
Let's go to the left. Let's start creating this motor actually. I create this one. I will hit eight select
all the faces, hit, let's move this forward,
and let's this side, let's move this up right here. In the front, we can
see how to eval. Let's se those two
aces. Those edges here. And that control
be to level those. Try to create something round like that.
That's very cool. And we have some tilt here. We need to cut it, some angle. Go to the left, and let's see how can we
create this tab out and use carver
tool? Ctrol shift. Use line cut, and let's
make cut goes like that. It space to cut it, and they
were going to be cut it. There's some problem
with the carver tool. I don't know what is it. Anyway, I will hit tab
and let's go to solid, and I need to create
this shape right here. I can cancel the carver tool
cut and use another method. That will work as well. Because if I go back and create another cut that
will be easier for me. I'm not going to create this, but I will controls it
and bring this back, and I will hit ft
A to add a cube. I will use this as a cutter. Let's move this right here. Go to the left top, to go to the wire frame. Cb these vertices
maybe this one. It can move it like this,
and move those like that. Let's go to the front, Let's move the whole
umetry to the side. H D take a CB and the and let's move this
one on the other side, or you can delete this and you can use mirror
modifier if you like. I will delete this x f tab out, add mirror to mirror
this on the other side, and the control I to a light mirror because
we don't need it. Got the slid, grab this,
have to grab this, control H B, se difference.
I think that's better. We have a circle right here,
Let's go to the front, Shift A a cylinder. Align the cylinder to the view. Hit and move this down. S and scale it, z to
go to the wire frame. We can move it
down just a little bit and scale it even more. In the perspective, push
this inside a little bit. Old have to go up the target, control Hits
difference. That's it. After that, we need to
create this have here. In this case, I
can grab this tap the mood and lets select
this entire edge loop here. I can hit D and move this
to the y a little bit, and then hit P s to separate
it, and then tab out. Cru this Nu geometry
and then it A, select all the
vertices or the edges, and then hit two this like that. The left view can understand
where should we move this. Let's see grab the
side and let's move this here, and the
grab the side, and let's move the side
here. Something like this. I will use the nf tool
to make cut here. You can click here and go
to the other side and hit A to activate the angle or let say to make
the line set right, and you need to click. But before you click, just C to cut to cut the whole gummetr. And then left to
click and then enter. After that, grab
these two vertices, hit here, let's move those here. Atle bit, and that's
very cool. That's nice. Now we need to give this
a thickness tab out, go to the modifier less, add a solidify and solid as you can see is
not working correctly, and that's because the
phase orientation. In this case, tab hit a hit a H n to
recalculate the normal, and now we got solidify. I need to make this work
on the opposite side. Something like that may
be as will be very. When you be satisfied with
the result control and apply the solidify
in the object mode. Tab again, go to the
edge, I'll click, c the entire edge loop here, control B and valent. Let's eval it to two edges. Something like this,
maybe will work. I like you can erupt the side, wise and move it
back. If you care. Now we got this result.
That's very cool. From this angle, I can see
some space here open area. I need just to close
it. To close this. I think we can I don't know, but maybe we can stop the eh mode and
select all of these faces, prob them, and then hit and let's move
those inside ale bit. Maybe we can activate
even. That's better. And then tap out. That's
very cool. All right. I think that's it
for this video. I will end it and see
you in the next one.
37. 038 Modeling section Bottom parts part 2: Hello, everyone, and
welcome back here. Let's see what is the next
geometry that we could create. Let's go to the
left, control three. And let's bring the
reference images. Let's see how can
we create this one this time. All right. I will hit Shift A and let's add Q to move it and let's
put the Que right here. Put a little bit and align
it with the next kmer. Tab to go to the edit
Z to go to wire frame, craft those vertices, move
them maybe right here. I think we can move those s. We can move those
all the way here. And select those ke to the z, crop those as well, Ke to the z, and let's
move those here, maybe. That's very cool. Let's go to
the bottom, Control seven, and select everything
at and scale those like that.
That's very cool. Actually, it is just a box. All right, and it will
be easy to create. I will select this
vertex with this vertex and hit heft and bring the
three decsor right here. T decsor still in the middle, by the way. All right. Let's tab out Hft a
to add another cube. From the bottom of view, you can go to the wire
frame and use this cube as a catalyst skillet to
this egg and this one. All right. L et's scale to the y tab and let's
see up this side. Hit Let's move this right here. That's very cool. And from the
left, grab those vertices, key to move those here, grab those key to move those up, and we just need to make we need to add some
angle here to this area. As you can see now, this will work as a cutter. Tab out hold have
to grab the target, control to B, difference. I will difference from here with the bro because maybe
for any reason, maybe I need to move this
or make it big or small, when I complete
everything, I will apply. I think we can make
the cutter a little bit smaller for a reason because I just need to make some
king here. All right. So now we got this
result is very cool. I will control R
tab to the cutter. I control r and
let's add one here. I will hit S to the y zero
enter to make a stri, and I'm not going to use Bevel, but I will hit
control shift R to duplicate this to
two edges like this. Maybe something like
that. I will select this to the y zero
tert mac flat. This one as well.
I think it's flat. Select this lifts,
Al cb this, control, the two level those 22, something like this, maybe. This g in the middle,
we don't need it, go to the mode, control
X to dissolve it. Then let's go to the phase mode. Let's select this face here. Alif to cru this face right here on the side,
S to scale them. I just need to create
something like that, as you can see, and we can grab this and this
g and scale those. To make the angle a
little bit wider and grab those and scale
them away like that. Grab this with this and scale them away a
little bit to the y. Now we got this shape. It looks nice. One more thing maybe we can do, we can grub the outer edges, those and it can
troll be to b them. But yeah, something
like this a toll work, and it will be nice. All right. This shape is better
than this one right here. All right. That's very cool. I think that's it. We don't
need to add anything else. We just need to a light or maybe we need to extend this up. I think according to this image, as you can see, to go up. Let's go to the lift control
three and grab this tab, go to the vertices
in the wire frame, hit key, and move this up. Something like
that. Maybe we can put here and then tap out. All right. After that, let's tap again and
go to the edge, grab this age and this age. I think I can bubble them
to two edges like this. I think it will be
better and even more beautiful. That's correct. One more thing here, maybe
we need to scale it just a little bit to align
it with this g here. Let grab this face, hold here to grab this face
and from the front view, we can tell where
should we scale this, Scale this to the age and
align these edges like that. Now let's tumble around
C to go to solid. As you can see now,
it's aligned with this face. And then tap out. So now we create this shape. Feel free to add whatever
thing you need to add. Okay. Even if you want to
add a shape right here, make some cut here,
that will be okay. Let's create this thing here. Let's see how can we do it. I will select this and tape to the eight mod control r.
Maybe we can add right here. From the left, we can see where should we
move this one here, control r and one
right here as well. Let's go back to Solid. Go to face mood, H three, It click to grab the face loop here and cancel
this one. We don't need it. Ctrol, out control and
make selection like this. Shift D to take a CB right
click to leave it in the same place and then Ps
to separate it tab out now. Grab this neweometry. Let's go to the modifier. Here we have boing,
we don't need it. Add a solidify. By the way, boolean for
this geometry, the new one. And we don't need any boolean
for this, just like paper. Let's do this, and
let's add a solidify, to give this a thickness, and let's give it thickness in the minus and activate
even thickness. Now we got something like that. You can go to the front to
check the size if you want. Something like this,
I will be cool. Don't worry about
the angle here. This angle may be better
and more beautiful. You have the freedom
to do whatever thing. Now we got very
nice results here. I will had control
A and a lights, and now we got this nice shape. If you like, you can
tap the mo and de grop this space a Ht S and
bring the three decosor here, and you can hit top heft
A and less add cube. Maybe you can scale like
the scale to the Z as well. K to this Z, let's move this right here temporarily,
S to the z. Control I apply a scale, maybe. Or maybe we can scalt even
more like this, make it tall. Tap to the eight
mod, crop this egg with this one and hit
S to scalt like that. Crab this with this, it
has to scaled like this. K to Z, let's move this up. Now I will use this cutter
as a cutter in the left. Move this and let's
put this almost right here. Something like this. Tab mo hit a select all
the faces and in the left Hf Dn let's duplicate
this couple time. Let's add one cobra here, and then hit Shift A to
B the last operation. Now we got this. Let's try
to boot in the center. To do that, I will hit A
to select all the faces, and N manually this boot the center like this.
That will be nice. Tab out and as it. I will use these
boxes as a cutter. Hold to grab this, control
shift B, choose difference. Now we got this nice shape. It's not exist here, but I just like to add it here. All right. What else? What
matry we can add here? Maybe we can take the circle and maybe we can take CBA and put r
here. All right? That will be nice, actually. What else we should do here. All right, maybe we can grab these cater CFD to take a CV of them and let's bring the shape
bag sweetest to tick a se. Maybe I can I don't know, but let's try to do that. I will go to the bag view, control one, and I
will rotate this just ale bit and align the
rotation with this angle. Try to find the close angle, something like this,
will work for me. And it and move it like that. Make some intersection here. Let's put those in the
center almost right here. Hold have to grab this, control and let's use difference
to create this shape. That will be nicer actually. If I want, I can go
to the modifier, select this object, and go
to the modifier right here, and I can add a mirror modifier. Let's add mirror to mirror
this on the other side. Activate bicect to cut the other side and delete
it and replace it with the mirror and hit flip because we didn't get
the correct mirroring, hit the flip to flip the mirror, and now we got this heap. It's very cool. I
like it. All right. Anything else we can add here? All right. I think we
can add some shape here. I don't know. I feel
it will be nice. Let's select this one
and tap grab this, for example, Shift S
cars to select it. Tab out. Shift An, let's add a box as a cutter. It gn. Let's take this
almost right here. And tab go to phase,
grab this face, it. Let's move this face right here. Maybe I can take this face
out almost right here, and I will use this as a cutter. I will select this face and move a little bit
down maybe here. That's cool. And maybe I can hit shift D and take
a COB on the other side. But we need to we need to
mirror this in the correct way. I will select this phase and tab and select this one, this phase. Shift S and bring the three d crosor exactly
in the middle. Tab out. Grab this one, and I
will hit right click. Set can orc to three dcorser, and then I will give
this mirror modifier. The mirror will work
to this darken. I will change this from x to
y, and that's what I want. Control I and apply the mirror. And then hold Hf grab this, control Hit B, and let's
choose difference this time. All right, I got
something like that. If you didn't like it,
you can ignore it. If you like it,
you can create it. After that, we can mirror
this on the other side. Select this, go to the
modifier add miro modifier. As you can see, we
don't see any result. Activate bicic to cut the other side because
sometime as you can see here, we have some silhouette. Do you know what's
happened here? Mirror works correctly and mirror this side
on the other side. But we got this side flipped
on this side as well, and it covers the cuts. When you activate bicects, that's will fix the problem, but you need to flip it. When you hit flip,
everything will be cool. And now we got this result. It's nice and I like it. And maybe I don't know, I
feel that I can scale those up to the z and make
them like this. I think that will be nicer, and I will accept this result. A. Let's see what's
going to happen if I add above for these vertices. Control FTB and let's
give them above. Is that something nice
to tap these corners? I think it's not worth it. I will control. It's
not so cool. All right. One more thing here we need
to do before we move on. I will make a cut
goes like that. Something like this maybe.
That will be better. We talked about that. Enter to confirm the cut, and
that's very cool. For this object as well, don't leave the face like this. Just make some cuts. K. Maybe we can add a cut here, right click to add
a new cut here, the same thing
here, and cut here. When you be satisfy
enter and confirm. Don't worry about the other side because we added
mirror modifier here. I will mirror the
side on this side perfectly. Tab out
and that's it. If you're okay with the result and you don't have
anything else, you can control and
apply the mirror. And these cutters, if you like, you can keep them for a
future cut like this. If you want to use these
cutters for any other geometry. You don't need to delete them. Actually I can keep them
because maybe I can copy them and use them
in any other place. A, this is how to
create this geometry. We created something new, and the result was very nice. So yeah, that's it for this
video and see you next.
38. 039 Modeling section Bottom parts part 3: Hello, everyone.
Welcome back here. All right. Let's
see. What's next? I think we can go
to the left view and left view. All right. Maybe we can start
with this geometry, this this long
piece we have here. All right. Let's go
to the perspective. When I say perspective, I mean the reference
image, I mean. And let's see what
we have there. All right. I think this umetry, it's just 11 piece, the curve that we got
here with this one. All right. Seems like this. Yeah. So let's see how can
we create all of that. I think I can unhide the body. I just need to see where's my body exactly goes the edges. As you can see, we have
some difference here, so we need to take care of that. You remember when we made some chink here when we
move the vertices down, that will affect this
umetry actually, and we need to put
that in consideration. So let's see how can
we go around that. Keep the body on and let's put the three
D coors in the middle. An cumery you can select
this one if you like. And tap to the edit mode
and let's select this. This vertex maybe because
it's in the middle. I will put the three
D cursor here, Hit to S cors to select it. Then tab out, go to the left, control three and Hit
A and let's add cube. G, and maybe we can move this. Let's see where
should we move it. Maybe we can start here
from the beginning, go to the wire frame, Z and wire frame, and now we can tap
with the edit mode, and now we can start moving some vertices and control them. Let's move, for example,
these vertices, maybe right here, maybe this one we can move it here temporarily. Even this one we can move
it here temporarily. Or we can align with the body. That's okay.
Something like this. Grab this one and hit key. Sorry. I grab this one, these two vertices hit key, and let's move those here. Grab those as well, and maybe we can hit key
and move those over here. And now I can select
those four vertices. Man, I select this phase. We have a phase here because
we select four vertices. And I will hit to extrude, and as you can see, we
have some extruion. I will hit radical to cancel the direction
of the extrusion, and I will hit g to move
it right here. All right. And what else? I think it go and it could
reach this geometry. I right? All right. I think it's
yeah, something like this. The alignment is okay. Or maybe we can hit key and move this up a little
bit, maybe here. Something like this.
And for this vertex, I think we can hit
key and I don't know, maybe we can move
this right here. And this two vertices, I will key and move them here. I will activate vertex snap and hit key to move
this to the Y, hold control to activate the snap temporarily
and snap this here. Now, we grab those
four vertices. I mean, select this phase, hit to extruded, and
let's have extruion. I don't know, maybe right here. All right. I just
got confused here. I feel that we have some
problem right here, or something not correct. Let's go to the left. These geometries, this
one, and this one, I think we need to make
them a little bit short. All right. So I will select this and select this geometry, tab to the mood grub all
of these vertices hit key, and let's move those
almost right here. Or maybe we can keep
them like that, and we can move this out. I mean, if I go to the front, I could move this right
here, something like this. This is the correct
place for this cmatry. Could be aligned with this one. In this case, I can
tap it move and grab the side and move it a little bit like this,
something like that. Now, let's go to the left, and now we need to move those
a little bit down, I think. I mean, I can grab these faces and hit E
and extrude those down. Now if I go to the perspective, now it's makes sense. I think. Let's go to the left, and you can make some
comparison here. We got the same
result. All right. What else? We could move
this all way to this point. Go to the left view, z to go to wire frame. Grab those. But we have some overlapping happen
here with the body. In this case, I will control r, and let's add an right here. Maybe right here, and let's move those four vertices down, key to the z, and
let's align those with a body to get
better results. All right. Crop those, hit key, and let's move those to
this end. All right. That's cool. That's cool. All right. What's next? What's next? What's next? We have a care right
here in this area. Let's see how can we
create it. All right. I will align this
vertex with the body, just move it a little bit, and I will grab
those four vertices and he keep twice to move those back and then hit ult
and move those forward. I don't know about something
like this right here maybe. I will move this, kee and I just need to
align it like this, and then I will buffle them. Go to the edge, grab
this g with this age. Control to buffle them. Let's make this round like
that. Something like this. And let's add some segment
ten segment maybe. With these edges selected, head key and let's move those. Maybe right here, but we got some misalignment.
All right. I will let control Z. I will grab these
vertices and he keep. Move those maybe right here, and I will bubble them
here in this area. Cant roll B, C this
edge and this edge. Ctroll B to bubble them. Does that make
sense? Party seems like we need to
move this one back. Guess a little bit.
Maybe you're right here. Now let's repeat
that, craft this A, hold here to crab
disc and troll B. I think now this
result is close, ten segment, which will be
very cool and round and nice. I will accept this. We
have a circle right here. Let's try to create it. Go to the left z to wire frame, and where is the
three D right here. Saft A to add a cylinder and align the
cylinder to the view. It's about 40 vertex and
let's move this right here. You don't need to change
any of the scale. This, maybe we can
scale a little bit. And we need to take this out. G and take this out
almost right here. Something like this,
that will work. All this one will be a cutter, so I will have to crop this. Ctrol HB and difference. Now we've got a hole here. That's very cool. What else we need to create
this one right here? We don't need to create the chal because we already have one, and you remember it, I think. But before I do that, I will tab and I will
select these outer aches. We can use the control
method if you like. Something like this, and I
will bubble those control B. Something like
this, it will work. But it will be very
close to this area. Ignore. Yeah. All right.
Let's go back here. We got some problem right here because this egg become
very close to this one, and that's not correct
because after that, when you want to add Bevel, the Bevel will
intersect with here. I will got some
intersection problem or overlapping
problem in this area. And that's mean I
need to avoid this. I need to give this
some distance. In this case, I will go to pa
grab this phase and control plus to grow co time and go
to the left control three. And it ey and let's move this. Try to center it. Even if that doesn't match the
reference mic, that's okay. It's not the end of the world. This place is very cool
and nice, I think. I will accept it. And I
will leave it like this. All right. We got some weird result right here.
I don't know what is it. If you've got a
problem like this, you can't fix it actually. I will hit to select this egg and this one as well,
and even this one. But before I select this, I will grab those
and delete them. All right, Let's
do something else. I will hit k to
make cut from here. Another cut goes here and
then confirm the cuts, and I will grab those
and delete them. And now I will hit Alt to grab this edge loop and lt have
to grab this and this. Select all of these edges and don't forget to grab
those as well here. When you convle right click and space to correct the space. If that doesn't work, you
can do something else. You can select them one by one. All right. We got
some weird results. I don't know why. All right. Let's grab this face and let's
rotate this to the x axis, x, and let's try to
align these edges again. We fixed those. Maybe now we can hit control plus
to grow the selion. And we can rotate those
to the x axis as well. And now I think all
the vertices aligned? No, we don't. Something
we're tapping here. We lost one. We
need to connect it. Let's at this cut here and
grab them again. I'll click. I'll have to click and here as well, right the click space. Now, I think we fixed it or not. I think we're still
missing one here. But why that happen? Really we are let's go to
the left and let's see. Is that acceptable or not? I think I can accept like this. It's okay, even if I lost one. All right, let's try to rotate this phase
just a little bit to the x. Yeah, I think now we fix it.
All right. That's cool. I will go back to the light
section and hide its, and I will take a
C B from this D, and let's put this right here. And let's go before we
switch to the left, I will rotate this to the y R Y, let's rotate this nine degree. Let's go out to the left and I will G to
move this right here. And I will hit S to
scale this and align it. If you want to get
perfect result, you can move this right here for now, and select this face, to S and bring the three
decorso in the center, tub out, grab this, H to
Scorsor to select it, and now it's in the center. Scale it a little bit like
this and take it out. According to the reference
em that we got here, it and take this
out just a little bit. Something like this. It will be nice or even
more just a little bit. You can't row up the
scale because we scale this to rectify the bevel. When you com bele we give
this body top details? Did we give these a group, it seems like we don't. If you hide the
light collection, you will lose this piece here. In this case, I can put all of these new details
inside a collection. Just deselect the body. And now I will add to
create a new collection. And I will add a
new and let's call this body bottom parts. All right, just to recognize it. And now I can unhide the
lights and grab this geometry and hit to move it to the body bottom parts,
and now it's there. I can hide the light
section, sorry, a light collection, and I can
have this one right here. All right. Now let's see
what else we should do here. Let's move this here.
Let's go to the left, control the three, and
let's go to the wire frame. We have the stuff
we need to create and cut them, cut this geometry. Let's go to the lift again. Hit sift A and
let's a cube here. Hit key and let's move this
cube, maybe right here. And let's scale this like that. Apply a scale tab, go to the vertices, scale those out,
maybe right here. Scale those in. Grab
those heat key, and let's move those right here. That's very cool. That's nice. Now let's select these edges and it can troll to bovel them. Let's give them nice round
results like this, maybe. Six or seven. Edges
here we can add. That's very cool. All right. Now we got this one geometry. I will hit HDD to take another Cob right
here and I will hit arteritate it 101180
degree like this. Maybe we can move it
just a little bit. Now I can e grub
those and hit H D to take another Cob and maybe
we can put those right here. And I can heft couple
time if I like. But for this one,
I can hear again, but we need to make
some editing for this. I will tab and let's
try to move those to this or that's not going to work. That's
not going to work. In this case, with
this one selected, it control H x and
activate carver, and guess may cut like that, and that's it. All right. Tab, go to the vertices, grab those vertices, hit key, and let's move those right here. Go to the edges, I grab this
corner and this corner, and control B to bubble them. Let's make some bubble like
that, and that's cool. Now I can take this OB shift
because we need to the site, and I will control and flop it like this and key let's
move this right here. Now, our job is to select
all of these geometries. And hit control J and
make them one piece. Tab to date mood hit a to
select all the phases, and I will recalculate the normal in case we
got any problem. That's it. All that's cool. Now we need to take those out, tub out key and take those out. Something like this. All right let's see what we got here. Everything looks nice. I will select those ho, you have to grab this one, control have to be, and
let's use difference. And now we cut this cut. That's very nice.
Let's go to the left, and let's see what else we
could do here in this area. Let's check the
perspective as well. All right. We have
something here. So edge maybe, I don't know. I can see it right
here in this area. I can't draw here. Yeah, here. What is this exactly? All right, I think I
will end this video, and we can com bele
it and the next one. All right, so see you next.
39. 040 Modeling section Bottom parts part 4: Hello again, and welcome back. Let's continue
creating this stuff. Until now we created this, and now let's check
the reference images, and let's see what
we should add here. We got some details
here we need to create. And this stuff right
here. All right. Let's go to the left
view control three. And let's go to the wire frame and let's see
from where we can start. Maybe I can start
with this stuff here. Let's try to understand
what exactly we have here. All right. I think we
can start with the Q Let's see where the three dicoor or
is closed right here. Let's hit sift A, and let's add Q, G and
let's move right here. Tap to the mode. Let's go to the vertex mode, and move these vertices, and let's put them in
the right position. Something like this. In the front, we can go and we can put this exactly
in the correct place. Moving these vertices
a little bit here. And I don't know, but they could be aligned with this surface
here, in the perspective, we can understand
that more. All right. I will gain and
move those close to the surface.
Something like that. And I don't know, but I think that we need to cut this metre like
this. I mean, this one. But before we do that, let
see what else we should do. Let's go back to the front and let's go to the wire frame. Here we have some angle
we need to create, it control r to add one here, control r to add one right here, and the grab those, and
let's move them like this. And now we need to
pile this right here, grove it like this, it
control lets pile it. Let's have some arc
like this. All right. I think it should be like this according to the according
to this mage right here. Ten segment, I don't know. I think it's too much. We can reduce the number
28, maybe seven. That will be enough
for this geometry. And now I will hit slag to
isolate this piece alone, and I will select some faces
because I don't need them. I need to delete them. Grab
those hit F to delete them, and let's work with this one. Let's go to the front
and hit slag to excite. Think this one, we need
to give it a thickness, go to the modifier at
the solidify and control the SolidFi Something
like this tool work, 0.8. There we go. We have this
shape we need to create. Let's see how can we do that. Before I create this shape, I will select this
geometry and I will go to the left control three because I think I need to cut this area. I'm going to take control
shaft x to activate cover, and maybe we can create
a cut like this, maybe And now we have this. All right. That's very cool. Now let's go to the
front it shift A to add, and maybe I can add
a circle this time. The circle is 100
centimeter radius. I will change this to
ten, make it very small. And it's weak the
alignment to view. And he let's put this
maybe right here. Has to go to air
frame, S and scale. And and let's move this right
here, maybe. All right. Control I apply a scale, tap it As E S scale
extrude scale. Let's scale this like that. Now I can grab these edges in the
middle and hit to the z, or you can hit E directly
and extrude those up, and a S to the z zero
enter to make this flat. And maybe we can move this down. Right now we got this shape. Now we can A E to select all the faces
and e to extrude it. Now we got this result. We got here very close phases. I suggest that we select these phases and
those here as well, and hit control to dissolve
them and make them one face. The same scenario for the site and control x. This one as well,
we don't need it. That's very cool. Maybe we can just make some
connection here. By the way, these edges, we don't need them as well. Let's select these faces and hit control x to
disolve everything. And grab these vertices, control x to dissolve them, and grab those x, but don't select the corner, control x to dissolve them. Just need to make
sure that I make some connection here
to avoid any problem. All right. It will be better to divide the big
pace, big surface. Let's call in gone. All right. Now let's move this
inside a little bit. Maybe right here. All right. Maybe we can the real
images here. All right. We just need to try to create something close to this
to what we have here. That's what we want to achieve. All right. Let's see what
else we could do here. It seems like that we have
some tube here inside, we need to create as well. To create something like this, I will first move to
the side to the x axis. And I will tap the IT mode and select
these faces. I'll click. Ha d to take a CB here. P S to separate it, tab I t crab this. Tab, go to the vertices, grab all of these
vertices and hit key and move those inside, and grab those here and hit key twice and move those inside as well,
maybe right here. Hit A, select
everything and then hit to extrude along normal. Let's give them a thickness
inside like that. Now we got this
results. And what else? Maybe I can bovle this this
area tab, grab this age. Before I bovle this, I will
move this vertex a little bit far because if
I bivle this one, the bible will reach this
point and I will have some overlapping to avoid it, I will it twice and
push this away. Now grab this control
and let's bile it. Let's have something nice
and round like that. As you can see vl reach
some point and stop, I think there's
something prevented, as you can see, this one, this on the other side, prevent the abovel
to work correctly. And here we have two
vertices not welded. As you can see, so
I'm going to grab those hit M and merge. And as you can see
one vertex removed. That's mean they are merged. If you satisfy with the bivl, it wise and weld this
one as well and make sure to activate auto marge. All right, right. Let's excite from here
and let's see what else we can add. Sorry. All right, let's see what else. Let's stop the mode
for this side, and I just need to
from the left view, I just need to move those
vertices a little bit. Something like this,
will be better. And yeah, I think
that will be enough. All right, let's go
back to our image and let's see what
should we add here? We have some stuff
here we need to add. And what else? All right, let's
check the real image. Let's try to create
something maybe like this. Do we need to do that? We have some shapes here. Maybe we can add
them to this area, but I'm not going to do that. You can do it if you like. All right. I have two options. I can create those or I can create something like
this. All right? I think these objects are
easier to create those as well, I think they are easy to create not a problem to create them. All right. Let's see how can we create simple
object like this. Let's put the three
d crosser here, it shift A at the cube. Scale make it small. Maybe we can move it out just a little bit,
maybe right here. And type the mode, grab this face, hit to the
z and let's move this. Almost right here. Go to the ge, grab this control and let's povele this and
let's make it round. Something like
this. That's cool. All right. Now I will tap out and maybe I can use
this object as a cutter. I can do that. Hit HD, for example, and take OB. Let make it a little bit big, it key, and let's move
this almost right here. Key and put this a
little bit here. Maybe. I just need to cut a
little bit of the umetry. S to the Z if you
like scale like that. Grab a hole, you have to grab this control HP and
use difference, and now we got a cut here. I will mirror this cut on the other side by
using miro Modifier. Just use the correct axis,
something like this. Apply the miro Modifier. We don't need it
anymore. And maybe we can add a hole right here. Maybe I can tap
the mode and grab this face and this face
and hit y to inst. And let's make some inst goes like this and
then right click and use bridge to break these faces together to
have a hole right here. And maybe we can hit Alt S
to make this big a little bit and activate offset even. All right? What
else? Something like this will be nice to create. Let's grab one, and let's move this here H D to
take another be, and maybe we can put
another cobra right here. I think we can scale
them just a little bit. So I'm going to delete
this one and scale this. But I need the scaling
working from the base, so I will head up to
go to the Edmod and go to wireframe. Grab the base. These two faces heft
to SN and bring the three dicosor
right here. All right. And then right origin
origin to three d, and then you can
scale it from there. By the way, you can put the origin.in the corner
here if you like. For example, you can grab
these three vertices, have S and coarser there, and you can hit S to scale. Sorry, you can sit organ organ to coarser and
then scale it from there. That will be better, I think. Now we got this
design. All right. So I think we can
duplicate this, grab this, hey end, let's duplicate
the CV right here, and we need to add a COVA
on the other side as well. Alright, to do this, maybe I can use the empty that I create
as a bivot point for those here and to use mir modifier to cop
those on the other side. Or I can delay that
and do that later. All right, let's go back
to our images here. And we have some stuff here, we need to create as well. Let's go to the left and
let's add a cube there. I think we need to add
the cube in the middle. So I'm going to grab
the MT because it's in the middle and hit ft S
and cores to select it, and then hit ft A
to add the cube. G and let's move this
new cube right here. Go to wire frame to
understand what you are doing here. And What is the first
mag that we create? Let's create the big one
tab, go to the vertices. Let's move these vertices, align them with the
shape, like that. Let's move this here,
grab those hit key, and let's move those over
here. That's very cool. And I will hit control r to add one g in the middle and bev
it. Let's eval it to two. Let's add two edges
here, control r, and let's add one g right here, the same scenario for this side. Or you can use
mirror, by the way. Let's move those hit Q to the z. Let's move this up here. For this area, if you like, you can grab these edges and control and val
them like this. And after that, you can grab these vertices and k to the z. Move those up a little bit like that. All right,
that's very cool. All right, Cris. So this is the shape in general. We have some cut here in the
middle we need to create, and we need to go to the front, by the way, to the front because
we just need to see the thickness of this matry. All right. All right. But I think we can see it. I can't see it actually. So I'm going to use the
three D perspective. And I'm going to scale it a little bit and make it
bigger than this geometry. I mean, this getre that
we have right here. It is to scale it
a bit like that, and that will be enough for you. All right now I
will, for example, This phase, if you like, or these two edges, H to S and the bring the
three d cuss right here, H to a to add, and let's add, by the way, tab out to
exit of the eighth mode. Let's add a cube here, to the z, make a tab like this and make it tit like
that a little bit. And let's give it a
little bit of thickness. Ct apply the scale tab, go to the edge, grab this edge, this edge had control to val. Let's add some sigmen there, and let's ddz 0.5 here. A Sigment will be okay for me. All right. After that, I will use this as a cutter. So hold ft, grab thec dr
Heft B and cues difference. Now we got the cut that we want. And here as well, we have
something we need to create. So I'm going to select, sorry, I will hit ft A again and
add another cube here, sket like this,
Scalet like that. Take it out a little bit. Then control, I apply the
scale tab and let's grab. These four edges, control, I'll click to selecting and then go to the
bottom control seven, control B to bivle this. Let's give it nice
puzzle like that. Nice round bivle.
Let's add ten segment, I think ten will be okay. Tub out, and that's
it. All right, now, let's make the cut. Select this hold shift
to grab this one, hit control shift P
and Q's difference. And we done with this. Now
let's see what else we can do. Let's try to create
this shape right here. I mean, this one here. Let's go to the
left, control three. And let's hit it a to
add, and let's add cube. Go to the wire frame, it key to move the cube
in the correct please. Tab to control the vertices, hit number one, to go
to the vertex moot. And in the wire frame
moot grab these vertices, and let's move those over there, and those maybe over there. And like those here, hit key and move those up. Let's say you can take those
up. That's okay for now. Now go to the edge, select this this corner, hold have to grab this corner, and hit control B
to level those, rotate the wheel back
to get two edges, or le a two segments, something like this, and
now we got this result. Now, tub outs, go to the wire, sorry, go to the solid and scale this out like
this. M it big. And then hold have
to grab the mer, control H B, and then
slice to make a slice. And now we got the
slice. All right. And because I used this option, I think all the
modifiers now applied. That's been these cutters, you don't need them
anymore and they will not affect anything.
You can delete them. All right now grab this
and scale it like this. And now we got this result. If you care, you can go to
the right left of view, and you can grab those, it key to the Z, and move them up just a little bit,
maybe right here. That will be better. And we still have some details
here we need to create. We have a circle
here we need to add to cut these geometry, let's go to the left, control three, heft
A, go to wire frame. Heft A and let's add
the cylinder this time, and let's align the
cylinder towards us. And Segment, I will add 52. And a key to the z, and let's move this up here, Scalet like that, and
now it's become cool. Got to slid a key and take
this out almost right here. Let's make a cut like this, and then I will use
this to cut those. Grab this, hold H to crab this geometry, let's
start with this one. Ha control H
difference, this one, because we need the object, and I will use the same object, hold H to crave this,
control HP and s difference. Now we cut this
result. All right. Now, we need to take a
geometry similar to this one, and we have one here. Go to the left, hit
dn les add one here. It let's move this
just a little bit, scale and scale it
and try to center it. Something like this,
it a little bit more. Something like this will work. It will be a nice control
lay up by the scale, and there we go. Very cool. All right. Let's create
this shape here. I think I will
create this letter because I don't want to
make the video very long. I will end this video
here and see you next.
40. 040 Modeling section Bottom parts part 4: Hello again, and welcome back. Let's continue
creating this stuff. Until now we created this, and now let's check
the reference images, and let's see what
we should add here. We got some details
here we need to create. And this stuff right
here. All right. Let's go to the left
view control three. And let's go to the wire frame and let's see
from where we can start. Maybe I can start
with this stuff here. Let's try to understand
what exactly we have here. All right. I think we
can start with the Q Let's see where the three dicoor or
is closed right here. Let's hit sift A, and let's add Q, G and
let's move right here. Tap to the mode. Let's go to the vertex mode, and move these vertices, and let's put them in
the right position. Something like this. In the front, we can go and we can put this exactly
in the correct place. Moving these vertices
a little bit here. And I don't know, but they could be aligned with this surface
here, in the perspective, we can understand
that more. All right. I will gain and
move those close to the surface.
Something like that. And I don't know, but I think that we need to cut this metre like
this. I mean, this one. But before we do that, let
see what else we should do. Let's go back to the front and let's go to the wire frame. Here we have some angle
we need to create, it control r to add one here, control r to add one right here, and the grab those, and
let's move them like this. And now we need to
pile this right here, grove it like this, it
control lets pile it. Let's have some arc
like this. All right. I think it should be like this according to the according
to this mage right here. Ten segment, I don't know. I think it's too much. We can reduce the number
28, maybe seven. That will be enough
for this geometry. And now I will hit slag to
isolate this piece alone, and I will select some faces
because I don't need them. I need to delete them. Grab
those hit F to delete them, and let's work with this one. Let's go to the front
and hit slag to excite. Think this one, we need
to give it a thickness, go to the modifier at
the solidify and control the SolidFi Something
like this tool work, 0.8. There we go. We have this
shape we need to create. Let's see how can we do that. Before I create this shape, I will select this
geometry and I will go to the left control three because I think I need to cut this area. I'm going to take control
shaft x to activate cover, and maybe we can create
a cut like this, maybe And now we have this. All right. That's very cool. Now let's go to the
front it shift A to add, and maybe I can add
a circle this time. The circle is 100
centimeter radius. I will change this to
ten, make it very small. And it's weak the
alignment to view. And he let's put this
maybe right here. Has to go to air
frame, S and scale. And and let's move this right
here, maybe. All right. Control I apply a scale, tap it As E S scale
extrude scale. Let's scale this like that. Now I can grab these edges in the
middle and hit to the z, or you can hit E directly
and extrude those up, and a S to the z zero
enter to make this flat. And maybe we can move this down. Right now we got this shape. Now we can A E to select all the faces
and e to extrude it. Now we got this result. We got here very close phases. I suggest that we select these phases and
those here as well, and hit control to dissolve
them and make them one face. The same scenario for the site and control x. This one as well,
we don't need it. That's very cool. Maybe we can just make some
connection here. By the way, these edges, we don't need them as well. Let's select these faces and hit control x to
disolve everything. And grab these vertices, control x to dissolve them, and grab those x, but don't select the corner, control x to dissolve them. Just need to make
sure that I make some connection here
to avoid any problem. All right. It will be better to divide the big
pace, big surface. Let's call in gone. All right. Now let's move this
inside a little bit. Maybe right here. All right. Maybe we can the real
images here. All right. We just need to try to create something close to this
to what we have here. That's what we want to achieve. All right. Let's see what
else we could do here. It seems like that we have
some tube here inside, we need to create as well. To create something like this, I will first move to
the side to the x axis. And I will tap the IT mode and select
these faces. I'll click. Ha d to take a CB here. P S to separate it, tab I t crab this. Tab, go to the vertices, grab all of these
vertices and hit key and move those inside, and grab those here and hit key twice and move those inside as well,
maybe right here. Hit A, select
everything and then hit to extrude along normal. Let's give them a thickness
inside like that. Now we got this
results. And what else? Maybe I can bovle this this
area tab, grab this age. Before I bovle this, I will
move this vertex a little bit far because if
I bivle this one, the bible will reach this
point and I will have some overlapping to avoid it, I will it twice and
push this away. Now grab this control
and let's bile it. Let's have something nice
and round like that. As you can see vl reach
some point and stop, I think there's
something prevented, as you can see, this one, this on the other side, prevent the abovel
to work correctly. And here we have two
vertices not welded. As you can see, so
I'm going to grab those hit M and merge. And as you can see
one vertex removed. That's mean they are merged. If you satisfy with the bivl, it wise and weld this
one as well and make sure to activate auto marge. All right, right. Let's excite from here
and let's see what else we can add. Sorry. All right, let's see what else. Let's stop the mode
for this side, and I just need to
from the left view, I just need to move those
vertices a little bit. Something like this,
will be better. And yeah, I think
that will be enough. All right, let's go
back to our image and let's see what
should we add here? We have some stuff
here we need to add. And what else? All right, let's
check the real image. Let's try to create
something maybe like this. Do we need to do that? We have some shapes here. Maybe we can add
them to this area, but I'm not going to do that. You can do it if you like. All right. I have two options. I can create those or I can create something like
this. All right? I think these objects are
easier to create those as well, I think they are easy to create not a problem to create them. All right. Let's see how can we create simple
object like this. Let's put the three
d crosser here, it shift A at the cube. Scale make it small. Maybe we can move it out just a little bit,
maybe right here. And type the mode, grab this face, hit to the
z and let's move this. Almost right here. Go to the ge, grab this control and let's povele this and
let's make it round. Something like
this. That's cool. All right. Now I will tap out and maybe I can use
this object as a cutter. I can do that. Hit HD, for example, and take OB. Let make it a little bit big, it key, and let's move
this almost right here. Key and put this a
little bit here. Maybe. I just need to cut a
little bit of the umetry. S to the Z if you
like scale like that. Grab a hole, you have to grab this control HP and
use difference, and now we got a cut here. I will mirror this cut on the other side by
using miro Modifier. Just use the correct axis,
something like this. Apply the miro Modifier. We don't need it
anymore. And maybe we can add a hole right here. Maybe I can tap
the mode and grab this face and this face
and hit y to inst. And let's make some inst goes like this and
then right click and use bridge to break these faces together to
have a hole right here. And maybe we can hit Alt S
to make this big a little bit and activate offset even. All right? What
else? Something like this will be nice to create. Let's grab one, and let's move this here H D to
take another be, and maybe we can put
another cobra right here. I think we can scale
them just a little bit. So I'm going to delete
this one and scale this. But I need the scaling
working from the base, so I will head up to
go to the Edmod and go to wireframe. Grab the base. These two faces heft
to SN and bring the three dicosor
right here. All right. And then right origin
origin to three d, and then you can
scale it from there. By the way, you can put the origin.in the corner
here if you like. For example, you can grab
these three vertices, have S and coarser there, and you can hit S to scale. Sorry, you can sit organ organ to coarser and
then scale it from there. That will be better, I think. Now we got this
design. All right. So I think we can
duplicate this, grab this, hey end, let's duplicate
the CV right here, and we need to add a COVA
on the other side as well. Alright, to do this, maybe I can use the empty that I create
as a bivot point for those here and to use mir modifier to cop
those on the other side. Or I can delay that
and do that later. All right, let's go back
to our images here. And we have some stuff here, we need to create as well. Let's go to the left and
let's add a cube there. I think we need to add
the cube in the middle. So I'm going to grab
the MT because it's in the middle and hit ft S
and cores to select it, and then hit ft A
to add the cube. G and let's move this
new cube right here. Go to wire frame to
understand what you are doing here. And What is the first
mag that we create? Let's create the big one
tab, go to the vertices. Let's move these vertices, align them with the
shape, like that. Let's move this here,
grab those hit key, and let's move those over
here. That's very cool. And I will hit control r to add one g in the middle and bev
it. Let's eval it to two. Let's add two edges
here, control r, and let's add one g right here, the same scenario for this side. Or you can use
mirror, by the way. Let's move those hit Q to the z. Let's move this up here. For this area, if you like, you can grab these edges and control and val
them like this. And after that, you can grab these vertices and k to the z. Move those up a little bit like that. All right,
that's very cool. All right, Cris. So this is the shape in general. We have some cut here in the
middle we need to create, and we need to go to the front, by the way, to the front because
we just need to see the thickness of this matry. All right. All right. But I think we can see it. I can't see it actually. So I'm going to use the
three D perspective. And I'm going to scale it a little bit and make it
bigger than this geometry. I mean, this getre that
we have right here. It is to scale it
a bit like that, and that will be enough for you. All right now I
will, for example, This phase, if you like, or these two edges, H to S and the bring the
three d cuss right here, H to a to add, and let's add, by the way, tab out to
exit of the eighth mode. Let's add a cube here, to the z, make a tab like this and make it tit like
that a little bit. And let's give it a
little bit of thickness. Ct apply the scale tab, go to the edge, grab this edge, this edge had control to val. Let's add some sigmen there, and let's ddz 0.5 here. A Sigment will be okay for me. All right. After that, I will use this as a cutter. So hold ft, grab thec dr
Heft B and cues difference. Now we got the cut that we want. And here as well, we have
something we need to create. So I'm going to select, sorry, I will hit ft A again and
add another cube here, sket like this,
Scalet like that. Take it out a little bit. Then control, I apply the
scale tab and let's grab. These four edges, control, I'll click to selecting and then go to the
bottom control seven, control B to bivle this. Let's give it nice
puzzle like that. Nice round bivle.
Let's add ten segment, I think ten will be okay. Tub out, and that's
it. All right, now, let's make the cut. Select this hold shift
to grab this one, hit control shift P
and Q's difference. And we done with this. Now
let's see what else we can do. Let's try to create
this shape right here. I mean, this one here. Let's go to the
left, control three. And let's hit it a to
add, and let's add cube. Go to the wire frame, it key to move the cube
in the correct please. Tab to control the vertices, hit number one, to go
to the vertex moot. And in the wire frame
moot grab these vertices, and let's move those over there, and those maybe over there. And like those here, hit key and move those up. Let's say you can take those
up. That's okay for now. Now go to the edge, select this this corner, hold have to grab this corner, and hit control B
to level those, rotate the wheel back
to get two edges, or le a two segments, something like this, and
now we got this result. Now, tub outs, go to the wire, sorry, go to the solid and scale this out like
this. M it big. And then hold have
to grab the mer, control H B, and then
slice to make a slice. And now we got the
slice. All right. And because I used this option, I think all the
modifiers now applied. That's been these cutters, you don't need them
anymore and they will not affect anything.
You can delete them. All right now grab this
and scale it like this. And now we got this result. If you care, you can go to
the right left of view, and you can grab those, it key to the Z, and move them up just a little bit,
maybe right here. That will be better. And we still have some details
here we need to create. We have a circle
here we need to add to cut these geometry, let's go to the left, control three, heft
A, go to wire frame. Heft A and let's add
the cylinder this time, and let's align the
cylinder towards us. And Segment, I will add 52. And a key to the z, and let's move this up here, Scalet like that, and
now it's become cool. Got to slid a key and take
this out almost right here. Let's make a cut like this, and then I will use
this to cut those. Grab this, hold H to crab this geometry, let's
start with this one. Ha control H
difference, this one, because we need the object, and I will use the same object, hold H to crave this,
control HP and s difference. Now we cut this
result. All right. Now, we need to take a
geometry similar to this one, and we have one here. Go to the left, hit
dn les add one here. It let's move this
just a little bit, scale and scale it
and try to center it. Something like this,
it a little bit more. Something like this will work. It will be a nice control
lay up by the scale, and there we go. Very cool. All right. Let's create
this shape here. I think I will
create this letter because I don't want to
make the video very long. I will end this video
here and see you next.
41. 041 Modeling section Bottom parts part 5: Hello, everyone, and
welcome back here. Now, let's see what
else we should create. I think we got
some details here, we need to do some stuff
here and here as well. Now, if I go to the right view or let's say left view control
three from the um bad, let's go to the left view. I will z to go to the
wire frame or you can z to come to the
x ray if you like. You have two option here. All right. Let's
create those shapes, and I think we can
start with the cube, it to A, and let's add cube. Cube is very big. Let's the size to maybe ten centimeter
and make it very small. Hit key to move it and let's
put it in the correct place. Let's start from
here. Let's align the corner with this
corner right here. And let's select the cube. Okay. All right. Tab to the mode, hit number one to
control the vertices, and now let's start
moving these vertices. G to the y, and let's
move those right here. Grab those four vertices, hit E to extrude them
right here and move these vertices to
the y, maybe here. I think that's it for
now, let's tumble around. Let's see what we've got so far. Tab out key and take this out, to excite of the wire frame, and maybe we can move this just a little bit,
maybe right here. Let's go to the left again, Control three and
go to wireframe. I will hit he D to
C the seneometry, and hit control and
mirror it on the y axis, just hit control M and then
y to mirror it on the y, and put it in the correct place. It should be right
here. All right now, we need to merge those
groves, hold the grabs, control J, and tell mode, make sure of something I just need to kick the
face orientation. As you can see, because we use mirror modifier,
sorry mirror command. This umatry flipped
the face the normal of this umatry flipped
Notes become inside. We need to flip
this back or let's say we need to
correct the normal. Select when you mark those
after you mark them, the stern off or let's
keep it for now. Tab, it A, select all phases, hit shift and to recalculate
the normal and that's it. Now you are ready
to make the trim. Because if you don't, you will not have any trim here in this area because this phase, this geometry is a flipped. Just keep that in
mind. All right now, let's turn off
phase orientation, tab out with the selected hold
shift to grab the target. At control shaft B, and let's open the pool tool
and let's choose difference. I can use this one.
I don't need price. A right now I got this.
That's very cool. Let's go back to the left, Control three, and let's see
what else we should create. All right. We have some segments
here we need to create. I think I can start
with the cube. L et's add cube. K, and let's move this one,
puts in the position. Scale this to the y, maybe key and let's put
this right here. Tab, go to the vertices, grab those four vertices. Key and move those up
almost right here, grab those key and
move those down. Maybe right here,
something like this. I think that's it. Maybe we can make it a little bit wider. I think key to the z and let's move this up a little
bit. That's very cool. All right. I think now we need to bring the reference images because I just need to see
what exactly we have here. All right now, I have
my reference mic. All right. Let's see, do we have another
m here? We don't. We just have this
one right here. And I think it's
enough. All right. It is just bunch of boxes. Let's go back to Blender tab
and let's select this one. Hit shift D to take
a COV from this. Let's put this CV
here and then hit shift r to repeat that again and again until you fill this area. When you satisfy, let's select all of these new
boxes that we created. All right. Think let's
grab them like this. An selected object
we need to deselect, for example, those,
we don't need them. We just need those. Take
those out for now z, and let's scale them to the
x axis, makes them thinner. Something like this
will work. All it control to make them one piece, and then hit control I apply the scale because
we scale those. G and take those back to the x axis and put them in
the correct position, something like this, we need
to make some trimming here. Let's go to the left
view control three, and I will use carver
tool to cut this area. Control ft X, activate carver, and I will switch to line, I will make a cut
goes like this. And they hit space,
and there we go. Let's try to click to
exit of the carver tool. After that hits to
isolate this piece, I think we can delete these faces from the
bag. We don't need them. Tap to the mode, go to face and let's select these phases because
we don't need them. You can hit F to delete them, and even these faces, if you like, you can
delete them as well. It's okay to delete them. A Let's see those here as well. And just hit F to
delete them. That's it. That's great. Tab out, it to excite and there we go. One more thing here
we need to do. We have this shape right
here we need to create it. This one here. Let's
see how can we do that. Let's go to the left view, control three and go to
the X ray if you like. Heft A and lets a Q. And let's take the
cube right here. Tape mood so we can see it and let's control
the vertices. I think we can take those
down, for example, right here. Grab those and move those here, for example, those here as well. Let's move them over there. Take those up to the z, and let's move
those right there. That's very cool. I will hit control r to add
one here in the middle. This new ge, I will val it
with control being less bev, for example, right here. I will select these edges, just hit number two
to go to the edge. I think I just forget to
activate the screen cast. Sorry, I just forget
to activate this tool. Maybe we can change the mouse size a little
bit. That's cool. Let's click to select this Alto have to click
to add this one as well. H control be beveled
a little bit. And now let's grab this age. Alto have to click, grub this
and scale those right here, and scale dose in
the Z axis as well. To create a shape like that. And acids. We have some
design right here. Let's try to create it. All right, Let's see
how can we do this. I think we can bring
the three D corsor here in this area at Heft
S end Corsor here, at Heft A, tub out, Heft A, and let's
add another cube. You can exact of the x ray and go to
wireframe if you like. And I will scale this down, for example, right here. And I can put this in the
middle and scale it like that. It can roll a apply the scale, and then tab go to the edges, grab this edge to
grab the corners, and it can roll B to bovel them. And let's bvl those, make
them round like this. I just add a seven segment, you can add eight if you like, and I got this result. This is what I want. Let's
see what else we could do. I will take all of these
geometry, tub out like this. With this one selected, I
will and grab this and hit key and take those out,
something like that. I think I need to
scale this down. Something like this, and I
will put this one inside it. Something like
that, it will work, and now I can make
some trim if I want. But I think I can go
to the left again. Control three, and
COB this one hefty. Let's take this one on the side. Use your eye and put
in the correct place. You can use M Modifier
if you prefer. This is something optional. For example, I will
use miro Modifier. Grab, this hold heft to grab. This one hit control Hit B, and let's use difference. Now we have trim. I will use mirror Modifier to mirror
this on the other side. Let's go to the modifier
and add mirror Modifier. All right, we could use
what axis the i axis, I think, R, and we need to flip. Yeah, just to flip it. Sorry, just use bic that's it. After that, apply the muror. I think we got some change here. We need to go back
to the left to move the side just a little
bit to the y axis. Tab, go to vertices, Z, to go to wire frame, to select all the faces. G and let's move this one
right here. That's it. Tab out Z, and there we go. Now push this one inside. Something like
this. That's cool. If you prefer, you
can go to the edge, you can click to
select this edge loop, t have to click, and you
can vl those if you like. You can ole those to two edges. But because we scale
this to the x axis, we will go some
problem with vel. Tab out control apply
scale tab and vl again. Now Bevel should work correctly. I think by adding this vl, I can make the result
even better and easier when it comes to rubbing. Something like this,
it will be nice. I can era this e loop
and this one as well, and I can hit twice and
move this forward to mark it with the
front side like this. Maybe I can make some
connection between those. For example, I can connect this vertex with
any vertex here, just hit to avoid any problem if I want to explore this to
another software. Maybe won't connect
here to the corner, that's will work as well
with K. That will be better. And one here as well, hit J. And this face in the back, we don't need it actually. We can grab all of
these faces and hit X F to delete them. Even these faces right here. These faces are not visible to the camera, you
can delete them. It's like to excite. And now we got something
nice like this. All right. Now we need to cob all what we have done here
to the other side. Let's go to the
left, Control three, hit shift D, take a COV, and
let's put this right here. Control M to mirror this, and hit key, and let's
move this right here. Okay, something like that.
All right, that's cool. And because we used
mirror command, I think these um, they have face
orientation issue. All right, they don't.
That's very cool. All right. What else
we should do here? We have these geometries here
as well, we need to create. Let's go to the
lift, Control three, Z and go to wire frame, Hit let's add the cube anywhere. And K and let's move
this right here. Let's start from this area. All right, T go to the vertices. Let's try to move
those over there, and then need to
extrude those here, move those down.
Maybe right here. And what else can
we take this one? HD and let's take a CB and let's put this cube
right here, maybe. Let's move those up. And
take this vertex up, a key, hold control and
snap it right here, but make sure to
activate vertex snap. Grab those key to the Z, and let's move those over there. Ke to the z and let's move
those up. That's very cool. What else maybe we can grub this one hit d to take
another CB right here. Ctrol M and mirror
its like this. Key to the z, and
let's take this down, for example, right here. You can swig this
two closest and it ke to the z and snab it
with this one to align it. You can grub this and move
it down just a little bit. You can grub those and move them forward, for
example, right here. Key to the Z, hold
control, snap it here. This one as well. We
let's see what we can do. A, I think we need to mark those key wise and mark
them like that, and move this one forward. All right. What else
we could do here? Don't worry about the side
because we can copy those. All what we need to do, we
need to create this one. And let's scrub this hefty, and let's take a Copy
and let's put this, for example, right here. G to the z, and
snub this one here. Just align this
edge with this one. A G to the z and align
those right here. And what else we could do here? I think I can move
this right there, something like that, and
I can move those up. All right. For these edges, I can mark them twice and
take those up like that. K to the z and align
its as very cool. Maybe I can now take all of these verte key and move
them right over there. And what about this one? I think I can use M
omitifier in this case. Let's add this right here, and I will grab this vertex key and move it and
align it with this. I can grab this half and x F to deleted and I can
duplicate this half. But let's put the the organ, I'm not going to do that, but I will manually select all of these
faces and hit he D, take a CV and control
and Mt and Mt. Like this. I think
that will be better. Yeah, I will accept this
results. That's very cool. We just need to co these faces let's
move those over here. Ct M to the z, and there we go. All right. What about this site? I will I think I can select
all of these faces. D, take a CVI over here, control and mirror those, and just position those, put them right here. Or if you like, you can
make the trim on one side and use M modifier if you
prefer. This is another option. H it a select all the faces
and take those out key, and let's move those
over here maybe. Someday like this,
and now we can make our trim here. Tab out. Or let's tab in again, A to select all the
paces and then hit ift and to recalculate the normal
in case we have a problem. Tab out, grab this
hit control Hit B and let's use
difference this time. That's very cool. All what we need now is to add some
curves to this geometry. I'm not going to add
these curves now. I will do that in
the next video. That's it for this video and
42. 042 Modeling section Bottom parts part 6: Hello again. Welcome back. Let's start with
the vl. Let's add some vl to these corners. Grab the uma and
tape to the move, go to the edge and
let's start with specific edges, the sharp edges. All right. Let's
start with this one. We have a sharp one
here, this edge, and we have sharp edge right
over here and here as well. And this one right here, and this one over here. And those here.
Actually, you can use mir modifier to mirror what you have done here
on the other side. I think that will be easier. I'm going to deselect
this. I don't need it. It control be two
bevel those first. Let's give them nice bling here. Accept the bevel and from here you can control it
farther if you like. As you can see now,
we have some vel, but we got some problem. I don't know why. All right. For example, this edge, because it goes like that, I'm not getting any
correct bl here. And what else this one as
well, the same scenario. So we need to change the
direction of the edges. I'm going to control
that to cancel that. It's like to isolate this
piece and I'm going to make some new connection.
Use the ni tool. I will make cut goes right here, for example, for this corner, and maybe for this corner, I can make a cut I know,
something weird ta. Why that doesn't work. Let's make cuts over there and cut over here
and cuts over here. One over here. What else maybe we can make a cut goes
right here and one cut here. All right. And maybe one here. This cut goes over there, and maybe I don't
know, one here, maybe. All right, one here
and one here as well. When you come, enter to
confirm all of that. And maybe we can make
some marking here. We don't need this a key
twice and market over here. What else? All right. I can ignore this for now. And do we need to do
anything else here? All right. Now let's try
to make another bevel. Let's select the
ekes that I want, the sharp aches first. Sec those. And this one as
well. If you like, you can erupt this as well. It can troll be to bevle those. Now Bvle is better. Let's see how much
segment here we need. Because if this area
becomes not smooth, we will have some
heading problem. We need to increase
the number of segment here just for
the sharp angles. But for 90 degree angle
or less than that, we don't need to add
too many segments. Ten segment for
these sharp angles, that will be okay, and it
will work. That's very cool. Now let's target
the other corners. Let's start from here. All right let's see like this. Grab this one right here. L et's scrub this over here
and this one and this one. Let's lay this. What else? I can era those here, and this one here. Sorry. All right. Now let's bubble
those as well. C. And let's give them
nice bubbling. That's very cool. Ten segment for these
corners. That's too much. I can reduce the number to, for example, five,
as will be okay. That's very cool. All right. One more thing
here we need to do. We need to delete some edges
here that we don't want. I can see to jump
to this select. This one right here,
select circle. And go to the face and keep
selecting these faces. All right. I will stick with the select
box and I will use C and now select these faces. And when you select
all the phases, just hit control x to dissolve them to
make them 11 phase. Let's see if that's work or not. Al is not going to work
like what we want. In this case, I will
select just these, these edges, and hit
control x to dissolve them, and I will do that for
the rest of the umetry. C erupt those Al right. Let's select those. The select these pack faces, control X. All right. And it control
X to dissolve those? All right, those here as well. Because I don't want all of
these edges. That's too much. Control X. I think the same scenario
for these phases, we can hit see circle select and we can select all
of these head control X, see if that's will or not? Yeah, that. Let's hit C again
and let's select all of these fases Exact it control dissolve it
and here as well. Can troll X in here as well. Ctrol. That's very cool. Maybe this one here, let's see, and let's select these faces. C troll. All right now, we just redue the number of the gs
here. That's very cool. One more thing you can do it. J grab these vertices
in the middle he key wise and merge
them like that. That will be better. Sorry.
All right. Los here as well. What else, maybe those here. I think this, we
don't need that we can control x to dissolve it. That's okay. All right. Maybe we can change the
connection here and here as well, and we can select these
edges that we don't want. We can dissolve them. We can't change the
direction of this edge? Maybe we can put right here, and de crop this
one and dsolve it. All right. What else
we could do here? Okay, let's accept the
results like that, but now we need to use mirror modifier to mirror
the site on the site. I will add the mirror
of the chemetry, and I will use the y
dark and use bisects. As you can see now
mirror modifier flip the result and its
mirror the side on the side. I don't want that. I
need the opposite. So I'm going to hit flip
to correct the result. You can use if the
organ.in the middle, you can use the x axis
if you like as well. To mirror this on the
x axis, use bsects, and flip to mirror this side on the other
side as well, if you like. All right. I will leave the
mirror modifier for now. I'm not going to delete it in case I need to do anything else. That will be there.
But I think we need to make some k here. And in this case, as you can see
here, in this area, we have some gap here. To fix this, I can go to the left view and I can move the organ
dots to fix this eh. Just go to the option and activate organ and
hit key and move it. Hold have to make the
movement slower and move it a little bit
and you will fix the e. Now we don't have any
H. Everything is cool. After that, you can add v modifier to vds
and make them ready. L et's bring the reference
Making and let's see what else we could
do here to this area. Are we finished here? I think we finished here. We
don't have much to do. All right. We just need to make some taper
here to this area. I will select this and turn
off organ. We don't need it. Tu mode. I think I will
apply or for any reason, if I need the mirror
again, I will add it, so I will apply it for now, control I end up light. I will accept this result. Grab these edges here. Sorry. These edges, and it
control be forbve. Something like this. You can accept the result
at any distance and let's activate clam overlap to avoid Buble to
go out like this, activate clam overlap and
put this forward like that and accept the
result, like that. Now we just accepted the result. I think now we have double ges
here and y that's correct. To fix this, ge mir them. A select everything and then
to open and mic by distance and make the Mic distance very star here to mark
these vertices. Kick the sharp corners because if this distance
a little bit big, we will have some
merging here as well. That's will be
wrong. But for me, we don't have any issue.
I will accept this. Tab out and there we go. Radically head
smooth, you can use auto smooth and now
it's become smooth. The holy thing that we
need to do now is adding level modifier to target the
edges and make them smooth. That's all. All right.
That's very cool. I think we will have some
Q here when we add the vl because this edge
is very close to this one and the two Bivl, they will meet each
other right here. This example in the
reference image, I had some space,
but here I don't. But let's see how to avoid
it when we add the biv here. I think that's it
for this video. I will end it and see
you on the next one.
43. 043 Modeling section Bottom parts part 7: Hello again. Welcome back. Let's see what's the next step. Let's bring the reference
images right here. And I think we have this
metro right here to create. All right. I think I
can't throw above this. All right. This one.
Let's go to the left. Ctrol the three, and it would be easy to create
this mat right here. It's just box and
some extrusion. All right. All right, Let's add cube, H A,
and let's add cube. The cube is not in the middle. I'm going to delete it, and
I will repeat that again. But let's select this one. It and cosor to select it to bring the three d corsor in
the middle of this geometry, and now I can add cube. It will be in the middle. Let's put the cube
right here for now. To, go to the wire frame moot and select this phase and
move it just a little bit. Coll this and move this up. And this phase as well. I say this phase
because when I do this, when I select when I make
selection like this, I can select four vertices. Four vertices mean in one phase. Let's hit e and let's
move those right over there and take those down, maybe right here, and let's move this back,
maybe right here. Let's go to the
bottom, control seven, and let's see how much
we need to scale it. We need to scale it
almost right here. That's very cool. H control r to add one here. Control to bevel this age
to two edges like this, control r to add one
maybe right here. Now we got ads like this. That's wrong. We don't
need this right here. I'm going to control z. I just need to add
here in this area. I will hit control r and right here and slide
it maybe right here. We can go to the left
view and exactly, it's in the correct place. Now we need to make
some extrusion. Let's see grab this face, hits e to extrude this. But when you hit, right click to cancel
the extion and manually move the new
geometry forward. That's what I want. Then go to the grab this k
twice and take this back. Right over there
and make sure to activate atomic to mir
these vertices together. We have this age.
We can determine where we move it
from the left view. We need to take it just a
little bit back, and that's it. That's very cool. All right, what else we should do here? Let's go to the left, and let's see how can we create
this geometry? I think we can start
with with the cube. I'm going to hit control
to go to the left, and I will do we
need to select this? It's in the middle. I remember that I added
one MT in the middle. I think this one right here.
I just need to use this t. I will have d to add
this empty right here because I add this
empty exactly in the middle. And I'm not quite sure if the position of the three d
corsor in the middle or not. So I'm going to use the t again. Grab the empty, heft S
coorsor to select it and now the three d coors
exactly in the middle. Heft a to add, and let's
add another cube here, G to move it, and let's put
it in the correct position. I will put this right here
and from here I can start. Let's go to the bottom
because I just need to understand what I
should do here. Let's go back to the left tab, and let's start
controlling this cube. First, let's grab those and hit key and let's move
those over here. Or maybe over here, and grab those as well key and
let's move those here. What else, I can select
those k to the Z and move those up inside
the oritapor. That's okay, grab those
vertices, extrude this. From the bottom, we can understand where
should we move this? Maybe we need to
move it right here, something like this
for now and go to the left view and take
this up Q to the z, and this one as well, k to the z, let's move
this over here. All right. What else?
I'm going to hit control r to add one right here. Control r to add one here
and move this a little bit. Let's go to the
bottom control seven, select all the vertices
and scale this to the x axis and make it a
little bit wider, like that. I think we have to create
this triangle here. Tab out A and let's
add cube G and move the cube right here and tap
the emo to control this. Move the space here,
take those up. And I will scale
those out like this. Control to add one right
here and scale this as well. And you can erupt those as well a key and sorry scale those. Don't move them. All
right. All right. Now, I need to use this as a
cutter to cut this triangle. What I will do is I will
scale this out to the Z axis, S to the Z, and scale
it make it pig. G to the Z and let's
move this up over here. Go to the left view and tab out. Use the carver tool to cut it. I'm going to control it X
to activate the carver, use line cut, and let's make a cut Align the
cut with the edge. Like this, and let's cut this hit space to
cut it and there we go. Now we have this cut. Now I can use this as a cutter, e and let's move this inside the human reas a little
bit, not too much. Something like this will work. Halt have to grab
the target control HF to B and let's
use difference. Now we got what we wanted here. Let's go to the
bottom control seven. That's very cool. I
think now we can make some vl tab and go to the edges. Let click to select
this in our edges. Before you do any beveling
tab control control A to open the apply
menu and apply scale. Tab again with these
edges selected, control B to vl them and
bvle them like this, and you just need
to grab this edge and a key wise and
merges like that. Make sure to
activate auto merge. I just need to have this taper. That's very cool. Now
we're done with this. All right. Let's see what
else we should do here. All right. Let's see how
can we create this uma try. I think we can
understand it from the bottom view. All right. I think we can start
with the cube, and we can create this. Tab T out and H, let's add another cube. Move the cube over here. You can select the
body if you like, and I know, you can hide it
if you want, if you prefer. This is a new cube
that we added, I can scale it out like that. Let's take the image
up right here. Scale Sorry. Let's
go to the bottom. S to the x, let's
scale it like this. And I think I can move
it a little bit here, Align this edge with the
edge of the reference image. Tab and go to the vertices, move those, for
example, over here. For now, grab this hit E to extrude it. I don't know where. Let's go to the left
if you control three. And hit A, select
all the vertices, hit Q to the z, and let's move this up in the correct position. Let's start from
here. Let's take those back gs a little bit here, and hit e to make another
extrusion, should be over here. For those, I can hit
key and take those up. Now I can take all of
these vertices up Q z. Sorry, except those here. Something like this.
Manually, if I want I can cut it
or I can push them inside the ornithopor body, that's okay if you
want to do this. Yeah, let's grab those
here and get to the z. A little bit, and that's it. From the bottom, I think
we need to make some tilt. I think we need to grab
those and scale them inside. I don't have a clear image to show me what I
should do here. But it almost the result
should be like this. I think. And let's see what
else we could do. Let's go to the perspective.
Let's see the result. Let's go to the bottom again.
All right. That's cool. All right, let's see if we need to add anything here
to this geometry. We have some design here we
need to do. Some slides. Let's go to the left
view Control three, and let's try to create
this shape right here. I think we can start with
the cube to do this. Tab out Heft A and let's
start with the cube. I can start with the cube or I can use the cover tool
as well to draw this. Yeah, Let's use that cover tool. Deselect anything hit t A
and hit heft A to sorry, it control Heft to
activate a cover tool. Let's use a create and
let's start from here. Don't use rectangle. I just forget that. Switch
to a line, hit space. Let's make cut like that. All right. This is the final click. When you com belet hits
x to close the hap, and then it to confirm it, it space to confirm it, and now we have this metry. Tach the mode, we got
just one edge right here. We don't need it.
I tumble around, I have this edge.
I don't need it. Hit control X to dissolve it, and now we got this
shape that I want. I will use this as a cutter, but I need to use
slice this time. Tab out, hold have
to grab the target, control H and slices and
now we have slices done. The same scenario
for this object, we need to do the same thing. Let's go to the left and
don't select anything. Hit control heft x
to activate carver, it space to switch to line. I just forget to go
to the wire frame, Z first, control heft x. Go to the line and let's
follow this shape. W to click here.
W to click here. H one here, and the final
click here and hit x, and then space to confirm it. Now we got this
shape, go to solid, cb this, control H to B, and let's use slice. Now we got another slice
over here. That's very cool. Let's go back to the left
and let's see what we can do for the other geometry. We can start with
the cube again, have the A at the cube. Let's move the cube over here, and we can create one side, and then we can Mort if we like. We have this option. Let's start with the mode and
grab these vertices. Let's move those over here and take those out, for
example, right here. I don't know, maybe right here, control at one age over here. By the way, you can make
the metropic, for example, you can make it like this and you can move it over
here if you like. Let's go to the left view, and let's take these up to
the z over here. That's okay. Take those here, for example. You can use carver tool
to make your cuts. This option is working.
If you prefer it, All right. Let's see do we
have anything else here? I think it should end here. I'm so quite sure of this should end here or
I need to move it. Let's go to the left. I will move these vertices, let's see where, maybe over
here and take those up. Now we have very big cube, and now we need to
cut it or trim it. Tab out and I will
use carver tool to cut to make that cut. Let's go to the bottom of view. I just need to kick if what
I'm doing is correct or not. I don't know. I feel that I need to end this geometry over here. Yeah, I don't need to
make this too much pi, so I'm going to tab again, select the tab, and the
grab these vertices, and let's move
those over here, B. Let's go back to the
lefts and that's it. Control shift x to
activate the carver, switch to line, and
now make some t. Let's cut this area freest
like this, hit space. Now we have cut. Let's make another
cut. H goes like that. If the frest leg doesn't
align correctly, you can hit out and move it
a little bit, like this. Let's make the second
cut like that. And there we go. What else? We need to make cut like this. He click and want to click here. I think want to click
here, it goes like that. One here and one up. After that, try to cover the trim area and hit space
to cut it. There we go. From the side, I can
cut the matter like this because I don't want to
go deep inside the theater. From the bottom, we need
to make some cut as well. Let's make cuts like
that. All right. That's very cool.
One click here. Sorry, it controls it. Sorry, he has made
a mistake here. Control X, and let's go to the line again
and let's make cuts. Something like that. Let's
make another cut like this. That's very cool.
That's very cool. Now let's see what
else we could do here. Let's of the Carver and I think now we need to
s some ges and bubble them. Let's go to the bottom view. Let's see if that
will work or not. From the side and from the
bottom, everything is correct. But we have some
area like this one. We you have two options, you can't tram it or you can add some edges and move some
vertices to create this. So I will go to the bottom and
from here I will add edge. I will use the knife tool, select it and tap
the, go to the knife. Let's add a cut goes like that. And hit space to confirm it. Now I will select all these
edges and move those up. Go to the left view and hit key to the Z
and let's move those. But I think I can control the vertex. The
vertice is better. Let's move this vertex over
here and this one over here. This one should go up here
and this one as well. Key and let's move this sorry. All right, I need to grab this, go to the lift, G to the Z, and let's move this over here. Let's see what we've
got so far. All right. Let's check the phase if we have any variation here.
You need to fix it. All right. The face looks flat, but not so much flat. We can go to the
left again and we can maybe make some correction. For example, I can hit the end, align this with the
reference I patter. All right. The same scenario here
we need to do it. We need to trim this area. But I just made a mistake. I just created this side. I could create this
umetry on this side. I can flip it, and
I will do this. I will select control
and flip it on the side and tab just
apply the scale. Kick the phase orientation in case we have problem
with the normal. Yeah, we do. Tab hit a ft and to recalculate the normal,
and there we go. Let's go to the
bottom, control seven, and lets turn of face orientation and let's
add a cut here as well. I think we need to
add a cut here. Before we do that, I just need to kick the reference image. Better. I think we need to add another
a reference image here because I'm not to understand exactly
what's going on here. Let's try to bevele this edge. Let's see what's going to
happen if I bevele it. Tab, and I can merge
this vertex for now, key wise and merge it here. And let's select this
one with this one. I think this ache that
I need to bevo it, head control be to give it a v. Let's bev it a little bit. And deactivate clam overlap and Let's go to
the bottom again. Let's make the woods
a little bit bigger. Something like this,
I think it will work. Let's go to the lift to
see what we've got so far. Bivle is working, but we got some issue right
here we need to fix. We don't need the bivle
to go up like this. We need to control it better. I'm going to hit control Z
to cancel what I have here. I will repeat the
vl again control B. But this time, I will
manually move the vertices. For example, those here, I will hit key to the Z and move this over here and
align this one as well, and what else wise and
slide this over here. For this vertex, I can go to the left view and
move this over here. Something like this. I think I can merge this vertex wise and
make it over here. This is acuery. It's
not finish here. We got a lot of job to do here, but I will end this
video here and I will come this in the
next one. That's it
44. 044 Modeling section Bottom parts part 8: Hello again, welcome back. All at least see
what's the next step. Let's complete this geometry. I think I need to make
this a little bit bigger. Now we can see some details. Let's go to the bottom
view control number seven, and I think we need to
make some cuts here. All right. I need to
make a cut goes like this, something like that. Let's see how can we do it. Maybe I can use a
box to do that, or maybe I can use Carver tool. For me, I will use box or
cube to make this cuts. All right in this case,
we need to add cube, so it t add cube, move it and let's put it
right here temporarily. Tap the mode, and now let's start controlling
these vertices. Let's move this just ale bit, maybe right here and let's
grab these vertices. Maybe we can move
them over here. Crab those S and scale
them out just ale bit. Maybe we can grab those or I will select the whole cometary and scale it out like that. Maybe I can grab those and scale them in just a little bit. Let's select these vertices, extrude the new
phase right here. Scale this phase to the x axis. Try to follow the shape, it e to make another
extrusion, maybe right here, S to scale this, and another
ex may be over here, and scale this a bit. E make another extruion, and maybe we can
scale it right here. I will hit key twice to slide these faces back
and then hit all to bring those forward just a
little bit. That's very cool. Now we cut the results.
Let's go to the left. Let's take these vertices up key and let's move
those right here. Something like this maybe. Now we need to make
a cut like that. Let's make sure that the
depth of the cut is correct. But we can't
understand because we don't have an image from inside, maybe just this one. Let's try to find another image. In this case, we depend
on the bottom view. We will stick with this image. Let's try to make
that cut and then we will decide
what we will need. Tub out, hold have to grab
the target control H B, and I'm going to
use the brush ol in because I need the cutter
because I don't know, maybe I need to
control it later. Now I got something like this. Let's go to the bottom and
let's make some comparison. Everything looks okay. Okay? All right, something like this. I will accept this result and
let's see what's the next. Let's go to the bottom again, and I think now I need to create this
right here. All right. Let see how can we
do all of that. Maybe we can start
with the cube. Yeah, let's start with the cube. It heft A and let's add cube. This is the cube. I'm going to move it and put right here. I can start with half of the umetry and then it.
I think I will do that. Tap it control,
let's add one A in the middle of grub the
cited xF to delete it. And now I will move this over
here and move those right here and try to follow the be
let's move this right here. Grab those e to make
some extrusion, and let's move this here and leave this a in the
middle, don't move it. Grab those hits extrude and
let's move this right here. Maybe I can take those
back a little bit. And extion here. Let's move those
a bit right here. Grab those vertices, extrude
them over here and take this Put it in the position. This one as well make
another extrusion. Actually, I can take this
and move right here, and after that, I can trim it. If I want, or at least stumble around and let's
see what we got so far. This is the is that we got. I'm going to select the
top vertices, all of them. I'm going to move the whole uma up to the Z and let's move it. Maybe I can move it a little
bit more Q z right here. Something like this.
That's something cool, we need to delete this
face tab, go to the face, cut these fases, XF to delete them because
we don't need them. We're going to use
Mor moodifier. Let's add the miro
modifier for now, and there we go.
That's very cool. We have some tilt here
we need to create. I'm going to tap the e
mot control r maybe. Right here. I'm going
to select this edge, and let's go to the bottom and hit key and take
this back over here. And now we cut this.
That's very cool. After that, I will go to the face and select
all of these faces. And I think now I can hit
I two, make some inst. But as you can I have the inst, but I don't want the
inst on the side. I don't want the inst
to apply right here. I just need the side. I'm going to hit control to
cancel that and I will hit I again and I will hit
P to activate boundary. Right now I got the
answer that I want. After that I will hit is
to put these faces out, a little bit,
something like this. Maybe I can move this edge
a little bit like this. Now, I got this result. Now maybe we can make some
right here in this area. We can go to the bottom view and let's see how can we
achieve something like this. I'm going to create
this geometry. I will tab out and
hit shift A to add a new cube here and just move it and put
it in the position. For example, you can put
right here and tap the mod. Right now, I will
focus on one side, but I will add 18 here in
the middle and I will delete this F. Let's focus on the side, grab those here,
move them ale bit. Something like this, Let's
make some extrusion here. Let's move this over here. Let's make another extrusion and move it manually over there. Let's take this one
and hit key and let's move this and let's
put this right here. What about this? Maybe I
can make another extion, cancel it, hit key
and move it manually here. Let's move this. I think I need to delete this control x to
dissolve it and acid. Now we need to add
the other half. Before I add it, I think
I will move this face back. Do we need to move it? I will move this just
a little bit right here, something like this. Now I can add miro modifier, and I can apply it to control A and apply the miro Modifier. I think we've got some
problem right here. We need to avoid. I will hit control to bring the
miro Modifier back and tape mo and let's
go to the vertex, grab this vertex, it key
to move it on this side, but hold control and
align it with the middle. The same scenario for this key, and move it to the x axis, hold control and align it here. Everything looks nice. We don't have any gap. A
control end up lights. That's cool. I will
use this as a cutter. Hit key to the Z and let's
move this over here. Hold TF grab the
target control HFT B, and let's use slice. Now we have a slice over here. We need to create
the other umetry. Let's go to the bottom here. And we need to add another cube, H A and let's add cube G
and move it. All right. Now we can scale this just
a little bit to the x axis, and I will tap to the edit mode and had control R to add one here at the middle, but I'm not going to
delete this half. I will keep it. I
will grab the site or lets vertices here and
move them over here. B right here, and the grab those and hit key and let's move
those just a little bit here, grab this one, hit key and
let's move this right there. That's cool. Now I
got this result. Tumble around, take
this up top, K, Z, take this over here, and I will use it
to make some slice. Grab this, hold,
grab the target, Ctrol half to and
let's hit slice. Now, we got another
slice right here. Now we need to apply the price, control Hit P and Q apply. And let's move the cutters. Let's see if this
still affect y. Grab this control Hit
P and Q apply a price. The same thing right
here, control, Q apply price. That's
not going to work. We will have some
problem right here. The school, control H P
apply price. All right. Let's move this one. I think
we applied everything. Let's move this price away, and let's move this one as well. Do we have any problem
here? All right. We don't. Something weird
happened right here. I don't know what is it exactly. Let's go to the bottom view
and let's see the results. I will select this tab. All right. This is not the
result that I wanted actually. Or it is just a phase here. Or manually, I will fix it. I will go to the bottom
and tap to the mood. I will take this vertex and align it over
here with this one and I think mir
modifier applied. Yeah, that's right. We still have mirror Modifier. All right. I think
now it's better. What about this? We still have something here
in the middle. I don't know what is it.
That's really weird. Maybe we have face
inside in the middle. I don't know, but I feel I
need to cancel all of that. So I'm going to control the couple time because there
are something weird a here. Let's see where
this will take me. So, I will cancel this. All right one more thing
here we need to do. We need to bring this back. As you can see, it's
just a bounding box. We need to go to the ob object
properties and then go to the display
as and texture. Because we hit controls
a couple time and we deleted the bleion here
from the modifier lists, we got double COVI here. We need to delete one of them. Hit delete and delete it. A here, we have this, I think we can delete
this now and we can apply the mirror modifier
for this geometry. Well, I just forget
to do something here. It's a mistake when I hit
inst to create this shape. I need to make some frame here and I will
show you what I mean. I'm just going to select
all of these faces and hit to the z and take this
pack and align it like this, and I will hit I to make
another inst inside like this, and now I can move
this one inside. K to the z, and let's move
this inside just a little bit. Now it's correct.
That's very cool. Now we got this
cater, I will like to isolate this because I think we got some
problem with this. I don't know what's
going on here, but we have some phases
inside. We don't need them. Go to the phase, grab
these phase inside, it X F to delete them all,
and I think that's it. Now we ready. All right. That's very cool. I'm
going to use this one as As a cutter. Maybe I can move it
down just a little bit. I don't need it to
go de too much. Or I select this one, hold shift and select the target,
hit control shift B, and I'm going to use s lis
in the autoboan section, and now we got my result. I will select this
geometry as well, hold H to grab the target, Ctrol Hit B and use sli as well. Now we have this and this. Now the result is correct. After that, I can
select those both and tap the mode
and go to the face. Let's select these faces. And I will hit to inset and hit e to extrude this just a
little bit like this. That's very cool. Now
I cut this result. Tub out, and there we
go. Now we have this. If you like, we can grab those
both of them and and you can hit key to the Z and move
those inside if you want. Maybe that's will make the
results even more beautiful. All right now, I can go to the
bottom view Control seven, and I need to create the circle. So in this case, I will select the
tab and I will bring the three D corsor right here. For example, let's
select these vertices, H S and Corser here. Coors to select the top
out heft A and let's add, for example, a cylinder or you can add the
circle if you prefer. Now I have the circle.
It's very big. I'm going to sweep
the vertices to 40. Need to make it to make
it even more smooth. The radio that's too much. I will add, for example, 15, centimeter and I will
scale manually like this. After that, G to the z, let's take it out like this, go to solid, Tach move, hit A and then F and then e
to extrude this like that. Push it inside the
umetry, yes a little bit. A to select all the phases, recalculate the normal
in case we made a mistake when we
hit to extrude it, it shift n, and that's it. Top out. Hold Hit to grab the umetry and then hit
control shift B and let's use difference
this time, I think. Something like this. Let's cool. Now let's select this tat mode. I think I can grab
this edge and this age and I can manually move this
just a little bit like that.
45. 045 Modeling section Bottom parts part 9: Hello again, and welcome back. All right, let's complete what we left in the previous video. We need to give this
a mirror Modifier. The organ dot is exactly in the center,
and that's what we want. Now we can add mirror Modifier. Okay. Let's go to the modifier
list and s Mr. Now we have r. X axis that's correct. We need to activate
bicect because we need to delete the rest
of the uma. Okay. I think you understand
what I mean. Let's go to the bottom
of view. All right. All right. This is the
half of the emetry. We will have this parts, and if you add mir modifier, you will have some overlapping. Activating pic sect will cut any emetry beyond
the middle line because of that we need bicect. So activate bicect like this, and I think we need
to flip the result. Sorry, just forget
to activate mirror. As you can see this
is the result, if you got something like
this, just flip it like this. And now everything is
correct. That's very cool. Let's bring the reference M and let's see what
else we could do here. All right. Maybe I can go to the bottom of you and
go to wire frame. Because as I can see, we
have some slices here, we need to add, and we have
some holes right here, we need to create as well. In this case, I will
apply the mooifier. Or I don't know,
maybe we can keep it. All right. It's
working on this side. So I'm going to add
slides right here and it will be reflected
on the other side. Okay, I will select the eumetry and activate
cover tool at control f x, and switch to line. Let's make cut start
from here and maybe it goes right here,
something like this. All right, something like
that. When you combate, yes it have to sweak to pull and then click and then
space to confirm it. And now if I go to slid,
as you can see, now, I have nice slide right
here. That's very cool. All right, let's see
what else we could do. Maybe we need to create another slice right here in this area. Let's select the geometry it Catal Haft x activates
Carver tool, switch to line hit space. Now let's make sli
right here as well. Let's click here, click here. Let's try to follow this shape. All that's not going to work. I will cancel it and
repeat that again. Catal Hf x and switch to line.
Let's follow this again. We should go over here, and then right here,
and then hold shifts, and now you can make the cut. All right. Now we
have nice slides, but we need to make some
tweaking over here. What I'm going to do
is I will select those both geometry and go to the bottom again
and tap the mode. Let's see grab these vertices in the wireframe mode like
this and is to the x zero enter to mixed flat
and grab to the sorry. As to the y zero,
miked flat like that. Maybe those as
well. M them flat. What about this one right here? Maybe I don't know, can keep it like
this. All right. I will accept this results. Now let's see what
we have done so far. Okay. The result is cool, but we just have one
problem right here. The cut now become very close and reach this
g. That's not correct, actually. That's not nice. It seems like we
have some problems. So I'm going to control this a co time. I will cancel that. I will go to the bottom and
just make some s here tab, and I will select this egg and move over here and
over here as well. Maybe I can make a cut. I don't know, or maybe I
can leave it like that. Let's see what's the correct? Maybe I can move this
right here, this a. Something like this,
maybe will work. Let's kick the face. If the face twisted a little
bit, we need to fix it. As you can see, we have
some twisting right here. That we need to make some
editing here in this area. Let's see how can
we keep this Fs, let's merge this one, g wise
and merge it right here. That will be better. All right. After that, maybe we can
move this just a little bit. To this direction. I'm not quite sure what the correct thing
that we should do. Maybe we can take this
back and snab it here. Now let's check the pace. We just eliminated the twist and now it's become
better. That's cool. I will accept this
result and I will create the cut again tab out, and then control space to go to line and start
following this shape. Something like this. Ha shift and then space to confirm it
and now we cut carbo cut. He try to click
to excite and now let's select the boto three. This one and this one, and
let's go to the bottom again, Tab and now make some tweaking. Let's scale those to the y axis, make them align them,
and those as well. And maybe those to line here. And what else? All right. That's very cool. Maybe
those right here. Right now the result is better. After that, tab out, you can select those and key to this and move this slide
just a little bit like that. I just need to make
some variation, and I will cut this again, go to the bottom,
go to wire frame. Use Carver tool,
cant quick to line, and let's make another
cut goes like this. Hold it and then space to
make that cuts very cool. Now let's select this and
let's select this umetry, and tap the e mode
for both of them. Let's scrub these
vertices at S to the x to align them. That's cool. Tab out and maybe now, we can move them a little bit. All right inside or outside
if you like, to the z. We can move those
back if you prefer. The idea is just to have
some variation here. To the z, let's take this
down just a little bit. And we can delete the
rest of it if we like. We have this option, or we can leave it like
this. It's okay. Let's go to the bottom let's see what else we could
create right here. We got a hole right
here in this geometry, we need to create as well. Let's select this one and
tap to the eighth mode. Go to phase, select this
phase and this phase. Maybe this one as well, hit to ins, let's
insert this inside. It e to make some extion, but cancel the extruion, and I will hit to the y is zero enter and move this phase back, key
and take this back. Okay, something like
this. Let's see what's going to happen
if I move this further. Or maybe right here,
that will be enough. Now let's see what
else we could do. We need to add some frame
right here in this area. Maybe I can grab
these two phases and hit H D to take a COB over here, and then hit P S to separate
them from the group. Tab out, grab those tub. Right now, I can grab this g, and this may I don't know, maybe we can hit E to the Z and extrude them
and align them here, G and take this back over there. Maybe now we can add
some cuts like that, and Bival cuts control
be something like this, maybe F to be thee, control to add one right here, control b to val it. X F to delete this. What about this area? Maybe we can add an right here and delete this phase
with this phase x f. Now, I can select all of these phases and hit E and hit right lick to cancel it and manually G
and move it to the y axis. Like to understand what
we have done here. G and take this
over here, maybe. These phases, we
don't need them, we can hit x f to
delete them if we like. Even these phases, if you go
to the front or to the back, we can erupt the site, hold you have to crap the site, it x f to delete it. This exits, and now
we got this results. All right.
46. 046 Modeling section Bottom parts part 10: Hello, everyone. Welcome back. We have some details
we need to create, for example, we have
some holes here. Some stuff right here. Let's try to create them. Let's put this C over
here, for example, and let's see from
where we can start. Let's create these holes. The three d coors in the middle. That's okay. I will add the key right here and I'm going to
move it ca a little bit down. And from the front
or from the back, I will tap the it mode
and coat the vertices, and I'm going to grab these vertices to the
position of the origin dot. I will add key and
take those right here. I did that because that's
will help me when I want to align the object on the surface
when I use the fate snap. Because of that, I did this. After that, maybe I need to make this a
little bit thinner, so I'm going to scale them to the y axis,
just a little bit. And I will go to the edge and control I click to
select these four edges. Control B to abovel them. Let's give them
abovel like this. But make sure to, sorry, you don't need to apply
the scale because you scaled this in the mode. Control be endless let's
have some bubble like this. Make it round and
nice like that. And now we got this result. Tap out, go to solid. Now I'm going to use face snap, and I'm going to center. I will snap this on
the surface because the surface we have
an angle here, right? To align this with this surface is better
to use face snap. Hit key to move this hold
control and snap it right here. But make sure to activate a line rotation e and
move this right here. As you can see, we
got the result. But the problem that
we have right now is the It's a flip. All right. We need to flip the drogan I will
move this right here. I just need to explain
to you what I mean here. If I activate the organ, as you can see, the z axis
pointing up like this. I need to rotate the Z axis. To do that, just
activate the organ, and then hit r to
the y, for example, and rotate this 18 degree, hold control to achieve this, and then turn off the organ. Now hit and align it. Now it work correctly
with problem. Now let's go to the Gizmos
activate N three is two local. That's very cool. Let's go to the left view. Let's put this in the
correct position. Maybe we need to rotate it, go to the rotation and rotate it just a
little bit like this. And now we need to move
it just a little bit. H H D, grab this, D, and all right. H d to duplicate this. All one here. Just cancel the z axis hit heft z when
you do that duplication. Let's add one over
here and hit heft r, and Heft r again, to repeat that. Now we got this. All right, now we grab
all of these copies and move them to the Z
axis just a little bit inside the uma try
and hit controlled J to make them one piece and
hold H to grab the target, control H, and chose difference. All right. Now we got
the cut that wants. Let's go to the
side view as well, and we need to create
the stuff here, go to wire frame, so
you can see them. We have this shape. Let's
select the metre that we want, and let's activate carver, if you like. We can
activate carver. Can shift X, and let's
s these two line. Let's make some clicks
here, one here, one here and one here
as well one here, and the last one will
be right here and hold shift and space to
confirm the slice. Right now, we got nice
slice right here. As you can see. But the problem that
we got right here, the slice goes
through the umetry, and we can see part of
the sli in this area, and we don't need that. In this case, I will cancel
this and I will repeat it. But this time, I will use the three decorsor as
the depth for the slide. I will put the three decosor
right here in this area. That's been the
slides will reach this area and it will
stop automatically. Right now, I will
go to the left and go to the wire frame, Ctrl ft, x activate carver, go to line, and hit d to activate
courser depth. All right now, I
will add click here. Click here, one here
and one here as well. And the last one, you can but right here, don't
move the mouse. Hold heift, and then space. A right now, as you can see, The slices stopped to the position of the three D
coursor. This is the depth. That's what I want.
When you be satisfy, taps it mode, grab
this phase right here. If you want to push it
inside, you can do this, hit alts and move this
attle bit inside like that, and then hit I to make some
inst just a little bit. And then hit e to extrude
this a little bit. We can hold control and nab it to the
surface, if you like. That will work as well.
That's very cool. We have some circle right
here we need to create, go to the left, go
to the wire frame. This time, I will add a circle or we can add the
cylinder, if you like. Or even you can use carver
tool to achieve this. And let's learn how
can we do this? Select the humors that you
want to cut and then it control heft x. Squeak
from line to circle, and just add one click right
here and move the mouse. And now you have circle Holt
heft to squeak to ripple, I mean slides, and then space, so click to confirm. And now we got this cylinder. If you don't like this results, you can use the coarser depth. If you don't want the cut to reach the end of the
geometry. All right. Let's learn how can we use
the coarser depth here. I will put the three courser
for example right here. That will be enough. You can see that better if you go
to the bottom view. Something like this,
the depth will reach this area, this distance. I will had control Z a couple of times to cancel it I here, go to the left control three and z to go to wireframe,
select the oma three. Control ft x activate carver, space to switch, space
again to go to circle. One click here in the middle. If the circle doesn't, create it in the
correct position, hold t and move it. All right. Something like
this will be okay, and hold it, click. Now, as you can see, I made the cut, but the depth reach the position of the
three D courser and that's what I want. It's very important this topic. Tab, let's select this phase, and then hit Alt to move this
inside just a little bit, and then hit I two
make some inst and then e to ext hold control
to snap it with this phase. Now we got this. That's
very cool. All right. What else we have here?
We have some holes? Maybe we can do this
later, not now. Let's see what we can do here. We have this ometry. Let's see how can we create. L et's go to the left control three and maybe we can
start with the cube, I think. All right. Let's go to wireframe,
sift A, Yeah, I will add cube G to
move the cube over here, and tap to the edit mode,
go to the vertices, and now let's start
controlling these vertices. G, and let's move
those for example right here, and the crab those, e and let's move those over
here, maybe, for example. Let's grab this and
this, e to the Z. Let's move those over
here. Something like this. Let's go to the bottom view, let's see what's
going on over there. All right. I need to
grab those and hit key and move those
maybe right here. Maybe this vertex, key and let's move it inside the
humetry a little bit. This one, I could
take it out a little bit and move it inside
the human as well. For this one, hit key and
let's align it right here. And we need to make a
cut here in the middle. I think I will use
carve tool as well. Tab out control heft
X, switch to line. Corser depth is on. We don't need it's d to
turn off courser depth. One click right
here, click here. Right click here, click here, and then it's bas and we got
the cut. That's very cool. Now let's go to the lifts, and let's see what cut
we need to do here. As you can see, we have
something to do here. See how can we handle it? I will tap the mode
and I will move all of these vertices down key
to the z right here, from this side, key to the z, and let's take this up over here because we will cut
anything we don't want. Let's go to perspective first. We need to move this
up a little bit, something like
this will be okay. That's very cool.
Go to wire frame, select the geometry,
control shift x, switch to line, and let's
make a cut start from here. One click over here, one click over here, and here, just cover it and
then hit space to confirm it. And now we got
something nice here. That's very cool. All
right, that's very cool. I think here we need to make
some slices in this area. Okay. It will be something easy. Let's go to the left again
and let's try to do it. But first, before we do that, I think I can unhide the body because I need to see how far this goes
inside the body. That's too much. I
think I can cut it. Let's go to the left. Hit control shift, go to line. Let's make cuts
goes from here to here and just cover it and
then space to confirm the cut. That's very cool. Now
I will make slice, something similar to this one. Uh, it's not necessary
to go to wire frame. I will do it right here. One click right here. One click
right here and one there. Something like this and hold shift and then
click sorry space. All right. Now we got
the slides that we that we need. All right. One more thing we
need to do here. We need to mirror it
on the other side. I will use the
empty as organ dot. Let's put that three
decosor over here to the position of
the empty because the empty is exactly
in the middle. Grab the met, this metry, and then right click, set organ organ to
three decorsor, as you can see now organ in the position of the
three decorsor. Let's add the
mirror modifier for the first object and
it's mirrored perfectly. Grab this hold to
grab the object with the mirror B to select it. There we go. T. All right. What else we could
do here? All right. All right. We have some
geometry right here to create. Let's see from
where we can start. Maybe from the bottom, we can understand a little bit
what's going on over there. I think I will hide the
body again and go to wire frame and let's
start creating the stuff. I have this geometry. I think we can start from box at box key let's
move over here. Let's go to the lifts. All right. Let's take this up. And maybe we can move it just
a little bit right here. Tap mode, and let's
control the vertices. I will take those up here and take this one maybe I
don't know over here, maybe. And the grab those, maybe
I can move them over here. I can go to the bottom view to understand exactly
what I should do. That's something cool. Go back to the left and let's take this one
and let's put this, for example, right here. And maybe I can take
this up to the body. Anything we don't want,
we will cut later, okay? All right. We have some stuff right here
we need to do. Some cuts. Let's start from
this right here, tab out and control
shift x to switch to cover space to go to line and let's make
quick slice here. Hold shift space.
Now we cut one here. What else? We got one
right here as well. Let's see how can we do
it as you can see here. Sorry, you don't need to
it's all already activated. Let's add a cut right here
maybe one right here, one here, one here. Just follow the line.
Something like this. Try to cover it, and then hold shift and space, and
now we got a cut. What else? Maybe
one cut right here, one here, here, try to cover it, hold shift and space
to confirm it. On cut over here as well. Hold shift space to confirm it. Now I will excite and
select this geometry, and I need to make
some cut to this. Control x, switch to line, one click here, here as well, and one here, one here, hold to make space to confirm. That's very cool. One
slice here as well. Select this umetry, control
heft x, space to line. One, click over here, one here, and one here
as well one here. The last one should
be over here, hold shift, and then
space to confirm the cut. Now we got this result
as you can see here. L et's scrub this one and
let's try to scale it a bit to sorry Let's chang Let's
bring the origin dot here, S origin to geometry, and scale it just
ale b to the x axis, make it thinner, and maybe I
can grub this one as well. Maybe I can make
this ale bit bigger. Ale b to the x axis,
make it bigger. Not too much. All right. What else maybe this one, I can make it ale bit thinner. As to the x. Or you can bring the orgin dot right
here. What about this one? Let's bring the Ogent dot over here and S to the
x, make it thinner. The idea here, we need
to make some variation. Let's make this one
thinner as well. And this one as well. And right click
organ to eumetry, make it thinner or bigger. Now we got the variation
that we want almost. Now I will select this and
tap the mode, go to the edge, grab this edge, and this edge
and try to volt control be. Or before I be val it, I think I don't know.
Let's try that. I will grab this face and hit
s to move this face inside, or that's not going to work. Let's go to the Or maybe
I can move the vertices, git wise and slide them back. Yeah, this way it will work. Just take it back ale
bit, not too much. Grab this egg and this egg
hit control to vol it. But make sure that you don't have any problem
with the scale, tab out control.
I apply a scale. Tab in and give it v. Something like this.
That will be nice. I want this to be a C. And now we created
this nice cumetry. All right, The holy
thing that we need to do here is to
create this one. We can see it from
the bottom as well. It will be easy to create. But we will do that
in the next video. That's it for this
video and see you next.
47. 047 Modeling section Bottom parts part 11: Hello again. Welcome back. Let's create this
geometry. I will show you. This one right here. Let's
start with a box, or cube. If you have to a to add
and let's add Cube, G and let's move this over here. Tap to eight move, hit eight, select all the faces. S to scale it, make
it big like this. Grab these irte, G
move those over here. And it to maybe over
here and scale it. G and move it just a little bit, maybe right here,
scale it again. A to make etc through
again, maybe over here. Now we got this result. Maybe we can move this a
little bit over there. Let's go to the left view and let's see what
we could do here. A to select all the cumetry, move it I don't know, maybe right here, something
like this, or I don't know. Let's start from here. Grob the side, you can
move this up here, grab the side, move it here, and I will use carver
tool to make my cut. Tub outs, and let's use carver, control heft x, and let's
make the first cut. Let's make a cut, sorry. I need to speak to a line, control heft x, go to line. Let's make a cut goes like that. If the position of the
fires point not correct, hold out and move it, and now it's correct. All right. Now it's pace to cut,
and there we go. Another cat should be over here. Another cat should be here. One cat maybe should
go over there, hold out and move it. One cat it should be right here. All right. One more thing
here, we need to do, we need to merge these vertices. I don't like to leave
them like that. Exactly of the carver tool tab, and now let's grab, for example. I don't know. I will grab those gat
wie and I will move them hold out and move them forward until
they meet each other. Now you can grab for
example, this one, heat wise and slide
it here and merge it. When you do that, it key and move this up
just a little bit. And there we go. Something
like this, that will be okay. All right. As you can see,
we have some round corner. We need to give this above. Let's move this over here. Go to the edge and
let's select the edges. A the necessary edges, this one. Let's start with this one, for example. Go to the left. Hit control two bev and
let's be it like that. And seven vertices. I think that will be very nice. Let's grab this edge right here, control B and bev it as well. Something like
this, it will work. One here, control B. Let's bevel this one,
bev this as well, control B, and
those here as well. Let's move this one first
over here and then control be to bevel it.
Something like that. I can add six segment here because it's
very small corner. I think Or let's
ignore this for now, this corner and this corner. After that, I will grab
the edge this edge, and I will hit control
B to bevel it. From the left view, we can understand that more, control B. And let's pval we
can see we have some problem over there or
something weird happened. Let's see what's going
on. I selected this edge. That's wrong. Go back. It control B and let's
bevele this with two edges. Okay. Something like that. We got some overlapping
having right here. Manually, I will grab this vertex and eat wise
and take it out like this. And let's see if we
have another problem. This one is very close. Move it a little bit
and give it space. This one is too far. All right. Space here as we ket wise and move this right here. Let's go to sold, and let's
see what we got so far. All right. When you
come believe that, now you can grab those and you can bubble them if
you if you like, control be and give them a nice bubble for edges,
that will be okay. That's very cool. All right. From the bottom, we have some design we need
to create here. And as you can see, we have some tilt up here. Using carver tool in this scenario will not achieve the tilt that
we got right here. In this case, maybe
we can create a gemetr to create this shape. All right, I think we can
use cube to achieve this. Tab out and let's add cube, move the cube over here. L start from here.
We can, for example, it's right here.
Something like this. You can use the cube or y. Let's use the cube. Let's move
this one maybe right here. Tap the mode and let's start
controlling the ectics. Let's move the tics
right here, this one, maybe we can put this over here, and we can control to add one H, maybe here and hit key and let's move this over
here in this area. Let's sec all of these ices. Key and let's move those here. Maybe. And we can take this out. Extrude this one
extriion right here. Take this out and
another extragion, E, something like this, that will work and grab the upper side and
move it up like this. That's very cool. Let's see
what else we can do here. All right, tub out, hold
shift to grab the target, control shift B, and use slis, and now we have nice
slis over here. That's very cool.
Let's go back to the bottom view and let's
see what else we could do. We have another slide. Let's try to create it. This time, I will use carver, select the oc that
you want to cut, control shift X to
activate carver tool, switch to line, and let's
start maybe from here. Do we need to create this shape? Actually, I don't like it. I
will create something else. I don't know, but I feel I can make it a
little bit thinner. Let's start from here and let's maybe cut over
here and one here. One goes here,
something like that. Try to cover it like
this hold shift, and then space to confirm it, and now we got this. Very cool. Let's take some
tweaking right here, grab the geometry in this
tab and go to the vertices, grab these vertices, it key and try to move them a little bit
and as to the x zero enter. The idea here, I need to
put those in the middle. Can do that manually as to the x zero enter,
something like this. I will add Momi fire later after I complete
all of these details. Now we've got this geometry, and we got the second
one over here. All right. I will use mirror
Modifier to add mirror for this geometry selected and go to the modifier list
and add mirror Modifier. Now it's mirrored
on the other side. We have some gap
here in the middle. We can go to the bottom
view to fix this. Right. Tab the mode,
go to the vertices, go to the wire frame, it
is to the x zero enter, and move this one
on the other side. Even if you see any
overlapping that's okay, tap out and activate
bsects and flip it. That will help to
fix the problem. Admiral modifier for
this umetry as well. You can CV the mirror
from this umetry. Hold you have to grab this, this one, this one, and then CV to select it. Now we have this
piece in the middle. This one right here. We can
give a temer modifier as, Add mir modifier, and
use bsects and the flip. Now we just have this
one in the middle. That's very cool. Let's see grab these pieces and let's
hit slack to isolate them. Let's see what we got so far. We got this shape. That's cool. All right now, I will
select this piece in the middle and apply the
Mural moodifier for it. Tap to the edit mode, I will select these faces. And those as well. And I will hit key to move those
up key to the z. All I think we need to grab
these vertices here as well. Let's make some connection
before we do that. I will grab those hit K
and those as well here hit K. And now I can select
the faces that I like. Grab all of these faces, and then hit G to the z. Let's move this
one inside a bit. Now we have something. And now let's hit slash two
excites almost finished. We just need to
add a circle here. Let's go to the left
control of three, and let's see how
can we do that? I will use a cylinder. Let's add the cylinder, aft
A and add the cylinder. The cylinder is very big, and the vertices count is low. I will increase the
number to maybe 62. And I need to align this to the view,
rotate it like that, and maybe change the radius
from 100 centimeter to maybe 15 and the depth 15 as
well, make it very small. G and let's put it right
here. Something like this. And we need to align this. We need to align
it with the angle. Let's go to the bottom view and I will attach to it mode and I will grab the side of
vertices and move it to the position of the
origin almost right here. Maybe I can give this
a depth a little bit. Now I will use the snap
to phase and activate align rotation to align
this one to the surface, key and align it like that. We can go to the left
to the wire frame to see where should we put
this? Let's do that again. Maybe we need to make
some scaling here. And scale make it pig
key and snap it again. Let's see what we got so
far. Something like this. Something like this,
it will be nice. If you would like to scale,
it's make it smaller, that's okay. It's not an issue. Now I need to push
this inside like that, and now I need to make
my cuts over here. Hold Shift to grab the target
and then it can shift B and e difference. Sorry. Let's move this inside.
That's very cool. Hold this control he
and choose difference. Something weird we got here.
I don't know what is it. I think this
geometry is flipped. As quite sure, let's
activate phase orientation. C of those control A app scale. Something weird type right here. Maybe because we have Mramdi
fire that doesn't work. Apply the Mramedi fire first. Grab this hold have to grab this one control heft and
let's use difference. Well, that's weird. Grab this, hold have to grab this, Ct H B, and use difference here. All right. We need to move
it a little bit farther. This is the problem. All right. That doesn't work. Sometime
that doesn't work. You just need to
move it to the left or to the right to make it work because I don't know
t doesn't work. Right Let's grab the ometre and I will hit controls a couple of
time to concert it here. I will grab the umetre. Maybe I need to make
some connection here. Maybe that's will help. Let's make connection
over here at J. Maybe over here to make some
connection between them. Maybe a connection
between those K, or this one with this one at J. This one, maybe with this one
hit K. Something like this. I don't know, but
let's try that. Let's see what's
going to happen. Tap out it. Grab this hot, grab this one, can troll have
to be and use difference. That's weird. That's weird to grab this, Cant
be, difference. If I move this geometer over
here, I will have the cut, but in this area,
we see nothing. I will cancel that and let's
see why that doesn't happen. Let's try to delete the
half of this geometry. It X F. I just trying to find
the solution. All right. Maybe we can make
another some cut goes from this side to this side. It's not necessary
to be the solution, but we are trying to
find the solution. This vertex, we don't
need to dissolve it. Let's try to see
is there any very close vertices all the geometry, all the vertices at, and Qs mec by distance,
we have zero. We don't have. A now tab out, it's like two, grab this ho, you have to grab this one
control and difference. Let's try to move this a
little bit here or there. Well, that's All right. To make this work, we need
to move it inside deep, and I think I will
accept this result. I don't have another
choice here. That doesn't work here as well. Aspet When I apply the scale for the, I note that the faces flipped. Maybe because of that, t to grab them t A and then shift in to recalculate the normal
and grab this one. Delete this poly in. We don't need it. Grab this. Lets bring the geometry bag, swing this two texture, tab hit a Haft n. Now grab this one tab hit at
n to recalculate the normal. Now let's make the cut again, cut or heft B difference,
the same scenario. All right. Nothing new.
I will ts you again. The problem is when I when I choose difference,
it's become union. I don't know why
that's happened, but let's try to use union. Oh, my gosh. Now it's working. That's really weird.
That's really weird. All right, I will
accept this result. And I will end this
video right here. I just forget to add
Mirror Modifier. I will apply this, control a
applied vitual gumetr to me, accept this and add
mirror Modifier. And yeah, that's it for
this video. Ends you next.
48. 048 Modeling section Bottom parts part 12: Hello again. Welcome back. Let's finish this area. We add miro Modifier. We don't need the cutter
anymore. We can delete it. We can tap the mode and we can select this phase over
here, hit I two inset. Let's make a small inset and
then hit E to extrude this. But I need to extrude this to
the direction of the pace. I will hit T and extrude
along the normal. Some extrude like this. Let's bring the reference Ig. I just need to see
what I could do here. I just need to extrude
it a little bit. Something like this, will work, and we can hit E to extrude
this again, I think. I can scale it like that. Scale it inside. Something
like this. That's very cool. Tab out, and I think
now we finish it. I will click head
smooth and then add auto smooth for this and the
same scenario for the rest. We have some here, we can see it because of
the angle of the at smooth, we can take this
bs auto bit until we see this edge and
this age as well. We can take it down.
That's very cool. 14 is working here
in the scenario. For this one, we need
to add maybe 14 as we to bring back
these edges as well. But make sure not to go less than 14 because you will make these edges
right here sharps. All right. That's
very cool. All right. Now we can say that
we finish this one. Let's add Had
Smooth for this and activate auto smooth for
it. That's very cool. Let's see what's the
next that we could do. Let's go to the bottom of view, and Let's see how can we
create the Cumetr right here? We can start with the cube. Let's bring the three
D corsor right here, Heft S. Or maybe we can move the t here and heft
to S corsor to select it, H A and let's add cube. And let's move this
cube over here, maybe. And We can start with one side, and then we can mirror it. Let's start with the side. Top to the eight mode,
go to the vertices, go to wire frame and let's move those just
a little bit here. And those and let's
move those over here. Or actually, don't worry too much about these
cuts. You can. You can use the cover
tool to cut all of these. Let's take this maybe over here. Even if you take it
here, that's okay, and maybe we can take this here, and I will cut it
using the cover. But let's go to the left
first and select everything and move this let's
take the side, and let's move this over
here. Something like this. Let's go to the bottom, it seems like we need to move this over here to cover
this area as well. All right. Now let's start cutting
this big box here. Tap out control shift x, go to line and first, let's cut it with the
angle of the body, something like this,
because we don't need all of the side, we don't need it. Confirm it with the space. Now let's cut like that. In one like this,
follow the shape. Something like this
and cut this at space. There we go. All right now
you can go to the bottom, Control seven, and let's see
from here what we can do. Control if x to go to line, and let's add the
line goes like that. All I will cancel this because
I just need to go back, can X and go to line and
let's do that again. Something like
this. That's cool. And one cut goes like that. One here, one over here, and this one should
go I don't know, maybe right here,
and cut the rest. T. That's very cool, and maybe we need
to cut this area. Also quite sure. Let's
see what we got so far. We got this result.
We have some angle, if you notes here in this area. That's mean we
need to grab maybe this edge and I don't know, maybe we can bev control B. Let's go to the side view. Almost there. We need to grab
these vertices to the z, and let's take
those up over here. Now we got close
results. All right. That's very cool. Now I can say that I finished
with this geometry. We need to go back to the bottom view and king
the cursor to the position, king the origin to the position
of the three D coursor, right lick set organ
to the three decorsor, and then give it with the fire. There we go. Now, we need to create
this geometry as well. Maybe we can start with the cube at shift A and
let's add cube over here. And Let's scale it to
the x axis like this. You can scale it to the y sv. Let's make it pig, or
something like this. Let's tap to the mode and
let's go to vertices. Maybe we can scale it just
a little bit to the x axis. Let's move these vertices
right here, maybe, extrude right here,
skelet inside like that. Let's make another
extrusion here. Let's in grab those E. Let's
extrude those, for example. Right here, maybe.
And extrude this again. Or something like this. Maybe we can scale
this to the x axis, and let's make another
extrusion maybe over here or let's move
it right here. A Let's grab those, scale them a little bit more, and the grab those forwards, srode them here and scale
them inside like that, and let's move this here. Now, let's go to let's
go to the side view, control three to go to the left, and let's see what
else we could do here. Let's grub the side up, and we can use carver tool
to cut what we need to cut, and the grab those, and
let's move those over here. No rights. Let's use Carver tool, tap out, control shift X, go to line cut, and let's make a cut goes
like that. Cut the side. We don't need it, and maybe we can make a big cut
goes like this. Let's see how can we
create these details. All right First thing, Let's
make a cut goes like that. Let's cut this from here, maybe. Let's make a cut goes like this. And maybe one cut. Let's make a cut. I don't know, maybe
something like that. All right. Let's see
what we've got so far. All right now we got this
shape, as you can see. Let's go to the bottom
and let's see what's the next step. All right. I think I got a mistake here. Let's go to the side view
here and I don't know. I think we need to
make some here. Before I complete this metry. Let's start creating
these small umetres here, and let's put them in
the correct position. After that, we will see what
we can do with the big one because I can't see exactly
what's going on over there. In this case, I will
shift A and add cube, and I will move the cube right here to create
this umetry here. Tab, go to the vertices and let's move the site,
for example, right here. Grab those, let's move
this one over here, and this one make
it big like this. All right. Something like this. I will use carver to
create this shape. Maybe I need to move this
over there and tab out control shift x and start
adding some cuts here. Control shift x, go to the
line and let's make a cut, start from here, and
one cut over there. Let's make a cut here. One cut should go over there. And one cut here and maybe
one here. That's very cool. All right now tab and
go to the vertices, grab the side and let's
move it a little bit. We need to add an H right here. Let's go to the left
view, control three, and let's move this
one and let's put it in the correct position. Let's put it right
here for now tab and let's see grab this
side of vertices, move it down, and tab
out e carver tool again, control ft, go to the line. Let's make a cut goes like
that, and another cut. Another cut. Start from here. Maybe something like this. Let's see what's
going to happen. I think I need to cancel this. I will have control Z because I need to make a strike cut. Let's do that again.
Something like this. Yeah, I think now it's correct. And let's create
the next Kmetry. This one right here. I will use Que and move it. Let's
put this right here. Tab, go to the eighth
mode, scale out like this. Scale to to the y axis as
well. Go to the lifts. Let's put it in the
correct position. Key to the Z, let's
move it over here, grab the side and move it down. Let's go to the bottom and now let's start
making some cuts. Tab, cantft x, go to line, and let's make a
cut goes like that. Let's align this edge. Cut should go like
this. That's very cool. Maybe cut goes like that. You can use t to move the edge. One cut should go like this. Let's make a cut right here. And what else We
cat would go here. We don't need this
one, we can delete it. Don't worry about the
side because we're going to use Momdifier. That's it. Now I will use Mo moodifer, add mirror and use bsects
and flip the results. After that, I'm to speak to the left view and let's see
what else we could do here. Control ft and use carver tool to cut this
area as well to trim it. The same thing here. Let's follow this shape. A something like this. Let's
see what we've got so far. What about this geometry? We should make it flat tab and let's make a cut
using cover tool. You don't need to tap it. Make a big cut, go to line, and goes like this. Maybe we can make
small changes here. Okay. Let's see if
this work or not. Or I will control
that because I just need to do something here. We got something. Let's go back and
let's do that again. A maybe something like this. Let's see if this works or not. Let's go to the bottom
view, to go to wire frame. Almost there. I will accept the
that I got here. But we just need to
make some tweaking and slide this and met
it like this. T. That's very cool. It's okay to have
some variation, It's not a big issue. Let's see what else
we should do here. I think I need to level
this edge, control B. Let's see what we will
got if we do that. I will activate clam overlap and put the words
forward to have this. It's like to isolate it because here we
have two vertices, we need to me them. Let's see this, and at
center, merge them like this. All right Let's see what
else we could do here. Maybe we can add
an a right here. Sorry, we can add bevel here. Let's see what's going
to happen if I do that. Keep tie and move
this over there. Something like this. The result that I
did here is not necessarily similar to
the reference image, but this will work. Some tweaking here
we need to do and the bottom view may
be go to wire frame, grab this side and move it up. Align it with this edge. To fill this area. What
else we could do here? I will tap the e mode and I
will grab this face and move it up and maybe this edge, I can move it just a
little bit, like this. And move it up a little bit. Dissolve this egg.
We don't need it. I didn't like the
overlapping that I got here. In this case, I think I'm
going to make some changes. I will select all
of these edges. I can move them at b to
the x axis or I can make a new trim and I can
trim all of these. I'm going to use Carver tool, t f x and go to line and
let's start from here. And let's make a
cut goes like this, and then hit space. I will use cover
tool, cantl heft x, and swa to sorry, Ctrl heft x, and
something weird. Select the object that you want, cantro heft x and s to line. Let's make a cut start
from here maybe. We can take a little bit from
it. Something like this. Now we need to make some fixing, it slack to isolate this umetry and let's see
what we got so far here. Go to the vertices and
kick the vertices. If you found
something like this, some vertices like that, you can dissolve them and you can merge some vertices
like this one here. Let's see what else
we can do here. You can grab those
and hit g and make some connection here or you can delete the whole phase
here if you like. But after you
complete the design, if the organ.in the middle, you can use miro Modifier, tom the side on the side. Tab out and add miro Modifier and hit bicect and
flip the result. Now hits slide to ex, go to the bottom and let's
see what we got so far. Select this umetry
and let's change the origin dot to the
position of the MT. Bring the three
decosor right here. Let's bring the three
decosor right here, et S corso to select it, and then hit select the umetry right click
origin to three dicosor, and then let's give
it Mo moodifier. And there we go.
The result that we got right now is not necessarily similar to the reference image, but it's okay, use your
imagination, make your cut. The idea here is to learn how to trim the object
using carver tool. You can do whatever
thing you like. You can trim add slices, do whatever thing you like, and it's not necessary to stick to the
reference image 100%. I will end this video.
That's it for this one and
49. 049 Modeling section Bottom parts part 13: Hello, everyone,
and welcome back. All right, Let's complete
the rest of the umatre. I think we need to make
some editing right here. Let's isolate this piece alone, and let's cap to it mood. I have this tip right here. I don't know if I
need it or not. Maybe I can merge it git wise and merge this
over here, for example. And let's go to the Let's go to the left view and let's
bring the other details. L go to the left again. All right. We need to make some
tweaking right here. L et's grub these
two vertices and move them maybe down
just a little bit. Or maybe I can make a new cut
to cut this and align it. All right. Let's see. What's
the best choice here to do? All right, these three vertices
are not aligned together. So in this case, I think it's better to trim it. That that's will make
it easier for me. Control ift X to go to the carver tool and
let's make a cut. Sorry, let's use line, and let's make cut
goes like that. Something like this. Or before I do this,
maybe I need to move some vertices down and
make another new trim, Let's see grab those over here. Something like this and tab out control and go to line and let's make a new trim goes like this. And maybe another trim from above or you can
ignore it if you like. Let's see what we got here. All right now, we got this
results. What about this one? I will tap the mood and I will grab this face and move it
down just a little bit. Make some tweaking here. All right. But I will got one problem. I don't need to
lose the connection that I have here, the alignment. Or let's see what
we can do for this. Maybe we can trim
this area alone. Let's grab this
geometry, and sorry, this one in the middle,
and let's grab this phase, and bring the three dcsor here. H A and let's add cube. Maybe we can use this
cube as a cutter. Let's go to the side
view or left view. Tap to the eight mode,
go to the vertices and grub the side and
let's put this over here. And this one, let's
crob this over here. Let's move this
here, for example, and this one may be right
there, something like this. Let's kill it to the x axis
like that, make it big. Let's use this as a cutter. Grab this hole, you have
to grab the uma tree. He control to P and us
difference with ph. And now we can control the
cube by moving it up and down. Now, I think this
result is better. I can move it back if I like. I have this option as well. The result that I got here
is nice and acceptable. I can control that even more
if I like. That's very cool. After that develop
the umatre control, I apply visual umetry to
mesh and delete the cutter. I will isolate the umetry. I just need to see if
there are any problem? Maybe we need to mark some
vertices like those here, git wise and take those back
and mark them over here. Maybe we can make some
connection over here J, maybe with this one and this
one as well if you like. All right. What else
we could do here? All right. Let's see what's
going to happen if I merc this vertex
with those here, get wise and take
this over here. And let's see grab this egg and this it
control x dissolve it and reconnect it again
to make this egg strike. All right, that's cool. Let's go to the bottom
control seven and hit to of the local mood first. Here in this air, we can see
that we have some table, and let's try to create it. Let's select this edge, and maybe this one as well. Let's go to the
bottom, control seven, and let's give it a
level, control B. All right. After that manual,
you can select this edge and you can
move it right here, and you can grub this vertex
and you can move it forward. You can grub these tics
and you can move them. This one and this one. You can move this one as
well, if you like. All right, sorry. I will use another mirror multifier to
fix the area right here. All right, somebody like this. Let's see the result
in the perspective. Let's check if we have any. Seems like we have some
face twisting here. Let's take this
bag to avoid that. Yeah. Now it's flat, and maybe we can fix this area as well by
adding another egg. In this area. We need to make another cut goes from
here, maybe ends here. And let's take this forward. But I need to activate vertex
stab and move this forward, hold control and stab it over here or a turnoff
a line rotation. For the CNI, we don't need it. Move this down, hold control,
and stab it here as well. And we will use
mirror modifier again to mirror to fix the umetry. Let's like to isolate it, and do we need to
do anything else? Do we have any double vertices? Yeah, we have double
vertice right here. I will hit A and then
M and use marriage by distance to merge
any close vertices. All right. We didn't
see any merging here. Let's tag up, for example, this one right here and hit
g wise and move it again. But make sure to activate
automatic. Don't forget that. Now they are merriced. All
right, that's very cool. All right, it's like to excite. And now we got a
nice table here. Let's see what else
we can do here. Maybe we can grab this metry and make some tabor
over here as well. Let's try that and let's
see what can happen. A small tabor like this. Maybe it will make the
result even better. And I canrab this
vertex and slide this down heat wise and slide
it down just a little bit. That's very cool. All
right. That's cool. Some of tweaking I would
like to do over right here. Let's go to the bottom. I just need to fill this area. I will hit control. Let's see. Can I add a loop? I can't. And this way, I can use knife
tool to make a cut. On to click right here, hit
A to make the cut sit right and hit C to cut through and then confirm it with left
to click and then enter. And we need another
cut over here. Hit K and make cut like that A and left to
click and then enter. Alright, I think I made
mistake here right here. I didn't press C to cut through the e
and the perspective. Yeah, that's correct. Ctrol to cancel this line and
hit K to other other cuts, it to make a stright, and then C and then left
click and then enter. After that, I will grab
those and scale those out and align them with
the tip of the triangle. I think now it's
better and make sense. If you prefer you can make a cut here in this
area, a slide, Ct, switch to line and
make a cut goes like that. All right, something
like this. Hold if and then click space. All right. And now we got
nice slides right here. The sit in the perspective.
All right. That's cool. Let's add mirror
modifier for this piece. Go to the modifier list, add mirror, and now
we just mirror this. Let's mirror this one as well. Add a mirror modifier, activate bicect, and then
flip, and there we go. Now it's correct.
That's very cool. If you like, you can
do something else. You can add an either
cut or slice right here. That will make the result
even more beautiful. Control shift x, switch to
line and ma cut right here. Let's make a cut right here. And one cut here, and then whole shaft and
then space to confirm. And after that excites, now we got another
nice shape here. We can e grab this geometry and this geometry and tap the mood, if you'd like to
make some editing go to the vertices wire frame, and we can move
this a little bit. And we can align those to
the x axis S to the x zero, something like this, and
now it's become very nice. After that, you can make
some variation if you like. For example, you
can take this up to the z and take this up just a little bit to
make some variation that will make the result
even more beautiful. For this one, you
can take this to the Z x as well
just a little bit. Right? These additions are not exist in the reference
image, but as I said, you have the freedom to add the cut that you like to to make the
result suitable for you. All right. I can make some
editing right here as well because I have
Mormdifier added. I will control one side,
I will take this up, hold control and
align it right here, or maybe from the left view, I can i quality and
move it just atle bits. All right. Something like this. This age, I can hit control x
to dissolve it to get a result like
this and table. All right. Is there
anything else? Maybe I feel that I have
something right here. I can grub this age
and this age and hit control accent dissolve
it to make this flat. That will be better for me. And let's go to
the bottom again. Here, we need to make
some cuts in this area. Select the matry and
then he control heft X. Switch to line, and let's
make a cut goes like that. Polt heft and then
space. And there we go. Got to solid, and now we
got nice slides right here. That's very cool. A let's see
do we have anything else? Let's go to Tabattom again. Go to wire frame, and let's see what else we
should create right here. All right. Now we need to create these geometries and the stuff. All right. But
before we do that, let's see, did we forget
anything in here? Let's go to the
left, Control three. And let's see what
we should do here. Before we go farther, I think we forget to add
the circle right here. Let's create a hole here. I will use carver
tool to do this, but I need to control the depth. I'm going to sweak to left view, and I will put the three
D cursor over here. And this will be my depth. The cuts will wreak this area. This distance. Now let's go to the bottom. And I will select the
um that I want to cut, control heft X and switch
from line to circle. And want to click here and let's try to create this circle. Try to move it input
in the center. And then click to confirm. And that's it. I
will simble around. Let's go right here.
All right, sorry. We didn't get what we wanted
because we forget to hit D to activate the depth.
It's very simple. Go back again here, and control to space
and space again, click, and let's move this
one in the correct position, it D to activate
distance, and then click. There we go. Now
let's timble around. And now we got nice
cut right here. Rights. The cut is not perfect
because because miro Modifier miro
Modifier is on. I think we moved the circle
just a little bit to the left or to the right because of
that we got this problem. To avoid this, you can
create a um right here. For example, I can tab and I can erupt this age and bring the
three decor right here in the middle and I can
use a cylinder in of adding using cover tool that can scale it from the
bottom, I can control it. Right now, it's
exactly in the center. Let's move this inside.
Something like this. And now we can make our trim. I will apply the
mirror modifier. I don't need it, and I will grab the in the middle I click and
control x to dissolve it. All right now the
phase become flat. Grab this as a cutter holt to
grab this, control shift X, and s grab this, hold shifts, grab the target, control shift and
choose the friends. Now we got nice cuts over here. That's very and we need
to cob some geometry, the seed we have,
maybe this one, and we can but over there.
But let's make sure. Let's see the shape. We need to create a
new here right here, but we will do that later. I don't remember if I created
something like this or not. Seems like I didn't. We need to create this geometry. We almost done here. What is this? Why this
right here? I don't know. All right, I will end this video here and the next
video will come bele the rest of the
stuff or the details. That's it for this video and see
50. 050 Modeling section Bottom parts part 14: Hello, and welcome back. Let's see what else we
should create right here. Let's go to the
bottom. All right. I will hide the body and right. Let's see create this geometry. Let's start with the cube. The three D corso
is in the middle. Shift A, let's add cube. Key and let's move the
cube right here, Tab, go to the vertices, Z, and go to wire frame, and let's move this
one, maybe right here. Okay. And let's see crop the
sit and let's move this over here. Crop this vertex. Maybe we can move
this over there, and let's move this here. Let's make one
extrusion here, maybe. I don't know, but maybe
we can move this right here and it can troll r to add. A one here. Maybe we can let's see those. Move them. Let's move this
vertex to the y a little bit. Let's move this one over here. Control, maybe we can add
an right here and select this and we can move this here. That's cool. All right. Let's see how can we create this angle, this tap. All right. Let's go to the left first, and let's put this
in the position. Grab those, take
this up over here, and we will cut the rest. Okay? Tab out control heft x, activate carver, swack to line. Let's make a cut like this. Let's cut this side and let's see what else we
can cut right here. Let's start following the ha. Okay Let's start from here. And let's make a cut like this. That's very cool. All right. Now we got this shape. I think that we need
to make some level. I can start with this edge. We don't need these
edges right here. I will grab this edge and go to the bottom and
the bullet control be and manually move
this right here. What about this one?
Let's select. All right. I think we need to go back
to the bottom and manually, maybe we can move
this over here, and this one maybe over here. Keep wise and merge this
vertex with this one. And grab this and move right
here. What about this? G wise and merge
this right here. Let's see what we got
here in the perspective. We got this weird result. I will grab this with this hit, make some connection between them and this ag
we don't need it, control X and dissolve it. Let's go to the bottom
again. Let's see the result. Now it's become close. That's cool.
Something like this. What about this area here? We got some weird
result here as well. I will select this and this hit gay to make connection
between them. Let's go to the bottom again. All right, that's nice. And I think I can take
this up maybe right here. Or I can grab these edges
and move them down. For example, I will grab
those and take those down a little bit. Or maybe up. The idea is I need this distance to
be similar to this distance. Now let's see what
else we could do here. L let's go to the bottom, and we need to make a
bevel here as well. Let's grab this edge right here, control B and volt. Control B. I think we got
problem with the scale, control A scale,
and let's vl again. The same scenario.
Let's go to the bottom. After the grab the edge, or you can control the vertices, kee and let's slide
this right here, and you can keep twice and
merge this right here. Something like this. All right. After you complete this
metre, you can mirror it. But before we do any mirror, we will make a trim right here and need
to create a slice, select the um, control
heft and go to line, and let's make a cut right here. All shift and in space. And now we got it. Let's
select this geometry and. Let's add miro Modifier
and grab this one as well, this geometry, and let's
give it miro Modifier as well. All right. Let's see what else we could do. I will add another cube and let's move this
over here top, and let's go to the vertices. Let's move this one right here, and maybe this one right here. You can stab it if you like, and let's move this I don't
know where. Maybe right here. Let's e to make extrusion
and move this over here. You can I will leave the sit because
I will use Momi fire. I to make one
extrusion right here, maybe and move it over here. Another extrion, maybe I
can move it right here. Let's take this vertex
and move it here. Or I can end it right here
and create a new geometry. I think that will
be better because this will be too long. Even this one a, I can hit
key tie and merge this pack. I will create a new
cumetr right here. That will be better for me. Go to the left. This
is the new umetry. I will move these vertices up, and now is the time
to make some cuts. Tab out, control ft x, go to the line, and
let's make cuts, align the cut with a body, space, and other cuts
should be right here. And maybe we can I don't know, can create something like this. All right. Let's see
what we got so far in the solid view. We
got this result. It's nice. I will keep
it if you prefer. You can go to the bottom and you can delete some geometry if you like or add some slices. As you can see now, this
surface, All right. I think I can delete a little bit from the mary
from the bottom. C troll if x and use carver. And maybe we can trim, make some trim using the
line, something like this. All right and make some slides to make the
results more interesting. Hold heift and space to make
some slides right here. If you don't like this egg, you can ignore it accurately. Do we need to keep it? When we add miro Modifier, we will understand
that let's add mirror Modifier and
use bicect to flip. That's very cool. Craft
this, add miro Modifier. Now let's see if
that's worth or not. Yeah, maybe I will keep it. This is nice. That's very cool. Some tweaking right here. I would like to do let's go to the bottom tab to the eight mod, select this and tap
to the eight mode, go to the vertices,
grab this one, keep twice and mage right here. I think I can move this old control and
snub it right here. Let's see check the perspective. I can tab again and
select we have two here. Kee twice and Merge. That's very cool.
And I think we can Let's try to align this
vertix with this one, move it up to the z first, hold control, and stab
it with this vertex and move it to the y and
stab it to this one as well. Now it's perfect. I will grab this
with this and move them up and align them
with this vertex. All right now, the
result is better. Let's go to the bottom and let's see if we
can do anything else. If you prefer, you can
move these vertices and align them with the um try. You can do this if
you like. All right. Let's tab and select
this one as well, Tab again, grab those vertices, and move them to the x, snub them with this vertex, and let's move those right here. The same scenario for
this side as well, grab them, move
them, hold control, snap them here and move
them just a little bit. What about those right here? Move them, snub them right
here, and those as well. Let's snub those right here. And what about this
one right here? Go to the edge, crab this edge, control x dissolve it, I think. That will work. Am
I right? All right. That's cool. Let's slash again. Yeah, I think that's
better. All right. What about this era
here. Let's see. I don't like what's
going on here. We need to make some tweaking. Like taking this face up a
little bit and snub it here, and maybe grabbing this edge and stab it right here, but
that's not going to work. In this case, we can go to the bottom again and
use the nF tool. Let's make a cut maybe
because like that, hit a to make the cut str, C to cut through left
to click with enter. A right now I can grab this edge and move it
and snap it right here. I think now it's makes sense. Let's move this and
stab it right here. I think that will be better. Tab out. Now it's become more
clean, I think. Let's go to the bottom and let's see what else
we can create, where is the T, this
one right here, grab it end let's move it. That's too far.
Let's move it up. And let's put the empty,
maybe right here. H to bring the three D cursor
to the boson of the empty. H to A and let's add
another cube over here. Tab, go to the
vertices, wire frame, move those over here, grab those, move them and
snap them right here. Grab those. Maybe we
can move those here. And what else? All right. I think we can make some
extion here, grab this. Let's move this a
little bit right here, E to make another extrusion, right over here, and
move this one back. C those, make some extrusion, move this here,
something like this. From the side, grab
everything to the z, move them up, c the
side, move them down, and after that, use the
carver tub out, cant space, go to align, align the cut with the body of the ornaor
and make the cuts. F here, Okay. Let's try to follow this
shape. That's cool. From this angle, let's
make some slides. Maybe from the bottom, I think that would be better. H control shift, and go to line and let's
make some cut like this. Hold shift and then space, and now we got the cuts. After that, I will select
this geometry and go to the solid mode tab and
let's go to the face. Let's scrab these faces, and let's move those maybe right here as to this easier enter if you want
to make this flat, or I think that's not going
to work to make this flat. You can go to the left and you can see how can you cut it? Or maybe we just need to move it a little bit,
that will be enough. Something like this,
that will be okay. That's very cool. It's close to my results, the reference image I mean. If you prefer, you can make some vl tab out you grab this tab and go to
the grab these edges. This one as well,
this one right here. Ct roll B to make some ibl. Or Bivl is not working because we got some overlapping.
I don't know where. Maybe here, we have two vertices or somewhere, maybe right here. Yeah, right here. Keep twice, and let's make some merc
here. That's very cool. That's mean now we
can make a ibl. Got those, control B,
let's make some vl. Maybe I can sider
this one as well. Control B. Let's make some vl, goes like this.
That will be nice. Tub out and now let's add mirror Modify for this geometry. Let's see what's
going to have in mirror bisects flip.
Now we got this. What about this one?
Add Mirror and acids. All right. Let's see
what else we can do. K Go to the bottom and
go to the wire frame, and we got some geometry
here to create. All right. I think I can co with the details that I create right here and use them in the bag. And I can grub this one as well. And this right. Let's select those. Sorry. I have to grub this one.
Is there anything else? A select those and then hit Shift D and take
a COB right here. I think we are using
local I spits two global and hit control
and mirror those. Go to the left view, hit key, and let's put those
in the correct position. Maybe we can scale
them a little bit. Something like
this, will be okay. But we need to make some
tweaking right here. Let's see what kind of tweaking. Let's start with this
geometry, the long one, and I think we need to cut
it using the carver tool. First, I will control
heft X and use a rectangle and
cut it right here. We don't need all
of that. I will switch to line to cut
from here as well. Something like this, maybe. It's space to cut it.
That's very cool. What else maybe I can grab
this metry and tap to it mod, go to the vertices and grab
these vertices and move them back over there and
make some cut after that. Something like this.
Control tab out first, control x, go to the line and
make cut maybe like this. What else What about this geometry here?
I mean, this one. I will show you
what I mean, tub, go to the vertices, grab all of these, and I think we can move those. I don't know that makes
sense. All right. The question is, I this
exactly in the middle? Let's go to the bag view. I don't know if this
in the middle or not. I think we got some
problem right here. I don't know. All right.
This is the middle. This is the MT we
got right here, and we need to make sure
that these pieces are exactly in the middle because
that's very important. Let's move this to the bag and
scale it make it big so we can have a line here in the
middle, and we will use this. This knots in the middle, all of these geometry. Let's tumble around and
let's sic them again. Let's try to put them
exactly in the middle. And let's see how
can we achieve that. All right, to do that, I think we can let's select them all and make this
geometry the active one. And this week this to
the active element. Go to the back, move this hot control
and stab it with the MT, and now it's exactly
in the middle, according to the active element. Right now, everything
should be correct. Let's delete this
mostre because I just need to make some
tweaking right here. For this one, I think I can
go to the face and grab these faces at x F to delete them all and delete
those here as well, maybe. Maybe those here, x F and
delete them. All right. Let's see grab these edges over here and hit F to create
a connection here. Grab this with this it g. Make some connection right here and grab these three edges at F, and add a cup here to the
end at F. I need this to be closed like this
because I need to use a trim or cover tool
to make some trims. And list sites. Go to the bottom and go to wire frame because
as you can see here, we have some cuts
we could created. Select the umatry that you
want to cut and All right. I think I will use cube. That will be more accurate. Sift A and a cube. I mean, I will use
the cube as a cutter. Go to the vertices. Let's move those over here. Let's start from
here and let's see grab the side and
let's move it all way right here to this angle, and then let's grab this vertex, and let's move it
forward and align this with this angle,
a little bit more. Move those right here. And the cor those, and maybe we can move it a little bit more. Everything's aligned now. S to the Z, make a Q to the
Z, and let's move it up, and now we will use
it as a cut tab out, you have to c this control V, and let's use difference. Now we got this.
That's very cool. From the side, we have
some cut as well. I will use a cube as
well to this cut. Let's move this cube
right here, tab, go to the vertices, s L et's move those over here. Move those over here as well. Grab the site as to the
y and scale like this. Now we can scale
like that as well. I will use as a car
hold have to grab this, control H P and use difference,
and now we got this. When you be satisfied
with the result, you can use mirror modifier
to mirror to mirror them. All right? We got extra geometry right here. We don't need them. We can go to the
left and control t x use carver this time and
we can make a cut like this. That's will be okay to
delete them with a cver. Hit space, as very cool. All right. Now I will
select the humetr hit control eye and apply
vital umetry to me, and I will delete these caters. We don't need them anymore. And now I will give this
geometry mira moodifier, and let's see what's going
to happen bisect flip. All right, that's cool. Okay. Go to the left. Or I think I will end this video because I don't
need it to be long. So I will complete all of that in the next
video. So you next.
51. 051 Modeling section Bottom parts part 15: Hello again. Welcome back. We got some editing here. We we need to do. Let's go to the left view
first and go to wire frame. I need to ubl this area first. Select the stop, go to the
edge, go off this edge. Hit control B, and
let's make some bubble. Let's add, for example, ten segments. That will be okay. And let's see if there are
anything else we could do. Let's go to the bottom view, go to the wire frame. All right. Now we need to use mirror Mdfier to make
some mirroring, okay? Let's select this humeri first, and this is the MT is
exactly in the middle. I will use it. Bring the three dcorso, in
the position of the Mt. H S corso to select, select this one and select
all of these um. All right. This one as well, right
click, those, I think, this one and this one,
O to three dcorso, and then add miro
Modifier for these. We have bleion, operation still
exists. We don't need it. Control A apply vehicle
umera tom. This one as well. We have, keep the vl. That's okay. Add
Mor Modifier here. Can I apply the rotation
to fix the rotation. This one, give it neomdifier. That's very cool. All right. What else we could do here? Let's check the rest.
Let's bring the body back and let's see the results. Everything looks nice. I think. Let's check those here. All right. We don't
need this one. Let's move this over there. Temporarily. Let's
put it right here. All right. What about
this piece right here? I think we need to
make some taking, Let's top to mode
and let's move this just a little bit from the left, move it and make the edge aligned with the
angle that we got here. Make a deg like this. And maybe from the bottom, we can do something right
here. It's optional. I don't know, but I feel
that we need to do something here like trim this,
something like this. I think that will be better. No so quite sure, but let's
try to make some bevel. Sorry, can roll me
with two edges. Let's see what can happen. All right. Something like this. Maybe I can erupt this vertice
key wise and move this up and align the egg
with the surface. Key wise, and let's move this just a little
bit over here. Something like this,
maybe. All right. What else we could do here? Let's give this Mal modifier. Because we made some editing
on the side and we need to reflect the site
on the side as well. Add mirror bisect flip
control a apply acid. Maybe this one we
can I don't know, let's try to vl those edges. Let's see what's
going to happen. If that can give me
something beautiful, I can accept it control A, apply the mirror first. Cub those two control
and let's pul those. I think that's will
be better. Right. This geometry become very long. I think we can make it
a little bit shorter. It's slash to isolate it, and maybe from here, we can trim some faces. For example, I can
go to the face, go to wire frame
and grab the side, and then it Ps to separate
this and s again twice. Let's fill this
one. Go to the age. I'd click, hit F
to fill this area, and let's grab
this side as well, and let's fill this
open area as well. Tab I'd click hit F to fill
this area and this ex site. I think that will be better to make it a little bit short. Okay. What else we should
do here. All right. We didn't have any mirror
for this geometry. Let's give it a
mirror or we have, but we need to change the
position of the mirror, we should put the
underneath the ol. Okay? Something like this. Let's go to the left and let's see what details
we should do here. We got this line, we
need to create it. Grob this hometr, can do heft x. Go to the line, and let's
start creating this. Let's add the click here,
click here and one here. And the last click
should be right here, hold and then space. And there we're
going now we have s. Go to solid. Grob this uma maybe we can scale it just
ale bit to the x axis. Something like this. Or if you prefer, you can tap
to the mode and go to face, you can erupt this face, and right, we have mimi
fire, don't worry. It I to make some ins inset
this just a little bit, and then hit E to
extrude this and align it with the face tap out to
get something like this. If you like it. Right click head to smooth
and activate Auto Smooth. Let's go to the auto
smooth here and let's see. We got some bad
heading right here. Maybe if we connect
these vertices, we can guess something better. But first, let's apply the
mirror for this cemetry. Grab this with this it
to make some connection. Okay. Something like
this, it will be nice. And I don't know,
but I feel this the normal is flipped.
Let's see that. No, it's not. What if
I apply the scale? Yeah, that's it's a flip. Maybe this one as well, apply the skill for this. I think all of these metre, we need to flip them. What about those,
those right here. Grab those, deselect
the body, tap it A, H n, to recalculate the normal and then turn
off the phase orientation. Now the heading is better. Grab this one had smooth
and then auto smooth. This one as well, heads
smooth and then auto smooth. This one as well. Is very cool. All right, we need to create
something right here. We can see that in
the bottom view, if you go to the bottom
view. We can see it. But let's go to the left. We can see something
here from the left. And in the back, we need to
change the image maybe to another image because I don't
see anything right here. Let's bring the
reference images, and let's go to the back.
B view, where is it? This one right here, and let's replace it with the
back view image. Hit number five from the bag
to go to the orthographic or you can use this option. All right, this is the ba image. Let's change it with bag. Just replace it like this. And there we go now we can see all the details right here. Right. Now let's go to the bag if
you control number one, and we can hide the
body if you like. Now we can see some
details over here. I can start with the cube. A Que move it up
right here, maybe. If you like type the mood, move these vertices up and those down maybe right
here, maybe for now. Let's take those over here
and maybe those over there. We can focus on one side. After that, you can add miral
modifier if you prefer. All right. Let's go
to the lift view and let's see what we got. Let's see grab this. Let's move those right here. Maybe those over there. Let's make some trim
with this one selected, control ft. Go to the line. Let's make some cuts,
something like this. Align the cut with the body. And let's cut all of that
space to confirm it. And from the back of view, we can activate carver tool and let's make some
cut like this with rectangle and then
speak to a line, and let's make some
cuts like this. A, that's very cool. Now we can use a mirror modifier to
mirror the side on the side. But we will do that later. Let's go back to the left and let's activate
carver tool again, go to the line and
let's make cuts. Just follow the
shape, and that's it. Maybe something like that. Try to cover it and then have
space to confirm the cut. Now we can go to
the bag of view, control, and we have
some hole right here, that's try to create it. You can start from here, select the human first, control x, go to line. You can use line and you
can use box if you like. Let's start with line.
Create something like that. All right now, we got the cut, but I will ignore the side. I will add miomdifier. I'm not going to worry
about what's going on here. So exit of the cover
tool and select the geometry and let's
add mimi and activate. A sorry we don't need any flip. Now we got this geometry,
as you can see here. All right Let's see what
else we could do here. First, let's see grab
this face over here, and I think we need
to let's apply the ofs tab and let's grab this face S
to the z zero enter, to make this flat,
grab this one, this one S to the zero enter. Or that's not going to work. Maybe we can move this
down just a little bit. All right. That's not
going to work as well. Let's scrub those, and I will hit control Z
to bring this back. And I think I will delete
these two phases, XF. And what else? This phase? I think I will make a
cut over here and delete this small phase and decrup those and move those
down just a little bit. And I'm going to use this
phase hit E to extrude it over here to the middle and
the grab those three fa, three edges hit F, and I'm going to use
Mor Modifier again. Add mirror modifier, activate bsects and control A
and apply the mirror. I just need some space here
for val modifier after that. I can move these faces
even more down if I like. But make sure to
kick the side of view because you need to move just a little bit
to the Y after that. All right. What else
we could do here? Let's focus on the side
vertex with this artic hit K, make some connecting here. That's something important. Lest like this and this one hit K to make connection
between them. And what about these
vertices over here? All right. Do we still
in the orthographic? Yeah. Turn of orthographic. Maybe I can make some
connection between those at k and from the
side as well at k. Can roll out. Maybe we
can add right here. Make some connection
over here. Okay, K? Don't worry about the
other side because we can use mirror modifier
as well again. I just like to
isolate this piece, and I will add one edge right here and make some
connection. All right Maybe this one with this one K. Maybe those k and this one
with this one K. All right. I think I will delete this. Or these faces in the bag, actually we don't need them. The camera will not
reach this area. I mean, you can delete
them. All right. We don't need all
of these faces. Croft them F to delete them
and keep it like this. That's will be enough.
What about the site? Okay? I will add modifier. And I can understand
what's going on. In this case, I can activate wire frame to see what's
having activate bsects, and you don't need
to flip anything. Just activate bicect. Control A to apply the Mormdifier and
that's it. Now done. Let's excite and let's
turn off wire frame. By the way, you can't
find wire frame right here from the object properties
and then wire frame. What else we should do here? Let's go to the bag view, and we have some segments
here we need to create. Okay. Maybe we can start
with the cube. If you have to A
and let's add the cube.'s right here, move it up. As to the z, scale, as to the gin scalet, even more as to the to
the x axis right here. Let's move this up over here, and I'm going to hit
Shift D to the z, and let's add a cob
right here and repeat that heft cable time until
you fill all of that. When you comlet, grab all of these new pieces,
pick nice angle, something like this, and
scale those to the y axis, and let's move it
inside like this. All right, control to
make them one piece, and then control you
have to activate carver, go to the line and
let's make some trim. Something like this. Let's trim all of
these faces from here and from the
back side as well. That's cool. And excite. And from the back
view, the same scenario, go to the carver and let's
make some trim like this. That's very cool.
Above the side, you can add modifier, and that will be enough bicect, you can throw a a plight. And now we got those.
That's very cool. What about the side
of these faces? You can delete them if you like. That's okay. You can keep them. That's okay as well. That's very cool. All right.
What else we should do here? Let's make some
tweaking right here, like grabbing these edges. We have Morbidi fire. We
don't need it a light. Let's sc this and this control
B to make some bibble. Make some bubble like that. And, I think that's it. All right. What else we
could do here? Okay. I don't know, but maybe we can make some bible
right here as well. Grab these two geometry
and go to the edge. Let's select this edge. And I'll click to grab
this one can throw be make some bling right here or
that's not going to work because I don't know, there are some limits here. All right. I will ignore it. I thought I can make some
right here and here as well. Let's bring back the body
and let's see the results. The result looks
nice and beautiful. Cool. All right. Now we need to add
del modifier and create some geometry
to finish this. All right, it seems
like we didn't add any bevel anywhere. So that's something important. We need to start
with the bubble, and we need to mirror some
object on the other side, but not in this video. All right, in the future videos. Okay. I will end this
video right here. By the way, I just
forget to create one geometry should
be right here, by the way, k? And maybe I will make some tweaking to
this area because I think if I extend this farther and put it
inside, it will be better. It's better than leave
it open like this. But I will end this video right now and see you in the next one.
52. 052 Modeling section Bottom parts part 16: Hello, everyone,
and welcome back. We didn't finish it. We need to add some geometry and maybe make some
tweaking to the heading. Let's start from here. We don't need this cutter
anymore. We can delete it. For this one, this piece, we can tap to the edit mode, maybe go to wire frame. I just need to grab the sit and move this up and hold control
and snap it with this one. Maybe these vertices, I can move them just a
little bit like this. And those as will I can
grub them and take those up or something like that. Let's go to the left view. I think that will be better. From here we can
control that patter, grub those and move them
up just a little bit. Something like this will work.
I think that's too much. What I need to do
here, I need to align the side with
the side here. I'm going to crab those
as to the z zero, enter to make it flat, move it, hold control
snap it right here. That's very cool. What else? Head smooth and activate
auto smooth for this? This one, Auto smooth, and give the head smooth. Kick the phase orientation, apply the scale first, and apply the scale for this
one as well. All right. We got some problem right here. We need to manipulate
the auto smooth. We just need to chang the
angle and take it back just a little bit to
bring the harp egg here. Grab this, right he smooth
auto smooth control scale. In case we have a
problem with that. That's very cool.
This one as well, Auto smooth and
give it he smooth. This matter as well. That's very cool. This one. That's cool. All right. I need to select those and
mirror them on the other side. I have this empty here and
the middle of the o is it. I think I just have one. I will hit d to B one empty right here. Let's move this over here. Maybe right here.
And L e's like this. Let's bring the
three d coorsor and the position of the Mt ft S. Grab this and this right click organ to the three D courser. Then you can add
mirror modifier. Or you can mirror them, it control if you prefer and add mirror modifier to mirror them on the
other side right here. The same scenario for these pieces, for
example, this one, right click organ
to three d coorsor, and let's give it
mirror modifier. Before we do that, we
need the solidify, think we don't just
apply it and add mirror modifier.
That's very cool. This one, this one, right
click Ogun 23 decorsor, and then let's add let's CV the mirror
modifier from those. Would those selected
hold have to grow up any object
with the mirror and just choose CoV to
select it and there we go. What else we should do here? Let's see, do we
need this cutter? Key to move it.
Yeah, we need it. Cut this humatry. Is control I apply vehicle
umatry to apply everything. Now you can delete
all of these stuff. We don't need them anymore. But about this
one, we still have the bully control I apply veal umatry to make and
delete these cutters. We don't need them. Okay.
L et's move this one. Let's see if this
affect anything. Right now you can delete it because it's not
affecting anything. This umetry, I think we need
to give it miro Modifier. Add miro Modifier and flip active Pisc
first and then flip it.'s co. Now you can apply miro Modifier,
but I will do that later. The stuff, you can grab
them and maybe we can move the empty right here and bring the three D courser to the
position of the empty and now let's select all of these
geometries and right click Origin to three decors and
you can give them a mirror, select one of them and add
mirror modifier for it. You can co the mirror modifier
from it for the rest. CV to select it. There we go. This geometry, right
click Om three d courser, and let's select any
object object with the mirror and give
it to this object. As you can see, mirror is not working in the
correct way in this way. I will apply the rotation to rectify that and there
we now it's working. Some of tweaking,
I need to do here. Let's stop to the eight mode and let's see grab this face, and those here as well
x F to delete them. I'll click to grab
this entire group. I will hit F to fill this area, and maybe I can hit E and cancel the extru and
minimally move it right here. In the wire frame. Scale this to the y to make
it flat like this, you can grow the
selection if you prefer, and then hit P s to separate it. Now we have this piece. It's like to isolate
it and tach mood. Coll this, push it inside
just a little bit like this. You can leave it like
this, it's like to excite. For this geometry, you can tap and you can grub
this a loop and hit F if you like
to fill it or you can leave it like this. Actually, I think we
can make it one bce, or hit to isolate this one. Yeah, I will hit F to
fill it and that's it. That will be enough. This a
we don't need it anymore. We can grub all of
these ages and hit control x to dissolve
them. All right. That will be enough.
From the left view, we can maybe cut the
umetrc gas a little bit by using cover
tool if you prefer, cut it like this and acid. All right. What else
we could do here? We need to create a umetry
in this area. I think. If I go to the lifts, I can see it here, and from the bottom as well,
I can see something. Let's start with the cylinder. Let's see how can we create it. The three d coosor is in the middle if a to
add a cylinder, and here we have a 62
vertex that's okay. Let's align this to
the view and manually, let's move it and let's
put this right here. All right scale
this a little bit. You can go to the bottom
view and scale this like that. That's very cool. You can work with one side. Let's hide the body. You can work with one
side and after that, you can add Mor modifier. I think I will do this. I will focus on the side tab and go to the vertices for example
and e to extrude this, a bit S to scale
it, e to extrude, and then e to extrude again
and S to scale. That's wrong. E to extrude again
and S to scale this, another extra like
this. No right. And let's see what
else we could do here. Do we need to make
another extrusion? E to extrude this again. S to scale this like that? Now we got this result. Let's Let's go to the left
and let's try to create this. I think we need to scale
it a bit like this. With this face selected, I will bring the three
D cresor right here. H A and let's add cube, move the cube up right here, maybe a to the z first, make it a little bit thin. Tap mod grab the side and scale to the y and
make it like that. Maybe we can move this a
little bit inside like this. If you prefer, or maybe we
can scale those a little bit. Something like this,
it will be okay. And now we need to
duplicate this. After that, we need to duplicate this and rotate
them in the same time. I will tab out and hit D to duplicate and then
r. But if I do this, the rotation will happen
here in the same position. What I need to do is I need to rotate like
this and add one co here and add a ra here and rotate it in the
same scenario for this one. I will delete the
duplicate this one, and I have the three
dcorsor here in the middle. That's something cool. I will speak the transform
Boot point to three d coorsor. I need to control the umetry according to the position
of the three dcorsor. This is the idea. Right now, I will select this geometry, have d to duplicate and then r and hold control and
rotate this nine degree. And after that Ht r to
repeat that again and again. Now we have four CVs. Rotate the view, tumble
around and Let's grab those. You can hit control J to
make them one piece if you prefer and move them a
little bit inside like this, make the end of this
umetry beyond this edge. Because after that, we
need to add vl Modifier, and we don't need to get any overlapping
here in this area. When you be satisfied
with the results, you can grab those, hold he to grab the umatry, and you can make the cut. But before we make the cut, I just need to make
some inset right here. Let's select this
face, hit I two inset. Let's inset this, just
a little bit like that, and maybe extrude this inside, and that's it, tub out, grab the cutters, hold
have to grab the target, control HB and
choose difference. Now we got this. If you like, you can hit controls
that to cancel that. You can tap some
edges if you prefer. Let's secure these edges and let's give them
above, control be. Maybe from the left view, we can see that
better. All right. I will tap out and hit control. I apply scale first and then tab in and repeat that bevel. All right, Let's make
some bubble like that. And now I will make my cut. Cub this, can have
to be Qs difference. Now we got this. Let's go to the left again and
let's compare the results. I think we need to scale this phase, just a
little bit more, grab this this phase and grow the select
go to the left again, and then S to scale, but cancel the xt X and
the scale to the z and y. You can go to the wire
frame. That will be better. S H x, and scale this inside, just ale bit like that. That will be enough. All right. That's very cool.
Okay. Now after that, I can add mir Modifier. But let's see if we have any
further editing right here. Let's go to the vertices. All right. All right. For now, I'm not going
to edit anything. I'm just going to
add miro Modifier. Go to the modifier list and add miro modifier and
less use bicect. Sorry, I think kick this. Something weird here. We need to apply
the rotation first and active x axis
and use bicect, and flib There we go. Now mirror is working. All right. Let's see what
else we should do here. In the bottom view
control seven, we have this shape
we need to create, and let's see how
can we achieve it? To do something like this, I think we can start
with the cube. I will put the three
D coorsor here and the mid S corsor selected,
and let's add cube, scale the cube like this at S
and make it pick like that, and scale this to the x axis
a little bit like this. Maybe we can move this down. I don't know, maybe here. And tap the move, grab this face, e
and move this up, and let's change
this to bounding box and scale this out,
something like this. All right now, I will grab
this g and this edge. But before that, apply
the scale and then grab this age and this edge and let's keep the vil control. So vl like this. I think I can move this down
just a little bit. I need the cut to be
a little bit far from this edge to avoid any overlapping when I
add vol modifier later. Something like this will be k, grab this and hold you
have to grab the target, control he B, and let's use slice to make it
slides right here. Now we got this result. After that, we can trim this area as well
with another cube. Let's add another cube over here and scale make
it t like that, Scalt like this as well. Tap it move, grab this face and scale it
as well, a little bit. Maybe we can move this
something like this. Ct A apply a scale, hold have to this, control
HP and choose difference. Now we got this cut over here. The position of this cut
is okay. I will accept it. And I don't know, maybe we can make the cut a
little bit wider. I will controls it
to cancel that and I will scale this like that. Ctrol A apply scale, control HP and choose
difference. Something like this. And here we have some
design we need to add. Let's go to the bottom and let's com bere, everything looks okay. We have some misalignment, but it's very close
to the result. I will accept it.
For any reason, if you want to correct the position of this
cut, it's very easy. Select the two geometry
and go to the bottom, grab the side and you can just move it a little
bit right here, if you like. These vertices, you need
to grab them like that, and move them right here. After that, add another
mirror Modifier. Let's select this geometry
and let's add mirror. Activate bicect and flip
the result, I think. Do we need to flip it? No,
we don't apply, grab this. Let's add mirror
modifier for this. Pic. We don't need to
flip it, and there we go. Now it's become close. A right now we grab this shade smooth and give it auto smooth, the same thing for
those as well. It's like to isolate this geometry because
I think we need to make some tweaking right here. For example, we can erupt this vertex with this
one hit J to make some connection between them and this one with that one J. That will help to correct
the Haden gas ale bit. And, that's very cool. I think we need to manipulate
the angles a little bit, take this bag to bring back the arb ages right
here, and sites. Let's see if we have
anything else to do here. Let's go to left, go
to the wire frame. We have some bolts
here, we need to add. We need to create them. But I'm not going
to do this now. We will do that in
the next video. I will end this
video now and see
53. 053 Modeling section Creating the front leg joints and the bolts: Hello again. Welcome back. We have samples here
we need to create, and let's see how can we do
the Before we do anything, I think we need to
make some editing to the auto smote here
because we lost one age. It should be right
here. Let's take this down just a little bit
until we bring this back. And as you can see when
I take the angle back, I can retrieve this sharp ge. Now, the result looks
very cool. All right. Let's go to the lifts, Control three and
let's see these poles, and let's see how
can we create them. In this case, maybe I can
start with a cylinder. It will be very big. I will change the radius
to ten centimeter, the depth to ten
centimeter as well, and maybe the vertices. I can, I will leave them two, align this to the
view, rotate it. And let's take this out. Key and take this out over here. Go to solid and Let's
make some editing. Tap to the edit mode. Let's grow up this face. Maybe we can move this a
little bit right here. Let's hit I to make
some insets like this. Maybe we can move this
just a little bit and then hit e to
extrude this over here. And let's go to the left again and add another cube because we need to add some cut
here in the middle. Tab hit heft to A, and
let's add the cube. Let's change the size to maybe ten centimeter
and make it small. Scale it like this, if you like. And control A apply the scale. But before that,
let's take this out. I need this as a car. Apply scale, and then tap
the mode go the edge. Crab these four edges, t. Control click. And let's
activate screen casts. I guess forget to activate
it and this recording. Let's move it over here, maybe as very cool. W the selected, and after
you apply the scale, now you can double them. Maybe we can go to the left, that will be better and
hit control and let's make the result round like
this. All right. Four or five segments
will be okay. Put this umetry inside this one. And hold have to
grab the target, control H to B and
let's use difference, and now we got what we wanted. And let's see what
else we could do here. Radical head is smooth and
add auto smooth to this. That's very cool. All right, maybe from the bag, if you like, move the
origin dots here, you can activate the origin and move it that's
will work like this. Or you can tap the mot hit a select everything and move the whole
geometry like that. You have two way. We can use this two
way to achieve this. I did that because I need to use phase snap to align
this with the surface. Because of that, I
need the orgando to be at at the end of the
bolts. All right. With this, I think
I need to go to the face grab this fase X F to delete it.
I don't want it. And maybe now I can make
some connection between some vertices L et's make some
connection between those. Okay, let's hit G, and now
we have some connection. And maybe we can make some
connection over here, it and maybe here
as well. All right. Something like
that here as well. And one here. Maybe
one here. All right. I think that would be enough. Cool. Now let's add Bival
modifier for this one. Add the bival and apply the
scale in case we go problem. Ten centimeter that's too
much less add 1 centimeter, still too much 0.5.
That's still too much. Manually move it, and
let's add two segment here and activate hard
normal as very important. And now we got this. Now we can duplicate it. Let's go to the lifts, and I will apply the level. Let's move this, for example
over here, its two scale it. Make it small like that. G to move it and let's
add one over here. You can scale it even
more if you prefer. Manually, you can put it
in the correct position, for example, right
here. Go to the left. Let's add another b shift D, and let's take under
cob right here. I will select this with
this one and I will use the position of the
three D coorsor to duplicate and rotate
these objects. Let's go to the
transform boot point and tweak this 23d coursor, and now hit H D and then
r and hold control to rotate this nine degree and then hit haf r twice,
and there we go. We finished with
that. All right. The next step, we need to duplicate those
on the other side, and we will do that later. Let's bring the reference image. I just added the new images to see what we got right here. We have some something
here to create. So let's start with this, and let's see how
can we create it. I think I'm going to change
the bottom reference image. Okay. Let's bring the
reference images, and let's go to the let's see where it's bottom, this bag. Bottom view, ok. Go
to the orthographic, use this icon, and let's see
where is the bottom image, this one right
here. I can see it. Now let's bring the bottom orthographic and let's
replace it with this one. I did that because I
have some details. I can have them with this image. Okay. I have the legs
and the join here. And we want all of
that. All right. Now let's go to the bottom view. And this is the geometry
that we need to create, and let's see how
can we created. The three decs still right here, I will shift A to add and
let's add the cylinder, and I'm going to
increase the vertices to I don't know, 62. Maybe. And yeah. Let's rotate the cylinder to the y axis y 90
degree like this. And from the bottom view, we can move this and put it
in the correct position, for example, right here. We can start from here. And the left, we
can see how much we need to scale this or
something like this. Leave some distance
between the two geometry, and let's go back to the left. Sorry to the bottom view. And let's see what
else we could do. Let's go back to the bounding box and let's move this back
just a little bit. Tape the muted control
R to add one over here and grab these
vertices and scale them. We can move them
first right here, and then it has to
scale them like that. Al, that's very cool. Let's bring the
reference MC and let's see what else we
could do. A right? I think we can create
these holes now. Let's add the cube right here. The three d cours are still
in the middle. That's cool. Tap out Hit A and
let's add cube. Move the cube up here. Tap the eight mod, let's
crop these vertices. Let's move them
maybe right here and crop them all as to the
y and sket like that. I will use this as a cutter. I will move this, for
example, right here. And now I need to
duplicate it six times. Let's go to the lift. And let's do that. I think I'm working
with the right. Yeah, I should work
with the lifts. Anyway, let's go to the right. I will seek that transform
0.23 d cars again, and with this cube selected, I will hit Hf d and r to rotate. Let's rotate this much, we need 60 degree and hit heft R and Heft R again
and again and again. Now we have six boxes
here, as you can see. We will use those as a cutter. Let's grab them all like that, and it control J to
make them one piece, and it's like to isolate them because we just need to
make some taking over here. Tab go to the edge. Let's grab all of these edges, and just make some bevel,
something like this. Tab out and then let's site. All right. We have some
problem over here. It controls that to cancel that. And let's vl this again
in the wire frame mode. But make sure the
ivle notes goes over this shape. All right. Something like this,
it will be okay. Or maybe I can go
again and manually. I can select these and move
them just a little bit, like this. That's
will be enough. Let's exit now, and with this selected hold shift
to grab the target, it control shifts B and let's use difference with the broach because I need to
control this further. All right. Now I
got something nice. But I think we need to make some tweaking to get a
result like this one. Or you can leave it like
this. It's still beautiful. All right. If you want
these to go deeper, you can select the cutter, and you can go to
the face and select the faces, these faces. All right. And you
can hit Alt S to move those inside if you
like. All right. So you have this
option if you like Alt S and move them move the mouse to book
these inside a little bit. But result like this, I like it, and I will accept it. So, yeah, I think
that's it for this one. Let's see what else we could do here. We need to create this. I need to add another
cylinder here. All right. And let's
K the number 242. And let's rotate this to
the y axis are y 90 degree. Let's move this out.
S and scale it. But bring this back
to bounding box and scale it. Go to the bottom. Let's make it a little
bit big like this. Move it inside a little bit tab, go to the vertices in
the wire frame wood, move those on the other side. And we need to make some
trim here using box, Saft A and let's
add cube or box, and let's move this over here. And tap the mood, grab these vertices,
for example, and let's move them over
here and scale them a little bit like that. That
will be enough. Let's move these vertices
a little bit from the edge of the cylinder
to avoid any intersection. Maybe we can put them
between these two edges, this one, and this one,
make the cut here. And you can make one
cut and after that, you can use mir modifier to mirror it on the other
side. That will be okay. Tab out Sorry. And now let's hit
s2dz scale like that. Hold Hegar the target, control HTP and let's
use difference. And now we got this cut. All right. Now let's
use Mamedifier. Rot on the y x not the x
and use bicect and flip. And there we go now we got this. Let's see do we have
any problem here. It seems like we don't apply
the miro Modifier and. Let's make a quick
connection between this vertex and this vertex
as will be better it gay, and this one and
this one hit Gay. And what else this one may be, and this one it J. That will help ale
bit with the shading. Ric shade smooth and then
activate auto smooth. Let's see if we have
any problem over here. Yeah. We still
have some problem. We need to go to the auto
smooth angle and let's take this angle
back just a little bit to bring the sharp eggs. This one as well, raic shade smooth and activate
auto smooth to this. It seems like we don't have
any problem with this. That's very cool. All right. We created this on this side. We need to move it
on the other side. Or you can leave it right here. But I prefer to
work on one side. So I'm going to control A, apply vital umatro tome, apply all the modifier. And these cutters, we
don't need them anymore. Crop this with this,
and I will shift. All right, I'm not going to
achieve D. Just move it over there and control to mirror
it like this and manually, let's put it in the
correct position. But I think we lost
sharp A right here, so I'm going to
manipulate the angle. Until I bring the harp A here. That's very cool. Grab those and move them ale bit
back, maybe here. And now we are good to go. But one problem we will
have here, apply the scale, and I think we will
have a problem with the phase orientation
because we use mirror command. Tab hit a shift
n, and that's it. Fixed. That's very cool. Okay, so I think that's
it for this video. I will end it and see
you in the next one.
54. 054 Modeling section Creating the back leg joints part 1: Hello again. Welcome back here. Let's see what else
we could create. Let's create this site. Let's see how can we do it. Maybe we can grab this
and take a CVI from it. All right, HD and let's
take one CV right here. And I think we need
to make it smaller, but from the bottom view, we can understand that more. All right, Let's
go to wire frame, and then we need to
scale this down. Make the sides of this
similar to the size of this geometry here and
the reference image. Let's move this over here. Or let's see where
should we move it. Maybe we need to scale
it just a little bit more and move it
forward a little bit. Okay. Or something like
this it will work, but we don't need the
rest of the metre, so I'm going to use Carver
tool, control heft x, and let's use a
rectangle to cut all of that, and that's it. Now we can tap the edit mode
and we can grab the site and move it inside as a
little bit. That's it. Let's see in the perspective
of what we got. That's cool. Now let's bring the
three dcorsor here in the position of this phase. Select the phase and then
shift a corser to select it. And maybe now we
can add a sphere. I'm going to add cube
and let's add cube, and I'm going to make some
editing to the cube tab, go to the, it a select all the s it control
B to give it abovel. Tsv move the above before
you move the above, activate LM overlap,
because if you don't, just going to hear
what's going to happen. If I move this, as you can see, I will have some
overlapping here. Control, control B. As you can see, I will
get some overlapping. But when I activate
a clam overlap, when I move this forward, it will stop at a point. Then add some segments
to make this smooth, we can add 11 or 12. Now I got perfect sphere here. When you be satisfy, just isolate this because
when we use the bevel, we have double ages here in the center on this side
and on the side as well. We need to mark these vertices. Now, if I go to the
g and hit out click, if I grab this g and hit to move it, as you can see is two. You can grab one of
them and hit control x, dissolve it. This is solution. This one as well, control x, dissolve it, and
this one right here, control x to dissolve it. Or you can leave them and hit
a select everything and go to the merge and hit
Merge by distance, all of these vertices
will be merged. This is another scenario. Tab out right click it smooth, make it smooth like
this, and less excite. And let's try to control this. Let's make it big this pole. Something like this
that will work? Maybe we can scale this
just a little bit more, because this one would
move around the pole. Let's grab this. Let's change the organ do to the position
of the three decorsor. Set org organ to three Dcorsor. Now when you r twice, it will rotate around the pole, and that's
what we wanted. What about this geometry? Tab, go to the vertices,
grab the side, and I'm going to move those
and push them inside the pole like this, something like this. That will be nice and enough. And that's very cool. You have the ability to cut
the ball if you like. You can do it or
you can ignore it. And my reference
image, I did that. I cut the sphere. So from the bottom view, we can do that,
select the sphere. Control heft X and use
rectangle and let's cut it, for example, from
here. And there we go. When you comble, just
activate auto smooth to this one, selected, sorry. Exact of the carver,
activate auto smooth, and everything will be nice. All right. Now let's say that
we finished with this one, and we have something here we need to create
this big geometry. Let's see how can be created. Let's select this tab and let's select this
phase and this phase, Hit and let's bring the
three d coor over here, and Shift A to add and let's
add the cylinder here. Scale, let's make it a
little bit smaller, maybe. Let's move this down
right here, maybe. Tab, go to the face,
grab this face, move this face over here, and then let's make some
extrusion and scale. A little bit of scaling
like that will be enough. That's cool. I don't know. Let's go to the bottom. Let's see how much
scale do we need to do. We need to scale the whole
umetry so scale it down. And the grab this face
and the scale it. Yeah. Now it is okay. After that, with this
face, select the ift, and bring the three
decosor over here and and tab out Hit A
and let's add cube. Let's scale this cube like
that and make it a little bit, K to the Z, and let's
move this over here. Let's make a cut like this. Maybe we can make it a
little bit wider. All right. You can align these edges of
the cutter with the edge of the cylinder to merge them
after we make the cuts. That will be easier for us. So I'm going to scale
this just a little bit. And as you can see here, I just align this
corner with this edge. And the same thing should happen to the site. That's cool. Grab this, hold you have
to grab the target, control B and choose difference. And now it will be
easier to me to merge these vertices over here. I can hit A and then and
Q is merc by distance, and it will be me these
vertices, the four vertices. All right. We have
some cuts here. I think we have
three cuts, I think. Let's see how can
we create them. Let's go to the bottom. Yeah, we just have
three. I think we can use books to do that. He to A and let's add box, go to the bottom, and let's move this over here, for example, and move
this down a little bit, make it wider, maybe. Something like this
that will work. Let's go to the bottom view, and let's use the three
dicosor as a bivot point. Let's change the transform
bivot point to three dicosor, and then hit ft d to duplicate the box and
r, let's rotate this. I don't know how much
we need to rotate this. 120 degree, and then hit
heft r to repeat that, and now we have three
boxes over here. Grab them all, holt H
to grab the target, or we can merge them first, control, and hold H
to grab the target, and then control Ht B and Q's
difference with the price. I did that because maybe
I need to control them. Yeah, as you can see,
we need to rotate them. R to the z rotate those
just a little bit. If that doesn't
work, you can scale them and move them away
just a little bit. R to the z, let's
change the position. Let's see if this work or not. Let's move those
a little bit up. I think this result
is okay and nice. Well, to be honest with
you, I don't like that. And let's try to find
another angle R to the Z. W. Okay. Maybe
something like this. Or I'm going to delete these cutters and leave it
like this. I will be better. If you prefer you
can add two cutters, one on the side and
one on the side. This will be better
and make more sense. But for me, I will
leave it like this, but you got the idea
how to create it. Right head smooth and
then out to smooth. It seems like we don't have
any problem, and this side, we don't need it
to, go to the face, grab this XF to delete it, and let's move this up. Maybe right here, and
that will be cool. All right. Let's see what
else we could create here. Maybe it's a time to create
the joint of the site. Let's see how can we do that. It's a little bit complicated, but together, we will
find a solution. Let's go over here and tap
the Emo Let's this face, H S and let's bring the
three dicoor over here. Tap out heft A and
let's add the cylinder. The segment 42, I'm
going to sweep this to 62 and rotate this to the y axis y 90 deg.
Let's take this out. Go to the bottom view, and I'm not going to to rotate the cylinder
with this shape because it will be difficult
to me to control it, but I need to create
it in this direction. After that, I will rotate it and put it in the
correct position. First thing that we
need to do now is to change this back
to bounding box. Let's move this for
example right here. Tab, maybe we need to
scale it just a little bit and make it big pots, and let's grab the side, and let's move it, for example, over here and scale
it just a little bit. Or before you scale it,
just add 18 right here, and then grub the side and
scale it inside like that. That's very cool. Maybe we need to scale this just
a little bit more. All right, let's
tumble around and let's see what we got so far. We've got this shape
to isolate it, and let's go to the phase, ec of this phase with this
one hit X F to delete them. And now we need to give
this a thickness t out and maybe we can go to the solidify and let's give this a bit of
thickness like that. That will be ne. And
apply the modifier. All right. We have
three holes like those. We need to create them. Hft A and let's start with the cube. Let's move the cube over here, and maybe we can take
this up and scale it, make it a little bit tall. Let's put this over here. Maybe we can make it a little
bit thinner, like this. And after that, We
can bivle the edges. Cantl A apply a skill first. Tab, go to the edge, I cant click to prob
all of these edges. Control B to bivle. But from the top, we
can control that. Control B and let's have
something around like this. We have a 12 vertices over
here. I think that's too much. Let's add ten. Ten
will be enough for me. That's very cool.
Let's go to the lefts, and I'm going to
use the position of the three de coursor
to rotate this. It's weak this 23 decorsor, and then hit D and r, and let's rotate
this 1120 degree. Let's have to to add
another one over here. All right. This is
the first step. After that, you can trim those. You can grab those, hold you
have to grab the target, control HP, and I'm going to use difference
with the price. I can control those
later if I need. And we have this triangle, let's try to create it. The same scenario. A and
let's add cube over here and let's go to the left and we need to scale it to the
white as a little bit. Maybe we can take it up over here and move it
over here as well. Tap, go to the face, let's move this face
forward just a little bit. G and move it here, and I'm going to scale
those to the y, and you can merge
those vertices, hit and at center and those as well, and
choose at center. After that, let's make
this give this above. Before you add any
apply the scale first, tab, grabs, control B, and
let's give this above. After you add the above, control the shape of the vel, to get a result like this. That will be enough. I think. Now let's grab
this with this and hit control B to give
them bival as well. And let's bring this back 2.5. Let's decrease the number
of the cuts to maybe four. Until we got a result like this, maybe five will be
okay. That's very cool. Now, from the left, let's rotate this hit r
and hold control, and let's rotate this
almost about 60 degree. F here, we're going
to hit H D and r to rotate and duplicate
this object about 120, and then hit heft
r to repeat that. Now we got these
caters in place. Well, select those all hold
have to get the target. Hit control Ht and let's
choose difference as well, and now we got these caters. Well, that's very nice.
One more thing here, we need to make this slice. Let's go to the top of you, and I'm going to add
another cube over here. Take this a little bit here and scale it to
the y axis, maybe. Scale it to the Z ax as well. And let's see what
else we could do here. Let's go to the top of you. Let's top to edit mode. Go to wireframe maybe. Control to add one over
here in the middle. Control be to vl it to two
like this and grab these two gest click and then t have to click to grab the loop and
then vl them as well to two. Now I will grab this face in the middle and move
it forward like this. I will grab this one
and move it away and this one as we move
it away over here. If you like, you can interrupt those and scale
them away. You can do this. And those as well,
you can inrut them and scale them away,
I guess a little bit. Right. That's very cool. After that tab out, hold
you have to cru the umetry, control H to and
let's choose sli. Now we got the sli that we want. As you can see the corner
of the cut reach this area, and it's very close to this one. I can scale it back and make it small to weld them
if I if I want. As you can see this vertex
is very close to this age, and that will be easy
for me to mark them. So I'm going to do the
same thing for this one. To do that, just
step to the mode and select those in
the middle and scale them to the y axis,
a little bit. Write, something like
that. That's very cool. And tap out. That's cool. We did great here. I will grab this and
this one as well. I will grab the cutter
and control I will hit apply price to
apply everything. L we need this. We don't. What about the side? Control to apply to apply everything. These cutters, we don't
need them anymore. We can select
everything and deselect the object and
delete the delete. Now it's ready. All right, now, let's add some shading smooth
for these two geometry, grab this, radically
head smooth, and then add auto smooth and the same scenario
for this one. Let's see if we
have any problem. We lost the edge over here. We can bring this back when we go with the auto
smooth and take this back just a little bit until we retrieve the hard here. And I think something
wrong here happened. All right, let's change
this to 15, maybe. We still have some
problem with these edges. 15 is not enough to cover those, so I'm going to increase
this 220 or 25. Seems like 25 can
fix everything, but we still have a
problem with this edge. We lost it. In this case, I will type the mode and
go to the edge I click to select the edge loop and
right click and Mark sharp, and now it's become sharp. One more thing, when
we added solidify, this phase pushed this age, I mean, pushed inside
just a little bit. I mean, this age. We need
to move it back out. Tab and go to the edge, I click and go to the top, go to the wireframe,
key and take this out hold control and snub
it with these vertices. But switch this to
bounding box and make sure to choose vertex
center that's cool. Key, and let's move
this over here and hold control to
snap it. All right. I'm going to repeat that
key to move to the x axis, hold control, and stamped
with these vertices. That's very cool. Now we can say that we finished
with this one, and I will end this
video and see you in X.
55. 055 Modeling section Creating the back leg joints part 2: Hello, again, welcome back. We have some stuff here
we need to create, and let's start doing that. Let's go to the lifts. We still have the three
d courser in the middle. Shift and let's start
with the cylinder. Let's change the vertices to maybe 32. We don't need much. Let's align this to the view. Let's scale it make it small g and let's move
this up over here, maybe. And scale it. Let's make it s
something like this. Let's move this forward just a little bit,
maybe right here, tap the mode, the sobs vertices, and let's move those
forward like that. We have some
penetrating right here, but that's okay.
I will accept it. The reference image, we don't because we scale this too much. I mean, the center
of the circle. But our result is a little
bit pick from here. I can't scale it because I will ruin all
the cut that I added here. I will keep it like this.
This is the first cylinder, Let's see grab the sit
and maybe we can move it even more to the x axis. Now I got this
result. That's cool. I don't know, but maybe I can
make it a little bit big. It's not big here in the
refs, but I will do that. Or maybe that will
cause some problem. Yeah, I will leave
it small like this. Or maybe even smaller. L et's grab this and let's move it inside a little bit more. And yeah, for now, this is okay. Let's go to the left again and let's change that
transform 0.23 d courser, and I will hit D and r to
rotate and let's rotate this 120 degree and then hit
heft to repeat that again. So now we got this result. Drab this with this. Let's go to the
back, for example, and let's tap to the t mode
for all of these objects. Let's use n tool, hit K, and let's make a cut,
for example, from here. When you click, it A to make
the c strike and then C to cut through and then
confirm the cut and then hit enter to cut
the three of them. Now we have a three ge lop
on these three cylinders. Let's grab these ge
loops one by one. And I will add be vel
control B with two edges, something like
this, I will work. With these faces selected, I will add D to take a CB and rital leave the CB in the same place and then
P to separate those. Now, grab the three of them. Let's see where is it. Crab
this, have to grab this one. Sorry. And grab
this one as well. Sorry deselect that object. What else deselect this. H key to move those
as you can see here. Let's make them one
control key to merge them, and now to isolate them
and go to the left. Tap to the mode and
go to the vertices. Now we need to make
some connection between the three circles. And let's see how
can we keep this. So first, let's
delete half of this. Let's degra this half and hit
F to delete these vertices. Let's delete half of this one. But try to delete the half
that goes to the center. I can grab this vertex and
hit control plus c t to grow the selection until I
reach the half of this, and then hit F to delete it. And what about this? All right. Maybe I can grab this vertex at control plus a couple of time until you ak
the half of this. Try to get the same results. For example, this
one, I'm not going to get the same result unless I kink the
point, the first point. Let's grab those in
the grow selection until you reach the
h. That's correct. Because I just made some
comparison the distance from this vertex to the edge
of the the same distance. For this one. That's mean we grab the correct
half x F to delete it. X F, that's cool. Now we need to make some
connection between those. Grab these vertices and
this F to make conn, grab and those F,
and those over here. Grab those. At grabs at F. Now we've got this
result as you can see here. After that, let's
add 18 here here, 18 right here, 18 right here. Let's see grab
those, all of them, it S to scale them, let's tweak this
to bounding box. Scale those, but
ignore the x axis. When you hit it ft x to ignore the x axis and scale them just a little
bit inside like that. We can go to the left view
to see how that will work, heft x and scale
those to the middle. When you be satisfied
with the result, it control be to buffle these these ages to get
something like that. I think this result
will be okay. Let's slash to excite
and there we go. Now we need to give
this a thickness tab or you don't need to tab. I will go to the modifier
and add solidify modifier, I'm going to give
it a thickness to the opposite dark control a api scale in case we got
a problem with the scale. Yeah, we got. Let's make it a little
bit small like this, and we got very cool results. The thickness is okay nice. Maybe we can increase this
even more if we like. We got the ability to
do this. All right. That's very cool. If you
prefer you can fill this area, I will slide to isolate this, and I will apply the solidify
tab to the edit mode, and I'm going to go to phase, I'll click to grab this
entire phase loop, x f to delete it. Now go to the I'll click
to grab this loop it F, and this one as vocal.
The same scenario. I'll click and then hit F. When you be satisfied
with this and this, control plus to grow
the selection and then control to dissolve
it to have one phase. There we go. Okay. I noticed that I didn't get
the same results. The result on this side is not similar to the
result on this side. So I think we can make. Let's see how can
we achieve that. I will grab these vertices hit G to make some connection
in those here as well, I will hit G. I can go to the wire frame and
grab all of these faces, it x f to delete them. We still have the three
decorsor in the middle. In this case, I will
sweep 23 decorsor, and then hits heavy and rotate and rotate this 120 degree. And then hit r be that. Grab the three control
j to merge them tab, and now go to solid. K, I can grab this with this and hit F and the same
scenario for those hit F, and this one as well hit F, and you can grab the
site hit F to fill it and the site as
well hit F to fill it. This is another scenario, and it will be perfect. I will accept this result
is very nice for me. We need to make some duplicates, HD, let's add another CV here. Let's grab those both of them. Hit D, and let's take
a COB to the end here. I think we can add a CV forward, HD, let's add a COB over here. But for this one, we need
to make some tweaking. I'm going to tap the edit mode and let's see what we can do. I will grab all of these edges, it control x to disolve them
to get a triangle like that, and maybe we can
delete these edges. Cru those and control
x resolve them. Maybe even those
we can grub them. And those here, control
x to resolve them. And now the result
become better. One more thing here
we need to do, we need to give this
a bit of thickness. Let's change this
to bounding books, and let's move this
just a little bit. Give it a thickness like that. Maybe we need to
duplicate this one. Right click set organ
to geometry first, Sift let's take a CBA over here. Maybe we need to give
it a little bit of scaling, something like this. Maybe some So cuts
here on the side. To add cut to the side, I s like to isolate it
and go to the left. The three d coursor is in the middle shift A to
add and I'm going to add cube to rotate the CQ
and let's rotate this cube, almost 30 degree and go to
local and let's move the CQ, for example, right over here. Let's tap to the moot and
let's grab these vertices. Let's move them down and
scale those to the S, z and scale them like this. You can grab the whole umetry, S to the z and scale
it make it big, a little bit. That's very cool. After that, let's
twig this 23 dcsor, let's read this two global. And then maybe we can move it first and put in
the correct position. Go to the left view,
control three, and then have D and R and take Cop and rotate
it 120 degree, and then have r to repeat that. And now we got our tars, grab them, control J, make them one piece, A
have to grab the target, control heft, chose difference. Now we got this shape.
If you don't like that, you can control Hit and e
difference with the price, and you can scale this
let's bring this back, and let's put the
organ.in the middle. Make sure that this one is in the middle and it's not
in the middle right now. Maybe I can use the
three D coursor. As a voz point, let's
read this 23 to Cursor, and then hit S and
cancel the x axis, and scale it just a little bit. By the way, canceling
the x axis, I mean hit shift x to cancel it. Let's make this a
little bit pick. Now I got nice cuts, Control A and apply visual
geometry to make to apply everything and then
you can delete the cutters. Slash two excite. Now we got this. If you like, you can scale it, S to scale it, shift x to cancel the x axis and make
it a little bit pick. Something like that.
It will be okay. We need to grab this hit shift and let's take another
COVA over here. I think we need to make
some val to this one tab. Grab this face hit control B and let's bival it with
two edges like this. And hit G, and let's move
this back gas a little bit. All right now we need to
create the core in the middle. We still have the three
D coorsor in the middle. Tab out Hft A and let's add. Do we need to add the cylinder
or maybe I don't know, maybe we can grab this one
and use it over there. Sift d to take a CB and add
the KB anywhere you like. And the grab this Bits
and selection decorsor, to move to the position
of the three decorsor. All right now, I
can take this out. Right here. Maybe I can scale it just a little
bit, make it smaller. You can read this
to bounding books, make it a little bit smaller,
something like this. One more thing here,
I need to tin, you need to penetrate these triangles or you can leave them like
this if you like. Or you can penetrate them, add a car and cut
it if you prefer. You have this option.
Maybe I will do that. Shift A and let's add a cylinder over there
and increase the number 242, and let's rotate this to
the y axis, y 90 degree. Move this out, scale it in, make it bigger than
this cylinder. That's it. Make it
a little bit tall. Maybe we can scale
a little bit more. I will use this as a cutter. Grab this, have
to grab this one, it control HF P and
use difference. Crab the cutter again, crab this. I control. You don't need to
cut all of these. This one in the middle,
you don't need to cut because it's not
visible to the camera. You can cut this
one, if you like, C this, have to crab this one, control H P difference. That's will be enough. All right now I can move this
inside over here. Tape the e mode, grab the side of vertices and move them
away inside like that. For the side right here, we can grab those faces and
we can make some extion. Maybe from the bottom view, we can understand that
a little bit more. Let's grab all of
these vertices here. We can move them
back a little bit, and we can grub
this phase and hit E to make some extrusion and
S to scale it like that, and E and make some another
extrusion like this. The same scenario that we have right here. That will be enough. One more thing here,
we need to mention, we can grab the
same sphere that we used over there and we
can use here as well. So grab, let's put the three
dicsor over here, maybe. L et's make sure that the
decosor is in the middle. And yeah, it's in the middle. That's mean we can now grab this face and this
face and bring the three decosor over here, tub out, and let's
grab this sphere. H D take Cobi, put it in any place you like. H selection decosor. Let's bring this over here, and we can scale it
and make it small. Let's use that here. That
will be enough. All right. That's cool. We almost
finish this piece. Let's see what else we could do. Maybe we can add auto smooth
and head smooth for all of these sorry, this one. Go this one, and auto smooth. Had the smooth auto
smooth. That's very cool. You can grab those, all of them, right click head smooth and lt and click to give them
auto smooth at once. Grab this with
this, head smooth, Alt and click to
add auto smooth for all of them. That's very cool. I can apply visual matter to me in this one as well
because we don't need the cutter anymore,
now you can delete it. Now it's become very nice. Now we can say that we
finished with this piece. It's a little bit
complicated, but we did it. And now it's become ready. I think I prefer to add
some bevel over here, control I think that
will be better. All right. Yeah, I
will keep this bubble. And let's see, do you
have anything else here to do? All right. Seems like we don't. So I will end this video and
see you in the next one.
56. 056 Modeling section Small parts left to finish the bottom ornithopter side: Hello, again, we'll come back. We have cylindrical shape
here we need to create. If I go to the bottom of view, and if I stick to
wireframe, I can see it. Let's see how can we create. Let's select this geometry
and let's tap the mode. Go to the face and de
grab these two faces. H S and let's bring the
three decosor over here. Tab and t n, let's
add the cylinder. All right. 42 is okay. Let's scale this,
S and scale it. And let's tumble around. Let's move this for now,
let's move right here. And let's step to move
the grab this face. All right. I think I
will bev, control B. Let's be val to two like this. Let's see this fift, and let's bring the
the coser over here. Tap Hit A. Let's add cube, make it small like this, and scale out to the x axis, maybe. Something like this. Then
control A apply scale. Tap, go to the edges, Ct click on one of these
corners to select the rest, and then control
to add some bel. Let's add some segment
here and make it round. Something like this. Four
segment will be okay. I will use this
as a cutter, tab, hold you have to grab this,
control and difference. Let's move this
down a little bit. Or I will keep it like
that. That's okay. One more thing here. Tap the, grab this pig face here, and then hit maybe, duplicated or hit two ins. Maybe over here, and
then I again to make another inset. I think
that's going to go to work. I will duplicate H d to the Z, List add the Copy right here, and then Ps to separates
and that. Grab this tub. I will hit S to make
a little bit smaller. We can go to the bottom view. Align this new phase with
the shapes if you saw them. I'm going to hit I two insets. Let's ins this
just a little bit. Now we need to
delete some phases. Delete the big one,
x F to deletes, and let's select some phases, maybe starting from
this one and ends here, and then it control I to invert and then x f
to delete the rest. I think we can reduce the
number a little bits, delete those as well, x, and that's very cool. Now, select those hit shift
D and r to B and rotate. But that's not going to work. Let's hit xf2d those. Let's wk this 223d courser, that transform vot point. Now let's repeat that
equal of those, S D and r, and let's rotate
those 90 degree, and shift r twice,
and now we got this. After this, after that, grab all of these faces, hit E to give them a
thickness, and then A, select them all and shift in case we got problem
with the normal. That's very cool. I
guess forget something. I forget to give those
above all to the corners, but I will do this right now. Select the corners. I should do this
for the first one, and after that duplicated. After you select all the edges, maybe from the bottom, control B to give them a bv. At least make it round. Four vertices, it
will be very nice. I will accept it. Tub out, move this inside the umetry. C hold heft and grab, control heft and difference. All right now I cancel this geometry and hit
control and apply vile geometry to me.
And delete this one. We don't need it.
That's very cool. Maybe I don't know,
but I feel that I need to sorry. I need to I grab these faces, hit control minus to
shrink the selection and I need to give it
a little bit of depth. A little bit not
too much. But as you can see, we
got some problem. When we move those, we got some merging happen
right here because of because of the
automrge activated. I'm going to hit
control Z to cancel that and turn off automrge, and then manually I will
move those up and that's it. For the heights of the
uma that's too much. Maybe we can reduce it
and delete this side XF tub out and let's move
this up in the position. Maybe over here. It seems like
we need to move those up. And I think that's
will be enough. Radically smooth and then add auto smooth and there we go. I think we need to cope with this humo frame and
add one over here. I'm not quite sure, but
let's go to the left, and let's see if we
need to do this. Yeah, that's right. We need
to add one right here. It would be easy to do that go to slid and let's
select this one. From the left H D, and let's take a CV right
here. It could be right here. Let's rotate this to
the y ry 90 degree. But the rotation happen according
to the three D courser. We don't need that.
Sway this to bounding box, Ry 90 degree. And now I can move it
and bots right here. You can scale it
just a little bit. And you need to take this out. If you want to put this
exactly in the middle. You can hit first and take
this out, grab this phase, and bring the three D
corsor here, tab out, grab this to S and
selection to coorsor, and now it's become
exactly in the middle. One more thing here
we need to do. We don't need this geometry,
we can delete this, and also we can
delete this phase F, and now grab this to S and
selection to cos there we go. Now we need to Mort
on the other side, Let's use the empty because the empty still in the middle
of this one right here. We can go to the left and
take a COB from the empty, maybe Chevet Let's put
the empty right here, and let's align the three
d coursor with the empty. Got this and right click origin, set origin to three decorsor, and let's add mirror modifier. Apply the rotation control A applied rotation to
rectify the results, and there we go done. What about this right here? Let's see, do we need
to add any shape. We need to add a
shape right here. Let's the one that we
create right here. Hit HD and let's take
a COB over there, and let's zoom and
just a little bit move it and i p it and let's
put it right here. We need to move it down.
That will be cool. Did we forget anything else? Let's go back to the left. I think we just forget to add one uma right here in this area, and we can take from
here, crop this one. Hay end, let's take
a COBI over here. And G let's move it. Scale, make it small like that. Let's see how can
we put it right here. Should be right here. In this case, let's bring
the three d c right here, H let's add the cylinder. Rotate the cylinder to
the y axis Ry 90 degree. Scale make it a little bit smaller and bigger
than the object, and let's move this inside and make it just a bit like this. Hold he to grab this, control
and choose the fence. Now I can tap the mode
and grab this phase. And move this inside like that. One more thing
here, we don't need this space, XF to delete it. Now we can go out and we can move the umetry inside just a little bit,
something like this. For this umatry, we still
have mirror Modifier. Let's put the mirror modifier underneath the bull tool and activate apply the polen
operation, delete the cutter, we don't need it,
and we still have the empty and thefts and
cursor to the empty, grab this right lick
origin 23 decorsor. Then let's add mirror
modifier to this. Can't apply the rotation
to correct the results, and then we're going
to we got this here. All right. Is there anything
else we could do here? It seems like we almost finished these details
underneath the neater. The only thing that we
need to do now is add bevel modifier for
all of these pieces. For any reason, if
we forget anything, we will create it. Or if we have any mistake, we will fix it. But for now, I will end this video and see
you in the next one.
57. 057 Modeling section Adding Bevel modifier: Hello, everyone.
Welcome back here. Let's start with evil Modifier. And maybe we can start
with this geometry. Go to the modifier list
and let's add evil and let's change the amount from ten centimeter to 0.3, maybe. Let's see what's
going to happen. I can isolate this and
first, check the scale, control A, apply the scale in case we have problem
with the scale. So this is the result of 0.3. All right. We have clam
overlap activated. We will turn this off because I just need to
kick, is there any problem? 0.3, we say it. 0.3 is still too much. I will add 0.2. 0.2 0.2. 0.15. Something subtle
like this, that will work. Let's add two segments and
activate hard and normal. It is very important
to get pater result. Now let's check the geometry. Let's see. Is there
any artifact here? Right it is smooth. Don't forget that.
Everything looks nice. If everything is okay, you can now apply the vel. Let's bring the
body back and let's see the results. All right. Everything looks okay. Now we can apply
the bevel modifier, select the metr and had
control it to apply it. And now, We have
another misione here. We need to make some connection
between the vertices, if we have big faces. I will tap to the EMD
and now I need to check. As you can see, this
face is very, very big. We need to divide it. We need to add some edges, some cuts to avoid any
problem in the future, if we want to send this geometry to another software
like substance vendor. So I'm going to grab those, for example, it K, make
connection between them. Or maybe I can hit K
to activate knife tool and make some cuts
like this one. And maybe some cuts
goes right here. These cuts will prevent
any overlapping happen when you send this
matry to another software. Let's apply those hit space and let's select this one
with this one hit K. This one with this one. The same scenario
for these pieces. It's a little bit annoying. I know that, but
we could do that. Maybe I can select this
with this and add cut here, and maybe we can use and goes
from here, maybe ends here. That will work. One may
be here and ends here, and what else may be one
cut from here, right there. Let's make a cut goes here. Maybe one cut goes over
here and one here as well. All right, Lt hit space
to confirm all of that, and let's start over K, and let's make cut here
and one cut over here. All right. And for
this side as well, let's make quick cuts. All right. After that,
when you come belet, you can space to confirm
all of these cuts. And maybe we just need to
add some here as well. That will be very quick. For this circle, maybe we can
add some cuts over there. And maybe one cut over here. That's very cool. Now
we can see that we are finished with the
sit for any reason, if there are any face not
visible to the camera, we can delete it. Keep that in mind. I will like to isolate this and
I will tap the mode. We have some faces right
here. We don't need them. I can select them, those here. These faces will not be visible to the camera
and those here as well. So we can delete them. But before we delete
anything from the side, we need to make a new cut goes over there because we don't need to
select this face, but we need to select the rest. Let's cc those, hold, tock those in the corner here
as well. F to delete those. Now let slide to excite
of the lac mode, and let's see. Let's
check the result. Everything looks okay and
fine, and that's what we want. By the way, I
deleted these phases because I don't need
these phases to take any area when it
comes to a rubbing. It's better to delete them. Let's select this one,
and let's check it. We have sharp edges, right here, we can see them. We can go to the t smooth and take this back
just a little bit. We need to give this
a ivl modifier. Canrol A, apply the scale. Apply the ropers,
and let's add vl. Let's add 0.15 with two edges
and with hard and normal. I think we don't need to do anything right here.
Everything is okay. Maybe we can COVID devel to
this geometry here as well. I'm going to hold hept grab
this and COVI to select it, and there we go to the
tube as well, grab it, hold hept this, and cause COB to select
it, and there we go. Now we have it. L et's grab the tube and let's see
what we can do with them. Let's tab the mode and let's
add one, maybe over here. We don't need the
rest of the phases. For example, these phases
and these phase as well, XF, delete them, tub
out and the exit. I can leave it like
this. That will work. Maybe I can make some
scaling just a little bit. For the v for the tube, I think we need to
reduce it to 0.1, 0.1. All right, 0.1 looks okay. All right. What about
this one right here? Let's take the same vl
that we added to the 2.1, select this whole gra of this, and CV to selected, and now we have vl a ed. Let's check if there are any face we don't
need to delete. It seems like we
have some phases, we don't need them, and
we can delete them. It's like to isolate this, tap the mode, and
let's go to the phase. We can select all
of these phases, x f to delete them, and now let's tap out and
let's check the results. Let's see what we've got so far. Everything looks okay.
That's very cool. Let's add vl to this
geometry as well. Grab this, hold he
have to grab this one. Choose COVID to select it, and there we go now we have it, control I apply the scale
in case we have a problem, and we can't see any Bival
right here in this area if I activate wire frame. In this case, I can
reduce the angle until I see the vl targeting this
area and now it's working. Let's check the geometry. We can isolate it to check it, see if there are any
tf, any overlapping Everything looks
okay. In this case, I need to see what's hidden
and what we can see. All the back, this
face right here. We can tab and go to this x
f to deleted, and that's it. Now, let's slide to exits. Let's add the same
vel to this geometry, grab this one hold you have to grab any
object with the vel. And then COBI to select it. Select this geometry, slide to isolate it,
and let's check it. Let's see if there
are any problem. Seems we don't have any
problem right here. Let's exit. Let's
check the faces. All right seems like we can delete some phases from the bag. Type the eight mode, go to the face and let's
delete these faces. All right. To select the area, you can grab the first phase and then hit control shift and grab the last phase on
the opposite side here. And this way you can
select the area. After that, x F to delete it. And let's excite.
That's very cool. Now I can mirror this
on the other side, and let's ching
the bivot point or organ dot to the position of the MT because MT
is in the middle. Bring the three
decosor over here, grab this set organ
to three decosor, and now we can give it mirror
modifier. That's very cool. Mirror Modifier for this one. Origin to three diquoor. Let's take the same mirror
modifier that I apply to this. Grab this, hold you
have to grab this one and CV to selected. In case you got a
result like this, hit control A and
apply the rotation because that's mean we have some problem
with the rotation. Now it's fixed. What
about this uma try? Control A, apply the mirror, hold you have to grab this, and let's give it the same bevel. And there's nothing here. We don't have any problem. So I will accept the results, and I will keep all the faces. What about those right here? Hold Shift to grab any
geometry with the l and tube a il, COB two selected. There were going we have Bival applied for this
geometry as well. And do we need to
delete these faces? All right, I will s
like to isolate those and after I apply the
ur and bevel modifier, I will tap the mode and I will
grab some faces over here, and I will delete them. And these phases
right here as well, the same thing because they are not visible to the camera. X F to delete them,
and we can keep the rests. That's very cool. That's very cool. Okay. Let's
add vl to this geometry, select the whole tot
this, OB to select it, select it again, t's to check
if there are any problem. We don't have any
problem, any artifacts. Everything looks okay. Maybe we need to add
auto smooth to this one. As you can see here,
we have a warning, enable auto smooth in
G data properties. So let's add Auto smooth or you can go here and
activate auto Smooth. Let's like to excite and now we need to delete
some phases, I think, the top one, we don't need it, and I think this phase, we don't need it as well. We have some area
visible from this phase, so I'm going to delete it. All right, Let's
like to isolate this and let's see what we
can do over there. I will select these faces, x F to delete them.
And what about this? What I will do is, I
will grab those and hit k to make connection,
and I will delete those. That will work in this case. Now, everything is okay. Select this one, hold
here to grab this, and let's add the vole And the same scenario add
auto smooth to this and up the scale in case we have a problem
with the scale. Slack to isolate this piece and let's see what
we can do with it. All right. Do we need
these interfaces? It seems like we don't, and I think we need to make some tweaking by grabbing these
vertices and take them down. Maybe over here.
Something like this. Now it's like to
isolate this tab, and let's go to the face. Let's select these faces. Even these phases,
we don't need them XF tab out, and I
think that's it. Now it's become
clean. And let's see. Is there anything else? Okay, so now we added vl modifier for all
of these geometry, and we just have one thing here. We need to kick the
connection of the vertices. And as we say, we don't need to leave any big faces because that will
cause some problem. So now is the time to
kick what we got so far. This one is okay, this one is
okay. What about this one? It's like to isolate it
and kick it. All right. Here we have big face. At least you can add
one egg right here. That will help to
make it better. Maybe one right here as well. To avoid any problem, just add a cut over here and
Add another cut maybe here and cut over here as well and one here and one right here. What about this side? I think we need to make some connection over here as well. And maybe some cuts between those and for the side,
the same scenario. And it space to
confirm all the cuts. Now, I think this
humus is ready, and we're not going to see
any problem with this. So it's like to excite.
Let's check this one. It's like to isolate it
tab mode. I think it's. We did that. That's very cool. T, it's like to excite. What about the rest? This
one maybe Tab and check. As you can see here, we have a very big face we need to
make some connection here. Lest this vertex and
this vertex hit G, and maybe this one
with this one hit G. You don't need to
connect all the vertices, just a few of them, and that will be enough. All right, maybe this
one with this corner, it's K, and maybe one here. That will be enough, I think. Maybe we can hit K cut goes
like this. It will be better. And you can leave it
like this. That's okay. What about this
one? It's like to isolate the tap end let's check. We don't have any problem
with this one tap out less excite.
What about this? We don't have any problem. All right. I think we fix those. And I think we mirrored
all the uma free. That's very cool. Okay, I will end this video here and
see you in the next one.
58. 058 Modeling section Adding Bevel modifier part 2: Hello, everyone,
and welcome back. H Let's add val modifier
to this geometry. We have vl modifier
added on this one, so we're going to
CB it to this one. To do that, select this, hold have to grab this and go to this arrow, CV to selected. Now select this one
alone and isolate it, and let's kick the result. Control I apply the scale in case we got a problem
with the scale, and now let's kick the edges. Let's see if we have
any artifact there. If we don't, that's mean it's
clear and we can move on. All right, everything
looks nice. Now, what I need to do is, I need to delete the
faces that I don't want. Let's see how many
faces we could delete. I think we can delete these faces because they are not visible to the camera
and leave the rest. In this case, it's like
to isolate this and I will apply the vl
modifier control and apply it and
tap to the mode. Let's select these faces. You have to grab all of them, and those over there, and
then x F to delete them. You may ask why why I
apply the bible and then delete these
faces because I need this small
corner to be exist. Because of that, I
apply the babble, and then I delete these faces. After that, we need to make some connection here
because as we say, we don't like the big faces
like this one and this one. We need to add at least one
vertex or let's say one cut. Let's erupt those G. Let's add Sigment over here, and maybe we can erupt this one, hold have to this H K to
make a connection over here, and that will be enough. For this side, maybe
we can erupt this with this All right. I mean, this one right here and you have to
go this hit to make a connection between them and the same scenario
for this one, it. That will be okay. And maybe do we need to add
something here? I think we need to
make some cut goes like this, and for the side. By the way, you can focus on one side and you can mirror it. You have this option. Let's
see go up these two vertices, this one right here and
this one over here, it J. That's very cool. What about these shapes? I think we can make some cut goes from
here to this one J. And what else Maybe some cuts activate kn tool
and make cut like this. Another cut maybe should go like that, something like this. Maybe this one as well.
Or I think we don't need. But for this one, we need to add some cuts and one cut over here and confirm
them and here as well. You can move it over there.
And I think that's it. Now I can add another
mirror modifier. Let's activate wire frame, and now let's go to
mirror a mirror, activate bsects, and I think
we don't need to flip, O we need to flip it. After that it control
A end up lights, and kick the um try hit slag to exit and then
turn off wire frame. I think it's okay
now and it's ready. Well, maybe we can
make quick cuts here. It, and to the side as well, it J. J forget to add
one cut right here. Sorry, not like this to this
edge and one cut over here. I think that's it. Tab out, and now let's select
this geometry, and let's give it Bival. We have Momdifier added here. Hold shift and let's see
grab bival from this one. Go to the arrow COVID selected, grab this slash to isolate
it and now let's check it. Ct apply scale in case we
have a problem, and we don't. All right Auto smooth, and give it had smooth to get
rid of these jagged lines here. Now it's become smooth. Let's see what's visible
and what's not visible. The top phase, phase
this one right here, we don't need it, so
we can delete it. It's to isolate this, and let's see if this angle, we can see it, we can see it. I'm going to apply the
vl modifier after that, I will delete the pace. Control I and apply it, to isolate it and tag the mode, go to face, these phases, and then delete them
F to delete them. Now is the time
to add some line. Let's add here as well.
Wrong to leave it like that. Maybe here as well.
Maybe over here. What else, maybe we
can make a cut right here and maybe one cut goes right there, maybe. No. And maybe one cut here. Don't worry about the other side because we still have
miro modifier added. All right one here, one there, and one here as well. When you comb just hit
space to confirm all that, and we should have these cuts on the other side if I activate
wire frame and correct. We have them. Let's like
to excite and I think that's it. All right. What about these geometries? Let's select those
and those over there, and let's give them vel
modifier or maybe we can merge them fir control
J to make them one piece. Hold have to cp any emetry with the vel and let's add
vel modifier to them. Now let's to isolate them. Let's just a little bit
to check the results. Right click head smooth and then give them auto smooth
to get better results? And don't forget to activate hard and normal in
the properties. Now we've got very cool result. I think we don't need to
do any further editing. Let's select this geometry, and we could give
it a vel modifier. The same scenario grab this, go to the vel COVID to selected. Control I apply
scale in case we got the problem. Auto smooth. It's like to isolate
this umetry. I just need to check
something. All right. Let's turn off clam overlap because I think we
got some problem. As you can see here, we
have some artifacts. If you keep clam overlap
on, you can see them. Let's turn off clam overlap, and let's see what that's seven. Tap the eight mode, and
let's go to the vertices. I think because these
close vertices, I'm going to hit eight to
select all the vtices, and then hit to open the merc menu and choose
mercy by distance. All right. That's not going to
work. Manually, I will move this vertex, get wise, and push it and Merge P
activate automeric ferrous, get wise and merges here. And now it's fixed
this one as well, Get wise and Met. R k head smooth and activate auto smooth
for this geometry. There we go. The same
scenario for this one. Let's give it bible first. Hold you have to grab this, CB two selected, grab this
one, like to isolate this. R k a smooth, auto smooth tab, grab this vertex, we, Mc, g wise Mc De. Let's exit, and all. What about this one? I think we gave it vl. We finish those over here, and what about the gematr, we gave it pile or no, we don't. Hold F to grab any
gemetry with the bible and go to the bible,
COVID selected. It's like to isolate it, kick it, see what's visible,
what's not visible. This phase on this side is not visible and from the
top is not visible. That's mean we can now. We can first activate auto smooth because if you notice here we
have some warning. Control A, apply,
sorry add Oto smooth. You can go to the object data ties and activate from here. And then we can apply vel tab, go to the face,
grab these faces. And F to delete them
tab out does it. It's slashed to excite, and that's very cool.
What about this umetry? Let's give it the vile, Holt
to cumetr with the bible, and add COVID selected. Selected, slashed to isolate
it, and now we check it. We don't have any problem, but we need to
activate auto smooth, activate it, and then apply vl. And let's see what
phase not visible, write this one tab, this one not visible,
and this one as well. Hold control and grab it. XF it slash to excite, and we done with this, tap out grub this
whole shifty crab and umetry with the val,
for example, this one. Coby val to select it, select the umatry, slash to isolate it, and
now let's check it. If we have any artifact, Control A, apply the scale. Everything looks cool and nice. Tab the mode, and maybe we just need to make
some connection here. Before we move on. But I think I will do that
after I apply the bl. But first, let's add auto smote for this geometry. That's it. Control A, and apply the tab, and now For example, let's see grab these
three vertices, G tie and let's mark
them over there. That's will be enough, and maybe K to activate knife tool and let's
make cut goes like that. Let's select those as well. Git wise, and let's
merge those up. And another cut we
could add right here, and maybe we can corrupt those vertices and
merge them up or not. I think we don't
need to do that. We can keep it like this.
What about the side? Maybe we can do
the same scenario, grab those get wise
and mark those up. And maybe we can
hit k and make cut goes like that and confirm it. Grab those here as well, get wise and make
them down right here. And another cuts we
can add right here. What about this one here? The same scenario use knife
tool and this cut maybe here. All right One cut to the corner. Maybe we can select this vertex. Hold H, to crab this one, hit J. Make connection between them, grab this, hold,
H, to grab this, J, and maybe we can use
the knife tool this time. Ma cut gos here. That's it. I think
that's well do it. It's like to exact
of the local mode, and let's see which phase visible and which
phase not visible. So we have pass right
here not visible and these faces underneath the body of the orator are
not visible as well, and maybe the same
scena right here. I think we need to
keep these faces. It's like to isolate it, go to the face, co all of these faces. Let's check them
before we do that. I think these
phases that we need to delete, corrupt them. But I can see just a
little bit of I can see something right here from
this angle. All right. In this case, what I will do is, I just can delete these phases, and I will leave the rest. That's okay. What
about the geometry? By the way, one more thing
here we need to mention. We don't need these
faces inside. We can delete them as well, tap, control R, and let's add one
H, for example, right here. The same scenario
for the other side. Kw n move its, a bit maybe here. Control and let's add
another one right here. Something weird happened here. Because we have auto activated. I think some edges are merged. Turn off automerge. Just be aware of that.
Let's add one over here, control r, and let's
add one right here. These faces in the middle. A click, crop them
all like that. X F to delete them.
We don't need them. Let's slash to excite, and as you can see, they're
not going to affect anything. What about this
humero right here? Let's like to isolate it. We don't need all of this. But first, let's
give this a Bible, and let's pick any object with the bible. Select
this hold here. Maybe we can take Bible from this Kobe to select it and grab this control I apply scale and give this auto
smooth control A, apply bevel tab and control to add one right
here in the middle. That doesn't work. You
can go to the front or to the top and let's use
knife tool to make cuts. O cut right here, maybe. If you like, hit a to
make the cast right, and C to cut through left
to click and then enter. A this, we can
move it over here, and we can add another
cut right there. Use knife tool, hit K, and hit A to make the ct
sit right left to click. Sorry, just made a mistake. Again, K, hit A, and then C to cut through. Left to click and then
enter to confirm. Well, these phase in the middle, we don't need them anymore,
XF to delete them, and these edges, we can slide them like this and the same
scenario for this one. In the perspective, we got this result. That
will be enough. I sl and that's it. All right. What about this umetry here? The same sc we can do. Let's give this vl modifier. Maybe we can take it from here, Holt grab this, vl CVI
selected, slate this umetry, s control A apply the
scale, to correct it, and give this auto smooth
control A apply vl, tab, control R. That's
not going to happen. In this case, the
same sc. Use N, K may cut A and then C cut through I will add
vl here, control B. Sorry. Segra this age. C troll B to Bival it? All right, Let's add one over here and let's slate
this one manually, and let's move it right here. These faces in the middle.
We don't need them. I'll click XF to
delete them all. That's it, tub out,
and there we go. If you like, by the way, its to isolate this. You can push these edges a
little bit more if you like. Something like this, will work, and this one as well, you
can move it right here. It will be better.
And that's it. All right, so I think
that's it for this video. I will end it and see
59. 059 Modeling section Adding Bevel modifier part 3: Hello, again, welcome back. Let's start with this umetry. Select it, and let's
give it Bival and we can select we can give it
Bivle from this one. Hold here to grab this and
go to the Bivl Kobe to select it and now we add it.
All right. That's very cool. Let's see before and
after. All right. We go something weird here. Let's upl the scale first, and let's now let's add it. All right now it's
working correctly. Always keep in your
mind to late the scale. Always. Okay. Now let's kick the matry before
we do anything. Anything looks clean and nice. We don't have any problem. If that's so, I will apply
it bevel, control A. And now let's see what's
hidden and what's not hidden. That's mean we now
after alying the bevel, we can grab all of these faces
and hit F, relieve them. We don't need them,
and that's it. Let's select this one, and let's give this bevel
modifier as well. With this one selected, hold shift and let's select this and go to the bevel
COVID to select it. All right now, I will grab it alone and slide
to isolate it, and now let's check if
we got any artifacts. As you can see, we have
some artifacts right here. Let's fix those by
merging these vertices, G tie and Mg it. Sorry, that's not
going to work because atomer is off activated, keep wise, and that will work, key wise here as well in the
same scenario for the rest. Sorry. Yeah, that's cool. Seems like we don't have
any problem right here. So I'm going to leave those here and let's check the side. We don't have any
problem right here. We got a problem.
Let's mark those here. Sorry, and those here as well. Key wise, and I think we have more than one vertex at these corners to avoid
anyth similar to this one. Let's hit eight, select
all the vertices and hit, let's choose merit by distance. Now as you can see
six vertices merit. Maybe that's solve the problem. Let's check the geometry again. Let's see. Let's give
this shade smooth. We got head smooth, but I think we got problem
with the auto smooth. Let's increase this
just a little bit. All right. We got one problem. If I decrease the number, I will have some sharp
edges right here. If I put this forward, I will lose this edge over here. That's something bad. Okay. Vile modifier doesn't target
this edge right here. Let's Let's try to find a
solution for this problem. All right let's fix the
artifacts right here first, wise and Mer this and
this one as well. I think we got the same
problem over here. All right, everything
now looks clean, I think. That's cool. Now, let's tap the mode, hit a select, everything,
go to the edges. Go to select, and here we
have a nice option here. Select sharp edges. This option will help us
to select the sharp edges. So at a to deselect anything
and go to select and select sharp edges.
That's very cool. Now I selected all
the sharp edges. After that, what I will do is
I will open this arrow and go to the item and give this vl weight,
cring this to one. And manually, I will select
these edges as well. I'll click, altpic click and the same scenario
here, Altepic click. Go up these edges, and those over here and
those here as well. Let's give them v weight to one. I think that's it. We just selected all the
necessary edges. After that, go to the properties to the
modifier and go to the vl. Change the limit method from angle to weight
because we need to control the weight
and now it's better. All right, that's cool.
One more thing here, go to the op data properties
and let's put it this 230, and now it's become
smooth and nice. If you don't see any artifacts, if your geometry now become D, you can apply bevel modifier. You don't want it anymore. So let's go here,
control A and apply it, and let's check
what's visible and what's not visible. All right. That's mean I can delete
these phases over here, grab them like this,
X F to delete them, and maybe this
phase and this one, x F to delete it. Or maybe I can grow the silicon. All right to select
those or control minus to shrink x
f to delete these. And let's see what
else we can delete. That's very cool. I think
you can keep the rest. Now the umatry is
nice and ready. All right, Let's
start with this one, select it it's to isolate it, or let's add vl
modifier above it. Let's select vl
from this geometry. COVID selected, and there we go. Now select this one,
it's to isolate it. As you can see, we have
too many artifacts here. Let's try to fix
them one by one. Go to the chmod, go
to the vertices, and let's see why
that's happened. For example, right here, we got very close edge. This edge right here is
very close to this vertex. To fix this issue, we need to move this vertex a little bit, wise
and slide it away. The same thing happened
right here to this one. Cub this kat wise and move it just a little bit
away from the vl. Darroch. What else? We don't see any problem
right here and here as well. We need to make some editing
right here to this one, kat wise and move it away. This one as well, move it away. And here, we got something weird kat wise and Met
here as well, maybe. Maybe I can era
this with this it J to make connection
between them. And maybe I can merge
these two vertices, as you can see here, we have
two key tis and merge it. And let's make some
connection between those J. And I'm going to change
the direction of the of this angle
because as you can see, because we got an
goes like this, we lost the bival on this edge. But if I grab this vertex
and this one hit K, if I make a diagonal
line goes like that, I can bring back the bival. But I need to delete
this one, this age. Grab it control x, and as you can see a X. All right, let's check the rest. I think we killed
all the artifacts. This face we do
need x F deleted. Okay. One more thing right here, we need to fix Get
wise and merges, and use knife tool, Ma cut goes here, G this control X and dissolves, and let's check the rests. Maybe I can make cut
over here as well. And get wise merges. Get this control X dissolts, M cut goes there. That will be better. A Let's see what else we could do here. The same scenery for the sit, make a cut over here, grab this age, control
X, and dissolved. Maybe I can grab this vertex kwiice and slide it over here,
and this one as well. Make some connection
over there with J. And the grab this one
g twice slided here. This one as well as
slide right here and Merge. That's very cool. After that, go to the to
select and select sharp edges. Target the sharp edges.
You can go to the ge mode. That will be better.
Let's do that again. Select sharp edges. That's very cool.
Manually, select the edges these edges because sharp edges cannot select
everything you want. But we will do that
in manual way. This edge right here as
well, we need to select it. I'll have to click and keep
selecting all of these edges. All right. I think I just selected all
the necessary edges. Those here don't
forget them as well. When you be satisfied
with the result, when you select everything, just go to the mean vel weight
and c this 21 and t out, go to the bevel, squeak the
limit from angle to weight. Now we selected all
the necessary edges and this mer now become rey. Well, that's mean now I can
apply the vel if I want, but maybe I can use it later. So I'm going to keep it, and when I want to apply, it will be easy to
apply. All right. Let's see if there are any unnecessary phase we can delete. Actually,
we don't have. All right. That's very cool. Now let's select this geometry. Let's give this a
oval. Hold have to this. COVID selected. All right, Let's to isolate it, and let's switch the limit
back to angle because we will use angle in this case, and maybe we can
change the angle of the bible itself 30-15
to target some edges. Let's see what's
visible and what's not visible here. All right. I think I can delete
this phase and those here x F and delete them,
and that's very cool. I think that's it
for this piece. The sphere we can ignore it, and this one right here, let's give this a bible. Let's take a Bible
from here to here. Okay. B to selected, select this one,
select to isolate it, and we need to make another
tweaking here as well. First, hit A and then
and merit by distance. All right, we have
four vertices merit. I think I will increase this just a little bit to marriage any vertices have
the same distance similar to this distance
between those here. So I'm going to
change it 001-2 s002, and then hit enter. All right. Three, maybe four.
Maybe manually, I will necret this until
I merge all of these. But don't go too much. 0.2, maybe will work
in this scenario. I just merge all the
necessary vertices. And I think we got
some weird tab here. Let's it controls
it. Yeah. Just make sure that you're
not go too much. Merit by distance, and let's add 0.014 vertice is merit. Let increase 0.050 0.08, 0.1. Let's check the rest.
12 vertice is married, and the umetry is still nice. So I think I will
accept this number. 0.1. All right. That's very cool. All right. Less excite. And yeah, now Bval now applied on this
one correctly, I think. All right, so I think
that's it for this video, and see you next one.
60. 060 Modeling section Adding Bevel modifier part 4: Hello, everyone. Welcome back. Let's complete the
rest of the umetry, and let's give them bevel. And maybe we can
start with this one. I think we didn't gave it a vel. Let's like to isolate it. And let's see from where we can start and what
we should do first. Let's select any
geometry with the Bival. Select this one as
a fares object. Hold HFT crop maybe this one, and we have Bival
still exists here, and then CV to select it, and now we just CB
the bival to this. Now let's hack the vl. As you can see here,
we have a warning tells you you should
activate Auto Smooth, semble, go to the
obvio data properties, activate Auto Smooth,
and go back here. I can't see any vel here. Maybe it's because of the scale, control A, apply
the scale first, and after that, kick the clam overlap or something
weird happing here. Let's activate the wire
frame L see nothing here. Sorry, I can't see
anything because the limit method
switched to weight. I need angle. As you can see now,
we can see something. This sharp edge doesn't receive any level
because of the angle. So we're going to
reduce the angle, take it back until
we see a level here. So angle then, it will work
in this scenario. All right. What else we can do here? If you're satisfied
with the result and everything is okay, now you can hit
control end of the bob because I need to
delete some phases. I don't need all
of these phases. I'm going to control
r to add right here. I just need to cut these faces
or let's say delete them. I will go to the face
molt click to select the phase Cos crabs
as well manually, and hit x F to delete
them and done. Let's see if there are
something visible here. A nothing visible. I will keep it,
select this geometry, and I don't know, we gave it bevel modifier.
That's very cool. Now we can say we almost
finished with this one, or maybe we can delete
these phases in the top, head slash and
isolated tab go to face these phases and
hit X F to delete them. We don't need them. Now let's see what else we should delete. Can we delete this site? I think we can because it's
not visible to the camera, grab it, he slash,
tab to the mode. Grab those manual like
this and delete them, but make sure to select this, don't forget it, XF done. What else? Is there anything else not
visible to the camera? Maybe from this side as well. But before I delete this side,
what I'm going to do is, I'm going to grab these vertices
and scale them to the x, just a little bit to hide
this a little bit of area. S X and move it inside like
that or that will work. Because I activate auto smooth, These vertices because they are very close to each
other, they are married. Hit controls turn
this off and then S X and scale it again
like this and there we go. Now it's cool. After that, grab these faces. You don't need them, and
then hit x F to delete them. That's very cool. Now we finish with this piece,
go to the next one. Maybe this one, two
will be the next. We still have the Bulen here. I'm going to grab this modifier and
control A and apply it. We don't need the
cutters anymore, grab them he delete. Because we have mirror
modifier applied, we can see the effect on the other side.
That's very cool. Now we have this, we need
to give it ivl modifier. Let's select any geometry
with the vl, maybe this one. Let's add the vl to
the selected object, this. Now we got it. Vivl still use the weight, sw this to angle, and then give this auto smooth. As you can see, we have
some artifacts here to fix those types of
the mode and let's check the area here and
go to the vertices. Because we have very
close vertices, we can see some is git
wise and merge it, but activate this,
don't forget that. Now we fix this one. Maybe we have the
same problem here. No, we don't because
we have miro modifier. So what we need to do
is fixing one side. As one problem I have here. I have very huge
phases, as you can see. This one phase. We
need to cut that, and we talked about that. Let's grab some vertices. There's something
weird happen here. Let's grab this control
x to dissolve it. Why does happen here.
Let's make these vertices, keep wise and make those
here and this one here. Something weird. All right. I will make some connection, it K, let's make cut from
here, maybe to here. As you can see, that's
fixed the problem. All right Maybe one
cut from here to here, it K, maybe hit K make
a cut goes over here. Something like this.
Maybe another cut could go here and maybe one cut here. Maybe what else? Maybe we
can add one vertex go there. Okay. Something like this. Maybe one vertex right
here and one right here. Maybe we can add one here. All right, that's very cool.
After that confirmed those, we have some
problems right here, we can delete this age because it's not going
to the cor direction. It should go like
that, not like this. So grab it control dissolve it because we
don't need it anymore. And for any reason, if we want to do
or create another, we will create like that.
That will be better. Sorry, made a mistake here. That's very cool. We have
big face here as well. This one is giant face. If I go to the face and click
this area, you can see. In this case, we're
going to target the corners and make some
connection over there. Something like this
and confirm it. Let's check the rest.
Maybe we need to make some connection
over here as well. And, maybe one here,
something like that. That's very cool. All right, this age is not beautiful.
I don't like it. I will delete it. What else? Everything is okay
and acceptable. Tab to mode tab out, I mean, and now let's
check the cumetry. Check if there are any
artifact, any problem. It seems like we don't
have any problem. It's like to exact and
let's check it from here. Let's see what phases we can
delete and what we can keep. All right. Now, I think we
can delete these phases here. Go to the pa, grab these phases. You can grab one side at XF deleted and the other
side will be deleted. These phases over here, you can delete them as well if you like. But I think we can add
contro r or I mean, add a loop here and you
can delete the rest. Ctro cross selection
and just grab those at x f to delete
them and that's it. Let's slide to excite and there we go. Now we got this result. Now we can say this,
geometry is already. Let's focus on this one here, let's see what we
can do with this. Fair thing, let's
grab this phase, and maybe we can hit get wise, to slide it like this, and then hit F or hit E for events see if that's work,
that's not going to work. F to delete this phase, and let's grab this
verts get wise, to slide them, hit E, this time, and Align the edge. Like that with the geometry, and just push it a little bit
back because we don't need the rest and keep it like this. Tab out and now let's
give it Pivl modifier. Let's select pivle
from ab this geometry, add to selected object, select this whole slash, and then control apply the scale in case
we have a problem. That's very cool. We need to give it auto smooth and had the smooth at the same time. A to get rid of these
jagged lines here. Now this becomes smooth
and nice, I think. We don't need to
do anything else. Everything looks okay.
I will keep accepted. Maybe this geometry, we need
to give it a Bible modifier. Hold have tab this one and go to the Bible CBI to select it. We have tool modifier bul. We don't need it for this geometry. I'm
going to delete it. As you can see, it's it's red. That's mean it's not important. We can delete it.
It's not going to affect anything. All right. Now let's check this geometry, and let's see the vl,
how it works here. C troll I apply a scale. It seems like we don't
have any problem, we can accept it directly, or maybe we can see some
small artifact here, tab, and let's see
why that's happened. Maybe because of the
direction of this age, we can change the direction. Maybe we can get better results. For example, I can grab
this vertex, hold, maybe this vertex and HJ to make a connection
between them. That will make it better, and maybe we can make some
connection over here, and maybe between those Maybe between this one and
this one as well at K, and this one and this
one over here at K. K? Maybe between those. That's very cool. Now let's go back here and
let's see why that's happened. I will grab this edge and
hit control to dsolve it. As you can see, because of the direction of
the edge, we got. W Now we can connect these
vertices with the new edge, for example, this
one with this one. It will be better.
As you can see, yeah, it's better. All right. Let's tub out, and I think
this umetry now is ready. It's slash to excite, and there we go. What else did we give this vl? We don't, Let's COB bible
maybe from this one, COVI to select it, and
let's select this, it's s to isolate it,
and let's check it. Kick, if there are
any artifacts, we need to give this auto
smooth as very important. That's very cool. We
don't have any problem. We don't need to fix
anything anything. Let's see what's visible and
what's not visible here. We need to delete some
fases. All right. After you adding the bevel and after you accept everything, I will apply the bev
modifier for this geometry. That's very cool now let's hit slack to isolate this again. Now we can see that
these faces over here. We don't need them in
some faces here as well, and the faces
underneath the body, we don't need them
as well. All right. Hit slack again, and let's
start deleting these faces. All right. Let's start
with these faces. Listen like those over here
in the same thing here, or don't because we
have miro modifier. List like those here. That's very cool. Maybe
those here, sorry. As well, I think. When you select the faces that
you need to delete, just hit sg to exact and
try to see these faces. Can you see them?
As you can see, now, I just see the silhouettes. I mean, I es, I can delete them. That's very cool. Now,
let's isolate this again and then we don't
need all of these phases. We just forget to select those. I think we can select them. And the solid mode. I guess, XF to delete them. We just have tiny
phases right here. Make sure to delete them because these faces can
cause some problems. X F to delete them. All right. Let's see the umetry. That's very cool. What else? May be these faces here inside? We can delete them as well. Let's try and let's see
what's going to happen. Go to the face and the grab
these faces, all of them. Grab them like this. All right, grab those over here
in this corner. And now it's s to see Is there anything visible
here from these faces? All right. As you can see, we can see these faces. That's being, you can delete them. You have
the green light. Slash to isolate
this, F and done. As you can see, we
have some faces, not deleted. All right. In this case, I'm going to
control Z to bring those back. There's another scenario
if you want to do that. Go to the ge, for example, and you can grub this
age with Alt click. But make sure to select
the correct edge loop. I think I will do that manually. So let's select this entire
edge loop manually using control click. Let's
select this one. Hold control, grab this, this. And this one over here. I think we reached the
beginning. Yeah, that's cool. When you select sorry, I think we need to grab this
one as well? That's weird. We get selected all of this. All right. Let's do that again. Yeah, that's very
cool. After that, just hit V from the keyboard, it V and the rali. Now they are separated. After that, you can select
the geometry and hit L to grow the selection, and now you can select the
phases that you want exactly. After that, hit F to delete
them. That's very cool. If you like, if you prefer, you can grab the edge loop and extrude it up a
little bit e to the z, and just give it a little bit
of extrusion, not too much. That will be better.
In case we can see something between these faces. I need to block everything. But I think we need to turn of the automatic first
and do that again, e to the z, and extrude this
as alpha bit like this. Or even if you ignore that, that's not an e qu. Now I think we finish
with this one. Am I right? What else we could do? Let's give those a
bevel modifier as well. So I think I will take
Bile see with Q three. Maybe from this one, I will take Bevel from
this one. Select this. Hold hept up this, and go
to the Biv to select it, select this piece first, select to isolate it and see what you can do here
is everything is okay. All right. We need to
activate auto smooth, so add auto smooth, simple. And let's see what's visible
and what's not visible here. We can delete some
faces. All right. What I will do is tap
the mode and let's select these phases and hit control plus to
grow the selection. Grow the selection
may be over here, and then delete the rest,
F to delete the rest. After that, go to the X, select the outer
edges, all of them. And then hit E to the z and ext the gas to
bits up like that. And I think that we do it. Let's hit select to exit
and let's see the result. All right, I think,
yeah, that's very cool. We have some small gap here. G to the Z, and let's move those up to close this gap,
and now it's cool. All right. I think
now vl targeted all the corners, all the ages. I mean, yeah, now,
this is ready. Let's COVID the vl for
this piece as well. Grab this hole, you have to grab this one,
COVID to select it. Let's select one of them.
It's like to isolate it. As you can see, we
have some artifacts. Let's give this auto smoot first and tab and let's see
why that's happened. We have very close vertices, git wise and Mm. Activate autom git wise
and merge it again. K is and Merge. Cool. Let's check the rest. All right? I think now it's ready. All right. Let's make
some connection from this vertex to this edge and
the same thing for the site. That would be better. Now
we can delete some phases. Let's this one control plus
to grow the selection. I think we don't need to
make any connection anyway. F to delete this,
go to the edge, grab the outer edges, grab them like
this, and then hit e z, a little bit like that. Let's exact and let's
see the result here. Looks nice. Tub
out and that's it. That's very cool. All right. I think you got the idea. And I think I will end
this video, and see you
61. 061 Modeling section Adding Bevel modifier part 5: Hello, again, welcome back. Let's add bevel modifier
to this geometry. Select it, and let's select any geometry with vl.
Let's see which one. Yeah, maybe this
one. Select this. Hold, you have to grab this. CV to select it. Now after that, select
this. Now we have vl. We need to activate Auto Smooth. Add Auto Smooth, it slash to isolate this and now
let's work with this. Let's check the result. Let's check if there are
any problems, artifacts. It seems like we don't
have any artifacts. Everything looks nice. Okay, now is the
time to see what's visible and what's not
visible here. All right. The faces at the
top, not visible. We have face right
here, not visible, and the faces in this area
as well are not visible. That's mean we can delete them. So it's like to
isolate this again. And I will apply the bevel
modifier, it control A. After you check everything, keep that in your mind.
Check everything. We don't see any artifacts. Now we can apply.
Control A and apply it. Tap to the mode now, go to the faces and
now select our faces. I will grab these faces first, and let's select
those here as well. And the grab those. Now we can hit control plus
to grow the selection. Select these phases
as I did here, and you can now delete them. It x F and delete them.
What about the sit? Select these phases as well, and hit x F and delete them. Maybe this phase, we
don't need it as grab it. You can grow the
selection control plus twice and you can hit
x f to delete it. Tub out. Now let's exe and
let's see what we have done. That's very cool.
Cool. Now let's add vl to this geometry. Selected hold to grab vl from
here and CV to selected. Select this one alone. It's to isolate it. Control A apply the scale
in case we have a problem, add auto smooth here, and now I think it's ready. Tap the mood or before you tap, control A apply the scale, tap. Go to the phase, let's
select these phase first, control plus cou time, and deglo the selection. Manually, I will select
those here, these phases. And I will excite
from the local mode. I just need to see what's going to happen if I
delete these phases. As you can see, nothing will
happen. I can delete them. I have the ability
to delete them. Okay? But I got one
problem right here. I will fix it. Grab this hit X F and delete. Well,
that's very cool. I have just one
problem right here. I can see a gap here. To fix this gap, grab this, go to the edge, I'll click to select the entire e loop here, and then extrude those
up to the Z, e to the z, and move those up just a little bit until you kill the gap, but I got one problem here. Because of auto merge activated, these vertices merged control z. Turn this off, very important. Always keep in your
mind to do that. Then e to the z, and extrude this up again here, top
out and there we go. Right click head smooth
to fix the head smooth. As you can see, we
lost the good heading here because we made some extrusion and
we add head smooth. How can I retrieve
the heading bag? In this case, I can
go to the modifiles, and I can add weight
normal to fix that. Always keep in your mind, weighted normal is
similar to hard normal inside inside the abovel. One more problem
we got right here. We just forget to give
these edges above, and that's really bad. We didn't note that. Now I need to do that manually. I will select this
one first and hit control to give it above
and let's add three. This one as well, I
will select this and it can be to give this above, and maybe I can select
those here as well. This one here. Cantro B
and let's bevel this. All right. I should not
forget that, but all right. That's happen tab out, and because we added
weight normal, as you can see, we have
very good result here. I think this face is not visible as well, we
can delete them. We can delete it. Any
does. We can delete it. Tab, grab these faces, and select those here as
well, don't forget them. If you like you can grow
a selection one time, or you can ignore that. A select those XF
and delete them. Tab out, Hs excite
and there we go. L et's grub this one here and let's give
this above as well. Se like this, maybe, and
let's co the above to it, and then isolate this piece, and let's check the result. Let's give this auto
smooth. All right. We need to give
it a head smooth, right head smooth to kill
these jagged lines here. And I think it's ready. All right. Now, apply
the bevel modifier, tape the moth and
select these faces, and we can delete them at controls a couple times
to draw the selection. And then until you
reach this area, head x f to deleted, and you can keep the rest
tub out and les excite. Maybe we can delete
this phase as well. This one, I mean,
XF and deleted. That will be better, I think. That's very cool. What
about this one, Let's top. I think we can B this this
one and paste it right there. I think that will be faster. In this case, I
will select this. I will select this one. S and then bring the three
D coser over here, and then you can delete it. Select this and
hit D to the z and take Kob down and delete the
mirror. You don't need it. Select this one, right
click Set Oigin. Organ to geometry. Now we have the organ exactly
in the middle almost. After that, hit Shift S
and selection to cursor, and then just rotate
to the y axis, ry let's rotate this 90 degree, and then scale it, make it big and hit g to the
z and move it down. That's very cool. Scale it
back a bit. Make it smaller. And I think I can reduce the length alte tech
key to the z and take this down and move it
up, something like that. All right, Let's
see what's next. Let's give this vl. Hold have to grab this, Kobe vl from it. Select this, it's
like to isolate it, and let's check
what we got so far. Everything is okay, but
let's check the umetry. Here we have the big pace. We can divide it to two by selecting this
vertex with this one J, make connection between them. The same scenario
here. What else? Maybe here as well, we can
make some connection view like or we can ignore it
because it's small. Now let's check what's visible
and what's not visible. We have some phases
right here, not visible. We can go to the bottom of view and check it from
the bottom of view. Maybe we can cut some
pass if we like. For example, these phases right
here, we don't need them. We can cut them. You can tap
the mode, go to wire frame. You can use carver
tool if you prefer, or you can use knife tool. Let's make cut from
here and s maybe here, something like
this, or even here, you can do that, it
C to cut through, and then confirm the
cuts and then hit enter. Let's see what we've got so far. I like to isolate this top. I just made a mistake.
Let's go to the bottom. I should cut this one on
this side, not that side. Let's do that again, it
K. Ma cut goes like that. Hit C to cut. Left click and then enter. Now let's go to the face. Let select these faces. Even these phase right here. They hit F, let's see, is there any faces we can
delete or we delete them all. It seems like we
delete all the faces. One more thing here
we need to edit. We can grab these vertices, it key twice and slide
it over to the corner. Let's see if that's will
affect the bevel results. Give this auto smooth and
everything looks fine for me. We don't see any
problem over here. This face on this side,
we can delete it as well. XF tub out, H slash, and let's check the result. That's very cool. I have
these phase over here, we can delete them as well. But we need to apply the vl modifier before
we delete them, and you may ask why
I could do that. Because here, if I
delete this phase, I will lose this small curve
of the l. I will lose it. If I delete this
phase in the edit before I apply the l.
But if I apply the v, I can keep this curve and
delete the phase inside. Show you example.
Let's select this one, its slack to isolate it. For example, let's select
this phase and I will delete it in the edit mode
before I apply the level. As you can see here,
we have some care. Here. I will hit
XF to delete it. Now I lost this care. I lost it. If I hit slack to
excite, as you can see, maybe this bad example, we can crop this
phase to delete, XF. As you can see here, I
lost this small care. So it is good to keep it. As you can see, kick
the result here. The result here is very
nice here in this area. But there here, we
can't see any care. So if you have any
scenario like this, apply the bevel first and then after that,
delete the phase. I will let controls a couple time to bring
these phases back. For this one, I
can delete because the edge is not visible.
It's inside the body. But here we can see the edge. I will tab out hit control, I apply the blevel tab again. Now I have the ability
to select this one, hold control grab this, and select this, and hit xF to delete them
and now tab out, it select to excite. As you can see I still have the small care. What
about this one? Let's give it the same
level. Hold to grab this. COVID to select it. Let's
go to this geometry. It's like to isolate it. Check the result. Do
you have any problem? Do you need to make
any connection if you won't go ahead and do it? For example, maybe I can
make some connection goes like that and ends here, drop this with the CJ. I think that will be better. Everything looks cool. Let's see what's visible and
what's not visible. The phases over here
are not visible. I can delete them even
before apply the bl. The phases over
there from the top, we can delete them
before apply the bibble. But the phases here inside, we can delete them
after we apply the bobble to keep
the small care. It's like to isolate this, t to the mode, go to the pace. C up these phases. We don't need them, F,
this one, XF to delete it, and now let's and let's
see. Everything looks cool. All right. What about the rest. The rest of these,
we can delete them after I apply the
bubble. Control A. But before you apply,
just give this to smooth and then
control A. Tab, go to the face grub these faces. Cb this here, F, and now we just
ended with this one. Tap out it s, and check it. Everything looks
nice and beautiful. This is the idea. I
think you got now. Now let's see what
else we should pick. Here, we need to
make some tweaking. As you can see, I have
some overlapping. I will crab these two edges
and move them away like this. I will give those
above Holt have to crab this maybe.
We don't have vel. S this Holt to crab this. COB to select it,
select this one, auto smooth, and I
think that's it. You don't need to do
anything. You can't hit control I end up light. What about this one? Volt
to this, COVID selected. Isolate this alone. Kick it before you do anything. As you can see, we have some
artifacts. I don't know. Maybe we added a vel. Yeah, we added a
level for this one. I guess forget that. But we
have some is right here. We have double l, s. Controls it, controls it. Let's delete the second
one. And keep this. We still have small
problem right here. Let's see why that's happened. Almost Most of the time when
you see something like this, it's because of two
vertices very close. Activate auto me, kee wise mic, this one key wise mic. Let's kick the rest. It seems like we don't have
any problem anymore. That's very cool.
What about this one? We gave it a bevel?
I think we did. Yeah, we did. That's very cool. What about this?
I think we don't. Hold have to this one,
give it the same bevel. It's like to isolate this. The results, see the bevel. Add auto smooth first. And I think everything
looks smooth and nice. Now is the time to check what's visible and
what's not visible. We have some fases inside. We don't need them,
we can delete them, but we need to add an
edge here because we have a small area visible
from this shape tab, and let's see how
can we do that? I will add an edge right here. This edge will help
me to keep this. Maybe I can make some
connection between those. Or even I don't know, I can leave this phase.
You can keep it. L et's make some connection goes from here,
maybe ends there, and the same scenario
for the site K, and go to the select this phase
because we don't need it. We can't delete X.
It's not visible. It's like to excite. Let's check the humus again. Now we can delete this
phase over here, this one, select it hit X F
to delete it as very cool. All right. I will like to isolate this. If you delete a phase
like what I did here, you will not here. Livel will not behave
correctly in this area. So in this case, I will ignore this phase,
I will leave it. I mean, I will control
Z and bring this back to to give the vl chance
to work correctly. So I will keep this
one and I will apply the at control
A and apply it. And now let's see what's
visible and what's not visible. All right. All of the phases right here,
almost not visible. Or I think they are visible because we can see yes
a little bit from them. In this case, you can do something if you like
or you can ignore it. Let's isolate this, Ta Edmund, you can hit control r to add
one a here in the middle, and you can hit control the
two aval it to two like this, and just delete the middle
area if you prefer. Or you can leave it like
that. It's not a hug. For me, I will cancel the
e here that I added and I will keep it like this.
It will be enough for me. Now is the time to
give this aboval, Hold Hall geometry with abvl, and COVID selected, and now
we add the abovl right here. It's to isolate this one. Take a look, check the
area, check everything. Try to find any artifacts
here, any bad heading. It seems like we don't. Maybe we need to add some edges, as you can see, this
one is very big face. Maybe we can add a
cut goes like that, and the cut goes like
that. That will be better. Go to the edges, cut this vertex with this vertex
hit, make connection, this with this J,
this with this J, don't worry about the other side because we have mirror
modifier added. Maybe the same
skinner for the side, equal of those it K or maybe
you can delete this site. I think we can delete
the side. I don't know. Ms are quite here. No, we don't. All right. Let's make some
connection over here, it K. And between those as well, maybe those here as well, it K. Hit K That's very cool. All right. Let's see now
what we can do here. All right. Before I do
that, I think I will end this video and see you next because I don't
want this video to be log. I will end it now and
see you on the next one.
62. 062 Modeling section Adding Bevel modifier part 6: Hello, again, welcome back. We did it finish here.
Let's complete this metre. Let's select this one.
I think this one. And let's check the bibble. I think we gave it a bubble, or maybe we added
bibble for this one. Yeah, that's right for this one. Now let's see what
faces we can delete and what phases we
can keep. All right. I think now we need
to apply the bible, modifier first before
we do anything. We don't have any
problem with the humory. Everything is okay.
That's very cool. That's mean now I can
apply the Modifiers. Let's apply the bible, and I think we can apply the bible and
leave the Mor Modifier. We have some phases
here are not visible. We can delete. So let's do that. It's too this, tap the mood. Let's see if we can
add the ac right here. Something like this.
Maybe we can move it up just a little bit k
twice and take this up. And L et's see what
else we could do. Let's make a cut maybe goes
from here and end there and confirm it and maybe another cut could go here and maybe could
reach this area. I'm going to to wide that because this area is
visible and I can see it. That's me, I need to keep these faces and I need
to delete the rest. Now you can delete
this big face. Gob those faces. Mine like this. After that hit X F and
kick the result again. Is there any problem? It seems like we don't have any problem. That's very cool.
Something weird happened here. I don't
know what it is. I think we delete this pa
and we couldn't do that. He to isolate this. Hold control and
deselect this one. We don't need to delete it. F, and that's it. Let's slash again and let's
check the results. Everything looks fine. Now let's give Bivl
to this geometry. Okay tub out select this. This geometry and select
anyone with the il, maybe this one, hold F to this, and B two selected. Now Hs to isolate this geometry, and let's check the
results. All right. No try to find any artifacts if we have
any artifacts right here. For me, everything looks
nice and beautiful, or I think we got one artifact
right here in this area, and let's try to find
out why that's happened. We have double vertices here, get wise, activate atomerg,
and marge it over here. This one, as well, maybe we can make a connection
between those. Thats will be better, and we
have a huge face over here. All right. It's
okay to leave it. All right. Now let's see what's visible and what's
not visible here. All right. Now I
can apply the bevel because I don't see
any problem here. Control A and apply it. Now I can isolate
this geometry again, and I can see x some faces, go to the face, manually,
grab these faces. Even those here,
it's like to excite and check if you can see
these faces. All right. That's me, you have the green light to
delete these phases. Isolate this geometry again, X F and delete them,
and that's it. That's very cool. What
about this one here? Hold you have to up
cometry with the ble, b be Bible to select it. That's very cool,
select this one. Isolate this and let's
see the results. We don't have ble over here. That's mean we can take the
angle down just a little bit, so we can have a
ible on this edge, and maybe this one
as Maybe we can reduce the number 215, maybe. Everything is still nice? We don't have any problem here. All right. That's
very cool. We have something weird over here. Let's see why that's happened. Let's go to the mode first, and maybe we need to
delete this phase, XF and grab these vertices, and let's see what's
going on here. All right, we don't
have any problem. Let's make some connection
between those G and maybe with those to avoid any problem if we want to explore this
out to any other software. Maybe we can make some
connection between them, and I think that's it. All right. Now let's apply the bevel modifier because
I don't see any artifacts. Everything looks nice. That's mean I can accept
this result. That's okay. Control I and aight
tab, go to the face, select these faces, and these
faces over here as well. I think we can delete them. Let's like to excite and see if you can see these faces or not. You can see them. That's
me you can delete them. Let's select those here as well. What about these faces here? Let's see. If we can
see them, no, we can't. That's, we can
delete them as well. Even those maybe we
can delete them. What about those grab them
like that and excite. We still can't see nothing. After that, hit F to
delete all of these. Sometimes you miss
some faces here, you can grab them in the wireframe and delete
them as well. Now we left it with this
metr that's beautiful. That will make the
rubbing process very easier for us after that. All right. Maybe we
can start with those. Let's select this umetry
hold, he taker disk. Or before we do that,
I think we have some bulion modifier
doesn't apply here. They are not going to
affect anything if you delete them because
we apply the proc if you remember when
we used the b tool. I'm going to control. I apply vecal umetry
to and that's it. After that at Bevel to this, and select this umetry alone, as you can see, we
have a mass here. We need to make some cleanup. Tap the Ith mode and try to
find out why that's happened. Maybe for this area, we can make some
connection here to fix it. As you can see, we fix
this, ma connection here, to fix this area as well, and maybe make some connection
over here, what else? Here we have very
close varieties get wise and mem like that. The same scenario here, get wise and mic those. And here as well, Merri those. Mark this one. All right. This side as well, get
is get y is married. Get is married here. Let's make some connection
between those G s. Maybe this one with this
one G. And maybe there. Or maybe I can delete
all of these phases, by the way. Just keep
that in your mind. Tab out, and now let's see.
Do we have any problem? Control, apply the
scale, kick the scale. Alright everything looks cool. That's mean now I
have the green light to apply the level. Apply it like this, and
you can now tap to move, go to the face, I
click or manually. You can grab these faces. You can hit C to activate
the circle select and just let the click and move the mouse to select
all of these faces. Like that. Hrolick
to deactivate it and His to exite and see the
results. Can you delete those? Yeah, we can delete them. We don't have any problem. So X F and done. What about these
phases? I'll click X F and delete them as well. We don't need them. Now we still have this small curve
and that's something fine. All right, select
this geometry hold, have to grub this, give
it bevel modifier. Like to isolate this
geometry alone, and let's see what's
going on here. We need to make some fixing
here, go to the vertices. Here, we got very close
vertices causing some problem, Mrge them like this,
Mrge this one as well. Mg this one here,
get wise, er it. Make sure to activate
automot very important. Get wise, mark this. Kat wise, make those
the same scenery here, eat wise, and katie,
the same thing here. That's very cool. And what else we could do here? Tab out. We have some problem over here, tab and let's see
how can we fix it? We can use knife tool
and make cut like this, confirm it and move
this vertex a little bit away from the
vl area from here. All right. What else? See do we have any
other problems here? Tub out and Kia. We have a problem over here. The same scenario, use NF tool, M c goes from here to here, and move this one key
tie and move it away. The same scenario here, we have this line goes
diagonal like this. We have very sharp angle. That's mean we can kang the
direction of this line. For example, we can
make connection over here, will be better. For this one, we can
hit control X and dissolve it and
leave it like this. Maybe if we want, we can make
some connection like this. T will be better.
What about this one? Can troll x and dissolve
it and this one as well. Or I think we can
hit K to make a cut goes like that and delete this one and hit K to
make cut goes like this. And maybe I can slide this
wise and slide it like this. All right. Do we have
anything else here? Seems we don't have any problem. And now we can apply
bevel modifier, I think. So, let's do it. If you like here as you can
see, we have some artifact. I I mean heading problem. If you want to fix this, you can go for example to the front. Tap the Emo would go
to the wireframe, hit K to make a use NF
tool and hit a to make the ct hit C s to cut and then left to click to
confirm and then enter. That will help ale bit to reduce the length of
the heading problem. Now the problem just
surrounded here in this area. If you like, you can do this. All right, that's very cool. Now, I think I missed
this key wise, Margot. Now it's clean. Control, I apply the level, go to the head seat, and let's select these faces. Using the circle selection. Those I don't want
them because they are not visible to
the camera, XF. What about those over
here? Like to excite. I think we can
delete nothing else. Yeah, I will keep the rest. That's it for this geometry, now it's become ready tab
out, and now as you can see, we don't have the faces
over here inside, but we have no problem, and we still have
the level here. It's very cool. What
about this geometry? The cylinders, we don't
need to give them above, but if you prefer, you can grab them, it's like to isolate them and tap
to it, go to the face. You can delete these faces actually because you
don't need them. X F and delete them and tap out control J, make
them one piece. That's will be better for
you. What about those here? Let's give one of
them above modifier. Let's give this a Bible,
maybe from this one. COVID is selected, and
let's isolate this umetry. It's very clean. We don't need to do
anything actually. Let's grub the rest, hold shift to grab this one, and let's give
them bile as well. If you like, you can control
j to make them one piece. It's very ok to do that. Yeah, that's it. We don't
need to do anything. If you like you can apply Bible or you can apply it later. I can't control A and
apply it, by the way, I can merge Those together if you prefer
or you can leave them. Okay. Let's give this one. Above hold if tab maybe
this COVID to selected. And now let's check if we
have any problem over here. We need to get rid
of these lines right cal head smooth,
and that's it. All modifier, work fine here. We don't see any problem. Anything is cool, exits, and let's give those
above as well. COVID to selected. And
everything looks okay. I think we can delete
this phase right here, control I apply the veal
tab, go to the face, grab this face and this x
F deleted, from this side, it's very important to
make some connection between those to make this face a little bit
smaller or maybe divide it. I mean, maybe we can add a cut goes like that.
That's will be enough. Maybe another cut
goes from here, maybe to here, and maybe
from here, maybe to here. Add some lines.
Avoid any problem. Then confirm them. That's. It's like to
excite. That's very cool. What about this one?
It's like to isolate it. Tab. Let's see, can
we do anything here? It seems like we don't
need to do anything. Unless we make some
connection here, maybe here. It's very simple
and here as well. On the other side as well, it and here as well
and here as well. I'm not going to
delete any phase right here for this one. T. Tab out to grab this one. We need to give
this shade smooth. And maybe for this geometry, we can delete the site after
we apply the vl modifier. We don't have any
problem with the v. Tab, go to the face, grab these face, X F, go to the site, make some connection to
avoid any future problem. H K, maybe here, J. By the way, I'm
doing that randomly. There's no rule about this. Make some connection. That's it. Maybe small cuts here. Maybe small cut over
here, that's well do it. Tab out. That's very cool. Let's give bl to this, hold epic up this one,
COVID to select it. Isolate this human tree. Let's see what's visible?
What's not visible? Well, this phase is not visible, XF, we don't need it. Tab out s, and do we need
to reduce the length? This seems like we don't. One more thing here.
This phase over here, we can delete it if we need. Yeah, I will apply the vel. Tab, go to this face
x f to delete it, tab out, and everything is okay. That's very cool. If you want
to give this sphere above, it's okay, you can give it. If you don't, you can ignore it. I think I will give
it a bevel modifier. Let's give it a vel
modifier because I just need to target sorry, just need to target this area. But I will got a lot
of artifacts here. In this case, if you want
to fix this in a quick way, we can try the marriage. Go to the vertices A, hit M and merge by distance and check the result. All right. I emerge any close vertices, and that's helped a little
bit to fix the problem. All right. Let's reduce
the number 20.01. I think we can
reduce step by step. Let's add 0.0 maybe five. 0.05 is a tub out, and we got some
weird problem here. I will canter it. Well, I think we need
to do that manually. Keep wise and merge. All right. Kit is I marriage.
The same thing here. And here as well. Here as well. And here. All right. That's will do it
for the sphere. Control I apply the
bubble slash site. All right, so we don't we just have a few of these human tries to
finish the bubble section. By the way, I just
need to remind you, you don't need to watch
all of these lectures, because I will repeat
that again and again, but I can skip that if I want, but I don't want to skip because some students
don't like that. They want me to do
everything step by step, and I will do that. But if you don't need to watch
all of these videos about adding Biv because it's
become very simple. I just repeated that
again and again. You can skip that and go to
the next step if you like. But for me, I will
finish everything. I will end this video and
see you in the next one.
63. 063 Modeling section Adding Bevel modifier part 7: Hello again, welcome back. Let's see what's
next we should do. We didn't gave this bevel
modifier. Let's give it one. Let's take it from this umetre, and COVID to selected. Isolate this umetre. Let's check it. Tape mood? Maybe we can make some
connection over here because we have very
giant face here. Let's divide it, it J, maybe here as well it, and maybe here, and
here, maybe one here. What else? I think that's it. What about the other
side? The same scenario. Okay. And one here. That's very cool. All right. We don't see any problem
with V. That's mean, yeah we can apply. So sorry, before you apply, I forget to add auto
smooth and then applies. All right. Now let's see what's visible and what's
not visible here. Can we delete some pases? We have this area, we can
delete I go to the left view. I can see how much
this goes deep inside, and I can delete this area by using maybe carver
if you prefer. In this case, I will tap the, go to wire frame
and use tool and I will make cuts like
that, H C to cut. Left to click and
enter to confirm. After that, grab these vertices. H F to delete those because they are
not visible as I think. Or I think it's
visible from here. That's mean we can
bring those back, and you can keep this
lines. Okay, to keep it. But from the top, we can leave these faces here. Let make sure that's
nothing visible here. Now hit F to delete those. And even this face right here, what we can do is we can make a connection
goes like that. From this side, use knife tool, and make cuts goes like this, and you can grab
these faces at x F. I think we can delete them and these
vertices over here, and the wire frame would grab
them F. No, that's right. You can delete those.
It's not a problem. What about this phase over here? You can delete, I
think these faces. Maybe the faces over here
and here and there as well. Let's do that. It's
like to isolate this geometry and
tap to the mode, go to the faces, grab
these faces with control. It's let's kick. Is there anything visible?
No, we don't have. Hit F to delete them. I guess deleted these faces. Even those here, I
can delete them. All right. What
else I can delete? These faces, I could
leave them because I have a little bit of
faces visible here. I can delete them. Or if
I want, I can do that. I can add one age right here in the middle and bev it and
delete the middle area, but that's not worth
it. I will ignore it. Let's give Bible to this metre. All right, COVID selected, and isolate this umetre, see what you can do here. Maybe we can make
some connection with knife tool hit K and
make some cut goes over here, maybe and grab
this with this hit K. And maybe this
one with this one, I think you can make
connection or you can manually use kn tool and
cut one cut right here, one cut over here and there. And here you can make connection using gay,
and here as well. After that, try to find
if we have any artifacts, if we don't go ahead and
apply bevel modifier. Let's see what faces
we can delete here. We can delete these faces on this side and this
side and the side. I think. Let's do that and let's see
what's going to happen. Tab, go to the face Grab these faces. Hold have to grab
those and this one, F to delete, tub out. Yeah. We can delete
them, and it's okay. Grab this umetry, hold, take a bevel maybe
from this one, CBI to select it and isolate it, give this head smooth. We don't have any artifacts. Control, I apply the
bevel modifier here. Tab, go to the fast click to
grab this entire face loop, XF to delete it because we
don't need all of these faces. What's the next maybe this one? This geometry hold
here to grab this, give it Bible, select it alone and see if we
have any problem here. We need to give it auto
smooth and tattoo. Let's see, do we need to
make some connection? Maybe I can make
some cuts goes over here like this. And one here. All right. Maybe with this
vertex with this one, K. Maybe those over here, make connection, and what else maybe some cut
goes over here. All right. Tub out. I think we need to make
another cut goes like this, and one goes like this. All right. We don't have
any problem with Buble. Maybe here, I can
see something weird. We have double vertices, wise and merges. That's it. Or if you want to
make sure that you don't have a station like this, just hit a select everything
hit M and merge by distance. We have one vertex removed. I don't know where is
it, but planer fines. Tab out control, I
apply vl and tab. I think this giant
phase we don't need it, selected and les exact and let's see, that's right,
we don't need it. I think this phase it's the only phase that
we can delete, and we have one
problem here and here, and I think I will control
a couple of times to bring back Bv modifier because Bival
doesn't target this age. And this age as well. So I'm going to take
the angle to 15 at enter or maybe 12
because this one, I needed to be targeted as well. And I think I just
targeted all the edges. And now I don't
have any problem. You can disaplay a
wire frame and kick. If you see anythin
line like this one, that's been vel
doesn't apply here. It should not apply here
because this face is flat. But I talk about the corners. Everything looks fine. Turn off wire frame control A. Apply bevel modifier. Tab, go to the face,
equ this face with this face XF, deleted, and site. That's it. Or I just need to mention something
before you delete this one. Need to tell you something here. Isolate this geometry. When you select those, you can
grow the selection control plus twice to select those here as well because
you don't need them, XF. That will be better. Tab out. And what's the next geometry? Maybe this one hold if and
scope level from here. COVID selected, and it's like
to isolate this geometry. You can activate wire frame
to kick the result here. I think we can make
some connection from this vertex to this one, g. And what else these
phases, you can ignore them. You don't need to make
a. Maybe what else? Maybe from here, sorry, K, may cut like that, maybe. On the other side, K
may cut like this. I have one extra vertex
right here, twice merged. Okay. Maybe we can
connect those. Ok to connect them.
From this side, I can crab this with this it K. Maybe a cat goes like
this, even here. It's not a is if you ignore
something like this, but I need to make sure that
I don't have any problem. J makes some connection over
here, and here as well. Let's make some connection. As I said, I doing that because I don't want to see any problem if I explore
this to another software. These edges, we don't need them, control and here as well. Something weird having
here. All right. What we have here are no
control X and dissolved. Do we have double
vertices here or what? All right. Grab this. Tab out, turn off wire frame. We need to give
this auto smooth. It seems like that
everything works fine. Here, we have something weird. I don't know what's
happened here, but something not good. Tab out. We have bad hanging haben here. In this case, to avoid
something like that, you can tab and go to face, you can grab those hit
XF to delete them, and go ah click to select
this entire He dub after you switch to H and
then hit F to fill this area. If you like you can do that. This egg in the middle, you
can delete it if you prefer, control x and dissolve it. Do we need to do
anything else here? It seems like we don't. Now we can apply vel, and now we can delete the
faces that we don't see. We have some phases,
we can't see them. We will delete them. I think these phases
just the top area, go to phase moo select this, grow the sel two time
contro plus control plus, and hit x f to delete those, and that's will be enough. Maybe I don't know,
but maybe this phase, we can delete as we.
This one over here. Control plastic
selection, and again, maybe X F. Yeah, that's right. I can do it. It's not going to
cause any problem. Well, that's been, we
finished with this geometry. Let's select this one,
hold hept grub which one? Grab this geometry,
COB to selected, C v to selected. Well, that's weird.
Sorry, we gave it. Sorry. I mean, this one hold Ht
grab this. COB to selected. Grab this new geometry, give this auto smooth and
try to find any artifacts, apply the scale in case we
have a problem with the scale, it seems like we don't
have any problem. We can accept this
result, I think. Control, apply the bibble. Kick if you can delete any
faces here. All right. I think we can delete
these faces on these sides and from
the top as well. Slack to isolate this
sp the mod go to face, grab these faces and
select those over here as well. Let's see. Yeah, it's just a little
bit visible this area. Well, that's been I don't know, but maybe I can make
some tweaking over here, or maybe can ignore these
faces on that side. All right. Well, in this case, I don't know, but I think I will ignore this face on the
side and target the top. But let's try to see what's the suitable
thing to do here. All right. Well, I will keep these faces
and I will target the top and the grad
selection twice, control plus, control plus, x f to delete the
top and that's it. That's will be a forming. We gave this bevel modifier. I remember, it's a time to give this one vel modifier hold
shift and the scrub this, COB to select it. Is like to isolate it. I can see that we
have artifacts right here because we have very
close vertices in this area. Get wise mir this, Get wise mark this. Maybe we can make
some cuts using, M cut like that, and
like this as well. Auto smooth That's very cool. I think now we are ready
to apply vel alight, or before we alight, C can delete any phase
before we apply vel. We can delete the top area and maybe these phases over here, this one and this one. Isolate this geometry tab
and select these faces, and those over here hit X F tab out and let's
check the results. Do we have any problem? All right, we can see
something from this area. But I think this is
not a huge issue. Yeah, I will accept this results control and apply the scale. What about this metre? Let's be v from here, and isolate this umetry, tap to the mode. Let's make some cuts goes
over here, for example. All right. And we'll
see what we have here. We have these vertices are
not connected to anything. Yes merge them. It
will be better. On this side as well
merge them like that. Give those auto smooth. Do we have any
problems right here? This one vertex, we
don't need it Mr, move it away over here, make some clean up here. Key twice and mark
these vertices. The top phases, we
don't need them, x F. And what about the rest? You can apply the bevel
modifier after you kick, the results this area
doesn't catch any bevel. So let's reduce the
number of of angle. Let's take it to I don't know, maybe ten and tritically hit the smooth to make this
smooth. That's very cool. Now we can see some vel
over here. That's cool. Apply bevel modifier, and maybe these phases on this
side, we can delete them. And what else What else? What else? All right. Hits to isolate this
umetry tab, go to face, grab these faces over here, and maybe those over here, and maybe those
we can grab them. And and even those here. Hits and kick if these
faces visible or not. Can we delete them or not? It seems like yeah, we can delete them because
they are not visible. After you selecting these faces, gas hit F to delete them. We still have some fases right
here. Manually grab them. Tick this area. We don't. One more thing here, we can
fix it from the bottom view. If you go to the bottom,
go to wire frame, you can grab those and just scale them inside a
little bit like this. We don't need to see
any overlapping. All right. Before because we made some scaling auto
merge these vertices, I'm going to turn this off. Before I turn this off, I just need to see the
number 0.1 is too much. I will add 0.01. This is the threshold
of the auto merge. Grab those again hit S
and scale them at bits. Something like this at
work. And that's very nice. This geometry, we didn't
give it any the ball, but I think I will com
believe the rest this one. I will give it the ball
in the next lecture. All right. So that's mean I will end this video and see
you in the next one.
64. 064 Modeling section Adding Bevel modifier part 8: Hello again, and welcome back. Let's give Bible
to this geometry. Let's go vl maybe from this one, let to crop this and
Kob to selected. Select this, tetra this. Kob Bl to selected. Select this geometry, and let's check the result of Bivle. Tab and let's see
what we can do here. I think we can make some connection between
these vertices. All right. And this
side, we don't need it. X F, it's okay to delete it. Maybe we can make some
cuts go like this. All right. What's visible
and what's not visible? I think I will keep all the faces and just delete
the top and I did that. After that, I can give this
auto smooth and apply Bible, and that's it. I'm right. Well, before I do that, sorry, I think I will reduce the angle to give the bevel to
this age as well. All right. That's very cool. That's me now it's
ready. I can apply. What about this geometry? Hold it and do we have
any bubble right here? I can do something right here. I can f d and COVID
geometry right here to keep the close and I
can take a bubble from it. I think we gave this able. Sorry. I think we gave it abi. Yeah, we gave this able. This one, we didn't hold to cut up this and COVID selected. Okay. And let's
check the results. Give this auto smooth first, reduce the number of
the angle to maybe 15. All the ge is now
received a bevel, and that's what I want. Tab go to the top area here, XF to delete this face. We don't need it. Is there anything else? We
don't need it? Yeah. After you apply bevel, you can tab and you can
grab these faces here. You can delete them XF. And now check the result. Everything is still
clean and nice. What about this one? Did we
gave it a bubble? We don't. We can co be the
umetry from here, have d to the y and
we can replace those. Grab this. H to bring the three dcsor right
here and delete it, grab this, have the Scorso
to select it and replace it. Move this up a little bit
right here and that's do it. What's next? Maybe this one, maybe
we can coeval from this geometry and
C to select it. Select this geometry and let's see what we
can do with it. All right. It's very tall. I think we can divide it to two. I don't know, but I think
that will be better. L et's make a cut goes from
here from this vertex. We have or Modifier. All right tub out,
apply the Mormdifier. Turn of vel fur now tub, grab this vertex with this one K. Just make some
connection between them. On this side as well, let's make some connection
between them. K. Those over here as well, let's make some
connection between them. And here it J. That's very cool. And I will select these faces, sorry and hit P S
to separate them. I don't want this
geometry to be tall. I will add phase
over here hit F, and phase over here
hit F. For those here, it's like to isolate them and It click hit F and here as well, It click hit F to
create a phase. Now we can activate
the all for this one. Is to isolate this. Let's check the results.
Do we have any problem? The Val doesn't target this H, we can reduce the number, take this back. Add auto smooth. Everything looks nice, I think. On this side and on
this side as well, we don't see any problem. Well, let's mean
we can apply vel. But before that, I will
select these faces, and those over here
hit XF to delete them. And let's see what's
not visible. All right. I will apply the
above, control A. Again, I can delete this phase here right
here and right here, and the same scenario
for the side. It's Tab eight select
this fase here, and this one over here
maybe. Even those. I think we can
select them as well, and the same thing for the side, grab and even those right here. Before you delete
them, just exit and see kick the results. Make sure that you can
really delete them. Yeah, you can even
those over here, you can delete them
as well, by the way. Isolate those again
at these faces as well to the group. Let's see. That's very cool and maybe the same scenario for the site, we can hold heft and
at those here as well. K? Am right? Yeah. Now I can hit x F and
dele them. Very cool. What about this geometry or
maybe this one in the middle? We didn't activated
the Bival for this? Let's activate the bival
let's see the result. We don't have mac here to do, delete these phases from the top and that's
will be enough. Apply the biv, but
before that add auto smooth control I applies, and maybe you can delete this pa and this phase over here, F to delete the top, and I think that will be okay. What about the shapes here. Let's give them a co from this. Isolate these geometries and kick if you have any problem, just add auto smooth. We don't see any problem, Cro apply, tap to the mood. Maybe now we can
select this space, Ctrol plus couple time to
grow the selection over here and XF to delete
the rest and excite. Yeah, it's very cool and nice. Nice. What about
this one right here, hold you have to grab this, Cobble to select it. Select this geometry,
try to check it. Do we have any problem?
We need to give it at to smooth, now
it's become okay. All right apply ubl and see what's visible,
what's not visible? All right, go to f grab
these faces over here, and you can delete them. I think. XF tub out,
and, that's right. What next, maybe this one? I shift let's move those
just a little bit forward. By the way, this geometry,
I will delete later, but I just wanted to be close
to take a bubble from it. Sorry. Well, we don't need
Momi fire. We just need bevel. Anyway, slate this geometry, hold here to grab this
by bevel to select it. After that, isolate
this geometry and g it, give this auto smooth first. This e doesn't
receive any bevel, reduce the number of bevel to
maybe 15. That's very nice. Tab. Maybe we can make
some connection after you apply the mirror
control A and apight. Let's make some
connection here between those and what else? Do we need to make
connection area? It's okay to do that.
Maybe here as well. This phase giant phase,
we don't need it, F. What about the rest? What's visible and
what's not visible here. Well, this phase
right here is not visible and I can't
keep the rest. Maybe this phase over here, we can delete it as well. So stick to isolate
this apply val tab, go to this phase the
glob those over here, hold here to grab
those x F, tap out, and by the way, you can, sorry, can it can tools. I need to mention something, delete those first, XF,
and go to the side, C and just scroll
the selection twice, and just delete those as well, xF because they are
not visible as well. That's very nice. Let's
give veal to this, hold you have to grab this one, C to select it. We can see that we have
some artifacts right here. Give this auto smooth
first. We already did that. Here we have very close, control x and dissolve this one and control x
to dissolve this age as This goes the wrong way. We need to grab this vertex with this one and it key wise
and slide it like this. That's will fix and
make the level work correctly as you can see
this before and this after, put your eye on this area
here. And this after. Well. Maybe we can merge them. Wise and merge them over there. Automrg of activated, wise
and merge it over here. Let's make some connection
between those if you prefer K. We have
some artifact maybe, very close edges, c hold to cb this control
x and dissolve them. Here we can see that we
have some artifact as we, Merge those over here and maybe the same
thing for the sit. And I think I don't know. Do we need to do anything else? Yeah, maybe because we have big face right
here as you can see. So make some connection
goes like that. And for this side, you can use the J tool, make some connection with them. Use tool, M cut gos over
there, and for this side, cub this with this
hit J. Anything else. Maybe we still have a
big face right here. Go to knife tool again, Ma cut goes like this. Cut goes like that, and grab this it g. This egg, we don't need it, control. Maybe we can make some goes like that as well
and grab this with this G. Maybe another cut goes maybe like this and for the other side,
the same scenario. I think now it's become ready. Let's see what's visible and
what's not visible here. The top faces, we can
delete them, I think, not all of them
because I can see something here, this area. Let's tap to the edit
mode, go to face, and let's select these faces, and those over here as well. And even those here had XF to delete them and let's excite, tab out and let's
check the result. Everything is still nice. We don't have any problem. And we can accept this result. C v from this
geometry to this one. Grab this hole, you
have to grab this one, COB to select it. Select this geometry and check it before you
do anything else. Give this auto smooth. We can see that we have some
overlapping here because of the vivle amount if you
activate wire frame. Think we can see some overlap
here, something weird. Let's see how can
we fix this issue. Well, in this case, after you apply the val, sorry, activate it, you can reduce the number for
this one specifically. I'm going to change the
bival amount to 0.01, or that's 0.05 or 0.06. 0.06 is okay for me. Let's check the rest. Maybe I can make
some cuts goes like this and the same scenario
for the other side. Because you have mermi fire, don't worry about
the other side. All right. Apply
mirror mitifier, and now you can apply the bevel, I think, and you can delete
some faces if you prefer. Let's delete this
one in the middle. I'll click control
X, dissolve it. I'll click over here to select the entire face lop XF tab out, slide, and there we go. Add to this geometry,
hold here to this. C to select it, select
this geometry alone, isolate it, check the result. A artifacts, add auto smooth, sorry and check the geometry. Let's see what phases
we can delete. I will make some
tweaking over here. I will take those
inside to delete this phase here. Hide this. And I think we can
delete this phase alone. Let's like to
isolate this umetry. Tab, go to the pace, g these faces over here. All you can do that
after apply the vel apply tab, C these pass. You can grow the sle
control plus twice and then hit xF to delete
those, and now it's ready. That's it. L et's add
the volt to this umetry. Hold may be crop this one. Cobe to selected. Select the eumetr
sect to isolate it. Take a look, kick the results. Here we have very big phase. We need to add more
connecting here. Add some cuts, goes like that. Maybe one cat goes right here. O cat maybe it goes right here. We cat maybe right there, and one over here. Maybe one over here. I enter to confirm that. That's it, I think. Now you can apply the l and kick what's,
what's not visible. Well, I think I should keep everything except this
phase right here, we can delete it to gross
section control plus twice, F, tap out, that's very cool. Well, add vl to this
geometry, hold to this, COVI vl from it. Kick it. Do you have any problem? No, we don't apply vl apply mirror. What about this geometry?
Did we give it the vl? Yeah, we did. That's very cool. This one right here,
hold have to cru this, give it a bevel modifier. Isolate this geometry
alone, kick it. I can't see any problem. But I have one acre right here. I need to bring this bag, reduce the number of the
bevel 215 maybe. That's will be enough. That's
very cool. Apply bevel. We don't need any Bovell. What phases I can
delete from the bag, I think we can delete. This phase, this phase, can row plus twice, grow the scion to target
these phases as well, x F to delete them,
and that's it. Anything else? Maybe we
can do something here, like make connection from
this vertex to this vertex, and delete this
phase right here. I think XF tab out. Well, I think that's
wrong because I have some gap right here. I will cancel that and
bring that phase back. Well, let's add val to
this geometry as well. Hold you have to grab this. B to select it. Select this
umetry, to isolate it. Give this auto smooth tab check. Do we have any problem? Y, we have this edge. It's not correct to
leave it like this. Make a cut goes like that. C this, control,
x to dissolve it. It will be better. On this side, the same scenario, hit K. Make a cut goes like that. Ctrol, x to dissolve this edge. Try to find if you have any
problem, any artifacts. It seems like we don't
have any artifacts. Well, that's mean we can apply bevel modifier.
That's very cool. Some Hes doesn't catch any bevel or reduce
the angle of to 15, and now they have a bail. Control, I apply it, this stuff, grab them, hold have to grab maybe
this geotre, curb from it. Isolate those, see what
you want to do here. Well, before I apply the, these phases in the back,
we don't need them. We go to the left, go to
the phase, wire frame, e maybe so tool and
select these phases. X F to delete them.
You don't need them. And even these faces in
these faces at the side, you can grab them as well. Hold you have to grab these
faces on the side as well. And then hit F, and let's tub out, and let's exit and let's check the result. Activate ble, see the results. Give this auto smooth. Yeah. We have a nice
veble over here. Now you can hit control and
appight, if you prefer. I think we almost finish here. This geometry, we don't need it. We cove it as a helper,
and now it's done. All right. Did we
give this above? All right. We don't
give this above. So I guess forget this whole maybe above
from this humanitre, COVI to select it,
isolate this metre. I mean, this one alone. Give this s, the smooth, and Tab, maybe you can apply
the bevel modifier first. Tap to the mood go to face, grab these faces at the top, grow the selection until
you reach this area. XF and delete the hits slack
to excite. Anything else? I think we finished here. And when we reach
the rubbing section, we need to rub all
of these pieces. And for any reason,
if we forget to add any bubble for any
geometry exist here, we will give it a bubble. But I will end this video here and see
you in the next one.
65. 065 Modeling section Starting with the front legs part 1: Hello again, and
welcome back here. Okay, now is the time
to create the xs. Let's see what
images we have here. First, let's go
to the left view, and let's see if we need
to replace this image. I think we need to replace
it with another image. Tumble around here, go to
the orthographic. All right. So this is the
image of the left. I'm going to add another image. We need to add left. No body left, left. Let's see where is it.
Front this one, left. Just replace it like this. And now we can see the legs
and the wings as well. Let's check the front
in the front view, I can see the legs in the back
view, I can see the legs. And the right view. I think you can ignore
the right view. Depend on the left.
That would be enough. What about the bottom? At the bottom, I
can see the legs. And I don't know, check
the top. All right. In the top area, if you like, you can add the top top B&G, click and drag and
add right there. Sorry, delete this. Just
make a mistake here. All right. Let's
go to the folder. Grab the top and replace
it there and there we go. W, that's very cool.
Now we are ready to go. Let's bring the
reference images, and let's take a look to the legs and let's see
from where we can start. Maybe we can start
with the front legs. We have some details
here. We can see. All right. What
else we have here? I think we need to add
more images here to understand what's
going on over there. Let's try to create anything. Let's see, can we do that? First, before you
start doing that, you remember when I created the collection
body bottom parts, I think now I will select all the geometry that
I created recently, and I will put them inside
the body bottom bar. And now you have the ability to hide or unhide all of these. And those here as well, let's grab them,
deisel like this. And let's try to let's hit and move them to body
bottom parts as well. Sorry, the body should
be in the collection. All right. Now I can hide
and hide these parts. Lets see what else
we can do here. Let's go to the
left and let's hid these details and try
to create the legs. All right. I have this image, can show me a little
bit of details here. What's going on over there, and I can use it to
create these details. I think we can start with a. We can add a cube right
here to track the stuff. So let's see where the three
decosor is over there. Let's see, do we have any
Mt here in the middle. Or don't worry, even if if the empty is
not in the middle. It's not an issue.
You can put the empty right here and add cube. And let's put this
cube right over here, and let's start from this point. Tap the mode and
go to wire frame, and let's go back to box select. And let's move this vertices
over here, maybe right. And maybe we can grab those hit key and let's
move those over here. Hit e to make another
extrusion over here. Maybe those I can move them
a little bit like that. Or let's see what
else we can do here. And let's select these
vertices over here, head key to the Z and
let's move those up here. Maybe we can start from here. And let's grab
these for vertices. I mean, this phase, it
and let's extrude it over here. All right. And maybe we can extrude
this right here, and maybe we can leave
it at this point or we can make another ext
maybe here, this area. Grab those it to the Z and
let's move those up here. Let's go to the bottom view, and let's see what
we can do there. The body, we don't need
it, we can hide it. Go to the wire frame and let's
start with these vertices, the grub them, hit
key, and move them. Put those, for example here, and the grab those hit key, and let's move those
over here. All right. Now we got this shape. I will add one
here in the middle here and hit control to
Bv it to two like this. And I will select this edge
over here and that one, hit ke to the Z, and let's move this down just a
little bit like this. Let's go to the left view and
let's make some comparison. I think we need to move it
down just a little bit. Alright, now I got this result, similar to the result that I got right here in this area here. All right, let's see what
else we can do here. We have a cut in this area, and what else we
have a cut here. We got some editing
we need to achieve. By the way, these
edges as well key to the Z and hold control
and snap them, but make sure to activate
vertex s to snab it correctly. Let's go to the left again, and let's hit control r to
add one edge right here. As to the z zero, enter to make the edge flat, control be maybe to pv this, let's pval it like that. Crab these vertices,
hit E to extrude, and S to the z and scale those down just a
little bit like that. There we go. W. All right, now tab out. And
let's select this face. Heft and let's bring the
three D coosor over here. Tab out, H A, and
let's add the cube. I will use this cube as actor. So let's kill it like that, and the scale is just a
little bit like this. G to the Z, and let's
move this b over here. And can apply the scale, tab and let's go this
edge and that edge, can and let's pivot
it like this. E to this, let's move this inside, yes, a
little bit like that. Hold H to crabs, control HP let's choose difference to make
a cat like this. The cat is not quite similar to what we have here
in the reference image, but I think this is
more beautiful, right? If you don't like it,
make it like this. All right, let's see what
else we should do here. We got a cut right here as well. And let's see how
can we create this? Maybe from the bottom of view, we can understand a bit what
we should do over here. Go to the cube, d cube, and the object mode, and I will make some editing to this
cube, starting from here. Let's kill it just a
little bit like this, tab, go to the vertices. G and let's move those over here and extrude again
here, and even here. Keep extruding until you until you can get a vertices to help you
to create this shape, like what I'm doing right
now, as you can see. All right, I can grab those over here and
scale them like that. Grab those as well, it S and scale them like this. Maybe those scale them
like this to the x axis. And now we got this shape. Maybe we can go these two vertices hit and let's move those
just a little bit. All right, Tab out to the z and let's move
this over here. You can go to the solid and move this up
just a little bit. And now we can make our cuts. Before you make that cut, go to the left, use
carver tool, control H x. Or maybe I can use
another cube to cut this geometry because I just need to make
something here. It he A, let's add a cube, G to the z and let's
move this down. Make it a little bit
wider, like this. T to the, grab this face, and ext this up and Let's
add one right here, and I will select this
face and hit to the Z. Let's take this up
just a little bit. And maybe we can
grab these faces. I'll click, let's take those
back, maybe right here. I just need to add some angle here in this area for the tar, not for this geometry, not for this geometry,
for this one. Okay. That's very cool. I grab the cutter, Holt,
you have to crab this, control heft, and let's
choose difference. Now I got a shape like this. Now, I will use
this as a cutter. Move this up over here, and let's cut the umetry. Holt, you have to
grab this, control heft, choose difference. Now I got a shape like that. That's what I wanted to do. Alright, so that's very cool. We did this. Let's see what else
we should do here. Let's go to the left, and
go to the wire frame. We have some box here. We need to distribute. So heft A at box G, and let's move it over here, S and scalt like that to the Y. Like this, G, and let's
move this over here. And let's see what
else we could do here. Move this up, maybe. Control apply a scale
tab, go to the edge, grab these es, this one
and this one, control B. Let's give them above like this. I think that's will be better, grab the side, make it
a little bit wider. And have D and All right. You can tap to the mood. I think that's will be
better. Tap to the mood. A, select all the faces and
duplicate in the T mode. Let's take some copies. At some distance, H arc time. All right, even that even if that doesn't match the
reference, that's okay. And grab those and
scale into the x axis, use them as a cater, move them inside
just a little bit. Hold, you have to grab this ter, H T and use difference. Now we've got this
beautiful s have here. All right. Is there anything
else we could do here? All right, we have
some shapes here. We can see them
in the left view. These shapes. Let's try to
create them by using cube. Move the cube, and let's
put the cube over here, and let's start
make some editing. Scale make it small first. Top the mode, go
to the vertices. Grab those and move them
just a little bit down here. Maybe we can select those hit
E and extrude those here. Move this one just a little bit. Right here, maybe, take this up. K crop those he D taka cob over here, mix
some with tweaking. G and move this here. And maybe we can hit to
the z and hold cantrol, sna Move it back here. That's very cool. What else? We can select all
of these vertices. H D, take another COPA
over here. Grab this edge. I'll click. Dissolve it, control X. Let's move this here. Grab those to the z, scale them just a little bit. And that's cool. All right, now, let's go to the edge. Select the corners.
All the corners. Okay? Like what I'm doing here, and head control to level. Let's add maybe I don't know. How many, may we
need five edges. Something like this. It
will be smooth and nice. Tub out and take
those out right here. Hold shift to grab the body control shift B and use difference with the
brush because I don't know, maybe later I can change the position of I like.
All right. What else? Go to the lift? Go
to the wireframe. We have a design here, we need to create as well. Well, maybe we can take a KV HD. Take a KV right here, and we can bring the hap back, go to the display as texture, and tap, go to the face, grab this one x F.
You don't need it. Grab those H, and let's
move those over here. And make another cut here. Hold heft to grab this,
control it us difference. And now we got this nice shape. Well, what else?
We need to create another umetry, I think. Let's start with
this one right here. Go to the ft wire frame, Hft A at Q, K to move it, let's move this over here. Tap go to the vertices, and let's move those
maybe right here. Okay? And I think we can
move this right here. And the grab this key and
let's move this down, control our let's
add H right here, grab those and move
this vertices, make an extrusion, and let's move those
here to this area. Now I can grab those
key to this Z, and let's take those down. From the perspective, you can go to the bottom view, see can All right. We can't
do anything here. Tap out, take this out and
align it with the BD with the surface key to
the A to the x axis. Tab to the ethno go to face, select these faces, and
move up to the Xstle bits. Something like this. All right. And Yeah, that will
be okay for this one. And now let's go to the left. Heft A, let's add another cube. G, and let's put
this cube over here. Go to the vertices, c these, move those over here,
and select those. E and take those here, or we can move them. You don't need to extrude them. But here you can hit
E to extrude this. Move this vertex a
little bit right here. Grab this face, E and
extrude this right here. And now we grab those, it and let's extrude
those over there. Control lets at one edge. Move this vertex a little bit. Take this bag, maybe like this. And now let's align the key and let's
move this over here, and this one and let's
move this right here. Try to align it better,
something like this. And this vertex align
this vertex with sorry. Align with this corner. You can select those as to the y is your enter to make the flat and align it again and key, and let's move this just
a little bit over here. All right. Send the perspective, tab out and take
this right here, and go to face,
grab these faces. Hit key and let's move those. Maybe right here.
That's very cool. All right, we need to make
this we have something here, we need to create some cut. I can go to the top view, and I can use carver
tool if you like, or you can bring the three
decs right here, add the cube. Let's move the cube right here. Tap to the mood, go to the
vertices in the wire frame. Move those over here,
and this vertex, just take it and move it
to the y a little bit. Let's use this as a
cutter as to the z. Make a tall holt shifts. Cut this, control heift
and e difference. We got this shape. Okay. If you want to mix some we can, you can go to face, and it can move this right here. All right, that's very cool. I'm just going to make
some tweaking here. Grab this control be and
add the bubble like this. I think that will be better. And my reference image, I don't have that, but I
think this shape is better. We just need to
create these shapes. Maybe we can use books and take the books and
let's put right here. Tap to the mode, go
to the vertices. Gee, and let's move
this over here. Okay. And take those
back just a little bit. Take those down. All right. Grab this TE and let's
make one extrusion here. Take those back, grab
this up. What else? Go to the edge,
select this corner, this corner, control
be puzle them. And what else we can grab this control and bovle this
as well. Something like this. And use this as a cutter.
Put it like this. Hold heft to this
geometry control Ht B and be slide because we
need to make slide here. And the second thing
we need to do, we need to create this
shave here as well. All right Ht A, and
let's add another cube. The cube is over here, move it right here. Tab, go to the
vertices number one, and move those here, this
one, move it a little bit. All right. K, and let's
move this right here, E, make one extruion, one extruion again here. Grab those, take them down, move this one right here, and now let's use this as
a catar have to grab this. Ct have to be slice. All right. Now we decorate. I
will end this video, and let's see and the next
video, what we can do.
66. 066 Modeling section Starting with the front legs part 2: Hello, Akin, and
welcome back here. According to the
reference images that I have here, for
example, this one. I have this shape. I
need to create it. This shape. And let's see. Is there any other image
can you show us the shape? We have it right here, but
it's not so quite visible. I have some images can
show us parts of the ape, for example, this one, and let's see this image right here. In the reference
image and the left, for example, we can
see it clearly. Let's start creating this shape. Further thing, make sure to put the three D cours and the
middle of this geometry. For example, you
can tap and you can cb this face Heft S and
courser to select it. Now it's becoming the middle. Heft I and let's add Q. And now we have a
cube. Go to the left, go to the wire frame, e, and let's move this, and
let's put this here. Tab, go to the vertices, and now let's move this
to the sit over here. Let's see grab these vertices. We just need to move them
up just a little bit to align them with this shape here, this line, G to the
z, and Move those. Hit to extrude and let's
extrude those right here. Now we got in the
perspective this result. Hit A and scale
those out like this. Let's try to find another image. All right. As you can see
here, we have some angle. We need to create
this angle here. In this case, I will select this edge and this edge on the side and hit and scale
those out like this. Maybe we can erupt, I know, in those and scale them inside
a bit. That's will work. That's very cool. Go to the
left again, go to wire frame. Here, we have angle
in this area as well. We need to create it. I could go like this. Okay? In this case, I will hit control r, and I will add egg here
in one egg over here. And now you can grab those and you can
scale them like this. A little bit. Make sure
not to make any overlaing. Something like
this, it will work. Let's go to the left again, and let's see what else
we can do here. We have a cut here we need
to make at this area. But before we do that,
what I'm going to do is, I will select this
edge and this one, I'll click, I'll have to click, and I'm going to buzle them. As you can see, we have a curve. Can troll ble those, something like
this, it will work. And that's very cool.
Go to the left. Go to wire frame tub out. Let's use carver tool to
cut the geometry like this. Control heat x, select the
geometry, control heft x, go to line space, and now let's start
adding our cuts, he space, and there we go. After that, select the geometry and tab, go to the vertices, grab all these vertices at S to the z to realign them again
in case we got any problem. After that, we got another cut, I should be over here. We need to make,
and I think we can see it here and the
reference image. It's not so quite visible here. Okay, let's see how
can we make this cut? Tab out, go to the carver, control C X, switch to line, and let's make cut
goes like this. If the first, click, not in the correct position, hold and move it a little
bit and make the cut space. That's cool. Okay. Now let's see what
else we can do. Tab again, go to the vertices. I'm just going to make some cut goes like that using knife tool, it K, cut, sorry, it K. Ma cut goes like that. It C to cut through and left to click with space
to confirm the cut. These vertices over here, we don't need them wise and let's move them
and merge them, but make sure to
activate automrge. On the side, as well, we have this vertex over and merge it. If you prefer, you can make some connection
here if you like. Make some coning like this. And what else? Tab out it slash. Let's select this mer, tab to the edit mode, go to the face, let's
select these front faces. Hit d to take a CV like
this because I want to use this as a cutter and
then Ps to separate it. Tab out, grab this tab and A, and then E to extort this back just a
little bit like this. And then hit A to select
all the cuetry and hit heft and in case we
flipped the normal. All right. Let's bring the origin do to the
center of the geometry, right click origin to geometry, and let's move it
inside like that. Scale it just ale bit, and scale it in dain
just to make it big. Tab, go to the face
like these faces. G to the z, and let's
move them down like that. All right. I will
use this as a car. Hold you have to
crap the geometry, control H to B and
choose difference. Now I got this nice cut. If you want to
move this forward, you can do this if you like. If you want to leave it like
this, it's all be okay. Let's put it right
here. All right. Let's see what else
we can do here. Let's go to the side. I just
need to make some change. Tap the mode, go to the edge, I'll click and
select these edges and just give them a b
control B with two edges. I think that will make the results better
and more beautiful. Maybe we can move those
back just a little bit, or maybe not moving, maybe taking these
edges and move them forward. Something like this. And now we just need
to give this shade smooth and activate
auto smooth for this. If you like can control, I apply visual quemetr
to me to apply this and delete the cattle because you don't
need it anymore. Okay, that's very nice. Well,
I think now we can go to the oj data properties
and reduce the number of reduce the auto smooth angle here because I want
to see this egg here. Let's see how can I do that. Yeah, just move this to
22. That's will be okay. Everything looks
nice and beautiful. And now we got all the
sharp edges. That's nice. Let's go to the
bottom. Let's see, do we need to do anything
right here in the bottom view? Well, I think we can see. All right, we can't
see anything. If you want to cut this area, you can cut it or if you like, you can leave it like this. It's not an issue. To be honest with
you, I don't like this close distance
between these two phases. Maybe I can make some cut over here as well. Select this tub. Grab this past S cost
selected tub out, H A a cube, scale this cube like this, scale to the x axis as well, and tub gb edge, level this edge, control because I just need
an angle here. All right. Now I got
this. Hold hetic tumetry, control CFP and use difference. All right, I think
that will be better. Yeah, I prefer
this. If you like, you can make the cut very
close to the umatry, you have this option to
delete these interfaces. I mean, if you hit control Z, you can select this cutter hole, you have to grab the
control to and difference, and you can select this cutter and scale it to the x axis, and you can tap and de
grab this upper side, you can move this up Q to the z. Maybe over there,
k to the z again. All right. Maybe
something like this. You can select these
top vertices and align them to align them
with this with this edge, and you can scale them to the x axis to make
the alignment better. Yeah, I think that's better. And what else? Maybe we can grab this and move
those forward? Like that. Tab out. Let's sit like
those. Both of them, it's like to isolate them. I just need to see
the result here. As you can see here,
I have a stip. Well, that's mean we need to make the cutter a
little bit bigger. I will tell a select
all the faces, and I will hit S to inflate this shape just a
little bit and make it bigger. But let's see what's going
to happen if I do that here. Well, I have some
space over here. I will accept this result and
I will select this humery, apply the humer to make
and delete the card, if you like, you can tab and select these
interfaces, go to the face. Seems like we have
something here. These faces not selected. We can go to face. Let's grab this vertig g wise and let's mark
this over here. Merge those over there,
those here as well. I'm not going to fix the side because I prefer to
add mirror Modifier. So let's add Mirror modifier, activate wire frame so I
can see what's going on, activate Pict and the
flip and a light. Tab now, go to the face, select all of these faces. If you want to push
these faces in, bring back the matri and
then hit and do that. If you prefer this, you can do it and
activate offset even. It's very important here. And now the result is better, I think, tap out, and that's it. Turn off wire frame. Now we can say that we
finished with this geometry. How can I see what
else we can do here. All right. We don't have enough
information in this area. We can see something here. All right. We need to
create these shapes. This is the bag leg, but
it's the same scenario. Here, we have these parts,
we have at the leg. They are similar to the
parts at the front. That's mean we can create
those, if we like. Let's go to the lifts. Let's see what we can see there. Go to the wire frame. Let's see how can we
create the geometry. I can start with the cube, move the cube over here. Scale it a bit like this. Move a tab, maybe right here, tab, go to the vertices, grab the site, e to the Z and
move this up, maybe here. Go to the respective, select all the vertices, make those bigger,
something like that. Select this edge and
this edge over here. Hit control. Before
you hit control B, just apply the scale first, tab and then hit control B and let's add a curve
like this and create the number of the
segment to make this smooth or assembly like
this, it will be okay. And I will go to face again, select this pace, hold here
to crab this. Hit I two ins. Let's inst this inside
just a little bit. Something like this, maybe
and then right click and approach these two faces
to get a result like this. Let's select the bottom side and move this down
just a little bit. That will be okay. And what about those here tab, control at one edge, Level it. I don't want all
of these vertices. I will take this segment to one and maybe just increase the
width just a little bit. Hold shift to control it
Petter while you change the number, All right. After that, maybe we need
to make some extrusion similar to this area,
if you noticed. So go to face, hit E and extrude the gas a little bit and
kal it inside like that. K? All right. Now let's see what
else we can do. I will select this face, D take CV right click, to leave it in the same place, and then Ps to separate this CV. Select this new shape tab, it A, select everything, and then scale this
out, like this. Crab this, this g,
hit e to the z, and those down, and move those away just
atle bit like this. And crab the side the side, control and bobble them. Let's have an nice curve here. Now we can hit a e to an extrude menu
and extrude along normal. Let's give this a
little bit of thickness and activate offsite
even. All right. That's very cool. Select
all the faces and then shift and in case we
got a problem with the normal and then tub out. Tab et mood, sir, I just forget to do something. I will target these corners. I think I just need to
make some changes here. All right. I don't
like this corner to be 90 degree and sharp. I think I can add the level over here to make it
like this around. And let's see do we
have anything else here to do? All right. This is for this geometry, and we need to create this one and this stuff over
here, this joint. But I will end this
video here and
67. 067 Modeling section Starting with the front legs part 3: Hello again. Welcome back. I just forget to add a
hole here in this area. Select this, bring the
three d coosor over here. Hit a to add and
let's add a cube. Scale, let's make it a little
bit thin and make it tall. Let's take this up
almost over here. Then tap the demo
go to the vertices, you co the top vertices, e and move those down, or maybe well, I think I can select those and it
like to isolate them. And select that cut tab control lets at
one edge right here, control to beivalent, two maybe two like this,
something like that. Now, select this edge and this age control be
two beivent to two, maybe and select this phase this phase due to the Z and let's create
something like this. Can put those away a little
bit like that if you prefer, or maybe let's move those
sorry. Something like this. And use this as a
catholt, H to c this, control HP and use difference. Now we cut this result. That's very cool. Ric smooth,
activate auto smooth. Everything looks nice, now
we can hit slide to exact. Okay, what about
this kmer over here? Let's go to the left and let's start with the cylinder.
Add the cylinder here. It is very big, let's
change this to 15, and 15, make it sm like this and change this the
vertices to 52, maybe. Align this to the view. Key and let's move this
over here, S and scale it. Let's put this try to
put it in the center, and then scale it
just a little bit, and let's create something
similar to what we see here. Select this one hit S and the
scale it just a little bit. Go to the front and. It seems like we can't see
anything in the front. No, we can see. All right. I think I'm going to grab all of these details and let's hit
to create a new collection, and let's call this
collection fronts, legs, tie and hide them,
hide the collection. I just need to see this one. Go to the front. All
right now it's better. Let's move this over here. Touch the mode, go
to the vertices and the wire frame mode,
move those over here. Zoom N a bit here,
it S and scale this, E N extrude. All right. That's very cool.
Sorry. Move this just a little bit over here. And what is the next step? I will hit he d to take
a COB from this phase. O here, hit two extrude
a little bit here, and then control to link select and ps to separate
this and neck it alone. Selate the umetry, scale
it down just a little bit, and let's move it
over here, maybe. Okay. Maybe, something like
this, maybe we can scale it, but let's put the three sorry, the origin.in the center right
click origin to cumetry, and scale this
just a little bit. That's cool. Control,
I apply a scale tab, co to the vertices,
sorry to the edges, I'll click, I click, control, and less
pivot like that. Now, I will select this one D and let's take a CBA over here. And maybe we can take this one HD and take a
Cb over here as well. I will scale this, but
cancel the x axis. Hit S and X to scale it to
the z and y, like that. Maybe I can hit HD again to take a Cob and put it
here maybe in the middle. Type to the mode,
let's grab the side. G and let's move this over here. And grab these vertices, G and let's move them
over here as well. For this side, you can select all these vertices and control x to dissolve them because
we don't need them. Select those S and scale them. E and let's extrude this
to the middle maybe. Let's make some change, for example, select those and make them close
the next geometry. Tab grab this
geometry or you can grab this one tab,
because the vertices. Grab these vertices hit, and let's move those
just a little bit, make them close to this one. The same scenario for this, select this one hit
S and scale it, and tab grab these vertices, and move them a bit to the
x axis almost right here. Now we got this result.
Now we just need to add mir modifier to mirror
this on the other side. In the perspective,
we got this result. Almost similar to what
we have right here. This face in the middle,
we don't need it. Select the tab, go to the face, cut this phase x F, delete it. Now let let's give
this mirror modifier, but I just need to make sure that the organ dot
is exactly in the center. All right. Now I can merge all of these
pieces with this one. He control J, make
the mon piece, and now select this, go to to the list and
add mirror modifier. Let's mirror this to the x axis, use bicect, N flip. But it control A apply the rotation because you remember when we
added the cylinder, we change the
option to the view, and that's effect the rotation. Apply the rotation and
everything will be okay. That's very cool.
Now we got this. All right now let's create
this geometry over here. Let's see how can we create it. Go to the fronts. Can we see a part of it? Maybe to the left. All right. We can start with the left. Add cube, key and let's
move the cube over here, scale it a bit, tab,
go to vertices, and the wire frame, move
those over here up. And then the fronts, A select all the vertices
and almost right here. T And let's try to create something similar
to what we have here. Fay thing that we need to do, I think we can delete this phase and this
one and this one F, and go to the front or
before you go to front, control at one edge, control B and bevle
it like that. Right. C up this, this g, eval them
just a little bit. Now you can cpt this face with this face to the z
and move this up. C up this edge with
this edge over here, control B, make them around. But make sure that
you don't have any problem with the scale. Yeah, we got a little bit of problem control airplay scale, and now everything is one. That's cool, now tab, and be. All right. Now we've got
nice round shape here. Let's see what else
we can do here. Let's add another edge in the middle and volt control to two edges,
something like this. It will be okay. Tab out. Let's give this a solidify and change the
thickness a little bit. We will have an overlapping
here, to avoid this, you can tab and select
this g. And on this side, you can grab this one
and dissolve them control X to avoid
any overlapping here. This thickness is
0.5 centimeter. If you want to go beyond that, you can do that.
That's very cool. Tab out, control I
apply the slid defile. But before you apply, activate
even thickness and apply. Now you can select this face
with this face over here, and you can hit E and
extrude those down. That's nice. Let's see
what else we can do here. I will control up
to add one a here, control b two above valid to two something like
this, that will work. I think this geometry
is not in the middle. I feel that we need
to move it just ale but let's see how can
we fix this problem. I will bring back the leg and A. Let's select this
umetry and then bring the three decorsor in the
position of this umetre. I think this human try
exactly in the middle. So everything should follow it. Go to the front and kick
the distance. All right. We need to move
this just a little bit and put it in the center. In this case, I will
select the umetry and if S and Q
selection decorsor, to move this umetry to the position of the three
decorsor. This is the idea. Then manually, we
will go to the left and put this again in the
correct place like this. Well still in the middle. And now we got correct result. Now everything is cool. Let's go back here tab, and it can troll out to
add one are in the middle as and control to be volt, and now select this face, it to extruded and
extruded like that. There we go. If you like you can erupt the side in the side and scale
them away like that, I think that will give
us interesting result, and you can do it. All right, maybe I can take
those bags just out of it. Yeah, that's very cool. Okay, right click. Had Smooth, add Otto Smooth, this one as well.
This one as well. All right, how to create
this umetry over here? Let's see how can we create it. Maybe we can go to the
front again and we can hide the legs
and keep those. Hit the A to add cube, we can start with the cube, and let's move the
cube over here. Scalet like this. Type,
go to the vertices. Grab those key to the z, and let's move those over there. And that's cool. All right. I think I can scale adjust
a little bit of the x axis. Yeah, now it is better.
From the left view, you can move the whole
emetry top out key, and let's move this here. We can scale adjust a little bit in the mode and then control a scale. All right. That's very cool. Tab
now and go to the edge, select this edge with this edge, control be to bovele
them and lets bovele them at some segments. And after you accept the bovel, now you can control it. You can't control
the width until you get something
suitable to you. Let's add 15 segment here, and maybe we can control
the width a little bit. Well, I think this
result is okay. If you want to be precise, you can do something else. You can't control
it and cancel that, and you can grow, for
example, this umetry. By the way, we need to
manipulate the auto smooth a little bit to
retrieve this harpge. So take this down just a
little bit and that's it. Anyway, select this metre, if you want to be pe, let's take this
pace, for example. Hay and let's take
it out. Right here. Tab, sorry, Ps to separate it. Let's focus on this. Tab, go to the vertices, go to the left. Let's see grab half
of this geometry, for example, these vertices. Maybe those control x
until you get the half, and then grab those it
to ex those right here. Now we got this result
as you can see here. I think that will
be more accurate, and hit A and move this
and align it with the box. Then grab these
vertices hit E and extrude them until they meet
each other at the middle. If you want, you can go to
the mirror and activate clip to avoid any overlapping. Now hit and move
them and they will stop at the center
because of the clipping. Now we don't need the cube. You can delete it, and we
can't focus on this one. Now after that, we can
give this a solidify. You can apply the
mirror if you like. A solidify activate
the thickness and give this a thickness. Until this reek, this edge, hold and move it a little bit, or something like this, that
will be okay and precise. Now we create a very
nice shape here. Control, apply the solidify
tab, go to the edges. Maybe we can select
those and give them some b if you prefer with
two edges like this. I think that will make the
result more beautiful. If you want to add a shape
here, you can do that. It's simple. You can add cube, and you can the cube
here in the middle. Grab this, for example, have to bring the three
D cursor over here, Tab out to grab this,
to S select to courser, and now it's become in the
middle. S to the z scale it. Ke to the Z, move it up, take it out or
scale it like this. Move this over here and
control y scale, tab, go to the edges,
grab these edges, control B, and let's pivle them. Maybe we can add some
segment over here. Now we got this. Hold
have to co decumatry, control H T e difference. Now we got NCat. You can go to the g again, C up this inner edge, Control B to bevolent, evolent to tool like this. After that, activate auto merge, just select this o g, key twice and merge it with
this one to get this table. What about the other side? You can add mirror modifier
and hit bicect and flip, and then you can alight. Now we got the same
result on the other side. One more thing here,
here we need to do, we can see some lines, goes like this to fix
this right he smooth, and that's it, and make sure
to add autosmooth from here, I mean, Now we can say that
we finish with this geometry, and now we need to
go to the next step. What is the next
step? The next step is to create this big
circle over here, and let's see how can we do it. I'm going to select this
geometry tap and let's select this ge and let's bring
the three decosor over here in the middle. 58 to add and let's
add the cylinder. Let's increase the number
of the vertices to maybe 62 and make it smooth or even
if you want to go to 72. And make it even more smooth. You can go to the front and see how much you
need to scale this. Scale this and make
it big like this. Tap divertices in
the wire frame. Move those over here if you like or you can start from
here if you prefer. Maybe we can take this down. E to extrude this
here, S to scale, e to extrude, e
to extrude again, S to scale, e to extrude, extrude S to scale, and now we got this shape. Now let's see what
else we can do here. I two inset give
this a thickness, e two extrude and S
to scale like this, I two inst extrude S to scale, I two inset, and E to extrude like this, right. Now we got this shape. And we need to do something. I think we just forget to Yeah, I think we need to block
the area over here. Let's go to the lifts and maybe we can get
half of this geometry. This is the. We can do that
again in the way of frame. Get half of this. And
yeah, that's very cool. What I need to do is, I
need to I need to select these vertices and
go to the face. Start with this one,
go to the left view. We need to select those maybe. These faces determine
the middle the center. Now we can corrupt
these faces until uric this area and you can select those
here as well, maybe. Sorry. Hold control
and select those. Hold have to add this one and then control and crop
those over here, and you can hit x
F to delete them. Now you can select these edges. A control, select this,
hold control this. Hold have to add this
control and control. When you select all
of these, All right. Before you do that, sorry, I can select those it F, and then select those hit F, and then I'll click
to grab all of these, but don't hit F. That's
not going to work. Go to face and a to make a
age like this. All right. That's very cool. In the fronts, we need to do
something over here, like selecting some vertices, may I don't know,
maybe those here. But make sure to select
the front vertices. And maybe we can grab those
and move those up to the z. Let's see what's
going to happen. That's not going to work. We need to hit control Z, and maybe we can select those
here as well. K to the Z. Okay. Something like
this will work. It's a bit bigger,
but it's okay. All right. Let's go. Right head smooth and add out to smooth. All right. We have a
lot of to do here, but I will end this video
and see you on the next one.
68. 068 Modeling section Starting with the front legs part 4: Hello, again, we'll come back. All right, let's see
what else we can create. Let's start with this
geometry over here, and it will be symbol to create. Let's grab this geometry, and tab let's go to the face. I need to select this
face right here because I need to bring the three dcorsor in the middle of this face. Sift S and move the mouse
down to scorsor to selected. Tab out Shift A, and let's add a cylinder. That
will be very big. Let's change this to ten
by ten centimeter. Enter. And maybe we can manipulate
the vertices to 42. And I think that's okay. Now let's take this
up a little bit. You can select to isolate
this geometry if you like. All right. Tap to
the moth control. Maybe we can add two or
three edges over here. Control be to level these edges. And now let's select these edges all them and vl them
Ct be atle bit, somebody like this. Go to face. I'll click on these
faces. All right. I think I need to select one, face, and leave one. Yeah, something like
this, and then it s and put these inside. Now I got this sip. G
something like this. Hit slash, go to the fronts. And then stick to wire frame, and let's see what
we got so far. This phase, right here,
we don't need it XF, and this phase at the bottom, we don't need it XF.
That's very cool. Now we can say done, right click head smooth and give
this auto smooth. What about this shape? Let's go to the left and let's start
creating this geometry. Let's see how can we do it. We can start with the cube. Add the cube. Let's
change the size to maybe 15 centimeter
for all dimension, and let's start from here, tap to it go to the vertices, and let's move the side here and maybe the side key,
move it over here. Drop those, move them down. And you can sell this
and move it like this. Go to the bottom view, and now let's see
what else we can do. Maybe I need to move all
the vertices right here, and maybe I can move this to the x axis just a little
bit and extrude it maybe, or I can grab these vertices
and move them over here, Align them with the edge. Something weird we
got right here. Let's see why that happened. Hit control r. In this case, I can extrude these phases E
and extrude them over here. I can merge some vertices twice and merge those over here. Grab this one it
and move it here. Let's see in the perspective
of what we got so far. Well, we got this result, but this result is not correct. A to avoid all of that. What I can do is very simple. I can take those back
and align them again. That will be easier for
us and extrude them. Make one extrusion over here, and now you can select
these vertices. And move them over here. That will be easier for us and move those here
and maybe this one. We need to move it a
little bit over here. Okay. Let's go to the front, and I think we need to move these vertices a little
bit to the x because here we have an
angle. All right. In the perspective,
everything looks. Let's see do you
have any other MA. I think I need to move this
vertex just a little bit. Maybe right here because I need this phase to be
flat, not twisted. Something like
this, it will work. Now the face is flat. If you pick corrective
view to check it as you can see it's a little bit flat, and
that's what I want. You can move this vertex to
this direction if you prefer, or you can take
this vertex back. That will help, I
think, as well. All right. One more thing
here we need to do. If I go to the bottom of you, I need to make some extrusion, but I need to add edges here, control r and let's add
one edge over here. Grab the side, these vertices. I mean, this phase, it
and let's extrude this, maybe here to the middle. We can hold the snub and snub it to the
circle, if you like. And this phase in the
middle, we don't need it. F to deleted. Now, I can add mirror modifier to mirrors
on the other side if I want. All right. Let's add mirror modifier. Tap out, go to the list of modifiers and add
mirror modifier and. Kick the center. We
don't have any problem. Everything looks
nice. All right now, let's tap the more
and go to the edges. I will grab these edges and try to puzzle them
that control me, and let's puvle them like this. All right. And let's see
what else we could do. We have on the side Let's
start with the cube, but let's tab out first. Hf the A, let's add the cube, move the cube down, Align the bottom side with this edge and
the reference image. Tab go to the vertices, move those down and
move this right here, and this one right here. Go to the edges, let's
select these four edges, and it control to level them. Let's give them some
segments maybe six. That will be okay. Maybe seven. Take this out, and take
this out over here. Let's make a cut,
hold heft this, ct Heft and chose difference. Now we have this. If you prefer, you can do something else. Before you make that cut, you can go to the front, for example, and
go to wire frame. You can cut this diagonally. Use carver tool, go to
line, and make a cut, goes like that,
and cut like this. I don't know, but I feel
that's maybe better. Go to sold holes, you have to grab this and choose difference. One more thing here, if
you if you prefer to do, you can tap and got the edges, and you can wivele this
with two edge like this, and you can grab this
edge key tie and move it and merge it as well. Using automer. But make
sure to leave automerg on. All right. Let's
go to this face. I know, let's try to
move this face a little bit down according
to the normal. Just speak this to the normal. I mean normal of the face
and activate the geismo, and move this a little bit
down, make it in the center. Use your e. You don't
need to be precise. Something like this
that will work. Tap out, and then swag
this back to global. If you like, you
can go to selects. One more thing here
we need to do, I think we need to take
these vertices back, tab, grab these vertices and
go to the All right, I can take those
back or I can cut this area if I want
have two options. I think I will cut
using cover tool, dro shift X, and
cut it like this. Sorry, switch to line, and make a cut gos like this. Tab and let's see
what we got so far. We don't need this vertice,
control x and dissolve it, and let's check the face. It's not flat. I can move this just
a little bit to the x x x from this angle and move this just a
little bit. All right. So now the distance between these vertices is similar to the distance between
these vertices. Now let's become flat if you can compare between these two edges, the distance is the same. Now it's become flat. What about this
stuff right here? Let's go to the left, and maybe we can
start again with a new cube and
move it over here. If you want to align this, type of divertics,
go to wire frame, G and the Z, and align those over here, and those you don't
need to align them, move those just a
little bit right here. That will be enough.
Take those over here. Go go to the back of
view, maybe. All right. In the back view, I
think we can see. We don't have a nice view or maybe we need to go to
the front to the back. Let's move those right here and maybe I could
move them over here, or I will hit control Z
and hit A and scale it. I think that will be better. Scale those two the
x axis like that. A Something like this. And let's see what
else we could do. Let's select this patom phase
and scale it out like that. G a little bit, not too much. All right. Let's see what
else we could do here. I think we need now to vl this control and let's bivle it, and let's add some
Sigma over here. Let's create this geometry. Go to the front and
start with a que. Key and let's move
this que over here. Scale it like that, a bit. Let's see in the per
aspect of what we got. Take this out. Tab, go to the vertices, grab those back like this. And we need to give this al, select this H control be. Let's add some sigment to
right here because the be big. Let's add 15 sigment here. Yeah. Let's see what
else we should do. Maybe we need to make the cuts. Let's go to the front again. Tab out to add the cube. And the wireframe mod, move this cube over here
and tab to the e mod, move this one right here. C d to take a copy over here, and let's move this here. And this one, take this up here. Et a select all these
faces and take those out and scale them because
we need some depth here, or something like
this that will work. After that, you go to the edge. Let's select these edges,
and let's stop with those. Give them a little bit
of bivaling like this and reduce the number of the segment because we
don't need that much. Four or five that will work
and here as we Control and bev those Okay. That's nice. I will
use those as a cutter. But before I cut, I need
to cut this matry first. Let's go to the fronts and let's check
what we got so far. We need to make a
cut goes like this. Diagonal cut. Maybe
from the top, we can understand that. Go to the top and I will use carver tool
and cut one side, Ct x go to line, and let's make a
cut goes like this. And cut all of that and exact. After that, select
this geometry and add the mirror modifier
and hit Pi sect, and then flip it because
that's what we want. And the perspective,
we cut this result. After that, I will
apply the mirror for now and go to the bag of view
and let's add another cube. I will use this as a cut. Let's move this over here, maybe as to the Z M t and Scale to the x
axis. Move it out. Tab, go to the vertices, grab the site and
move those back. If you want to move
this all the way here, that's okay, I think
you can do this. Well, after that, tub out
hold to grab the target, control heft P and
Ques difference. Cut it. What about
this geometry? Tab grab this face, move this face down and
snub it with this line it. And from the bag, you can
grab this face and move it and snub it here as
well. That will be better. Tub out, grab this as a cutter, hold, have to grab the target, control heft P,
and us difference. Right. Let's see the
thickness here is very cool. Let's give this shade smooth
and then auto smooth, the same scenario for this one. All right. One more thing here we need to
do we need to cut this geometry using
this this shape. But I need to duplicate it. Grab this CD, take another ob and this new skills
ale bit like that. Scale it a little bit. And I think we need to make some a
little bit of changing here. For example, I can grab
these vertices and move them up like this, and I'm going to use
this as a cutter, but I don't need to see this edge here or
on the other side. Well, in this case, I will scale this to the x and y
and ignore the z. So it S and then hit
shift and make it big. Until you put these
underneath the circle. Or if you don't want
to scale it like this, you can do something
else from the left view. You can go to the vertices
and crab half of the umetry, sorry, and move it back just
a little bit like this. And that's will be okay. Hold to cb, control
H V and difference, and now we got what we wanted. That's very nice. Well, let this geometry alone and let's see what
we can do with this. Add auto smooth here
and go to the edges. Well, we have something
not good here. I need to move what I did
here down out of bit. Let's go to the normal and let's select this phase and it can trobs to
grow the selection. Let's select these faces, whole heft and add
this one and move the whole faces down like this. I think that will be better. And for the other side, you can add another
mirror modifier. And here, I don't know, but
let's try to level this area. If I got a nice result, I will keep it if I
don't, I will cancel it. Select those over
here, control be. L lets add two edges. Let's see. What's will happen? A, that's not going to work because here we have
three vertices, get wise and Merge one. Mk one. And what else that's
it go to the edge. Go up the edges. Ctrol B and let's make
some ubling here. I don't like to leave
a harp like this. I prefer to add a
vel to this area. All right, let's try to
bevel this area alone. Ct see what's going to happen. All right. That's
not going to work. You're not going to
get correct results. To avoid this, you can
do something else. Going. I will bring the
three decs a right here. And I will use Carver tool
and use this one as a depth. The position of the
three D coorsor, I will use it as a dip. Now you can go to the orthographic view and
pick a nice angle like this, and you can cut this area
using the carver tool. Tub out it control heft
X, activate carver, you can use a
rectangle of f Prof, rotate the view,
pick nice angle. You can go to the
line of f Prof, and just make a cut
goes like this. And let's see what
you got after that. All right. That's
not going to work. Let's do that again. Sorry. Switch to
orthographic view. Yeah. Let's try it from the top. C, e cover and let's
make a cut goes like this and go to D to activate the depth
and let's make a cut. If you like this,
you can keep it. Well, let's see what
else we can do here. Can we bubble this area? Control B? That's
not going to work. I'm not going to get nice
results if I bubble this. I can keep this or I can
ignore it if I like and bring this back. All right. I think we finish here or not. Let's grab this vertex and bv control if B to
bevel the vertex. I just need to taper
this just a little bit. But this vertex right here will cause some
problem. But that's okay. I will connect this
with this one K, and I will grab this vertex and control grab this one with this one hit K. That
will be better for me. If you like, you can
grab this vertex, he key wise and the slide it up. Or you can do something else. You can tap this edge alone. Can throw and give
it a little bit of pebble. I think that
will be better. Later we will try to make
some connection here. I think that's it
for this video. I think we finish
this and see you
69. 069 Modeling section Starting with the front legs part 5: Hello, again, we'll
come back here. One more thing here
we need to do. We need to add a
beam here between this area and this area. And I don't know, I think we
can cob something from here, like Coving this one or maybe
this geometry and use it. I'm going to use this
one. I think a toll rock. Let's try the ending a cob here with the three D the organ
dot maybe in the middle. All right let, how can
we do that? Right click. Set origin origin to
geometry, r to the z, rotate to the Z axis, but apply the rotation first because z axis
goes like this. I think I need to bring this
back to global, R to the z, rotate this nine degree, hold control, and
move this over here. Try to boot in the center. To make sure to move
this one in the center, you can select this
geometry and go to the face. Crab this face. Cs select it. Tab out, grab this selection to
coarser. That will be easier. Tab, go to the tess, and let's move the
sit right here. But avoid the overlabing. I will got overlabing
here in this area. All right. Let's see
how can we fix that? I think we can select
these vertices and scale them to the y like this
and move them back ale bit. And the same thing for the site, you can select to
isolate this geometry. Grab those, hold can't grab
those, and maybe this one, or I don't need this S to the y zero enter and then
move those y here. That's will be enough. If you prefer you can grab those here, This is to the seer enter. Move this right here.
The same thing. As to the y zero enter and
move those right over here. It's like to excite.
And top again. Now let's select, these vertices and move them a little bit. Here. And we can scale
them and make it smaller. I think that's will be better. One more thing
here, I will select those both and it's
like to isolate. I think we need to make
some cuts in this area. So shift a to add and
let's add a cylinder here. And let's rotate this to
the x axis x 90 degree. Scalet small like that. Make it a little bit
big, not too much. And use this as a cutter. But this is very big actually. Maybe we can scale this, make it smaller and make
this one smaller as well. Well you have to go
up this met we can row B and chose difference. And now we got a hole. We can hit slash twice
to isolate this alone. Make some tweaking over here. For example, with
all this like that. Yeah, something like
this. All right. Add auto smooth and then sorry, add head smooth,
right click head smooth and then add auto smooth. You may ask why I did this here. Why I add this
angle here because that's will help me when
it comes to rubbing. Okay? When Blender rub the mat, umery like this, it will be difficult for Blender to rob it. But umatry like this,
it will be easier. Because of that, I prefer this
sap it's likes to excite. And by the way, one
more thing here, we can do it. We can delete this phase, except even this one
if you don't like it, and you can leave it like this. That will be okay. Hits lis. And that's very cool. I can say that I finished
here with this geometry. All right. One more thing
here we need to do. I will select this with the tab to the emo tab and
go to the edges, select these edges and just
puzzle them at control B. Let's puble them a
little bit like this. I like to keep it like this. I think that will be better. Mirror modifier to
this geometry to mirror this side
on the other side. So add mirror modifier, bisect and flip acids. All right. Anything
else here we need to? Are we finished here? I
think we finished here. We don't need this cutter
you can delete it. You don't need this cutter
over here you can delete it. And everything here looks okay. Maybe I can mirror this
on the other side. Let's see what's
going to happen. Let's bring the three
decorsor in the middle tab, and maybe we can
select this edge. Use it as a reference. Have the S cursor
selected, tub out, grab this one, right click
organ to three decorsor. I just need to move
the origin dot of this geometry to the
position of the three decosor. All right so right click
organ organ to three decosor. And then I will give
it mirror modifier because the origin dot
become in the middle. Add mirror multi wire to the small emetry to mirrors
on the other side here. All right. That's cool. I think we can make some tweaking
like moving I don't know, but move this over here, and we can cut the rest. Somebody like this.
And we can cut this area like using
this one as a cutter. If you like D, take a CB and scale it a bit and
use it as a cutter. Move it just a little
bit over here. Well, apply the mirror because this is the mirror
side mirrored side. Grab this ho, have
to grab this one, Ct D and choose difference, and cut it like that. I that too much, you can control that and scale this down. A little bit. All right. That's very cool. Anything
else here we can do? Let's see what's
going to happen if I mirror this one on
the other side. Let's triplic organ 23 decosor, and use Mom fire. Okay. All right. Maybe we need to make
some tweaking here. Apply the mira modifier
and type the mode. Control R. Maybe we can add
one here in the middle. And it control be to beval
it to two like this. H this edge and this edge, control again to bel them, and the grab this face
and move this down. All right. And scale it
just atle bit like that. Well, what about
these open area? We can close them. We can
select all of these phases. Hit X F to delete the mall
and go to the ge Old click. Select the entire He loop. And hit F, and here as well. Select all of these, it
F to fill this as well. The same scenario
for those Alt click, select the entire faceop, X F, go to the Alt click, and then add those here. All right. We need to
delete this one manually. X F, go to the g, select all of these F, and here A click. And then hit F, that's cool. We don't need these gs. What we can do is we can select these and hit control x
and make them one phase. And we can do the same thing for the side control x and
dissolve them all. And for the side, I
just forget that. We can select control x, dissolve them and select
those over here at control x. That's very cool.
Let's to excite and there we go. All right. For the cut, the cut
that we got right here, now it's become not useful because we are
not going to see it. That mean if you like, you can go to the top of you and you can ignore
it. It's right here. You can't control the x
used carver tool and cut it because it's not
visible anymore. Something like this,
that will work, and now it's become nice. And what about those over here? I think we can tab to the edit mode and move this
face just a little bit down. Let's check the
reference Image first. Do we need to do this? I
think we need to do that. So let's move this back just
a little bit like that. And the same thing here, tab grab these faces and move those inside just a
little bit and tab out. Well, I think now
we just con beleted this arm. All right. What is this geometry?
It comes from the light. Let's activate the light
and let's see them. All right, we have this
geometry, and we have this one. We don't need this one.
I grab it a delete. I think we just finished this. We can see that we
have some overlapping when when the leg be
at this situation. We have some overlapping happen
here. It's just a little. It's very easy to avoid. Just move this down, this and move this down
just out a bit. And that will be enough. All right, that's very cool. That's a long journey
but sweet grades. All right, I think I
will end this video. And for any reason, if I want to go back to it as
something, I will do that. But for now, I
think we finished. We just need to add the
vol modifier for the leg and then add some vertices, make some connection right to avoid any problem when sending this geometry
to another software. So, I will end this video
here and see you next.
70. 070 Modeling section Starting with the front legs part 6: Hello again, and welcome back. I just noticed that I got
some mistake right here. I made. I just need to
make some much taking. Let's start with the leg. All right. According
to the reference mage. Let's see. Let's see
which one we can use. Here we got some problem
here with the leg. This should not go up like this. It should go like
this diagonally. Well, to fix this one, I need to go to the edit mode and select those and move them like that. All right. So let's go to the left and let's check from the left
view if we can see anything. Well, we don't have
an edge right here, so we're not going to depend
on the reference image. But let's check these
reference images. All right. If you're not here, the edge, this is this point
and this point, and it goes like that. That's mean we need to
do the same thing here. Moving these vertices back will cause some
problem to this face. It will be rotated a little
bit. We need to fix this. Well, if I pick an
angle like this, I think moving this phase to the x x will help to solve it. So I'm going to move this
even more like this. And now this phase become
flat. Okay, that's very cool. Now we can see that
we fix this one. And I think for this ometry, I can make some taking. I hit like to
isolate this umetre. And let's add one right here and delete the rest with this selected hit V and
ribbit like this, and it control and
select this one hit xF. Grab the side as to the
y s zero enter and move it like this. All right. I think this result is better to move or this edge
away from this one. I will accept this result. And I think we don't
have much here to do. Or maybe we have a small
geometry right here. We just forget to create it. Okay? And let's see how
can we create this? This one right here. Let's
start with the cube. Go to the left, go to
wire frame at the cube. G, and let's move
the cube over here. Tab, go to the vertices. Let's move these
vertices right here, for example, and those maybe
we can move them over here. And let's make somewhat taking like grabbing this edge and hit control to
be vet control. And maybe we can
select this face, hit and extrude it right here. And I don't know,
extrude it again, select this edge
and move this down. Maybe we can erupt those all
of them and move them up. Something like this. Or least take this back a bit and
maybe this one right here. And the perspective
we got this result, I think we need to scale it, make it small like this,
or maybe scale it, make it big just a little bit, something like this
that will work. From the top of
you, maybe we can make some cut using
the carver tool. Tab out control X, go to line, and let's
make cut goes like that. And accept it. And then when
you comby the tab the mode, select these vertices at S to the x zero enter
to miked flat. And here, just merk
these vertices. Ket tie and merge this over here and end the button
the same scenario, ewe and merge this over here. All right, I will add mirror modifier to the
geometry, Add mirror, activate bicect, to cut the other half and
then flip Uplight, tab to emote, and let's
slate this vertex. Let's add the three
decosor over here, tab, if A, and let's
add another cube, scale, make it small like this. Make it tall a little bit. G to the z, move this
up, maybe right here. Tab and go to the vertex. Grove this vertex,
maybe we can, I think, move this over here, or maybe we can make some
extruion like this. Ma another extrusion,
take it away. And here I will grab
those and move them up. Just need to add an
angle like this. Well tab out and use
this as a catarholt, you have to grab the target, control he B and
let's use difference, but with the proch because I need to control this farther. Now, maybe we can move this up right here and go
to the eighth mode. Maybe I can select
these vertices, and just move them a
little bit like that. Yeah, I think that's okay. If you prefer you can grab this face and move it
inside if you like. All right. What else
we could do here? I think we need to add
bubble here to the bag area. Gut this one tab to the
eon go to the edges. Ctrol be and let's
povele this like that. And I will keep a
symbol like this. That will be enough for me. Ctrol, I apply the poolin
and delete the cutter. You don't need it. Yeah, something like
this, it will work. Okay, that's cool.
So this is the ctr. It's very simple to create. If you prefer, you can
cut the bottom side. I will select this geometry
and use it as actor. I will HD to take another COV and use
this new CV as actor. Right click to leave
it in the same place. All right. Hold H
to go the target, control H TB and
chose difference. And now I just cut it the side. Let's give this auto
smooth to see the result. Y, that's it. Alright, so
I will end this video. I think in the next video, we will start with
the bag legs, Ar. So goodbye.
71. 071 Modeling section Starting with the front legs part 7: Hello again. Welcome back. Let's go to the back legs, and let's start creating Okay. Let's go to the left. Let's create this leg. Okay? As you can see, we have some variation If I make comparison between
this leg and this one. This one is aligned
with the ground, but this one is not, don't worry about that
because when we complete, we will bos this, and we will use the oint
and move this down. But now let's care
about how to create it. We don't need the button
parts, I can hide them. I need to see the stuff. And maybe we can some geometry from here
and move them there. For example, These parts are similar and both legs in
the front and in the back. This one and this
stuff right here. I think we got
some problem here. Let's bring back the body. Yeah. Let's move this
one and let's put it inside the collection, and now let's hide the rest. Just need to make sure
that everything is okay. All right,
that's very cool. So I'm going to
select this geometry, this one and this
one right here, this geometry here,
this one here as well. And this stuff over here. And this may be in the arm. Grab them and copy them, D, and let's take C Cop right here. All right,
that's very cool. Let's go to the left, control the three
r to the z rotate those 180 degree. Like this. Hit key, and let's move this and let's put
them in the position. Try to align them.
Be careful here. Key to the z may be. All right. Something like this,
I think at work. Okay, this is the first step. We got some variation,
that's okay. We'll find a solution
for all of that. All right, so this
is the first step. I got this image for the bag leg because the back foot is not
similar to the front foot. So I will put this
right here to use it. But for now, focus
on this area here. Let's finish it. All
right, first thing. Let's make some cuts. I need to make some cut. Go to the left, control three, and we need to cut
this humanitre. I don't want all of these. Tap to the emote,
go to the vvertics, grab all of these vertices, move them just a
little bit like this. And now I will cut cuts from
here. Using carver tool. Select the human
control have to x and then go to the line and
start adding points here. Let's add a cut
here and here and one here, and cut all of that. We have this one,
we will manually. With this one selected
type, go to vertices, crop them all at XF
and All right now, we need to create
all of this stuff. Okay. Let's start from this era. Maybe we can use a cylinder. Let's see where
the three decosor. Three decosor over there. We don't need the three
decosor to go away. First, let's select
all of these, and let's go to the bottom view. I just need to make sure to put this in the correct place, g to move it, and manually, just put it in the correct
position like this. All right, that's very
cool. Now let's go to the left and maybe before
you go to the left, just tab, you can grub
those verts, for example, because they are
in the middle, and bring the three Dcor
over here, Tabo. All right now, we have the
three Dcsor in in the middle. H A to, Tubo Add a cylinder. Let's increase the vertices to 52 and align this to the view. G and move it, and let's
put this over here. I think the size is nice,
and it's very cool. All right, so this
is the first step. After that, I will scale
this a little bit like this, and I will tap the emo,
go to the left again, and let's grab half of this
sphere, something like that. And it to extrude this. Let's see how that will work. Grab half of this. And go to phase E and
extrude it like that, and it to the y zero
enter to make this flat. In the perspective,
we got this result. I don't need all
of these phases, so I'm going to grab
them all like that. For this side, control
x dissolve them, and the same scenario, grab all of these,
deselect this one, deselect this one, add this control x to
make them one phase, and those here, deselect
the rest, control x. All right. We will have
some vertices right here. Grab all of these vertices, hold control grab
those, control x, make it one, and the same scenario for
this one, control x. So now we ended
with this result, and that's what we want for now. Go to the left and
now let's move those, for example, over here. Somebody like this? All right. Maybe we can move those
up just a little bit. And let's move this over here. Let's make some tweaking here. Control R to add
one H right here, but we can do that. I will use knife tool at K and
make a cut goes like that. For example, at C
to cut through, left to click and then enter. All right now I can
grab this geometry, and I can move it down, G. Let's move it, for example right over here. But I will got a problem here. We need to delete some vertices because it's strong to goes
like that and then go down. We need to create a
result like this. In this case, I can go to the
edge, select the human rey, go to the edge and select
some acres, dissolve it, go have this one, dissolve it, and maybe this one dissolve it. You can see it from the side, but if you go to
the perspective, you can see it from
here. All right. I think that's enough. I'm right. Yeah, that's enough. Even if that doesn't match the reference
image, that's okay. All right, so that's
very cool. All right. After that, maybe we can grab these vertices
and hit key to the z and hold control and
align this vertic with this one and manually move it and let's
put this right here. Kay? Align it with
the difference image. Alright, that's very cool.
So this is the first step. After that, to next to it. And keep small
distance right here. Very small. You can hold
control and snab it, but choose the
closest not center. Because if you hit
center and snab it, it will snap it to the center, if you choose a closest here, you will snab this
vertex to this vertex. So hit gen and stab it. That's what I wanted. Something
like this. All right. Let's go to the bottom and
let's see what we got so far. I think this geometry
is a little bit thick. I need to make it thinner. All right, so make it
thinner like that. And this one you can
delete it and recopy it, Cheved and Deca Copy over here. This one, I will
scale and make it thinner and and let's
move this right here. If you would like
to snap it or keep very small distance
that will work as well. And now I got this
result. All right. In in the left view, I can tap the second
geometry and the grabs vertices and move those
back almost right here. All right. And we need to
add the third one. Okay. All right, Liz, I think I just
need to do something else. Let's go to the left. Hit can troll r. I just need
to add an right here. All right, lets, can we do that? How many vertices we have here? Can Troll R. All right, I can't add any egg right here. I don't know why.
Maybe because here we have more than four vertices. Let's move these vertices manually and let's
a. That's right. We have double vertices here. We forget to delete
this one G twice and marget and we should do the
same for this one as well. Tab, sorry, Tab and grab
this one, G tie and marget. All right, grab this
geometry for now, tab, control r, and
let's add over here. You can go to the left view and manually hit and move
this line and align it here. Grab this face as you
can see its face. Hit E, but cancel the extrusion. When you hit era click and
manually move it like that. Let's move it, for example,
right here for now. As to the y zero enter
to make this flat. Or write something like this. And we need to do the
same for this one. Tap control R at
anywhere you like, or you can from here align it G toi and slide it with this one. You can see that from the left. It's a little bit higher G
two wise and move this down. All right, that's very cool.
Now select this phase E, right click and manually
move it right here s to the y z under. Okay. Now it is correct. After
that, select this one. Go to the bottom control seven and let's
take the third b d, and let's add another
b right here. And go to the left again. All right, and let's see
what we can do with this KV. You can leave it
for now like this. But before that, we just need
to make some tweaking here, grab these vertices
for the third V, and in the left view, just move those back over here. Okay, that's very nice. All right. Okay. Let's see what next
we can create. Let's go to the left view. Go to our frame. Let's
create this umetry. Et a to add and add and
move the cube right here. For example, Tap the eight mode. Move these vertices maybe down right here and move
this one right here, and those who can
move them over here. That's very cool. Now, you
can use a carver tool, if you like, to make your cut. All right Tab, go to
the eight object mode. Control to X, and switch to line and
make a cut goes like that, and a cut goes like this. And cut goes like
this from here, and cut goes like that. And one cut goes like
this. All right. After you make the cut, the line that you use is
not so quite perfect. When you comb the cuts tab
and just align these cuts. For example, here we
have some variation. This vertex is lower
than this one, and we need to align it. S to the z, zero, enter, crab those, Sz, zero, er, and those here as
well, Sz, zero, enter, and those here,
Sz, zero, enter. Let's see what else
we can do here. We need to make these cuts. I can use a box to do that. Heft A to add and
let's add cube, key and let's move
the cube over here. S and scale. Let's move this
one over here. All right. Tab the, go to the edge, grab this edge, and
this B to be ve. Let's add above like that, and scale, something
like that. All right. In their perspective,
guests make a tl. And in the left view, HD and let's take some
copies, Heft couple time. And try to grab all of these copies and ge and try
to put them in the center, but don't select the images. I just selected the images, and now it can be moved. In this case, I can go to the blueprints and
go to the filter and activate selectable and go
here and turn this off. Now you can't select the
image. That's very important. All right, now, grab those e and manually move them and try
to put them in the center. All right. Something
like that, I will work. Ctrol J make them one piece, rightly slate them
like this. Control J. That's where, grab them again. Control J, and hold shift
to grab this geometry. Control shift P and difference. And now I got my cut. H S and scale just a
little bit like that, and we need to make another cut. Tab and let's grab this vertex. This. I gue need to put the three d cror
here in the middle, H S corsor to select it, H A to add cube and let's scale this cube,
make a tall like that. Can put it in the
center if you prefer. And to the z, let's
move this over here. Ct lay up by a scale, tab, go to the edges. Grab this with this one, control B bivalent. All right. Control this. Do that again. Control B and volt like that. A and scale this even
more if you like. And I will use this
one as a cutter. Holt you have to crop this. Control TB and difference. All right. Now we
got this result. That's very cool. One more
thing here we need to do, we need to make a cut
over here to this one, to this geometry in the middle. I can use box to do that. H to A, and let's
add a box here, and let's move it right here. That's be enough
tab, go the edges. Grab this egg, this edge control be and less pvalt like that. Move this up, maybe right here. Okay. Let's see
what we got so far. Grab this grab this human tree, control to B and difference. And now we got our
cut over here. Let's see what else
we can do here. We have another cut over here. We can use another fork or cube. Move this right here,
go to the vertices, make some change. You can move. Maybe right there, grab
those, move them down. Move those up. Grab this here, and this one could be here. And use this as a cutter. Hold have to grab this control
HTP and chose difference. Or sorry, you need to e slice. All right, select this,
hold you have to cut this, Cl have to P and Q
slice note difference. That's great. That's very cool. I think I will end
this video for now and we will complete
in the next video, C.
72. 072 Modeling section Starting with the back legs part 2: Hello, again, welcome back here. Let's see what's next. Let's go to the left view, hit control three and then
go to the wire frame. I just need to make
quick tweaking to this gory tab and
go to the vertices. Let's move those just a
little bit almost right here, and we just we need to
add some v to the side, this age, control B
and vl like this, and that will be enough. I think we have got some
problem with scale, I think. About India. We have control apply skill, and then let's use the
vevele again, control B. Right now it's correct.
That's very cool. Let's go to the left view again, select the geometry, and
then go to wireframe. Let's create these shapes. Let's use carver tool. After you select the geometry, control it x and go to line, and let's start making our cuts. Hold shifts and then space to
confirm because you need to add slice no cut and
one more cut over here. There we go. After that, select the geometry
and this one and tap the mu go to the edges, select these edges here, and level them
together, control B. Let's add a curve over here. You can go to the
wireframe to sees and e c the number of the
segment to eight maybe. That's very nice. For this oma, maybe we need
to move it back a little bit. But before you do
that, I think I can select those vertices
for the both met, this one and this
one tap the ice, S to the z zero er. Maybe this one as well, S and the z zero. Now, select this vertex
with this vertex for this for this humery and move
those pagas a little bit. In the perspective,
we got this result. There's one more thing
here we need to do. We need to scale those inside, it to the x. S. Let's
bring the organ dot here, right click it organumery, then S to the X scale it a little bit and
make it smaller. This one, we need
to tab and select this phase and this phase and
move it inside a ale bit. I That's will be okay. One more taking
here we need to do, select those both geometries
and go to the left view, and go to the edges and the wire frame would select
this age and this edge. Or you can start with
this one, bevlet, control B, like this. Add a Sigment make it smooth and select
this one control B. Maybe we can reduce the
number 28 to to nine. That's cool. Let's see what
else we can do right here. L this joint here, and we need to create
this shape in this area. You can use a box
to achieve that, H to A and let's add a cube, and tap to the e mode,
go to the vertices. Let's move those over
here and those here, to. Extrude this right here, maybe. Control to add one here, control to add
another right here, grab those both and
move those down. Move this a little bit right
here. That's very cool. Maybe control to
add one age over here and move those
to this area. Select all the vertices
and scale them like that. That's very nice. Now we need to make this metry, hold, control heft
P and Q slice. Now we got sli here. We just need to scale this
inside a b to the x axis. All right. That's very cool. What about this one right here? We have these shapes
we need to create. Maybe we can start with a cube. Let's put this over here. Tap it mood, and let's
select this vertex. Gee and move it
over here, maybe. Grab this one, ge and
move this over here. And this one, let's move
it, for example over here. I just want to
align the edge with the shape and the same
thing for the site. Control R and maybe
we can add one edge over here and move this up. This one, maybe we can
wise and slide it. Control R to add one
edge right here. Control r to add
one a right here. Grab this one, keep wise, and slide it a little bit. O leave this here, grab this one, keep wise, and slide this here,
control r to add one here. That's very cool. Let's add another a here and let's
start from this area, maybe. Select this vertex, g
wise and move this up. Select this one twice, and let's take this
right here and move let's take this up here. Maybe I can use this vertix or I can bring
those down if I prefer. For example, I can take this one G twice and
move this down right here and manually take
this and put it here. After that, we'll see how can
we move this and slide it. It seems like it's
difficult to slide it. O In this case, maybe we can use this
er tex key tis and take this up here,
and move this one. I can delete the rest, what
I want now, these phases. After that, I can delete H control I to invert
the selection, and then it x F to
delete the rest. Now I just ended
with these phases. When you Cblete, just make a connection
between those using F. And those here as well. It FF, let's this
with this hit F, select this alone hit F couple
time until you fill it. Now we can say that we are
finished with the catar. You can tap out and scale
those out. If you want. Well, we need these to
cut this side alone. Before you do that, just go to the edge and let's
give them above. I just need to select
all the edges, select them all, like that, select the edge ring
and then level them. I just hit control to
select the first one, the edge ring, and then I
have to add and add those. Right now it control be two
above and let's puffle those. Give them nice bubbling. Let's go to the side view, and let's see what we got. All right. That's
not going to work. I need to add individual bival for e.
For example, this one. Let's give it a pivle like this. And this one. Let's
pivot like that. Ctrol B and let's pivo this one. Control B. Control B. For this one, we don't
need to attend here. That's too much. For
this small area. We can add five, that's will be enough and
can roll and add over here. L increases to seven or eight, B, C, and here as well. Now we got this result. Now we can let's move it a little bit
inside, not too much, and now let's make the cut, hold, have to cut the metre, control H P and Q slice, and now we got our slice here. Tap the mode, go to the face, select all the faces and
move those just a little bit down like this and tab out. We are not finished here.
We need to make sit taking, but we will do that later. For now, maybe we can
focus on this area. Let's see what we
can create here. We go to the left, we
have these shapes. Maybe we can start with
the cube to create those. Let's add this cube right here. Maybe we can move
this one right here and move this one
here. All right. Before you make any tweaking hit Kid and take
another COV here. Let's go back to this one and let's move this
over here, sorry. Grab those both. And let's
hit id to take a CB. And throw to mirror this.
Let's move this here. C troll maybe to mirror this on the other side to the z.
Yeah, that's very cool. Select this, move
those over here, and maybe we can co those
and hit D and da CV here, and we can select
those here, and here. H D can troll to the
y and the CV here. Maybe now we can take a B from this HD and add one right here, and I can mirror it. Even this doesn't much. Yeah, I will got
some variation in this case. I will
delete this one. X F and I can select this geometry at D and
add this right here, control and mirror it
and move it right here. This result, I
think it's better. Now we need to select all
the edges. Grab them all. Let's go to the perspective,
control, grab this, control ult shift,
and keep adding these edges. All of them. When you combs, you
give them nice, control B, and bubble them. Let's reduce the number of
the segment to six maybe. I think that's will be enough. Now take these geometries out. For example, right here, that will be enough, and maybe we can move them
a little bit inside. Hold here to grab
this control and lis. After that select
those and move them inside and move them to the x axis a little bit. All right. I think we got the problem here. G to the y to the x. Or something weird.
I will let controls a couple of times because I
noticed something weird here. I think that's because of
the phase orientation. Now if I go to the
phase orientation, those rate, I need
to correct that. First, grab them all
control apply the scale. Tap it An Tast. Turn off phase orientation. Move those deep ale bit, hold to grab this,
control H P two slides. That's. Now g to the x and move those
inside a little bit. Let's go to the left again and let's see what else
we should do here. We have this geometry, we have this cut,
we need to achieve, select this and use knife tool, tap the moot first,
use knife tool. Let's make our cuts, it a to make the cut stright, and let's it A twice
to turn off that, add another cut right here, but I just made a
problem, sorry. I didn't hit C to cut through. Let's repeat that again, it
K to activate nF tool and let's hit C to cut through and add the
first cut right here, hit a to make the cast str and hit eight twice to turn that off another click right
here and then hit a to make the cast str and then left to click
here and then enter. Well, as you can see, I have the cattle
on the both side. When you comb, grab this
and hit e to extrude it, a little bit, and let's
select these edges. Maybe. Let's see which
one we can pick. Let's start with this one,
move this right here, and maybe we can move this right here,
sorry not this one. This edge, move this right here, and move this edge down, or you can hit each wise and
slide this if you prefer. We need to hit key
wise and take this up almost right here. L et's align this
edge with this one. What about this edge over here? This one, I mean, we go to the left view and
move this up here. I think we need to grab all of these vertices to the
er, make them flat. All right, that's very cool.
Now we got this shape. Make sure that this age is flat. As you can see, we have something right
here, if you notice. That's mean we need to make
a little of tweaking here. Or first, grab this whole
control snap it with this one, grab them both and move
them up just a little bit. Well, there's
something weird here. Let's sick this vertex, move this out and snap it with the other vertices
and this one as well. I think we got some
weird problem here. After that, move this up
and snub it with this one. All right. Now or
something weird. I will grab the whole face and snap it to the x
axis, zero enter. Right now it should be flat. Now grab these vertices, this t and this verte. Let's move those just
a little bit down. You can hit slide to
isolate this umatry, and go to the front or back
of view and kicked from here. As you can see, it
goes like this. Let's move those just a bit do. Now, I think it's become flat. Now it's better. All right. After that, we just need to use mir modifier to mirror
those on the other side, we will finish here. I think. We just need to create the foot. After that, we will
finish the bag. All right. I will end
this video here and
73. 073 Modeling section Starting with the back legs part 3: Hello again, we'll
come back here. Okay. Let's see what
else we can do. Let's start with
mirror modifier. Let's mirror those
on the other side. Make sure that we have the
origin.in the middle exactly. Let's select this geometry,
for example, and tab. I just need to put the three D courser back in the center. For example, I can erupt one from here and ft S and bring the three
D coosor right here. Now it's become at the center. Select this geometry,
for example. As you can see the origin
dot is not at the center, so we're going to move
it in boots right here. It's very easy, right click
Set organ to three dicosor. Now it's become in the position
of the three di coorsor. When you comble, go to the
mirror at mirror modifier. We got another problem. The phase orientation is
not working correctly, as you can see this is the
x axis goes like this, and we activated the x axis, but the mirror work
to the y axis. It's very simple to fix
that, select the umetry, control A, and then apply
the rotation and done. Let's do the same
scenario for those right click set Ogin to
three decorsor, and add mural Modifier? If you've got problem,
control A apply rotation? That's very cool. All right. What about this
humit right here? Right click set Ogun
to three decorsor, Add Mural Modifier. Control A apply
the rotation and. This one over here, right click set Ogun to
three decorsor, Muromdifier, control
A apply rotation. Okay. What about
those over here? All right. Do we
need these faces? I think we don't. We
just need the whole. That will be enough actually. Forget to making that. We don't need all of these details. And I think that depth
is too much. All right. Maybe we can move those
a little bit right here. That will be enough.
Yeah, that's very cool. What about this metre? Add mirror Modifier to this.
All right. Fair thing. We need to change the
Origin dot for this one, and I will use the position
of the three decosor. Rightly set Ocon to cometry. Sorry, set Ocon 23 decosor. And then let's add miral
modifier and activate sects, and you don't need to flop it. That's it. All right. I think these geometries, we need to cut them because they go deep in the side of this one, and we don't need that because they are hidden,
as you can see here. We can cut them. Go to the left, control, and let's start
with this geometry. Let's see what we
can do for this. Well, actually, you can
select this one as actor. For example, you can
go to the phase mode, and you can select these
phases and use them as actor. Detach cob like this. P S to separate those out. You don't need mirror
modifier deleted. Sorry, you need to select those and delete mirror
modifier from them. I guess ended with this one. Go to the vertex k wise. Let's move this back, hold out and move this
uphold control and snab it. The same scar here. For this one, you
don't need to do this. Move this down hold control
and snab it. That's okay. Maybe now we need to make it
a little bit tull this one, keep twice and hold
t and move this up. Make it tall as well. E
index through this pack, and select this one hit
E index through this. Snap it with this
one and then select this c with this c hit F. And grab those F and
this side as well it F. All right, sorry. I think that's Yeah.
Yeah, that's right. And maybe we can move this over here and give it some thickness. I will use this as a cutter to cut all
of these geometries. This is the idea. All right.
Let's start doing that. Select this as a cutter
hol, you have to grab this. I control Hits. Sorry. Yeah. All right. It's a little bit tall. We need to make
the cutter taller. Let's move this over here. I think that's will be enough. Holt have to grab the target, control H P and use difference using p because
we need the cutter again. Okay. Now, select
the cutter hold, H to grab the next one. Control H P and use difference. Grab the cutter again,
hold, have to grab this, control H P, and use difference. All right. That's very cool. Now you can apply the bul in for these geometries,
and you are done. No, you can delete the cutter. A right now we made them short. And that's what
we want actually. There's some stuff right here
we need to do in this area. If we go to the bottom view, control seven, we can see them. As you can see here, we have
some editing to make here. Let's see how can
we achieve this. Let's go to the side to the left view and let's
pick one uma prefers. Let's select this
one. It's like to isolate this and go to the left. What we need to do here, we just need to make a cut
goes like this. That's what we need
to do. All right. Let's go Let's spring back the other uma t and
go to the left. You can't see the left view, can just see from
the bottom view. But let's see how
can we keep this L et's add a cube maybe using cube as a
cutter to cut these. Or if you prefer, there's
another scenario, if you want to do, you can select this
phase and CB its H D, taka CB and then PS
two separate it. And you can use this face
to do what you want to do. First, let's tab and let's
grab these vertices. Get wise, and let's
slide this over here, for example, and this one gewis and let's slight this over here. And after that,
hit t e to extrude along the normal and extrude this inside as you
can see like that. When you comb, grab this age, and the grab this control be ambivalent to two
like this maybe. Something like that, maybe. And the grab this egg get
wise and merge it like that, and the same thing for the side, get wise and merge
this right here. Well, grab this
face at the Paton, Alts and move it out, and this one as well, Alt and move this a little bit. In the left view, this is the result that we cut. So we're going to use this
as a cutter to cut this. Make it wider. Just a little bit like this. Hold Heft this, control heft V and chose
difference with price. As you can see, there
is no result because this one the phase orientation of this geometry is not correct. Select the cutter tap a Heft N, and now we got the
cut. All right. Well, after that, we need to add the same cut to this umetre
and to this one as well. I think I can duplicate
this one head, take a coop, and make it wider. And in the lefty view, we can manipulate these vertices and hold alt and move those out, and from the side, g and hold alt and move
those out. All right. Let's see what we got
in the perspective. The result is not correct because we didn't select
the four vertices. Let's grub them from here. Keep wise. Sorry,
grab them, keep wise. Hold t and move those like
this and those here as well. Keep wise and move those
out almost right here. And then that's it. Well, let's use this as a car Hold H to
grub the geometry. Control H B and difference. And now we got this.
That's very cool. In the left view,
we need to create another umetry it
could be over here. Let's see how can we do that. Heft A to add and let's
add cube, move the cube. For example, right here, we
can start from this area. And tape it mod. Let's manuate these vertices. Let's move this, for
example, right here. If you would like to snub
it, go ahead and snub it. Move this vertex here, grab those, and let's
move those sorry. G to the y, and let's
move those here. Or maybe right here for now, M one ext here. And what else? Let's take this bag here
and let's select those. E to extrude this
almost right here and manually move this here. And this vertex, maybe we
can move it down like that. And this one, maybe we
can move it right here. Okay? Let's go to the perspective and
let's see what we got. All right, that's very cool. Something we we got right here, maybe because of this geometry, we need to make some
tweaking, I don't know. But let's select all
of these geometries. And taps the mode, I think we need to make
some editing or not. We have a small step
here. All right. Let's see what's going
to happen if I grab all of these vertices
and move those down, key to the z, for example, and snap those over here. And even for this geometry, let's select it and let's
go to the vertices, and let's select
all the vertices. All right, F, sorry, I just going to do
something else. I don't need to snub these
vertices to this geometry, the new geometry that we added. I will snap them and
align them with this one, G to the Z and snub
them here better. And now I can select this geometry and make
some editing to this. Like I grab these vertices and move them up and
snap them right here. And that will be better.
Now select this. All right. Maybe we can select this vertex, hit g and move it and
align it with this edge. And for this one, g twice and slide this
down a little bit. I think that's will be enough. One more thing here
we need to do. Let's bring the three
D cursor over here, it it A, and let's add another
cube and the object mode. Move this cube
down a little bit, scale it make it t. Like that. And we need to make
a cut over here. Control up the
scale for the cube. And maybe we can grab this egg with this ache and level demo two like this. Think it will be better
and scale it like that. All right, tab out hold
to grab this geometry, control HP and use difference, and now we got this
shape. That's very cool. For those, I think we can apply the boll tool for this
geometry, and what else? Th now we can delete the cutters. We don't
need them anymore. Sorry, this one,
apply the poll tool. And there we go. All right. We got a small
problem right here. We need to move these
phases just a little bit. Let's see how can
we achieve this. Let's select this
pace, for example, and we need to move to
this direction like this. Let's see how can we
achieve this. All right. Maybe we can go to the
transform orientation and Q. Which one? We can? Let's try with normal. But normal will not give you the direction that you like if you select
this one alone. All right, Let's use the active element to align
this with the active element. Let's select this one, to grab this one and make this one the last one
to make it the active, and you can move those a
little bit right here. And you can scale
them if you prefer as like this. All right. That's cool. And now let's
do the same thing for those. Isolate these umetry first tub, and let's select this one and the last one hold
here to crab this, and let's move those
just ale bit over here. Let's excite from the local
mood and if you like, you can scale them as well. Something like this.
I think it will work. Maybe we can move
them a little bit. All right. I think
this result is nice and I think it will work. I think that's it.
That will be enough. Let's see, do we have
anything else here to do? All right. We just need to create a humus
right here, this one. And I think I can co one of
the parts here from here. Maybe this one, I can co it, go to the C right here. Rotate this to the Y
R Y 90 degree enter, and to move it and let's
move this over here. T. And move it out right here. Maybe. Go to the left again and let's see how can we position this and what
else we could do. We have some overlapping
happen right here. That's mean we need
to make a trim. So let's bring the three
deco right here and the position of this geometry, and let's add a cylinder. Align the cylinder
with the sory. Let's rotate this
to Y R Y 90 degree. Scale this down a little bit. Something like this. Hold
you have to cut up this one. I think we can make a toll
to cut the whole humery. Hold sifts. The cylinder segments not enough.
I will accept it. Hold heft this, control
he and Qs difference. That's will be enough. A, that's very cool. What about this? Maybe we can co this
geometry from here. This one, HTD to
use it back there. And Okay, let's
select this sphere, Hs, courser here, drop the H S sel to courser to put it
exactly in the middle. And I think we can scale it like that and use it right
here. All right. All right, that's very cool. Anything else here
we need to create. I think here we've got
a circle in this area. If I bring the reference images, you can see that I have this shape that we need to create, and let's see how can we achieve this right tap to the edit mode. Let's select these edges, for example, C D take a copy. Let's put this cop right
here, Ps to separate it. And let's go to the vertices. Let's see what else
we can do here. In the left view, maybe we can start
with this vertex. It's not in the
middle. All right. All right. Yeah, let's
start with this vertex. Sea this two bounding box
and sit this two global. Hit E to extrude this, not the edge, one vertex, E to extrude like this, and E to extrude this to the Z axis and move
this one like that. When you combate, this new ge, ps to separate it,
and that's it. All right, go to the left. Now I can rotate this
edge, as you can see. But the rotation is
not working correctly, something weird happening here. Why this moved
That's really weird. Let's hit set organ
org why this moved. All right. I will hit controls a couple of times just need
to see why that's seven. That's weird. Hay to
to this direction. Should not be z,
should be global. Yeah, still in the
correct place. Go to the vertices. Pick anyone, for example, this one, E to extrude, e to extrude down and move
this a little bit like that, and select this ag
and this ag and hit PS and scrub the rest
PS to separate them. Well, now select this small
umetry, go to the left. Now you can rotate it like that. That's very cool. All right. Now what we need to do is We need to rotate this and put it in the middle
almost right here, and maybe we can make guess
a little bit of tweaking manually like this. All right. Now hit, sorry, T first to the Edmod select all the vertices
of the small metre, and then hit D and
r to rotate it and rotate this 120 degree, I think, but not like this. Let's dele this one. We need to put the three dcsor
in the middle first. Cursor to select it, and let's rotate according
to the three D courser. Select this one, Tab A, selects all the vertices, H d r and rotate
this 120 degree, and it heft r to repeat
that, and now we have three. That's what I wanted. And after that elect these vertices, the three of them a
control have to be to give them Vival Let's add, for example, five vertices over here, and that
will be enough. Right click and let's
convert this to curve. And now you can go to
the curve properties and You can go to the geometry, and go to the depth and
give this a little bit of depth, 0.4 centimeter. The same scenery for this
one, and grab it right click, convert to curve, and go to depth and
give this a depth, 0.4 centimeter or
more if you like. Right click, had smooth, right click, head is
smooth. All right. If you don't have any
problem with this result, you can hit control, apply visual gemetr to M, to make it Mh, and
this one as well. When you combte, key and
move them inside like this. And now we've finished
with this one. All right. That's very cool. We just need to
create the foods, and we will finish
with this leg. Okay. I will end this
video here and see
74. 074 Modeling section Starting with the back legs part 4: Hello and welcome back. Let's
start creating the foot. Let's bring the reference images and this is what
we want to create. Let's see from where we can
start maybe from the left, it control three, and make sure that we got
the three d coosor in the middle. That's important. Let's select this geometry, and let's grab those both or
maybe we can select this. And grab one vertex S
and cos selected acid. Now it's becoming the middle. Heft a to add and
let's add cube. Let's add the corner
of the cube right here and tap to the vertices
and go to the wireframe, and let's start
creating this geometry. Let's move these vertices
right here for now, let's start with this half, it tote and e to extrude again. Maybe we can move those down, key and grab this one, Key and move this over here and this one, move this right here. All right. All right. From the bottom, if I
go to the bottom view, let's go to the bottom
view, Control seven. All right. Hit eight, select
all the vertices, and let's move this right here. And let's see what
else we can do here. I think now I can grab these vertices and
manually, it key. Let's move this transform Biot point sites
to bounding box. Let's move this right here, and this one right here. If you want to pop size you've got another
way to do this. You can move it like
that and cut the rest using K and make
a cuts like that. Yes to cut. And confirm the cut
and then hit space. Now you can delete the rest, grab all these fases, XF and delete them, and you will gut
open area like this, grab it and go to face and use a grad full,
and that's it. All right. What about this site? Move these vertices a
little bit over here and this one, it goes there. I think. Maybe those, I can move them a little bit. One more thing here,
we need to do. We need to bivle this age, grab it control and
bile it like this. All right. That's very cool. Now let's
start with this site. H H a to add and let's
add cube, g to move it. Let's move this over here tab, go the vertices, grab
this site, move them, hold control, snap them
with the with this, or maybe we can move those up. Something like this, let's move those and move
them right here. I think we need to do
something here for this metre. I think we need to add an edge right here,
just going to how you. Maybe we can hold it
with these vertices. Grab those, grab those G, go to the lifts and this side, move it up to the Z and
align it with this one. Now, the result is better. Now let's go back here. Tab grab the side down,
snab it with this one, and let's move those right here and make one
extru right here, and we can move this over here. All right. Let's go to
the bottom of view. And let's see what
else we could do here. Let's select the site
and align it with this vertex of the first
finger and grab those, and we could move. I don't know. We could move those
almost right here. I can see in this
case, I will do is, I will select select
all of these details, and let's try to create
a collection for them. All right it and cos
the new collection. Let's call this back
legs and hide them, and now you can go to the
bottom view to see better. Select this tb,
go to wire frame. Here, we need to add edge loop, and we need to move
this right here. We need to move this
one a little bit here, and these edges, we need
to move them like that. Or if you prefer, you can
cut them using a knife tool. You can do this, it K
start from this vertex, hit C to cut th and
confirm the cuts and then hit space and
delete these faces. You don't need
them. These phases. X F, go to the perspective, and you just need
to grab this F, and make sure you don't
have your double vertices. That's very cool. Go
to the bottom of view, and now we got nice results.
What about the side? The same scener we can
use the F tool, it K, make a cut goes from here, it C to cut, left
click and then enter. Now, go to the face, grab these faces, XF,
those here as well. And the perspective, grab this edge, I'll
click and then F. Now let's go to the bottom. Now let's select this edge, control be less pvlet like this. That's very cool. What
else we should do here? Right. Let's go
to the left again and let's see what next
geometry that we could create. All right. Maybe this geometry. Let's see how can we create it. And the bag view control one. We need to add a hole
right here in this area. You can use the bag view or the bottom view,
if you prefer. Let's add cube here. H to a to add and let's
add cube as a cutter. I will use this as a cutter. Let's start moving
these vertices and put them in the correct place. For example, let's
move those over here, and those may be over here, and those may be over here. And what about those? We can
move them and align those. This is the result that we got. Move all of these
vertices down like this and take those
up over here. Now we can make a cut. But go to a bag of view to grab these vertices
and move them like that. It's very important. Maybe I can move a little bit like this. When you complete, one more thing here we
need to achieve, I will select these
vertices and keep wise and move those forward just a little
bit, not too much. Hold have to this
geometric control HTV and choose difference to
other cuts like that. Let's use Mirror Modifier, let's see what's
going to happen. Let's add mirror and qu
bisect end the flip. Now, we cut this
result as you can see. One more taking here, we need to do, we need
to cut this area. From here, according to
this image. Let's do that. The three D cursor
still in the middle, H to A and let's add a cube. Go to the left if you like let's move this
cube right here. Tab move and maybe we
can grab the side, to ex grab the side,
down like this. Grab those, maybe we can move
them like this, and maybe, we can move them down a little bit and move those like that. I think that will be enough. Move those inside the human try. Rights. I will make this wider. From the bottom view, we can cut this using the carver
tool. All right. Control H x go to line and let's cut
the cutter like this. We don't need the side. For
this side, we can mirror it. Select this add mirror modifier, use bsect and the flip and then control A and apply the mirror because we
don't need it anymore. Well, I think this
cutter is ready. Hold to grab this, control H P and Q
difference with the p because I think I need to control it
further if I like. This result is not bad. If you want to move the
deeper, you can do that. H again, move the deeper. All right. Cool. Let's see what else we can do here. What else we could do here. For the legs, I think we need
to make some tweaking here. We need to move the upper vertices inside
a little bit or we can cut these I will grab this
first and go to the mode. Let's select these vertices and move those inside like that, and this one as well,
move it inside. Try to avoid any twisting when you move these
vertices is very important. A result like this, it
will work. It's nice. Now you can grab all these vertices and just
a bit move them like this. Leave some space
here in this area. For the back legs,
the same scenario, Grab these edges, this one and this one and move it
inside almost right here. L isolate this metre because
I got some weird thing here. Because of this vertex,
move this as well. That's very cool. I think that's will be enough.
That's will be enough. Maybe we got some twisting
here to this metre. We can move this like that
to avoid any twisting. Right now it's become flat. That's very cool.
Right. Let's see what else we can achieve here. We got a cut here, if you noticed in this area. Let's see how can we achieve? This is very simple actually. Just add cube and cut it. Heft A and let's add cube, and the left view,
let's move it in the correct position,
for example, right here. Go to the vertices, move those inside a little bit, and those right here. You can see it, by
the way. All right. Maybe we need to move
those down just a little bit and move the
side out like that. All right. What else? Maybe we can move those
vertices like this? Tub out, H A, grab this control H P and Q
difference with price. Now let's see what
else we can do. I think we can move this like
that. That will be enough. That will be enough.
Grab this control A, apply visual geometry to make and delete the cater
you don't need it. All right, everything
looks cool. I will select this and apply the ball pool and modifier and delete this cutter.
We don't need it anymore. For this mores, we can mirror them if I like on
the other side. Can you use mirror Modifier. This one, as we give
this a mirror Modifier. That's very cool. We have
a cylinder right here. We could create, go to the lift ift A and
let's add a cylinder. Align this to the view, and et's move this right here. If you like, you can
scale it like that, and scale it again like this. And I think we can tap it mode
and grab this side maybe. I can grab one side and
mirror the other side. Let's hit I two inside, and to move this inside,
something like this. I will grab this edge and this edge and hit
control B to above it. But we need to
correct the scale. Control A, apply the scale. Tab again, control B, let's add abovel like this. This phase here in the middle. We don't need it x f, and we need to bring one geometry from
them parts to right here. Let's do this and
hide the baton parts. Let's see which one we can pick. Maybe we can big this
one or I don't know. Anyone you like. Yeah. Maybe I can grab this one. HTD take a Cop. Let's put this cob right here. We have two of them. You can scale them if you like. I will lead the M modifier. I don't need it right
click or tometry. G and let's move this over here. Go to the lift, S and
scale this, make it big. Manual, try to put
it in the center. If that hurts for you,
you can select this. I'll click, select any A loop, any phased loop, and bring the three D
coursor in the middle. Tu out to c this. H to select into
coursor, and that's it. L et's move this one inside. That will be enough. For the other side
for this geometry, control a applied rotation
first and add mural modifier, flip and activate bisects. For this geometry,
select this one, to S cursor to grab this right click organ 23d cos and
just give this am modifier. D. Right click de smooth
at auto smooth. And it's to exits. We need to bring the bag legs. We need to create a hole
here or we can ignore it. Let's go to the left,
s. Grab the tab, go to the vertices. Let's move these vertices and align them with the surface. That will be enough for us. We don't need to add
any hole right here. There's no reason. All right. I think now we can say
that we finished this one. I got this line right here. I'm not going to create because actually, I don't like it. I'm going to ignore it and
you know how to create it. It's become symbol to you. And I think we
finished the bag legs. We just need to add those to the coll at and add
them to the bag legs. Now when you hide them,
you will hide them all. Let's see if we forget anything
here. All right we don't. Everything looks okay. Everything looks nice.
One more thing here. Noted this. These acres is
wrong to leave them like this. I'm going to grab the G
twice and mark it like this. If you like you can level
this after that like that. If you like this
result, you can do it. If you don't, you can ignore it. Right now, everything
is ready and nice. Very cool. I think now I can end this video and
see you in the next one.
75. 075 Modeling section Adding bevel modifier to the front legs part 1: Hello again. After we finishing the bag
legs and the foot, now is the time to add the l to the front leg and after
that to the back leg. So I'm going to start
with the front leg, and let's see how
can we add the vel. I don't want to see the
body, so I can hide it. I don't need to see
the bottom parts. I can hide this and I
can hide the light. We don't need it.
And the back leg. And this stuff right
here. Where are they? Yeah, those. All right. Let's start with
this one, select this and hit slides
to isolate it. Before I add the modifier, I just need to make
some connection here to avoid any problem. As you can see, if you go to the face and select this face, this face is big
and we got a lot of curves here and angles
and they are not supported. It's very important to support
these edges. All right. Something like this, Let's do that together before
I add the bubble. For example, this corner, I can connect it with this
egg and add an age like that. For example, this
corner, the same thing. You don't need to connect all of these vertices,
just one of them. This one goes maybe right
there, maybe this one, it can connect
them together like this and make one cat goes here, and maybe one cat
goes over here. That will be okay. Maybe this one, I
can take this up, and this one as well
if you like like this. Maybe this one right there, and maybe this vertex, something like this.
Maybe one cut. I can take it right there. It's okay. Maybe one cut goes here and
confirm all of that. Here we have two vertices. Merge it, and you can merge this one g twice
and merge this over here. We have an overlapping
right here. We don't need this edge, grab this with this one. Control. Let's make a cut here
as well. Confirm them. This here, we don't need to click control x and dissolve it. Here we have multiple edges, grab them, go to the
face mode, grab them, hit control x to dissolve them, and s see what else
we can do here. Maybe I can grab this
vertex and make connection. There's no reason to
do this, I think. Let's go to this side and
let's see what we can do here. Go to the n tool K, and let's make cut, for example, goes like that. Maybe cut goes like this. And I got goes like this. All right. Somebody like this? That's cool. Maybe
one cut over here. Maybe we can add the cut goes, for example, there and
confirm all of that. Go to the edge or
go to the face, select all of these faces, X F to dissolve those. Grab this edge. I'll
click dissolve it. This one can and dissolve it. Let's see the results. Now we've got very nice
result here. That's cool. Here we have double edges, we don't need this,
we can dissolve it. Here, as well, we got
very close edges, dissolve one of them, and let's hit controls and
dissolve this one. I'll click here we have
open area, I think. I don't know why
that's F to fill it. Now, I think we are ready to give this but before we do that, Let's add a support edge look
for this ecometry, as well. Because as you can see it is
not connected to anything, just connected to these
edges here and here as well. But we need to make a
connection goes like that and the same
thing for the site. Let's using the tool. Let's make cuts like this. It's a little bit pouring, but you should do that
to avoid any problem. And those here, the same thing. On the other side, you
can use mir modifier, but I don't want to use it. All right I just forget
to activate screen cast. Let's move this over here. K to activate NF
tool and make cut. If you want to add tl and add another one and
keep doing that, when you comble, guess hit
space to confirm all of that. What about those here, you can use to make a
connection between them. And the same thing for the site. That's very cool. What about this
circle right here? I don't like this type of conning to make a new cone here, for example, and maybe here. And maybe here and one here, and dissolve this, dissolve this one and dissolve this one. Hit K, let's make cut codes
like this, for example, on the other side as well, maybe cut cos like that. Right. Let's see, do we have
anything else here to do? Maybe here we can use the nF tool and make cut
goes like this in one here. And for this side as well. Maybe we can make
some connection between those using gay. Maybe one here, and that will be enough. That's very cool. Now let's add Bier. Go to the modifier add bevel. L et's change this to
point 1 centimeter. Let's add to segment here and activate hard to normal
that's very cool. We got a problem right here because if I turn
on clamp overlap, the bival will stop at a point, that's most of the time happen because there's an artifact. I will turn this off and I will try to find the
problem exactly. All right. We should see some something
bad here somewhere, but I'm not quite sure
where to find it. All right. We don't have
any problem right here. What about this area? I can't see any problem. Maybe here. We don't
have any problem. Or maybe here.
Everything looks okay and cool. That's weird. Anyway, I will
accept this result. I didn't find any art. I
guess everything looks okay. So Let's like to excite and
let's go to the next one. Maybe this geometry,
hold H to grab this because I need to take
Bival from here to this one. I don't need to add Bivle, and adjust the amount
and do all of that. I'm going to grab this, hold H to grab this one and
co abovel to select it. Select this geometry and
apply a scale before you do anything and try to
see what we can do here. Maybe we can make some cuts like this and one here as well. And maybe the same thing here. It. And I think that
everything looks okay, I think we don't
have any problem. For this geometry, I will apply the bevel because
I need to delete some faces here in the ba these faces,
we don't need them. We can't see them
F to delete them, and it's to exact. Now we can say that we
finished with this geometry. What about this
geometry right here? Let's see what we
can do with this. Select this hold this eontry
and Kobe to select it. He's like to isolate this, and let's see what
we can do with this. We don't have auto
Smooth added add Auto smooth and tab and
let's see what we can do. Go to the vertices,
use the n tool. Let's make some cuts like this. And maybe cut here. Because as you can see this corner doesn't have
any connection anywhere. It's better to do this. Maybe one cut here. And one here, maybe, for this one, right. Confirm all of that, and these
edges, we don't need them. Control X. This one
right here, dissolves. Let's see do we have any
vertices we don't need. What about this side?
This side is not visible. I can delete from the top
of you, go to the face, go to wire frame, and manually select
these faces like this. When you select all
of these faces, hit X F and delete them. The same scenario for the sit, grab all of these faces and X F and delete them.
You don't need them. Maybe here we can make some
cuts something like this. Confirm them. This A, we don't need it, dissolve it. Go to the vertices,
and let's see, do we have any vertices
here, we don't need. This one, it's in the middle. We don't need it, dissolve it. Maybe this one as
well dissolve it. This one dissolve it.
We got some vertices. We don't want this
one, we don't need it. All right. One more thing here
we need to do. I will move those out
just a little bit, maybe right here and the
same scenario for those. Let's move them right here. And now let's check
the result of Bevel. Everything looks nice. H s to exit. Now let's select this one and let's see
what we can do with this. Tab got to this face. We don't need it F. All right. One more thing
here, we don't need this to go deep, like that. We can move this out maybe right here.
That would be enough. The same s in order for this
geometry, selected tab, go to the face,
grab these faces, X F to delete them. Any vertix alone, you can
delete it like this and this. And these gs, we don't
need them, dissolve them. Maybe we can make a cut goes
like that. That's okay. Or even if you delete this, you can do that and make
another cut goes. All right. This edge right here, we
don't need it, dissolve it. These edges, we can
move them back. For example, right here,
that's will be enough. Let's make those control
J, make them one piece. Hold H to grab this geometry, and let's co the bival to them. Select this and kick the bevel. We don't have auto smooth
add auto smooth right here. Everything looks okay. Nice. Now we can go to this one. Hold Hit to grab this geometry, Kobe Bival to select it, select this geometry alone and Add auto smooth here. Tab and let's see, do we
need to do anything here? We don't Maybe we can
delete these faces, XF to delete them
tab out, to exact, and that's it. All right. This geometry, hold shift and the corrupt this and let's
Kobe Bivl to select it. Select this one hit
slides to isolate it. Tab. These eggs right here. I didn't give them vl. I will bubble them manually. Let's add some sigma right here to make this area
smooth like this. That's very cool. Now, let's
see how the bible will work. We don't have any
problem with the Bible. It works in nice spots. As you can see here, we don't see any bubble in this area. We need bevle modifier to
target this corner as well. Bivle reached this here and stop here because this
angle is very small. I'm going to crank back
this until I help the Bivle to catch this angle and
now done. Very cool. I can say that I finish
with this humer. But I just need to
mention something here. Maybe I can delete
some phases from this phase. The interfaces. But before we do that,
what I will do is, I will go to the left view
and tap to the eight mode. I think I will add a cut
right here because this area, it's the only area
visible to the camera. In this case, I can use
the n tool, for example, and make a cut here
or maybe here, it K and make a cut
goes like that, hit A to make the cut s right, C to cut, click and the enter. Well, that's very cool. Now I got this.
After the tub out, here we have the applied. Go to the pace sorry. Tab go to the phase mode, and now we select these
faces inside all of them. All of these phases
are not visible. You can delete them.
X F to delete them. XF tub out and now it's slide to excite and
kick the result if you like. I don't have any
problem with that, and that's very
cool. That's nice. This geometry, let's
give it above, holt hefty crops, for
example, COB to select it. Ctrol A apply the scale
in case we got a problem. I think we don't have any problem with this
geometry, we can skib it. Let's go to this one,
holt hefty crops. COBI to select it,
select this geometry, and let's see what
we can do with this. Before I move farther, I think I can make
some changes right here by taking these edges
and level them, control B. Let's make them round like that, or maybe we can make
them like this. That's too much control
B, something like this. Tub out and kick the result. Everything looks nice, but
here we got some corners. They need some supports
because they are alone. Go to the vertez stern
of bovel for now, go to the vertex, it K, activate knife tool
and make some cuts, and maybe from the pot as well, and from this side,
the same scenario. F here, All right. Maybe here we can
other the cuts. And maybe here. And this side as well. Maybe here. They had space and
confirm all of that. Let's see do we need to do
anything else Activate. Let's work correctly
without any problem. That's mean we can move on. All right. All right, cool. I
will end this video here because it's become
a little bit long, and I will see you
in the next one.
76. 076 Modeling section Adding bevel modifier to the front legs part 2: Hello again, Let's add
vl to this geometry, and let's CV vl
from this object. Selate this, whole shift. Grab this COVI to select it. Now we have here,
slack to isolate this, kick if we have any problem. Seems we don't have any problem. Vivil works correctly. Well, that's very cool. We can say we've done with this, or maybe we can tab and craft
this face x f to delete it. We don't need it and exxIse. Let's add Bovel here, hold, to craft this geometry,
B to select it. K and let's check the
result. All right. Maybe we can take the number of the angle a little bit down
because I can't see l here. So let's take this down
just a little bit until I see that vl works
in this area, and that's very cool. All right. Let's grub this one. Or before you move on, apply vl apply mirror, and I think we can
delete some faces. Let's go to wire
frame mood and I think I can grab this
face for this um three. If I move it, as you can
see, is related to this one, and I can delete it F I can delete this phase
for this one as well. You can grub this phase. You can control L,
tooling selects, and then hit Alt H. So Heft H to hide the rest
and keep this one visible, grub this phase, F, and then hit Alt to
bring back the rest. Let's select this
one, control L, Shaft, select this phase, this phase, XF to delete them. We don't need them, and then lt. Let's move to this
one, control L, shaft, grab this XF to
delete these faces, Alt to bring those back, and let's move to this one, control, link select,
and then Alt H, shaft s, grab this
face with this one. X and then Alt to bring back
the rest, select this one. Control L, shaft, select this x F to delete
this phase, then lt. The same scenario for
this one, control, link select shaft, select
this one, xF and Alta. That's very cool. Now we deleted these phases
that we can't see We got very small gap here, but that's not going
to affect anything, I think we can keep it. Or maybe if you prefer, let's see what we
can do with this. Maybe this phase or Yeah, maybe this one or
let's grab this. A go to the Alt click, select the entire edge loop. By the way, if you've got
problem with these lines, if you want to hide them, I think, here we
got nice option. We can turn off this
option right here. If you want to turn
off the sharp edges. That will make the
viewbard easier to see. Select this edge hit E and S to extrude this inside
just a little bit. All right, something
weird. I won't control that because I
got something weird. Let's do it again, E to
extrude and S two scale. Move this inside. A little bit. The same thing for this side. I'll click E to extrude and
then S two scale inside. Okay, that's very cool. All right. I think
now we did great. Tub outs, it's like to
excite.'s select this one, and let's give this aval
old heptic of this one, and COVID to select it. Select this geometry, and let's see what
we can do with this. All right. The result is okay, but we need to add
some cuts here. Maybe we can add one vertex right here and maybe one here. In case maybe to
the side as well, we can add one here and
maybe one here as well. Maybe one cut over here, and to this side as
well. And on this side. That's very cool. And here
we got something weird. Maybe because this vertex, we need to merge it, G twice
and let's move it here. Let's see what we have here. Let's check the other side. The same scenario, grab the G twice and
merge it right here. All right. That's cool. I think that's it. Yeah. That's very cool. Let's move on to this
geometry. Isolate this one. That's cool. Just
give it a vl, hold, you have to grab this CBD
selected, and that's it. Select this one hold,
you have to grab anyone and give it, CB vl to it. Kick the results, see if you
have any problem right here. We don't have any problem. All right. Let's excite. And what else Let's add
vel to this geometry, hold hept to rub
this COVID selected. Let's isolate this geometry and let's check if we
got any problem. And we got weird thing
here in this area, Jagged line. I don't
know why that's happen. Delest these vertices and
them at, we don't need them. All right. And why these
vertices are here? That's weird. Let's dissolve them
all like that. Okay. Something weird. Let's turn over
bevel because I just need to understand what's
going on over here. Okay? Well, maybe I can keep
this line and delete this. T that will be better. And now, I think
it's become better. Let's see how many edges
we have here. Just one. That's what we want. One more
thing we need to do here, make a quick connection
goes like that. And connection goes like
this. And what else? Maybe some cut goes here and from this side goes
here and confirm that. But we got problem right here. Just delete this extra
age, and that's it. Okay. Now let's turn on Bevel and let's see
what we got so far. The result is not bad. I will accept it. All right. Can troll I apply the scale
in case we got problem. As you can see,
applying the scale, give us even better result. All right, that's it
for this geometry. Let's select this hold,
we have to grab this. COVID selected. And let's
check this one as well. Let's see if we have any
problem here right here. It seems like we don't
select this hold, we have to grab this geometry, Bevel to selected,
and now select this, and let's see the result. We got a problem right
here at the corner. Let's see what's
going on right here. T L et's apply the scale first
and turn of bevel for now. We have double vertices, twice and merge one of them. Or you can hit A, select everything and then
M and COVID sorry. Merge by distance. Here we
have three vertices removed. Okay. Tab, and maybe
we can I don't know, let's try to make cuts go
like that or like this. And maybe another
cut goes like this. And maybe right here and one here. That's very cool. Okay and grab this egg, maybe get wise and market here. Let's add a cut here
as well, sorry. Don't worry about the other side because we got mirror
modifier added. Maybe we can make a
cut goes like this. Maybe I don't know. What else? I think that's it. All right Tab and now let's see the
bevel out works here. Do we still have
any problem here? All right, seems we don't, but we just need to add head smooth to kill this
artifacts right here. And we don't see any
level to this area. We need to reduce
the angle amount. Take this down until you see this edge. All right,
that's very cool. Now it's become smooth and nice. If you like you can
apply Mural modifier. Now we got what we want,
and we can move on. All right, so I think we
finished this geometry. Let's see, do we have
any phase to delete? For example, this
one. Can we delete anything here? All right. All right. I think
we can't delete any phase right
here. Maybe here. Alright, we can't delete here. All right, that's it, I think. Okay, let's check it again. I just need to make sure. Yeah, maybe I didn't
gave this a bible. No, we did. Yeah,
that's very cool. All right. I think that's
we'll do it for this video. So we finish the front legs. I will start with the back legs, and then we need to
create the wings, okay? I will end this video here
and see you in the next one.
77. 077 Modeling section Adding bevel modifier to the Back legs part 1: Hello, again. Welcome back. Let's start with the Back lex and let's start
with this umetry. All right Go to the modifier
list and add Bevel. And Let's add 0.1, the veal amount and add
auto smote to this matre. Let's add two segments. Go to the heading
activate hard the normal. Now let's check what we got. Let's like to
isolate this emotre. Let's see what further
editing that we should do. Let's stop and maybe we
can make some cuts here. K, and maybe we can make
a cut goes like that. Maybe cut goes like this. That's not going to work. Put right here, it's okay. Maybe another cut
should go like, sorry, go like that. For these vertices as well. Here those here as well. One here. This corner alone, just give it support edge here
and one here. This one as. S not here. I will hit enter to confirm all of these cuts
and let's start over here. And maybe the same scenario
for these vertices here. Maybe here. That's very cool.
This vertex is alone. Let's add an right here and
this one as well, maybe. That's very cool. Even those if you like, you can make some connection over here and don't worry about the other side because
we're going to use Mifi to mirror this
side on the other side. I know it's a little bit
annoying, but we could do it. All right tub, and let's
activate a wire frame because I want to see
which side is mirrored. Let's go to the list and add modifier from
the modifier list. Let's put Bible underneath it and put as a first modifier, bisect and flip
That's very cool. Now you can apply
it and that's it. Turn off wire frame and you
can leave it like this. What about this geometry? Select this one. Hold,
have to grab this, let's c vl from it. Now we got it, select this, and it's like to isolate it. Let's see how vel behave here. Right click head smooth, and then add auto smooth. Mr modifier, I don't
want it applied, and I just need to make
some tweaking over here. I will select these
face hit control plus to grow the selection and hit control x to dissolve
all of these faces. Then manually select these faces and hit control x to
create a big phase here. The same scenario for those because I want these
details on one side, but not on the other side. Control x and grab
these face as well. And it control x dissolve them. That doesn't work. That's okay. We can start again. Well, maybe we can make a cut anywhere and start again or less x F and delete
it like that. And we can start over,
I click and then F. This is another way. All right. What about this edge? Maybe we can move those ale bit, gwi and we can move them Maybe right here,
we can merge them. What else we can do here? Do we need these edges?
I think we don't Anything else? Maybe because
these vertices alone, we can make some
connection goes like that. It's better. Let's make a cut here and
let's make a cut, sorry. Cut here. Let's go to the sides
like this with this hit, and this with this hit. The same thing for this K. Let's make a cut, I don't know, goes like this, and
one goes like that. And the same thing here. Mark those. Made a mistake. For this vertex, I think
we can I don't know, maybe we can connect it right
here. That will be enough. These vertices are not
connected to anything. Maybe we can make
connection goals like this or like
this. Let's see. K. Maybe we can make
a. Something weird. Let's make a cut goes
from here to here, and another cut maybe
goes from here to where. I think we have a
vertex right here. Something like
this. It will work. The same scenario for this site, e tool and make a
cut goes like that. And cut goes like this. All right. On here, and what else
may be one right here. For those, we need to
do the same thing. Okay? Maybe one cut goes like this. What's above those right here? I maybe we can't make
a cut goes like that. Maybe one goes up. Maybe this one right here. Maybe we can make a
cut goes like that. Maybe one goes here. What else? Maybe one cut goes there
and one goes here. All right, one here, maybe. We almost finished here. I think that will be enough. Now let's see how B
will behave here. Let's turn off clam overlap. Let's check if we got or
if we have any artifacts. We have artifacts right here. Double vertices, and
merge this right here. Let's see if we have
something similar. O in and these areas. Seems we don't have
anything here. What about those over here? Everything looks clean. I guess. Let's see before and after when we turn off nothing happened. Let's mean it's clean.
Hit slash to excite. Now we can say that we
finished almost with this met or we can do something
else here actually. Tab and go to face,
select these faces, it X F. You don't want them. And you can apply bevel modifier and tab again and go to phase, select the entire phase loop, or you can go to the edge and select the entire edge loop of these and it control plus
two gross selection. Before you delete, see
this phase is visible. That's mean we can't
delete it but. We can do something else. Grab those and hit g wie and just slide them
a little bit over here. That will be enough.
That's will be enough. Select those and let's
give them vel maybe from this one. Let's check them. Apply Mura modifier,
add auto smooth tab, grab the site X F, we don't need the tub out. Well, after that, you
can go to the phase and select the phase F. We
don't need them, delete them. Maybe we can hit control
x to make this one phase. Is there anything
else we can do here? Maybe we can give this shade
smooth and then apply bevol and tap and maybe we can delete. We got this area Bv. Well, that's wrong. But
I think I can keep it. I will have controz the cou time to bring back the Bovell. To avoid something like this, you can increase the angle, just a little bit more. That will work.
That's very cool. Now you can apply it. Tab,
go to the pace Out click. That's not going to work
because I think we got vertices here in the middle
or edges as you can see. Ctrol x to dissolve this.
And maybe this one. All right. Now let's
go to Face Alt click, select the entire Face
tub and this one as well, and this one, x F
to delete them. Now we just ended with this. Turn off the wire frame. It's like to excite and done. Okay. Let's see what
else we can do here. Let's add devel to this. We got polym modifier, we can delete it. We
don't need it anymore. H you have to grab this in COVID to select it.
Let's check this. Can we do anything here? Seems we don't need
to do anything. All right. Bill is not working
right here correctly. Maybe we can make some connection over there
and dissolve this age. I think that will
help a little bit. The same CNI here. G this with this, dissolve
them. That's very cool. What about these geometries? Let's give this one above. Hold have to c up this
geometry, control to. Add COVID selected. Let's isolate this one and let's see how can
we work with this. Add Had smooth f and
then add auto smooth. Can we delete some phases here? We can delete some phases,
but not all of them. I think I will leave it.
But before I leave it, I just need to kick the cumetry. All right. Leaving
this cut like that, that's not going to work. We need to make some connection. Go to the vertex
at number one and maybe we can start with
those K. What else? Maybe use the n tool and
make cut goes like that, and another cut goes like this, and cut goes like this. Even this one, you can
make goes like that, and move it k twice
and merge it here. What about this
area in the middle? Well, I think these faces in the middle are not
visible to anything. That's mean we can delete them. Am I right? Yeah, we can delete them. Don't worry about
what's going on here. This vertex maybe
we can support it. This one right here, something
like this. It will work. Do we need to do anything else? We got mirror modifier, so don't worry about
that other side. Maybe those over here, we can add cuts, gos like this, maybe. And confirm them. All right. Maybe a cut like this,
and that's okay. All right. Apply bevel tab, go go to phase, grab this pick phase
x F to delete it, and keep this area
empty, and that's okay. Well, I think we got
face here as well. S, XF and delete
them. Keep it open. Now let's hit slide to excite and let's
check the geometry. We don't have any
problem. It will work. Grab this whole shape
to grab this geometry, C vel from it. I'd like to isolate this. Check the result. We need
to give it auto smooth, control A applied
scale in case we got a problem with the
scale. What's not visible? Before you go any farther, right smooth, and
that's it, I think. These faces are not visible. We can delete them. It's like
to isolate this geometry. And apply val modifier
tab go to face. You can select all
of these faces, even those right here, K, and you can delete them all, K x f and delete
them, and keep those. Because those faces are
visible to the camera. What about this geometry, Let's give it vel from
this. C to select it. Like to isolate this one alone, and radical smooth
at auto smooth, and stop and let's see
what we can do with this. This vertex is alone. We have an angle right here. Maybe we can make a
cut goes like that. We got the same
thing here and here. Maybe cut goes like this. Maybe cut goes right there, or that's not going to work. It. Let's do that again. It should goes like that. Maybe one cut goes
here and one here. What about this one?
Maybe a cut here and one here and confirm the rest. The organ dot, I think it's
exactly in the middle. Well, in this case, I
will activate wire frame. I will add mirror modifier and hit control
apply the rotation, and activate bicect and flip. Move this one, put it
underneath it and apply mirror. Tab, this age in the middle, we don't need it, control. All right. Now it's become
ready and smooth. This geometry, let's give
it a v. COVID is selected. After that, control, apply the scale in
case we got a problem. Add auto smooth here. We don't need to
do anything else. Apply vl, isolate it, go to face, select these faces, and then hit x f to delete them. That's it, I think. Select this, hold shift grab isseometry,
COVID to select it. Kick it before you
do anything here. Apply the scale first,
add auto smooth. Well, these faces right
here, we don't need them. We can delete them
all. Apply level tab, go to face, select
all of these phases using control and click and
then XF, and then exit. Well, what else
we could do here? Maybe this metr we
can give it a bibble. Hold epti rub this, COVID to select it. Isolate this umetry, kick it. Do we need to do anything here? Maybe just a quick
connection here to these vertices, and here as we. Enter to confirm them, and that's it, control I
apply scale add auto smooth. Apply level, we don't
need it anymore and tab go to face,
select these faces. I think we can delete them. X F, we don't need them. And it to excites.
I think that's it. We finish the site
and we got the site. I will end this video and
see you on the next one.
78. 078 Modeling section Adding bevel modifier to the Back legs part 2: Hello, again, welcome back. Before we move to the side, I just forget to
finish this area. Let's select this geometry and let's add the
bibble to this. Hold here to grab this
one and give it bibble. Let's isolate this
geometry and kick it. Let's go to the edit mode. Maybe we can make
a quick connection here between these edges. These vertices as well. This a, maybe we don't need it. Tab at auto smooth, and we don't have any problem with Bival control
A and apply it. Tab got to face Alt click, select the face loop, and then xF to delete them and leave those, and that's it. For this one, we can isolate this geometry and apply bevel. We can delete these
faces in the middle. Alt click, have to click,
and let select those. Manually maybe we
can grab those, add them to the selection. And let's add those here. XF or before you delete them, just hit I to inset, let's insert those
just a little bit maybe right here and
delete the rest X, because we can see a little
bit from the umetry here. Because we made some inst, I think we got some
shading problem. If you've got a shading
problem like this, by the way, I just got
a problem right here. This edge is not pavled. I think I can grab
those manually, and those here as well can
troll B and let's pivle them to three, something like this. Maybe we can dissolve these
edges and those here as well. Ctroll x and that. Anyway, we have auto smooth. To avoid that, we can add weight normal to
fix the heading again. Okay. One more thing here, just go to the auto smooth and right. That's
not going to work. We don't see any a right here. I think we will
do that manually, grab this, control be
and lepvle it like that. Okay. I didn't notice that. But now it's become
clean and nice. It's like to excite
and that's it. Okay, that's very
cool. Let's start with this human try and
let's give it a vl. Hold shift, let's be ivl from this one, Kobe to select it. Let's isolate this human try and let's see what
we can do with it. All right. Tap it mode and make
some cuts here. Okay. I think we can add
cut to one side and then you can mirror
the other side. All right. Grab those hit K. And those here
he K. All right. Let's make a cut goes here, and cut goes here. Cut goes here. And
maybe one goes here. Go to the ge, dissolve
this edge and dissolve this one. All right. Okay? All right, vl is not
working correctly. Let's turn off clam overlap, and now it's working.
But why that's heaven? Something weird here we got. All right. Maybe because of these edges, this
one, and this one. Now let's turn this off and on. Yeah, we still have a problem, but I'm not quite
sure where is it? Well, that's weird. I will hit eight,
select all the vertices and hit and's Merc by distance. We just need to make
sure that we don't have any close vertices. It seems like we don't have. Okay, I will apply this Mifier and maybe
can add another one. Or see Yeah, we don't need to add another
one. That will be enough. All right, that's very cool. Now we can just make a quick cut to this to this corner here. Tub out, turn off wire
frame, and that's it. It's side to excite, and let's start
with this umetry, and let's give it a bivle. All right, select it. Go to the g. This
egg and this egg, we need to give them a bivl. Let's add maybe
four or five here, and tubs Se where the biv
is is applied right here, and we have some edges
doesn't have any biv. In this case, we
can red the angle. And no less chickes. Now, I think Bv is targeted
all the sharp edges. Yeah, that's correct. Well, one more thing
here we need to do, go to wire frame tab,
go to knife tool. Maybe we can make a
cut, goes like that. H C to cut through and delete the rest of the phases
that we got right here. Control A, apply
tab, go to face, select all of these phases
manually like this, and then F to delete them. H to, and there we go. All right, this
one, we could give it l. Let's co il from this. All right. Isolate
this geometry. And I don't know. Maybe we can co
the same geometry from the front leg
and boots right here. Or maybe we can make
the cuts quickly. Okay. Let's do that.
Sorry, that's wrong. Okay Let's make a cut
goes here and cut here. And maybe we can select those corners and add some
bovel over here can be. Let's add two,
something like this, and we can make some cuts to support these edges
from the both side. And here as well. Confirm them and start over. Okay. I think now we finished
with this one. Let's add bevel to this. We don't need to
do anything here. J accept it. Let's add bevel to this geometry,
we have bevel here. Select this one, hold Hit grab
this, add vl to this one. Isolate this geometry
and kick it. We don't got any problem here. We can accept it. Get this
phase, we can delete it. All right. It's not
visible. Add dol to those. Isolate them, and I think
we don't have any problem. But we just need to
reduce the angle. That's very cool. By the way, if you
didn't understand what I did here, as you can see, Bible reached this area but
doesn't target these edges. If I take the amount down, I can include this
angle to have the ible. So take this down until you see the ible applied
on this edge here. When you finish control
I apply the vel tab, and let's see what we can hide. Well, let's select this
geometry, and maybe, maybe this one, control L
and lt H to isolate them. Maybe this phase, we can delete XF and maybe this
one XF to delete it. Old to bring those back, controls, and we need to
delete this one as well XF. T e. All right. Yeah, I
think that's correct, but we got a gap right
here. All right. I will fix it, control L, grab this shift ge, select this x f. All right. Alt H to bring back the
rest, select this control. Shift H, G up this XF to delete it ult H.
That's very cool. Now, just go to the edge, Alt click to select this edge, e to extrude and to scale scale this inside and that's it
just to hide this gap. All right. It's exact. Select this
one hold epigraph, this geometry, C ebival to this. Kick it if we have
any problem tab, make some a quick
connection here. Okay. Maybe cut
goes here as well. And let's see what
we got here here. This vertex he twice
and emerge it. Let's check the site,
the same scenery here. And use knife tool. Make a cut goes like this, and cut goes like that. Cut goes like this.
That's very cool. Okay. All right. That's it. It's like to excite. Select this whole have to grab this copy to select
it and that's it. This geometry, the same thing. We don't need to
do anything here. Now start with this one. COVID selected, t's like
to isolate this umetry, and kick it if we
got any problem. First, let's add some
cut goes like that. Knife tool, make
a cut like this, make cut goes like that. Or we have miro Medifi. We don't need to do this
for the other side. This with this, we can
make connection hit K, with this, the same
scenario here. The here as well, it K and those here, hit K. And maybe a
cut goes like that. That will be enough. And do we need to do
anything else here? Add auto smooth, we forget that. Everything now is
okay and acceptable. We can go to the next step, grab this geometry and
let's add Beval to this COB to select
it. Isolate it. We can't see bival here. We can reduce the
number of the angle. Add auto smooth first, control I apply the scale and
take this down until val, catch these edges, and I
think it does that's correct. All right. I think we got
twisted, twist here. I can grab this edge and
move it back like this. But just be careful, not too, something like this. It will work. Yeah. All right. Anything else here? We could do. All right, do we need this g? I don't know, control
X and dissolve it. Th we don't need it. It's like to exit and kick the result. It's nice. Let's add
bevel to this one, hold, you have to grab this
Kobe to select it, and it's like to isolate this at and let's
see what we can do with it. First, make a cut like this to support this corner
and this one as well, the same thing. This here, Maybe we can add auto smooth and kick the control ala scale. Everything looks nice, I think. We don't need to
do anything here. Okay. That's very cool. Let's add the to the
cylinder hold he grab any cmatry with the vl
and COB to select it. I think that's it.
Yeah. Maybe we need to add auto
smooth here, we have. That's very cool. Now, I
think we finished with the bag legs with the foots. That's very cool. Okay, now, I think I can end this video and see
you on the next one.
79. 079 Modeling section Aligning the back leg joint to the legs arm: Hello, everyone, and
welcome back here. Before we move on to the wings, I just need to put this geometry
in the correct position. I mean this one. This
should move the bag legs, and it should be
rotated a little bit. Let's select all the
parts one by one. Crop them like this,
and select the sphere, and then isolate them at slash. I'm going to select this
geometry and tap to the mode. I need to select, for example, this entire eight loop and bring the three
dicosor over here. I will add an empty go to the
MT and add an empty here. I will add this empty to
control the whole cemetry. I will link all of these pieces to the empty except this one. Select everything. D select
this and deselect the empty. Hold grab the empty, that control B to set parent. Set parent and keep
transformation. Now if you rotate this,
everything will follow it. If you move or scale. This is the first step.
Now, let's excite and go to the bottom
view, Control seven. From the bottom view, we can rotate the MT and put this in the
correct position. Rotate like that, align it. Try to be precise. You can
hit the key to move it. But let's use local and activate the gizmo and move this to the local
docking like this. Let's move this one over here. Something like this,
it will work or maybe if you want to move
this deep a little bit. It's okay to do that. Well, I think no, I'm
going to take it out. Okay. Check the distance
here. All right. It's aligned and
kick the other side. Make sure it's aligned. As you can see, now, the
empty is a little bit inside. So let's check the other
side and let's see. Do we have the same station
as you can see it is not? That's mean we can rotate it just a little bit, not too much. Just hit our hold it
and rotate like that. That will be enough. Now it's exactly in the correct place. Now we put this in
the correct place. After that, I will select this use and move it
and boot in place. If you want to be precise, select the sphere, bring the
three decorsor over here. Rub this, have to
sel into Corsor, and now it's become
exactly in the middle and Align this with the body from the bottom
of view, you can see that. Move this a little bit right
there and now is perfect. Right. Anything else
here we can do? Well, Make sure that you put this exactly in
the center of this circle. As you can see,
it's not right now. That means we can now grab this and move it a
little bit to the y. You can eyeball it. What about the Z dark? I think the Z dark. We don't have any
problem with this. Let's realign this, H the
S coarser to select it, have the S selen to coorsor, and go to the bottom
and move this a little bit to the x axis.
That will be enough. Maybe I can grab the whole, the bag leg like this and
move it back ale bit. But don't use the local
because each object will go to its local darken and
we need to avoid that, go to the global and move it. We need to move
it to the y axis. It's e to the y and move those. Let's see where
should we move them? Maybe right here for now. And maybe we can bring
those down to the Z. Let's move those a
little bit down. Kick the distance here and here, it could be the same. You can go to the left if you like and kick it
from here. I think. Maybe you can align the circle with this one with
the black one. If I need to do
this, I'm going to a key and move this
a little bit down. I think you got me
what I wanted to do, I want to align this circle with the black circle and just keep the distance Keep
the distance even. All right. I think now it's
it's in the correct place. Let's check it from here. All right. Okay. Let's check this again. I think it's ok now. Let's check this area. Do we have any penetration? We got a little bit of
penetration right here. Maybe I can ignore it. I don't want to worry
about this stuff. V. Okay. Now, I think we
finished with this one, and now it's become ready. And for any reason, if we want to edit this farther, we will do that later. But for now, we got very next
result. That's very cool. I will end this video,
and in the next video, I think I will start with the wings, we need
to create them. And we got some
stuff right here, some cuts, some slices to
the body we need to make. All right, so let's end this video here and see
you in the next one.
80. 080 Modeling section Starting with the wings part 1: Hello, again. Welcome back. Now is the time to
start with the wings. Okay. Let's see from
where we can start. I have these reference images. I have some details
to the joint, and let's see what else
we got right here. I think this is the image. Okay. And maybe
this one as well. Anyway. And in the project
folder, I got this image. The wink alone, you can zoom
in and see the details. I'm going to use this image. Excite and let's go
to the top of you. By the way, we got the
part of the wing here. We can count on this image, and we can bring this
image and put it here. Let's put this image
right here for now and grab it hit the M and
s words blueprints, put it inside the blueprints, and now it's not selectable. But temporarily, I will turn this on for now and scale it. Let's hit key and
move it to here. I think I will change this
to three d courser because I need to put the
three decosor right here and scale it according
to the three d courser. Maybe I can go to the properties
of the image and take the pic down. That's better. G, and let's move the
small right here. Put the three decosor right here and scale it just a little bit. All right. Now let's
see before and after. All right. A tiny difference
that we got right here. So we can use this image
to create the whole wing. I can put it anywhere or we can leave it right here and
turn this off for now, and hide the body. We don't need it for now. And all of these details, the legs, the parts,
we can't hide them. And we can now start
with the wing. Right Let's see from
where we can start. We have this image, can show
us a little bit of details, what's going on over
here, and we will use it. Maybe I will put
this right here. All right. Fair thing, let's start with the
cube, H shift A, and let's add cube. Let's change this back to
bounding box and tap the mood, grab all the edges,
control B Bivalt. All right Bivalt
like this for now. And when you make
val open this mio, and let's give this a segment. Make this smooth nice. A 15 segment. I think that will be nice and let's activate clam
overlap and move the width until the until we got these edges in the
center mixed or merged. Don't worry about
any overlapping because clamp overlap
will prevent this. When you complete and
satisfy, that's it. You can now grab these
edges in the middle. Because here we
have double edges, you can grab them and detach them or dissolve
them or you can hit A and go to hit M to open the merge menu
and hit merge by distance, and they will merge
automatically. So after that, scale
this and make small, and let's move this right here, or let's keep the organ dot here tub and move this right here. We can bring the body temporarily to put this
exactly in the correct place. Move this b over here,
and let's go there. You can grab the body
and select, for example, the entire eight loop and
bring the three dicosor over here and tab out,
select the sphere, selection decsor, to make
sure to put this exactly in the center and scale it a little bit, something like this. It will work, go to the top
view, make some comparison. I think it's okay the size. All right. That's very cool. Maybe from the front of view, we can make some rotation or I'm not going to do anything. I will accept the
result. All right. We need to delete half
of this umatur, I think. Or more than half. So tab to the edit mode
for this geometry, and let's see how can
we deal with this? We can't trim it,
I think because I can't use these edges
because they are not stri. That's mean we can use
trim. Let's cut it. Use carver tool, grab
it, control have x, and the secrete rectangle
goes like this, maybe, and from it like this. Now we've got this half.
This is the first step. After that, we can tap
the mode and go to face, slate this face,
hits e to inset, inset this just a little
bit and go to the front, for example, to see
what we got so far, and then hit e to ex something like this
and scale this inside. All right, something
like this as we work. Don't worry if that doesn't s match the ers image that's okay. We can handle this. But now
we got nice result here. After that, we need to give an inst at I,
something like this. I will work, I think,
and e to extrude this inside and move a
deep inside like this. That's very cool. All right, I'm not going to
add these details. I will do all of that later. Now we'll start
creating the stuff. Let's see from
where we can start. Let's go to the top of
view and maybe we know, we can use another cube or
maybe we can add the cylinder. All right let k the radius to make it something
small, 20 centimeter, and we need to rotate this r y, 90 degree, rotate this to the Y, and move this right here. All right. This cylinder
is not will work because we need more
edges here at the size. One more thing here,
the three D coorsor is on the ground and
I don't want that. I will delete this, and I will select this one
tab, go to the edges, it I click to select
the entire glop, bring the three
dcorsor over here, and now let's se create
another cylinder here. And let's incre this 252. And rotate this to the
Y R y nine degree. Move this over here and
the scale it a little bit. Tab go to the vertices. Grab the side. Let's move
this for example right here, grab the side and move
this deep inside. Well, after that, select this edge loop and
hit control be two level this. All right. I think this result is okay. We have 15 edges
here or segments. Let's check it in the
perspective. All right. I think I will
accept this result. From the front view, we
can control this further. Tub out, and let's use Carver tool and control x
and let's cut this area. All right from here. And what else? Let's make a cut sorry. We need to cut
from here as well. That's mean we need to
add another cutter. Tab out, H if a to add
and let's add cube. It's very big C
this 20 centimeter, make it small and hit to move it and let's
move this over here, and tab to the edit mod,
go to the vertices, grab the site, move this over here and move those just
a little bit like this. Go to the, grab this control
be less pvalent like that. Something like
this at will work. We don't need 15 edges here. We need ten, that will be enough and make this
a little bit wider, and I will use this as a cutter. Hold H to grab this geometry, control H and e difference.
Now we got the cut. From the top of you, we
can trim it as well. We can make some trim. I think I can scale
it just a little bit. And move it back.
Something like that. A Let's check the
result over here. All right. Let's go to the left, control three, and I don't know. I feel that we can scale
it just a little bit more. Go to the front and let's
see what we got there. Let's become a little bit
bigger, but that's okay. It's not an hue. All. Let's go to the top again and maybe we need to
make another trim. We need to cut this area. Let's see how can we do this? Go to the wire frame and
use carver tool again, control Hfts control ift x, and use rectangle and let's
make a cut goes like that. Cut one side and
don't worry about the other side because we
can use mirror modifier. All right, Let's check that cut. I think it's okay,
and maybe we can go farther if we want. All right. Maybe we can can truck x again and make
another cut goes like this. A, that's we'll work. Well, now I will
use miro modifier to mirror this side
on the other side. Let's add miro modifier, and use y Pisect, and flip, and there we go. Now we got the same
result on the other side. You can apply the mirror
Modifier if you prefer. And now we got one
more cut right here. Let's see how can we do it. Heft A to a and
let's add a cube. And move this up over here. Take this right here tab, go to the vertices, grab all of these, move
them inside, make it tall. Let's use this as a cutter
and let's see if that's okay. Let's go to the left and see. We need to scale
it just a bit like this and move it even a
little bit down like that. Or maybe we can move
it up a little bit. You can align this
box with this line. I think this will be better give to the Z and align
it right here. Use closest option
with the vertic snap. Hold H to grab this control
H and s difference, and there we go. Now we got the cuts. We almost finish
with this geometry, ic head smooth and then
add auto smooth and now it's become ne. I guess. All right. Let's go
to the front view, and let's see what
else we can do here. We got some stuff right
here we need to create, and let's see how can
we achieve those. To create this human tre, I will start with the
cube a cube right here. Let's try to put it over here. Somebody like this,
maybe. All right. Let's make sure that the
cube is in the center. Let's go to the left. All right. The three D cossor is, I think it's in the
center in this one. All right. The cube is in the
correct position, I guess. Hit S and selections. Go to the front view. I think the cube is
exactly in the center. All right, don't
worry about the cube. Where's the cube right now? Let's try to create
this geometry for now. So I'm going to move
it right here for now, and I need to move it
forward maybe right here, something like that, and maybe make it a
little bit wider. And taller grab this side of vertices and move them
inside like this. What I need to do
here, I need to make cutscs like this like a cross. Well, I have two option here. I can cut those or I can make this small
and make extrusion. I think the easiest way is to scale it back and
make some extrusion, and I'm going to show
you what I mean. I will scale this maybe like this and hit control
r to add 18 right here. Level this with control to two edges and select this face, drop this face E to open
the extrude menu and use extrude along normal and
extrude this out just ale bit. And then go to this edge, grab this edge, control
B to level this. Let's add some Sigma. I got a problem here with scale. Scale is not correct. Ctrol A and L scale, and then add Bevel again. Now bevel should work correctly. Let's make this a
around and nice like that. That's very cool. Well, I think now we can go to the front view and go to wireframe and see what further
editing we need to make. Rights. Before we
do anything here, what I'm going to do is, I will select this
geometry and go to the left and rotate
it along its normal, along the organ doot. H d to duplicate and r to rotate and let's rotate
this 180 degree, like this, and let's
check the result. Go to the left to the front, and let's see what
we got over there. Well, we should get a distance
between those similar to the thickness of the wing
joint. That's very important. Well, that's mean we need
to make some chins here. I will select this one
and move it right here. Well, maybe I will move
it right here for now. I just need to see why
that's what happen. Let's see what's
exactly the problem. To the front again,
and I don't know. I feel that we should move this pole and align it
with the reference image. Then when I combate, I
should move it back. But before I do this, I need to put empty here in the
position of this pole. H S and courser to select it, and then H A and let's
add an empty right here timberly to use it later. Now let's select
all of these stuff. Go to the front and let's move those down,
maybe right here, center something like this. When we combate, we will move this back to the
correct position. Okay. Let's see now, what
else we could do here. We what will happen
if I move this up? Let's move this up and
let's see what we will get. It will be very
close to the edge, and that's actually
not quite correct. We need to avoid this. Let's go back to the front and or at least see
how can we fix this? Well, to avoid this, I think
we can scale this up again. Tab, go to the vertices,
grab the side. Scale and make this a little bit bigger, something like this. Don't worry about the interface. We can delete them later. Well, let's see if
that's will help go to the front and let
position this object. First, Let's put in
the correct position. Maybe we can move it a
little bit up right here. The next we need to select
this, grab this circle, bring the three
decosor over here, and delete this one.
We don't need it. Go to the left control three
and use the three decosor as a Bevot point he d to duplicate this and to root 8180 degree. Let's go to the front and
let's see what we got. Now, the result is correct, and we still got nice space
here between these objects, and we can move on. I will select this
one and move it in the center right here. Maybe I can tap to EMO to
see what editing I can make. I can grab these
vertices, for example, and s2z and scale
them to the Z axis. I can grab those over here
at s2z and scale those up. Maybe this, I can
dissolve it and this one because later
when I want to add vl, Biv will wreak these verts maybe that's will cause some
problem overlapping problem. I will control x to dissolve
it. That's very cool. Radically had smooth
and add a smooth. Yeah, I think that's
it for this video. We got a lot here of
the umetry to create, but we will do it together. But for now, I will
end this video and
81. 081 Modeling section Starting with the wings part 2: Hello again. Welcome back. Let's create these
objects right here. Okay. Let's start with the cube it A and
let's add the cube. And let's take this
cube out for now. All right. To create those, we need to make some editing to the cube. Tab grab these vertices. Move those forwards. I think I can sweep these
two bounding box. Let's move those, for example, over here, make it tall. And later when we complete, we will scale this down. Ad control to add
maybe right here, volts with control
22 edges like this. And grab each. I'll click,
I'll have to click. Sorry, I think I just forget
to open the screen casts. Let's move this over here. Okay. With those selected control
be and let's puzzle them, grab this face, move
this back a little bit. And maybe I can make some
tweaking to this edge by taking this and
move it back again. All right. What about this area? I will select this edge and bring the three d
coorsor over here. Haft a to add and
let's add a cut cube, M it small like this, or let's make it a
little bit bigger. We need to I think we
need to tap the mode, and the grab control
x to dissolve it. And now we got this result. Let's move this face inside
hold S and move it like that. And I'm going to use
this as a cutter. Tab hold to grab is geometric control HP
and use difference. That's what I
wanted here. Right. I think this geometry
now is finished, or if you prefer you
can grab this hit alts and move this inside. But that will ruin the shape. I can bring the catara bag and make it a little bit bigger
by by using these edges, get wise and hit t
and move those out. And this one as well, gist and move those
out like that. And now select this phase
and move this phase to its direction ts and move
this inside, and that's it. Hold you have to
grab this, cant H B s difference. As we do it. Now, go to the left and hit key, and let's put this at
the corner over here. You can select this
umetry and grab this vertex if you prefer
and bring the three D cos right here and select
this and sorry, I need to bring the organo
to this to this vertex. So I'm going to activate activate organ and
move the organ, hold control to snab
it to this corner, and then turn off the organ. And now with this
one selected heft S and selection to coorsor, and nows become
exactly at the corner. Now you can scale it according to the position
of the organ dot, and now you can get very
accurate and as result. Something like this,
I think it will work. And just make a till grab the
side and move those inside. Now we can say that we
finish with this geometry, and we need to duplicate this
and have multiple COVIDs. But I think I can do that later. After I adding the
vol and the stuff. For now, let's focus on what
we need to create over here. I think we can start
with the wing itself. And maybe we can go
to the top of you to see how can we start there. All right. Let's
select this tub. I'll click to select
the entire a clube and bring the three
dcursor in the middle. Because I need to add
cube here in the middle. Hefty a to add and let's add
cube and let's use this cube to create the wing. And maybe we can scale this
and make it big like this. And control, I apply a scale and tap
the mode, go to the edge, grab the side with the sided
control be to bivle dose, and let's make it round in nice. All right. Let's see how
many vertices we need here, and increase the number
of the vertices to get round nest
round result here, and activate clam overlap
to avoid any overlapping. And now we got two edges
here at the middle. All right to avoid this, A, select everything,
merge by distance. We have two vertices
merged. That's very cool. Go to the front view, and let's scale this geometry
to the z axis S to the z, something like that, and
move this over here, maybe. All right. Let's go to the front and let's see how can
we deal with this. I think we need to move
this geometry forward, maybe right here, or
maybe right here for now. All right. That's very cool. I need to move this
inside almost right here. Okay? Go to the top and let's
see what we got so far. Well, I think I'm
not getting round, nice round result here. Well, in this scenario, we can we can use a
cylinder to achieve this. So let's delete this cube and
let's add a cylinder here. 52 vertices kicked
in the perspective. I think it's nice and
working, go to the top. Let's move this over here. Scale it a little bit. Make the edge of the cylinder max the reference
image from here. A to sorry, go to
the front view. Let's move this one just
a little bit right here. Now go to the top. A
does not don't work. Maybe we can move this over here. Okay. Something like this. I will accept this
result for now and we'll see what else we
can change later. Go to the top view and now go to vertices and let's go
half of this cylinder, it e to extrude this. And let's see what
else we can do here. Now, we can s to isolate
this umetry alone, and we can grab the site. This pase faces right here, had control x to
dissolve them and grab these faces as well, and had control x to
dissolve them as well. And those right here, you can control, and to
the x zero to mi flat. We will got some vertices, grab them all,
deselect the corner. And this one as
well, deselected. And the rest control X. The same scenario for the side, deselect this one, deselect this one control x to dissolve them, and that's very cool. All right now, we can
go to the top or to the front and it to bring
back the other details. Let's see the thickness,
hit A S to the z, scale it just a little bit. Something like that, that will work. And that's very cool. Go to the top and now
let's see what we can do to the site.
Maybe we can move it. I don't know, maybe right here, it E to make extrusion here, maybe one extrusion,
maybe over here. Okay. Control R, maybe to
add an A here to this area, but I can't do that unless I make some connection
here between these tses. Grab those hit gay. Grab those hit gay
and make this phase quot so we can add a group when we hit
control R. Alright, go to the top view now. Let's hit slack story and
then go to the top view. Can rol r, and let's
add one edge over here? Can row r to add another edge? It should be right here, maybe. Let's grab the side of vertices and move those just
a little bit right here. And let's grab those. All right. I think it's wrong to move this, but I should add one edge, maybe right here and
make this area smooth. Okay. How can we
make this smooth? All right. I think
I can scale those, sorry, it B to extrude them. Let's extrude those off
right here and grab this edge and hit
control B to bubble it. Let's do it again, grab this control B. Alright
why that's not happen. Go to the edge, you grab this. From the top view, hit
control B to bvle this. All right. Let's turn off clam
overlap and move. We need to delete
this ache because this ache prevents
the vl to go farther. I'll click x to dissolve it. Now, grab this control
b and let's piv it until you get the
care that you like. Something like this. Maybe
we can manipulate the I. Maybe that can give
us better results. Or if you like,
there's an scenario. You can add multiple
edges right here, and then you can
manually move them. For example, I can grub those
and move those up right here and it can roll out to
add some edges right here. And manually, I can move these vertices and
end this area. That will be nice as well. Just try to follow
the reference image. And that's it All right. Maybe we can move this
down just a little bit. And that's it. All right. What about this area? We can maybe move this one
right here and piv this edge, go to the edge, grab this control bee,
and let's pival it. And now we got nice
results over here. Let's bring this 2.5. Yeah, that's it. I think
we can go farther. A 15 segment. Okay. All right, go to the front and let's see what
else we could do. We need to scale
all of these parts. Let's go to the top and
let see how can we this? Go back to the front. H control to add one g over here because we
need to scale this. Grab the side and
the wire frame mood and g to the z and let's
move this up over here. This vertex move
this here manually. Because we got the origin
dots in the middle, we can add mural modifier. Add mural Modifier and let's use the z axis after I applying the rotation and activate
bicect, yeah, that's it. You don't need to
flip it because we got the result that we want, and that's something very cool. Now, what about this area? I think now we need
to cut this area. Okay. And I think we can use carver tool to
achieve this mission. All right, so can
troll ft X go to line to use the line cutter and let's make cut cause like that? Try to cover it and then
had space and done. When you combate, just go back
here and type the Et mood, how many vertices we got here? We got two vertices.
We need to merge them. That's very important to avoid any beveling problem when
we add bevel modifier. And don't worry about the
other side because we got mirror modifier will
do that job for us. All right. Let's see what
else we should do right here. All right, go to
the front again. And we got this curve
we need to create. And let's see how
can we achieve this? Let's add cube, H A
and less add cube, move the cube, for
example, right here. Tap the emote, grab the side. Let's move the side, align
the site with this area, and move the side as well. Right here. From the top view, let's grab these vertices, move them right
here, for example, out, and let's align this edge with this edge
of the reference image. Okay? These vertices, we just need to move
them a little bit here. I think that's it. Now let's go to before we move to the front, let's select some edges, crab these edges and
those over here, and those here as well. Now we need to give them vl. We can start with the front. It can be vl those. All right bubble them until
you've got there that you like. What about This side, maybe we can grub the side and move it a
little bit over here. When you will be satisfied
with the result, H have to gro this control
FP Q difference with brock because maybe I can go back later and make
farther anything. But for now is nice
and beautiful. Let's go to the top and let's see what else we should create. We need to create
this shape here. Let's see how can
we achieve that? Well, Maybe we can use IST or maybe we can
add the box to do this. All right. I think I can apply this pul end result
and delete the cutter. We don't need it anymore.
I'm going to select this and use inset
to insert this area. But before you make the inset, maybe we need to make
a cut goes like that. Or before we do that, I don't know.'s tack
the reference Images. Let's see if we have any close mag as what we should do here. This is not so clear. Let's try to find another
one. Let me be this one. Okay. At least see here as well. This is not correct. I don't have a clear image to show
us what we need to do here. But maybe this one. I just need to make sure if this
ends here or go further. That's what I wanted to do here. All it seems like
I will not find a good reference here.
Let's check this. All right. I will ignore this, and I will depend
on my reference. Go to the top again and let's see how
can we achieve this. All right. I think I can
make a cut goes like that. So go to the vertex it K activate knife tool and
make a cut goes like this. We can kick that
from the top view. I think that will be better it K and make a cut goes like this. Let's go to our
reference images. Was it All right. After that, maybe we can go
to face and select all of these faces here and
hit I to in set. Let's make some ins. We will got some overlapping,
but that's okay. We will try to find the
solution to avoid it. This is the first step I did, but we got some
overlapping right here. I will use the nf tool
to make cut goes right here and what about
these vertices here? Key tier some merk here. Key and mers over here.
That's very cool. What about this
side right here we got overlapping as well. Let's make cut goes
like this, maybe. Maybe I can era those to make
connection between them. For these edges, we can
dissolve most of them. This one, I need to
dissolve and it K, maybe we can make
a cut goes like this and dissolve this age. Go to the top view and
go to the vertices. Maybe we can move this just
a little bit right here. What about those? According
to the reference image, so go like this. We need to make some
editing right here, grab these vertices,
all of them. I'm going to put the
three d corsor over here to this vertex
and sweep this 23d corsor Because I want to
scale those to this level. S S to the y zero er.
That's very cool. What about this area? Maybe I can grab this vertex and move it
right here manually. And what else? I
think that's it. We can go to the next step, grab these faces again and
hit e to extrude this inside. All right. Let's try to add
the or before we add the, let's move this up, it can let's add two edges. I think that's not
going to work sorry. I will controls a couple time and I need to make
another inset. Let's make another inset. It will be small
inset, not too much. And it is to move those inside just a little
bit. Not so much. Here we got very close vertices, wie and mix them, if you like. We
almost done here. If you prefer, you can grab
those edges it control and bubble them and get
round shape here. I will get some overlapping, activate clam overlap
and move this manually. It seems like I can't. This result is. Maybe we can
increase this a little bit. All right. That's very cool. And click K smooth
and add auto smooth. Kick everything. The
result looks nice. One more tweaking we need
to do to this area here. According to the
reference I make, we got some extrusion here
and even here as well. Let's see how can
we control that. Tap the mode, grab
all of these faces. It I two inst. Like that and hit
t two on extrude no menu and choose extrude along the normal and
extrude this inside a little bit and
choose opposite even. I think that's it for this one. Tab out. All right. Very cool. We still have
some tweaking to do here, but I will end this video here and see you
in the next one.
82. 082 Modeling section Starting with the wings part 3: Hello, again, we'll come back. Let's see what's next we could do. We need to create this. All right, select this
one, tap the mood. We still have Mormdifier here. I will apply Mor
Modifier control A, and now let's start over. We need to make cuts, maybe according to this image, maybe between this
vertex and this vertex, hit G to make connection
between them. And now we go to the face selects these
faces, all of them, and hit I to inset and let's insert this
inside a little bit. All this thickness,
it will work. And as you can see, I got some overlapping here,
but that's okay. We can avoid it.
Grab this vertex, heat wise and merge
it with this one. The same thing for the side heat wise and merge
it for this with this. Okay, go to the edge. Grab this entire age loop. I'll click and beval it. Ctrol be to beval it. Biv it to tool like this. Give it the same thickness. And for this age, just move a key and hold
control and stab it right here. Bring this back. Maybe this one, key, and hold control
and stub it here. All right, now let's see
what else we can do. Go to the top of view. We got some variation
right here. Happens. Let's try to avoid it. All right, Let's try to understand what's
exactly happen here. As to the sorry. See this two bounding box, as to the x zero enter, move those and align
those with this. And move them to the y
as well and align them. And now I think in
the correct place, those as well move them
and align them here, and in the y as well align them. Now, if you got that view, we still got a little
bit of variation. T's try to avoid it. We don't need all of that. Anything else? All right. Now I think now we
can grab all of these faces that sorry, Alt E and Qs extrude along the normal and extrude those
inside a little bit. Something like that,
will be enough. One more thing here
we need to do. Maybe we can level some corners, for example, this corner and those over here
and here as well. Like this old hefty crop. This one, control
be to vel them. Let's make this round and
nice, like that, maybe. All right, that's
not going to work. Let's pavl this again. Let's increase the
number of the segment. Something like this
will be enough. And maybe for this
one in this age, can troll be and let's
povele those as well, something like this,
that will work. Try to merge this area. We got some close vertices here, but they are not mark. You can do that, and the
wireframe would grab those. At have to grub those M
and cosmic by distance. As you can see here, four vertices merged. All right. The same thing we can
do for these corners, we just need to give them
small bubble. Will be better. And here, I think we
don't need and here. I think we can dissolve this and maybe we can get
wise and slide this a little bit here and revolve this edge to get round
in nice care here. These phases, we
don't need them, control X and dissolve
them, those here as well. And quickly if you like, just make quick conne
goes like this, and maybe here as
the same thing. All right, crab those
control, go to the vertex, activate knife tool, make
a cut goes like that. Cut maybe goes like this, in one here, and confirm them. All right. Is there
anything else? The same thing maybe for
this area, go to the face, crab those control, go to the knife tool,
cut goes like that. I one here, maybe
one here as well. A one here and one here.
Let's check this one. Let's see what we
got. Yeah. All right. That's correct. What
about this area? Let's go to the back
of view, cant one, and we got something here, we need to add. We need to use to cut this area. Let's see how can we this? Well, I think I can start with with the cube,
select the geometry. H to bring the three d corsor to the origen dot of the geometry, have a to add, and
let's add the cube. Move the cube maybe over here. Scalp a little bit
to, grab the side. Let's move the side over here, grab this side as well, and let's move the side. I don't know where. But it would be right here. All right. And we need to select this
side of the cube out. And this side, it should
go deep a little bit. We can go to the top of view and we can see how
to control this. Let's move this, for
example right here. Let's see in the perspective what's going to happen
if I move this. That's wro. We need to take
it back almost right here. That's be enough, I think. One more thing here
we need to do. We need to add edge right here, and control r and maybe we
can add edge right here, this side, these vertices, we don't need them to
go deep like this. We need to take them out. For those, we just need to
move them a little bit. Even those, we can
take them at bits out. This is the idea. This is
what we should create. Something like this.
Now, let's cut, let's make that cut, and
let's see what we will go. Hold have to grab this control HP and choose
difference with brush. I just need to see the result. The result looks nice. After that, grab the cutter tab, go to the edges of the cutter, grab those edges can
be and let's pole. Let's make this area around. We can go to the back
of view to check it, and I think it is very close. All right. So far
we got this result. It looks okay and nice, and I will accept it. I guess, we don't
have any artifact, any overlapping,
any penetrating. Everything looks clean. Don't worry about
the site because we will use Mramdifier, after all. So let's keep the
cutter in this place. And let's go to the bag of view, and let's see what
we want to do here. We have this beam. We need to add this beam. We can use a cylinder, right. And I will cran this back to 42 and rotate this
90 degree like this, scale it make it small, and
let's move this over here. Scale it a little bit. Go to the vertices,
grab the side. Let's move this over here, grab the side and take this O maybe right here temporarily. Something like this. And take this out for now
right here, maybe. Maybe we can move
it a little bit inside. All right,
that's very cool. And we got some details
here we need to create, but Maybe now we can start
with the wing itself. Let you go to the top of view, and let's see how
can we do that. All right. Well, let's hit shift eight to add and let's add the queue for now and let's move the queue.
Maybe right here. A. Let's start with the
editing, go to the edit mode. Let's see grab these
vertices over here. Sorry, we should go to
the wire frame first. Move those over here, and
let's move the side over here. Temporarily let's
move this here. And what else maybe we
can move the side here. Maybe those L et's grab this, it e two, make one extrusion. Maybe right here. Let's
move these edges and align them with the wing
itself like this. For this one, you can hit control r to add maybe
one edge right here. Let's grab those and
move those like that. Grab those, if you
want to move those further hit keys
and hold out and move those like that. All right. Now, maybe we can
unhide the wing, and let's see the rest of it. Grab these vertices, heat wise, hold out and move those
farther right here. And extrude this.
Let's move this. I don't know, maybe right here. Hit another extruion, to
extrude this over here. Another extruion, Let's
extrude this right here. Okay control our maybe we
can add one edge right here, grab those, move
those down like that, and take this right here. Move this vertex here. All right in the front view,
let's see what we can do. All right. One more thing
here we need to do. I need to scale those to the
ZA axis because the tip, it could be thinner,
something like this. And one more thing here, we need to scale those as well. But in the correct way. I will grab two vertices
from here as a guide. For example, this vertex
with this vertex. I can hit he d and take
those right here as a guide. Go to the front again and
let's use these vertices. Hit e to extrude, extrude the guide, and
let's move the guide, for example, right here. Or at let's see where.
Maybe right here. Let's go to the top view, and let's see from
where it starts. Let's try to understand
the idea here. Let's go to the fronts. Move those maybe over here, and scale those to the
thickness of the wing. And now we can move all the vertices
according to this guide. As you can see, for example, these vertices big S to the z, and scale them and align
them with the guide. What next those here big, c them S to the z and
scale them to the guide. T here SZ and scale them to the guide,
and those over here, the same scar When you Cblete,
you can delete the guide. Now I can grab this
control tolling select, and I just selected the guide, it xF to delete it and
s. That's very cool. Now we got this result. And let's see how can we
create the rest of the wing. From the top view, let's see
what else we should create. We got this share as
we need to create. But before we go any farther, as you can see, we got
some overlapping here, we can see part of the wing. We need to edit that. To add that, we need to make
some cuts or some trim. I think we can use cube and
cube right here to do that. Hit A, and let's add cube. Move the cube over here. Maybe we can take this
almost right here, tab the scrub one side
and move it away. I will use this cube as a
cutter from the top view, let's see what we can do there. Let's move these vertices right here and maybe
those over here. Align these vertices with
the direction of the Of the wing? For example, grab those and move them and align the direction
of the cube of this edge with the direction
of the wing from this area? When you be satisfy, let's
make farther anything. Zoom here, k to the x, to the x, let's move
this over here. Can you grab those
four vertices? Or we don't move them a
little bit right here. That's will be enough.
And in the front view, we can I don't know. We can vl this edge from here, I can troll be to val it
to two edges like that, and use this as a cutter. So grab the wing, it's like to isolate them, so you can understand what
I'm going to do here. Grab this hot, you have to grab this one to be and
chose difference, and this is the result
that we got here. I will hit controls to choose difference with the pride because I need to move this bag, guess a little bit,
hot if and move it. Something like this,
because I need to merge these vertices here. H let's move this farther. Try to be precise. All right. And after that, you can give this mimi fire. But let's check. Is there anything visible here? Seems like we don't
have anything visible as being that's correct. Control, I apply visual
geometry, delete the cutter. We don't need it
anymore. Tab, and here we just need to
make some tweaking. As you can see we
got very tiny face. We don't need it actually.
Let's try to avoid it. So how can we avoid it? You? I've told maybe we can
make a cut goes here to here. And make this vertex
get wise, mark it here. And mark this one, get wise, and mark
this over there. What about the side? I think we don't need to
worry about the side. All what we need to do now is
to add ro modifier, maybe. So we still have the
origin.in the middle. Add ro moodifier to the Z axis. Ignore the x add to the Z, activate bicect, and now we
got nice result over here. Control A, apply the mirror, make some connection
between these artses. It will be better and
those here as well. Maybe even those, no, I'm not going to make connection here because the line
will go like that, and when you add the all, it will cause some problem. That's very cool. I think
now I can end this video and let's see you in the next video what we
d create. All right.
83. 083 Modeling section Starting with the wings part 4: Hello again, welcome back. Let's come beneath the wing. Okay, let's bivle this one. Let's go to the edit
mode. Grab these edges. We need to give
these edges a bible. Select them all like this. And those here as well. And let's hit control
be to bibble those. Some like this, it
will work maybe. We can go to the top of view
and kick it from the top. See how the works here. It's not exactly
like what we wanted, but manually we can edit it. So let's select these edges. I'll click to grab the entire edge
look and maybe the bottom one as well,
I'll to click. Go to the top and manually
move those right here. All right, go to the vertices, move those over here. Maybe move them here. What about this area here,
you can keep it, I think, and maybe we can move those back here and
align it with this egg. Can zoom in a little bit
and move it right here. Let's see in the
perspective what we got. We we got this result. But we need to make
further taking All right. We need to grab these edges
and scale them to the z, almost right here, and we
need to make sure that all of these edges got
the same scale. I'm going to CV this edge
and use it as a reference. CV for example, right here, and hit E to extra like that, go to the front and
use as a guide, use this as a guide. Now what we need to do is, we need to go to vertices and select S to the z
and scale them and align them with the reference
and go to the next edge. This one, crabs z and scale them and align
them with the reference. The same thing to
those over here. I think we don't need
to manipulate those. That's it, I think. You
can, I think that's it. There's another
scenario if you like, you can grab one vertex and grab the last
one, for example, this one, and you can hit F to create a connection
between them, and you can use this
line as a guide. P has to separate it and
select this line alone. Move it forward
just a little bit, and you can delete this guide. Let's grab it like this, x F and delete it
and use this line. Go to the front, and let's see what editing we can do here, tab, go to the vertices. Maybe this one, we need
to move it a little bit, and let's go to the right. Sorry. This vertic here, maybe we can move this down. Maybe right here. Let's move to this one and move it down
just a little bit. All right. That's very cool.
Maybe this one. If you want to keep this,
it's okay, leave it. If you want to delete
it, you can delete it. But after you're doing that, you need to add another mirror
modifier to the Z axis. Add mirror and turn off set and activate Pi and that's it. I think now the
result is correct. All this before and
after. That's very cool. Apply mirror tab and
delete this in the middle. We don't need it because
if I add Vevl modifier, maybe Vevl will reach this area and I will
get some overlapping. You can delete it.
You can keep it for now temporarily
and decide that later. Well, now let's go
to the top and let's see how can we create
the cumetr here? Maybe we can start
with the cube. Let's put the three D c in the
middle Hit A and add cube. Let's move this cube right here. Tab, go to the vertices
and wireframe. Well, now let's select the side, and let's move this cube,
for example, right here. Rub those, let's move
the cube over here. Let's make some alignment. Maybe I can move this over here and I can delete
the rest if I want. What about the thickness? Let's move those here, and move these
vertices over here, and then we can cut it. As you can see now, the cube
that I add aligned with the reference image. All right. Grab these vertices, extrude
them almost right here. Make another extrusion here. Let's move this
one up over here. Grab those it E and
extrude this forward, right here. Another
extion maybe. And take those down like that. Maybe we can move
this a little bit. G twice, take this right here, grab those E and extrude
those almost right here, move them down, maybe
we can move this up, grab those both
one ex over here. Let's take this back
and move this up, and manually take this
and move it here. L et's align it with
this vertex and align this vertex as well with
this one. And there we go. At least see in the
perspective of what we got, go to the front or go
to the back of view, control one, and let's check it. I think the size is okay, but we need to use another guide to We need to scale
it from the tip. Maybe by using the same guide. Yeah, I guess going to align it with the
edge of the wing. Select the tab, go
to the vertices, move this down and
start s to the wing. But I need to sp two edge stab and move this hole control
and snub it. Keep doing that. A something weird we got here. Let's move those down here. And let's grab this vertex
and move it and snub it. T here, move them
down and stab them. What about this here? Move it down. Stab
it right here, and you can ignore the rest. Now we can add mirror
modifier to this add mirror act Z and activate bisect as well
to cut the other half. Now we got this result. Let's check it and let's see what farther editing
we can do here. We got an H right here, maybe we can create it. Let's see how can
we achieve this. The result is very
nice, I think. Let's select this geometry, tap it control to
add one like this. Let's select this
phase in this phase. Maybe we can select
those as well. The idea is, I just need
to extrude this up. I thought I can
extrude those down. Well, Let's see do we have
another scenario we can use or maybe we can select this entire AT that
we just created. I don't know maybe we can
be volt control vt two like this and select these
faces right here, you can use control to a this. Crop them all and
those over here, H Q to the z, and move those
down just a little bit. I think that will be
enough. I think that's a, something like this.
It's very nice. What about this area? We can go to the top of view and there we can decide
what we can do here. Maybe we can go to the back of view because I need to
trim it and cut it. By the way, something
else we need to do before we cut this. We need to scale. Let's go to the top of view. We need to. Maybe we can move
these vertices to the edge. I think we could
do that manually. This one should end
right here, this cut. I think it should
end right here. Let's see how can
we achieve this? Well, fair let's start with
those, move them here. What about this area? L et's Let's try to fix it from here and maybe
in the pererspective. Let's move this one right here. You can use vertex stab and use closest
and move this one, hold control stab it here. That will be merged
automatically, and you can do the same
thing for the rest. For example, this
one right here, right, move this one here, hold control and stab it. The same thing here,
hold control and snub it here and move it to
the x and snap it as well. The same thing for the rest, snub it here and
snab it to the x. Until you merry all
of these. All right. That's very cool. Let's
go to the top again. Go to our frame, and let's
see what else we can do here. Control R to add one edge and
move it just a little bit. And now we need to select, sorry, there's something
weird tapping here. Well, what I will do
now is I will fox on one side tab and
grab these other edges. Crab them all, crab those here, and this one and hit
key to the z and move those almost right
here, something like this. Yeah. When you keep all of that, now you can cut, cut the rest of the umetry. I mean from this area. Let's go to the top and
let's see how can we aqueep that? Go to wire frame. I think we can use a cube to
do that or use cover tool. Let's use cover tool. The cut, I think
it goes like this. Maybe Activate car tool, control heft x and make cut goes like that after you
select the matare. So something we
are tapping here. Let's make the image
not selectable. Let's go to the top of you. Cat control heft, activate car. Let's make a cut goes like that. Then maybe we can use Le to make a cut goes
like this, maybe. And cut the rest. Let's see in the perspective
what we got so far. Well we got this result. I think I will hit
troll Z and bring this. Sorry. Let's go
to the top again. Let's do that again. Troll c x. Make a cut like this, and I think that's it. We can keep the rest. Sk to isolate it and
see your results. If you like, you can
apply Mo modifier. And these faces right here are not important.
They are not visible. You can delete them easily, and that's very cool. All right I think now
we can say that we finish with this
geometry. I guess. Maybe a little bit of tweaking
before we go further, I don't know, like
moving these vertices. L et's see how can
we achieve this? Let's move these vertex
a little bit, like this. Maybe we can move this one and hold he to grab this one
and move them a little bit. Like that, make them close. This one, you can move like
that. That will be enough. All right. I think that's cool. Go to the top. We
have these shapes. We need to create as
well. We can use Que. Add be, move it
here, for example. Let's control the vertices, move these vertices over here, and those here as well
may be right here. Let's move those
maybe right here. Those should be right here. And this vertex may be here. Let's move those
for example here. Let's Yeah. Take those back. A, select the whole umatry head, to take a CV right here, and control M and
flip it like this. Crab the side, and
let's move this here, and those should be right here. Control L to select the whole umatry head and
let's take a cob right here. Control M and let's
Mite like this. Crab the side, move it here, crab the side, move
it right here. After you complete all of that, select the edges at the
corners and give them a level. It control B, and
let's pizle them. Give them nice pizle. Let's see how many vertices, maybe we can add nine or ten. Now the result is okay. After that, because we
use mirror modifier, sorry, not mirror modifier, mirror command, I will
hit A and then have to to recalculate the normal in case I got problem
with the normal. Now tap out, the z. Let's take this over here and let's see what
we can do here. This depth is okay. Hall
shift to grab this geometry, control shift and Qs difference, and now we got our cuts. Tap to the edge mode. Let's select these
faces, all of them, and it control be two level, and let's give them
two edges like that. And turn off climb overlap. Let's increase the vivle
amount because I need a taper. When you be satisfied
with the veble, grab the top edge
of this one for all of these shapes,
and e twice. Well we got something
weird here. We got weird
resolved right here. I don't know why
that's haened L's hit controls a couple of times. Let's ignore that cut because I think that's happened
because of the variation. Okay. Variation in the thickness between this area and this area. So we should select each one. Sorry, we should move these phases up get
wise and or this ge get wise and
slide this up and merge it or you can hit
control plus and go to phase, hit control and
make it one phase, and then hit to extrude along
the normal and extrude it. Now the result is correct.
Now it is better. The same sen areas do it
for this one, control plus, control x and dissolve it, Alt extrude along the normal and extrude it inside
just a little bit. You can iPole it,
control plus, control x, T, extrude along the normal, and now cool. Let's
start with this one. I cant, let's pivle this
face to two edges like this. And again, control B. Let's pivle this
almost right here. Use a clam overlap, and let's move this up. All right that's. After that, we got two edges right here. We can delete one of them. Go to this one, control B, bev, until it stop,
go to the edge. I'll click control x
dissolve one of these edges. Go to this phase, control B, bev until it stop,
go to the edge. I'll click control
x and disolve it. Now we got this. I think
now we've finished. The only thing that
we need to do now is add another miro
modifier to this. Let's add miro modifier, Z and activate sect, and we should got the same
shape here on the side. Radically shade smooth, and
we added O smooth recently, and now it's become very nice. All right Let's top to emo to this area. Maybe we can make
some tweaking here. For example, we don't need
these edges here like that. Maybe we can align this and
align this as well, sorry. And we can go to wire frame, grab the side, and move
it and snab it here. I think that we'll do
it for this video, and I will end it and see
84. 084 Modeling section Starting with the wings part 5: Hello, again. Welcome back. Let's create these objects. Okay. Let's go to
the top of you. From there we can create them. Let's create this humo
tree and let's put the three d coosor
and in the middle. Or I think it's in the middle. Go to the top, shift
A, and let's add cube. Let's move the cube right here. Starting maybe from here. All right, hit S and scale this. And tab and go to the vertices, grab those, move those
over here, grab those. Move those, for example,
right here, go to the fronts, and S two disease, elvis almost right here. Let's see what we got
in the perspective. Control r and let's
add one g right here, maybe another g here. Let's select this phase, this phase as well, S to
the Zn scale it down. Like this, maybe grab this edge, and this to the Z scale
this a little bit. Or maybe this ge, we don't need it.
We can ignore it. Now we've got this result. All right, go to the vertex, grab these vertices in
the back and move them inside and delete this face XF. We don't need it.
It's not visible. Go to the top tab out, have the or let's see, can we duplicate it now
or what we can do here. All right, I'm not going to
duplicate this now because I need to add vel and rab.
I will do that later. After I add bevel and
robe, I will duplicate it, and I will get all of these
copies rubbed and beveled. But I will take a
copy right here and rotate it 91 80 degree. And move this a little
bit right here, go to the back and here we have some variation as to the scale it and
make it thinner, and it control a apply
the scale, and that's it. And ignore the rest. We got a beam right here
we need to create. So go to the top tab out, H A to add, s, go here, bring the
three D cross right here. Hit to a to add and
let's add the cylinder, and let's Yeah, I will accept the vertices
number. Scale it like that. Key, and let's move
it over here, maybe. Go to the front and
move this up top. Grab the side of vertices, move this over here. Go to the edge, grab this side, the side, control B
and let's col those. A and scale it, have z
to cancel the z axis. Right now we got this
result. I will keep it. It's very nice. R c head is
smooth and then auto smooth. This geometry, we need to make
somewhat tweaking to this. Like to isolate it, go to
the top, tap the eight mood. We need to cut it using
maybe cover tool. Tab out control X, go to line and let's
cut it like that. And that's it. All right now, let's see what we got
here at the tip here, how many vertices guest one. Yeah, that's what I wanted. And it's tied to excite. Maybe we can move this back
a little bit right here, and that's will be enough. Right. This be maybe
we can make a taller. Let's try that. Let's
see what we will go. Move it right here. That will be enough. That's very cool. The car that we got right here, we don't need it anymore.
Grab this control. A apply visual humer to me, apply everything, grab this deleted. You don't
need it anymore. Radically head smooth.
And that's it. One more thing here
we need to do, I can't see the A here because of the auto smooth number here. So I will add 15 and
let's see what I will go. Ack the rest. I don't see it. Let's add 12. Now I can
see it. It's fixed. That's very cool. All right. Is there anything
else we need to hear? We have some shapes
here we need to create. According to this MH can see. We got the stuff. Let's
see how can we do that? Let's tab to the mode and go to face I'll click
to grab these faces. Have the and let's
take copy right here and then Ps to separate it. Let's focus on this one. Tab control to add one here, control to bev it. Let's piv it two,
something like that. And delete the
rest of the metry, this one, and this one XF. We need to create five
pieces from this human tree. So in this case,
what I will do is, I will grab these faces, select three at D
take a CB and right click to leave it
in the same place and then P S two separate it. All right let select
this tab, cut the g, I'll click to grab
the entire loop, and bring the three d cos
in the middle tab out. Select this small human tree
that we just CVD this one. And let's hit radically
set organ 23d coarser. Now let's grab those both. Maybe we can go to the left and let's rotate this and
duplicate it in the same time. Let's hit D to B and
then r to rotate, rotate this 72 degree. All right 72. All right. The rotation now is
going to the x axis. I can go here to the atom and right. Where
is the rotation? 72 and I need to do that again, Shift D and then r rotate
this to the x and choose 72, enter and then sift and ft
r. Now we got five copies. I just need to determine where is the phases
that I should delete using this method.
That's very cool. Let's see grab the
whole geometry and deselect this and merge
those, control J, just to control All right. That's weird, why
that's happened. We need to make one
of these active, now controlled gay, and a. Now they are merged. All right. Now we have some
phases we don't need. We need to delete them,
grab the t to t mood. And now you can see what
phases we need to delete. If you don't, you can
select those and go to the material add material
to this geometry. All right, let's give
this a material. And turn off used
nodes and go to material review
viewboar display. Take this down and make it dark, and now you can recognize them, I think, especially if you
scale those as a little bit. All right now, grab
this geometry tab and delete any face underneath the black faces
using the face mod, grab grab those grab those here, grab those here, hit X F to delete them and
delete the guide. We don't need it
anymore, and now we ended with this result. Well, now, let's see what
else we can do here. All right, select those tab
and go to the vertices, select the corners,
grab them all. And you can bubble these edges. Or these vertices, control
if and bubble them. Let's got nice round angle
here. That's very cool. Tub out and this excite. Now let's take
this bag, move it. Let's see how can
we achieve this? Well, I think manually, let's move this back
until its attack with the body,
something like this? That will be enough. Let's add the solidify to give
this a thickness. And the offset zero out the offset because
I need solidify to work in the both sides and
give this a thickness. A little but not too much. That's very cool. Now, I
can use this as a cutter. Hold H to grab this
geometry, control H V, and Qs slice, and now we
got nice slides over here. Select those tap the mood. We can delete these faces.
We don't need them. Using control, hold to
add this, hold control, x F to delete them, and s to exit. Now, select this umetry,
to isolate this. All of these phases
are selected, what we will do now hit
control minus to shrink, target these phases and then hit xF to delete them because
we don't need them. There we go. Right click, Had Smooth add Auto Smooth. The same thing, Had
Smooth add Auto Smooth. All right. We still
got sharp edges here. All right. We got
double vertices, it A selects the whole gemetry, and then hit and merge by distance and marriage
any close vertices. That's very important.
Now it's become smooth. We can do the same thing to this geometry if we got
any close vertices, A, select everything and
merge by distance, and we got a vertices merged. That's very cool. Now
it's become nice. Well, this vertex
with this vertex, we can make a connection between them and the
same CNR for the rest. Hit k. Let's do that for
this one and this one hit K. This one and this
one hit, sorry. This one, and that
one, crab this, hold to grab this K. Crab this, hold to have to grab
this K. Crab this, hold to have to grab the J. All right, that's very cool. Now, these edges, it's wrong
to leave them like this. We don't need them because if I got this very
narrow angle here, I will got problem when I add, it's better to de control
to dissolve those. And the same thing for the
side control for all of these. Okay, those here as well, and those here as well. After deleting all
of these vertices, now we can make a new
connection between those. It will take a
little bit of time. I know, but it's
better to do it. You just need to do
that for one object and don't worry about the rest because you
can duplicate this one. Okay, grab this with this it K, this one, maybe with this one
hit K. Grab this with this. This one, select those K. Silos. All right, I think
now we just finished. It slash to excite. And now, it's very cool.
All right. Let's see. Do we have anything
else to do here? Well, I think we don't.
We got bad shading here. Let's see why that's happened. We got very close
vertices, it A select. All the vertices,
mic by distance. We got two vertices. Let's increase the number
two maybe 0.02. 0.03 Yeah. Just to get rid of
these very close vertices. The same thing we need to do with select this g
twice and Mercer. The same thing for this human
te tap it a and mercy by distance 0.03, That's very cool. Okay. Do we have anything
else here we need to do? Now, I think we
can select all of these details that we
created, grab them all. Everything. Move
it, make sure that you didn't add and this joint right here,
you need to add it. Now let's Did we
forget anything here? It seems like we don't. And let's hold and
sorry, at the empty, turn off the body, at the empty, and connect all of these
geometries to the empty. Control P set parents
and keep transform. Now we can move all of
these by moving the empty. Let's bring back the
body and All right. I think we just moved
the three D coorsor, top and let's select
these vertices. Bring the three
decorsor over here. And let's move this to the position of the
three d coorsor. H to selection to Cursor. Well, I think, that's red. Let's go to the left view. I just need to make sure that the empty is exactly
in the center. All right. How can I know that? In this case, I think
I will add a sphere here and cree the segments
and the scalet like this. Try to put this in the middle. I think we got some
thing wrong here. I will tell you what is it. Select this, go to the edge. A click, grab this
entire edge loop, have to S N to bring the
three D crusor right here. I grab this Mt Alt P and a clear parent
and keep transform. And again, I will select
Let's delete this guy. Deletes. Let's see
what do we got here. What is this? This is the
image. It's not selectable. Don't worry about it. Select
all the details, everything. D select this, Ds this. Hold shifts. Or before you
do anything, grab the guide. Shift and selction to crosser. Sorry. We need to clear the
parent, grab everything. A to be clear and
now select the MT. Now it's free. Okay, Haft S
and selection to coarser. Now MT is exactly in the
correct position, I think. After that, select the wing and deselect this,
deselect the Mt. Hold have to grab the T, control P and set parent
and keep transform. Okay. Now to move it.
Yeah, now it's moving. All right. Let's
bring back the body, and let's try again. Let's
take this sphere out. I will use it as a guide, but before I use it, I just need to kick
this again. All right. Now select this tub, bring the three
decosor over here, tub out, grab this empty
Hs selection decosor. And now I think it's
in the correct place. Hit artwie and start rotating
this and kick the result. All right. Kick
from all direction. The distance looks okay.
Everything is okay. It control Z, and that's it. Now it's become very
nice and accurate. Well, we don't need this
guide. I thought we need it. You can delete it. And I will end this video here and
see you in the next one.
85. 085 Modeling section Adding Bevel modifier to the wing: Hello, again, welcome back. Now is the time to
add vl modifier. Let's select this
and isolate it. Go to the modifier list add vl, and let's add 0.1. Add hard the normal activated, and here we could
see some bovle. If we don't, that's mean
we got some problem. Let's turn off clam overlap, and let's see where
it's a problem. Okay. It's right here. We got a problem here. Why that's happen. Let's see how many vertices we
have here, we have two. All it A, select
all the vertices, it and s merric by distance. As you can see, 20
vertices are mer. That will help to
fix the problem. And now it becomes smooth. If I turn this on end of it's not going
to change anything. That's nice. Tab, grab
this face F to delete it. And let's see if we need to do something else here.
All right, we don't. It's slack to excite. And let's go to the geometry. Hold H to grab this
because I need to copy the bl from this
one. COVID selected. Crob this one, slack
to isolate it, and kick the clam overlap. Alright there's no difference. That's mean we don't
have any problem. Bible works correctly here. By the way, we need
to add two segments. Forget to do that,
add two here as well. All right can't troll. I apply a scale in
case we got a problem. Very cool. Let's like to exe. And one more thing here
we need to mention, I don't need to push these
faces deep like this. I can actually grab
them and delete them. If I like, I can do that. But after you apply the bevel,
just keep that in mind. Now tab, go to face. I'll click. I'll
have to click and keep grabbing these faces, F and delete them
and leave the rest. That would be enough. Even to this geometry, we can tab and you can
delete all of these faces, and maybe we can do
that later because I need bevel still applied here. All right, let's select
this geometry hold. You have to grab this
and cove to selected. Let's select this isolated and let's see if we
got any artifact here. All right, Yeah, we got
too many artifacts. Let's hit A and then and
merge by distance. All right. After that, let's grab this
vertex, merge it here. Mk this one right here, and let's try to find is
there any other problems? We got one here.
Let's mire those. We got here as well. All right, what else? All right. Let's see grab this a
control x and dissolve it. That's very nice. And here as well, G
twice, Mr this one. And on the other side here, we don't have. What else? Let's make a cut
maybe like this, and on the other side as we and confirm these phases right
here, we don't need them. Grab them XF Okay? Anything else we could do here. All right? I think that we don't need that
many of vertices. We can dissolve some of them. Yeah, let's keep this one.
Or I will bring this pack. Okay, I will keep them. All right. Now it's become D. We got some weird
hitting right here. Well, to fix this, you
can go to the top, for example, go to wire frame, hit k to activate NF, to make cut like this, H C to cut and make the cut. After that, you grab this
k twice and slide it, it E for even F to flip. And let's move those right here. Let's see what we got
in the perspective. We got this result tab out, and that will help
to clean this area. The same skin right here, you can grab all of these faces and hit two in sit and that's
will help to fix, but I'm not going to do that. All right. I think now
it's become clean. Excite, and I'm not going
to apply vl to this one. I will duplicate this
and boots right here. But before we do that,
I will select this tab. Grab this entire A lube, bring the three D
coorsor over here. Grab this geometry, right click, sit organ organ 23d courser. Now delete this one, and
let's have d and r to rotate this along the x axis and
rotate this one degree, and now it's in
the correct place. Select this geometry, hold H to grab anyone with
vl and give it. Okay. After you add the l, slash to isolate it, control A apply the scale in case we got a
problem with the scale, and check what we
need to do here. Everything looks okay. There's no editing
here. We can accept it. Let's add the veal to
this geometry as well. Both have to cru this, Kobe to select it. Slash to isolate it, control A apply the scale. Add auto smooth tab, and let's make some quick cuts, gos like this in one like this. All right, it K again. Make a cut goes like
that, and confirm it. These phases right here. We don't need them
XF tap out as it. All right. After adding the vel now, I can
duplicate this. Let's select the geometry, slide to isolate
them, go to the left. Okay, H D to take a CV and
let's add a cob right here. Move this up to the z. Almost right here. Grab those both H D, take cob right here, and let's rotate
those 180 degree, but I think I can use
mirror and mirror them, and let's move those back here. After you mirror those, just
control I apply Hal tap it A and shift N because normal will be
flipped after a mirror. And that's it. Is
exact from here. All right. What else? Let's add bevel to this umetry. Hold have to grab this,
add COVID to selected. And let's select this umetry
alone, and let's see. We got a lot of artifacts here. Let's start with these
here, select these faces, control x and dissolve them
and dissolve those as well. Let's make quick cone
using the M a cut here. Cut maybe here and one here. The same thing for this side. And confirm. All right. Tap out and let's
check the geometry. Control I the scale. It looks smooth, but we need
to investigate and see. We don't see any
bevel right here. I'm going to cring
this bag the angle of l, and now we got it. Let's check if we got
any problem here. Everything looks
nice and smooth. All right, I will
accept this result. I don't see any
problem right here. Let's see grab this umetry hole, you have to grab
this and COVID to selected, select this one, isolated, control, a
scale in case we have a problem add auto
smooth and almost done. I think this ex. All right. What
about the cylinder? Let's give it a a lt, you have to grab this,
COBI to select it. C troll ale, and there we go. This one as well, holt,
have to grub this, COBI to select it, and let's
add auto smooth to this one, and there we go.
What about this? I got a problem here. When I moved the edges down
they merged at the center, and that's not correct. Well, I have two options. Either I accept merging
these at the center or Separate them like this. I think the easiest choice is to
marry them at the center, grab those at M and Mc at
center and the same thing here, grab those here, it
M and Mc at center. And let's check the rest. Alright, everything looks okay. Now let's add vl to this one. Or by the way, if you
want to bring this back, can hit alt click to select
the entire edge loop, and you can bev
it if you prefer. You have this option
if you'd like to do. After that, you can go to the face and select
these faces if you like. If you wish to move
these faces out. I mean, Alt and move
those out if you like. So let's go to the top of you and from the top we can see, as you can see, they are a little bit far from
the reference image. So I'm going to a Alt S and move those away
just a little bit. Okay. Something like
this, it will be nice. A little bit of tweaking
here we need to do. Move this from the top of wise, and let's move this over here and align it like
that. That will be enough. If you like, you can move
this one, right here, and that's it. All right. Let's add bevel modifier
to this emetry. Hold you have to
grab this one maybe and add control A
apply the scale, and add 00 smooth. Let's see how clam overlap
affect this umatre. It's not affecting
anything that's mean, we don't have any problem
with this. We can move on. Let's add l to this mat
as well. Grab this. CV to select it,
and now we got it. Turn clam overlap on and
off and C before and after. Ctrol, A apply the scale. I think I can't see Bible. Well, yeah, we have
a bibble here. Let's isolate this geometry, and we just need to make
some connection here. First, maybe I can use knife tool it K and
make cut goes like this, using T to cut and
make that cut. After that, maybe I
can erupt those K or maybe K to activate the knife and make
cut goes like this. The same thing for
the side, maybe. Okay. And the side as well. All right. And maybe
cut right here. Go to the edge, dissolve
this, dissolve this one. We don't need it.
Make those together, key tie and marry them. Okay, what about the side? The same scenario, use tool. Make a cut goes like that. Okay? And what about this
ache? We don't need it. This one, we can keys
twice in market. Hand delete this.
As will be enough. This side as we Confirm the cut and dissolve
the C we don't need it. Another k to activate
the knife tool. This one is not in
the correct position, and merge it here n again. Because we got mirror
modifier exist, I'm not going to worry
about the other side. What about this area? Maybe just this corner, we can support it. Or can I mir? What about those over here? Well, I think I can ignore them or put
them at the center. L et's see if we got
anything here to do. All right. It seems like we
don't have anything else. All right. This one is ready. Well, what about this humo tre? Let's go to the edit mode and
try to mirrg some vertices. We don't need this
vertex right here. Try to avoid any close vertices. For example, this edge. What we can do is we can grab this and this one and key
wise and move it ale be away. That will be better. All right. We don't need these
face like this, C trol X and dissolve them. Use the knife tool, hit K, and make a cut, goes like this. What about this area? Grab this e, we don't
need to dissolve, dissolve this one as well, and go to the top maybe k
to activate knife tool. Let's make a cut goes like this, and one cut goes like
that, maybe here. This one, dissolve
it. We don't need it. All right, What about
these vertices? Let's make some connection. E ni tool. Let's make cut
goes like this, maybe. Cut goes like that.
Something like this. For the other side, we can
use a mirror modifier. This egg right here, we don't need it, dissolve it, this egg here, dissolve it. This one, dissolve
it, we don't need it. And this one here. All
right. What about this area? We can maybe just
add one cut here, k, and maybe one cut
right here like this. That's will be enough, I think. This vertex. This is very let's grab it and
dissolve it as well. Grab this one as well. Kat wise and slide it
a little bit down. We got some problem
with the heading. We will fix this later. For now, let's see
what else we can do. These faces, I don't like them, Ctrol X, or fox on the side. Go to the vertex, e tool, make cut goes like that, and cut goes like this. All right. What about this area? All right. Maybe a quick cut goes like that and another
cut goes like this. That's very cool. What about
this vertex right here. Let's add a cut
here and that's it. Now let's add mirror
modifier to this umetre and activate wire frame to see
which side is mirrored, U Z, and activate bicect
and now it's done. Now you can turn off wire frame. Wire frame, you can
find it right here. Object properties underneath
a viewboard display. All right to fix this heading, you can apply the bevel, let's put vl
underneath the mirror. You can apply bevel
and add harder normal. That's will help to
fix it if you like. But it's not visible. You can ignore it actually. All right. Is there anything
else here we need to do? It seems like we don't
have anything else. I think the wing now
is become ready. And we just got some stuff to
the body we need to create. And after that, we will
come to when I reach rob, I will duplicate this
after I rub the first one. Let's end this video
here and see you in the
86. 086 Modeling section Creating the Grill to the ornithopter tail: Hello, again. Welcome
back here. All right. Now I think we can go back to the body
and comb the details. Let's start with these
stuff that we got here. Okay. Let's see how
can we create this. All right. Let's put the three D cos for
example right here. F e to add and let's add plane. Let's move this plane
for example right here. We can scale it like this. And yeah, something like this, can troll A apply this kel, I will duplicate this one,
but I'm not going to use HD. I will use Alt D. If you
hit HD and add COV here, if you go back to this
one and make any edits, the edits will the edit will
apply on this geometry, but it will not affect this CV. But if you duplicate
this plane use Alt D, Whatever edit you make here,
this one will follow it. It will affect both of them. That's why I need to use Al
D. So let's delete this one. Grab this metre. Maybe we can scale just
a little bit control. I apply a scale. Al D, and let's take
a COVI over here, and I will align this CV with
the body of the or thepor. I can use face snab int
center and align rotation. Hit g to move and to hold control and snub
the body like this. Go to the transform, transform orientation
and chose local. And locally, let's go to the rotation and
let's rotate this just a little bit and
move it like that. Something like this maybe. Or maybe we can rotate this just a little
bit holding shifts. I just need to align it. All right. That's
very cool. All right. Now, whatever it I can
make here, for example, if I skelet as you
can see there, this Kobe will be affected. All right. Now let's see how can we what else we can do here? Let's grab this vertix,
and let's move it, and let's see how that
will affect the Gumetr. I think I can select this and this body and this one
in its to isolate them. All right. Grab this tab, and maybe we can grab
this vertex and move it. Let's move this over here. Grab those, and let's move
this almost right here. Grab this vertex,
maybe, let's see. All right, maybe we
need to grab this. Let's move it maybe right here. Alright, that's very close. K. You can control that farther. And you can tap out and move this and keep close like that, and you can tap to mode and
make further editing here. Let's grab those both and move them just a
little bit here. Let's go to the side and
let's see what we got so far. Let's move right here
maybe grab the side, and let's see what
we can do here, heat wise, and all right. I will keep this here,
but I can move this one. Move this a little
bit right here. Get this g tie and
let's slide this in. Maybe right here, and
that will be enough. All right. So now I
got this after that hit control r and
let's add edges. Try to add many edges, and leave these
edges in the center, we added 109. All right. Let's increase this. I think we need to
increase this number to I don't know, 120. All right, 120, maybe? Or 140. All right. After
that, go to the edge. Let's start with this edge. Hold, have to grab this and
leave one and select one. And I'm not going to
grab them manually. I got nice strick. You can use control, Hit end plus Blender will
understand what you want. As you can see, I can leave
one edge and select the next one by using this method
until you reach the end. All right. You can
ignore the last one. Hold control and ignore it. Well, after that, I can grub those and move them up a bit. And don't worry about the
side because it will follow. And let's move them maybe
to this direction atle bit. Maybe we can move
them a little bit up and vel them. It can't be. Let's add some bvl right here. Let's see here, what
we've got so far. We got this result. All right. I think we need to
move these faces down. All right. All right. Let's check the result
here and the perspective. Even if those goes
up, don't worry. We can fix this. All right. So now we got this result. After that, with
these faces selected, you can hit two ints. Let's make small
inset like that, and after that, hit to
delete these phases, and now we got these holes. All right, let's see what
else we can do here. Let's try to select
the top as those here. It control H plus and
the crab the rest. Until you catch the last one. All right, right here. Grab those and bubble
them, control B. And just bubble them a
little bit. All right. When you be satisfied, it A, select all the faces and
move those down just ale bit or All right. And let's see in the perspective
of what we got so far. All right. So we
got this result. All right. That's very
cool. All right now, I will grab the
entire edge loop, the outer edges, crab them all. And I will hit right click
and choose the mark seam. I need to convert
this edge to seam, and I will show you
later why I did that. After that, let's add the solidify to give
this a thickness. A little bit of
thickness, not too much. Let's take this back. I just need a little
bit of thickness. And let's activate on the
M because we just need the M. All right,
0.05 maybe thickness. Something like this, it'll
work and apply it All right. That's not going to apply
because it tells you that you need to make a single user
to apply the modifier. But let's see how the solidify
works here on this umetry. If we got any solidify? Seems like we don't. All right. The modifier that you
add here I think is not going to affect the
umetry here, as I think. So I'm not going to use
any modifier. All right. Maybe manually we can do that. I thought I can make just a little bit
extrusion to these edges. All right. But maybe I can
tap to the mode and go to the edge and manually grab these edges and it can troll
p plus a couple of time. Blender will select the rest. Let's do that until
I reach the end. All right. I just
selected one side. Now we need to go to select select loop and loop to select the rest and hit F to create phase for
all of these edges, and then hit Alt to extrude along the normal and
just extrude those down. Tiny bit, not too much. Let's see what we
got here. All right. We need to extrude it on
the opposite side, control, Al extrude this All right. Now the extrusion
works down here. Yeah, that's very cool. After
that delete this faces, X F and as. I just need a small rim
here because I need to add vel modifier, and I need these es to be veled. All right. So we can say
that we finished here. I will grab this n deleted. I don't need it
anymore, grab this one, and let's add bevel modifier to this metr and let's add
point 1 centimeter. Control A apply a scale in case we got a
problem with the scale. All right. I think that's
to Mach 0.05, 0.03. Let's add two segments, and let's add auto smooth and
activate hard the normal. Now we got this shape
beveled and ready. Maybe we can decay decrease the number of the
angle because as you can see, this egg doesn't
catch any bevel, so we can take this down until until we see
bevel applied here. All right. I think
that's it. I will hit slides to isolate
this metre alone, and I just need to check it. All right, let's go
to the wire frame. Well, these faces, I don't
want them after I add the vl. I just need a little
bit of curve here. So that's been I can delete these faces if
I can't catch them. Okay? I will apply
Bival and let's tab, and let's see how
can we grab those? Let's see if that's even
possible to grab them. Let's hit control, shift
the plus, and see blender. Yeah, I think Blender can
do it. That's very cool. So let's select the rest. Hold the plus until
you reach the end. Another one. All right, when you grab these edges, go to select and use edge loop, control plus to grow selection and then
x F to delete them. I just got this small curve, and that's what I wanted
actually. All right. Well, that's mean we
don't need the seam. I thought I can use it, but I got another way. So I'm going to hit A, select everything and then hit right
click and clear the seam. We don't need this.
That's very cool. Tab out and that's it. Let's like to exit
and let's check it. And let's see the
pace orientation because maybe it's a flip. Yeah, that's right. That's
a flip. Let's flip back. A radiometry, grab this tab, hit Aft N. Tab out,
grab this tab, hit Aft N. H. All right, if this doesn't want
it to be flipped, we need to tap hit Alt
and use a flip flip it. Manu will like this,
grab tap it A Haft N. Well, grab this one,
tap it A Haft N. Done. Grab this tap it A Haft n.
Done. All right. This one. Tap it A Haft N,
or anything else? Maybe those tap it A Haft n.
That's cool. We done here. This one here, tap
A n Hf N. Okay. Is there anything
else here to flip? Seems like we don't
have. That's very cool. Let's turn our face orientation. What about All right. This uma tree I just
going to show you. I don't know if I have a
reference image to this or not. All right. Yeah,
this one right here. Let's try to create this. All right. How can
we create this? Well, I think I can bring the three D courser, for
example, right here. It A, let's add cube and scale it like
this, make it very small. Maybe we can move it forward
like this and grab it, it A all the phase and scale this Maybe we can scale
it down like that, and scale this make it t. Let's move this back
for example right here. Let's move this down.
We can start from here. Hit f d to the z, and let's move be here. Hit ft cou time. Let's go down until I
cover the whole area. All right, that's
very cool. Now, let's go to the edge and wire frame. Grab the side. Move the side
right here, grab this one. Move this side right here. And now it's a time to
align this with the body. So tab out and let's hit r to rotate
this like that, maybe. And right click, set origin
to geometry. All right. Maybe we can move this
just a little bit. And now we got this result. We just need to rotate
this to the Z R Z, rotate this just a little bit. And now we got this Maybe we can rotate this
to the X r x a bit. Not too much. I think that's it. Maybe we can move this
down a little bit. Something like this. And we
just need to cut the rest. So I prefer using. All right. I think we
need to move this deep. Inside. Yeah, maybe right there. I think that's better.
Yeah, I will accept this. Well, Let's go to
the orthographic, because you need to cut
this in the orthographic, not in the perspective. Control shift x activate carver use line and let's
make a cut goes like that. And sorry, something weird we
got right here. All right. Carver tool created
this geometry. Alright, that's not going
toward. So delete this. Well, if that doesn't work, we got another solution. Tab, go to the face, grab these faces here. Shaved, and let's take a CV. Right click to leave the
b in the same place, Ps to separate it. Rob this and then tab hit A and along the normal
and extrude this pick. That's very cool. Now, we got some overlapping happen here. And we can use this
to cut these shapes. Hit A and then have to n to recalculate the normal in
case we got a problem. So use this as a catapult, have to grab this umatry. Control have to be
and s difference. And now select this umatry alone and it's like
to isolate it. And now we can delete the rest. Tab, go to the face and
let's grab these faces, grab these faces and hit
control to select the rest, F to delete them all,
and there we go. It's like to exit,
and now we got it. One more thing here,
maybe I can do it. Because I added holes here, we can see what's inside. So to avoid this, maybe I can let's select this
one and isolate it. Maybe I can create phase here, and put it underneath
these holes. All right. I think we
don't need these faces. We can delete them accurately. And let's see how can
we deal with this. Did we gave it a bubble? I think we don't let's add
double modifier to this one. Control, I apply the scale. Ten centimeter two mac
point 1 centimeter is okay, add two segments
and ad autosmooth, it's already there, and activate hard the
normal and done. That's very cool. These faces
here, we don't need them. We can grab them
and delete them. F. And these edges here, we can hit F and a a
cup here and exact. All right now it's better. We can apply bevel to
this geometry as well. Hold have tab this
and CV to select it. Select this geometry. Apply the scale first in
case we got a problem. Let's see if
everything looks okay. We don't have any issue here. That's very cool. All right, so yeah, I think now I can end this video and see
you in the next one.
87. 087 Modeling section Adding lines to the Body part 1: Hello, again. Welcome back. Let's select the wing and let's put it inside
a new collection. Grab all the details. Let's select these to move, and let's see what's moving
now. That's very cool. Now, hit M to a new collection,
and let's call this. Wing and hit enter twice, and now we got them
inside new collection. Now we can hide
them and hide them. I just need to grab
those here as well. It M and wing. That's very cool. All right, now we can go to the oid. Or before we go to the oid. Yes. One thing here. Yes, I forget to do. I
forget to give this a bivl. So let's add ivl from this
geometry to this one. Select this whole he to rub
this obvl to select it. All right, can
troll apply scale, and now we got ivle, correctly added
on this geometry. Well, I can delete half
of this if I want. You can do that, or
you can keep it. Let's decide this letter. Let's hide the wing for now, and let's go to the body. And let's see what else we
can do here. All right. According to the
reference images, you can see that I got lines
here added on the body. We need to create
all of the stuff, and we got this button
right here to open and close the door to open
and close the door. This we need to create as well, and we need to add
all of these lines. Okay? And here as well, and those right here,
all of this stuff. So let's see how can we do that? Let's go back to
the perspective, and let's select the body. All right. I just need to
make a small change here. According to the
reference image. I think I should separate this geometry and give
it separate material. So I think it's better to
separate from the geometry. Let's select that body and
let's see what we got there. Let's activate wire frame
so we can see here. We got vl in this area. We need to delete this
bevel right here because I need to cut it right
at this corner. To do that, I will
turn over bevel. Let's see what we got here. Tab, go to the edges, and we need to select all of these edges. I'll click, maybe. Make sure that you selected
the correct edges. When you be satisfied
with the selection, you can hit V to separate this. After that, select
any edge from here, hit control to link select. Make sure that you select
the correct object. After that, hit P has
to separate it out. Turn off wire from this
and this one as well. Now you can go and activate
the be val for this metre, and this one is separated now. Let's select this. The body alone and it's like to isolate, and let's see what we got
so far here. All right. We got what we want
in the school. I select this one alone, and let's see What
we got right here, activate Bible to this. And a bubble works
correctly to this one. The only thing that
we need to do here is tab, go to the edges, I'll click to grab the
edge loop and just hit e to the x and just make
small extruion over here, and that will be enough. I think, Let's activate wire. I just need to see what
we got so far here. I don't know. Maybe
we can go further. I think that's it. All right. Turn off wire frame. Let's see the result here. We need to select the body
as well and go to the edge, select these edges, and maybe we can extrude those to the
x axis a little bit. Ale bit, not too much. All right, that will be okay. I think we got problem right
here. Let's see what is it. This area is mirage. I don't know why that's
happened maybe because of the auto marriage or
something like this, or maybe I can I should give
this area aval or whatever. In this arrow and
let's see here. What we got iv weight 0.08. Let's add 0.08 as well here. That will help to fix this. 0.08, and me increase 0.50 0.5. This one as well, 0.5
enter or that's wird. Let's add one here,
similar to this. Let's the other corners here. Po eight with Crease one. And maybe this corner or yeah, we need to do we need to do anything here? I think we don't. Everything is work
correctly, I guess. All right. No the result
is better for me. That's very cool. I will add a separate material to this one, just
to recognize it. Let's add a new material
here to this one. Let's go to viewboard display
and let's make this dark. If you'd like to give
this a metallic, you can give it metallic
and make it a little bit glossy. That's very cool. Let's see now what
else we could do. Let's start with a body, and Let's check what
we got right here. We got bevel and this stuff. Well, what I will do now, we have the extra folder here, and we got some shapes
here or gumetries. I will grab the
body and hit shape the take V in case
we need to go back. We will still have a COV and
leave it in the same place. Hit M and move it to the extra, and now we got right here, and you can call
this extra body. And just hide this hide
the extra and that's it. All right. Now we need
to apply the level. We don't need it anymore.
I control I to apply it. Let's see how can we
create these lines. Let's go to the left. Let's hide the Mural modifier for now
and turn off weight normal. Go to the wire frame, and let's see how
can we create this? Well, select the body
type to the edit mode, and maybe we can use
knife tool it K, and let's start adding
cuts following this. Let's add the cut goes maybe
from here and ends there. Goes here and here and ends maybe right here and
hit Enter to confirm it. In the perspective, we got this. If you want to
recognize its selected, and right click and choose Mark seem to make this
red to recognize it. And now if you like,
you can vol it. But let's add some support age, for example, one here, and maybe use ni tool, add a cut goes like this, maybe. And the same thing here, maybe we can add a
cut goes like that. And what else? What
about this area? T's add a cut, maybe
goes like this. This edge, I will dissolve
it because this edge, we got sharp angle here. Sharp angle like this, maybe it will cause some
problem when I level this edge. Temporarily, I can dissolve
this one and move on. What about this edge right here? It's tilted a little
bit, goes like this. So what I prefer to do, I can use the knife tool
again and make a new str cut, goes like this,
and grab this one, the right one, and hit
control x to dissolve it, and the grab this and hit
right click and mark m. Okay. All right. This edge
is not goes strike, the same scenario, make
a cut goes like that, and you can mirk these vertices with this
new line, if you like. This will work as well. Now it's become striight. All right. Now we can select
the line, the new line. All right, this egg
is not going to work. So let's make a cut goes maybe like this
and dissolve this. Let's start over,
select this line. Hold can troll and
keep selecting this line until you
weak this area. Hit contro two bevol it, and let's bev a little bit. Tiny bevl. And sets. Now we got something here, but vl is not work there. I don't know why,
Maybe because we got very close
vertices like those. Try to avoid them and make
sure to activate atomic. Don't forget that. Let's start again by selecting this age. Let's start again,
Control. Let's be it. Give it whatever vl
you like, activates. Do we have any ost even here? All right. Let's make the bible smaller. C troll this manually. Maybe 0.2 is okay. 0.2 enter. Kick the bible
and see the results. From here, Bible is
not work correctly. But anyway, I will
accept it and I think I can manually treat this problem. So let's see how
can we treat it. I will at an goes like that because I need to move this
vertex to this diakin. I need a guide and grab this gt wise and
slide it over here, give it the width that you like. Grab this vertex. Use
knife tool hit K, make a cut goes from here to here and confirm the
cut and one by one, Ket wise and marriage. K sorry, Keat wise and marriage. Keet wise and marriage. This one as well, Marriages, and we don't do anything
here. Go to face. I'll click to grab the
face loop, this face, as you can see, automatically we'll select all of these faces. Make sure not to select any
other faces like those here. When you be satisfied, hit all to open the extrude
menu and s extrude along the normal and extrude this inside
like that. A little bit. That will be enough. Go to the edge and let's scrub these edges, for
example, this one. Well, we need to
give those aboval. I'm going to move
these vertices, t twice and move
them over there. And let's do we need
to give them a vl? Actually, we need,
but I think I can use the modifier, think
it will be better. What about this sharp
angle we got right here? Maybe we can bev it. You can val it if you like. I think we can select this
one as well at control b. Let's make it round
like this. If you like. Let's select these faces. Sorry. Ct and dissolve them, and maybe a quick cut like that. I think that will be enough. Nice curve we got right here. The same thing may be to
this side, grab this edge. Hold can grab this, can throw to veal dose. Let's go nice here, and grab this vert, heat wise and mice here, this one heat wise
and merc here. B this, maybe with this one k, grab this ge dissolving. That will be enough.
That's very cool. This is how to create this edge. Now we need to do the rest, go to the left or let's
hit slash to go back. Go to the left now. Go to wire frame, select the body tab. Use tool, it K, and let's make a
cut goes like this. If you want to ignore the snap, you can hold control
while you use the tool to ignore any snapbing. And confirm the cuts. Now let's go to the perspective and let's see what
we've got so far. All right. Quick support. Let's add the support egg
here, one, maybe right here, one there, one, maybe here, one here, just to the corners. Maybe a quick miking here, we can do select these edges. If you want to If you
want to recognize them, you can convert those to Sam, and it control to Buble. Let's bubble those 22 edges. Let's add 0.2.
Something like this. Go to phase A and
ext inside alphabit. Something like this. All right. That's cool. We
finish with this one, go to the lift, wire frame, and let's see what
else we can do here. All right, we got a line
right here, we need to do. Go to the tool. Let's make a cut goes maybe from here and here goes there. And maybe here and
maybe goes there, and one cut should ends
there and confirm that and right click Markm
to recognize it another K to activate the knife tool and make
cut goes like that. Confirm them, right
click Mark them. And now we got our cuts ready. Now let's see what further editing that
we should do here. All right. All right. For this area, I
will repeat the cut. I will use NAF tool and make
cut goes from here to here, maybe and right click Mark sm, and I will delete this one. Ctrl X. Cut up those Ctrl X. Mark sm That's very cool. This age is very, very close, Morgue,
heat wise and mergit. You can merge it from here
as well and delete this one. All right, what else
we got right here? Well, I think we can support this angle and subort
this one as well. And what about this?
We can ignore it. Here in this area, we can make some tweaking like merging this verte right here and this
one right there. And this and this age, maybe we can change their
direction or dissolve them. Here, we got the same station. Kat wise, mirrors this more right here, and
this more right there. And maybe we can
grab those four, control x to dissolve them. Because if you leave them, maybe they will cause some
problem to the bevel. Support this angle as well
with an goes like that, maybe. Here we have close
vertices, Katie, at wise. Move them a little bit here. This vertex is close as well to the Katie move
it here, this one, et tie a move it right
there. What else? Maybe we can move these
vertices a little bit away or merge them, at wise, Mr those. For those right
here, you can move them a little bit
farther like this. Right now, you can
select this edge. I think we need to select it. All right. Let's move the
just a little bit right here and select these edges. Hold control in the
grab, all of them. All right. At this age, right here will cause
some problem to the bible because it goes with a line. That's wrong, it goes like that. Anyway, let's try and let's see what's going to
happen control B. Let's add 0.2. Enter and let's check the bible. From here, that's very good. We don't have any problem. Check the re Well, every thing looks okay. Now it's just the time
to go to phase and hit t and extrude along the normal and extrude
this a little bit down. All right. 1 centimeter
is too much. Let's add -0.5. That's see enough,
I think. This face here in the middle
between the two side, we don't need it x
f to dissolve it. That's very
important. Here seems like we don't have any problem. Everything works correctly,
and here it's works fine. And I can say that we
can end this video here, right and see you
in the next one.
88. 088 Modeling section Adding lines to the Body part 2: Hello again. Welcome back. Let's see what we can do here. This edge. All right. I think I can't
fix it right now. I will leave it like this. But I need to give these corners maybe at the curve
here at the corners. So grab the b DN tap
to the edit mode, go to the edge, select these
edges, start with those. I control be two bubble those. Let's add some segment here.
Or something like this. And the same thing for the rest, Cb this one over here and it
can roll B to Bivle those. Maybe those here as well. Ct roll B and Bible those. I think that's it. Let's see if we need to do
anything else here. I think that's it now, we can go to the pace and let's
delete these phase. We don't need all of these. Maybe we can erupt
those hit control x and grab those hit control
x and leave the rest. Or I think something
weird happen here. No. Everything is okay. Grab those control x. And maybe the same thing for
the side, control control x. Maybe we can make a
cut goes like this. All right. And what
about this one? You can ignore it if
you like. All right. Let's select those here, tro X, control X
and dissolve them. And what about this area? Maybe we can mark this vertex there and this one there and use tool to
make a cut right here. All right. Now let's select this egg and
this egg dissolve them. And this vertex just
met its right here. Yeah, that's it. All right. Now, I think this line is ready. Now we can go to the next one. Okay. All right, let's go to the left
again and let's see what else we could do here. We got a line right here. Use the nF tool, hit K and make a cut starts from
here and ends here, and grab this A to mark. All right, That's very
cool. Let's try to vl it control B to two
edges like this. Alright, that's
not going to work. What I will do is, I will change some edit this area like
deleting this egg maybe. All right. And, let's see
what else we can do here. Maybe I can add a cut goes like that because I need
the vl two ends here, and now let's
select this control and let's bivele
this to two edges. 0.2. There we go. Now, go to face, select these faces and then hit t e to open extrude menu and
extrude along the normal and move those inside
to maybe 0.5 maybe. Sorry, -0.2. I think that will be okay. Right? Yeah, -0.2. It's okay. Well, let's see what
else we can do here. I will use the NF tool to
make a cut goes like that. And yeah, I think
that's it for this one. You can go to the next one. Let's see what we got there. Well, we have an edge
who goes like that. Go to vertex and use the F tool, M cut starts from
here and ends there. You can see to cut through
and cut this enter, and now it's like to isolate this geometry and
let see the cut. All right. That's very cool. We got these vertices, sorry, before you do anything, just right click and
mark Sam to recognize it and now go to the vert
grab these vertices, all of them kat wise and
merke them with those. All, this one, Mc Kea wise, this vertex in the
middle. We don't need it. And now we can grab this one, eat wise, mark it here, this one as well, Mr there. Hit K to activate the knife
tool and let's make a cut. Goes like that, maybe, and just select the
edges that you want, and then hit control
B to be this. And let's add 0.2. Go to phase and then
ult Ed along the normal and move this
down to -0.2 as well. You can do that. Let's
see what we got. The depth is okay. We
don't need to go farther. One thing here we need
to do, this phase, we don't need it x f
because it's in the middle. Now we can see that we are
finic with this one as well. We go to the lifts, And
let's see what next? Well, this age right here,
we need to create it. Use knife tool, M
cut start from here, goes there, maybe and there
and ends almost right here. Le enter, go to the age. Seems like that I can't select Let's see if I
can select this age, that I created. Yeah. And now, Mark seem All right. I like to isolate this, and let's work with this one. Let's see what we can do here. I don't want the g
to read this area, so I'm going to hit
K and make a cut goes like that and
ignore this from here. Well, let's select the
rest of the geometry. And before you select anything, just these close vertices, try to try to get rid of them. Merge this small right here
and this one over there. Make a cut between those
hit K so hit K. And what else let's see if there are
anything else we can do. Make a cut goes
right there, maybe. A go to the edge, C this edge, hold the and the grub
this one, and cb those. And then control B two bevel. Let's see how Bevel
will work here. Add 0.2, and kick the
thickness. All right. It looks okay. Go to face, select all of these faces, and then hit all and
extrude along the normal. Let's add -0.2 as. And that's it. Let's
go to the third one. K. This one right here. Let's see how can we create it. Go to the vertex hit K to
activate the knife tool, and let's make a cut goes
like this and ends there. After you add the
cut right click and Mark or go to
the H first, Mm. Its like to isolate
this metry and let's work with this
one. All right. Select it. And let's
try to pval it, and let's see what we all got. Control B, and let's
bevel this to 0.2. Alright. Everything looks okay. I don't see any problem. That's me now I can go to face
and select all the faces. And then maybe I can
deselect this one. At and extrude along the normal and move this inside to -0.2. And maybe we can make some connection like
this and one like this. And this egg right here,
we can dissolve it. All right. I think we
finished with this one, or before we move on, maybe we can make a
cut got like that. Okay All right. What else? Let's go to the lefts
and go to wireframe. We got a long cuts right here. So let's try to create
it, go to the vertex, or to the edge and
use knife tool, and let's make a cut
start from here. One click right here and then next click
right here, maybe. And one click right here. And it goes and ends right here. Confirm that. And when you
do just right click and mark SM and hit slack to isolate the geometry and now let's see how can
we work with this. All right. Let's try to track it and let's see do we
need to do anything? Well let's leave this. I thought I can delete
it, but maybe later. All right. All right,
here we have a corner. Maybe we can make a
quick cut goes like this as a support with the
corner. And here as well. All right. And let's go here. All right, this egg now has become very
close to this one. So I can delete this
egg or get wise and mark it and just grab
this one and delete it. All right. We got this one is very close deleted,
this one as well. I mean, dissolve it, no deleted. All right, this one dissolve it. And this one right
here, I'll click, and I think you can dissolve
it as well. All right. Now we can make a quick cut. Now, let's select this edge. All right. Grab it. And then hit control
be to the vallet. And let's add 0.2 hit enter. And let's try to see if
we got any problem here. All right. It seems like
we don't have. All right. I got one problem right here. Bevel goes like this. I don't like that, actually. I will hit control Z and make another cut goes right here, and this one, I
will dissolve it, and let's select this again. And let's see what's happened. Hot control and select
the whole eumetry, s the whole line, and hit control B, and
let's add 0.2 centimeter. And now let's check this again, especially from this area. Right now it is okay.
That's very cool. Now I can go to phase and hit t e stroot
along the normal. Move this down and here you
can adjust it -0.2 and acts. It slide two, go to
the left again and let's see what we could do next. We got this line right here. Let's try to create it
using the knife tool, starting from here, maybe, hit K, and let's make a cut
goes from here from outside, and let's go here. And one click here
and one click here. But hit C to cut through, and then click and enter. Go to H and let's select this new line that we
just created. I'll click. All right. All right, right click, Mark sm, just to recognize it. Like to isolate this umetry. And let's see from
what we can do here. Go to the bag view. I think we can come the cut there, and all right. Let's go to the right, K, and let's make a
cut goes like that. It A to make the c
strt and confirm it. All right. That's very cool.
Now, let's select this age. All of it, right click Marx sm. We don't need to do
any editing guess hit control be and bevts. And let's add re 0.2. All right kick the bubble now, in case we got any
problem. All right. We just got an overlapping
happen right here. Well, it's important
to avoid it, but we should avoid it
before we do any bubbling. So I will gewiss and merge those and now select
this ache again. I'll click to grab the side. I'll have to click to
add this one as well. Make sure to select
the whole line. And then again can
troll All right. Let's add 0.2. Kick the line again. Everything
looks fine from here, and here as well. There is no problem. After that, you got to phase extrude along the normal and
extrude this a little bit. Activate offset even, and
let's add -0.2 to enter. Well, we will get some
twisting right here. All right, Let me
tell you something. Why would I need to extend
the cut to cut this area? Actually, I don't
need to do that. At least try to make a simple. What I will do is I will use the knife tool and
make a cut cos like this and cut cos like that. And I will delete this edge
loop because actually, there's no reason to do that. So select this side to grab
this control B and add 0.2, go to face now. Extrude this down and Qs -0.2, the enter of Steven, and now it's better. All right. That's very cool. I don't see any problem. Just this phase right here, we don't need it XF and deleted. All right. I think now
we did all the cuts. All right. One more thing here from the top of
view, we can see it. It's slight to Let's
go to the top. And in the reference image, let's hide some parts. And as you can see
here, we have this. Let's try to create
as well here. Let's see how can
we achieve this. Select the body. And I think we can hide
some of the body. AB and let's cut this area
and hide the rest. All right. Now let's go to the top. Go to our frame, and
now I can see better. Well, let's use the nif
tool hit K tab hit K, and let's make a
cut goes like that. Hit A to make the ct
str and add click here. Add click right here and click
here and then hit enter. That's very cool. That
cut is very okay. Let's see what we can do
here in the perspective. Let's make a cut goes
maybe like this, and let's merge this line, kee wise, and merc
it right here. What about this line over here, get wise and market? Sorry. Ignore this. Ket wise and merge this. Maybe this vertex, we
can slide it over here. Three. Now go to the edge. Grab those. Let's add Mark
am just to recognize them. And I can Yeah, I think now I can bible this, go to the edge and select
these, select them all. It can B to Bible, and let's add 0.2. Okay. Let's go to the top. All right, I can see that
we got some variation, I think in the thickness.
Es a little bit. Maybe we can solve
this by moving this vertex right
here. Let's try over. I'll click select those control. I think now it's working 0.2. All right. You can add Yeah, I think now I can go
to the face and select these selected faces and hit all to extrude along the
normal and ext two -0.2. All right. After that, go to the edge and let's
select this corner here. And this corner as well. This a right there. Go to
the top and it can troll me. Let's focus on one side and
let's pigle this like that. A, the result looks
okay and nice for me. One more thing here we
can do. Go to face. Let's select those control legs, grab those control legs. Use nf tool to make a cut
may be cos like that. One cut maybe goes like this. This ag, we don't need it. What about this area? Hit K, to make a cut, maybe
goes like that. This may or you can leave
it, it's not a problem. Grab this one dissolve it, grab this, dissolve it. Hit K, to make a cut goes like this to any one of these
vertices, and that's it. Now hit Alt B to bring back
the rest of the geometry. The next step, we need to add
a vl modifier above this. One more thing here,
we need to do, just delete these
faces at the center. X F and delete them. One more thing here
we need to do. Maybe we need to vl these edges. I'd have to click
and DC leg this one. I'd have to click and DC Lg
this one. Right. Let's see. Do we need to vl this or not? Let's bring the
reference Image let see. Yeah, we got a cave here. So yeah, we could do it. It control be and val it. Something like
this, it will work. That's very cool.
Now, go to face, let's grab these faces, control legs, control legs, and just leave one
edge right here. Maybe if you like, you
can make some cuts. And grab those maybe. And let's support this vertex with the edge and
this one as well. The same thing for the
side, Ct, control leg, and dissolve those
those over here. Okay, that's very nice. Okay. All right now is the time to add avel This bevel that I will add, will target these edges alone. So let's go to the modifier and let's
add double modifier. And the method to weight because I need to
select specific edges here. And let's add amount 2.05. Make it very tiny
and act hard normal. Now let's stop to go to the
edit mode and now let's select the edges that
we would like to vel. So let's select this. You can actually go to the
face a Alt click to select the entire phase though for one line and hit control
plus two grow the selection, and then you can
go to select and choose select boundary
to select the boundary. And that will be enough for you. After that, let's add mean
bubble way to one maybe. Now these ages should
receive the bubble. A 0.05 0.08. Maybe we can make that
a little bit bigger. Let's turn of clam overlap. Right. Let's see if we
got any overlapping here. We can turn on the fire frame. Let's add two segment here.
All right. That's very cool. Let's see if we can sorry. Let's see if we can select this entire face loop and
val it as well. All right. Let's go to select select
loop select boundary. What I will do is, I
will hit right click on the select boundary and
add to Quick Orite. As you can see here is
we got removed from Quick Forte because I have already added this
to the quick forte. So you need to add it. And when you hit
Q, you will find it right here, select boundary. It will be faster for you to do. Let's add double way to one, and let's see what
we will go here. All right. The result
looks nice and acceptable. So yeah, I will target the both side and
give them bubble. But for now, I will end this video and see
you in the next one.
89. 089 Modeling section Adding lines to the Body part 3: Hello again, Let's
complete these lines. We gave this abovel, and let's do the same thing for the rest. Let's
start with this one. Tap, go to face, I'll click to select
this face, all of it. And make sure to not
selecting the unwanted faces. For example, those right here. Just be careful and kick this
area as well. All right. After grabbing these faces. Now you can go to select
loop Qs boundary. I added this to the
quick for variety. Now I can hit the Que
and hit select boundary. After that, I will
give this pv to one. Now select the top,
the same scenario. I'll click to select the face loop again
and de select those. All right. One more thing here, I just forget to tell you about. This phase should
not be selected. I mean, these edges, we should not give
them this one maybe. Let's take this back to zero for now because we just need to
see how can we give it above. But for now, let's
focus on the top edges, maybe we can select
them manually. That will be difficult ale bit. So let's go to face. I'll
click select these faces. Deselect those. And now just a grow the selection control plus and deselect the
pass this phase. And from here, you can
deselect this phase as well. And this phase right here. Well, that's a bit annoying. I think we need them.
We need them, sorry. After that, let's
select the boundary. Make sure to select this edge and give this
piv weight to one. Let's see what we got. Now, I think the
result is correct. I guess. Well, vl here is not
working in the correct way. Maybe I can make reconnection here to help vile
to work better. Now it is better. I can
dissolve this g and this age. Now is better. This ge right here, just give it pival weight
to one as well. Maybe that one on this side, the same scenario, give
it pival weight to one. For. All right. One
more thing here. I just wanted to mention, as you can see here in
the geometry section, we got this oxen meter
outer. It's sharp. I can change this to arc, and I can get another little
type if you prefer this. You can do that. So this is
before and this is after. So I think I will
stick with this one. I don't know, but I feel
this that's better. I think let's check
it from here. It's round and beautiful, especially if you increase
the number of the segment, that will be even
better and nicer. All right, that's very cool. Yeah, I think I can
stick with this one. Let's check the rest.
Let's start with this one. Go to face I'll click and plus to grow the
selection select boundary. Add way to one. Go to face again, I'll click select boundary
and add to one. Now let's check the results. Vl works correctly or not. You can tap out and turn off
wire frame and kick it here. And by the way, let's put the weight normal
underneath the vel. All right. Let's make this offer now because
we used hard normal. Hard normal can give
you similar result, similar to weight normal. All right. This result is fine. Now let's move it to
this one. Go to face. I'll click, select
this phase loop. And let's deal this one for now. And this one as well, go and case boundary. Let's add bubble to one. Again, let's go to face. I'll click and Del this
and this one over here, and grow the stro plus, and let's add sorry. All right. All right, I think
we don't even need to switch to edge and do that. I think we can add
increase the Bible to one, but But I think
in the same time, if I do this, the
vile will target even these edges and I
don't want to do this. Let's see the result
here tub out. Yeah, that's right. This
method is not going to work. I will control the
couple of time. All right. Let's stick to our method. Switch to boundary and
e v weight to one. And here we got these corners, we grab them at the vile to one. And the same thing for this corner and this
corner a double way 21. Let's see what else
we can do here. Bivle is not working
correctly in this area, so I'm going to
make another cut. Goes like this to
help Bovle to work better, and there we go. We gout. Let's move to the next one. All right go to the pas
I'll click to select the phase loop and let's
see here what we can do. And let's select those.
I'll have to click here. And let's see where it will end. That's not going to work.
Maybe from here, I'll click. Just be sure that you
selected the all the faces. Let's add those here.
That's very cool. What else? I think I just
select all the faces. I guess when you do that, tweak this two boundary
and add val weight to one. Manually select this one, give this val weight to one. And you can, now let's
select the outer edges. Select them all. You can select them
like this or if you prefer you can do the same
thing, select the faces. I'll have to click here. I'll have to click maybe
right here and here as well. All right. Make sure to selate this
triangle and this one right here. What else? This phase, we don't
need to select it. Control last to grow a
selection and choose boundary and at level way
to one, and there we go. Let's check level
here. All right. It works fine here. You can excite and kick. Well, I think we can
give this edge a bible as well to make this round, and even this one,
you can do that. If you like. Okay, what else? Well, what about these edges? This one, give them
bible way to one. And maybe those over here. Let's add one here. You can
do that for all the corners, add one here as well. Tab out and now let's
try to track it and let's see it, it looks okay. Let's activate the wireframe. I get to see the distance here. This distance it's very big. I can move these
faces out a bit. I think that will be better. Let's try to grab them all. Select all the faces. Grab this as well, and this one. And deselect this
face over here. We don't need to select it. Let's maybe let's
focus on this corner. I will head out as to
move this face out. Let's take it out
almost right here. This distance, it's
very okay and cool, but we need to check if we got any problem anywhere,
any overlapping. Seems like we don't
have any problem. But let's make a quick
search and check. We can tap out and
turn off wire frame. Well, everything looks okay. I don't see any
problem right here. Something weird happened
here in this area. I don't know what
is it. But let's try to find out why
that's happened. All right. We got a
problem right here. Maybe because this age got y, the old ages got vl weight, and I think they are
valed Let's check them. Yeah, we got these
edges valed really bad. That's really bad. Well, we don't need
that actually. Let's see how can we
avoid all of that because this is a
very bad problem. We need to grab
all of these edges and delete this pv
weight from them. Well, let's see how can
we do that together? How can we this Well, in this case, I think I will select all
these new lines again. Just to grub them all. Let's add those I'll have to click to
select the face loop here. All right make sure to
select all the face loop. That's very cool. And
those here as well, turn off level for now. Let's select this one as well. I'll click. And what else? Maybe those over there
are the same thing. I'll click. And those
here. That's very bad. At this one, grab this triangle, and this one right here. Just select these edges, these lines that we
gave them above. And let me see what we got here. After that, it
control blast to grow the selection and delete
unwanted faces like those here. Delete them. And here we got
unwanted faces because when we hit control
blasts, selction grows up. So let's deselect those. Sorry. And what else do
we have anything else? I think I just selected all
the necessary faces here, and then hit to hide those
to see how that will work. Or before you hide them, just switch to the edge and
hit to hide them like that, and now hit eight to
select the whole mesh like this and delete the vl
weight from it at zero. And now we can start over. A right now we don't
have any ble weights. It and delete the
crease as well, zero enter, and now hit
edge to bring those back. And now let's see
what we got so far. Turn off wire frame, and now let's activate ble, and now le sho target
just these edges. All right. Do we still have any
problem right here? Yeah, this one, this egg, as well as here here to delete the crease
and delete this from it. All right. What else? Here we got an artifact
that try to fix it. I think we just
need to move this vertic a little bit far. That's it. Maybe we can get up those ke
and move those right here. That do it. Now we
don't have any problem. Now we can move on. All right. Right now the mat is clean. Now let's move to the
site, go to face. Let's I click to
select this face loop. Make sure that you
selected whole faces, and that's it, I think. After that, choose
boundary and add to one. Let's go back again. I'll click. D select this face here? I control plus to
grow a selection. And Dselg those, we
don't need them. And those here as well, we don't need to select them. And then let's add sorry
before you add anything. Then sweak this two edge,
select the boundary, and let's add le wave to
one and done. All right. What about these
edges right here, think we gave them a le. But what about this corner, G tics and let's move
this maybe right there. All right. S, can we fix this? Let's try to pick
nice angle it key, and let's move this over here. But make sure not to move
this inside these vertices. Maybe this corner, we can give
it val way to one as well. This one over here,
I'll click and des this one iv way to one. Let's check this area.
Let's see what we got here. Everything here
is cool, I think. Except this edge, give
it eval way to one, and I think we need to check this edge
right here as well. Yeah, double way 21. That's very cool. Now
let's move to those here, go to face Out click
select the face loop. All right. Okay, that's very cool now. These faces, we don't need
to select them for now. And maybe those or
this one over here. After that, swag
this two boundary, add vy to one. Go to face again, I'll click and we need
to grow the selection. I cant plus, but let's
deselect this one, control plus, then boundary
and let's add v21. Well, now manually, let's grab these corners here, add vy 21. And let's see grab this
corner over here at wait one. This one as well. And that one. Sorry. Let's move those. Let's move this
vertex over here. Something here we need to dit. Let's see how can
we fix this area. I think I don't I can merge it wise and
merge those over here. And what about this
one? What is this? T I can dissolve them, and I can add another
cut goes like this. Now the result is better. Now we can move to
this one, maybe. Or maybe I can end this
video now and finish later. So see you in the next video.
90. 090 Modeling section Finishing the body lines and adding a frames to the windshi: Hello again, welcome back. Let's come believe these lines. I think we got just two.
Let's select this one. I'll click to select
the face loop. And this face right here
we can dissolve it. Sorry, I can deselect
it and check the rest. All of these faces
should be selected. All right. Deselect this one. I mean, this one right here. And let's go to the edge. Sorry, it Q and select
boundary loop. All right. I mean, you can go
to select loop and chose boundary after
that add Bay 21. Well, let's go back
again, go to face. I'll click to select the
face loop from here, and then deselect this face
and deselect that one, the control plus to
grow the selection, and then boundary
loop at way to one. Now let's target this edge, and this one over
here ad way to one. This one as well. All right. Something weird. Okay,
I think we can make a new connection goes like that and dissolve this one and dissolve
this one as well. This one is not going
to work correctly. Maybe we can move it right
here and dissolve this. This one as well, maybe we can slide it at wise right there. All right. Now it's working. Now let's select this edge over here and let's add way to one. Now it's working
correctly. I guess. Let's go to the other side here and let's see
what we can do here. We need to grab this edge
and add above way to one. And here we got this selected, and we have vl weight. We need to zero this out. We don't need any vl weight
here. Let's go back here. Everything is cool. Well, now we need to come
to this line over here, go to face I click, select the face loop. Deselect this small
phase here and convert to boundary loop at
double weight at one here. Go to face again. I'll click. Deselect
this one control plus to grow the selection, and add boundary loop and
add val way to one as well. And now select those four edges. Let's add val way to one. Now it's okay and ready. Now let's make another
cut goes like this. Just to support this corner, and let's check the area
right here. That's very cool. We don't need to add the
volley to this edge, so I'm going to add zero here
and here and here as well. I think we complete
all the geometry. What about this one? We gave it, I think, we did. But the bottom phases, I think we didn't give them. So convert this to boundary loop and add the velo
to one. All right. Now let's bring back the
other side. All right. Now is ready. Kick if
we have any problem, Maybe this one, we
didn't give it. Yeah. So let's go to face I'll click, grab the pace loop. All right. I think I can merge this vertex. All right, let's see,
how can we do that? I'm going to select this
edge and get wise and merge it right here on
the side. Grob this edge. Maybe we can grab this vertex, get wise and slide
it over there. Let's make another
cut goes like this. After that, grub this egg and this ge and dissolve
them. We don't need them. Let's go back to face. I'll
click, select these faces. Deselect this one. We
don't need to select it. All right. I convert this to boundary loo and
let's add weight one. Let's repeat that select
these face again. The select this one control
plus two gloss selection, and convert this to boundary
loob and add weight one. A something weird happen here. Let's select those again. De select this phase
control plus and then convert this to boundary
loop ad vl weight one here. Okay, now's work correctly. This che we didn't gave
it. Let's add one here. Now, it's ready. What
about this area? Everything is, select these
ages and add zero here. We don't need to add vl
weight here in the middle. Now I think it's ready.
That's very cool. Task. Let's bring
back the other parts. It's sched to exact
of the local mode. According to the
reference image, we got a hole here in this
area and hole here as well. Let's see how can
we create those. Let's select the geometry, go to the left view, and L et's see how
can we do this? Let's stop the mode, and I think it could be
almost right here maybe. I can maybe use face
and inside the face. I think that's will
work or maybe I can add a cube and use trim
and cut this area. Let's see how can we achieve
this? Let's try the line. Let's select this one
control B two to be volt 22. Like this. Use a knife tool
to make a cut goes like that, and we cut goes like this. Now let's this face and let
it to extrude this inside, you can move this to
the x axis like that. After that go to the edge, grab these four edges and
control to level them. Try to get something
and nice, like this. And now let's try to
fix what we got here. Rob those control X Ctrol x. Use an F tool to make
a cut goes like that, maybe. And what else? Maybe this g, do we need this, Ctrol X and dissolve it. Disolve one, we don't need to dissolve it.
What about this one? We can dissolve it, I think.
O. Now we got this result. The same thing on this side, grab these faces, control
x and make them one face. Use the knife tool to make a
cut goes like that, maybe. This age, we don't need
it, we can dissolve it. Let make a cut goes
like this, maybe. What about this age? Well, I think we can
use the knife tool at k and make a cut goes like that. It's C to cut and
cut all of that. Grab this age. And delete those. What about this one?
We don't need it. This one as well.
We can dissolve it. And let's hit another
K can stand this cut, it's to cut and er
that's very cool. Maybe another cut goes
like this, and goes here. Something like this, maybe. We don't need any crease here, zero out decrease from
this one as well. What about this area? A to use the tool again and let's
make cuts like that. These edges, we don't need them, we can't dissolve them
even this one here. After that, I can
select this edge, all these edges, and I
can give them a bevel. It can roll be to bevel them. We got something right
here, Let's try to fix it. Tie, merge those here. Go to the edge and let's do
the same thing control B. One problem right here as
well. Let's do that again. Go to the edge and
select these edges. Control B. We will get some
overlapping right here. T. Because this line
goes like that. That's so go like
this. Use knife tool. Maybe we can make
another cut goes here, and the cut goes maybe right
there and delete this one. So let's select these edges again one more time, Ctroll B. And now Bevel soul work
in the correct way. Let's add two edges like
this and accept it, and let's do the same
thing for the side. Ctroll B, and let's
bevel it a little bit. Well, now we got this
nice shape here. Very cool. We need to do
another one right here. I would be down here. So go to the lift. Select this tab, and let's see how can we add
another one right here. I will use NF tool to add
a cut maybe like this. Okay. Maybe I can grab this one g twice and move this forward just a
little bit right here, and select this phase
and hit E to extrude, right click to
cancel the extrusion and move it manually
to the x axis. Maybe right here. Right now, go to the select these edges. Hit control be two bovel them. Something like
that, I will work. Now let's make a new connection. Let's see grab these faces, control x and dissolve them. Use N tool, maybe we can
make a cut goes there, and another cut maybe goes here. And what else One cut
goes there, maybe. And one goes here. Confirm all of that, and
let's delete the rest. Delete this one,
we don't need it. This, we don't need it. Delete this as well here. You can't like to
isolate this umetry, think that will be better. And what else? Grab those, dissolve them. Use the NF tool to make
a cut goes like this, maybe, or something
weird ha here. Let's use the tool, cut go. This with this hit K, and
manus move these edges. What else? This edge,
maybe we don't need it. This line right
here, we can change the direction of it here
and delete this one. A right now, go to the edge, select these edges, and control two bevel.
Let's add three. And let's add three
as well. And Vic. Yeah. It's like to excite
from the local mood. Let's bring all the
details and let's see what's the next step? We almost finish here. We added all the
details, all the stuff. We just need to rob it now. I think. But before we do any arriving, we just need to add empties at the joints so we can move the
parts by using the joints. I don't know. Maybe we can do that after we complete
the arriving. We can do this, or even before you have
the ability to do that. Yeah, that's very cool.
When I comb the Rb, I will duplicate
the wings and put them in their positions, and the same scenario
for the legs. After I texture them, I will duplicate them. A quick change here
I want to make. I didn't give this
edge above weight. We gave this one
above weight 0.1, and this one as
well as 0.1 enter. And now it's become correct. And something here, I
just forget to mention. We just need to add these
frames these frames, one, we have one here, and we have one there as well. And we can see them in
the reference image. If we go to the left, for
example, we can see them. And I don't know, maybe
we can create them now. They're not going
to take much time. We can grab the windshield
and duplicate it and maybe we can use this new
duplicate to edit it. So I will tap the it
mode and go to face. Let's select these faces
because we need these faces, and we need these
faces right here, and you can control I
and delete the rest XF. Right now we can edit those
to create these frames. So go to wire frame, and now let's see how can we keep that? Use the knife tool. If you like make a
cut, goes like that. It's C to cut
through and may cut here and make another
cuts goes like that. It's C to cut through
and confirm the cuts. Well, these phases right here, we don't need them
F. Those here, XF, we don't need them. This age, we can
dissolve it. All right. And now we got this line. We can use it to
create these frames. I guess. You just need
to do something here. You need to grab the
windshield and hit go to face, hit all it is, and just move the windshield ale
bit down, not too much. A little bit. Something
like that. It will work. All right. Now, let's
select this one, and let's give this a thickness. Add a solidify and let's control the
thickness. All right. Now it's ready, I think, activate even thickness,
and that's cool. Now, let's go to the left again, select this one,
go to wire frame. Let's see how can we cut
this use the knife tool tab. Let's make a cut goes like that, it's C to cut through, and let's add another cut. Is C to cut through
and then enter. Grab these faces. All right. I think we got a problem with the cut
through on this side. I'm going to repeat that again, it K. Cut goes like that, it C to cut through, and another cut goes
here and then enter. Now let's check the result. Now is k. I'll click
to crab those, X F to delete them.
We don't need them. Let's give this one the
same solidify, selected. Old shifts or I think they
have the same solidify. Yeah, sorry, they got
the same solidify. I will put the bible underneath them in case I want
to bobble them, and I will change
the limit to angle and add here 0.02 enter. Make the vl very subtle. You can control it
0.05 if you like. Let's add two segment. I think that will be okay. If you want to
increase it's okay. And now we got this result. Activate hard and normal.
I think we should do that. Now the heading is very cool. We finish with those as well. Let's change the material, volt to this geometry, control L and link the material. That's very cool. All I think now I can end
this video and see
91. 091 Modeling section Adding solidify to the doors: Hello, everyone, and
welcome back here. Before we move to the rob, we need to com be the
and the side window. We didn't give the
door any thickness. We need to fix that, and
let's see how can we do this. We got subdivision surface here, ring crop, mirror modifier. I think now I can apply all of these hit control A and
apply Vhle Gomery to meas. Okay. Select the door and isolate it, and now we got this result. After that, we need to
give this a thickness. Let's add solidify
and choose ym. We don't need
thickness from inside. I will accept this
result and I will add vl modifier above this. Apply the solidify and add vl. I will change the
limit to weight, open this tab to
the eighth mode, and now lets select the edges that we want specific edges. Let's give them a specific pivl, let's add here one, for example, or maybe we can add I just need to
make some variation. First, I will control it from
here from the val weights. Let's add 0.1, keep the
amount, for example, ten centimeter or less, and you can control
everything from here. 0.01, for example. Let's add to segment here and
activate hard normal from the heating section, 0.010 0.02. That's very cool. Let's hit
control C to COVID number. Let's select this edge loop, and let's add here 0.02. For the rest, those as we. These edges 0.02, Let's select this corner
right here, 0.02. Maybe selecting this one, 0.02, and what else we need
to grab this and this. Let's select this one.
This one right here. All right. Now we got
nice pebble here. The same thing for these edges, the outer edges, tab, go to the Alt click, select the edge loop and
as 0.02, control enter. And Let's see grab
this corner right here and this one may be
right here and this one. I think the number
here could be changed, especially for this one, I think. Let's deselect this. Let's focus on those here. We got a little bit of. Let's add 0.1, or let's
increase this manually. Let's see what we
will get there. L et's isolate this metre. Let's zoom here. Let's
see what we all go. I think we can grab this as well and give it
the same number. Let's add 0.2. I think we need to
increase the segment here. But that will be too much.
Let's deselect this one. Let's see what's going to
happen, let's zero out this. Or that's not going to work. That's been these gas, we could target them
manually to achieve that. Let's cring this back to two, and I think manually I will give those the val that I want. Let's select this
one and this one, zero out this tumber here. Hit sla to exit from the local mode and it
control be and veal them. Let's add the segments.
That's very cool. Go to the fase,
select these phases, control x and those as well. This vertex, control
x and dissolve it. Now we got this result. The same scenario here, select those and control
x dissolve this vertex. For this a right here, you can bev it manually as well, control and bev it. Something like this,
that will work. Let's see these phases control
X and those control X. That's very cool. This vertex, we don't need to control x. Now I think we just finished. Same scenario for this border, we can give them a solidify. Let's hit control A and apply visual geometry to
apply everything. Tab, I think I just need to make some
tweaking right here, kee wise, and let's
move this over here. Maybe right here. The
same thing for the site. Kee wise, and let's move this. You can do something else, you can dissolve it
and use tool again. Hold have to make the
cut at the center. Okay. All right. Maybe here we need to
move this vertix a little bit right here and
this one as well. And this one. Okay.
What about this? That's very cool. Now we can
give those add solidify. Am. We don't need any thickness. I will show you what I mean. This is with m, and this is with M, as you
can see, the difference. Add the solidify with trim and apply the solidify
and now lets a devel. All right, I'm not going
to use weighted method. I will use the angle. Let's add 0.1 as a thickness, and let's see the result here. Add two segment here,
0.5, maybe see. Something weird here. Turn off clam overlap. I just need to see the ble how it works here and
listing this 2.1. Add auto smooth here. I think we added. But we need to activate the
hard and normal. We got problem right here, but we don't know
where is exactly. Maybe here. Okay. We got something here to
prevent bubble to work correctly. We need to find it. Fay thing, if you don't
know where is it exactly, just tap it A and
then and s merit by distance and see if there are
any close vertices merit. Twice, and let's
move this over here. I think I'm not
going to find it. As you can see the heading looks nice and there's
no problem with this. Let's like to excite. Now let's select this
glass ad control, apply visual uma tom. Let's give this solidify add the solidify and just
olerm and apply it. Let's add the same level
that we add to the frame. Hold you have to c the
frame CV to selected. Now we got the same
level add right here. That's very cool. Because we gave
those a thickness. Now, we can't see anything, and that's what I wanted. The rest of the human trees. Everything looks okay and ready. Grab this frame as well, and let's give this a solidify. I think I need to add level to the side as well because
we don't have Tub, go to the edge, tub,
go to the edge. Crab this edge and
this edge as well, and let's add vl weight. But I don't know the number. Let's select this one
and go to vl weight 0.1, control C. Now we select this hold, you
have to grab this. Control V, paste here. Now. After that, you can apply vel, and now you can
add the solidify. All m. Now, this ready. Apply the solidify and let's
add double again here. Let's add 0.1. Let's add two segment here, and let's activate hard normal. Now the heading looks very k. That's very cool.
Now I can exit. Anything else here we can do. Maybe we can select these
frames and tap the mode because I just need to bubble these edges and make
them brown a little bit. Grab those and let's
bubble them a bit. Something like this.
Let's add edges, maybe. That's cool. Cool. After finishing the doors, we need to create
the door handle. It could be right
here. It's responsible of opening and closing the door. If you go to the left view, you can see it right here.
This shape right here. So let's see how
can we create it? I'm not going to
create this now. I will do that in
the next video. So that's it for this video
and see you in the next one.
92. 092 Modeling section Creating the door handle: Hello again, welcome back. Let's create the door handle. According to the reference
images, a few notes here, we got the door handle, and we got right here. Let's see how can we create it. Go to the left and
let's go to wire frame. And this is it. How can we create. Let's bring the three d crosor over here, for example, F A and let's add. Maybe we can start
with the cylinder. The cylinder is very big,
let's add 15 centimeter, and make it small
and let's change the vertices amount
to 52 maybe segments, and make it high resolution, maybe we can 62, and align this to the view
and apply the rotation. Scale this like that.
Something like this. Let's go to solid mood
and let's take this out for now. Tab, go to face. Let's move this face a
little bit back because I think almost this is the height. I mean, from here to here, and it control to add one edge over here maybe and the grab this face
and it has to scale it. Scale it just ale
bit, not too much. Maybe we can move this face
back, maybe right here. Scale like this. I
think that's will work. We need to add six
holes, I think here. Let's go to the left view and let's bring the three d
crosor in the middle of tab, hit A and let's add be Cube is very big change this
215 centimeter. S and scalt like that, it key to move this
almost right here. Grab the cylinder tab. Scale this even more
just a little bit. Grab this key to the z and let's move this
down almost right here. Tap to the mo, go
to the vertices, grab those and scale those out. Align this edge with the
edge of the cylinder. That will be better. Okay. That's very cool. Now let's
see what else we can do here. I think we can scale this just a little bit and make
it smaller, maybe. Now this piece is ready. We can now rotate CV and rotate. So first thing, let's tdl, it organ to three decorsor, to move the organ dot of this cube to the position
of the three decorsor. Then with this cube selected, hit he D and r and rotate. Let's rotate this,
see how much we need 60 degree maybe and it aft r until you get six
C. That's very cool. Now we got our CVs. Now we grab all of these copies
and move them like that. A tab, if you want, I just
need to do something. Let's align the sit
to the x axis and align to the x axis
as well because when I scale the och
I got problem here. We need to rectify the shape, the, and now it's better. All right. We'll see if we
need to do anything else. After that hit control j
and make the one piece, hold to grab this geometry, control shifts B, and
let's choose difference, and now we got our cuts ready. Tap the go to face, grab this face, hit I two. Let's inset just
ale bit like that. Maybe we can let's see
what else we can do here. I will hit E to extrude this n, something like this, and
it I to inside this again, and to this out and
the ballet control. Grab this face to answer this. I again to move this space
inside a little bit. Now go to the edge,
grab this edge with this hit control and let's
pubble those a little bit. With four edges if you like. Now it contro a
couple of time to grab this and hit P to
separate it from the group. Right now, we need to add a
cylinder right here or bots, and we need to create
this hap right here. Let's see how can we this? Well, first, I think
I will grab this one, go to the left view, let's move this up and scale it. Let's move this one as a put, and let's put this
right here maybe. We still have the three
D coorsor in the middle. He ratic origin to
three d coorsor, H d and R and let's
rotate this 60 degree, Heft arc time to
duplicate this one. After that, hit Heft
A and let's add cube, scale the cube like that. Make it a little bit key to
the z and let's move this up. Almost right here, maybe
we can make it bigger. Control A apply a scale. Top, go to the edge wire frame, grab these four edges. Let control and
let's povele them. Let's get something
around like that. Activate clam overlap, and seven edges,
that will be enough. We got two edges here
and the mid hit, A, select everything and
merge by distance. Four vertices merge now. That's cool. After
that grub these edges, control and let's pubble them. Let's add maybe four or
five edges right here. That's very cool as well. Go to the left view, grab one of these D taker Cb and let's put a cob right here. Right click set
organ to geometry, and let's take this
out almost right here. And it's he d to take another
b to the side as well. Well now let's grab those, and let's move those and
align them to this one. Sorry, Let's take this two
vertex snap and Queckloss. We got a problem right here because align rotation
is activated. Okay, now it is very cool. The here as well grab them. Select those and move those
back and snap them as well. That's very cool. Now, in the position of the three d courser,
I will add empty, and let's move this
empty to the of this design and link
everything to this empty. Select all of these details. Hold shift, pick the empty. It control be sit organ, sorry, sit parent to
object and keep transform. And now if you move the empty,
everything will follow. After that, you can go to the snap and choose face snap and align
rotation and chose center, and now you can snap this
to the osm that you like. Hit key, hold control, and snap it to the body. But the snap it will work
according to the empty. Let's go to local and I just need to see where the Z
direction for the empty. The Z direction goes up, I need the goes like
this to got what I want. In this case, I
will activate organ activated and rotate the gizmo r to the y and rotate the z axis. R to the Y, let's see
if that's possible. That's not gong to
having. I don't know. Maybe you can do this for the T. I think see what option
do we have here? In this case, let's move this for example
here temporarily. Let's like to isolate this one. Grab everything,
deselect the MT, and B to clear the parent
and keep transform. Now we grab the T and
let's rotate this r, rotate this to y. Y. R Y, rotate this nine
degree like this. Now goes to this direction,
and that's what I want. Select now everything
and hold have to grab the T control and sit
parent and keep transform. Let's like to exit
of the local mode. Now, grab this, move
this right here. Now, would this setting
activate phase, choose center align rotation?
Maybe we don't need this. Hit ey, hold control,
and snap this, and it will snap to
the body perfectly. You can use the
local, if you like. Maybe manually, we
just need to move this inside a little bit and
that will be enough. Well. One more thing
here we need to do. We don't need the back faces. Tab, grab this x
F and delete it. Radically head smooth
and add auto smooth. Now it's a time to give
this abb This one as well, tab, go to face, grab this face, XF and dissolve the de
deleted and tub head smooth and add auto
smooth here as well. The same thing for the rest. Let's select all of these bulks and hit control
J to make them one piece. And right head smooth and
add auto smooth to them. This one as well, head smooth, add auto smooth here.
Now let's add bole. Go to the modifier add
bove let's add 0.1. H can troll A, apply the scale
in case we got a problem. Let's add two segments, add the normal activated
turn off clamp. As you can see, we
got very weird result because we got some
overlapping haben between the vertices. It A, merc by distance. A vertices merit. That's help a little bit, but we need to make
further tweaking, like it K, maybe make
a cut goes like that. That's why I tell you always support the t because you
see how this a gumped here. But when you make a
cut goes like this, that will help to fix it. Turn bubble of timbery, let's see why that we have
very close vertices here. Hit A again, merge by distance. And yeah, now it's
work, I think. This edge is not going
to work, so deleted. Hit K make cut goes
like that, maybe. Cut this edge and dissolve it. Something where wets have
been keyed twice ameret. K. Let's check the rest. Everything looks okay
except this area. Will K make a cut
goes like that, and dissolve this edge. Kei mark this one. K, cut goes like this,
dissolve this edge. Kei mir the vertex. Everything else
looks okay, I think. And now we can move on. Actually, we don't need
to do anything else because we gave everything
val and everything is ready. Well, I think now we can
say that we finished this. The only thing
that we need to do now is COVID on the other side, and I'm not going
to do this now. I will do this later
after I rub this. Go to the phase orientation, kick the phase orientation in case we got
something flipped. Everything is nice, everything
is clean. Turn this off. And yeah, now we got it. So I think now we
finished with this one, and I can end this video and
see you on the next one.
93. 093 Unwrapping section Starting with the body part 1: Hello, everyone.
Welcome back here. I guess now we should
start with robbing. We almost finish everything. And for any reason, if
we forget anything, we will do it. But for now, we'll
start with robbing. I need to rub all the
pieces and make them ready to export them if I
want to export them or to texture them
here inside blender. I think I can start with
these pieces first. And after that, I can move
to the body and to the legs maybe or to this part underneath the nithpor and the wing.
So let's start with those. Let's select this umay first and let's see how can we rob it. First, I think I can
subt this view to two. So go to the corner,
click and drake, and let's sublit
this to two window, and change this from
three D viewboard to UV editor because we
need to work right here. All right, so this piece, it's like to isolate it, and let's check it
before we do anything. Do we have any problem?
Actually, yeah, we do. We have some problems here. For example, we don't have
a bible here here as well. So let's try to fix this
before we arrive it. Let's decrease the number of
the angle here to 22, maybe. Now, 22 covers and
fix the problem. Except for this area, we need to reduce
the number again. So let's reduce this to 19, and Dia now is working. That's very cool. All right. Now let's see what's hidden. Alright, as you can see, um This piece embedded a little
bit inside the humo tray, so this part, we can't see it. We can delete the
bottom phase. I mean. So it's like to isolate
this tab and go to phase, crab this with this
XF and delete it. We don't need it. Now,
I can apply it devel. We don't need it anymore. Now we need to rub this. So let's top to the mode,
and now we got this. If you have the harp edges, sometime when you want to rub, you will got these blue lines, maybe you don't
like to see them, you can go to this arrow here and turn off
the harp edges, you can hide them from here. A anyway, let's see
how can we do that. I will go to the phase, and
I will select some phases. For example, before I start, I just need to
explain something. The idea of rubbing is
like you have a Cesor, and you want to
cut these corners. For example, if I have this
geometry in real life, can cut it from here and from
here, and I can open it. If I cut this from here and here and from this side as well, I can open this side to this drain and this one
as well to this darken, and I can open this as well. So it may will be like this, and this one will be
opened, like that. And maybe this side could
be opened like this. Okay, something like that. So this is the rubbing. We need to do that. So it's very important to add seams
in a specific area. You need to think about them. After that, you had to rub. The algorithm inside blender
will do that job and it will rob it in the nice way. But if you didn't help
blender with the seam, blender will not rob it
correctly. All right. For example, if I got
this, and if I hit A, now I can see here in this side, I can see the result, the UV. I got a U V here. If you go to the opio
data properties here, maybe here, here, you can find
we got already a U V here. But this UV is not
correct because you remember we start with the cube and we
adjusted this cube. And this result is not similar to the first
cube that we added. That's mean we need
to re arrab it again. But if I rob this
now, to rob this, just hit twice for
here, or here. So I'm going to hit twice. This is the result
of the rabing. Now, Blender tried to open it. Try to open it from
here and from here, from here as well, and try to push this down to make it flat, and we got this result. But is this correct? Well, we need to examine that. We need to see if
that's correct. Do we have any
distortion here or not? That's very
important. All right. I got a nice tool. It's free. You can download it from Gab. It's called text tool. I will use text
tool a little bit. And I think it's the
only add on that I will use here on this course because I don't like use addons. Let's see where
we could find it. Let's go to the browser. Okay, this is the website
gettab.com slash AV, Martin slash text Tool blender. Just go to this
link and you will find the tool right here. And you can click
on this text here. That will lead you
to the next page. And from there you can download
the text tool. It's free. All right. There's a
version for three D Max, and for Blender, and I
think for other software. I think from here
you can go down, secroll down until you
find the text tool, 1.5 dot zip, so just hit click and you'll be
able to download this tool. After that, just located where you save this and you
can go to Blender again. Here inside Blender, Go to dit, and then preferences and go to the add on seen and go
to Install after that, search for the tool
and select it. Just try to find it and then grab the tool and hit
and install add on. And it will be here listed here, activate the checkbox here and go to this Barger icon
and his safe preferences, and you will be ready to go. You will find this
tool when you tap the Edit mode and
you open the UV. You will find extra tools here, and you will find
it here as well. And the robbing SCV robbing, you'll find text tool
here and you'll find these tools comes
with a tool, right? Why I need this tool?
What the reason of that? I need this tool because it can make some stuff faster for me. For example, if I want
to add a checker map, I need to create a material and block some nodes together. And I need to if I want to apply the same material
on another object, I need to select
the object and go to the material and assign it. I don't like to do all of that. I got this tool can make
faster for me. All right. So for example, I
just arab this piece, and I need to check it
here in the perspective. So I will tap out and go to the checker
map and select it. A blender automatically will add the checker texture
on it, right? And it will spare me from
a lot of steps to do this. So it's a very nice tool. As you can see now, the
checker added automatically. And if I hit this checker again, it will sweep me to
another checker. And if I do that again, it will sweep me again to
another type of checker. So I think I can
stick with this one. Okay? As you can see, we have some distorting here, I guess, for example, here, And here, we
got some problems, and we got some variation. I mean, as you can see here, the square it speak as
compared to this one. That's mean we have
variation. Right. Now we need to help
blender with that. Let's see how can
we achieve this? Let's tap to the mood, and
let's go to the phase. Let's select these phase, for
example, Llet select those. I will go to solid mood to
make that easier to see, and I guess y, I
think just those. And I will grow the
selection just one step to select these
phases as well. At control plus. Okay. And as you can
see, I just got those. Well, that's very cool. Now, the next step that we
should do is we need to go to Select and ose select
boundary loop, just to select the outer edges. And after that, go
to U V and mark im, or you can hit right
click and mark Sim. And now I got the seam. That's mean I got a Cesor
and I cut this area. That will help Blender to open
this and rub it correctly. Well, now let's see
what's going to happen. I will hit A and come
here and hit twice. And now I got this
result of rubbing. I will go to the Mateal review and I just want to
see what I got. Now the squares here are
even, and it's better. As you can see, we got
another scenario here. But we still got a little bit of distortion as you notes here. You can ignore this if you like, or you can solve it. Now, let's try to add another seam somewhere
here to fix this area. What I will do is, for example, I will add goes here and
one seam goes right here. Right click, mark Sam this sam right here,
I don't want it. I will delete it. Clear team. Let's recall. Now let's hit A and here, come here hit U twice. Now the result has become
better and see what I got here. All right, It's become
like a better fly. You can go here and you
can rotate if you like. You can scale, you can
distort if you want to go guest grab some vertices key and move
them if you like. And you can do a lot of stuff. I just I just forget the
proportional editing oven. Okay. So this is how to rub, and we will do that again and again and again
and definitely will understand what's rab
mean and how can we use it. So now I can say that this
piece is finished. All right. You can open it from here, you can add another seam
right here if you'd like to open it from this area. I or you can ignore it
and make it like this. And by the way, you
can add seams here, if you prefer, you can
grab some edges here, go to edges and grab
some edges, for example, this one and this one
and, you can go to U V and here we
got MarxiM, I gas. Let's is it. Yeah, Markm can add seams from
here, if you like. And you can add another
seam goes here as well. Markm as you can see, I just add seam inside the UV. So that's mean you
have this ability. Now, if I A to select
everything and go here, or sorry, you can hit A, to select these phases
as well, hit U U twice, and I got this This result, as you can see, it's different. And here inside the rub here, inside this menu, we got
two type of rubbing. We got angle based, and we got confirmal. The difference here, angle base, it's more accurate as
compared with the confirmal, but the angle base need a little bit time to rub
and this one faster. And there's another thing here. Angle base, work with organic
stuff and confirm work with with the geometrical stuff, I mean, hard surface stuff. So because this hard surface, we can use conformal, and I will get better results. And for any reason,
if you didn't get correct result, I mean, if this seque not even, that's mean the The
U V is not correct. You can try another method here, strict it from angle base to confirm or from
confirm to angle base. If you see something like this, as you can see, we got some
a little bit of variation. Sometimes just kick the view, for example, if I
rotate the view here. You will see that I
got some distortion, but that's actually happened
because of the view. If you rotate it like that, you will see they are nice. Sometime because
of the face twist, you remember we say it always, don't twist the
face, try to fix it. Right here, we got some
angle here, if you notice. Because of that, we
can see that we got some weird result
here. But that's okay. If you've got
something like this, it's okay, you can ignore it. So we can say now, we just rub this one, now let's go to the next one. Go to solid, and let's
pick maybe this one. It's like to isolate it. And before you isolate it, just see what's visible
and what's not visible. What we can do here.
All right, fair thing. We can tap and grab this face, and we can delete it XF. At the same time, we can grab
this edge and it keep wise and take this up Sorry,
I will hit g to the Z, I'm not going to slide
them and move those up, and that's very
cool because they are embedded inside too much. Alright. After that,
check the modifier, see what you got
here. We got bubble. We got mirror modifier.
So that's very cool. Now I can hit control A and
apply visual um with too ch. But before you do
that, just check if there are any problem, any thing you need
to fix, for example. Well, let's apply the mirror fs, Control A. Alright after
applying the mirror. Now let's try to
find the solution to this after you
tap to the mode. Let's see how can we fix this? Let's turn of vl for now. A let's make a cut
goes like that. I just forget to do that. And maybe one cut
goes like this. And let's see if we have a face here
in the middle or not. All right, we don't
have any face in the middle. That's very cool. Okay, now let's tab out
and let's activate vil. And the angle, let's
take the angle 215. Or maybe let's add ten here. I just need to
include these edges. I need Bible to target
those here as well. We can activate the
wire wire frame to see maybe manually or 3.7. I will be fine. All right. That's very cool. Now I can see that Biv
targeted these edges. All right, so this
is the result. Now, if I accepted this result
and if everything is nice, now I can now I can apply
Bevel and rap this piece. And that's what I'm going to do. Before that, maybe I feel
if we move those away, maybe that will affect
the Bevel and give us better result. Let's see. As you can see, moving these vertices can affect
the bevel a little bit. I will accept this and
control A and app light. I will tap the e mode and let's see from
where we can start. What phases that we could cut? Let's go to the phase and
let's select some phases. Maybe I can select those first. Grab those and add those here. I can I'll rab this one. Let's see what else
we can add here. Or maybe I can add teams to these edges. Yeah,
let's do that. I will go to the
selection just one, control plus, and
it, by the way, you when you go to select, here we have the
select boundary, it right click and add to
Quick right, for example. Let's add this one,
add the quick right. If you add it, now,
when you hit the Q, you can access this option. So just hit the Q. And after you add this to the quick rite, now you can hit Q
and select boundary. That will be faster,
and then you can add Mark Sam here as well. Go to U V and mark Sim right click add
to quick over right. Like any option. So
now we got seams here. We can add Sam here as well. To cut this one. Mark Sim
and add Sam right here. What about this area
here? All right. The seam that we get
right here is not good, so I'm going to delete it. Let's select this one
and this one here. We don't need this seam here. Let's clear the seam. We want this seam to be here. Maxine. The same
thing for the side. We don't want these seams here. Sorry, clear seam, and
let's select those. That's very cool. Okay. Now let's see what
else we can do. Let's hit and select all
the fas as well hit twice. And I will add
hacker to this one, and let's see the results. We got some distortion. We've got some distorting here. Let's add one seam
here as well to cut this area and one here as well. Mark Sam, and let's hit
A again and hit twice. I think now the result
is a little bit better, and we can do better. As you can see, we have
some overlapping here and here in this area and
in this corner as well. To help to prevent that, I can add Sam here as well and seem to
this corner as well. Right mark m, and now
hit A and here hit A U. All right. Now, the result
is a little bit better. We don't see any distortion. The square here of the checker
is very nice and cool. And that's means, yeah,
we can accept this, and we can move on
to the next one. So the next one
should be this one. A selected. This face is not visible. Grab this F and delete
it. We don't need it. And we can now tab
out and accept Bevel. We don't have any
problem, I think with Bevel. I think we don't. Just one thing here
we need to do. Just make a cut goes
like that, right? And cut goes like this. I don't like to
leave the corners here without any support age. And what about this area? You can do and create a cut
here in one cut over here. After that, when you com belete, apply the bevel and that's it. Is, because I just need
to check something. I have some faces
here, not visible. For example, These faces here, I can grab them and grow the selection cou
time and delete them. We don't need them.
They are not visible. At what else? Now we can select these faces and
those here as well. And even those here,
you can select them, and those over here. And what else? All right, let's see what else we
can grab, maybe Yeah. For now, those, hit control
plastic roll selection and convert this to H, loop, and then mark Sam. So I just add the
seam right here. Sorry, I can include this
one as well, by the way. Let's delete the seam. Clear Sam and let's grab this. And this one and
mark. All right. Hit A, select everything, and here hit A and again. And now we got this one. This one become
very long selected, and we need to cut
it maybe from here. Switch to edge. We
need this edge, and maybe let's
see it from where we can cut it. Maybe
from the middle. Select this and select this
one as well and right click. Sorry, go to U V and mark Sam. So now here we should
have a Sam and yeah, it does it A and and
again to Arab it. Now it's become shorter
and that's better. Let's add checker and
let's see the result. All the squares, very nice. There's no distortion,
and that's very cool. Tub out. This is how Arab works, and we're going to rab all
of these pieces one by one. And you will understand how this works because we will
make a lot of examples. But for now, I will
end this video and see
94. 094 Unwrapping section Starting with the body part 2: Hello, again, welcome back.
Let's rab this umatre. Let's hit slack to
isolate it first. We got mirror modifier. I will delete it because after I rab this, I can mirror it. And here we got bevel. First thing, let's tap the mode, and let's check the umatre. This face right here,
I don't want it. Grab those, delete them X F. And here maybe we can make a
quick connection goes here. As well be better, and here
as well, the same thing. Alright. After that, let's
see how can we rob this? I will apply bevel
modifier and tap the mode. Alright? I think I
can start with face, and let's see how can
we do that together. Well, Right, right, right. Let's add some seams here? Let's add seam here. Go
to the A mode I'll click. Let's target the corners. Grab this a here and let's add
seam and this one as well. And let's add this
one. All right. I going to make this
big gas control space, and let's add seam
right here. All right. So now we just add
seams to the corners. What about these edges here? We can grab them and
separate them, I gus. Okay. But, All right. Yeah, let's separate those
for now. It seem here. And maybe we can do
something else here. I will select these faces, select those here, and
maybe those over here. And hit control plus to cross
selection just one time and convert this to boundary
after that adds M. Now, les excites, it A, select all the whole
geometry here, hit A and hit twice. And now we got this result. We still got some problem
here as you can see. That's mean these edges here, we need to give them a seam to help blender to work better. So grab these edges at the
middle, those here as well. Sorry, at seam, and
now hit A and here, hit A, u and u again. Now the arriving become better, but we still have
some problems here. I'm going to grab
these edges as well. This one and this one,
and the same thing here. Let's grab them and
let's add seam, and the same
scenario, and again. It's become better now here, but we still got some problem. The big thing here,
I think we can separate the site by
selecting these edges. Right here, I'd seem here and separate this side, I guess. And maybe we can let's see
what else we can do here. Yeah, let's hit A and
here hit and again. All right. That's very cool. We still got some
overlapping to this area. All right. Right here. All right. I think
the overlapping it's here in this area. What you can do now,
you can go to the edge and maybe you can
select these edges. All right, let's add this one and add maybe
this edge right here. The idea is, I want
to add a cut here. So you can choose the edges here or in the UV
editor and add Sam, let's rub this again, hit twice. And now it's rub.
That's very cool. Now we can add checker
map to see the result. Tub out a checker. And
now it is very cool. We don't have any distor. We got some seams here,
but that's okay. After that, you can add mirror modifier to mirror
this on the other side. All right, let's add
mural right here, and apply the mural, that's it. All right, let's go
to this geometry. Let's see what we can do here. We still got pan modifiers here. We can apply them. Control
A apply cle geometry tome add auto smooth here. Smooth. I think we
didn't have any devel, so I'm going to add
the vel quickly. Let's at 2.1. Control I apply the scale in
case we go a problem, activate hard the normal, and I think we done. After that, apply
Bovel modifier, tab, go to the phase. Grab this phase, can roll plus couple time until
you reach this area, XF and delete them,
and just keep those. The same thing I need to do
to this one, grab this face, control plus couple time
until you reach this area, and xF to delete them. Hit A, and here hit A as well, and AR. That's it. Now we just check
our map and done. We don't have any
distorting here. Go to solid, and let's pick this geometry and let's see what we
can do with this. Alright, Liss like
to isolate it. And let's see what's visible, what's not visible here. Alright. Let's isolate this geometry tab,
and maybe this phase, we don't need it F.
Well, after that, I think now we can apply the vol because I think we
don't have any problem. Apply it and go to the
edit mode and see, do we need to add any vertices? This corner as you can
see here, this area. We can just add one, maybe right here, just to help. So let's go to the vertex. Maybe I can select this
vertex with this one hit G, make a connection between them. That's will work. And let's
see what else we can do here. All right. Maybe I can
support the side by adding H goes maybe from
here and end there. That will help. And
I guess that's it. Now we can start
robbing this one. So first, you go to face, let's select those because
these faces are not visible, so I'm going to grow
the selection over here maybe and hit X F and
delete these faces. Now, let's hit slash to exact
and the CD we have in gap. We got small gap right here. All right. I have two options. I can take those up to the
Z and move this over here, and I think that's
better. A right. Yeah, I think that's better. Now let's select this one, and let's see what
else we can do here. Let's top to the mode, and let's select some
phases to start with. Maybe I can grab the side. Grab those here and de grow
the selection just one time and convert this to boundary and mark sm. So now we got sm. This one is separated
from the geometry. Let's select the other faces, and maybe we can select those
here and the clo those. Select all of these
faces. All right. Let's add those as well. And those here. Those
faces as well here. All right. Had control
plus one time. I think we can add
those here as well. Yeah. Control plus
just one time. All right. Before you do that, I guess, yeah, we can
add those here as well. Yeah, I will add those, and
later I will add seam here. Control plus, and then and then swag this to
boundary and mark seam. Here in this area,
I need to just select these corners
and give them a seam. That's very cool.
That's very cool. So what does it mean that
this phase it's separated. We just need to work
with the stuff here. Let's see how can
we solve those? I guess we can before
you add any seam here. It's strong to leave
those like that. We just need to make
some cuts here. All it K to activate the ne
tool and let's start adding cuts goes like that. Okay? And let's add cut
goes like this. And one goes to
the corner, maybe. Confirm those, and let's
go to the other side, and let's do the same thing. Let's add cut goes like this, and cut goes like that.
And here as well. All right, and here, and cut here and one goes there. Now we can rub. Let's go to the face and let's
select these faces, all of them. Can throw a click. And the same thing for the side. And hit control plus
to grow selecting just one time and Swedes
to boundary and add seam. All right, what else we should
do here? What about those? After that, let's hit A, select everything,
and here as well, hit A and hit twice,
you and you again. Okay, now we just rub this, but we need to add checker map
to see what we got so far. Before we go any farther,
what are those here? I just need to see from
where we go those. I will swing this to sink
sink because if you do that, now, whatever thing
you can select here, you can see it here as well. Going to select these vertices, I just need to see where
are the All right. It seems like we got gly
seam here in this area, and we don't need to so
selected and clear seam. And here as well, I'll
click Clear seam. Now hit A, and here
A, U and U again. Now, the result is
better, I guess. Now let's ad checker and
see the result go to solid. Sorry, I mean, tub
out. A right as I rec. Let's add it Smooth. I think we just ruined the We ruin the shading here because we
added head smooth, but we can fix this by
using weight normal. After you add the weight normal, just apight and that's it. Okay, now we can say that we are finished with this
one. It's ready. Let's like to excite, and
let's go to the next one. This one, what will
be the next one. I delete this phase. We don't need it F, and now
it's the time to add seams. All right. We don't have
auto smooth added here. Let's add auto Smooth, apply the vol tab, and let's select some phases. Start with those,
select these faces and grow the
selecting a one time, control plus, right and Marx im. And what about this face here, and maybe this one here. Grow the selection just one time and sick boundary marking. Hit A and here, hit A U U. Now it's this atacar here, and I think it's done. We can go to the tub out. Go to solid, sli, go to where to
this one, I guess. Isolate this geometry, and let's see from
where we can start. Tab, go to the face, grab these faces here,
X F, delete them. We don't need them. And I guess we can make
some cuts here. We got mirror modifier, so I'm going to
work with one side and mirror modifier will do
the job for the other side. Hit K may cut cos
like that, maybe. And some cut may
be cos like this. And cut cos like that. All right. And maybe cut goes
like this. And what else? And cut goes like that
here and one here. And here, maybe. And just make connection
between them as well like that. And here maybe. That's very
cool. This side, as well. Let's do the same
scenario here hit K, and make cut goes like this. And one goes like
that. All right. Maybe you can add one
cut here and here. All right and one here as well. And one here and one
here. All right. Let's add cut goes
like this, maybe. And that's it. What
about this circle? Let's support the
circle quickly. Let's add cut goes like that, and maybe one cut
goes like this. And what else maybe one
cut goes like this? And one cut goes to this. This corner. Maybe we can
support quickly. Tub out. Al right now we can apply Bevel, I guess because
we just finished, and we can apply miro modifier, so control A apply
miro modifier. Right now is the time to rob this and let's see from
where we can start. Fair thing, let's grab this face and this face control plus C time until you
reach this area, I guess, and Swedes and a seam. All right, I don't know, but I feel this will
not rub correctly, but let's try.
Let's try for now. Let's go to face again, and let's see what
phase we can pick. Let's select these faces here. Okay. Okay. Let's grab those. And maybe we can add
those here as well. I'm not going to use the Geisma I will stick this
back to select box to hide the Geisma even those
I can add them to the group. And those here. What else? What else? Maybe those here as well. We can add them. Control
plus one time, I guess. And before you do that, I guess need to do
something here. All right. Let's select those
over here and Okay. I just need to hit
control Blass and deselect those from here
and those from here. After that s two
boundary and Markm. So we just add sam right
here to cut this area. And now let's target these Let's target these edges and let's give them SM as well. To help the algorithm
to work better, and let's target
this one as well and give it SM and maybe
this one right here. As. Yeah, I think
I will actually, I don't want to select
the entire age loop. So I guess we can undo that and we can
manually grab this one. Add this and add this
one as well, and maxim. The same thing for the side, crab this hold control. Crab this one maxim. All right. What about this
ometer right here? Let's go back to phase, and I guess we can
select those here. Control plus just one time and squeak this to egg and maxim. So I just add the sim as
you can see like this. All right, what about this
area and this area here? I will hit C to swa to
circle or circle select, and I just need to just
be precise, it C again. And let's pick these faces. All right, sorry, I just
made a mistake right here. Oh, hit. Alright. Let's do that again. It's she. Okay? I think I will
grab them like that. It'll be faster for me and more accurate and add
those here as well. Okay? And those here as well. Sorry. After you adding all of the set control
plus just one time, swag this two egg and mark
in. We got this corner. We need to help to open it, so let's add the
same right here, and this same here, we don't need to actually
clear this one here, and let's add just
one same right here. Sorry. Now hit A
select everything, and here hit A as well
and you and again. Now it's rob. Everything is rob. Now let's check her and
let's see if we got any distortion here.
Alright, we don't. Everything looks okay and nice. So that's me yeah, we can
go to the next step. Okay. Let's go to solid, it's like to Excite. All right. So now I guess we can
say that we finic those, and I will end this video here. And after that, we need to finick those here
and the next video. So the next.
95. 095 Unwrapping section Starting with the body part 3: Hello, everyone,
and welcome back. Let's start with this geometry. Let's isolate it, and let's
see what we have here. I think I just need
to apply bevel first and apply a scale in
case we got a problem here. Tap hit A and here hit
A as well and U twice. And I think that's it. We don't
need to do anything else. We can kick it. By adding checker and C.
Checker is very nice. I don't see any distortion. That's mean I can go
to the next step. Okay. Tab out its leg to excite, and let's start maybe with
this one. Isolate this one. Let's see what's visible,
what's not visible here. The bottom side, I
guess we can delete it, and it's it's already deleted. Apply level tab. Let's go to the edge. Grab these edges here, mark m, and those over here. Mark Him A, select
everything and here A and U U. I guess it's done
tab out a checker. Yeah, we don't see
any distortion. Go to the next one. What
about this geometry? I guess we don't need to errupt because we got
this already erupt, so I will select this one and bring the three
decosor over here and select this H D taco
HFTs cos to select it, scale this down and
make it small a little bit like this
and delete the old one. This one right here.
We don't need it. I will use this in state. But we need to go to the left and we just need to adjust
the rotation a little bit. We should do that.
Rotate this scale it a little bit like
that. And move it. And I guess we need to rotate it just a little bit more like this and move this
down right here. And I think that's it. Apply
a scale, and that's it. A Let's sect this
geometry and let's isolate it. The same CNR. We don't need this face tab, to face grabs faces,
F, delete them. See if we need to
do anything here. I think we need to do
something accurately. We need maybe to make some
cuts here using the NF tool, or something like
this, that will work. The other side, I
can use Mo modifier. Sorry. Yeah. That's it for this one. Let's go to this side and
let's make cut goes like that. Okay? And Let's confirm those and we almost
finished here. Maybe cuts goes like
this in one cut here. We still got those here. One here as well. Yeah, I think that's
it. For the other side, as I said, I can use Mmdifier, Let's do that tab, and let's add Mo moodifier, and let's activate bic. Let's see the wire here. Yeah. Now it is k. We
don't need to flip it. Remember. No, no, sorry. We f. Yeah, we should do that. When you complete, just apply the mirror modifier
and turn off wire. We don't need to do anything
else. Just kick the vel. As everything is
okay. All right. Everything looks fine for me. I will apply the bl, and now is the time to make
some rapping here. All right. Let's go
to face, sorry, tab, and let's go to the face, and let's see from
where we can start and, how can we rap this
geometry? All right. Let's select this. The g in
the middle, we don't need it. I'll click, and
dissolve it, control x. After deleting this g here, let's see from
where we can start. L et's select these faces
here, and those here. Rub them like that.
And de crab those. And select those. Maybe those over here, and even those you
can grub them. After that, it can
troll just one time and swing this two in maxim. These edges over here, I can open them to help the
old gorram to work better. What about those? I will try and let's see what's
going to happen, it A, and here hit A, and u again.
Let's see what we will go. A checker and see if
that works or not. All right. I can tab and I can
scale you and make it big. I need to make the
checker small to get better to see the result better. The result is not so quite good because this area is a little
bit difficult to rob it, but we will try to
make it better. Tab again and let's see
how can we do that. Let's go to sold for now. Let's hear from where we can start and how can we rub this? I guess we can make some
cuts between these holes. Let's make some cuts here. Let's will make the rubbing
a little bit easier. Something like that, the
same scenario for the site. We have here and here as well. And here, and the same
thing for the rest. Here as well. Let's
check this area. We can add cut here and cut here and here as
well, the same thing. All right one here.
And one here. This is the last one. I
will show why I did that. L et's add the cut
goes like this. And one cut here, maybe in one here. Confirm all of these cuts. Right now, let's grab this
phase starts from here, hold control and keep selecting these phases here, like that. You can grow the selection, but if you do that,
the selection will target these phases as. Actually we don't
need to do that. I think I can stick
with those for now. Now, let's use boundary loop
and let's mark Sam here. Let's go to the side go to
face, select these sorry. Select these faces. And this to seem the
same thing for this one. You can start from here
if you like. Okay. Cut up all of these and maxim. What about this one right
here? Let's start here. Hold control, keep
selecting these faces, and let's sick to
boundary and maxim. After that, let's hit A
and here hit and again, and let's see what
we got so far. As you can see how
we open this in a nice w. We still got some overlapping
as you can see here. Let's see where that.
For example, this area. And let's see what
we can do about it. How can we fix this one? I guess we can go to face and select some faces from here. Grab grab those faces. Here, tweak those two boundary
and asm in this area. Maxim. That's very cool. The same scenario for the rest, go to face, and let's
select these faces. Maybe those here and
those here in the middle. You can erupt this one as well, and convert to boundary
and then maxim. The same sinner for the rest. Let's grab those over here, and those here, here, and those here as well. Maxim. Let's go
here, go to face, grab these faces and the U V. H and the same scenario at seam. Now let's hear what we will
got A and hear and again. Now the result has
become better, but we still got those. Let's grub them as well. Select these phases, go to face, don't forget that sick to face. Let's select these phases
over here and those as well, and maybe those here. Let's go to the other side.
Let's grub those over there. S We can stick with
those. Add those here. These phases. And go here, Maybe before you go here, let's add those here as well. Let's select those here. Let's add them. Okay? Yeah, let's add those
here and those. After that, convert
those to loop and add C. Now hit A and hit and again. Now, everything is rubbed
and now it's become nice. We don't see distort a
little bit of distortion. That's okay. I guess. Let's see where that
here to the corner. We just have a bit of
distortion here at the corners. Let's see the checker. The stab hit A and hit S
scale, make it very big. I just need to see
the checker here. All right? We got a
little bit of distortion. Let's try to solve it. We got the distortion
right here. In this case, I
can go to the face agin and select these faces. And those here as well. An face with the problem, grab it, add them to the
selection, those here as well. And add those, I guess, the same thing for the
side add those here. Yeah, let's select those here. Hold and add them, and those here as
well's add those. And those over
here, Maybe those. Let's see, do we have selection? S. I guess we can select
lasso in this time, and that will make the
selection easier for us. Let's go to the
rest, those here. Grab maybe those here. Hold shift and let's add those here and the same thing here. Let's add those here. Let's add those over here. Okay. Add those select those, and let's add those
here as well. After you select all
the necessary phases, as you can see, what
we are selected here. Now we can convert this to
boundary loop and sorry. And then mark him. Now hit A here, and you again. Now, the result,
it's become better. You can scale this, make
it big, not that big. A little bit. And now we fix
the distort here right here. It's a little bit annoying. I know this part. We fix it. Let's hit to excite and let's see what next. Maybe
this one right here. Well, I think I'm
not going to rob it. That will take a huge time. What I will do is I will bring the three dc over here
and select this one. And hit H D take Cob here, Heft S and Corso to select it. I will delete the old. Or before I do that, I think
I guess I need to scale this as a little bit and
delete the old one. We don't need it. And
this will be enough. To go to the left and just see it kick
the alignment here. We just need to hit R and
rotate this as a little bit, not too much. Yeah,
I guess that's it. Now we can say that
we are finished with this part and in the next video, we will see which part
we want to start with. For now, I will
end this video and
96. 096 Unwrapping section Starting with the body part 4: Hello again, welcome back. Let's start with this emetry. Select this one. Isolate this. Let's see what we want to do. Kick the vl. Kick
everything, k the line. Let's see how many
modifiers we got here. We got mirror, we got
vl. That's very cool. I'm going to b one side and
I will mirror this again, or I can keep the
mirror for now. Well, what about vl? I don't see any problem with vl. That's mean I can accept it, so I control and key mirror. Tab, go to the edge, and let's target these edges. Grab them like that, and crop this one as
well and mark him. And what else? What about
this one in the middle? Well, we can let's see
what we can do with this. Let's leave it hit A, and here hit A as well
and u and u again. L's checker and let's
see the result. We don't see any distortion. It's very nice. You can
scale it and see it. The checker is very okay.
I can accept this one. Let's leave it like this. That will be enough for me. You can apply mirror and
tab and grab them together, hit you and you again to put
them side by side like this. I can say now, I just
finish with this one, go to solid and let's exit. What about this
gumetry, selected, and let's see what
we can do with this. Think we just need to
hit A and here hit A, and again rub it.
I guess that's it. I check if you prefer tab
out and see the result. The result is okay.
We can skip this. Slash to excite. Let's
grab this umetry here, slash to isolate it. Kick the bevel in case
you go a problem. I guess we don't have any
problem. Apply bevel. Tab and let's see
what we can do here. Well, this phase, it's hidden. You can keep it, you can
delete it if you prefer. And, I guess I can select this face and
add the same right here, or maybe, yeah, I will select these edges here
in the middle I'll click. You can select them like
that or you can go to the face and select these
faces if you prefer. Okay. Select these
faces, all of them. Go to the side and
let's add this as well. But just be careful. Add those over here.
Now hit control plus scar selection and deselect those and deselect this phase. Now we just select the side. When you comblet, select
boundary mark in. The same scenario for this here, just dero those, and
add those over here, C plus one time, deselect this phase, deselect this phase, and boundary mark. Now hit A and here
hit A, u and u again. Now it's rut her. All right. That's where we can't
checker or what? Yeah, now. Now, I guess the result is okay and the same
thing for the other side. You can apply mirror and tap and here to see
them together here. That's enough, I guess. Now you can excite and
go to the next step. Let's sit like those Tap
hit A and hit and again, and actually, that's it. You don't need to
do anything else. After that, you just need to mirror this on the other
side if you prefer. By the way, you can delete
this emetry and just add plain and you can add
a texture right here. That will be enough as
well if you prefer. Okay. All right. Let's mirror
this on the other side. We got this. This metry have
the origin.in the middle. But it is far away ale bit. Do we need to mirror
this right now. We got this empty
gas in the middle. I can move it right here
and use it as center point, I will bring the three decorsor right here and
select the geometry, and ralex origin
to three dicosor, and then I can add mirror
modifier to this geometry. Let's add mirror and
see what you will go. We got the problem, control
apply the rotation in case. Now it's working. Well
apply mirror tap it A, select them both hit and
again. That's very cool. You don't need to check
actually here, just exit. What else we can be
here to start with. We can go to the windhield. We don't need to do with vel, anything you can apply, control A tab, it A, select the windhiel, here, hit A as well u and u again. Now it's a. Let's check
and see the result. Hit S to scale this. Do we have distortion? We don't see nd distortion, but I think we can add one A here in the middle
to make this two side. Yeah, here maybe or here because I don't want
this piece to be Hung. I can sublit it to you, it A, and u and u again. All right. What else we can do here? Maybe we can start
with the door. It's like to isolate it. We don't have any
problem with the bible. Tab apply tab hit A, and here hit u and u again. It is a checker and
see it it Skillet. See in case we go
a problem here. Everything looks okay. We don't see much distortion. It's just a little bit. I can ignore it and accept this. So let's exit. Grab the window
here, grab them like that. We don't have any
problem with Bevel, control A hit A and here, hit and again, I guess
it's done a checker. If you prefer you can scale them a little bit just to
see the checker better. Tab out, C, we don't see any
problem. That's very cool. Go to solid, slack to excite. What about this humid here? Select it, tap it A, and sorry before you do anything, let's see
what we got here. We got bubble, we got mirror, I will hit control,
A, apply vital umami. I will accept all
these modifiers, tap it A, and here and again. Add chucker map, scale this tab out and C in
case we get a problem. We don't have problem
everything is cool? We can skip this and
go to the next one. All right. What else? I guess now we can
start with the body itself. Let's select the body,
isolate the body. We don't need any
mirror for now. I can turn this off for now. Bevel weighted normal. Do we need to leave
the bevel here? All right. This bival is just
alight on these edges. Yeah, I will apply. Ct apply apply this one as well. Now we have half of the body, and now we will
start adding seams here tab and maybe we
can start with this one. Let's add seam right here. Maybe we can cut the side maxim and make a cut right here, maxim and maybe we can add
make seam here as well. Now this become one
piece and this one as well. One more thing. You remember when we
add seams for these, I guess now we can or we could
delete all of these seams. Let's se grab them like that. Even those, I will delete
them, and I will repeat them. I will recreate those. You can hit A actually, and you can clear
seam and start over. That will be better.
Let's go to the edge. Let's select this one,
the same scenario. Maxim, one right here, maxim, and one maxim. I want to add seam right
here because if I rub this, this one will be very long, I just need to make it shorter. What else? Maybe we can
add a cut goes like that. Let's scrap this edge, starting from here
and end there. Let's add seam here. The same thing here, let's cc those add sim. What about this side here? Maybe we can. I don't know. Where should we add
sim here? All right. Maybe we can add
seem to this area, I guess, select those here. And what else? All
right Let's see. Let's stick with the top area, and after that, we will see what we can do with this site. Maybe we can start
with the circles, Let's gro maybe this edge, and let's convert this to Sam. What else? Lets this
edge right here, one of those, and
Let's add sam here and maybe one of
those here at Sam. The same thing for this side, maybe this one at
gb maybe this one, and maybe one edge
from here at Sam. That's cool. What
about this area? Maybe we can add sam
ends right here. And maybe one seam could end here and start
from here and goes, I don't know, maybe right here. All right. That's very cool. Maybe we can cut this area. Let's see grab this
one and this one. Let's add seam ends here. Right. What about this place? Let's see, what we
can do with this? Maybe we can add seem
goes here, and ends here. All right I just need to
cut this two small pieces. I think we need to maybe
start from here and end here. For any reason, if I didn't like these seams, I
can't delete them. What about this one? I click
and let's add them here. Maybe we can start from here. I'll click as well, and
let's see where this goes. I will go to the end. I don't want this. May I can
end it maybe right here. Okay. So sorry. Mark Sim. And maybe let's add im, maybe I don't know. Maybe we can convert
this one to him. Maybe we can add him
over here as well. And just cut it from here, just grab one to add him here. All right. We're
not finish here. We've got a lot of job to do. What about this area here? I think I can hit I click and select this area and
add him over here. Maybe we can add im
over here as well. I click, or grab this
one I click and cut this and I think we can extend the seam and add
sim right here as well. It's like we cut the
whole um like this. All right. Maybe we can
see goes like that. And maybe I don't
know, maybe goes here. And maybe one seem starts
from here and ends here. And let's see what
else we can do here. Maybe we can add to this area to cut it or maybe we
can add seem here. And maybe one here, maybe. All right. What about this one? Can we ask him right here?
Maybe, yeah, we can. Something like this. You just need to cut this side. And let's cut this side
as well, and this one. Let's make cut here and here, and here as well, the entire a loop here,
and those over here, grab them it and
it Q and mark him. Okay Let's see what
else we can do here. I think now we can rub it
just to see the results. After that, we can
add more seams. Or before we this, I don't know, let's try to add
maybe Sam here to this area click and
delete this one. Leave the sam right here. Let's see where this will go. It will end here. Let's
add seam here. All right. Let's hit A and here
hit and you again. Let's see what we
all got. Let's add checker map and let's scale
the U we make it big. Just need to see the checker
or I just want to make the checker small so I can
locate the distortion. I guess we don't
have any distortion. Everything looks okay, I guess. Let's scale the U V even
more a and make it big. If you make this big, the
checker will be small. As you can see, now we can notice that we got a little
bit of the stork right here. You can ignore the
storking like that. It's not a big. All right. Let's see what else
we got right here. Everything looks fine. All right, I guess I will
accept this result now. So Tab, maybe now we can scale
them back, make it small. Now I can activate the mirror, and I will have
the same seams on the other side and hit
control A a lights, and now we can b
the full geometry. Now, we got piece above, so I'm going to hit A and hit you and again to rub
the whole pieces. Now it's rut. We rut the body.
That's very cool. Let's go to solid,
it's like to excite and let's go to material review. I just need to see what
we errupted so far. All we just errupt everything
except these borders. Let's select this one, you just need to check it what
we got right here. I guess I can tab and make
some cuts here. We got B. T we don't need it,
you can apply, Ctra A. Now, tab, I'll click
and let's add cut right here and maybe
cut right here. Just target the corners
because I sorry. Well, that's not going to work. We need to use another way
like grabbing these faces. And mark them as Sam. But I will hit A and
then right clear same. Now let's start over and
let's select these faces. Let's grab those here, boundary loop and maxim. Let's do the same
thing for the rest. Let's grab these
faces over here, grab them all maxim. Let's grab those over here. Gb those. And Maxim. And let's select
those over here. And mark Sam. Maybe we can add sm
here in the middle and maybe seem here as well, and maybe one sm right here. Just reduce the length
of this cmatry. What about this area? Let's
add here and see here as to this corner maybe
maybe to this one as. Maybe one sm here
and one sm here. That's very cool.
What about the site? I will grab it hit
xF to delete it because I will use
mirror modifier. Tab our story hit A and
here hit and again, and now we just rap all of this. If you like you can
add checker and scale it and see it, it's okay. We don't see any story in here. Scale this back. All right now, I will
add mirror modifier. And apply it, and that's it. All right, let's go
to the next geometry. These borders are right here. This one here. Slash to isolate
it, and let's check it. Let's see what we got
here. Apply bevel. And Let's see what else
we can do here. Maybe before we apply level, maybe we can add some seams
here to these corners, add seam right here, maybe
in the middle one here. Maybe we can divide this one several times. Sam right here. I'll click seam right here, one in the middle and on
the other side as well. Maybe one seam right here
and one here as well. The same thing. Mark
Sim here, and Sim here. It A apply level tab
We still got the seam. That's not going to
work. We will go some problem if we do
that. It's not an issue. I will select them
all and clear seam, but I think we can
leave those seams and just target those at the
corners in the wire frame. Grub them. Sorry. Grub those. Add those here as well, using KFT, and let's
add those over here. And clear seam let's start over. Grab those Mark Sam and
this one right here, sorry. Let's select this one. Grab this hold
control, select this. And mark Sam here as well and
select this one right here. All right. Let's see here. Okay. Now,
let's hit A and go to the U V, hit A as well, and
here hit U U again. Now they are rubbed
and they are ready. You can check out if
you want to check it. It looks okay. Go to slid. What about these pieces? Let's select those,
isolate them. We got solidify, we got
bevel. That's very call. Apply the solidify, and for Bevel, you
can apply it as well. Now tab, and let's
see what we can do. We've got two sides here. Let's grub the side. I'll click. Let's
I'll click here. Markm the same thing here. Go here. I'll click
on the side and go to the center I have to
click and Marks it, it A, and here hit and again. They are rubbed. That's very cool. Tub out. Let's from the local mode. Now, I guess we just
rub the whole body, and that's very cool. We just need to rub this one. Let's do that now, select this piece and let's
see how can we rub it? Maybe we can grab these faces, and maybe we can grab
those here as well and choose boundary loop and
mark Sam a seem right here. And hit A and here hit and
again, let's see the result. The result is okay. A Checker. It's very nice. We don't have any problem.
Tap out this exit, and maybe we can
select those here. Grab this with this hit
control k to make them one piece and a smooth. We just forget to that tap it A and here hit u and u again. They are rapped acid.
Don't worry about them. Grab this one, tap it A here, u and u again. It's rapped acid. And those tap hit A, u and u again and
they are raped. Grab this slack. Tap it A. Okay. What about this one? L et's see how can we
rob it. All right. Maybe we can re have
the ball apply it tab. Let's see if we can select
these and sublet them. Select those here. Okay. Ctrol plus loop Markem. All right. I think we can divide this 22 by adding seam right
here and seem here as well. Let's do that, it A and now
here hit you and you again. We still got some problem right here. Let's
try to fix this. I will select these fases. And hold shifts and let's add
let's add those over here. Let's add those here. And maybe those here
as well. All right. And those here. After that, let's come back here and let's choose boundary
loop and max him. Now hit A and here hits you
and you again and that's it. I checker and see it, scale this, make it big. Everything looks okay. We
don't have any problem. Let's move on. Now
let's hit to excite. And now we just ray. I check to this one if you
prefer and those if you like. Okay. All right. Everything now is rubbed and
ready for the body alone.
97. 097 Unwrapping section unwrapping the body using udims part 1: Hello, again, we'll come back. Okay. Before we go any further, I just need to mirror this
door handle on the other side. First, I will grab them all
and merge them together. It control J and
make them one piece. Alright, now it's
become one piece. After that, it's d P and clear parent and
keep transformation. Now I can delete this et. I don't need it anymore, and I got this. All right. After that, I need to put the kin dot of this
geometry in the middle. And I guess, this one
is in the middle. So I'm going to use it, it
H S and Corso to select it, and then grab this right click it Ogon origin to
three D crosser. Now, the origin dot become
here in the center. After that hit control, I apply the rotation, and let's add mirror Modifier to this matry and now we just mirror this one
on the other side. After that, you can apply
the mirror Modifier. And you will have
all the UV map. All right. Now let's see
what's the next step. Okay. Here we have the UV editor. I will go to new and create a new new image because I just I need to use U DMs
to rob this one, right? How to use UDM inside a blender. You need to go to the new, and then you can give
this a name if you like, for example, I can
call this body parts. All right. And then
go to the width. I will use two K, so just
click and drag and grab those two and multiply those
with two and hit Enter, and now we got two K. And just activate tied and that's it. Now you can hit k. Now
you got the UV and you have the name UV Map 1001. After that, you can
go to the image, and from here, you
can control the UV. You can add plus and
add the count you want, for example, I can add ten, and then hit Enter. And don't worry about all of
these settings. Hit enter. And okay. Now as you can see, we got ten UVs. All right, you may ask what stu Dems and why I want to use it. I have two option here. The first option,
I can add all of these UVs inside one UV, right? And after that, I can export it to substance
inter, for example. But if I want to do that, I will get very low resolution, or I can increase the texture size to four k or eight k to
get patter resolution. Maximizing the C to
four K or eight K, that will that will use too much from the Rm
inside the buter. But using UDMs that's not going to use a lot of rams
from the buter, and muter can handle it
and the end of the day, you will get very nice results. By distributing these UVs
to very small UV size, for example, two k, two K, muter can handle two
K without putting the Rm under too much pressure. So now what I'm going
to do is I'm going to tap the mot, for example. And as you can see, how
many UVs we go right here. All right, I'm not going
to put all of these UVs inside one UV square like this, but I will distribute these UVs. All right, I will
distribute them. To every UV here. Let's start, for
example, with this part. Before I do anything, I will
take all of these UVs out, for example, but
them right here, and let's start with this part. Select, for example,
any phase here, a get control L tooling select. And as you can see, what I selected here, what
I selected here, you can see it
right here as well, activa and now we
got it right here. Now, what we need to do is,
we need to move this UV, and I will put this UV, for example, right
here. And kill it. You can hit you and you
again to rub it if you like, and it will be rut right here. You can rotate it if you prefer or can you leave it like that. Let's rotate this hit and
rotate this nine degree, and hit and let's
move this right here, or you can go to UV and bake and that will
help to bake it, but turn off rotation. And that's very cool.
You can scale it just a little bit mixed smaller
and put it right here. So as you can we gave
this part right here, we gave this whole UV. That's been this parts will receive all the resolution
from this square. And you got another You have nice thing we can do. You can't rotate it
diagonally like this, and you can scale it to have more space if
you prefer that. Can do something
like that. So if you prefer this, you've
got this auction. Now, if I rotate this like
before, as you can see, we can note that some part of this
geometry goes out, right? That's very cool. All
right. What else? For example, this
part, hit control L and rub and you again. And as you can see, it will
always rub on the first one. When you do that, just hit
g and move it one unit, move it to the x and hit
one enter, and this one. We'll go to here to this V.
Let's give this one U V, hit control, and
here hit u and u, again, it will go here. It, and let's move
this two un three. Hit g x and hit three, I will go to the third
one. One, two, three. Sorry, I could take this back, G and hit minus one to
put this one right here. Prof, we can scale it just tiny bit and move it right here. All right, what else? Let's
grab this part a control L, and let's see what
you can get here. All right hit and again, and now we got this
part right here. Hit and let's move this two
U three. That's very cool. You can center it if you like. You can rotate it, pf like that, and scale it just tiny bit. Now let's grab this
hit control L, to select. All right. Let's hit and again to rub this And now we
got it right here. H key to move it in, let's move it to this unit. But I can do something else. If if I got this a
little bit tall, I can add a seam
here in the center. You can do that, if you like. Let's grab this, and let's
go to you and mark Seam. Now we got seam here. I got seam here in the middle. And yeah, it does. And you can grab those
and hit twice to rub it, and it will be rub
to two pieces. Now you can move it and put it in the place
that you would like. For example, right here. You can scale a tiny bit like this. That's very cool. Select
this control L. Sorry. Let's go to this face. Control L, tolling select. And now we got this part. Well, let's go here, it twice, and now we got this part rub, it to move it and let's
move it to this unit. Or before you do that, I guess I can rub it to two biases. So let's go to the edge. Pub this edge in the
middle and let's add. All right. Let's add seem here. Or you can go here and a
im quickly if you like. Now, grab those both, hit twice, and x and move this sorry something weird tapping here. Let's go to phase. It's very important.
Because if you don't, you will grab the edges
from here as well. Make sure to go to phase
and hit x five unit, maybe. Am right? Yeah, five units. Now we got this in
the correct position. What about this MR here, control L, Link elect grab. This U V, go here, U twice, and let's move it
right here temporarily. Do we need to add a line here? It's very simple, go to
the egg, grab this one, come here, add sm, grab all of these details, and the face mood.
Don't forget that. U twice g x six units. Am I right? Yeah.
That's very cool. Let's select this
one at control L, to slate, go here, U twice. Now it's rot here. G and go seven unit to the x at enter. And
now we got this. We can hide this
temper. What else? I can grab this one?
Control L, link select. Go here. U twice. We got it x eight units. All we got this to the eight. Grab this one, control L. K
link selects here u twice. It's rub X and nine units. And we got it. That's very cool. What else? Maybe I can select
this, control, then select. And the same scenario, I rub it, and let's
move this 11 unit up. Well, we need more UVs. That's very cool and easy. Let's go to the
plus and add plus, and how many us, for example. Let's add, for example, six UVs and hits. And now we got six UVs. All right. Let's
grab this control. And now we got this
u and u tis rab it. Key, and let's move
this up one unit. Key and move this one. Sorry, and K one units. Now, I guess we put this
in the correct position. We can move it a
little bit right here. Grab this one, control L.
Write U twice, grab this one. G, let's move this to two units, and one unit up, and done. What about this here, control L. And here we, let's
move this 23 units, and to the z one units. I mean to the y no z, we don't have z right here. Grab this, control
L. Come here twice. And key and let's
move this over here. And key and take this
one up one unit. If this tall a little
bit, that's okay. Go to the g. Rob this
g in the center. Come here, Maxim, right, and select this U V alone, control L to link select
and rob it twice. Let's move this key, and how many units we
want four units, I guess. And one unit up. Okay, that's very nice. And confirm that, grab
the spine control L. All right G here. U twice, rub it. E, and let's take it
out for now temporally. Go to the edge, grab
the edge in the middle. Go here, mark Sam control
L, not like this. Go to face, or you just
grab it right here, and twice rub it again. G and let's move it
this time five time. And one up to the Z, one up. All right, we need more UVs. Go to the plus,
and let's add one. Let's add five units,
five counts here. Five U Vs, I mean, and hit. Now, we got five. And you can add too
many UVs if you like. Let's grab the
side and hold ift, and let's add this one as well. Hit control to grab
those together, and let's hit U
twice to grab those. And it key to move this
one, maybe six units. All right, it to move
this up one unit, and move this yes, a little bit right here,
and that's will be enough. Did we select this one? All right. This one as well
hold here to corrupt this. I'm right, control, and
let's cru this twice, and hit to move this over here
and to move this one unit. All right, that's very cool. I think we finished with those. What about this part
control L to link select. A it twice and rub it. Now we g got this one robbed. Maybe we can add the same here in the middle to
make this two pieces small. Okay, grab this and
go here at Sam. Select the Up again. I
rub it again u twice. And let's see where
should we put this? G and move this over,
sorry. Go to the phase. G and move this one
over here to the eight, and one e to the y, one can center it if
you like like this. What about do we select those? Yeah, we select
those. What about this air control
L, L link select, rabbits, key, and let's move
this to the ten number ten, I guess, or nine and
one up, I guess. Is. Scale just ten bits. All right. What else? I guess we need more UVs here. We need a lot of UVs, and that's possible.
We can't do that. Let's select this one, and I guess we can equal
this one as well, control to link select. Pull. Let's hit U twice here, and we got them a k and take those over here to three units, or two unit three. G, and add two. And maybe we we need to select this part and
this one control. I'll up this G two unit
of one unit to the x. All right. That's cool.
Did we select those? Or not? Now, we don't. We need even more UVs, go to the blast and lets add
five here and add Ok. Now, we got five more
UVs, grab those. U twice, rub them, k and take those up to
two units and k to the x. S to the x. Move those two units. All right. What else? Did
we selected this one? Yeah, we did this one. Yeah, we did. All right. What about this
part and this part. And those here as well, control L, link select. And it's twice to rub them. Now we got them here. Let's
move those to maybe four, three unit here,
and two units up. Okay. All right. I think now we select everything except except these parts. I think I can give
each one each whole. I can give it one U
V. I can do that. Select maybe these parts. I control tooling select
and this one as well. And here hit twice. Now we got those a rub
and hit key to move this, for example, right here, four units, and two units up
and now we got this here. All right. The same thing
for this one, grab those. Select some faces,
control L tooling select, and go here twice, Arab it key and
let's move this over here to six unit, I guess. Six it enter, and to the y, and let's add two unit up. Well, we need two u Vs, so let's go to the
blast and let's go to add two here, it. Now we got two here. Let's go to this side,
and let's do the same, grab those faces, and hit
control to link select. The idea, just make sure to
select all of these faces here and hit twice about it. Let's move this to
almost seven units, enter and to the Y two. And we need to select
this one as well. Trol. And a bit. Let's move this to the
eight and to the y is two. Do we forget anything?
What are those? Well, these parts let's see
what we can do with them. All right. I can
give them one U V, so let's go to the U
V and just add one. All right. Now we got one rab
those U twice and rab them, and let's put them
to the number nine, enter and two All right,
I think that's it. Before I end this video,
I just note something. I will select all the UV and select sorry and check
which one is empty. I noted that this UV is empty, and that's something
I need to fix. What I will do is, I will select these UVs and control L to
make sure that I select the whole UVs and G and move this one unit to the x
minus one, and that's it. Alright, so now we
got this results, and I will end this video
here, C U in the next one.
98. 098 Unwrapping section unwrapping the body fixing the UV size part 2: Hello, everyone,
welcome back here. Okay. Before we go any further, we just need to do
something important. After you complete
distributing these UVs, you should go to the material preview to check the checker. Okay. Now, this is the
result of the checker. And as you can see, we noted
that we got some variation. Here we got small checker, here we got big checker. Here we got very big
checker texture here, and so we got a
variation. That's wrong. We need to Unify all the UVs. Texture. So L et's see
how can we do that? Let's try to understand exactly
what we should do here. You can, for example, check, where is the biggest
checker texture? All right. We got this side has almost
the biggest checker, and this one as well, I think this one
bigger, I guess. And we got this area, a big checker texture here. So we can scale those Are the small checkers and make them big to unify them with
the rest. We can do that. For example, let's see
where the smallest one. All right. I guess this
area is the smallest one. So I will select this
part and this part and control and see where are
they? They are right here. All right to make this pig, I need to scale this down
like this to make it pig. Right? All right. So this is an option.
You can do that. Or you can, for example, you can make the big tempture small by moving these
UVs to new UV square. For example, if I grab this, the ses right here. I can move this one
and right here, I can scale this,
as you can see, it's become big, and I can grab this one and scale
this one as well. And now the UV becomes
small. So that's an option. But if I use this option, I need a lot of UVs. So as you can see here, we got 30 UVs. Okay? So now, I think you understand the idea of what
we should do. All right. What about this
area? Hit control L and let's selectively seras it? Let's try here, what
we can do with this. Well, maybe we can
add a seam here. Maybe that's will help
to solve the problem. I don't know. Let's
try to do that. We can add a seam over here. L et's add sam and let's select
this face with this face. I control L and hit
twice to rep it again. And maybe we can move
this all four unit, I guess, three, sorry. Et me see if we got
different results. Almost the same results. There's no UI difference. So I'm going to hit controls that to cancel what I did here. All right. In this
case, I got no option. I just need to select
the rest and scale them up or I can add another UV. O now let's try to
find a solution for this problem
and let's try to make the big UV or the
big teture smaller. And maybe we can
start with this area, just select some pass. And as you can see, this
is the UV for this area. Now you can select all
of this geometry here, hit control L to
select the rest. What I will do is, I will
scale this just a little bit. When you make this UV bag, the checker will become small. All right. But how can I put
all of these inside one UV? Let's try to do that. I will
go to UV and hit Pak Island. All right, that's
not going to work. You need to Manually, you need to grub these and
scale them piece by piece. For example, like this,
it key take those out, and you need to grub them
one by one and put them here and rotate some of them and distribute
them manually, sorry. For example, putting this right here and grabbing this control. G, and let's put this
right here and rotate it. And let's move this over here. Let's grab this control. G and let's move
this we put this. Let's put this
right here, maybe. Well, I guess that's
not going to work. If I scale it, I will
got some variation. Right? We can't do that because
we got some overlapping. So that's not going to work. We need to put this
inside one U V to get rid of this
problem in this case. All right. So I think I will add more UVs for this situation.
So let's start with those. I them, control and
go to the UV and pak. All right. I think
we need to make them first or them
hit twice to them. And now you can move them. Don't use bake. Move them for four units, I
guess, and two. All right. That's very
cool for this one. The sec of the rest control, wie rut them and let's
put them, for example, three unit up, write those here ui and rupt them and check the size,
make some comparison. We need to scale those
down just a little bit. Maybe like this. We still see some
variation here. This area, it's very big. All right. So let's move
those up three units, key to the y, and let's move this
again to the x one unit. And maybe we can select
those control L, see where are they, and we can scale them down
just a little bit. Make it a little bit big to reduce the variation
that we will get. All right now we can
go to this arrow and add new UV here. So let's go to the plus
let's add five and hit. That's very cool. Now
what I will do is I will add I think we got space to
add two pieces here as well. For example, I can
erupt those here, it control L, and it
uize to rub them. I can move those up right here and move
them here as well. We got space to do that. We can zoom and
just a little bit and scale this tiny bit. And move this up right here. Yeah, that's very cool. The same scenar I will
do it for the rest, let's grub this one here. This one here, control,
and I rub it U twice, and move this three unit up, and let's move this
two units to the x. All right. Let's move
this right here. And we can scale it
down again. All right. Let's select all the UVs and let's see what
we got so far. Let's select those here, control, and we can move
them manually here. Maybe right here, key. Let's see crap this one with
this one and scale them. You don't need to
rub them again. That will be enough.
Let's select the rest, where are they we got
this Mall right here. We got this small right
here and what else? We got this one here as well, this to this control L, and let's move those over here. L et's put this one
right here and bring this one right here as well. Rob them like that. It is and scale them
gets a little bit. You can grab them all like that, if you prefer and hit
twice to rub them, and you can put them
inside the new area. This this two unit here, and you can scale them
down a little bit. Let's see what else we can do here. What about those here? Grab them twice and rub them and let's see sorry we did that we did that.
Let's go to this one. Rub those control L U
twice and rub them. And let's put those
back four units here. We need to move them. Move those up to two
units and one unit here. Let's see what we got here
in this area. All right. The same thing, maybe we can, in this case, Before
you do anything else, I think we need to go back to select those here, control L, and yes kill them down and make some comparison
between the side and the side. All right. Now it's become the same and they are very close, so now we can go
to the site here. Select this and this control L, find them, rob them again, try to move them manually. Let's see where should
we put those All right. We don't have a
space right here. We can put them
right here or here. Scale them gues a
little bit. Like this. What about this
one and this one? Control L A of them and let's put them
back in the same place, five unit, I guess, right. And two We got some variation, I think. The rest of this is very close. The same scenario for the side, grab those control L, and let's see where
they are right here. Let's select them all like this, control L. Key and
let's so those up. Grab control L, rub them, and let's move those back
to six units here, maybe. Or seven, add one and
move this up to two. Grab those and let's put those
inside one new U V here. I rub them or manually, we can move them and
put them right here, and scale them, maybe
up just attle bit. Now the scale is okay. A Let's see if we
got any empty area, we got this area as empty? Let's grab those control L, and let's move them back to the X one units the minus one. Now we can delete this
or we can use it. At see what else we can do here? What about this one,
this area, control? Can we do anything here? All right, let's
select one side or let's select those
both at control L, and we got this me right here. I will rearra this, and let's see where
should we put this. Let's move those 23 unit here. And I will grab one a control L, and I will take one up
here to this area alone, and I can scale it just a little bit to make the checker smaller. And this one as
we grab this one. And scale a little
bit, make it bigger. And move it, use
your eye to do that, and let's put this right here. You can rotate it if
you prefer like this, and you can rotate
this one as well. The size. The size looks okay. Because if I move this down. Yeah, it's very close.
You can scale this just a little bit. All right. This area got big checker scale and this one got
small checker scale. I will grab those here and
maybe scale those down to make the check a little bit bigger, something like this. Let's select those right here. Maybe we can scale
those up a little bit. What about the rest? The
rest is okay, I guess. We still got subtle
variation here. This area, I got big checker
here, big checker size. I can select those
two locate them it control L to see
there right here. Maybe we can move
those out for now. Let's see one site a control L. Let's let's move
this one right here. Rrotate it a bit like that. Maybe we can scale it. Something like this. Scale
this a little bit more. Maybe we can rotate it
and scale it again. Now that you go become
smaller, what about this one? I will give this one a new UV. Let's add a new UV here, and we got a new UV right here. Let's move this to the UV
and rotate it like that. And scale it. Try to
avoid any overlapping. The result become very close. As being y, we can accept this. And what about the rest? I will accept what I got here. Maybe just this area, I can control to
select those here, and those here as well. I gue to see where
I think I can add the U UV to distribute those and put them
inside one U V one UV. Let's do that again.
Let's add one U V here. So now we've got UV. I will move those right here and scale them up
just a little bit. Well, let's see, we don't we got some variation if we
compare the site to the site. I guess we need to add
seam somewhere here. So let's do that because the arabic is not correct
here in this area. We need to add more seams here. Let's grub this edge here. Hold can grab this one, and let's mark seam. And here, the same
thing. Select this one. And hold control, grab this. Marx. Now let's select one side, grab this one control L.
Hit twice to rave it, and let's see the
arriving result. Let's move this way here. All right. Do we have
any d stork in here? We can add more SIM
here to open this. I think we need to do that. So let's add more SIM here. I'll click to grab
this entire edge loop. Let's select this one as well. And let's add SM here as well. Now, I will select
all of these pieces. Control L, and I rub
them all it twice. G, and let's move
those over here. Let's see where we put those. All right now let's check the scale of the U V. It's okay. We don't see any
problem right here. So let's put this
inside this unit. Make sure that you
use the phase, and let's move those right
here. And what else? I think that's it. Yeah. Now the size become okay
as compared with the rest. Let's check this area as well. I think we don't have
any problem with this. Grab those all and
let's see do we have any MTU V. All we don't. Now, I think we can move on and see what's
next we can do here. It's a long journey, I know
and a little bit annoying, but this is how it works. If you want to get
accurate result and nice. All this geometry, we
can say it's ready. We got a little
bit of variation I know we got, but that's okay. It's not a problem, not a huge problem. We
can accept this. If I want to be more accurate, I will take a long time
just for this object, and I don't want to do that, but you got the idea, and you learned how to scale things and how to
fix the problems. And that's what I wanted
to do. All right. So now we can say
this object is ready, the body, and now we need
to jump to the next metre.
99. 099 Unwrapping section using udims for the Top body parts: Hello again. Welcome back. Al right now is
the time to create a new U deems for
these top parts. Okay? So let's exactly
from this one. Don't worry toll here,
if you want to reach it. And let's select this piece, and let's create a new
Udem let's call this. You can call whatever
thing you like. For me, I will call
those top parts. All right, two K tile, and then. Now we got the first
U square here. And maybe let's see
how many we want. Let's add five for now. And for any reason, if we
want more, we can add more. And then hit and
now we got five. Let's hide this panel, and let's see what
else we can do. All this piece is and rut
and this one as well, it's ready and rut. So I think we can select those all of them and
put them inside one UV. Go to the UV and just
average island scale, check the scale. This option, I will correct the scale and give each
part the actual size. After that, bake them,
and now they are ready. The baking, I don't like it. I think we can add this further. I I guess. Let's go
to material review. We can like to isolate this
mat refers. All right. I guess I will accept this. Let's go to the
next one. T here. All right tab, and let's go
to V average. All right. After that bake, and
let's move this one to one unit, G. Sorry. All right. I think
I can add all of these details inside one
unit. I think we can do that. So let's s, all of them. You can Mage them by
the way, if you like. All right it control J two Mr them and tab
and let's average, the scale and take them. All right. Now let's
go to material review, and that is all that we've got. All right let's select these
pieces. Select this one. Control J Mr them, Tab A, and got V average the scale, and then pa and move
them just one unit. And there we go.
And this one, sir, we could add it to the
group Control J tab. Let's do that again,
Ag scale and bake. That's very cool. Let's
select this piece, and let's put this
one inside one U V. Tab it A, go to UV bake. Let's move this to U V three. Okay? Okay. What else
select this one? Let's subdivide this 22 pieces maybe using this
egg and this one here as well. And this one. Let's convert this
to Sam. All right. And let's see what
else we can do it A, select this and hit
U twice to Arab it, and let's move this to
number four, right? Tab and let's see the result. All right, I think that's it. Let's move to this
piece tab and bake. All right. Let's move this
to U V five. All right. Now, I think we can select those at control
J and merge them. What about this piece here. All right. Check if you
have any overlapping, we don't see any
overlapping right here. What about this one?
Let's become here and this Let's select this one and let's move this
to number six, I think. And now I can merge it with
the rest at control J. A But if you do that, you should fix the
average scale. All right? There's another
scenario, if you want? You can select all of these
pieces and just merge them together and let's tab. And, Let's fix the scale, go to the scale. And now you can let's
go to the wire frame. Let's sb this piece, and
let's see where is it. This one is ready. We don't
have any problem with this. And what about this
one right here? All right. Go to face and let's move these faces
right here and let's hit bake. And let's move this
one right here. I think now we can
add another UV map. So let's go to the image and let's add plus
and let's add, for example, three
here, and then. But here we need to make some editing because
this piece is very long. So in this case, I will select these edges. Isolate this Juma three. And I will add SM here as well. And maybe S here, this area. A What about this one? A Let's try to I think
I will delete this seam and just add once sam in
the middle. Clear seam. Now hit a selects
these pieces, those. Make sure that you are
in the face mood and hit I rub you and you again
and I'll rub it again. Now let's move this one and
let's see where should we put this. All right. Maybe right here.
Let's check the rest. Let's check the check ar map. This one is still big as
compare with the rest. In this case, I will select
just this geometry control to select and tweak this to normal to select
the whole piece, and I will bake it and move
it to this unit right here. And just kill it ale bit. Make sure that the U V
touching the border. What about this
geometry right here? Well, let's see what
we can do with this. Al right, let's
check the checker. Let's make some comparison. All right, this
piece right here. It's a little bit big as
compared to the rest. We can fix this by adding seams, but I don't like to
add seam everywhere. So see what option do we
have here to fix this. All right. Let's take some
parts from here, for example. Let's go to the face and
let's select these faces, and those here maybe
grab these parts, and let's take them out to new U V. Can we grab all
of these parts? Control L, let's see
what we selected here. Control L. Cycle
of those here and maybe those control L. Even those and let's
go to UV and bake, and let's put them right here. Es move them one unit. And now the checker
becomes smaller, and now maybe we can take those and go to
UV and bake them. All right. The result
become a little bit better. I think that's it. We got a little bit of
variation. I know that. But I think that's it. Let's slide to excite. And what about this
piece right here? I want to merge it with the
rest, and this one as well. Grab this with this control,
make them one piece. And you can grab those control and make
them one piece as well, t and check if you have
any overlapping anywhere. We can see that we
got some overlapping. Let's select this
geometry, control L, toing select, and let's see
where is it. It's right here. That's very cool.
Grab this control L. All right, it's right here. But we can see that we got
some overlapping right here. See from where that comes, grab this geometric
control L. A. To fix this overlapping
happen here, go to the UV and
bake those again. To fix this issue. Now we don't see any problem. What about this area? Grab this control L, and grab those here as well, control L and go to UV and choose bake
to bake them again. And now the result is better. Now it is the time to grab those here, grab
them all like that. Control L. Control L, tolling select,
and U V and bake. All right now let's
check them one by one. And let's see if we got
any overlapping anywhere. I think we don't. What
about this one right here? Well, I think we can do
something else like taking this and putting these stuff
right here, for example. Key and let's move
this right here, and this one as we can
move it and right here, and we can grab the
whole U V a key and take this minus one center
if you like like that, and take this one s k minus one and delete
this one, the last one. All right. Now let's move
to the doors and let's see what we can do about them.
Let's see like this one. And I think we can subdivide
this to I think four pieces, Let's top to the e mode,
and let's go to solid. Because I have egg
hiding right here, I can use it as a seam. Let's add the sam right
here and them here as well, but this one is visible acculy. Yeah, this one is visible. I can control to add one right
here and use this as a sm. Let's add Sam here
as well. What else. Let's hit A, and let's create
a new UV map for this one. Let's exact from this
from the top parts, and let's hit new
and let's call this. You can call it
whatever I think. Maybe I can call this wind, heal, something like this. And then activate tiles, two k and then k. Let's incre the number of the UV is two maybe three and then enter. Rub those and let's hit twice, and again, and now it's rubbed. All right, let's put each part inside U V. Let's
scrub this control, tooling select. Go to the phase. Don't forget that.
Let's move the header. First, let's scrub those
and move those down. Crab this first one, control L, go to U V and let's hit
Pak or that's very cool. Crab this one, control L, and let's go to U V
and let's hit bake. K, and let's move this 11 unit. Select this control L.
You can use bake again. Let's put this number two. And this one, let's
bake it as well. Let's move this to
the fourth one. Now it's like to
isolate this one, and let's check the scale. The scale is okay. This part right here,
it's a little bit big. But we can accept it. If you like, if
you want to this, you can control L to link select or select this one
and size it is right here, control here, and you can scale it down autob want to make
the square autle bit big. This one as well that control. Maybe we can what
we can do here. Right now, I think
it's become even, and that's it for this one. And I think we can add the side glass as well
to the windshield. So let's see those both and All right Let's
see like those. Let's move those
maybe right here for now and control j
and merge them. All right now tab, and let's add each one of
these two new UV. We need one, two, three, I think we need three, so let's add three here. It's. T this one. Ctrol L, and let's move
this one right here. And go to UV and bake. That's very cool.
Select this, control L. And you can hit G, and let's put here for now, go to the UV and choose bake. Select those and let's
put those right here. Go to UV and hit bake. Now let's check the
scale. Check the checker. The checker of
these become small. We need to scale those
down just a little bit. Now the size become even. That's very nice. All right. So the windshield with the side glass now
become one piece, and that's what we
wanted. That's very cool. What about the door? And
this piece right here, we should find a solution for
this and even the frames. The same scenario, we can grab all the frames and
give them one killer. I control J to make
them one piece, and after that, we can
decide what we can do. After merging these borders, I think I will end this
video, and the next video, I so finish the body and make it ready to move to
the other parts to a them. So I think that's it for this
video and see you in the
100. 100 Unwrapping section giving each part of the body a material: Hello, again. Welcome
back. All right. Let's start with the door. Grab the doors and let's add a new UV map, U Dems, I mean. Go to the name and call the doors and activate tiled and hit okay.
That's very cool. After that, open this
arrow and let's, Add maybe just two,
let's add just one. Right now we got two here. Top and let's select
this part, it control L, and let's move this over here, scale it like that, and go to V and hit bake. It will bake it in
the same place. Grab this control L
to select the rest. Put this right here, scale it
a little bit and hit bake. And now let's check
the variation here. The door should receive the
same body texture size. And now I got very close results with the
body, and that's what I want. What about these pieces right here, this
one, and this one? We can merge them with
the border, I think. According to the
reference image, I think they have
the same color. That's mean we can
merge them together. So let's do that. Select this, grab the borders, hit control
J and make them one piece. Now, we'll stab and let's
see what we got here, go to the U V average UV, the scale, just
rectify the scale, and now it's corrected. After that, go and hit bake. We don't want to
bake them right here inside the doors UV. We will create a
new UV for them. And let's do that, and let's
see what's going to happen. Tab out, and let's
exit from the door, it to create a new UV. And let's call this borders. And activate tiled ad. And maybe we need three. If we need more,
we can add more. Let's add two here
with this one, they will become
three. All right. Let's to isolate these
pieces, and let's stop. Well, let's see
from where we can start and what we
should do here. Let's select this
one and this one, it can troll to link select, and let's move
those here for now. Let's see what we
can do for the rest. All right. Let's grab
these pieces first. I control tolling select. And let's go to UV, and I think we can grab those and those
here on this side, and put them inside one, UV, and let's see
what's going to happen. Just bake. All right, and let's move those right
here for now, minus one. Let's grab the rest and let's
take them out from here. I will put those right
here temporarily. I just want to see
what's going to happen. All right. The scale
is still big. I guess. Something weird we
got right here. I will hit, let's grab those. Control L tooling selects, and let's hit I rub you and you again to rear rab them because I got a
problem right here. I think we just fixed this. All right. The sides, it's cool. Now let's go to the rest. Select those and
those here as well. Et control, tolling selects
and go to UV and bake. Let's move this 11 units. Let's check the size, and let's make some comparison. The size a little bit big, bigger as compared to this one. What about the rests? Let's bake those as well, go to the UV, bake. Let's move those to the unit
number three, right here. Okay. We got some
variation here. Before we go any further, let's open this side and
let's add another UV here. Let's add 24 now.
Let's hide this. Let's subdivide this one. Go to the edge. Let's
select this gg. We can cut from here, and we can cut from here as well by selecting
these edges. Maybe we can add the cut here, maybe and one here. And what else maybe one right
here. What about this area? Let's add the cut here and let's select and let's
select this e here. Or if you like, you
can ect this one. Maybe one edge from here. I just need to add seem
here in this area. You can select this here. And maybe one here in this area. Well and maybe one
here and delete this. Something like this. Now let's
convert those two seams, select them all and
let's hit twice. Let's move this one to the fourth square minus one. All right, Let's kick the U V. I think I can
select this side, control L and move
the side or Yeah, let's move it first, one unit here and go to UV and
hit bake to rebake it. And let's select the rest. Control L, select and U V bake. That enough. All right. I think that's not
going to work. Let's see what's
going to happen if I rotate this a little bit like that. All right. There's not huge difference But we can subdivide this even
more to get close results. Or you can accept this result. And that's make more sense
because don't forget that the body takes
here, it's big. If I it's like to excite
from the local mode, leaving the door
border big like this, it's makes more sense because they are very
close to the body. And for the borders, it's okay to leave them small. So I will accept this result. Speak they are very
close to the glass size. I mean, the texture
size of the glass. So yeah, I will accept this. And one more thing
here, we need to do. We need to give each
one a material. The door is ready. Okay.
Let's go back to box select. The doors ready. Okay. Don't worry. Squeak to the glass
set from here. All right. This one is ready. And this one is ready as well, and the glass is
ready. Is very cool. By the way, we just need to
select the UV before you tab, for example, the windfiel, and then tab, and you will
find all the UVs ready to go. Anyway, now let's give
those a material. Let's speak this
to Hader editor. I want to give those
a material because substance if I want to
export this to venter, substance vendor
understand the material. Don't understand the umetry. For example, if I
give this a material, let's say material one. And if I give this
material number two, when I send those two
subistence venter, substance venter will separate these geometry according
to their materials. But if I add the same material to this gemetr and those here, they will become
one geumetry inside subistance venter. All right. So Let's go to the header here and let's delete
this checker material, and let's add U and
let's give this a name. Let's call this body Mt. Well, we need to apply
the body material to the body itself
and for these parts, so select these parts and go to this arrow and let's se
for a body material, and now they are receiving
the same material. But that can cause problem
because if you do that, that's mean you merge
the two materials here. All right. Let's go to the UV. And Swedes to U V editor
and kick the results. As you can see here, we have
some overlapping happen right here because we gave
those the same material. So in this case, what I'm going to do is I will give those another
material, all right, and ins substance ventor when
I create the body material, I will cop it and paste it on those to receive
the same material. So go back to the Hyder editor here and let's delete
this material from them, and let's add the new material, and let's call this to
parts empty for material. And that's it. All right. What about the windshield? Let's give those new material, and let's call this wind shield, t, and let's give those
material as well, let's call this
material maybe borders. All right, let's delete
this A from here. And let's type
empty for material. And what about the door frame? What about the door? All right, let's tub and just need to
make sure of something. Let's this window to two and Let's read this
to you, editor. All right, ya, I
think we need to give it a specific material or I
can merge it with the body. I got this option, but I will give it a
specific material. Because I don't know. Let's go to the body parts. And let's stop to it
and let's see if we can add U U vehicle. I can't, as you can see here. I don't have that plus anymore. So now I'm forced to give
this a new material. And there's no
problem about this. Select the doors here,
delete the checker from it, let's give this
one new material, and let's call this doors. Hit enter, and by the way, just doors empty for material. What about the borders? We did that. That's
very cool. All right. I think the body is ready. One more thing here,
I just forget to mention the door handle, we didn't rub this piece. We didn't give it any U deem. What I'm going to do is I will tab and see what
I got right here. Let's select all of these
parts and go and hit avg scale and hit bake. Let's see what we got
here. I all right. We have two option here. We can put each one
inside the new U V, or we can combine them
both inside one U square. For this piece, I
need this piece to receive nice amount of details. So in this case, I
will select this one, create a new UV for this one. And let's call this door handle, and less activate tied and
hit ok. That's very cool. Now let's add another U V. Here. So Let's select this one and
go to UV and let's hit bake. Let's move this 11 unit. Grab the rest. You
can select them here or you can go
here and grab it like that and go to U V and hit
bake and leave them like this. I think that's beer.
Yeah, that's sera for me. Let's exact. All right. What material we should give? Well, give those a new material. Yeah, let's give those
a new material or maybe we can mix
them with the door. I don't know. Let's
go to the door. Let's try to find it. All right, we can't
create a new. All right. There is no problem. I will give it a new material,
and I will call this. Let's call this
door handle, maybe. Please delete the checker. Add this handle
empty, and that's it. All right, that's very
cool. All right now, what about these pieces here? And this, the parts, we will see what we can do
about them in the next video. So that's it for this video
and see on the next one.
101. 101 Unwrapping section Creating udims for the tail: Hello again, and
welcome back here. Let's see what we can do
for these geometries. Okay Let's tab to the Emo. Let's see what we
got. All right. I just need to make
some comparison between the size of the
body and this part. So I'm going to give the body the same
material, and after that, I will bring the new material that we gave to the body back. Let's hit control L
and link material. And as you can see
the size is okay, we don't have any problem here. Let's give this one the
same material and let's see what we will get there,
control link material. This one is small, and there's
no problem about that. Well, let's see what
we can do for those. Let's go to the UV and
let's create a new UV. Let's call this te
and activate tile and how many UVs we want
for maybe I don't know. Let's add for now two.
Now we got three. All right tab, we have
those in the first V. And what about this one? Well, we need to mirror
it on the other side. What I'm going to do is, I
will select this one and bring the three D cursor in the
position of this, grab this. Right click st origin
to three D courser. Now let's add mirror
modified to this one. Go to the global. And let's add mirror, control A apply rotation,
and there we go. Well, after that,
apply the mirror, tab, hit A and let's hit U twice, and now it's rut g, and let's move it one unit. Let's put this more right here. What about those here? Grab this one tab, and hit g and let's
move this 12 units. All right three, I mean, sorry. And maybe we can merge them. I think we can do that.
Grab those hit control, make them one piece tab, and now we got this result. What about this one right here? The tab, and let's
see what we got. Let's create a new UV here, let's move this one
to the fourth unit. Key hit three, and as. Maybe we didn't give it mirror modifier,
I guess, or we did. I think we did, but we
got some overlapping. I will go to the UV and
bake. That's very cool. Well, that's mean we can
mark those all of them. Grab the mid control J, and now they are married
and distributed, and we don't have any
problem with that. We still got some variation in the scale. Don't
worry about that. It's okay. What else
we can do here. Yeah, I think that's
it. Well, now let's create a new
material for these parts. We can create a material now
or we can delay this later. I think I will create
later because I don't want to explore this
geometry out for now. All right. For now, we just need to focus
on the robbing, and after that, we will
do what we need to do. Now, I think we can end this video here for the
tail and after that, let's see from where we
can go with this One. That's it for this video and
see you in the next one.
102. 102 Unwrapping section Unwrapping the wing part 1: Hello, everyone. Welcome back.
Let's start with the wing. We didn't rut these pieces. Let's see how can we rapt them. Let's go to the
UV editor, first. Now we are inside the UV editor. Let's start with this ball. It's like to isolate it. Let's see from
where we can start. Well, see if we got any
problem with the heading. If we don't, now we can apply the bible and
tap to the edit mode. Go to the edge and maybe we can add a sm here to this area. We can add seam here,
right Mark seam. Let's see what else
we can do here. Maybe we can add seam here
as well in the middle here. Maybe one maybe right here. Just to cut this area as well. And I think you can extend
the seam, but not like that. Let's go to our frame,
delete from here. And let's add a seam
right here maybe or adding seam right here, it will be visible
to the camera, but I think we can add it here starting from this
edge and ends here. Let's convert this to S
as to help to open it. I don't know. Maybe we
can cut the 22 pieces. So I think we can add
seem here as well. Okay. Let's add sim here as well. All right. Mark Sam. Let's see what else
we can do here. Maybe we can cut
this to two pieces, because it's like a circle, and we just add one
same right here. Let's try and let's see what's going to happen
if we arab this now, select everything, go here, twice, and there we go. Now let's go to the
text tool and checker. Let's see the result. We
got some distortion here. If I want to get rid of this
get rid of this distortion, I can add the seam
right here as well. Let's select these edges. All right, let's see
if that's possible. Let's im here and
maybe here as well. One him here. And one here. Or hit A and here hit you twice. That's help a little bit. Okay. Let's choose angle base and let's see what's
the difference here. There's no huge difference. Let's choose conformal. All right I think
for this umetry, I will use angle base, and now we can tab out and let's go to the next umetry.
Let's select this one. Let's isolate this metry and let's see what
we can do with this. Apply the modifier tab and let's go to the face and
let's activate circle select. Let's select these fases. Like this and control plus one time and choose
boundary and mark sim. Let's mark this one as sm. So we separated this and let's
choose this area as well. Go to face and
select these faces from here and these faces here, and I can row plus one time, and maybe we can add
him here as well. Let's convert this to
boundary and mark him. What else we can do here? Maybe one him here in
the middle, we can add. Do we need to do that or not? Well, one sim starts from
here and maybe end here, I guess, right click Marxim. Let's select these faces. Control plus just one
time boundary and maxim. That's very cool. What about this era here? Grab the site, hold
here to grab the site, control plus one time
and boundary markam. Well now hit A and
here hit twice. Now we've got this result
lets choose conformal, and this cases can give us better results.
Something I don't like. I guess we can add
the seam right here and seem right here. And delete the seam here that we added here
in the middle. Grab its clear seam. Its A and again, U twice. Now we got this result. Let's add the
chucker. Very cool. Very cool. Let's hit
slash to excite and top. Now I will select this metry. I need to give this
the same rubbing. Grab this whole to
select this one. I control and chose whereas,
let's try to find it. Ob UV map. All right. I think there are
some difference, let's al ove fairs, and
let's do that again. Select this one, hold heft and grab this control
L and C U V map. Now let's give this a Hacker. I think we got the same results. Yeah. This is how to UV map from object
to another object. You need to select the object, the first object that
doesn't have the UV, and then hold shift in the
grab the other object, they could be similar, and then control and CVV
map to select it. Now we can say that
we finish with those. You can merge them, grab them at control and merge them to, and we can move the
side right here. You can go to face, and, let's grab this control L
and move one part here. Later we will see what
we can do with them. Let's grab those tab at A and I rub U twice,
and that's it. Give them a calcular material and the C. That's very cool. What about these details here? Let's select this and go
to solid. We have vl. We don't have any Q apply vl tab and let's
select these phases, and those phases over here, and maybe those here. Ct plus just one time, deselect this one,
deselect this one. Maybe now we can add
boundary and then C. What about these
faces here and those, and the same thing,
those here, grab them, control plus just one time
and boundary and then sm. Now, what about this? We don't want all of these
faces actually control plus. One more time, X F delete them. Now tab A and here U twice, and we rub this. That's very cool. A checker. All right, everything is fine. Tab out the slash to excite. Let's select this
piece, grab it, and then apply the bival
Tab to go to the D mode. Select these geometries here, control plus just one time, and then boundary mark Sm. Let's select these
faces over here. Maybe we can add
those here as well. All right and then
can roll blast, just one time, boundary mark. Okay. What about the
site? Select those? And Ctroll blast just one time. Sorry, before you do
that, something we here. Let's select these edges and we need to blevel them
manually, I guess. I can be to bovele them.
Let's bugle those 23. Let's give this weight
normal to fix the heading. Let's see before and after. There's no need to add this. Well, now let's tab or
maybe I think we need. Yeah, let's add it and
control A and apply it. Tab again, go to
face, these faces. This one and this
one add the control plus and boundary maxim. It A and here hit U twice. Now it's rubbed.
What about the rest? They should have the
same amount of vertices. We can grab those
and hit control to level them to three like that, and hold to grab
this control LUV. Well that's not going to happen. In this case, I think we need to delete these pieces
and recopy them. Select this one, Hs courser
to select it and delete this. Select this H D, and then
heft a selected to courser, and now we got the first
V here. That's very cool. Now let's go to the side. Let's select this and
maybe this one as well. Let's delete them. Select those here. H D and let's take
a KV for the side, and control and mirror them
on the side. All right. Let's go to the left view and move those manually and put
them in the correct position. After you do that, I think the phase
orientation flipped here. After you applying the scale, kick the phase orientation. As you can see, it's
flipped, tap hit A, ft and to recalculate
the normal. Now everything
should be correct. Now what we can do is we can merge all of these
stuff, control k, to make them one V, tap it A, and go to the U V and hit
p. And they are baked. Now we can checker
to see what we got. That's very cool. Let's
start with this one. Isolate this humo three, and let's see from
where we can start. We have murror, and we
have bevel, apply mirror, apply bevel, and let's
top to the edit wound. Let's go to phase and let's select some phases
to start with. We can grab those faces here, and those here as well. All right. Maybe those
we can add them. Hit controls just one
time and cse boundary and mark this as a seam. Or maybe we can
add this as well. Yeah, sorry. We can
add those here. Let's add the stuff. There's no reason
to separate them. Let's add those here.
Made a mistake here. And those here as well. Now, now boundary
and then mark am. That's very cool. The same
scenario for this side. Let's select those first. Control plus a couple of time. Let's add the rest. Ctrol plus again. Well,
before you do that, let's select this and this here, Ctrol plus boundary mark sm. C. All right. What
about this area? Select all the faces here. Let's see what else we can do. Let it control plus
a couple of times until Ik this age to
boundary in mark him. Let's see what else
we can do here. Let's go to phase and select maybe these
phases right here. And maybe those here. All right, s like
those one by one. All right in this one,
se like those here. That's very cool. Maybe we can rub this one alone
so I control plus to grow a sel and use boundary
and after that, add a seam to this area. Well, we got small problem
right here we need to fix. I control plus to grow a sel and just delete
these fases from here. We don't need to select
them in those here. After that boundary and mark. That's very cool. Well, now let's select
these faces right here, and those here and maybe
this one control plus just one time and delete
the faces from here, control and delete them. Boundary marks here. All
right, that's very cool. I think this geometry
is ready now. Or no, sorry, we need to
add sam here as well. So let's select these
face right here. Can trobcro the
selection and de select this here and boundary mark. Let's select those here. Maybe control plus,
or maybe we can. Let's see what we can do here. Well, let's add those or not. I'm not going to add them. Grow selecting just one time, boundary, Mark. That's it. What about these faces? Select these faces. Let's add those one
by one like that. Like this. Control
blood just one time and delete these
phase from here, and these phase
from here as well. We don't need to select them, and then boundary Marx. Well, maybe one them right
here, it will be good. Mark. Now I can hit A, select all the phases
and here hit twice. I and Let's make it big. Sorry. T. You need to
check the checker. Everything looks clean and nice. We don't see any variation, and that's what I wanted. But this geometry
is a little tal, and I think I'm going to subdivide it by adding
more seams here. Well, something weird tapping
here, how can we fix this. I'm not getting correct result to this area as
you can see here. I didn't notice that. But let's see how can we go around it. In this case, what I will do is, I will select these corners. And maybe adding those here, and the corners here as well. Let's add them and go here to boundary and mark Sam
it A and U twice again. I think now the
result become better. I'm sure. Let's check it. Let's kill it f and
let's see the U V. Not yet. We still got some problem
here, we need to fix. Well, I think maybe we can
add A here in the middle. Maybe that will help to fix it. I mean, S here, we can add. Let's add SM here. You can select this
one, this piece, or select them all twice, scale those again, and
let's see the result. It's a little bit better. That's mean I can't
accept this one. What about these pieces? I don't know if from
where they come. Let's try to find
them. All right. Let's select this one, go here. Let's select this vertex. Well, that's bad. Something
we got right here. Let's sick this manually. I think we can mirk
those twice and mir this here and this one
and this one right here. Maybe we can hit key to the Z and sick this to vertex snap, key to the Z, and hold,
turn off rotation. A rotation. Grab ke
to the Z and hold cantl snap with this key to the Z and snap
this right here. I think that's
better. We don't need any seam right here
so hit clear seam. Another thing we got here,
let's try to find it. Well, we got weird seam here, grab those clear
seam from this area. What about those here? Let's try to find them. Well, let's right
here, I think. Okay. Let's add seam here, and sorry, Mark Sam, and let's
select this edge, and this one and
this one as well. Clear and add here. What about this one? We don't
need this seam, clear seam. The same scenario here. Yeah, we did that. Now
hit A again and U twice. Scale this and now let's
see what else we could do. Well we got, see. Why that happen? I will grab this and
let's see where this will go and clear Sam and
let's extend this one. Mark Sam. The same
thing for the site. Mark Sam and delete the seams. This one as well. Clear sem. Hit A, and let's do that again, again. Scale this make it pick. Let's see do we still
have any problem here.
103. 103 Unwrapping section Unwrapping the wing part 2: Hello again. Welcome back. The outrubing is very good. But here, in this area, we got some overlapping
overlapping at this corner, this one, this one, and
I think here as well. Here. So let's see
how can we fix this. I think we can go to face
and select these faces, and manually we can
erupt those as well. A something like
this. Let's select this phase here and this one. Let's go to solid mood. Let's swing this to boundary and then add seam. All right. I will delete the
seam right here, clear seam, and
this is what I got. Let's do the same thing here. By this time, I will select
the edges Using control, and select these edges, and mark seam and select
this one and clear seam. All right now I can rerat this. But before I do that, let's
try to fix this area as well. So maybe we can start from
here, selecting these edges. Or maybe's those. All right, and maybe this one. I think and Mark Sam. And let's delete this A here. Clear. That's very cool. Now hit A and again twice. And let's see what we got. Well, that's helped a little bit to get rid of this
overlapping here. Now the result is cleaner. You can go to the
material review, and you can scale this
up and kick the corners. Everything looks okay. So this is how to fix this area. Tab out, go to the solid, and maybe we can start
this time with the beam. And before we do anything, let's see what's visible and what's not visible
from the beam. All right, I think
we can tap and go to wire frame hit control
r to add one right here, v22 almost right there, and hit xF to delete the
rest and grab those. I think we should
apply vl first. Just hit control, A
tap A and D te to it. Now we got this result.
Let's see the checker. We got a little
bit of distortion, but I will ignore this, and I will accept this result. What about this one
right here, Tab? And I don't know. Did we
outro this piece or not? Let's uply the bible, and we don't have
any seam right here. So I will like to isolate this. Let's select this side and
maybe those right here. Control plus just one time. And Mark sorry. Cos boundary and then mark Sam. It A and here hit twice, and now it's rap. You can check out to check it. That's very cool. Tab out. Its go to the top view. From the top view, we need
to distribute these pieces. Hit shift D to take a Cobi. Let's put one right here
and hit shift time. All right, we just
need to create all of these. That's very cool. The same scar for this one. Tab, and I think we need
to apply level first, control A. Tab, go to face, select these faces over here. Ct rol plus just one
time, use boundary, and then C A and here
u2r rabbit. Now done. Go to the top, Have
and take a CV here, Haft arc time, and let's create some CVs
here and the act. Well, now let's scrub
all of these new pieces, and controlled J to
make them one piece. And the same thing
for those here, just select them, go to the top and select
them like this. All right, and hit control
J to make them one piece. That's very cool. Tab hit A, and go to U V and hit
bake to bake them. The same thing for those here, grab those tub hit
A and UVn bake. That's very cool. All right. So we finish with those here. Now the wing, let's
see how can we rab it. I'm going to divide
this for small pieces. That will help to
get better results. Let's go to the top and let's see how can
we achieve this? Let's minimize this
view a little bit. And maybe we can
adding a cut here and maybe one here and
so on and so forth. Hit K to activate the
N tool and make cut. Cs like this, it A, to make the cut C to cut,
click and then enter. Now we've got a cut here, another cut right here. Let's make cut here,
cut and then enter. Control that. Let's
do that again, it K. C to cut through and enter here. Maybe one cut right
here we got already. Yeah. Okay. Let's go
to the top. All right. Maybe one cut here, knife
tool, maybe one here. All right. Okay, now let's see how can
we rub this human tree? Let's isolate this one, and maybe we can I don't know. Let's kick the uma tree first. We don't have any problem. Everything looks okay and fine. That's mean now we
can apply mirror. We can apply bevel. That's very cool tab, and let's start with
this human tree. Let's go to the face select. And maybe we can
select the side. Hold, have to cut
the side right here. Cantl plus just one time and
boundary and then mark sm. I just marked those as a Sam. And what about those here? Ctrol plus just one time and mark s boundary and then markm. So I just added Sm at the corners and let's
see what else we can do. Well, maybe we need to
manually add sam right here and seem here in this area. Let's ads him here and
here as well, Marx im. All right. Let's see what else. Let's select these faces. And those can throw
plus just one time, boundary and then maxim. K. Go to face again, let's select these faces
here until this edge, and maybe I don't know, maybe we can add those here. All right. Control plus. But Ds those, sorry. And Ds like those here,
and those over here. Let's see what we've got so far. All right. After you select
all of these phases, Qs boundary and Mark Seam. Let's e this edge, and let's convert
this to seam as well. And what else. Let's see what else
we can do here. Maybe now we can jump
to the next part. All right. Well, we
add this e here. I don't know. Maybe we need
it or we don't need it. But let's add a seam here. I will hit I'd
click and mark Sam. And let's grab this ag here
in the middle and add seem here and maybe seem here
as well. That's okay. All right, My we can
add seem here in this area and seem here
in this area as well. Halt click mark Sm. So we opened this from
this side, all right. And from this side as well. That's very cool. What about this edge, Mark, and the same
thing here, Mark sm. This one as well. This one. Let's select
all of these edges. Markit's select this one
as well and this one. Marx and the scenario
for the site. We can of click and Mark sm. No all the edge. Let's select this one. H control grab this, and those here, maxim. This area we can go to face, grab those control plus s one time boundary and then maxim. All right. Now let's see what's going
to have a if I rub this. But before you rub anything,
try to divide this. Add sim here. Sim here. I'll click, Sim here. I'll click and Sim here. This area that we're about it, that will be enough
and Sim here, I guess, we need to add All right, Maxie. Now hit A and here hit twice, and now it's rubbed. A checker. All right. Although we divided
this to small pieces, we still see that
the checker is still big because this wing
is, very, very long. Let's bring back
the other ma tries, and let's start with this one. Slack to isolate it. We got bevel applied, and let's go to the top. And let's see how many
we got right here. I think we can divide
this to two here, and control r, and let's
add two edges here. I think we can use
an F tool, it k, make cut goes like
this, hit C to cut through and confirm the cut. Control B to bvle this to
two edges, maybe like that. Sorry, we don't need
to select those. Get this one, control B and bvle it like that.
That's will be enough. And what else? All right. Now let's start adding Sameer. Grab this edge. I'll click, select
the entire edge loop. And maybe we can
deselect from here. And mark this as a seam. Let's go here, grab these faces. Control just to grow selection, stick this to boundary, and then mark Sam. And what else? Maybe we need one seam right here or we don't
I think we don't need just add seams
here to the corners. All right. We need
to grab those, and I'll click mark Sam
and those here as well. All Let's check this area. These edges, as well. Let's try to select
them and mark Sam. The same thing for this edge, I'll click Mark Sam. Writes Mark Sam
and here Mark Sim. Well, I don't see any
bubble here. That's weird. I think I will bible this
manual hit control be and vet here to two edges, and something weird I got. I don't know what
is it. Well Bile is not targeting these
edges here. That's weird. All right. I think I will
hit Alt click to select this edge and manually, I will diselect all
of these edges. All right tal here, I think. I could kick this before
I apply it butle, but that's sometimes happen. I will bovele this
manually and let's see what's going happen.
Bivle it like that. And here we got
very close vertices that try to fix this area, select the ages control
x to dissolve them. And the same thing
here, select those. Control x to dissolve them. And now I can erupt this, I can roll two to bovele it
to three edges like that. And let's select this seam, I'll click and this one, and let's see clear the seam from them and just target this. All right. That's it. Now
let's go to the next one. Mark, Mark Sam. And what about this here? All right. Let's select
this one as a seam. And let's go to the next one. I think we can add seam here. Mark this one as Sam. This corner right here, we need to add Bevel control
B and let's bovel this area. Cut up this one in
the middle. Mark Sam. And I think that's it. Just this space here. Cb those control
plots just one time, ose boundary mark Sam
to open this area. And let's see what
else we can do here. I think we need to
do something here, like crabbing this a control
plots and I don't know, maybe we can let's see
what we can do here. Maybe we can open this
area by adding seam here. And maybe clear this am from here to make this one connected.
All right, grab this. With this one clear am. Now hit A and here hit twice. And I checker scale those, see if we got any
variation, any problem. The checker looks okay. I don't see any problem here. Kick this area and kick
this one here as well. Well, everything looks okay. That's me I can accept this. That's very cool. Is there anything else
here we need to do? I think we just raped all the pieces and
everything now ready. What about the scale? Now we need to discuss that? As you can see, we
have a huge variation. The checkers here are very big, here, are very small. On the ball a little bit big. And we got a lot of variation. We need to find a
solution to it. Let's go back to the wing
here and let's tap the mode. Before I do anything,
just forget something. Let's put all of these in
the UV. So let's take this. Grab this one tab, it's a sel everything. Bake this as well.
And let's grab those, select those, go to
the UV and bake them. All right. This one here, let's give them a checker. And U V bake. Okay. What else? What about this
geometry tab, it A. All right. Maybe we can mark
those control gay, make them one piece, tab hit
A and go to and hit bake. I'll break the scale
first and bake. Let's see what else
we can do here. Okay. All right, I will
end this video here. In the next video, we
will start using U Dems, and we will try to find a solution for the variation here that we got in the scale. So I will end this video now
and see you in the next one.
104. 104 Unwrapping section Unwrapping the wing part 3: Hello again. Welcome back. Let's come belete the wing. Let's start with this geometry and let's see what
we can do here. Let's top mode, and this
is the result that we got. I think now we can it to
create a new UV here. Let's call this wings. You can call this, for
example, wing one. And let's activate
the tiled and hit. Now we got this u V ready. Let's go to the image
and hit this plus. Let's add, for example, ten, let's start with ten. Now we got ten V square here. Okay, Let's see what
else we can do here. Let's go to the material review
so we can see the checker and let's grab these faces. I think we can put
them inside the UV. Or maybe we can All right. Maybe we can select the side it control L. Let's move this
one right here for now. Maybe we can era this one, control L, and let's put
this one right here. And maybe we can
select this control L. Let's move this one right here. All right. What about those? Let's see crop them like that. And, let's take those out. First, let's put
those right here, go to the U V and choose bake. Now they are baked and
kick the texture size. All the details should
have the same size now, Let's taro this one
and let's move this right here and go to
U V and Q is bake. I will add bake to
the quick for it, so I can reach it quickly. Just hit the Q and
bake. Now it's ready. See if you note here
we got some variation. This become small. In this case, we can If we can grub this and
add it I control L, G, and let's put it right here. Now, let's those both
and let's pick them. That's help. After that, let's ecru those. Let's move those over here. Okay. Let's see what
we can do with them. Let's kale those and make
them a little bit big. Let's pick them first,
go the UV and bake. Let's kale those down and
now the sides become ok. I think we can grab those piece pi pies
and put them here. And Let's see that
possible control L. Let's move this over here. Maybe all right right here, maybe we can rotate it. Key and let's put
this right here. Let's try to rotate a
little bit more. All right. We got a nice space here. We can count on
that that's let's sell those control L. Let's say g and let's
move this one right here. All right maybe right here. Let's sec this one control L. G, and let's move this one
right here as well. And this one as
well, control key. Let's move this one, for
example, right here. I I prefer to grab this and
hit key and move it here. You can hit to rotate like
this and move it here. What about the last
one, you can grab it as, L if you prefer. You can bring this here if you
like. Rotate it like this. Rotate a little bit more
let's move this over here. All right.
That's very cool. Now, we got this result, and it is very nice. Let's select this
one as well tab, and let's see how can
we work with this one? Well, let's take
those out first. Let's select with this
side and let's move this right here and go
to the U V and Q bake. And now they are baked. The result is fine. I can grab this one, H
K and let's put this y here and go to
U V and Q's bake. Now it is baked as well. We got very close result here. If you like you can
manipulate the margin. That will help to put a
distance between them. I think that's something
important we need to do. Let's grab those control
and go to U V and Qs bake. 0.03 as a distance
between these geometries. That's nice. I think Blender will always
remember the margin here. The result is fine. Now let's select this one tab
and let's erise it. All right. It's right here. Maybe we let's tap out. Let's move this here
for now temporarily. Let's select all
the human here tab. Let's see where
should we move those. Hit g, and let's put
those right here. Hits to scale them, and they should receive
the same texture size, something like this,
that will be okay, and you can put those right here, and that will be enough. Or you can move those a little bit right here,
Can you grab this, control L, G, let's put
this one right here. What about these
human trees here? Now, we just selected
these for uma trees, and let's grab them like this
and let's bake bake them. Now we need to kick the scale. If the scale is okay, we can move on. I think the scale is okay. And we can accept this. Let's let's select this
one as well tab again. Let's see what we
can do with this. We need just to make it
a little bit smaller. And I will select this one and this one hit control to
make them one piece. And let's All right, let's select this one at
control, tooling select. Let's select all the cumetry, or let's say all the phases
that connected to this one. And let's move
this I don't know. Let's move this out for now. Select those. Let's
move those out as well. Well, now let's make
some merging here. All right select this with those here at control k because
there could be one piece. This one with this
one at control K. And let's see what
we've got so far. Now let's erupt those it key
to move those right here. And let's bake them.
The size is okay. I will keep it.
Select those as well. Let's move those to
the UV number six, and then bake them. That's very cool. What about this piece? Let's
start with this one. We reached the UV six, and now we need to
work with this one. Let's sec up all of these, it let's move maybe
right here temporarily, and we need to find
a solution for that. Maybe I can select those both
and put them inside one UV. Let's see if that's possible. It, let's move those right
here and take them. S. All right. They are still big. I think now I can use this
age as a seam. Well, we need to go to the top, use knife tool, it K, make a cut, goes like that, and to cut and then hit
enter to confirm it. Maybe I can use this
one now as a seam. Let's mark this one as sam
and now I can select those, and hit twice to rob it. T. And move this six units. Now we got this result. Well, now it's become smaller. That's good. But we need to
make it even more smaller. I think. Let's slate the
rest and hit twice to up them and move them
right here temporarily. Now the size becomes smaller. Let's move to those here. And let's select these pieces. And maybe I don't know. Let's grab those over here. I control. Let's move those here in this
area and bake them. The size become smaller. Let's select those
and let's move those right here and
bake them as well. Or the size become big. Maybe we can take part of them like
those here, control L. Maybe we can move those right
here and bake them here. Or the size now become better. Now let's target those here, grab them, control,
and bake them here. The size become close. What about those right
here? Control L. You can scale them just
ale bit down. All right. We don't have a variation here. For this piece alone. But if you compare
it to this one, we got a variation
noticeable variation. But that's not. I
can accept this, and I can move on.
Let's move to this one. Let's hit tab, and let's
see what we got here. Let's select everything it, let's move those right here,
for example, temporarily. Let's see how can we
work with this one? Well, let's select two parts, let's start with two parts and let's move those
to the UV eight. I just need to make sure
that UV eight is empty. No, it's not empty,
even the ten. We need to add more UVs. Let's add, for example five
UVs here, and then he. And now let's go to this part, and let's select all
of these pieces. Let's move those right here. For now, crab those key
and move those right here. Now let's kill those
just a little bit. We could see something here. Or let's start with this piece. S is it control L. Do that again,
control L and Qs Sm. Well that will help to give a limit to the growth
when you hit control L. Let's move this just
a little bit right here temporarily, and
let's take this out. Move this right here and
let's scale it a little bit. Try to make the size of the wing similar to
the size of this part. We need to scale it even more. Something like
this it will work. But now it's become
very big to the U V. That's me maybe we can
cut it to two bases. Maybe cutting this
will help a little bit to make this smaller. I will use knife tool hit k, goes like that, hit
to cut in the inter. With this new e, you can
drop it and mark sm. Now you can grab those both
and hit go to the face, don't forget that
and hit U twice. Hit key and let's take
this up one unit. Key one unit enter. Now, the result is
amazing. It is very cool. Let's move to this
part control L, it key and let's move this right here, and let's take this. Yeah. Now it's become
good, Cove this control L. Maybe we can move this one right here and scale it manually. Let's see what will get if we do that and
put this right here. The result is very close, but we got those here, we can detach them. Let's add seam here
and seam here as well. Add Sam. Now I will select those
and hit twice to a bit, and hit key and let's
move this right here. Scale a little bit.
Let's move this. Yeah. Something like this. Maybe a little bit more and
maybe down just a little bit. What about these parts? Let's see what we got here. We got this result is
a little bit weird. Let's try to find from
where we got those. Well, we got gly seams here. Let's try to grab all of these seams and clear
seam in this one as well. Clear seam. Clear seam. Clear seam. A clear seam. Let's add Mark Sam,
let's add sam here. What about this part?
That's very cool. Now, I will select these
parts and hit you twice, and let's see what I will get. We still have weird teams here. Or I will hit control Z, and I don't know, maybe
we can try that again. Control and hit twice. And now the results would
be cleaner, yeah, it does. Let's move this 11 unit
up and one unit to the X and take this
up almost right here. Now let's grab this one. Control L, r to
rotate it like that. Hit key, and let's move it here. The sides become okay. What about the rest? Let's
start with this, control L. Key, and let's move
this over here. Scalt manual like this. Well, maybe we can reduce the length or maybe
I don't know, maybe we can rotate like that
and scale it, diagonally. Well, that's not going to work. The same result. We still big. The size of this
part is not matching the size of this one
right here in the rest. Let's see what solution
we got right here. Well, maybe we can add. Let's see what we can add here. Maybe we can add an egg here. This area. Go here and let's mark
this one as a seam. Let's those, can troll
and twice to our rabbits. Let's see what we got. Let's move this 22 unit
here and key one unit up. All right. It's not a huge difference. Maybe by adding one
here in the middle, maybe that's will help
to solve the problem. Or you can accept the results and ignore this variation
that you've got right here. It is not huge actually.
You can accept this. Let's move to this one. Control
L. Let's see where is it, right here. All right. Huge twice to rub it. Key and let's move this
one, maybe right here. Right. Let's zoom in here and move this put the claws to this edge. Maybe we can move
this up temporarily, grab those here, control L, Par and rotate this. G and let's move
this one right here. Grab those control LG. Let's move those down here. Try to avoid any
overlapping Yeah, we don't have any problem here. Grab this, control L, link select U twice to rub it. Key and let's move
this one unit up. K let's move this two
unit here, and manually, let's move this up here, and I think the result is nice, and we can move on to
this one, control L, L link select and
rob this U twice, let's move this one
to three units, it key and move it one unit up. And that set for this, P control L Arabs to move
this three units, Art this 90 degree, and let's take this one unit. Manually, we should move it up. We can scale it down
just a little bit. Make sure that you don't have any overlap. This one control L. Let's move this right here. We can arrow it or
you can bake it. Ba and let's move
this right here. V cool. This one as
well control L. Maybe even this one control
L. Let's move those. You can grab them all like that. Hit key and let's move
those right here. Sorry Le see what
we got right here. That's weird. Where is it? From where this comes. That's really weird. Let's move this one right here, and move those over here. What we can do for this one. Grab those and let's reach the scale in
case we got a problem. It seems like we don't
move this right here and bake and that's it. I think we could
move the small right here or somewhere here, maybe. This face. Where is it? Yeah, this small right here. Let's hit, let's move it. I think it should be
connected here to this area. I guess. Let's go to the
egg and select this egg. As you can see, this
vertice is highlighted. That's mean this one should
connect it here to this area. Yeah, this one right here. I will hit right click and let's see what option
do we have right here? Stick, and the a stick. And we have U V here. I think we don't need it, or we can keep it for
the wing itself. Let's to excite and now is
the time to rapt this piece. Well, I think now I can end this video and see
you on the next one.
105. 105 Unwrapping section Unwrapping the wing part 4: Hello, again, welcome back. It's the time to
rob this geometry. Let's start to it mode, and let's see from
where we can start. Okay. Let's see grab
this cited control. Or maybe we can isolate it. Before we do anything, I will select this one and tab, and we reached the UV 16. I think we need more
UVs here and let's add five UVs for now. And let's start from here. That's very cool. All right. Let's select this tab. Let's isolate this first. And maybe we can start
with those here. Control L to link select. All right. Maybe those
as well, control L. And this one. After that,
let's see where is it. They are right here.
And by the way, I think you can grab
them all like that, and let's move them
for now right here, and here from this point, we can pick these
geometries, for example, those right here, cant
L. And what else? Let's see grab those over here, control L. All right. All right. I don't know.
Maybe we can rub them or I think we just need to do something here because what are we doing with this
edge or with the sm here. I think we can select
these edges and tic stick. And I think that's
will be better. So let's select those,
go to face, grab those. What about this ag right
here? Let's see where is it. Let's delete this vertex. Try to find it. That's where. We got seam right here. Let's delete the seam. All right clear seam.
We don't need it. And I will select those
again. And this one here. I'm right, and this one
and hit twice to Arab it. And let's move
this to the UV 16. Let's check the scale.
After that, bake it here. Let's like to excite and
let's see what we got so far. Maybe we can tab and select this one and
isolate those both. The size is big, or let's mean we can add
more geometry, for example, this one hit control L to add it and hit key to
move it right here. All right, with
those selected here. I can grab those and go to
the UV and break the scale. That's very cool and now we
can bake them again here. That's nice. Let's
make some comparison. This result is okay. Maybe I can scale this down
just a little bit. All right. Now the scale come close. Let's go to the next one
hit Control L select. Maybe this part, we need to
select as well, it Control L. All right. So now we get those. Hit, and let's move those right here, and let's go to the
U V and let's hit B. Al right, the size, it's okay. I will accept this, I guess. Let's move to the side,
grab this hot here, to grab this one and control
to grow the selection. And we got those. All right, hit key to
move those right here and go to the UV and hit bake. That's very cool. Now,
let's select this one. And this will be big. But let's see what's
going to happen it control L, toing select, and key to move
those, for example, right here and go to
the UV and Q bake. All right, it's acceptable. The size is okay. All right. Let's go to this one. Club dose control
L, link select, and let's hit the key
and move those right here and go to the UV and bake. Alright, awesome. All right, I think
we need more UVs. Let's go to this one, grab those two faces, control. Grow the silicon, it key to move those over here and go
to the UV and bake them. All right select this,
hold this and control L. Key and let's move
those over here. Let's put those, for example,
right here temporarily, go to the U V and bake, it key and move this
one unit up and done. And what else the same
thing for those hit key, and let's move this right here
and bake key, one unit up. This one as well, I grab those, and maybe we can select
those control L, link select and hit G to
move those right here, U V and bake G to the Y and
one unit, move it one unit. It's become big a little bit. So in this case, I
will grab those, control L and bake them here. And move those one unit up. And let's see like
those controlled. Hit key to move those right
here, bake them here. All right. We got
something wrong here. The result is not accurate. Let's see why that's.
Maybe we need to add Sam here, and here as well. So let's take rub those and
come here and just mark SM. Let's do that again, select
those control L. Go to face, hit number three, and now
let's go to U V and hit pak. Or let's hit A rub. We need to re rub it. Now let's put those
right here, Pak them. G and those up one units. All right. Now we
need to add one, two, three, four, four UVs. So let's add four hit enter, and then okay, Now
we got four you vis. What about this one?
All I guess scale it. And let's put it anywhere. For example, you can hit key and put it right here.
That will be enough. And I guess now we've finished. Maybe we need to
select those that control to scale those down. Something like this. All
right, that's very cool. Let's top out its
slide to excite. And now we can
select these pieces. It can troll gate to
make them one uma tre. And grab those as
well hit control J. Me them one ometre. And I think we just
forget this cylinder. So let's see what we
can do with this. Let's add the car
texture to this one. I don't know, maybe
we didn't rub this. I will apply the Bible, isolate this ometre and
go to the edit mode. Let's select these faces. Grow the selection
just one time, tro plus, boundary and maxim. Hit A, sorry,
before you do that, select one A, for example, this one, All right. This will be visible
to the camera. This one, will be hidden.
So let's grab this one. I'll click and a seam hit A and hit twice to rub
it, and now it's done. It's rob. You can move this
one right here and hit key and move this one,
maybe five units. And you can create
a new island for this Tub out hit
slide to Excite. And now you can mark it
with the rest, control. Control. All right. Now we should have
one piece, Control K. That's very cool. Now, if
I talk to the edit mode, I should not see
any overlapping. But I guess I got
overlapping right here. We got some overlapping right here comes from
these geometries. And that's wrong.
We need to fix it. So let's select these
pieces one by one, and those here as well control L and Qs normal to select
them all like that, and maybe we can maybe we
can give them a new UV or maybe we can select the rests and re them
in the same place. Let's grab those as well here. It controlled and hit bake. All right. Now, let's
check the scale. Before you do anything,
hold if and take the margin back to All right. All right. Let's add 0.01.
I think that's nice. All right, kick the plaz
and make comparison between the plaus that you have here
and this one right here. It's a little bit big. So in this case, I think we can age the scale, maybe, and maybe hit you
twice to rob it here. Let's see what we got so far. All right. We don't
have a huge difference. I can accept this result, and I think it will work. So let's select all
the uma tre here. Tab, and let's see. Do we have any overlapping? We have overlapping here. Let's move these human trees. Make sure that you are
in the face mo key, and let's move those right here. Kick the rest of the human tree in case we got any overlapping. All right. Everything
looks clean, I guess. I don't see any
overlapping here. We just need to add
more U V. So I'm going to add a new U V here. So let's go to the image and hit the plus and let's
add two here and hit. That's very cool.
What is this exactly? All right. That's weird. Something weird we
got right here. We can't ignore this
small bol gone. Let's see grab
those, all of them, and hit key to move those maybe six units and hit key to move
those up right here and bake them
and that's it. All right. What about this bog? Hey, and let's move this
right here for now. Maybe we can go to the egg
and select any egg and it stick and see where is it. Yeah, it could be right
here. That's cool. A anything else? Let's kick the UV again in case we got any
overlapping here. Well, I think we don't
have any overlapping. That's mean we finished the wing dems and
now we can go to the next I don't see
any overlapping, everything looks okay, tap out, and kick the cacer. We got a variation,
but that's okay. It's not a problem. Very nice, very cool. All right. So I think that's
it for this video. And before you go
to the next step, kick kick the heating here. Sometime when you mir object, you will get a problem
with the heating. So make sure that you didn't
have any problems here. All right, I guess I can end this video now and
see you on the next one.
106. 106 Unwrapping section Unwrapping the Light part 1: Hello again. We'll
come back here. Let's start with this metre. Let's hide the legs
in the wing and body. Hide all the collection
just leave the light. And let's rob it. Let's start with this sana. I will isolate this metre and
see what I got right here. I need to put bevel
to this area, but angle is not going
to help in this case. I will swing this to weight, and let's turn off
the wire frame. Tap the eight mode,
and let's go to select and let's select
all the sharp edges. Go to the edge, s and go
to select sharp edges. Let's give them bevel weight. Go to the em. Vel weight to one. Let's select this edge, and let's use the n tool
to make cut goes here. And let's add blight to one. All right now, the
result is better. Let's activate wire, and let's check the result
as you can see here. You can add vl to this
edge if you want to help these edges to continue
going to this direction. If you like, you can
do it if you don't, you can ignore it for
me. I will do that. Grab this edge with this edge and let's add vwight to one. I feel that this result is more beautiful. And I will keep it. Let's see if that's will affect the heading is not
affecting anything. That's mean I will
accept it. All right. After that, you
can apply bubble, and let's delete the wing and let's go back
to the UV square. All right I think I need to
turn on the screen cast. Let's add number one here and let's move this a little
bit, maybe right here. All right tap the move, and let's see how can
we rub this geometry? Let's select these faces, maybe. We can start with maybe as
well, we can select them. Let's select those over here, and those as well had control plus to grow the
selection just one time, and then I got this result, se boundary, and then mark Sam. That's very cool. Let's add Sm here and seem here as well. Now let's go to this one. Control blows just one time
boundary and mark sem, maybe we can seem here, maybe to open this area. What about this area? Maybe we can seem here as well, and sem here, and maybe
one seam right here. And Sam there. Let's minimize
this. That's very cool. What about the side? Go to face, go up this face control plots just one time to go
a selection here, and then boundary and then sm. Maybe we can add one s here and one sm to the
side to help to open it. After that, it A, select everything
and here, it twice. Use conformal, and now
it's done. Let's check. Go to the text to checker. And the result looks very okay. We got some distorting here. Let's find out why
that's happened, maybe because we didn't
add here as a seam. Let's this and this
one and this one, let's mark seam, and again, hit A and U twice to rob it. Now the result is better. Tab out and go to solid, and let's go to
the next geometry. Maybe we can start with this. Isolate this emetry, check
it before you do anything. Do you have any problem? Is everything is
okay, Kick the bevel. Well, everything looks fine. Control A, apply it. Tab hit A N U twice,
let's add checker. I will accept this result. I'm not going to add any
sam anywhere. All right. This exact. Well, maybe we
can start with this one. Isolate the umatry. Try to kick it case
you have any problem. If you want to add
any support egg loop, just do everything. I think it's ready. Apply the vol tab, go to the e knife tool. This cut maybe go here, and maybe cut goes right there. This age is not good. Maybe we can delete it because It goes to this direction close to the edge of the circle. And as you can see that affected the bevel
just a little bit. So if you want to keep it, it's okay, but for
me, I can delete it. What else we can do here? Maybe we can make a
cut, goes like that, add a support to the circle, and maybe one cut
goes like this. And maybe let's see what
else we can do. This corner. As you can see it
goes like that. Adding one goes like this, it's better. All right. So let's add cuts. Maybe it goes like
this, and that's it. We did that on the other
side, that's very cool. Now is the time to
rob it. Go to face. Let's start with
these faces here, and maybe we can control plots just one time and boundary
and sm. Let's add Sam here. Maybe we can add
seem here as well, Mark Sm selecting
and this edge here. Until you read this area. Go to face again, grab these two faces, control las just one time
and then boundary Sam. What else we can do here? Maybe we can add the
seam right here or not. Maybe we can open this area
as well by adding seam here. That's very cool. Now hit A, select all the hums free and here hit
twice to rub it. A checker and let's
see the result. All right, the result is nice. I don't see any problem here. If you like to open these, let's kill the UV a little bit. I just need to see
what's going on here. We got a little bit of
distortion, I think here. If you want to detect these, go ahead and detect them or you can leave them because don't forget these stuff are not
visible to the camera. You can ignore them.
A result like this is very nice and I can
keep it. All right. Let's hit lash to
Exit and maybe we can start with this
geometry. All right. We got these faces or sorry, we don't have any
face from inside. Let's will help to rap quickly. Just apply bevel,
Tab hit A here, it twice, and it could be raped. A checker. It's very nice. Let's go to the next one. Maybe this one. We can
start with this. Check it. If you have any problem. Everything looks okay. We can accept the bevel tab. Maybe we can make quo cuts to these corners to
avoid any problem. And maybe on the other side
as well, we could do that. Cut goes like this.
It would be enough. And a cut goes like that. Confirm them hit enter
and now let's rab it. Crab this face, and maybe
we can grab this one, controls just one time to grow the selection
boundary and maxim. Maybe we can add a seam here. Marx. And maybe we can add
Sam here as well if you like. What about this corner? You can add sm here. I guess to open
this one as well. Hit a and here hit
twice to a rub it. Let's add the checker and let's see if we got any problem here. We have a problem right here. Let's kill this. The checker is not good here at this area. Well, that's mean
we need to select those faces as
well and det them. All right grab those
and those here. Hit control just
to grow selection just one time and mark Sam. Sorry, se boundary and then Sam. Now let's do that again,
hit A and here hit twice. Now I think the
result is better. Let's make it pick
and kick it here. It looks clean. We
don't see any problem. Now let's take it.
Bring this back. Now we can go to the next one. All right which one
we can pick now, maybe this human tree, isolate this human tree, Kick if you got
anything, any problem. Well, I think we don't
have any problem. Now we can apply bevel tab. Check if you want to add any support edge
or we don't need. Now let's go to face
sit these faces, maybe those here, and
this one right here. Even these faces. And control plus just one time, D select this one
boundary, mark Sam. Now we add the seams here. Let's talk at these
corners here, and let's add seam and
those here as well, Mark Sam this corner here, and we need to delete this edge and this clear
seam and just keep this one. Mark Sm. We need to
cut this. What else? Now we just open this
area? I think that's it. Now hit A and here hit. Checker. Let's see what we got
scale just make it big. I just need to see if we
got any distortion here. I think we don't
have any distortion. Everything looks okay and fine. Well, that's mean we can go
to the next step. Bake this. Go to solid t out and let's
go to the next geometry. All right W one? What about this one?
I think we rub this. I guess. Do we need
to re rap it again? All right, let's re
arrab this umetry. Let's see what's visible,
what's not visible. We have some phases
we don't need. A tab, go to face, grab this one, x F
deleted, go to the edge. I'll click ke wise and
move here or to the z, and move those right here maybe. Let's move them a little
bit up and that's it. All right. Apply the tap the mode and let's see
what we can do here. Let's select these faces here. Maybe those as well
and those over here. Can row plot just one time. Sorry, I have a mistake. That a mistake here. Let's deselect those. Can row blots just one time,
kick the other side. That's very cool and
boundary and then maxim. We need to open this
geometry as well. Maybe we can add seams here. On the other side as well, you can isolate this emetry. I think that will be
better. Let's add seam here and I'll click
and add sim here as well. Let's see what else we can do. Maybe we can make a quick cuts, goes like that as a
support to these corners. Okay. That's very cool.
What about this area? Let's see these faces, can last a couple of time
and boundary marking. What else we can do here? Well, maybe we can I don't know. Let's see what else
we can do here. Maybe we can cut this area
by adding seams here. Let's go to the site and
let's add seams here. Let's select these
edges as well? Let's add seams here. Maybe this area we
can add sim here. Let's check the other side. The same scene area here, select those and add and
maybe here. All right. Let's see what else
we can do here. Well, I'd click and
let's add seam here as. Do we need to add seem here? Let's see him here. Let's see what's going to
happen if I this, it A and here hit twice. Let's checker. Let's
scale this, make it big. I just need to see if we got
any distortion anywhere. We got a little bit of
distortion, but it is hidden. Don't worry about any distortion happening here in this area. You can ignore it. I can see
that I got distortion here, who's going to see
this? All right. That's mean you can ignore it. So let's go to sold and then
let's excite. All right. And what else? Maybe I can slate this umetry, Isolate this k if
you've got any problem, anything you want to add, or I don't want to
do anything else. I just need to apply bevel and see what's visible,
what's not visible. This phase right
here is not visible, Ctro plus cou time and hit
XF to delete All right. What about this area here? I don't like to
leave these corners like that without any support. Use the knife tool and just
quickly add CAT like that. The same thing for the side. Always do that. Now,
let's select these faces, and those here as well. Let's hit control just to grow the selection
just one time and then boundary
and then mark Seam. And let's see where
should we add seams. Let's select these faces, and those here as control,
grow a selection. Maybe manually we
select these corners. Boundary and mark sm. By the way, the boundary, you'll find this right here select lobe and select boundary, but I just added this
to the Quick right, right click and add
to quick right. If you want to remove it, it right click and remove
from Quick frit. Let's see what else
we should do here. What about this area? Le I don't know. Maybe we can add s here. And add s on the
other side here. It A and here hit twice. I check Skillet tab out, and let's see if we
have any distortion. We got some distortion
right here, but it's not visible. You can't ignore it. It's
okay. Don't focus on that. We'll t and bring those back, and let's go to solid, and let's see what else. I think now I can
end this video. All right, and we will complete in the next
videos. See you next.
107. 107 Unwrapping section Unwrapping the Light part 2: H Hello again. Welcome back. Let's select this geometry
and let's a rub it. Isolate it first and
then apply Bavel. Before you apply, just check it. All I can apply it. Tab it A hit twice. And I checker and
let's see what we got. S's make it big. And let's check the result. We got a little bit
of distortion here. But I think we can accept it. If you like, you can
suppress some faces, for example, you can manually select these face right here. And those over here, you can use select lasso
and you can ecru those, and maybe those right here, and those over here. After you select those, just swing this to
boundary and mark sm, it A and again, u and u again. Now the result is a
little bit better. Let's scale this. We still
got some distortion here. You can separate this
area if you like, or you can ignore it. This distortion is not too
much. We can accept it. Hit A and bake them, and let's move on to the
next geometry. All right. Maybe this one, we can
isolate this geometry and let's see what we can do with this appliable check it
before you do anything. Here, these corners,
they didn't have any kind of support in
the circle as well. So let's add support
here or if you like. I think we can delete these phases because they are
not visible to the camera. You can erupt those and
hit control plus just one time and hit F to
delete them if you like. And even those right here. So let's do that again
and cut up these faces. Let's a those over here. Hit control plus H x F to delete them. I
think that's better. We got gap right here, so that's mean you
can ignore this face. Yeah, I think I can Well, let's see if this is visible. Well, actually, I think
it's wrong to delete those. I will keep them because they
are visible to the camera. Let's add some cuts here and
maybe one cut right here. And maybe cut right here. And one c there to support
the circle and us it enter. All right. With these edges selected, our face selected, I will convert this to
boundary and mark. Maybe we can spread this area. Halt control and grab
this edge and mark sm. We need to open this. What about this face right here? Let's see grow the
selection couple of time. One more time.
Let's select those. You can drop us one more time. You can add seam here as
well, boundary and seam. What about this age?
I think we can clear the seam from here. Clear seam. Let's see what else
we can do here. Maybe we can add
the seam here and another seam on
this side as well. Let's add seams here and maybe
one here as well or here. It A and here hit you
twice and let's rob it. Add checker S to scale it, make it big, tab out, see if you've got any
distortion anywhere. We got a little bit of distortion,
but I can ignore this. It's okay. What else? Everything looks
okay, except for this error because we didn't
add a seam to the circle. Let's add seam here, maybe Markm and here as well, maybe we can add Sam. Let's add this again,
u tize S and scale it. Now the result is better. Now let's take those
and move go to solid, and let's go to
the next geometry. Maybe we can start
with this one. Isolate them and apply
bevel tab to the edit mode. And maybe we can just add a quick supports to these corners and on
the other side as well, the same scenario,
and there as well. Confirm that. But
here we got problem let dissolve this age and this one and get
wise and mark this. Now, go to the face, let's select these faces
and maybe I don't know. We can add those as well.
Select them like that. And let's go to
the side as well, the same scenario,
drop those here. And those here control
plot just one time, loop seam. All right.
That's very cool. Now, go to the face
again, select those. We didn't add a support
edge for these corners. So let's do that
again. All right. For this one as well, This edge, we can move it a
little bit and mark it here. Anyway. Now as we
go to the face, and let's select these faces
and the same thing here. Grob troll plus, grow selection, just one time and
boundary and max. That's very n. Now we can add. Sorry, I'll click Sam to open this cylinder
and one s here, it A and here hit twice, and now it's rubbed. You can a chucker to see the result and scale
if you prefer. Now we got this result. I will accept this
bake Got to solid, let's go to the next met. Let's go to the material review. Let's see which one we
could pick and start with. Maybe this one, go
to solid, grab it. He if you've got
any problem here. Anything you want to add.
I don't see any heading. That's mean we can apply vl, or maybe we just need to fix this area here because
I don't see any l. Let's reduce the The
limit is weight. That's very cool. Let's me now I can erupt
this age and increase the weight to one to add
arb A here to this area. That's very cool. Anything
else? I think that's it. Control, I apply
visual human trite to apply all of these modifiers. Now tap to the eight
mode and let see. Do we need to add any cuts? Maybe we can add the cut right
here and maybe one here as well. Maybe one here. Something like this. It enter or space. Let's go to phase now. Let's see some phases
like those here. Let's add those and
those over here. It control block just one
time and boundary and Sam. As you can see, I just
converted those to the seam. Let's see what else we can do. Go to face, and maybe we can
select the side as well. C row blow just one time
and boundary and then seam. Let's see what else we can do. Maybe this side, we can
select all of these faces. Cant row blow just one time
and boundary and seam. That's very cool. This side is already separated. I guess, we just need
to focus on this area. All right. Let's grab
those all of them. Can rob just one time
boundary and mark seam. That's very cool.
Now we can rob it, but this cylinder here. We need to give it Sam or two SM if you like
to make it smaller. Hit A now and here
hit to rob it. It tells you that the
scale is uniform. In this case, can A of scale
tab and rab it again Uwe. Now, a checker,
Scalet make it big, you just need to make the
checker smaller to see the result in case we
got some problems here. Well, we got a little
bit of distortion, but that's not a huge problem. We can't ignore it. Now we can say that this one
is ready to go. Let's go here and
bake and go to solid, and let's move on to
the next geometry. All right, Let's see
which one. Go to materal view and let's see which one doesn't have
checker, right these. So let's start with this one. Isolate this, go to solid first. This one, it should be
easy to apply vol tab. You can add right here. I mean, Sam and
maybe if you like, you can cut from here
and add Sam here, if you want to make this
the length shorter, it A and here hit u twice to
our rabbit, and it's done. We got some problem right here. Well, that's mean we can
add him here as well. All right, so add him here, hit A, u twice a rabbit. Now the result is better. A C. It looks nice. I can move on to the next one. Maybe this one,
selected, go to solid. And check the bevel. We don't see any problem,
apply bevel tab. Let's check the supports edges. Maybe we need to add cut here supporting this corner
and this one as well. I enter. I think that's it. Now let's go to face to sele
some phases to rub them. We can grab those
and those as well. Grow the selection one time, can drop plus, switch
to boundary maxim. Side as well, you
can erupt those. The same scenario for the side, can trop plot just one time, loop and seam what else? Maybe what about this area? Maybe just this side, we can select all of
these faces here. Control plus just one time
and boundary and mark am. Okay, now I can hit A
and here, hit U twice. A checker. Scale
this make it pick. Check that checker. Do
we have any problem? Yeah, we got the store in here. If you like, you can add
him here and separate this. Same thing for the side. You can add him right here. Hit A and U twice again,
scale this make it pick. Now, the result, I think
a little bit better. In general, everything is fine. Okay, bake this
tab out, go to so. Let's move for the next one.
Well, which one we can pick? Maybe this one.
Isolate this geometry and let's hear from
where we can start. Pick the bible. I guess we
don't have any problem here. Control A, apply bile, tab, go to the edit mode, and I don't know. Maybe we can add a cut here, goes there and maybe one
goes to the side as well. Maybe one here, one here. And enter to confirm
all of that. That's very cool. Okay go to face and let's select
these faces here, those here, this one. This one, let's add up the side, drop plus Jegro one
time boundary maxim. All right. I think we
should add this one as well to the group. Okay. Let's select those mark sm and this sam here
deleted. Clear sam. All right. What else? Let's select this grab those, control plus just one
time and boundary Markm. And select those here. Sorry. Can tro blaze just one time, boundary marks very cool. What else? All right. What about those here? Select those, Cantlz a
couple of times until you reach this edge, boundary marx. I need to separate those. I guess we could separate
this side as well. Select those over here and
the same thing for the site, control block just one time. All right, let's check
this. All right. That's very cool.
Now, boundary maxim. What about this one here? Select this, tro plus,
boundary, and maxim. Well, now I think we can rob it, or maybe we just need
to separate those here. Ct plus boundary maxim. Hit A in here, it twice to rob it. A checker. Scale let's make it big. K that checker. But All right. We got a little bit
of distortion here, but that's not an issue. You can ignore it. What about
the rest of the uma tree? This area is hidden. Don't worry about any distortion
having right here. Okay. Can ignore it. The rest of the uma
tree is very cool. Now bake those back. Tub Let's move on. What about this one? All right. This mat, this piece,
and this piece. Let's bring the
three dicrotor to the position of this
one. Grab this. I will delete this
one. We don't need it anymore. Select this HD. Sorry, HD. Take a COVI boot anywhere and Ht S
selection to Cossor. The same scenario for this, bring the three
decosor over here. H to S crosser to select it
after you select this one. Delete this. Let's maybe
select this geometry, H D put it anywhere, H S selection to
Cossor and now done. So we finished with
this geometry. I just forget those here. We didn't rub them. Tab it A, U twice, and they rub. We got a problem with the scale. Applies kale tab again, U again, and rub them. A checker, if you like. It's done. Go to this one. Control A applies kale
tab A and here done. A checker, if you like. Well, I just forget those
here as well as slash, and Tap apply level top, go to face, grab those here. Cross selection until you reach this edge, boundary mark Sam. And Sem here, and Sim here. A and here hit twice, A it checker. Cool. Let's excite. Crab this. Apply bevel tab, go to face, crab these faces,
control blog just one time, boundary sm. Maybe we can add
quick cuts like this. Let's select those
control blocks just one time and boundary maxim. Mm hmm. Controlled
las boundary mark sm, it A and here hit you twice. Keck, everything looks. Tab out, and let's move to those here. Tab or apply level first. Okay, let's go to the corners. Cut out these corners. I'll have to click to add these edges and mark S A and here hit twice and they
are raped with conformal. That's very cool. A checker. Is very nice acids.
This excites. Select those. We have vl, applied, tap it A,
here, hit twice. A checker, they are
rubbed. What about those? We still got ivl applied, and here we still
got vl applied. If you like, you can merge
those together at control J, and even though you grab them at control J, make
them one piece. Okay, that's very cool. Now, I think we just rub
all the pieces. Did we forget anything here? Well, no, we don't. After that, I will create
Uds for this geometry. But for now, I will
end this video and see you in the next one.
108. 108 Unwrapping section Unwrapping the Front leg part 1: Hello, again, welcome back. Let's rub the front leg. Let's turn off everything and
just turn on the front leg, and turn off the rest. Let's see how can we rub it? Let's start from this entry. Isolate this one. Check the vel. Make sure that it's clean and we don't have any artifacts. All right, everything looks
okay, everything looks fine. Now I can apply bevel, and let's start
rubbing this one. Let's go to face and let's
select these phases, for example, even
this one right here. Let's add those as well
here. Add those here. And the same scenario
for the side, you can use C to
activate circle select, and you can add those A control plus just one time
to grow selection to reach this edge boundary maxim. After that, maybe we can
select those over here. Ctrol plot just one
time boundary maxim. Maybe we can select
those over here. And trolas just one time, but don't forget to grab
this one and this one? Trolas and then mark Sam. That's very cool. We can
select those over here. And can troblaz, just
one time, Lub Mark Sam. And what about those over here, tro blazob Mark Sam? M. All right. That's very cool. H it A and here hit you
twice is to scale a checker. And check if you have any
distortion, any problem. Well, we don't have
anything. We can move on. Let's take this bag, and
let's move to this geometry. Isolate this one. Check if
you have any problem here. Well, we don't have any problem. Control I apply the
bevel tab, go to face. And let's select these
faces right here. And those over here. Can troplaz just one
time boundary Sam. Right. Select this
face, those here. The same thing for the site. Ctros, mark boundary
and then mark Sam. Anything else we could do here? Well, yes, select those here. And those over here can
tro plus boundary mark. Hit A and here, hit twice. I checker, scale this. Check it. We don't have
any problem. Take it back. Let's move on to the next
one, this one right here. I think this one or
what. Let's start with this. Check it. We don't have any artifacts. Everything is okay. Control A. Apply the bile, tab, go to face. Let's select these faces. I'm using can troll and click. And when I need to
add the new geometry, I had shift click. Grow the selection
until you reach this edge and the
middle loop seam. All right. Go to face again, select those over
here. And maybe those. Ct row plus one time Lube
and Sam. That's very cool. This one, I can select it
and this one right here, can tro plus s one. A S it A and here, hit twice. A checker skill it. We don't see any
problem, Pak this bag. Let's move on to the next one. This one. We don't have
any artift apply bevel d. All right. Grab this face. Control plus couple
time just two time. Mark sm, let's separate this. All right add sm here. And maybe one sam
goes like that. And what about the rest? Go to face, I click, and Tro plus until
you reach the same. One more time. Let's
add those to the group. Maybe. And maybe this one I'll have to
click boundary Markm. Okay. Well, maybe we
can add sim here. And what else maybe
one sim here. Start from here and ends here. The same thing on the side. We need to select this edge. After that, the graph
of this face can do last two time until you reach
this edge, loop mark him. All right, that's very cool. Okay, okay, it A and hit
you twice to a rub it. And let's see what we got. A checker, scale this. Scale this even more. We got
some distorting right here. Well that's mean we need
to make more tweaking. Let's these faces
here in the middle. Select them all like that. I can't roll plus until
you read this Lu Marx ym. And maybe we can I don't know. Maybe we can select these faces as well
and separate them. L's can drop laws just one time. Let's add those faces here. And those as well. Convert this to boundary
loop, Mark Sam. Now hit A and here hit
twice to rob them. And let's go to material view. Let's add, scales, and let's
see the distruction now. We still got some
distction right here. Well, maybe we can
add now SM here. And on the other side as well, I'll click Mark seam, I'll click Q and Mark seam. It A and here hit Q twice,
and kill this again. Now let's see if we got
any distortion anywhere. Everything looks okay, I think. Well, that's me we can move
on to the next geometry. All right. Which
one? Maybe this one. Isolate this tab. Or let's add first,
tab, go to the edge. Maybe we can divide this to two. So let's add two seams
here a A U tie to rabbit. We got a little bit of the
sorting, but that's okay. We can move on to the next one. This one right here. We
don't see any artifacts. Now we can apply vel. C to face, grab
those select side, face mode, can trop
just one time. Sam to separate this and
grab this side as well. Select those, and this
one can drop las. All right, can drops. And Okay, Loop and maxim. Maybe we can add sem here. Add seem here goes there and the same
thing seem goes here. On the other side,
the same thing goes here. And one sim here. Now, let's try to
abrupt this A in here. U twice tells you that we've got a
problem with the scale, tab at control A apply
scale tab and A U twice. A checker, scale, make it pick. See the checker. We
don't have any problem. Everything looks okay.
Let's pick this pack. Tab, go to the next geometry. This one, isolate this, and we don't have any
bob anything here. Tab and let's start
adding seams. One here. Sorry.
One him here maybe All right. Maybe
one see him right here. And see him like this. What about this one right here? Maybe we can add one sm here and seem on the
other side here, the same cometry to open
it from both sides. The same thing here. Let's add s here and maybe seem
on the other side. This one as well here and
one on the other side. All right. What else? What we got here. Do
we have phase here? I think we don't
let's go inside. Yeah, we don't have phase here. Well, maybe we can separate just the side to help Blender
to open it and a rabbit. Now let's try and let's see
what's going to happen. Hit A here, hit twice. Tells you we've
got a problem with the scale, control a scale. Ta hit A we our rabbit. Checker, sorry. A checker, scale this and see the result. The result is okay. We don't
have a huge distortion. We still got a problem here? Well, maybe we can
a team here and rea this twice as, make it big. Maybe this time the
result is better a little bit. All right. Let's take this bike and tap out and move
on to the next one. To this uma right here. Apply level tab, and
let's go to the face. Let's select the side, all of these faces. Those here as well. Antro plus loop
Sam, that sam here? What about this side right here? Well, maybe we can
manually select those Cant plus boundary Sam to separate those and
separate those here as well. Can row plus and boundary
loop, and that seam. What about this one here? Select all of these faces, C row plus, boundary
mark, and one s here. Maybe we can rob it. I think it A and here
it twice to rob it. H scale this check it. We don't see any distortion. We can't move on. Okay, Tab. And maybe we can now start with this geometry
here, selected. That should be easy
to a apply vl. Maybe we can add m here, and maybe one here
as well to open it from two side hit
A and here hit twice. I check, scale this. It's good. Let's excite. And go up this one here. Apply vl, tab, go to face. Go up these faces, all of them. Control plus until you
reach this edge right here. Sm boundary and then seem A
and here u twice to rub it. I check our scale it
looks fine. I think. Let's bring this back, top out. Select this one, let's rub it. Apply ve, control A tap Let's
see how can we arab this. Maybe we can cut
the corners first. Let's cut these corners. Sm here and maybe
seem here as well. By the way, you can select all of these faces and it can throw up plus if you prefer. Just one time and
dissolve those. Sorry, I mean, deselect those and those
over here as well. After that, you use blue
and Sam to a seem here. We got two sms here. Let's delete those clear
cleared from here. And clean it from here? Clear those. And
for this corner, I think we don't. Yeah. All right, that's
very cool. What else? Maybe we want him
here to open this. And I don't know. Maybe we can add
him here like that. Do we need to do add him here? I think, yes, we need
to add seam here. To reach the end.
That's very cool. Okay, this side as well, try to add seams here. Let's go to face and
let's select sorry, just select these pass
here and those here. After that can row just one
time and Boundary marks him. Let's see if anything
else we can do here. Maybe we can add here and
one him here as well. And the same thing for the site. Let's out of this and let's
see what's going to happen. Before you rob it, just make sure to select
these faces as well. Hit controlled last
gross selection. Maybe we can dissolve
deselect the story, and deselect this phase
right here and this phase. All right. Let's mark those as it
A and here it twice. We're not getting correct
results because of this area. Let's go to phase and
let's select these phases right here and maybe
those over here. Yeah. Let's come back here. Maybe we can add seam. Boundary and mark Sam. Let's go to this and select
this face as well, Ct select. All right. I think I
can select them here. Let's select those back.
What I need to do is, I just need to clear
the seam first, and after that, add it again. Clear Sam boundary and maxim. Now hit A and bus again twice. Now we go a little
bit better result, but here we get a mass, and'll see why that's happened. Because we didn't add
a seam to this one. Let's add one sm here, hit A, and u twice to Arab it. What else? Maybe those here,
we can select them, and on the other side,
the same scenario. Let's go here, Qs boundary, Mark Sam Now hit A and U twice. Now the result is a bit better. What else we can do here? What's going to
happen if I selected these phases right here
and the pace mode, and maybe those here as well. And let's get those
the same here. I think. All right. Before I do that, I just need to make sure that
what I'm doing is correct. Well, something here
is not make sense. All right. I think
we select those. Let's come back here
and bound remarks. And the same thing for
the side. Boundary mark. Hit A, out of this again. Now the result is a
little bit better. Let's checker, scale this. It looks okay. We
don't see any problem. Well, that's pin, end this
video here, and see when
109. 109 Unwrapping section Unwrapping the Front leg part 2: Hello again. Welcome back. Let's select the
umetry and isolate it and kick if we have
any modifier here. We don't have anything. Let's apply the scale first, and then tap to it mood and let's see what
we can do with this. Well, these edges, I don't like to leave them like that
without any supporting, so I'm going to use
NF tool and make a cut go maybe right here. One cut goes like that. On the other side here as well. And one cut maybe here
and confirm that. The same thing here, at K, let's make a cut goes like this. Cut goes here, maybe
cut here and one here. All right. Now let's
select these faces. And those here. T can throw blots to grow
selection and sloop seam. Maybe we can add seam here. Sorry, not all of that. Maybe just this area. Let's select those faces. That will be easier for us. C row blocks just one time. And boundary mark him. All right. Let's see what
else we can do here. Maybe we can select
these faces right here. And add him. Cross selection one time and
we got these phase as well, we need to include them. Let's select them.
That's very cool. The same thing on the side. Let's try to grab them. Maybe even this one. After that, to loop and Maxim. Maybe those here, glow
the selection just one time and make sure to select
these small faces here. Now. What about this area?
Select those all. Okay can toro one time. All right, Manually, I
will select those here. And loop. Let's see what else we can do. I will hit A and here hit twice to see what's
going to happen. I check, scale
this, make it pig. C and kick the checker. We don't see any problem. Well, that's mean we can
go to the next gumetry, and maybe this time
I will crop this. Kick the bb, we don't
see any artifacts. Apply this and now
let's move on. Let's go to phase and let's
select all of these phases. Okay. Well, maybe we can select those. What about those here? The same thing for the side, you can select these faces. It can ro. Maybe we can add those here and
the same thing here. Can Trop lz just one time, Lobe. That's very cool. What
about these faces here? Select them all. Can rows just one time and
boundary and then Sam. Okay, what about this area here? Maybe we just need to put
up this edge in Marken. Sorry, this one and this one, we could select them
as well. What else? Well, maybe we can now
select these faces. Okay. Let's go to the top, maybe. Maybe we can control from
here and select all of these. That selection is cool, controls across selection one
time and select those here. We don't need them.
We don't need to a. Those here. All right. Now, boundary and Sam. All right, right, right. We got weird seem here, why that's happened.
Let's select it. And clear the sim from here. Okay, what else? All right. We got some vari here. We selected this side. Let's add Sam here as well. To this area, and
the same scenario here. Let's do the same thing. Let's add s here and
see here as well. This s that we create here, maybe we don't need it. Something like
this, it will work. Okay, now, I think we can jump here and select all
of these faces. Cant row blast one
time and boundary Sam. Maybe we can add a cut here and cut here
to open this area. Hit A and here it twice to them. A, scale this make it big, and let's see what
else we can do. Everything looks okay. Well, it's a little bit tall, so I think I can grub
this edge and I'd seem here as well to
cut it to two pieces. Hit A, I'll rub this
again, and skillet. Now the result is better. Now let's be this. All right. So let's
go to solid top out. This is what we got. What about this geometry here? Go to solid kick it. All right. Control apply scale in case we got a problem
with the scale, and let's select these
faces over here. Those, all of them. Can rob loss one time and loop seam. Or maybe we can add
the side as well. Sam and de this a clear seam. This one, actually we can add as well and delete
this one, clear sm. Now let's see what we can
happen if I add this it twice. Well, what we didn't
add the same here or what? That's weird. Hit A, and here. We got this area here as well. Yeah, that's right. We could add here to the all corners.
Let's do that quickly. And here as well. Now it's A. A, scales, A. Nice result. Let's move on to
the next geometry. Maybe this time, this
one here. Isolate it. We don't need to
do anything here, tap A or first apply the
tap it a twice a rabbit. That will be enough. If you
don't like this result, it's very easy you can add seams to the corners
that will help a. And here as well. And
I'll click Mark sem, and the same scenario here. And one seem here. Okay. Now hit A U twice. Now let's rut and ready. Vicle. Let's select this
time this geometry here. All right. Maybe now
we can apply level. Tap and let's target the corners and let's add seems
here and here, all the corners and maybe see here to help them to be opened. And Sim here maybe
Sm to this area. The same thing for
the other side, Sim here, and Sim here
and one here as well. All right let's go here. Add sim. O sim here. Let's rec. What about the rest? What about this one here, Add s here, and this sim here? All right. Now hit A and here
hit you twice. Let's check or scale
this and see the result. If you like it, you can move on. It's nice. I don't
see any problem. All right, T What else? Well, maybe just those
Tap A and here two twice. Hacker and on. I think we just rut
all the pieces. Did we forget anything here? Everything is rut and, I guess. That's very cool. I think that's it for this video and see you on the next one.
110. 110 Unwrapping section Unwrapping the Back leg part 1: Hello again, welcome
back. Let's the bag legs, and let's start
with this geometry. Isolated. Apply bevel, we don't see any
problem with bevel. Tap to the em would go to face. Let's select these
faces over here. Maybe this one as
well can ro ls and see and let's select
those pass as well, Ctro plus just one time
and boundary and Sam. Now, I think it's ready because
we have Mural modifier, whatever thing you will do here, it will be reflected
on the other side. Hit A and hit you twice, I checker and it is cool.
Let's go to the next one. This one right
here, up level tab, and let's go to the face,
select these faces. Maybe those here.
Antro plus Gross, and Loop and Mark im. Let's select those faces
here and those here. Antro plus just
one time Loop and Sim What about this area? Grab this face, can drop
plus loop and mark sm. Now hit A and hit you
twice. A checker. We don't see any
problem. Let's move on. Let's select the cylinder
apply level tab, go to the edges, this edge. Mark them and this edge
as we have Mur modifier. Maybe we can grab
this and a sam here. Or maybe we can cut it. Apply mural tab, hit A and
hit you twice to rob it. Now we got this result. Well, the result
is not promising. Let's see what's going to
happen if I remove this seam. Maybe the same thing here. And maybe we can add
him here as well. A hacker, Scales.
It's acceptable. This geometry as well,
the selected tab. Maybe we can make
it a little bit shorter by moving these edges ge wise and maybe
move them right here. I think that will
be enough and now we can we have mirror
and we have bevel. Let's apply the bevel and
keep the mirror for now. Let's see what we
should do here. Okay. Maybe we can
select these ma tries here and those as well. Grow the selection can drop
last couple time until reach. This edge and Lu Marx. Now hit A and let's hit twice, and let's see what's
going to happen? Scale this. Yeah,
it's acceptable. We got some distortion
here, but it's okay. I will accept this result. After that, you can apply
the mirror if you like. Don't worry about the other side because that side is
a rubbed as well. Here, apply bevel,
tab, let's go to face, let's select apply
mirror as well. Tab, go to face,
grab these faces. Even those if you
like, can erupt them? Can ro plus one time
and Lou Marxim. Go to face again, select
these inner faces. The same thing here.
Tro plus lube and Mark. What about these
faces right here? Can Tro plus Lub Marxim. What about those here? Can Tro plus Lube and Mark sim. What else we could do? Let's try to rob this hit A and
here hit you twice. I check our scale this and see if we got any
distortion anywhere. Well, we don't have
any distortion. All right. Let's go to this one. I'm not going to R up this. I don't need to do that.
I already did this. I'm going to co this
and move it right here. Select this one, heft S and bring the three
Dcsor right here, select that one, H D take
a CB and Hit S and secos. Now we got this here. R to
zero t this 180 degree. Like that and delete the one with the
bible and keep this. And nice and ready. The same thing for
this geometry, bring the three
decosor right here, and I think you can delete it. L et's go over here, grab this, H D, take a CB, have the S selection to courser, and let's go back here and let's see what we got. Very cool. Select the geometry, have the
S scorso selected, deleted. Go back here, grab this one, have the selection
to coser, and pom. The same scenery here,
S scorso selected, delete this grab this one, have the selection to courser, and we got right here. The same thing here,
delete this one. Grab this HD,
selection to courser, and now we got this, and
this one as well, deleted. Go back here, H D, and that's very cool.
What about this one? Let's move the three D crosor. Grab this HD, selection
to courser, and done. Now we got these uma
trees rubbed and ready. What about this uma right here? I think it's similar
to this one. So I'm going to have to and
bring the cortar right here, delete this uma try
and maybe we can grab this one he d
and selection to cos, but I think we need
to make some tweaking here by moving this one and rotate this 180 degree. Let's move this pack, out of bit and put it right here.
That's will be enough. If you'd like to move
this pack, that's okay. What about this ometry? Let's see, how can we do it
delete this, select this one, H D selected to
coursor, r to the z, rotate this one, 80 degree, and I think it's perfect. Okay. Let's check it. Yeah.
Very cool. That's was fast. What about the rest? Now, we need to go back to A rubbing. Take the dm check if
you got any problem, anything you need to
add, or nothing here. Well, I think we just
something weird here we got. Let's go to the face and
try to select these faces. They are not selectable.
Why that's happened. Let's make some cuts and let's see what's
going to happen hit K. Let's make cut
goes like that. And maybe another cut goes
maybe from here to here. Okay, let's do that again. Hit K, M cut goes like this. So, I didn't notice the
mirror modifier here. L hits like to exit
and let's start over. Well, we don't need this side, so I'm going to
hit top and apply mirror and apply bevel,
and let's start over. All right Now's these
faces right here. Grab those all. Like that. Okay. Maybe just those and on the other side,
the same scenario. Let's add those here. It control plus just one time. We don't need these faces. We don't need. The
same scenario here, we don't need these faces, we
don't need to select them. But maybe we can add those here, and those here, we can
add them, and those here. And these tiny faces.
And the same thing here. That's very cool. I think the same thing
we could do here. Select those over
here and those here. Now, and to add s here. Now go to face again. Let's select all of these faces. And can row blaz just
one time Lupe and Sam. Well, anything else
here we could do? Let's select these
faces right here. And maybe those and those
can row bz just one time and delete this and delete this and this one as
well and this one here. And this one here,
we don't need it. We got something weird here. Before you add Sam here, just he click, sorry, clear the seam and then go to
boundary and mark am again. That can give us cleaner result. What about adding s here? Maybe that will be better
to divide this to two. K, and I don't know. I feel that we can cut this 22k, using the n tool, M cut here
and a sm to cut this 22. Let's move this over here, maybe the cuts in the middle. Hit A and hit. Scale this, make this
pick and kick the result. You can scale this even more. Kick if you have any
distortion anywhere. We just got a bit of d
story into this air, but we can ignore it.
That's very cool. Tab and let's move on. Let's select this geometry here. It's like to isolate it. We don't have any
modifier, that's cool. Tab and go to face and let's
start selecting these faces. Select these faces. And those here. All right. What else? I think that's it
now, we can trow just one time, loop and Maxim. For these corners,
we can add here. For this area, maybe we can
add him here and 1:00 A.M. Right here to separate this
and maybe see him here in the middle. All right. What about these faces
here, like those? Let's add those control blasts just one time
and des like those, we don't need to add them. And let's choose
boundary and marxim. I just add them right
here to cut it from the middle because
it's a little bit. We just need to make
the length a bit sh. What about this area here? Well, maybe we can
go to this edge, I'll click and add
pi seam here or not. Let's see, how can we fix this? Maybe at the corner we can add seam it A and hit
twice to a b it, and we still got a problem. Let's go to the site as
well. Target the site. K it control bla, and All right. Before you do that, maybe
we can add him here. Try to cut this. Maybe
one here as well. Maybe here. So Mark im, and what else maybe we
can add him here at the corner and seem here. After that, let's
select these faces. Can ros and D select this face, D select these
faces here as well. And then Lube and Sam. Let's add Sam here as well
to help this to be opened, and from here, and
here as well, Marx. What about this area? Maybe
we can open it as well. Add him here at the corner. Okay, what about the rest? Maybe we can add him here
and one him over here. And i here and one
here to cut this area. Now hit A and hit twice to
Arab scale, apply scale. A check, scale this. Let's check the result. We
don't see a good result here. Maybe we can add sim. My that will help, Arab
this again and scale. The result now looks better. And it's acceptable.
We can move on. All right. Let's go to solid and let's see what is the next geometry
that we could pick. Let's move to this
geometry, tap A. Before you do that, apply scale, tap it A twice, it's done. Now, let's select this one. I sold the metre. I think I will complete
this one in the next video. So let's end this
video here and see on
111. 111 Unwrapping section Unwrapping the Back leg part 3: Hello again, we'll come back. Let's start with this geometry. We have weighted normal. I will control and apply it and slash to
isolate this geometry, taps mood and select some
faces. Se gro of those. All of them. That's very cool. Maybe we can these faces as
well and those over here. Guess I can drop plus one time and sw this to
boundary and mark. Let's do the same thing
here on the side. Go to face and select those. I Something here, I got, it's weird. What's happening here.
Let's move those back. Let's see from where they come. To these phases,
and delete them. Let's see what
else we have here. F, delete this.
Go to the vertex. Let's sec this phase F. Get wise. Let's
move this one back, it all to move this
forward almost right here. Maybe now I can hit
get wise to grab this vertex and mae get right
here, this one as well. Let's see how many vertexes
we go right here. Sorry. Let's move this small right here and the grab those
four vertices hit F, and the grab this small hit
F. I think we just fix this. Use the nf tool, make a cut, maybe goes right here, grab this control dissolve it. All right. What else we could
do? Ke wise and merge this one.
Let's center this. Now let's add another weight normal to fix this
problem and apply. Tab, we still have
the same here. Now we need to
select those again. Go to face and now. You can hit C to open
the circle select, and you can select them
like that, if you prefer. Hit C again and select
those manually like this. All right. Let's add those here. Hit can Trolss to
grow selection. As you can see, these are all the phases
that we selected. After that, it to open
the quick loop and then. Let's go to face again and let's select these faces over here. Can't a plus just one
time boundary lobe seam. Maybe on this side,
we can do something. Let's select these
faces right here. Cant plus just one time, boundary lobe and seam. What about these human trees? It A and hit twice here,
and let's see what we got. We got a problem
with the scale tab, control A by scale tab
and A rob it again. It make this pick
to see the checker. We got some distorting
right here in this area. As you can see here. The checker is not looking fine. We need to fix the problem here. Let's see how can
we go around this? To do that, I think we can go to phase and select these phases. Hold it and control and
select the other side. Hold it at this one,
hold control crop this. Let's do the same
thing for the rest. And hit control plus two
grow selection boundary sm. Now hit A and here hit twice. Maybe that's will help a
little bit to fix the problem. Now we got this
result, we still got some overlapping here,
for example, those. I will it tro z because
this method is not working. We can do something else. We can extend the selection. Let's add those. And then let's do that again. Ctrol plus or I think that's not
going to work because it really grow too much. So let's do that again. Let's start from scratch. Let's control hefter plus. Let's see if Blender can
understand what I want, or that's not going to happen. So I think manually
we select this. After that, can
roll just one time and then boundary
and then sorry. And then C A and
twice to our rab it. Okay, now let's add check again. Make this pack and let's
see what we got so far. Now the result is
better and now it's become. L et's top out. I think now we can
start with this umetry. It's like to isolate it. We have mirror modifier. Let's turn off mirror
modifier for now. Let's see how can
we rut this ometry? Well, let's so the eight mode and Let's see from
where we can start. I think we can add
here to the corner. Marx. We need to cut
the corners first. Let's sult these faces. Let's go to the corners here. Just target them like that. Let's target this one at Sam. Let's select this edge, and that one at
seem here as well. Yeah, something like this.
Now I can open this one. If you'd like you
can add s here, if you want to divide it to two. What about this? We can
add another seam here. Make sure that the seam
break the end like this. Maybe another sam we
can add right here. And make sure that
the sam reek sorry. Let's see what else
we can do here. Maybe we can add
seam right here. Do we need to do anything else? Maybe seem to this edge to
divide this humane to two. Don't forget that you should
target these edges as well. I seem in the same
thing maybe here. We did that, but from
the top, we didn't. That's very important
what about this area? We didn't as. What
about the site? Let's select this age in
the middle. I'll click. I'll have to click
and those as well. Cb those here as
well, and mark Sam. Sam here to this corner. Maybe one s here. Maybe we can add
here as well to open this and same here and make sure that the
same reach the end. That's very cool. What about this area, what we can do for it? Now let's hit A and hit twice, and let's see what's
going to happen. Control I apply scale. I'll wrap it again. I checker, scale this, see the result. Before you go any further. I don't see any problem. Everything looks
okay and acceptable. That's mean I can move
on. Let's pick this bag. Let's move on. Add Mirror
equ alight, if you like. And maybe we can start
with this geometry. Well, those here, I
think we did give them. We didn't rut them.
Tab A, Uwiice. Ctro a play skill. That's very cool. A
checker. They read. Select this one. Tab A, we, checker, done.
What about this one? Tab it A wise, I checker done. What
about this one? Isolate this tab,
grab this phase here, and those over here. Grow the selection
just one time. The select those, we don't
need to select those. Let's add this phase here. We don't need to use
the face selection. What I can do is I can target the seam that
I want and open it. It's not complicated umetry. Sam here, and I think
that's it A here, it twice and I very cool. This one may be isolated. Go to solid tab, go to face, select these
faces, control blasts, grow the selin one time as Sam the same leas kick
this before I go. That's wrong. It's
wrong to add the seam here and for the side. For this side, we don't have any problem to add the
seam in the middle, but this one, no, it
could trick the end. Manually, I will select
those and those clear Sam. And a seam here. Now it's correct.
What about this side? We can do the same
thing. Grab those. Make sure to select face. Grow the selection,
and now boundary seam. Now it's correct. All right. Maybe we can use the n
tool to cut this 22, hit K, make a cut. In this age, convert this
to Sam hit A, twice, and checker and let's see
what else we should do. What about this metry here? Apply Bevel tap, maybe we
can select these faces. We can't throw last one time, Sem here, and what else? S here? It A and hit twice to a rub
it and done. You can checker. What else may be
those stuff here? Isolate this one. Tap the mode, and let's add Sam here. At have to click
a S here as well. Maybe one sm around
the um like this, hit A and here hits twice. It's opened. Now you can
check our scale if you like. What about those
here? Grab them, tab, go to the edge. I'll click here, I'll have
to click here and one here, S A U twice, they are raped. I'll check out if you prefer, and let's exact from here. What about this
humid right here? Or maybe this one
here in the middle. Isolated and apply. Let's see what's visible? What's not visible here. Yeah, it's like to isolate it and let's see from
where we can start. We can I guess, we can select all
of these faces. I mean, the side and
the side as well. It can throw blows just one time and chose boundary and
mark to a seem around it. Now you can target the
corners and some seams here. Maybe here as well,
we can add seam. Maybe same here not here. Same here in the corner. On seam right here.
And maybe one here and one here as well. Maybe one sam right
here if you'd like to cut this humore 22. You can cut it like that
by adding Sam right here. All right. Now hit A
and here hit ut wise. Throw a apply scale ui again, I check scale make it big. Kick that checker. We got some distortion
here in this area. Well, that's mean we have
something not make sense. Let's see why that's happened. Do we forget something? Yeah, we forget this one. Add seam. Now let's do it again. A bit SN Scle. We got problem
right here as well. I don't know why
that's happened. Did we forget something
here as well? Or not. Let's see what's going
happen if I add seam here, it A twice. Something weird. We have some connection here. We can find it in the
U V. Let's maximize this just a little bit.
As you can see here. Let's go to the edge, and let's grab this edge and go here, grab this edge as well here. Mark those asm, and let's try to check
the rest of the ue, it A, and now the results
should be rectified. Now I don't see any problem
here. That's very cool. Tub outgo to slid,
it's like to excite. Now we can see that we are
finished with bag leg. I guess everything now is
ready except this piece. We will do it
later. But for now, I will end this do and
see you in the next one.
112. 112 Unwrapping section Creating Udims for the Light: Hello, everyone, and
welcome back here. Let's go back to the light
and let's create a U Dems. So hide everything and just
leave the light active. And let's go to the UV editor, Treat this two UV editor, and go to the new to
create a new image, and let's call this light. Light U Dems. And change
the scale to two K, multiply this with two, multiply by two hit
enter and activate tile. All right. If I go to
the material review, I got all of these
pieces rubbed and ready. Tab, hit a select everything, go to V agate the scale. Make everything ready. If you would like to bake them, you can bake them
and bake islands. That's very cool. Now
let's move those away. Maybe right here for now, and let's see what
we can do with them. Let's go to the ME here and
let's add a new U Dems. Let's add, for
example, six, and hit. Now we got six ums, and let's see from
where we can start. First, we need to
kick the scale. I will bring the
wing, for example, and make some comparison Tab to the light,
grab all the UV. All the parts and scale them and make the size of the texture similar to
the size of the wing. Scale those maybe something
like this. It will work. This size is okay for me. Now let's see how
can we distribute these parts to these us. A. Let's start by maybe
emerging some geometry. What about those here? Let's try to find them. They are right here. Let's
take those here, for example. All right. Let's see how
can we handle those? Let's go to the UV and
chose bake islands, and now they are baked here. The size is still okay. Let's see what else
we can do here. Let's select this
geometry, this one maybe, and these small
parts, grub them all. What else? I think
that's tab, it A, grab all of these
and bake those, and let's go to the material
and let's see what we got. We can control this later. Let's move this
one, one unit here. After that, you
can merge them if you prefer it control J, Tub out control K and
make them one piece, and you can merge those
as well if you prefer. Grab those control K. Let's make one of these
active to merge them, control K. Now they are merged. Okay, that's very cool. Let's select this um
and let's top and it, and let's see the size. Still. Let's move this to
number three. U three. Let's see like this one, and those here maybe
tab and bake them. And maybe we can move
those to units four. What about this one? This
one. Let's see where is it. Bake. Let's move
this one to five. All right. Let's
see what else tab. Do we have anything outside?
We have those here. Bake, e, and let's
move this to five. Kick if you have
any overlapping. I don't see any overlapping. But before you go farther, now you need to kick the scale
and see what part is big. This one is big, and let's go there and let's see
why that's happened. Well, to fix this, maybe
we can add H right here. So t this as a seam. Maybe we can make
a goes like that. All right. Let's go to the edge and deselect those.
Let's do that again. Let's see how can we
Maybe we can do it here. Isolate this metre. Maybe we just need to
cut it to two pieces. At the s right here. We don't want him here actually. We won't on goes like that. And maybe goes here and here and reach to this area Markm. Okay now grab all of these
parts and hit twice to rub it. Let's move this
one to unit three. Like to exact of the local mode, grab those tab, and we
need to move those. Make sure that you
are in the phase. Let's move those one units. Sorry. We got something here. Let's move those up for now. Crab these parts, and maybe
those here, and Qs bake. And crab those here, move them down and bake. We just fixed the scale. That's something good. Maybe we can scale them a little bit. What about the rest
of the uma tree? Everything looks okay. We don't see any
problem anywhere. The size looks okay. We don't have a huge variation. The variation is very
little and we don't need to worry about that.
Yeah, that's it, I think. That's very cool. You can merge this piece before you merge it and
make it one piece. Kick if you have
any overlapping. Because we don't need to we don't need to have
any overlapping. I don't see any
overlapping here. That's mean I can grab them all hit control k and
make them one piece. Let's go to slid and let kick, the heating in case we
got a problem here. We we got just a little bit
of a problem right here. In this case, we can
outweight normal. Maybe that's will help
to fix everything. All right. Yeah. Now I can
control I end up light, and the U V is ready tap out. Let's see where
could we go next. Maybe we can start
with the front leg, but I will end this video here and do that
in the next video.
113. 113 Unwrapping section Creating Udims for the Front leg: Hello again. Welcome
back. Let's create dims for the front leg. Let's turn off everything, activate the front
legs, and that it. Go to the new. First, go to the UV editor
and then new image. Let's call this front legs, two K and activate
tied it k. Let's add, for example, ten UVs, it K. Now we got ten UVs. Now let's start let's
select everything top it A, select all the pieces, and go to UV and a
the scale first. Now the scale is even, and The side of the texture
is it's okay, I think. Well, we still got
something here. The scale is not correct for this one right
here. I don't know why. Well, maybe we can apply
the scale for this. Maybe we have some problem, scale problem, control,
apply the scale. Tap it A, select
everything, go to the UV, Abreg the scale, and now
the result is correct. And even the cker size is okay. Well, after that, go
to the UV and bake and hit and scale until you make the
size looks like this. It's very close to the wing
and to the light now become. If you want to make sure you can bring the wing back
and make some comparison. Maybe we can scale them just
a little bit like that. And this result is nice. You can bring the
light if you prefer, and it's close to
the light as well. All right. Let's see
from where we can start. Let's move those out for now, and let's go to the face and let's select some geometry here. Maybe we can these. Umetrate control L and choose normal to select
the whole umetry. Maybe we can put
those inside space, one U V. So bake them. That's not going to
happen. Well, we need to reduce the number.
Let's take those out. Let's select this part first, and I think we can
use alone bake it. Well, it's okay. I can accept this result. Let's move to those control L, and maybe we can add those
control L and bake them. Now they become small. We can add more geometry here. Let's add this one
control L and bake them. The size looks cool. We can move this one
to V number two. Okay Let's select these pieces and maybe this one right
here and this one. T, hit A, select them
all, and then bake. The size looks okay. Let's move those to Unit three. What about this one? Tap A, select all
the pieces, bake. Kick the scale. Still small. Maybe
we can add something here to this one. I
don't know what is it. Maybe this one, grab
them all, bake them. Maybe we can add those here, tap it a bake. All right. Yeah, let's do that. It, and let's move this maybe
to the Unit four or five and bake those
again. That's very cool. Let's see what else. Maybe this geometry
now and those or this one along
top it A and bake. The scale is very
big for this one. Maybe we can make
some cuts here. Okay Let's isolate
this um alone and let's see how can we fix this? Go to the top. Use the nf tool, M cut goes like that. It enter, and now
we got a new cut. Go to the edge, and maybe
here let's hit twice. Maybe manually move
this right here. But that's will ruin the U V, but, I can accept this. A here, it A and hit
twice to re rab it, and let's kick the result. All right. Let's take this out. Maybe right here.
It's like to excite. Maybe we can add some
pieces to this group. Series right here. Grab those. And maybe we can
copy some parts. Maybe we can add those
pieces, the face, control. Yeah, maybe I can add
those to this group. Grab those, control L, it key, and let's move
those right here, grab those and Q bake. Now let's select
those, all of them. Let's move those right
here, bake them. Well, still bake
actually. Is very big. Even if you bake those here, you're not going to get correct results
because of the scale. Let's correct the scale
first, and then bake. Right now, the result looks a
little bit better, I guess. Grab let's average
the scale again. We don't have any problem
with the scale and bake. All right. Yeah, I think now it's become better as compared
with the foods. The scale is okay. Let's see what else. We got these gmries. Let's bake them any it key
and let's move those to six. Maybe we can scale those down. Or what? Yes, a little
bit, not too much. Now we can delete some UVs. We don't need all of these UVs. All right. Hit a sorry just
forget something. We have a mass right here. Let's try to find out
why that's happened. We got overlapping here, heap. Okay that's happened. All right. Okay. L et's move
those out temporarily. Sorry, because of the back legs still in the group
of the front leg. We'll grab those
hits and move those to the legs collection. Now we see everything fine
without any overlapping. Now let's grab those
key and bake them here. Now let's kick this
again in case we got any problem. Well, now we don't. Kick the scale, kick the size. Everything looks
okay and acceptable. And fine. Well, now you can merge some geometry
if you prefer. You can select those, for example, and make
them one piece. Control K. You can do that because they will
receive one material, and you can erupt this
with this at control K, make one piece with this
one as well at Control K, and maybe those as well at control K. What about
this one and this one? You can make them one
piece if you like. This one in those here, you can control J and make them one piece. You can do this. This one with this geometry, control J, make it one piece. This one with this make
it one piece, control J. All right. That's cool. Now we got one piece
here and one piece here, and here, what about those here? All right. I think that's it. Now let's kick everything again. Try to avoid any overlapping. I don't see any
overlapping here. Everything looks okay. I think that's it
for the front leg. After that, move
to the back legs to finish the back legs. That's it for this video and
see you in the next one.
114. 114 Unwrapping section Creating Udims for the Back leg: Hello, again, welcome back. Let's create utums
for the Bag legs. Let's hide everything
and turn on the back legs and select
the tab to the e mode. Here we have everything. Go to the U V. Make sure that
you select everything. All right. We have
mirror modifier here? We don't need it. Any mirror you can app. We don't
need any mirror. Hit A control a apply
visual uma retom now grab everything it A
and U V accal first. Well, we got some problems
here. I controls it. Some problem we go right here. All right. Why that's
happened? Right? We got some big geometries, those, we can scale
them or bake them. This one, we can bake it. All right. Let's do that part by part
let's scrub those tab. It's a alg the scale. We still got a problem. Well let those both
and lets see maybe because of them. Ag the scale. No, we don't have a
problem with those. Well, fact those control a the scale in case
we go a problem. Tab again, V a scale. What are these I don't know. Hit controls it. All right. Let's
start with this side. Tap it a regular scale. We don't see any problems, so I'm going to hit a and
move those away right here. What about this and this, c those averg scale and bake. Let's move those right here. Now, let's el these pieces. Maybe this one as well tab, bake first, and then
I break the scale. We don't see any problem yet. Let's move those away. And maybe from the problem
comes from this one. Right Let's go to
the material review. Maybe it comes because
of this or this. Tab, grab those K average. Bake L et's see grab
those three of them, Tab it A V average. We still don't see any problem. It comes from here because
this one is not rubbed. I just forget to hide this. This one shouldn't be here. Hit M and move this
to the bottom bars. Because of this um sorry. Now I can grab all of these pieces and average
them without any problem. That's right, and bake them. Now I will scale those
and get my size. This size, maybe. Make some comparison
between those. Maybe we can scale it
just a little bit. I mean, the UV. Something
like that. That's okay. Move this U V right
here, tab out. Now let's create a new here. Let's change that title
name to bag legs, two K, activate tile then hit. Here we can add ten V. And
let's start doing that. Well, let's grab these pieces, tap it A and bake those and see the
result is not correct. Grab those two alone
and bake them. The size is still okay. So I will accept this. Let's select those back, tap it A and bake. The size becomes smaller. Well, maybe we can add
the cylinder to it. A and bake, maybe
we can add this. And this one, tap
it A and then bake. It looks fine. Let's move this two
units number two. Now we got this in
those here already. Let's scrub this tb and bake. The size, it's big, I guess, or acceptable. If we add some seams, maybe that's can help
to reduce the size. I don't know, but maybe
we can add some seam. For example, we can cut the whole geometry
from the center, add seam here and hit
you twice to a rab it. Now it's become
smaller, I guess. Yeah. Let's move
this to it three. That's very cool. Select this
one, and maybe this one. This with this top A and Sorspk. The size looks, let's
move this group to UV number four, I guess. Let's select all
of these pieces. Tab it A and bake. The sides still okay. Move those to number five, I guess, not six. Sorry, I just forget to
hide the front leg hide it. Yeah, let's move those
back one units this one. Everything looks okay, cool. What about this
metary tab, bake it. The size becomes smaller, maybe we can add
something to this. Maybe adding those together, or that's not going to happen. Maybe we can add this or what? Yeah, let's see grab
those b. This one. This one and this one,
tap it A and bake them. The scale looks, this
one is very big. Why that's happen? We need to scale those maybe a little bit and
make them smaller. Now, tub, we go have this tab again and let's choose bake. Let's the scale between them. Now let's move this to six. What about this geometry
tab A and take it. The size become smaller. Let's hit and move this
one to seven maybe. We can scale the UV
down a little bit. Or you can add some
geometry with this. Let's select these
pieces, and I don't know. Let's select those as well. Let's see what's
going if we do that. Tab it A, let's
go to Mater view, and bake, that's not going to happen because
now they become big. Let's select those alone, Tab it A and bake kick the size. It's still big, I
guess, or what? If I compare this to the foot, it's smaller and it's okay. According to the size of this square to maybe this
one or this one. It's. Well, that's mean
we can accept this. So it key and let's move this 27 and bake those right here. And I don't know if
we have a UV here, so I'm going to move
those out up temporarily, hit A tab, and yeah we have. Let's scrub them. Hit key and let's
move those right here and bake here. That's it. What about these parts, Tab hit A and bake. The size, I think it's pick. Let's move those to eight. Maybe right here and bake. Well, that's only
going to happen. We got overlapping here, key move it one unit. What about motels? Maybe we can select
those together and bake. The size it's small and nice. We can add those t and bake. Or let's average the
scale, and now bake. Now speak better.
Let's move this 210. Now A select everything
tab, and let's see, do we have, we have
some stuff out. Bake those and let's see
what we will got here. Let's move this
one, one unit up. Now select everything,
scale them like that and see the variation. We got a little
bit of variation, but we can accept it. Well, if this big
and this small, that's mean this
geometry will receive titure high resolution
as compared to this one. This image will receive
tie a little bit zoomed in and a little bit pluri
as compared to this. This is the idea. I will
control Z to bring those back and just try to kick the U V if you've
got any overlapping. All right. I don't
see any overlapping. That's been now we can
merge some geometries. Let's select those, for example. This one, this one,
and these parts. Yeah, you can't actually
grab them like that. Grab this one and those here. It control, make them one piece. Key to move it, make sure those here as well control
J, make them one piece. Now let's select those here. Control K, make the one piece. This one with this
one, control J. This with this control J, this umatry, with those here, control J, make the one piece. That will be easier. That's very cool. Maybe I can merge this
with this one, control K, make them one piece, and kick the pace orientation
in case we got a problem. We don't see any problem. All right. One more time
tab and kick the U V. We don't see any
overlapping here. That's very cool. All right. Now it to exit and let's
activate the rest, bring back the other details, go to review, and let's
make some comparison. It's very cool. Until
now it is very cool. Well, we can say
that we are finished with the light and
front and back legs. Now we need to move
to these parts. We need to rub them one
by one and finish them. After that, we can see maybe we can start
with a texturing. I think that's it for this video and see
you in the next one.
115. 115 Unwrapping section Starting with the bottom parts UV unwrapping part 1: Hello again. Welcome back here. Let's start with these details
underneath the or tepter. I want to hide
everything except those. So we call them bottom Barts. And there we go, we got them. Let's start with this geometry.
Select the first one. Is like to isolate it. Here on the side, we
have the UV A ready. UV editor. And let's start
robbing this emetry. First, let's check
what we got here. We got mirror, we got vl. Check the gematry, in case
you got adding problem. If you don't have any problem, just go ahead and apply Bevel and apply mirror
because we don't need them. Control A, apply a scale
in case we got a problem. And now let's stop with emo
let's see now what we can do. Let's start with these faces. Let's select all of
these faces now. Maybe I can grab those
as well as a one phase. And those, select
them like that. Okay. And those here. All right, I guess forget to
activate the screen casts, let's go here and activate this. Let's add number one here and
offset this on this side, maybe and close this one. All right. So now we
selected just this side. I'm going to control, but just
to grow the selection just one time and then convert
this to boundary. And by the way, If you
want to convert that, you need to go to select and select loop and choose boundary. But I just added this to cook variet Whatever thing you
want to add to ok varie, just trot click and
add cook overt. Okay Now HQ and
select boundary loop and then Markm O you can
htlick and choose Maxim. So now we got a seam right here. That's very cool. And maybe now we can target these corners to give them same as well to help blender to
open this area better. So grab those four
edges, now mark them, and the same scenario
for this one as well, select those and mark a seem. That's very cool. Now let's
select the side this time. Control plus gross selection
and boundary and maxim. Now let's add the seam right here and one more
seam here as well. Gross selection just one
more time and add sm. A now let's this, hit A, and on the
side, hit twice. From here, you can
choose the method. I will work with conformal. As I say, conformal works with these kind of
geometry better, but angle base work
with the organic stuff. Now let's go to the text tool and let's a checker and
let's see the result. It's very cool and nice. I don't see any problem. I can move on to the next
emetry. Maybe this one. Isolate this emetry and let's see what we
can do with this. We don't have any problem
with bubble, so up light, now tab and L et's see
how can we open this. Maybe we can add some seams
here on the both side, can troubles, draw selection and mark Sam circuses boundary
and then mark Sam. And you can cut this
these lines maybe from from two area. I mean, we can add seam here and one seam here as well
to cut this silt to two. The same scenario for
this side, let's do it. And now hit A and here
hit twice to allow them, and I think it's done
a her very cool. Let's go to the third
object, maybe this one. Isolate it, see what
we need to do here. I don't see any problem. Can Tro I apply the bevel. Okay, now, go to the face and now let's these faces over here. And maybe we can open this
face or maybe those together. I don't know. That makes sense? Or I'm not going to open those. Can rollos just one time
and then boundary and maxi. What about those here
and those over here? We can open them control plus, this one time boundary
maxim. All right. And what about this side? Select all of these faces. Right control plus,
Boundary maxim. What about this area? Well, here, maybe we can add sm here and see maybe here
and see on the side. I guess sublet it this phase, and now we got this spilt. I add a cut here and
cut on the side. I don't want this
spilt to be long. All right, so now hit
A and here hit twice, and now you can ad
checker and there we go. If you want to cut
this from the side, now as you can see,
we got long geometry. If you want to cut
it, that's okay. But for now, I will
ignore it. Okay. Let's move on to the next one, maybe this one here. All right. By the way, just I want to
mention something here. If I bring back I want to bring back the material editor
here or the shader editor. We got this texture comes
from the text tool. What I can do is I can go
to the material side and here go to the viewboard display and change the color
to whatever color. Well, that's will help
me a little bit to see what object I rubbed.
You have two options. You can go to the
material review and see the checker
or you can stay in the solid mode and just change the viewboard display to
whatever color you like, just to recognize the geometries that you added this material on. So now let's hide this. Now we now we know that we arb this geometry and this
geometry and this one. Let's start with this All right. Let's see how this
will be raped. Go to the modifier section. We have the all
applied. All right. Let's see what's going
happen if I hit tab and A and rob it quickly, U twice. I will get this result, but this result is not correct. As you can see, we've got
some overlapping coming here. So to avoid this, I can go to the edge and maybe
add cuts here, maybe here as well, we can add cut just to help the software to get
better results. Maybe seem here and on the side, you can add sam
and here as well. All right, let's
add the same here. Let's see what's going
to have been hit A and here hit twice. Now we get a little
bit better result, but these phase on the side will make the process
a bit difficult. A to the software to rab it. So in this case, we can
go to the face here. Sorry, go to the face
at number three, and the grab these faces on the side and those
phases on that side. So as you can see, we just
selected these phases. Now, I will se
boundary and maxing. And now hit A and
rob this again. Now the result is
better, as you can see. A checker, you don't have
any problem. Move on. Well, what about this umetry? Its like to isolate it? We got bubble,
applied, control A. Tap to the edit mode? You can rob one side and you can mirror this
to the other side? You can do that. If that's
a bit difficult to arrow, but it is easy actually. We don't need to do
that extra step. Select those face here can
trouble us just one time and then bound loop and C hit A
and hit you twice to rob it. And now we got this result. We got a little bit of
distortion, but that's okay. I don't see any problem
with that. We can move on. What about this metry? Okay, we got mirror. I will apply the ball
and keep mirror for now. Tab to the edit mode, and well, maybe we can
focus on the site for now. Okay, select these faces. All of them can trow
blast just one time. All right, Wes a
weird result here. Let's try that again. Can
row las just one time. And maybe another one and choose loop and then S.
I just added C here, and just target
these two corners, and let's add CM here as well. Now hit A and here
it twice to Arab. Now, it's rot, but
yeah, it's Arab. And we got miro Mifi. That's mean we got
CM here as well. So in this case, tab out apply mirror after
you rob the side. Tab a hit A and hit twice, and now both of them
are rat and they ready. All right. Very cool. Now let's move on to the next
two and three. By the way, we didn't give it
a checker. Now it's ready. Write what else may
be those over here. We don't see any mirror. The organ dot where it's
still in the center. We don't have any problem. I will rub the side and
mirror it on the other side. Let's go to the edit mode. We just al everything. Now we can see what phases we can sublet. Select these phases. I'll click. Can T
roblos just one time, or even if you, if you want, you can at C Trow
again, if you prefer. And at boundary, let's see
what's going to happen. I will controls it. I will cancel this step. Et choose boundary and maxim. Now, just add one in
here at this corner, and let's go to the side here. Let's select these
faces over here. These phases here as well. Sorry, you don't select those. All those here. Had can
rob us just one time. D select these Diselect those. Now, I got this results,
boundary maxim. That's very cool. I
think now I can rob it, but we need to do the same
thing for this side as well. A select those over
here, and those here. Tro plus to grow
selection just one time. D select this one and
this one. Loop Sam. Go here, I'll click troop
Sam and one S here as well. Now, what about this
side over here? I will grab these faces, F and delete them. Let's focus on those here. Tap it a twice and see
what's going to happen. Well, we got something weird. What are these here?
Something not good here. Yeah, because of these edges. All right, sorry. Let's try to find the solution
for this area. I just forget to include
this area as well. So I'm going to clear seam from here and clear seam
from here as well. And let's extend the selection to this area and
this one as well. And the same scenario for
the side marks him here. And marks him here as well. Now hit A and twice, and now we got better result. A checker. Very nice. That's it. Is exit. I guess, very nice. We
don't have any problem. Yeah. Let's excite. You
want to add mirror, go ahead and add
mirror modifier. D alight. Tab again
hit A U twice to re arrab them because we got four
pieces now, and that's it. Now let's move on
to the next metre and maybe we can't
pick this one. Let's isolate this metre. We got these faces in the back. I think we don't need them. So I'm going to delete them. Let's apply the bubble
and keep mirror. Tab, go to face, grab this face, can travele couple time
until you reach this area, and F to delete this face
because we don't need it. Check if you've got any problem, if you want to do anything
here, see what we got here. I think I will accept that. All tap the mood and now let's start selecting
some faces from here. All right. Let's see
from where we can start. Maybe we can grab
those, all of them. And don't worry
about the other side because you still got mimi fier here.
Select these faces. Okay? Grab them all like that. Let's select those over here. Let's see what phases
that we are missing here. I think we can selected
all the pass on the side. After that control bla just
one time and then loop Sam. We just add the seam here. Now's see what's the next step? Maybe now we can
grab these faces. I control bla maybe just
one time and maybe we can use loop and s.
Maybe one s here, we can add and maybe
one seam here, and the same thing for
the side and the side. All right. What I'm
going to do is I will delete the seam
that I added right here to make this piece
still connected to this one. So delete these seams. I mean, just to clear the seam. And clear the seam
from here as well. Well, now let's see what
else we could do here. Maybe we can add
seam here just to cut this long built
that I will got here. It will be long when
it will be open. It will be like this. So adding seam here mean cut it from
one side or from two side. Adding one seam right here and maybe one seam right
here to make it shorter. That's better. All right. What about this area here? It will be a little
bit difficult to rut. So I'm going to seems
here at these corners, I guess, to help to open
this and maybe here as well. And on the other
side, the same thing. And here as well.
That's very cool. All right, maybe seem here
to cut this area and right. Let's see what else
we could do here. Let's rob this and let's
see what's going to happen. Hit U twice. Now we
got this result. Add checker. Well, this area is
not rubbed well. As you can see, it's right here. So in this case, I guess we can add seem here, selecting these edges,
and maybe what else. Maybe those over here as well, and maybe these edges.
Grab them and mark. Now hit A and U twice. We will get a little
bit better results. We got extra seams, I know, but don't
worry too much. Do you know why
because this area is it's almost will be
dark in the render, so don't worry about
seams adding seams here. Now we got this, and
because we got or modifier, this one will be okay. We'll now tab out a mirror tab, and again, let's re rap
this tie, and it's rat. We at checker, we
can move on tab out. All right. What else
we could do here? Well, maybe we can rub this
geometry here, is selected. That's very cool. Apply
level. We don't need it. We don't have any
problem, I guess. Everything looks fine. Maybe we just need to
support this area quickly. We say that before you
see something like that, and you have an angle, and this angle does not
have any connection. It's better to add
connection because sometimes if you export
this two substance better, for example, you will
got some problem. I mean, this face will jump
here in this empty area, and it will block it like that. So adding sam right here will
help to fix this problem. On the other side,
as well, hit K, use a nf tool and make cut like this and confirm it with
enter or over the space. All right now, let's try to rob this quickly and let's see
how that could be done. Maybe we can select these
faces, all of them. Or maybe even those here,
we can select them. Let's see what's going
to happen. All right. Or maybe I will
deselect those because I'm going to hit control
plus to grow the selection, and they will be
selected automatically. Control plus. And now
let's delete those here. And delete those here as well. Well, maybe we can add a seam
right here in this area, Q loop and Sam. Maybe one seam in
these corners as well, just to help to get
better results. I'll click in Markm. All right. What about this area here? I can select all of these
cavities and add a seam here. Select those. Ct
blot just one time and deselect the rest of the faces because we
don't need to grab them. And the same thing here, hold Ctrol and deselect
them and Lue Markie. Now hit A and here hit twice. Let's add the checker and
let's see the result. It's very nice. We don't see any
problem. Go ahead. All right, I think that I don't want to make
this video very long, so I'm going to end it. And
see you on the next one.
116. 116 Unwrapping section Starting with the bottom parts UV unwrapping part 2: Hello, again, welcome back. Let's select the geometry
and let's try to rob it. It's like to isolate it. Before you do anything,
just check if there are any thing we can
delete. All right. Maybe the site, we can
delete these phases here and the phases that we got here. Let's see what's going
happen if we do that. Yeah. We deleted that.
Yeah, that's very cool. Now, let's go to the eight mode and let's see what
we can do here. Before you do anything, let's make a quick
cut. Goes like that. To ensure that we're not
going to face any problem. Maybe on the side as well, or you can use Mo
moodifier, if you prefer. Maybe one cut goes like that. Something like this,
it will be okay. Control. I apply the bevel. We don't see any
problem with that. Now let's tap to the
e mode and let's start rubbing these geometries. Maybe we can select these
faces like this quickly. All right let's sec
those like that. And let's select those
over here. All right. Let's see what else
we can select. Okay. I don't know, maybe we can add those for now. It can troubles just
gross selection and de select those
we don't need them. And, I think that's a, now hit Q and add
boundary and mark. Now we got Sam right here. Don't forget to add s here as to open this area as
well. And one here. That's very cool. Okay, Maybe now we just need
to grab this face, can rob us just one
time and loop and seam. Okay, now you can
rub it, I guess. It A and here it
twice to Arab it. Let's see, was
what we have here. We got some overlapping
happen here at these corners. Let's try to find the solution. We can go to the edge and target target target the corners and convert these edges to Sam. That's. The same
thing here as well. All right, now you can hit
A and U twice to rub it. And now we got nice results, but we still got
problem right here. You can grab these
if you prefer, grab these phases like this and those and you can add a
seam here if you like. So boundaries hit A and u
twice. Now we got this. Okay, so I think we
finish this one. We still got some
subtle problem here, but I will ignore that. That will be enough.
Add a car to this, as you can see, very nice, and let's move on. Maybe we can start with this. We have Ms still exists that's very cool,
tab and let's see. How can we arrow this? Well, far this face here, maybe we don't need
it. I will be hidden. You can grow a selection two time and hit F to
delete the rest. Let's select these phases here. Let's select those over here. State those. In those faces. Now we
just selected this side. Maybe we can add this side
as well to the selection. Now we just controla just
one time and loop and maxim. Let's see the result.
Do we have any problem here? We don't see any problem. What about this area here? I think I can add one
seam, goes like this, and don't forget to
select this side as well, it can drop just one time and loop seam to add the same here. Now we just add the
seam right here and if this opened this area, it will be a little bit long. Maybe we can add the same
right here to make it. Maybe we can select this
here. And add sim here. Or I think that's not going
to work. Maybe one sam here. Hit A and here hit twice to rab this and let's
see what's going to happen. We got this weird thing here. Let's see from
where we got this. Well, because of the seam here. So let's clear that. We don't need the seam, and we don't need those here as well. Clear seam. Let's add sim here. Let's see, do we have
anything else here? It A and here it u twice. Still got this weird line, let's see from where this
comes because of this area. So I think we can now select these edges and clear
seam A again, tie. Alright, so now we got this. But I don't know. Did we add the seam right here? This area, it's not opened yet. Yeah, it's not opened.
The scro those mark him. A, U twice. All right. We still got the problem. The scro this area,
as you can see, we have some weird connection, try to find out
why that's seven. Why that's seven. All right. Let's add sim here. Again, u twice to arab
it. That's weird. Here as well. Let's add seams here to this corner
and again you twice. Now the result is a
little bit better. Let's add checker, scale this, and let's see what we got. Is cool. Let's try to see if we can do. What are the?es? We got seam right here. We should get better results. All right. Something
we're having here. The rest of the umatry rapped correctly
without any problem, but this one here, it's
not a raped correctly. Maybe I can add the seam here. I don't know. Let's try to
see what's going to happen. Select the outer edges and mark those as and I'll click on this one and
clear sam from here. Hit A and twice, and let's see what's
going to happen here. Well, we still
have problem here. Let's turn off mi for now. And try to find out
why that's happened. All right. Maybe we can clear the seam from all of these area. Let's try to arab it and let's see what's
going to happen. Cut up all of these
edges and just go here and clear
seam, hit A twice. Okay. We still have problem All right? Maybe we selected. Yeah. We could bring back the same that
we got right here. All right, A, twice. I think that's not
going to work. Well, Something weird here happened this area. I
don't know what is it. Maybe we have double vertices. Let's go to the vertices, hit A and hit M. Merge by distance. We got
two vertices married. It A again, u twice
in the same scenario. Let's choose angle based, and let's see what's
going to happen. I think the same result
we got right here. Yeah, almost the same result. We don't see any difference. Well, maybe in this case, we can cut this geometry. All right? Maybe
we can cut this. Or maybe we can add egg
right here or lessem. On this side, maybe that's
will help a little bit. Alright, that's not helping. Let's go to the face, select
these phases one by one. Can trouble last a couple
of times until you reach this edge Lube C. A
again, Arab it again. Maybe we can cut it. Maybe we can add a cut here. Let's see if that's
possible or not. Now if I scale this and
make it big like that, you will see that we got
very noticeable distortion. Well, let's go back
to the Edit mode. And let's go to the left. Let's make some cuts here. I will use nol K,
activate the knife tool. Maybe we can make cut
goes like that first, or maybe let's see from
where we can start. A. Let's start from here, it C to cut through and
make one cut right here. Confirm it, and maybe
we can add cut goes like that or let's see
where should we put this? Hit K M cut goes
like this, maybe, it C to cut through and
confirm it. All right. Now let's select these edges. I'll click, grab this. Let's market this one
*** and market this one assem it A and twice to rub it, and let's see now
what's going to happen. The results now
become more cleaner. But we got a lot of seams, but we will go with it. It's okay. Let's
try to scale this, and let's see the
results. It's better. I had controls
that to bring this back and move on
to the next uma. Don't forget to
activate the Momoftro, I apply tab again, grab all the uma twice
to re rob it again. That's it. All right. So maybe this time
we can All right. Let's see grab this
geometry here. And let's see what's
vis what's not visible here. Isolate this. T to go to the edit
mode control or maybe we can add a here or we can maybe we can go to the front and use the knife tool to add one
A here in the middle. But let's check that again. Let's see what's
visible and what's not visible here. All right. So yeah, we can
delete some phases. I think we can do
that. Go to the front, for example, K to
activate the F tool. Make the cut hold, to hold, you have to make the
cut at the center, C to cut through and cut
this from the middle. Something weird here we got. All right. Let's do that
again. Go to the front. Use the knife tool.
Hit C to cut through, make the cut hold, have to make the cut at the center and
click and enter to confirm. Yeah, now is better. Can Troy to bevel this 22 like this and delete these
phases in the middle. We don't need them now let's
start rubbing this geometry. Well, go to the face
these phases in the front and those
here as well. And this one here. I select all of these faces, and it cant bloss
select just one time, and then boundary and mark. Now, we got here, and maybe now these corners, we can give them as we. Okay. And those here as well. And what about this one? Maybe
we can assume here or not. Yeah. If I rub this,
I got this side, it will be very
tall, so I'm going to make a charter by adding Sam. Maybe here in the middle, we can add seam by using the ni tool and M
cut goes there, hit Enter, and you can mark
these two edges as Sam. Hit A and here hits twice
to it. Add the checker. You can scale C if
you have any problem. We don't see any problem.
That's very cool. Tab, apply the
mirror, tap again, grab them all twice and the s. Let's move on
to the next one. Well, maybe those here. This hits like to isolate those and apply level,
leave mirror, or, maybe we can apply it
before you apply it, hit a U twice and a
rabbit like this and let's see the result
without doing anything. It's okay and acceptable. We don't see any problem. Well, that's mean
we can move on. Apply this, control a tab, para them again.
Now we got this. Those as well. Apply
the V a mirror, tap it A, U twice, and they re arru. That's okay. I think we got problem
with the scale, control A apply scale tap
again twice to rearra them, I checker and move on. Those maybe we can
grab them, tap it A, or before you tap
apply v mirror, tap it A twice and rub them. A checker, if you prefer. We got problem with
the scale, I guess. I think we've got a problem with the scale, Ctrol, a scale. Tab again, rearra them
U twice, and that's it. What about this umetry? Isolated. Let's see
what's visible? What's not visible. Let's
start raving this one. Tab, go to the face. Let's start selecting. Let's start with those here, I guess. Select all of these. Ct plus c time until you
reach this boundary mark. At seem here, that's very cool. At the other side, you can
use MR. We can do that. Now let's start selecting
these edges here. Make sure that you select those here as well,
don't forget them. Let's mark those as a seam and mark this one
as a Sam I'll click. I'll click here and mark
this as a seam here as well. Okay, and those here. Let's add him here and
those as well as him. Okay, go to the face again. Maybe we can select those
here. And even those and those over here. All right, select all of these phases can drop
last just one time. And you can add those here, if you prefer, it's
okay to add those here. But make sure to select these two ph or four
phases here we go. All right, that's very cool. Well, now can tro plats
selection just one time and this select those here. Okay. Let's check the rest. We don't need those as well. All right now, boundary and sm. Well, now let's see
what's going to happen. But before you anything
select those over here. Right. Let's focus on this one, can top last couple of
time until you reach this age Lupe S. Now, it A here, hit you twice. I check, scale this,
make it big, kick it. I don't see any
huge problems here. I can accept this. We got some distort right here, but this area it will
be hidden. It's okay. I can move on. Tab out. And I think that's it for this video and see
you in the next one.
117. 117 Unwrapping section Starting with the bottom parts UV unwrapping part 3: Hello, again, welcome
back. I just forget to rob this cylinder. Let's isolate it, and let's
see how can we rob it? We have bevel up lights. Mirror, let's leave it
for now. Tap the it mood. You just need to add maybe
18, maybe right here. Or maybe here, anyway you
like and convert this to Sam, it A here, hit twice. And that's it. A
takete, map and done. After that, apply mirror, tab again twice to
rob them together. Okay, now let's excite and we done with this. Okay.
What about this one? I think I'm not going to re arab this because I did that here. Let's go to the
left. Hit **** end. Let's take a C. Let's
put this CV right here. And let's select this
one and delete it. Let's work with this.
Or maybe before you delete this, let's see what? What I can do. Oh, yeah, I will delete it, and
I will rescale this. But we got a problem. The Ogon dot is not in
the center, right click. Se Ogon to the geometry and then has to scale it and try
to mot it in the center. Let's move this a little bit, maybe right here, and then
S to scale this again. Al right now we got
it. Well after that. Now maybe we can Ar I will
tap the moot and go to face, cut up all of these faces, and he can move those
inside, maybe right here. Something like that.
That will be enough. And manually, the same thing you can move those boots right here. What do we can use
Mo Modifier and D. What about this metro here? All right. It's
like to isolate it. Kick. If you have any
Modifier, we don't. Tab, and let's see
how can we rob it. I just need to add one seam
here and one seam here, and that will be enough. Okay. Let's add him here to cut this whole area
and see him here as well. Now hit A, here, hit
u wise, and done. At checker. Everything
looks fine. Go ahead. All right,
this geometr here. Tab and let's check it. We don't need to
do anything here. Tap Awe, and done. Checker. That's it. Let's move on to maybe
with this, maybe? Slide to isolate it and tub, first check the modifier. We don't have any
modifier there. Grab the site, can
rob us just one time, convert the loop and mark seam. And what about this area? Maybe we can grab those grow
the selection until you reach this edge and loop and then seem to
add seam right here. Now let's scrub the sites, and maybe those here as well. C trop at just one time
and then Lu and Sam. Well, what about this area here? This sam we don't need it. All right, but we
need to cut this one and the same thing. This sam, we don't
need it as well. Let's mark those as S. What about this area?
We got the sam here. We don't need but we need those to cut this site
and the same thing here. Okay, I think that's
it, now we can rob it, but before we do that,
let's check this area. Do we need seams here? Well, I think we can
ignore the seam here. Let's try to ignore it and let's see what's
going to happen. Clear seam from here and
clear it from here as well. The same scenario for the site. Okay, grab this one and
this one clear seam, the same thing for the side. Grab this one with this
one and Clear seam. Hit A in here, hit you twice. I checker, scale it. All right. It looks fine for me. I don't see any problem here. And distortion,
everything looks okay, I can accept it,
and let's move on. What about those here?
Tap it A, u twice. I checker, move on. Select those tap it a u twice. I checker, move on. Grab this slash to isolate it and tab Let's go to the egg. Maybe we can add s start
from here and goes here. Mark Sam and the same
thing for the side. All right, Mark Sm.
Well, I think that's it. Hit A here hit you twice. I checker, see the result. It looks fine. Very cool. Move on. All right. What about those here? Let's see what we got here. Okay. Let's tab, we
have bevol alight. Keep them of now. Grab this edge,
hold control crab, this one to select these
edges between and Markm. Let's focus on
this area as well. Grab this one hold
control clove this. Mark Sim, let's go to
the sit right here. Grab this one hold control
c this one, Mark Sim. And this one as well. Mark Sam and add Sam right here as well. All right now, not
about those here. Th I can cut this
and add one here, it A and here hit u twice, and I think it's
done. That's right. Now, apply miror tabg and
hit A, and that's it. Let's move on to what
to this g eumetry. Okay. Well, let's see. Can we delete some faces here? Because we don't need
all of these faces. For example, this area here, I don't see the inner faces. That's mean we can delete them, I guess. I'm right? All right. Let's like to isolate this geometry,
and let's t the Edmond. Let's select these faces, and let's see if these
faces are visible. Before we do that, do we have any problem with
the geometry or not? Apply the vol Tavia
and see check it. Well, I don't see any problem. Yes, I have bad here. Maybe by adding weight normal, I can fix it and then apply it. All right, check the scale in
case we got a problem with the scale or x y z
one, that's okay. We don't have any
problem with the scale. Now, tab and go to face, and let's select these phases, and let's see what's
going to happen if I delete these
faces, all of them. A light to excite. These faces are not visible. Well, that's mean you have the green light to
delete these faces. That's very cool. Okay tap out, go to the mirror and
apply mirror tab again. With these phases selected, just make sure that
you don't select the small curve here of the
bevel. Select the phases. After x F to delete it. And here, we just
forget to delete those X F. T that's it. Let's excite, and let's
see what we got so far. Well, we don't
have any open area that's means we are good to go. After deleting these fases, now we are ready to aro this, Iolate the umetry and let's
see from where we can start. All right. Well, maybe we can select these
geometries here, and maybe those here as well. All right. And now just hit
control plus C time until you reach these edges and us boundary and seem
to a seam here. And let's see what
else we can do here. Let's select these phases. It control plus just one time. All right. Now
boundary and seam seam here to open this area. And I'll click to grab this entire aube control
plus a couple of time until you reach those
and let's select these faces as well here
and those over here. And maybe we can can throw las just to grow selection one time and manually add this face. And I guess that's it. Choose boundary and mark sim. The same thing for the site. Let's select those or
maybe I'll click here, can throw bla couple time
until you k these faces, and manual add those here
and add those over here. Can throw bla just one time
and man will add this one. And ick the corner here, maybe we need to add
those here as well, and Boundary and seam. And here, I guess we can
delete these seams, clear seam and add one here. Or I think you don't. Or let's add. All
right, that's it. What about the rest? Grab
those here, grab those here. I guess can rob
las just one time. And let's check what
else we can pick. Manual let's grab this face and this phase over
here and boundaries. Okay, that's very cool. Now, let's sit like
these faces over here. Go to wire frame and manually
c up all of these phases. And then you just can't
trop last one time. This select these phases
here and those here. And now maybe we can use
boundary and add Sam. Sound and then Sam. I get that's it. Well, now let's see what's
going to happen hit A and here hit you twice.
Now, we got this result. Let's either checker,
scale this. All right. We got nice results except for the sit here
and the site here. We need to find a
solution to them. Let's try to find a
solution to this area, and let's see where
that's happened. I'm not quite sure
why that's happened, but maybe if we add
some edges here, because if you make
some conversion between this area and this area, we've got a lot of edges here, but here we got big faces. Maybe we can add some
edges goes like that. Maybe that can help
to fix the problem. So let's use the
nif tool, hit K, and maybe we can make
a cut goes like that, and maybe hit K again. Maybe we can make a
cut, for example. Maybe we can go to the
vertex mode first, hit number one and use
the knife tool again. Hit K. Let's make some
cuts caused like that. Maybe K again. All right, maybe another cut, I don't know, maybe
goes like this. After that, I can e crop this vertex and the ket wise and merge it
with this one here. Okay, maybe we can use NF
tool to make cut goes like this. Something like that. As you can see the UV, these cuts I'm adding right now, the affecting the UV. All right. And maybe we can add
cuts. I don't know. One cut goes like that, maybe something like this. All right, Let's check the
cuts that we added here. Everything looks okay. I guess. Now let's hit A again, hit twice, and
let's rearra those. I think now we getting better
results here on the side. And you can make some
comparison here. Can see when we added
edges right here, we got better results. But here we still not, so we need to do the
same thing for the side. You can do that again here. Or you can use mirror Modifier to mirror
this on the other side. You have the two option. So I prefer to use
mirror Modifier, but let's ers activate wire
frame to see what's going on. Okay, Add mural modifier
and activate bicect. And I think that's
it. That's very cool. Apply the mirror. But
before you apply, just kick the area
here in the middle because sometime when this
structure become big, it can merge these vertices
because they are very close. So it's very important to kick this area everything looks okay. I will apply the Mural modifier, and now as you can see,
I don't see any problem. Now, when you tap the mode, hit A and hit rub,
and now it's done. As you can see, now,
everything looks fine. So just keep in your
mind when you rub, if you got umetry like
this, for example, and here you got a lot
of edges and cuts, and this area doesn't try to add cuts here as well
to get better rubbing.
118. 118 Unwrapping section Starting with the bottom parts UV unwrapping part 4: Hello again. Welcome back. After finishing this geometry, let's move on to this one. Selected and let it
select to isolated. Here we have I will turn
off mural temporarily. We have these lines. We can fix those by adding
shading smooth. And if you do that, you
will ruin the geometry. You will ruin the
shading, I mean. You can fix that by adding weight normal
and apply it troll. Now, tap to the eight mode, and let's see what we can do. Here, this area, we
don't see bubble. I will go to the edge and
select this one control be less bubble it 23 edges here, and I need to add another got normal because I made some
change here, end up light. After that, tape the mode. As you can see here,
we got big face. Let's add some cuts
cos like that. To get better result
when Uv rove this area. Go to the vertices first
and then use the nF tool, and let's start adding
cuts like this. Something like this. After that, confirm
all of these cuts. All right. I'm not going
to add with normal now. After I finish
everything, I will add. Let's see what else we can do. You see these vertices. It's wrong to leave
them like this. We just need to add
some cuts go like that to support these corners. Hit K to activate the F tool and let's grab these vertices. Use the F tool, hit K, and let's make cut
gods like this. Cut goes right there, maybe. And here, maybe we can
add cut goes like this. And here, confirm all of that. Let's enter, and
let's do that again. That's very cool, and here
as well the same thing. And here as well, that's very cool. Maybe we can add cut cos like that here. Let's check this a let's
see what we got here. We got some edges we don't need. You can hit out click and
and it to dissolve them. I don't know. Maybe deleting
these edges some problem. Okay, let's go to the face
and before we do that, let's check if we need to
do anything else here. All right. It seems
like we are ready. So let's start with
these phases over here. Maybe we can select
those phases, and we can the
selecting a one time. I can troll plus. And let's
see what we got here. It's very important to
select these phases as well. All right. And maybe this one. In these faces here. I'll write those over here. After you select all of these, then you can choose
boundary and mark. Let's delete this seam here because it's strong
to leave it here. And grab this one and
this one and this one. And what else? I
think that's it. Or, sorry, Maybe we
need to grab this one. Yeah, we should add asm here. It's important to ads him here. We got those. Let's
go to the face again and let's select these
faces, all of them. Let's select those over here. Had contro to cross selection
and select this face here. And select those here. All right now, let's
choose Lube and Maxime. Maybe we can add
sim here as well. Like these faces here.
And maybe the space here. Let's choose Lube and Maxie. Okay, Let it controls it. Hit cantro last just one time, and then we grab these
faces here as well. Let's select those here. Now, maybe we can add seam, so let's choose
boundary and maxim. All right. That's very cool. Well, now we can maybe sub
this area by adding seam here. Let's extend the seam here, drop those and mark, and here, mark. I. Now hit A and here hit U twice. We got the sub H. Let's
see why that's seven. A comes from here. Let's see clear the same from this area. I didn't notice that. Let's kick and this
one we don't need it. All right. This as
well, we don't need it. This one, Mark Sam. It
A and here hit twice. Let's add checker
and let's kill this, let's see, where's the problems. We got this s in here. We need to fix. So let's add Sam right here and one
seam here in this area. It A and twice and re this. Let's see what we've got so far. Maybe I can add Sam
right here, is it here. Let's those mark it A
and here hit twice. We could add seem here as well. A and D tie. Can as check the checker. We got problem right
here at this area. Let's see why that's
something we're having here. We got a connection here. I'm going to select these edges and let's try to find
them right here. So I'll cup those
Mark SM A and D tie. I think now we solved
everything, I guess. You can scale it, make
the checker small. That will help you a little bit to see if you've
got any problems. For now, I don't
see any problem. That's mean I can't move on. All right it controls that, tab, and let's add
weight normal. And by the way, activate
mirror and apply tab A, wie again, tab out, add weight normal, apply. Now it's become
clear. All right. Let's move on to
this metre here, and we still have Mo moodfier, and let's turn off
temporarily tab, and let's see how
can we do that. All right. Select these faces. He can drop just one time. And let's mark here, L a seem. U n tool. Let's make
cut goes like this. And let's add SM here as well. Hit A and here hit twice. Let's checker and scale this up. Let's see what we've
got here so far. All right. Let's hit to exit and
let's grab this one. Hit tab and hit checker and ts. All right. What about those here? Let's grab those over here. Tab hit A and hit ut wise, and I think that's it.
Yeah, that's okay. We got a little bit
destruction right here. Well, it's not difficult to fix. I will apply the
wall and tab again. All what I need to do here, just adding Sam here
to open this area, it A wise and that's
become better. Let's check. Maybe here as well, we can add Sam at this area, and I don't know,
maybe Sam here. It A and here hits you twice. What about this era
here? It you twice. All right. I think
I will ignore this. I got some overlapping
right here. Well. All right. I
will separate this. I can ignore it, but if you want to send this
to another software, sometime that's
causing some problem, and we don't make
any problem here. So let's this as after you
choose the boundary loop, it A and twice that's it. Okay. Something like this. Tab out and very cool. Apply mirror modifier, tab A, U twice, and three robes, and let's list ites. Let's select this, metre here. Apply the, grab these edges. Let's grab this right here. All right, that's very cool. Hit A and here hit
twice, and it's done. Now you can add a checker. Apply Mor tab again, rob it again invest it. Let's move on to what? Maybe this one right here. Okay it slash to isolate
this human tree. We don't have any
modifier right here. Now we can rob it
before you do that, just make quick cuts gos like
this to get better results. Something like that. Maybe we can I don't
know. I think that's it. We can accept this result. Go to face, grab all
of these phases. It can trouble to gross
selection one time. Before you do anything, check this area and kick this
now boundary and max. Okay, what about this
side right here? Now, go to face
select these faces. Grow selecting a one
time boundary and maxim. If I rub this, I will get very long build comes from here. I need to make some
cuts here or here, just to make this shorter. Like adding seam
here in this area, not here in the middle and
maybe one seam right here. And one seam right here. All right. A it, we got a problem
with the scale. If I open this and go
to Tol s its tab out. I can see that I got some variation here in the
scale. There could be one. Control I apply a scale tab
again twice, and now it's A. Add the check check it. I don't see any
problem. I can move on. All right. Where should we go? Maybe I can start with those right here. Let's start with this piece. Let's see what we
got right here. Tap, it's a u twice and
rabbit eye checker, scale it, and let's see
what we got so far. It's okay. I can't accept it. All right. That's it. Hacker if you like. Let's move on. Let's see
grab this geometry here. Let's see what we
can do with this. Here we have with normal. We don't need the tab. Go to face and let's select
some faces here. All right, grab those.
Select those over here. And yeah, least those here. All right. I can row. I don't want to select
this one. I will choose Lupe and seam. Now we just add the same here. Well, this seam right here, I think we don't need to add it because I will these fas and
I don't like to sub them. Let's clear from this area. You can go to face it click and grow selection two
time and clear seam. That will be faster. That's very cool. Now we got the seam here. Maybe we can add
seam here as well. The seam here is
not going to work. I'm going to clear
it and c this one with this one and ads here and the same
thing for the side. That's very cool. Mark here, and I
think that's it. Maybe we can add to cut
this to two pieces. That will be better. Now it A hit twice and
let's see what we will got. I check our Scalett see the
checker what we got so far. Well, I don't see until now. I don't see any problem dist. We got very subtle
distortion like this a here. We got something happened here in here as well
if you noticed. Well, Let's add a
cut goes like that. Maybe that can affect
the U V to better. Hit A and u twice, S and scales, and C what we got. Well, I think I can dissolve it. Hit A again, twice,
S and scale this. We still getting something
weird having here. Well, maybe by adding
one A, goes like this, maybe that will help
to solve the problem, so I'm going to with K and C to cut through and
cut goes like that. Let's try to add another
cut, maybe goes like this, and let's see if that
can fix it or not. Hit A and U twice. S Klete. That's fix the problem
just a little bit. Let's see if we got
another problem. Maybe here we can add some cuts as a support
for these corners, and here as well. In one here. Hit you twice to rearra this, kill it, and now we got
patterism. That's very cool. So I think I will accept this and I can move on
to the next one. But I will end this video here and see you
in the next one.
119. 119 Unwrapping section Starting with the bottom parts UV unwrapping part 5: Hello again. Welcome back. Let's out of this geometry now. Let's isolate first. We don't see any modifier
here. Let's move on. Tab and let's select some
edges to convert them. Okay. Let's move to this one. Hold control, select
these edges and Sam and choose those and hit
Q and Q Sam. All right. What about this area here? Well, in this case,
let's see what we can. I can add edge right here, but that's not going to
work because this area, we need to cut as well. If you do this, you will
got some overlapping, it will be like this. When you are b it. So I think it's better to
cut the whole edge. Maxim and like this
one. And maxim. Maybe we can cut this
from the center as well. All right here, two twice, and acids. You can add checker. We can move on.
This is got solid. I don't see any problem
with the heading. Just this uma tree. Maybe we can add with
normal again and apply. All right. Maybe we can
now rub this, let's add. All right, let's see
what we can add. Ha this smooth, maybe. And hit A and U twice, and it's rub a hacker
and let's move on. What about this one? We already rub this piece right here. So I'm going to hit D to
take a CBA from those. And I think All right,
let's see what we can do. I will hit right click
set organ to the umetry. But that's will
affect the mirror. Alright, I will
delete the mirror, and I will delete everything. Let's select this one and
let's go to the left, for example, hit key to move this and let's try
to put it in the center. You can select this umatrn and
have S coorst selected and then select those H S
selection to three d Corso. Okay, now we need to
scale it a little bit, so H S and scale it. All right now the
size, it's okay, tap to the edit mode and grab the side and move
it out like this. And let's make somewhat
taking to this side. Let's grab these edges and key and move them
like this inside. And this geometry,
you can't delete. We don't need it anymore, and we need to do the same
thing for this one. You can delete, if you prefer. F and deleted, and you
can now mirror it. So let's select this geometry, and I will use the
position of the organ dot. Okay. So H S and
corset to select it, and then select
this one radically organ to three D Corso. Now I can use miro
Modifier to mirror this. But because we did
some change here, I will hit tab and A and
u twice to re arrive it. And now it's ready.
Tab out, add mirror, modifier, apply miro Modifier, tu again hit Au twice and done. Okay. Now we got this
geometry right here, apply vl and leave
mirror for now. Let's see what we
can do with this. I think I can isolate it first. And let's select this space, control time, gross selection
like that, select the rest. Okay? We got these face we
need to select as well. Or actually, it's easier for me if I select
these faces first. And it can tro couple of
time to select the rest. We go the selection just 11
more time and there we go. Now, choose boundary and seem. Let's add seem right here and maybe seem
right here as well, it A and here, u twice. All right. Let's see
before and after. I think it's already
rubbed or not. That's weird. Let's
rub it twice. That's not going to work. So I need to sul those, I guess. Let's select those faces. Can't throw bls. And select these
faces, as I did here, loop and seam, it A, u tie and it. Let's check her. Scale it. K the distortion. I don't
see a huge distortion. I can move on. We got a little bit of
distort right here, but no one can notice it. And if you want to get
rid of that distortion, you need to add more seams. And you got the idea. So I think that's
it for this piece. Now you can apply mirror
and tap again, it twice. Acids. Let's move on
to the extremetry. What about this one right here? Maybe we can CVI this, d z, take a CV here, and
tab D the side. You grab this one, right
click it organ to cmatry. Rotate this to the Y axis
R rotate this 90 degree. Minus nine degree. Now
let's slate this one, have to S courser to
grab this selection to coarser and scale
it just a little bit. And delete the old and
there we go lasses. What about this? Let's
start with this one. Okay. Let's tap it mode and let's
see how can we rove it. I will turn off Mo for now. Let's start with this phase
gross over here, maybe. Maybe we can add the seam here. Yeah, let's add sam here, chose boundary and Sam. Maybe one seam right here. Sam. And what else? Maybe we can
add Sam around this area. Mark Smtend the same here. The same thing here. Okay, let's see what else we can do here. We can add seem maybe right here and maybe seem right
here to cut this to two pieces like that. What about adding Sam here? It's important, I guess. And adding seam right here. All right. That's very cool. I think this area
should be beveled. Let's use the nf tool and
let's cut this there. Now we should be. Let's
bivle this 23 edges. Like that. All right. That's very cool. Now, I think I can a rub it, so tap it A U twice. A, this piece become very long. So I think I can select
these pass, for example. Or maybe it's
connected from here. Yeah, that's right. It's
connected from here. Let's go to the edges
and add seem here. And again, and a rabbit, twice. Here, we got connection
as well on the side. Let's trap those and
Q S A and twice. Oh, that's very cool. Now I will apply the mirror, tab again hit A, U twice
to rerab them again. Add checker, scale them
just a little bit. Kick the result. If you
see huge distortion, re it, I don't see huge
distortion. I can't accept it. After that, I will add weight
normal to fix the heading. Now the heading become better and apply the
modifier after that. All right, let's
select this one. And I just want to see what's visible,
what's not visible. Well, maybe we can
apply urop now. We have faces over here, are not visible. We
can delete them. So yeah, let's hit
sh, to isolate this, tap to the edit mode, go to select these
faces over here. And maybe this one here as well. Rob them all like that, it X F and delete them. We don't need them. A. Okay. Let's see what's happened. I don't see any problem. Everything looks okay. Let's start rubbing
this geometry, and let's see how
can we do that? We should do the same
thing for the side, by the way. So grab those. Did we grow the selection? We don't. Okay.
Select these faces, F and delete them. Okay. Now, let's start adding some edges like adding
some s. I mean, maybe here and cut
this one from here. Maybe we can add seems there as well to make this shorter. Maybe seem here as well. And seem here as well. And select those
and let's add sm. All right. What else?
Maybe we can add him here. Alright, that's
not going to work. Or maybe we can select the specific edges and add him here and maybe
see him here as well. I should select this one as
well. What about this area? Let's select this edge. All can grab those until you
reek this area and add them. The same thing for the site, starting from here, selecting
these edges and mark. Now we done what
about this area? Let's see what we
can do with this. Maybe we can select
these faces now. And, let's see.
How can we do it? Can row plus g
selection one time. And maybe we can change
this to boundary loop and maxim to open this area. All right. What about this area over here? Let's select these edges, and maybe we can add seem here. Yeah, L's select
those over here. Maxim and select those
over here and Maxim. The same thing for this side. Select those here, and Mark. Well, maybe we need to
add one same right here, just to cut this 22. Right now hits A and
here hits twice, and it's a rot. But let's see if we missed anything because I noted that
I got something weird here. And maybe by adding same
right here, I can solve it. I think we could add
same right here. So let's se these edges
Sam and those over here. Hit A and here twice
to re arrab it. Now, we got this result. Let's see what's
going happen hacker. All right. I don't
see any problem. That's okay. We can move
on to the next metre. And I think this one,
we have sit like this. Okay? I think we just
need to maybe add on sam right here because
it's a little bit tall. So maybe adding sam
here to cut this 22. That will be enough hit
A and tie and done. A checker, it's very cool. Move on. All right. Well, maybe we can
edit this geometry and cut it. It's a little bit. As you can see here, we
got a lot of area here? It's not going to be
visible to the camera. You can cut this from here and delete the
rest if you prefer. But now let's move
on to this one. Let's see what we got here. Did we even give this a bubble? I think we didn't
give it a bubble. Do we have any bubble
here? Anywhere? Yeah, we got bubble here. Let's copy the bubble from
here to this geometry. Select this. Hold
here to grab this. Go to the bubble.
Copy to select it. Now select this one
add auto smooth, kick it before you do anything. Apply Bole tab, go to face. I'll click, grab these faces, X, delete them because they are not visible to the
camera, I guess. Yeah. Tab it A U twice done. Tells you, you need
to correct the scale. It's easy, tab. Control a apply scale
to again U and U twice. I checker and let's move on. Let's select this geometry, isolated, and let's see
what we should do here. All. Let's start to the edge mode, and Let's select this edge, go to the edge mode fs. Let's target these edges.
And those over here. Sorry, and to see. And let's add seem here as well. S. All right. What else? Well, let's see what
else we can do. Maybe we can cut this from here by adding
seam in this area. And don't forget to
select those as well. These small edges. Maybe we can cut it, I don't know, from where maybe. Let's try to find a way here. All right, let's cut this one. What about this area? Let's select the
the selecting just one time whose
boundary loop and. Let's add him here.
That's very cool. And this edge over here at. And you should select this edge as well. Okay. The same thing for this area, I can select those phases. I cant row loss just to
grow selection one time. And let's see what we can
do after that. All right. Let's choose boundary
and then Q C. Okay, I will ara this. Let's see what's
going to happen, it A and here hit you twice. I check her. It's very cool. Let's move on. All right, I think now I can end the video, and we got a lot of
geometry to work with. But we will combate all of these in the next
videos. So see you next.
120. 120 Unwrapping section Starting with the bottom parts UV unwrapping part 6: Hello, again. Welcome back.
Let's select this one. And let's a rob it. I don't have a bible here. We can cob it from this one, CV to select it, and then maybe we
can add Ot Smooth. It's already there. No, it's not activated, and then apply. And then tab go to face
three, these phases. We don't need them because they are not visible to the camera. XF and tab A U twis we got
a problem with the scale. Tab control A apply
scale, tab again Uwie. Done. A checker, move on. Maybe we can select
this and isolate it. And maybe we can delete
these phase in the middle. So let's see how can we do this. Tab, control r1h right here, Ctrol be bevolt like this, and then these
phases delete them. Very cool. Well, now you can hit A and here you can
hit U twice to a checker. Everything looks okay.
It's acceptable. Let's move on to this one. Here, you don't need
to do anything, apply scale in case, and then U twice and a rabbit. A checker. That's it. What about this one right here? I think we don't have
any bubble here. Let's COVID from here. COVID selected, can
troll I apply scale, add autos move to this one. Can apply bevel tab, let's go to the sorry. Go to this edge over here. Well, actually,
here we have faces we don't want those
XF and delete them. And all what you need to
do is adding SM here. Sorry. And add SM right here. Us it hit A and u twice, and its will be roped. Add hacker. Very cool. Move on. Let's select this geometry, and let's see what's
visible, what's not visible. I will accept the
whole geometry. Turn off uro for now. Let's try to find do we
have any problem here? Well, everything looks okay. So now I can start
with these faces, select them all like that, and even you can crop
those over here. You can trop just one time
cross selection loop sm. Okay? All right.
That's very cool. Got to face again. Let's
select those over here, these faces, and control Blas, just one time Loup SM. Okay. What about those here? Select them, H cantl
blocks just one time. And Loup Marks. Grow selection just
one time loop seam. Let's add seam here,
and that's very cool. I just I add seam right here because this
geometry to be very. I just needed to cut
from the center. Even this one actually, I should add seam right here. I think that will be better. All right now hit A
and here hit wise, and I think it's done. I don't see any history in
everything controls it. Before you do anything, activate apply i and bits. Let's move on to this geometry. Okay. Let's see what
we can do with this. We got some hidden
faces, I guess here. Well, I can delese some
faces if I want from here. I like to isolate it. I don't have any modifier, everything ready. I guess. So let's see from
where we can start. Let's select these faces here, and maybe those let's see
grow selecting just one time and s boundary
and let's ad sm. But yeah, that's cool. I don't have any issue here. Well, the same
thing for the side, select these faces, can
Trow plus boundary seam. What about these faces over
here? Let's select them all. C row plus boundary
seam as well. What about these
faces over here? Can ross one time boundary seam. Maybe now we can rob it. Its A N U twice. I checker. I don't
see any problem. Tab outs, move on. Well, maybe we can rub this. Apply scale, far tub A, uwize. But apply mirror. I
think that's better. Tab it A, uwize. It's ru. Let's move
on. Sit like this one. Apply scale in case
we go a problem. Tab and let's see what
we could do here. It's weird, this object. I feel that we could
move this edge, and let's move it over here. I think that will be better. Let's go to the
bottom view and maybe we can move these edges just
a little bit right here. And even we can I click
and hit control be to bole those 23. That
will be better. Even this area control and give it a little bit of
bvling. That's great. Now let's select some faces or let's select some gas
maybe this one here. Let's add Sam here to
open this from here, open the seam, and
the seam here. What else? Maybe we
can add sem over here. All right. And one sim here,
but I will delete this one. I think that will be better. Now let's ad rab it
and let's see what's going to have it A U twice. It will be bit like this, and that's enough for me. Let's read rob it again
after applying mirror. Now we can move on to
what's to this one. We still got mirror,
a scale in case we go a problem and like
this phase over here. Well I guess I can
add one here and one s over here. Okay? And sorry. I think we didn't add this
him here. And even here. Okay? Let's add him here
and once him over here. And this ge, I think we can hit control B and bev
it to two to three. Okay. Now we can tap
A and here twice. Let's see what we got. Well, the result is not cool. Maybe I can add one
sm here as well. That will help a little bit
to give me better result, it Arab it again. I still getting problem
somewhere here. I don't know where is
it right here, maybe. Well, maybe we can as seem here, just to help to open
this area A and D twice. That's not going to
happen, I don't know y. Well, in this case, maybe
we can extend the same To reach this area
and add seem here, A and here a utize. Now everything looks okay. Apply Mural tab again utize. Let's move on to
the next cumetr. This cumetr, I guess. We can isolate it tab, and maybe we can select these edges and
convert them to SM. I guess we can open
it from here as well. And we can I don't know, open this area and open it from here and add one m
here and one sm over there. It A and here hit twice. A Kicker looks fine. Let's move on. Well, what
about this one over here? Tab and let's go to face, select some faces, and maybe we can select
those over here. And even those control blasts just one time to grow the selection and
ose boundary seam. All right. What else?
Okay. Let's select these faces as well. Okay, select those. And
select those over here. Grow selection just one time and loop and seem to
add sam over here. All right, Let's rub this. I think it's ready. Let's
move on to to this one. Okay, I think we can add
here to open this like that. All right let's start from here. Adm here, and here. All right. I think that will be an Fit A, u twice, and it's ru. I guess apply murror, tab again, Arab this again. And I'm not going
to ra this one. We already did that. Let's select this
geometry over here. Isolated. Let's hear
from where we can start. Go to face, select these faces. Let's seg selection just one
time and diselect this edge, this face, I mean, and
choose loop and seam. I just forget to diselect
those from here. Diselect them like that
and let's add one. Let's select this edge
and choose Maxim. Well, that's because we could diselect those
over here as well. Let's do the same thing here. Okay. Now it's correct.
Let's move to this side. All right this side, we
don't need to do anything. Hit A U twice, they
will be rubbed. Just like that. Finished. All right. Let's move on to
this um right here. Well, I don't need
these faces over here. They are not visible, I guess. And we didn't gave
this bible, I guess. Think we didn't
give it a bubble. Yeah. Well, let's select
this one. Hold here. Maybe we can co
bubble from here. CV to select it. And these faces at the top, we don't need them.
X F delete them. And not else. All right. Now let's check the um before we do anything. Just this one. Do we need to add
support egg loop? Well, maybe we can add one
egg right here as it supports and maybe one here
and one here as well. Now I can apply bevel or it tells me that I should
activate auto smooth. After that, apply
the bevel modifier. Now I can tab and see
what I should do here. How can I rub this one? Or maybe we can start from here by selecting these phases, selecting just one time,
loop Sam to open this. Maybe we can now select
those over here, g selecting just one
time and use loop Sam. Maybe now we can select those
over here. These faces. C robs just one time, grow sel loop and s. Maybe we can add one edge
over here and one edge here. Okay. What else? Maybe
we can I don't know. We could add see
maybe starting from here and goes up and this one, I think I can delete it. Clear the s. This area will be connected. Okay.
That's very cool. Hit A and here hit you twice, and let's see what
we got so far. I check our scale this, see it. Do we have any
distortion, anything bad? Well, I don't see
any problem here. Well, I can move on
after I apply mirror, re rave it again in the assets. Well, by the way, these phases are not visible.
These pass right here. You can delete them
if you like, F, and you can delete this age, clear clear seam clear
seam from here as well, and clear the seam from here. And clear this, and clear that. All right. The same thing for the side, select those can trobus and use the clear seam first
and then x f to delete them. Sorry, I should
not delete it from here after you clear the seam, minus to shrink it and then XF. That's faster. Now hits A and re it twice, and now it's rub. Let's move on to this geometry. I don't need to
do anything here. Apply or tack a and Arab it. I checker, move on. What about this one right
here? The same sing are you? We got these edges
a little bit tall. I'm going to grab the side
and the side G twice, and let's take those
down, maybe over here. I think that's will
be enough for me. Now tab it A and U twice. A rub it I check, move on. Let's like this one right
here. The same thing. I don't need to
do anything here. Tab. I got Mall tab
it A and U twice. That will be rub and it's done. I checker if you prefer. All right. So I guess that's it for this video and
see you on the next one.
121. 121 Unwrapping section Starting with the bottom parts UV unwrapping part 7: Hello, again, welcome back.
Let's rab this geometry, selected first, and
let's isolated. We don't see any
modifier, Taps mood. Let's try to check it in case
we need to add anything, fix anything. All right. We can start raving this. Well, maybe we can start
with these phases here. I guess. I can select
those over here. Maybe. Maybe we can I just want to kick this area,
see what we got here. All right. We got
double vertices here. I will hit A and then hit M to open the marriage
and marriage by distance. Here we have 13
vertices marriage. That's very cool. Okay. Now
they will become one vertex. I think we can make
some kin here, like using the knife tool, I cut goes right there and one here.
Let's delete this one. And this age, and
maybe this age, we don't need it. And what else? Let's go to the vertex, activate knife tool and make
that goes right here maybe. Okay, what about
those over here? Maybe we can drop those hit, make a connection between them and Okay Let's see how
can we fix this area? Maybe we can use NF tool. Let's connect those over
here and confirm them. Now let's start deleting
some edges we don't need. For example, these edges,
we don't need them anymore. Okay, what about
those over here? Maybe we can dissolve this one? Get wise, and let's
argue this one here. Grab this one, dissolve it, grab this one and dissolve it. We should have three
edges here at this area. Let's go to the vertices. Maybe we can grab this
one get wise and merge this one right here.
All right, sorry. This one we should argue it. Something like this. M
this vertex right here. We need another cut goes from
here and there like that. Let's grab this one
twice and let's this right here maybe, no,
that's not going to work. All right now we
got this result. After that, let's
use pur modifier to mirror this on the other side
and let's activate bicect. So on this side, we should
get the same result. Let's activate wire.
Now we got this. Something like this, apply
mirror and let's add weight normal to fix the heading and
now it's better, I think. It's still nice and clean. Now we can tab again and go to the faces and let's select
some phases to ad them. Maybe we can start
with those over here. These phases here, we can
add these phases as well. I can roblog one time to grow the selection. That's very cool. Now we can use boundary and
s to add seam right here. Let's see what else
we can do here. Let's try to rob
it and let's see what's going to happen it twice. This is the result that
we got right here. We need to make some
tweaking, I guess, like adding C right
here to cut this 22 and on the other
side as well. It A and here hit two
t to re arrow it. Now it's become smaller. Let's add checker.
It's looks okay. We can move on to
the next humetr. Maybe this one right here. Let's see what's visible, what's not visible here. We can delete some pas I guess. Let's isolate this humetre
after you've selected. And then leave the miro
Dota apply tap to mood. I think we didn't give this. We didn't give it above. So I will add bevel modifier, apply scale in case
we go a problem. B, I will give it 0.1. And a two and activate hard the normal and
give this auto smooth. Now, the result become. Now you can apply vl. And I guess now we can delete some phases we don't.
We don't want. For example, these
phases right here, okay. Let's hit to isolate
this geometry again, and tap the mode. Go to face. Let's see grab
these phases over there. I don't know, maybe this
one we can pick it. After you select all
of these phases, you can hit X F to
delete the rest, and those over here,
we don't need them. We add this space, X F. Now, let's like to see
what we got so far. Still nice. All right now
we can add some seams, and let's see
whould we add them. Maybe we can add just
one seam right here. A one here. Huge wise to rub it. Here we got some
overlapping happen here. In this case, we can
add the s here as well. Hit A and here hit
huge wise to open it. What about this one right here. Yeah, we can add S here as well. It twice to re ar rab it, and it's better now. I think now we can move
on to the next geometry. I guess I can rob
those tab A twice. I think that's it, or we
could do something else. Well, I think we need
to add some seams here at the corners. I seem here and one sim
right here. And one sm here. What else? On the other side, we need to do the same, but I guess we can use mirror
modifier to mirror those. So tab and select this
control L to link sel X F to delete
all of these faces. Well, maybe here we can add. I'm not quite sure
how this will work. Let's am, let's see
what's going to happen. It A and here hit two twice. Let's see what we got here. In this area, we got
some overlapping. Well, to avoid that overlapping, maybe we can cut this 22, or you feel like you
can accept this. Well, I think we can
add one here or C, A and u twice to re arrave it. That will help a little bit
to give us better results. No. I will select this age. I'll click and convert this
to Cam to cut this it twice, and now it's become two. A checker. That's very cool. Now we can use Mr modifier to mirror this on the other
side and apply the assets. Let's move on now and let's
see what else we can do. All right, rub this one. It's like to isolated. And we got the ball up light, and let's go to the edit mode. I think now we can rub this. Let's go to faces and let's
start maybe with those. Let's like these
faces, all of them. Okay, what else we
should pick here? Can throw las just
one time, maybe? Let's select those as well, and maybe we can all Maybe
we can add these faces. Let's grub them.
Manual like this. Maybe can row plus again
and Ds these phases, we don't need to include
them even those over here. Hold can troll and ds like
those and ds those over here. H can chose boundary and Sam. Now we got this seam right here. That's very cool. Maybe we
can add another seam goes here and reach this area. M sam to supp this. Maybe one seam right here. And on the other side,
the same thing to open this. What else we could do? Well, for this area, maybe we can hit control
to above this like that, maybe and hit XF to delete these face inside because we
don't need them, I guess. I don't see any open area
here. I can move on. Let's see what else
we could do here. How can I rub this? Can we add here in the middle? See what's going to
happen if I do that? Or maybe I can delete this clear sam and
just target this area. Just like that.
What if you prefer, you can clear this area
and leave the seams here. That's will work as well. Now let's see what's
going to happen, hit A and here it twice. I got this resolve
what we got here. All right, this area
is not rubbed well, let's scale this let's
see where the sortm. Yeah, they still connected
here in the middle wall. Maybe we can supplt them. Mark. These three rub it. Now we got another result. Here in this area, we can
see some overlapping. Let's try to find out where that happened. Let's
happen right here. Maybe by adding a
same right here, maybe that's helped
to fix a little bit. We still got overlapn
g right here. Maybe we can add
sam here as well. Let's rerat this, now it's
become open and here as well, we got the same
problem. All right. This area is a little
bit difficult, but I think we can
grow the s here and clear and then boundary and mark seam to
sublet this from the group. A and rero We got the same problem right here. We can do the same idea. We can select those. We go
the selection just one time. Clear the sam from here
and s boundary and marxm. U twice to re rab it, and now we're getting this. Scale this and let's
check the checker. I don't see distortion. It's okay. It's acceptable. I can move on, so
it controls it, go to slid and let's move. Well, maybe we can
start with this. Okay. Let's see what
we can do here. I think we can tab
and go to the edges, carve these edges in ewe and just slide those
right here, maybe. And maybe we can
select this face. Before you do anything, just make a quick cut goes like this. Now select these faces. Grow the selection,
just one time and Lube and let's mark those as Sam. Now we can maybe
select those faces. C rows just one time
and Lube and Sam to add seam here. What else? Let's select these
faces over here. Grow the selection just
one time and Lube and Sam. Maybe we can add one
seam right here as well. Or not here, I will add
here in the middle. Now hit A and here
hit you twice to a rab it. We got
seam right here. I don't want it. So let's clear the sea hit A and
re rab it again. Let's add checker.
It looks okay. We can move on. All right let's select those
here. Isolate them. I don't see any modifiers here. We can tap select
this face, this face. Selecting as one time or
two time and slope seam. After that, Well, I think we
can do something else like adding here in the middle and
use these edges as seams. Hit A and here hit twice,
and that's very cool. All right now let's tab out, and I guess that's
it for this video, and we just need to rub
those in the next video and maybe these object
over here, and this one. All right, that's it for
this video and see you next.
122. 122 Unwrapping section Starting with the bottom parts UV unwrapping part 8: Hello, again, welcome back. Let's rab this geometry, selected and hits like to
isolate this geometry. We don't see any modifier here, and we don't see any problem with the object. We can rub it. I will add Sam here in
the middle I mean edge, and then I will convert this to SIM. This is a fair thing. And maybe after that, we can go to face and maybe
select these faces. All right, before we do that,
I think we just need to add some cuts around this circle. Maybe cut goes from here to
here and from here to here. After that, it can row blast
to grow the selection, good phase, and now
we got this results. We need to add these
pass to the selection. Maybe we can select
those of right here. Let's select these fas as well. This one over here. All right now hit select
Boundary loop and then Sam. And now we got seam right here. All now hit a and hit twice
and's see what we got. Let's scale this just a bit. I don't see any distortion.
We can move on. It's. What about this one? Let's isolate this geometry, and let's tap the mood. Let's see from
where we can start. Maybe we can start
with these faces. Let's select them all like that. Corrupt them all like this. And let's select
those over here. Grow the selction just one
time and choose loop and Sam. Now we've got the
seam right here. All right. Maybe now we
can select the site. Like this, and grow the selction just one
time can row plus. And then loop and T. Now
hit A and hear and again. All right now it's rub and
I don't see any problem. We can move on.
Select this umetry, and let's isolate it, and let's start rapping this. Let's see from
where we can start. Maybe we can select these
in our faces, all of them. All right, select
those over here. I selecting just one time
and Qs loop and Sam. Something weird
here, L controls it. I don't know why these faces
I didn't select these faces, but I think we got
a problem here. Let's do that
again. Let's select these and our faces again. Can row loss just one time
and Qs loop and seam. Maybe we can add seam here and maybe seem right here
because if I rub this, that will be very tsp by adding seams here and
maybe one seam right here. Let's see what else
we can do here. Select these faces, maybe. All right, let's hit control
plus to grow a selection one time and loop and Seam. Here we got under seam. What about this side? Let's add some seams, maybe one here and
one here as well. And maybe one here
at the corner. And one here, or it A and twice? All right done. Let's
add checker, scale this. I don't see any problem.
We can move on. Okay, maybe we can
select those over here. Tap it A and u twice.
That will be Arup. We got a problem with the scale, tab control A by scale, tap again, let's re rob it. All right, Let's check
her. That's very cool. What about this one
right here. Let's be. Well, maybe we can be this one, or this one right here. Let's go to the lift.
Shift, let's say obe. Let's put this cob right there. Kill it. Grab this deletes, select this, hit key let's put
this over here. So scale bit. Move this out. Make sure to put
this in the center. And yeah, I think now
it's in the center. We just need to move
the chest a little bit like this, and that's it. All right now, we can tap and the grub the side and
the key and take this out. We can go to the back
of view and pull it, I will put this right here. You don't need to use mirror. That's will be enough. Okay now let's jump
to these objects. Let's start with this one.
Let's see what we have here. All right. Let's top
and let's see him here. And maybe I don't know.
Maybe see him here as well. The same thing here. A and twice, and now it's rut. A checker if you like. Lets select this. Everything is applied. I mean the modifiers. Now we can tap and go to
pa these phases over here. Maybe we can add
seam right here. So use boundary and mark Sam. And I don't know. Let's see what else
we can do here. Well, maybe we can add
here in the center, but that will be a
little bit difficult. I will use this here
and mark those ***. I'll click and Sam. Okay. I'll click
here and mark Sam. For now, let's hit A and it R, and let's see what's
going to happen. Well, is that I got, and this is not correct. I need to cut this add seam like this to help
blender to open it. Maybe we can add Sam right here, for example, go and
reach this area. And maybe the same
thing for this side, we can add another seam. A now hit A and here hit twice. We got this, but in our side, we need to do the
same thing for it. Let's select for example this ag and let's
convert this to Sam Let's pick maybe
this one right here. Mark seam, it A here hit twice. All we got this result. Le add checker, scale this
from outside everything. Okay, but we got some
distortion from inside. Well, if I want to
eliminate this distortion, I can add seams
on the other side here and cut these areas. O you can ignore it. So if you like, you can add seam here. I'll shift to click to
add these edges as well. Or sorry. And those over here. And now you can market them
as SM and you can open it. For example, you can a seem
right here to open those. Okay. Something like this. Yeah. Now hit A and he hit you twice. It's all. That's very cool. Now we can move on. Well, maybe we can
grab these cylinders, tape and pick these edges. And mark Sam it A and twice
to Arab it and checker. Let's move on maybe to these objects and tablets
add edges and mark them as m. H A and here
twice to a bit, and that will be
enough for this. What about this geometry? Let's see how can we rob it? Tab. Let's go to the edge. Let's add one sam cry here. And maybe one sam
goes like that. H A and it twice, and it's rub. And that's it. You don't
need to do anything else. What about this
geometry over here? Well. Tab and well. Okay, let's go to the face
and let's select these faces. And let's choose
boundary and Mark seem. And just delete one side. For example, let's
delete from here, and let's delete
this one as well. And the seam from here. And let's add Sam
over here and cut it, it A and hit u twice to Arab it. Now we got this result. If that doesn't make sense, if you want another result, you can, sorry, I think I
didn't add Cam right here. Let's mark sm. Hit
A and hit u twice. Yeah, now it is b. Let's
cut here, for example. It A and U twice. Now we got this. It's ra ready. Let's select this one. And he will have
level applied tab, hit control to a one right
here and mark this as Sm. It A and here hit twice, and it. I will accept like that. Now let's move on to
the next geometry. This one over here. I just need to it,
and that's it. That will be enough
for me. What about this geometry over here? Let's isolated and see if we
need to add anything here? Well, I think we can rob it. So go to the face
and let's select some fases and let's
add some seams. All right select those. Can rob les to grow selecting just one time and
co loop and sim. You know, we got him
right here. What else? Maybe we can add him over here. What else? Maybe we can add. Okay, and maybe once
here to cut this area, it A and here hit twice. Let's see what we've got so far. All right. Something
weird. Here we go. All right here, we should ask, I just forget this area. All right. Let's do that again. Now we got another result. Let's add the
cucker, scale this, and it looks okay.
We can move on. So let's exe from here. What about this right here? And let's add seams
here to open this. And seem here and maybe
one sam right here, it A and here hit you twice. And let's add checker. Sorry, that's not going
to work because I should add edges here
to extend the same. Or I can select these edges
and add seams like that. Now hit A and hit
you twice to rob it. Now, we got better result. We got a little bit
of distortion here. But that's okay. I
will accept like this. What about those over here? Let's see how can we up this? Let's and let's go to the face
and let's see some faces. Okay, select those faces. We grow the sel one time
and cose boundary and seam. And we need to do
the same thing for the site. Select
those over here. Can throw lost just one time
and choose bound and seam. And maybe we can add seam right
here or maybe right here. Mark this as the same thing for the rest. Maybe here as well. And here. Okay, what else?
Maybe now we can go through the whole geometry
and reach this area. Or maybe not here,
I will delete it. Maybe we can put
here in the center. I think it will be
better if I here. Now hit A and hit
twice to a rabbit. Tells you that we got a
problem with the scale, ply scale, and create a rabbit. Well, we go this result is
not so quite beautiful. Let's see. What's going happen
if I angle base. Let's stick with
conformal and let's see how can we fix that. Maybe we can seem here as
well and cut this site, and the same thing
for for this area, let's see here, it A
and let's rerob it. It's become better. But here we got some waviness. Let's see how can we fix it? I can't fix it by
adding C right here. That's well hell. Hit A and
hit huge wise. All right. We still got
something weird here. I don't know what is it. Will control that to
cancel what I did here. And maybe I can add one right here and
convert this to seam. And let's see what's
going to happen. We still got a
problem. All right. I will cancel that again, and I add Sam right here, I will add another seam
here in this area as well. I remember that I add s
here or not. No, we don't. Okay. So let's add Sam here. Don't forget to
select those here. On the other side,
the same thing. D Sam it A and let's re rob it. Now we got this, and I think
this result is better. Yeah, I will accept this one. I think that's it
for this video. I will end this
video here and see.
123. 123 Unwrapping section Starting with the bottom parts UV unwrapping part 9: Hello, ga, welcome back. Let's rub this metre. Selected and isolated first. See if you have any
modifiers. We don't. Tap the mood as
coded the pace and let's start with these phases. We grow the selection
control plus just one time, and let's activate screencast. Let's move this over here. All right now, let's convert
those two boundary and seem. Now we got Sam right here,
and I think that's it, it A and here hit
twice, two time. Now it's done. At Checker. It looks okay. Now let's go to solid and let's start
with this one, maybe. Let's see what's visible,
what's not visible. All right. Well, we
have Bv, I will apply. Let's t to the mood. Maybe we can start with
the with this area, we can select all the faces
and the same thing for the rest. Something like this. Let's select those over here. Now hit control lets
just one time cross select and the same
thing, add Sam here. Well, after that, let's select this phase is s and
let's add here. As you can see, let's see
what else we can do here. Well, I think we can add at the corners here to
get better results. All right. Maybe you
on here as well. Yeah. Now hit A and let's hit
U two time here. All right. Now let's ad checker and
let's see what we got. We got a distortion. In this case, we can add
C here to prevent that. On maybe we here. Now let's do that again, twice. Now, I guess the
result is better. We can move on now to the
next mer, maybe this one. We'll apply the tab, go to let's select these
faces and those over here. Or maybe we can ignore that. We can add seem right here and rob it and let's see
what's going to happen. Yeah. That's it. Let's move on. What about this one right here? Well apply the v tab and
let's go to the face. Let's select those over here, and select those as well. And maybe those here. Yeah, Let's trow the selection, can row plaus let's
add him here. That's very cool. Maybe we can add here as well
to open this area, I'll click and then convert. Maybe one Sam right here. I'll click and Sm. Maybe we can open
this area as well by adding Sam here and one
Sam as well right here. Hit A and rob this. We got a problem with the scale, apply scale. Let's rob it. Let's check and see
scale make it big. I want to make the square smaller so I can
define the distortion. I don't see a distort.
We can move on. That's it. See what
we got right here. We didn't gave it any bevel, I guess, Let's add
bevel modifier 0.1. Let's add two segments, apply the scale and
activate hard the normal. I don't see any problem
here. Everything is okay. Apply Bovel tab. Let's grab this and market as
S and target those as well. Let's convert those two Sam. And this one as SM. Somebody like this. And
one seem right here. Now hit A and rob it. That's it for this uma. What about this one right here? We didn't have any vl. Let's delete this modifier,
and let's add the vile. Let's add 0.1 with two segments, apply the scale in case, add hard and normal, and kick if we got
and problem here. Now we can move
on, apply vl, tab. Let's go to the select
these phases here. Grow the selection one
time, add what else? Maybe we can add one right here and here and one here to open this
area, A and A rob it. A cheer looks nice. What about this Germer here? Let's see what we
can do with this. Let's select this
face, grow sic, this here and market as m. Let's see what
else we can do here. Well maybe we can add
him over here and open this area from the side
and from the side as well. It's a and a rob it. I think that's it. But what about the rest? What
about this one? Well, in this case,
I think we can co the UV information from this
to this one and further. I'm going to select this
hold he to crop this. Control L, select this, hold he to crab this,
Control L and C UV map. Now if I go here and tab, I should see UV map
and you can but, we don't have any problems. I'm going to select
those all of them. And hold to rub this, control L, and CV. After that, let's isolate them all and let's kick
them as you can see. Everything looks okay. Now you can hit A and hit
control k to make them one piece and to
and rut them all, hit huge whites, and now
they are rut. I guess. Well, before you rub them, I just want to
mention something. We cove the UV map
to for the rest, but we didn't see
any seams here. We can see the sam just
applied on this one, but we can't see the
seam here for the rest, but they have the UV map. If you re rub them, you're not going to get
the correct result. But before we do that, I just want to make
sure of something. If we rub them like this, I just want to see the checker. Well, even if we didn't
add a sam accurately, the result is not so bad. L et's see if I can accept this. For the first one is, we don't see any distortion, but for the rest, we can
see some distortion, but maybe we can ignore it and accept it because it's
not going to be visible. This is a very tiny piece. You have two options.
Ad seems like what I did here or you
can just it and does it. Well, I have nothing to lose. I will add seams here. Licit controls a couple of time. To add sam, what you need
to do is go to face, grab all of these and go to U V and e seams from islands
to add seam for the rest. Or you just can bake it if you like. You can bake it and that. You are good to go. For me, I will accept this. That will be enough for
me. I guess that's it. Do we forget anything here? I think we guess
rubbed everything, I guess. What about this one? We didn't rub this one, why. Do we have a matri
similar to this one? Yeah, we got this
one right here. I'm going to CVI this D, let's take a cop right here
and move this up k to the z. Oh, my God. It's exactly in the same
position. That's cool. Let's de this and hit ke to the Z let's
move this up here. Go to the bottom and
let's make some ks here. All right, that's
very cool. Well, now we just need to create
U dims for these, and maybe we can mirror
those on the other side. Let's see how can we do that? We got this in the middle, I guess, this piece. Let's go to the bottom
and let's check that. Let's bring the three decosor
over here and let's use it. First, let's grab this. Set org or I'm not going
to king the organ. I will mirror them, I guess. Ue mirror command. Select those. And hit have d to take a CV
like what I did right here. Then swak this 23d courser that transform the vote points, and then hit control and choose x axis to mirror
those on the x axis. Very cool. After you do that, control A and apply scale and now kick the phase orientation. Because when you do that,
some phases will be flipped. You need to flip those back. We tab now hit A and then hit shift and to
recalculate the normal. Kick the other human phrase
like those over here. Tap it A Hit and to
recalculate the normal. Tap recalculate the normal. Let's see do we have
anything here else to do. Those here, tap it Aft N. Right Something weird
here, I can see. I don't know, what
is it. Lets try to find out what
we got right here. Well, I guess we
didn't rupt this, I think, or not. Let's apply the scale first. Let's add above modifier. Let's add 0.1. Amount apply the scale. Let's add two segments. And what else? Let's
activate hard to normal. Apply above all, and
let's add heating smooth. A tab it A and it's U
twice to re arrab them. Yeah, I think now it's okay. Let's go to the face taking a kick the phase
orientation again, we don't see any problem. Right now, we can mirror this on the other side
as well, the same thing. Let's go to the bottom
or before that, let's select the
necessary human phrase. Cb them all like that. I guess move them,
make sure that you are selecting the
correct geometries. After that, we need to
put the three dcursor in the middle and I guess it's
in the middle already. Let's go to the bottom and
then hit H D take a CV, control to the x. Now we got a new CV
on the other side. Well, after that,
control a p, kill. After that, as you can
see, they are flipped, tape it Aft and to recalculate
everything. It's done. Well, that's very cool. Now, we need to work with
you dims, I guess. Let's check if we
miss anything here. Everything looks okay and cool. Yeah, I think now we
need to distribute these UVs and create
UDMs for them. After that, I think we can start texturing this or theter. But for now, I will end this video and see
you in the next one.
124. 124 Unwrapping section merging objects and backing UVs: Hello, again, welcome back. We finished the robbing side, now's the time to organizing
the UVs and create Udums. Let's start from the front here. Let's select some
geometries here. Maybe I can pick those. Maybe I can add those to
the group and the stuff. As you can see. Let's hit
slack to isolate those. As you can see, we can put them aside one U V. H it
tab, as you can see, we got overlapping UVs, and let's go to the UV, Aric the scale, and then
just hit bake to bake them, and now we can bake those. All right. After you do that, tub out and control gay to
make them one geometry, now they become one geometry. Now, if you want, you can
just pick one of them, and as you can see, you can select the rest because now they become one geometry. What about let's see
what we can add here? Well, this one,
maybe we can give it we can put it alone
inside one UV square. I'm not going to add
anything with it. But maybe we can select
those over here, and maybe this and those here. Let's see what we
got. Maybe those and we can put them
inside one UV. Let's isolate them first. But do we need to
select those or not? I'm also quite sure accurately. Yeah. Let's select
them. Then A to select all the faces
and then go to the UV and just avg the scale, and then go to UV
again and bake them. That's very cool.
After you completed control J to make
the moon geometry. That's very cool. Let's. Let's
see what else we can pick. Maybe we can bike
this geometry and this one and create one
UV for them. I guess. We'll select them, and let's
isolate these ometries. Tab it A, U V ac scale, make the scale correct, then bake them, and then tab out controlled
J, make them one piece. All right. We got this
and maybe we can add them with We can mark them. Yeah, let's select
those over here. Let's add these 22
geometries to this group. Select them all like that. K them if you like. Tab and select them all, go to the U V and the
scale again and pick them. Now let's see what's
going to happen if I go to the material review, let's see the scale. Well, now, the scale of
those metres right here, let's convert them with the
scale of those over here. All. As you can see this is
the size of one square here. You need to make comparison between the size of this and for the rest
Because I will demand on those. I need all the geometries
have the same square size. As you can see, this
one is a close, but a little bit big, I will accept it is
not a huge difference. Let's now let's compare this with this one right here and let's see
what's the difference. The size looks okay even here. You can kick this
area if you like. Kick the size between
the square, and, for example, maybe
the sequre here. They are almost the same. Am right? We could compare
it with this one. It's a little bit
smaller, but it's okay. There's not a huge
difference here. The size here looks
fine for those. Let's go for the rest and
let's see what we can do here. Let's select these
metes, all of them. Maybe even those over here. Let's move them first. Make sure that you
select everything you want. That's cool. Now tab, hit A and go to
the U V A the scale first, and then bake and
now we just bake those, something like this. But I don't want to
make those one geometry because I need this area separated from this
one right here. But now let's stop out and let's see the sides of the chucker. I can't tell now, but I think we can move on. According to this
seque right here, I can see I think it's
similar for the rest. That's we can move on. But before we move on,
that I will do now, I will select those right here and it can troll,
make them one piece. Well select those like that, but make sure that you have active geometry
and then control. These bolts, they should be attached
to this one control J. Now, this one should be
attached to the arm, so I'm not going to merge it, but this one and they
could be married, control you can mark them. This, this control ga,
make them one piece. So now we got this. We got this. And I think that's correct. Let's excites and let's
go to the Mal review. What about this, this
one, and this one? Let's select those over here. Let's have to go
to the eighth pot. Now go to the movie and
I fg the scale fairs and then bake them. Let's
see what we got. Let's go to the to the material
review. The size is big. We got a problem right here. The checker size become very
big and that's not correct. Well, that's mean
we can just put those together. Now tab. Now it bake. Or the size now become small. Well maybe now we can add
some small geometries here. Let's see what we can add. I think I'm not going to
add anything with those. I just going to select these two umatries
and hit control merge them, make them one piece. That will be enough and just put them inside one U
V and that's it. The same scenario for those
control merge them and put them inside one U V. If you like we can bake them
again, re bake them. What about these geometries? Maybe we can select those those
and control J miric them. Tap it A, go to the the
scale and then bake these. Well, this one is very tall. Maybe we can cut it to two by
adding one seam right here. Add Sam, and now we
should have a seam here. Select those again
and let's them. Now it is better. All right. Maybe we can select
these two trees. Let's add this one as
well in this. All right. Let's tap the mood,
select them all, hit A, and go to the
UV and kick the scale. After that, bake them. I think you can merge
them control J. After you tab out. Now
they become one piece. Now, let's exact, and let's
go to material review. Let's check the checker size. We should merge this one as well with them, grab them again. Let's merge them
again, tab it A, and the same thing, let's
check the scale and then b. All right. What about this one right here? Let's select those. This one, this one.
Maybe this one as well. Let's see what else we can add. What about this eumetry? Let's select those over here. Let's isolate them first. Tab, kick the scale
first and then bake. After that, Mr them, control, make them one geometry. Let's. What about these? Over here? Let's
select them all. I will have control
k to mir them, Tab A and the scale, and bake. All right. Maybe we can
mark these stuff together. And make the one
piece one geometry. Well, let's hit control, make the motometr tab, it a K the scale. And then bake tab out. Maybe we can meri those as
well, make the monometr. But this one is very
big, but it's okay. Let's try to mark them. Controlled gay, kick the scale, Ok the scale, and
then bake them. Okay, let's see what
else we can do here. All right now let's
check the checker, let's see what we've got so far. For this one, the
checker is very small. Let's go back here and let's mir some geometry here in this area. Maybe I can select these pieces and it can
two mir them together. Maybe this one as well, should be merged with
the rest control. Now, let's tab and
select all the phases, average the scale
and then bake them. Even the sphere, we can merge it contro make it one geometry. Let's do that again.
Let's average the scale and three baker. The same thing for the site. We will select all of these. Now he control tab, select them all and avg
the scale and then bake. What about merging
those together? He contro Let's a
the scale and ba. Maybe what about
this one right here? Can we merge those together? Or at Control J tab and average bake Maybe those we can merge them together, and even those we can add them, cantl J tab the scale and bake. Well, these pieces,
maybe the same thing, we can select them
all and to mir them. Something we are here. Let's apply mirror for this
one. Let's do that again. Select those control J. Select them all and bake them. We are not finished here. We
just marked some geometries, maybe even those we can
mark them together. Let's take them. Merging
these geometries will make the process
easier for us. But after that,
we need to create Udems and we need to
retake the checker again and see what's better
for this for these parts? Well, for now, I
will end this video, in the next video, I think
we can start with Dems. I will create
multiple UV squares here and distribute all of
these UVs to these squares. I think that's it for this video and see you in the next one.
125. 125 Unwrapping section Creating Udims for the bottom side parts part 1: Hello again. Welcome back. Let's create U Dems. Let's open the UV editor
and go to the new it U, and let's chin the
width and the height, click any drug and multiply
this Number with two. Hit Enter, and now we got two K. Give this a name if you like. Well, we call them bottom parts. You can call them
whatever name you like. And act the tile, and then hit. Now we got this number. That's mean we are good to go. Let's open this panel and go to the images and click plus, and here we can add
how many DMs we like. Let's add 20. Maybe
we need here and hit. We will got 20 V here. I need more, we can add. If we need less, we can glit. Let's start with those tab
and we got them ready here. Let's go to the material review. Well, the size of checker, if we like it, we need to make the rest of the geometry
have the same sides. This size here, it will
be become our reference. These geometries
will receive two k resolution,
texture resolution. And that's very cool. We need to check the rest and
we need to make sure that all of these metries have
the same checker size. For example, if you
make conversion here, we can see that the
size of checker here, it's a little bit big, but if you've got something
like this, it's okay. For example, if I got a
square like this and I got a little bit bigger
like this, it's okay. But if you got something
like this, no, that's not acceptable
or even like this because that's
a huge variation. If you got something
smaller, it's okay as well. Let's move to the next geometry.
Let's select this one. We merged those together. Let's tab, and let's
see the UV here. If you make a comparison here, the sequare he here is
a little bit bigger. If you kick this one and
compare it with this one, it's a little bit
bigger, but this is not a huge as we say it. So now what we can do is we can select
this and accept it. Let's move this to the unit two, ke to the x and h two, one, two. I just need to fix
this one right here. We got double seams here. Well, maybe we can
delete one of them. I don't like this result. All right. Maybe we can I'll
click to grab this age. Maybe we can start from here. Hold, select this and this. Deselect those over here. And select this one and
clear the seam from here and clear the seam from here as well,
select this one. And this one, what
control and select it. We got weird result here. Well, the easiest way, I think we got another
way to do that. We can go to phase and select
these phases, all of them. Let's select them all like that. Let's select those over here. Or maybe we can go
to the top view, and we can go to wire
frame and grab the site. Let's see what we've got so far. Con mi to hr the selection. Shrink it again until
you reach this edge. We'll after that, clear
the seam to clear the seams from here
because we don't need these seams to be
selected these ages. Let's check this area
and let's see if we got the same problem.
I think we don't. In this case, for this geometry,
what I'm going to do is, I will A and hit twice. Now we just this. Right now we can move it
to one unit right here. That's very cool. All right. Let's excite and let's see what else
we can do right here. What about those over here tab? Let's check the result? We got these strange faces here. Let's see where are they? Maybe we got double faces
here as well. Double seams. Yeah, we got this weird seams. I think I can delete
this seam from here. Clear seam. Some mistake. We need to fix We could connect those at s here, and the same thing
for the side as well. What about the side? We got the same problem here. And clear from here. Now hit a, let's re arab
this. Hit you twice. Let's move this one to
the third position right here. Now we got this. So we finished with this one
and this one and this one. What about this, stop, and let's try to kick if
we got any problem here. All right. I think we
don't have any problem. Even the check our sizes, we got a variation
as you can see here, this big, and this is
a little bit small, but it's not hue. I will move this to
the fourth position, so hit key and hit
number three to move it to the fourth
position right here. Now, if I grab those
all of them and tab, I should not see any
overlapping here. If we accept the size of the checker and we don't
have any problem with that. Now we can mark those together and make them one
piece. We can do that. It's okay. That will
be easier to control, grab them and make
them one piece. Now if you tab, you'll find them
distributed like this without any overlapping
as you can see here. Now let's focus on
those over here. Let's see grab those in tab. Well, we got those here. Maybe what about this one. Let's see if we got
any overlapping here. The sides of the checker
is okay, I guess. Thank you. Now I can move this
to the five position, and number four to move
this to the 55 position. Am I right or not? Yeah, that's very cool. What about this mer? I will put this in one
U V. This should be moved to the
position number six, it and move this to number six. Yeah, that's correct. What
about this one right here? Let's move this to
the position seven. Tap it A it key and move this to the position number seven
I guess right here. Sorry. We can select this
and kick them. They should be side by side. That's correct.
That's very cool. The checker here is very
small, in this case, you can scale it
down if you like and make it a little
bit pick like this. What about this one right here? By the way, yes, you need to
mention something because we fix those and we don't
need to go back for them, you can cru them
and hit control, make them one piece,
because they already. All right. What about the rest? This one right here?
The tab is check it. All right. Well, for this one, let's move this to let's
see which position. The last one we
put it here, 007. This one should go to
the eight, selected. It's, it key and move
this to the eight. All right. If you finish with this
and you okay with them, grab them, control K and
merge them together. What about this one? The size looks okay. Let's move this to number nine, key and move this
to number nine. If you don't have any
problem with them, grab this with this,
control K and merk them. Like that. O What about
this one right here? The size of this
checker, it's smaller. I will accept it. That's
not a UQ problem. Let's move this 210 key and
let's move this to the ten. And if you finish with this
select it and select the rest and it control j to merge
them with the rest, make them one geometry. Now as you can see, we
got one geometry here. With different UVs positions. What about those over here? I think we sorry, we
didn't mirror those. I don't know why
that's happened. But it's not a huge problem. We can add mirror modifier and mirror this on
the other side. Hit bsect and flip and alight, tap A and twice. Go to the material review
and kick the result. The checker is very small. You have two option here, you can accept any scale, make it small to make
the checker size even or you can add
geometries with this one. For example, I can combine those with this geometry
actually, I can do that. Combine this geometry with
gemetries right right here. I think I can do this. Well, in this case,
let's stop, and, I think I will
temporarily move them and put them right here
and select the rest. And what I'm going to do is, I'm going to select those
together like this. He control. I'll make sure that you selected
all the necessary faces. But I did it now, I just selected with the
group with this group. And I'm going to bake
them together inside one U V. So bake. Now
check the side. The size looks nice, and now we just fix this area. After that, you can merge them. Select this, select
the control j and make them one piece. As you can see, now,
this become one piece. What about this geometry? This should go to
the D umber 11. I guess, tab, it and
move one unit up. If we don't have any
problem with this, we can merge it with the rest, I can roll and merge it.
Now let's lay this one. Well, I will give
it one U V squve this one unit one
unit to the x Sorry. Something weird. You can hold control
actually to snap it. That's very cool.
Let's kick what we got here. And the snapping. You can hold control if you don't want to
use that number. H it, hold control, and stab this right here. That's very cool. If you
finish with them, Mic them. Let's see what else we got
right here. We got this. Let's move them to the unit then key hold control and
move those right here. Move those to the units. Like that. Using control,
I think is faster. But those don't merge
them because they should be rotated these objects. What else? Let's see what else? What about this geometry? Let's tab and let's
see what we got here. Let's move those to the 15. A we finish with
this one. Mk it. Tab and kick. Everything looks cool. What about this one right here? Let's select it and let's move this to unit. I don't know. 16. Tap it A, select everything key, and move this to the
unit 16, I guess. As you can see this
goes a little bit up, move it down a little bit. You can bake it actually, and that's it. Bake
it and that's it. Mark it with the
rest, control J. Let's select this one over here, and let's move this
to the unit 17. And bake it. That will be faster and merge
it with the rest. Control J. What about this
far right here? All right. Uh Will we reach 17 that's cool. Now 18. Let's take
this one to 18, and I think we can merrick this one with the grab them all. Let's go to the U V and
the scale and bake them. Now we can merck those
together, grab them. And let's move them to
the unit 18, I guess. All right let's hit
key to move them and hold control and
snub them right here. After that, we can bake them
and that's will be enough. I guess that's we'll
do it for this video. Let's see what we can
do in the next video. See next
126. 126 Unwrapping section Creating Udims for the bottom side parts part 2: Hello again. Welcome back. The last may we robbed is
this one. We got this result. I just want to
mention something. This geometry here. It's got the same checker size. But here you have an option
if if you want to take, you can select these faces, select them all and you can
scale them if you like. Or maybe I can select
this one right here control L and swa the select link to normal, not to the same. Now what I can do is I can
scale this and make it bigger. If I do that, I will make this
receive even more texture, That's okay if you do that. Let's kill this
just a little bit. Let's bake it here. Kill it down like that. This result for me is better. You can do the same
thing for the rest. If you have space, for example, this one, you can select this, and control, and let's see
where they are right here. If you have space, you can
scale them and make them. But if you don't,
you can ignore it. For this example,
I can't do that. Or I can, but it's
annoying a little bit. I could rearrange these UVs
to scale this a little bit. That we'll take a
little bit of time, so I'm not going to do that. But if you got the
chance, you can do it. Let's check this one, let's see where is it. Let's right here. For this one, maybe we
can scale it because here we got space and we can use this space
to scale those here. Maybe we can bake
them. Let's see what's going to happen. We'll
spake them here. And kill them back. Hit ge, let's move
them over here. And I think now we can move
them one piece by piece, control L, and maybe we can move this right here
and rotate it like this. Maybe we can grab those hit control L and hit
R and rotate them like that. Bring this over here, and
rotate this a little bit more. At least see what we got here. We got, we can hit control L and bring those maybe over here and maybe we can
rotate them like this. And the same thing for this one. Now we can erupt those
all of them, control, and it is to scale
them guess a little bit and move them over here. Make sure that you don't
have any overlapping. It's very important. You can do the same thing for this
one as well because we scale, we could scale this one as well. That's mean we need to find
the space for both of them. For this U V, I'm not going to scale this one, but I will had control the
couple time to bring this back because I don't have
enough space to do that. I will ignore this. But I
think you got the idea. For example, this one, you
can scale it a little bit. Try to find it where is
it, it's right here. We have space here,
we can use it. So I will bake it here, and you want it to be like this. That's very cool,
scaled like that. Now select all of these UVs. After that, It can troll
in case we miss something. After that, you can
rebake them here. All right. That's very cool. If you find space, any empty area, you can use it. You can, by the
way, you can move some UVs from one place to another place like moving some Vs from here and put them right here if
you have a space here. But I can see that we have some overlapping
here in this area, and I don't know why that's hen. Let's try to find out
why that's happened. All right. I think we
made a mistake here. I guess. Let's check the rest. Do we have any
overlapping or not. I don't see any
overlapping right here. What about this one? I don't see just
here in this area. Well, I think we should fix that by grabbing all the UV
like that and it control. I scaled this too much, so I will average the scale
and re bake them again. All right. Now it's correct. Keep in your mind to activate the sync to see all the UVs. This one right here,
because if you don't when you
select one geometry, you will see just the
selected geometry, and you will think that
there is nothing right here. But you have geometry right
here or UVs right here. When you activate UV sy, you will see the rest even if you didn't select
them right here. A Let's complete the rest. We reached number 19. Let's see where are
these pieces right here? That's very cool. Let's now
we need to rub this one. I think we rub this
or not? No, we don't. Let's move this to U
V number 19, it key, and let's move this to eight and one unit
up and that's it. The scale is okay.
I will accept it. It's similar to the rest. But now let's focus on this. By the way, after
you finish this, you can merge it with
the rest if you prefer. We didn't mark those.
We can merge them now. I control, make them one piece. Select this one and
hold to crop this, control, make them
one piece as well. Let's select this
piece right here. Tu let's rob it right here. It's rot, but let's kick the checker and
let's see the side. I can cut this tattoo
to make the size smaller because it's
a little bit tall. The checker size of this one, it's similar to the res I guess. Maybe we can move
to the number 20, or maybe we can add
this to control J. We can merge this with it. Let's see what else
we can merge here. Maybe we can add those
two together, control J. Select those hit A and
hit twice to rob it. We got empty or right
here, we can use it. But see do we have a small
geometry to add here? If you're okay with this result, you can market with
the rest after that. But before you market, move this to number 20, it key, and let's move this over
here to maybe number, ten, and then after that, move it one unit up key. All right. What about
this geometry here? A Let's tub and let's see what do we have right
here. We just have this one. Let's try to do something. I think we can move this one to the number 20 as we put right here and Mc it with the rest. I don't know. Let's see
what's going to happen. Let's go to the movie and the scale and then
bake them together. If the checker size
become very very big, I'm not going to accept it. But if the size is still
okay, I can accept it. The sizes become
very big actually, and that's not going to work. I think it's become very big. If we make a comparison
here, well, that's weird. I don't know what to say about. It's hard to tell, actually. Well, I think I can
accept I don't know. I will accept it.
It is not too much. I the size, I thought
it's become very big according to the
squares I got right here. But I forget that these
squares are connected on the other side. All right. After this, is the time to
move to this one right here. Let's rub it, and I think we
could move it right here. So it's ready. We can hit G to the y and hit number two
to move it right there, and we just need one V, I guess. I will hit a select everything
tab and kick the rest, see if I miss something here. If we got some overlabing, if we don't, we can move on. Well, everything looks okay. That's mean we can
finish this one. Tap it A. We got all of the UVs. Now let's move this up one unit two units and move
it to the x one unit. Let's go to this arrow and go to the age and let's hit this plus and let's create a new U V, and we should have
one right here. That's very cool. Now
hit A and then tab. We can see some
overlapping right here. I don't know why
that's happened. Because of these two metries. That's right. This one
and this one, I guess. Let's take those
out for now here, and now hit A again
tab and let's see. Do we still have an overlapping? We don't. Let's check those. Let's try to find
them where they. They are right here.
That's very cool. We got space for these, but we didn't find
the space for those. Let's try to find Let's
try to find a space here. Maybe this could be nice space. I'm going to grab
those and hit key. Let's move those over
here for an temporally. Do we have better space? All right. H it scale them. Zoom and kick that kicker. It key and let's move
those over here. The site is okay, but now what I'm going to do is I will select all the UV here, and control L and go
to UV and take them. Yeah. Now it's ready. Let's check the UV once more. I don't see any overlapping. Select all the UV to make
it visible and easy to see. That's very cool.
Yeah, that's cool. Well, now we can say that we
are finished with the site. Now we can merge everything. Control and merge them, and you can select it All
right, let's marry them. You can select it and move
and see what's not merged? That's very cool.
Now, it's ready. I don't want to merge those. Yeah, I think now we just finish with this
one with the site, and let's see what
we can do next. I will end this video here
and see you in the next.
127. 127 Unwrapping section fixing some variation in the UVs size: Hello again. Welcome back here. Before we move on, let's check the UV again
for last time. I will move to material
preview and kick the checker. L et's see do we have
any problem we missed? For the body,
everything looks okay. But I think this area right
here and this one here. It's not okay and the checker
is not similar to the rest. Well, let's try to find a
solution if we can do anything. Select the area, select any phase you like
here, head control. After that, you can go to the select link and swag this back to Sam to
target this area. Now we know that this is the piece that
we are looking for, let's try to find the
solution. Can we scale it? Can we do something? Let's move this for example right here. Maybe I know. Let's see if we can
rotate it like this. The idea is we just need to
scale it and make it big. H All right. Maybe we can add seam
here in the middle. Let's see, how can we do this? Maybe we can add seam
here one seam right here, goes like this and cut this. This is an option we have here. We can add seams right here. Select this edge, hold control, and let's scrub this one and
let's mark this one as Sam. Let's do the same thing
maybe for this side. Now I will select those
both here, go to the face, number three, control L, let's rerut this, hit twice. Now it's at. Let's move to the same
position right here. And bake it. Now let's see if we fix the
scale a little bit. Maybe manually we can grab these faces right here and
or rotate them like that. Let's move those over here. Maybe we can move this
one over here as well. Now, let's select those. It is to scale them like this and make the
size smaller here. After that, bake them. Let's see before and after. Let's do that manually. Key and move this over here, and this one control. Maybe we can move this one here. Let's try and let's see
what's going to happen. That's cool. This one, control L, and let's
rotate this like that. Let's move this right here. I think I can delete the
seam here from the middle. But even if you keep
the seam is not going to be visible because here we have some
stuff above it. Now let's say that we are
finished with this one here. We can move to this one. But I think I'm not
going to do anything here because if I
want to fix this, I cut it to two, and I should create a
new UV to fix that. I'm not going to do that. If you select it, this
is the UV right here. You should add a simple
amora here, and after that, you should take half of this and create a new UV here
and put it and scale it. You can make a small
tweaking here though. For example, as
you can see here, this line, it doesn't go straight like that.
It goes like this. You can rotate this a
little bit if you selected these vertices or these faces. Let's let's move to
the two de coursor, and let's put the
two de coorsor, for exam b here, and I will
use this as a pivot point. Let's rotate this according to the two de coorsor like that. Let's see if that puzzle ple. Let's use the vertex. But make sure of something. If you rotate these vertices, these vertices here will be affected because
they are connected. In this case, what
I'm going to do is, I will hit shift g to
isolate this alone, and now I can rotate
it like that, and then hits t g
to bring the rest. I think we will get
the same result. I will got this
open ar right here. All right, if that doesn't work. What I'm going to do
is I can open the tool here and use this tool,
for example, grub. But I think that will
affect the rest or maybe not. Here we have relax. Let's move this just
a little bit here. Now we got almost right line. We can do the same
thing for this. After that, I can scale
this a little bit. Let's go to the face and
let's go to the box select, control L to select all of them. Hit, move this down
just a little bit. Let's put two right
here and I will scale this a to this point. Let's put this right here. Now let's go here, hit, and scale up here. A and move it just
ale bit like this. That's a little bit better. I think that will be enough. Let's hit slide to excite
and let's check the rest. For the legs, the check
size is a bit i here. Let's see if we
can do something. Here we have these parts. Let's re arrange these UVs. For example, let's
select those over here, and let's move them up here. Let's speak this
to bounding box. Hit to rotate, let's
rotate those like this. Maybe we can select these faces, and temporally move
them right here, maybe. Now let's select those again. Maybe we can put
them right here. I just need to make some
space to scale those again. Let's select this
one, control L, maybe we can move it hit
key and put it here. Let's see if that's possible. Select this one
control L and maybe we can move key and put it
right here in this area. You can rotate this like that. Something like this. I think it will work.
What about this one? Control? Maybe we can maybe
we can rotate this control L. Let's move this over here. Control let's rotate this as and let's move it right here. Now we got this. I
think that we can grab all the details and scale
them from this point. I'm going to sweep
this 22d courser. Let's go here this and
scale those like this. All right. But we got some problem here. It's easy to fix.
What I can do now, I can take this and
move it if I like. I can do the same thing
for the rest of I want. A Make sure that all these islands inside the
U V square, and it does. We can say now, we just fix this and scale it down a little bit. If you want more, you can take this and put it in any
other place if you prefer. For example, you
can move some of these geometries and put them right here.
That's another option. But if you want to
move these islands, you should select the whole arm because sometimes when
you see empty area, actual, it's not empty area. But because you didn't select the rest of
the human trees, you think this empty area. As you can see when I
selected the whole arm, I figured out that this
is not an empty area. But for example, here, we got empty area
here in this place. That's mean we can
move those at control, and we can move
those right here. Or move one of them,
maybe not the two. Here, we can't do anything because all the UVs are filled. Maybe we can take
just one and move it Let's move this over here. Something like this. Even though we can move them a little bit. By the way, the algorithm of blender is not quite good at. There's a blockings.
They work in better way. Let's move this one,
maybe right here. I just need even more space. Now what I'm going to
do, I'm going to select. Let's select this one first, and maybe we can
move it right here. Now I can scale those even more, I cant roll L, and
scale this again. As you can see, the car
now become smaller. That's very cool.
Now, we will go some variation if we
didn't scale this. Let's try to find
this right here. Let's select it, control L, and we could scale it as well. Let's read this to bounding box, and scaled as, something
like that, maybe. Now we'll move it up
maybe right here. Just be careful, maybe
we can move this one to another place it control L
and rotate it like that. We can put it right here. Now, I can move it and scale it's a little
bit more if I want. For me, I think
it's okay for now. Let's see if we can do
anything for this one. The select link to normal
to select all of them. We got this Do we need to
scale this a little bit more? Well, yeah, we can
if we moved some of these Vs and distribute
them on these Vs. But I'm not going to do that. I will accept this
result. All right. Is there anything
else we can do? Okay. Everything looks okay and nice? That's very cool. Now, everything is robbed
and can say it's ready. For this video, I
think I will end it here and let's see what we
can do in the next video.
128. 128 Prepering the scene to substance painter: Hello, again, welcome back. Let's prepare the scene to
send it to subsistence nor. All right. Let's start with the legs. I need to copy this on the
other side and finish it. Let's make sure that we got the three D coosor
in the center. Had shift S and Qs coosor
to the world organ. Then let's start with this leg. Select everything. Sit like this one as well. Hit you to move
to make sure that I didn't lift
anything as recall. After that, sw this 23 decorsor, that transform vot point because we want to
use a three decorsor. Then hit sf D to
take a KB and then hit control to activate mirror and choose
x and then enter. Now we got KB. We CVD the legs on the front
leg on the other side. After that, go to the
phase orientation. With this one selected hit
control and apply scale, when you apply the scale,
it will be flipped. Tab, select all the pass, hit and to recalculate
the normal. Now we are finished
with this one. After that turn off
phase orientation. Select the light, it H D, take a CB, control, and then x, and then enter control
A apply the scale, tab, A, select all the fast and to recalculate the normal. We done with this one as well. What about this leg here? Select all the
details, everything. Then D, take a Copy
control to the x axis, it er, control A apply scale, tap it A, H n. I
calculate the normal. Let's focus on the wing no now. Let's grab this empty as. I need to take a Cp
and put here down? Take a Cop let's move it here. Make sure that you put this
exactly in the center. I keep something like this. What I will do is Now the wing is following the
empty, as you can see here. I will select this and
tab and let's select. Let's see what A can select, maybe this a It click to
select the A loop and dft and courser to select it to bring the three
D courser in the middle. Then tab out, select the empty
ft selection to courser. Now I guess now it's become
exactly in the center. If you've got any variation, you can make some tweaking and scale can scale the wing or you can scale the hole,
make it smaller. Let's selve the body again
and let's tap the mood. Let's select these faces. Maybe these faces. Grow the selection cou time. Before you grow the selection, let's grab those as well here. I will activate
proportional editing, and I will scale this
to the bounding box, and scale it just atle bit. Make it small. Try to kill this gap that
we got right here. Now the result is better. Now the result is okay. We can accept it. We should do the same thing for
this side as well. Let's select this pha, grow selection here and
select these phase as well. Maybe we can scale this just
a little bit. That's it. We can see that we
have a small gap here. Let's try to solve it now. You remember when I
deleted these edges, I can make some changes here. L et's hit wise to slide this. But before that, turn off
proportional editing ke wise, and then hit out and move
those inside a little bit more like this,
but not too much. You can I guess we can hit if and fill this area
and maybe bev it. Something like this,
we can put this inside new U V. I will
find a solution to this, but let's try to
cub all of these. Select this one, ket wise, hold and move those forward, maybe right here, then hit F can troll B and be vol
it a little bit like that. Let's do the same
thing for the rest. Grab those K. Hold move those
right here. F can troll. And this one as well. Key twice hold, then F control
be Now go to the face. Let's select these
four new phases. Grow the selection
just one time. Now, we could go to
UV editor again. All right. Now let's see
how can we fix this? These new faces. Let's convert this
to boundary and add team and let's
select them again. Grow selection one time and
here hit U twice to rub them. Now we got them right here. Now what I'm going to do
is try to distribute them. Try to find an area like this
right here. We can use it. We can move this, for example, right here, and I can take one. And put one right
here, scale it. Don't worry about this. It's not necessary to receive any kind of texture
because it will be hidden. Select this one, hit key, and let's move this over here. You can put this above that, but I'm not going to do
that to avoid any problem. I don't want to have any
overlapping in the UV. I can put them
together like this. Okay. Let's move this down here. Select this one control L and K. Let's move
this over here. Select this one control L and scale this a little bit key
and let's move this here. Control L. We done with this, I guess. It's like to excite. And now we can't see anything. That's very cool.
Okay, let's cob be these swings
on the other side as well with the empty selected. Or a D, take a Cobi and put the three
d coorser at the center. Ctroll to the x. Cantl to the x. Sorry, Sick this 23d
coorser. Forget that. Ctroll to the x enter, C A apply a scale, and after that fix the
phase orientation tab at A. Okay, Tub, as a shift n to recalculate the
normal and check it now. That's very cool. I don't
have any problem right now. Well, now let's go back
to let's turn of phase orientation and we
got one machine now. We need to give those
specific materials. This to shader editor. Let's see how can
we achieve this. Let's see that we
created a wing material I can go to this
ar right here and open this list and
go to the material, go to the blender file and
open the material section. Here, whatever material I
don't want, I can delete it. Let's grab any material
that doesn't have any name like this
one, and those there. The Kecker, we don't
need them anymore. This one, I need it. Select them all trot and delete and delete all
of these materials. Now we got borders material. We got door handle, we got doors. We got dots. What are the material? Dots truck. We got top parts, and we got the windhill. All right now, let's go
back to the view layer. And let's sick the right
before we do anything. Just want to find Now we got all of
these materials. We gave material to the border. When you select the border, you can see border material. We gave material to do material, we gave material to the glass. We called wind. And we can give each
one of them a color, and I prefer that actually
just to recognize them. For the wind hill,
I gave it a color. For the border, let's
make them dark. Something dark. Maybe increase the
metallic a little bit. And for the door for the do, page, maybe to recognize it. This is the door. We
gave it a material. What else The wing, we didn't give it a material. We have one, two, three. What about the body?
We gave it a material. The door handle, we
gave it a material. This one and this one
on the other side. Not just a material. We got a UV ready to this. If I sub this to two, I can swing this to UV editor to make sure that
everything is okay. Yeah, we got a UV for this. And there is no overlapping
here. That's very cool. Maybe we can king the
color to something. I don't know, red, astrociz it. That's been this
one had a material. What about the body? So these top parts, we gave them a material,
that's very cool. L to. I don't know. Blue maybe. The body, let's add a material, let's call this body
empty for material. Now the body have a
material and we just need to change the color to something orange maybe to recognize it. Now we can t and see the
body, everything is ready. I guess we don't
have any problem. Well, this stuff right here. We didn't give them material. Let's give them a material, and we can call those tail. Yeah, can call
material tail parts, MT, and let's change the
color just to recognize them. All right Tab to the edit mode for those and
see if you got any problem. Any overlapping. We don't
see any overlapping, everything looks
okay. We can move on. These parts here, we didn't
give them a material. So let's give them
a material here. Hitting, create a new material, let's call those
bottom parts empty, and let's give them a specific color just
to recognize them. That will be enough.
Not just that, you give those the
same. These parts here. They should have
the same material. Hold Shift, select
this one, control L, and link material
and not just those, you should select
these parts as well. I think you should give
them the same material. Because if you select those
and all the details and tab, select this one and
see where is it. Yeah. They are part
of the bottom parts. They should have
the same control L link material and the
same thing on the side, this one and this one, I guess, have the same material. Yeah, that's right. Select
those over here. Yeah. Hold it, select this
one and this one, hold heft to crus
Control L link material. That's great. Well, now,
what about the light? We gave it a material? For the light less
add a material. I will call this this
will be the right light. I'm going to call this
R underscore light. R under score light. Mt. And let's give it
a specific color. This one, let's give
it another material. This one will be the
left underscore light t, and we can give it a
specific color as well. The same thing for this leg, create a material leg t. Let's give this
any color you like. And give those the
same material. A t to this control
L link material. The same scenario for this one. This one will be the left. Let's add L and
the score leg Mt. Let's go to the material
viewboard display and give this any color we like. Select the rest of
the human tree hold hefty crop control
L link material, give them the same material. What about the back legs? By the way, I just forget
to do something here. For the leg, I will call
this F R for front right, just to recognize them. This one, F L for front left. For this one, I will
give it a material. I will call this B
underscore r underscore leg, empty and give it
whatever color you like. Select the rest. Old gifts, select this link material. The same thing for this
one, select this one, add the new material
B and the score left, and score leg for material. This one, the left, and
this one become the right. The same thing is give it
whatever color you prefer. Control L and link material. Right now is the
time for the wings. Let's select this
one. Let's create a new material for this. Let's call this under right, top right wing Mt. And let's see what
color we can give it. Let's select those and give
them the same material, control L link material. This one, we could
give it a material and let's call this bottom under score R k t. That's right. Let's give it a color. Control L link material. The same thing for this one, let's give this a material T and score wing t. Sorry. Here I made a mistake. I call this leg. It's not a leg, it's wing. Let's change this to wing. Was become correct. T
L T r, that's right. Now let's give this a color. Control L link material.
This one as well. Bottom. L wing Mt. Let's give it any color. Control link material. Now we gave everything a specific material
and that's something important because if we export
this to substance ventor, we gave it one material. When we send this to
substance ventor, substance ventor will take it as one object because we
gave it one material, and the UV will be
overlapping each other and we will
have a huge problem. But now we just separate all
of that with the materials. That's something important. Now we can say that we are
finished with this video. And so next.
129. 129 Sending the mesh to Substance Painter: Hello again, and welcome back. Now this Oofpter is ready to
send it to Substance Mentor. You can select all the details like this and you
can export them. To export them to
subistes matter, you can go to the file and then export and
export it as FBX. I have the FBX models. I saved here. I
don't want those. I can delete them. And
let's explore this as maybe let's call this Freeman or netapor. Full Mish. And here just activate selected object because
we selected the nitpor. So just check this activated. And there was
nothing here to do. By the way, this is the option you process icon to activate it. Export it after you
do all of that. Hit export FBX. And asset. Now we can go to
substance vendor, open the software and let's
import the mic there. Before you go, save the
project. Don't forget that. After saving this project, you can excite from the blender, and we can start with
substance Mentor now. Now, I am inside
substance Mentor, and this is the welcome screen. I will close the welcome screen. I will assume that you know
how to use substance matter, and I will try as much as
I can to cover the basics. Well, here we have this three D view and the
two de view sublet to two. Here we have an option if
you want three dn2d or only the three D or only the two D. Most of the time we work
with the three D only, but sometimes we can speak to three D and two d just
to see the U V. For me, I will speak this to
three D only for now. Here we have the
shortcut of 1f2f3. If you want to use them, to import the damage, go to file and then hit a new. Well, now, this new
project window open. Go to select to
select the FBX file. Freeman or chapter,
and then hit open. Here we have the
document resolution and the normal map format. I will work with penal GL. I think Blender work with
open GL normal format. The document resolution, don't
worry about this option. We can change this letter. U V tile setting Use UV tile
workflow. Activate this. It's very important
because we used U DMs. Here we have this first option. We will start with
this first option. Preserve UV tile layouts, per material, and enable
painting cross tiles. Activate this and that's it. We don't have any camera
to import and that's it. Okay. Let's give
this a bit of time, and we should see the
three D model right here. Well, now we can see
the three D model. And here on the side, we got the texture set list. We got all the materials
that we created. You remember B bag left leg, bag right leg, inside
each material, we got the Udems. We can hide and hide whatever
thing we need from here, and we got all of these udums. But the problem here, we
can't control the udums. I can't hide them from here. Well, before you do anything, try to check the model. In case we got a problem A
problem with the geometry. Try to avoid all of that. Make sure that you
don't have any problem. When you make sure that
your object is clean, you can start painting
and adding the texture. For me, I will hide some geometry from here and
let's start with the body, whereas the body
should be right here. The body. Check the body
if you've got any problem. By the way, one more thing
here I need to mention. How to navigate inside
subistance meter. If you want to orbit like this, hold out and press
the left click, hold left click and orbit. Zoom and zoom out rotate
the wheel of the mouse. If you want to make and zoom out like this,
I think they call it. Hold out and hold right click and move
the mouse up and down. Pan hold out and press the
middle mouse at one end, you can make a pan like this. I can go to the
setting and here we got the field, the focal length. I will change this
from 17 millimeter to, for example, 150. Now, the lens is better. For me, try to pick the
suitable number for you. For the body, we don't
see any problem. Let's activate the back
left leg. Let's check it. Let's see if we got a
problem with the normal. By the way, if you want
to rotate the light, hold shift, right click and move the to the
left and to the right. You can rotate the environment. Try to kick the geometry, see if you have any problem, I don't see any problem. Everything looks
okay for this leg. Let's activate the next one. Well, even this one looks okay. Let's go to the borders. The borders, I think looks okay. Let's activate the bottom parts. But here, kick this carefully. I don't see any problem, any overlapping DNOI because you remember when
we created this, we added edges to the corners. And that prevents
any problem here. But I can see here in this area. I got very small problem here. I can see ages in this
area here and here. Well, I can avoid this for now, or I can go back to blender
and fix it if I like. So we got just one
problem right here. Let's see how many
problems we gather here. Here, everything looks cool. Here, we got some
shading problem. Maybe we can fix
it inside blender. Here as well. We got
some shading problem. We got two problems here. Let's rotate the lights to see if we got
any other problems. Sorry. Here in this area, I don't see any problem. Everything looks
okay for me here. We got this area we need to fix and maybe
this one right here, we can fix it or
we can ignore it because it will be
covered by the titure. Even this one, by the way, when we come the texture, we can go back to a blender
and fix the shading issue. If you like. Let's
bring bottom left wing. You can kick one wing and
see if you've got a problem. For the rest, you can
accept them because we because the other wings came from the original one and
the original one is clean. So that's been the
rest of the wings, they should be clean as well. I don't see any problem from the top and from the
bottom, I guess. Yeah, that's very
cool. Let's bring the rest. The door handle. I don't see any
problem with this. Looks very cool. The dos. Nothing here. All right. The front legs, I think we don't have any
problem here for this one. And even this one.
The light looks okay. I don't see any problem here. Well, maybe guess here, we got some weird
hating going here. I don't know why
that's. But it's not. We can ignore it.
This one as well. All right. Wind
healed looks okay. The human tray looks clean. Let's kick this area here. I don't see any problem here. Somewhere think happened
here in this area. I don't know why that's h.
Maybe because of the vertices. We can check this or we can ignore it because it's
not so quite visible. All right, so very cool. We can say it's very
clean and very nice. Well, that's a sign to start creating the
texture for the ore. Very cool. I will
end this video here, and I'm not going to
texture in this video. And I will see you
in the next video.
130. 130 Fixing some problem with the mesh and the UVS: Hello, again, we'll come back. Let's fix the problem that we found inside
substance bender. We came back to Blender. We got the problem
with this emetry. I will select group of emetres, and I will tap to the emo. I just want to see
why that's happened. Well, that's happened because
we got bible right here, but Bible doesn't target this
age. This is the problem. In this case, we should find a solution to this and
we need to bible it. So let's go to the edge and
let's select this edge, and maybe this edge
and this edge as well, and the same thing here. Hit control be less bolt and
let's see what can happen. Or something like that. Let's see if that's
will work or not. I think it's all work.
Let's go to the side, and let's do the same thing. Let's select these edges. On this side, as well, the same thing,
select the edges. Hold control and add the age. Hold have to add the new one
hold control, like this. The same thing here. Now, bevel those three
control B and bevel them. A little bit like this.
I will be enough. After that. Let's add weighted
normal for all the parts. Go to the modifier,
add weight normal. Now the heading should be
fixed. You can apply it. Let's see if we got any
problem, heading problem here. Speak this area right here. I don't see any problem here. It looks okay. I guess. All right. Let's see if
that affects the UV. I just want to kick the UV after that before I do anything else. Well, let's go here and let's see select this face and
try to find it where it. That's right here. All right. This is the that we got. We got two seams here. We can delete the
seam if we want. Clear seam from here. I think there's no
need to re rab it. Clear and maybe we can and
or clear this one as well. All right. I don't see
any problem with the U V. Everything still fine. We got some weird
thing happened here, but it's not a U problem. I can accept it and we can
move on a slash to excite. After you fix this, let's see the problem here. I guess we got some
shading problem here. Yeah, that's correct. As you can see here, we got
something weird. Let's give this weight normal, and that will help to fix it. You can see even before and after a lot of problems
this modifier can fix, and you can add this modifier for the rest actual if you like. Let's y weight normal to this one and let's see
before and after. Apply. I don't see any problem here. What about the wing? Let's see if that can
help or make any change. Before and after. There's
no difference here. We can delete it. We
don't need it here. Let's add the modifier to this light and let's see
what's going to happen. Not a huge difference deleted. Let's add the modifier
to the back legs. Turn this on and off. There is no huge difference
you can delete it. What if we add this right here? Nothing. I think now damage
become ready, I guess. D I don't see any problem. One thing here we
got in this area, Let's go to the dot
select the avoid the tab the moot and
let's go to the vertices. Let's select these
vertices over here. Let's see why that's happened. All right. I don't
see any problem here. Let's select these vertices
and the wire frame it M and M. There's no
overlapping vertices. Everything looks
k. Let's tap out. Yeah, cool. Don't
see any problem. Even here. Everything
looks okay. So now we can save this again and pre send
it to substance venter. We fixed almost all the problems that we noticed and saw
inside substance venter. So let's send this back again, save it file and save. After that, let's send
it to substance vendor, export to FBX, and sorry, I didn't select let's select
the whole mich like this. And export export to FBX. Freeman On apter
preparing scene all at lest King the name to
selected, forget that. And Freeman Onpter
two Substance mentor. A exports. Now we are inside
substance ventor, let's excite from the scene and let's bord the mesh again. Go to the new and
choose select and let the note we save that again another name is inside blender file,
I guess right here. Let's open it. Don't
change anything. Just hit okay, and let's
exact from the scene. Now it's sloting the new
image, and now we got it. Now let's see the problems. For example, this
one right here. I think now it's fixed. Now, yeah, it's fixed. Even on the side. What
about the light here? Let's see what we got. We fixed this one as well. What else? Let's
check this one here. We got some issue here, but we can't ignore those. Let's check the length,
the focal length. Let's change this to
150. That's very cool. Now we fix the problem and we send back damage
to substance tor. Right now we are ready
to add some material to the geometry. All right. Slit the Window 22, two D, and three D.
I just need to kick. Sorry. I need to kick the UVs. Now we are on the bag left legs. This is the UV for the
leg for the lift one. I don't see any overlapping. Everything looks cool. You can check the rest.
Let's close this one. Let's jump to this
one. The right leg. Looks okay, close,
go to the body, see if you've got
any problem with the body, any overlapping UVs. It's very important to to check it before
you do anything. What we go right here. Well, everything looks okay. But I don't know
what's going on here. Let's go back to Blender and let's check the vie
here for the body. Just need to see what's in here. Hopes we go some overlapping
here. Why that's happened? We are these faces? They are hidden here. I
didn't notice this problem. Well, in this case, let's see what's going to happen
if I re bake those here. So go to the UV and hit bake. Well, the problem is
they will be baked right here, not in
the same place. Let's accept the baking. UV and bake. Let's move this two
units up or three unit Well I think that's it. Let's maximize this.
I just need to see. I want to avoid any
overlapping in the UV. If I draw a line goes up from
here and goes up like this, this group of UV are in
the correct position. Well, that's mean we
are good to go here. We just fix the problem. And that's very cool. All right, save the project again and let's go back to
substance venter. Let's try to find if there
are another UV problem. Okay, now we are inside
substance ventor. In the body, we don't have
just this problem right here, and we fix this inside blender. We need to the model again. But let's check the other UVs. I don't see any problem
with this closet. Let's go to this one here. Well, here, the baton parts. I think we don't
have any issue here. We can accept
everything and move on. And here as well, I don't see
any problem with the wing. The batom, all the
wings except them. Door handle. It's okay. Doors. I don't see any
problem with the doors. Well, the front legs, kick them. That's okay. Close those two. The the lights, miss Chicke
There is no overlapping. There is no any problem here. That's very cool.
Even the right light. The tail looks cool.
The top parts. Let's check them. I don't
see any weird thing here. Well, that's we can accept that. Yeah, everything
looks cool here. And the wings all
the wings are good. And even the wind, I guess. Yeah, that's very
cool. So we just got one problem and we fix
that inside vendor. I will send the file again
to substance vendor. You'll learn how to do that. And for now, I will
end this video. I think in the next video, we can start with the material I mean to create
material to the whole. So that's it for this video
and see you in the next one.
131. 131 Substance painter creating material for the body part 1: Hello, again, welcome back. We imported the mesh again
to substance matter. And now let's see from
where we can start. Let's go to the setting and let's change the
focal length again to 150. And the Zoom bag. We fixed almost
all the problems. We don't have any
problems anymore. Now the next we we need to
go to this CO right here. Titure setting in this, and now we need to
bake the bake it. Bake it means make it ready to add the ticketure on it
and to to bend on it. So baking is very important
step that we should make. Open the bake menu. Here we got the bake menu. We got some options here. We don't need the normal. We don't need this option. This option, you can
use it if you got high resolution model and
low resolution model. You can't combine those. You can move the normal map from the high resolution to the low resolution
using this option. We don't have higher
resolution and low resolution. We just have this model. So
I'm going to turn this off. Thickness, we use thickness
when with the characters, when we work with the skin. But in this case, we
don't have any thickness, and ID, we don't have any ID. This option, we use it
when inside the blender, when we give the eumetry
a specific color, but not using the material
using the vertex paint. I'm not going to use ID. We don't have any ID, and I will keep the rest. All right. The output side, you can king
this to one k. After that, when I finish the texturing, I can sw this to two k
and chang this later. All right. I think that's it. When you do all of that, you can bake all the textures. And as you can see, we have
the number of the textures. So it's bake textures. After the baking is
finished, I will be back. Okay, now, baking is
finished is 100%. After that hit, Okay. After
the baking is finished, after that, let's
check the geometry again case we got any
problem after the baking. We can start with the body, see if we got any shading
problem, any artifacts. Rotate the environment,
hold, if hold, right click and move
the most to the left or to the right to rotate
the environment. I guess we don't
have any problem. Well, that's mean
we can move on. Let's kick the wings quickly. We can kick one of them. Nothing here. The bag legs. I don't see any problem
right here even here. Well. So we bake this we baked
this at resolution one k. If we want to change
the resolution, we can sweak this 22k or four k, and it will be sweaed. For now, let's work with one K. I want to tete
the body first. That's being I can
hide the rest. Let's close the ums
now, all of them. Ok? That's very cool. Now turn off all of these
eyes and just hide the body. Let's work with the body, and let's see how can we
create a material for this. Inside substance vendor, we got material section and
we got smart material. All of these materials
are ready to use. You can just click any trug
and throw it on the mat. Let's ex from this window. If you like, you can create
a material from scratch, or you can use
ready material from these and use them and apply
them on your geometry. But before you move on, it's very important
to save the file. Save it and after that, start the texturing journey. Go to file and then save
us and save the project. After saving the project, you can open the
DMs for the body. And you can pick
whatever material. For example, let's try to see
what's going to happen if I add this material on the body. We got this layer automatically
added on the body. We don't need it. We can use
the track and delete it. So let's try to use steel band. Just click and drag
and put right here, and let's see how that
will affect my geometry. Well, now this smart
material I added, I will apply on all
of these UVs or Dems. Just give it a time and you will see what's
going to happen. As you can see, this is
the result that we got. The Smart material. It's
a folder with effects. Here we got inside this
folder, multiple effects. The base paints, some
roughness, some sharpness. So this is the smart material. It's a folder with a bunch
of effects. You can. You can use multiple
smart material. You can add them if you like. You've got this option. Or you can create a new
one from scratch. Well, here we need to learn how to create a new
material from scratch. Let's see how can we do that. But I'm telling you you can use a smart material in case you
want to get fast results. You can take these right
here and apply them. Let's delete this smart material
that I added right here, and let's start with fier. Here we got the filler. I added this as a filler, and it will be applied
on the whole body. After that, let's
add just one or two. After that, let's
change the name to base color because I want this fill layer to
be the base color. Db click on the
text here and let's change the name to
base. Base coolor. Now we got this base color. Inside the setting
of this fill layer, we will got the
setting right here. The U V, the projection, the scale, the stuff and
the material itself. Inside this flare,
we got color metal, rough, normal, and height. For the base color,
we don't need to work with heights or normal. I will turn those off and
let's focus on the color now. Before we chang the
color let's bring the reference Images to take a look and see what
we could do there. So this is the reference images. Let's focus, for example, on this one, this
image right here, or let's try to
find another one. Maybe this one. L et's try
to understand the color. It's page color, I guess, and we got some dirtiness
and some sts on it. Let's try to create
something close to this one. Let's kill this, make it small, and let's put this
right here maybe. All right, F here, we
can change the color of this fill layer to
whatever color you like. Let's increase the
saturation up, and let's try to
pick some bae color. Something like this, you can copy the number from
here, if you like. From here, you can
control the brightness, if you want to make
it bright or dark. Let's manipulate this. Maybe we can take this down, just desaturate it a bit. Something like this. I think it could be good start or maybe we can cra this up de
saturationle bit. Or something like this, I guess. We can start with this color. This is the base color.
Here we got the metallic. Metallic control the
nature of the material, if you want to make
it metal or plastic. If I cring this up to one, it will be reflective
as you can see, it's become like gold, and if you push it back, it will be like
plastic or paint. So this is important
controller here. The roughness, if you
want to make it rough, very rough or reflective, as you can see, it's
high reflective paint. So you can control that
from this slide here. For me, I guess I can turn
off roughness for now and turn off metallic for
now and keep the color. This layer, it will be
just for the color. I just deactivated
all of these options. Well, now I will add
another fell layer, and with this fell layer, I will control the roughness. Turn of the metallic and the base color and turn of the normal and the height
and keep the roughness. From here you can
control the roughness. Let's call this rough.
Roughness. And as you can see, and as we said before, we can control the
roughness from this slider. But we can do something else like putting some variation here if we want. If I add a black
and white texture here inside the roughness, I can create a variation
in the roughness. For example, if I go to the procedural site
or section here, I can see that I got
a lot of images, black and white
images we can use. Let's see which one
we can use here. If you put the cos on any image, you can see a preview here. For example, let's use this grind dart thin.
Let's put it here. Just click and the drug and
put it inside the roughness. Well, you can see that I got some variation
here in the roughness. I can break the roughness
by using this method, I can control that
even more if I like. This is the first step. The first step is adding
pas color and roughness, another fill layer
with roughness and control the roughness. But we need to control
that even more. Let's see how can we do that. I will add a filter here. Sorry, I will add a level here, and this level I need this
level to affect the roughness. Now if I manipulate
these sliders here, I can control the
temperature that I added. I mean, this one right here. You can control it
from here if you want this to be more rough, like what I did here, as you can see, now the
rough becomes strong So from here you can
control all of that. If you notice here, I can see seam comes from the
texture itself. If you get a problem like this and you can see the seams
or the edge of the UVs. Sometimes you can go to the
texture or to the filler and k the projection from UV projection to
triplanar projection. Sometime this
option can help us. But when you do
that, you need to manipulate the scale
of the texture. Now I can increase the scale
to, for example, four. The texture is still big. We can increase this to seven. Increase that even more. Now I can see that I fix the problem with the sam
and I got the same result. But I scale this
to 48 to get this. This is the first step.
This is the base color. After that, maybe we can add some dirt above
this. Another color. We can add a fill layer
in this fill layer, I will control the color and
the height, the roughness. The roughness, I will
put this 21 because I want this to be dirt material, let's call this dirt, maybe. Maybe color dirt just
to recognize it. For the base color, let's try to create color
similar to this one. Open this, let's move
the courser right here. Let's see cring this
up a little bit. Something like that, and make it dark because this
should be like dirt. After that, I will add a mask. Add black mask. T Now
we cut black mask. When I added the black mask, I lost everything almost, but I will add a texture
inside black mask to control that dirt material
that I create here. But before we do that, I think we can manipulate
this a little bit. Make it saturated. I think
that will be better. Now let's go to the color dirt and go to the black mask and
pick one of these textures, and let's use it there. Before you drag any texture, go to the black mask and
hit right click and let's add fill layer inside
the black mask. And here inside the fill layer, I can add whatever color I like. Texture here. Let's see
which one we can pick. We got a lot of option here. Well, maybe let's see
which one we can use. Let's see what's
going to happen if I use this one. Let's
put this right here. Now I can see I got something. And we can control
that even more. If I go to this ope right
here and at a level. This level will control this texture because
it's above it. J tickering this a little bit. Let's try to create
something similar to this one or even close. All right, now, the
result that I'm getting now is looks okay and nice, and we have the seam bag. In this case, maybe we can use triplanar for this one as well, and manipulate the scale. An the scale again. Something like this.
I think it will work. Yeah, that's very cool.
So as you can see now, we got some dirtness, on the body and now
it's become nice. That's very cool. You can control that even more
by using the level here if you like to
reduce it or increase it, if you like, you've got
all of these options. If you don't like the texture, you can use whatever
texture from here. Let's see what's going to
happen if I use this one. Let's go back to
to the fill layer, and let's pick maybe this one. So as you can see, there's another
type here we got. Now it's become very dirty. We can use this one if you like. I guess this one is okay. L et's see if we got another
images, can help us. Let's see what's going
happen if I use this. Well, that's not going
to or that's too much. I can reduce the the scale
number here or size. T maybe ten, let's
see what's going. I can get a result like
that if I do this. You got a lot of option. Let's see this one.
Well, that's too much. See what we've got here. Let's
see this one right here. Yeah, that's too much as well. By the way, you can invert
the texture if you like. You can invert it and you
can get a different result. Less cake. I don't know which
one we used before. I guess we use this.
Yeah, let's use this one. Let's increase the number
of the scale to 15 maybe. This result looks okay and nice, and I can control the
scale even more if I like. But this very nice. It's subtle effects. Let's activate the level. When I activate the
level, I will lose that. I can go to the level and
control it again if I want. Something like this looks
okay and cool for me. This is the first step,
this is how to add fill layer and how to control it and get different
effect from it. Well, I will end this
video here and see
132. 132 Substance painter creating material for the body part 2: Hello again, welcome back. Let's see what else we can do. Until now, we added
three fill layers here, and we got this result. Let's scale down the
p. Hold control, hold, right click and move the
most to the left or to the right and scale it down. Let's go to the
material section here, not smart material, materials. Here we got son of read
material. We can use them. And here we got
the rest material. We got a lot of materials
we can kick here. We can kick them and see them. What I'm going to do is, I will use the rust fine. I will take it and put above the colored
earth right here, this new material will
cover everything. Well, first, let's go to the option of this
rust material, and let's change the
UV, the projection. As you can see, we can
not the seams exist here and visible here
as well and here. We need to avoid that. I will change the projection
from UV projection to tri planar after that, I will change the scale
to, for example, 20. Now we fix the same problem. But we need to make some
tweaking to the material itself. Let's go to the color first
and let's desaturate it. Let's take this down and make
it desaturated like this. Something like this,
it will be nice. Because according to the movie, or according to
the image itself, the weather is dusty and
the color is not saturated. The rest be like this, as I think, it's better. After that, we can
add black mask to the rust material and we can add any
texture we like here. After adding the mask, I can go to the effect
and add effect. This time, maybe I
can use ad generator. Let's add generator and let's
see what we can find there. Well, now we have the generator
and we have this option. When you open it, you will find bunch of
options right here. We've got this option, metal we can use it. Let's
start with this one. Let's add this effect on the ordinary thetor let's
see what's going to happen. According to this generator, I got the rest material. Now, I just applied
on the edges, and that's something
nice actually, but we can control
that even more. We control, we can control it. Let's put this forward just a little bit and let's see
what's going to happen. So this option can help the contrast and this one
can control the level. The grand amounts,
increases maybe right here, let's see what's
going to happen. A now we got this result
actually is not beautiful, so I'm going to take this back. The wear level, let's take
this down just a little bit. I need the effect to
be not that much. Well, this effect
is. I don't know. Let's try to control
that even more. Let's see what's going
to happen if I a bit. This is very subtle effects. Well, what about
the grange scale? The grunge scale will
help to scale the g. So now we got this
result I turn this off, you can see before and after. This is the result
that we got here. You have all the controls if you want to control
that even more. Let's take this effect
as a first effect. We can add more effect
above this one. We can go back here and
add another generator and we can use new
generator from here. Well, let's see this time
which one we can pick. For example, dirt, let's try to see what Dirt can do here. This is the result that we got after adding the dirt generator, and we can control the
dirt generator as well. But I think we got some
seams here, if you noticed. We can see the UVs here. In this case, if you've
got a problem like this, inside the setting, here
we use triper, it's false. It's weak this to true. That will help to fix the
problem a little bit. Let's see what's
going to happen. As you can see that eliminate
the same appearance. Now we got cleaner results. What about the d contrast? Maybe we can increase this a little bit and let's
see what's going to happen. The result looks nice. The grand amount here,
and the dirt level, we can control at
least take this back just a little bit
because that's too much. We got this result. Maybe we
can increase a little bit. But before we increases, remember when we added
the dirt generator, we lost this generator
as well, the edge. We can't see any edge
here, if you remember. It's very important to
change the blend mode, I will change this to screen
to see both effect here. All right. Now, very cool. After that, maybe we can increase the dirt level
maybe just a bit. Cool. Now we get this result. We got some rust here. All right. L et's see what
else we can add here. Above all of that, maybe
we can at this time, fill layer, and in
the gray scale, we can use any texture
from the procedures. Go here and let's pick
nice teste from here. Let's see which one we can pick. Let's try to find
something nice. Maybe this one. Let's see what's going to happen if I use it. Click and track and we try here. Now we can see some
nice effect here. Well, let's change the pro to to fix the problem and
let's change the scale, for example, to fi maybe. Right now, I can see
some rusts on the body. At least increase
the contrast a bit. Increase the balance, maybe. Right now we got this result. Well, I think that's
too much, I guess. But it's become almost close to what we
have here ale bit. Maybe we can take this
back a little bit. A Don't forget after that, change the blend mood to screen to blend
it with the rest. That's very cool. Maybe we can take
this back a little bit, reduce the effect. Effect like this is very
nice and looks nice. Don't forget this
one K resolution. T Well, now, maybe we can
add dust above all of that. Let's add the new filler. I add two, let's
delete one of them. Let's call this dust. And turn off the heights
and the metal key dunes, crank up droughness,
and make it of the color to
something like dust. Let's wait for the saving. All right. Maybe something
like this. Like a dust. That's very cool. Now we
need to control that, and let's see how
can we do this. I will add black
mask like alloys. Here we got ready
masks smart mask. Open this list, and
as you can see, we got a lot of masks here, and you can kick them and see which one is suitable to you. Let's see which one
we can make and use. All right. Let's
use this one and let's see what's
going to happen. It's called dust clan. Well, I think this one will target the cavities as
you can see right here. All right. This kind of mask I think is
not going to work. So I'm going to
delete it from here. Let's try to find another one. Here we got a lot of option. A lot of choices we can. Let's see which one we can use. In the dust section here, we got this dust soft two. Let's try to use it and
let's see the effect. To click any drag
and put it inside the black mask.
Let's wait for this. Well, as you can see,
this is the result, I can turn this off to
see before and after. Well, that will help to reduce
the effect of the rest. You can control
that even more when you go to the filter itself. Here we go all the
options if you want to change the
global balance to something This result is
nice and I like it actually. Don't forget this is one
K texture resolution, not two K. When I
squeak this to two k, it will be even more beautiful. Okay. Now let's try to
add something else. Like adding a fill
layer right here. Sorry paint layer, and we can use the of the software to
bend anywhere you like. Click any drug and you can
see what I'm doing here. But we need to go to
the bruh section and pick a nice bh from
these options. A Maybe this one is okay. What else see. Do we have a better option? Well, maybe this option. Let's see like this price. Let's kill this down
make small like this. Let's use this to bend. Let's see what's going happen
as you can see the effect. But maybe we can make it smaller because we just need to
create some leaks here. Let's create some leaks. Something like this, and maybe some leaks here underneath
the door, if you like. So Plotinus in any
place on this side, let's do the same scenario. Something like this. Let's scale the price
and maybe we can add some pltines, like this. So touches. Rotate
the environment. Maybe we can add some
touch right here. Let's make the price smaller. Something like that. Let's focus on this
area a little bit. All right. Something like this and on
the side, the same thing. So touches here maybe as well. Maybe a little bit here and
here on the side as well. All right. I think that's it. Now we got this result. It looks fine and nice. For any reason, if we want to and add things
we can do that. After all of that,
maybe we can add some effect here
or filter skull. Let's add a filter and let's pick a filter from this option. I will use the Carbon to make the texture
sharp and crisp. By Zooming, as you can see, now it's become very
clear and nice. I can turn this on and off
to see the difference. This is before and this is
after, now it's become sharp. You can keep it a
very nice option. I think that's it for the body, and if we want to go back, we can go back and edit
anything we want to it. That's it for this video
and see on the next one.
133. 133 Substance painter Applying body materials to the rest of the geometry: Hello again, welcome back. Let's apply the
material that we just created on the other parts. For example, the top parts
that we got here in this area. First, let's bring them. Top parts, I think
they are here, and now we cut them.
That's very cool. Now let's go back to
the body material, and now what I'm going to do is I will create a new folder. Let's go to the folder, se add a new folder here and now
select all of these layers, move them inside the folder. Now they become
inside the folder. Now we can close and
open the folder. We can call this body empty for material and enter to accept it. Now, after that, he control
C to C V this folder, and let's go to the top parts and delete this layer,
we don't need it. Hit control V to
baste it right here. Now the same material should
be applied on these parts. That's very cool. Let's open the
folder because here we can do some tweaking here. Well, maybe for the paint, we don't need any paints here. Let's de the paint layer. And I think one of these
textures need some tweaking. It's a little bit plury, if you not here. Let's try to find some solution. But first, let's try to find it. Let's turn off those and
see where is it exactly. Let's not here, maybe here. I guess, let's go
here and see this. Go to the garage and maybe we can manipulate the
scale for this one. And yes, increase the number. Now the results become better. Let's see what we can identify and increase that even more. A 100. Let's check the
rest of the metre. It looks nice. And I think we can accept it. Well, maybe now we can work
with aware a little bit. Let's see if we can manipulate were level, just a
little bit back. Maybe even more. That looks okay. Let's
go to the dirt and let's see what change
we can make here. Let's decrease the dart
level. Let's take this back. Something like this, or maybe
increase it just a bit. Let's take the
ground amount down, Let's see what's going to
happen or maybe increases. That can affect the dirty
and make a strong or soft. Let's take this down, and
let's see the effect. Well, I prefer to cr this up
to make the dirt crisp and sharp I guess we can use custom grand here. We got the oc right here. You can put any mage
right here, for example, we can go to the PQs section and we can pick one of these ages and let's try to use them see
what's going to happen. Lets see which one we
can pick maybe this one. Try to find nice one. Maybe this one. Click any drag and let's
put this right here. All right. So now
we got this here. Let's manipulate the contrast. Even more maybe. What about the balance? From the grand scale, we can manipulate the scale, increase this a little bit. So now we got this result. It is a nice distribution. I like this. You can try another
image if you like. There's a lot of images
here, you can pick. For example, let's see what
can happen if I use this. This custom grinds
put this inside in. This is another result.
Let's see this one. And let's change the
scale back or forward. We got a lot of options. Well, I guess I can use this. At a kick the rest. I think everything
here looks cool. Now I can this material can and bring the door handle. Let's see where this door
handle is right here. Delete this layer
from here and it control the two
based what we CVID, and let's see the results. Well, it looks beautiful, and I'm not going to make any tweaking here.
I will accept it. It looks nice. The same thing on the side. We could get correct results. I, that's very cool. What else we have here? We got the stuff of the tail. Let's try to find the tail, where is it tails right here. Delete this layer and it can V to best right
here as well. And now we got it right here. That's cool. Let's
take a look here. I think here we can make some tweaking if I
open the material, for example, and go to the rest. Maybe I can increase the
scale of the U V here. It is going to
happen if I do that. Maybe that's help to get better result here
and here as we. Maybe we can manipulate the dirt and the edgew filters. Let's see what we can do here. Maybe we can change the
grand scale a little bit. All right. In general, the result
looks nice and beautiful. I can accept it. Well,
what else we have here? We have the doors. Let's
go to the, No door handle. Yeah. Let's delete
this layer from the. He can two best, the same material, and now
we got it alight on the. That's awesome. All right. What else we got here? Where is the frame?
Borders. We call it. Well, let's see what's
going to happen if I apply this on the borders. Delete the set control
V and spat it here. Well, the result is nice, but we need to make tweaking. What I'm going to do is, I'm going to king
the name to borders. And open it, and I will go to the base color
here and make it der. Something like
that. For the dust, we don't need the dust. We can't delete it from here. That's very cool. Let's see if we can delete the
rest from here. Well, I think I can delete it. I still can have
beautiful results here. Yeah, I will delete this. I don't want it on the borders. That's very cool. Now I
got nice result here. And don't forget
I'm working with one K resolution.
Just remember that. All right, so that's cool. Okay, I think
that's it for this. I will end it and see
you on the next one.
134. 134 Substance painter Creating material to the windshield: Hello, again. Welcome back. Let's create a material
to the windshield. First, let's unhide it. Let's well right here. Easily this layer and
let's create fill layer. Well, we don't need any
height information for now, any roughness any metallic. We just need color for now. Let's change the color to something similar to
what we have here. But I'm not going to
make it transparent. Let's move this up a bit
and maybe even up here. Okay, Let's pick a
color like this one. For the metallic, I
will activate it and I will book this forward like this and keep editing
the color here. It's a little bit hard to pick the correct tone here
because it's transparent. This is, I think that's for now. I will accept this and maybe later we can make some tweaking. We can't call this base. We can add another layer
to control the roughness, turn those of all of them. Keep the d roughness.
Let's call this t. Roughness. From here, we can control the roughness. Let's
see how can we do that? Let's go to the procedal
section and let's try to pick a nice texture from here. Well, maybe this
one, let's start with this one. Let's see
what's going to happen. Well, the result,
it's beautiful. I like this. But we can
control it with the level. So go to this C let's add level, and here we got
the affected kel. We need to effect the roughness. Let's try to manipulate this. All right, make the
effects settle like this. Well, that looks nice, I guess. All right after that, add. So to do that, I will add
another f and I will call this By the way, I think in the smart material, we got material
coal dust, I guess. That's right here, but I think
it's not going to work in in the scenario. I'm
going to ignore it. Let's see how can
we create this? Let's turn off the height and the normal and the metallic. Crank up the roughness, make it very off, and let's pick a color
similar to the dust. Something like this maybe. Or something like that. We should not see
any reflection. Let's see what's going to
happen if I swing this to triplanar or that's not going
to affect the seam here. Anyway, I will
accept this result. Now I will go to the Smart mask. Here we have smart mask, and I will pick one of these. For example, let's try this
one, what's going to pen. First, let's add the black mask. Let's use this. All right here, I can see them. Before I do anything, I
just need to fix this area. Let's go to the roughness, and let's change this to triplanar and
increase the scale. Now is better. Let's
go back to the dust, and let's put this inside
the mask, black mask. Let's see what we can get. We cut this result. It's almost nice,
but we got this sm. Let's try to fix it. Now we got texture
two and tie one, let's open it and activate
triplanar for this one, and activate trip for
this one as well. Let's see if that can affect
the titure and fix it. All right. Let's
manipulate the scale. Maybe even more.
Now we got this. If you don't like this result, you can delete this
mask and you can add a generator and you can pick a generator from
here if you prefer. Maybe we can use, right. Let's use the dirt generator. As you can see this
is the result. Well change the dt level, take this back
just a little bit. Make the effects settle. Maybe let's see what
could we do here. Change the scale back. L es increase the dart
level a little bit more. After that, maybe we can
go to the opacity here. Let's take this down
just a little bit. A Let's try to find a
solution to this same. Let's activate Trier. Maybe now we can manipulate the ground scale
and cring this up. Something like this. Let's see what can happen if I change
this to U V projection. Nothing. We we got
something weird here. This seem right here, it
seems like it's a bit difficult to remove
it right now. Maybe later I can't find
a solution to this. But for now, let's focus
on the material itself. Let's go to the bas color. Let's see what can happen
if I make this darker. Let's make it dark like this. I think that
will be better. I will duplicate that as
control, I think, control. If you hit right click, you'll find the
duplicate option, and I will delete the
disk generator from here, and I will keep the ask, but I will go to the procedural section
and pick one of these te. Let's see which one we can use. Maybe this one or this one. We got a lot of option here. L et's see what's going
to happen if I use this. Let's add the fill
layer here first, and then grab this and here. And a level to
control the layer. We got this result now. Okay, let's go back
to the dust here and cring the ops down
just a little bit more. And the same thing
for this layer. Something like this. I will accept this
result for now. If you want to fix
the same area, we can create a layer,
not fill layer, we can create a paint layer and the blend to pass and then make the size of the b then you can go to this tool
called clone and I will clone a sample
from here and best dr here and keep bending this
area until I hide the seam. To do that, let's take a sample, for example, from here. I'm going to hit V and click and then now bend
right here on the seam. As you can see, this
method can help us to eliminate the seam. V and let's take from here. Okay? Okay, so now the
result become better, I mean, the same area. But to be honest with you, I'm not so quite with the wind. Well, let's go back to the opacity of this and
let's take this back. Let's hide this for now. I think I can
accept this result. I mean, I can ignore this layer. Or even this layer. Well, I think this one, I can delete it or
ignore it, keep it off. This one we can edit it
even more by adding, for example, paint layer and painting make some paints
here on this area. Maybe we can change the
bh to another bruh. Let's try to find a good b here. Let's see if this works or not? I am painting here on this area. I should see the original
material that comes from here. Well, if that doesn't work, you can king the gray scale of the paint layer from white
to black to work as a mask. Now let's see what's
going to happen. Now I can see the original
material or layer. But this is not the good. Let's use this one. I think this one will work. It's spin the air that we like and keep the rest with the dust. Let's rotate the
environment ale bit here. Okay. Let's delete the dust from this area from the door as well. Let's make this area. But let's try to find
another. Maybe this one here. All right. Let's try
to find another one. Maybe I can use this
one, the default one. All right. Let's
delete this area as. If you try to click,
you can ching the sides of the brush and follow. Here we got a lot of options. Let's man the flow a little bit. Right now it's become a
little bit soft, not sharp. Let's go to the side here, rotate the environment
a little bit. Let's make some
painting here as well. Let's delete this area. Okay. Now, the result become a little bit better and make sense. If we have a dust
on the windshield, that's mean the borders should
have some dust as well. Maybe we can co this dust layer and control
to CV let's go to the border. The borders. Let's see where
are the borders. Yeah. He control V to put the
layer here on the borders. We could see a good result
and the close, I guess. Let's see before and after. It is a good layer to add. We don't need the binds here, but we can go to to the garage and make some
tweaking here, if you like. Manipulate the
balance a little bit. A result like this,
I can accept it. A I think that's become too much. So let's take this back
to here maybe 2.30 0.3. A something like
this, I can accept. Yeah, this is how to the
material for the wind. I think I will end this video here and see you
in the next one.
135. 135 Substance painter Creating a material to the bottom parts: Hello, again, welcome back. Let's create material to the bottom parts. We
got them right here. We selected the
buttom bars material and the texture set list, and let's see how can we
create a material for them. Let's go to the material. Se. And let's see if we can use any materials exist
here to start with. According to the image, this area should be rusty
and should be dark as well. If you check this image here, it's black material
or dark material, and at the same time, y. Let's see how can we
something close to this one? So Let's use this image
as a reference image. Let's put it right
here. Let's see what we got here in
the material section. Here we have this on. Let's see if we have
dark on material. By the way, you can use the smart material as
well, if you like. This one is good, steel rust and wear.
So I will use it. Select and drug and
let's put it here. Now it should be applied on the geometry, that's very cool. Now we got this result. Let's go to the setting
of this material. Maybe there we can
make some tweaking. We got the dirt level. Let's increase the dirt level a little bit let's see
what's going to have. Dirt intensity as well
we can control it. Let's add even more dirt here. Something like this looks cool. Trust intensity let's see what's going to happen
if I increase this. I think that's to decrease this. 0.13 is okay. For the color, maybe we can make this a bit. Something like this.
I guess it's cool. As a base material. Surface iperf maybe we
can't increase this. Let's see what's
going to happen. That's will add
surface imperfection as you can see, its
height information. And it is nice, actually, we can use some of that. But what about the scale? Can we do something
to this scale? Le see can hap if I
this two triplaner. And if I manipulated the
scale to, for example, 50 time, maybe even more to
I don't know, 80. Okay. It looks okay and nice. I guess even if you
increase this to 100, let's see what's
going to happen. Now the texture become small, and that's something I want. But make sure of if you
increase this number too much, you will repeat the texture
as you can see here. We got the same effect here, and that's not beautiful in here as well. Is
will be repeated. So avoid big number here. Let's add, for example, 70, using a number like 70 as can help to avoid
the repetition. This is nice. Let's see
what else we can do here. Maybe we can add a
material above this. Let's check this rust material. Let's see what's going
to happen if I use this. Click any truck and let's
put this one above this. And now we got this result. We Let's go to the setting here and change the saturation. Let's take this down
and make it dark as well. All right. Something like this.
It looks nice. L et's see what
cavities can do here. No a huge effect. Maybe we can make this
a little bit darker. Let's see what's going
to happen if I sw this to and change the scale to, for example, 50, or
maybe even more to 80. I think it's okay and we
can move on from here. In the technical parameters, you can reduce the effect of the normal ale bit. It settled. Let's take this number
down a little bit. That will help to reduce
the height information. Now, the height information
becomes subtle. All right, that's very
cool. Well, now I will use mask and I will put the mask on the rest that I
added a black mask, and now we got the old material. Maybe we can use one
of these smart masks. Let's see which one works here. We got a lot of options, but we want to put the st
material in the cavities. So let's try to find
nice option here. Let's choose this one the moss. Let's see what's going to
put inside the black mask. Well, that's weird. Let's go to the mask itself and let's change
the level, take this down. The height information
is too much. Let's try to find out from where this height
information comes. Maybe it comes from the steel, Let's turn of the height, and let's see what's
going to happen. Nothing. Maybe it
comes from the. Let's go to the material
and turn off the height. Yeah. All right. We need to fix this,
see how can we do that? Well, what about the height
position? Let's bring this. Let's put this to the middle and let's
see if that's effect. As you can see that
effect that is. Let's take this down slightly. All right, effect
like this, it's okay. Height information like this. I can accept it.
It's okay and cool. Well, maybe I don't know. A bit much. I guess. Let's see height range, but I can benefit
from this. All right. This can increase the strength
of the height information. Let's take this back to zero. What about the normal intensity? I don't see any difference here. So let's take this down. Make it close to to the
middle. It will be okay. Let's take it back
just a little bit. Yeah, something like
this looks very cool. We can accept it. All right. Let's go
back to the mask and see what change
we can make here. Well, maybe I can change the color a little bit,
just to recognize it. I just want to see where this
effects become. All right. We want this to be
in the cavities. So let's go back here to the mask that we added here and see
what change we can make. Well, I think the moss is
not going to work here. The moss is not
going to work here. Let's try to find another mask. Let's see which one we can pick. Maybe we can use
this wa right here, sk sand, selected and let's put it here inside the black mask and
let's see the result. This mask will
target the cavities, but it is very strong, let's go to the option,
just to click on it, and maybe we can go
to the curvature and to the VD collusion
and take those back, for example, take this
from one to here, maybe 2.2, and this one as well, 2.3, and let's see what's
going to happen here. Now as you can see
the effect become less, and become subtle. All right now we can go
to the same material and make the color
dark as we did before. All right. So now, this is
the result that we got. Maybe we can make this
a little bit brighter. It looks cool, and we can see some dirt and the cavities and that's
something we want. We can rotate the
environment to see the result even better. If I make a comparison between
the reference image and this result, it's almost close. We can see that we got some, some rust here, and we got
the rust here as well. You still can manipulate the color and make
brier if you like. But I think that's too much. Let's make it darker
a little bit. Now, let's see if we need to add another layer above this or not. Let's add a dust layer. I will go to the layer
and add a new one. Let's call this dust. And I don't need any metalness. I don't need any
normal lend height. I just need the roughness. Crink up the roughness to one. And for the colorless, try to pick color close
to the dust color. Maybe something like that. Maybe darker. All right. Maybe we can add black mask and we can
control the black mask. Let's add a flayer here. And if we go to the
procedural section here, maybe we can pick
one of these images. Let's see what can have it
if I use the artic gradient. Let's increase the
balance, or decrease it. I don't think this
will work nicely. Let's try to pick
another ticket here. Let's see which one we can pick. We got a lot of
choices actually. Let's see which one
is working here. Let's see what's going
to happen if I use this. This one is nice, I guess, can give subtle effect
covers every as you can see. It's very cool, I guess. Let's rotate the environment
a little bit, and let's see. What we got right here. All right now, these
parts become old and rusty and we got dust on them. If you prefer, you can control d two duplicate this
one to d B one, and you can add another
texture here if you prefer. Let's see what's
going to happen. Maybe we can pick
this one right here. Now we can see something. You can this to a triplanar maybe and increase
the scale, if you like. Well, let's try to
find another one. Let's see this one.
Click and Drag, and let's put it right here. This one is nice as well. But I think when we added this, we lost the previous one. Let's change the blend to. Now, I think we can
see both of them. We still can
manipulate the scale. One more thing here we can do, if I go back to the
dust material itself, I can activate the height
information if I like, and I can have some depth
here in the scratch material. If I take this down, as you can see, we can
introduce some depth here. If you like that, you can do it. You can make it
settles and creases. Ok, that's very cool. Let's check the site. Let's go back to the number one, this one, the original one. Let's maul the balance ale bit. Let's make it like this. And for the scrits, I think we can make the color darker because we don't
need a lot of sis here. The result now will
become nice, I guess. All right, I think that's
it for this video. I can add some rust if I like, or I can leave it like this. But I'm not quite sure. Let's see what we can do in
the next video. See you next.
136. 136 Substance painter copying and baste the material to the rest of the parts: Hello again, welcome back. Let's make some tweaking to
the bottom bars material. I want to reduce the dust effect by using
the piste slider here. Let's reduce this
just a little bit. M the effect a
little bit settle. Let's add rust
above all of that. Let's go to the
material section, and go to the rust material. Click any drug and let's put it above underneath the dust, and now we get it right here. Let's chewing the color firs, desaturate a bit, something
like this. Make it darker. Okay, now let's create a mask, black mask, and let's add
fill inside the mask. And let's use any
gray scale image. From the procqual section. Let's see which one we can use Maybe we can use
this one right here. Click and trucking and
let's put it here. After that, we could
see some rust. Especially if I added a level to control that. All right. I will delete this one
the level for now. I think this image not giving me the result that
I'm looking for. Let's try to find another one. Maybe this one black and
white or let's try this. Let's see what's
going to happen. Maybe this one a
little bit better. You can see some variation here. That's nice. Let's change
this to triplanar. Let's change the scale
to, for example. Let's see what's going to
happen if I invert that. We can see some variation, but I think if I
add now a level, we can get better results. Let's move this for example right here, let's see
what's going happen. Or I think the scale
become very small. Let's change this back to 40. Maybe 30 or 20. We got a lot of
scratch in this image. Let's see what's going to happen if I use this one right here or do we have
another choice here? Or at least change the
scale for a ten here. I think now it's looks better. You can go to the rust material and you can open the
technical parameters. Here you can manipulate the normal intensity and
the height position. Let's see what's going to
ha if I take this back, you can introduce thickness
if you like this result. But be careful. M
it very subtle. Now, maybe we can
go back here and add let's add the filter
inside the filter, I will add to sharpen
the image a little bit. I can increase the
parameters here. Maybe I can go back to the image and change
the scale to 15 maybe. I think it's I can
see the pixels. Let's see what's going to
happen if I cring this back to U V projection. So let's hide this and
let's see before and after. It's not going to work. So let's change this back to Trainer. Let's change the scale to ten. If you don't like this
mage for any reason, you can change it with
another mage if you like. But I'm not so quite sure
actually which one we can pick. Which one works here. Right Let's see which
one we can use. Let's see what's going to
happen if I add this here. This one is nice as we. You can see we've got a
very nice variation here. Or let's see what
else we got here. Let's go to the side.
Let's check this area. Well, I guess everything
looks cool and nice. And the same thing for the side. All right. I think we can say that we finish
with this material. Now we can CV it and baste
it on the wing wings, I think, and let's
see what we will get. First, go up here and
create a new folder. Grab all of these materials, move them inside this folder. Let's give this folder a name. Well, let's call this old nor old metal Mt for material. Right now we can
unhide the legs. The front legs. Let's
try to find them. Let's unhide the right one, and I'm going to hit control
C to C this texture, and then go to the right
leg and delete this layer, control V to best
this right here. Now's see what we got so far. The result looks cool. I can accept it when
we can move on. Let's hide the other
leg. Let's select it. Delete this layer, V to paste the same
material here as well. Let's see the result. The
result looks okay as well here. That's very cool. What about the bag legs? L
et's hide this one. Let's select this.
Delete this layer, con to past the material layer. That's very cool. The same thing for this one. Delete the layer, H control V
two based the material here as rotate the environment
to see the result here. It's What else we should do here. Maybe it's the time
for the wings. Let's see where the top wings. We got this one and this
one. Let's start with this. Delete the layer at and let's add the same
material on the wing, and let's see what
we can get there. Now it's applied.
Now we can kick it. The material is very
nice and beautiful. At least for me, I like it. That's very cool. Let's apply the material
on this wing as well. Let's try to find it. T is right here.
Delete this layer, it control V to base
it right here as well. Let's give this a bit of time. Let's see what we can get here. Very cool. What about the light we got, and we got the other wings, where are they this
one and this one. Let's select this
control V here. Yeah, it's cool. And what
else? This one as well. Hit Trove This one as well looks nice
and beautiful. I think we got some similarity
here in the texture. We can make it tweaking
for equ one, if you like. We got this ability, for
example, go to the wing. I will control all and right click on it just
to jump to this sing. I can go to the t go to the
mask and go to the ground. Here, we can just
change the scale to make some variation,
for example, 10-12. That can help to change a little bit the shape of the rust. As you can see now, we
got a different result. We can do the same thing
for this wing as well just selected and you can
go to the crust. Go here and then
change the scale, for example, to nine or eight. T's see what's going
happen if I do that. Maybe we can try another number. Let's try 11. We can do the same thing
for this swing as well. Let's select the sing. C
roll out the end right click to go to the
texture set of the swing. The same thing, let's
go to the rusts. And here, let's
make some tweaking. Let's change the scale of
the U V to, for example, f. Maybe this one as
well. The same thing. Ens to 13. We made the variation
between these wings. Now we got the lights. We didn't give them a material. Let's try to find them. We got this one. Let's select it and control V two based
the same material here. Let's zoom in here and
let's see what we got. This looks nice. The same thing for
the other light, delete this layer, it control V to base the material
here as well. All right. That's very cool. Okay, so I think that's
it for this video. Now the or thep
become almost ready.
137. 137 Substance painter Changing the texture sets resolution: Hello, again, welcome back. This video, I will change the resolution of each
part to two k resolution. But let's start doing
that one by one. I will hide all the pieces. Just to click any
drug like this. Let's start with back left leg. Let's go to this section
here, texture set setting. Here we have the size, King this from one k to two
k, and give this a time. Okay now the texture
become two k resolution. As you can see here,
we have some details. All right, that's
very cool. So we are finished with the first one. Let's check the other side. All right. Okay, now, I can hide this
and hide the next one. Open this. It should
be two resolution. I think this one is 1k2k, let's change this 22k. I didn't select the
dure set itself. You need to select it, and
then change this to two. Let's give this a bit of
time. All right done. All very cool. Let's move to
the next one to the body. Let's hide this one
and hide the body. Select the texture sets. Let's turn off this gizmo
for now. We don't need it. Let's change this 22. Now finish. Let's zoom in
a bit, as you can see. We got a lot of details. The result become
better. Very cool. Now we can hide the
body and go to the next one. We got the borders. Okay, select the
border texture set, go to the texture set setting, change the size from
one K to two k, and let's wait for this a bit. Done. Very cool. Let's move to the next
one. Bottom bars, hide this one and unhide this. Let's change this to two k. Swedes 22, Let's wait for this. Now I changed all the texture
sets to two k resolution, and after that, we will export
the texture to plander. But in case you want
to add anything else. If you want to change
anything else, you can change that and do it, but I prefer you do that in one k resolution because the
performance will be faster. Now I will end
this video and see
138. 138 Substance painter Exporting the textures out of substance painter: Hello, again. Welcome back. Now let's export the
texture to blender. To export texture, you can go to file and export texture
or you can control hefty. Let's start doing that. This is the setting. Here we got where you
want to save them. Chose the direction. And after that, you can choose which one
you can start with. I will export those one by one, or I can export them at once. But let's learn how
can we do that. Here we got all the texture
that we are about to export. We got the base color,
the metallic roughness, normal height, normal open
KO and MPT clsion AO. We don't need all
of these textures. We need the base color,
it's very important, metalin we needed,
roughness we needed. But this normal, we don't
need it because we're not going to see any normal
information on this texture. Height, we don't need height because we are not going
to use displacement. But normal open gel. Yes, this one, we need it because the normal
that we used here, the height information, we will see them only
on this option. This one we don't need it, and
this one we don't need it. MP preclusion, it's optional. If you want to use it, or if you want to ignore it for me,
I'm going to ignore it. I'm not going to
export this texture. So I'm just going to export four titure for each
one for each part. Here we got the U V
tiles or the U Dems. Don't play with these.
Keep all of these on. When you be satisfied,
you can export it. As you can see here,
the size is two k, according to the texture size, and here we got the
global setting. After that, you can export this. So I'm going to export this.
Let's start with this one. Turn off the normal height, turn off the mit collusion, and I will export this one. If you activate the rest, they will be exported
automatically. Let's start with this one, H exports and let w for
the export to finish. A now done. I will
open the folder. As you can see, we got
the texture right here, and this is the normal
map with the open Gel. If I open the image, I can see the
details by zooming, I can see the normal and
the height information. This one that we
want in this case, now let's ex the rest. By the way, each texture
have the same me. All right. As you can see, BL leg, black, left leg, and et cetera. Now let's explore the next one. Let's go to the setting,
and let's export this one. Turn this off. The same thing, we need to turn
off some textures. We don't need the normal. We don't need the
height, we don't need the bit glucon and I
can export the rest. Hit export and they will be
saved at the same folder. Let's go back here
and hit export. The export is finished. Now let's go to the folder. This is the folder, and
the texture s that we export it is B R. It
should be right here. B, and here we got the PR. As you can see, everything
is working and beautiful. In the normal looks fine. This is the idea. This is how to export these texture
sets one by one. And I'm going to do the
same thing for the rest, but I'm not going to record that because that's will
take too much time, and there's no reason
to record all of that. You got the idea,
and you learned how to export and what to export. Export all of these texture
sets, and after that, we will jump back to blend
or to import these textures. That's it for this video and
see you in the next one.
139. 139 Importing the textures to Blender: Hello again. Welcome back. Let's import the texture that we made in
substance matter. Let's import them here, and let's see how
can we do that? I will start with
the big piece here, the body, and here we
have the body material. Well, to do that, I can
go to the ad and go to the texture section
and add image texture, and then go to open, and now let's s for the folder. And here we have
the texture file. Okay, this is the
texture folder. And before I open it, I just want to
mention something. I exported two type of texture, one K, and two K,
because I'm recording, I will use texture with one k resolution to make the performance
of the computer good. So let's open this. I put all of these images
inside these folders, and each folder has the
same name of the materials. So for example, the body, if I want to go to
the body material, I should be right here. Open it. First, let's add the base color, select the base color
and then hit open image. When you do that, blender automatically will
understand that you want to select the U Dems and we'll
speak this automatically to UDM styles and will
select all the textures. Now, if I blog this to the
base color, now it's blogged. Let's select the body and
it slide to isolate this. Now, if I has to go
to material review, let's give this a bit of time. Now we got the body
material applied and ready. Well, that's very
cool. After that, I need to bring
the next material. Had heft to take a V, and let's put this right here, and let's change the color
space to an un color. I will mention why I did that. Well, for the base color, we need the colors. We need the RGB color. Because it's a base color and the color is very important. But metallic roughness, normal. These channels are not
similar to the base color. These are just information. We don't need any color space. First, let's import the image. Let's import the roughness. Pick anyone with the roughness. A texture with roughness, pick it from the same folder
from the body folder, and now we got after that, change the color space to none. And now block this
to the roughness. Now we should see
some roughness. Well, for the body, we didn't use any metallic and we didn't have any
height information. So if you like, you can keep it like this. If you don't, you can take a V, another V and import the
normal, if you like. And set this to color. And here you need
to add a new node. Let's go to cyc at t A and
cc for normal normal map. Plug this to the normal. Make sure to sit this to color
and block this two color. But because we didn't have any normal information or
height, there's no difference. Even if you cut this from
here, it will be okay. This is how to set
up the material. Let's go to slid now and
let's pick another one. Pick those the top parts, So let's go to add let's add
image texture right here, and I will add
normal mob as well. In case I want it. I will
select those both and had control C to copy
them. All right. Now I will start with
this one, go to the open, and now find the folder. Let's search for top parts. Here. Let's start with
the base color selected, and swag this to RGB, and plug this to the base color. You can isolate the
geometry if you like and go to a material
review and there we go. After that, hit D, take a Cb, Let bring the roughness, to bars roughness,
Swag this to color. Plug the roughness
to the roughness. And that's it, we don't have
any height information. That will be enough.
If you like, if you want some
height information, if you prefer that, you
can do something here. You can use the roughness
as a height information. But in this case, you need to use bump. Not normal map,
block the normal to the normal and block the
color to the height. If you do that, you can introduce some
height information. After that, you can
manipulate the strength here. Let's add 0.01 maybe, and you can make it subtle. You can increase this to 0.1. If you prefer that,
you still have this option if you
want to use it. It is cool. I can accept it. Let's add 0.2 and
let's see what's going to happen. 0.13. Let's make a settle. Now I can say that I'm done
with this piece. Let's go to the next one, and maybe we can add
material to the borders, select them, and
it to be the two. Let's go to ben. And let's search for borders and choose pace
color. Here we got it. Plug the base color here. It's like to isolate the g eumetry in Z and
go to material review. Now I got it. Let's
add roughness. Grab this one, take
a cop right here, and's for the roughness. Plug this to the roughness. But before that
can sweak this to nine color and plug
this to the roughness. You can mute and mute the material to
see before and after, this before and this after. If you want to add normal, you can add normal, but we didn't create any
height information. Maybe we can use the roughness to simulate the height information
or we can ignore it. For me, I will ignore it and
I will accept this result. It looks nice. Let's go to
slid again and select this do. It's called door material. Let's try to bind it. By the way, I just want
to mention something. You can be one of
these materials H O because if you do that, when you choose this
open file or open image. This will lead you directly to the folder of the textures. But if you create a new one, I mean a new I texture. I I open this one, this will
lead me to the same folder. I just need to go back
and pick the next one. But if I create a new I
texture and hit open, this one will lead me
for another section. This is nice trick
if you want to use. Let's delete this. I'm going to hit control C
to CBI this one, and let's co the doors, control V to beast here. Now I will change the texture. Open this, and let's go back. We need the door,
whereas doors material. Co is the base color here. And Swedes to RGB and block
this to the base olor. It's like to isolate this. Come to material review.
Now we got this. Hit heavy, take a CB. Let's put this right here, and let's choose the roughness
and block the roughness. But before that, swi is to olor, and block this to the roughness. Now we got roughness.
That's very cool. We don't have any
height information, so I'm going to cancel that
and let's go to the next one. Let's add the windshield, maybe. Control V two bas the same mag texture,
and let's open it. Let's go back one step, and let's search for the
winheld, is right here. Let's pick the base color
first, and bug it here. Let's isolate the geometry, go to a material review. Now we got the base color. Hit d to take a Cobi
for the roughness, and let's for the roughness.
This is the roughness. Swedes to n color, ploug the roughness
to the roughness. Ha d to take another Kobe. This time, we need
the metalness. Let's go to the same
folder and let's search for metallic opines. S is two color because it's just information and
black this two metallic. Now we can see something better. We don't have any
height information. You can ignore the
normal and assets. Let's go to solid and let's
move on to the next metre. Maybe the door handle, select those over here
and let's hit control V, and let's search for door
handle.'s right here. Add the base color.
Block this right here. Swing this to RGB. H D, take another B right here. Let's add the roughness. Swing this to no color, and block the roughness
to the roughness. And that's it. We don't have
any height information. For any reason, if you want
to add them, something easy, just take and COB, go here at the normal open and
treat this two car. And let's search for normal map, plug the normal to the normal
and plug to the color. Now we got the normal map. Let's go to the next geometry. Maybe these parts right
here, tail parts. Let's start from here heat
V. Bring this over here. Let's for the tail parts. Right here. Let's
add the base color, and blog it here, Swu this to RGV. H D take an Kob and let's
choose the roughness. Sw this to color, blog it. L et's isolate the human. Let's see the result.
The result looks okay. That's very cool. Let's move on to the next one. All right. Maybe we can start
with the light. Let's add material to the light. He control V, and for this. It's right, right here. Let's add the base color. Pug the base color here, slide to isolate it. Go to the material review. Now we got it. D, taka Cobi. Let's search for metalins. Pick anyone plug
this to metallic. Change this to Nine color. HD, take another KB. Let's search this time
for the roughness. Swing this to an angular. Plug this to the roughness. Now we got the roughness. For these pieces, we need the normal map because
we got height information. H D, and go here and pick the normal open GL,
and normal map. Plug this here and plug
this to the color. Now we can see some
height information. But change the color space. As you can see, we got
problem is not correct, so change this to ne color. Now, we can see some height information
here. It is very subtle. This is how to import the textures with the
odiums. It's very easy. All what we need to do now is
to import the other texture for the stometris and acts. After that, we can
render the ortho.
140. 140 Adding empty objects at the joints: Hello, everyone.
Welcome back here. Before we rack the
ordini thefter, I just want to add some empts in a specific area in the joint. And let's start doing that. Okay. Let's start
with this area. We got one empty right here, and this empty could
control the engine, but we don't want these two engines to be
controlled by this one Mt. I want to B another
one on the other side. So let's select all
of these parts. And it's Al P and Q clear parent because we don't want
that parent, right. I will control Z, and
I will do that again, Al P clear parent and
keep transformation. Now, when I move this
MT, nothing will happen. After that, I will bring the
three D cursor in the middle and This sick that transformed z 0.23 d
cursor because we need it. I will hit D to
cove this and hit control and mirror this
on the other side. So now we got another T
in the correct position. I will select it, and let's
go back to the boundary. Box, and let's see
the two local. I just want to check
the direction. So x axis goes like this. We should have the same
thing on the other side. So let's check this
one. That's correct. Right now we are ready to link this engine to this empty.
Select this engine. Old F to grab the empty, control B set parent
and keep transform. Now if I rotate this, this one will be linked to this. All right, after that, we want to add an intia here so
we can control the leg, and let's see how can
we do that. All right. Or maybe we can start from here. So let's grab this piece
tab, and let's go to face, select this phase
and this phase, and let's bring the three
decorsor right here, Heft S, and cursor to select it. And let's activa sycren cas. I just forget to do that. Let's move this over here
and let's exclude this. So now we got this
three D cursor exactly in the right place. I will heft A and add
an empty right here. You can scale it and
mix small, if you like. All right. Now we need
to link this this and this geometry and
what All right. All of this, we need to link them to this empty, you
have to grab the empty, control B and keep transform
of if I rotate the empty, I can rotate, all of
them. That's great. Let's do the same thing
here, grab those, go to face, grab
these two faces, and let's bring the
three dcorso over here. Shaft A to add, and let's add
another empty right here. But we will get some
variation in the scale. So to avoid this,
I can grab this. And to bring the three
dcorsor in the middle. Shaft, take a Cobi, control, Alright, that's not going to
work because we just forget to speak
this 23d courser. So control and then
x and then ter. And now we got this
in the correct area. Now let's select these pieces. Let's move them
before we link them. W have to grab this,
Control B keep transform. All right One Mt we need to put right here.
Let's select this one. All right. Let's ft A two. Let's bring the P
cross afa right here, Hft S. Course
selected ft A at Mt. We got one empty. We can scale a and small like this. All right. Let's check the scale.
Let's at 0.2 maybe. Okay. And now let's see
what else we can do. I will select this
and select the leg, and I will hold
shifts and select the empty had control
B and keep offsets. Now, if I rotate this empty, I can move the leg. And I think we need to
link this one with them. I guess hold shift to grab this new Mt control B
and keep transform. Now if I grab the
empty and hit R, I can rotate all of that. Now I can link this Mt to
this empty right here. Hold heft to grab
this empty control B and keep transform. Now, if I rotate this
empty hit R twice, I can control the
whole leg. All right. We can do the same
thing for the site, so let's go here,
and let's grab this. Bring the three
dicrosor over here. Let's add a new empty. Let's go to the em. Let's scale this 2.2 head enter. Select this, hold
to grab the arm, hold he to grab this piece, hold shift to grow up the empty, control B, and keep transform. Now grab this empty,
hold, have to grab that, control B, and keep
transform as well. Now if I head art wise, I can control the whole leg. Let's do the same
thing right here. Let's start from this area. We can select this one. Shaft S, bring the three
dcorsor over here, and we can add
another empty here. Let's change the scale 2.2. And let's link this
engine to this one. All you have to grab the empty
control B keep transform. Now, if I rotate this,
I have something. Let's do the same
thing right here, grab this, bring the
three D crosser here. Now, let's add a new
empty here, Heft A. Add empty. Let's
change this 2.2. Now let's link this
engine to this empty. Grab this, hold heft
to grab this empty, control B, keep transform. Let's go back here and let's
bring the three decosor, and let's add a new
empty in this area, and let's change
this 2.2 as well. And let's link this
piece, this leg. And this piece, I
guess, as well. Hold he to grab the empty. Ctrol B. Key, keep transform, and now let's rotate this empty and let's
see what we got. At art wise, now, we got this. Let's do the same
thing here. Grab this. Heft and let's bring the
three d cursor right here. And Ht a to add and
let's add empty. King the scale 2.2 make small. Let's select this, hold,
you have to grab this, and hold, you have
to grab this one, and then let's the empty. Control B and let's
keep transform. All right. Now let's
select this piece, stop. Let's go to phase, select
this phase, this phase, bring the three
Dictor over here, and let's add another
MT in this area. Let's change the scale 2.3, if you like, make it
a little bit bigger. Now let's select this, this one, hold shift to grow up the
t. Ct, keep transform. Now, if I rotate this, I get all of these
pieces linked. Now, select the
empty hold shift, grab this empty right here. Control be keep transform. Now, if I rotate that one, I can control the whole lek. All right. What's going on? Let's sweep this
two bounding box. All right, correct. All right, just forget this one. We need to link it.
All right hold shift, and let's see grab this empty control B
and keep transform. What about the sit?
Tab, grab this face, this face, bring the three
D cursor in the middle. Shift A, at empty 0.3, and grab all of these
pieces. Hold shift. Grab the empty control B, keep transform, les move
it. That's very cool. Select and I think we link
those select this one, this piece here in the middle. Where is it? This one? Hold shift, grab the empty. Control B keep transform, and now list like this MT, all have to grab this one, control be keep transform. Now, if I rotate
this one r twice, I can control the whole
leg. That's great. What about this area here? All right, let's bring the
three d crosor in the middle, and let's add an
empty right here. We can scale make it
pies a little bit. Let's move this up, for
example, right here, maybe. I'm going to link
the body and all of these details to
this empty here. So select those and select
these parts as well. And the lights. Hold, have to cru this peak empty control B and
keep transform. Now, if I move this, that's
will control the whole body. We just forget to add the
glass and the frames. Cb them, hold, you
have to crab the mt, control B, keep transform. Now, let's hit key to move this. All right. That's very cool.
Let's check those here. We need to add an
empty right here. Let's select this tab, and we can grab this
phase in this phase, bring the three d coorsor
over here in the middle. And now let's add an
empty right here. Add empty, let's add 0.3, or 0.5, make it
bigger, a little bit. Now let's grab the feather,
hold he to grab the empty. Ds like that, control
be keep transform. Now, if I rotate this,
I have something here. We need to do the same
thing for the other side, so L et's sit like this, tab, go to face, G of this
face, G this face, bring the three d
coors in the middle, H A at empty, Kang this 2.5. Cra the feather hold, H to c the empty control
B, keep transform. Keck its, very cool. Let's do the same thing here. Tab, let's add new empty 0.5. Grab the feather grab
the empty control B. Keep transform, and
the same thing here. Tab go to face, grab this,
hold he to grab this, and let's add an empty here
0.5 and grab the father hold, you have to grab the empty
control B and keep transform. After that, we need
this empty to be controlled by this
one by the big one. Grab this hold have
to grab this one. Sorry, let's pick another angle, grab this, hot he
to glob, this one, control be keep transform. The same thing here, grab this. Hold shift, and grab
this one right here, Ctrol be, keep transform. And this right here, grab this hot he to
glob this control be and the same thing here. All right,
that's very cool. Now you can control
the wings if you like. If you grab this
one, for example, If you hit artwise, you can rotate the wing, and you can rotate this
one as well if you like. So this quick way to
create pose if you want to create some poses,
and it's very cool. I think we need to
link this one to the empty control
Keep transform. Now let's see what we
got. That's very cool. So, yeah, we just created an empties and we link these
pieces to these empties, and that's it. All right. After that, we will start
rigging this ny apre. So that's we'll look for this video and see here
on the next one.
141. 141 Riggning section Riggning the front legs part 1: Hello, again, welcome back here. Less rake the Onfptor. I want to move these wings. I want to move these licks, and we need to use
armature system or bones system that comes
default with the blender. All right to achieve
all of that. We need to create a relationship between these paws
so we can control the ornithopter easily if we want to make some
animation or anything. But first, before we
start doing that, let's try to explain a little bit how to
use the armature. If you want to add armature, just hit Hit A and go to the armature section,
and choose armature. And now we got this armature. Let's move this
right here for now. This is the armature
or the bone. We will use this to
rag the oritpor. The armature have body
and have a tail and head. This is the tail, and this is the body, and
this is the head. The armature has a three mood, object mood, edit
mode, and bos mode. Object mode It's like the
object mode for the mesh. It's like the object mode for the mesh section
or anything. The edit mode, here we can edit the armature,
make some extrusion, delete bond or delete armature, move, rotate, do whatever thing. Bows mode, we use Bos mood
after we create the skeleton, we go to the Bos mood to
create a relationship and to make some bows. Right. Now if I tab, I can
go to the edit mode. When I go to the edit mode, I can select the tail itself
or the body or the head. When you select the body, the tail and the head will
be selected together. If you select the
tail, for example, you can and move it, and as you can see, it respond. And when you move
it and make it pig, the armture itself, it will be pig as well,
as you can see here. We can move the head as well, the same scenario,
or we can grab the body and move it from
position to another position. We can make extrusion. If I select the
head, for example, I can hit E, and I can
got another bone here. I can extrude one
here and one up, and I can grab the head itself
and make some extrusion. I can grub the body, and I can subdivide it. If I hit right click subdivide, now it's become two, or I can grub this one
alone, subdivide, and I can subdivide it
as many as I want here, according to this slider here. I can delete, I can rob the bone and it delete,
it will be deleted. And when you delete it, you will have an empty
air between them. Or you can dissolve them, control x, you can
dissolve them, delete the bone and fill the space between
them like this. So this is the edit mode. I can make extion
here from the middle. You have this ability. As you can see, I'm creating something
similar to the tree. All right, so this is this what's going on
in the edit mode. I can scale and make
the bone big or small. I can rotate. If I want, I can grub the bone and rotate
it, as you can see here. I can grub the bone and move it. I can move this one, and then
I can do a lot of stuff. Between these bones,
we got a relationship. I can select the bone and hit Alt B to clear the
parent between them. For example, like this one, if I grab it at Alt B, I can clear parents. After that, I can move it. As you can see now, this bone, I was
connected to this group, but now it's separated. I can select this one at
Alt B and disconnect bone. And I can move it. Now,
this bone is disconnected, but it still have some relationship between this and this according to
this line right here. There is a difference when you use when you use a
clear or disconnect. Now, if I had to clear, I
will cut this relationship. All right. I will hit a and hit delete x
and delete bonds. And I will tab out it hep A, let's add another armature. Let's move this new
armature right here. And by the way, when
you add armature, you will find the armature
right here added. The first one that we added is right here, we can delete it. We don't need to delete this one, and let's
work with this. Right now, if I touch the
edit mode, as we learned, we can make some
editing like moving the head or hit e to extrude,
make some extrusion. For example, let's
create this shape. Now let's see what's going to happen when we go
to the bows mode. Let's go to the bows mode. Now I'm in the bos mode, even the color now
become different. The Bos mode, I now starts
moving these bones as I want. But see here, if
I move this one, it will be moved according
to the anchor point here. If I select this
one and move it, it will respond as well
and it will move this one. This one will respond to this one because
they are connected. If I grab this one and move it, the three of them will
respond to the movement. All right now let's
go to the edit mode. Let's make some tweaking. Now notice here when we made
a bows, we got this result. But if we go to the edit mode, we will jump back to
the original state. If I want to bring back
the original bows, I can reset the rotation
and the position. L r to reset the rotation
g to reset the position. Now I can go to
the edit mode and everything will jump back
to the original state. Well, let's make
some change here. For example, I will create a new bone here hit
E and another one, and I will select this one hit x to delete and
delete the bone. Now, I deleted the bone, but I still got a
relationship line here. Let's see what's going to happen if I go to the Bose mode. Now I mean the bos mode. If I grab this, I can
rotate it as you can see. But if I grab this one, I can move it and this bone right here
will still respond to the animation or the
movement I am creating here because we still got
a relationship line here. But if I go now, back to the edit mode, I will select this
bone and hit Alt B, and I will hit to clear parents. Now I lost this line. Let's go back to the Bos mode. Now if I rotate this one, I lost the relationship
between them because I cleared the parents. So we will learn how to use bon system here
to rake the mipter. Let's go to the object mode. We grab the bon and delete it, and now we don't have any armure right
here as you can see. All right now, let's go here. We got the three
dicar in the center. That's cool. I will
hit fift a to add and let's add one arme.
Now we got it. We got one arme here
added in the center. You can move it in
any place you like. All right. Before
we go any further, here we have some option. All right. Here in
the viewboard display under the pic data properties, here we have some option. We can show the
name of the bone. We can show in front. For example, now I
am above the bone. And I can see it and
I can select it. But if I turn this off, it will be underneath the body. You can activate this one. It's useful here in front. We got more than one
shape for the bone. Display as this option here, we have this option
and this option. You can try them and see them. For me, I will start with this one and maybe
I can jump to the next one. Let's switch to octahedral, and let's start doing something. As we learned, if we
want to create skeleton, we need to go to the edit mode. Just keep that in mind. Now, I will tap to
go to the edit mode, and as you can see, now it's edit mode. I will select the bone here, select the void, for example, maybe I can keep this bone
here in the same place, but I will take another copy. I will hit he to take a copy, and now we got a copy. As you can see, we
got a COV here. I want to use this
CV to start rigging, for example, the front lick.
Let's start doing that. Let's see how can we do this? Well, now I get the bone, and what I need to do is, I need to put this
bone right here. To control this. After that, I want to create a bone for the arm to rake the whole arm. All right first, I think
here we got an option. I want to select this MT, and I want the head of the
bone to jump there like this. But I can't now select the Mt. I need to go out and
then select the Mt. I will turn off this option and now start selecting the object and let's see if
that's all work. I think that's just
work in the bos mode. Okay, don't worry.
What I will do is I will tap out and
I will select the Mt. I will hit ifts and bring the
three D courser over here. As you can see, now I will
go back here and tap. Let's select this head hit ift
S and selction to courser. Now as you can see,
I moved the head of the bone right
here in this place. Before that, maybe if you want, you can select the body and it r to the y to rotate
it like this. Hold control and
rotate this 90 degree. And you can move it
if you like right here and start doing
that, grab this. Sorry, I made a mistake here. Tab out, grab this, a selection to cos. Sorry cos to select it, and then grab the bone, grab the head, have a selection to coser,
and now we get it. Well, after that, we need We need to move this as well and put here almost
right here in this place. So let's do that
together. All right. Now what we need to do, we need to grab the center
of the sphere, or you can use this empty. So tab out, grab
the empty tab and, grab the heft S and cos selected to bring the
three decsor over here, and then grab the bone tab, grab the and select decsor. And now we got this bond
and Bos now it's ready. This is the first step. After that, we can select this ball and e e to
make one extrusion. Let's extrude this right here. We can go to the bottom of view and see if this is in
the middle or not. All right. Almost right here. Now let's make
another extrusion it E to extrude this over here. For now over here,
let's see where we could move this
one after that. Now we got this result. As you can see, now,
the bone become verbic, and I can't see anything. In this case, I can the
of the bone to stick. That will make things
easier for me to control. We still got the the tail, and we still got the head, when the body All right. After that, we need to see what we should do here in this area and
how to work this. I will take the tail and move this back
just a little bit. I want this one to be exactly in the center of this shape because here
we've got a rotation. So in this case, what
I'm going to do is, I need to select this one. So tab, grab this hit slash to isolate this metary tab in, and I will select this circle I click and bring the three
D courser over here. Tab out it slash. Now, let's go back
to the bone here and let's tap the mode
and let's bring this. I want the head to be in the position of
the three D courser. Okay. So Let's go to the front. I will select the body of this
pond and go to the front. I just need to see do
I need to move it? I think we need to
move it just a little bit right here, maybe. So we got this almost
close to the center. After that, let's see
grab the head and hit a chos sleion to courser. Now it's become exactly
in the correct position. After that, I will make another ex hit E to make
another extrusion right here, and this is a new bone, it should be exactly in
the center of the circle. We got the empty ready, so I'm going to tap out And select this empty, bring the three
decosor over here, and then grab the
bone tab and grab the head if and
selction decorsor, and now this become
exactly in the middle, and that's very cool. After that, I will make
one extrusion down to control the leg,
as you can see. So the bones that I
create right here, these bones will help
to move the arm, and this bone right here that
I created the joint here, that will help to rotate
the leg like this. And this point right here. That will help to move the
leg like this or up or down. This is the first
step. This is how to create the bones and
how to extrude them, how to put the tail or head
in the correct position according to the
position of the three d. Now we got this result. We are still not
finished yet here. We got to do something. Okay, now is the time to
give these bones a name. As you can see the
names here, bone, zero, zero, one, 002,
three, et cetera. So we're going to
king these names. And here I want to
mention something. Let's start, for example, from this bond right here, let's see what name we
can give it. All right. Let's go to the bone properties, and here we can king the name. Okay. So this one, I will
call this because this one, this p is on this side, this side is the right side, it's very important
to mention that to type r for right or L for left. So let's select this bone. I'm going to call this because this one is for the front leg, I will call this F t
for front Ender score. Maybe I can call this gin because this point
I need this bone. I need this point to
control the k here. I'm calling this k or this kin. I added this bone right
here because if I don't, this pone will go
diagonally like this, and I don't want that. I want this point to
go like this and then go to this direction. Because of that, I created this extension and
I called extension. It's not useful now, but I just created to make the looking better as you can
see here better than this. Let's see what else
we can do here. Let's give this one a name. Let's call this
one F t for front, Leg foots underscore r for right, and then hit enter. And this one right here. Let's call this FT for front underscore rm
joint underscore r, just to recognize it. There we go you can see,
how we created these ponds and we gave each
one of them a name. This is how to ch the name, how to create this how
to position these ponds, and now I will end this video, and let's see what we can do
in the next video. That's
142. 142 Riggning section Riggning the front legs part 2: Hello, again, we'll come back. In a previews video, we created these bonds. Now let's see how can we create a relationship between
the object and the bone. Let's start doing that.
I am in the edit mode. In the edit mode we
learned, we extrude, we move some bones, we delete bones. That's it. That's what's going to
happen in the edit mode. We create a skeleton. After that, if we want
to create a relationship between the object and the bone, we need to jump to Bos mode. Let's go to the Bos mode. Now let's make some connection
between these bones. For example, I want
to link the engine, this part, I want to link
it to this more right here. How can I keep this? Let's grab the piece, but just keep in your mind. You note that I can
select the bone and I can jump from the bone to the
object, as you can see. Well, that's happened
because I turn this off. If this one on, I can't
select the object anymore. So just keep in your mind. When you are in the bones mode, just swing this two off, look object mode, turn this off so you can select the
object with the bone. Okay, select the object, hold, have to grab the bone. At control B, and here we
have set parents and's bone. Now, if this bone moved, the object will follow it. If you want to rotate it, the object will follow it. As you can see now, we create a relationship between
this bone and this object. Well, now is the time to
create a relationship between this arm and this
big bone right here. Select it, hold,
have to grab this. Let's do that
again, select this, hold, have to grab the bone. Hit control and choose
bone, just one. Now, if I move this one
right here, if I hit, for example, you can see, so let's hit controls
it, bring this back. I just forget to connect
this object as well. This one will be
connected to this bone, selected and select this bone, hold control and deselect
this bone. We don't need it. Holt after that hit
control B and choose bone. Now let's move this
one hit r to move it, as you can see, everything
now is connected. What about this era here? Let's move this one. As
you can see what's moving. Well, I think this
object right here, it should be connected
to this small bond here. You can use this object to connect it or you
can use the empty. I guess. Or the empty, I think the leg is
connected to the empty, so I'm not going to use that. Anyway, select this
object right here. Hold shifty grab this bone, this one right here. All right. And then it control P and
two bone, and now done. Now if I move this one,
this one will follow. What about this one?
If I grab the empty, as you can see, the
whole, it could be moved. I will link the empty. I can link the empty
to this mo here, or if you like, you
can link the object. You can do that. You
can do this or this. The easiest way I think we can mark those together for now, this one hole, you have
to grab this control, make them one piece. Let's move them.
Let's see what we got here. That's very cool. Hold hefty grab this one as well and link those
together to this bone. This one right here.
Hold heft and grab it, it control be and s bone, and now it's connected. Now if I move the source, r, for example, you can
see I can move the arm. And if I move this one, I can move the foot if
I move the arm here, if I move this one alone, as you can see
what's linked to it, and this one as well. This is the idea, this is
how we connect the bonds to connect the
object to the bonds. And now we gave
everything name, right. So I think now we can create
a quick relationship. To help to move this leg. A Let's see how can we do that? I will go back to the edit
mode because I'm not finished. I will select this bone and
grab this head and hit E, and I'm going to create a
new bone up, and this bone, I will select the
body and hit P, and I'm going to
choose a clear parent. Well this bone have no
relationship with the other bone. Now we got this. This
bone right here, it will be a controller
to control the leg. If I want to grab it and
if I want to move the leg, I can move it with the
help of this pone. Let's select it, and let's
go to the bond properties, and let's give this a name. FT leave the FT. Let's give this F g. I mean, front leg control. Ender score r for right view, for right side, and then
hit enter. All right. That's very cool. Now let's
go back to the bows mode. We added a new bone right
here and we need to use this. Now if I grab this end
move, nothing will happen. Now I will select
this bone right here, and I will create a relationship between this
bone and the other bones. To do that, here we have
the bone constraint. We use the bone constraint. All of these cul constraint. We use those to create a
relationship between the bones. One of these options that will work in
the scenario is I K, I guess, is it. Inverse kinematic, IK control. I'm going to select this more
right here and I'm going to add this relationship
or this constraints, IK, inverse
kinematic. All right. When I set up this constraint, you will understand
what this will do. Well, fair thing, we need to choose the
armcur as a target, and we just have this
armcur right here, so select it and let's add it. Now it tells you, here we have which one you
we need to select, and we need to select this pot right
here because we need to control the leg
according to this pond. This one will be the controller. We need to put this one
right here in this section. Let's search for
this one is called front controller r, selected. Here the chain the chain length. We got this bone, and we got this one number two, and this one number three. This one with this one with
this one, create a chin. We need the chain rigged
this bone right here. I'm going to change the number. Let's change this 0-2 to three. As you can see now, we got a come from here, goes there. All right. Now let's see what's
going to happen if I grab this and hit
key to move it. As you can see now, with this by selecting
this spawn alone, I can move this leg in this way. But the posing or let's
say the ruging is not finish it because we
got some problems here. Okay. Fair thing, we don't need this joint to
move in a freeway. I mean, I need this
one, this joint, and this join to be connected together
and moved together. Now if I grab this controller
and move this one, you can see that
I have an angle. I can see there we got an angle. If I move this one. K? And that's wrong.
We don't need that. We need to phrase the
relationship between them. Let's select this
power right here and go to the bond properties. Let's see what we got here. We got some option here, we need to lock Here we got
in the inverse kinematic. We got the x and y and s. I'm going to lock
all of the axes, just to click and drag
and now they are locked. Now if I grab this one and
move it, as you can see, I lost the joint here
in this area because I locked all of these axes for this bond. As you can see here. Now if I move this one, this one will be locked. Well, that's something
cool and great, but we are not finish it. Now the second problem that
we got when we move this one, we still got this p connect to this group and
moving in all direction. We don't need this
one to be moved. To solve that, I can go
back to this bone and go to the constrain section and
I will ing the length. As you can see, the
connection jump from here to that bone. I'm going to go
back just one step to make the connection jump
from here and end just here. So now if I go back here, you see now we moved the
connection from here to here. Now if I grab this controller
and hit you to move, now I got this, and
now it's correct. I go here, for example. If I move this one, as you can see the movement is very cool. But we got one problem. When I move the le, if I
move this up and down, we can see that we got
some rotation happen here, and the engine could
be rotated as well. This piece could be rotated with the arm because this piece, it's the responsible
of rotating the arm. We need to do that. Let's see how can we do this? As you can see now if I move it, I don't see any rotation. Well, when I move this, this bone right here, it's
rotating with the arm as well. Maybe we can use the rotation of this bone as a help
to rotate this one. Let's see how can we do that? In this case, I will create
another bone to achieve this. We learned if we want to create new bones or make any editing, we need to go to the edit mote. Let's go out from Boes
moot to edit mode, and I will select this mo here, and I will hit e to
make one like this, and now we got this bone here. I will give this a name. Let's call this front and Maybe can controller. And the 001. We don't need it. It's enter, and now we cut it. All right. Now let's see
what else we can do. After creating this bone, I will go back to the Bowes mode to create a relationship
between them. Let's move this one,
the same scenario. First thing, let's separate this bone from the group.
I just forget that. Let's go back to the bone, to the, this bone. Alt P. Let's see grab this one. I think it's separated
automatically. Because when you hit Alt P, You don't see anything here to pick. That's something cool. Let's go back to the bows
mode. I got this saw. I need to co the rotation from this so
right here to this so here. And I need this piece, the engine to be
connected to the spa, not to this son. No to the son. I
will select this, hold you have to grab the spaw Deselect anything else, it
can roll B and chose bone. Now when I move this one, the engine will follow it. It's no longer
connected to this. Now let's select this one, and let's go to the bone
constraint properties to create a relationship between this more right here
and this more right here. Select this, go to
the constraint. Let's add CB rotation, CB rotation to co with the
rotation from this to this. So that's very cool.
Now we got the target. What is the target? We need
to choose the armature. We're working with the armature. And now it tells you from where you want to
cop the rotation. We need to cop the
rotation from this point. So it's called Ft extension
r. Let's see for this one, FT extension r,
and now we got it. Now we just copy the rotation. Here we got option, very important to change. Now it's working according
to the world space. I'm going to speak
those two local space. This one and this one. Just keep that in mind.
Now everything wins back. Now if I grab this,
hit key to move. Now we are taking the
rotation from this point, but we are taking the
x and the y and the s. We don't want
all of these axis. We just need the
rotation like this. I think it is y axis. We can swing this to
the local and activate the gizmo to see
what's going on here. As you can see, the y is
going to this diction, so we need the y rotation. Let's go back to
the bone and turn off x and z and
keep the y active. Now if I grab this N H key, as you can see now we
got some animation here. But the problem is the
animation is flipped. To fix this, I'm going to activate the y in the
invert to flip this pack. Let's see what's going to
happen. Now it's correct. As you can see, when you
move the leg up and down, the rotation work very
clearly and very nicely. Now we've got very beautiful
animation here and nice. So let's go here and let's move this lick is
very beautiful. All right. This is how to create a relationship
between the bonds. If you didn't understand that, we'll just repeat the
video again and again, and just do that by yourself. Create these other the names, create a relationship
between them, and you will understand that. For now, I will end this video and see you in the next one.
143. 143 Riggning section Riggning the front legs part 3: Hello again, welcome back. Let's com belet rigging
the front legs. Now I am in the bows mode, and I got this result. But the question is, did
we finish here or not? This leg should be opened like
that, something like this. When the leg takes direction, this part, the arm should
be tilted a little bit. As you can see now,
it goes like that. It's str, but it go
diagonal like this. According to the
reference me five, bring the reference meter here. As you can see how the leg goes diagonally to
this direction. Something like this. All right. So we need to
create this effect. When I open the leg, the arm should
tilted a little bit. All right. Let's see how can we achieve
something like that? So we have two meat. No. I will a Trolls
to bring this back, and I will go back
to the editing mode because we need to
do some editing. Well, this pot right here, I'm going to have d
to take a CV of it, and I will put this a
new COV right here. Okay. And I'm going to
call this front leg. Front leg rule. I'm going to call
this rule R O L, and I'm going to delete these
numbers here and hit enter. Now if I go back here to
this pond and the bos mode, let's go back to the bos mode. If I go back here, let's
go to the constraint. I have the bull target. I can use it. Let's change the name
before reaching the name, let's delete this part.
We don't need it. Let's change the leg control
to leg dioxin maybe or arm. Front arm drogin. He enter. Now after that, let's go back to the Boes mode and
let's select this. Let's go to the
constraint section. As you can see, we
got the rule target. We didn't select anything
for this section. Now I'm going to select
this point right here. Pick this one, and
now we got it. All right, we should
select the armature. After that, grab the bone. It's called Ft arm is right
here, Ft arm direction. There we now we got
it and selected. Now, if I move the scan roller, the arm will always be
directed to this bone. As you can see now. And
if I move this one, the arm will follow it,
as you can see like that. This is very important step. Okay. Now we got something close to what we have
here in the image. But the question
is, did we finish? Actually, not, we
are not finished. Because when I move this down, for example, the foots
follow the direction. I need the foot always to point down because that's
something very important. And we need to find a trick to achieve something like that. I'm going to at control a couple time to
bring the leg back. And because we need
to make some editing, I'm going to switch
back to edit mode. Okay. Now, I think I
can grab this bone or maybe this ball
right here and hit E to have a new bone like this. This bone right here
is just extra bone. I need it for something. First, let's change
the name of this bone. Select it, go to the
bone properties, and let's change this to maybe a front stabilizer
and delete these numbers. Now we have the stabilizer
bone right here. After that, I'm going to
duplicate this bone up, D to the z. Let's add this one right here, and let's give this one a name. I'm going to call this
Z direction top, maybe. Re top and change,
delete these numbers. We don't need them. And we need another one at D to the z, and let's add one right here. Let's call this du bottom. All right, so I'm going to
use these bones to help, I'm going to use this one
and this one and this one, to help this bone to be directed always done or pointed
always down is the idea. And let's see how
can we do that? All right. We
finish the editing. Now let's go to the
boys because we need to create a relationship
between these bones. All right, now we are
in the boys mode. The idea now when you move
this when you move this bond, as you can see, this bond
here will follow it. This bond will follow the group, and this p as well, and this one as well. We don't need that. I need to detect this and detect
this one as well. So let's go back
to the edit mode. Select this pond, it
Alt B and clear parent, select this one, Alt
B a clear parent. Now this bone and this bone, not affected by the movement of this bone right
here or this group. Let's go back to the Boes
mode and let's kick that. Select this, it you to move, and as you can see,
I got what I wanted. All right now what
we need to do is, we need this bone to follow
this one right here. To the x and to the y, just to this dark, not to
the z darken. All right. That's mean we need to co the
position from this to this, and I will show you
what I mean here. I will select this part right here and go
to the constraint, and I will add COV location. I need to b the
location from this one. All right. I will
select the armature. After that, select the bone
that you want to work with. I want to work with this one, and we gave this a name,
stabilizer FT stabilizer. So let's go here
and let's search for FT stabilizer. We
got it right here. Swig this to local, this one to local, and turn off the zt and
keep the X and Y. All right now when I go
to this pond and move, this bond should follow it. Let's see why that
doesn't happen. So I just forget to
leave this at world. Let's change this pack to world. And now if I move this one, as you can see, I
got what I wanted. Well, if I take the leg down, now the position of
this point goes down. But this right here is going to is not going to be
affected by the z axis. It's just going to go
to the x and to the Y. As you can see now,
when I move this one. Well, that's something
cool. I like it. Let's bring this back to
the original position, old key to reset the position. Well, now I need this bond to follow this bond right here. So we need to create a
relationship between them. Select this bone, go
to the constraint, and let's add COB location. Let's choose the armature, and let's add this bone, the FT front z direction. This one right here. And let's turn of the z
axis we don't need it, and now we got what we wanted. Now, if I move this
one, these two bones will stay where I want. After that, we need
to add a constraint, help to make this bone
look at this bone. Always goes down. To do that, let's go to the
constraint second here. And let's choose dumped truck, select the armature,
and then in the bone, I will put this one right here. Let's search for this. Is
called Ft Z direction. Bottom. But I want to
do something here. I just need to ching
the name of this pond. We don't need the
zero, zero, one, just delete them to
enter, and that's it. A now this pone should
always follow this. Let's go back to the const. Let's see what we got. And now we got what we wanted here. But we will got one problem. When we go down like
this, it will be flipped. That's a been because this
bone it's close to this one. If we take this bone
down a little bit, we will avoid this problem. As you can see now
we got what we want. Now if I hit to move the leg, I got the result that I want, but I still got
one problem here. Well, this shape or this uma tree should
not follow this pont. This one should always
direct it down. Well, let's try to find a
solution for this problem. I think if we want
to fix this problem, we need to connect this um
tree to this pont right here. Okay. So let's see what's
going to happen if we do that. Select this bone, hold
shift to grab this one. It control B and
let's choose bone. And now let's see
what's going to happen. I will move this one right here. And as you can see, we
don't see any problem. But we got some misalignment
here happen in this area. As you can see right here, we got some misalignments. Let's try to find
the solution to this one and see why
that's happened. Well, I think to avoid this, we can tap the it mode of this geometry and select this control to
select the emetre. And then you can hit
P as to separate it, and you can link this one
to this bone right here. Control B and's bone. Now let's see what's
going to happen. I will move this one
here, let's go back. As you can see everything
now it's in the place. So I'm going to
accept this result, and it is nice for me. All right, Let's hit G
and let's move this down. Now we got the
animation that we want. But we still got smaller
problem, I guess. If I move this up, I will have some overlapping happen right here in this area. I can fix this. I don't have any problem
with that to fix it, but I not going to fix
it because I'm not going to lift this arm up like this. So I will ignore it. Now I can say that we are
finished with the front arm, and now it's ready and
beautiful, as you can see. And I can get a bow similar to this one
here in the movie. Very cool. It controls it, and I think that's
it for this video. After that, I think I will work with the back
legs or with the wing. Let's see what we are about
to do in the next video. So.
144. 144 Riggning section Riggning the Back legs: Hello, again, welcome back. Let's break the bag legs. All right. Now I'm
in the bows mode. We need to go to the edit mode because we need to make some be, we need to make some extrusion, Swak to edit mode, and I think I will select
this pond and use it. L et's see how can we do that. First, let's take a Cb head a d and let's take
Coby right here. And I think we need to put
this bone here, first. I will change the
have of the bone to octahedral I can see the tail
and the head. Fair thing. I guess I can tab out and select this empty and bring the three
D coosor over here. Then grab the bone tab. I will grab the tail Hats
and selection to coser, and now we got the
tail over there. Now we need to bring
the head here. Let's do that, tab, grab this empty, a
cursor to selected, grab the bone tab, grab this Hafts
selection to cursor, and now we got what
we wanted here. Now, in the bottom view, I will select the tail and extrude it a little bit
here to the middle. I think we can tap out now
and select this piece. The grab, for example,
I don't know, I just need to make sure that
this one be in the middle. I will eyeball it, select
the grab the tail, hit E, and let's make an
extruion goes over here, and with this one selected hit E to make another
extruion comes here. In the left of view, we can determine where should
we put this one. Hit to move it and let's
move it here. It's very big. I know, I will change
this to stick, so I can see it better. Now we got this bone right here. I will hit key and move
this bag over here, for example, I need to put this one exactly in the
circle of this shape. Tab out, select this tab
in go to wire frame, grab these faces or these edges, bring the three D
coorsor over here, tab out, go to solid. Select the bone tab, grab the tail, shifts and
selection to coorsor. Now we got it in
the correct place. After that, I will make
one extruion, goes here. This one, it should be
in the middle as well. Tab out, grab the empty because the empty
is in the middle. Heft is bring the three
D cursor over here, and lets select the bone
tab and grab the tail. Heft is selection to cursor. Now we got this.
That's very cool. After that, I will make
another extrusion down. We can go to the left view and we can move the
extruion almost right here. Now I will select
this tail and make extrusion to extrude right
here to control the leg. This bone, I will
separate it a Alt P and clear parents, like this. We need to do the
same thing here. I need to create another
bone goes up like this, and what we named this arm d. I'm going to co the
same name from here. I control C to COBate. Let's go here and pass
this name right here. But the front, I will change
this to B K for back. And keep the arm
direction right. It's okay and enter. The same thing for the rest, I can co the same names. Let's go here and take
the name from here. Control C to CB it and go here, control V and k the Ft to bk
for back and keep the rest. The same thing for this bone, Let's this name from here. And let's pit right here. Ctrol king this to PK enter. This one right here,
I think we call a extension. I guess. A Ctrol C, go here, Ct k to B K enter, as, what we call this
bone right here. Engine control C. Let's go here and let's call
this the same name and this two K, enter. What else? What about
this one right here? Let's take the name from here. Control C, and go here. Control V and this two K. Enter. Now let's see create relationship
between these bones. I will go to the Boes
mode and I will select this bone and add invert
kinematic I K. It's right here. Let's choose the me as a target
and then choose the bone. We need this bone to
control this arm, so we need to pot here. Let's find it is called
BK eg controller. You can type the name if
you like, BK and circuit. BK Leg Ctroller,
this one right here. After that, let's set
the cane and the can, we need the cane to reach
this pont right here. Let's set this to
number one and then number two. That's very cool. After that, we need to
slate this pond and go to K inverse kinematics
and lock all the axis, xy and z because we need this pond to be 90
degree with this one. Two lock its. Now let's see what's going to happen
if I move this one, its to move and let's move it. We got something nice, but we didn't link the
object with the bone. Let's do that. Let's
select this object. Hold have to grub the bone. Ctrol be use bone, and now we got it. It's linked. After that, let's
select this one, hold, have to crap the bone. This bone right here, and
this select the small one, Ct be link the bone. What else? I will tab and
select this geometry, control to link select
and Ps to separate it. Now, this object should
always follow this one, I guess, Ct and bone. What about this one right here? This one, and let's select this. Hold have to grab,
all of these details. Hit key to move them, make sure that you selected
the correct object. Hold shifts, grow up
this bond right here, deselect this, hold
control and deselect it, and then hit control B and bone. Now let's see what
we have done so far. If I had key to move this
one, as you can see, I get correct animation mo I just need to
connect this one. I think we need to connect
it with the group as well. Hold, you have to
grab this bone. Diesel like this,
control B and Qs bone. Now let's see what's
going to happen. Que this one, a key to move it, and now we got
something nice here. Now it is the time
to create this one. We just forget it.
The bold target. I should put this bone
right here in this area. Let's choose the armature
and then in the bone, let's choose the PK diction, PK, PK r direction r.
There were going we got. But we experience now some twisting here,
we need to fix it. To fix this problem, I can go to the bull
angle and just rotate it. But I prefer to go to the bag view and do
that from there. Let's go to the bag.
I control number one and rotate this until you
get something correct. It's about nine degree. Now I think it's perfect. Right now if I move
this one, head key, the leg will will look
at the arm dark in bone, and that's what we wanted. Now is the time to keep
the foot, was look down. Let's go back to
the edit because we need to do some editing here. Let's grab this bond
or this head or tail, hit E to extra this up
like this right here, and we need to give this a name. Maybe we can take the same
name that we got right here. We call this front stabilizer. So it control C to CB it and go back here and let's hit
control V to paste right here. I'm going to king this
to B K to recognize it. After that, I will take a B
from this point right here, H D to take b right here. Then he D to take a
CB down right here. I guess, Now let's take the same names
that we got right here. Just forget to activate
screencast number one here, and let's move it
slightly right here. Let's take this name. Control
C front direction top. A Z direction. Let's go here and
paste the name. Ct V, and let's change
this to B k for bag. And let's let's do
the same thing here. Let's take the name from here. Control C, and go here and hit control V and this to B enter. All right we finished now. Let's select this
**** and this point hit and a clear parents. So we cleared the parents.
That's very important. Let's go back now
to the Bos mode, and let's create a
relationship with those. So this po right here
should follow this ****. Let's give those a relationship. Select the bone, go
to the constraint, and let's choose B location. We don't need the Z duction, turn this off and add the
armcure, and choose the bone. We should add this
bone right here. Let's search for this one
is called BK stabilizer. Go to the S hit BK and
search for a stabilizer. We got it here. Now
if I got this AK, sorry this one, this one should follow it, and
that's very cool. Now, this one should
follow this one. Select this, go
here, be location. Turn off the Z ax. We don't need it,
Qose the armature, and let's choose this bone. I need to put this
pone right here. Let's search for BK and
then Z direction top. Now let's move this one, let's see what's
going to happen. Now we got what we wanted. After that, this bond right here should
always pointed down. Let's add dumped track because this constraint will do what
I want and choose armature, and let's put this bond here. S for this one, B
K leg controller, g foot, leg foot. This one right here. Let's
see what we got so far. Hit the key to move this one. All right. We got
something weird. But we didn't select it. P K. Sorry, I'm sorry. We select this one. P K direction. But That's very cool. Now
we got this problem. Let's see how can we fix it. The problem that we got here, we didn't select the
back Z direction. We selected the
front Z direction. Just be aware of that. Let's go back here at pK, z direction bottom, and now
it could work correctly. Now if I move this,
I got what I want. That's very cool. Now, always
this leg will point down. That's very nice. Let's
see what we've got here so far. With these objects. Do we have any misalignment? Let's move this leg, for
example, right here. Let's check this area. We got some misalignment here. Happening. Let's try to find out why that's happened. It's weird. I guess we separated this
to two. I don't know. Let's hit control z, and
let's select this one. Yeah, I separated to two. When we hit control L, it got half of this geometry. In this case, I will select
this tab control L and choose normal in the sit in the select link
menu and hit P, now select those both, this one and this one, hit control to make
them one geometry. Hit slash to isolate them. Tab hit A hit, M sorry not n, and merc by distance, and Mrc these ses. Now it slash to excite, hold shift to grab this bond. D select this, Control
B and Qs bond. I think now we just
fixed this problem. Now let's move this for example right here and let's
see what we got so far. Yeah, I still in the position, and everything looks cool here. Lit controls to bring this back. Now I can say that I finished
with the bag leg, I guess. S. Very cool. Let's check the joint here, working very nice and smooth. One thing is not
finished here yet. This engine should be
rotated with the group, so we need to find a
solution for this. I will go to the
bottom view at C sen, and I think I need to duplicate this bond
in the edit mode. Go to the edit mode,
select the bone, and let's choose this. Swak this to local. Well,
I have two options. I can hit E and extrude
this, but be careful. The extrusion should go in the correct direction like this. I'm going to hit E, select this E, Let's extrude
this but just be careful. Now, I think it's correct. Ballet. Let's check from here. Let's check from the back
of view, for example. Everything looks okay, I guess. Es, right. Now, select this bone, its AB, and, now it is separated
from the group, and that's what we wanted here. Let's give this bone the same
name that we added here. Let's see what we named this. Ngian controller, hit
control C to B the name. Go back here, select this one, it control V the
Ft to B K for bag. All right now we've
finished here. Let's go to the bows mode. After that, we need to link the engine to this
more right here. You remember when we link the
engine to this empty here, so we're going to link the empty to the bone.
We can do that. I'm going to link the
empty to the bone. Select the empty, hold
have to grab the bone, control B and Qs bone. Now we got it. Now if I grab this bone and rotate
it, as you can see, the engine is affected by that, but now we need to create
a relationship between this bone and the
sone right here. Select this one. Go to the constraint and CB rotation because we need to
co, chose armature. And in the bone, I will add this one B K, extension r, search for B K, extension r, we
got it right here, and then sway this to local and this one as
well to local space. Now when we move the
bag leg up down, this engine should be
rotated with the group. But we got something weird. I will select this. I just need to see which
direction I want. I just need the y,
select the son, turn of the tern of
the z, keep the y. Now I will grab the
son, hit g to move it. Now I got what I wanted, but the animation is inverted. I need to invert this back. I will go back to
the bone and just choose y invert, and that's it. Now, let's go to the
controller, G to move. Now we
145. 145 Riggning section Rigging the wings part 1: Hello again. Welcome back here. Let's rig the wings, and let's start with this one. I am in the Bows mood, I guess. Yeah. Let's sick
back to its mood, and we got this
point right here. I'm going to use
this point again. I will C D to the Z, and let's take a COB,
for example, right here. And let's move this
point here. All right. I need to create a bone
to control this wing. If I want to move the wing to this di or this dia
or up and down, I need a bone to
control all of that. And I need another bone to
control the movement up and down because this
wing could go up and down to help the ornate to fly. All right. So let's see,
how can we do all of that? Fair thing, I will
go here and change the display of the bone
from stick to octetrl. And I want this bond to be exactly in the center
of the sphere, and we got the MT exactly
in the right place. So I'm going to tap out, and I will select this et and bring the three
decorsor over here in the position of the empty and select the bone tap. I will grab the head head
shifts and selection to cursor. And now we got this exactly
in the correct place. After that, I will select this head shifts and
selection to cssor, and now we got the tail exactly in the position of
the three decorsor. As you can see the
bone now disappear. Actually, it's still there,
but it's very, very small. I'm still selecting the tail, I will move the tail to his
dirt to get this result. Now I got this exactly
the correct, please. So this is the first step is
to put this bone right here, and you will understand
why I did that. After that, I need
another bone here. I will he d to CV this, and I need another CV right here to control the
feather itself. If I want to bend it like
this, or keep it like that. So I want the head to be in
the position of the empty, tab out, select this empty, Haft as cursor selected. Crab this tab, crab this
shafts, selction cursor. And now we got we got this head exactly
in the position of the T. Let's go
to the true view. Let's see if that's
right or not. Yeah, that's very
cool. All right, so this pon will help
to control the feather. What I'm going to do now, I'm going to link the
feather to the son. So let's go to the bows mode, it tab and go to Bos mode, and select this feather, hold have to grab the
spon, control and spoon. Now, if I rotate this pon to the Z to the z as
you can see, now, we got this. All right. All right. That's very cool. Let's see what else
we could do here. Select the bone, and let's go back to the edit
mode because we need to make some
editing. All right. After that, I will select
this bone and go to the top view and hit
ChevD to take B, and I will put a cover here, and I will rotate it. If you rotate this, you will get a
rotation like that. But if you want to make a
rotation according to the head, you can swak the transform
bevot point to active element. And now when you
select the bone, always the head will
be the active element. Now, when you rotate
the bone, to rotate. The rotation will be according
to the active elements. Hold control and rotate
this nine degree. Let's move this one for
example right here. After that, I will take
another Kobe and I will scale it down like
this and keep the close. Now, I need this one to be the axle and this one to follow it when
I rotate this one, when I rotate this, this one should rotate around
it like this. Let's go to the Bos mode, and let's see what
we got so far. If I rotate this one,
nothing will happen. I need this one to be
connected with this. So in the edit mode,
we can go back. Grab this hot, you
have to grab this it control be and don't connect it, but just keep offset. Now we got a relationship
line between these modes. Now, if I go to the Bos and
if I rotate this to the Y Y, I will guard this result. And that's what I
wanted. All right. So now we decorate. After that, what
I need to do is, I need to connect this piece and this piece
to the son right here. So in the bos mode, make sure that you're in
bows mode, grab this, hold you to grab this piece, and then hold he to grab
the spon can and bone. All right. Not just that, I need this bone to be
connected to this bone as well. Okay, If I want to make a connection
between these two bones, I can go to the edit mode, and I can s this
bone hold he to grab this pont control and
choose keep offset. Now they are connected, and we got an offset
between them. Let's go back to the boss mode. Now, if I rotate this,
this one will follow it. But if I rotate this one, this one will
control the feather. One more thing here
we need to do, we need this pone to
always follow this one. So at the end of the day, this pon and this p, they follow this one right here. And we can keep that
in the edit mode. So let's go to the edit mode. Select the soon,
hold have to crab the pont control B
and keep offsets. Now let's go to the bos. Now if I rotate this one, as you can see all these
pons now following this one. All right. Above that, I will go
back to the edit mode, and I will select
this it and I will hit E to make one
extrusion up like this. All we need this
pond. All right. Now, I think it's the time
to give these ponds a name. For example, this one, maybe I can call it wing
direction and keep in my to mention that this wing is the top wing or
the bottom wing. So I can say top top end score wing controller Ender
score r for right. All right. Maybe
this one will be top ender score wing feather ender score r. This pro here, maybe we can call it Tb
underscore wing, thumber, under score r. This pro here, maybe we can call it. T wing, protator, and the score r. What about this one?
Let's call this one. T wing small thumb and R. Now we create
all of these pons. Now let's see how can we create a relationship
between them. Okay. Fair thing, we need this power here to be
affected by this bond here. When I rotate this one, this one will go up and down, and I want this one to follow. I want this bond here to
follow this power here. Okay, I will go to the Bos
mode because inside Bos mode, we can create relationships
between the bones. I will select this power here
and go to the constraint, and I will choose one of these. I need to use one of
these constraints. I think Locked truck. This constraint right here is
almost similar to this one. But this one has specific
features we want to use. So let's add this one here. In the target I will
add the armature, in the bone we need to
add this bar right here. So the name of this one to wing, wing is small umber. Let's for this one. K top. Wing small thumber added, and now start following this small right here,
but we don't need that. We we need to follow one of these axes and see which
one is working here. I will change the locked axis to the x axis and let's
see what we got so far. We got this results, but I think there's some kind of mistake we got right here. And I think the mistake
is in the edit mode, we linked this bond to this one, and that's not going to happen. I think we should link this bond to this
one to the big one. So I'm going to switch
back to edit mode, and I will select this bond. Hold he to grab this
big one control B and keep offset
with the big one. And now I will go
back to the bos mode. Now, the result, I
think it's correct. Now, if I rotate
this to the y axis, it's r to the y, and if I rotate this
one, as you can see, the son will follow
the small one. R, y. Now, let's type
expression right here. I just need to rotate this one. I will go to this
arrow and open it. And let's speak this
to x y z. I think. I don't know how
to pronounce this. Anyway, let's add an
expression right here, type hashtag frame,
multiply with ten, for example, and then hit enter. And now let's hit space to see. As you can see now
we got this results. But I did that because I want
to kick of the thumbing, I think, I did. I added this expresse right
here because I just want to check if the pating
makes sense or not. If not, I need to make some
much weak in to the bone. So as you can see here, this feather can reek, this one and can hit it. So we need to find a
solution for that. Let's stop the animation. Let's take this back to zero. And I will go to
the edit mode and push this bone close to
this one a little bit. We can go to the top of you, I think, do that. Just make it close. I was right here and now come right here. After that, let's go
back to the Boes mode, and let's hit space. Now the b thing is a
little bit better, but maybe we can
tweak that even more. So it's shift and left arrow
to bring this to the zero, the time slider, and let's
go to the top view again. All right. I think we need
to take this to zero, and then go to the edit mode, and let's move this one
a bit more like this. And let's go back to the
Bose mode, it space. Now we got better results. Now we don't have any
overlapping here. This level is very nice. Even if you grab this bone and hit r to the
z to rotate this, you can rotate it and you're
not going to lose the PT. If you grab this one to
rotate the whole wing, you can do that as you can see. You can rotate the wing and
everything will follow it. All right. We got some problem I guess here. We need to fix. Let's select this.
Stop the animation. Let's select this one and
let's delete this expression. Right click, delete
drivers, and that's it. L et's try to find out
why that's happening now, if I rotate this one. This pond and this
pond should follow it. But I think we need to make some much weaker in the edit mode. Let's go back to the edit
mode and select this one. H dig up this control and maybe we can swig this to
keep offsets. Grab this. All right. This point right
here, should follow this one. H you have to grab this. Control B, and yeah, we got keep offset active. Let's go back to the Bos mode. Now, let's select
this, r to rotate. Now I think we got
the correct result. Now, if rotate this
to the Y R to the Y, can get the result that I want. But let's add another expression right here to the y. I
just need to check it. Before I go further. Let's type hashtag frame, multiply with ten, for example, and let's hit space. Now if I grab this
and rotate it. Yeah, now it is following all the bone following
the big one, and that's what I wanted. That's very cool. All right. Let's bring this back to zero. And let's delete the
driver from here. One thing here, I
just want to mention, when we link this
object to the bones, I just got a small
problem right here. If you notice now this piece, it's just moved slightly
from the original position. So we need to bring this back, let's select the s right here. And let's see why that's seven. We got this MT in the
correct position. I will bring the three dcorsor over here in the
position of the Mt. Now if I select this object, I can see that the origin
dot goes down a little bit. Before I move this one, I need
this piece to follow this. If I select this one, I can see the organ
dot is right here. So first thing, let's
select this one this piece. Bring the three
decosor over here to the position of this,
and select this one, Hrlick set organ to
set organ 23 decosor. Now, this geometry and this one, they are sharing
the same organ dot. Okay, now I can go back to the I its and bring the three decorsor
to the empty position, and then select this it shifts
in selection de coorsor, and this one as well, it
a selection de coorsor. Now we got this in
the correct position. Now let's select the bone
and go to the Bose mode, and let's see if we
fix this or not, I will hit r twice
to rotate this one, and now we got the
correct result. And let's rotate this
to the y r to the z sy. And we don't see any problem. Everything looks
okay. So for now, I will end this video and
see you in the next one.
146. 146 Riggning section Rigging the wings part 2: Hello, everyone, welcome back. Let's duplicate these bones to this wing because I
need to wreck this wing. I'm not going to recreate
all of these bones, but I'm going to select this group of bones
and copy them down. But we will got one problem. You remember that we moved
this wing a little bit out, so we got some variation. This wing right here is not
exactly underneath this one. So we need to find a trick to cov these bones and put
them exactly right here. So let's see how can we do that? Fair thing, what
I'm going to do is, I will select the bone
in the object mode, and then maybe I can grab
this empty right here because I just want to
tell you something. Right here, this head of this bone is exactly at
the center of this empty. So if we cob this
group of bonds and aligned this new CB
the head of this bond. To that empty, I will got the whole group in
the correct position. Select the bones,
hold have to grab the empty and hit
slash to isolate them. Now go to the bones tab
to go to the edit mode. Now we are in the edit mode. Let's select this
group of bones, and let's go to the stab and
let's make some tweaking. Activate vertex snap
and choose active. All right. And I
guess that's it. Now I will hit f d d to the
z and I will take a CB here. This is the first thing
that we need to do. After that, I need
to hold Hf and click the spon and click
on this again. To make this pon the active
one, the head of the son. Right now, I'm going
to hit G. To the Z and align this with the hold control and align
this bone with this MT. I will go to the wireframe Z
to see what we got so far. Right now we got this
exactly in the middle. I think. Now we need to move it a little bit
forward like this. Hit g to the x hold
control and stab it. As you can see, we lost
the sabb. I can't snab it. In this case, just
to the orthographic, weak the view to
the orthographic, and let's try again hit
G and hold control, and now we got this
exactly in the x axis. We got some variation
as you can see here. Let's move this a
little bit to the y, I guess G to the y hold
control snap this one. Now I think it's
exactly in the center. Yeah. Now, I think it's correct. After that, I will hit
slash to bring back the other geometry and let's see if everything okay or not. Let's go to the solid and
let's go to the Bow's mode. Let's connect this object
with this bond right here. Select this one I have to grab this and it control
the Q's bone. Now if I rotate this one Z, I could get correct
result, I guess. I will select this father
and this point and its to isolate them and
let's go to the top view. Let's see what we got so far. Is everything is okay or not? Where is the organ dot for
this object is right here. In this case, what we can do is, I will hit slide to
excite and I will tab to grab this face and
this phase right here and it if S and the bring
the three decosor over here. Tab out and I will select this
feather, hit right click, and I'm going to change the origin dot position to the position of
the three decosor. Now we got this right here. I'm going to select the
bone and this feather and slide to isolate
the and go to the top. I just need to see if everything is in the
correct position. Yeah, I think. The organ dot is exactly at the tip of this bone. I mean, it's exactly
in the head. All right now, let's
go to the bones mode, and now we got this finished. We need to link the
other bones as well, so I'm going to select this one, Holt to crop this one and
holt he to cru this bone, D select this,
control and Q bone. I think we got some
kind of problem. Let's see what's happened here. I think we got some
kind of problem, but let's see why that happened. Let's select this, hold
he degrab this one. Let's see where is the
organ do for this geometry. Let's select this geometry. Hold he is and bring the
three decosor right here. Then select this organ
organ to three decors. Now let's link
those to the bones, select this hold, H
de crop this bond. Control B and bond. It comes up and goes
here. All right. Let's try to find out
why that's happened. Well, I think that's
happened because of the constraint that we add here. Because we need to king these. I'm going to turn of
the track constraint and try to do that again. Select this hold to get
this bone, troll and bone. We got the same problem. Something weird happen here. Let's see like this geometry, and let's hit control, A and let's apply the location and apply the
rotation and apply the scale. Let's see if that can help. So let's see like this, hold have to crop this bone. Ctrol the Qs bone. Okay, that's not a solution. In this case, try to delete this bone and recreate it again. I will go to the edit
mode and select this bon, hit x and s delete one. I will select this hit
E to recreate any one right here. All right. It's called thumber. I'm going to select this
bone and copy this name it control C and go
back to this one and hit control V and
the top to bottom. Okay. Bottom, wing R, keep the rest of
the name the same. Had enter, and Now let's
go to the pose mode, select the geometry, and first, let's bring the organ dot back. I'm going to a t click, set Og Ogon to three decorsor, and then hold crop the bone. He control B and chose bone, and we got the same
problem still. In this case, maybe we
can try another scenario. I'm not going to link this
object directly to the bone, but I will link those to
the t and after that, link the MT to the
bone that you need. I'm going to select
this and this and then hold here to grab
this empty right here. Hit control be sit parent
and keep transform. After that, I will select this and then hold
have to grab the bone. Grab the empty hold
to grab the bone. Hit control and Q bone. Now if I hit por
rotate, now I got it. Let's see what's going
ha in fy rotate this. This pond should
follow this bone. We can do that in the edit mode. Select this hold hept bon. Control B and s keep offset. Now let's go back
to the voice mode. Let's rotate this and let's
see what's going happen. Now we got the same
result. That's very cool. Now let's create a relationship
between these bones. But before we do that, I think we just need
to change the name. For example, this one,
let's go to the bone here. Pon properties and let's
change top to bottom. CB the bottom. But before that, just delete the numbers here
and then go to the bottom, it control C to CB it because we need it and then
enter to accept that. Now, let's select this.
We got the same thing. Grab the top control V, place the bottom, and
delete the number enter. Now, let's select
this bone here, delete the, control V at the
bottom and delete the rest. Let's enter and select this tiny one and do the same thing, delete the top, and replace
it with the bottom, and delete these
numbers right here. I think we are finished
here. That's very cool. Now let's go to this
bond and let's create a relationship by
using constraints. Let's add log a truck and
let's choose the army here and I need to I need this pond
to look at this right here, but keep the axis. I mean, not rotating like this. I need to get the same
result that I did above. L et's select this
point right here. I mean, this one,
the smallest one. Just go to the name it
control C to COVID. That will make the
process easier for you, and then let's go
to the constraint hit control V and select it. Now it's directing
as you can see, is pointing to this ****
and we don't need that. I'm going to change the locked axis to x
and turn off the z. Now, if I rotate this R to the y and rotate, I
will got what I want. One more thing here
we need to do, we need to link this son to this song right here.
Let's go to the edit. Sorry. Cilic this hold, you have to cut this it
control B and key bos. Now let's go back to the both. Now if I rotate this,
hit r to the Y, I should get the
result that I wanted, it r to rotate this one. Now I got what I
want as well here. So I think now we are
finished with this one. Let's see now what
else we can do. We finish the front
leg and the back leg. Everything now is ready. We finish the wings, and after that, we need to COVID spons on the other side so we can rake the side as well. For now, I will end this video and see you in the next one.
147. 147 Riggning section Copying the right side bones to the left side: Hello again, welcome back. Now I need to copy all of
these bones on the other side. Let's see how can we do that. Let's bring the three di
courser in the middle. You remember that I gave each bone a name
and in the last, I add R for right or for left. I just created the right side. Because of that, all
the bones now hearing the same letter because we was
working on the right side. Now I will go to the front of
view and in the edit mode, I will select all the
bones on the side. Any bone in the middle, ignore it, you don't
need to select it, select the bones on the
right side. All right. Now, we need to go to the
armature and we need to go to the symmetrize
and to symmetrize. Now, Blender will automatically CVD the spons on the
other side and it will blender will put all of these sons in the correct
position, not just that. I'll change the last
letter to L for left. Now let's check what
we got right here. We got a lot of names,
so I'm going to go to the bone here
and turn off names. We don't need to see names. Now we got what we wanted here. Now is the time to
link this object to the sons and we can do
that in the bows mode. Hit tab and go to the bows mode, or you can go here and
swick to bows mode. Maybe we can start with the front legs and let's
see how can we do that? I think we can change
the bone to sticks. That will make life
easier for us. Well, first thing, let's
start with the engine. I can link the
engine or I can link the empty of the
engine to the spon. I will select the empty, hold to gb the part right here, it control B and just Q's bone. Now if I rotate this bone, the t will the che
will follow it. After that, I will select
this piece in this arm, and I will hold
to grab this one. D select this, it
contro be N Q's bone. Now this arm is linked to this bone right
here, not just that. We need to select this one, I guess and supplt it. I will tab and grab
one phase it control to link select and go to
this menu and choose normal. Don't forget that because we want to select the whole
me not part of this. Then it p to separate it, and now select this hole, you have to grab this bone,
it control B and quose bone. A. Okay. Now let's see what
else we can do. All right. We need now to select the leg. And this part, and link
to this bone right here, it control B and use bone, and then hit Alt A
to decal the ponds. Now if I move this,
hit to move it, I should get something,
and that's correct. But we need to add this
one as well to this bone. I cantro be Ds and chose bone. This one as we should
be linked to this bone, hold you have to grab this son, control B and chose bone. Now if I grab the
controller to move it, now I should get
the same result. Now, everything
looks fine for me. I don't see any problem. That's cool. Now let's go to the bag licks and let's
try to do the same CNR. All right. One thing here,
I just forget to do. I didn't select this pond. So we need to do that. Let's go to the edit mode, select this bond right here, and then go to the rm cent syms. But maybe we didn't
give it a name. No, we did we gave it a name. Let's symriz, and now we got on the other side with the L
letter. That's very cool. Now let's go back
to the Bos mode and select this hold shift
to grab the empty. Let's move the empty first.
I just need to kick it. Hit. Yeah, now it's
working. Grab this. Grab the empty hole, you
have to grab this bone, control B and Qs bone. Now if I rotate this, the engine could follow
it, and that's correct. Now we can grab this piece in the arm right here and maybe
this piece here as well. We need to make sit
taking before we do that. I will select this and tap
the mode, select this face, control to select this
piece and separate it it Ps Now, let's select, sorry, let's select this
piece right here. Hold have to grab this, and then hold you have to
grab this one as well, hold you have to grab this bone. I control B and Qs bone. After that, select this piece
right here. This stuff. Hold, you have to grab this point right
here and decel this. Hit control B and
choose a link to bone. Now if I grab this here, it to move, let's see,
what's linked here? We got some weird
problem right here. I don't know, but I
think we lost a bone. This bone right here, I don't
know why it's not moved on the side because we
didn't give it a name. This one of the problems. We didn't gave this pont a name. We could name it. Let's see. What name should
we give this one? I just forget that. All right. Let's call this PK for ba. PK? PK Can we call this extension
or maybe food extension, Footstin, underscore r, and
now let's go back to edits, sect this and go to
Armature symmetrized, and now we should get
it on the other side. Under the name, BK foot
extension L. That's very cool. Let's go back to both and
let's see what's going to happen. All right. We lost some relationship here. Let's try to fix it. Well, in this case, if I want to avoid all
of these problems, what I can do is, I can
go to the edit mode. All right, go to the edit mode, and I can select all of these boons that I
got a problem with. Actually, I can delete them. X and delete bonds. Now what you can do is now you can recopy all of these
bonds on the side. Just make sure that you selected the correct bonds
and after that, go to r Mur and Q symmetrize
move to the boes mode. Now let's grab this
one, hit Q two moves. Now everything is working, fine. Except this piece, we need to link it to
this bond right here. I cant B and Q's bond. Now let's grab this and move it, and let's see what's
going to happen. Yeah, everything looks okay and nice for me. It's very cool. Now we don't have
any problem here. What about the wings? Let's see what we can do for the wings. We can grab this piece first and link it to
the son right here. Deselect the rest. I control B and son. Sorry, sorry. It control z couple of time. Grab this, hold here
to grab this son. It control and not
automatic weight on. Now let's rotate
this. And let's see what we got. Yeah,
now it's linked. We need to link this metre
and this metre to this son. You remember the problem
that we faced here, we can avoid it by using
the MT if we like. Because these two objects
are linked to the MT, I will select the MT and
old you have to crab this control B and Qs bond. Now, I rotate this
bond right here. Let's see what's
going to happen. Yeah, now we got what we
wanted. Not just that. Now, if I rotate this to the y, I could get the same result. This more here, it could move
everything. That's correct. Let's do the same scar you here. I'm going to select
this feather hold, you have to crop this bone, it control the and Qs linked to bone and I'm going to select the empty
that we go right here. It's r. Yeah, everything
is connected to the empty. After that hold shift. Rob this mora here,
deselect this. I control B and Q's bone. Now let's move this point.
At let's hear what we got. At r, that's very cool. Now let's see grab
this point here at r. A H control everything, and this one H
control the feather. This mo right here
at r to the y, right now we got this.
That's very cool. One more thing here,
we need to do. We need to look the
axis for some bones. For example, this mo right here, it could just rotate
to the y axis. We don't need to
move it, we don't need to rotate it
to the x N to this. In this case, select the bone and hit and to open
this panel right here and lock all the axis and
release the axis that you want. We need the y, just chose y. Something very important, speak
this two local so you can see you can see the
direction of the gizmo. As you can see now,
we should have guess the rotating geismo active here because
we locked everything. Because of that, you
can see the geismo. Now if you hit G are not
going to do anything, if you hit R is just going to rotate this to the Y axis, and
that's what we want. The same scenario
here, select this one and lock all the axis
and release the y, and now we got it. The same thing for
this bone right here. This bone we don't need to move it anywhere that
should be locked. I'm going to look the
location and look the scale. We don't need to rotate it. Sorry, we don't need to move it and we don't need to scale it, but we need to rotate
it to the x or y or z. Okay The same thing
for this one. Lock the location,
lock the scale, and do the same thing
for this one as well. Lock all the axis,
except rotation. For this bone, let's lock everything and
keep the y active, and this one as well, lock everything and
keep the y active. Okay, that's very cool. Do we have anything else
here to do? All right. That's very cool.
Now let's go back to this point and
let's check that name. We didn't give this one a name. So I'm going to call this roots. I think I can now go to the
edit mode to B this one, I will hit d to the
z to take another CB and speak this to the active
element and scale this down, I just need to make this
a little bit smaller. This roots bone,
it should control all the bones and it
should move all the bonds. This one right here, it move or control the joints. For example, if I grab this bone right here
in the bos mode, and if I hit to move this one. L et's go back to
the box select. As you can see if
I move this one. That's will move the leg and
I guess this bone or not. In this case, we need to link this bone
to this one right here. Select the son,
hold to grab this. I control be and
Let's choose bone. I guess. Not like this,
not in the bos mode. I guess that should
be in the edit mode. Let's go to the edit mode. Select this bone, hold,
you have to grab this. I control be and keep offset. Now this pone right here
is connected to this son. Now if I go to the
bos mode here, and if I move the sone, that should move
the leg with it. Let's go back to the
Edit mode and let's select this pone as well.
Hold you have to grab this. I control and keep offset, and these bones as well,
you can grab them. Grab the body, and this
one as well, hold, you have to grab this, hit
control and keep offset. Now, if I go to the
bows mode again, and if I move this one, this one should help to move the leg and the engines as well. Not just that, I need
to link the body of the body of the oritor
to this bone as well. Select the Mt, hold, you have to grab the bone, and the bows mode, hit
control and choose bone. Now if I select this
bone and move it, it will move the body. Let's go back to the edit mode and let's grab these
bones of the wings. Hold shift to grab this, it control B and Q keep offset. Now all of these bones should
follow this one right here. Not just that, let's select these bones over here
and do the same thing. These bones should
follow this one as well. I cant be and keep offset. Now if I move this one, s in the bos mode, Let's see what I
will get. Now that's will help to move
all the joints. Now I got this result.
As you can see here. We did that, we linked all of these bones to this one
because I need this pone to be like a suspension when
this oripor takes of these legs should stay in the same place just
a little bit before they goes up with the oripor. When this goes up a little bit, these legs should stay
in the same position. Because of that,
I did this trick. But we need to do
something else. Now we need to link all
of these necessary bones to the original one to
the root to this bone. So let's go to the
edit mode now. And fair thing, I need to
link this bone to the son. I control and keep offset. Now this bone will
be the master. After that, let's grab this controllers bond
and the stabilizers bon. And what else those
here as well, I guess. That one right there,
it shift grab, this one, hit control
B and keep offset. Now let's see what's
going to happen if I go to the boss mode,
if I move this one, hit, as you can see now, this bone can
control everything. Now, all of these ponds
now moving with this one. We need to do the same thing
for the front, I guess. Let's move this again and let's see which point we would pick. The edit mode, let's go
back to the edit mode. The edit mode, we need to
select this pond right here and that one and this
one right here and this one. And those here, and
those over here. Hold shift, grab this. Control and Q keep offsets. Now let's go back to the boes mod and let's see
what we got so far. Now it key to move, and now as you can see, I can control all the bones. All right after we linked
everything to this bone. Now we let kick the again. Let's see if we got any problem. Let's move the leg. I don't
see any problem here. Let's move this one. I
don't see any problem here. Everything looks okay. Let's go to the front legs, Let's grab this, and
end let's move it. Everything looks fine, and let's select this
one and let's move it. Still fine. Let's go
to the wings. S moves. This one moves, this one moves. By the way, this
point right here, we need to look the
axis for this point and just keep the z axis. Look everything and
keep the z rotation. That's what we could do the
same thing for the rest. This one as well, and this one right here. That's very cool. All right. That's very cool. Okay. So now we got this spa can control the
body and the legs, and the spaw can
control everything. All right. Maybe we
can give this a name. Let's call this roots,
maybe body controller. You can call it
whatever name you like. Just need to recognize it. This one will be the root. That's it. Now we got
very cool results. We raged almost
everything, the wings, the legs, and the
result is very cool. For this video, I will end it here and see you
in the next one.
148. 148 Riggning section Creating costom shapes to the bones: Hello, everyone. Welcome back. In this video, I want to create shapes to
control the bones. I don't want to
see all the ponds. I just need to see specific
bones and we need to give these ponds a specific shape
so we can control them. First, let's go to the top
and make sure that you are in the object mode
for everything and then hit shift A and
let's add plane. I think I can move this plane above the body
right here for now. From here we can start. This st creates a
shape similar to the to the orinar tapter itself. First, maybe we can move this plane right here
and start from here. We can go to the wire
frame as well lest and add one ech maybe
right here and let's scrub those and scale them
a little bit like this. I'm just trying to create a. Maybe we can select those
and scale them like that, and we can select those as well and scale
them a little bit. Maybe we can move
this right here, to extrude this and scale it, and then extrude this right
here and scale it as well. Now we've got a hap
similar to the body, and maybe we can
scale those down. Something like this. Maybe we can delete this ache.
We don't need this. I think that will be enough. Something like this. I will grab this vertic and
try to create some hee. It's not necessary
to do what I'm doing if you don't like it. You can do whatever
thing you like. Let's try to create something
similar to the wings. Let's move this one right here, for example, and the bring
it maybe right here. I will hit control to
add one ge right here. Let's grab this one, keyhol control and stab
this one to Marriot. I will control to add
one e in the middle, and I can delete half of this at x f, something like that. I will select go to solid, and hit to isolate this gumtry. Go to as at least
select these faces. What I need to do is, I
just need the wire frame. I don't need the faces. I think we can select these faces and hit control
x to dissolve them, and then hit x and delete only
phase to get this result, and now I will
grab these, x and. I just deleted pa and
I got this result. After that, I can mirror this. L et's add Mural
modifier, a light. Tab again, grab this edge, and then hit x and s
e to delete the edge, and now we got this
shape right here. Do you want to
create this shape? Actually, not necessary
if you don't like to create something complicated
like this? It's okay. Just create whatever
shape you like. You will see why I did that. Let's take this back
down to the zero level, it Shaft, selection to cos and let's move
this a little bit. Let's take this out for
now right here. All right. Now let's go to the bone. Go to the bows mode, and select the bone. Well, now we need
this bone to take the shape from this
one, all right. In this case, we can go to the bone bone properties
and here scroll down. I think we got a
viewboard display, and here we have custom oj. Pick this shape
that you created, and it will replace right here. But as you can see,
we got this result. It's not exactly
like what we want. We need to manipulate
this and rotate it. Let's select the original
geometry here and tab, it a select all the vertices. I'm going to rotate
this to the x axis x, Rotate it like that, hold control until you get
the correct result. Rotate this ninth
degree and you can move this towards the y axis. As you can see what's
going to happen here, we are fixing the problem and
we can go to the left or to the right and keep
moving this to the Y until this
reach the zero level. And now we got it. Now
we got the first bone. Now tab out, when
you select this, you are not selecting a have, you are selecting
the bone, the root. If you go here, let's call root. Okay. Now I can control the whole tap from
this bone here. This is the first
shape and I told you, it's not necessary to
create a shape like this. You can create arctangle,
and that's it if you like. Let's see what else we can do. Let's create a shape
for this bar here, so we can control the wings and Let's see how can we a keep
something like this. Let's go to add and let's add, by the way, tub out
from the pose mode. Go to the object
mode and let's add, for example, a circle. Let's move the circle. Before you move the circle, go to the menu of the circle and let's
manipulate the vertices. We don't need that vertices. We can reduce the number
210, for example. Let's take this out
right here for now. Now let's grab this circular and let's
stop to mode, it A, select all the
vertices and then hit D to take a cop and leave
the cop in the same place. And rotate this to the x rx let's rotate this
nine degree like this, and now we got this shape. We're going to use this shape to control this bond right here. Now we got the shape here. Let's go to this
pond, for example, and let's go to the bos, select this pond, go to
the bond properties, scroll down until you reach the custom object or
viewpoard display, and let's pick this shape here. And now we got it. But
it's a little bit big. We can go down and
we can scale it. I guess from here. Let's grab those and let's 0.7, and let's scale
this a little bit. All right. Now the size looks okay for me. I can accept it. And I think we can I think we can scale this one. I
think that will be better. Tap it A and scale this
down. That will be easier. Now let's go back to the
same bones like this one, and let's pick this shape. Let's grab this and
let's pick this shape, and let's select this pont right here and let's pick this shape. Now, if we want to
control these ponds, we can grab these shapes and hit R to rotate them and do
whatever thing we need to do. Let's create a new
shape as well, t to the object mode and and
let's add another circle and increase the number
to maybe the enter, and hit let's move
this over here. And let's tap the Edmod select
all the vertices hit D, and then S to scale
this inside like that. We can go now to the top
view to make some tweaking. All right fad thing
we need to do, maybe we can delete
these edges at X E, and maybe we can grab this one, hit to make extrag like this, and this one hit E to make
an extragal like that, and hit E to extrude
this almost right here. Grab this with F to make
connection with them. Let's grab these edges at X E. To delete those and maybe we can
delete those as well, E, or maybe even those X. Now we grab this F
to connect them. Now we got this shape
as you can see. Maybe we can move this
just a little bit. That's very cool. Let's
see if we can pivle those, control to be let's
pigle them a little bit. Or I don't care too
much about the shape. Now, let's see where
should we put this shape. I will go to the bos mode
after we select this, and I think I will
put those right here. Grab this bond and let's go to the costume shape
and let's pick this one, and now we got it,
but it is very big. I'm going to grab this one
and take another CV right here because I need to use
this Cf another bonds. Grab this tb and
scale this down. And make it small like this. Now, maybe we can scale
this a little bit more. I'm going to use this
to control the wing. Right. Let's do the same
thing for the rest. Let's select this
pont right here and then go to the custom Have
and let's pick this one. Let's do the same thing
for this, grab this pon. Go to the custom
heave and pick this, select this one, go to
the custom and grab this. Now we can control the wing from this pont right here
and the same thing for this one. And that's very cool. We need to do the same
thing for this pond, select this pond and let's grab this shape right
here to use it as well. Select this pond and go to the custom object
and let's pick this, and we need to rotate this, so grab this tab, and let's rotate
this to the x axis. Something weird our x. Rotate this 90 degree and
now I think it's correct. Yeah. Let's scale this
make it small like that. Let's see what we got here. The size, I think it's okay. We can scale it a little bit, and now we got this result. I'm going to accept this tab and let's move this
a little bit away from this. But not in the,
keep that in mind. Let's select this p and let's
give it the same shape. Scroll down and pick this, and let's select this moro here and let's give
it the same shape. And the small right here, and let's give it the same shape. All right. That's very cool. I will hide the
empties from here. Let's hide them. And
now we got this result. Now let's see creates a shape
for this small right here. Let's go to the top. G
swick to the object move, hit heft a to add and let's add plane here. Hit
key to move this. Let's move this, for
example, right here for now. We can move this shape here. And let's grab this. Let's tap the mode and let's
make some with we can. Let's extrude this for
example right here. Let's see grab this.
Grab this one, and then it and Q's center. Let's hit control,
let's add an right here and let's grab those
to scale them like this. Let's see grub all
of these phases. X and Q only only phase, and we grab these two edges
hit x and s delete edges. Now we can grab those two vertices and
align them with those. E move this a little
bit right here. Now we got this
shape like an RO. Let's kill it down a little bit. We don't need it
to be All right. Now what we need to do is, we need to go to the bones, speak to bos mode,
select this bone, and let's go to
viewboard display, and let's use this one as a
custom object. Pick this one. It's pointing down,
we need to flip this, grab this tab, and
let's rotate this to the Z axis 180 degree. And now it's done. After
that, let's take this out. We can move it to move it to the axis to move the ape
out or let's say up. After that, you can
hide the shape tab out and let's move this,
let's put it right here. Now I can use this object
to control the body. If I hit key, I can
move up or down. As you can see. We
are not finish here. We need to create
a controllers for the leg and controllers for the wing as well so we can
open and close these wings. But for now, I will end this video and see
you in the next one.
149. 149 Riggning section creating animation to control the wing part 1: Hello again, and welcome back. Let's create a new
collection for these shapes. Let's exit of the bos mode, go to the object mode, select the bonds, and then
go to the object mode. Now let's select all
of these shapes, and we can bring this
one right here as well. Grab those it to create
a new collection and let's call this
collection shapes, and let's hide it for now. Let's try to create a bone
to control the wings. We need to create a bone to
open and close the wings. Let's see how can we do that. I will use one of the
constraints it's called action. We will use the action
constraint to do that. So fair thing, let's go to the armature and let's
switch to Bows model. And I will sublet this
window to two like this. And I will speak this
to dope heat and speak the dope heat
to action editor. Now we got action editor, and I will sublet this again to graph editor in case we want to make some much
tweaking in the graph editor. So now we got now we
got the The timeline, we got the Dp heat, we got the grab editor. All right. So fir thing let's try to create
some animation, and it will be
symbol, don't worry. Let's create animation
for the feather, And We need to add
key frames here. Let's activate auto keying
first. Now we got this. We need to rotate
this to the Z axis, so we need to add
keyframe to the Z axis, Htrotlck, and insert
single keyframe. Now we got keyframe
right here at the zero. And let's do the same
thing for this one. Add a single keyframe
and those here as well. We need to add a single
keyframe for these bonds. Now let's move the time
line to, for example, 220. From the top of view, I will rotate these wings like that. We can hold control. Right now we got this result. Now, if I take this back, it will open, and if
I move this forward, it will be closed like this. We need to do the same
thing for the rest. L the Potom wing hold control and rotate this
and closed like that. And the same thing for this
one r and rotate this. And that one R and rotates. As you can see now, we
closed all the wings, and we can open them like
that when we go back. But when we go forward,
they will be closed. Now what I will do is, I will select all the bones
And as you can see here, we got a key frame for each one. I selected here. I need to duplicate
these key frames. I mean, when I go forward, I want these wings to
stay where they are now. So let's select this key frame. This key frame for the stu
right now, they are closed. I will hit D and move this
forward for to the 40. Now from 20 to the 40,
nothing will happen. So 0-20, we close the wings. 20-40, nothing will happen. I'll just co be the
same key frame. But after that, we need
to do the animation. So let's go to sit. F 40 to 60, these wings will
be opened again. Let's start with this
one, go to the top. Now we are at six, and we got the auto king open. I will hit R to open this. Let's open this one, and now
we got key fray for this. So 40-60, this will
be open. All right. The animation that we are
getting right now is like this, is very simple, but we just need to make
somewhat tweaking. You notice that I opened
the graph editor, and I can see the animation. If I hit control in
middle moose Paton, I can control the oom. Now I got this curve right here. This curve is the curve of the animation that I got 40-60. All right. It goes like this, and I just need to
make some tweaking. I got these sticks here. The stick, is the head of the stick, and this one as well. By moving these sticks, I can control the care. And if I select this one, I will got stick right here. But if I hit right click, I can convert the stick to free or whatever
choice from these. So let's choose a
free for this one, and let's select the
stick and choose free, right click and choose a free. I can grab this one and make
some tweaking like this. Any tweaking you do here, that will affect the animation. So now I hit space to play. The animation now
become go slowly and then goes faster after that
when it treack the end. That's something nice I wanted. All right. I can manipulate this one as
well if I want like this. Now let's check this animation. Now it goes fast. I can take this one and move it edge a little bit and
make it like linear. As you can see. And I think I need to move
this from sit to maybe eight to make it
a little bit slower. Yeah. Now it's makes
sense. And nice. So we made a simple rigging, a sorry animation for this wing. We need to do the
same thing for s. So the animation is for this one, I will end for 80.
What about this one? I'm not going to
make these wings open at the moment and
closed at the same moment. We need to make some variation. So for example, for
the second wing, I need this to be
opened before this one. So select this, go to the top, hit ter rotate, and let's
rotate this like that. Old control or i
pool it like this. Now, for this wing, this wing will
open at this 0.77. When a hit play, this
one will open before it. We need to make some
tweaking to the graph for the second bone or
for the second wing. The same scenario, grab this
hold here to grab this, convert those two free, and let's make some here. Let's move the stick
right here and maybe we can move the stick
a little bit here. Now the wing it would be
opened in another way. It will go slow
and then go fast. And that's something I like. If you don't like, you can
ignore what I'm doing here. Alright, so that's very cool. Now we got the first wing
and the second wing. Opened. I think the second wing, we need just to tweak
it a little bit. So we are selecting
the second wing. What I'm going to do is, I will hit the bottom
arrow to go to this point and just rotate this
ale bit the wing. Like that. Now let's check them. Still got some variation, we need to avoid this variation. So let's go back to the eight. And by the way, there's a
trick, if you want to do. You can move this dots to 80 and make them open and
close it at the same moment. And after that, I just going
to do what I'm going to do. I will move this to 80. Now if I go to top, let's go to 80, now they should be opened
at the same point. They should reach
the same point. And here we can
make some tweaking. I think we need to tweak the
top one not the bottom one. So let's go to the top, it r to rotate, and let's
rotate this bag guess a bit. And now I think it's correct. After that, if you want to
bring the variation back. Now if I open those, they
will be opened together. As you can see.
Well, in this case, if you want to make
some variations, select the second one
and take the point back guess a little bit,
and that's we'll do it. Okay? Or if you want to make
the second one go slower, you can move it above
the 80 like this. And let's see what we will got. Now it is very cool. All right, so let's
go to this point and let's go to this side, and let's rotate this wing, go here, hit R to rotate, and let's open it like that. Pool it and open it in the
correct way like this. Now we cut a new
animation for this one. All right for this one, we need to tweak the graph as well, select these points and right click changes to free and let's try to make
it lie like this. Something like that, or at the end see what
we got so far. It is very nice. I like it. And let's hit the bottom arrow to go to jump to this point. And I will select this bone as well and
rotate it and open it. Hold cant roll and put
it underneath the sing. Okay, now, if I go back, I got this animation. All right. So for the new one, we can make some
tweaking to the graph. Let's do the same thing. Let's change this
just a little bit. Make some variation. And let's see what we've
got so far. Very nice. I like it. It's cool. Let's go here and let's see
the result from this angle. C. So that's for opening
and closing the wings. At zero, everything is open. Now they will be closed, and then they will be
opened again like this. In the movie, I just noticed something when
these wings opens, the pilots make some
checkup for these wings. He got some battle to press or something or
some handle to push, and these wings, they
rotate like that. To kick these function or notes. So we need to create
something similar to that. And let's see how
can we do that. Well, at this point. Now all the wings opened. Now I want to select all
of these points and add key frame after the wings
open and one frame. So the end of the wings sphere, I will go one frame, and now I will start at key
frame for the rotation. At key frame for all
the points here, not single key frame. And let's add a key
frame for those as well, and those right here as well, and for this one as well. So now we got a key frame
for all of these. All right. From this point, I
will make or yeah, I will make animation
for these bonds. So this is the start.
I will go forward, for example, at 90, and I will select this bond, and I will rotate this
ale bit to the x axis x, and let's rotate this like that. Let's move this forward
just a little bit, and hit r again to the X, and let's rotate
this down like this. Let's move forward like that
to the 100, for example, and hits alts r to receive the rotation.
And now we got this. When these wings open, it will rotate like
that, like this. And we need to do the
same thing for the rest. Let's sit like this
one, and let's go to this point. All right. So this is the start. Let's go a couple of frames, for
example, right here. And let's rotate this to the x axis a little
bit like this. And maybe we can
rotate this two time. Let's rotate this just a
little bit to the x axis. And let's freak the 100
maybe let's go beyond it, and let's this t r. And
now we got this result. Okay? Let's go back again. Let's do the same thing
for these wings as well. Let's go forward just a
little bit, for example, to A, and let's rotate
this to the x axis x. Let's rotate this down
just a little bit, and maybe we can go a little bit forward and let's rotate
this to the x axis, a little up like that, and maybe let's
go beyond the 100 and let's hit r to
the x and let's go down again and hit all r at 106, and now we got different
animation, as you can see. And we need to do the same thing for this
one as well, selected. Let's hit r to the x, and let's rotate this
just a little bit up. Move just a little bit forward, r to the x, rotate this
down, just a little bit. Move again, r x, and
let's move this up, maybe, and let's go here, for example, and
hit a r to rest it. So let's see what
we've got so far. Let's go from this
point forward, to play. Very cool. So now we got very smooth
and nice animation here. After that, when these wings
make some quick check up, these wings, the top, they should go up like that
because at this level, if these wings
become to beating, they will attack each other. So these wings, they should
go up before they take off. When this neapor goes up, these wings should go
down just a little bit. To have some space for beating. I go to green. This is the space that these
wings want to move without any overlapping or
intersection, they say, Okay. Now, after this animation, let's go to this point, and now we need to make
another animation for these bonds, this
one and this one. Let's start, for
example, from frame 110. Let's add another key frame to start from here for this one, and for this one, just sit
click and insert key frame. So let's see grove
this and let's go to the fronts. All right. To the number 120, they will be opened like that, who can hold control to rotate
this 25 degree like this. And this one s we hit
hold control and rotate this 25 degree up.
So now we got this. All right, let's go
from the beginning to understand what
we've done so far. I will hit play But the animation a little bit
fast. What I'm going to do. I will select those
both of them, and I will grab the
last key frame, and let's move this to a 30 or to the 40, for
example, maybe. Let's go to the graph editor, and let's make summit taking. First, let's select
this bone right here, and maybe we can grab this pone. Yeah, as. Now we got
them right here. This is the ca for
those two bones. We can make summit taking to
the graph editor, I guess. Let's grab these points here
and this one and this one, He click and free. And let's try to I don't know. Maybe we can take this down
maybe or this one as well, we can take this down just
a little bit like that. And let's see the anime now. Yeah, we can make some we can pull this like that and
pull this like this. Yeah. Now it is very cool. Now you can see what I did here. They will go slowly
first and then they will be faster at the end. Very cool. Al right now, the nit chapter
is ready to take off. Now we can say that
we are finished here. We reach the 140. Let's give this chen name. Let's call this
wing, and that's it. And just to click this
little heal to save this. All right. And now we got it. After you complete
the animation, and after you be
satisfied with this. Now you can go out and you can
click this X. Don't worry. The animation is still here. I go to this or I can find it, and I can make any tweeting
that I like if I want. But for now, let's exact
from the animation here. Let's minimize this
just a little bit. So we created our animation
now and it is ready. And now let's see
what else we can do. How can I control
what I did here? Let's go to the edit mode, and I can copy one
of these ponds. For example, I can copy
this point right here. Let's go to the left view and
hit heavy D to take a COB. Let's put a COV right here and let's rotate
this bone like that. Maybe we can move it
and put right here and it B and clear the
parent for now. Okay, clear the parent. We got this bone. We can
give it a name because this bone will be responsible
to animate these wings. Let's call this wing controller. All right, so now we got
the wing controller. And I think that's
it for this video. But before I end this video, I just need to
mention something. We still got this shape
applied on this son. I will go to the bond properties
and delete this shape. We want to see the bone itself. So this pond is ready. I will end this video
here, and the next, I will start make
some relationship between these ponds to
create my animation. That's it for this video and
see you in the next one.
150. 150 Riggning section Adding action constraints to control the wings: Hello again. Welcome back. Al right now is
the time to create some animation for these wings. And I will use
action constraint. I will select this son, and I will add the
constraint on this point, and I will CB it for
the rest after that. Let's go to the constraint
section after you select the son and let's open the list and let's
add the aching constraint. Action constraint will help to apply all the
animation that we did, and it will help to
apply it on these wings, and it will help
to make the bone, the controller to control
all of the animation. And instead, I grab
the time slider to move it forward or backward
to see the animation, I can now move the
bone forward and backward to see the animation with the help of the action. So first thing, we need
to select the armature, and we need to select the bone
that we are working with. O bone me this M right here, select the son and
in the bone section, let's let's go to the Sarge. Search for Wing troller the
name of this bond right here. All right, so that's very cool. Well, after that,
let's select the bone. We need to move the bone to the y axis forward and
backward to see the animation. Here in the setting, we need to use the y axis. And for the target, we need to use the local space, and the range of the animation, the range of minimum
and maximum. This is the number the number of the distance that this
point will travel. So from this point, it is the zero, and where
you want to move it. You want to see the animation
when this goes ten points, or you want to see
the animation when this goes 20 points, or if you want to
see the animation when this goes for 50 points, you can determine that. So for me, I will
start from zero. To, for example, let's add here four points
and let's enter. After that, let's see
grab the animation, the em this one, the wing animation
that we created here. We need to put right
here, and the frame. We need to go back to
the wing animation and see where this will end. It will end at
140, In this case, I will I will leave the zero or you
can add number one here, and it will end at this 0.140. Maybe we can add two frame
above that, 142. All right. So now we got this constraint. Now, if I got the bone and if
I move this as you can see, let's see what we got so far. So this is the animation
that we got for now because we just apply the action constraint
just on this ****. We need to copy the
same constraint and add it for the rest, and let's see what's
going to happen. So I will select this
**** and this and this **** and hold H this
pon. Let's go to the bows. I just need to copy
the constraint from this point right here to
the rest. This is the idea. All right, so go to the bows and go to the constraint
and CB two selected. And now all of
these bones receive the same action constraint. Now, if I move this one, they will be closed. Let's move this forward
and let's see what's going to happen. Now,
they will be opened. But we got something weird here. I think I will hit old key to bring
this back to this level. And I will delete the acne
constraint from these bonds. I just need to kick something. Let's this, and let's keep the cine constraint
light on these four now. I just want to see what's
going on over here. All right. I just
want to make sure. I want to see where
the animation will end because I think we got
some weird problem. I will turn off auto king and let's play the animation,
and let's see what we got. So from this zero,
they should be closed, and then they could be opened, and we got this. And then after that,
they could be opened up at the 0.140. All right. So this is all the animation. And let's see what we got here. Let's excite from from
here from this animation. Well, now I'm not
getting what I wanted, and maybe I don't know, maybe that's because
of these options here. So let's try to change
the range 4-10. Let's see what's
going to happen. All right. Let's go back here. In this case, what I
should do is, I guess, I need to go back
to the wing and take the time back to
zero and then excite. All right, let's see if
that will work or not. And I will delete the
action constraint. And I will add this again because that sometimes
makes some problem. Let's it to receive the bone to the original position and
take the slider back to zero, and after that, let's exite from the wing animation and make sure to turn
off the auto king. And now let's start again. Let's start over let's see
what's going to happen. I will apply the
constraint on this one. So let's go to the
action constraint, Que the armature, Que the wing. Controller, and let's choose
the y location, local space. The rank from zero to
maybe ten or less. Let's choose the wing animation. Start from one n to 142. And now let's see what's
going to happen if I move this. All right, let's apply. Before I move this, I will apply the same action to this one. So select this, hold,
have to cru this. Sorry, select this one,
hold you have to crut this. Go to both constraint
COVID to select it. So this point and
this point they got the same aion. All right. Now if I move this forward, it will close, that's correct, and then it will open, and it will rotate like this, and it will open up. Now it's correct. Now, I will
bring this back to zero, and I will co the same ion
constraint for the rest. So select all of these pons. Grab them all. Or
before you do that, I think we need to make
some much we caning. As you can see, I should
move the bone from this point to this one to get the whole
animation finished. Well, what I can
do is I can go to this point right here and
change the number from ten, for example, to four. And the same thing for this one. Let's change this to four. And now let's see if we can make the animation
become shorter. Yeah, now it's become shorter. That's what I want.
That's very cool. So let's bring this pone back, and now let's co be the same action constraint for the rest. Let's select the rest, this pon, this pon, this so right
here, this one as well. This one right here and
this one, hold shift, and let's select this because we got the action
applied on this one, and then go to Bos
constraint COV two selected. Constraint, COV two constraint,
two selected ponds. Now, if I move this forward,
they will be closed, and they will be opened and
goes up, and now it's ready. That's very cool. Okay. So
now we got this animation. We should start from here. The spon should start from here, and then go forward and
open the wings like that. Okay, that's very cool.
Now what I need to do is, I need to cob the spaw. I will hit to bring this back
and go to the edit mode. And I will co the spawn
hit D to take a CV. I will move this CV forward
and maybe move it up. And let's give this a name
to king to win troller. I will call this leg g Ctroller. Enter. I want this bone to
control the leks this time. So now we can say that we
are finished with the wing, and now's the time
to control the leks. But before I end this video,
what I need to do is, I need to create a costume
shape for this bone. I will use the same
shape that I used here. Let's go to the shape section
and let's unhide them, and let's see corrupt this one. Hit HD to take a OB right here, and maybe we let's see
what we can do here. Maybe we can rotate this or
I can keep it like this. For now, I will
leave it like this. Select this bone, as this bone, and go to the bon properties, go to the costume have, and let's pick the second one. It will be big and not
aligned correctly. So select this tab. It is to scale at first, make it small because we
don't need to be big. Scale it like that, and let's rotate this to the
x axis, our x. A right 90 degree. And now we got this bone ready. If this small a little bit, you can grab this
one and scale it. And now we got this bone
ready to control the wings. For any reason, if you want
to make some tweaking, we got some problem right
here. Let's try to fix it. You can make some tweaking
if you like, for example, I can grab those and delete them to create some variation. All right. Yeah, I will
keep it like this. Now it's become nice. Tab out. And now we got this bone
ready to control the wings. Now let's move this
forward and let's see the result is very cool. I think that's it
for this video. Let's grub these
shapes and first, let's go out to the object mood. Now you can hide
them if you like, and now the result is very cool. That's it for this video. And the next video, we
will the legs C one.
151. 151 Riggning section Creating animation for the legs: Hello again, welcome back. Let's create animation
for the legs. We got the bond
ready for the legs, and now let's create animation. Let's sad this to bows mode and let's open the graph editor just a little bit right here. Let's put this one right here. All right. This is the situation of the lake and let's see from
where we can start. All right. First let's
start with the front legs. Let's try to rig them. We need to control this bone
and this bone right here, and maybe those here
and this one here. I think these bones are
the only bones that we need to create the animation. So Let's start with this one and let's activate auto keying, and because this one it
can move in all direction, so I will go to the
location and add keyframe. Let's select this one, and let's go here and add keyframe. This one as well
selected add keyframe, and this one as well a keyframe for all of these directions. What we need to do
is, we need to bring the reference mag and
let's see what's going on. As you can see the lek could
go out just a little bit, and I think we got some
images from the top. According to this mag, you can see how the
leks will be opened. They should go like this, like x, and this is the orden
thepter here in the middle. We need to create
something like that. Let's see how can we do this. Let's move this image out. We got the idea, and now I
will move the frame forward, for example, 220, and from here, we can start the animation. Let's select this. Or before
we start the animation, I think we can duplicate
the same key frame. Okay, let's go back to zero. I just want to do something. Let's add a key frame for
the bag legs as well. Select this one at
key frame here, select that bone
and add key frame, select these bones, and let's give them a key
frame and this one as well, let's give this a key frame. Now after adding key
frame for the bones, I think we just need to we
can start with the back legs. I just need to do something
before I move on to the front legs. Fair thing. What we need to do is we need these legs to be closed
when this oropor goes up. When this goes up,
flying in the air, these legs, they should go like that. And stick like this. So we need to simulate that. We need to create
that animation. From zero to number
ten or maybe 20, these legs will go
up first right here. And from here from this point, the animation will begin. So this is the first
thing that I did here. I just move those up. Assuming that this
ornithapor is in the air. After that, I will open the leg. From 20 to, everything
stay as is. In this case, I will add another key frame
for these two bones. Now 20-30, nothing will happen. 30-40, these bonds will go down and they will
be opened fully. Let's go to the left view. Let's move those to the
zero level like this. You can zoom in,
hit key to the Z, and let's move those sorry, Swe this two global,
hit ge to the Z. Let's move this up right here. Now what we can do
is we can go to the top and we can create something
similar to this image. Like scaling those out. You can swig this
two bounding box, and I will scale
those out like that. And now we got
these licks opened almost similar to the
image, as you can see here. But the legs are
tilted too much. We need to fix
that. In this case, Let's go back to to 30, and you remember the bones. I will add a key frame for for these two bones because I want these bones to start
moving from this point. Let's see what we
got. I think we got something weird
tapping here. All right we got
something weird. Let's go back to these points, and let's see what is
the problem exactly. So at zero, they will
be like this at 20. Let's see what we go so far. We got some weird problem.
Keep that in mind. That's always happen when
you want to make animation. I will grab these three key frames and
I will delete them, and I will start over. I just need to see
what's going on here. I think now we let's hit old key to bring
those bones back. This one, this one old key. Now everything is
right in place, and I will delete those as
well, and let's start again. First thing, we need
to move those up. We added a key frame. But for those, so select them. Let's move this Let's
move the time to ten, and let's take those
up almost right here, and now we got this animation. When we go back, we got this. I will duplicate this
key frame to number 20, HD, and let's take a
COVI two number 20. 10-20, nothing will happen. But from 20 to, these saws will go down. Let's go to the left view and
move those down like that. A Yeah, I think
now it's correct. That's happened
20-30. After that, I need to open these legs. I will go to number 40 and I will open
this leg right here. And before you move it, I just need to make
sure of something. Let's see how the distance. We go 200 centimeter. A almost 200 centimeter to
this darin the same thing, I should do it for
this bone as well. Let's move this 200 to the x
axis, something like this. Now we got this result. Now if I go back, this
is the animation that I got case this goes down
and then opened like that. But I think there are something
not makes sense here. At this point, these bonds
should not wreak the ground. At this point, these bonds
would wreak this area. Let's see, because these legs
could be opened in the air, something like that, and you
can tweak that if you like. Let's go back to and let's move those up just
a little bit more. From 20, they would be
opened like this to 40. All right. Let's go
to the 40 and let's see what we got here
in the graph editor. Let's see where the animation. This is the
animation. Let's grab this bone alone, let's
see where is it. It's right here, I guess. Yeah, it's right here.
What else this one? It's right here. Now we
can grub them together, and we can create some
variation here at this point. Let's grab this one and this
one and let's choose free. Maybe we can create
somebody like this. Let's see how that will
affect the animation. Let's go back to 20.
It's space to play. All right, this
animation is not nice. Let's Let's try to make another
pattern here. All right? Maybe we can move
this right like this, and maybe this one as well. Let's see what's going
to happen if I do that. Now it's become fast.
Now what I can do is, I can go to number 20 and grab those and
scale the making as it is and make the distance
bigger to 60, for example. Yeah, now it is okay. Let's see if we can make any ing here. Let's go back to 20. Let's go back again. Maybe we can crop this point and take this back ale bit and let's see what's
going to happen. The mation looks fine, but we can make somewhat weaken. Before the frame 60, let's go back just a little bit. I will grab these two bones and just move them
a little bit up. I will create a new
keyframe right here. Let's see what that can give us. Now the animation,
I think it's become better because now the les, they should go like
that, and after that when they reach the ground,
they go down like this. I think that make more sense.
Yeah, now it's better. Now it's makes
sense. That's cool. But we still got one problem. The arm is rotated too much. We need to move these
bones out as well. So let's see how can we do that. From this point, we
don't have any problem, but from here, I think we
could control the bones. Let's see how can we do that? Let's select this one
and select this bone, and maybe we can
co this key frame. I want these bonds from
zero to number maybe 30. I want them to stay
at the same position, so I will hit and co this
key frame right here. After that, these
bonds should be moved. When we k the 60, the animation will be done. I will grab this point and
move it to the x axis. Almost right here, let's see, we moved this 150 maybe, 150. Let's add here 150 and minus. Let's move this 1150 as well. All right. So now
we got this result. Yeah, now it makes
sense and nice. Let's go to the zero and
let's see what we got there. Very cool. Now we
can say that we are finished with the bag legs. Now let's go to the front legs and let's see what
we can do there. Let's go back to zero and don't
worry about the bag legs. We can see that we are
finished with them. Let's go to these pons and
let's see what we can do. You remember we created a single key frame for those
for this pond and this pond. And the animation should
end at the frame 60. I mean, the back
legs and front legs, they should be opened at the same time or
reach the ground. So Maybe from at at the frame, maybe 40, Or maybe 30, I will duplicate this key frame HD to frame 30. This is this two frame for
this bone in this bone. That's mean 0-30, nothing will happen to these two
bones right here. But after that, we will
see some animation. From to 60, I will
move these bones. I will grab this one and move it and let's see how much
we need to move this. We need to move this
to 130 and minus. So 100. A 130. We something weird. I will controls it and I
will repeat that again. Let's move this one to 100 and maybe 150, right here. This one as we, this point and let's move this one to 150. Now we got this animation.
Now we got this. All right. After that,
let's go to the left, and let's see if the front
legs reach the zero level. At this point, we need
to select this point and this point as well and
go back to the left view, and I just need to move those
down just a little bit. That's very cool. Let's go to the images and L
compare the result. All right. I think
the front legs, they could go down even
more a little bit. I guess. Let's go to the top of you and let's see what we got so far. The result is cool.
I think that's it. As you can see, now if I
make some comparison here, this point is alone the light, and we got something
very close to that. I will accept this result. After that we need to kick if we need to manipulate the
rotation of the arm. But I think it's very close. Let's rotate the view here. Yeah, it's very close. But we got some
overlab h right here. Because of that, I will move these bones just a
little bit away to avoid that overlap. Let's do that. We need these bones
to see from where. The animation will
start from Frame 30. Let's select this
bone and this bone, and let's see grab
this frame and let's duplicate it to frame 30. 0-30, nothing will happen. After that, when these
legs open to frame 60, these bones will move. Let's move this just a
little bit right here. Let's move this almost 60
centimeter, like this. Right now we fix the
overlapping here, and this one as well,
let's select this one, and let's move this 60, I guess. Yeah, something like
that. Now we could see very nice and
correct results. That's very cool. Let's go to the left and let's
see what we got. We got some problem
with the bag legs. I think we can move those
to help them to reach their zero level. All right. And now let's go back
to the lift and let's check and let's go to
zero and let's see. All right, so the animation
is very cool, I guess. And don't worry about the overlapping that
happened right here. B When the nitpor
goes in the air, these wings should be opened. But for now, we got
nice animation. Now we can accept it to to add an action constraint
to control the legs. After you creating
the animation, go to the action editor and
chang the name for legs. L just call them call the
animation x, and that's it. And let's activate
this little shield, and then take this back to zero, turn off auto king and
let's exact from here. So, now we just finish
this animation, and the next video,
we will learn how to create action
constraints for the xs. That's it for this video and
see you in the next one.
152. 152 Riggning section Adding action constraints to control the legs: Hello again, welcome back here. Let's add action
constraints for the legs. All right. So let's start
with the front legs. Let's leg this p, for example. Let's go to the constraint. Let's add action constraint. Let's choose armature,
and the bone, we need to select this
pon to control the lex. We gave this a
name x controller. Let's go back to this pon, and let's search for the lex. Controller. We got
it right here. We need to use the y axis
to move the spont choose y. Local change this
to local space, and we need the range
to start from zero, for example, to
what to five maybe. Or two maybe 24. We need to get the animation, we call it licks,
let's select the lex. And the frame, I just forget. Let's choose the lex animation, and let's see the frame
at 62, let's add. It's ends at 60, but we will add two
frame above it, 62. So let's add zero here or
one to frame 62 head enter. And what else we could do
here? I think that's it. Now if I move this, let's
see what's going to happen. Now we can see some animation. That's very cool.
Now we need to CB, we need to co the action
constraint for the rest. Let's select this bone, hold shift to crab
this and this and the bag legs as well crab this and this
and the sons here. Then hold shift and select
the last one, this one. Go to Bos and constraint
CV to select it. Now all of these bones
got the same constraint. Now if I move this,
As you can see, now we got some animation. So the animation should
start from here. When you go forward, this
legs should be opened. Very cool. All right.
That's very cool. Now let's give this a shape. Let's go to the top of view, and let's excite from the
pose mode to object mode. Let's create a plane. Let's move it right
here temporarily. Let's try to create a shape. First thing, scale is
just a bit like that. Apply the scale after that tab and let's make
some tweaking here. Let's see what taking
we can do here. I will control out to
add two eggs right here and move those just
a little bit like that. Maybe we can add two
ages right here as well, and maybe we can move those
just a little bit right here. Or let's add one a here
and one here and move those key and move those
just a little bit like this. Let's move this one right here, and maybe this one right here, we need to add some
care here in this area. Maybe this one we can
bev it 23 like this. We want to create something
similar to a human foot. Let's grab this one and
move it right here. Maybe this one we can
move it right here. We got this result. All right. Now, after that, I will hit if a to add and I will add
a circle right here. We got the circle there, let's decrease the
number of the segments. It's right here, by
the way, circle. I will hit key to move it
and let's move the circle. What's going on here. Hit key to move it and let's
move right here. Go to the top and
let's kill this. Hit key and let's
move this right here. Let's kill this even more. Something like this. Hit and
let's move this right here. I will Hit HD to take another C right here
at S and Skillet. Hit KD take another cob
right here, Skillet. It the end, let's take another cover right
here and scale it down. Now we got this result. After that, I will go to phase and select
all of these phase right here and hit
x and Qs deletes. Let's dissolve these vertices. Let's dissolve these
vertices control x. Now hit x and delete only phase. Now we got this
shape right here. Now what we can do is let's
move those right here, and maybe we can use mir modifier to mirror
this on the other side. And apply the miro modifier, and now we got this shape. I'm going to use this
shape for this bond, and we need to move this
in the shape section. Let's add this in the shape
and open the shapes for now. Now let's go to the
bonds armiture, and Swedes two boes,
select this bond. Let's go to the pond properties, go to the costume shape, and let's pick this
slick, and now we got. But we need to rotate
this, grab this, select all the vertices
at r to the z, and let's rotate
this one degree. If you want to scale
it, make it big, make it small, you
can do all of that. Tab out and let's
hide the shapes. We are finished here. Now we got this the controller
for the legs. Now, the result is very cool, but we need to make
somewhat taking. If I move these controllers, as you can see, we can
move them forever. They can go wherever you want. We need to lock all the
axis for these and just activate the y axis because we need to move to
the x to the y to the Y. The same thing for this one, lock all the axis and keep the y active. That's very important. Now I can't move it anywhere
just to the y axis. After that, I can
add a constraint is limit limit location
to limit the animation. Because if I take this bag, I can move it back to whatever
distance that I like, but I want to lock this. I want this bone to
reach point and stop and go forward and reach
a point and stop there. We can achieve that
by using one of these constraints
limit location. So let's add limit location. We let's see from
where we can start. We need to use the
local space and we need to lock the y
axis, Lock the y axis. This is the minimum, maximum, and this is the minimum. The minimum will
start from the zero, and by the way, let's go to local. The maximum, let's move
this, for example, 1 meter, and now let's
move this forward. Let's see if we can move it. We can't move it. I think
that's because of the minimum. We need to or at least change that number
2200, for example, 500. This is the maximum. G
to receive the bone. This is the minimum. I'm sorry. I just confused here. I will keep the zero and the maximum 400 or 500
centimeter or five meter. Now if I move this one, this one will k
500 and will stop. This distance, it
makes sense n. Now, I can't move it any further. I locked it. Let's do the
same thing for the feet. Let's s it old key
to reset this. Let's scrub this one, and
let's add lock location. We need to lock the y axis. This is the minimum zero, the maximum, for
example, 300 centimeter. I think that's will be enough. Let's sit old key to reset this, and I think we
need to flip that, I guess, or maybe we can
set this to local space. Yeah. I think we
need more distance, so let's speak this to 500. Now I think we got the
result that we want. Now we locked this one as well. That's very cool. After that, one more thing here
we need to do. Now, if we move the
nipter as you can see, these bones not
following the base bone. We need to go to the edit
mode and select this bone and this pont hold
the roots bone. I control P and ke offset. Now let's go back
to the base mode. Now, all the e is still there, and we don't get any problem. Now we can bos this if
we move this forward, and we can take this like that, and we can get a result
similar to the Mag right here. All right. Very cool. Now you can grab this one if you like to got some
result like this. If you want to move
this up or down, you can do this
according to this bond. We got very nice rigging
result here. I like it. V, nice. Are not finished here. We need now to do one step. We need to select all
the bones and hide them. Let's go to this section is called object
data properties. Now we need to select all the necessary bones and
put them inside a layer. So I will select this bone
because this one is necessary, and I will select this right
here and this pon here, and this one right here. And the wings and this
one and the bones here. All the necessary bones, I can grab them and maybe
this point right here. And this here. Now, I think I just selected all the necessary bones,
those here as well. After you select
all of these bones, hit M to open the layer. Let's put those, for
example, in layer two, just to recognize them, and now we got them
in the layer two. We got them right here. Now I will select the
rest of the bones, hit, and I will put
those in Layer three, and now we got those
in the layer three. If I activate layer two, I can see just the
necessary bones. If I go to layer three, I can see the rest. What I'm going to do now, I will select these bones again, and I will move
them to layer one. And now we got them
in the layer one. I will keep the rest
in the layer two or layer three. You can do that. Now the scene become clean, and if you want to see
all the bones just activate layer one and
you got them right here. Now the scene become
cleaner and nicer. So I think that's
it for this video, and see you in the next one.
153. 153 Creating environment part 1: Hello, again, welcome back. In this video, we need to start creating an environment
to render the scene. Let's bring the
reference images. I got these images from
the movie and we need to try to create something
similar to what we have here. Let's try to understand it and let's see what
we got right here. We got a huge circle and
ground and some walls here. L et's see if we
got another image. We got this image right here. You can see the size of human as compared with this big place. A let's try to create something. Let's say close to this one. It's not necessary to
be perfect because I don't have a lot of
information about the place. I just got some images from
the movie and that's all. All right. Let's put
these images right here. Let's start adding maybe
plane. Now we got the plane. Let's make this smaller, and let's focus maybe
on Maybe this image. Let's put this right here
for now. So this is a plane. And I'm not quite sure how big
I should scale this plane. So I'm going to
use this image and try as much as I can to create something
small in the size. I will scale this plane
and make it very huge. So it is scale like that. I got some problem
with the heading here. You can see that
we got some lines. I will turn off
cavity. To avoid that. And when I go back, the design rule disappear, and that's happen according to the according to
the view section here, we got this start clip and end clip. Increase this number. For example, I can add another zero here, and
that's we'll do it. Let's kill this. All right. L et's go back to the tim. Let's see how much
we scale this. I think I will change
the unit two meter. That will make the calculation
a bit easier for us. Now I ge scales about
400 meter or 500. This scale is okay. Maybe I can scale it just
a bit, make it smaller. I will tap them. I will grab this vertex and this vertex and take this bag, maybe just a bit. Make it t. Right now I will hit A to
select all the vertices. I mean, I just want
to select this phase. Or you can go to the phase mode. I will hit e to extrude this up. Let's extrude this
almost, I know. Maybe right here for now. It's about let's see how
much we need to scale this. Here we got a 38 meter. I think that's too much. Let's scale this, let's keep it height because after
that, I need to cut it. So don't worry about the
height. We can cut it. Now we got the results. What I'm going to do now, I will go to the top of you and make some
tweaking to this. Let's top to the object mode
and I will had control shift x to activate carver
tool and tweak to line. Let's make some cut
goes like this, maybe. Let's cut this
corner, for example, and maybe we can make
a cut, goes like that. Something like that, maybe.
Now we got this shape. What I'm going to do now, I will use Mr Modifier to mirror this side
on the other side, it bisect and then flip
it, and then apply. Now we got this shape. Now I will tap the
mood and go to face. I will select, for
example, these faces, and I will extrude
those just le bits. Or maybe before we extrude that, maybe we can add
some one right here, or maybe I can era this e
in the middle click and it control to bevole
it to tool like this. I'm going to select
this phase right here and I will hit e to
extrude it like this. And I will hit control
r to add one like that. Let's move this phase a
little bit like this. Let's extrude this again
and take this down. All right. So now
we got this shape. I think we can move those vertices just a
little bit forward. Hit key, and let's
move those like that. Because here we have
staircase here, and anyone who want
to reach this area, he could go up and
then reach this area. That's what's happened in
the movie. Now we got this. Now let's go to the
lift view control three and from here, let's try to make some tweaking. We got a big circle Huld
cut this. All right. So now we can cut this right now or we
can delay that later. But first, we don't
need the roof. I will tap and go to face and select the roof and
maybe even this one. Or maybe I can keep
it, x, delete that. For the ground, I can grab the ground and hit
P S to separate it, and now we got this
shape. All right. All right. Now let's try
to create this pig circle. I will add to A to add
and I will add circle, and the vertices, I
will add 150 vertex. I will scale this circle, and make it big like this. Something like this maybe. I will had key to the
Z and move this up. Now we got this result. I will tap and hit A, you can go the vertices, hit E to extrude and to
scale after the extruion. Let's extrude this like that. Now we got this
shape. After that, I will hit A and E
to extrude this up, and now we got this
shape as well. From here, we can grab all
of these faces out click, H key to the Z, and
let's take this down. Maybe right here,
something like this, or maybe even down if you would like to
take it, it's okay. Now let's go to the left if
you go to wire frame tub out. I will had control heptx
and switch to line. I will use carver, and I will
make a cut a diagonal cut. Let's see how can
we achieve that. Let's make a cut, for example, it goes like that, maybe. Somebody like this.
You can i poll it, and cut it like this, and maybe
another cut from the top. Let's try to see the images,
what we should do here. I'm not going to cut
this the top side. But what I'm going to
do is I will tut to mode and grab all these
vertices and it keep twice. I will move those
down like this. Before I do that, I think
I need to turn off atom. So ket twice and move
those down like that. Something like this. With
these phase selected hit control I to invert
the selection hit F to delete the rest. Now we just got
something like plan. Now, what I'm going to do is, let's delete these
extra vertices here. We don't need them.
Now, what I will do is, I will add a solid pi to this. Let's give this a thickness.
Something like this, maybe. All right. So now
we got this result. As you can see here,
but here in this area, we got some problems,
try to fix it. I think we got tra vertices. I will hit control X
to delete this one. Now I'm not experience
any problem here. Everything looks cool. Now we got this pi circle. Let's go back to the
left and let's see now what we can cut
from this wall. Before that, just
kick if this circle is exactly in the correct place. From this side, it goes down and I think now we got
nice result, nice height. All right. I'm not using
any dimension here. It's just the cook environment. All right, so that's cool. Right now, let's make some
weak in to the circle. Let's try to make some extrusion like what we are
seeing right here. I will select it and
tap the eight mood. Before I tap to eight mood, I will apply the solidify. Now, let's tap again. Let's control r to add
maybe a circle like this. As you can see, we got
multiple levels here. In this case, what we
can do is we can grab some faces this one hold control and keep
selecting these faces. Okay Let's see those as well. Maybe we can extrude them
just a little bit like that. Maybe we can add
another control R right here and right here, and maybe we can select
these phases as well. Maybe we can create another
level, something like that. Here in this area, we
got a lot of job to do. Let's hit control r
to add an right here. No right here, control R. Let's add one egg
maybe right here. Let's select some faces. Maybe we can grab
all of these faces, and maybe we can grab
most of these faces. And leave some of them. I will hit E to
make some extrusion and I will use extrude along the normal and extrude this just a little bit. If you got this problem, the extrusion goes so fast, you can accept any distance
from here, you can adjust it. Just keep that in
mind. Now we got this. I think we got
double right here. Now we got this result. Let's start creating some
holes maybe right here. We can't control to add 18 right here or just
one and bev it to two. Maybe now we can erupt
some phases randomly. Let's leave those two
and the other faces. Something like this. You don't need to be precise. After grabbing all
of these phases, maybe we can's of the
orthographic view. After grabbing all
of these phases, I will hit AE and let's
extrude those along the normal and let's
put those back gas a little bit, maybe right here. That will be enough, I guess. Let's see what else we can do. Maybe here, we can hit sorry. Maybe here we can at an
edge and bubble it as well. Let's bubble this to two, and let's see grab some faces. Maybe we can leave three
phases and pick random faces like that. All right. As I say, don't seek for
precision, make a symbol. Okay. Let's pick those here. That's nice. Now I
will let A E and Q along the normal and
let's put those ale bit. I just say that you can control this from here from this slider
after you open this menu. Let's see what else
we can do here. Maybe we can make some adjustment to
this level right here. Let's add an edge
and hit control and let's bubble this
edge like that, and maybe we can pick some phases from here
and I don't know, maybe we can push them back. So it de along the normal
and move those back and use this menu to control it. Something like that to work. Right Let's see what
else we can do here. Maybe I can grab these faces. I don't know. Let's try to push those forward
just a little bit. Let's control them from here. Maybe we can add
one egg right here. I control to bet
like that and we can grab some random faces, and we can push them inside. It, let's extrude this, let's move this one
back right here. A what else we could do here? Now we got this result. It's nice. Let's see what we can do here
in the wall. Can we? Let's grab the wall to and maybe we can add
one edge right here. And maybe one A here,
and let's grab, for example, this
phase and this phase, and let's extrude those along the normal and
maybe I don't know. Maybe we can grab
those here as well. Let tend extrude and
let's move those inside and let's control the distance from here and activate
offsite even. Something like this. Let's
see what else we can do. We got this line inside. Seems like we need to do some tweaking here
from inside if you can. I will add control r to add
18, maybe goes like this. Another control r like that. Maybe we can grab all
of these faces like a circle like this. We can pick those Let's
see how can we do that. Let's make some tweaking
to the view here. Let's change the focal
length from 150 to maybe 55. I think that will be better. Now I will grab these pass hit Alt E and let's extrude
those along the normal. But I think we will
got some problem here. Before the extrusion, I will
hit control z cou time. And I think we just let's
see what we have here. I think we have double ages. I will grab this g and hit
control X to the solves. I think these phases will
be enough for me to pick. I will hit Alt click and
hit Alt along the normal, and let's move those inside. Now, I think that's it. After that, we can go back to this wall and maybe
we can cut it. I control heft x and use carver tool and let's make a
line goes with the circle, and let's use this line to cut this wall, and now we cut it. I will slash to isolate it. I need to see what
I have done here. Here we got big face, x F to delete it. We don't need it.
That's very cool. Now is the time to arab this. Let's this v22, and let's
read this to U V editor, and let's create here some quick seams.
Let's start from here. Let's go to the edge
and let's grab these. Let's add a seam goes here and maybe or I don't
need to add sm here. Maybe seem here, and maybe we can add the
seam goes here as well. Okay All right. Let's see what else
we can do here. Let's try to open this
area by adding seams from here. All right. Let's seam here as well. Maybe seam right here. Maybe we can cut this area as well. But something here, I
just need to mention. I want to sulate this phase, hit P to separate it because this one should be
connected with the ground. I will let slide to exit and
I will select the ground. I will go to the vertices
before you go to the vertices. Select this with
this hit control to make them one
piece, and that's it. If you like, you can
grab the vertices, hit and merge by
distance to mir those. We got two vertices me.
Let's rob this one. Tap hit A hit twice
and it will be rub. We got a problem with
the scale, I guess, I will hit control A
and apply the scale. Tab again hit A hit
U twice to rub it. And change this to confirm
don't rob it with angle base. Now we got this
runD, can excite. Now let's grab the wall
here and we gave this asm. Now I can t and hit A and
here hit twice to rub it. Now we got this result. Let's see what we
got right here. I don't have any
problem, I guess. Everything looks okay. Alright, so we arrive this
one and it's finished. I can tap out. And maybe we can go to
the circle, and here, what I'm going to do is, I will tap and go to the edges and I'm not
going to select anything. And here inside the
select section, I can go to this option is
called select sharp edges. That's what help me to grab
the edges, the sharp edges. After you selecting all
of these sharp edges, just mark sm one more thing
here, I just want to mention. If you like, you can delete some seams from some
places like this, or if you like, you can
ignore them actually. I will ignore them. Now let's tap it A and here
twice to rab it. Now we got this results. But I think we need
to cut the circle, I guess, see if we
got any problem. As you can see the circle, I think it's perfect,
and it's okay. But we got these small edges. That's where, let's see
from where that's coming. All right, I think we
got some problem here. Let's pick these edges, hit to the Z, and maybe
we can move those down. Because here we got some problem actually. I didn't notice that. I will hit to the Z, and I will activate automic because I need
to mark those back, it to the Z, hold control, and let's mark those
maybe right here. Let's see if I can't
accept this result. I don't know. I just
move those down. I think now the
result is better. I will hit A and hit
twice to re rabbit. I try to see from
where these comes. We got the belly
aches here or what? Something weird here happened. Well, actually, we can delete
these faces from the bag. It X F. That's will make
the life easier for us. Maybe I can grow selection because here we got doble
ages, something weird. I don't know from
where these comes. Hit XF to delete them. Even this area, if you like, you can select this one as a first phase hit control
heft and pick this one. Let's do that
again, select this, hold control heft, and pick this and hit XF
to delete all of this. You can open it from the side. All right. All right, so now I will end this video, and let's comb it
in the next one. So see you next.
154. 154 Creating environment part 1: Hello, again, welcome back. Let's re rub this. And the previous video I just deleted these
faces right here. In these faces, deleting these faces is not going
to make any problem. So let's hit A and
let's hit twice again. And now we got this rub. Let least see from
where these comes, I just want to
pick this one and. Let's check this. All right? I think we get double
edges right here. In this case, if I want to
avoid any double edges, I will hit A and then hit
and s merged by distance, and we got 44 vertices merged. And this edge right
here, I don't want it. I can select it and
hit clear seam. We don't need any
seam right here. Let's try to find if
we got any seam in the area we don't want. We can delete it. All right, let's see if we can
do anything else. All right. So let's
rap this again. It A and here hit you twice. All right. Now, I think
the rest is better. All don't worry too about these stuff. You
can ignore them. All right now, after
we erupt everything, let's try to create the
materials for those. Let's select the ground first and Let's tweak this
to Hader Editor. Let's add a new material and
we can close this panel. I can call this ground empty. All right. And maybe we can Yeah,
let's start from here. After that, after I created
the ground material, I will duplicate it for
the wall and for the roof. One more thing here, I
just want to mention, after you jump to the material, you can determine
how high is this. You can grab it and it to the Z and take
this down if you like. You still got this option. Okay. You can do
something like that. One more thing here,
you can grab all of these details and spike
this 23d coorsor, and you can put the three
d coorsor in the middle, and you can scale it, make
it small or make it big. Okay? Maybe we can
just scale it down, control a and lay scale. Make it smaller, just a
little bit. All right. So after that, I can
add it Smooth and then add auto smooth
here. Not just that. I can add vel modifier
above all of that. Let's add vel here, and let's increase the
number from 0.1 to 0.3. Let's add two segments, open the heating and
activate hard to normal. And if you prefer, you can go to the cumary industry
this from harp to arc, that can give us another vl
result as you can see here. So now we got this. You
can make this harbor, I guess, we can add p two. And we can co the same
level for the wall. Let's grab the wall hold,
have to get the roof, control L and
choose CB modifier. And now we got the same
level of light here. After that, you can activate auto smooth for
the wall as well. So now we got almost everything. Okay. I think now we can
create some material. So let's grab the ground and let's see how can we
create this material. In the project folder, I will leave these images. All right. You can
download them. Let's grab this aerial beach. I got this image
from Titure Haven. It's a free website. We can get Tite HDRI
images from there. I will grab this image, and I will put it here inside, and let's block this to
the base color right here. All right now, I will select the ground and it Z and
go to material review. I just want to see
what I got right here. As you can see this is
the result that I got. And we need to do
a lot of tweaking. First thing, let's bring
all of the images. So we just added the
base color diffuse. Now I will bring
the roughness here. Tweak the color space to none because we just
need the information. We have just a black
and white image and black this to the roughness, and now we got roughness. And we got the normal map. We can bring this in right here, and this creates normal Hit a Hit a two
search for normal map. We got right here, blog this to the normal and speak
this to no color, and we can block this letter. Or let's block this here
and cut it from here. Okay. Now, what I can do is, I need to create texture
coordinate and mapping. If you activate the nodular, if you go to the preferences, here we got the nodngular, activate this node rang because it's a very helpful addon
in the addon section. After that, go to go to this burger icon and
he safe preferences. I can grab one of these
images and hit control T. When you hit control T, node triangular will create ticket coordinate
and mapping for you. And pluck this to U V.
Let's move this right here. Block this to the vector for this one and
this one as well. All right, so as you can
see this is the result. Now what I can do is I
will add a value node, and I will block this
to the scale here. According to this
one, I can scale this and make it very small. All right, as you can see now, we got this scale. But the problem that I got
now now it is repeated. I can see the pattern here, and that's not make sense. So this idea is
not going to work. So I will cut the value. I'm not going to use
it. In this case, we need to use some trick. I will get some help
from the Veroni. I will shift to cc and the circ for Vernid. Voronoi texture. And I will have control t for the Voronoi to add the mapping
and teture coordinate. I don't need I don't
need the mapping. I will had control to delete it, and I will block
this to the object. All right. Now I got the Voronoi texture. Because I activated
the node angular, I want to activate
the screen cast. Because I activated
the nodringular. Now, if I want to review this, I can control and click to
review this slot or this one. So as you can see this is
the result of the Voronoi, I will click again to see
the second choice here, the c. And as you can see, we got these shapes. Now the scale is at five
as you can see here. I will change this to 0.1 maybe. And you can see all of these patterns, all
of these shapes. What I'm going to do is, I'm going to take this image
or let's say this material, and I will make this material to be distributed on
all of these shapes. That's mean each shape
you can see here. It will review the material. All right. A right. Let's see how can
we achieve that? So now we got the Varnetic sure. I will use math node. Let's go to search
and search for math, and let's block the
math right here. If you block the
math right here, you can see that
I changed this to black and white information. I will s this to multiply. And now we got black
and white variation, and we got color between
the black and the white. So each piece will help
to present this material, and that will help to
make the texturandom. So let's see, how
can we achieve that? All right. Now, if I
plug the image back, and if I take the
result of the value and plug it in the location here,
we should see something. Let's wait. And as you can see, now each part, it
shows the materials. Shows a part of the images
that we got right here. And now as you can see
now it's become random, but we still got
some problem here. We got some seams, and we need to fix the scale. Now, if I go to the scale here, I can now use the value and black it here in
the scale second. And I can make this very
small and as you can see, I still got the
randomness problem. In this case, I can
scale the V as well. So let's go to this one
and try to manipulate it. Let's try to let's add 0.3, something like that, and we can manipulate this
one. Don't forget that. You can manipulate
the number here. That will help to make
the result random. Now as you can see,
I become random. I think the Varnis very small. We can make it a little
bit big, 2.2 maybe. Now, this result is cool, I guess, and maybe we
can control the scale. From here, we can add maybe ten. Let's see the result
if we add ten here. All right. Very cool. Still nice. Just keep in your mind, everything
is controllable. We can change that later. Now this is the
seta that we got, that's helped to
randomize texture, but we still got
one problem though. We got these seams. We need to try to cover them. In this case, what
I'm going to do is, I will select the material and hit FTD to take another COV. What I'm going to do is, I will Use this copy of this material to cover these lines and
blend with the rest. But let's see how
can we do that? I will grab the Voronoi texture and the texture coordinate, and I will hit Shift
D to take another CV, and let's put this CV
for example right here. And I will hit
control shift click and click again just to see
the result of the Voronoi. And I'm going to change
this option from f one to distance to H. But as you can see
nothing happened here. I will add another All right. Sorry. I will had control
have to click to see. And as you can see, now
we got this result. We got a black line
in the middle, and we got gradient color
here goes to the white. Well, how can we control this? If I add color, let's circ rum. Cam and let's block
this right here. Let's take the white
value to the black, and as you can see now, we have the ability
to control this. So I will use this setup
to kill these lines. And let's see how
can we do that? As I said, we got now two materials, this
one and this one. I will mix between
those I will grab this and grab this control heft and right click
from this to this, no triangular will create
mix header for us. In the mix in the factor, I will use this mask. Let's block this right here and let's sublog
this to the output. Let's see what we will get. As you can see now, this ticket sure right
here is covering the line, but we still got problem here. The ticketure is very big, as you can see as compare
with the first one. Can you see here, this
one is very zoomed in. Well, if we control the scale, we can fix this problem. In this case, I can copy
the mapping here he D, and let's take cobra here, and don't forget to
save the project. It control is to save it. All right. Now let's sub block
the vector here and here and to the normal map. And don't forget
to CB the texture coordinate as well and
the U V to the vector. So now we got this result. Now we can scale
this and make it sm. Let's go to the
material review again. And now we got this result. And I will zoom in here. As you can see. Now, just keep your eye on this
area and on this area. I will add a value his shift
A to shift four value. And let's add, for example, number one right here and let's sublog this to the scale here. Now let's increase
the number here. Increase the number
until you make these two texture
at the same size. So maybe ten, we
can add ten here, think ten will be okay. As you can see, that's
helped to mix between those. Let's see what else
we can do here. All right, now we
got this result, but we can see
some b lines here. Well, maybe if we
manipulate the cola, maybe that's will help
to fix the problem. If we make this smaller, maybe or bigger,
something like this. Maybe we can book this
to the white value. Maybe that's will help
to blend this even more. I guess the result now is fine. Let's go back here. And let's kick the scale that we add here. Here we got ten. And here we got 14, let's
read this to ten. Yeah, now it's blended. Okay. Now I will go to the solid mode and
let's exit from here. I'm just going to get 1 ft
here from this ornithopor, and then I will select the
ground and isolate them. I just need to compare the
texture according to the foot. So I will z and go
to material review. Well, this is the
result that we got. The texture is still very big. We can make it even smaller. So let's do that. Let's go back here
and let's start here. Let's change the
scale to maybe 15. All right. Maybe we can
increase that to maybe 20. Maybe 25. And the same thing, this one, three is 225. All right, let's see
what we got so far. Before we go farther and
increase the number here. We can manipulate the UV, because I think adding big number right here,
big numbers here. I think that will affect the
performance of the computer. So we can add ten, for example, here and there, and we can sub this
to two and open the UV editor and I
can grab the ground and tap and scale this. I have this option. I can scale the
ground from the UV. All right. I think we can do
that even more. All right. Maybe we can scale it even more. And let's tab out. All right, now we got this
result as you can see. If you go back and if
you not any pattern, you can go back to the material, and you can go to
the value here, and you can manipulate it, and let's see what
we can get here. All right we can
create some variation, but that's not enough because
of the scale of the vino. Add 0.4 maybe. Let's try to
manipulate the scale. Let's see what we can get here. Change this to one maybe? And don't forget to change
the same scale here as well. And this Voronoi texture.
So let's add one here. And if you want to
control those both, you can do something here. What I'm going to do is, I will grab a value here and let's change the
number of this value to one. And I will block this to
the scale of the Veroni here and to the scale of
the Veroni right there. All right, right there. And if you hold shift erratically and cut
this wire like this, you can create three road. You can use this dot to change the direction
of the wire, if you like. Something like this. Okay. So let's try to change the direction. Let's add maybe another
point right here. And maybe one right
there. All right. Just to see the
line. And from here, you can control the scale for the So let's zoom in here and let's see
what we've got so far. All right. We can see a little
bit from the pat train. And let's see how that
can be avoidable. Alright, we still got
the problem here. Well, in this case, maybe we can scale this back
as a little bit. All right, and let's
see now what we can do. I'm just going to kick
the Voronoi here. I just want to see the scale. All right? It is big. Let's
change the number two. Two, maybe 0.5.
Let's make it small. Yeah, 0.5. I think
that will be okay. Let's like this, it control
heft and click on this. Let's go back to
M the math here. All right, I guess
one thing here can help us to
avoid this pattern. If we go up here, maybe by manipulating the
color ram, we can fix that. So let's zoom back
a little bit and maybe we can take this
close to the black. As you can see that can
help to avoid the pattern. But just be careful. All right now we
lost the pattern, and now we got a nice result. And we can tweak this
farther if we like, but just be careful of that. All right, F far
distance is very nice. And if you Zoom and you
can see some details, and that's what I wanted. So for now, I can say
that I finish here. On one more thing you should do. You need to block
this to the normal, but I will make this step later because
normally some performance, so I'm not going to
block this here now. This is the setup.
This is how we can use Verni to create
random texture. I will coy the same material
to the wall and to the roof, and there we can make
some tweaking as well. But for now, I will
end this video, and
155. 155 Rendering the scene and edit the image with photoshop: Hello, again, welcome back. Let's apply the material on
the walls and on the roof. Let's go to solid view and let's to bring back
the other pieces. And the Let's select the wall, hold here to grab the ground. I control and link the material. Now, the wall have
the same material, but I need to change that. So I'm going to change
the name of the material. Just click this CO right
here and make a single user. I mean, make it unique. Let's change after
that the name. Let's call this wall. Sorry. Wall t for material. Let's grab the wall slash to isolate it and let's
go to material review. I just want to see
the result over here. As you can see the Verni
size is very small here. So let's change this to
0.1 maybe and make it big. Let's check the results. Maybe we can manipulate
the size here. To bland these two materials. Now we got this result. Actually, it is nice. L's cool. Even the scale. But here, I just want to make
something for the walls. I need to make the
teture a little bit. In this case, let's
go to solid fs, shift A and let curve, RGB curve, and les black
here this one in the. Let's go to the material review. I will take the curve
down and make it dark like this,
something like that, and I will copy the same curve at D. Let's put this right
here on this one as well. Now the material will be darker. You can control
that if you like. But just be careful because because any variation
here, some problem. You need to change
those simtously. I'm not going to make any
further tweaking here. Maybe later we can do. Now let's go to the roof, grab a hole here to grab the wa, control L and link the same material from
the wall to the roof. Let's go to this icon. Let's make it unique,
and let's call this roof MT and like to isolate this. Let's go to material review. I just want to see the result. I will control x on the B curve because we don't need
to make this darker. And let's check the
results from a distance, and let's see what
we got right here. Actually, I like it. It looks fine. If you like, you can change the Vern size for this
one, for example, 2.4, maybe, if you like, you can do that, or maybe
that's too much, 2.2, maybe. And let's see what
else we can k here. Maybe we can the
multiply value here, and the same thing we can
the color rump value here. Something like this. That will
help to plan the material. Now we got this results. It looks nice from a distance, and I will accept it. After you doing all of that, now we can block the normal map. Don't forget it. Let's supply
this one as well here. Let's hit to bring the other and let's apply
the normal map. Let's supply this one as well. Let's go to the ground and
let's do the same thing here. But for the ground, I will isolate it and I will save
a project before I do anything because I just need to see the normal map value.
I want to check it. I will z and go to
material review. All right let change this to, maybe two, and this one as well. We can see a little bit
of height information, and that's enough for me. I will accept that. All right. Let's go to solid
mood and let's hit slack to excite of
the local mood. And I think that's it. Now, I think we
can add a camera. We got the three d
courser here and the dl. I will hit a to add
and less add a camera, and we got this camera here. Let's try to back view, for example, a view from here. Let's pick this,
something like this, and you can hit control
Alt zero, less activate. Let's move this right here. Hit control zero. If you do that, you will frame the camera here from this view. You will align the
camera to this view. This is a quick way
to set up the camera. Hit control zero,
and now we got it. If you want to
control the camera, you can select the camera
and go to the view, and here we have an option
and try to find it. Lets see where is it. Right here in the navigation, we got walk navigation. If you select this option, you can move the camera like
you are playing a game. You can move the
mouse as you can see, and you can hit W to go
forward as to go backwards, like you are playing a game. You can put the camera
in any place you like. For example,
something like this. And I can go to the
setting of the camera and here change the focal
length, 15 millimeter. I think I can increase
this to 120 millimeter. Now I need to take
the camera back. Now, let's try to control
the camera again. You can go to
select to the view, sorry and then go to the navigation and
choose walk navigation. Or if you want to
reach this quickly, you can hit shifts
with Tilda key. Tilda key it's underneath
the ESC button sce button. Now I will hit S to go
back, something like this. Now I got the ori por in
set the frame right here. All right now we
got the camera ID. After that, let's go to the render and I will sweep
this from EV to cycle. I'm not going to change
anything for now, but I just need to see how
can we create the lighting. Now, let's the ground and
the wall and the roof. And because we speak
this two cycle, I will z and go to the render. I just want to see the render. Now we are rendering with cycle. Let's go to the environment
now, and in the color, I will add let's see
what we can add here. Right here, we have
environment texture, we have a schticture. So just add schticure, and from here you can control
what you want to do here. We got this result
as you can see here, and we got here some options. If you like, you can
rotate the sun from here. If you grab this and move this, you can rotate the sun in
any direction you like. As you can see now, I have the
ability to rotate the sun. So Let's tik this back to zero. The sun evolution, this will
help to move the sun up. Let's add, for example, 24, and let's see the result. As you can see now we
got another result. I think we can see
the sun in the sky, I guess. A is. It should be here, but
we can see it because the sky is very bright. Here we got the sun size,
we can change this. If you change the sun size, that's will affect the shadow. I mean, if you increase
this number, for example, to five, that's will
make the shadow softer. For example, two, I think it will work and it
will be fine for me. Here we got some options. We can use the air,
the, the ozone. Let's increase the air, and you can see how that
can affect the result. It can make the
weather a bit yellow. I like this result actually. Let's move this to 2.5 maybe and the dt may we can add some
dt here, if you like. You can make the weather.
Let's move this to maybe five. And you can work with
the ozone if you like. All right. As you can
see the header will be affected by that.
That will be cooler. All right. All the sun
comes from this direction. I think if we manipulate
the altitude, let's see what's
going to happen. If you want to see the sun disc, you can move up the air, and now we got it right there. If you want to see
where is it exactly. By after doing that, you can see how can you control the sun if
you want to rotate it, for example, or if
you want to move this up according to
the sun elevation. Something like this. I think
this elevation is cool. So let's the air 2.2 maybe. Sorry we increase
this to 2.5, I guess. Now we got this w. I think this lighting now it is
perfect for the render. Let's go to the solid
and let's hit slide to of the local mood and
easier to go to the camera. Let's see what's going to
happen if I render this. Before you do any render, just hit control as
to save the project. Let's make a quick render to
see what we will get here. Let's go first to a setting and I will activate the
Denise for the render, I'm not going to work with noise threshold, I
will turn this off. I will work with samples. I need some samples
number to render this. I will speak this
for example to 200. I think 200 will
be enough for me. If you want to increase
this, you can do that, but that's need
more time to finish the render. All right. If you have got powerful Q, can read this to QV, if you want to render with QV. For me, I will keep it on CPU. And I don't want to
change anything here. I will leave everything as is, and then I will go to render
and make it re render. Let's see what we
will get there. As you can see,
this is the result, the render is not finished yet, but I think the sun
intensity is too much. I will hit scape to cancel
the render and exit from this window because I just need to make some
tweaking in the environment. Here we got the sun
intensity. It's one. I will swing this 2.7 maybe. Let's make another render. I just want to see
the difference. I will go to the view render, and I will swing this to slow two to render
with slow two, and let's go to the
render and render image or you can hit F 12 if you like. The sun intensity is
still high, I guess, so I will end this render
again and let's excite. And here I will his Z and
go to render render right here and let's tweak the sun
the option of the sky here. Let's give this a bit
of time to render. And now we got this. Let's see what we got here and render. Let's go back to the sky and increase maybe the dust
intensity to maybe eight. Maybe that can help to reduce the sun intensity or maybe
ten, we can add here. I will hit control to render a small area like
this one, maybe. I just want to focus here. Now, I think the sun
intensity is cool, I guess, I think we can
start with this one. I don't have very
bright lighting here. The lighting looks cool and even for the
ground, it looks okay. Here I mean. This result,
we can accept it. I will control B and
then Z and go to solid. Maybe I can change the frame of the camera
to another position. Let's rotate this
just a little bit. I can't see the roof from here. By the way, just remember you can grab the roof
and move it down. You still can do that. Just keep that in mind. Hit ke to the Z and move
it down if you like. Let's go to the camera zero. You can control that.
Let's move it up. All right. If you
want to see the roof, you need to take the
camera back a little bit. Let's try to take a
t from here maybe. A. Something like this. I think it will be nice
and save the project. Don't forget that, and maybe now we can make quick render. All right now, the
render is finished, and this is the
result that we got. If you want to save the image, you can go to this
image and then save us and just add the name
here and then save. If you want to
change the format, you can go here and change it to whatever format you like. I'm going to save this image and I will take it to photos. Now I'm inside Photoshop
and I got this image, so I'm going to click
any Track and put here inside
Photoshop. All right. What I'm going to
do is I will go to filter and here we
got Camero filter, or you can hit control
H A to activate it. So let's go to this filter. All right, now the
filter is opened. It's very nice and cool filter to add some effect to the image. So here we got a lot of sliders. You can check them. I can manipulate the texture
just a little bit. This slide right
here can help you to make the texture harbor. I can go to the details, hold control and click
this one to open it and let's push the hardness
just a little bit. That will make the
details more sharp. If you want to control the
contrast, you can do that. Crazes just ale bit. What else we can do here. If you'd like to check the
temperature if you like, you can make it yellowish or can make the weather
cold like this. Cleart, you can use
it if you like. Don't like to use this much. I can push you
gues a little bit. We got a lot of options. The result is very cool. You can now hit ok to
accept all of that. You can see before
and after if you hit cant Z, control Z. After that, you can go to
file and save the image. So I think that's it for
this video, and you in the
156. 156 Taking another shot with new poses and motion blur: Hello, again, welcome back. In this video, I need
to create another shot. I want to take this
nipter up in the air, and I want to open
the wings and try to make some new posing there. First thing, what I want to do. I want to grab the whole
environment and hit M, to create a new collection. Let's call this y roment. And let's hide the
environments collection. Let's go to the On thefter,
and let's see what we can do. I will go to the bows mode after I select
the armature and let's close the legs and let's open the wings like
that. All right. Everything looks cool, but I got just simple
problem right here. If I want to take
this in the air, let's change this to global and change this to bounding
and turn off snap. If I take this in
the air like this, I should rotate it just
a little bit like that. And if I do that, I will got
some problem right here. I will got some of
alaving habit right here. I want to avoid this. So
before I take this up, let's try to fix this, and
let's see how can we do that? I got the bone selected,
I will go to the bone. Properties, data properties, and I will activate this layer, hot and activate it. And now we got all the pons. I will reset everything, hit A all t r to
reset everything. And I'm just going to
add some limitation to the spawn. All right. Fair thing, let's
activate the axis because I just want to see
the axis of the spawn. Let's go here and sorry, maybe right here and
let's activate the axis. And now we can see the axis. So x goes like this. This is z, this y. Now we got this pont selected, I'm going to use constraints. Let's go to constraint, and let's add limited rotation because I just want to
limit the rotation. Now we got limited rotation. We want to limit
the x axis because this pond is rotating
like this to the x axis, so we need to target the x axis. Activate the x axis, and as you can see,
we got this result. We want to speak this to local. Okay, now after picking
the right axis, now we should add
numbers right here. I will go to the
left of view and I will rotate the root pond. I just want to see
what's going to happen. So keep your eye on
this foot right here. Let's see what's going
to happen there, if I rotate the
ornitapor like this. So I want to rotate the
ornitapor like this, and I want to get a result similar to this bond right here. If I got some overlapping, I need to rotate this back, so let's see what
we got right here. We don't have any overlapping. So this level is very cool. But I want this bone to get the same angle and
stop at this point. After you rotate
the root like this, now you can manipulate
these numbers. So let's see what's
going to happen? As you can see, if
I move the minimum, I can give this bone a little bit of
freedom to be rotated. And we need to limit
this rotation to, for example, 14 degree in
minus or let's rotate this. And let's see how much
we need. We need -16. All right. And that
will be enough. So to the minimum, now I
just knew that I want -16. What if I rotate this
to the opposite dain, for example, like this? I want this poont to get
results similar to that one. So let's select this
point, and let's see, how much we need to the
maximum? All right. We want 33 degree or maybe 34. Yeah, 34 degrees. All right. So now we just fixed this. Now if I grab this
bone and rotate it, I'm not going to have any
overlapping happen here. So we fixed this. I
will get the bone, and I will grab this and hold shift to grab this bone
and the same information. So go to both and constraint
and CV to select it. Sorry, we got some problem. If I do that, I will be the
same dam track to this one. So in this case, let's
add this manually. Let's go here and let
limit the rotation. So at the rotation not location, and let's activate the x axis, and let's give this
the same number -16. Let's go back here
and let's add -16, d enter, and the
maximum let's add 34. And let's see if that works
here or not, at Altar. L et's rotate this to the x. If that doesn't work
here for this foot. Sorry, I just want to
sweak this to local space. Yeah, I think now it will work. Let's rotate the root p.
Yeah. Now it's working. That's very call. So it was because of this
oh here the owner. Swa this to local.
Don't forget that. All right. We want to do the same thing for
the front lex. So let's grab this one and
let's add limit rotation, and let's choose I think
the x axis or what? I think the z axis in
this case, I guess. Yeah, the Z axis, we want
to work with the Z axis. As you can see, the
Z goes like this. So let's activate the Z axis, and let's turn off ward. Let's treat this to local, and let's scrub the roots, and let's go to
the left view and let's rotate this t bit forward. All right. So this angle, I think it's okay,
something like this. So let's select this bone and let's move this minimum
back a little bit. All right. So 21, I guess, 22 minus -22. I think it will work
to this dochin. Now, I will grab this and
rotate this like that. And we want yeah,
something like this, rotate the root like this, and I want this bone to have the same angle similar
to that one there. So select this bone again and
let's rotate the maximum. This is the minimum, and this is the maximum -22 and the
minimum and the maximum 5.6. Now if I rotate the
roots like this, or like this, I'm not going
to get any overlapping there. Let's ad altar to the roots, and let's see grab this bone and let's add limit rotation, and let's activate the z, and s is two local. And let's give this
one the same number. So we added in the minimum -22, and in the maximum 5.6, I guess, and let's see what's going to happen if I rotate the roots. All right something weird
we got right there. L see what we have there. Yeah, that's right the
numbers are right. And we got the Z axis. And I'm going to rotate
the roots like this. Okay. Until the top and let's pick that bone and let's see
how much we want here. Maybe we need to
kin the numbers. We want to add 22 right
here and five -5.6 here. I guess. So now let's grab the root, and
let's rotate this. And yeah, that's right. We
could flip the numbers. Hit a ter the root, and now this one is
ready to take it up. So let's bring back the
environment and let's hit to the. Take this almost right
here, something like this. Maybe down just a little bit. I'm going to rotate
this to the x axis x just a little bit and maybe we can move this
forward like that, and now we got this result. Let's close the lex. Let's move the lex up like
this. That's will be enough. All right, That's very
cool. After that, I need to add some
animation to these wings. Let's start with this one.
Let's go to the item here and go to the y rotation. Let's add a quick Let's add
a quick driver right here. So I'm going to click here and tie hashtag frame Multiply, for example, in one. Let's see what's
going to happen if I hit hit space bar to play this. It is very slow, so we need to add more, I guess, multiply by. Let's see what's going to
happen if I multiply this 2.1. Let's hit play. It's
very, very slow. Let's increase the
number two, maybe ten, Or maybe 50 it space. A that's weird, still slow. Let's add five a space. A right now it's a
little bit faster. Let's try another number. For example, let's add ten play. That looks cool, I guess. Maybe we can increase
that even more. Let's take this one to zero. I just noticed when I
add the three here, I can get a fast
result like this. So I'm going to
accept this number, and I'm going to co what
I did here for the rest. Okay. So grab this hit
control C to CV and let's go to this one and let's hit
control V here, enter. I think we got some problem
here. Let's see what is it. Hit control V. Hata.
Don't forget that. Sift three and hit
enter. All right. So now we got this result. Let's do the same
thing for this one. Got up this hit control V
right here and let's add the high tag. And
this one as well. And turn out if I hit play, I can get this result. But I think we can make some variation
there, for example, for this one, going to add 3.1, let's see what's going
to happen if I do this. I can get some variation if I do that. The same
thing for this one. Let's add 3.2. That's very cool. Maybe this one as well. Let's add three, maybe. 3.1, the same thing. All right. Now the
result is looks cool. And let's take a
shot. All right. Let's bring the
camera over here, and let's see what we will get. If you like you can take this down just a little bit
right here, for example. Let's hit control old zero to
bring the camera over here and just hit shift Tilda
to control the camera. And let's hit S to
go back, just a bit, hit Q to go down, you can hit e to go up, and let's frame the
camera like this. Something like this.
Let's go back a little bit. All right. This result looks cool for me. I just want to do something. I want to activate the
the motion blower. It's right here, just activated. All right now, after
activating the motion blower, now we can make a render. But keep in your mind, if you and go to render, you're not going to
see any motion blower. You need to render mage so you
can see the motion blower. So I'm going to
render this image. The render is finished, and this is the result
that we got here. It's very cool. All right. So now what I'm going to do, I will excite from the render and let's split this
window to two here, and let's speak this
to image editor. And this one, I will
speak this to compositor, and let's it in to close this. And let's bring
the render result. Let's try to find it
or you can circuit. Render results right here. Now we got it. And let's go here and let's
activate use node, so we can see the render
and the composite note. All right now between
this node and this note, we can add effects, if you like. To make soit taking
to this image, if you want to make
someit taking, just like you take
this to photoshop. So for example, let's go
to the color section, and let's see what we got here. We got color correction.
We got this option. We got color balance. I can use this and
put this right here. I can control the highlight, I can control the mid tones, and I can control the shadow. So for example, if I want to make the shadow
a little bit darker, I can take this down
or up if I like. Maybe we can take this
down a little bit. And the highlight, we
can take this up so we can make some contrast
here. All right. I can add a care
of here if I want, let's search for
things right here. A KV. Is right here. So I can use this one to make this to add some
contrasts if I like. You can add one point, or
you can make it brighter. And you can add
filters if you like. You can go to the filter
section and add this filter, and you can tree this to harping if you want
to sharp this, let's change the factor to
0.1, make it very subtle. Now we got some shares,
crazy sharpness, actually. Let's add 0.05. See before and after it. We got a little bit of sharpness there. You can try Diamond sharpen. Let's see before and after. Yeah, it's better a little bit. You can do a lot of things
here by using the composter. Now we got this result, and it looks nice and beautiful. I like it actually. Vic. So this is how to render your scene
in size blender using cycle, and this is how to
make some boses and some motion blur to get
beautiful results like this. So I think this is the last
video here in this course, and maybe I don't
know in future, maybe we can add more videos. I'm not quite sure,
but I think that's it. If you want to bring
this ipor back, you can grab all the bones, hit A and hit old R and old
key to reset everything, and this orifpor will
go back to the ground. So I hope you enjoy this course, and you find it useful. My name is Mara Hussein. Take my other courses, and I hope you enjoy it. So that's it, and good bye.
 Marwan Hussain, 3D Artist and tutor