Transcripts
1. The intro: Hello everyone. My name is Mark saying, and I want to welcome
you to my new course. In the blender, we will
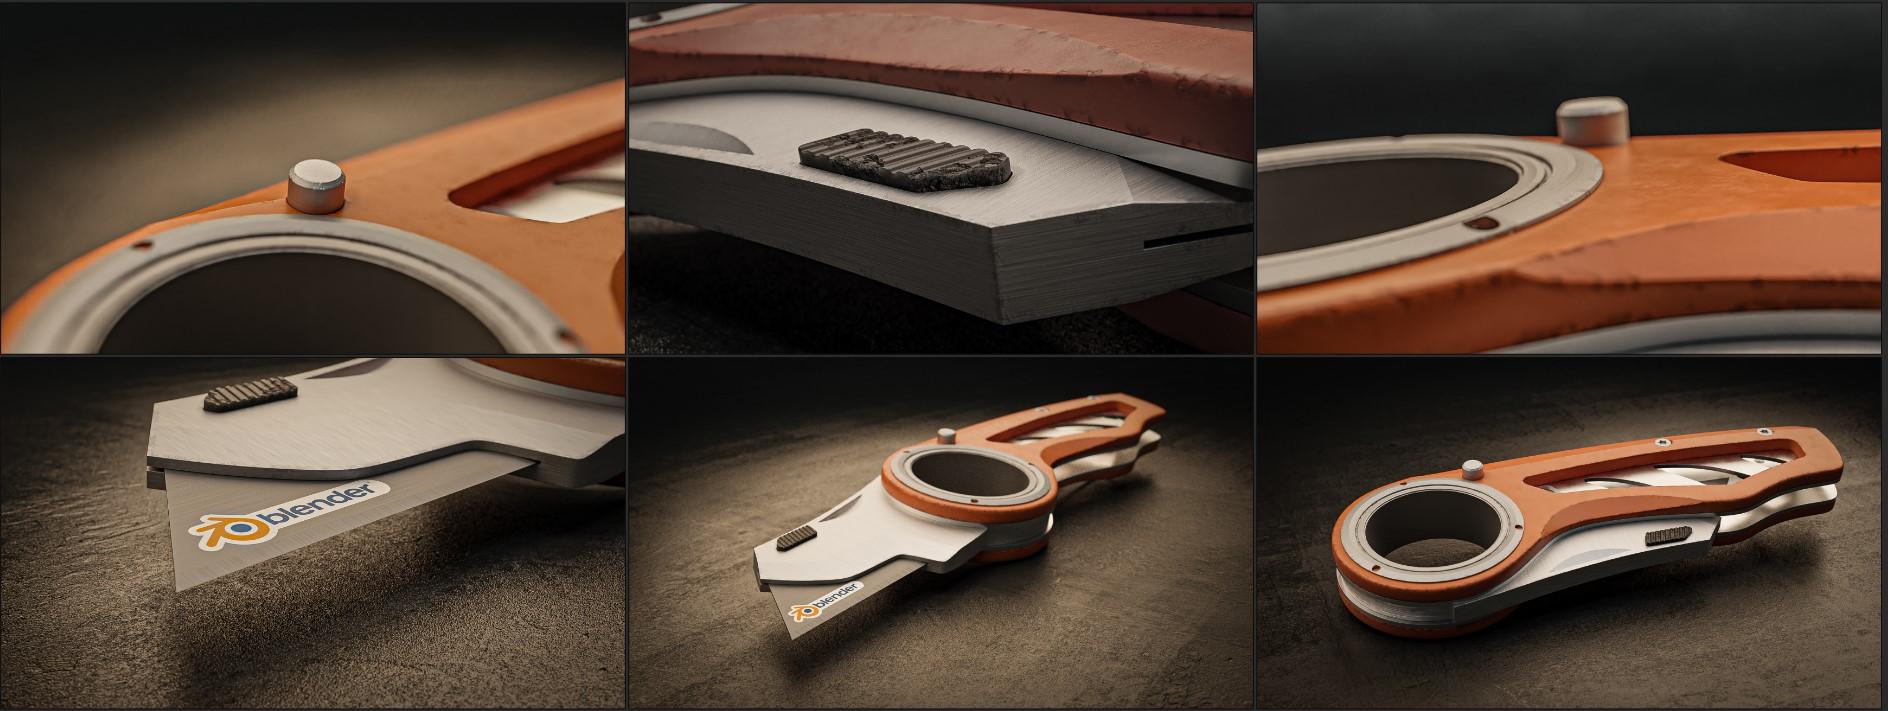
learn how to create this tool utility knife. In this course, we will
focus on modelling. We will learn how
to model this from start to finish as overlook, the model looks easy
to create bots. It's a little bit challenging because we got a lot
of details here. We need to take care
of the modelling. We will learn how to create the material, the
material section. It will be fun and easy. I'm not going to
drop the 3D model. I will teach you how to create procedural texture and
make it looks realistic. And the materials section, we will learn a lot of beautiful techniques
and we will use these techniques to create
something nice and realistic. As you can see. After that, we will
add the lights and prepare the environment
to render the scene. We will learn together
how to create nice depth of field and dequeue. A very simple way to create very nice
effects with a camera. And we will learn how to
create nice soft light, like what you see right now. And after that,
we will take this to the compositor inside Blender to post-process the images
and make it looks better. And we will use Photoshop to post-process
the other images. So we will learn
how to post-process the images inside the blender and inside Photoshop as well. Alright, so this is
all about this course. I hope you like it and I will be joined me to learn
something new together. My name is Mark was saying, and I made a lot of courses. You can kick them out. And I hope to see you inside.
2. Before you start: Hello again, we'll
come back here. Just before you start. I just want to mention something here. You should download
that resource files. When you download it
and you will find these files inside it. Okay, Here we have
the reference images. All the difference
I make you sad. We will use in the course and
he will have that texture. Okay, How the country
take a short downloaded from pulley haven
and this HDRI image, and this is the blender look
I will use in the course. And this image, I will use
this as blueprints and I have the final result here and reference images
inside the pure ref tool. This tool is very handy and the beautiful you can download it from pure rev.com
for free to use it. So if you want to browse
these images here, you got them here. If you want to use a pure, if I advise you to use the PRF. Okay, so that's for
the resource file. Just don't forget to rate the
course and other comments. It's very important to me to fix any issues in this course
or in future courses. Don't forget to ask me
if you have any problem. We can put your question
underneath any video. You got a problem with R7. So that means say, That's it for this video, and I will see you
in the next one.
3. Adding the reference image: Hello again, we'll
come back here. Alright, let's get started. First thing we need, we need
to add the reference image, and from there, we will start
creating the utility knife. So let's go to the folder. I have this folder,
I have these images. I just want to use this one. I will drag and
drop it here inside Blender to start
with this image. And don't forget, I have the reference
images and as I said, you will find these
projects holder. Alright, so let's take
those out for now. And let's prepare the scene. I have the camera and this
source of light and this cube. We don't need them now. So I will hit a to
select all of these. Whatever shortcut I will hit. You will find it right here. Okay. Just keep that in mind. So hit a to select all
of these objects, and then hit X to
open the Delete Menu, and then hit D to delete. To delete it, yes, it's a XD. Or you can hit Delete
from the keyboard. Alright, I'm sorry,
that's lists. You can start from the top. You can start from the front, lifts whatever view
you will like, you would like to start with. You can start for me, I prefer the top, so I will hit seven to
come to the top view. Alright, from the
number seven for top few, one for fronts. The 34, right? Okay. But if you hold
Control and hit three, you will speak to the left. If you hold Control and hit one, you will switch to bag. Okay. If you hold Control
and hit seven, you will speak to bottom. Just keep that in mind. I will hit seven
to go to the top. If you don't have an
unbarred in your keyboard, you can go to the View
and go to the viewport. And from here we can pick the view that you
want to start with. After that, let's
open the folder. I will click and drag the image. And we try here inside Blender. That's it. Now we have it. Alright, I want to align
this with the x axis. I want the image
to be like this. Okay? I want to rotate it. So let's rotate it. To rotate this, you can
go to the Rotate tool, grab it. Right after that. You just need to grab this
circle to rotate it. For me. Actually, I don't like
to use these tools, but I would prefer to
use the shortcuts. Okay, let's go back
to select box, and now let's start
using the shortcut. Because if you teach
yourself using the shortcut, your workflow will be faster. To rotate this image. I will hit our after
you select the image. And now you can rotate
it as you can see. So let's rotate this and align the utility tool or
knife to the x-axis. Don't worry about the image if the image goes like
this, That's okay. We're just carrying
about the utility knife. I will hit key to move this down a little bit to the Y key, to the y, by the way, key to move, to grab it and
move it when you hit key, this selected objects that
will follow your mouse. If you want to choose
the x, you just hit X. To move this to the x-axis. You want to move this to y hat y to move
this to the y-axis. Or you can use the Smooth
tool if you prefer. Okay? So let's move this just
a little bit right here, and let's go back to select box. And by the way, if
you don't like to go, if you are walking here in the middle and your
mouse right here, and you don't like to go there. There is a fast way to bring these tool
here in the middle. Yes, it shifts with a space
and you will have it. So for me, I like to
use Shift Space and use more headspace to select
books, et cetera. Anyways, so now the
image is almost ready. Now we need to
determine the size. Okay, you can work
with the size. This size is very big. It's about two meter
or three meter. I know it's very big. And I know the tool
is very small. It's about 15 centimeter, but there is no problem to start with the
size, if you like. We can start with this size, creating everything,
make it ready. And then when you complete
the whole project, you can scale it down. And that's it. So we
can start like this. It's okay. And we can scale it and make it small
and start from there. That's all work as well. For me. I will scale it and make it
small and start from there. But before I do that, I want to add a guide. Alright. And before
I add a guide, Let's go to the
scene properties. This option right
here, this one here. And let's go to the units. And as you can see, the unit works with meter. I don't want to
work with meters. I want to work with
centimeters or millimeters. Alright. For now, let's relate
this to centimeters. And let's add the cube
here in the middle. To add anything
inside the blender. You can go to the Add
to open the Add menu. And from here you can choose whatever objects or whatever
thing you want to add. If you want to add text, camera, lights, whatever thing. Most of the time we will use the mesh section to
add things here. So I will add a cube.
Let's add plane. Let's start with plane.
Now we have plane. After you add anything
inside the blender. On this side here, you will. It will have a menu pops up. Most of the time you will find
the close like mine here. You should open it by clicking
this arrow right here. When you do that, you
will find some options for this new objects
that you added. As you can see here, we have the size is
about 200 cm or 2 m. I want to scale this down and make it like
a reference for me. So let's check the size
from 200 centimeter to e.g. 15 centimeter and make it small. So this, this size is almost similar to the
size of this utility tool. So let's scale this
down and make it small. Let's go to the top view
and wireless killing. When you hit S and
scale, you can move. So hit S to scale. And let's move this
back right here. And scale this even more. Alright? And this move, this just
a little bit right here. You can scale it a little bit, a little bit more like this. Pen. There we go. So now we have all been
almost to the correct scale. So we can now start from here. I will grab the reference, my reference plane, and I
will hit Delete to delete it. Alright, That's very cool. Now we can start from here. I've started that if you like, you can crop the image and you can go to the image
properties here. If you prefer, you feel prepared to manipulate the opacity, you can activate it and work with the
opacity if you like. Here we have some options. If you want to play with for me, maybe I can guess The year is the opacity a little
bit fast for any reason, if I want this, I want the full opacity I will
occur and give us back. Alright, so yeah, I
think that's it for this video is just about
preparing the scene. And maybe we can move
this a little bit down like that to the
y. And that's it. Alright? Maybe we can take this down
a little bit like this. And our model will be
right here in this area. And this one will be underneath. It's alright, so that's it. And see you in the next video.
4. 004 Start modeling the handle: Hello again, we'll come back, or at least start from here. Okay, Let's add this up. Let's go to the Add menu and let's go to the
Michaelis here. What we have here,
we have a plane, we have cube circle
and we have cylinder. I want to start from the, I want to tell it
from this area. Maybe adding a cylinder or a circle is the easiest
way to create this shape. And from here we can
extrude some vertices and creating the handle. Okay? You can't do that or you can start with the handle
and just throw some vertices following
the reference image to create this area. But I prefer to start with a circle and go from that point. I think this is the easiest way. Let's say that. So
let's do that together. Let's go to the add. And let's go to the mic. And I will choose a circle. And now we have a circle bots, because the new circle that we added is
very huge and big. If I zoom back, I can see it. In this case, I will change the radius of this circle to 1 cm and then hit Enter
to make it small. And now it's become small. And always keep in your mind
whatever thing you will add. A twelv, follow the
position of the 3D cursor. This small circle right here. After that, this can
throw all the vertices. We don't want all
of these vertices. We want to start low Bali. And after that, we will add some smooth modifiers
here to make this smooth. I will not start
with 32 vertices. Let's crank this
back to the sea. Maybe 12, let's see. 12 works. Let's kill
this total bits. But don't accept, don't accept
the scale because you will lose this menu right here. Okay? I just want to see
what's going to happen. Just hit S and scale. Alright, well, maybe
16, this as 16. Alright, yeah, maybe
I will start with 16. I think this will be better. Let's start with 16.
I hit this, kill it. Now I can scale it
and accept the skill. As you can see, after
I accepted the scale, I lost the menu for the, for the size and for the
vertices for this circle. Maybe now I can guess
more of the knife a little bits and align it
with the circle like this. And maybe we can change
the opacity a little bit. Something like this. Alright, now we are good to go. So I will select the circle. Before I select the circle, I think I can make the
image not selectable. Okay, let's do that. If I
miss selecting the circle, I will select the image. And for any reason, if I hit G, I will move the image instead
of moving the circle. So to avoid that, I will make this swan or the image and
selectable by going to the outliner and open
the filter right here and activate this OK. You're right here is
called selectable. This option right
here will help you to disable the selection
for the object. So now I have this one. I will disable it like this. Now I can't select it. I can't. So yeah, let's start from here. Let's go to the top view and
let's select the circle. And let's scale it a little bit, maybe even more
and maybe move it. Maybe right here. Somebody like this. Let's move this up a
little bit right here. That's very cool. The idea
is I just want to align this circle with the
heap, the knife. That's all what I wanted. I get very nice result here. After that, I want to go to
the Edit mode of this object. So now I'm in the
whole object mode, as you can see right here,
I'm the object model. And the object mode,
I can't control the vertices because
here we have vertices. Alright? We have vertices. I want to grab
these vertices and move them to follow the shape. But they can do that
in the occupant mode. To control the vertices, I should go to the motor
to edit the circle. So now I'm in edit mode. Now I have the ability
to control the vertices. All right, First
thing we could do, I guess, is to give this
circle a thickness. Okay? Because this tool listed bring the reference
images right here. And let's see, let's
kick the tool e.g. this, for this image right here. You can see that we
have here a thickness. We could have, we have a
big circle right here. And we have a small
circle right here. So we have a thickness, or we have a thickness,
as you can see here. Okay? So it's very important to make this small and
less what's right here. I think. It's very important to make some insects and scale those insights to
create the circle. Okay, to do this, I will hit, after I select all
of these vertices using the selection
tool like this, I will hit F to fill this area
and make it a giant phase. And after that, I will hit
I to make some inserts. So let's make something
like that. Alright. I know you can't see, but that's okay. Don't
worry about that. Let's make instead like this. If you'll want to see through
Z to go to the wireframe. Now I can't control,
that's even better. So Alice inserts the circle about here, something like this. Here's your eye, and I will
delete the middle face had x. Now I'm selecting the face, so hit X to open the deletes
menu and choose phase. You can hit X and F
to choose the face. If you notice underneath
each ward here, e.g. face. Okay. We have a lion and or the F, that's mean if you hit F, You will automatically
choose the face and instead of go to the face. And because using your mouse, so hits x and then f
to delete the face. Now, I finished with this. Now I can grab these
vertices and move them to create the handle. Alright, so let's
start e.g. from here. Maybe or maybe from here. I will hit G to move
this one a little bit following the
edge like that. And I will hit E to extrude
this vertex like that. Maybe we can put one right here and we can hit E again to
make another extrusion. And keep in your mind, keep some distance here
between the vertices because in the end
of the day we're going to use
subdivision modifier. Subdivision with the firewall, divide all of these lines
and make it smooth. So at the beginning,
make it globally. So let's say Club
is vertex E and let's extrude one
right here, e.g. and maybe another
one right here, following the shape
of the knife. And let's add e.g.
one right here. And let's add this
other one right here. And I will tell you
why I did this. And let's hit E to extrude. Here. After that, you can eat, grab this vertex and hit
Control Shift B, because I want to teach
you how to build vertices. And you can Google this and
you can rotate the wheel of the mouse to add three
vertices like this. And after that, you can grab these vertices and control them. This one e.g. but
this one right here, for this, for this
one e.g. right here. And this one, maybe we can put this right
here, maybe. All right. Somebody like this. Maybe we can move this one
a little bit up. Yeah, somebody like this. Alright, let's see, grab this
one and let's move this. Let's follow the care of here. Let's put this one right here. Hit E to extrude again. And either E, another
extrusion like this. Alright? For small curves,
you should make the vertices distance of
the vertices a little bits. Shorts are smaller, okay? Because we have a care of
with the big curves me that the distance big would
the small curve like this, you should have a small distance between each vertex to follow the shape because you
don't have another option. By the way. Let's hit
E again and let's keep extruding this line
and follow the shape. As you can see, we
have a big age. So be careful, sorry. So I will make the
distance a little bit. Alright, so now I
reached this area. As you can see. Alright, now I want to move this
one, pill, this vertex. So I want to marriage, by the way, I want to
merge this with this one. To do that, you can
select this one as a fierce selection and then hold shift and grab this one and
make it the second silicon. As you can see, we have a
difference in the color. This one is pride because it's the last vertex you select. And this one, it's
not as bright as dark because it's the
first vertex you select. That's mean. We have, we have
an active vertex. This one is the active vertex. So select this whole TFT, call this to make it
this one. The active. After that hit M to
open the marriage menu. Hit MRI here, and
then choose lasts. That's mean. If you hit atlas, that's mean. The first vertex will
follow the last vertex, the last one you picked. So it's amen to that last. As you can see now,
they're smears. Alright, so this
is the first step. Now we got the shape
if you got solid mode, because this primitive shape. And I think I will end the video here and see you
in the next one.
5. Creating the low poly shape of the handle: Hello again, welcome back. So this is what we got
in the previous video. This see what we can do. Let's go to the top. If you had seven and from that I'm bad. And let's see how can we
create this shape here. Okay, The easiest way
to create this way, we can grab all of
these vertices, just select them using the select box and select
those over here as well. So I just selected
the open area. That's all what I did. And I will hit F to fill this area. Okay, after selecting
these hit F. And now let's go to wireframe is C to jump to the wireframe. By the way, if z letter
doesn't work, you can. I mean, if it was the
letter or the descendants, activate the wireframe for you. You can speak from solid
to wireframe from here. Or you can go to the Edit
and then Preferences. And here in the key map, I guess you can activate
pie menu on a track. Okay, can activate the spine. And when you do that, when you hit Z without
moving the mouse, you will have the
wireframe toggle or you will have the
ability to toggle the wireframe on and off. Okay. But if this one oh, this one off, sorry,
this one off. Now if you hit Z, you will grab the pie menu and you can go to the
wireframe and q as wireframe. But for me, I activated
this option, alright, to have extra, extra tool
to manage the wireframe. Now if I hit Z, I can toggle
the wireframe on and off. But if I hit Z and move
them over a little bit, I will have the payment. Again. It's very nice
option here to activate. After you activate this, you can go to the
burger icon and hit Save Preferences to save
it. And let's use light. Alright, now after grabbing
all of these vertices, I will hit I to make
some insects like this, but make sure of something
here when you make the inserts aware on this area right here and
this arrow right here. If you keep pushing the inserts, you will get some
overlapping like this. And that's what we want to
avoid that we don't want that. So make a small
incident like this. After that, manually, you
can move these vertices. Okay, So let's start
from this one. Hit G, and let's move
this one over here. And let's do the same
thing for the rest. Following the shape. Okay? Use these vertices to
create this small curve. The same scenario here. Okay, grab this one and let's
put this bar right here. And this wireless put this here. Maybe we can move this
a little bit here. Hit key and move this
file right here. This is really cool. And let's
move this one over here. Right? Let's move this one over here and maybe this
one would be right here. Okay? Now let's see what we can
do with these vertices. Let's say crop this, and let's
maybe put it here for now. And let's put this bar right
here following this shape. And this one may be, we
can overthrow it here. And let's see, grab this one
right here and this arrow, we need to take
another decision. I guess. I don't like to make this. H goes like this and then
suddenly goes to this auction. I think that's not good. So in this case, we can. Make a new cut here and this
area to make the smoke here. And after that, we will see
what we can do with the, what we can do with these edges. How can we get rid of them
or cleaning this area? So to create a cat
here and this area, I can grab these
two vertices and hit K to make a
connection between them. Just hit K from the keyboard. And now I have a connection. And maybe I can
sub-divide this egg to one or two vertices
just to grab those. And then heterocyclic
enqueue is subdivided. And when you do
that, you will have this menu tool and create
a vertices number here. So maybe one. I think one will be
enough, I guess. Okay. Yeah, Let's take
off the spine and let's put this right here. And this vertex,
maybe we can put a three here, something like this. If you want more
vertices in this area, just select this and
hit Control Shift B to have a bevel
and add two here. So now we got an ice cube. And don't worry
about these edges, we will find a
solution for them. Alright, so this area needs
a little bit of fixing, elicit, grab this and
let's put this right here. Maybe. I was very cool. Maybe this one we
can move it here and this one we can write here. Alright, let's recall. Now let's hit Z. Let's exact of the
wireframe mode, and let's go to their
face selection. We can pick using these icons, or you can hit number
three from the keyboard, nodes from the numpad. So I will hit three to go
to the Face Selection Mode, and I will grab this
area to delete it. So to delete this, just
hit X to delete menu. After that, we need
to pick the face. I just need to hit F. So XF delete this giant phase. And now we need to find some solution to
this era because it's wrong to leave these
vertices like that. Alright, so we need to support them and make some connection. Before we do that,
Let's get rid of this line right here
and this one as well. So let's go to the
edge selection mode. Hit number two
from the keyboard, and let's say grab this
one and let's delete it. Alright, actually, I
don't want to delete it. I want to dissolve it. I want to get rid of this age and keep the face. To do this. You can hit Control
X to achieve that. And let's call this one, hit
Control X to achieve that. And this one as well, Catholics. So now we still have
the face and we deleted the edge the ages. I've started that we want to find the
solution to this area. We want to make some connection. Alright, so, okay, in this case, maybe we can use the
knife tool. Okay? We need to use the knife
tool to make some cuts. You can, if you like, you can go to the
vertex silicon mode and you can grab
those two vertices. And then you can hit right-click
and choose sub-divide. And after that you can increase the number
to two like this. Now we have a vertex right here and a vertex right here,
and we can connect them. So that's works. Let's see. Grab this with this hit K, this with this hit J. Right? We just connected those. But this error
become, become dense. We have a lot of vertices
here and this area, but that's not a big issue. We can control that. Alright, let's bring this
image right here again. Okay? Alright, now I think
we can give this a thickness. I guess. According to the reference
images, as you can see, we have a thickness, so we could give this
one a thickness. Let's put this tomorrow
right here, the image. And let's tap to go
out of the edit mode. And let's go to the modifier and then to the modifier list. And then let's choose solidify
to give this a thickness. As you can see now solidify, give us a thickness, but it is very big. Let's make the
thickness smaller. Maybe 0.0, 0.2, or
IQ, that's too much. 0.10, 0.1, that
will work for us. I guess 0.1 will be good. Well, no, that's I think
that's not going to work. Is 0.15, maybe. Somebody like this, 0.15. After the thickness. We have some details here. Let's bring the reference
images and let's see what we can do here. Or this image is nice. Let's make it a little bit. As you can see here, we have
some HAPE we need to create. And here in this area as well, we have some hard line here. We want to achieve
something like this. So let's see from
where we can start. Okay, let's accept this modify. It can throw a to
apply the modifier, that's it, except it. And then let's go
to the top view. And this is Z to
go to wireframe. And let's check the
design. For this line. I can see it's right here. But this this line, I can see that actually
it's not so quiet visible. But it goes in the middle
of the scores like this. So it will be easy to follow. So we need to create a
line, goes like that. Alright, and ends here. Somebody like this. I will use the knife
tool to achieve this. So let's put the
image right here. Maybe we can make this
a little bit smaller. And let's see how
can we achieve this. List? Select our geometry
analysts tab to it. And let's hit K to
activate the knife tool. And let's start from maybe, start from here, maybe almost from here using
this point, I guess. And let's make a
cut goes like this. All right, it should go live, zoom out, go like this. I guess. It should touch this
button a little bit. Alright, somebody like this. Alright, one right here. And wine goes almost right here. And then when you
make the cuts yes, hit space to confirm the cuts. So now we created this
line as you can see here. Alright, so the, the other line, it should be right
here in this area. So I will hit K to activate
the knife tool again. And let's start from this edge. And here. Click here, and here as well. And here. Okay, Let's go to the top again. Space to confirm that. All right, let's go
to the top again and hit K to activate
the knife tool. And this mic cuts right here. And I cut here, I guess in one here and
maybe one right here. Alright, we will, can
throw that later. Somebody like this. For now. I'll see you in the perspective
of what we got so far, has Z to go to the solid mode. So far we got this result. Alright, now after
adding these acres, I will add one here and the
middle to cut this area. So I will hit Control R
to add one H right here. As you can see, this egg is, it will stop at that point
as you can see here. Because this phase is not quiet. Quiet mean face
with four vertices. This one, we have 123456
vertices because of that, the edge loop tool
to stop right here. But that's not a big deal. We can hit Control R here in this area and
add another edge. After that. I can grab this with this and hit J to make a
connection between them. And the same thing
for this area, because we have an income
right here, not quiet. Scabies two vertices and hit J to make a
connection between them. Alright, so now we've got this. After that, let's see, grab these vertices and let's
move them to the middle. So let's scrub them one
by one holding Shift. Crop them like this. Club, this one and this one. And leave this
one, the last one. And maybe we can leave
this one as well. Alright, now what I need
to do is I want to move those vertices in marriage
of them with this line. Okay, to achieve this, I want to do something
called sliding. We know how to move vertices, just hit G and move the mouse. These vertices will follow. But sliding. It's another
way of moving vertices. You need to hit Key two times, G and G again, and move the mouse
down to slide those. When you slide those, they are, they will automatically
stop at this line. But we will have problem. We will have two vertices here. They will not be
married. Before you slide these vertices
and move them down. We have an option right here. It's called auto marriage. Just activate auto married. And before you do anything, just go to the option. Here we have the
threshold of the, of the, of the auto american make this very small
number, 0.01 e.g. because we are working
with a small scale sometime this threshold,
without being aware. We mixed some vertices
accidentally when we move, when we, when we remove
any edge or vertex. And that will give you an
example to understand what I mean. Alright, e.g. let us assume that we
have very close vertices, two vertices like those. And let's assume that the
threshold is 0.5 centimeter. And for some reason we want
to move those a little bit. When you move them, they will be married because of the
threshold right here. As you can see, I just move
them, but they are married. Maybe we can move, grab
those and move them, and they will be married because of the
threshold right here. But this hit Control
Z couple of time. But if I make this
very small, 0.01 e.g. if I crop those to move them, nothing will happen because
the threshold is very small. That's what I mean. So activate this and
put a small threshold, american threshold
right here and start merging these vertices. So let's select these
vertices again. I will start from this
one and hold control and keep picking these vertices
until I reach this one. And then hit G twice and move those to this
line and measure. So now we have this shape
created, as you can see. Now these vertices are American automatically because of the
auto American activated. Alright, so what about this one? We will hit key to the zn
with his down or not down. Actually, maybe we could
see where could we move this this move this back.
Maybe a little bit. Something like that. Yeah, maybe something like this. After adding the
subdivision surface, this shape or this
air will be better. But for now, we
learned how to create this small angle here. Okay? So I think that's
it for this video. And see you in the next one.
6. Using Bevel to define the edges sharpness: Hello everyone, welcome back. Okay, let's see
what's the next step. Alright, so let's start here. Before I move these
vertices down, I think I can make some
editing to this area because I don't
like the topology. These lines. I don't like this results. Maybe I can make any cuts
and make it more sense. So let's see how
can we fix this. All right, let's go to the top and hit Z to go
to the wireframe. This edge right here. I can move it and put it here. I think that's what we better. Okay? And maybe for this one I can make a new cat
goes like this. I guess. So I will use the knife tool, just hit K to activate
the knife tool. And before I do that, I just want to activate
the screencasts, I guess forget to activate. Let's move this over here. And yeah. Alright, so hit K to
activate the NF2 line. Let's make a cut goes like this. What I want to cut
the whole geometry. We have an option comes
with the knife tool, it's called Cut, cut through. If you had C from the keyboard, you can toggle this on and off. So his c to activate
cut through and then hit lifted leg to make the cut and then
Enter to confirm it. Alright, so now we
got this result. Let's move this a little
bit, baby right here. Okay, somebody like this. Alright, so now we can get
rid of this age, I guess. So let's grab this one. It can throw likes
and dissolve it. Let's go to the top view I can. And for this area, let's see what we can do here. Let's go to the wireframe mode and I will hit K to activate. And I've taught I maybe I can
make a cut goes like that. It's C to cut through, left-click and then Enter
to confirm the cuts. Let's go to the solid. And maybe now we can, let's
delete this edge. I don't like it. And this one as well as the city
that's I don't want it. Alright, so let's see
what we got here. This one, I don't want it. Okay? Alright, So let's maybe we can mirror it to this vertex with this
one using automatic. It's already activated. So hit G twice to slide this edge and this
mercury right here. Okay? And let's go back
to the top of you. I just want to move these vertices and
put them into place. Right here. I'm not finished here.
We need to make, to make some clean. Here in this area. This edge, I can dissolve it, hit Control X and the smoke this vertex twice
and miraculous one here. Okay? Alright, so now we
got this result. Does it go to the top? And let's see what else we can do here. Let's move these
vertices a little bit. Negative care better. Handle this, check
this care of as well. Okay. I can megan, the distance between these
edges, even I haven't. Aldon comes default
with the blender. If you go to the Edit
and then Preferences, go to the admin section. And here you can search
for loop tool L double 0, P. Activate this tool. It's called a mish loop tool. And now inside this mode, when you hit right-click, you will find the loop
two right here and here we have all the options
at comes with a look tool. So I want to make the distance even
between these vertices. What I will do is I will go to the edge selection
mode and I will grab these edges holding
Shift and then hit right-click and then choose space to make the space
even between them. So it's just a way of
correction to correct the space between the space
between these ages. Right now is go to
the top and let's try to see the result of this care are
still good, I guess. Alright. Alright, now let's see,
grab these vertices and let's move them down. Before we do that, I will grab this
vertex and merchants using automatic key twice and slide it and
welded like that. Now let's go to this vertex starting with this
one hold Shift and let's add those as well. And I will do Keith wise to slide that was down in
medicine right there. After you do all of that. This age, we don't
need that anymore. So I will hit Alt
click to grab it. And it can throw an
extra dissolve it. And he called this one
and it can throw X. Okay, Now is the time
to add some Bevel tool. Make this area sharp, similar to what we have
in the reference images. And there's these edges as well. Okay, let's see how
can we do that? And if we have any
topology fixing, we will do it. Temporarily. I will delete this
edge and this one. I will hit Control
X to dissolve them. To make that topology
here simple. Okay, and let's check this area. Let's see. Do we have
any type of fixing here? Hey, maybe we can grab this
vertex and move this up. Try to pick nice view like
this and hit Q to this here. And let's move this
up and alignment like that, like this. Alright, let's see what
else we can do here. Let's go to the top view and let's make some editing here. Z to go to wireframe List, activate the knife tool
and let's make a cut starts from here and maybe
ends here like this. I just want to add a new edge
right here and this area. So hit C to cut through and then confirm
it and hit enter. Now, when you tumble around, you will find the new edge
that we got right here. After adding this edge less
mixed between those two, the secret key twice
insulated here. Okay, Now we got this. And maybe we can add
another edge right here to support this area.
Let's go to the top. And I will use an f to let K and let's make the
cut goes like this. Hit C to cut through and left-click and then Enter
to confirm the cuts. And let's see, grab this one, this manually move this
a little bit right here and maybe we can grab
this and move it here. The slide is vertex a
little bit right there. Alright, so we can use the new tool to make this distance here even
so I will go to the ER. Before I do that, I will delete this edge right
here. I don't want it. And let's go back
to the top view. Let's move some
vertices a little bit. So let's see carbon, this one, Let's put
this right here. Something like this. I've started that. Let's go to this site. And let's see what we can
do here. For this area. I think I will accept
what I got right now. Okay, maybe later we
can make some editing to the topology here. But for now, let's
keep it like this. Now let's go to the edge mode and let's start
picking these edges. Okay, Let's start
picking these edges. And let's give them a
nice amount of doubling and don't forget to drop
those over here as well. Hold Shift to pick a new
edge and then hold Control. And then follow the edges. Something like this. And now let's hit Control B to activate the bevel endless
add three pages right here. So I added almost 0.006, maybe seven,
something like this. And now I got this result. So this is the first step
targeting these shapes. After that, let's target. If I bring the reference image. These shapes has a small
amount of buffer link. They are sharp as compared
to the edge of the knife. I mean, if you kick this area there before
that we have here, it's big as compare to
this shape right here. So we have some variation
here in the bevel. Okay? We want to put that
in consideration. Now I want to check something. If I grab those, by the way, when you zoom in and go clause, you will have this
annoying clipping happen. To avoid that, just
hit Enter to open this panel and then go to the view and the clipper
start make it very small. Click and drag and make
it very small number. Now if I grab those and it can throw be, the
COs can happen. As you can see, bevel will, I will get some
overlapping here. If I double this area. So I will avoid
this age and pick theorists until I got here. And let's do the same thing
for this side as well. Leave this one and
let's select the rest. Hold control and keep cropping these edges almost right here. And now let's give
them the purple. Can throw a, b and
let's pick nice purple. Let's add e.g. 0.00,
0.04. I guess. Sort of work. After that manually, we will
connect these together. So let's start from this area. I will crop these edges and it can throw me to Google them. As you can see, we have some
distortion have right here. If that difficult
to control and you can manually use the
knife tool, e.g. I. Will activate the
knife tool hitting K. And let's make a
cut goes like this. So I'll just repeat that again. It K, and let's make
cut goes like that. And then goes like this. And then hit right-click to
add a new egg from here. And then hit Enter
to confirm the cats. Okay, Now after that man will, we will move these. Or maybe we can club this one. Okay. We can scale it a little bit. Sick a lot with this and this. Let's move those a little bit. And maybe we can
grab those and pick nice if you are like this
and hit key and move it. Something like that. And we'll grab this one and this one this age and move
them inside a little bit. Okay, maybe we can
accept those as well and move them down like this. Okay, now we call this
results this achy. I don't want you to grab
this with this one. It can throw X and as
always, we don't want it. All right, let's make
some editing here again. And maybe these,
we can scale them. Scale them to this point. You can use the vertex mode and the club is vertices hit
key twice, enslave them. That's where walk,
something like this. That's very cool. So now
we got this results. If I tap out now
and if I applied a subdivision surface and
go to the modifier list and our subdivision
surface. This can happen. Let's add two here and
right-click and hit Shade Smooth. Now we got this result. It's nice, as you can see here. We got the hard edge blended
with the smooth ER here. That results. It's nice. And you still have the ability to move some vertices if you prefer, if you want to grab those
and for any reason, if you want to grab those
and move them down, can do that if you want
to get better results. All right. And we want to do the
same thing for the rest. I will turn this off for now, Kimberly, because I'm
not finished yet. But this is the
technique that I will use to achieve this. So let's do the same thing
for the, for this one. Let's go to the edit
mode and let's hit Control R to add H
right here, e.g. land. One H right here
using the knife tool. Something like this. And let's move those. All. Let's see how can we move them. Try to big nice angle, because it's depend on that. Let's move this a little
bit right here and grab those and move them a
little bit like this. When I move those, I got some merging
having here that's happened because of the auto
marriage is still active. If you want to avoid that, go to the option and go to the threshold and
make this very, very small, 0.0 001 e.g. alright, now let's see, grab these vertices and let's
move them a little bit. Sick Club that was over here. And let's move them a
little bit like this. Handle, this. Made his vertices close, he's wise and the
slightest one right here, and this one as well. Okay, Now, use the
knife to let K and let's make cut
goes like that here. Right-click to add the new cuts. And make cut goes
here and then hit space or Enter to
confirm the cuts. Now go to edge selection
mode and grab this edge. And this one hit Control
X to dissolve them. Alright, so now we
got this result. Let's check this
from this angle. Somewhat tweaking
I want to do here, I want to grab those and he gets dizzy and move this
up a little bit. Okay. Alright. I guess I can grab
this egg and it can throw away two
bullets to two. I guess I will hit Control
Shift R to duplicate the age, something like that. And this one in the middle, I don't want it anymore. And let's see what
else we can do here. Maybe we can make the
distance even here, starting with this
egg and ends here. Let's select the rest. Grab this hold Control and grab this hold Shift to add a new
one hold can throw a lot of this when you grab all of these and those as
well, look, forgive them. Theoretically again, Q
is the loop tool and hit space and go to the top view
and let's see the result. Okay, so following the
path as very cool. Maybe we can do
the same scenario here for those over here. Called can throw land the
same thing for this one. And by the way, can you
crowd them like that? That's will work as well. By the way, CAFTA are
grabbing all of these, right-click and choose space. Okay? Okay, now we just need to move some vertices a little
bit to get some care of. It goes like this, e.g. those or we can move
them up a little bit. Right here. I can move them down like this. And the same thing for the rest. This one as well, just
move them a little bit. The idea here, I just want
to make a subtle curve. That's all what I want to do. Now unless you guys can have in fact the way
subdivision surface. Okay, this area looks cool. I can now skip it and
go to the next one. Very nice. Now we got something
close to what we have here. Let's see. Alright, e.g. this
image right here. Yeah, we got something
close. A nice. Alright. Yeah, I guess that's it. For this video. I will end this video here and
see you in the next one.
7. Finishing one side of the handle: Hello again, welcome back. Let's focus on this side. Let's tablet mode. And okay, let's use an F2, let K, and let's make
this other cut here. It goes there, and the new card goes from here and ends here. And then it space
to confirm that. Okay, and now let's smooth
some vertices a little bit. Like a fair thing we need to do. We need to get rid of these edges just to grab them
and it can throw it with x. And here, I can't recall off this edge and this one hit key twice in slide, it's right here. And go to the Vertex
Selection Mode. Grab this one, it
can slide down. And let's see, crop this one. Let's pick a nice angle or view, and let's move this
one right here to make a small curve here and this area or that than leave
it sharp angle. Alright, so what else
we could do here? Let's go to the top and
maybe we can move this a little bit forward like this. Okay, we're almost there. Let's activate the
subdivision surface and let's see what
we will get here. Let's see sites. All
right, It's cool, but let's see what can happen in five Americans this
vertex with this one. So he key twice and
this marriage hits. And let's do the same
thing for this one. Alright? We still have
nice results right here. Alright, for now we can say that we are finished
with the site. I guess. Maybe we can move this a little bit down here and
maybe with this one, we can slide this away. Yeah, something like
this. Looks cool. Let's go to the site and let's
see what we can do here. Almost the same scenario. I will use the knife tool. I make cuts, maybe start from here and add another cut here. And now hit Enter to confirm
that or we can IT space, turn subdivision
surface Timberlake. And now let's move some
vertices around, e.g. from the top view, we can plug this one in with a
little bit right here. And now I can grab
those and pick nice view and move
them e.g. here. And let's focus
these vertices and make them close to
each other like that. And after that I will grab them. I just want to create a
small calf goes like this. So I will move those
a little bit with this data cloud with the Mickey. And let's move those over here. We can move them a little
bit down like this. I guess. Maybe those
I can hit Q twice, enslave them. Okay. This one, I need
to move it down, I guess a little bit. And as you can see, this one is a little
bit elevated. That will take you to this
here and move it down. That's better. Okay, Now let's use
the knife tool again. Let's make a cut goes from
here, here and there. And cut goes here. And then hit space to
confirm that cuts. Let's move this up a little bit. Slide It's alright. And this aqueous don't need it. Grabbed them, Control
X to dissolve them. And now I can drop those
may be and hit Alt S to move these edges towards
the normal of the age. Because we have egg got to come to it from this side
and one from the side. So the normal will be like this. The same thing happens
here when you use OwlTest. Okay, so, so far we
got this result. Let's see if this result
need more tweaking like moving these little bits. Now, it looks cool. I will tap out and activate
the subdivision surface. And let's see what we got so
far. Alright, it looks cool. I like this. So now we've finished
with sharp edges. Everything looks cool and nice. Let's tab again, and let's add a bevel to
this area as well. So let's hit Control, be making similar to this one. Lists of bringing the
reference images. Okay? Alright, don't worry
too much about this area because
this area will be covered with with this ring. So don't worry about
this too much. Just give a small amount of beveling, make it very subtle. And this will be enough. You can turn off
subdivision surface suddenly like this,
it will rock. The same scenario for this side. I will hit Control
Z to cancel that, to grab those together to give them the same amount
of buffer link. So grab those and even
you can grab this side, alt Shift click to add those. The entire edge loop. Alright, after
selecting these edges, now let's give them
a bevel amount. Can throw be the smooth
muscle a little bit. Something subtle. Almost 0.0 is your eighths or nine Enter. Okay, That's very cool. That's nice. Okay, before now you add the bevel amount to this
area and make it smooth. I will copy this geometry. They can either copy. And I will tell you why. Okay, Let's bring back
the reference images and let's try to find I have
an image right here. Yeah, this one, this is the another side of
the utility knife. The hay that we've got
here is not similar to the shape of the other
side of the utility knife. We have some
additional hole here. And this big area that we
have on this side here, it's a little bit shorter. Alright, tap out and let's
hit Shift D to the z. And let's put this
copyright here. Handless mirror
this to the z axis, go to the object and go to mute or unmute or to the global z. Now it's mirrored and I will leave it like
this Timberlake. Okay, I can hide it for now. And let's work with this. All right. Let's tab to the ethmoid and the bevel that we
got here in the middle. It's sharp, not smooth as
compared to this area. So let's give it a specific
amount of beveling Alt click to grab the entire loop
and then hit control V. Alright, small amount of
beveling, almost 0.01. That's what be enough. Enter, I guess. And for this one, this side, let's hit Control V. I
remember I added zero points. 09, I guess. Yeah. Similar to the bevel
amount that we added here. Alright, now let's activate
a subdivision surface, at least see what we got so far. With Level two. Alright, let's looks
nice and clean. Beautiful. We have some pinching
happened here. Okay, add the harbor area here, but don't worry about
that because at the end of the day
you are not modelling a car to care too much about this stuff,
you can ignore them. I think general result
looks very cool. Okay, so I think that's it for this video and see
you in the next one.
8. Creating metal plate under the handle: Hello again and welcome
back here listed bringing the reference image because I want to create
something new here. We have multiple layers. Here. We have the first
layer we just created, and we have another
one underneath it. And it's visible right here. As you can see, all of
these shapes in this layer. This, yeah, can we create it? Let's put the reference
image right here. And let's grab this. Let's start with this
one. At this point and let's pick some edges. I will turn off
subdivision service temporarily that we'll
focus on this edge. I will hit Alt click to crop it like that entire edge loop. And he called this
one alt Shift click. To select this one. I think I just need those. I will hit Shift D to the z and let's move the
senior copyright here. After. I've taught coping that, now we need to separate it. Hit P to open the menu
and choose the first one, selection so you can hit P, P to P, S to separate this. Now is that tab out and let's
select the scenario shape. And I will go to the local mode. You can hit slide from that, I'm bad, or you can go to that. Again, go to the View. And here we have
the low calorie. You can create it from here. Alright, now before
you do anything less, activate a subdivision
surface to make it a smooth. And now it's smooth and nice. And apply the
subdivision surface to upload the
subdivision surface, go to this arrow and hit Apply Auto can hit
Control a as a shortcuts. So it can throw a top lights. And now if I tap to edit mode, as you can see, this
one is very smooth. After you do that, let's make some connections
here with some vertices, e.g. like candy drop those for those and hit F to
greater face here. And maybe can't get off
those, those as well. And it's F because
I want to fill this area if I don't
created these faces. If I grab this side
with these vertices, with these vertices, I mean the circle with
the outer vertices. Now if I hit F, I'm not going to get the
result that I want. So at least create face here
and face right there, F. And now let's give
this side of phase. Grab these vertices with
Alt click and then hit F. And now it's Alt click here. All you have to click there. And now with F. Now we got this result.
It's very cool. Alright, now let's
hit slash to excite all the local mode and let's activate subdivision
surface for this one. And this topic. Alright, manual listed
G to this here. Let's move this up. And let's give this a thickness
before you do anything. Let's use the solidify modifier. Let's go to the Modify List
and you will solidify. Alright, now I got
weird results. That's because of the
normal of the faces. So I will turn this off to
see what's happening here. And I will hit slack again
to jump to the local mode. And I will go to the overlays and activate
face orientation. As you can see here,
we have two normal, we have the right one hand, we have the blue one,
and that's wrong. We could make this one
either red or blue. So to flip this, to flip the normals of
these phases right here. It's easy. Tab to the edit mode, go to the Face Selection mode. And let's select these faces. After you select these faces, just hit Shift and
Alt and sorry, to open the normal menu
and then hit Flip. And that's it. Now it's done. And it's
fixed after that tab out. And turn off the
face orientation. And now let's activate solidify. Now as you can see it
working correctly. Let's kick this killing case. We got some problem
with the scale. The scale is not that cool. I will hit Control a
and apply the scale. To fix the scale.
As you can see, how the scale affecting the
the, the bevel amounts. Before I applying this kill, the thickness number
here was not thrilled, but now after I
applied this killed, I got real results. Now I need to reduce
the thickness. Let's make this smaller. 0.1 maybe. And let's hit Select to excite. And let's see what we got.
Let's compare the results. And let's compare this to
the reference image as well. I think 1 mm, 0.1 centimeter is okay. Pick whatever view,
front or side of you. And let's move this
up here to this here. Let's move this right
here, something like that. And yeah, it's really
cool. It looks cool. Alright. Alright, after that is the time to create these shapes here. Let's see how can we do that. Let's go to a top view here and has you to go to wireframe. And let's try to
create these shapes. Let's take the reference image out for now. We don't need it. And let's add a plane here,
and let's start with plane. The plane is very big. This is about two meter. I will change that number
to 1 cm to make it small. And now we have to write here. So tap the ethmoid and
let's go to the vertices, I guess want to grab one vertex, hit Shift D. And let's take
this as a copyright here. And now let's start with this
vertex to secrete escapes, hit E to make some extrusion
following these shapes. Okay? Somebody like this, this to grab this with this hit F to make a connection
between them. And maybe I can hit Control R and slide this edge right here. This make a small curve here
by adjusting these vertices. And let's take
another Coby hits, have to figure out another Coby. And let's start from this. This place hit E to extrude these vertices and
this try to follow this shape. Right? All right, We're almost there. Now let's pick up those,
hit F. And there we go. Another Coby can be
quite of our vertex. You like it here, t and let's add one right here. Something like that. Alright, another vertex here, d. Hello, Let's make
another extrusion. Okay, so now we create
all of these shapes. After that, Let's
add some relax. Let's use the relaxed to
relax some edges, e.g. as you can see here,
the line is not smooth, it goes like this. So using the relaxer is
something very important. Let's say garb is vertex and
maybe you can crop this one. Hit right-click
and choose relax. To make this relaxed, you can hit Shift R
to repeat that again, but one, relax, it's cool. Okay, What else? Maybe I can crop this with this one or controlling
crop that one. And then right-click and choose relax. Okay, That's very cool. Let's select these
vertices over here and let's use a relaxed right-click Loop
tool and choose relax, hit Shift R to repeat that
again. Something like this. I was very cool. And
those over here as well, Let's select this vertex
fault can throw up that one, right-click or relax. That's very cool.
And these vertices as well, Right-click, relax the archival time and you can correct the distance between
them if you like, if you hit right-click
and choose space. Okay, let's grab this vertex and hold Control
and grab that one. And then hit right-click
analysts use relax again. And then right-click
and choose space to make the space between
these vertices even. The same thing here is to
grab those and hit space. Okay? Maybe we can do the
same thing here. Space. Alright, That's very cool. Alright, now let's your
subdivision surface to make these pieces smooth. Okay? I think in this era we need to add some extra
vertices, I guess. Oh, let's leave them
for now to tab out. And by the way,
delete the plane. We don't need it x,
f to the liters. And now we got this. Let's add subdivision
surface to this. Now we got smoother results in this area that is of
this no, so quite smooth. So in this case we can add
some extra vertices here. We can grab those over
here or hit Control Shift V. And let's say Club is vertex with odorless
add one vertex right here, hit Control R and
add one right here. I will select these vertices and then hit right-click into space to make the distance even. It can throw an hour to
add one vertex right here. That's will help to
make this smooth. This adds three maybe
vertices right here. Now let's see what
we got so far. Now the area here
becomes smoother. You can club this vertex, it can throw me if you prefer, hit Control Shift B, sorry. Let's make this
one even smoother. And this one had Control
Shift V with two vertices. Something like that. Yeah, now it's become smooth. Okay, let's hit M to
hide this panel for now. I think we are finished here. Now I can apply the
subdivision surface. And now if you tap it, it mode, as you can see, the
result is very smooth. Okay, I've started that. Let's give these a thickness. After your tablet mode, you can now select each one and hit F to fill it like this. You can go to the solid more to understand
what I'm doing here. Hit club this one, alt click and then hit F. And now you can give
those extrusion. So hit E and extrude
those up like this to avoid any face flipping, I mean, normal problem. To avoid any normal hues, you can hit a to select all
the faces and then hit Shift and to recalculate the normal
and fix the normals here. Now if you go to the
face orientation, everything is a blue, that's me and everything is correct. Now top out and move those down a little bit for
the Z and just move them. Let's add the blade to
the selection hold. You have to crop it. And then let's hit
slash to isolate them. And now as you can see,
we have some penetration. That's all what we want here. After that. We want to
make some term here. We need to cut this. Okay? I'm going to use one of the odd ones that comes
default with a blender. Guys go to the Edit
and then Preferences. And let's search for all tool B, 0, L. This tool comes default with the blender
just activated from here. And to find this tool
after you activate it, you should open this panel and go to the edits and open the poll
tool. It's right here. You can use the
shortcut Control Shift B to access the
Bowl Tool Options. And now I want to
use the Bowl Tool to create a whole is here
to make some trimming. Okay, So these objects
that I just created, this obvious are the cutter. I'm going to use these
objects to cut this plate. So first thing, pick the Katara and then hold
shift and pick the targets. Okay? So this one will be the
first thing to select. The target will be the
second thing to select. After that. Now you can go to
the Bowl Tool Menu. Here we have two section. We have the auto Boolean and
we have the price volume. The difference is, if you choose the option
that we got right here, you will get the results, but you will lose the control. E.g. I. Will use difference.
And now done, I got what I want and that's it. Now let's use the brush
Boolean. This section. Let's hit difference, and now we got the
same results paths. The difference is now I
can select these objects. Let's call it the Ketterle. And I still have the ability to move it around and
change the position. So that's all the
difference between those. For me, I will, I will select the Auto
Boolean and that's it. But because I picked
this one, it's okay. After you will get the
result that you want, just hit Apply all and
it will be applied. So now we got what
we wanted here. Okay, That's very cool. Let's hit slash to excite
all of the local mode, and let's go to the top. Alright, Very cool. Okay, then, So I guess that's it for this video and see
you in the next one.
9. Creating the handle ring: Hello again, we'll come back. Let's bring the reference image and let's see what, what's next. Okay, according to this image, we need to take a
copy of the plate. And yeah, we just
need to duplicate it and we need to keep some distance between
them with the new copy. I think there's this distance
about 8 mm or maybe 5 mm. I'm not sure, quite sure. If we assume that this one is 1 mm, so we have 123, 4 mm. Yeah, I guess this one, the distance is
about four or 5 mm. Something like this. Alright, so in this case, let's go to the front. If you'd like to go the
front or to the left. I just want to see the the
hip from the side view. We'll hit Shift D to the z, let's say a copy and
let's put this copyright here, something like this. And I will duplicate
it four times. Okay, hit Shift R to be bad. And two times. So now we have four pieces. So this is the distance. Now we can hit
Shift again to cut other Coby and delete these pieces between
them hit Delete, and now we got the
correct distance. Alright, That's very cool. Let's browse the images and let's create this
ring that we have here. Let's see how can we create it? Let's see if we have
this omega is cool. I can start with this
image right here. Alright. Let's go to the top
and we still have the old gen dot exactly in
the center of the circle. I guess. If nodes, what you
can do is you can tap and you can pick up
a circle and hits. I just selected this
circle and then hit Shift S to open the pie
menu for the 3D cursor. He was cursor to
select it to make sure to bring the 3D cursor exactly
the center of this circle, because I want to create
a new shape here. So let's tap out. Now. We have the 3D
cursor in the middle. And then hit Shift a to add, and I'm going to add
the circle here. The circle is very big, I guess. So let's change this to 1 cm, make it small like this. And let's increase the number
of vertices to maybe 60. 60 vertices, I guess. Maybe 70. Yeah, I think this
will resolve this. Cool. Alright, so that's very cool.
Now let's go to the top and let's hide the
image for now. Hit S to scale this. Let's move this over here. Okay, hit S to scale this. Somebody like this. I think we need to take this up a little bit
key to the z for now. And let's go back to the top. And let's kill it's
a little bit more. Let's bring back the image. Let's see what we have here. Now the size of the circle similar to the size of
the reference image. All right, we're good to go. Cool. Now let's tap mode and
select all the vertices. Just hit a and then
F to fill this. And now let's hit I to make some inserts and Z to
go to wire frame mode. And let's kill
this a little bit. Just keeps some distance between this edge and
this one right here. Some thickness, because this, we have some thickness here. Maybe we can scale it even
more just a little bit. And when you complete, just hit X to delete this, this big face in the middle. So now, until now
we got this result. Alright, now let's see
what else we can do here. Alright, now let's go
back to the top view and hit Z to go to wireframe. It can throw our two, add
one H almost right here, align it with the, with the circle of the
handle. Something like this. And let's add another edge
right here in the middle. Control R and confirm
and then hit right-click to leave it in the middle. Get to the Z. Let's move this
up a little bit like that. Something like this. Maybe. Just a little bit, not too much. Alright, let's see what
else we can do here. I will it grow up, hit Alt, click to grab these vertices, and I will hit E to the Z, this extra little bits
and take this down. And then hit E and then S to mix some insect
inside a little bit. I want to create this small
egg that I have right here. That's all what I want to do. Then when you compensate that hit E to the Z and
take this down. In this area, we have some, we have this H right here. Let's try to create
something like this. Okay? So I will grab this edge here and it can
throw me to bevel it, give it a small amount of beveling and then go to
the Face Selection Mode. With these faces selected, just hit E and move those down a little bit. And
let's all be enough. Alright, now let's go back
to the edge selection mode, alt click to grab
the entire loop. And then let's give
this a thickness. Hit e to the z to
extrude this to this z-axis to give this a
little bit of thickness. And then it's E and then S extrude and scale to move this inside a
little bit like that. You can actually scale this even more if you
prefer. That's okay. I've tried that tab out and go to the side of
you had key and move this one and alignments
with the handle. So now let's see what
we got so far. Alright. If you don't see the edges
and the extrusion you made, you can make some tweaking
to the setting here. I will activate the cavity
so I can see something here. Here are the type I will
choose both so I can see the shadow and the edges. We can manipulate
this a little bit. Already. This up here
is nice actually. Alright, Now, before and after. Let's increase this a
little bit and this one. Cool. So this before and after. Now, definitely we see
something Very cool. Okay? Now we need to mirror
this. On the other side. We could use mirror modifier. Let's go to the side view. Mirror modifier
working according to the origin daughter
of the geometry. In geometry you add inside
the blender has origin dots. I mean this dot right here. Okay? So if we add a mirror right now, mirror modifier will mirror or this opiate according
to the origin dot, the origin dot position. Now it's not correct. I need to move it so I can go to the option and activates origin. And now I have the ability, after I select the object, I have the ability to
move the origin dot. Now if I activate the
gizmo and move this, the object will not move by, the Oregon dot will move. So I want to put
this in the center, something like that about here. And I will leave it
right here, Kimberly, I will adjust,
adjust this later. Alright, let's see what
else we could do here. You remember the COBie that
we take from the handle, the spring, this bag and
let's see, where is it? It's right here. I will
turn this off for now, just to move this up. And let's put it in the
correct position. Alright. We think we have some
misalignments. I guess. I think that's
happened because we didn't apply the
subdivision surface for this piece here and now
it's okay, the size now. Okay. Alright. Now let's go back here. So let's add the mirror modifier to me or this on the other side. I want to I want to create
another Coby like that. That's all what I want to do. So go to them with a modifier list and let's
add mirror modifier. Alright. Now, mural
work to the x-axis. We want smear or
torque to the z axis. So this is x-axis. This is the z-axis. X-axis is don't,
don't too benefit us. Switch this to Z. And now
it's working very cool. But I want this edge, I want this week, this edge right here. Well, that's mean I
need to move this one a little bit down. I mean the origin dots. Okay, the same scenario. Let's go back here to the
optional activity, the origin. And let's move
this one manually. And let's move this one and
zoom in a little bit here. Alright, it's aligned perfectly, I guess. Now everything is cool. When you complete
everything, okay? Yes. Go back here and turn this off. We don't
need that anymore. Earnest. I will hit Slack to isolate this alone because I just want to
work with this one alone. I will tab and I will grab this entire edge loop
and hit S to scale it. And then I will hit E to explore this and
market like this. Alright, so now I
got this results. It's closed. It's not opened. And call this exact now. Alright, That's very cool. If you have a small gap between the blade and
this, you can fix it. This is something easy. You can go back and go
to Face Selection Mode, hit Alt click to grab
all of these faces. And then you can hit Alt S to book these phases out and align them with the plate
and then tap out. If you are not satisfied with the resolution
for aneurysm, if you think that's
a mistake and you want to give this
more resolution, you can turn them temporarily
and isolate this alone. You can tab and you can
grab all of these edges. So let's start with this edge. It just sets, can throw
and Alt and click. And let's go to Selection
and choose, Select, select loop and select lobe. Where's it? Edge or ink to
grab all of these edges. And now we can hit Control Shift R to duplicate
all of these edges. Okay? Duplicate these edges. Now we got this result,
but still the jacket. Okay, We didn't fix that. Now, but we, now we increased the number of
the edges. After that. You can grab these edges. All of them are actually, you can hit Control Alt
click to grab all of these ages and go to Select, and go to Select loop. And here's the option circle
to make this perfect circle. And now we fixed the problem. If that was a
problem, by the way, now it's become very
high resolution and very perfect. Okay. Yeah, Very cool. I will stick with this result. Now let's activate
them and I'm with the fire and everything. Looks cool. We got some problem here. I don't know. Let's
see what we have here. Sorry, the x axis, we just forget to
turn, turn it off. So turning this off, as you
can see before and after. Alright, watch this area here. When you Before and After, just used the z-axis,
and that's it. And by the way, if I
go to the wireframe, I can see I think we have
some overlapping here happen. I don't know. But I guess we have
some overlapping. If any orbital overlapping
happening here, you can activate the bisects. Alright, to eliminate
any overlap between these two objects. Okay. That's very cool. Alright. Now this has light to excite and let's see what
we got so far. The result is very nice
and clean and beautiful. So I will stick with this one, and I will end the video here and see
you in the next one.
10. Creating the plate holder step one: Hello again, welcome back. Here. Lets you create a blade holder. I mean this part right here. Let's, let's activate or
unhide the reference image. And let's go to the top. Let's see what we got here. Alright, I think we can start the handle Coby being
some vertices from here. So let's tap to go
to the Edit mode, endless, go to the edge mode. And let's see, grab
this edge loop, just hit Alt click and
you will select it. Hit Shift D to the z to take a copy and you
can put through your Timberlake and then you
can hit P S to separate it. Now, this one no longer
connected to the, to the handle. It gets to the Z a little
bit at this point, this right here, the origin
dot is not in the middle. I will hit fwrite a click and set origin,
origin to geometry. Alright, now become the middle. This unhide, the other details. And let's see what we can do. Let's try to find another
image, ISO image. Alright, e.g. this one, as you can see, it
is a big piece here. We have, and it's thick. So let's start with this circle. Let's move this up
to the roof here. And let's go to the Edit mode. Turn off subdivision surface, select all the vertices hit E. And this explored this down. E to the z. You can start like that. Oh, actually I prefer to
use another technique is you go to the top and let's
use another technique. First thing, I will
give this a thickness, so I will hit E and then
S to extrude this out. Something like that. Make it smaller as compared
to the handle circle. And now I can grab some
vertices and start from there. Let's hit E to extrude
this vertex right here. And it's going to
extrude this e.g. right here. Let's keep doing
that to create this shape. It's EA again, this starts
following the shape. The TA can create this area. Okay, somebody like that. And one extrusion
maybe right here. And maybe one here, I guess. So I will grab those and hit F to make a connection
between them. Than the perspective. We got these results. I can take this up. I have no problem to do that. Okay, so now let's
tab and let's see, grab these four vertices. I will hit F to create
a face over here. And Buchanan grab those as well. And hit F to create other phase. And now it's about
filling this area. Alright, let's hit Alt click
to grab this edge loop. And this or I will pick
these vertices manually. This hold Shift and
add those as well. And I will hit F to fill this. And now let's make
some connection between these vertices. Okay? Fair thing. Maybe we can connect this one with this vertex. Hit TK to make a connection. Maybe we can connect
this with this hit J, somebody like this.
And what else? Maybe we can connect this
vertex with that vertex h, k, k. I can add one
vertex right here. And I can crop this, or I can hit Control R to add one H right here and
connect those with k. Like this. And the club is vertex
with this one hit J. What's the LC club this
with this one had J. Maybe another vertex
I can add right here. Or I can use the knife
tool from the top view. Hit K, make cut goes there. And confirm it. Maybe we can slide this a little bit there. Alright, I will
use the knife tool again to make cut
goes like this. I guess. Actually, maybe I can put
it right here. I think. Let's move this vertex and let's put it right here
and this one as well. Okay? Maybe this, I can move it here trying to
following this curve. Okay? And I can use the knife tool
as well to achieve that. Let's make a cut,
goes like that. And now it's, let's make the distance between
these vertices even. So I want to grab this one
and the club, the last one. Let's pick those
manually like Beth. Before I do that, let's
temporarily leave this edge. Hold this one. And maybe
we can merge with this, with this rhetoric similarly. Okay, now let's grab these edges and then hit
right-click and choose space. Now, the result, better. This coordinate, this
one with this one hit J. This one with this one had k. This one with the
new vertex right here. He was knave told me cut. If you want to put the cut
in the middle hold Shift and okay, let's
put it right here. It's a tensor. And
maybe a cut goes from here and it's
their rights tells. What about this one? Alright, let's see,
grab this first one and then the last one here. Right-click and let's rectify
the distance to space. Okay, this edge,
I don't want it. But if you delete this edge, you will lose this corner. We have here. This
case you can hit X to delete menu and
choose limit dissolve. Okay, to avoid
losing this corner. What else we can do here? Let's hit K to either cut, new cuts, goes like that. Maybe Kimberly, less.
Repair the distance. I can grab those radicals, they can to space. Because we added a new one here. Hey, maybe we can push
this one to the end here. No problem. Don't worry
about this for now. Alright. Now let's try to find a
solution to this error because we have giants and gone. Let's use the knife tool
and make some cuts. Goes there. Okay, maybe we can add this right here
and leave this one as quiet. And this one has quite as well. Maybe we can grab those and
slide them a little bit. Move on to this one, trying to create some space to this
pattern that we have here. Alright? We can cut this
area in a different way. Okay, We have another
option to achieve that. Maybe I can slide this in the middle and slide this
a little bit right here. Okay? Something like that. I can make the distance, even if you want, you can do that right leg space. And the same thing here. Grab those Right-click space to see what's going to
happen. Yeah, that's cool. Cool. All right, That's very cool. Maybe we can correlate the
distance here as well. And here. Alright, that's nice. And the perspective
we got this result. Now we can give
this a thickness. Okay? I will hit a and then
I just want to make sure that I don't
have any problem with that face orientation. Okay. Everything is blue from this site and right on the side. That's very cool.
That's awesome. Now I will hit E to
extrude this down. That's alright. Let's go to the
side. If you e.g. and let's move this new shape. Let's put this into place. Hit Q to the Z and
leave a small, very small distance here. Then tab, go to the vertices. Activate the X-ray mode. You can hit Alt Z or you can
go to the wireframe busy. And let's scrub this
side is e to the z, and let's move this one down. Key to the ZA can and let's
move it's almost right here. Cool. So now we got this result. All right, I've
heard that list had one egg here in the middle
and I will be filleted, can throw be somebody like this. Maybe. We have one site thick and I think the
other side is not thick. Let's try to find
another image here. Yeah. We have some variation
in the thickness. Right? Okay, Now let's move these vertices and hold
them with the senior age. To create this. Had to create this shape here. So let's talk about those. This add those as well. And all of these vertices, I will hit G twice
and move those down. Slide them. Don't forget
to activate auto marriage. That's it. Now they are married. The same scenario here. Let's select those vertices and then key twice and move
those up right here. When you'll be satisfied, Alt click and delete
these guides. We don't need them actually. So let's start with those. Alright, then start
with those as well. I don't know, but I think they are not married,
not about marriage. And delete the rest. Can throw X to dissolve
them. As recall. Notice hits like to
isolate this geometry. And let's use bevel to
bevel the sharp area. Let's go to the edge mode. And now actually
we are in the age. And let's start picking
these searches. Writes the sake as well. We can select it. These edges over here. And those silver here as well. Hold can throw blank, keep picking these edges. All right, like this. And yeah, those
over here as well. And hold Control and pick
this this one over here. And those, Let's start with
those over here as well. Okay? Maybe we can add this
one. As very cool. Let's add this and these
circles inside as well. We forget anything here. Alright, I think we picked
all the unnecessary edges. Now I will hit Control V to bubble all of these
edges and let's add three vertices,
sorry, three edges. That's very cool. Hey, this area I want to add
here and here as well. To make this like a curve, I can do that in the top view. Let's see how can we achieve
something like this? Maybe by cropping this age that was over here or
just those it can throw, we'll see what's
going to happen. That's not going
to work. We will face some problems here. Because we built
all of these edges. So that's now become a little
bit difficult to achieve. Let's try to find
another scenario. Maybe by using the knife tool. Can make a cart, goes here and hit K can
make a cut goes over here. And now I can grab these
two edges and manually, I can move them
for the both side. By the way, I'm not
going to worry about this side because in
the end of the day I will use the mirror
modifier or tumor or tumor or the other side. So let's hit G to move
this a little bit. Somebody like that. And I will use the knife tool to make a new cat goes here. And then you cut,
goes over here. And I cut goes through
that corner there. Confirm all of that. Grab this with this hit
Control X and dissolve them. Okay? This looks better. If you don't like this
triangle here. That's okay. We can move this edge, and actually I can move this
right here in the middle. There's no problem to do that. The SEC love that vertex
with this one here decay to make a
connection between them. Like this. Club is hit Control
X to dissolve it. And let's slide those a
little bit like that. Now is the time to
mirror this side. On the other side
using mirror modifier. Before I add in numerous
mirror modifier, I will hit Control R to add
one H here in the middle. And can throw RY here
to add on here as well. And go to whatever
view you like. Go to wireframe is
z and choose faces, face selecting the crop
half of this geometry, and hit XF to delete. And now we have half of this. After that, Let's grab the
circle and let's bring the, bring the 3D cursor in the middle of this
circle for our reason. And I will tell you why. It's Shift S and choose
coarser to select it. And now king the position of the origin dots the
position of the 3D cursor. Because we want
this in the middle, so we can use Mirror, mirror modifier
without any problem. Alright, so tap out, go to the object mode and then hit right-click
insert origin, origin to 3D cursor. Now it's done. Alright,
I've started that. Let's add the mirror modifier
and turn off x to z. And let's put the subdivision surface
underneath mirror modifier. And let's activate this. Let's see the final results.
Let's take this out. Alright, and it's very
cool, clean and smooth. And I will accept it. Nice. Alright, so this
is its for this piece. And that's it for this video.
And see what the next one.
11. Creating a crack for the blade: Hello again, I will
come back here. Alright, Central. Now we created the plate holder. This piece right here. We have a small crack here in the middle of this geometry. We need to create lists of
bringing the reference images. Let's see what we have. Okay, This check that
and makers see week one. As you can see here, we have the plate and display. It should be inside a crack here we need
to create us all. It's feasible. It's visible a little bit
right here. You can see it. So, okay, let's see how
can we create that. Alright. Okay, fair
thing we could do. Alright, we have the mirror and subdivision surface
still exists. I will take a copy of this of this piece and I want to
hide it for any reason. If I, if the technique
that I'm about to use that doesn't work in the
fire crew and the old Kate, I can go back and use a new one. Alright, I'm always do that. So I will hit Shift
D to take a Coby. And when you hit
right-click the new COBie, we'll go back to the
original position. So now we have a
copy above a Coby. And now I want to put
this in a new collection, just hit M it from the keyboard
and hit New Collection. And let's call this e.g. I don't know, maybe extra. Extra and just hit Okay. Yes. To recognize it. And now I have the
new copy right here. Okay. After that, you
can hide the extra file. Okay? And now let's work with this. The first thing I
would like to do, I will apply the mirror modifier and I will apply the
subdivision modifier. I mean, I accepted the
result of this result. And now let's see how can
we create this crack here. Maybe I can start with with
the books are playing. I will hit shift a, shift a, and let's add plane.
It is very huge. Okay, I will change the size to 1 cm to make it very small. And let's go to the top and let's move this
e.g. right here. I will go to the edit mode. Now I'm in the editor,
will just hit Tab. I guess forget to
activate the screencasts. Okay. Now we have the mouse,
you can see it. Maybe we can make them upsides. A little bit big tech of this. And there we go. I will go to the vertex selection mode and I will move those inside
almost right here. I want to use this as a
cutter to cut this geometry. And let's move this a
little bit right here. And I will move
the new plane down here to this he had at
this point this right here for now, Kimberly. So until now, we've
just created that. And that's all what we need. Alright, let's see if what we are doing, something correct. Maybe we can check the images. Alright, so let's see which one. Alright, yeah,
something like that. You can extend the crack
to reach to this point. That's all. After that, this new plane, we're going to give
it a thickness. So tap out and let's go to the modify
our lists from them, modify our second here. And let's add solidify to
give this a thickness. And let's change this to 0.1, 1 mm, 1 mm. Is this too much, I guess? So I'm going to change
this to 0.05 alpha 1 mm. And I think this, this better. Alright, after that, Let's
apply this sort of DeFi. We don't need it anymore. Hit Control a. And let's move this up a little bit because the
crack is not in the center. Okay, and now I can
make the trend, but before I do that, I just want to activate the wireframe of the
holder a little bit. So let's go to the object, data object, sorry, I'll
give it to properties. And then let's go to
that view board display and activate wireframe. Now we got this. So I will move this new geometry and a lion, this edge to this edge, e.g. e. To the z. Let's move this one
almost right here. Something like this. Alright, let's make a
little bit of tweaking because I want this
the upper side. I want this to be aligned
with this age perfectly. And lower side. The side. I want to
align it with this age to make the process
easier for me. Okay, so let's do that. Alright, let's see,
grab this and let's tap to edit mode and go to the
face, select this face. And I will use the snap to snap this face
with one of these vertices. So go to this knob
and activate vertex. Because we want to align this face with one
of these vertices. Hit G to this year and hold control to activate
the snap temporarily. Hold control and snap this
face right here and now it's snapped with this face. And now let say
covered his face, had e to the z and hold Control and snap it
with this vertex. As you can see now with this, the two sides of the
plane now they are aligned perfectly with
the edges of the holder. Now, everything is perfect. Now we just want to make
the cuts and catalysts. Alright. After that, select the Qatar and in this geometry, and then hold shift
and grab the targets. And then hit Control
Shift B to omit the Bowl Tool menu and
choose difference. In. Now we got it. We got the crack. All right, now
let's try to tweak this to make it ready to give us a small amount of babbling. So in this case, let's grab the targets, I mean the plate holder
and touch the edge mode. And let's check this area. I just want to move some
vertices in case we have some overlapping because
sometime as you can see, we have some overlapping care. Alright, to avoid that, I will select this area or I will hit a to grab
the whole vertices. But just be careful about that. I will hit m, choose
marriage by distance. But keep in mind the threshold right here of this.
The threshold. The threshold is big. You will mark a lot of vertices. And here we'll run the geometry, make this number very tiny. I will add 0.001,
something like this. And here we have 600, almost 700 vertices removed. Let's check the geometry in
case we got the n problem. I don't know from where he got all these
vertices to married. Let's check this area. Maybe the software marriage
some vertices, yeah, the software married
these vertices as well. So that's wrong. We want to make this
number smaller. I will hit another, I will add another
zero and hit Enter. And here we are. We have 74 vertices married. And that's makes sense. I guess. Now maybe we
can accept this result. So now let's move
these vertices. I can, Let's see if
they are married. They are Americans. We have these vertices
and the middle. Sometimes they call
it orphan vertices. We want to merge them
and get rid of them. So let's say crop
them one by one. This part is the
most annoying parts. Every 3D artist hate this part. The cleaning. So let's hit key, activate the auto marriage, and hit key twice and
slide this vertex and starts numeric this
dread disease. So let's start from here at Gateway is
arithmetic this one. And keep merging
these vertices and make the, the line cleaner. Alright, we don't have a lot. It's not going to take too
much time for us to clean. Alright, so let's move
this vertex here. And maybe we can hit Control X and dissolve it,
by the way, yeah, that's will be faster rabbit and hit Control X and solve it. That will be faster. There's something like
this. What else do we have some vertices here? What about this side? Alright, now,
everything looks cool. I just want to mention
something here. You see this H right here, this diagonal edge
that meets this one. It's not correct to
leave it like that. Because when you add the
vault with these figures, you will have some
intersection with this egg and the ball will not work
here and this area. And I will give you a quick example just to
understand what will happen. We'll look up these
edges and it can throw me to the village.
As you can see. Here, we have some overlapping. That's what I'm talking about. But check this area. If I add Bevel here,
nothing will happen. Everything looks cool because we don't have a diagonal
edge becomes like this. And this case, we
need to clean that. We need to grab these
edges and clean them. So I will select this edge. As you can see when
I hit Alt click, it goes around the
whole geometry. A quick tip In case you can to grab these edges here
because they are very close. You can grab one of, one of these edges here. Because as you can see, it starts from here and
go around the geometry. You can block the
road. Block the way. You can delete one
of these edges temporarily and
bringing them back, or let's say hi them,
not delete them. So I want to grab this
and hit H to hide this. Right now I will hit Alt
click. As you can see. Now I can hit Alt click without, without select, selecting
the whole edge. This is the idea
and then it can hit Control X to the Solver button. Make sure to come up the edges. As you can see, I just deleted
this edge and when I hit Control x, It's being dissolved. So now I will hit Alt H to bring the edge back,
and now it's clean. Now if I go back to the edges and select those
here and hit Control V, bevel will work correctly
without any problem. That's what I want. Exactly. One more thing here. I don't like to leave the corner like this without supporting. I will add a color like that. And another, sorry, yeah, H, another H goes
to this direction. That's all make or that will
help people to work better. Okay, so let's go
to the vertex mode. Carb is vertex with
this one here the J. Grab this with this hit J. Something like that.
Alright, this egg, we don't need to anymore. I will delete it. So yeah, let's do the
same thing for this side. Okay, I know that we have edges comes like this,
but that's wrong. Let's see what's
going to happen if I add Bevel to this area. All right, We will not work. Okay? But as you can see
when I added the bevel, this H goes to this direction. Alright, so this is
how it should be. So it's ignored this direction. In this case. I can help it and I can add, it goes like that and make
bevel walk in the correct way. So grab those two vertices, hit J and make a connection
here and delete this one. Now if I club those
and hits B2B bullets, as you can see now
everything looks cool. The same scenario
lists repeated here, and grab this with this hit J. Sorry, this with
this one, hit J. What's going on? I can't do that. Yeah. Yeah, that's right. We could add a vertex here
and this area, alright. Seems like we have
some problems here. I will move this one
timber or Lee right here. Or maybe let's see what scenario we can
use to fix this area. Alright, so I will hit K to activate the
knife tool and I will make cat goes from
here to here temporarily. And I will move this vertex and align it with this
vertex right here. So I will turn off the automatic because I don t
want to merge them. So turn this off, hit G, and don't forget to activate the vertex snap and hold Control and align
this one right here. Timber me. Okay, Now, let's see, grab this vertex, one of these vertices,
and let's move them. Not this one. Alright, we
want to pick the next vertex. Let's go to the
wireframe and let's see if we can't be kids. Yeah, I think now I got it. So this is the problem
with this vertex. Okay? What I will do is I will grab this vertex with the new
one and j two merge them. And how I can hit U twice in slightly to
an American here. But now I want to
activate the automatic. Okay, that's it. Now I
fixed the hue after that. I can delete this edge. I don't want that anymore. All right, let's see if
we have any hue here, any overlapping
edges or vertices. Okay, everything
here, it looks cool. Now, all what I want to do is add the voltage
over this area. Okay? So yeah, let's do that together. Before we add the
devil in case you want to make this thinner, this area, this crack, you can go to the face mode
and select this giant phase. And you can hit P to
the Z and take this up, or you can grab both
of the side and hit S to scale for the z and put those together
to the center. The z-axis, but make sure to hit S to the z. Something like this. Alright, Now the
results, it looks cool. Except for this area we
have some overlapping, it's very easy to fix. I will grab this one and
move it down the middle. That's will be
enough. Let's see. What else do we have
any problem here? Alright, so we don't have
any problem right here. Alright, now let's
go to the modifier. Let's add bevel modifier, this tab to the object
mode, and let's add double. Okay, now after adding that bevel, Let's take these images. We don't need them
anymore for now. A fair thing we could do now is to change the limit
method to wait. And let's change the amount
to zero points, 1 cm. By the way, you can change that. You want it to millimeters, that makes life easier for you. And now we are working
with them at the meters. Okay, now, tab to the edit mode and let's pick a
specific edges here. Let's see, crop those edges
that we want to level than the AQ that we want to
bevel, crop them manually. You would think that
control method just leave a small amount
of, let's say, just leave some
distance here and pick another edge and one you
use the cancer all methods. These edges between this
distance will be picked. The same scenario until
the auricular first point. Alright, so after you
select all of these edges, just go to the mean devil, wait and crank this up to
one to give this above all. And now we should see some
bevel as you can see. Alright, now this big, these edges inside and it's
kept them bevel as well. And those over here, this edge here as well. And we have those over there. Alright, I think now
we are finished. I guess. Yeah, that's very
cool. Alright, now let's kick the
amount of the bevel. As you can see
here in this area, we are about to have
some overlapping. So just keep that theorem
by 1 mm is too much. So I'm going to
change this to 0.5, K 0.5, or maybe even the
chambers two points. One, Let's see
what's gonna happen. Is 0.05. What's going on here? Let's add another zero here. 0.0 is zero. I don't know. Seven. Alright, so
as you can see, is very, very small
level here we got. And let's add two segments. If you want to add more, you can add more as okay. To make this smooth,
Let's tab out and let's turn off the wireframe. And let's see the results. Alright, third,
so it looks cool, that looks cool and we
can accept this result. Let's see what's
going to happen if I add weight is normal here. Or actually we can
go to the cadence. I can't activate harder than normal and activate
auto smooth here. This option will help to
get rid of any bad shading, as you can see here
before and after. I will show you this before. As you can see, we
have some problem. And this is after. So it's helped a little bit. You can use it has very cool. Now we created the crack. The results still
awesome and cool. Alright, so that's it for this video, I'll see
you in the next one.
12. Creating the nail nick: Hello again, we'll
come back here. Okay, in this video, we'll
create the nail Nick, this small bars right here. Alright, so let's see
from here we can start, we need to create
this on one side, just one side here.
And that's it. Alright, maybe we can
start with a circle, our cylinder to create this. See where the 3D cursor, the cursor is right here. I will hold Shift
and right click and move the mouse here to move the 3D cursor to the senior position above
this phase or surface. And I will hit Shift a to
add and maybe we can add. Yeah, let's start with cylinder. It's very big. I know. Let's change the radios to five millimeter and depth
to five millimeter as well. And let's increase the
number of the vertices to maybe 80, maybe 90. Suddenly like this I guess. And let's go to the
front or to the side. And let's rotate this
cylinder like that. This year to be guts. Sorry, not like this. On the opposite side. Something like this. And let's move this up
a little bit like this. And let's see what we got
here and the perspective. Let's move this over here and
take this down like that. Okay? And now we need to maybe rotate this to the
z-axis is a little bit dizzy. And maybe we can move it
right here after the Z a little bit again. Alright,
That's very cool. Now, I will change the
position of the 3D cursor to the base of the
cylinder because I want to scale this according
to the 3D cursor. So activate the vertex
snap and then hold, shift and hold Control and snap the 3D cursor to the base
of the cylinder here, or maybe maybe right here. I think that's what
will be enough. Yeah, that's very cool. Now when you scale,
if you scale, the scaling is still happen
from the center out. But if we can get that from
that transform pivot points, if we switch this to 3D cursor, now the scale we'll walk
from this point out. Okay? So hit S, as you can see now, let's go
to a solid modelling scale. This make it big pair. Let's see what we
got so far here. Let's select the Qatar, the cylinder hold Shift, grab the targets, and
then hit Control Shift B. And by the way, keep in
your mind something you will lose the bevel if you, if you used the few, use the auto Boolean
this section. So in this case I'm going
to use the Boolean. As you can see now we have
the nail, the nail neck. Now you can scale
this even more. Sorry, can just grab the
cylinder and scale it's even more to make this better. And you can push this
deep, or if you like, you can rotate this
to the x-axis, but cannulas to local. The transform orientation
to the local Android dated. Because we want
to rotate this to the local x of the
cylinder itself. Right now Let's hit RX. Rotate this a little
bit like that. And it is still small, I guess. So I'm going to scale it even
more and make it very big. If you'd like, you can move it inside a little bit like
that if you prefer. And let's see what
else we can do here. Alright, so that is
how it looks cool. Maybe we can move it to
the x-axis a little bit. Maybe right here, because
according to the omega, the distance here is
small knots, so big. And we need to maintain
that as well here. Okay, let's see,
let's hit G from the top view and let's move
it a little bits like that. And maybe we can push this deep inside a little
bit, I guess. Or maybe we can rotate
this, the x-axis, R to the x. Something like that. Okay. Let's take this out a little bit and rotate this to the x. Something like this, I
guess R to the x again, rotate this to the x axis. But keeping in mind, don't try to rotate is too much. Let's go to the top
of you and let's hit G to move it right here and maybe, alright. Maybe we can scale this
even more, make it big. And let's move this
Manuela again. And let's put this right here. Alright, I think that's
this result is, okay. Let's make some
quick comparison. Maybe we can scale this
even more a little bit and move it inside a
little bit, not too much. Alright, let's go
now to the top. Alright, now the result
looks okay for me. But I got a small problem here. The vertices, the
segments now they, they need to be increased
to get better results. That's will be easy
to do actually, I will leak rub that Qatar and tablet is more
towards like Katara. And I just going to make
some tweaking here. Let's go to the face,
hit number three. And you can have
all of these faces. And you can't grow up the faces or you have
another option if you prefer. So I will go to the edge
mode and hits Control Alt, click to grab all
of these edges. I think they call it shrink. Select a few, go here
to the select loop. It's called a drinks. That's what I did here. And then hit Control Shift R to duplicate these edges
on the both sides. When you do that, I'll
move the mouse up or down to have these
edges duplicate it. It's a little bit
annoying, I know, but alright, Now we
got it after that. Make the distance
between these ages even. All what you need to grab this edge and the
upper edge, this one. And then hit right-click using
the Loop tool add-on and hit space to make
the space even. Sorry, not like that. You can use circle on this time. Alright, now it's better. Tub outs. And now we made it
more smooth here, as you can see now the
result looks better. All right, so
that's really cool. I will accept this. So now we've got this cuts. After that, you
can move the ball, the Boolean modifier
above the bevel. Alright, move it above here. And now you can
target these edges and give them bevel weight. But if you go to the board, you will lose it by the way. So in this case, if I use the weights, sorry if I use the
angle, I can do that. But because I'm
using the weight, that's a little bit
difficult to achieve. So in this case, I
will apply this, but not right now. I will apply that later. For now, let's try to create the release button
for the plate. Let's see how can we create
it. Let's go to the top. And let's go to the wireframe. As you can see, this is
our result and by the way, you still can't edit it. The cylinder, you still can move it and rotate
it if you like. In case you want to make
this 100% similar to the nail Nick we
have and the holder. Or you can do that. As you can see now if I
scale this a tiny bit, I can achieve the results
and the reference image. Let's move this a little bit. Alright. Now we got it. Alright, so
that's it for this video. The next video we'll
create the release button. This one here. Okay, See you on
things with you.
13. Creating the release button: Hello again. Welcome back here. Let's see Korea the
release button. Okay, let's go to the top view. And I'm just going to move the 3D cursor
inputs right here. All what you need to do
is hold Shift and hold, right-click and move
the mouse to the point. That was one you like, e.g. right here. And let's
add a new object. I will hit Shift a to add
and I'm going to add a cube. The cube variable changed the number right
here off the size. And his E to go to wireframe. And now I can see there
are lists button. I will try to create
something similar to this one right here. So let's start. Let's tap it more than go to
the vertex selection mode, hit number one
from the keyboard. And let's make some
tweaking here. I can move those with
those right here. Can crop though centi, those up. Grab this point smooth, disappointing, e.g. right here. And the crop this
one and put it here. Move this one here, move that one, e.g. right here, and we can add a
new edge to this area too. Move the senior age almost right here,
something like this. And all what we need to
do is we need to make some beveling to make
the corners smoother. So this Tumblr that
Let's see what we got into perspective.
That's all what we got. So let's start with this corner. I will go to the age
and the club they say hit Control V
to before this age. You can make this smooth. Add more edges here, just rotate the
wheel on the mouse. Okay, something like
this will be enough. And this one we can
bevel it as well. Money-related can throw
away and developed. If you want to make the befall radio small door to increase the
number of the edges. Okay. And what about this area? I will look up
those together and hit Control V and
move all of them. But before I do
that, I will delete. I will delete this edge. I don't want it, so
I will hit Alt Click going to grab the entire Aikido. I will cancel this h and it
can throw X to the sulfates. And now let's scrub
this with this. I deleted this edge
because I don't want it. That's all. I will
look up those I had controlled and Bevel
them like that. Okay. Something like this. And what about this one? The same scenario. Something like this. Okay. As you can see now
this goes deep inside. They come with
three, hold Shift, grab the targets,
hit Control F to B. And I will choose difference and the
barrage body and second, because if I don't, I will lose the bevel
effect that I got here. Alright, this one,
I don't want it, I don't know this
from where CMS okay. So yeah. Alright,
now let's do that. Let's grab this hold here. The godless it can throw, you have to be and then
just hits a difference. And now we got the whole. Let's move this up a
little bit because I don't like this to go deep. Something like
this. It will work. Yeah, that's really cool. Now is the time for the pattern itself. Let's take a copy of the catalog itself had
helped e to the z. And let's take a
copy right here. I can't see the object. I can go to the object
properties and scroll down to the viewport display
and change the display us to solid so we
can see it again. And I'm going to make
some changes here, like reducing the number
of the edges here. Maybe we can grab
those and delete them and slide this one had gateways and puts it in the center
and this one as well. I don't want that many edges
here because I want to use a subdivision surface
here to make this smooth. So there is some edges
here and make it low Bali. That's all I want to do here. And this area as well. The same thing. Alright, now let's make the distance even
for these corners. Okay? By the way, if you want to
make this easier for you, can, you can go to the wireframe, crop this side and hit X to delete it all and
focus on this area. So as the club
those heterocyclic into space to make the space, even. Those as well. Ignore those. Let's go here. And to space and your
Oswald, same thing. Alright. And now we can give
it a thickness, hit E to extrude, take this down and give it
a little bit of thickness, and that will be enough. Alright, so this
is the first step. After that, I will hit Shift
a and add another cube. And I will move this cube up right here and skill
to the x-axis. And scale it to the
y as well, to the z, sorry, scale it to the
y and make a towel. Go to the top view and
let's see what we got. It's killed us to
the wire. Again. Maybe we can make it thicker. And after all of that scaling, hit Control a and
apply the skill. And now let's tablet mode and go to the agents and grab
this edge with this one, hit Control V to bevel them. And let's add the
three edges right here to get a result like that. That will be enough. Alright, I will use
this as a guitar. Let's go to the top and let's rotate this a
little bit like that. Hit key and just
move this over here. Align this with the, with the site, the
rotation or the angle. Alright. Now let's take some
COBie security and let's make some copies here. Hit Shift R after you make the first Coby has kept out to repeat that
again and again, until you reach this distance
and this will be enough. Alright, now, grab
those together and then hit Control J to make them one piece and move this, these catheters down
here and grab them hold. Skeptical of this geometry
hit Control Shift V and tools difference with the brush so we can control them and move them. So grab this, these
Katara is and move them up a little bit to
get a result like that. Something like this. Maybe this result
looks cool. I guess. We can count on this or maybe we can move this
inside a little bit. Yeah, I know I will accept this was on that will
be enough for me. When it will be satisfied. It can throw a and
apply this geometry as image to get rid of the scatter
and so we can delete it. Alright, so now let's
work with a button. Let's see what we can do here. Because this one is low poly and we need to add a subdivision
surface to this one. We need to make a
lot of work here. All right, we need to make
some connection between this, between these vertices first. So let's start to elicit, grab this one had key
twice and markets. Make sure to activate
the auto marriage. And maybe we can grab this
point and make it right here. And what else? Alright, so here in this era we got a lot
of narrating here. We need to do that, a lot of work for you to do. You can use either method. We can go to the wireframe. We can treat us to face and
come up with these faces. Okay, grab all of these
phrases using these points. And this one as well and this face and hit XF
to delete them all. And now we just end
it with this shape. So now let's go
to the edge mode. Hit Alt click. The idea is
grab the entire edge loop. That's all what I
want to do here. Then hit E to the Z and
X through this down. Like that, something like this. And to make this straight line, just hit S to scale
this to the z-axis and then has zero
Enter and done. Alright, you don't
need to add a copier, don't fill this area. There is no reason to do that. All right, now let's see
what else we can do here. After that. Maybe we can grab these
acres, all of them. Let's go to the vertices and
see what we can do here. I want to grab the
entire edge loop and we want to
give it a default. So we'll see how can
we achieve that. Go to the face, this face
and keep hold control. And they kick these phases
until you reach the end here. And now I will go to select. And let's move this a
little bit right here. And then let's go
to the Select loop and choose boundary
to cap the boundary. Or you can crop the
boundary in a manual way. When you do that, you can
befall those can throw be eligible for them. Okay. But make sure of something because sometimes
if you do that, you will get some problem. As you can see here in this
era, bubble doesn't work. So I'm going to cancel it
because here we got some, something like Make sense. This edge, we don't need it. I will hit Control
X to delete it so we could make
some cleaning here. All right. Do we have any problem here? Seems like we don't. So I'm going to use
that control method. Right? So let's see, grab this edge, holding control until you
reach the fairest points. This one. Now done. Now let's try to build
those I can hit, can throw, be to the full-time. Right? Something like that. I guess. Well here in this area we have this edge annoying us, so
I'm going to delete it. Write this one as well. I will delete it. And what else? Try to avoid all of these edges. We don't want to repeat
that bevel again. Alright, What else? Actually, I can
grab these edges as well and delete them. Okay? Maybe those can cause some
problems for us. Alright? This part is annoying. I know that this is
the 3D modeling. Let's delete all of these acres. Alright, I think
now we're finished. Let's go to the face and let's
pick these faces quickly. Holding control. And now let's go to the select and choose lobe and
choose boundary. And let's give them another
bevel, it can throw be. Alright now before his
working without any problem, let's check the results. Alright, now let's see
what's going to happen if I add a subdivision
surface to this. So let's go to the modifier
Alice as subdivision surface. And let's right-click
and choose Shade Smooth. Alright, now, it's
looks cool. I guess. If you are like you
can tap and hit Control R to add
an H right here, but does not dunk to work. In this case, if you want to cut other and it goes like this, you can use the knife tool if you'll go to the front, e.g. you can now use the knife tool, hit K and make cut
goes like that. You can hit a to make their costs right and
see to cut through. Then left-click to omega cut and thorough Enter
to confirm that. Alright, so now we've
got an H right here. After that, when you
hit key twice to slide it, you can hit E. And alignments have
the alignment works on the orbits cited F to flip that alignment
and move this up. Something like this. And
let's see what we got so far. Do we need this edge right here? I will delete this one. And maybe delete this one. Because in some problem here. Yeah, now the result is cleaner. If you want to increase
this to two, That's okay. Always very nice. So I'm going
to use this as a button. So move this insight. I think it's fits. You can scale it and make it
smaller or if you prefer. That's okay. Let's see what we got so far. Everything looks cool. About to now is already and
looks very nice. And yeah. Now all what we need is
adding some bubble here to this one into this
whole mural right here. And that will be, it's alright, so that's
it for this video. And I will see you
in the next one.
14. Using bevel modefire on the nail nick and the release button: Hello again and welcome back. Let's add the vault
with the nail Nick and butter or less. Let's see, crop the plates. And you remember we have a boolean for the this
button and above all, sorry, a boolean for
the NIC, nail and Nick. I don't want those. I don't want to apply them. So let's put those yeah, Let's apply this one. It can throw light and light. Now it's applied. That's one was for
the nail neck. Now, if I move this one, I think yeah, that's not
going to affect anything. You can delete the cat
or without any problem, crop the plate and hit can throw light and
apply this one as well. Now if you move this one,
now you don't think this. So. Yeah, that's very cool.
Alright, What else? Now let's hits like to
isolate this and maybe now we can add these
edges to the bubble. So tab and let's go to the
edge and let's drop all of these edges
manually like that. And let's add those. All. What we need to do is we need
to go to the bottom here and give them mean
bevel weights. And it creates this to
one to see some bubble. If you didn't see and Bevel here that we need to
make some tweaking. This one as well. I'll grab all of these pages. Alright, something like that. And create this to
one right here. And this error, we need to make some tweaking, as you can see, this diagonal egg, the same scenario where
he talked about that. We need to give this small room. So I will grab this
one because this edge, because it's very close to
this one, to this edge. And that will delete
that hit Control x and maybe this one as well. I don t think that's here. This area I can
add some support. The age goes like
that as a support. Alright? So it can make cocktails like that if you
prefer or maybe like this. Let's all work as well. Let's go to the vertex and let's
see what we got so far. That's very cool. The
result looks good. What else? Let's check this site. Alright, we have a diagonal edge goes through this life that
we need to get rid of it. So in this case, I will
look up this vertex ID key twice and disliked it and make it there. That's
what would be better. Or maybe let's try
to smile right there because I can see that I have some very candid
bevel this area, not smell to this
area because of this. They are kind of this age. But if I move the
direction there, I will fix that variation. So let's make cuts, goes there from here. That's points and hit Enter. And you can delete this one. You don't think that anymore. That's will be better. Alright. Let's see this. This area as well. If we need to make
some cleaning, like grabbing this
vertex and market here, Keith wise and
marriage, this file right here, something like that. Okay. Alright, seems like we don't
have a lot of cleaning. Maybe grab this one and
move it and make it here. Grab this one in markets
with this vertex. And yeah, I think that's it. I guess. So now we have some default
here and this area, okay. If you want to the bevel
targeting those alone, you can add another copy of
this pitfall and you can target those using the
vertex scrub method. I will teach you
how you can do that in case you don't like
this salt of this bevel, if you want to give it more
believable, Let's save that. So yeah, let's Colby
this bevel modifier. Yes, it duplicate. You can
hit Shift D if you like. Now we haven't or Copy, close this one. We don't
need that anymore. Let's tab and let's see, grab the senior ages. Grab those. And after you select
all of these edges, a clean the bevel, the mean bevel weight
zero, this one. Okay, so now we don't have
any beveled weight here. That's mean this modifier
or i'th here is not affecting those
editing we made here. Okay, after that, now
let's select these edges. I can. Manual like that. And let's select those
over here as well. Okay? And we can fix these edges over
here, I guess. Okay? Now after we select
all of these edges, now you can go to the Object Data Properties and go to the vertex group and add those as a vertex group. Just hit this plus.
Now we have a group. So we need to assign
this new edges or vertices that we are
picked recently. Just say the sign. Now. They're assigned. Okay. I've told you assign those. Go back to the modifier and change the limit method
to vertex a group. When you do that, and
I would tell you, you should pick
the vertex group. So I will choose this new
group that I just added. And now this second
bevel is just targeting. This is aqueous. So now I can control it's
even more if I prefer. This, make this number smaller. Let's add here one. Let's
see what you will get. As you can see now I
can make them bigger. I can control that even more. Let's add 0.1, e.g. is what we will get here. This turn this off. Let's see. Alright, bevel, a
few mega number, big, old, got some
overlapping problem. Let's make this smaller.
It's zero or one. E.g. is hero e.g. five. Alright?
Alright, this amount of beveling looks cool, but I can't accept it
because as you can see here, we have some shading problem
here and there as well. If we if we can fix this, I will accept this amount. If I can't, I will make this
amount here very small. So let's see how can
we fix this area. Okay. Alright, I think
we can't do that because we got a lot of
acres here and this area. Let's turn this off
and let's see what we, what we got here. We have double edges here. Now we don't. Alright, let's change the number to
something small like 0.04. Lists like this one to
see why that seven. Alright, as you can see
by moving this edge, I can solve some issues here. Okay? But at the same time I can cause some EQ or the I will
accept that small amounts. E.g. 0.030, 0.02. Maybe you'd see
something like this. And maybe we can get rid of this air hit Control
X to dissolve. It's okay. And change the
direction of this age, maybe to the middle with K. Cat goes like that. I think
that's what would be better. That's really annoying. Let's move this vertex a
little bits and centered here. As you can see when
you move this, That's affect the
level of civil works. Alright, so what
about this area? Maybe we can slide this
a little bit until we kill the artifact here. Let's kick this area. We got some work here to do. I will hit key twice and
slide this one down. This one as well. To
give the bevel and more freedom to torque here. Let's go to this
side and let's see, do we have any problem here? Alright, seems like we
don't have a problem here. On this area. We got some weird
goes like that. Create artifact here. Maybe we can add an
a. It goes like this. Maybe this will help
to fix that problem. A little bit. All right, everything looks cool and clean. Let's tap out. Alright. Maybe we can add H
right here just to kill some artifact here
in this area, hit K. Alright, I think that's
cozy and your problem here, so I will ignore it,
can throw this here. Let's see what's
going to happen if I waited normal to
fix the problem. There's not going to help. So I will delete it. I will accept that I got here this diagonal egg,
maybe I can delete it. Okay? I know that we got some
problem here, hitting problem, but it's not so it's not huge. We can ignore it. So, yeah, I will
accept this result. Alright, now after
you do all of that, now you have the ability
to apply the devil. Because actually you
don't need it anymore. Thus, all world what
we need to do here. So I will apply the first one, hit Control a and apply the second one and
accept the results. And yeah. Okay. So that's it for this video
and see you in the next one.
15. Creating the blade and mirror the nail nick: Hello again and welcome back. This time let's create a plate. And it will be something
easy to create. Let's go to the top of view
and let's go to wireframe. And let's start with plane. Maybe we can sell the plane. But before I add the plan, I just want to do
something here. I will tap and grab this
face and this face. And I will put the 3D cursor
between these two phases. So I will hit Shift S
and corso to select it, and it will be in
the middle exactly. Pop out. And now let's create a
plane. Now we got it. I added the 3D cursor
in the middle because this should be in the middle,
exactly in the middle. I just want to make it
a life easier for me. Let's tap to the
edit mode and go to the vertex at number
one from the keyboard. And now we can start by
moving these vertices. Let's put those
inside and outside. Okay? Maybe we can move
those right here and those key and this
move those over here. Alright, something like this. Let's see, Club those
and let's move them. And they perspective. You can determine that it can move this inside
almost right here. And you can use the knife to let K and make cuts goes like that. Hit Enter and delete this
face XF to delete it. Alright, so this
is the first step. After that. I will give this
a thickness using a solid. If I go to the modifier, modifier properties and then
open the list over there modifiers, Alice,
other solidify. As you can see, solidify works from one side, work just to one side. As you can see here. I want the swirlify work
from the middle out. For the both directions. I can darken. To do that, I should zero out the opposite just as
zero and then hit Enter. Now, the thickness will
work for the post side. We want to add maybe 0.1. Alright, so maybe
we can have 0.3. Alright, 0.3 looks
cool. I guess. Yeah, it looks cool. Right after that. Let's tab. I just wanted to make
some tweaking here. I just want to move these
two vertices a little bit away from the plate holder. So key to the y. Move those to the y a little bit and just keep some space here. All right, now, we're already, I will apply the salt defy
that sets for the solid phi. And I will hit, can throw our after I switch to edit mode, tap it can throw out. Let's add maybe right here because the top to see
where should we put it? Yeah, exactly why there. And now I will add one H
here in the middle as well. And smirk these vertices
through this age and the middle activates vertex
or you don't need to digest, activate automatic key
twice and club is here. And you can go to
the local mode, hit slide from the bad. And the crowd is
vertex twice in. Take this here and
this one as well. The same thing for this
one, G twice. Sorry. And now you can delete this
AQ, don't need it anymore. Control X and solve it. Alright, let's tap out and
see what we got so far. We got this sharp result end. That's it for the blade. Actually. You can
do anything else. Alright, one more thing here. We just, I guess forget
to do the nail neck. We got right here. I noticed that we have another one on the other side and
we need to do this. So let's see how can we do that. Let's grab this and
let's go to the top and go to data. Go to wireframe. As you can see, we have the same topology
for the both side. So in this case, I will hit C to
open the selection, select and switch to face. Or before you do that, just hit the three and
then go to selection. It's C. And the Start select
these polygons and the wireframe mode. So let's select all of these
polygons. Just be careful. Like candy, grab those as well. Those are here. Make sure not to leave
any polygon or any phase. So yeah, I think those face, I think I picked all lens
surfaces for the both sides. And D, deselect this big giant faces here
and then we're done. We don't need them. As you can see now we
selected these phases. Alright, after that,
after doing that, I guess hit P and then as two
separate this, these faces. And now I will tap to edit mode. I'm sorry, I select
the senior geometry and I will delete this half. I don't want it hit XF
and keep that half. Alright, because we still have the origin.in the
middle I'm going to use mirror modifier to mirror
this on the other side. But we can see that we
have some American because the marriage a threshold
here is very high. So I'm going to keep this 2.1. Okay? Right, That's very
cool. Alright, let's see how the results.
Alright, cool. Now I will apply them here. I'm with the fire and
now I all Americans this bike with the plate holder, add them together and then hit Control J to marriage them. Now they become one piece, but the vertices
still not married. In this case, I will tap it a order you don't
need to add a guess. Go to the top view and
just select this area. Because we worked
here in this area, you can de-select some
faces if you prefer. After you select this
area, just hit em. Alright. Did we bevel these edges without
being old stuff? That's weird. It
seems like we bevel these edges as well.
For this mistake. You can, you can ignore it. It's not a huge
mistake because this face almost flat or you can clean it if you tap to the View tab out as you can see, still a smooth, we can
see some silhouette here. If you want to clean it, you
could go to the edge and pick those one by one and
try to delete some edges. But that will take a lot
of time actually do that. Okay, So yeah, let's try
to clean some of them. I tried to make the
results better. That's not going to work.
So manually, let's see, grab some aqueous and dissolve them that will
help a little bit. To clean the make the
results clean are listed. And it seems like we could
do that for the other side, but I have a faster way. I can crop one face from
here and one face from here. I hit Control L to link select, to select those back. And then you can hit P to separate them to open
the sprite menu and then hit S to pick the first selection to separate the silicon
or the selected faces. And you can do this
same scenario. We can delete this half tab. You can pick whatever
face or vertex or edge and then hit Control
L to activate the link, select and delete all of these phases at XF
to delete them. All right, Before you mirror
or this one, if you can. Who can explain this further? That will be cool. So let's see if we can do that. Alright, needs a lot of folks. Because I'm recording,
I don't want to spend too much time here. I will leave it
like this because silicon, I will accept that. Now I will mirror this
on the other side, the same thing and
use the z-axis. And let's add here 0.1 or is use a number to avoid any merging and hit
Control a to apply it. Now we'll grab this new
geometry and blade holder it Control J to make them
one piece and tap. Now let's just hits a, sorry. To select all of these vertices. You can grab them
all you can't or you can just smaller group
of these vertices. Alright, so these vertices, almost all the vertices
that we want to marriage. So I will hit M anomeric
by distance and make it, or keep the number
here very, very low. So as you can see here, almost all the
vertices are married. And now this geometry is already a step out and
let's see the heading. The heading looks cool. But let's delete this edge. Maybe this edge causing
some heating problem. Alright? Maybe this one as well. Maybe we can fix something here. This America, these vertices get wise handless marriage
that was over here. And maybe we can make
those over there. Okay. The result looks cool. And yeah, alright, now we
just finished with the plate, and that's it for this video
and see you in the next one.
16. Adding holes for the pivot circle: Hello everyone and
welcome back. Here. On this circle we should
add the three holes. Alright, so as you can see
here, we have three holds. The suffering that reference
MH back here and just put this file right here is go to the top view and go
to the wireframe. As you can see,
these are the holes. So let's see how
can we create them? Can we start with the cylinder? I will hit Shift a
and go to the Mesh. Second nature the cylinder. And I'm going to
reduce to 40 vertices. Or maybe therapy. And I will just scale this
down and make it small and let's compare the size. All right, now that
size looks cool. Something like this. And according to
the reference MH, it should be above
this line here. So let's move this a
little bit right here. Okay, Somebody like this
and just move this up. And I think it is a big thing. We need to make it even smaller, as you can see here, it's small. So let's put that
in consideration. Let's make this smaller,
something like this. And we can move it right here, some clay that hands Kayla to the z-axis so we can
have some depth. Now, let's, looks
cool. This result. Okay, so now we
have the first one. I've tried that Let's
duplicate these cylinders. Let's go to the top view. And I want to work
according to the 3D cursor, but I want to put the 3D cursor
in the correct position. I will select the circle, and I will pick one
of these edges. As you go to the agent would
pick one of these acres, just pick a circle and then hit Shift S and then bringing the 3D cursor in the
middle of that circle. And that's it. I just created a new pivots to these cylinders. Alright, after that,
I will duplicate these cylinders according
to the position of the 3D cursor to a cave that I should change that transform
pivot point to 3D cursor. And then hit Shift D to take a Coby and then hits
are after that, hold control and rotate
this to 120 degree. And then just hit Shift
R to have another Coby. There we go. Now we got those mirror
modifier still exist here. But before we apply
that and cut this area, Let's bevel these edges. So let's tap it and mode
for this geometry and let's pick all of these acres. And before I do that,
I guess going to take a copy of this geometry
just in case I will keep it right here
under the extra file here. So I will hit Shift D to
the cocoa bean and then it's m and move to the extra. So now we have the
same object here. You can hide the folder itself. I'm always do that. In case I want to go back
and use the ordinal one, I can't read it very easily. So this tab now, and let's grab these edges
and those over here. And let's give them a bubble. Or maybe before I do that, before I do that, I just
wanted to kick this area. I don't know of this. We have a sharp
angle here or brown. Let's try to find. I think it is difficult
to determine that, but I think this area
is round, not sharp. That's been I can't grab these edges and those over here and the
vole them hit Control V. And let's add some
edges right here to make this round like that,
something like this. And now let's start over
and let's pick this. And I guess the same thing
for this edge right here. Alright, I think we need to grab this edge
and it can throw, be ambivalent just to
two edges like this. Even this one, it
can throw the end the velocity two
edges like that. And now I will start
picking these edges again. Or maybe this one as well, control being developed to two. Okay? So it seems like we need to do that for all of these edges. Cut up this, yeah,
this one and this one, I hit Control V to the
field m2 edges like that. Just a little bit
of chamfer in here. I did. And now let's start over. Let's pick all of
these edges again. And let's give them very
small amount of beveling. Okay. Hey, this one and
this one as well. After that, it can throw
me to befall them. Elizabeth will those and add three acres and make the buffalo amongst very subtle,
very, very subtle. Now we got something cool here. Alright, so now I will pick this one and
bevel it as well. And maybe we can add four H's here and
make this smoother. Okay? When you do that and when you
combine all of these stuff, now you can use this as a
Katara to cover this area. I will hit right-click to make
this smooth shade smooth. And I was become smooth. After that, I will
add the weight normal to make this better. As you can see, I
added this modifier, but it tells me you should activate the auto smooth
to get better result. So go to the object
data properties and then go to the auto
smooth end, activated. As you can see here we
had before and after. Now, it looks cool. Alright, now, let's
use those as a Katara. I will occur with the first one and the second and
the third and hit Control J to make
them one piece. And now I will hit Shift and
grab the targets and hit Control Shift B to open the Bowl Tool menu and
choose difference. Now we got this results. Right-click k, the smooth. And let's activate auto smooth
again because we lost it. Here sometime when you
make some cut operation, you will find enter under the geometry data here we have clearer costume
split normal data, clear the old data or the
normal data and the start over. Okay? I will, by the way, when I use the first option, I lost the modifier. So if you want to, if you don't want to lose it, you can hit control the
travel time and you can use the second option. So I will grab those, hit Control Shift B, and I will choose this option. I did that so I can benefits
from the mirror modifier. Now if I move this one
above them, you're, what's happening is now we have the Boolean effect and then mirror and then
wait to normal. So now we've got the same
effect on the other side. Okay, now, let's see what
else we can do here. Alright, weighted normal
now is not going to work because I just have 11h here. And this area, I
need two bullets. I have an H right here. I want to be valid if
I double this age, weighted normal will work. Okay? So after that I will apply
the Boolean effects. So now I got this
for the both sides. And I will tap and sit, grab this and delete
the character. You don't need it anymore. Now just say grab this
geometry and tab. And now we just need
to be these holes. So select all of these
holds like that. All of these selected then go to the Select ensured select
Loop Ventures boundary to select the outer edges and then just hit Control
V. And let's see, a bevel works here. Alright, It seems like
it doesn't work because we need to make some
cleaning here in this area. So I will cancel that. And now this time to
make some clean here. Let's open this menu right
here just to see the view. Reduce that number. Make it very subtle. And I was living start. Alright, here we have
very close vertices. I can grab them
and hit em ensures marriage by distance.
They are malnourished. And maybe we can make this F9 key twice
and merge it here. Something like this. Or actually we can delete
this edge if you want. Or you can change the direction. Maybe you can America
there and the club, this one and delete it. You have a lot of options. This one you can make
it e.g. right here. And this one, you can
merge it here, maybe. Let's see the side to
see what we got here. Do we have any problem? I think we don't have a problem here. Maybe this one I can make
it here and leave the rest. What about this circle and
see what we got over here? We have the same problem. Keith wise marriage,
this one here, this one here maybe. And you can make this
one right there, or if you prefer, that's okay. We argue this vertex key
twice and splits right here. And maybe this one
we can make it here. We have two vertices here
and get wise and budgets. As cool. Now let's go to the
third one here. See what we have. The same thing. How do I get wise? And let's marry this one. This makes us more right here
and this one right there. And it seems like we
miss some problem here. Let's try to use
another technique. I will grab those
together and they'll pair frame mode and I will let them introduce married by
distance to make them here. And this market, the small right there and those silver here. This one with this one here, this one with this one. Now after you do all of that, now you can pick
this face again, because these phases
have a different smooth. I can use the chef team
thought if you hit Shift key will open
the select similar. You can find it right here and
there are the Select menu. Here we have the selection
or you can choose flat smooth to pick these new holes. And let's isolate this geometry. I just want to make
sure that I didn't select anything
else accidentally. And I just forget to kick
these holes on this side. But it seems like we don't
have a wicked problem here. Alright, yeah. Now let's try to
fill those again. Let's go to Select
and cause boundary. And alright, so we have
another problem here. I seems like here we
have doublet vertices. I didn't notice that, so I will mark those. Alright, now everything is okay. I can have the key and
curious flats smooth. And then go to Select
and then go to boundary. And now let's bevel
those again it can be. And make the bevel Ahmad
subtle, not too much. Let's tap out and let's
see what we got so far. We don't have problem there. Let's go from this side. We've got some shading
problem and that's happened maybe because this
age we didn't bevel it. I can select the anchor points. I hit Control P to bevel
it to three edges, maybe. Something like this. Alright? If you have a
shading issue on this side, it's not a big, big deal. You can ignore it by
moving some edges. Maybe that's what
help a little bit to fix something here. Alright, I can ignore it. I have some ways to fix those, but I don't want to spend time
on something not visible. Or at least see what
else we have here.
17. Creating the lock button hole: Hello everyone,
Welcome back here. Let's see, create
the lock button. Go to the Tobii few and
easy to go to wireframe. I just wanted to see
what I have here. Alright, so if I follow
the reference and make, I'm not going to get
correct results. Parts, list or the
cylinder Alice, how can we control the
3D cursor is right here. Maybe I can move it
and put it right here. Just hold Shift and right-click
and move the mouse. And now we have the 3D
cursor right there. Hit Shift a to open the menu
and go to the mesh section. And let's add the cylinder. Now we have a
cylinder right here. You can manipulate the radius
and the depth if you wants. And for the vertices, maybe we can start
with a 1010 vertices. And I got the result like that's okay until now
we just add this. Before we go any further, I just want to put the whole utility knife
and a new collection. I will grab all the details and I will hit em and create a new collection
for this one I call, I will call it utility. Okay, and hit Enter twice
to put all of these inside. Why collection? Just
to organize it. And after that, I want to
make trim here and this area. Before I do that, I want to take a copy of this geometry in case I want to go back
for any reason. So I will hit Shift D
to take a copy and hit right-click to move it
back to the same place. And then I will hit M to open the menu for the collection, and I will move this
to the extra. Okay. I've turned that
now I can start, but before I do anything, let's go to the top
of your hand and let's reposition this button. Maybe we should scale
it a little bit and move it like that. Maybe something like this. The result is close. So for me I will accept this. I will hit S to the z, scale it like this. Maybe I can take a
copy in case I want this Coby to create
the button itself. So I guess I'm going
to put a copyright here because I scale this, I will apply the scale link is scaling sometime
making some problem, causing some problems. So, alright, let's
start from here. I will use this as a
cutter to cut this. I will turn off subdivision
surface for now. This fault here of the club, this geometry hit Control
Shift B to open the Bowl Tool. And let's choose the France. Now we have a hole
here and this area. Alright, let's see what
else we can do here. Should we accept this or we
could do something else? I've talked to still
have the ability to move the new cuts or
wherever you want. I will accept this results. Okay, now I need to apply this. You have a new modifier added automatically
for the Bowl Tool. I will hit Control a to apply it and delete the character. You don't need it anymore. That sets. Now let's select
this geometry and let's go to the local mode. Because here we
have a lot of work. Let's tabulate it is mode. And now we need to make some reconnection here and there to make this makes sense. Because now if you tap out to activate a
subdivision surface, as you can see, as you
can, There's nothing here. It's not make sense at all. So that's not going to work. So we need to make
some reconnection. They start with this vertex. We can connect it
there by moving this vertex after you
switch to vertex mode, gateways activate or the
turmeric. Don't forget it. Okay, hey key twice, and let's move this bar here. So for this one, this one, we've
finished with this one. What about this one here? We can connect it
there with this, with this, it's ek. Now we have the
quad here, quads, a polygon with four vertices. Okay? What about this one? I will drop this with this
head k Omega connection. Right? I have a triangle here. I know that, but
that's not done. It's not a huge problem
because this face is a flats. So don't worry about
that too much. This edge right here, I can connect it
with this one at j. And you can delete this one. It can throw likes
and delete it. Alright, This vertex, you can
merge it with this vertex. And this vertex you can make
it with this one as well, it k. And you can
delete this and this. It can throw legs
and dissolve them. Alright, What else here we have. We have this vertex Keith
wise and merge it here. We have doublet vertices key
twice N rejects this one, marriage it here as well. Alright, so what
else we could do? Hit K to activate and I've
told my cat goes there. And now we can delete
those security. We don't need them anymore. This vertex, we can make it with this one and this one
with that vertex j. Now we can say that we are
finished with this side. After that, we can go
to the other side. Alright, let's go
to the other side. So this vertex with this one, we can merge them
and delete this one. Hit Control X to dissolve. It's this one with
this one hit J. This vertex maybe with, with that vertex at
k. This one sheet, why is saying move it here. This one with this one at j, this one with this vertex. And this vertex there, we can break it there. This one with this one. I guess. Yeah, Would this one had J? This egg? We don't need that anymore. I mean, this one can delete it. Now I will connect this
with this, it Jay. And connect this vertex k twice. Make it here. And this would, this may be a j. Alright, so what about
what we should do here? Do we need those? I think we
don't give them, I guess. And temporarily maybe
I can delete this one, Kimberly or I will
leave it. Alright. I just wanted to check
what's going to happen if I bevel this it control V. Bevel works correctly. Now I will grab this, these edges or this side and go back to the Alt
Shift to add the edge loop. And now I will hit Control
V to the vote them. So let's purple them to maybe four H's here if you prefer. Make it smooth a little
bit, not too much. And now we got this. Very cool. All right, let's see
what else we could do. Let's activate the subdivision surface and you see the result. The result is very nice. I will hit, after I select
the geometry, I will, Let's right-click and choose Shade Smooth to
make this smooth. Okay? That's very nice. Cool. Alright, so here we have some pinching
here happen. Let's go to the top. And this year, if we
can solve this area, little bits by removing
some vertices around it. Let's move this a
little bit like that. Maybe we can grab them
all like this and move them something like this. Okay, the C13 cards
and the perspective. Alright, it looks cool. On this side we have
the same problem. So we can go to the
top view on and make some tweaking to these vertices to
maintain the roundness. We can move those a little bit. You can put your eyes on this. Alright, this silhouette here. See what's going on.
Everything looks cool. I guess we can move those away just a tiny bit, not too much. Alright, so I don't want
this tube to look so tight. Alright,
That's very cool. Let's tap out. And now I can accept this. It looks cool. Alright. To be honest
with you, not so much. So let's try to find some way to let's create a guide
hit Shift E to the Z. And let's take this
guy up at S2 disease. You're Enter to make this flat and hit P and then
estrus or practice. Now let's see, grab
it and let's grab these vertices and delete those and delete those,
not all of them. I guess. I will keep this one
in the middle and grab it, right-click and choose circle. Go to the top. And I will use this as a guide. Okay, now we have the guides. Let's select this geometry and let's tap so
it's more than Lucy. How can we maintain
the roundness? Let's go to the vertex. Alright, so all what
I want to do here, I just want to align this circle with the roundness of the hall with a
circle that I added. Maybe we can start from here by moving some vertices around. Before I do that, I just want
to see the distance between the circle and the hole here. We need to keep this distance. So if you go right here, you can see the distance
now become big. Alright, so that's me. We could move those
little bits like this, and we can grab those
over here and move those a little bit like that. Grab those over here. And by the way, you can create the smoothness of the
circle, make it very smooth. Now let's pick up those key and let's move this a
little bit like this. Let's see what we
got on this side. Okay. Something like this. And for the other side, don't worry about it too
much because it's hidden. There is no reason
to spend a lot of time trying to fix
the other side. Just care about the area, the visible area to the camera. Okay. What about
those over here? Maybe we can move
them a little bits. And the yeah, I think we just need to move
those tiny bit like this. And let's see what
we got so far. Alright, now the
circle looks better. And for this side, as I said, I will ignore it. So now we've got
something called here. Well, that's very nice. And after completing this, now we need to create the
screws that we have here. This holds as well, but not in this video. And the next one. So that's it for this video
and see you next time.
18. Creating the screws holes: Hello again, we'll come
back and reference image. We have two holes here. Let's start create them. Listen like this. And let's go to the top of view tab through the edit mode. I'm sorry, you don't need
to type it in the most. Sorry. Let's put the 3D
cursor right here. Hold, Shift, hold, right-click, and let's move this over here. I forget to activate
this Screencast, this activated fan,
this small bits here. And let's close this panel. Let's move to 3D cursor
a little bit right here, and then where's the screencast? Oh my God, that's weird. Okay, come on here and you go. Alright, now, now
let's add a cylinder. It you have to add, Let's
add this in the right here with, with ten, right? This is actually
almost not quite sure. Maybe that's too much. All right? Ten vertices. All right, I think
that's too much. Maybe we can reduce this to
to six, something like this. So I will delete this. Hit D again. Let's add another cylinder
and let's change this to what about aids? Yeah, we can start with aids this year
is going to happen. All right. So we still had
a subdivision surface. I will turn this off Timberlake and I will hit S
to the z to make this tall. And then hold Shift, grab the geometry,
hit Control Shift V. And let's choose
difference with price. Now we have the modifier
added automatically. And let's tap. I just wanted to see where
this exactly applied. Well, we can make some tweaking here before we
accept the result. If you go to the top view, I want to rotate this and align, align these vertices, this
one or this one with a line. So grab the cylinder and the wireframe mode
to crop it like that. And that's our this rotators. Something like that. Maybe
we can move it a little bit and align it like this with
a little bit of rotation. It can move it again right here. All right, We just need to
rotate it a little bit more. And that's will be enough. Right after that, we need to add another cylinder right here. So the Edit mode, when you grab the whole
vertices of the Qatar hit hefty and take another
copyright they are to make other cuts this area. And the same scenario, just scrub this and rotate it
and align it with the edge. And let's move this a
little bit right here. There we go. Now if you go to the
perspective tab out, now as you can see, we have two holds here. One, you'll be satisfied
with the result. Apply the, apply the the
ball, the Boolean modifier. And now it's the time to
make some tweaking here. I will select this geometry and hide it like this and tab. And here we have
some work to do. Alright, let's start
creating some, adding some edges
here to support this. E.g. we can start with this one, merging this with this hit gay. And here we have some
marriages as well. Very thing with this,
with this vertex key twice and slides. And this one as well. Gee, and key and slide the
same marriages rights. What else? We can hit Control R to
add one H right here. Something like this. And we can club this with J. And another H right here in
this area may be an MC cuts. We can connect them like that. The same thing here. Maybe we can add one H right here and connect those together. Maybe this one with that one, and this one with
this one, it K. And actually to be honest, I think we can mark this there. All right, what
else we could do? Alright, cool. For this area. What about this? Let's select this with
this hit J married, UM, this with where we
could move those. I will use and I've told
to omega cuts and maybe we can make a cut
goes like this. Timperley come up with
this, with this a, j, this with this. Vertex hit J, this
one with this one, it j and k to activate. And I've told I make
cut goes right there. Alright. Now let's go to the edge to grab all of these acres so
we can give them a bubble, but not right now let's
finish this area as well. The silicon, these vertices e.g. and make a connection
between them. Hit J, it can throw an hour
to add one H right here. Can throw off to add
one a try there. And let's make some
connection between them. Okay? That's very cool. And here we have
very close vertices. Let's merge them together. And the same thing here, Keith wise and merge them. Let's go to this side.
Let's do the same thing. Grab those marriage within those here at k. This
one with this one. This one, this is j. This vertex with
the word alright. Hit K to activate. And I've told them
maybe we can make it there and delete this edge. That's what will work as well. Let's see, grab this side and this side and
the swivel them together so it can throw
the Too Good To Go them. Nice bubble with three H's. That's what we'll be. Okay, make it small. And let's see, Club
this side now, grab them like that
and hold Shift to add new edges using the
control methods to add this. And now let's give them a specific level similar to
the pivot that we have here. We have a little
bit of roundness. So let's add four edges here to make this
tight and sharp. And now we got something. Alice activate
subdivision surface. Now I got this result, but I have something happening
here and here as well. Alright, let's see
what's, you know, we can use to get rid
of this pinching here. Okay? By grabbing some
vertices and merge them, maybe that will help to get
rid of some venturing here. The same thing for this
area and grab those key twice and those vertices
together like this. But that's still not perfect. In this case. What we can do is either way, let's hit right-click here at this moment to make this smooth. We can grab this circle. I have d to the z, they are Coby, and then it's
P as two, separate it out, grab this tab again, hit a to select
everything and then to the Z and hit zero Enter
to make this flats. And now go through the vertices and delete these vertices. I can relax and
increase the number of the smoothness for this
one to make it smooth. Now, when you go to the top, I can use this as
a guide for me. Now let's tab and smooth some
vertices a little bit less. Yours can happen. Alright, if that doesn't give
us what we need, Let's try something else. Let's try to delete these edges and let's see what's
going to happen. Because of this egg is we have
this pinching having here. So let's go to the edge at number two
and let's select those, dissolve them in those as well. Let's go to the other
side as well here and grab those and
dissolve them. Top outs. Now we got something but we lost the sharp
edges right here. And this area, I will turn
off subdivision surface. And let's see what scenario I
can use to make this sharp. Alright, in this case, we can add extra
acres to the circle. When you do that. This method can
help a little bit. So now what I will do is I
will go to the face mode, hit Alt, click here to grab
the entire face loop here. It can throw up last
couple of times until you reach this point, this phase. And the same thing for
the other side, I guess. Alright, now let's hit Control Z to go back and manually I will, I will add those using
the Alt Shift and click, sorry, I'll have to click here. That's not going to work. I will add those
manually holding Shift and keep clicking this. Alright, after you
add all of those, now hit Alt H, sorry, hit Shift H to
isolate this phase. Because here I want
to add something. Let's add some edges here. Alright, so to do this, to add edges in the middle. For each phase, I can
pick these edges. I can hit Control
Alt and pick those. And to add another egg is here. Hold Shift and keep clicking here until you add
all of these edges. Like that. After
that just hurts, right-click and your sub-divide. Okay? And you can add two
here, or if you like. After that, you can grab these. Alright? So we missed
these, these edges here. It seems like we
have some vertices. Yeah, we have extra
vertices right here closing some problem just for
this side and this side. Alright, in this case, I will connect those manually using the knife tool
hit K and let's make cuts, goes like that. And the same thing here. And here as well. Here. I thought that's confirmed with these cuts for
this to this area, Do we have any problem? Seems like we don't
have any problem here. Let's go to the face
mode and let's select these edges that we added. And let's add those. And those here. That's very cool. Now let's go to the top and
I'll all what I want to do is I want to scale those
out from the center out. But when you scale these, just be careful,
don't use the z-axis. Now if your scale,
those as you can see, because the scaling working to the old Archean
and the z as well. You will have, this will go
up and we don't need that. But if you hit S
and cancel the g, you can scale them and
get better results. To cancel axis unit
to hit Shift Z. I mean, if you want
to cancel the Z-axis, just hit Shift,
Shift Y to cancel Y, Shift X to cancel the x. Now let's go to the
top here and hit S to scale and then hit Shift Z or Z. And let's kill
this a little bit. Let's bring back
the roundness of this shape. Something like that. All right, now let's see
what's going to happen if I hit Alt, if I hit Alt H to bring
back the other pieces. So now we got this result and we have a lot of vertices not
connected to anything. But let's give this a try. I will bring those back,
connect them, e.g. hit K and maybe we can
connect those over here. Let's see what's going
to happen if we do that. I just wanted to test that. So let's connect this one right here and this one
as well right here. Alright? And this vertex, we
want to slide it a little bits inside
this one as well. The same thing for this side. Gateways and slide. This slide is vertex a little bit key twice and over that
a little bit right here. Now let's see what can happen if I activists subdivision surface. Alright, now the
result looks cool, but not so my circle,
why it's cool, because we have
some heading a hues here and the shape is not
so quiet route, I guess. I think we need to
tweak that even more. I, we have some techniques
here we can use. Alright, to achieve
better results. Let's turn of subdivision
surface for now. Alright, if we have
a problem like this, we can fix that
manually by moving these vertices and align those to guide what we have here. So this is an option
we have here. I think this one is
the best option, so let's try to do this. Let's move these vertices and align these vertices
with a guide, Hickey and smokeless a lens with a guide and grab
those vertices in G. And let's move this
way. And let's keep doing that until we
get a perfect circle. You do all of that.
Now, let's see what's going to happen if we activate subdivision
surface again. Alright, now result
looks better. All right, after that editing, the result looks very cool
parts here in this area, if you noticed, we have
some waviness happen here. That's happening
because of the scaling. We did the first time. To fix that. We just need to grab these in your vertices and move
them down a little bit. And that's it. So let's pick nice angled
like this and then it got up. Those practices are key to
the Z and move them down. And that's what they're worth. The heading looks
cool until now. And the result looks okay in case you want
to bring the heart, the heart shading
here in this area, you will need to
change the connection. If you prefer. You can use an app to learn, make new cuts goes like this. The CEO is going to happen. After that, you
can delete these. I just switched to edge mode. And the corrupt fame
and hit Control X. You can do the same thing here. Hit K, and this mic
cuts, it goes like this. And delete these edges. Alright, Very cool. All right, after finishing this hole here, Let's go to the spine and
let's do the same thing. Select this and turn off
subdivision surface. We don't need it for now. Alright, I've heard that I
want to add aqueous here, so I'm going to select
these faces, all of them. And I will add these
phrases as well. The group. Alright. After that I will
hit Control plus two times to go to the selection. Then I will hit Shift H
to isolate this alone. Okay, now, I will
hit Control R and R, two edges for each side. Here and here as well. Alright, in this case, I need to delete these edges. Timberlake hit Control
X to dissolve them. Let's add two H's here. And here, Oswald
Control R. And here. And even here. Let's delete those edges here. Control R and let's
add two H's here. Use the knife tool
to extend this edge. And the same thing here. Okay? What about this side
of the same scenario? And this one? Alright? After adding all of
these edges first go to the Face Selection Mode and
start selecting these faces. After that. Let's kill those to
get around shape. Let's go to the top
and then hit S. But when you scale this, keeping a reminder to
disable the z-axis, when you hit Shift Z,
you will disable it. So hit S to scale to t2, cancel the x axis, and try to make this round and
nice, something like this. Okay? Maybe these vertices as well, I can manipulate
them a little bit. Okay? Now I got this shape. Let's hit Alt H to bring
back the other pieces. And here we got some
bulge, goes like that. We need to move these
vertices down a little bit. I will select these vertices
manually like this. And just pick a
nice Angola, Hey, key to the Z and move
those down a little bit. And now we got something. Alright, That's very cool. Now, let's use the knife
tool to make cuts. Goes there. The same thing for this side. It kay? Alright. We have X-ray EKG here. We don't have vertex
here, we don't need it. I can grab this with this had three legs to relax this one. Okay. That's it. I guess this tab out now, L is actually a
subdivision surfaces. See the final results. Yeah, it looks cool for nice. And here as well,
everything that looks cool. Head slash to excite and you can delete this
one, we don't need it. And yeah, I think that's
it for this video. I will see you at the next one.
19. Creating the lock button and the screws: Hello again. Welcome back. Let's see Korea, the
button and the sucrose. Let's start with a baton and maybe we can start with this, would this cylinder, or
maybe with this one. Let's see what we got here. Alright, maybe I can
start with this one. So I will tap and select
all of these vertices. And by the way, if
you delete this fuel, if you had a circle and
you would delete it, we can start over. You can add a cylinder
with 12 vertices, okay? And we can start from here. Okay? Let's zoom in here this
two or three cards. Alright, let's tap the
More than two phase. This phase just hit E to explore this a little bit
endoskeleton side and then hit I to make some
insects like that. Go to achy, grab
these two edges, hit Control V to befall them. Let's add three acres here. And this face, we don't need
it at x f to delete it. Alright, so before you do, before you delete that, I just want to make sure
of something here. Okay. He just wanted to see what we have exactly right here. Alright, let's take this
manually inside right here. And I guess we could
extend it a little bit, move it down, make it taller. And let's move it right
here temporarily. And let's see what
else we could do here. Let's try to find another image. I just want to want to
address number seven here. Yeah, I got it.
Should be like that. I'm going to draw two. It should be like this. Somebody like this, right? So I'm going to take this
face and move it up, make it shorter, and make
some inserts and extrusion. Let's do that
together. Let's hits like to isolate this e to the z. And let's move this
almost right here. And then I will hit I to
make some answers like that. And I want to extrude again. But if I, if I extrude this e.g. here, I want to
extrude this again to create something like this. And I want to make this the size of this new extrusion
similar to the sides. Alright, to make that perfect and to make this easier for us, I can grab these faces. I can delete this face first, hit x and then f to the liver, and then crop this
faces at e to the z, hold control and snap
those right here. That, but when you do that, the normal will be
flipped automatically. If you go to the face
orientation here. As you can see, these
phrases should be blue, so we need to flip them, just hit Alt and choose flip. And there we go. After that, you can merge them. Let's turn off
fairs orientation. Now let's go to the
vertices you can always write this is alright, hit em and then choose
marriage by distance. And now they are married. They are married
automatically because we activated auto
America recently. And now I can grab those, hit E and extrude those even
more and hit F to fill this. All what I need to
do now is just add some edges here to make
these corners tighter. Grab those, hit
Control V to make some bubble and make
the bevel very subtle. And let's see what can
happen if I activate subdivision surface or at subdivision surface with level to articulate here the smooth. And it is very cool. If you want to
make this tighter, you can add support
loop to this side. And this side to make the
heading better, entitled, I will hit tab to go to the edit mode and I will hit Control R to add
one H right here. And then I will hit
Control Shift Alt to duplicate this a to both sides, up and down. And by the way, you
can, you can be valid. This ad right here Control R and one year as well to
make this fair tighter. And here are the same
thing over here. Alright? Maybe one H right
here and one here. Alright, this area as well, you can add some supporting heel up right here
to make this tight. Okay, now, as you can see, the shading is very sharp
and that's what I want. The citizens likes to anxiety. And now let's make some tweaking tab and
go to the vertices. Go to wireframe
basic lab the side. And let's move those down a
little bit. So e to the z. Somebody like that. Somebody like this
may be very nice. Okay, Now let's create
this grows here. Let's see where's
our reference image? Not this one. This
one right here. Alright. We have the 3D cursor, I guess, the middle or not. Let's tab and let's
pick any edge. Right? Let's see, grab these
edges as you have the S and bring the 3D cursor
exactly in the middle. And let's add a cylinder here, a, and let's add the
cylinder right here. Okay, I will increase the
number of vertices to maybe 50. And I will start from here. Okay, so let's move
this a little bit. So maybe right here,
something like that. Maybe we can make this
a little bit smaller. It's like to isolate it top. And actually, Paul, what
we need to do here, just add beveling
here or Control B. Let's add two like that. And let's take all of these
areas as well and give them bevel, three acres. Somebody like this. And we want to create
this shape here. So let's see how can we do that. Hit Shift a to add
another cylinder. And let's add six vertices
here at the center. And then scale. Let's make it small like that. Maybe we can scale out a
little bit more like this. And then my control, I apply the scale
tab and hit Control R. Let's add some edges here. Alright, one by one. Alright, something like this. And now when you complete, grab all of these aqueous and
then hit S to scale them, and hit Shift Z to
cancel the z-axis. Three gets a shape like this. When you complete it, just
hit Control V to bevel this. And let's give them nice
amount of beveling. And now let's see,
grab the head. It can throw away to
the vault them as well. Alright, now we got this shape. Hold Shift, grab this. It can throw chefs, be enqueues the friends
with the price. And let's put this
deep a little bits. And now we got this shape. Very cool and easy. Alright? When you be
satisfied with the result, you can hit Control a and apply visual geometry to make
to accept the result. Now, grab this and deleted
so we don't need it anymore. Alright, after that, Let's
select this and isolated. I just wanted to
kick something here. Write it like hey, this mouth. And as you can see, the result is not cool. So I'm going to tap and the crop all of these edges
and keep them at before. So crop them one
by one like that. And then hit control
V to bubblegum. Let's add the three
or four of you like. Alright, because it looks cool, I don't have any problem. Let's grab this side as
well and this bubble, It's alright, Very
cool, Very nice. Cool. Now let's tap out and let's try to find the
solution to this shading. Fair thing. I will
delete this face. I don't want it hit XF. And then let's add weighted normal way that will
help us to fix the kidding. But as you can see, it tells you that you should activate the auto smooth here. So keep that in mind. Activate the auto smooth here. And now it's become very cool. Head slash to excite. And then let's go
to the top view. Hit Shift D to take a Coby. And let's move this
copyright here. Make sure to put this
exactly in the center. And now we got
something cool here. Very nice. I'm going to select those and just move
them up a little bit. That's will be better
and more beautiful. So I think that's
it for this video. And see you in the next one.
20. Adding new holes to the grip blade: Hello again and welcome back. This video I want to
focus on displayed. I want to add the hole right
here and one here as well. And I want to make
this as smooth ER, because if you check e.g. this area here, you can
see the edges a little bit jacket and not so quite small if I want to
make this motor, alright, To achieve that. So I will isolate it. And let's type the
ethmoid can hit Alt click to grab the entire
face loop like this. After we switched to
face and just hit right-click sub-divide to
sub-divide the spaces, and then go to the edge. Alt click to grab this entire edge loop and hit Control likes
to dissolve it. Now switch back to the face at number three from the
keyboard and then hit Alt click to select the
entire face loop again. And then heterocyclic endures, look tall, I don't end it
relaxed to relax this. Now it's relaxed and has
becomes more thorough. Okay, After that I will hit right-click and choose
here the smooth. And as you can see
this, it's ruined. The healing is not good. I will activate the auto smooth to bring back
the good hating. And now it's better. Now it's become smoothness sits like to excite
all the local mode. Let's make some cuts
starting from here. Go to the top, you
have the a and let's add a cylinder here. Alright, it is very big. Let's change this
to two millimeter. And here let's add two
millimeter as well for the depth and for the vertices, I think I will accept
this number of vertices. All what I want to do
is scale this a little bit and it adds to the Z and
make it taller like this. And let's move this a
little bit right here. People can make it
smaller and a little bit. And now we got this. After that, I will let you have the crop this or
before I do that, maybe I can take a copy
and boots right here. Can throw a I'll play
the scale first, go to the top, grab the sacral, Shift S, and then bring
the 3D cursor right here, this cylinder here
with D they could copy and then adhere to S and
Q selection to cursor, to move the cylinder to the
position of the 3D cursor. Now we have to, you can
carve them together. It can throw the CEJ, make
them one piece if you prefer. Now hold here if the crop, this control here to be. And let's choose difference
to make the cuts. And now we got it.
Right-click here the smoke again and
activate or this month. Alright. Record. Alright, after that, Let's
fill this area with something. So in this case, alright, we have
weighted normal here. I think now we can use the screws to make
some editing to them. So let's start doing that. Okay, Let's grab these edges. Ellis hit F to fill this, hit I to make some
answers like that. And let's hit E to extrude
this new phase we got. Because that's
almost right here. Alright, it's a little bit big. Let's move it down. Let's go to face Alt click to grab all these phases and
I'm going to scale them. But don't scale
them to the z-axis, hit S to scale and
cancel the z-axis, hit Shift C, and scale them
a little bit like that. Now I will take
this face up key to the z, almost right here. And after that, Let's bevel, these edges can throw be. Let's add the three if you like. Something. Cool. Okay, Now we are done here. I will delete this and
replace it with a new one. Select this list to bring
the 3D cursor over here, you have to ask ourselves is
selected and then delete it. Select this one here. If D take a copy right here, you have to ask selection
at the coarser and done. Alright, for this blade, maybe we can create our, sorry, we can add a bevel
to make the edges smooth. So I will select it and add
the bevel modifier here. Or it's, it's all right here. And let's change the amount
to maybe five millimeter, 1 mm, 0.1 or 0.05. Make it very subtle. If you want, you can add
two segments here and you can activate the harder normal
in the shading section. To make the shading better. It's like to isolate
it and let's see, let's check it in case we cannot solve the problem
for any reason. Alright, it looks cool. Alright. I will accept this result. And I think we can
reduce the amount of the volt 2.0 to maybe
make it very subtle. And Yara, Alright,
so that's very cool. Now I will replace
this with this one. Fair thing, Let's
hits, right? Sorry. Yeah, I just want to take a
cobia and replaced with this. But before I do that, let's make sure that I added all the unnecessary
Cats. Alright, e.g. here I need to add a hole
in this area as well. So I will crop the button, bringing the 3D cursor
off right here or hit Shift a to add another cylinder. Move the cylinder down to
this position and scale. Let's make it bigger
than this beam. Then hit S to scale it a little bit as to the Z, make a towel, right-click, make it as smooth, and then activate the auto
smooth for the Qatar. And there we go, hold Shift, grab the target, can
throw hair to be. And this time choose
difference here because I don't want
to lose them modifier. Because if you pick
the first option, you will lose all
the modifiers here. So it can throw shift B and then use the
friends from here. Now we should have a hole here in this area and
yeah, that's right. After that you can hit Control
a and apply the Boolean. Like bats, and everything
will be called. Delete the Katara, you don't
need it anymore and you can select to isolate
this to see the result. The result looks
promising and nice. Alright, That's very cool. I forget to activate
the screencasts rights. Is there anything
else we can do here? So bringing the reference image and I think that's
it for this one. Yeah. Alright, I have a shaft here. I want to add the
end of the knife. Alright, but I just
want to locate it. See what should I put it? Actually, we have two of them. One should be right
here and one there. It's almost right here,
something like this. Or let's say right here. And it is just a cylinder. So I think we can add
right now it's not going to take time
from us to do. And I guess we can
start with this, are bringing the 3D
cursor over here. Shift a and let's add
another cylinder. I will increase the number
of the vertices to 40, make it smoother
or a little bit, and scale it a little bit this year and
let's move this down, align it with a blade. You can go to the
any view front lift and tap to control these vertices just to move
them down a little bit. Key to the z. And let's move them down
and align them like that. Right. Now you can move it and put
it in the correct position. From the top view,
maybe we can deter, determine where should we
put this almost right here. Alright, that's
right, cool, I guess. Right-click Hey, this mortar and activate auto smooth
for this one. If you want to
make this thinner, hit S and cancel the z and scale up a little
bit to the x and y. Alright? What else
we could do here? Alright, this one,
I think we should, this should penetrate the plate
so it will be easy to do. I just come to adhere to
take a cobra right here. And then all three
of the crop that Qatar Control Shift B and
then choose difference. And after that, go to
the modifier and apply the Bowl Tool Boolean
modifier and delete this. We don't need that anymore. So now we have a whole scale it and cancel the z
to scale to make it, to make a thin a
little bit and then tap to grab these vertices up. Key to the z. And let's move this
up a little bit. Maybe we can scale it
a little bit more. At S, cancel the z
and the scale that back rights, That's right, Go right now is the time to take another Coby and
ports right here. So in this case, alright, How can we mirror this? It will be easy to do. I will select both of these
species and tap to edit mode. E.g. I. Can grab this face and this face and put the 3D
cursor in the middle. Of these phases, you have the S and cross or two selected. And now the 3D cursor, exactly in the middle. If you go to the side of you, is you can see it's
elemental tabs. Alright, now delete this, we don't need it anymore. Select the split half d. They are Coby and live
within assemblies. And now I want to
mirror it on this side, but I want to use the 3D
cursor as a Bigfoot points. In this case, you should go to the transform pivot point and industry that's to 3D cursor. And then it can throw em to activate the mural and then just hit z to determined the
axis, and then hit Enter. And there we go. Now it's done. It's exactly the
correct position. Alright, That's very cool. What about these pieces? We can do the same scenario. So I will grab those
and then hit Shift D, take a Coby Control M Z Enter. Now we got those exactly
the same material, but we could make some editing
here to cut this area. I told you before that this side right here is
not similar to this side. Okay. Because of that, I didn't add it above
all to this area. You're a member. So we need to add the salts. All right, let's see what
else we could do here. I think we have a
beam here as well. We need to add. So maybe we can
cope with this one, but after I make this
a little bit taller. So let's see, grab
these vertices, hit E to the Z, and let's
move those down right here. And yeah, let's go to the
top view and hit Shift D. And let's take a coping with
this Coby e.g. right here. I guess. According to these images, I think it's exactly
right here beside this. Right? And I don't know, but I think it's thick and
I make it thinner, I guess. But it's not a big issue of
we want to make it thicker. Alright, so let's start over. I will delete this and I will
scale this a little bit. Just hits this,
hit S to scale it. Cancel the z-axis. But just remember, now we are working according
to that 3D cursor. It's really this back
to bound the worst. Because if you don't feel
it as, as you can see, how scaling working according to the position
of the 3D cursor. So let's read this
back to bounding box. It STFT, make it thicker. And lists like this
with this tab. And let's select these circles. We just created both of them. And let's learn how to help. Can we scale those in
the same position? Hit S, and cancel the z-axis. And you can scale them. By bats. As you can see, it's
something easy to do. Let's see. Yeah, very cool. That's great. Alright, now I can take, can you Coby here, here if D, and let's put this in Jacobi
almost right here. Somebody like this, I guess. And maybe I can make it
taller a little bit. Sorry after you
duplicate it because I want to cut this area. So Shift D, take another copy, hit S to the Z, make
a tall like that. And now let's make a new trim. Select this one,
select the whole. You have to grab
this control here. If we choose a difference, apply the, apply the
Boolean modifier. The same Qatar hold, Shift, grab this side, can throw heaps, be curious difference, apply the Boolean and
then delete the caterer. We don't need it anymore. So now we got a
new hall and it's clean and tidy if you want to check it. Everything looks cool. All right, That's very cool. Alright, now we can see that
we have some details here and now that I've
become looks better. All right. I think I will end the
video here because I don't want to make
this video too long. And I will see you
in the next one. Goodbye.
21. Working on the other side of the grip and make it ready: Hello everyone. Welcome back. Here. Now is the time to add
halls on this side. Let's see how can we do that. I also liked this side and this side And it's
like to isolate them. And I will tap for each of
them and let's see how can we do something like this, right? So let's try to understand
what we have done here. Okay? We still have the 3D
cursor in the middle. That's something cool. I'm going to use it. And I will turn off
subdivision surface for now for each of them. Alright. Okay, to keep
something like this, what I'm going to do is I will
take some faces from here, take some faces, Coby,
some faces here. Starting with this one, just select these faces. Alt click to grab the entire
face loop here and maybe we can add those to the
group manually like this. And this one as well. It can throw a plus two
time to crop entire area and another plus to grow
the silicon right here. And I could do the same
thing for this side. So I will hit Control
Z couple of time. Okay, Let's do the same
thing for this side. Let's wrap this. All. You have to click Alt, you have to click to add those. And Alt click right here, sorry. Add those manually. Don't forget that.
Those over here. And let's say grow
the silicon together. And now we've got these
traits are selected. That's very cool. I will
hit Shift D to take a copy of those and leave
them in the same place. And then I will hit P
as two separate them. After that, I will
shrink this to a 3D cursor because I want to use a 3D cursor as
a billboard points. And then I will hit Control M to activate the mirror and then
just give it the axis is z. Then hit Enter. And now I get this new copies exactly
the correct place. After that, I will tap to select this and I will
delete these faces. It XF to deliver and
grab this face as well. And this one hit X to
delete them as well. To replace these rates with these new faces that we
are copied from the side. Alright, now is the time
to make some merging. I will drop this one
and this one hit Control K to make
them one piece. And let's start with a little
more to make some editing. Here we have some merging
we want to achieve. Alright? So manually activate or so lets readers to vertex snap key hold control and starts snapping these vertices after you activate
auto married here. And we could do, I think you could do that for all these vertices g old can throw on this
tab is right here. Okay? What about this one right here? Hold control and establish here. Alright, we can snap
this to anything here, but we will find some solution. You can isolate this one alone to make their
life easier for you. Writes, this slab is
vertex right here. And so let's hit Control R to add one H
here and the middle, and move it a little bit. And let's make this
one to this edge. And this one here, I think it's married or no. Alright, What else
we could do here? I will move this a little
bit and mercury right there, and this one as well. But before you do that,
just add one egg here. And we already do
this one right here. And that one here. Okay. Another can throw
out right here. See where this will go. Yeah. Okay, Call me like
this one here. And marriage this
vertex right here. One H right here. This vertex as well. Very cool thing that
we've finished here. Except for this site. Sick of this vertex
here and move it here. The smugglers together,
maybe we can use distance. And right here is the threshold
to 0.01. Alright, that's. I'm not going to work. Let's use two. Yeah,
now it's working. And this one here, mercury here. And right here, grab those. All of them by distance done. This vertex E and
radius right there. Alright? What else?
We have here? This same scenario. We will repeat this here. So it will be easy. You may already do
this over here. Had a support edge to this
area in this one right here. The same thing for this crop. Those all of them
married by distance. He enlists America. This one here can throw out
to add supports H here. Crop is vertex key
and I get there. This one. Marriage. Alright, what about this side? A little bit of editing and we will be, we'll finish this. Marriage and marriage. Support a globe here. Maybe we can add right key and merge this. Alright? I think now we are done. Alright, now Alyssa, bring
the reference images here and let's see what we should do. As you can see
here in this area. The shape, the open
area here is not, goes to this. To this end. It's reached this area, and we will have another
hole here. Okay? So we want to do
something like this. I'm not going to use
the reference image. So let's see how can we
do something like that? Alright, so that the
air could go like this. By the way. That's all what we could do. Something like this. Maybe we can move this vertex
and merge those together. This vertex, this vertex. And at a club right
here to support this new geometry that we
are about to add here. So, yeah, let's
start doing that. Hit Control R to add the
support H club here. And let's select
this face maybe. And that one. And I will hit
right-click and choose approach to break between them. Yeah, something like this. Okay. Alright, let's see if we put that all actually
not, that's not all. I will add one edge
right here and I will crop these faces and it right-click and
choose brick faces. And from the top view we
can make some editing here. Like moving these
vertices a little bit, slight them like that. And maybe slide those
in the wireframe mode. A little bit as well. Hold Alt case,
something like this. And maybe these vertices hit Key and maybe we can
move them a little bit. Right here, I guess. I'm not going to
slide them this time. I'm going to move them.
Something like this. I guess. After you do that, I will select this edge and
bivalent hit Control B. And maybe we can add four edges and make this
around this area around, hit Control X to this
egg to delete it. Now we have two vertices needed to be connected
to something. We will care about those later. But for now bliss to what whatever necessary
thing that we could do here. It can throw be to add maybe
three edges right here. And maybe here it
can throw be to add three edges to make this round. And here control V
to add three edges. Delete this edge, this edge. And now it's the time to make some connection and grab
those together, hit J. And on this side as well, delivers, grab this with this hit J to make some
connection between them. And what else? Let's delete this edge and
the club is with this hit J. Grab this, with this one, hit J to make connection
and delete this edge loop. Okay? What else? What about this area? Alright, for this area, the slide is a
little bit to twice, and this slide is so far here. Club this with this hits j. Can throw likes, crop
this with the set J. Same thing here. We could do something
to displace. Heat wise. Slide this over here. Alright, I think I can make
one of them, the scrub, jay. And let's see what can happen. The same thing here or
let's say crop e.g. this one and this one is j. And let's make
some editing here. I just want to move some
vertices around like this to get better topology. Let's move this one
as well, right here. Okay? Alright, that's looks promising. Crop this with this hit
J does make connection. It's better. And maybe we can slide
this a little bit. Like this. Summer cleaning. Alright, should we
do something else? Can we make this a, go around this geometry
and connect here? I think we can do that. Let's add one H right here
and delete part of this. And the club this
with this hit J to marriage them.
Something like this. And now you can crop
this with this one. Hit J key twice, and let's move this around. You can actually crop
those if you prefer. I can crop them and choose relaxed or
relaxers are coupled. Time to relax this even more. To get better roundness here. And I think, yeah, that's it. Now, let's bring back the other pieces
because I just want to see how much level I should
to create here or add here. It's very a little availing
here we could add, so it's not going
to be too much. So negatives tab, and I will
start picking these Hs, those over here as well. It's like to isolate it. And let's pick these as well. And this side here. And that will spell them. It can throw me. Let's give them a nice
amount of beveling. And now let's check the bevel in case we got any problem here. Oval here is not going
to go to this direction. That's not correct,
goes like that. But it's something easy to fix. Let's check that our area. Okay. Everything looks cool, I guess. And on this side we
have an a problem. By the way, we still have the ability to control
the bevel here. Right? 0.070, 0.08, I guess. Yeah, something like this. Top outs and now this
activist subdivision surface and let's check
that apology. Yeah. It's clean and nice. All right. Very cool. For these halls. I don't see any bad kidding. Everything looks cool. Even for this side. Let's activate
spheres orientation. I just want to see if
what if I have any Flip? Normal here? No, we don't. Okay. It's lead to
anxiety and cool. I will hide this image. I don't want to see it for now. And one thing I just
want to make in here, but it's activated a
subdivision surface. I think this whole as we
have here on these heats, these should match
the hole right here. The hole that I created
for this heats. By the way, you can ignore
that's not a big deal, okay? But it's not something
difficult to fix. It's very easy. I can Coby H from
here and I can use it as a cutter to cut both of these heats to have
something more beautiful. We can do that together. And I told you if
you don't like that, you can ignore it and you do a cube so many
beautiful layer. I will hit Shift D to D
C to crop this vertices. Alright, I picked those
vertices from here, and then I will hit P as two, separate them out,
grab this and apply the subdivision
surface and this tab. And let's see the smoothness. Very cool, very nice. If you, if you like, you can make it a space
even if you want. Or you can ignore that. As something up to
hit F to fill this, hit E to extrude
this up right here. And now we got a new
keto right-click here, this mortar and activate
auto smooth here, makes sure that this
catheter is not flipped. So I will turn off, sorry, turned on
first orientation. So the color is blue, That's me. That's something
cool and correct. Now, I will pick the Katara and these two heats and
hits like to isolate them. Okay. As you can see, we have an open area here. We need to hide it, so it will be somebody
raised to do, let's see, grab those
together are endless. Tattoo it more to
go to the top view and grab all of these vertices
and the scale them hit S, but cancel the z-axis
and scale them. Scaling working according
to the 3D cursor. I don't want that actually. It's really this back
to bounding box. Hit T and scale
them a little bit. And he can move them like that. I want this hole to be exactly in the middle so
I can delete it. Alright, That's lists. Top out. Alright? And I think we can
mark these two heats. Yeah, I think it will be
better to merge them. So I will grab those together, hit Control J and
make them one piece. So now they become
one piece hearing one bevel modifier
up. After that. I will scale this a
little bit smaller. I will exert all the local mode. I just want to make this a little bit smaller,
not too much. But let's put the
3D cursor, sorry, the origin.in the middle
of this Geometry, right-click and set
origin to use symmetry. Let's go to the top and see
where its origin daughter. Yeah, it's almost in the center. I will scale this
tiny bit like this. I just want to see some edges from here and here,
That's all what I want. And maybe we can move this
slightly bit here, right? Maybe we can scale it to make it a little bit. Not too much. Because somebody like
this, or maybe you noticed here we leave
some space here. Maybe we can do
something like this. Okay? And yeah, so I'm going to
use this as a Katara crop, this hole to help
pick up the heat, it slash to isolate them. So this has a voltage of the caliber target
Control Shift P and Q is difference with brush. And now we have the
Boolean modifier control I end up light done. That's it. Now you
can delete this one. Now we got something
very cool and nice. Alright. Yeah, very clean and beautiful. Alright. I just want to check
something in case I want to align this. I have some something here. Maybe I can move
some vertices and align them to hide this. It's not so quite necessarily, but let's see if we can do that. Just want to grab these
vertices and move those around a little
bit like this, maybe. I think that will be enough. Okay. Somebody like this? Yeah,
something like this. Looks cool. Alright, so I think
that's it for this video. Let's bring back
the other pieces. Yeah. Yeah, that's it. And see
you in the next one.
22. Creating the pocket clip: Hello again and welcome back. When I was working
for summaries in Blender crashed and
I lost all the work. And I rebuild all of these, all of these details. Again, and I reach this point. You might find some
differences here. A few compare the result of
the course with this result. So that's okay, that's happening because as I told
you, I lost the work. Okay, now we need to
create the bucket clip. It's something could be right? It should be right here. Holding this utility knife
to the bucket or to the, to the built lists of
bringing the reference image. I just wanted to see is
this one right here. Alright, and I have this image, I can use it as a reference and make it to start creating this. Think, alright, first thing, we need to create this
on this side here. So this side is the bottom side. I will switch to
the bottom view. It can throw seven,
and there we go. I have the 3D cursor over here. I will hit Shift a to add plane. The plane is very big. I will change this to two millimeter and
make it very small. And I will move it
temporally right here. It can't move it right here. Maybe we can scale
up a little bit. For now. I want to move this up a
little bit right here, above the shape or
above the 3D model. And move this here. And let's make some
comparison here. So this, this piece to start from this point and ends here, we have a small distance between this edge and the start
point of the clip. And the area here is
a little bit bigger. So let's try to to maintain that Laura described something similar
to what we have here. I will just kill this a
little bit and move it. Splits right here. Killed even more. So this size looks close to
what we have here. I can start with this. And for our aneurysm
that naughts, I can scale it even more. Let's start from here. I will tap and go
to the vertices. I want to grab
these two vertices and move them over here. Thing that they could reach
this area almost right here. And when you do that, sorry, you just
go to the bottom. Scale this a little bit
because as you can see here, this area is wide and
this one is narrow. So I will scale this a
little bit like that. And that's it. So now we got this
result. After that. If you look at this
from the side of you, you will notice that
at the beginning it starts flat and then go up
and down, and then go up. So we want to create something
It's exactly like this. In this case, I
will hit Control R to add one H right here. So this area will be the flat area and
another edge right here, or you can leave it in another
one would be right here, a stance on this area. Right after that. You can grab this H and H key to
this and move this up, integral of this
one, e to the z, and move this up as well. Let's go to the bottom again. Alright, after that, so
let's make this area around. Okay. I can't grab these
two vertices and hit Control Shift V and bevel
this to four vertices. And activity clam overlap to avoid any overlapping
happened in this area. So now we got this round shape. After that, let's
go to this site and lisp if all these vertices
as well hit Control, Shift P to buffer them two
or three edges like this. Okay? Alright, so now we want to create this open
area here in the middle. So let's see how can we do that? All right, I think now we can go to the face and select
these two faces and hit I to insert to make some
Insert I guess like this. And after that, I can slide these acres had
key twice, enslave them. Almost right here.
Somebody like this, and then crop this
face with this face. Or before you grab anything, maybe I can grab those as
well, enslave them forward. And now grab this with
this hit X to delete them. Now we ended with this result. So now I will click crop
this vertex, this vertex. And let's try to reveal them to see what's going to happen. Alright, I think we should start with this
one, with this site. It can draw here
to be the bullets. You can move a lot like that. And after that you
can clean this area or you can give it a thickness
and developed later. If you accept this result, you will need to clean all of these vertices because
we don't need, we don't want all of that. We just want the care of here. By the way, cleaning this area is now something difficult. You just speak to face it, grab those and it can throw likes to dissolve
all these vertices and starting you just add an
H right here and one here. That says, now you can grab these and it can throw
likes to dissolve them. And those are over here as well. Dissolving. That's
all. That's all. So it's not going to
be something huge. Let's grab this
vertex and this one hit Control F to be
endless purple, this one. Alright, and go to face, grabbed those can throw legs. Use knife, tool, make
cut goes like this. One goes like that. And confirm the cat, go to the edge, grab
these unnecessary edges. It can throw X to delete them. Now we got this result
as you can see here. Well, what we need
now is to give this a thickness after
we bevel this area. Because if you go to the side, if you have some we have some some bevel
here in this area. This area is, It's not
has not sharp here. We have some care
of goes like that. So we want to create
something similar to that. I will hit Control V
to add a bevel here. And select this with this one it can throw be to add
Bevel right here. And here as well can throw
be to either pitfall. That sits. Alright. Now after
that, I will hit a select all the
vertices and hit MAN married by distance in case we have some
close vertices. Just try to merge them. Alright? Now is, now you are ready to give
this a thickness. Alright, tab out and
go to the modifier. And so defy, let's add 0.1. 0.1. Looks cool for me, is very nice. But before, I think before we do that,
we can do something. Let's turn this off temporarily. We just need to make
some connection here because we want to
use subdivision surface. And because I'm going to
use subdivision surface, I can't leave this
vertices without any supporting because I'm only
going to get good results. So let's start doing that. Let's start with this
vertex here at the middle. Use the knife tool,
make cut hold, Shift to make the cuts in the middle and then hit
Enter to confirm it. And let's make a cut goes. By the way, you can
focus on one side. And I've taught that you can
give a ten minute or so. Yeah, maybe we can
use mirror modifier. And I will grab this with this, his gay make a
connection between them and hit K to activate. And I've told to make
cut goes like this. And one goes like that. And wind goes like
this and hit Enter. Alright. Actually, there is no reason
to use mirror modifier. It's, it's easy to
make these cuts. So use the knife tool again. Make cut goes like that and
one goes like this tensor. So yeah, we are almost done. Let's activate the
soul defined now. And that's very cool. Heads can throw
light to apply it. Now it's the time to target the sharp edges and
give them before. So go to the face, Alt click face
motif number three, articulate to grab
the entire face loop. The outside and the
inside as well. Hold Alt Shift and
the inside faces. After that, Let's move this out. Go to the Select enqueues,
select boundary. When you pick these boundaries, just hit Control
V to bevel dose. You can. Alright, let's add the 34. Now. The size is big a little bit. In this case, I will
change this to 0.005, maybe make it very subtle. Maybe I can add four. I will add two ambassadors. After that. I will add support
a globe here and here to support this result. But let's see what
we got so far here. If I, if I add
subdivision surface, Let's add to a level. Looks cool. I will hit
right-click and create a smooth to make this very nice. So let's go to the side of you. And let's move this up. Okay, somebody like this, align it like that. Go to that, to the
bottom of view as well. And we need to rotate it like this, something like this. And maybe we can push
this back a little bit. Alright, let's see what
else we can do here. Maybe we can grab this side. And I don't know, but let's try. I will move this here and move those in the wireframe mode
crop is vertices. And let's move those over here. Something like this. And now it's looks better. When you do all of that. Now you can copy
one of the sucrose hit cavity and the
Coby would try here, scale it, make it smaller
because it's not so big. Hit G. And let's move this over
here and hit key to the z. And let's move this up. Because somebody like this, and we need to
make this shorter. So let's go to the side tap. And easy to go to wireframe, hit G to the C. And let's
move this a little bit. But before you move it, turn off automatic because sometime when you move
something automatic, merge these vertices and
causing some problems. So let's move this wall right here, and that will be enough. Now, it looks for a cool. Alright, in the bottom view, control seven, Let's
select this one, hit Shift D, and let's take
another copy of this book, this Jacobi right here. Now we got something
nice and very cool. So, yeah, I will end this video and
see you in the next one.
23. Fixing some shading issue using Data Transfer modifier: Hello everyone. I
will come back here. Before I go to the next step, I just want to make some
fixing here regarding the shading and whatever
thing we have here. Let's start with this one. I will isolate this. You remember when
we created this, we lived this shading problem. The easiest way to avoid this
shading problem you can, you can speak to face
and select all of these faces around the circle. And then you can hit I to
make some insects. Okay. And when you do that after that, delete the outer edges. We don't need them anymore. And then it can throw likes. Now if you tap out, as you can see now, the shading a hues are gone. Why? Because we added an extra
H and these shading, a huge surrounded in this area. So I'm not going to be visible. We can replicate this
here on this area. Okay? We can go to the face
and select this face, this, all of these phases. And you can hit I to make
some insert here as well. And that's it. Now if you tap out, now it's become clean and nice. Let's do this for
this one as well. The same thing. Alright, so we are
finished here. We have some problem here, I guess I think I
actually didn't accidentally deleted
the wrong age. So I'm going to hit Control
Z couple of time to bring back these edges
and let's start over. Alright, let's pick the Savior's hit
Control X, Control Z. This big these manually
just be careful. Can throw likes,
pain. Now, awesome. So we are finished with
this piece mirror modifier. We'll fix this side. This shading here, I here, don't worry about it
because it's hidden. Okay, Now let's go here
and let's see what's, what we can do here. This area, we have some
shading, a hue here, this nasty shading,
and here as well. And here, you can use the
same technique accurately. You can make some insert here. And you can do something else. Alright, let's try
something else. I will pick one of these faces. I want to grab these
phrases on this side. So I will be quiet and hit Shift D key to open the select
similar enqueues, normal. As you can see now, I picked
all of these faces and maybe I will add this one and it helped here
and do the same thing. It was a normal deselect
this edge or face, sorry. Deselect this in our face
and deselect this one. We don't need them. So as you can see, I just
selected those over here. After that, let's go to the
object data properties. And here we have this
little applause. Just hit it and it created a new group
and then hit assigned to assign all of these faces are
vertices to this new group. Assign them like that. And that's it. You can give this a name, double-click it, and
let's call this e.g. can call this heading
just tokenizers. No, that's it. Alright, now I will pick
one of these phases, e.g. this one and hit Shift a
to add plane top, sorry, bringing the 3D cursor here, first half this and coursework
to Selected Shift a. And let's add plain killed
the plane if you like, make it big like that. And I just want the plane, but I don't want to see it. So I will switch here and go to the viewport display and this regular display
as two pounds. So the plaintiffs still there, but I just see the
edges of the plane. All right, after that, let's go to the modifier
here and let's add. Data transfer. And what I want to do is I
want to transform the data from the plane to this geometry to
kill this artifacts. So it tells you where
is your source? My source is my plane,
this one right here. I want to COBie the shading from the
plane on this surface. After that's which
option we could pick. We will pick face corner data and activate costume normal. After that lists three this to this
option projected phase. Interpolator it. So now as you can see, we clean this area, but if you have problem, we don't want to
target the whole face. This here. We need to go to
the vertex group and till this modifier that you
should pick a specific area. So now, as you can see now, this modifier taking the
heating from the plane and apply it on this
surface and this surface. Alright, but we got a problem
here on this surface. Let's try to solve it. Because this, because this plane has
one dark in one phase, darken this side
taking the wrong, this side, I mean this
side of this geometry, taking the wrong
normals from the plane. In this case, we can give
this a specific modifier and we will specific modifier
and maybe a specific plane as well to correct
the heading here. Alright, to do that, just go back here. And let's go to the face. I just want to, I want to remove these faces
from this shading a group. It's very easy. Just pick whatever view and switch to
wireframe and grab the side. And just hit remove, to remove this, this side. This side right here, still exists, the hidden group. Our problem is here and this
side, alright, anyways, Now tap out, as you can see, this side is released. Okay, but now we need to
create another shade, another group here,
vertex group. So tab, grab one phase, hit Shift key to open the select similar and choose Normal. And I will hit this plus, and I will call this e.g. shading to enter and assign. These vertices are these
phases to this shading. Hit Assign, and now they're
assigned to you about. Now let's go to
the modifier here, and let's duplicate this one. Now we have a duplicate here. After that, I will cope
with this plane hit Shift E to the z to take
another copy, e.g. right here. And I will work
with senior COBie. So select this, go to the
second modifier and I will delete the old source and I will replace it
with this in your plane. Now, right? I will delete the shading
because as you can see here, this second modifier, working with the fairest
shading, a group. We don't think that
we want to work with the second heading groups. So let's read this to two. And we still have
the same problem. To solve this, just select
the second plane top to this. Hit Alt Enter to open the normal menu and
flip it. And that's it. Now this done this side. Now it's become clear, clean. This side as well. Now you can't grab this one and it can throw light apply
because geometry to make sure to apply
these modifiers and delete these two plants. And now we have something very nice and
clean here in this area. Okay, before I end this video, something here I just want to mention regarding this clip, if I hit Select
to isolate it and go to the top, if you e.g. this error right here, it's not so quite perfect circle because we have some stretch
goals to this direction. When we apply the
subdivision surface. But to fix that, we can tap and we
can add a support, a club here and here to
bring back the roundness. So let's try and let's see
what's going to happen. You see this distance here. Keep your eye here,
and let's see. And you will see when
I add H right here, how this can help
to fix this issue. Hit Control R and let's add the edge right here
and one right here. As you can see now it's gone. The same thing you can
use here. And one here. Alright, to eliminate
the stretch. And now we got very nice circle here and nice circle
here as well. Okay. Now let's hit slide to excite. And that's it.
24. Setting up the scene and adding an HDRI image with a light source: Hello again, welcome back. Okay, now, let's
create a material to the utility knife and Lisa, prepare the environment or
its first thing I want to do, I want to add some
kind of plane here. It should be like this. As a background. I can start with the plane at
the plant right here. And I can tap to edit mode and select this edge e to the z to x through
the top like this. And I can call this h hit
Control V to be valid. And let's add some edges
here to make this smooth. And maybe I can scale
it a little bits. And I will add some edges here. And this area in
case I want to make this like a, like a cylinder. And I will show you what I mean. I want to bend this. I wanted to be like this. Something like this. Alright, like a hollow cylinder. I can use the, the symbol deform
modifier to keep that. First, I want to add an empty here to use it as a pivot
point for the modifier. Let's add the modifier
first into his band. And now I can bend
this as you can see. But now bending, working
on the x axis like this, as you can see, I want this
to work on this z-axis. We got what we want almost. But you can control that
by adding an empty. And I will show you what I mean. Hit Shift a to add and
let's add an empty here. And let's select this plane and the origin will be the Mt, just to leave it empty. Now, if you remove the empty, this will affect the result
of the bend modifier. Let's spin this a little bit like that and
hit right-click. Make this smooth. And that's it. If you don't like that, turn this off and make
it flat like this. So there's something optional. Alright, I've started that.
Let's add a camera here. Hit Shift a to add
and add a camera. After, after you add
the camera, this, pick a nice view Like like this. And then aligning the
camera with this view. Yes, it can throw
an alternate zero. There we go. Now, this camera
aligned with this view, if you want to control
the camera farther, go to the View, and then go to the navigates and choose
walk can have vacation. When you do that, you
can use the WASD, like you are playing a game, you can go back and zoom in. And if you rotate the wheel
of the mouse backwards, you can make the
movement slow and nice. So now as you can see, I can control the camera or
like playing a game. You can go up using E, you can go down using Q. So after you frame
the camera inputs and the suitable position, left-click to accept that
position. And there we go. Now we have the camera
and the correct position. The camera, It's speak a
little bit, I can scale it. Scaling the camera is not
going to change anything, just the size of the camera. I like to keep it like this. So this is the first
thing I've heard that lists oblivious of you
to two views like this. And three, there's
two shader editor. Close this panel,
you can hit N. And I will change the mode
from object to world. Because here I wanted
to do something. After That's I want to add an HDRI image here
to eliminate the scene. So let's hit Shift a to
open the administrators go to the texture and I will
choose environment texture. Let's put this right here. And let's go to open. Let's search for
the ticket shared folder here you will find
an old industrial hall. So I will open. This ensures that our image, alright, now we
have the HDR image. I will apply this
to the background. And now if you hit Z
to go to the render, you should see something here. Let's give this a
little bit of time. And now I have some lighting
coming from this HDRI image. If I cut the connection using
control and right-click, I will lose that light. Alright, so now we
have the diameter. After adding the HDR image, now, it's the time to add
some materials to this, to the scene. So let's start with the ground. Let's bring this back to Object. And I will hit New to
create a new material, and I will call this
material ground. Hit Enter. And let's change the base color
to something dark. Something dark. Maybe we can reduce the
roughness a little bit. Alright, let's add some
roughness to the ground. Let's hit Shift a, and let's go to the search
bar and let's search for mass grave MUS, not a mass grave diggers Europe. And now we have it. I want to preview this ticker. Sure, I just want
to see what's going to happen if I apply
this on the ground. I haven't all done. It's very important to activate. I just go to Preferences and
go to the admin section, a lit, search for
node triangular. It just hits, just type. Typically our habits. No triangular, it
gets activated. That's it. This are done when
you activate it. It will give you
the ability to use some useful shortcuts that will make your workflow
faster and easier. Alright, now I want
to preview this. I will hit Control Shift. Left-click on this to see
that take a shower and how it will be applied
on this plane. So now we got this result. I will change the scale and make the scale
smaller or like this. And maybe we can add
some details here a little bit and manipulate the dimension to get
something like this. And let's see what
else we can do here. Maybe we can increase the
number of details a little bit. Until now I got this result. As you can see.
Alright, now we need to make some change to the black and to
the dark color here. Let's hit Shift a to
search for curve C. You are cubic curve like
this. Over here. I want to use the snot to
control the black and white, the calories that comes
from them as grave texture. So fair thing here we have two vertex or two
vertices. Alright? If I take this e.g. down, that will affect
the white color. It will make it dark.
And if I take this up, That's what effect
the dark color and make it almost gray. So this variation is useful for me to use
it and roughness slot. But let's make this a
little bit, make it settle. You can grab those
together. This one. Hold here, the grab this one, and you can move them. So until now I got this. I will apply this
to the roughness. And I will hit
Control Shift click on the principal PACF
to see the result. As you can see,
because I did that. Now I have some variation. If you want to
control this further, you can hit Shift a
to add another curve, C, you are cubic curve. And let's plug this right here. Now you can, can throw the final result
that comes from here. Let's make this, take this down. And as you can see now we have some little off roughness on the ground as will make the
render looks like a nicer. So yeah, so this
is the very thing. After that, Let's add some
lighting here to make, to make the scene looks better. I can control the
HDR image here. And if I take this up, I can make the light
looks stronger. But I don't like
to crank this up. Let's go back to
the object mode. I want to create a
new lights here. So let's see how can we do that. Here's zero to switch
to the camera view. I will change this editor to 3D. And let's add some
lighting hit Shift a, and let's go to the light. I will choose the spotlight. And I saw what I picked here, Shift a and go to a light. Spotlights. Now we got to hit key to
take this up a little bit, hit S to scale it. It's big. I don't want
this to be a big. Scale it down, make
it small like this. After that, let's go to
the light properties here and let's see
what we can do. Fair thing. Let's try to point this towards
the knife and the spec. A nice position. Let's move with this
e.g. right here. Alright, we have
that camera here. We have the lights on that side and the front or
almost in front of the camera. Let's change the
position of the light. And let's put this e.g. right here from the
top of your PPE, we can address them. That's even more. I will put this right here. Okay? And let's use this
small ball here. Hits, left-click on this end, moves towards the knife to point the light
towards the knife. Alright, That's very cool. Let's tweak this to cycle
that render engine. Because we want to
work with cycle. As you can see now,
we have some lighting comes from the light source. And this is the
result of the lights. If you go to the light
properties here and if you increase the size of the light, the radius, you will make
the light looks smoother. And maybe I can change this to a character something
yellowish or bluish. We can control that. And I want to control
this cone shape. If you go to that
beam shape here, you can control that. This is the blend. When you make the way you manipulate that blend here to have some distance between this circle
and this circle. You will control the
sharpness of the lights. So if you make the
distance between them, the light will be
soft and vice versa. So let's increase the size
of the sport, make it big, and let's change the size of the plant and make it
small to get softer light. After that, you can control the power of the
light from here. If you want to increase it. Let's see what's going to
happen if I add e.g. 50. Alright, now we
got this results. Let's go to the Render Settings here and let's
activate the noise and the viewport. All
right, very cool. Oh, Canada result
looks nice spots. I don't want the lights
to be at that far. I want to make it close and
small and this same time. So I will hit G to move the lights and make
it very close. Somebody like this. And I did this
because I want to see some shadow here and
this area, this area. So let's make this small
entity and move it here. And I will go to the
Properties trying to change the size, their ideas. But if you change the radius that this will make
the light sharper. Let's see, how can
we control this key? And let's move this right here. Let's reduce the number of the power to maybe ten. For now. As you can see, we
have soft light and this area now become dark. And this is our goal. We don't want to eliminate
the far distance. The far areas here. Alright, so I think
that's it for this video. After that, we will start adding material to the
utility knife itself. And let's see what we will
have here. So that's it.
25. Creating a material for the ground: Hello everyone and
welcome back here. A small change here
I want to make, I want to change the
material of the background. I downloaded images or materials from the Internet
from poorly haven.com. I downloaded the concrete and the dark coat and slapped tiles. Let's start with a concrete. I just want to make the
ground like a concrete. I think that will make the results more
interesting and beautiful. So let's start doing that. I will select the ground. Don't forget to sublet the
window to two windows. And this is the material that
we created for the ground. I Ola grab these and hit
Control X to dissolve them. I don't want all of these nodes. Let's go back to the folder. I will open the concrete texture here we have some textures. We have the diffuse, we have the displacements, we have the normal MAP AND, OR for normal map. And here we have roughness. Let's start with a diffuse
to click and drag. And let's put this right here. Now we have it. Diffuse color should
be connected to the base color like
this, and that's it. Now it's connected. Let's
check the ticket taker. I will hit Z and go
to material preview. So I can see the result
of that texture. As you can see,
it's a bit large. Let's go back a little bit. Don't worry about the stretch
happening right here. Okay, Because camera
will not catch it. If you want to fix
it, something easy. Alright, let's fix it. It's
not going to be complicated. Lists sublet this window to two, and let's change
this to UV editor. And I will tap to the
plane we created. Select the whole plane
and just hit U two times, u and you again to our robots. And now it's erupt
and down as you can see, everything
looks awesome. I will tap out and
close this window. You can put your mouse
right here at this corner and click down like
this to be married. Now let's go back
to the knife tool. As you can see the material, it's a very large and
we need to tweak it. So let's do that together. You can grab the node of that
texture on it Control T, because we activated Node
Wrangler nor drank grow will create these two notes that ticket short
coordinate and mapping. And now you can control
the scale if you want. From here, we have
a scale to the x and y and z. I want to
control those together. So in this case, I want to add another
note to control the three of these options. Hit Shift a, and let's
go to the search bar. Let's search for value. Value. We'll do that for us. So let's connect this. Because the number is zero here. Material is too much citrate. Let's add e.g. here five, as you can see now, it's better. We can change this to maybe 20. Now it's become better. We can change this to
therapy to see the results. With 30. I think
30 is looks cool. So maybe we will stick
with this number. Alright, so now we have this mapping and tickets your coordinate to
control the scale. Now let's bring the other
maps we have diffuse, it's, it's right here. Now, there's good. We don't need to use
displacement by the way, normal map is enough. So I will click any track to add the
normal map right here. But keep in your
mind something for the diffuse color space, leave it as RGB. But for the normal
map and darkness, change the color
space to non-color because we don't need any
color Infinium information. Now I need to connect
this one with the normal, but not like this. It's wrong to connect like this. We need a note here
between those. So let's search for normal. Normal. Not this one. Sorry, we
need the normal map, Shift a to search and the
search for normal map. And let's put this right here, connect this one to the normal, and connect the color
to the color. Right? Now we should see some normal. As you can see, we have
some height information. And that's something cool. All right, so now we've
got the normal after that. Let's control that roughness. Let's go back to the folder, grab the roughness,
click and drag, and let's put this right here. The same scenario, color
space should be none. And let's connect the roughness directly to the roughness
slaughtered like this. Now we should see something. Alright. Now we have
some roughness here. You can control the normal map, you can keeps 2.5 to make the effectiveness and
don't forget something. We changed the scale because of that normal map is not
working in the correct way. Let's change this back to one. The scale of these two
images are very big Y, because we didn't connected
those through the mapping. Because you remember, we
changed the scale right here. So in this case, I will connect these together
to get better results. And now the result makes sense. Now when I go to the value
to change the scale, I will control all
of these nodes. So let's go here
and change this to 40 to make this even a smaller. And now it's okay. That's very cool. Let's go
to the camera has zero. And now we are ready. So I think that's
it for this video. After that, we will
start with a material to create the materials
for the, for the knife. And incase, you noticed
what I have here, I guess to sweep this tool with Blender file because
I did something here. It should be right here. This could be activated the scene view
layer, every layer. Alright, so that's it and
see you in the next video.
26. Creating material to the handle: Hello again and
welcome back here, let's say create a
material to the handle. Let's say like this and
let's add the new material. And I want to make
dislike plastic. It's not necessary to make this similar to the reference images. But I prefer to make
this like plastic. It maybe we can create
another material like metal. I want to make
this orange color. So this big orange
color like this. Somebody like this, similar
to the blender logo. And we want to add
some roughness here. Okay? So this here, Can we do
this adding gravitons here? We can use a texture
map or we can use noise texture or
a mass grave texture. Let's start with mass grave. I will hit Shift a to
strike for mass grave, just hit MUS and
you'll find it here. I want to preview the
texture on the handle. I all had cancer or
Shift-click to see it. Alright, it's citrate
a little bit. I can fix this by adding mapping
and texture coordinates. So I will hit Control T, keeping all my to activate
nodes, rain clouds. So you can do that a
black objects and instead of generated object will
help to apply this. Not as grave to be sure, will help to apply it
correctly on this object. Even if you didn't have UV map. So block the object to
see better results. After that, Let's change
the scale to e.g. 20. Alright, to a little slit, change this to 200, or maybe even more. And after that, we need
to add some details. Keep in your mind details, make your computer is slow, so try to control
this and a good way. But if you manipulate
this slider, you can see anything. You will need to take
that diminish and down. So let's take this down to a very low number,
point-to-point three. And now let's
entries the details. Now as you can see,
we have some default. Zoom in a little bit. Very cool. I've tried that. Let's choose the option FBM. Let's change this
to multi fractal. And now we have
something nice here. So we can start from
here if you'd like, you can increase the
details or the woods, but not too much. 0.6, 0.7. That's something we cool. Now I will use this as a roughness, but we need to
control it even more. We can add a mixed
texture mics, TV. And we can block this
to the roughness. And here we have two color, the black and the white. I can control the black and whites by manipulating
these two colors. So I will use this as a factor. And now I can manipulate those. I will control shift
click to activate this. Now because we don't
have any variation here, we can't see any variation
here as well. But e.g. if you make one of these dark, now, you can see something here. So let's manipulate
those little bits. Maybe we can make this brighter or maybe
darker a little bit. This is one of the
ways to control this. We have another scenario if
you don't like this result. Alright. Now let's connect the
prince of the SDF. So we can see. Now we
should see some roughness, but it is very subtle. And the extreme angle we
should see something and now we have something
accurately what it's not so quite clear. If you want to control
that even more, we have another option. If you hit Shift a to
Sierra Club for curve C, you are until you
find are cubic curve. And let's plug this. And let's plug this
into the roughness. Alright, now, the
roughness is very harsh. If you take this node down, you can affect the result
of the magic grave texture. Now, I will show
you what I mean. I will hit Control Shift.
Click on this to preview it. Now if I take this dot down, that will affect
the brightness or the color of the mass grave. And if I take this dots up, I will make the dark color. Upright or a little bit. So you can control that by
using this controller here. So I will take
this down a little bit and make them almost
even a little bit. Let's apply this
to the roughness and let's see what we got so far. It looks cool. Let's go to the Render
Settings and let's switch the render
from eBay to cycle. And let's activate the
noise and the viewport. Render. His Yan is go to the render. If you want to cut a
small error or Android, you can hit Control B and draw an error like
this. Two are under it. And instead of rendering
the whole of you, that will make the process
faster a little bit. Or at least try to
break an extreme angle to see what we got so far. Now we got something here. But because we
activated the D noise, we can see the
roughness clearly, but we will ignore that and
we will check that later. For now, let's try to create some height
information for this. We add, we want to
add some bumpiness. Let's move those
a little bit up. By the way, I left this here, if you want to use it, it's
another option for me. I will leave it right
here. Now let's add some height information. I will hit Shift a, and I have two options here. I can use another
texture map rights, or I can use the
magic brief itself. So I think we can
use a noise texture. Let's try it. Let's search
for noise and outliers. And pick the second option. And let's add now between the noise texture
and the normal map, we want to add a
node right here. It's called bump. So let's search for bomb
and add it right here. Because this gives me
black and whites color. I should plug this tool, the bump and then
to the normal part in the previous example. We had a normal map. Because of that we added
a normal map, this one. So just keep in your mind
that we have a difference. Notes here. Let's
delete this one. I don't want it. And let's
plug this to normal. And like the factor
to the heights. And before we do that, I just wanted to see
the result here. First, let's see if we
connect this to the scale, hot desert to the vectorial,
what's going to happen? Just wanted to see, I think
now it will be very alright. Yeah, maybe I can
control that, right? I thought that I have a value of node right
here, but I don't. So let's change the scale
to something for 500. And let's add some, alright, let's add some details and increase the roughness. So now we have some roughness. Creates the details
a little bit so you can increase the roughness, but keep in your
mind, roughness will make your computer a
little bit slower. So now we've got this
lets us can happen if we plug this to the bump
and let's see the result. I will activate this. I just wanted to see
what will happen. As you can see,
it's a very rough. So I have a controller
right here, I can control that. So let's add 0.1 and let's
see the result with 0.1. Alright? We have something here. I think it's too much, so I will change this to 0.05
and make it very subtle. And I can change the roughness 2.5 and the details 2.5 as well, make it all right, I think that's too much. 0.7, 0.6. Alright, it's too much. But I can still
control that by using this strength here option. So let's change this to 0.01 and make it very, very subtle. So now it's become subtle. As you can see. And this is a
scenario if you want to add a bumpiness here,
if you don't like that, if you want to add
the bumpiness, you can go back here
and you can ignore that roughness and
push their skill, e.g. 3,000 and make it very dense. Let's change this
to maybe 6,000. Alright, that's still,
let's change this to eight. Something like this. And you don't need any
details and any roughness. Let's change this to ten. Now it's makes sense. And now let's see what we
will have here. We could see some bumpiness, speculate if we increase
the strength here, Let's change this to 0.05 maybe. And now we have some bumpiness. This another scenario if you'd like It's alright, promptness. Make more sense
in this scenario, I guess. Some subtle bumpiness. Maybe we can, we can
change this to 0.03. And because it's very subtle. Now let's go to the
Render Sacramento.
27. Creating radial brushed metal material: Hello again, welcome back. Let's see, create
a metal material for this part, for the space. Select this first and let's
go to the material section. After you supply the window to go to the New button
right here and hitting you. Now have in your
material, alright, we want to create a price
metal material here. First thing we should do, here, we have the metallic slider. If you crank this up to one, That's me in this material now it's become metal material. If you will leave as zero, means it's plastic material. So I will crank this up to
one to make it like a metal. And here we have the color. The base color will
affect the result. If you make this white, it will be shiny metal material if you make this
dark, totally dark. So let's see what we got so far. I will hit Z and
go to the render. And let's give it a
certain cutoff time. As you can see now
we have some metal. If you crank this down, it will be dark metal. Here we have the roughness. We could control it, but I will control
this with the nods. So let's see how can
we create all of that. To create a radial
priced material. We issued this starts with tickets to your
coordinates, notes. So I will hit Shift eight
to four coordinates C or. And here we got it. Let's put this right here. This talks with this one. And I need a vector math. Let's hit Shift a to
search for vector math. Let's put this one right here. If you open this list, you'll find a lot
of options here. I want to choose the distance. So let's pick that distance. And let's plug the object
to the vector right here. Alright, Victor, math
with distance option will achieve the
result that we are seeking, the radial approach. But we are not even here. We need to use the
noise texture. So the way to search
for noise and all high noise texture. The second option here, and the black of value to
the victory right here. I will hit Control Shift. Click on this one. I just want to see the results right here. And I will hit Z to go to
the material and review. Maybe this will be a little bit faster to see
what we got so far. Alright, so now we got this
result is not so quite clear. Alright. Let's add a color arm this
time to make some contrast. Because the outs come here we have from
the texture noise, the colors between the black
and white, almost subtle. So I will use color ramp
to make it more contrasty. Half-day to search for rum. Color ramp and plug
this right here. Can throw here to
click to activate the color on this book. This a little bit. Alright, we don't see an effect that's mean that that's
the band on the scale. Let's crank this up to 200 and let's see
what we got so far. We can see something. Let's crank this up to 1,000. Alright, so now we have
some radial effect here, especially if you
make this a bit dark. This, crank this up. Yeah, now we have some radial blur effect. Alright, let's see how can we use these combination of nodes. Let's move those a
little bit right here. After all of that listed
like this to the base color. And let's see what
we got so far. I will apply the
principles based EF. And here we have something like this to the
roughness as well. And let's cut the base color. Just timber already. I just want to see it that
often is how it will rock art. We have something right here, but the result is
not so quite good. We need to control that
even more so first thing, let's preview the color ramp, hold Control, Shift and click. As you can see, the
contrast is a bit high, so I will reduce that by
taking this back a little bit. Okay, just make a subtle, alright, after that, Let's plug the principle of PACF and let's see what
we got so far. Alright, so this is the outcome. We still have the
ability to control that. Okay? If you want
to enter a stamp, the effect even more, you can log this to the normal. By plugging this to the normal you will address and everything. So I will hit Shift a
to Z Eric for bomb. And let's put the
palm over here, like the pump to the normal. And let's move those. I just want more room here and plug the color
to the heights here. And now we should see
some height information. Let's give this a bit of time. Alice CO2 will go so far. As you can see, the scratch
here are too large. That's mean we need to
make those smaller. Let's see how the scale effect that I will crank
this up to 2000. Alright, bike
bringing this number, the scale, we can
get better results. So let's change that to four. Alright, let's increase
those even more. Let's add 5,000. Alright, now we got this, we got something here
and let's change this to six. Oh, that's very cool. For now. Let's change the distance to 0.2 and the strength
to 0.2 as well. Now the effect is at all. Alright, but I can
control that even more. Let's add to 0.01 and make
it very, very subtle. Alright, now we're
getting something here. Let's mute the bump, hit em. I just wanted to see
the result before and after without bump
and with the bump. So I will hit M to mute it. It's giving me a
very subtle effect. Let's crank this up to zero. That's 0.0, maybe four. All right, here we got
something after that. Let's control that roughness. I will hit Shift a to search
for a curve, RGB curve. And let's plug this right here. As you can see here in the RGB care of we
have two points. This point and this
one right here. This point up here represent the white color and this one
represent the black color. If I take the white
color towards the black, I will make any
pride error here, dark, and vice versa. If I take the black dots
here to take it up, I will make any dark
area more brighter. So let's crank this, take this down a little bit. And let's take this up a little bit until we get something
nice and subtle. Alright, now we got
something here. The result looks okay. Now we have the
radial effect here. Let's go back to the bump and let's see how
that's affected. A bump. I will cut the connection of that roughness because I just want to check the Bumble on. Hold can throw right-click
and copy this. And let's see the
Bumble on how it works. As you can see the slices
you see right here, it comes from the bump. If you are happy with
this result, that's okay. If not, you can crank this
up a little bit less. Crank this up to 0.07. Maybe. This result looks,
I think too much. Ellis, take this back to six. Alright, we got some
bumpiness here. The results, okay,
and acceptable. I will crank back the roughness. In cycle. As you can see, the results looks
more beautiful. Let's apply the same material
on the button right here, and let's see what we will get. Okay, let's select the
button right there. We didn't name the material.
Let's give this a name. Just go to this bar right
here and give it a name. Let's call it radial,
priced middle. And hit Enter. Right now Let's see crop the
butter right here. And let's go to this arrow and let's search for
this new material. And let's go over here. I just wanted to
see the results. I will see this two material
preview so I can see better. Alright, it looks okay. But here on this side we
can see some historic and I guess it's applied on
this side normally. But when it comes to this side, the material is citrate
to this direction. We need to find a solution
to fix this a here, right here, we see
how can we fix it? The easiest way to
achieve that effect, you can go to the vector math node and
crank this value to e.g. 50. As you can see, we can increase the
side effects parts. If we do that, we will lose the effects
on the face here. And as you can see, the effect become settled
layer on that face. Let's crank this up to 100. The result looks
better as you can see, but we are losing the product
methyl on the phases here. For this piece,
everything works fine. But if we duplicate this material and apply the different material
on this side, maybe we can get better results. You can use this as a shortcuts. But if you don't, you can
create a new material. There is another way
to achieve that. Let's zero out this number here, and let's have more space here. Let's search for mapping. The second choice here. And let's plug this over here. If you add the mapping, you can go to the scale to the Z and the crank this
up, e.g. to 100. And as you can see, we got a very nice effect here, but we lost the top
price metal effect and it's become very subtle. Lists reduce the scale to 20. We fix it, but we lost
their effect over here. As you can see, for the epic. For the big circle here, the effect is very cool. Now it's become
subtle and very nice. Part for the button right
here is not, I don't know, maybe because the
scale is the scale. Before we do anything, we have some very
I can, I will hit Control a and apply the skill. Maybe that could
help a little bit. It's helped a little bit, but it's not enough. Alright, let's duplicate
the material and give this piece as specific materials so we can control it better. So now we have number two, as you can see right here, that's mean this material that's applied onto objects to this
one and this one right here. If I hit this number right here, I will make this material unique for this object because
this one is selected one. So select this and hit
this number right here. And we just need to change
the name a little bit to radial price of metal. And just type bottom button. Yeah. Just broken as to
Bhutan and that's it. Now let's see how
can we do this? First thing? I will believe that bobbing, I don't want it. Or you can zero out
the z-axis or sorry, just a number one,
and that's it. Now, we got the
effect back here. Let's kill of the
effect is not enough. Maybe we can change the scale here and the
noise ticker start to maybe 1,000 to make this radial even smaller to maybe
ten. Let's attain here. Now it's become very small. After that, let's go to
their materials second here. And here we have a
little applause. Just hit it to create another material slot and use this arrow to pick the
same material for the baton. And here we have the same thing. Now I want to apply the second material
for the side faces. This hits like to isolate this geometry alone so
we can focus on that. And let's see how can
we achieve something like this tab to go
to the edit mode. And as you can see, we are still, we didn't apply
the subdivision surface. Alright, I will accept that. Let's go to the face and
let's pick this big, these faces and the middle. And I will hit Control
Plus couple time. Alright, let's
manually pick these, go to the wireframe which is z, and this hold Shift
and pick these faces. And maybe those as well. Let's pick any side, any view you would like
to choose and hold, Shift and add those as well. The group. Are these
faces as very cool. Now let's go back
to the material. And as you can see now, I am on the material, material number two here. With these faces selected, hit assigned to assign the second material
for these phases. After you assign all
of these, top out. And let's go to the
material preview. And here we will can throw
all this material even more. You can just play with the
z-axis list at ten here. Now I got what I wanted, but this material still
affect the first one. In this case, just make this unique material and go
back to the first material. And let's add number one here. Alright. Now as you can see, we have the two effects, but here on this face, we got some problem. It's easy to fix. We just want to include
these races and apply the second
material for them. So tab again, and let's
add these phases, Alt Shift, click to add those
and maybe those as well. Let's go to the second
material and hit Assign to assign these top out. Now we can figure that out
through are looking for, for the first material if
you want these circles to, if you want to, effects on the site to be dense, just go to the x, y, z here, grab them all, click and drag and move
the mouse to increase the less kill until you get the result you are,
I'm happy with. So now the result looks fine. Let's excited slag to
exert from the local mode. And let's check
the first results. Alright, it's looks
cool as well. Let's see the psych or
under what we will get the zoom here a little bit and
hit Z to go to render. And let's give this
a bit of time. Alright, we getting
something here. If you are not so
quite heavy like me, you can make the
effect stronger. Let's go back to
the material review and Let's start with a circle. With this big circle here, I will increase the
strength to 0.1. Let's see what we
get if we do that. I just want to make
this stronger. Let's add 0.2 and
the CO2 will get, I think that's too
much, 0.1 or less. That will be okay. The same
scenario with this one. We have two material, we could give them
the same number. Let's start with this one. Let's add 0.1. Alright, this for the surface and
this one for the site. Hey, let's add here 0.0, sorry, 0.1 to enter. And now it's become
even stronger. For any reason if we don't like that effect and
the final result, we can delete easily. Alright, so now we got metal and that's it for
this video and see you.
28. Creating brushed material for the blade and the blade holder: Hello again and
welcome back here. This, it creates another
brush metal material for this geometry. Alright, maybe we can
use that reference image and keep it close here. And let's select this one and let's add a new
material right here. Let's give this a name. Let's call this metal. And that's it. If you don't see the material, just hit the home button from the keyboard to frame material. Crank up the metallic to
make this like a metal. And his, he to go to the material preview so we can see the results right here. As you can see now we
have some metal material. I will hit Shift a to search
for noise. Noise texture. Let's put this right here,
hit Control here to collect, to preview the result here. I will add mapping and texture coordinate to
control the result here, I will hit Control T. To do that, you will
need to activate Node Wrangler and
preferences here. And the odd ones, section two. To activate the shortcuts, I will use the objects and
plug it here to that vector. How this be projected
on the surface? I want this to be projected
on the surface by using the opposite option of
Pterodactylus can throw the scale. Right. Now we can see some noise. 600 maybe. Alright, now if you
go to the scale, you can control
the scale and you can squash it like this. You can pick whatever
direction you want. For me, the x-axis
is working fine. So I will use the
x and maybe why? You can try that. Let's see, what's
the x can do. Lists. Let's crank this scale
back to 3,300, sorry. And lists, and increase
the x-axis scale. Now we have something
here, as you can see. Well, I will use this and the
roughness, the normal map. So let's move those a
little bit right here. And let's plug this into the roughness and I
can throw that later. Let's apply the principle
be as df to see the result. Okay, now we have something
that is out there is no sir, quite cool because
we have the results. Cut that comes from that
texture is a bit contrasts. So I will hit Shift
a to search for color RGB curve,
how cubic curve. And let's use these
nodes to control that. So I will take this
down a little bit and take this up to make
this a little bit rough. When you take this up, you will make the dark color
brighter, and vice versa. When you take this Daniel, make the whites color darker. So let's take this
up a little bit. Something like this. I think it's makes sense. So I will I will accept
this result for the normal, I will add a bump map. Let's search for
the bomb and like it's like the normal
to the normal. And bring another note here, I will use mix RGB, and I will plug that
color to the height here. And I will plug the
factor or to the, to the factor right here. So I will activate the mix here just to see the
result over here. Let's pick the color one
and let's make this dark. I want the result to be a little bit contrast
before it goes to the pump. So now we got something. Let's plug this.
Alice, what we got, the bump is strong. I can control that and
reduce the effect a little bit until I can
get something nice. Well, on this side we don't
we don't want too much bump. Something subtler rock at all. What I want here, just
the effect of the lines. 0.0, maybe 30.08. Yeah, something like this. Let's see what we can do here. Maybe we can make
the effects smaller. I will apply the
texture control shift click to preview this,
then will execute here. If you want the effect
to be stronger, you can manipulate the y axis. Let's make this very
small number, like 0.1. Alright, let's see
what we got here. And the principal, PACF, the CEO, is going to
happen if I reduce the x axis scale to maybe 50. I just want to see
big lines here. And now we got something. Alright, Very cool.
Now we got something bots. On this side. We don't, we don't want
these lines to go like this. We want, we want them to go
like that with the geometry. So for that, I will
create another material. Okay, let's go to this plus and let's hit it to
add another material slot. And the slot I will pick the same material
that project metal. And I will make this unique. Just hit this number right here and change this to Material. Material and their score
to just to organize it, you can add whatever
name you like. I've tried that. I will select this
geometry and isolate. It. Just hits like to isolated. Or it can go to select to view and local of
you and talk a lot. Toggle Local View tab
to the edit mode. And now let's start doing that. I will pick the, the, the light in the
middle, just Alt click. I think. Let's see if that works or not. After that, I will hit Control
blast to grow the silicon. Silicon a little bit more. Or at least de-select those this week to face
at number three. As you can see, I'm right now selecting all
of these phases. It can throw a plus again, one more time and one more time. After you reach this point, I think now we could
pick the rest manually. Just going to hit,
can throw blasts. Just one more time to grab
those Oswald. This line. And I will maximize the viewport hit control
space to do that. And manual I will hold
Shift and add those. You can hold Shift and add
in your face and hit control shift click to add the area, e.g. let's start with this one. I will hold Shift to add this. And then I will hit Control. Shift to click here to add, sorry, sorry, let's
do that again. I added this one already, hold Control Shift
and let's add this. As you can see, I selected the whole area,
I'll just do it again. All you have to add the new one, this face right here, hold Control Shift and add this. Let's do that again. Hold Shift to add
the new one here, hold Control, Shift,
endless, pick. I think we could see
which one we should pick. This one right here. Well, that's cool. E.g. this resume here and
hold Control Shift click. Add the new face. Control Shift, click here. And this corner as
well as hold Shift. And out of this manually, I think now we added all
the unnecessary faces. Let's start here as well. Let's add this face right here. Hold Control, Shift and
click here to add this area. And let's do that again and
again until we select it. All, all of these
interfaces. This one. Let's go over here,
hold Control. Shift click here. Okay. Let's add this. Let's go here. Hold Control. Click. And alright, this one. Let's go here, hold Control, Shift and click this. After you select
all these phases, I will hit Shift H to hide the rest and keep
those, these big faces. I don't want to select them. So I will pick this face, hit H to hide this
and this one as well hit H and the crop the rest. Alright, you can hit
Control Z couple of times. Just want to break those. Who Z to go to wireframe. And in the wireframe, I think you will, you can pick these. I can see better and pick these phases
in the correct way. So hit H to hide them. We just want to hide
those as well over here. Alright. I will
hit eight silicon, all of these faces and
these faces that I wanted to give them
a specific material. I will apply the model to, to them just hit Assign. And now this is material
assigned for these phases. I will hit Z to go
to Materials Review. I just wanted to see
what I got so far. The result is cool. Now I want to go to the to the mapping and
resets of the scale. Just grab the North and hit backspace tourists
it everything in. Now let's manipulate the
z-axis to get what we want. Crank this up. Now you can tap out and
see the result better. That's very cool. All right, now we
got something here. Very nice. Let's hit
slash to excite. And let's see what
we got so far. Let's apply the same material
for the blade as well. Selected. And let's go to this arrow and let's
choose the project metal. But I will make this unique because I think it should
be darker a little bit. So I will hit this
number right here. And this changed the
name underscore. And let's tie e.g. blade. Just to organize it. Let's go to the
base color endless. Manipulate this a little
bit, make it darker. Taking this down. Something
like this for now. And I think we should
make some kinks here. The C crotch should
go to this direction, I guess according to this image. Let's see how can we do that. Let's go to the mapping here. And instead of adding
the number 50 for the x, I will add the same
number to the y. So let's add 50 here. And let's say this one. Let's add one here. Now
we got what we want. And it will reduce the
x axis scale to a point to maybe to strike
this even more. And now we got something
for these geometries. I will creates a specific
material for them. The same scenario
that we did here. We will replicate
that they can hear. Let's go to this little
plus and let's hit it to create another
material slot. And let's pick the price
metal underscore played C. Whereas with this one and
I will make this unique. I will call this. After I make it unique, I will call this
blade Yesterday. Organize it. And that's it. Alright, now let's select this. It's like to isolate the, I think this will be both are
endless tap to edit mode. And let's pick this face
and that face as well. And I will select the
second material and assign this material
to this, these faces. After that, let's
manipulate these. The scale here. Now I will reserve the scale or you can
receive the whole node, just select the node
and hit backspace. After that, let's crank up
the x-axis to maybe 20. Let's see the result here. And let's reduce the, the, the y-axis to point to. And now we've got something. Very cool. Okay, After that, Let's hit slash two exits
from the local mode. The result now is very
nice and beautiful. What about the heat
metal we have here? Let's see, create a new
material for this one. Let's add the new
Ellis Calvinists. He is, you can call it whatever name hits home to
bring the principles here. Crank up the metallic Tuan. And plus hits like
to isolate it. I just want to focus on this and maybe we can
add some noise to share. Hit control shift click
to see the results. I will add mapping and
texture coordinate. Hit Control D. Don't forget to activate node triangular and
the preferences. And I will use the
projection type from object according to
the object, like this here. Crank up the scale a
little bit, e.g. to 20. Let's start with 20.
Alright, It's not enough. Let's change this to
I don't know, 200. Something like this maybe. And let's add some details here. Let's increase this to three. Now we have some details
here, maybe four. Don't increase this too much because it's effect that under, and we can give this a
little bit of roughness. We have some, some variation. I will use this
and the roughness. And maybe I can add color ramp. Somebody like this. Let's make the effect
stronger like that. Now, let's make the
effects at all. You can use the color
ramp to achieve that. So you can pick e.g. this top and go to the color and reduce the color. If get here. Let's crank this up a little bit and let's go
to the white now. Endless, reduce the white. You can go beyond that. If you add another node, e.g. if you add a curve here. So I will apply this
to the roughness. I just want to see
the effect here. Hold Control, Shift click
to activate the principal. And let's see what
we got so far here. I can see some
roughness effects. Let's add a curve here to
control that even more. Plug that are cubic
here, right here. And let's see what we got
so far. Let's push this up. Now I can see something. Let's go back to the
color ramp and maybe we can throw the black color here. Let's see what we can
get by using that. Make the subtle. Let's go to the white. Alright, let's see
what we can do here. B, we can make this
darker a little bit. Something like this. It's, I think this will
rock hits like to excite. One more thing I would
like to do here. I want to apply that plastic material on
the other side as well. So select this geometry
hold, Shift, grab this, hit Control L, and choose link material,
tooling that material. Let's give this a name. Let's call this
plastic, if you like. Hit Enter. And there we go. Alright, I think that's
it for this video. After that, we will create
material for the screws. Okay, and the pocket clip. Right? And so that's it for this video and see
you on the next one.
29. Creating material to the pocket clip and for the screws: Hello again, welcome back. Alright, let's create a
material for this course. Let's start with this one. I don't need to create
a new material. I can cope with the same
material that I created to the to the bottle right
here and used here as well. So let's see the material. We gave it a name, Rachel Brice metal button. So I will select this one and I will use this arrow
to add this material. It's right here. I will hit Slack to isolate this and his Yan go to
material preview. That itself is called butter. I'm getting the same
problem on the site. I will do the same scenario I did for the button tap
to go to the edit mode. And let's select these
side faces, all of them. We can start from here. It can throw basketball, attempt to grow
selection until you reach this area, I guess. Get something like this maybe. Alright. Now let's create another slot here
and let's bring the retail price metal
this series, it's 001. And hit assigned to assign
this for these faces, India, I think we
should fix the, the name and instead
of this number, maybe we can add underscore
site just to recognize it. And that's okay,
That's very cool. This tab out and hit slash
to excite and lists. Add this same material
for this one. Grab this hold here
to grab this one, hit Control L and link material. Select this hit Select to isolated Lend-Lease
fixed the problem. Tab and let's see, grab this face canceled
last couple time to go to the selection until you
reach this area and then go to the second material, hit assigned to assign it. Let's tap out and I will
do that for the rest. Let's select this one and let's copy the
material hold, Shift, grab this control L, link material,
select this alone. Slack to isolate. These faces. Can throw
up last couple time. Okay, one more here, and then assign the
second material. Alright, let's excite and let's pick this one
hold here of the club. This can throw l, make Material. Tab, select this phase can
throw up last couple of times and assign the
second material. Alright, This excite from here, and let's see what
else we could do. Select this one and
let's give this the radial part metal
material, the site one. And done. Very cool. We have another cylinder here. Let's give it the same
material. The site one. And yeah, that's very cool. All right, now let's recreate
material to the clip. And don't forget something we should add the material
for this course as well. I will hide the ground
Timberlake rabbit and hit H to hide it. And let's see, grab this one. And let's apply the same
material for this hold Shift, grab this sucrose to copy the material from this to those. And then hit Control L
interlinked material. I will select them. It's like to isolate them. And let's see what we
could do after that. Alright, tab for both of them. Grab this face with this phase, can throw lots, couple of time. Okay? And maybe two times. And let's pick this
material, hit Assign. I've done this excites. Let's grab this enlisted creates a unique material for this hitting you to
create a new material. And I will call this
clip empty for material. Hit the home button
to bring back, bring the principles
and the frame It's this should
be almost black, so let's choose a black color. And let's crank up my talionis and we need
to control the roughness. So I will use the you can use noise fixture or
you can use mass grave. Let's try mass grave. That's MU has sent. Grab that Musgrave
texture right here. I will isolate this
so I can see it and grab the node and it can throw T to add mapping and
texture coordinates. Right? I want the projection to be applied according
to the objects. And hit control shift
click to see the result. Let's crank up the scale. I can see anything. Let's
change this to 500. Alright, maybe even more
we showed to crank this up to 2000 AD. Some details here
and let's write, let's crank this down that Dominican two small number here and crank out the
details of fluids. Now we have something here. 2000s, I think it's too much. Let's add one. This time, I will
use care of hits, Shift a and go to
the search bar. And let's search for curve
like this right here. And let's take the y value down a little bit and
take the black value up. Alright, now I will plug this
result in the roughness, and I will plug the
principals as well. I just want to see
the result over here. Now we have some nice roughness. It's cool. There is no, I don't need to manipulate this. Roughness looks very cool. Alright, after that, I just want to add some effects
to that clip. I want to create H and where effect targeting
the sharp edges. Let's see how can we do
something like this? All right, First thing, there's
a lot of way to do that. The way that I find its work. It's by using the bevel
and the geometry nodes. So let's start doing that. Hit Shift a to search
for the bevel. And let's add the bevel
right here and let's hear it for geometry nodes. Let's put that geometry
node right here. I will add a vector math
to mix between those. And I will switch this
to dot products and Lisp like this vector
right here and block the normal that comes from the geometry to
the vector right here. I will hit Control Shift click to see the
results right here. Alright. After that, I
will use the map range, hit Shift a to search
for the map range. This one right here. Let's plug this over here. After adding them
up branch nodes, I just want to explain
what is this node? This node is similar
to the color ramp. If I add color up here. Alright? From minimum means fits
this top right here. And from maximum means
this right here. If you increase this number, that's mean you are
pushing this forward. And if you manipulate this, that's mean you pushing
this to this direction. This one, and this one represents the color
for each stop. The two minimum means
the color of the first top and the two
maxima means that the color of the
second stop here. Alright, so I will use this first thing I
want to mention here, the effect of the
age and where you can see it and the material, material review, you should
go to the Render and you should this week that
render engine to the cycle. Now we should change
the number of the radius to a small number, 0.00 to maybe make
it very small. And here lists Kinga from
minimum to point 9.2, minimum, 21.2, maximum
is zero out this one. All right, as you can see
now we have the effect, but it is a trunk and maybe we can control that even more. Let's go here and let's
change this to 0.001. Maybe even more or less as
02 or something like this. As you can see now we create the mask targeting
this tiny area. I will use this mask
to add some bumpiness here to make this result
more interesting. So my mask now it's ready. Let's, alright, let's move
those little bits here. And I will create. A noise texture, if you like, and link it to the
normal hit Shift a to search for noise. The noise texture can throw shift click
to see the results. I will hit Control T to add mapping anti-Castro
coordinates. The projection I want it
according to the object. And let's change the
scale to 1,000 2000. After that, let's
add a color ramp. Search for rum. Like this right here. Let's make the color more
contrast. Something like this. We could change the scale even more to maybe, I don't know, eight, or maybe even more. This tried to add ten. Heartless, see what we will
get if we plugged these. Let's bring those over here. I will hit Shift a
to search for bump. And let's plug the
normal over that bump to the normal right here and the color of the
ramp to the height. And let's blog the
principal over here. As you can see now
the effect is strong. Maybe we can invert
the result here. So after that, I
will use this mask to make this bevel just to
be appear on the acres. To do that, I should use mix, how UB hit Shift a
to search for mix. And now we can throw out here. After creating the mics are QB, I will connect the result
to the factor right here. And I will plug the color
ramp to the color to here. I will hit Control Shift
click to see the results. Now I can see something less. Connect the mix RGB
now to the out, puts to the height here. And let's activate the
principal's control shift click. All right, now we have
some age and where here, but maybe we can
control that even more by adding color ramp here. Let's see how that will
affect the result. I will hit Control
here to click to see the result of
the color ramp. And let's see what we can do. Maybe we can make the effect
thinner and maybe stronger. Let's go to the
color here and let's kinda number one to number two. To make this even lighter, you can use another
map range if you prefer to give you
the same result. Maybe we can change
this to three. Make it even whiter. Alright, now the effect become
very strong at the edges. Hello, Let's see
if that works too. Let's go to the mix and
let's see the result. This blog, the principles. Alright, let's go back
to the color or maybe we can make the, the effects a bit smarter
by taking this back. Because I think we lost the effect that I can't see, to be
honest with you. But I think I will
add a light here. Just want to see the
effect even better. And let's move this slide, e.g. right here on the side. Let's zoom in a little bit. Hard as you can see here, we have the effects
still exist. Here. And here. Let's see how can we can make
this stronger. Maybe by taking this bag, we can make the effect stronger. Now we have some
agent where here. What about this area?
Now that's very cool. One thing more here,
I want to mention, you can use the same mask up light on new material and
you can mix the two of them. And I will show you what I mean. I will hit Shift a to search
for principled be STF. I will crank the
metallic to one. And many believed that
often is 2.3 maybe. And let's hit control shift
click to see the results. As you can see, this
is the results. I will mix between
this material. Would this one using
the mix material node, hold Control, Shift and hold right-click from
this one to this one. No triangular, we'll
create the mix shader. Alright, I've taught
that. Let's move those a little bit right here. That's very cool. Alright, here we could, you like the results? So let's plug this over here. And the CO2 will
guts. After that. Let's go back to the
pigs and let's change this color from white to black. Now we have the effects
are, as you can see, the black colors come
from this material. And the whites color that we have on the x comes
from this material. All right, now what I
want to do is I want to cut the bump from
here and the blog, It's right here to
the senior material. Hello, zoom in
here a little bit. I just wanted to see the result. Alright, this imperfection
should go inside, not outside. If you have a result like this, you should invert the bump
node to get correct results. Okay, now I will change
the base color of the metal material
and make it a bit darker because it's too bright. And let's see what's
going to happen if I change the scale from 10,000 to somethings
smaller, e.g. five. Let's see how that will
affect the result. Let's see the colorRamp. Right? Let's put those
together and make the effects the
trunk little bit. I think we could crank the
skill up again to hates. All right, then let's
like the mix shader. Now we can see something rather than so. I think that's it
for this video. And I will see you
in the next one.
30. Adding edge wear for the handle: Hello everyone and welcome back. Here, in a previous video, we created a can wear
for the bucket clip. We created this mask. I want to use this mask
again on the handle. I will grab all of these
notes and hit Control C to copy them and
select the handle. And here it can throw v. Let's move them a little bit
up and move them right here. I just want to see the
result on the handle. If I apply this, I will hit Control Shift click and his Z to
go to the Render. And I just want to render a small area I
will hit can throw be to eclipse some
error like this. As you can see, the mask is working, the result looks fine. Maybe we can control
the radius right here. Let's see what we will get if I increase the number of e.g. if I came to the two to five, maybe that will help to increase
the effect a little bit. Let's check the result
over here as well. Arthur, everything looks cool. Okay, that's mean the
mask is working and now I can use it in case I want to add some bumpiness
or add whatever thing. Okay, let's go here and let's see how can
we use this mask. I will create another
principle via SDF, hit D to this one, and let's put this
one right here. And I will make this
a little bit darker. Something like temporarily. I will fix that later
if I didn't like it. And I want to use this mask with some height information
blocked to this material. And I want to mix Material
with this one as well. Mixing those, I can use
the Node Wrangler add-on. Use the shortcut Control Shift and right-click from this to this node triangular added the mix header for us.
That's something very cool. Alright, now let's
oblige the mixed header. And I will like the color
from the color ramp that comes from the age and where nodes like
adhere to that factor. And let's see what you will get. All right, As you
can see now we have some dark color comes
from this material. If I changed this material
to sampling rate, e.g. you will understand
what's going on or maybe something black just
to recognize it. Alright. I don't want this
result to be smooth like this. I want to break, to
break this line. In this case, I can use
mass grave node here and let's mix it with the nodes. Hit Shift a to search
for mass grave type MUS. You'll find it here. Hit Control Shift
click just to see if the results are its first
thing we should do, we need to add mapping
and texture coordinates. We have those over here. I will take the
texture coordinate, hit Shift D. Let's put
this right here and Lisp like the object to
the vector here. And let's change the scale
to something big 500, maybe, something like that. And let's manipulate the details and take the dimension
two small number. Now I have some details. I think scale is a
little bit too big. I will reduce the number. Maybe 200 or something
like that, or maybe 300. And maybe we can use
color ramp here, hit Shift a to search for rum. And let's put it right here. And let's make the contrast
strong. Something like that. Maybe. Now I want to mix between the mask
and the color ramp between those two nodes. I can hold Control, Shift, right-click and move
the most from this to this and not triangular. We'll create a mix RGB
for us. Now we have it. I will plug this to
that factor so I can control the factor and
leave this file right here. And let's see the
results from the mix. Now we got something. I will change the y to the
black of the killer one. And now we got something. We predict the smooth line
and now we all bonds there. So I will use this results and black
it to the factor here. That's what I should do and
block the mix shader as well. And now we have some
variation and the age. Now, if you prefer, you have two option. You can assume that
we have a paint here. And the second
material is metal. You can assume that
and you can do it. Now. We made it like a metal. Or you can hit Control Z couple of times
to bring back the color. Alright, sorry, let's hit Cancel headsets to
block those back. And let's click and drag the
color and width right here. Or you can make this
a little bit darker and the keyword that variation. After that we need some
height information. And we can use the result from the mix
and plug it here as well. So let's do that. I will hit Shift a to
see Eric for bump. Let's put the bump right here. Plug it to the normal
and what else? Now I want to make some kind of connection
goes like that. I want to add a rewrote
here and one here as well. Okay? If you hit right-click and
sorry if you hit Shift a, you can go to the layout. And here we have the
railroads suggests adults, we can use it to change the direction of this
connection lines. So I will use this. There's a fast way
if you want to add any reward to any line, you just can hold, Shift and hold, right-click and move them out a
little bit on the line. And now we have our roads. Okay, After that I can grab
this one that I created, G and move it right here. And now I can make a connection comes from this line
to this three roads. And from this three row two, the height like that. So now we have some height
information. Let's zoom in. I just want to suggest
to see that results. The result is no. So quite clear. This check another angle. Let's check them
mask or maybe let's check this area
here, low-carb area. Okay, so let's go
back to the mask. I just wanted to see the
result of the mask again. Maybe by increasing their scale, we can decrease the
effect a little bit. So let's add 500 again. Right now it's increased a
little bit, not too much. Now we have something here. You can manipulate the
color around here. That's what effect the
results out of it. And we can manipulate the
color ramp here as well. That's what effect the
results a tiny bit. So let's see what's
going to happen. Fly. I could take this bag. This, what's going
to happen if I take this towards the black? Now that effect, I think it's become a little bit stronger. Especially if you go
back to the bevel and increase the radius 5-9 maybe, or at least see what's
going to happen if I liked the mix shader
control here to click. Now the effects is more visible. Let's see the result from
the bump I will a blog of the bomb to the material outputs
hit Control Shift click. As you can see, the bump goes
out and went to invert it. You can use this button right here and invert the results. Now the result is correct. If you want to make
this even more sharp, you can go here and push this white color a little
bit as become sharp, little bit. As you can see. Let's say like this material. All right, now we are
getting something, but I just want to reduce
the effect a little bits. I can change the color and make it brighter
or just a little bit, and thus will do. And for the height information, I will reduce this number 2.5. And I will bring
back the ground, hit Alt H here. And now we have this. That's very cool. Now I will use the same mask I created right here
to apply it for, for all the parts here. So I can crop the holy
group and hit Control C. And for August, e.g. I. Can grab this end here, hit Control V naught, all the nodes being COVID. So I will repeat that again. Let's go back here. Those like that hit Control C. Let's go here, hit Control V. Now we have them. I
will hit Control Shift click just to apply this and
see the result over here. The result is not
so quiet, good. So let's see what we can do. Let's reduce the effects, something like that. And let's duplicate
this material. Hit Shift D and let's
put this right here. I will make this darker
metal. It can throw. You have to click just to
see if the effect here. Alright, now it's become
a little bit darker. I will, I will mix between
this material with this one. Hold Control, Shift and right-click and
move the mouse from this material up. No triangular. We'll create the
mix shader for you. And now we have it. Alright, now I will use the mics nor the end
blanket here to the factor. And as you can see, we have some variation here. This change the color
of this one and make it darker a
little bit as well. And I will use this. I will make the same scenario. I will plug the
result to the bump here to make some
height information. Shift a and let's
search for bump. Plug the normal to the normal. And let's add a rewrote here. Hold Shift, right-click and move the mouse. And now we have one. Let's add another
rewards right here. Let's go to the layout and I3 are lists of black dots
through this dots. And let's plug this
to the heights. And this, a blog that bump to the output node can throw shift click just
to see the results. Alright, inverted. The
result is correct. Let's change the
strength to 0.5. Make it subtle. And
let's plug this again. All right, now we have, we have some height information and
we have some variation in the color. That's very cool. By the way, you can block
the same roughness. I think that's way better. I made a quick render just
to understand the details. Don't worry. We will learn together
how to make our underlying this, the result. Until now, it's beautiful. This stuff we added here made the utility knife
looks more realistic. As you can see, we have
some dark spots here. It's like something
like harassed or there are
something like this. When you add it there
to your object. That's, we'll make it look
more realistic and beautiful. Okay, So I think I will
end this video here. And let's see together
what we can do to the blade holder and
how can we make, we tweak it to make
it more realistic, a nice for the
bottle right here. In the outliner we
should activated because it's hidden in the render and it's visible
and the viewport. So we will fix that later. Alright, so that's,
we'll do it for this video and I will
see you in the next one.
31. Adding edge wear for the other parts: Hello again and welcome back. I just want to mention
something important here. For this button right here, the release button
for the plate, if I hit Z to go to the render. As you can see, it's
not visible here. The button is right
here and the outliner, everything is activated, but I still not
see it right here. If you have a problem like this, you should go to the objects properties and
open their visibility here. And sometime for any
reason these turned off. I don't know why I didn't
come to this area, but I don't know why
these turned off. Just activate all of
these options for the camera or diffused glossy
trans transmission, etc. And now it's reasonable. Okay. Alright, let's see
what's the next step? The next step I want to add some darkness or h n
where for this part, all what I need to do is copy
what I did to the circle, grab all of these notes. Can throw. See. Here, are sorry, I just forget to activate
the screencasts. Let's add number one here, and let's slide this right here and hit Enter
to close this, Let's pick this object and hit Control V. And now we
have all the notes ready. Let's hit Z to go to the render, I just want to see the results. Alright, I will apply
timber only the color ramp, hold Control, Shift
and left-click. We just want to see the mask, how it will work here. I should see black and
white, so results. Alright, here we
have two material. The mask now applied
on the first material, not on the second material because if you go to
the material second, as you can see, we have two. Well, that's me. We need to copy the same nodes and applied for both of them. So we can see some result there. So let's go here as well. I hit Control V, and let's
apply this over here. Now we have something. And to be honest, I think we don't need
to tweak anything. All what we need to do is plug it and create a second material
and create this effect. Let's see what we will get. So we have the mixed Friday, I will duplicate the principal had to take a copyright
here, hold Control, Shift, and right-click
and drag to this material to
create a mix shader. Don't forget to
activate Node Wrangler. And I will make this
a little bit darker, something like this
to the middle. You can take it. And I will plug the same roughness for this
one to this material as well. So I will click and drag and plug this into the
roughness slot here. And by the way, we could do that for the
second material as well. So I will maybe I can cope with
Smith here and I hit Control C and go here, hit Control V. And
it can throw shift, right-click key drag like that. And molecular roughness here
as well, the same scenario. Okay, after that, Let's
use the mix outputs, applied it to the factor and
the black, the mix here. And we could do that
for this one as well. It will be something easy. Alright, it's a little
bit, I know buds. And the end of the day,
it's somebody easy to do. Now as we can see, we
have some effects. All what we need to do now
is create a bump here. Maybe we can copy
this one at the end, this or this right here. Luxuries to the normal. Maybe we can add a rewrote. Go to the layout and
three rows right here. And hold Shift and right-click and drag to
other rewards right here. And let's plug those
together like that. Click and drag. Sorry. I've taught that. Plug
these two the height. Let's see, crank the
height up to 0.5. Maybe. I will plug the height
information, the bump. I just want to see do
we need to flip it? And yet we need to invert it. It can hit the invert button. Alright, now we
have this inverted. Now I will hit Control C
to copy what I have here. And let's go to the second
material here, hit Control V. And let's plug this over here. And let's add the railroads
here and one here as well. And connect them together. Alright, so now let's see, let's activate this material. The mix shader plugged, but for the first one is not. So I will hit
Control Shift click. Alright, now we have
something in the viewport. You can't really understand
what you have done. Because the render
is not secure. It's not clear about
when you render it, you will see the effects. In general. Now we have some AQL effects. This is something tweakable. We can tweak it later for any reason if
we didn't like it. Maybe we can make
the second material a little bit brighter. And this slot as well, Let's make this a
little bit brighter. Okay, Now, maybe we can create material to the bottom
because we forget to do that. It will be something easy. I will hit New to create
a new material and I will call this black plastic. And does it go to the color
and make it something dark? And the roughness,
maybe we can add some noise here to
make some variation. So I will hit Shift a
to search for noise. Hit Control Shift click
just to see the results. Hit Control T to add
the coordinates, you can delete them mapping
hit Control X if you don't want it, like the object. Crank up the scale to 1,000. Let's see if that works. Yeah, it looks okay. Let's plug this to the roughness and let's see what we will get. So now we have some variation. Let's go back to the, to the noise texture and let's crank out the details
a little bit to five, maybe not too much. Maybe we can give it a
little bit of roughness. And I will add a curve for
curve like this over here. It can throw here to click, just to activate it. I want to make some tweaking to the bright areas and the dark the area make the roughness
results more rough. So I will make the
private area a little bit darker by taking
this dot and move it down and crank up the
dark area a little bit. To make the effect subtle. Now I will block the
principled leader she was going to happen if I apply the same noise
texture to the bump, to the normal hit Shift a, and let's search for Bump. Let's put this right here, plugging the normal
to the normal hand, plug the factor to the height. Alright, It's, the
effect is very strong, so I will reduce the
strength to 0.2. Maybe. We'll, in this case,
maybe we can control that by adding a color
Rob list for ramp. Let's move the color rum
and plug it right here. Let's see the black
and white color. I will let control here to click to the color on PC the result. Let's crank up this a little
bit and push the white towards a black to make the
result looks more contrast. And this blog, sorry, I thought this connected
to this peculiar. I will plug that
principle again. Let's push this a little bit. I want to reduce, make the black and
white results more, looks more contrast to reduce
the effects and make it, apply it on a certain area. Pushed out even more. As you can see now the bumpiness targeting just a certain area. And now let's
invert the results. Alright, now we're
getting something. In the view port. The results is not necessary to be good, but in the render it
will be very nice. Okay, so now we're
getting something here. I will come back to
this accumulator. Let's check the plate. Now. In general, it looks okay. As very cool. For the plate itself, I think we don't need to do anything bots for
the blade holder, I guess we can make some
change to the let's see. The scratch we added. I don't know, but I think
this crash here a little bit. A strong or so quiet visible. Maybe we can increase the number here to make these
lines looks thinner. So I will crank this up to 400 and let's see
what we will get. Alright, so this material, I guess, let's see which one. We manipulated the z-axis. Well, that's mean
this material effect, the side lines here. So I guess that's wrong
to crank this up, maybe we can change
the number to 200. Because I want these
lines to be more visible. I just want to see
the result of this. What's going to happen
if I crank this up? Alright, and it's not
so quite visible. As you go through
the material review. And let's see, grab this alone, hit slash to isolate it. I just want to see what's
going on here because I don't see any site lines here. Okay, Let's go back
to the mapping here and let's see
how that affects. The side lines here
describes alright, so I will change
the number to 100 because it's not
visible in the render. And for the site, I should go to the price material number one and King menu below the
x-axis a little bit. Okay, so maybe we can
increase this to 100 as well. Now I think the result
make more sense. This hits like to bring back the other pieces and let's hit Z and go to
the Render again. For the second material, maybe we can make the effect stronger or by increasing
the bumpiness. Let's change this to, I don't know, 0.1 maybe. Still not visible
the effect here. So I will crank this 2.4. Okay, now I can see
some scratches here. And it's makes sense by the way, according to the
reference images, this area looks rough era of increasing the
mountainous here, it's something acceptable and it's close to the
real utility tool. Maybe we can reduce
this a little bit, 2.3. Okay, Now it's very cool. Let's go back to this
button right here. I just want to add a new layer to this bottom,
some imperfection. So I think we can cope with
the same notes we added here and paste them on this button. So I will hit Control
V right here. And I will hit Control Shift
click Yes to see the mask, I will, it will rock. It's a little bit strong idea, so I will change
this to 0.50 005. Alright, maybe six. And these nodes, I
should copy them again. Hit Control C. We could go to the second material here and hit Control
V here as well. And the black, the ramp. I just want to see
the effect here. Alright, now, let's see the mass graves because you
are or how it will look here. I think we should change
the scale a little bit too. I don't know, maybe 1,000. Make it very small for this site or for this material
and this material as well. Okay. So right now the rest
of I think, looks better. Let's take back the White killer because It's very
too much contrast. Let's plug the color ramp. Hit Control, Shift, click.
Get something like this. I think it's good results. Let's switch to the
second material and plug this or this node as well. Alright, now the
effect looks better. Maybe we can scale this
even more to 1,200. The same scenario for
the fairest material. Alright, now at something cool. All right, after
that, I will create a second material.
Just copy this one. And let's make some
very handy color a little bit, not too much. And hold Control, Shift, right-click and drag like
that to create a mix shader. Now, I will use the outputs, the mix RGB output and the blanket to the factor
for the mix shader. And I just want to create
another bump node here, have D, and let's add
this one right here. Plug the normal
to the normal and enlist other rewrote
Shift a to add rewards right here and hold
Shift and drag to add. I rewrote here as well. And let's make some
connection between them. Like this to the heights. And I just wanted
to plug the bump. I just want to see
the effect here. I think we should inverted. It's not so quite visible here, but in the render, it will
be visible and make sense. Let's check the result of the
mask here and here as well. The render, as you can see, we have some dark line
here on the sharp area. Maybe if we go here
to the map range and we can increase this
number a little bit. We can add another nine here. Alright, so now we kill this black line
week. We got here. Let's go to the first
material as we'll end this at nine as well here. Alright, let's go back to this material and
let's duplicate this hit Shift D and
mix, mix between them. Like That's blog this over here. And like the mix shader as well. And let's create a bump. You can copy this one here. D block the normal
to the normal. Alright, maybe we
can move all of these notes a
little bit forward. And you can plug this one. The height directly. Can add a rewrote the entity
key to move it like this. And there are as well.
Okay, Now after that, Let's check the strength to 0.4. Maybe I just want
to see the effects. Let's go here as well as
plug that mix shader. And let's change
this to points for. Let's go to the second material because I didn't inverted. Now we have some
imperfection on the button. Now, it looks more realistic. N nice. If you like. At something optional. You can crank up the
bump for the scratch to maybe zero points to maybe or three Hen make it more
strong for the side. And for the top area. I think we can use
0.2 in this case. Okay, Now the result
looks very beautiful. I just want to check
something else. I want to kick the screws here. Just wanted to pick one of
them and so many little bits. And let's see what
we got here. So far. As you can see, the result
is similar to the bottom. That's mean we are good to go. Let's check this bottom as well. Alright, for this one, everything, it looks
cool and okay. Alright, so I think
that's it for this video and I will
see you in the next one.
32. Adding Blender logo to the blade: Hello again, we'll
come back here. I just want to add the
blender logo for the plate. Let's select the blade and
see what we have here. Okay, so we just
have this material. Let's go to the resource folder. I will provide this
Image, Blender logo. I want to use it. So I will
love just to click and drag and put it right here
inside the shader editor. And I will hit slash to
isolate the plate alone. Or maybe I can pick
the holder as well. Because I want to build this
and the specific place. Let's go to the plate and
let's see how can we do that. First thing, I want to rub this, to add this image on
it's rubbing this plate, it will be very easy. Just split the view to 2.3, this to UV editor and Tab
to go to the Edit mode. I don't want to see
the image right now. I will hit X to delete it. I just want to see the
geometry and now we have it. Okay, let's select this
face and this face, it's like to isolate, sorry, I saw this alone. And let's see how can
we do that together. I just want to add some
themes in specific places. Let's start. From this edge. I will add the seam right here, just hit right-click
and add some seam here. Mark scheme. The scheme is like you have a Caesar to cut this
area from here. Let's add seam here
and here as well, Right-click magazine
and maybe seam here. And let's go to the side and
let's do the same thing. Let's add seems for these edges. And what else? I would cut this area as well. I'd seen we have seen either
the end necessary area. Well after that, I
will hit a to select all the faces in here
in the Viewport. You can select the whole
UV and hit U twice, u and u again. Now it's arrived,
as you can see. If you open this perineal, you can see the Arab method. I will read this to confirmable. And let's see what
we got so far. All right, maybe we can add seam here is not so
quiet necessary, but I will open
this area as well. Mark seam here and here as well. Hit a again and hit U twice. Alright, now we got, yeah, it's not so quiet
important, but that's it. Let's check this killed before anything
because I don't know, I'm not so quite happy
with the UV plicae. Bring this bag, go to the ATM, and I don't have any
problem with the scale. All right, Everything
is one here. Let's mean we don't
have any problem. This tab again, and let's
check if we have any problem. Real rabbits.
Alright, after that, let's see how can we make this
MAQ visible on the plate? Select the image. And let's hit Z and go
to the material preview. Alright, and I will hit
Control Shift click Yes to see the result here. I can't see anything. Let's preview the
image right here. So this is our u, v right here, and this is the
image I will rotate. Let's see which
part we could pick. We could pick this side and ignore the side. We
don't need this side. So this week to face
and clubs face. Alright, and maybe this
one as well hit G. Let's move this out for now
and let's focus on this side. Hit R to rotate this piece. Hold Control to
snap that are taken to the 90-degree like this. And I will hit Q to
move this over here. And let's kill this. For some reason. I don't see the
image right here. It should be it
should be right here. Should be like this. But I can't see it because I'm working on
the second material. It's something easy to fix. I will select the note, hit Control C, and go over
here and hit Control V. And you can delete it from here. Just hit delete and delete this. Let's go up here. The sublime, the principled. Before you go any farther,
let's plug it here. Control shift, click
just to preview it. And now I can see it's
without any problem. I will scale this
a little bit more. And here and the image setting, we have this option
is called repeated. I will make this clip
because I don't want to see the other images to
repeat its logo. And now I can scale this and change the
position of the UV. And that will help me
to change the position of the logo on the geometry Oswald
lists of bring back that other pieces hit slash
to excite, tab out. And let's select
the placeholder. And it's like again, let's
go back to the plate and Tab again with a UV and
let's hit G to move this. And let's put this in
the correct position. We can scale this even
more key handlers for this amber,
almost right here. Okay, Now I guess the
result is very nice. Now the question is, how can I mix this image
with the material? Let's see how can
we achieve that. Listen, bringing this
image down here. I will make this
bigger a little bit. I will hit Shift D to copy
this material right here. And I will plug this
image to the principal. And let's see what
we got so far here. Okay, So this is the result after Blogging of this material. I just want to make
some tweaking. I want to create a mask. I will hit Shift D to take a copy from the logo and
I will put it right here. And I will add the mix RGB. Let's put the mix right here. I will use the color and
drag it to the factor. And I want to preview this node. Hit control shift click to
see the result over here. And I will change the color one to something
dark. The CO2 will go. Alright, let's see the results. I will use the color to
leave the color one, white and color to make it dark like this to get
out, It's not like this. After that, I will use color
ramp to achieve my goal. Hit Shift a and let's
search for rum. And let's plug it right here. And the sick crank up
the dark spots until you kill any details
here inside the logo. Now I have whites
and black mask. I will use this. When I mix between
these two materials. I will hit Control Shift, right-click and drag
from this to this. And now as you can see, I have a mixture that already, I will use this new
mask and black it to the factor right there in the mix shader and block
the mix shader over here. Okay, Now let's see.
There's gives us a bit of time to see what we got so far. Now we are getting something
but need more tweaking. I will add another note here, the search for Invert. Invert the colors here, the black and white and the black earth after
the color ramp. And it should go directly
to the factory here. Now the result looks
beautiful and nice. So let's move these
nodes a little bit. Let's see where
should we put them? Maybe right here. And maybe we can
add some rewards to make the result looks better. And let's use the bump and plug it to the
normal right here. Let's add a railroads,
something like that. And sorry, this move, this hit G, and let's
move this over here. And the same thing
for the roughness. Let's use our roughness, plug that roughness to
that roughness over here. Maybe we can add somebody wrote. It's not necessary,
but I just want to make this
organized and better. So now we have the logo already. One more thing here,
I just missed it. I want to mention you remember when we are rubbed this plate, to be honest with you, it's not necessary to
arrive everything. If you switch to the face
mode, Let's go here. If you tap and a few
grabbed this phase, you can select this face alone in a rabbit, and
that will be enough. You don't need to add
all of these themes. But for some reason
I just missed that. So all what you should do, just grab one face
and come here and hit U twice to be
unwrapped and assets. And maybe I can show you
and give you an example. I will take a copyright here. And whatever thing I will do to this copy is not going
to affect this one. I will tab and go to the edge, and I will select all the
edges and hit right-click and a clear the
seams that I added. And I will reabsorb it. Hits a select all
the faces in here, hit U twice to rabbits. Alright, let's delete this. We don't need anything, but for now, it's you twice. I can throw out a rabbit because it's giving you a warning, tells you that you
should add some teams. The idea is, I want
to delete the ovary. If that doesn't work, I will go to the object data properties here and go to the UV section
and just delete my UV. Alright, now if I tap again, I don't have any over here. So let's do that again. All what you need to do is just select this face and camera here and hits this here. Alright, let's tabs like this. Sorry. Let's add a UV here. Just select this
face and come here. Select your face and hit U twice to a rapid, and that's it. You just need to grab
this face alone. And you can rotate it
after that and bring your logo and alignments
and everything. And everything will
works properly. Now if I hit Z to go to
the material preview, now I have something
without robbing everything. Let's move this over here. Maybe we can scale it even
more. It can move it. And there we go. Now we have almost
the same results without a wrapping everything. So just keep that in mind. Now I will delete this
because I don't want it. Okay, so I think that's
it for this video and I will see you
in the next one.
33. Preparing the environment and the lights to render the first image: Hello everyone and welcome back. Here. I made a quick Render
to all what we have done. And this is the results. So far. I took this image into Photoshop and I made some color
correction to get this result. And we will do that
again with you. But I just want you to
see the results so far. I just covered, It's nice. But I think we can readjust the color that we
added to this to the handle. I don't mean the orange color. I mean, the second material, I think it's a little bit dark and this
effect is too much. So maybe we can adjust it
to get better results. So let's see how can we do that. I will split this window to two and I will save
us to hate or editor. And let's start with
the Handle selected. This is the second material. Just make this a
little bit brighter. Or we can cope with the
same color like this. Drag and drop it here
and make it dark, but not too much. Very little. And for this part, the circle, the same thing. I think we made this very dark, so I will make it a
little bit like this. This will be enough. Alright, you can cope
with this number if you like 0.36, almost. Okay, now let's see how can
we make the final render. How can we render this? I will use cycle to render this. And let's set up the scene. Let's go back to the world moved here because
I just want to make some adjustment to the
HDRI image that I added. I changed the strength
to 0.5 towards one. And I just reduce
the effect 2.54, 0.4 if you like. So this is the first thing. And after that, I changed
the power of four. This light I added, I changed the power 23 wild. And maybe I can take
another copy of that. Before we go any further, I will select the ground and let's see the ground texture. I think I can make this
a little bit darker. I will hit Z to
go to the render. I just want to see the result. And I will hit Control B to
cut small area like this. And I will add a curve here, hit Shift a to search for curve. And I will take this from the middle and bend
it down like that. Will make the ground
looks darker. Because something like this. And now I will switch
to the 3D view board. I will live, I will leave this view for the
render and this one. I will leave this view
to control the scene. Alright, I think I can take
another copy of the slides. I will hit Shift D. And let's put this
light over here. I will hit after I
say it like that. Let's hit Z again
and let's move this. Make it close. I guess. We can hit R to rotate
it a little bit. Somebody like this. Alright, let's look at this unit from the eye of the
camera, it will hit zero. I want some reflection
on this part here. And in order to get
something like that, I could move the light a
little bit and a line, it's almost with the ground. So I will tell you what I mean. Let's take the light down a
little bit and rotate it. When I move the
light a little bit down in alignment with
the ground like this. Now I got some highlights here. Okay, Let's go to the top. If you hit number
seven, I just wanted to see the direction of the camera and the
direction of the light. Maybe we can rotate the light a little bit and pointed
towards the camera. Maybe that will help to
make the effect stronger. The same time if you take this down even more,
That's what the ****. A little bit to make
the results stronger. But be careful. Maybe I should draw this a little
bit to that towards the ground and move it up. I think I'm working
with the local. I will switch this to a global. Because somebody like this get the result looks
nice, I guess. Until now the result looks fine. One more thing here,
I want to tweak, I want to tweak the ground. Shutter a little bit. I will select the ground and I just wanted to see
the roughness here. I hit Control Shift click
gets to see the roughness. The ground, it's too rough. I can reduce the effect
of darkness a little bit by adding another
care of right here, I can copy this one hit
here with the COVID. Maybe this will work. I don't know. I want just to reduce
roughness effect a little bit. That's all what I want to do. Maybe if I take this one and
make the image more dark, maybe that will help little
bit to make it small glossy. If you make this more glossy, you'll see some light
hits on the ground. That's what makes the
result more interesting. I will, I can throw
here to click to see. So as you can see,
this is the difference between this image
and this image. This image is too bright, that's mean, it's two are off. This one is not too bright. We can take this even
more a little bit. And let's make some comparison. The same CNR for the normal man. Maybe I can increase
this number to 1.5. I just want to see
the effect here. Maybe I can render a small area. It can throw the endless
cut small error like this. I just want to focus
on on small area. Okay, so far I got
some details here, but I'm not quite sure
of these details. Exactly what I want because I should run through the whole
image and I've talked about, I will decide, but for now I
will accept what I did here. And then together we will
decide what we should do. I will hit Control a, Control Alt V to get
rid of this window, smaller window we created. And I just want to
do that again on the utility is cell because I just wanted to see
what I have done so far. Editing we did for the material. I just want to see the results. You remember we made
the effects a little bit subtle and that's
what we wanted. So let's see what we
have done so far. Okay, let's select the
placeholder. Okay? This is the first material. Material and this
one the second. I'm also quite sure, but I
think the second material, It's a little bits the bump
of the second material, it's a little bit high. Maybe we can reduce a
scratch effect a little bit. As you can see
here on this area. It's 0.3. I think we can change this to point to and make
their fixed subtle. So far everything looks okay. Now maybe we can
do something else. Actually. I want, I want to add the
3D cursor in the middle. It's all already in
the middle parts. For any reason if you
want to do that, e.g. let's select the plate holder and I will hit Select
to isolate it. And I will tab and you can
crop whatever circle you like, or aik is here, and hit Shift S and Q is
corso to select it. And now of course are snapped to the selected page
with the circle. And then you can tab out and hits like to excite
of the local mode. I want to add an empty right
here, decided and empty. And maybe I can scale it a
little bit and move this up. Here. I will connect
these parts to the Mt. It can throw be after
you club all of these, select the MTR as
a final objects or last object and then hit control V and Q will sit
parent or objects. Now, if you rotate the
empty, rotate this to the Z. Now I have some these parts now connected to this empty and now they are following it. And that's what I want in
case I want to close it. Or if I want to open it, this empty will help. So this is the first
thing I've heard that maybe we can add another empty so we can control
the whole plate. Let's see how can we do that? Maybe I can stop this new
empty with this angle here. I'm also quite sure,
but I will look up this age and bring the
3D cursor over here, Shift S and cursor to select it. And I will add
another empty here. This empty, I will use it
to control the whole knife. Alright, I will hide the
light and the camera, and I will select the
ground and I will go to the outliner and hit the
dots next to the zero to C. Whereas the ground should
be right here somewhere. Whereas it's this
one right here. I will call this ground
just to recognize it. And I will hit M to open the collection menu and
let's add a new collection. Maybe we can call this ground
and the ground inside this. Now it's already there. Alright. Now let's hide the
ground. We don't need it. For now. I will select all the pieces. Okay, just let's see
what's going on here. Let's go to this eye
here and let's hide the lights and hide the camera. We don't want to see it and hide the leave the images
the empty, sorry. Do we have an eye for
image? I don't know. Let's think that's it. Now what I will do is, now I will select
all of these pieces. De-select this empty. I don't want to
select this for now. And de-select these parts, because all of these parts
are connected to this empty. All what we need to select this empty with the rest
of the geometries. Hold, Shift, grab this empty
and then it can throw me and sit PRM to this object. Now if I move this
object or rotated, the whole knife will follow it. And that's what I wanted. Do we have another empty here? That's where your alright, I will the detach this
empty from the parents. We said. So I will hit Alt B
and clear parents. I think we added this empty for the grounds to control the band. Okay, so now we have this
empty cans rolling everything. And we have this empty controlling the plate
holder and all the stuff. Alright, That's very cool. Anomaly. So bring
back the ground because I just want
to align this better. So I think I can go to the front view and see
what we got so far. I will select this empty and hit R to rotate
this a little bit. Alright, now this parts here laid on the ground
and that's something cool. You can rotate them, they can. Alright, That's very cool. So now this knife laying on
the ground in a correct way, but I think we should
rotate this to the x-axis. We want to rotate it
in that direction. So I will hit R to the x, rotate it like that. Maybe we can't rotate
this even more until, I think, until this
edge hits the ground. So if we go to the
front of your maybe we can determine from
that angle R to the x. Maybe local x hit X again, X twice to switch to the local. And now we're cutting something, I think now it's aligned
with the ground. So this is the natural way when this knife laid on
the ground, I guess. Okay, That's very
cool. Let's see what else we could do here. I think that we can
make a quick render. For this, we fix the ground, we add another light source and the lighting now become
interesting and nice. Maybe now we can make
some render here. Let's bring the camera a neither camera and lights and less easy to
switch to the camera. If you want to
control the camera, you can select the frame of the camera and then
go to the view. And you can go view ports, sorry, where is it navigation? And you can go to the
walking on vacation. When you activate this option. Now you can control the camera like you
are playing a game. If you hit W, a, S, D, you can move the camera
to the old direction, e.g. S. To the high courts. They will do forward. D for the right, for the left. If the camera moves fast, you can rotate the wheel
of the mouth towards you and make the
movement slower. If you want to go up, you can hit E. If you want
to go down, you can hit q. So pick a nice angle like this, e.g. somebody like this. Okay, and let's make
a quick render. I just want to see
what I will get. This is z and let's
go to the indoor. I just want to see something before I switch to the under. I wanted the outer area, the far area to be dark
and the close error to be to be illuminated. And I got that, I guess. Okay. Alright, it looks interesting. Let's go to the solid again. I just wanted to kick.
Is everything okay? Yeah, everything
looks okay and cool. Let's go back to the
camera and maybe we can do something else here. I want to control the depth
of field or the camera. After we select the camera, let's go to the camera setting here we have the depth of field. This will isolate the background
and keep you focused on a certain area and
that's what they want spots here and the
depth of field setting, we have a focus object. We can create an objects. The camera will focus on the position of
that object always. So let's see how can we
do something like this? E.g. I want to I want the camera to focus on this
area right here. So in this case, I will hold Shift and right-click to put
the 3D cursor over here. And I will hit
Shift a to add e.g. an empty and maybe I can use the plain x. I will use this one. Let's check this, the name
of this new empty hidden F2. And let's change this to
focus gesture recognizers. Alright, that's very cold. Now, let us go back
to the camera. Let's pick this empty
as a focus point. Like that. Alright, That's very cool. Now let's go back to the camera and let's activate
the depth of field. Now if I hit Z to
go to the render. Now the camera will
always focus on the empty and ignore
everything for any reason. If you want to move the position of the empty for another
place, you can do that. And you can snap the empty
for the surface of the knife. Alright, to do that,
you should go to the snapping menu and change
the snap to the face. That will be easier
for you now if I hit G to move this empty, if I hold Control, it will snap on the phase e.g. I want to focus on that
area, the far area. Just leave it there and give
this a little bit of time. As you can see, the focusing
shifting for that area. Alright, if you want
to focus on the blade, grab that empty
Hickey hold control and snap It's on the blade. And we will get what we wanted. The focusing is a
little bit extreme. Maybe we can select the frame of the camera again and go
back to the focus here. Here we are, here
we have the f-stop. If you make this
number is small, the depth of field
will be very strong. E.g. if I add here one, it will be very strong. If you increase this number, you will make a subtle e.g. I. Can add ten here. Maybe that will make
the effect subtle. So far, the result is very nice, but we getting a
smaller problem here. You see this area here
underneath the knife. I should see some shadow, but because I added the lights, comes from this data, I lost
the shadow a little bit. So in this case, let's treat this to 3D view
port and maybe we can change the position of the light
because it's not benefit us. From here. Maybe we can hit
G and move it up a little bit and rotate it
again like that. So we can see some shadow here. Now is the result looks
more interesting. Now we have some shadow, is very important to have some shadow underneath
a utility knife. Alright, so, so far I
will accept what I did here and I will make a quick one there to
see what we got so far. Let's go to this setting here. And three violent or
engine to the cycle. And let's go to that intersection
here. If you want to. If you want to use the noise threshold to clean up you're
seeing that's okay. But for me, I will turn
this off and I will use how many samples I should
give for this scene. For me, I can add 200
or maybe 300 assemble. You can add 1,000, you can add whatever number you want here about keeping
your mind dots will, takes more time when you
increase this number. I will activate the
denoise because I want, I want to de-noise the image
in case I got some noise. That advice setting here, I think I will leave
everything as is. And yeah, that's very cool. I think the result will be I think now we can take a shot. If you don't like
the position of the of the focus points, you can crank, can
get to whatever position you're like, hot I did. Did we miss anything here? Yeah. I think now
we can render this. Yeah. So lists his Yan
switch to solid. And let's go to the render
and let's render the image. Just hit Render Image
and it will be rendered. And before you do that, hit Control S to save the scene. And let's render this after
then the render is done. I will be back. Now the render is done. The result looks very, very nice and beautiful. Okay, Now, if you like, you can save the image. I can go to the Mh
and then Save As. And you can save it. And here you can
choose a file formats. For me, I will use PNG and if I wanted to save
it the color depth, I will speed this to 16. That will give you an
ambiguous Citroen color depth. That's well, hello,
if you want to make some color correction
inside Photoshop. And then let's give
this a name, e.g. final one. And hit
Save Image us. And now it's saved.
If you'd like, you can excite from here and you can correct this
image inside Blender. Let's tweak the
editor type to image. And let's bring the result. The result is zero as it
should be right here. Yeah, this one. And
let's just break this editorial to that
composite compositor. And now we have the image. Whatever thing you
will add right here, it will affect the image. Here. And here we have a lot of stuff. We can add e.g. we can
hit Shift a to add. We can go to the color
section and we can add pride and contrast
color palettes. Let's try this. Let's
plug this right here. All right. Here we
have three sections. The first section,
it's for shadow. You can correct the color
of the shadow, e.g. if you want to make it
a color of the shadow, a little bit bluish, you can crank this up and
make its bluish if you prefer to give you a nice effect or if you
want to make it Friday, you can do that. So, yeah, this is nice way
to control the shadow. You can make it small contrast, if you like, can take this a little bit
down, not too much. The second section will help you to correct or
manipulate the mid tones. And the last one, it's for the highlights. If you crank this up, you will make the EU will
affect the highlights alone. Something nice to do. Alright, if you want
to add more nodes, you can hit Shift a and
go to the color and you can add whatever
Clingo like e.g. you can add RGB curve here. And you can use
this to make some, make them looks more
contrast if you like. Alright. Let's do much. Because somebody like this, you can hit M to see that
result before and after. Okay, somebody like that. It's just give me a
subtle effect here. We can, you can make this image, it looks sharper if you like. You can go to the Filter
here and add a filter. And you can see this
through the box carbon. And now the result become sharp, but the effect is
the factor is high. So I will change
this to point to maybe make a subtle and
I think it's still high. Let's change this to 0.1. And let's see the result
before and after. Let's zoom in a little bit,
hit M to mute and unmute. You can see what fits for you. Alright, somebody
like this looks cool. Alright, I will
accept this result. And after that you can save it. Okay, so let's go to the Mh and Save As and I can save
this as a final tool. You can hit this Plus and Save, save it with depth 16, or you can save this as a CABAC. Have this was your
final tweaking. Save it here from this bottom. Alright, so I think
that's it for this video. And see you there.
34. Render the final image: Hello again and
welcome back here. Let's take another shorts. Let's make another render KB
and you're on my something. We added all this stuff
to adjust the image. If you make another render, these nodes we added
inside the compost star will affect the final results. I mean, they will affect
the rendered result. If you don't want that, you can grab these nodes and
hit M to mute, mute them. For me. I will leave them. Maybe I will unmute the
sharpened note we add here. I don't want this.
Okay? Or maybe I can mute all of
these and then I can decide if I want them or not. So I will hit M to mute them. And that's it. Let's go back to the
3D view port here. And I will change this one as
well to the 3D view worth. This is e to the two
go to the Render. Alright, so now we're
getting something. Let's move the
camera a little bit. But maybe I can move this
camera in with a solid mode. So I will hit. Let's go to the View and
then go to the navigation. And choose walk navigation. And let's move the
camera a little bit. Maybe something like this. I just wanted to see
the whole frame of the camera so I will
rotate the will of the mouse and less. As you can see here, we have some clipping. I can fix that if I
select the camera, the frame of the camera, I can go to the camera setting, and here we have a clip star to, I can change this to 1 mm and
make it very, very small. So now I can zoom
in a little bit. All right, Now I want to zoom. I want to focus on this area. I will crop the focus points, this empty and the
key to move it, hold Control to snap it here. Now with the camera will
focus on this area alone. And everything else
will be blurred. If you want to make
this effect setup, you can increase the f-stop. Okay, so I can
change this to 30. And I can hit Z and
go to the render. I just want to see
the result before I take action and
render the image. Maybe we can increase
the number two for t. That will make the depth, the depth of field subtle. Yeah, this result, I
think it looks cool. So, yeah, let's render this
one and let's see what you, what you will get
after the rendering. I will hit Z and good solid. And I will go here and
open the view render. I rounded this
image on slot one. I will change this too
slow to render it here. I've told you three that's
too slow to excite. And then go to the lender
and render the image. And let's wait for
that to be done. The renderer is finished
and it looks re, nice. Alright, because I
activated the de-noise, I can now leave it on the
denoise or I can just read this to a view layer if you want to see the original
image without, without the effect of the noise. As you can see if you, their attention on this area
can tell the difference. When I read this from
the noise and make it through the combined. So I will accept the noisy image because it's, it's
actually clean. I will save this image, save as, and let's call this
maybe final three. Yeah, maybe final three. And I will choose the the P&G as a file
format end color depth. I will S3 this to 16, and I will save the image. Alright, now let's
go to the Photoshop. Now I'm inside Photoshop and this is the folder of renderers. I will select Render that
we just made this one. And I will click and drag and we'll try her inside Photoshop. I'll write here
inside Photoshop, inside the filter
section we have a filter is called Camera Raw Filter. You can hit control shift
and a to activate. So let's Go to this filter. Inside this filter we
have a lot of options to color correct image and
make it more beautiful. E.g. here we have
the temperature. If you want to make
this cold or warm, you can use the slider. And if you hit
double-click on the same, ROE will zero it out. So for me I will leave the
temperature I'm really going to play with for now. Let's go to the exploit or
explore here we'll make this bright or dark. Maybe I don't want to
play with this one. Maybe I can tweak the
contrast a little bit, but not too much. Somebody like this. And maybe the highlights, maybe I can increase the
highlights a little bit, but not too much. Something to 50 to maybe work. And the shadow, if
you want to make the shadow looks more
dark, you can do that. Okay? Maybe I can make the shadow
a little bit brighter. Here we have the texture that's make the tickets
sure, looks sharper. So let's push this a little bit. As you can see now, the image looks more clear, the details and the clarity
is like a contrast almost. We can use it to make the
image looks more clear. Now we can see the details
of the crown better. And if you scroll down, you can open the
details section here, you will find a sharpening. Sharpening. Let's crank this up a
little bit to make sharper. You can see before and after. Alright, I think in the record you will find it difficult
to tell a difference, but when you try it,
you will see it. And here we have a second for the effect if you want
to add a vignette. So I will crank this
towards the dark. Alright, this is something nice. You can switch up here to there. You can go to the five
brands in case you want to make the color saturation
a little bit less. You can take this
down a little bit. There's something
optional, or if you want to saturate the image
with the color, you can creeps up. So for me, I will take
this down a little bit. Maybe we can make
the effects subtle. Something like this looks fine. In case you want
to make this call, you can create this
towards the blue. Are the yellow, if you like. I will post this tool for towards the yellow
maybe just a little bit. And now we got something
nice and beautiful. When you will be satisfied with the result you can
hit Okay, to save it. All right, Now if
you hit control Z, you can see before and if
you hit Control Shift, as you can see that after. After doing all of that, now you can go to the File and Save As and save this image. So let's change this to capex. Whereas the cubic. And let's
call this final keyword, final three, it's
okay and save it. We got something weird here. You can hit Control Shift S
and you can save it as well. So to save this as a JPEG, and let's remove this
copy number here. Let's crank this up to
the 12 and hit Okay. And now let's check the folder. Right here we have
the final result, this openness, and let's
see what we got so far. Alright, It's very cool. So this how to tweak
the MH using Photoshop. Let's ignite and let's
go back to Blender. This excites from this window. Now I want to take either hertz. So let's go to the View and
let's go to the navigation. And Q is walking on vacation. And I just want to move my camera a little bits from
a higher point like this. And I want to rotate
this and close it. But keeping all my to use the local the local option
here and not the global. Now go to the rotate and rotate this hand closet.
Something like this. Or to work fewer, if you want to
rotate this a little bit more thus will be okay. Alright, that's nice. By the way, if you
switch this to global, as you can see now, that the gizmo is tilted with with a shape or
with a human trait. But if you split this to global, you will lose that. And if you rotate
this using global, this object will goes out
of its place a little bit. Because of that, we want to
avoid that by using local. Okay, let's go to
the camera is zero and maybe now we can
make out the render. Let's see where is
the, where the empty. He left the empty right here I will select it and
hit G to move it. And hold Control endless
snap it right here. This is the focus points. We want to focus maybe
on this area and you can pick whatever area you
would like to focus on. And let's hit Z to
go to them. Render. I just want to see the
result before I render, it. Looks okay. Now I
will render it. And let's see what we will go to the Render and render the image when they're under completed. I will be back. Right there under now is
done and I will save it. Let's go to the image
and then Save As, and save this as Final Four. And then let's choose
color depth to tweak this to 16
PNG and save it. Okay, now let's go
to the Photoshop and the grub pure image. And let's put right here. I will hit Control Shift a to go to that camera raw filter. And let's start from here. Okay, Let's talk
with the contrast. Let's make this image a
little bit of contrast. For the highlight this, increase this a little bit. And for the white, I think I will leave it black. Let's see. We can do for the black. I think I can leave
this as well. Let's crank out that
extra little bits. I want that texture to be
more clear and clarity. I will use it to define
the details even more. And let's scroll down, open the list of the details and let's
increase the sharpening. Let's make this sharp. Now we got a lot
of details here. It's very cool. Let's scroll down
to the effect and lists, manipulate
the vignetting. Let's take this back a
little bit and make a halo, black halo around it. Right? That's very cool. If you want, you can
manipulate the vibrance. Because somebody like
this tool will be okay. Alright, that's very cool. For any reason. If you want to change
the color of the handle, you can go to the Color
Mixer and you can, as you can see here, we
have the orange color. You can pick the orange
here and you can change the color to whatever
color you like here. If you want to make this
yellow, you can get, if you want to make this pink
or red, you can do that. You have a lot of
oxygen and you can saturate this color by
pushing this a little bit. As you can see now
I have the ability to change the color, but I don't want to do that. I will hit double-click on
this one to zero out this. And now we done if it
looks cool and beautiful. So I will hit Okay, to accept what I did. And let's see the result before and after I
will hit Control Z, Control Shift Z, as you can see, now it's better and beautiful. Okay, So this is
the final render and we are finished here, and the course is
finished as well. I hope you like the course and I hope you learned
something here. And definitely I will see
you in future courses. My name is Mark was saying, and I made a lot of a lot of Blender courses,
kicked them out. And I hope you'll like them all. So I hope that's it for this video and see
you in future courses.
 Marwan Hussain, 3D Artist and tutor